1
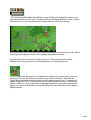
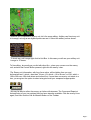
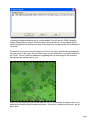
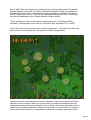
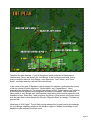
GETTING STARTED Welcome to Panzer Campaigns Market Garden ’44. With the German Army in retreat across Western Europe, and the Russians steamrolling towards the Reich, you now take command during history’s greatest airborne landing – the battles for the bridges leading to, and across, the Rhine from Holland, in the operation that could possibly end the war in Europe by Christmas 1944. This guide is designed to get you playing immediately. For veterans of the Panzer Campaign system, once you have played the Started Scenario, be sure to check out the "What's New in Market Garden `44 " section of this manual. SCENARIO SELECTION Page 1 Insert the Market Garden ’44 CD, if you haven’t done already, and, after the introductory cinematic, you’ll be taken to the File Selection Dialog. Click the scenario #00_Started and then ok. This takes you to the AI Selection Dialog where you choose the side you wish to play. For the purposes of this tutorial, select Allied AI "Manual" for yourself, and "Automatic With Fog of War" for the Axis. Click ok to get the game underway, you are now the Allied commander. Page 2 Your first Command Report will appear with information relevant to the first turn. Note its contents and click ok to close it. OBJECTIVE OF THE GAME Click Info, and then Victory, on the Menu Bar. As you can see, to obtain a major victory in this battle you must earn 375 Victory Points by the scenario’s end. Click ok to close it. Page 3 If you look at the map, you’ll see some oval shapes with numbers inside them. These are your objectives. To win a major victory you will need to hold objectives, and inflict enemy casualties, with a total equal to 375 points. If you incur losses, points are taken away from you. TURN 1 In this scenario the Allies move first. Click on the unit indicated. It is a recon unit and its information is now displayed in its Unit Box in the Hex Info Area. Let’s send this unit north to scout the road leading to the top of the map. Double click the recon unit on the map, or click its Unit Box, so that the Unit Box lights up. It is now "selected" and ready for orders. Page 4 Let’s move it one hex at a time. To do so, right click an adjacent hex. If it is able to move, it will obey. The Status Bar will tell you why, if it is not able to move. Now select another recon unit as shown. Let’s move it to a distant hex. To do so, with the left mouse button down, drag it to the indicated hex. The system will determine the path it follows, so it’s wise to drag smallish distances to keep control because, with fog of war active, movement cannot be taken back. Page 5 (Tip: Clicking the Reachable Hexes Button on the Toolbar will highlight the extent a unit may still potentially move in a turn. Clicking the Divisional Markings Button on the Toolbar will add color to your forces based on the organizations to which they belong. Let’s now send a third recon unit to the smaller objectives in the center of the map. Select it, and right click adjacent hexes, until it reaches the position as shown. Doing so will reveal an enemy unit. Did it fire at you? The system handles enemy defensive fire during your turn, and will likewise fire your units during its turn. If your unit survives fire against it, and possesses sufficient movement points, you may return fire. To do so, select your unit exactly as you did for movement. Now with the Control Button pressed, place the mouse over the adjacent enemy unit. Crosshairs will appear. Right click to fire. The results of your fire will be shown on screen – either there will be no effect, or you’ll cause a loss, or possibly disrupt the enemy (the results will be yellow), or cause it to be broken (the results will be red). Most direct fire occurs against adjacent hexes. Page 6 Now that you’ve spotted an enemy unit, let’s fire some artillery. Artillery can fire at any unit in its range, as long as an eligible spotter can see it. Select the artillery unit as shown. To check any unit’s range right click its Unit Box. In this case you will see your artillery unit ’s range is 12 hexes. To fire artillery, do exactly as you did with direct fire – place your mouse over the enemy unit, and with the Control Button pressed, right click the enemy’s hex. (Tip: Enemy unit information, with fog of war active, will be hidden from you and summarized as X, which = less than 10 men, XX, which = 10 to 99 men, or XXX, which = 100 to 999 men. With both direct and indirect fire, if more than one enemy unit exists in a hex, you are given the option to select a target should your weapons be appropriate. We may be able to soften the enemy up further with airpower. The Command Report at the beginning of your turn advised that you have airpower available. Click the enemy’s hex again, and now click the Call Air Mission Button on the Toolbar. Page 7 A dialog will appear showing any air units available. You will see the 126th Canadian Fighter Wing ready for orders. Click the Wing’s line and then ok. An air mission will be conducted against the selected hex and, if successful, its combat results will be displayed on screen. Continue to move your recon units about, and fire as you wish, both directly and indirectly. You may do so in any order. As you select many of your units this turn, you will find them to be "Fixed". This is a state of readiness suggesting that, at some stage in the scenario, the system may release them to you. See if you can maneuver your forces, and end Turn 1, as indicated. If unable to do so, it is because no scenario plays the same way twice – the enemy, weather and fate etc., will all play a part. Page 8 When you’ve finished your actions click the Next Turn Button on the Toolbar and click ok, if prompted. The enemy will move and fire its forces. Your units may fire automatically in reply. Some enemy movement may be spotted. Your next turn will be announced once the Allied Command Report appears. TURN 2 It is still daytime and most Allied forces remain Fixed. Let’s see if you can capture the objective you attacked during Turn 1. First we’ll order some more artillery fire against the enemy’s hex. As before, select an eligible artillery unit, place your mouse over the target hex, and press Control plus right click. If you hadn’t previously, you may very well now have disrupted the enemy, or broken it. If not order more artillery fire. The weaker the enemy, the better for the next stage of your attack. Page 9 Let’s now order an advance into the objective itself. To enter an enemy occupied hex, you must assault it. Move your recon unit adjacent to the objective, if not already there. If you have sufficient movement points remaining (they have to be colored white or green), select your recon unit and right click the enemy’s hex. A dialog will appear announcing the initiating of an assault. To resolve your assault, click the Resolve Assault Button on the Toolbar. Results will appear showing both sides’ losses. If you win and any remaining enemy retreat, you will capture the hex. If you win and the enemy is unable to retreat, you will capture some of its forces but not enter the hex. (Remember, do not worry if your outcome does not match the one illustrated, as play will differ). (Tip: If you capture an objective hex you will earn its Victory Points, but objectives can be recaptured an endless number of times in a game. Only the side owning it at a scenario’s end receives the points. To take an objective hex simply enter it. You do not need to remain there). Let’s now continue to reconnoiter to the north of the map with your other scout units. Select any unit and, this time, click the Change Travel Mode Button on the Toolbar. Page 10 You’ll see a white line appear at the bottom of the unit icon, and a "T" next to its movement points in its Unit Box. It is now in Travel Mode, this gives units a larger movement allowance, particularly when using roads. Click the Reachable Hexes Button and you’ll see this larger movement span indicated. Maneuver your recon units towards the objectives at the north of the map using Travel Mode. You may expose hidden enemy units along the way and may also take fire. React as you see fit. (Important Note: Travel Mode is the only way to cross a bridge at a river. Beware though, when in Travel Mode, offensive and defensive strengths are greatly reduced. In addition, it costs movement points to change out of Travel Mode. Page 11 (Tip: If you’d like to see labels for the map press the Shift key. As you can now see, the larger objectives you’re aiming for are called Joe’s Bridge, a key crossing point from Belgium into Holland). FINISH THE GAME You now know how to move, fire, and assault with your forces. With the victory conditions in mind, keep maneuvering your forces in the manner you see fit. The end of the game will be announced at the conclusion of the enemy’s final turn, at that time, the final Victory Points will be shown. To restart the scenario, click File, then Selection in the Menu Bar. A list of scenarios will appear and you may select any by double clicking on its entry. FURTHER INFORMATION This Guide is designed to make you feel comfortable with what’s going on in Panzer Campaigns, but it is no substitute for the User Manual which is the series’ rulebook. You can see this while playing by pressing F2, or click User Manual here. The Main Program Manual discusses the various elements of the interface in helpful detail. You can see this while playing by pressing F1, or click Main Program Help File here. If you wish to delve inside the game designer’s head, press F3 while running the game, and the Designer’s Notes will be yours, or click Notes Help File here. Pressing F4 invokes a feature called the Parameter Data Table. It provides a host of information, including movement costs, terrain benefits, and stacking limits amongst other things. Lastly, documentation for the game’s editors may be found in the following help files: Scenario Editor Help File Order of Battle Editor Help File Page 12 Finally, be sure to check out the "What's New in Market Garden `44 " section of this manual as well, and once you have played the scenario, check out the entertaining Winning the Started Scenario After Action Report by Adam Parker. Page 13 WHAT’S NEW IN MARKET GARDEN ’44? Congestion The presence of a Congestion marker simulates the jubilant crowds encountered by XXX Corps at certain points along the approach to Arnhem. Congestion acts like an Obstacle, the exception being that it solely impacts either the Allies, or the Axis, during a scenario. It remains on the map for a set number of turns, determined by the Parameter Data. Wired Bridges A Wired bridge contains a probability of automatic damage once a unit moves adjacent to it. Wiring solely impacts either the Allies, or Axis, during a scenario, determined by the Parameter Data. Depending on whether a bridge is deemed "large" (WIRED), or "small" (Wired), the probability for damage is also set by the Parameter Data. Ferries Page 14 A Ferry allows one uncombined unit, in Travel Mode, to cross a river during its turn, using its full movement allowance. Scheduled Dialog A unit listed with a 0% arrival probability in the Scheduled Dialog, shares the first non-zero arrival probability of the unit above it. This new convention serves to assist scenario design only, and has no effect on game play whatsoever. Optional Rules Limited Air Recon - ON With this option active, a unit spotted by air recon cannot be the target of an air, or artillery attack, unless an eligible spotting ground unit can see it also. This option is on by default. Locking Zones-Of-Control - OFF With this option de-activated, a unit may move from one zone of control to another, at the cost of its entire movement allowance, so long as a friendly unit occupies its destination hex. For the first time since Panzer Campaigns Normandy ’44, Locking Zones of Control will be off by default. Page 15 Broken Terrain Though Broken terrain has existed in other Panzer Campaigns titles, be aware of the new art used to represent dike terrain found extensively on the Market Garden battlefield. Otherwise the impact of Broken terrain remains unchanged, and its effects are listed in the Parameter Data Table. Once you have played the scenario, be sure to check out this very entertaining section, Winning the Started Scenario, an After Action Report by Adam Parker. Page 16 WINNING THE STARTED SCENARIO An After-Action-Report By Adam Parker Introduction The history of the military art is ripe with tales of gallantry and cowardice, caution and improvisation, luck and sheer bad timing. In Panzer Campaigns you are given the chance to experience this great cacophony that human leadership under fire bestows. Unlike many a war game system, Panzer Campaigns offers an extremely intuitive approach to fighting an operational war. Ease of interface, commonsensical rules, and very little micro-management make for the donning of the General's hat in quick order. How then does one go about winning a Panzer Campaigns scenario? As this question has been the focus of many a post on the various Panzer Campaigns forums, what follows offers a blow by blow look at the anatomy of a Panzer Campaigns battle, with Market Garden's Getting Started scenario serving aptly as our baptism of fire. Never forget this truism: Very much like real life, no plan in Panzer Campaigns will ever guarantee survival after contact with the enemy. More so, the nuances of the system imply, that contact with the enemy will likely change a scenario's progression from one sitting to the next. Keep this uncertainty in mind as we now enter a real time chronology of the fighting along theMeuse l'Escaut Canal. The push of XXX Corps, to the Rhine in Market Garden, required a massive initial drive to garner momentum. The crossing from Belgium into Holland at a frightful pace is the task that now rests before us. What follows reaches this documenter's quill the second it unfolds - and therefore, he can predict not a thing. The Plan "There's nothing like the anticipation before battle, is there General"? "I tell you Adam, and make no mistake about it, time is of the essence today. Find a bridge and expand our lodgment into Holland. This is but the beginning you know. You must pave the way. Once you push off, there will be no stopping before the Rhine itself and may we then all be home before Christmas". Page 17 My staff had the map of operations sprawled across the trestle table by the time I entered my command tent. Five objectives for XXX Corps were inked in blue for the sortie this day. Key to success, it was obvious, lay with both banks of the bridge across the Meuse l'Escaut Canal, (already optimistically designated Joe's Bridge by my planning staff in honor of my Irish Guards commander). Three smaller objectives populated the center of the map. A referral to the operations order, or Victory Dialog, confirmed the General's words. 375 victory points were required for our mission to be a major success. The on map objectives totaled 400. I would likely need to capture them all to keep the Corps on schedule. "Everything starts with the Victory Dialog", I always hammer into my men. "Regardless of what the map shows, your actions must always be dictated by your victory requirements". 375 points... What if I could only achieve four of my objectives, the 50 point hex on the right flank looks troublesome? Well, if the enemy would only oblige me, I would gladly make the remaining points needed with enemy casualties, but I’d likewise need to minimize my own. Attention shifted to my order of battle, my starting positions having been indicated on map with organizations colored by use of the Divisional Markings Button. "What of reinforcements?" I asked my Chief of Staff. "None scheduled sir". "What of the availability of our on map forces?" The Fixed Units Button revealed the dark Page 18 blue of XXX Corps to be fixed and, consequently, beyond my initial control. "Consult the Release Dialog", I instructed. An orderly produced a schedule of fixed unit releases via the Menu Bar. XXX Corps it was shown would be entrusted to my hands as two flanks – Left to be released on Turn 4, (1600 hours), and Right at midnight on Turn 6. With fog of war about the battlefield, none of these releases could be certain. "Three squadrons of recon must make the opening drive sir", the Planning Officer indicated. "Colored purple on the map sir, from left to right, Squadrons C, A, and B". "Very well, we'll work with what we have. Listen up gentlemen… We don't know what Jerry has out there, but with speed we must proceed. Cautious speed albeit." I penciled over the map likely areas of enemy resistance. "What we do know is that Jerry has been on the run since Falaise. He is tired, short on morale, and desperate for rest. Headquarters expects old men on bicycles I tell you! Well, I don't know about that, but if an objective looks scantily protected, I will drive at it hard with our recon force! If en route we make contact with the enemy, I will bypass him. Minimize our losses, gentlemen, but be Page 19 daring in our thrust. If push comes to shove, and my anticipated bottlenecks prove too hot, I will await the release of XXX Corps." I said, holding back my doubts regarding time. "I will then gladly improvise en route as we've been accustomed to many a time." I glanced at the confident faces around me. Some veterans of Dunkirk, Greece, and the Western Desert ... and Caen. "Joe's Bridge! A jolly good name that. It will be taken!" Without realizing it, my fist hit the map with a thud. "I want it taken at the soonest gentlemen. If Jerry is unprepared, he will not be given a second chance! Carry on. We kick off at Midday". The delay in releasing the infantry and armor of XXX Corps indeed posed a tactical dilemma. Recon serves to scout, gather intelligence, and above all, to avoid prolonged contact with the enemy. Today I would need these eyes and ears not just to scout territory, but also to take it, and then deny it, until relieved. This gamble might pay off, as the Unit Boxes of my recon forces showed Squadrons C and B to each contain twenty-five armored fighting vehicles, and A in the center eleven. That would be quite some might if bicycles with elderly men did populate the enemys’ garrisons. Page 20 Therefore the plan was laid - C and A Squadrons would probe the left flank around Lommel and, if clear, aim directly for Joe's Bridge. If the enemy proved weak, then a chance would be taken at Joe's Bridge - both objectives. "Joe’s North", and "Joe’s South", would be taken by rush and held until relieved. In the center of the map, B Squadron, with its twenty-five vehicles, would probe the vicinity of the two central 25 point objectives, "Central Alpha" and "Central Bravo". Here I possessed an added punch. For though fixed as part of XXX Corps' assets, two batteries of the Royal Horse Artillery were designated as indirect fire support. With a reach just falling short of Joe's Bridge itself, this firepower might swing local combat superiority in B Squadron's favor. Either way, I had no choice. Any delay, in that portion of the map, would slow the right flank's drive towards the 50 point "Objective East" at midnight. This was my gravest fear. What then of XXX Corps? The left flank, being released first, would need to drive straight for Joe's Bridge, exploiting whatever the situation might be. Without Joe's Bridge in our hands the entire scenario would be moot. Page 21 The right flank, with only three turns post release available to it, would then need to thrust en-masse towards Objective East. It would be with the greatest of luck that B Squadron would get anywhere near that side of the map. So armor, and the British Tommy, would join the fray and two natural avenues of approach were designated to them. I checked my watch. With the show only moments away a gem of information reached my hands. The RAF, courtesy of the Canadians, would be available for close support. I acknowledged the Turn 1 Command Report and gave it to an orderly. As tempting as it would be to invoke air cover at the first sign of trouble, I'd likely need to keep that ace up my sleeve. If only I also had the Royal Navy as in "Epsom" just three months ago! Turn 1 September 10, 1200 hours – Allies Task 1 –"Recon the western flank": A and C Squadrons, using Travel mode, move Page 22 separately up the Lommel highway using reachable hexes. A Squadron makes contact with a unit of Wehrmacht <100 men strong in forests just short of the first town. It survives opportunity fire without loss, and bypasses it completely, exhausting its movement two kilometers due south of Joe’s South. C Squadron bypasses too, and exhausts its movement west of Lommel. No further enemy contact is made, and Lommel is, surprisingly, clear. Task 2 – "Recon Objective Central Alpha": B Squadron, using Deployed Mode, moves, hex by hex, adjacent to Objective Central Alpha. It exposes a unit of Wehrmacht >100 men strong, garrisoning the town, in improved positions. Still, with green movement points indicating its ability to assault, it allows the Royal Horse Artillery to firstly indirect fire. The second volley disrupts the enemy, making it ripe for close combat. However, B Squadron direct fires instead, to further reduce the enemy’s numbers. German response At Joe’s South, a unit of 88mm Anti-Tank guns <10 strong reveals itself through long range direct fire at A Squadron, causing the loss of one vehicle. Still in Travel Mode, A Squadron otherwise survives in good order. At Objective Central Bravo, a unit of Luftwaffe infantry >100 men strong reveals itself to the distant B Squadron. This intelligence is noted for future reference. Commander’s diary I am both surprised, and relieved, at the enemy’s initial dispositions. He appears weak on the western flank, and my estimation of his morale has been borne out by the ease in disrupting his garrison at Central Alpha. With Central Alpha disrupted, an assault by B Squadron could have succeeded in capturing my first objective for the day. However, seeing that the enemy remained untested in battle, and that his garrison persisted at >100 men, I reasoned that a session of direct fire, in preparation for an assault next turn, to be a good tactic. Surprises can go both ways, and a tanker’s greatest fear is the ubiquitous "88". The presence of these guns at Objective Joe’s South pleases me not. Humber vs. a high caliber AT gun is not a fair contest and A Squadron was lucky to survive in good order – thankfully, long distance direct fire is much weaker than point blank. Nonetheless, Jerry has revealed his hand. A sinister one, but I dare say he has done so too early… First up, my focus will return to Central Alpha. Turn 2 September 10, 1400 hours – Allies Page 23 Task 1 – "Capture Objective Central Alpha": The Royal Horse Artillery continues its suppression of the disrupted Central Alpha garrison. B Squadron adds a round of direct fire and then, using Deployed Mode, assaults the enemy’s hex. Objective Central Alpha is captured and the enemy retreats north. Task 2 – "Eliminate Joe’s South 88’s": The RAF is summoned in to fly close support against Joe’s South. A successful sortie eliminates all anti-tank guns and, quite unexpectedly, the now rubbled Joe’s South is left vacant. Task 3 – "Recon Objective Joe’s North": C Squadron, using Travel Mode, moves adjacent to the west of Joe’s Bridge and makes contact with a unit of Wehrmacht <100 men strong holding the far side. 1 vehicle is lost to opportunity fire before the squadron can deploy. Having done so, and with sufficient movement remaining, C Squadron direct fires at Joe’s North. Its single round disrupts the defending unit. Task 4 – "Capture Joe’s South": A Squadron, maintaining Travel Mode in order to ensure sufficient movement to enter a rubbled hex, drags two hexes and captures Objective Joe’ Page 24 s South. Though in a precarious position now, facing an adjacent enemy unit whilst in Travel Mode, it exhausts its movement and in Travel Mode it must stay. German response A Squadron takes direct fire from the Joe’s North Garrison and indirect fire from an enemy artillery unit, hidden somewhere on the map. While A Squadron survives unscathed, the garrison at Joe’s North fails to undisrupt. Three Waffen SS infantry units >100 men strong reveal themselves five kilometers east of Joe’s South. One concludes its movement out of view, rendering its final position unknown. Commander’s diary In Travel Mode, the armored cars of A Squadron fanned through the debris of Joe’s South and, with the enemy disrupted on the far bank, possessed a fair chance of surviving the venture. A definite risk indeed, for it was uncertain whether the enemy possessed the will to reinforce Joe’s North in his turn, and counter-attack the exposed recon squadron. Yet the gamble paid off, as did the push at Central Alpha. The enemy’s morale in both cases has let him down. Rather than assuming an air of over-confidence, I am brought back to reality by the unexpected appearance of SS on the battlefield, and the question of morale takes a totally different turn. I cannot yet gauge the intention of these elite warriors, but their presence is an ominous one, both for Joe’s Bridge, and area of operations in general. Nonetheless, has Jerry given me another opportunity in his failure to reinforce Joe’s North? Turn 3 September 10, 1600 hours – Allies Page 25 Task 1 – "Clear Central Alpha vicinity": The Royal Horse Artillery maintains harassment of the remnant units retreating from Central Alpha. B Squadron adds a round of direct fire and the retreating enemy unit is eliminated. Task 2 – "Capture Joe’s North": C Squadron, using Deployed Mode, moves to Joe’s South. A Squadron, still facing the disrupted enemy garrison at Joe’s North, maintains Travel Mode, allowing it to cross a bridged river and assault the enemy’s hex. Objective Joe’s North is captured and the enemy retreats northwest. B Squadron again remains in Travel Mode with its movement exhausted for the turn. Task 3 – "Reinforce Joe’s Bridge": The first release of XXX Corps occurs on schedule. Using Travel Mode, all units drag and drop, to their maximum reachable movement range, aiming to establish a defensive perimeter to the east, and south east, of Joe’s South. All units make the journey without contact, via the western flank of the map, other than the 5th Brigade HQ, which blunders through the map’s center and into a unit of 88mm Anti-Tank guns <10 strong! Surviving opportunity fire, the HQ luckily backs away and redirects itself en route to Joe’s Bridge. Page 26 German response Indirect fire targets A Squadron at Joe’s Bridge, with no effect, while the defeated enemy at Joe’s North retreats further away. No additional enemy activity is observed anywhere on the map. Commander’s diary Indeed, the opportunity to strike at the heart of this battle was at hand and, within just three turns, both crucial Joe’s Bridge objectives lay in XXX Corp’s hands. By the use, and luck, of solid reconnaissance, the probing fire of last turn, the lack of enemy preparedness, and the poor morale of his troops, the way was set for yet another gamble in sending A Squadron, now exposed, as our bridgehead over the Escaut Canal. So, it is with immense relief I see the first party of XXX Corps released to my control, and taking position, (albeit an exposed one as well), around Joe’s South. The blunder of 5th Brigade HQ stresses the importance of employing drag and drop movement with care. The loss, or disruption, of that HQ would have jeopardized the morale and supply of the XXX Corps contingent now on the move. Turning to the southern flank, B Squadron, in eliminating the enemy presence at Objective Central Alpha, has freed itself for the next phase of the plan. As I say this, however, evening approaches and the SS recently spotted to the east have disappeared. Could there be a hidden enemy presence to the west and center too? In all my experience the SS have never been known to shirk from a fight, so it is now a question of where, and when, will they turn up? I have but only one maneuver unit in the south with which to exploit. Turn 4 September 10, 1800 hours – Allies Page 27 Task 1 – "Recon Objective Central Bravo": Using Deployed Mode, B Squadron vacates Central Alpha and takes position adjacent to Central Bravo, from the south, thereby maintaining a favorable elevation. A unit of Luftwaffe infantry >100 men strong is confirmed to still be in position within trenches, as opposed to the weaker, improved positions of Central Alpha. Opportunity fire destroys 1 armored vehicle, though deployed, and B Squadron possesses insufficient movement with which to respond. The Royal Horse Artillery indirect fires at Central Bravo, and its fourth salvo belatedly manages to disrupt the entrenched enemy garrison. Task 2 – "Defend Joe’s Bridge": C Squadron, using Travel Mode in order to cross the river, joins A Squadron at Joe’s North. Both change into the tougher combat ready Deployed Mode. XXX Corps units deploy to the east and south east of Joe’s South, and the infantry of B Company enters Travel Mode in readiness to join the Joe’s North bridgehead next turn. German response Page 28 The garrison at Central Bravo direct fires at B Squadron, and is unable to return to good order. At Joe’s North, the defeated Wehrmacht, in an act of gallantry, halts its retreat, charges Joe’s North, and is eliminated by the subsequent opportunity fire of C and A Squadrons. Commander’s diary Despite this one episode of German aggression, the countryside around Joe’s Bridge lays dormant. Yet, I know Jerry is out there. A Squadron radios a desire to probe to the north but, as tempting an idea as that may be to a recon unit, in place all northern units must stay! The enemy will soon come. I am still correct in my estimation of the enemy presence around the central objectives, and I take a measured risk in leaving Objective Central Alpha vacant, while making preparations for the capture of Central Bravo. Yet, with one mobile unit in the south, I have no choice, other than to do all things possible to pave the way for a rapid thrust to Objective East once the remainder of XXX Corps is released. I do trust that I have measured correctly, for I am planning on the enemy being preoccupied with his north. Turn 5 September 10, 2000 hours – Allies Page 29 Task 1 – "Capture Objective Central Bravo": The Royal Horse Artillery continues indirect fire at Central Bravo, increasing the odds of an assault’s success with each enemy casualty. B Squadron forgoes a possible round of direct fire and, using Deployed Mode, assaults the objective hex. Central Bravo is captured and the surviving garrison retreats east. Task 2 – "Bolster Joe’s Bridge North": The infantry of Company B, using Travel Mode, crosses Joe’s Bridge and joins the positions of C and A Squadrons in the northern bridgehead. With sufficient movement remaining, it deploys in place. Task 3 – "Prepare for southern operations": On the southern map edge XXX Corps headquarters moves four kilometers, in Deployed Mode, to the town of Hechtel in anticipation of future action. German response Page 30 The remnant, defending unit of Central Bravo, direct fires at B Squadron, eliminating another vehicle, and inflicting medium to high fatigue. Silence persists over the remainder of the map. Commander’s diary So the penultimate objective now rests in my hands and the scene around Joe’s Bridge plays calm. Why then has the enemy not responded, in any meaningful way, up to this juncture in time? A check of the Victory Dialog highlights an unexpected dilemma. At 366 victory points, I’m currently just nine points short of my coveted major victory. So the issue is this: Do I simply hold in place and try to inflict significant casualties at Joe’s Bridge when the enemy counter-attacks? Surely nine points won’t be hard to find via battle. However, what if the enemy doesn’t counter-attack? Or, worse still, what if he counter-attacks and inflicts significant casualties on me? It all boils down to the key issue – what will the enemy do? Without knowing the answer, to the last objective at Kleine Brogel, I must push on. Turn 6 September 11, 0000 hours – Allies Page 31 Task 1 – "Prepare the central route": The second half of XXX Corps releases on schedule and the Royal Horse Artillery indirect fires at the retreating Central Bravo garrison in an effort to clear XXX Corps’ central route though the map. Though the enemy unit >100 men strong, it remains disrupted. The newly released XXX Corps force is split into two arms, one to follow a central route to Objective East, and the other, an eastern route through the village of Peer. Task 2 – "Recon the eastern route": B Troop armor, using Deployed Mode, moves east, hex by hex, to the town of Peer. It continues north until two kilometers from Objective East, there it makes contact with a unit of Luftwaffe infantry >100 men strong, positioned in forests, which does not use opportunity fire. C Troop armor, using Deployed Mode, moves to B Troop’s hex. Again, opportunity fire is withheld. Two companies of infantry, using Travel Mode, move to reinforce B and C Troops. Though able to join the armored troops’ hex by staying in Travel Mode, both companies elect to end movement one hex short and, therefore, are out of enemy direct fire range. Task 3 – "Recon the central route": A Troop armor, using Deployed Mode, moves, hex by hex, along the central route. Contact is made with a unit of Flak halftracks <10 strong Page 32 deployed along the primary road. A Troop direct fires and 1 Flak truck is destroyed. The last two companies of infantry, and a machine gun company, using Travel Mode, move to reinforce A Troop. Completing their movement adjacent to the south, all, but the machine gun company, possess sufficient ability to deploy. Task 4 – "Re-occupy Central Alpha": Both the headquarters of XXX Corps and the Guards Armored Division, using Deployed Mode, move towards Central Alpha in order to re-occupy it next turn. Task 5 – "Hold at Joe’s Bridge": All units forming the bridgehead and perimeter at Joe’s Bridge wait in place. German response Indirect fire targets Joe’s Bridge and the central route. At Joe’s North the enemy moves three units of Luftwaffe bicycle Fallschirmjager, each > 100 men strong, adjacent to the north and northwest. No direct fire is used. The bridgehead force opportunity fires, but all Fallschirmjager remain in good order. A unit of SS Panzer Grenadiers, >100 men strong, moves adjacent to XXX Corp’s Recce Squadron, comprising Stuart light tanks. One Stuart is lost to direct fire and the SS survive opportunity fire in good order. On the central route, the unit of flak halftracks direct fires at A Troop and is eliminated by opportunity fire in reply. The Luftwaffe infantry in the south direct fire too, but their efforts are with little result. Commander’s diary So Jerry makes his move and plays directly for both ends of Joe’s Bridge at once in perfect textbook form. With his attacking force in good order, all units remain capable of assault, but my lads remain in good order too. Facing such potential odds, I expect my bridgehead to hold for at least another turn. That said, Jerry reveals only one of the three formerly spotted SS units in the vicinity of Joe’s South, and he continues to surprise me in other ways too. The central route to Kleine Brogel appears barely protected. Objective East should, therefore, be within reach in this coming turn. Turn 7 September 11, 0400 hours – Allies Page 33 Task 1 – "Finesse Joe’s perimeter": Sherman tanks at Joe’s South, using Deployed Mode, move one hex north to bolster the beleaguered, and weaker, Stuarts under pressure from the SS. One Stuart is lost to SS opportunity fire. Task 2 – "Defend Joe’s North": The Joe’s North bridgehead direct fires at the three Fallschirmjager units, targeting those in clear terrain first. One recon vehicle is lost to opportunity fire, and one Fallschirmjager disrupts, still leaving two remaining in good order, capable of assault in their turn. Task 3 – "Clear the central route to Objective East": A Troop, using Deployed Mode, moves north along the central route without opposition. It hooks south, along the Kleine Brogel secondary road, and heads immediately for Objective East, halting adjacent to the north. A unit of Luftwaffe infantry >100 men strong is spotted as a garrison devoid of fortifications. A Troop direct fires but, to its surprise, ends up being disrupted courtesy of Luftwaffe opportunity fire. Task 4 – "Disrupt Objective East": The Royal Horse Artillery joined by XXX Corps’ own Page 34 artillery units, with A Troop serving as eligible spotter, indirect fire at Objective East. The first volley disrupts the Luftwaffe garrison. Indirect fire switches to the lone unit facing B and C Troops on the eastern route. It survives in good order. Task 5 – "Clear Central Bravo vicinity": B Squadron direct fires at the disrupted former Central Bravo garrison. The Luftwaffe unit immediately breaks and routs east, posing an insignificant threat to the area. Task 6 – "Reinforce A Troop via the central route": Using Travel Mode, the three infantry companies, on the central route, move to join A Troop at Objective East and change into Deployed Mode before entering its hex. No opportunity fire results. Task 7 – "Reinforce B and C Troops via the eastern route": Using Deployed Mode, the two infantry companies, on the eastern route, enter B and C Troop’s hex. With movement remaining, all units direct fire at the adjacent Luftwaffe infantry. The enemy unit disrupts. German response A second unit of SS Panzer Grenadiers >100 men strong moves adjacent to the hex once occupied by XXX Corp’s Shermans, now solely held by a unit of Corps’ engineers southeast of Objective Joe’s South. Direct fire, from positions adjacent to Joe’s North, destroys three armored vehicles, but opportunity fire disrupts another Fallschirmjager unit. To the south, both Luftwaffe units direct fire with little result, and a unit of Wehrmacht >100 men strong is spotted approaching Objective Central Alpha from the northwest, now held by the two British headquarters. Commander’s diary The pressure finally explodes around Joe’s Bridge and, despite a furious defense, the enemy maintains an offensive punch both to the north and south. More SS lurk hidden to the east and I am fully aware that my perimeter, around Joe’s South, offers scant coverage to the west where I have little to offer other than the 5th Brigade HQ. Yet, focusing on the southern flank, Objective East looks to be on the verge of collapse. So the devil’s math is this: If I take Objective East, and claim it as a victory buffer, I may yet lose this mission if I should be surprised anywhere at Joe’s Bridge and lose just one of its victory locations. Have I deployed correctly? Should I be in action at all to the south? Nothing can ever be certain with the SS around. Final Turn September 11, 0600 hours – Allies Page 35 Task 1: "Capture Objective East": The massed power of XXX Corps’ artillery indirect fires at Objective East, maintaining its disrupted state. On the objective’s adjacent northern flank, A Troop, also being disrupted and therefore ineligible to assault, can only direct fire. Using Deployed Mode, the three infantry companies stacked with A Troop immediately launch into an assault. Objective East is captured. Its defenders retreat west. Task 2 – "Clear the eastern route": While easily capable of assault this turn too, the combined forces of the eastern route play conservatively and direct fire at the lone Luftwaffe unit adjacent. The enemy, with its morale shattered, soon breaks and routs to the east. Task 3 – "Defend Joe’s Bridge to the last man!": All units, comprising the Joe’s Bridge force, direct fire at will. In a coup, the northern Fallschirmjager completely disrupt. A unit of 88mm Anti-Tank guns <10 strong opportunity fires two kilometers from Joe’s South. SS Panzer Grenadiers, to the perimeter’s east, opportunity fire and the Stuarts bare the brunt. German response Page 36 At Joe’s Bridge, a unit of SS assault guns, >10 vehicles strong, moves adjacent to the southeastern perimeter of the XXX Corps’ engineers. Direct fire disrupts the engineers immediately. More Stuarts go up in flame, a Sherman too… Is there an unseen probe to the west? Suddenly all sound of battle stops. Outcome: 440 Points – Major Allied Victory. LESSONS Later that evening at Kleine Brogel…. "Joe’s Bridge reports complete enemy pullback from the north and east sir. Elements of XXX Corps have extended the bridgehead and the southern perimeter." Page 37 "And the SS?" "Pulled back to the east, sir." "Very well. Our airborne umbrella will soon be arriving so we’d best ready to join them". I tapped the roof of my Daimler and, with a grind of gears, set off for the carnage of this past day. What lessons can be learned from this sortie just ended? Well, obviously we’re going to be in for a few surprises. The appearance of SS to our flanks was one I had not counted on, a totally different kettle of fish to old men on bicycles, even Luftwaffe on bicycles to be exact. I was wrong in other ways too regarding the enemy’s expected dispositions. The RAF indeed paved the way on the bridge. My airpower, therefore, would be an asset I would guard as judiciously as my tanks, whenever available to me. Yet all up, I believe it was boldness, applied against the limits of time, which helped square the battlefield for our victory. A moment’s hesitation at Joe’s bridge in the first two turns; the failure to reinforce the bridge with the first release of XXX Corps; the failure to apply the RAF to the core location; all could have swung my victory into defeat. Boldness does come with risk and, quite honestly, had things turned sour on the eastern flank, I could have been at risk of losing my Commission. By Turn 5, boldness had almost secured a major victory, without the objective at Kleine Brogel being in our hands. Hence my message, to my men, that not everything on the map need be relevant, only the Victory Dialog ever matters. Yet, what if I had held off on the approach to Kleine Brogel and Jerry had subsequently pulled a further surprise out of the bag at Joe’s Bridge? Without air recon, I truly was in no position to judge what Jerry had up his sleeve to both the west and northeast. So to Kleine Brogel we proceeded and, with luck, Jerry succumbed there. Nothing is ever guaranteed when fighting a Panzer Campaign. "Alpha Papa Leader", my Chief of Staff crackled over the radio net. "Didn’t the Canadian Spitfires put in a good show today?" We’d be in the thick of it had they failed to take out those 88’s. That I had seen many times before in this war. I smiled wondering what the story would have been had I pushed everything up the map’s center? "We’ve a long way to go yet. Alpha Papa Leader out". Page 38