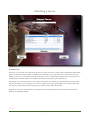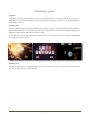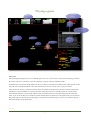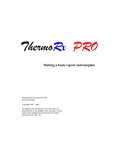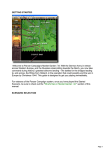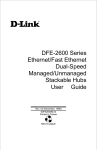
1
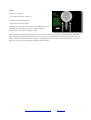
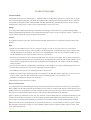
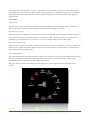
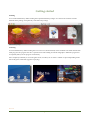
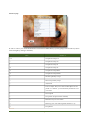
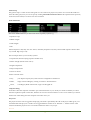
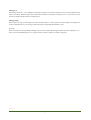
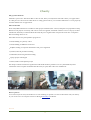
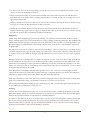
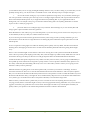
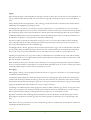
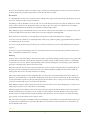
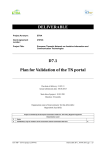
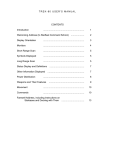
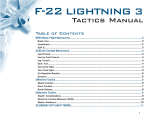
M
A
C
T
R
E
K
A s p ac e le ge n d c ome s t o Coc oa
USER MANUAL
SHIELDS UP, PHOTON TORPEDOS ARMED, PHASERS STANDING BY
Chris Lukassen, 2007
Revision 1.2.0
h t t p : / / s o u r c e f o r g e . o r g / p r o j e c t s / m a c t r e k • e m a i l : i n f o @ l u k y. n l
M
A
C
T
R
E
K
A s p ac e le ge n d c ome s t o Coc oa
Revision Control
REVISION
DESCRIPTION
RESPONSIBLE
1.0.0
Initial Release
C. N. Lukassen
1.0.1
Bug Fix
C. N. Lukassen
- FrameWorks are now also Universal
- Fixed echo in SoundEffect
- Quicktime Framework properly referenced
- Released as non-debug
1.1.0
Update
C. N. Lukassen
- Fixed bug in server deselect
- Fixed bug in message duplication
- Improved connection handling and shutdown
- Better separation in classes
- Improved dashboard behaviour
- Cleanup messages, playerlist etc when quiting
- Added RSA (Universal)
- Enabled manual entry of servers
- Added Classical Theme
- Updated the User Manual
- Placed source under SCM
- Added Credits pane (Pascal Defcom)
- Added online help, coup, quit and war declaration
- Added response to HOG call
- Included relocatable server
- Send Quit to server when ending game
- Fix server install problem
- Fix problem with dmg appearing on right half of screen
- Released Developer docs
1.1.1
Bug Fix
C. N. Lukassen
- Fixed problem in hog call
- Changed default message “Active”
1.1.2
Bug Fix
C. N. Lukassen
- Fixed RSA resolve (Karthik)
h t t p : / / s o u r c e f o r g e . o r g / p r o j e c t s / m a c t r e k • e m a i l : i n f o @ l u k y. n l
REVISION
1.2.0
DESCRIPTION
Update:
RESPONSIBLE
C. N. Lukassen
- Added macro handling
- Added reading macros from file
- Added Rendezvous (1667734)
- Added William Balcerski to credits (artwork)
- Added support for sending/receiving RCD/RCM (1682996)
- Added distress keys
- Added experimental resolution switching (1678784)
- Added improvements in cloaking behaviour
- Added new graphics for wrench, fuel and army
- Added map-able mouse keys (1666849)
- Added voice commands (1663917)
- Added continious mouse steering (1636254)
- Added interaction on galactic map (1636263)
- Added new tracker sync screenupdates with server (1636277)
- Added support for command-Q (Apple Quit)
- Added licence file
- Added support for sturgon & hockey servers (1595617)
- Bugfix in RCD handling (1684823)
- Bugfix race condition causing hangs resolved (1691205)
- Bugfix return focus to GameView after send message (1636270)
- Bugfix keymap changes are sometimes not processed
- Bugfix RSA enabling error resolved
- Bugfix settings only saved upon game entry (1674341)
- Bugfix server reading of messages
- Bugfix to send messages up to player "k"
- Bugfix local echo of own messages
- Bugfix display of shield/label while cloaked
- Bugfix hogcall fixed (1625370)
- Changed cleanup of mainnibs
- Changed handling of settings (1682996)
- Changed default key for quit is now "Q" not "q" (1684995)
- Changed presentation of war declaration (1682448)
- Changed entry screen for backport to OS X 10.3
- Changed presentation of key map by sorting them
- Changed label only shown for 1 player (COW compliance)
- Changed graphics classic theme (improved)
- Changed settings dialogue (tab pane)
- Changed presentation of cloaked ships (COW compliance)
- Changed disabled debug labels (COW compliance)
- Changed logging mechanism
- Changed User Manual / Licence
h t t p : / / s o u r c e f o r g e . o r g / p r o j e c t s / m a c t r e k • e m a i l : i n f o @ l u k y. n l
3
Credits
MacTrek was made by:
• Chris Lukassen, design, coding, etc.
• Judith Lukassen, HMI, graphics
• Noa Lukassen, sleepless nights
MacTrek is based roughly on the design of JTrek. Which on it’s turn
is based on one of the older versions of COW. It is hard to be
complete, but never the less an attempt is made.
Robert Temple,William Balcerski, Pascal Defcom, Chris Guthrie, Ed James, Scott Silvey, and Kevin Smith, Tedd Hadley,
Andy McFadden, Eric Mehlhaff, J. Mark Noworolski, Nick Trown, Lars Bernhardsson, Sam Shen, Rick Weinstein, Jeff
Nelson, Jeff Waller, Robert Kenney, Steve Sheldon, Jonathan Shekter, Dave Gosselin, Heiko Wengler, Neil Cook, Kurt
Siegl, Larry Denys, Kurt Olsen, Brandon Gillespie and many others.
h t t p : / / s o u r c e f o r g e . o r g / p r o j e c t s / m a c t r e k • e m a i l : i n f o @ l u k y. n l
4
Table of Contents
Introduction
1
What is Netrek?
1
History
1
Basics
1
How to read this manual?
2
Game Concepts
3
Tournament Mode
3
Ratings
3
Plasmas
3
Hints
3
How to Conquer Planets
3
Getting started
5
Installing
5
Launching
5
Settings
6
General settings
6
Mouse
7
Action keymap
8
Sending personal messages
10
M a c Tr e k
i
Sending macro messages
11
Sound settings
12
Selecting a server
14
Available servers
14
Login permission
15
RSA enabled servers
15
Entering a game
16
Logging in
16
Selecting a team
16
Selecting a ship
16
Playing a game
17
Game view
17
Galactic map
18
Status dashboard
18
Computer dialog
18
Message List
19
Message dialog
19
Charity
20
Why sponsor MacTrek?
20
Who will benefit?
20
How to sponsor?
20
Appendix A: Kia’s Clue Guide
21
Vocabulary
21
The way to become a "clued" player
21
M a c Tr e k
ii
Dogfighting
22
Escorting
22
Planet defense
23
Planet taking
23
Ogging
25
Base ogging
25
Base defense
26
Bombing
26
Basing
27
General questions
28
Summary
29
Appendix B: License
30
Preamble
30
Definitions:
30
Clauses:
30
Derived Licences
32
M a c Tr e k
iii
Introduction
What is Netrek?
Netrek is a free to play open source software cross platform multiplayer hybrid multi-directional shooter and real time
strategy game for up to 16 players. The goal of the game is to capture all the opposing team's planets. It combines
"twitch" style reflexive dogfighting with extensive team play and strategy.
History
Netrek has a development history beginning as far back as 1972 (Alto Trek). It was also heavily influenced by the
PLATO game Empire, written in 1978. It substantially reached its current form and its peak player-base in the early
1990s as a contemporary of XPilot but has dwindled steadily since then as more newbie friendly games became
available. It is no longer under active development, but its client and server code still contain many design features that
would be of interest to amateur or professional network games developers.
Basics
The graphics of Netrek are simple top-down format. You have an external view of your ship from above and the game
map is laid out on a 2-D plane.
Two teams face off, each controlling an equal number of planets. Planets slowly generate armies, which may be picked
up by players. Enemy planets may be taken over (or retaken) by dropping enough armies on them. Armies annihilate
each other on a 1 to 1 basis, so to take over a planet with 4 armies, you need to drop at least 5. A planet with 0 armies is
considered to be neutral and does nothing until someone puts an army on it to claim it.
Planets can be bombed to kill off armies, but cannot be bombed if the army count is 4 or less. Also, you can only pick
up excess armies from your team's planets, where "excess" is defined as over 4. Some ships have the ability to randomly
bomb 2 armies at a time instead of 1, so it would be possible to bomb an army down to a population of 3 but never less
than that.
Before you can pick up armies, however, you need a kill. You can obtain kills either by killing an enemy ship or by
bombing enemy armies. Your kill count resets back to 0 every time you die. Consequently, people with 2 or more kills
are generally targeted for ogging just to remove the threat of them carrying armies around.
Players control various classes of ships:
Scout (SC)
The scout is the fastest ship in the game, which makes it good for bombing out-of-the-way enemy
planets. Since the scout can only hold 2 armies, it wasn't very suitable for taking over enemy planets,
but it’s speed is unrivaled
Destroyer (DD)
A fast ship, strong enough and agile enough to make it a popular dogfighter, but not as fast as a scout.
The Destroyer can carry up to 5 armies, which is the largest number which would be needed to
capture a bombed planet. Most top players feel the Destroyer is too weak to be of much use in normal
game situations.
Assault Ship (AS)
The assault ship is a dedicated army carrier. It can hold a lot more than a Destroyer and is a great deal
stronger, but is poorly equipped for dogfighting. The Assault Ship is the ship of choice for capturing
well-defended planets, however, due to its toughness. Also, every other ship in the game can carry 2
armies per kill, while the assault ship can carry 3 armies per kill.
M a c Tr e k
1
Cruiser (CS)
A good front line ship, stronger but slower than a destroyer, but still with enough maneuverability to
dodge a lot of torpedoes. The cruiser is generally the most popular ship for both dogfighting and
capturing planets. It is also the default ship.
Battleship (BB)
More powerful than a cruiser, but slow and sluggish. The battleship's speed makes it unsuitable for
the defense of a wide zone, but it is quite good at defending a single point, like an important frontline
planet or the team's starbase.
Starbase (SB)
Vastly more powerful than a battleship and even slower to move around, the Starbase can be the basis
for the front line. Your team can only have one, and if it's destroyed, your team must wait 30 minutes
before another can be used. Proper starbase piloting is generally considered to be an entirely separate
skill from dogfighting. Starbases are also the primary targets of ogging, since attempting to dogfight a
starbase generally results in death.
Up to 16 players, often widely separated geographically, connect to a central server running at some site. There are
about 30 public servers in the world and of these maybe 10 are well known and popular. The individual players uses a
client program (e.g. MacTrek) to connect to the server of their choice. Once in the game, the server receives commands
from the client (and hence the player) and sends the positions and status of the other ships, planets, etc., to all players,
several times per second. The net effect of all this is to create a virtual galaxy where everyone can see each other and
interact, or to put it less academically, everyone plays in the same galaxy to try to take it over.
The original COW client
The JAVA Client
The new MacTrek client
How to read this manual?
You have already worked your way through the introduction. Next are the game concepts, and if you want to become a
really good player, you should read Appendix A. The rest of us jumps on the the installation and configuration section.
If you get lost in the menus you can find the relevant section in a logical order in the remainder of this document.
M a c Tr e k
2
Game Concepts
Tournament Mode
Tournament mode starts you when have 4 vs. 4 and the teams are not diagonally opposite (e.g. Fed vs. Kli is no good).
You can get DI (damage inflicted) only during tournament mode, and more DI leads to promotions. DI is a composite
score based on total planets taken, armies bombed, and ships killed. During Tournament mode you receive no DI for
attacking non-warring races, i.e. those races not represented by a team of 4 or more.
Ratings
Your rating will be updated only during tournament mode. Ratings are derived from your planet bombing, killing
(offense) and getting killed (defense) rates, normalized with respect to the average of all players. That is, a rating of 1.00
means you have exactly the average of all the current players.
Plasmas
To get plasma torpedoes, get 2 kills, and refit to [DD/CA/BB]. These home in on a target but can be shot down with
phasers.
Hints
• Watch your fuel. When you run out, your weapons wont fire, you cant go very fast to run away, and you’ll be
helpless. If you run out of fuel, go orbit a friendly or neutral fuel planet. Avoid chasing ships, unless you know they
are badly damaged or out of fuel. Its very hard for you to dodge their fire, and very easy for them to dodge yours.
On the other hand, if you can get someone to chase you, waste them!
• Learn who your enemies are. If you shoot at friendly ships, not only do you waste fuel, but you show everyone that
you are a beginner. And many players will specifically go for beginners just for the easy kill. Change speeds a lot. It is
often useful to use high speed to get into the action quickly. But at high speeds you will have a hard time dodging
enemy torpedoes.
• If you are not in combat, fly around with your shields down. This enables you to repair a little damage, and you use
less fuel that way. But beware, you are very vulnerable if you are surprised.
• Each additional warp halves your turning speed. Slow down to turn.
• Watch your galactic map to get the big picture. Pay attention to cloaked ships. Enemy ships near you will cause you
to go to yellow or red alert. This can be used to tell if a cloaked ship nearby you is an enemy or not.
• Torpedoes you detonate wont hurt your teammates.
• Bomb enemy planets with armies on them.
How to Conquer Planets
You conquer planets by first bombing the armies on enemy planets down to less than four. Below 4 you cannot bomb
them. (Neither can the other team pick up from them, however.) Here is one time where the AS is useful: the AS always
bombs at least two, so if the planet is at 5 and you bomb it with an AS, it will always go to three or less! If the planet is
at 6, however, you should first bomb it down to 5 with a normal ship and then have the AS bomb.
Then you need to get some kills you can only carry armies if you have killed with your current ship and beam up some
armies from one of their own planets (you can only beam up armies if the planet has more than four armies, so you
have to keep your enemies from bombing your planets!). Once you have armies, orbit the enemies planet and beam
them down. Each of your armies destroys one of the enemies armies, so you will need more armies to capture a planet
than the planet currently has. Usually, as a rule of thumb, it takes 5 armies to capture a planet, unless of course, it has
fewer armies than that on it.
M a c Tr e k
3
Some planets are more important to capture, too. Fuel planets are good planets to capture, because capturing them
prevents the enemy from refueling on them. Similarly, repair planets (look for the little wrench symbol on the planet)
repair ships orbiting them much faster than normal. Agricultural planets are most valuable because they generate
armies quickly.
Game Pattern:
The game starts:
The teams have all their planets and usually about 30 armies per planet. So, the object in this stage is to bomb out as
many of the enemies armies as possible, while preventing them from bombing out your own.
The planet capturing stage:
Most of the armies are bombed away, so the players concentrate on capturing the enemy planets. Its kind of pointless to
try to capture enemy planets while they still have a lot of armies, so this is why players don’t try to capture planets
until this stage. If the enemy has lots of armies, it is very easy for them to simply recapture their planets.
The Desperate wait for armies:
The players have used up most of their armies trying to take planets, so they are waiting for more to grow on their own
planets so they can take the enemies. What few they do get often end up dying, as the ship that was carrying them is
hunted down by hordes of enemy ships.
The Last Planet Defense:
One of the teams has lost several of its planets. It only has a few of the ones near its home world. They don’t have many
armies to recapture their worlds because they don’t have many worlds to grow them. But their worlds are well
defended because they come back real close to them when they die.
This stage can last for hours if the winning team isn’t aggressive or well-enough organized to take those last few
worlds.
M a c Tr e k
4
Getting started
Installing
You can install MacTrek by double clicking the required installation packages. You will need to install at least the
MacTrek Client package, and optionally a MacTrek Font package
Click to install a package
Launching
You launch MacTrek by double-clicking the icon. The server (when installed) can be launched from within the MacTrek
client program. The program will show a splash screen while loading all sounds and graphics. When the progress bar
is completely filled you will progress automatically.
Once completely launched you are in the game menu, from here you can select a number of options depending on the
state of the game (connected, logged in or playing).
Launching the client
The splash screen (Version 1.1.x)
M a c Tr e k
5
The fully loaded game
Settings
General settings
The general settings have impact on how the game is presented, and not on how it is controlled. You can use these
settings to fine tune the look and feel of MacTrek.
SETTING
EFFECT
Accelerate
On some slower computers (PPC 1GHz) it might be
beneficial to cut some corners in the drawing to
dramatically increase performance. As a side effect,
some artifacts can occur under rare conditions.
Graphics theme
MacTrek supports currently 3 themes. The themes are
composed of graphic and sound effects. The latest
netrek graphics are available as well as a MacTrek only
graphics theme. The Classic theme is based on the
original graphics. This is also the theme for the galactic
map.
Tracking
A tracker that will synchronize your map with server
updates, more smooth but may cause temporary
“freezes” use with care.
Resolution
Experimental setting to play in a different resolution
then the native screen resolution. (May lead to offscreen display)
Log to console
Generate debug information in the console log file
M a c Tr e k
6
Mouse
Default settings for mouse buttons :
BUTTON
D E FA U LT E F F E C T
Left
Fire Photon Torpedoes toward Mouse Cursor
Right
Change course toward Mouse Cursor
Middle
Fire Phaser toward Mouse Cursor
Wheel
Zoom in/out (cannot be changed)
Pressing the left mouse button in the galactic map while keeping the command (⌘) key down will create a new centerpoint for the galactic map (off centre).
M a c Tr e k
7
Action keymap
In order to control your vessels in MacTrek. You will need to define the keys you are going to use. Default keys (these
can be changed by clicking in the table):
KEY
EFFECT
0-9
Set Speed to Warp 0-9
)
Set Speed to Warp 10
!
Set Speed to Warp 11
@
Set Speed to Warp 12
%
Set Speed to Warp MAX
#
Set Speed to Warp HALF
>
Increase speed by warp 1
<
Decrease speed by warp 1
c
(Un)Cloak
l
Lock on object. Sets your course to that object. If it is a
planet or a starbase, you automatically dock there once
you arrive.
t
Fire torpedo
f
Fire plasma (requires 2 kills and refit)
x
Beam down your own armies
z
Beam up your own armies (planet must have > 4)
p
Fire phasers
M a c Tr e k
8
KEY
EFFECT
u
Tractor Beam, pulls target toward you.
y
Pressor Beam, pushes target away from you
s
Raise / Lower shields
i
Get information on the player or planet nearest your
mouse cursor.
D
Detonate your own torpedo’s cause less damage then a
full hit, but more damage then a miss
d
Detonate all enemy torpedo’s in a fixed range around
your ship. All torpedo’s add some damage to you, but
less depending on distance
k
Set course, based on current mouse position
*
Send in practice robot, or transwarp to starbase (when
locked onto one)
b
Bomb, must be in orbit of planet to bomb
o
Orbit planet
E
Send distress call
F
Send carried armies report
e
Toggle docking permissions (when flying starbase)
r
Refit to different ship (orbiting home planet)
R
Shutdown for repairs
Q
Quit
h
Help (toggle)
\
Take screenshot
C
Coup home planet
W
Select the nearest planet for (h)ostile or (p)eace
negotiations
M a c Tr e k
9
Sending personal messages
There are several ways to select a destination for the message you wish to send. You can:
• Select a message in the message list, you wish to reply to
• Select a player in the player list, you wish to send a message
• Enter a special key combination, this is the key “m” followed by:
KEY
D E S T I N AT I O N
0-9, a-f
Message is sent to the player with that number, if the
player exists.
t
Send a message to your own team
A
Send a message to all players
F
Send a message to the Federation players
R
Send a message to the Romulan players
K
Send a message to the Klingon players
O
Send a message to the Orion players
Then type your message in the message dialogue and press enter to send it. (Or move your mouse in the game area)
M a c Tr e k
10
Sending macro messages
By pressing a key while keeping the control button pressed, you will send a macro to your TEAM. Macro’s are
extremely usefull to send a lot of information while typing as little as possible. Currently MacTrek supports the
following macros:
KEY
MACRO
E
Help, with your dammage
F
Sends an armies carrying report stating how many
armies you are carrying and the name of the planet
your mouse is hovering above (suggests you want to
take the armies there)
e
Detailed help message
a
About to bomb planet x (planet below your mouse)
b
I am bombing planet x (planet below your mouse)
c
I am carrying x armies
s
I am controlling space near (you get the drill :-)
r
I am escorting player x (player near your mouse)
o
I am offing player x (...guess)
p
I am protecting planet x from bombers
t
I am taking planet x
i
Planet x has new armies
x
Player x has picked up armies
M a c Tr e k
11
KEY
MACRO
f
Player x is an easy kill (free beer)
h
Player x is hurt
n
Player x is low on fuel
1
We should bomb planet x
2
We should control space near planet x
3
We should ogg base x
4
We should ogg player x
5
We should save planet x
You can send the messages either as normal text (macros) or as receiver configurable distress, this has no impact on
your client but allows others to re-format your message to their liking. (e.g. localization)
Sound settings
SETTING
Effects volume
EFFECT
Controls the volume of explosions and other sound
effects
Voice over
Have the computer read out incoming status messages
to you, so you have your eyes on the game view.
Voice commands
Allow to give vocal commands to your ships crew
M a c Tr e k
12
MacTrek comes with voice commands. These are based upon Apple’s speech recognition technology. In order to use it,
you must first enable it in “System Preferences”. The settings as displayed work fine, though you may enable
“Speakable Items” if you encounter problems with your accent.
Supported commands:
• Torpedo
• Plasma
• Phaser
• Course
• Shields
• Bomb
• Repair
• Lock
• Tractor
• Press (Pressor is too confusing)
• Max (Warp)
• Stop
• Cloak.
M a c Tr e k
13
Selecting a server
Selecting a server
Available servers
The select a server screen will automatically present you with a list of servers it has found at the internet with running
games. The number of players field is not updated very frequently, so you may need to try around a bit. If you have
started a local server, you will find it at the top of the list. You will also find Sturgion and Hockey servers. They offer a
modified game of Netrek which is not completely tested, the advised game type remains Bronco.
Alternatively you can manually enter a server name with optional port number (e.g. luky.nl:2592) if you know where
the server is running. You also connect to a local server where you can play against robots. Your friends (on the same
lan can join your game by manually entering your ip number in the connection text field.
MacTrek users in your LAN should see your computer and you should see theirs automatically since MacTrek has
Rendezvous technology build in.
M a c Tr e k
14
Login permission
If MacTrek cannot connect to a server it will say so in the selected server field on the top of the page. It can take a while
to negotiate with the server. If you are permitted to login, the login button will be enabled.
RSA enabled servers
You will quickly discover that some servers have RSA encryption enabled. This means that the client (MacTrek) are
expected to respond to a crypto request (with the proper response) within a certain timeframe. Version 1.1.0 of MacTrek
supports RSA, but the corresponding key may not be installed at the server.
As a result, you may be kicked out of a server after some seconds. If you enabled voice over, you can hear the computer
tell you that you need a “spiffy, new RSA enabled client.”
M a c Tr e k
15
Entering a game
Logging in
Logging in is exactly what it sounds like. Each server records the statistics for every player. This allows you to earn
promotions if you perform better than the average player and log enough hours of netrek. (e.g for Lieutenant 2 hours
and a rating of 1, DI of 2.)
Selecting a team
Players can belong to one of four teams: The Federation, Romulans, Klingons, and Orions. Each team flies in different
ships but their characteristics are the same. The Federation occupies the lower left corner, the Romulans the upper left,
Klingons are upper right and the Orions in the lower right.
If you cannot select a team at all, either the server has reset on the end of the game, or you connected to a RSA enabled
server that does not have your key.
Logging in
Selecting a team and ship
Game entered
Selecting a ship
Selecting the right ship for you depends mostly how you play and what role you play. See the introduction chapter for
more details. Then click play to enter the arena.
M a c Tr e k
16
Playing a game
Computer
Dashboard
dialog
Player
List
Message
dialog
Other
Torps
Player
Message
List
Planet
You
Game-
Galactic
View
Map
The game in full action
Game view
The first thing that springs into view is called the game view. It is your main view on the action. Depicting yourself in
the center of the view at all times. It will show the ships, weapons when fired and the planets.
Each planet has a long name which appears on the local window, and a three letter abbreviation which appears on the
map. The color of the planet indicates its owner, which can be one of four team colors or gray for neutral.
Some planets will also have symbols near them. A person symbol means there are more than 4 armies on that planet
(and hence it can be bombed if it’s an enemy planet or beamed up from if its a friendly planet). A wrench symbol
means that the planet is a repair planet; while in orbit around this planet you will repair damage much faster that
usual. A gas can (looks like a sort of little box) means that the planet in question is a fuel planet, and you can refuel on
that planet. This is important, because although you regenerate fuel automatically if you are not constantly using it, a
fuel planet will fill you up much faster.
M a c Tr e k
17
Galactic map
The galactic map is a small version of the game view. It will show all players everywhere. You can use this window to
show the entire galaxy but you can also pan (by clicking command-left-mouse button at the requested center position)
and zoom (mouse wheel) to zoom in on an area of interest.
Status dashboard
The status dashboard shows you the current levels of primary systems e.g.
• Speed (in warp)
• Shield strength
• Hull strength
• Full
If these drop below 60% they will color Yellow, when they drop below 30% they will turn Red. (Speed works the other
way around, high warp is red)
The second part shows your secondary systems
• Torpedos left (based on flying torpedos and fuel level)
• Phaser strength (based of fuel reserve)
• Engine temperature
• Weapon temperature
• Armies on board
Armies on board can be:
• Gray, your ship has capacity but you do not have enough kills to fill this slot
• White, empty marine landing bay, waiting for armies to be beamed into
• Green, a landing bay filled with marines, eager to be dropped off
Computer dialog
From time to time the computer will need to pass some information to you, usually it is about it’s inability to control
more that 8 photon torpedo’s at the time, but there are also more use full remarks. If voice over is enabled, you will not
need to look at this dialog since the computer will read it out to you.
Player List
The player list shows who is logged in and playing. The name is preceded by the rank of the player which gives you a
reasonable idea if the player is a newbie or has logged 400 hours on this server. The little “+” marker in front of the
rank, means that the player has one or more kills and thus is able to carry troops.
M a c Tr e k
18
Message List
The message list shows, as you might have guessed, messages to everybody, messages to just your team and messages
to just you in them. Read messages! This is important. Netrek is a team game, messages to you or your team allow you
to interact and plot the downfall of an entire galaxy.
Message dialog
This is where you type your message to be sent to another player or a team of players. See the chapter on Settings how
to select a destination for your message. Then click in the message field and hammer away!
Important:
Enter will send your message but depending on your mouse position the dialogue remains focused, requiring you to
move your mouse into the game view or galactic map in order to return key control to the game.
M a c Tr e k
19
Charity
Why sponsor MacTrek?
MacTrek is open source. This means that it comes for free, but if you really like it and wish to show your appreciation
for a fine piece of software and a zillion hours of coding, please read on, you can make a difference to a lot of people by
even the smallest form of appreciation.
Who will benefit?
Chris and Judith Lukassen run a number of small projects in Ghana (West - Africa) to help the local population to help
themselves. All projects cost money, and various sources are applied, a hand full of dollars or euro’s will pay for those
schoolbooks, that leaky roof that needed to be fixed, the power regulator that will spare the classroom of computers
that are breaking down etc. etc.
Since 2002 we have run/participated in programs in:
• Yendi, building of a primary school
• Yendi, building of additional classrooms
• Kadjebi, training of computer maintenance staff, power regulation
• Jassikan, Palm Oil production training
• Techimann, Women Organization training
• Laptop project Volta Region
• Tamale, Widows and Orphans project
The unique connection with local organizations and friends makes it possible to cut away the middle layer that
contains the usual corruption and makes that the money is spent, there where it is needed most.
Setting up computer training
Palm Oil Production Training
Women Organization Meeting
How to sponsor?
You can use PayPal to send your donation to us. We will keep you posted as to what we have done with your money.
So you can also see it is well spent. Contact us through [email protected] for details.
M a c Tr e k
20
Appendix A: Kia’s Clue Guide
Valuable advise from Jan Sandorf, one of Europe's best players. A good read for the novice player, covering all basic
situations in Netrek.
Vocabulary
This might seem uneccessary, but I'm writing this for the novice player(s) as to the experienced ones. So here's a few
expressions used by players and what they mean.
Spacecontrol: This term is often used when assistance is needed near a planet, either because the enemy is preparing an
assault or that your team needs help clearing the enemy planet from enemy ships.
Twink: Often used by "experienced" players to name newbie players. I try not to use it myself (we were all there once).
LPS: Last Planet Stand. The enemies last planet which should be the worst possible one defending. Far away from the
enemy homeworld, and preferably not an AGRI or FUEL planet.
Scummer: A person that are mainly playing to get high stats and doesnt really care about his own team. This type of
player is also known as DI-scummer.
d++: This a very cryptic but useful way to describe that an enemy player is carrying armies. This particilour case (d++)
would mean that the enemy ship with the letter d has picked up 2 armies. A + indicates an army. b++++ would mean
that b has picked up 4 armies. This is also used when planets "pop", TAU++ means that there is excess armies at TAU.
Pop: This is a expression used when planets create new armies. This is often used to alert your teammates that one of
the enemy (or friendly) planets has armies that should be taken care of. This might mean bombing or picking up
(Ex."tau popped").
@: The '@' sign is used instead of 'at' because its shorter to type. "tau @ 5" is one way to indicate that there is excess
armies at the planet 'tau'.
DI: Means "Damage Inflicted"
Ogg(ing): When you OGG someone, it means that you try to kill a certain player by all means without caring about
your own ship, it's more or less a suicide attack. This attackform is mainly used against other players that carry armies
or that are potential carriers (see Ogging further down for more info).
Plock: A shorter word for Phasor Lock.
Core: The 4 planets closest to the homeworld and of course the homeworld itself.
Potential Carrier: A enemy player that has kills. Make sure to track this player to see if he picks up and then announce
it to the rest of your team (se above).
The way to become a "clued" player
First, there are no shortcuts. You have to play alot and get experience but here is a few hints that will help you on the
way.
• Look at the strategic map more than 50%, this is really important and you have to look at it even when dogfighting,
escorting and/or taking planets.
• Look at the playerlist every now and then, this to see which of the enemy players that are potential carriers. Keep an
eye at those players with kills and keep track on them if they pick up armies, dont forget to alert your teammates.
M a c Tr e k
21
• You have to keep an eye at the message window as well, this to see if any of your teammates has spotted a enemy
carrier or if your team needs help escorting etc.
• When you died and your ship 'res' in at the homeworld, don't just rush at maxwarp to the front and then start to
think about what to do. Check if there is anything important that you could do to help your team right away as you
appear at the homeworld.
• Helping a friendly carrier thats in trouble in your own core. This could mean checking the enemy SC bomber to help
save a pop or to simply kill him off before he can hurt your carrier.
• Check if there is a friendly ship thats leaving the front to move back to pickup. Move in his direction to be able to
help him if he's beeing ogged, if there is a ogger you might be able to pick up an easy kill. Anyway, since he's leaving
the front your presence there will probably be needed, controlling etc.
Dogfighting
Maneuvering: When dogfighting you need to keep changing your speed, this will make it much harder for enemy
ships to calculate where to aim at. Most of the time I fly at warp 2 dodging and turning all the time, this combined with
sudden rushes and speed changes works really well for me. Remember to 'det' torps that you cant dodge, better to 'det'
them than letting your shield/hull take a real beating. I also use 'det' to create "holes" in torpedostreams, which I can
dodge through.
Fire: I Never fire 8 torps salvoes unless I'm 100% sure to hit something, it costs a lot of fuel and you cant afford running
out of fuel when that enemy ogger might be coming at you with warp 9. I fire 3-5 torps at the time carefully aimed, use
your phasor when you get within the 15-20 pts range. (Remember to use pressor if you get too close to him, explosions
hurt)
Damage Control: This is something that's very hard to do, especially if you're a new player. Since a ship repairs BOTH
its hull and shield at the same time it's really beneficial to be able to take some damage in the hull and the rests on the
shield. The really hard thing is to figure out HOW much damage you can allow on the hull since damage to your hull
lowers your maxwarp as well. Of course damage control in the smaller ships, DD, SC is questionable, I've never done it
in any other ships than the CA, BB and SB.
Hints: Remember to count the hits inflicted on the opponent. Lets say I fly a cruiser (CA) and I dogfight an enemy
cruiser, I hit him with 3 torps (each makes 40 points of damage) + a 20 points phasor I know that he's almost done for
(140 points of damage from his total of 200), another 60 points and he buys the farm.
At all times remember to conserve fuel, fuel is more vital that most people realize. A ship without fuel is a sitting duck
(more or less). Remember to keep your shields down as much as you can, it saves alot of fuel.
The most important thing tho is keeping one eye at the strategic map, this to avoid enemy oggers and most important
to spot cloaked enemy planettakers coming your way.
Escorting
Position: This is a little different from case to case. If your team is about to take a frontline planet then try to clear that
planet from enemies. If there are no enemies around move up a bit and stay between the closest enemy and the planet.
Then you have ground to fall back on and buttorp any onrushing defenders.
Core takes is a little different tho, then you should wait for your taker to get ready and together with him and the other
escorts move in and push them off the planet. Never rush off to the planet ahead of all the others that will only alert
enemy defenders and you will find your- self outnumbered and killed (to no use). Stay between the enemy and your
planettaker and remember to 'det' torpedoes heading towards him.
M a c Tr e k
22
Of course all the above is depending on the situation
When escorting a taker be agressive (No don't run at warp 9 towards the enemys buttorps) put preassure on the
defenders by shooting torps and phasors. If you're outnumbering the defenders mutualing with them is a good option,
but remember the longer it takes to clear a planet the more defenders will arrive.
Hints: After your team has taken the planet it will be very wounerable so you and your team has to defend it right after
the take. This applies especially to AGRI planets wich will "pop" very fast, stay close and protect the planet it pays off.
Planet defense
Position: When defending planets the most important thing is to keep track of the enemy planettakers, use the strategic
map to keep an eye at cloakers. When you notice an assault against a planet in your sector alert your teammates (use
team message line) and move to the planet fast. If the enemy planettaker has escortships with him you have be very
good at delaying them so your teammates can get there in time. I prefer to ignore the escort (if I have 1:2+ in odds) and
just cloak and go for the carrier. I have found that this slows the planettaker more than if I would have stayed at the
planet and tried to dogfight his escort(s).
If alone at a planet thats under assault by multiple enemies, DISTRESS and then DELAY the take, Stay alive, lob torps,
phasor, look threathening, the important thing is to get more defenders there in time to stop the take, its unessential
who gets the carrier in the end as long as you stop their take.
Hints: When I notice a lonely cloak coming my way I wait with firing at him. I wait for him to make his move towards
the planet (remember he's the one running out of fuel) and then I blast him into pieces with phaser and torps.
If you fire like a madman at him wasting all your fuel he will dodge and when he sees that you're out of fuel he goes in
and takes/bombs the planet and you cant do shit about it. Remember to keep a cool head, with this tactic I have nailed
lots and lots of carriers.
Another thing, when you have fired your torps at the cloaked carrier or over the planet and you score no hits, 'det' your
own torps and fire again. Don't let him get that second or two until you can fire again, this might be the thing that saves
your planet or not.
Planet taking
Planets: When taking planets you have to choose the most strategic planet to take for your team. The enemy AGRI
planets are prime targets since they can produce more armies than an ordinary planet. Other important planets are of
course fuel and repair planets in the frontline. Be flexible, if you see that the planet of your choice is too heavily
guarded switch to an easier target and get it before they knew what happened.
Ships: Depending a little on what kind of planet you about to take you should chose the ship thats most qualified for
the mission. I tend to use the CA when taking frontline planets and the 3rd space planets. When going into their core I
usually use the DD bacause its good maneuvrability and feint and dodge my way though while remaining cloaked. For
LPS situations the AS ship is probably the best choice. Because of its extra hull you will get that extra half a second to
beam down that extra army and that really counts. The AS also has a great cloaking ability. Scouts are perfect in the
engame as well, use the SC to sneak in and drop armies on whatever planets the enemy has left. That will weaken their
defenses and give them less armies to use for retaking planets.
When carrying in the CA I help my escorts clear the planet instead of just cloaking, this really speeds up the take and
you will be able to take the planet before more defenders can arrive. Learn to dogfight well and use it while you're
carrying.
Oggers: As soon as you have 2+ kills you are a hot target for enemy oggers, and they'll be coming at you until you're
dead. This is when the strategic map comes in real handy, keep an eye at cloakers coming your way and as always alert
M a c Tr e k
23
your teammates that you are carrying and might need help. If there is only 1 cloaker coming at you at the time you will
probably manage all by your self, the trick is to NEVER run out of fuel. Basically I keep to 2 simple strategies:
1.
As I see the cloaker coming my way I remain at speed 3-4 moving slowly away from him, when he gets
real close (just about to uncloak) I press maxwarp, turn at a 90 degree angle from him, and use pressorbeam at him (if
he has uncloaked) and buttorp him. Try to cripple him instead of just killing him, if you cripple him he will sit
damaged in your core and just watch you go for the take without beeing able to do anything. Remember to 'det' his
torps if it looks as if they're going to hit.
2.
Just cloak and run at a 90 degree angle away from him. The best thing is if you can sneak by him and
charge against a planet and take it before he gets there.
Hints: Remember to cloak when you go in to take the planet, if you're not enemy pressors and tractors will pull you out
of orbit and they'll shoot you and your valuable armies into atoms.
If you are moving in towards an enemy planet and an enemy comes acing towards you firing all that hes got, slow
down let him waste all his fuel at a target he believes is orbiting the planet. When his torps has passed move in and
take the planet.
If I see a torpstream coming right at me while I'm beaming down I quickly raise my shield, 'det' them and continue
beaming down, this might give me that extra second I need to finish the planettake instead of getting blasted right
away.
There is a neat trick that might work from time to time. If I'm moving in towards a planet cloaked and the defender
starts to fire torps at the planet (hoping for the lucky shot) I 'det' the single torp and he usually thinks that was a hit on
me and fires all hes got at that spot, then move in and get the planet before he understands that he's been had.
I mentioned earlier that speed is important, always make sure that you know where you are going even BEFORE you
have picked up armies. When I'm moving back to pick up armies at our rear planets I check the enemy planets to see
how many armies they have defending. This really saves a lot of time when you know where you are going at same
moment as when you have picked up.
When the enemies are getting down to less than 6 planets and you see that your team has a advantage, its time to
choose the enemies LPS. This can of course be determined earlier but its hard sometimes to take exactly those planets
that you want. The LPS should not be the enemy homeworld or a fuel planet if it can be avoided, the further away from
the homeworld the better. Why? you might ask. First, all killed enemy ships start close to the homeworld which makes
it very hard to get, second dont leave them a fuel planet where they can refuel their empty tanks.
When an enemy carrier has taken a planet and you arrive 2 seconds too late to do anything about it (and you're
carrying yourself) there is a trick that might work. Fly at maxwarp against the enemy planettaker as if you are about to
ogg him, cloak when you get into the same screen as him. This might scare him away from the planet and then you
quickly reduce your speed move in and take the planet before he knows that he's been cheated.
M a c Tr e k
24
Ogging
Ship: Chosing the ship is a little depending on the target, I mostly use the cruiser (CA) because it's torps and phasor are
more powerful than the destroyer (DD). SCs are really neat to ogg with too but then you have to use a little different
tactic.
Timing: Picking the time and opportunity is 50% of the ogg. Usually the best time is when the person has his mind at
other things, like dogfighting or picking up armies.
Conducting (with CA): If there is no real hurry I pick my target and move to a spot that isn't too far away from him,
then I wait for the right time to move in. Then I cloak and move in at him at maxwarp, if I see that he hasn't spotted me
(he's not fleeing) I keep at maxwarp just until before I uncloak. Then when uncloaking I get him with my tractorbeam
and hit him with the phasor and torps. Remember to 'det' his incoming torps this will get you the last inch all the way
in on him, this to get him in your explosion if you havent got him already.
If he sees me while I'm moving in and he starts moving away I slow to warp 4-5, this to make me able to dodge his
torps. I then chase him down while switching between maxwarp and warp 4-5. Keep a good look at your fuel, you
have to have about 2000 left to be able to finish the ogg.
Conducting (with SC): The SC ogger has to be more patient, the best time to ogg in a SC is when the taker is just about
to start orbiting. Hang around the planet he's about to take (Stay cloaked and circle at low-medium speed) and when
he moves in to take your rush in and kill him. If you're a bit lucky the escorts will blow you up on him as well
Another good opportunity to SC ogg a taker is when your defenders have scared him off from a take and are chasing
him back towards his core your approach him from the opposite direction as his persuers and you will be able to catch
him a bit off guard or without fuel.
Hints: Sometimes I chose just to neutralize a player that I know is carrying by just keeping track of him and whenever
he moves to the left to find a way through I move to the left flank cutting him off etc etc. Sooner or later he gets careless
and might gamble and go for a planet anyway and then he's all yours.
Base ogging
When ogging a starbase you will probably need the whole team or a large part of it. The key to a successful baseogg is
coordination and determination.
Coordination: The best thing is to use the message line and call for a baseogg, like: "get in position for a baseogg sync
with Rf". Then its the player Rf that calls the ogg, when he cloakes and moves in so does does all the others. It's really
important that the player that is leading the ogg waits for all to get in position, if the timing is really good and enough
oggers get through the base will probably be at warp 1 or maybe even dead.
Conducting: I use 2 different tactics when ogging a base, either I conduct a ordinary ogg, uncloak, tractor, phasor and
torps or I try to get all the way into the base (ontop of him) and then uncloak. By doing the latter you will surely get
him in your full explosion (100 pts of damage) plus any torps/phasors you can fire before you die.
Repeat the coordination and conducting phases until the base is dead. If the defence around the base gets too thick
there might be a good idea to abort the ogg, there is no point in giving away kills unless you can get through to the
base.
Hints: There is always a good idea if your team combine the ogg with 1 or 2 plinkers, this to keep the base attention on
other things than the strategic map.
M a c Tr e k
25
Do not lock on to the base when you're about to ogg, your ship will automagically slow down as to dock (even tho it's
an enemy ship) and you might not get all the way into the base because of that.
Base defense
As a basedefender you have to be real observant for cloaked enemy ships and be quite handy with the phasor and you
have to be willing to sacrifice yourself for the base.
Positioning: I want my defender to be at my side or at one of the sides just infront of me. This will enable me to use the
pressor/tractor on him so I can dodge torps and he can help me 'det' a few torps now and then. The worst thing is
people hiding behind the base thinking its some kind of undestructable fortress.
Ships: When playing as a basedefender you have to be careful with your fuel consumption, I try to fly the cruiser (CA)
or destroyer (DD) because they have a better fuel recoverance rating than a battleship (BB).
Hints: If the base is really hurt you can help him by towing him towards a homeplanet so he can repair.
If you stay real close to the base you can help him 'det' enemy torps when he's getting ogged, the hard thing with this is
to avoid blowing up on your base.
As soon as you get the chance refuel at the base (if you need it) and always try to have full fueltanks before each new
oggwave.
Try to have a few players breaking up the wave a bit ahead of the base, instead of just sitting at the base and wait for
them, a combination of both seem to work best.
Bombing
Tactics: I prefer to look at bombing as 'initial' and 'non-initial'. The initial bombing is the first stage in a new game when
your side has to bomb all the enemy planets, the planets will then contain around 30 enemy armies or so (this might
vary from server to server). The non-initial bombing is the continous bombing that occurs during a game, where the
purpose is to keep the enemy planets clean from armies.
Ship: This is the part when it comes to personal preferences and of course the time in the game. In the initial phase of
the game I play the assaultship (AS) mostly because of its excellent bombing capability, but also because when the
enemy planets have close to 30 armies it hurts to be orbiting.
After all the enemy planets have been bombed its time to switch to the non-initial bombing tactic, this is when your
team has 1 person dedicated as a lone bomber keeping the enemy short of armies. At this stage I fly the scoutship (SC),
its great speed makes it perfect for the job. When playing the SC bomber role try to keep away from the enemy ships,
your role is to bomb NOT to give away kills to the other team.
Hints: When moving in to bomb a planet cloak, the reason for this is the same as when taking planets, you don't want
enemy ships to pull you out of orbit when you are bombing.
When playing the scout-bomber be smart and use the scouts great speed and maneuvrability to feint your opponents.
Pretend to be heading for one planet (you are cloaked of course) and then when the defenders come racing, switch
direction and move to the alternative target and bomb it. Then when they come at you again you do the same thing
again, staying out of the enemies tractor range is critical.
The same sneak tactics apply to bombing as those to planettaking, cloak and feint your opponents. Be smart don't give
away kills just to bomb that extra army unless the other team is real short of armies. If they have no armies they can
have all the kills in the world.
M a c Tr e k
26
Note) When defending armies at your own rear planets you have to take care of that enemy scout, either by just
controling the space and not letting him bomb or by ogging him. The ogging part is pretty easy, the key is to get him in
your tractor beam. As soon you get him in the tractor start phasoring him to death, don't waste fuel on torps because
they will surely miss. Remember to 'det' his torps when you are ogging him.
Basing
When playing a starbase you can be a asset to your team or a pain in the ass. The worst thing is a base that needs 3+
permanent defenders all the time and still needs to go and repair every now and then, all you do then is occupy a slot
in your team and are more a burden to the team than an asset. A good baseplayer should be able to manage with 1
defender, unless he's beeing heavily ogged.
Positioning: I have seen everything from bases "idling" in the core to real frontline bases, what is best can probably be
debated for years. I think the base helps the team better if he plays an aggressive role, I try to place myself at the
middle planet of our frontline together with 1 defender. There I can help my team with refueling, refitting and
spacecontrol.
Plinkage: This can be really annoying for a base, this is when your defender(s) are really useful. Use your tractor and
pressor beam on your defending ships (of course you can use enemy ships as well), this combined with your warp 2
will really help you in dodging those torps.
If you are under heavy plinkage (2 or more ships) it hurts to be 'detting' all the incoming torps, sometimes it might be
better to suck a few torps rather than to 'det' them all. Try to 'det' the first torps at maximum range, this might open up
a hole in the torpstream and then dodge through, all this depends on the situation.
Don't get too engrossed in dodging plinkers so that you miss the 4 cloaked oggers coming in at you, keep a good look
at the strategic map.
Oggers: When playing starbase you have to keep a good look at the other team to see if they are preparing for a
baseogg, and if so call upon your defenders before its too late. There are some signs that might help you in predicting
when a baseogg is imminent.
•
If the enemy team are killflat (or almost).
•
You notice that the enemy SC has stopped bombing and are sorta "waiting" instead of bombing.
•
There are enemy ships spread out in a nice semi-circle around you.
•
When a large part of the enemy team are cloaking at the same time near you (at this time its probably too
late).
First when you are under heavy ogging the most important thing is to NEVER get wtemped, if you do get wtemp you
have probably used the phasor and plasma too freqvently. I try not to fire the phasor unless I'm pretty sure that I'll hit
something.
I try to keep a neverending stream of torps in the air all the time this to help my defenders to find the cloaked vessel
before he gets too close. This combined with a few plasmas is usually enough to get 2-3 of the oggers out of business.
Then when the first enemy ship uncloaks I hit him with the pressor, this will give me higher speed and make it harder
for the others to hit me with their torps, and of course I don't want his explosion all over me.
Now the hard part begins, try not to panic and phasor at the closest enemy and detting all that is fired at you, keep
firing at the other nearby cloaks while dodging or detting the pressored enemy torps (I never said basing was easy). All
of the above depends on how syncronized the oggers are, if they are really synced you will take a serious beating no
M a c Tr e k
27
matter how good you are. The important thing is to survive the first wave so that you can get more defenders there to
defend you. Remember to send distress to your team so that they can see your status if you're hurt.
Hints: Even tho the starbase is the most powerful ship and can take a real beating, be cautious and dont go too deep
into enemy space unless you have defenders at your side. It's been so many times that I've seen a good base get plinked
to death in enemy space after his defenders got blown away. Ie know your limits.
Help damaged teammates by tractoring them out of danger and by letting them repair at you. Dont do this unless
you're sure that you wont get him blown up all over you.
Don't steal kills from the other players of your team, you can't do anything with your kills so let the other players get
the kill instead.
General questions
Q) When playing a LPS-game, Why shouldn't I bomb AGRI planets close to my own LPS/homeworld? (this is within
reason, if the planet has 8+ armies bomb it down to somewhere around 5-7 armies)
A) Because when your last planet pops you will get 1-3 armies, then you should bomb the closest planets with a
assaultship (AS) and try to get them down to 1-3 armies defending, then you can take the planet even tho you had so
few armies. If you bomb continously the AGRI planets will pop back up to 4 armies in no time.
Note) This goes for the offensive side as well, pick up armies of the planets closest to your enemies, this to prevent
them from bombing the planet to less that 4 armies. In this case it doesnt matter if you get killed while carrying.
Q) How do I know if a player with kills have picked up armies or not?
A) First, if you look at the strategic map and see a player with kills orbiting one of his own planets with armies its a
pretty sure sign that he has picked up armies. The best way tho is to keep track of those players that has kills and check
the armies at planet he's moving to with 'i' then you see if he's picking up or not. Ships that pickup armies also tend to
blink at the galactic when they pickup.
Note) Set your galactic and tactical map to show resources.
Q) how do I get phasor lock on cloaked players?
A) The key is the strategic map, set the galatic updates to 'frequently' then when you get the update (the ships move on
the galactic) you phasor at the cloaker.
I used to phasor at the galactic screen but I had trouble moving the cursor back to the tactical screen and maintain the
lock. So now I watch the galactic for the update and phasor at the tactical and that seem to work really well now.
Q) Why should i help anyone else in my team, it doesnt give me any DI?
A) The team that plays together and help eachother will win in the end. If you help other players you will soon find
that they will come to your aid when you need it. DI-scummers will get less and less help and in the end he wont get
any help at all.
Note) I have seen teams with several high ranked players play as individuals and lose BIG. Keep your team together
and use the team message-line to communicate and you will win.
M a c Tr e k
28
Summary
Well I hope this has helped you in some way to improve your netrek playing. It's not sure that all this will work for you
but I think what I have mentioned in this document covers the basics and holds some advanced hints/help as well.
-KIA ([email protected])
Don't argue with a fool because he might be doing the same thing!
M a c Tr e k
29
Appendix B: License
MacTrek - Copyright (c) 2007 Chris Lukassen
Preamble
The intent of this document is to state the conditions under which a Package may be copied, such that the Copyright
Holder maintains some semblance of artistic control over the development of the package, while giving the users of the
package the right to use and distribute the Package in a more-or-less customary fashion, plus the right to make
reasonable modifications.
Definitions:
"Package" refers to the collection of files distributed by the Copyright Holder, and derivatives of that collection of files
created through textual modification.
"Standard Version" refers to such a Package if it has not been modified, or has been modified in accordance with the
wishes of the Copyright Holder as specified below.
"Copyright Holder" is whoever is named in the copyright or copyrights for the package.
"You" is you, if you're thinking about copying or distributing this Package.
"Distribution fee" is a fee you charge for providing a copy of this Package to another party.
"Freely Available" means that no fee is charged for the right to use the item, though there may be fees involved in
handling the item. It also means that recipients of the item may redistribute it under the same conditions they received
it.
Clauses:
1.
You may make and give away verbatim copies of the source form of the Standard Version of this Package without
restriction, provided that you duplicate all of the original copyright notices and associated disclaimers.
2.
You may apply bug fixes, portability fixes and other modifications derived from the Public Domain, or those made
Freely Available, or from the Copyright Holder. A Package modified in such a way shall still be considered the
Standard Version.
3.
You may otherwise modify your copy of this Package in any way, provided that you insert a prominent notice in
each changed file stating how and when you changed that file, and provided that you do at least the following:
a)
place your modifications in the Public Domain or otherwise make them Freely Available, such as by posting
said modifications to Usenet or an equivalent medium, or placing the modifications on a major network
archive site allowing unrestricted access to them, or by allowing the Copyright Holder to include your
modifications in the Standard Version of the Package.
b)
4.
notify the Copyright Holder of your change
You may distribute the programs of this Package in object code or executable form, provided that you do at least
ONE of the following:
a)
distribute a Standard Version of the executables and library files, together with instructions (in the manual
page or equivalent) on where to get the Standard Version.
b)
accompany the distribution with the machine-readable source of the Package with your modifications.
c)
make other distribution arrangements with the Copyright Holder.
M a c Tr e k
30
5.
You may charge a distribution fee for any distribution of this Package. If you offer support for this Package, you
may charge any fee you choose for that support. You may not charge a license fee for the right to use this Package
itself. You may distribute this Package in aggregate with other (possibly commercial and possibly nonfree)
programs as part of a larger (possibly commercial and possibly nonfree) software distribution, and charge license
fees for other parts of that software distribution, provided that you do not advertise this Package as a product of
your own. If the Package includes an interpreter, You may embed this Package's interpreter within an executable of
yours (by linking); this shall be construed as a mere form of aggregation, provided that the complete Standard
Version of the interpreter is so embedded.
6.
The scripts and library files supplied as input to or produced as output from the programs of this Package do not
automatically fall under the copyright of this Package, but belong to whoever generated them, and may be sold
commercially, and may be aggregated with this Package. If such scripts or library files are aggregated with this
Package via the so-called "undump" or "unexec" methods of producing a binary executable image, then
distribution of such an image shall neither be construed as a distribution of this Package nor shall it fall under the
restrictions of Paragraphs 3 and 4, provided that you do not represent such an executable image as a Standard
Version of this Package.
7.
C subroutines (or comparably compiled subroutines in other languages) supplied by you and linked into this
Package in order to emulate subroutines and variables of the language defined by this Package shall not be
considered part of this Package, but are the equivalent of input as in Paragraph 6, provided these subroutines do
not change the language in any way that would cause it to fail the regression tests for the language.
8.
Aggregation of the Standard Version of the Package with a commercial distribution is always permitted provided
that the use of this Package is embedded; that is, when no overt attempt is made to make this Package's interfaces
visible to the end user of the commercial distribution. Such use shall not be construed as a distribution of this
Package.
9.
The name of the Copyright Holder may not be used to endorse or promote products derived from this software
without specific prior written permission.
10. THIS PACKAGE IS PROVIDED "AS IS" AND WITHOUT ANY EXPRESS OR IMPLIED WARRANTIES,
INCLUDING, WITHOUT LIMITATION, THE IMPLIED WARRANTIES OF MERCHANTIBILITY AND FITNESS
FOR A PARTICULAR PURPOSE.
M a c Tr e k
31
Derived Licences
JTrek - Copyright (c) 1997 Robert Temple
Permission to use, copy, modify, and distribute this software and its documentation for any purpose and without fee is
hereby granted, provided that the above copyright notice appear in all copies and that both that copyright notice and
this permission notice appear in supporting documentation. No representations are made about the suitability of this
software for any purpose. It is provided "as is" without express or implied warranty.
Xtrek - Copyright (c) 1986 Chris Guthrie
Permission to use, copy, modify, and distribute this software and its documentation for any purpose and without fee is
hereby granted, provided that the above copyright notice appear in all copies and that both that copyright notice and
this permission notice appear in supporting documentation. No representations are made about the suitability of this
software for any purpose. It is provided "as is" without express or implied warranty.
Netrek (Xtrek II) - Copyright 1989 Kevin P. Smith
Permission to use, copy, modify, and distribute this software and its documentation for any purpose and without fee is
hereby granted, provided that the above copyright notice appear in all copies and that both that copyright notice and
this permission notice appear in supporting documentation. No representations are made about the suitability of this
software for any purpose. It is provided "as is" without express or implied warranty.
COW (BRM) authors (including but not limitted to: Kevin Powell Nick Trown Jeff Nelson Kurt Siegl)
Permission to use, copy, modify, and distribute this software and its documentation, or any derivative works thereof,
for any NON-COMMERCIAL purpose and without fee is hereby granted, provided that this copyright notice appear in
all copies. No representations are made about the suitability of this software for any purpose. This software is
provided "as is" without express or implied warranty.
M a c Tr e k
32