1
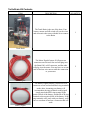
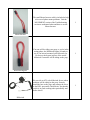
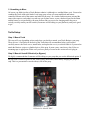
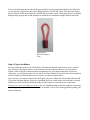
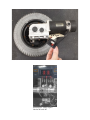
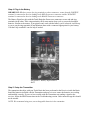
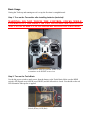
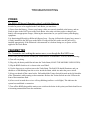
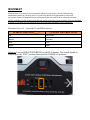
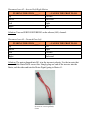
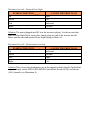
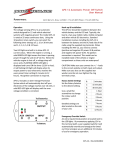
TurtleRC Turtle Brain Model A
Instruction Manual
V1.0
WARNINGS
Keep your hands off the control sticks when powering on the Brain or Transmitter.
Always use a functioning killswitch if someone will be riding on your prop.
PRACTICE driving your prop in a safe area away from people until you understand how it
moves and reacts.
Turtle Brain Kit Contents
ITEM
DESCRIPTION
QUANTITY
The Turtle Brain is the star of the show. Your
battery, motors and kill switch will use the wires
and accessories that come with this kit to connect
to the Brain.
1
The Motor Pigtails feature 45A Powerwerx
connectors on each end. One end will plug in to
the Brain's M1 or M2 connector, and the other
will plug in to the motor. You may have to cut one
end off and use wire nuts to make the connection
to your motor.
2
Turtle Brain
Motor Pigtail
The Battery Pigtail features a Powerwerx 45A
connector on one end and red/black ring terminals
on the other. Assuming your battery will
accommodate the ring terminals on the pigtail,
simply attach the RED ring terminal to the
positive block of the battery, and the BLACK ring
terminal to the negative block of the battery. If the
ring terminals won't work with your battery, you'll
have to cut them off and use a connector that will
work.
Battery Pigtail
1
The small Motor Inverter cable is included to help
solve out-of-phase motor problems. Visit the
MOVEMENT section of the Troubleshooting
section to understand when and how to use the
Motor Inverter.
1
If no one will be riding your prop, or you're in the
testing phase, the Killswitch Bypass is handy to
use if you haven't mounted your killswitch yet.
Do not use the bypass in place of the actual
killswitch if someone will be riding on the prop
1
We provide an ATV style killswitch for use when
someone will be riding on the prop. Securely
install the base to the prop, and connect the wires
to the KILL port on the Turtle Brain. Test that the
switch is in good working order periodically and
before shows.
1
Motor Inverter
Killswitch Bypass
Killswitch
How to Use This Guide:
Congratulations on your purchase of a Turtle Brain! Although the Brain is super easy to use, we hope
you'll read through these instructions for some important usage and safety tips.
Requirements:
In order to make something move, you'll need three thing in addition to the Turtle Brain
1. Motors and Wheels
Acknowledging that our Turtle Brain is just that, a 'brain', we need to have something to control. In this
case, the 'brain' is controlling 1 or 2 brushed DC motors. Most configurations will have 2 motors in a
'differential drive' format – the motors spin separately which allows whatever you are driving to change
direction by varying rotation of the motors, instead of relying on any kind of steering mechanism.
Motor Specs:
Specification
Amperage (A)
Continuous Output Current
32A
Peak Output Current
Fused at 40A
Typically, the motors and wheels used in electric wheelchairs work extremely well with the Turtle
Brain. These motors are quiet, robust, capable of carrying heavy loads, and fit within the specifications
of the Brain. Additionally, several of the wheelchair motor options already share the same connectors
used on the Brain. If you need help locating good used motors, visit the FAQ section of turtlerc.com.
One additional benefit of using wheelchair motors is they typically come with wheels in addition to the
motors themselves. Otherwise you'll need to find wheels that will work with your prop and motors.
2. Battery (and necessary charging equipment)
In order to power the Brain and the motors, you'll need some kind of portable power source. We'll get
the technical specs out of the way first:
Specification
Input Voltage (Battery
Voltage)
Min Voltage (V)
Typical Voltage (V)
Maximum Voltage (V)
6
12 or 24
33.6
Marine or powered wheelchair batteries are great options for powering the Brain and the motors, and
typically come in a 12V format. Visit the FAQ section of turtlerc.com to view recommendations on
tested battery styles and brands. In addition to the battery itself, you'll need some means of charging it.
Select a charger sufficient for the voltage of the battery you've selected, and one that will maintain the
health of the battery over several charge/discharge cycles.
3. Something to Move
Of course you didn't just buy a Turtle Brain to admire it (although we wouldn't blame you). You need to
combine the Turtle with some kind of cool stage prop or item you want mobilized and remote
controlled. Mount each of the motors and wheels from step 1 in a similar fashion (motors oriented the
same with respect to each other) to avoid any out-of-phase issues, create a sheltered spot for the Brain
and the battery to sit (preferably with some airflow and easy access for charging and to the power
switch), securely mount your kill switch (if someone will be riding on your platform), and you're good
to go!
Turtle Setup:
Step 1: Mount Turtle
This step will vary depending on how and where you decide to attach your Turtle Brain to your prop.
There are two ¼ inch holes in the back of the Turtle that will accommodate bolts (you'll need to
carefully remove the Turtle cover, install bolts, and replace the cover), or a thick cable tie if you need to
attach the Brain to a pipe or cylindrical piece of the prop. In some cases, some heavy duty Velcro or
mounting tape is appropriate. Make sure you leave plenty of room for the various wires to plug in.
Step 2: Mount & Install Killswitch (or Bypass)
We highly recommend that if someone will be riding on your prop that you use the killswitch option. If
the pull cord is removed, power to the Turtle will be deactivated, immediately bringing the prop to a
stop. This is a precaution in case the rider(s) fall off the prop.
Illustration 1: Port for
Killswitch is labeled 'KILL'
If you won't be having anyone ride on the prop and don't see any practical benefit from the killswitch,
we also provide a bypass loop that can be plugged directly into the KILL Port. This shorts the battery
directly into the Turtle motor controller, and will always remain closed. The bypass loop is also helpful
during testing of props that would normally be ridden but are unmanned during technical rehearsals.
Illustration 2:
Killswitch Bypass
Loop
Step 3: Plug in the Motors
How you attach the motors to the Turtle Brain will ultimately depend on the motors you've selected.
Lots of electric wheelchair motors use the same Powerwerx connectors that we use on our Motor
Pigtails, which will make connecting them straightforward. If your motors don't have Powerwerx
connectors, you will likely need to cut one end of our Motor Pigtail off, strip off some of the insulation
from the Pigtail and from the Motor wires, and use wire nuts to connect them.
Once you have your motors connected to the Pigtails, plug one of them into M1 and the other into M2.
If you later determine that the Turtle isn't responding how you would expect (left and right or forward
and back reversed) check the Troubleshooting section for how to correct the motor connections.
Having issues with connecting your motors? See the Troubleshooting section for problems with motors
not moving in the correct direction, or the FAQ at turtleRC.com if you're having problems getting your
motors connected.
Illustration 3: Powerwerx Connectors (Red and Black) are standard on some motors
Illustration 4: Motor inputs
labeled M1 and M2
Step 4: Plug in the Battery
IMPORTANT: Whether you use the ring terminals or other connectors, ensure that the POSITIVE
terminal is connected to the wire leading to the RED Powerwerx connector and the NEGATIVE
terminal is connected to the wire leading to the BLACK Powerwerx connector.
The Battery Pigtail we ship with the Turtle Brain has Powerwerx connectors on one end and ring
terminals on the other. These ring terminals will fit most marine deep-cycle or powered wheelchair
batteries. Similar to the motors, if our pigtail won't work with the battery you've selected, it will be up
to you to cut the ring terminals off and terminate them with a connector appropriate for your battery.
Visit the FAQ at turtleRC.com for help if needed.
Illustration 5: Battery Input Labeled
BATT
Step 5: Setup the Transmitter
The transmitter that ships with your Turtle Brain has been pre-bound to the Receiver inside the Brain.
Install the batteries included with the Transmitter and power it on to ensure the batteries are working
and installed correctly. If you ever have trouble with the Transmitter not sending a signal to the
receiver, follow the BIND instructions in the Troubleshooting section. Under normal usage this should
not be needed.
NOTE: We recommend using new, non-rechargeable batteries in the transmitter.
Basic Usage
Getting the Turtle up and running once it's set up the first time is straightforward.
Step 1: Turn on the Transmitter after installing batteries (included)
WARNING: DO NOT TOUCH THE CONTROL STICKS WHILE
POWERING ON THE BRAIN OR THE TRANSMITTER. DOING SO
MAY CAUSE SUDDEN UNCONTROLLED MOTION OF THE PROP.
Illustration 6: Push the POWER button on the
transmitter to the RIGHT to turn it on
Step 2: Turn on the Turtle Brain
Use the big power switch to apply power from the battery to the Turtle Brain. Make sure the BIND
switch is off (flipped away from the word 'BIND') and the killswitch is closed. You should see the red
LED illuminate when power is applied.
Illustration 7: Power Switch (Orange), BIND
Switch (White), LED (Red)
Step 3: Use your RC Prop!
That's it! Once everything is powered up and all the connections are configured properly, drive the prop
with the RIGHT thumbstick on the transmitter. Be careful here, depending on the style and mounting
locations of the motors, it may not take much stick movement at all to make big movements with your
prop.
BE SURE TO PRACTICE DRIVING YOUR PROP! This step is very important. While we've made
every attempt available to us to make the Turtle a safe product, the responsibility for USING it safely
rests in your hands.
TROUBLESHOOTING
POWER:
The RED LED doesn't illuminate when I switch the Brain on.
In order for power to be supplied to the Turtle Brain, you must have:
1) Power from the Battery – Ensure your battery cables are correctly installed at the battery, and are
firmly in place in the BATT port on the Turtle Brain. Also make sure that you have charged your
battery with an appropriate charger, following the instructions for you specific battery and charging
equipment.
2) A functioning Killswitch or Killswitch Bypass Loop – If using a killswitch or bypass loop, ensure it
is firmly installed in the 'Kill' port on the Brain. If using a killswitch, make sure the pull cord is
installed appropriately. If the killswitch is disconnected or is broken during use, no power will be
applied to the Turtle Brain.
TRANSMITTER
The Transmitter isn't making the motors move, even though the Red LED is on.
In rare cases you may need to re-bind your Turtle Brain to it's transmitter. To do so, do the following:
1) Turn off everything.
2) Plug only the battery and killswitch into the Turtle Brain (LEAVE THE MOTORS UNPLUGGED).
3) Flip the BIND Switch so it is closest to the word 'Bind'.
4) Use the large power switch to turn on the Turtle Brain. The Red LED should illuminate, and you
should see a faint blinking from the receiver inside the Brain, which sits under the power switch.
5) Keep your hands off the control sticks. Pull and hold the Trainer Switch (located on the left shoulder
of the Transmitter) while turning on the transmitter. Release the Trainer Switch once the LEDs on the
front of the transmitter flash.
6) After several seconds the receiver will stop blinking (and have a solid light). This indicates the
system has established a connection.
7) Turn off the BIND plug and the main power switch to the brain. At this point your Brain should react
to incoming transmissions from the transmitter.
MOVEMENT:
Because there are so many ways to mount the motors to your props, you may end up having
mismatched control of your prop at first. If your Prop doesn't react appropriately to the stick
movements, follow the diagrams below to determine what you need to do to correct the situation.
NOTE: Sometimes it may require more than one tweak to get your system working. Solve one problem
at a time. If you don't see your situation here, check the FAQ at turtleRC.com or contact us.
Movement Issue #1 – Inverted Forward/Back motion
PUSHING THE STICK ____...
...CAUSES THE PROP TO GO
Up
Backward
Down
Forward
Left
Left
Right
Right
Solution: Turn on SERVO REVERSING for the ELE channel. The switch should be
clicked up to the “REV” position (instead of the NOR(MAL) position)
Illustration 8: Example of servo reversing enabled on the ELE channel
Movement Issue #2– Inverted Left/Right Motion
PUSHING THE STICK ____...
...CAUSES THE PROP TO GO
Up
Forward
Down
Backward
Left
Right
Right
Left
Solution: Turn on SERVO REVERSING on the aileron (AIL) channel.
Movement Issue #3– Forward Goes Left
PUSHING THE STICK ____...
...CAUSES THE PROP TO GO
Up
Left
Down
Right
Left
Forward
Right
Backward
Solution: The motor plugged into M1 is in the incorrect polarity. Use the inverter that
came with the Brain Kit to correct this. Simply plug one end of the inverter into the
Brain, and the other end into the Motor Pigtail going to Motor #1.
Illustration 9: Use the
inverter to correct polarity
issues
Movement Issue #4– Forward Goes Right
PUSHING THE STICK ____...
...CAUSES THE PROP TO GO
Up
Right
Down
Left
Left
Backward
Right
Forward
Solution: The motor plugged into M2 is in the incorrect polarity. Use the inverter that
came with the Brain Kit to correct this. Simply plug one end of the inverter into the
Brain, and the other end into the Motor Pigtail going to Motor #2.
Movement Issue #5– All movements inverted
PUSHING THE STICK ____...
...CAUSES THE PROP TO GO
Up
Backward
Down
Forward
Left
Right
Right
Left
Solution: This occurs when both motors are in the opposite polarity that the Turtle Brain
expects. Simply enable SERVO REVERSING on both the elevator (ELE) and aileron
(AIL) channels (see Illustration 8).