1
Curio
User Manual
© 2010 Zengobi, Inc. All rights reserved.
The owner or authorized user of a valid copy of Curio
software may reproduce this publication for the purpose of
learning to use such software. No part of this publication
may be reproduced or transmitted for commercial purposes,
such as selling copies of this publication or for providing paid
for support services.
Every effort has been made to ensure that the information in
this manual is accurate. Zengobi is not responsible for
printing or clerical errors. Because Zengobi frequently
releases new versions and updates to its system software,
applications, and Internet sites, images shown in this book
may be slightly different from what you see on your screen.
Zengobi, Curio, Sleuth, and the Zengobi logo are either
registered trademarks or trademarks of Zengobi, Inc. in the
United States and/or other countries.
Apple, Mac, Mac OS, MobileMe, Quick Look, and Macintosh
are trademarks, registered trademarks, or service marks of
Apple Computer, Inc. in the United States and/or other
countries.
Getting Things Done and GTD are registered trademarks of
David Allen & Co. in the United States and/or other
countries.
Other company and product names mentioned herein are
trademarks of their respective companies. Mention of thirdparty products is for informational purposes only and
constitutes neither an endorsement nor a recommendation.
Zengobi assumes no responsibility with regard to the
performance or use of these products.
Every effort has been made to ensure that the information in
this document is accurate. Zengobi is not responsible for
printing or clerical errors.
Contents
WELCOME
......................................................................................................................................6
ABOUT THIS MANUAL
......................................................................................................................6
WHAT’S NEW IN CURIO 6
..................................................................................................................6
WHAT’S NEW IN CURIO 6.1
.............................................................................................................10
WHAT’S NEW IN CURIO 6.2
.............................................................................................................11
WHAT’S NEW IN CURIO 6.3
.............................................................................................................12
WHAT’S NEW IN CURIO 6.4
.............................................................................................................13
GETTING STARTED
....................................................................................................................15
CREATING YOUR FIRST PROJECT
....................................................................................................15
DEFINING YOUR GOALS [PRO]
.......................................................................................................17
BRAINSTORMING
.............................................................................................................................19
SEEKING INSPIRATION AND RESEARCHING
.....................................................................................24
MANAGING YOUR ASSETS
..............................................................................................................25
TRACKING YOUR PROJECTS............................................................................................................
27
SHARING YOUR IDEAS
....................................................................................................................28
SEARCHING, ARCHIVING, AND ENCRYPTING
...................................................................................29
THE DOSSIER [PRO]
...................................................................................................................32
WHAT IS A DOSSIER?
.......................................................................................................................32
ADDING A DOSSIER TO A PROJECT
...................................................................................................32
CUSTOMIZING A DOSSIER................................................................................................................
33
CREATING A DOSSIER TEMPLATE
....................................................................................................33
EXPORTING DOSSIERS AND TEMPLATES
..........................................................................................34
IMPORTING DOSSIERS AND TEMPLATES
..........................................................................................35
SHARING DOSSIERS AND TEMPLATES
.............................................................................................35
THE IDEA SPACE
.........................................................................................................................37
WHAT IS AN IDEA SPACE?
................................................................................................................37
CONFIGURING AN IDEA SPACE
.........................................................................................................37
DRAWING SHAPES
...........................................................................................................................41
DRAWING LINES..............................................................................................................................
41
ADDING TEXT
.................................................................................................................................43
WORKING WITH FIGURES ON AN IDEA SPACE
..................................................................................45
CHANGING FIGURE PROPERTIES
.....................................................................................................48
CREATING AND USING FIGURE STYLES
...........................................................................................51
ASSOCIATING META DATA WITH FIGURES
.......................................................................................54
LINKING FIGURES
...........................................................................................................................58
RECORDING VIDEO AND AUDIO ASSETS
...........................................................................................60
USING BRUSHES AND PENS
.............................................................................................................60
THE INSPECTOR BAR
.......................................................................................................................62
INSERTING DATES AND TIMES
.........................................................................................................63
INSERTING VARIABLES....................................................................................................................
63
CREATING AND USING FIGURE STENCILS [PRO]
.............................................................................63
CREATING AND USING IDEA SPACE TEMPLATES [PRO]
...................................................................65
MAKING LISTS
............................................................................................................................67
CREATING A LIST
.............................................................................................................................67
CONVERTING A MIND MAP INTO A LIST
..........................................................................................67
IMPORTING A LIST
...........................................................................................................................67
EXPORTING A LIST
...........................................................................................................................68
MODIFYING LIST PROPERTIES
.........................................................................................................68
LIST PREFERENCES..........................................................................................................................
69
INSERTING NEW TEXT FIGURES INTO A LIST
...................................................................................69
WORKING WITH LIST FIGURES
........................................................................................................70
MAKING MIND MAPS
................................................................................................................72
MIND MAP TERMINOLOGY..............................................................................................................
72
CREATING A MIND MAP
..................................................................................................................73
CONVERTING A LIST INTO A MIND MAP
..........................................................................................73
IMPORTING A MIND MAP
.................................................................................................................73
EXPORTING A MIND MAP
................................................................................................................74
MODIFYING MIND MAP PROPERTIES
..............................................................................................74
MIND MAP PREFERENCES
...............................................................................................................75
INSERTING NEW TEXT FIGURES INTO A MIND MAP
........................................................................75
WORKING WITH MIND MAP FIGURES
.............................................................................................75
WORKING WITH FREEMIND
............................................................................................................78
MAKING TABLES
........................................................................................................................79
CREATING A TABLE
.........................................................................................................................79
IMPORTING A TABLE........................................................................................................................
79
EXPORTING A TABLE
.......................................................................................................................80
MODIFYING TABLE PROPERTIES
.....................................................................................................80
TABLE CONTEXT MENU
..................................................................................................................81
WORKING WITH TABLE FIGURES
....................................................................................................81
MAKING INDEX CARDS
............................................................................................................83
CREATING AN INDEX CARD
.............................................................................................................83
EXPORTING AN INDEX CARD
...........................................................................................................83
MODIFYING INDEX CARD PROPERTIES
...........................................................................................83
WORKING WITH INDEX CARD FIGURES
...........................................................................................84
GATHERING ASSETS
..................................................................................................................86
THE ASSET LIBRARY
.......................................................................................................................86
USING SLEUTH TO SEARCH THE WEB
.............................................................................................87
THE SCRAPBOOK
.............................................................................................................................90
COLLECTING SNIPPETS FROM ANYWHERE
......................................................................................91
FINDING LOCAL FILES WITH FLASHLIGHT
.......................................................................................93
SPREAD PDF
..................................................................................................................................93
MANAGING YOUR TASKS
.........................................................................................................95
USING THE STATUS SHELF [PRO]
....................................................................................................95
SYNCHRONIZING YOUR TASKS WITH ICAL
.....................................................................................96
“GETTING THINGS DONE” IN CURIO
...............................................................................................97
SEARCHING YOUR PROJECT
..................................................................................................98
PERFORMING A SEARCH
..................................................................................................................98
WORKING WITH SAVED SEARCHES
...............................................................................................100
TIMESTAMPS
.................................................................................................................................100
SHARING YOUR PROJECT
......................................................................................................101
PRESENTATION MODE
...................................................................................................................101
SHARING THROUGH MAIL
.............................................................................................................103
EXPORTING....................................................................................................................................
103
EXPORTING SELECTED FIGURES
...................................................................................................106
PRINTING
......................................................................................................................................107
INTEGRATING WITH OTHER APPLICATIONS
.................................................................108
THE EVERNOTE SHELF
..................................................................................................................108
ADDING AND USING INSTANT DOCUMENT TEMPLATES
................................................................109
ADDING CONTENT FROM A LINKBACK-ENABLED APPLICATION
...................................................110
ADDING ICAL EVENTS TO IDEA SPACES
........................................................................................110
ADDING ADDRESS BOOK CONTACTS TO IDEA SPACES
..................................................................111
GRABBING WEB ARCHIVES
..........................................................................................................111
WEBVIEW FIGURES AND GOOGLE DOCS INTEGRATION
................................................................111
ADDING MAIL MESSAGES TO IDEA SPACES
...................................................................................112
TAKING SCREEN SNAPSHOTS
........................................................................................................113
QUICK LOOK INTEGRATION
...........................................................................................................113
MULTI-TOUCH SUPPORT
................................................................................................................114
APPLE REMOTE SUPPORT
..............................................................................................................114
MIGRATING INTO CURIO
......................................................................................................115
FROM AQUAMINDS NOTETAKER
.................................................................................................115
CURIO PREFERENCES
............................................................................................................116
GENERAL PREFERENCES
...............................................................................................................116
IDEA SPACE PREFERENCES
............................................................................................................117
PROJECT CENTER PREFERENCES
...................................................................................................119
TAG PREFERENCES........................................................................................................................
120
FLAG PREFERENCES
......................................................................................................................120
PRESENTATION PREFERENCES
.......................................................................................................121
LABEL PREFERENCES
....................................................................................................................122
DOSSIER PREFERENCES
.................................................................................................................122
CURIO PARENTAL CONTROLS........................................................................................................
122
APPEARANCE PREFERENCES
.........................................................................................................123
Welcome
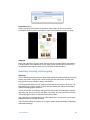
Curio is a powerful and easy-to-use brainstorming and project
management application that promotes visual thinking for
gathering and shaping your ideas, while managing all the notes
and documents associated with your project.
Curio's intuitive interface and tools encourage effective note gathering, research, and
creative exploration. Its freeform, open environment encourages you to more easily
visualize, associate, and recall information.
About This Manual
Because of itʼs open and freeform environment, Curio can be utilized for a variety of
tasks. So instead of telling you what to do with Curio, this manual will guide you through
the many features of the software so you can decide how to use them best to accomplish
your goals.
Curio is available in two editions: Curio Professional and Curio Standard. Any features
discussed in this manual are available in both editions of Curio, unless otherwise
specified by color-coded symbols like [Pro], which means Professional edition only.
Whatʼs New in Curio 6
Curio 6 contains several new features and tons of improvements. The list is really too
long for us to fully cover here, so weʼll just hit the highlights. For a more detailed list of
whatʼs new in Curio 6, choose Help > View Release Notes from Curioʼs main menu.
Tables
Curio 6 adds support for wonderful, native, integrated tables!
That's right, true tables with resizable rows and columns which, like our other collections
such as lists and mind maps, can contain any Curio figure such as text, images, URLs,
movies, and more!
Through the new Table Inspector, you can add and remove rows and columns. Plus show
or hide header or footer rows and columns.
Like most everything else in Curio, tables are fully style-able. Modify a table cellʼs font, fill,
border coloring, etc, and then use the Table Inspector to make that cellʼs style the default
style for all body cells, row header/footer cells, or column header/footer cells.
You can even save all your style information using the Style inspector so you can easily
switch the entire look of your table on the fly. Click on the table then check out the Style
popup in the Inspector Bar where you can quickly switch to one of the bundled table
styles or one of your custom styles.
Figure Stencils [Pro]
Curio Pro 6 adds support for figure stencils where you can create, re-use, and share
frequently used figures and grouped figures.
"
Curio User Manual"
6
Create an idea space which contains a bunch of related figures. Perhaps office furniture,
or network diagramming, or geographic maps, boilerplate text or line figures. Make sure
to name your idea space something representative like “Office Furniture”.
Next, drag that idea space to the new Figure Stencil Shelf where Curio will import all of
those figures into the stencil repository.
Once in the repository you can associate the stencils using one or more custom
collection tags such as “Work”, “Home”, or “Favorites”.
To use a stencil just find it in your Figure Stencil Shelf then either drag-and-drop its entry
in the shelf to any idea space to copy all of the figures over. In this case of our “Office
Furniture” stencil it would bring all of the office furniture over.
Or, double-click the stencil to drill down into the stencil to see all the top-level grouped
figures within that stencil. Then you can drag over just the figure you want, say a
particular chair with the “Office Furniture” stencil.
Custom Flags
Using the new Flags Preference panel, users can create flag sets with custom flag
images. Any type of image is supported, although scalable images such as icns files are
preferred for nicer scaling, otherwise built-in bitmap scaling is used.
Since you can use any image as a flag, you can find thousands of potential flags on the
web! Icon repository sites, such as IconArchive (http://www.iconarchive.com), are
recommended as you can download icons as icns files for beautifully scalable flags.
But even static 16x16 png's such as FamFamFam's Silk Icons (http://famfamfam.com/
lab/icons/silk/) are awesome to use in lists and mind maps. Just drag and drop their
folder of incredible looking icons into Curio's Flags Preference panel and you'll instantly
have access to 1,000 new flags. Very cool!
Your new flags are accessible in the Inspector Bar, the Flags Inspector, and the Search
shelf. Yes, you can even search on your custom flags.
Easily share your flag sets by simply dragging a flag set name out of the Flags
Preferences panel directly to the Desktop. Curio will create a folder which contains all the
flag set's images. You can then send that created folder to a friend or colleague and they
can drag it directly into their flag set list to instantly gain access to the same flags.
Mind Map and List Branch Colors
The style inspector now supports branch colors for list and mind map collections!
When enabled, the colors — including pen color, fill color, gradient color, and text color —
of the figures along a hierarchical branch will be the same. This is particularly effective in
mind maps as each branch will have its own coloring to make it really stand out.
The branch colors feature will override just the colorings used along the branches while
maintaining the the level-specific shape stylings. So, it works in tandem with hierarchical
level styles where the hierarchical level defines the shape and the branch color defines
the coloring.
While you can manually specify the pen, fill, and text coloring for each branch, Curio can
help you get started, via a nifty color palette popup found in this inspector. Using each
color in the selected palette, an appropriate pen, fill, and text color is created and applied
to a branch. The colors in the palette are repeated as necessary to make sure each
hierarchical branch is colored. (While the popup only shows the first five colors in the
palette file, all colors in the palette are used before repeating when coloring branches.)
"
Curio User Manual"
7
And, it's incredibly easy to add more color palettes to this popup simply by drag-anddropping Adobe Swatch Exchange (.ase) files into the style inspector. You can find
thousands of these files by exploring sites like Adobe Kuler (http://kuler.adobe.com) and
ColourLovers (http://www.colourlovers.com).
More Mind Map Line Styles
In addition to our standard straight mind map line style, we're happy to introduce curved,
elbow, and rounded elbow line styles. The line style is switchable via the new Mind Map
inspector panel.
Mind Map Smart Sizing
By extremely popular demand, the mind map figure will now automatically shrink or grow
as the nodes within the mind map are collapsed or expanded. This default setting can be
controlled via the new "mind maps shrink as nodes collapse" option in Curio's
Preferences. Note, however, if you manually resize a mind map then it will not
automatically shrink when collapsed.
One-Click Hierarchy Branching
Now Curio makes it incredibly easy to flesh out a list or mind map branch in a whole new
tree.
You begin by right-clicking on a figure in a list or mind map collection, the "parent
collection", and choosing the "Prune To Linked Collection" menu item.
Curio will then create a new list or mind map, of the same style as the current collection
where the selected parent becomes the new top level item — either the title of the list or
the central topic of a mind map — and all of its children will be hierarchically arranged
underneath.
The children of the original parent are then removed and the original parent itself
becomes a jump action which, when clicked, will zip you to the new collection. The new
child collection can remain on the current idea space or it can be cut and pasted onto a
different idea space, and the jump action in the parent collection will still track it down.
And, the root of your new child collection will automatically get an jump action associated
with it to jump you back to the parent collection item.
This means, if your list or mind map is getting a bit too crowded or busy, you can easily
prune off a branch and bring it to its own mind map perhaps off on another idea space
where you have plenty of room to let your mind feel unrestricted.
Additional Mind Map and List Collection Features
•
•
"
Two new list enumeration prefix styles which are commonly used in legal and
scientific publications are now available.
•
1, 1.1, 1.1.1, 1.1.1.1 ....
•
1., 1.1., 1.1.1., 1.1.1.1. ....
You can now associate flags, priorities, and ratings with list and mind map collection
figures (previously you could only do this for items within these collections). You can
search on this meta data and the collections themselves with appear in the Search
shelf.
Curio User Manual"
8
•
To be more consistent with other mind mapping applications, pasting onto a node in
the mind map will create children instead of siblings. However, pasting onto a list
node will always create siblings to be consistent with other outlining applications.
•
You can now check the "allow full control of figure size" text inspector checkbox for
figures within a mind map. This means you can stretch a mind map node to be as tall
and wide as you want.
•
If you hold Shift down when clicking the Mind Map toolbar button you will get an
empty mind map figure. What good is that? Now you can select a branch in another
mind map, copy or cut it, then paste it into your empty mind map figure to get a new
map.
•
New "Allow expanding/collapsing" checkbox in the List inspector which you can
uncheck to turn off the expand/collapse disclosure triangle and bullets. By turning off
this option, you choose a bullet prefix style and not see double-bullets!
•
When converting back and forth between list and mind map (via the collectionʼs rightclick context menu), Curio will now keep track of the style used for the previous
collection style and restore it when switching back.
•
You can now select items within a locked list or mind map collection. This permits
copying the items for placement elsewhere.
•
When checking or unchecking a parent node in a list or mind map you can now tell
Curio to suppress the warning that changing the parent will check/uncheck all of its
children.
•
New keyboard shortcuts for Insert Mind Map (Command-Control-M) and for Insert
List (Command-Control-L).
•
Tweak to OPML exporter so the title elements are contained within a head element
so we're now fully compliant with the OPML spec.
•
Importing and exporting OPML now supports item notes by using the "_note" XML
attribute quasi-standard (as per OmniOutliner).
•
Exporting or copying a mind map or list as a text outline will now include figure notes
in the output. Normally the note will be rendered as a sibling of its associated figure.
However, if Curio is set to use tabs to indent the outline elements (see Curio's
Preferences > Idea Space > Use tabs to indent) then you can type the following in
Terminal if you want the note text to be rendered as a child: defaults write
com.zengobi.curio "Copy Text Note Is Child" -bool yes
Task Management Enhancements
•
New "Include items with no start or due dates" checkmark in the Status section of the
General Preferences. If unchecked, then Curio will no longer include any unchecked
figures in the Status shelf that don't have a start or due date associated with them.
•
Likewise, new "Sync items with no start or due dates" checkmark in the Sync section
of the Project Properties. If unchecked, then Curio will no longer sync with iCal any
unchecked figures that don't have a start or due date associated with them.
•
New Preference: Skip Weekends When Determining Due Dates, if you want Curio to
ignore weekends when calculating due dates and durations.
Search Refinements
•
"
If you use the Search shelf to search for some text that starts with a pound sign (#)
then we'll look for the word as a tag. Thus, searching for #legal will do a search for
Curio User Manual"
9
a tag named legal. Note that normally text searching for just legal would return
any results which contain that word in the figure's text, asset contents, notes, and
tag. Thus, prefacing it with a pound sign is a fast shortcut to choosing it from the
Search shelf's Tags list since it will only return an exact tag match.
•
The Curio Spotlight importer has been updated to include any used tags and #tags
with a project's scanned metadata. This means if the tag legal was used in a
project then legal and #legal will be in the resulting Spotlight metadata.
•
All of those changes means that if you use Spotlight to search for #legal, you'll see
all projects that use the Curio tag #legal, and if you then choose one of those
projects from Spotlight's results list, Curio will launch and open that project and
automatically do a tag search for legal.
•
If you search for some text in the Search shelf, find some results, and then doubleclick on an asset figure in the idea space to launch it, the search text will be sent to
the launched application. This means if you search for the word fisherman using
the Search shelf, and find that it's in one of your embedded PDFs, then you can
double-click the PDF and the fisherman search phrase will get passed to Preview
so it will automatically search for fisherman upon opening the PDF.
•
When searching in the Search shelf for a certain asset type, it will now find internal
aliases to those types in addition to embedded instances of those types.
Sleuth Updates
•
Added Photos.com, JupiterImages, Bing, Bing Images, Bing News, Bing Videos, and
Wolfram Alpha.
•
Updated Merriam Webster dictionary and thesaurus and Google and Google Images.
•
Remove sites that are no longer in service.
Plus So Much More
Seriously, Curio 6 is chock full of tons of new features and improvements. To read the
fully detailed list, be sure to choose Help > View Release Notes from the main menu.
Whatʼs New in Curio 6.1
Curio 6.1 adds several very cool features to Curio 6.
Index Cards
Curio 6.1 adds a new type of figure collection: Index Cards! Thanks to tremendous
feedback in the Zengobi Forums we're thrilled to introduce index cards to our fans.
An index card is a fairly simple collection: it consists of a title text figure and a body
figure. The body figure is, by default, a text figure as well but you can drag an image or
other type of asset figure in there to replace its contents.
To create an index card, use the new Index Card toolbar button, or choose Insert > Index
Card (Command-Control-I). Type in a title, and type in some body text.
An index card is resizable but not scrollable. This means any text that grows past its
bounds will be automatically clipped when it's not being edited.
You can customize the look of your index card using the normal Figure and Text
inspectors. In particular, while the spacing of the body's lines is based on the body text's
font size, you may want to extend this a bit using the Line Height control in the Text
"
Curio User Manual"
10
inspector. You can also adjust the display and coloring of the title and body lines using
the new Index Card inspector found under the Display tab.
Like our other collections (lists, mind maps, and tables), index cards are completely styleable so you can click the Style popup in the Inspector Bar to choose a different style. You
can also change its attributes and save the resulting index card style via the Style
inspector. And you can share the styles you create with your friends or send it to us for
posting on the Curio Community Center. If you want a different default to appear when
you click the Index Card toolbar button then use the Format > Set as Default Style for
Index Card Figure menu item.
You can easily export your index cards by selecting one or more cards and choosing
either Edit > Copy As > Text or File > Export Selected Figures As > Text.
Figure Decorations
You can now quickly and easily associate an image decoration with any selected figures.
How? Just drag-and-drop an image into the new decoration image well in the Flags
section of the Meta Inspector. Or you can double-click the image well to show the
standard Apple image panel to take quick iSight picture.
This decoration image is displayed alongside your other flags and adornments, and are
sized with them via the Adornment Options size slider. Note, however, unlike custom
flags you create in the Preferences > Flags window, these decorations aren't searchable
via our Search shelf, but they're perfect for quickly pairing a decorative image with a
figure.
Exporting or Copying as Text
Curio's copying and exporting as text as gotten a whole lot smarter. First, you can now
select one or more figures on your idea space. Then, Curio will nicely concatenate
together all the text representations for the selected figures in a logical way. This means a
nice text outline representation for lists, mind maps, and index cards, and tab-separated
text representation for tables.
The result is one output file, or clipboard string when copying, that contains the contents
of all selected figures for easy importing into another application.
Whatʼs New in Curio 6.2
Curio 6.2 adds more yummy goodies to Curio 6.
Curved and Orthogonal Lines
Curio now supports curved and orthogonal lines! Just right-click on a multipoint line to
select a new line type via the context menu, or change the line type in the Figure
inspector. You can drag your midpoints around to change the shape of the spline curve or
orthogonal control points.
On-The-Fly Multipoint Lines
You can still right-click on an existing line to add midpoints but now we've added an even
faster way to create multipoint lines.
Grab the line tool and click to start the first point, then drag to place the endpoint. But
before you release the mouse button hold down the Option key. When you release the
mouse you'll find that you've dropped a midpoint and now you're placing a new endpoint.
"
Curio User Manual"
11
Continue holding down Option to keep dropping midpoints as you release the mouse. If
you're done, just release the Option key before you drop your last point.
Since we're using the Option key for this that means we've taking away the normal
modifier to create a non-sticky endpoint. So, the Control key is now used for that
operation: just hold Control while dragging a point so you can place it over an existing
figure without sticking to the figure.
Index Card Enhancements
Copying multiple selected figures as text or exporting them to text will now grab them in
scanline order instead of basing the export on z-order. This means left to right, top to
bottom. So you can now lay out your index cards in a rough matrix or grid and they
should output as text in an expected order.
You can now change the location of an index card's title and body figure's flag
adornments using the little circular slider in the Adornment Options inspector panel.
The index card body lines are now drawn under the body figure's text. However, any flag
adornments are drawn off to the side with no lines underneath (looks nicer that way).
You can no longer drag items out of an index card, although you can still cut or copy.
Instead, when you try to drag the title or body text of the index card the index card itself
will be dragged. This should make it much easier to stack and rearrange cards without
accidentally dragging content out of a card.
Whatʼs New in Curio 6.3
Curio 6.3 adds a few more Snow Leopard features and other fun stuff to Curio 6.
Leopard and Snow Leopard Enhancements
For both Leopard and Snow Leopard customers, you now have access to the standard
Edit > Transformations submenu which allows you to uppercase, lowercase, and
capitalize any selected text. In addition, you will now see the standard Edit > Speech
submenu which can be used to make your Mac speak the selected text.
In the Curio's Preferences, under the Idea Space icon, you now now enable grammar
checking, smart quote substitution (automatic straight quotes to curly quotes), and web
link detection. Snow Leopard customers can also enable automatic spelling correction,
text replacement (controlled via System Preferences > Language & Text > Text), and
dash substitution (double dash to em dash substitution).
You can also modify those preferences on-the-fly when editing some text using the Edit >
Spelling & Grammar submenu and the Edit > Substitutions submenu.
Status Shelf Enhancements [Pro]
You can now group your tasks by rating or priority.
Printing Improvements
First, substantial code improvements were made to the print and PDF export code
modules to make them more efficient and faster, particularly for large projects.
Next, we added a useful tweak to the print footer.
The print footer currently shows the idea space number. However, if the idea space
doesn't fit on the single sheet of paper then each sheet would end up with the same
footer which isn't terribly useful.
"
Curio User Manual"
12
So we've changed the footer to support printing the idea space number and optional
sheet information. For example, if idea space #26 spans onto 9 sheets of paper then the
3rd sheet would show 26 (3 / 9) as its footer.
More details are described below in the printing section.
Curved and Orthogonal Lines
Curio now supports curved and orthogonal lines! Just right-click on a multipoint line to
select a new line type via the context menu, or change the line type in the Figure
inspector. You can drag your midpoints around to change the shape of the spline curve or
orthogonal control points.
Whatʼs New in Curio 6.4
Curio 6.4 adds a few more features and fixes to Curio 6.
Attached Text Figures
If a text figure is selected or is being edited, then you can quickly create an attached
figure – that is, a text figure with a sticky line attaching the current figure and the new
figure – by simply holding down the Command key when clicking on the idea space
background.
By default, the line connecting the current figure and the new figure will have an
arrowhead pointing to the new figure. However, you can modify that with these additional
keyboard modifiers:
•
If you press the Command+Shift keys then you will see a bi-directional arrow with
an arrowhead pointing to the current figure and an arrowhead pointing to the new
figure.
•
If you press the Command+Option keys then no arrowheads will appear and you
will just see a solid line.
Smarter Task Syncing
Curio will now receive updates much more reliably from external clients that sync with
iCal. That means apps like Appigo's Todo and similar iPhone task managers. The
problem was that external sync sources don't update the iCal item's last modified date
stamp so we didn't realize any changes had occurred, that date stamp is only updated if
the change is made directly within iCal itself.
With this fix, while Curio has your project loaded, you can now use your external task
manager to make changes to the tasks (edit the title, priority, etc) and mark them as
complete or incomplete and those changes will immediately sync through iCal and then
into Curio. Going the other direction still works as well: change the item in Curio, save the
project, and it will sync to iCal then to your iPhone task tracking app.
In addition, when the project is first launched Curio will now see if there are any changes
from iCal and update Curio's figure with iCal's updates. We can't rely on last modified
dates for the items, as described above, so we just assume iCal has the latest info. This
means changes made to tasks in an external task manager while Curio is not running will
be correctly displayed in Curio next time you open the project.
Note, however, you should still remove tasks from within Curio first and those will then
sync to iCal and then to the other external sync agents. Supporting the removal of tasks
in an external source or from iCal and then syncing to Curio is too risky as the task may
"
Curio User Manual"
13
be a parent element from a list or mind map and then those child items would be autoremoved which may not be what you had intended.
List Tweaks
•
Bullets and numbering enumerators are now colored to match the level style's font, if
appropriate.
•
If you're editing the title of the list and you press tab then you'll move to the first item
in the list.
•
Conversely, if you're editing the first item in the list and press shift-tab you'll move to
the title.
Installation
Download
The first step to installing Curio is downloading it, so if you havenʼt already done so, visit
www.zengobi.com/curio and click on the download button.
Install
Installing Curio is as easy as drag and drop. After downloading the zipped Curio file, your
browser should automatically uncompress it and leave the resulting Curio application in
your Downloads folder. Then simply drag the Curio application icon to your Applications
folder. Thatʼs it! Youʼre now ready to run Curio.
Launch
Go to your Applications folder and locate the Curio icon, then double-click it to launch it.
Licensing
Curio will run unlicensed for 15 days so you can spend time trying it out. If you decide
that you need more time to decide to purchase, you can request an extended trial license
key that will give you another 60 days of unlicensed use. Each time you launch Curio, it
will ask you if you want to request an extended trial license and provide you with an easy
way to submit your request.
After your trial period has expired, critical functionality like saving changes to your
projects, printing, and exporting will no longer be available, though you can continue to
open and view Curio projects and play with Curioʼs other features.
After purchasing an edition of Curio, you will receive an email message containing your
license key sent to your registered email address. The message will also contain link that
you can click on to easily register the license key within Curio. But if youʼd rather register
the key manually, then simply choose Curio > License from the main menu, and then
copy and paste your license key and registered email address into the appropriate fields.
"
Curio User Manual"
14
Getting Started
Curio is an intuitive Mac OS X application designed to be the
home base for your creative projects. Curio's extensive featureset includes tools to help you define the goals and scope of a
project, collect research and take notes, outline ideas and
create to-do lists, construct conceptual diagrams and
flowcharts, and even sketch out designs with pressure-sensitive
pens.
Anything you can do on a whiteboard or in a notebook, you can now do with Curio, plus
so much more.
In this chapter, we're going to take you on a tour of the basic features of Curio and
describe how you might use them. Curio's flexibility allows you to work the way you want.
It doesn't force a particular workflow or method of organization on you.
However, Curio was designed with the following general workflow in mind:
1. Define project goals.
2. Brainstorm, collect research and notes, and manage your project.
3. Share ideas.
4. Archive.
Curio has features to help you with each step of this creative process. You can use the
features you need in any order you choose.
So letʼs get started!
Creating Your First Project
Creating new projects
The first time you run Curio, a new project will be created and presented to you
automatically. The project window shows you the Organizer on the left and a blank
canvas, which we call an idea space, on the right. You will also see the Shelf on the right
side of the project window with the Inspector Shelf selected and displayed.
Anytime you wish to create a new project, choose File > New from the main menu.
"
Curio User Manual"
15
Creating new idea spaces
Each Curio project can contain any number of idea spaces that can be arranged in a
hierarchy in the project's Organizer.
To create a new idea space, click the New button on the toolbar. The new idea space will
be created directly under the current idea space, ready for you to type a title for it.
You can create a specific type of idea space by clicking and holding the New toolbar
button down until its popup menu is displayed, then choosing the type of idea space you
want to create from the menu.
Alternatively, you can select an idea space in the Organizer, then press the Return key to
create a new idea space.
Rearranging and renaming idea spaces
To rearrange idea spaces in the Organizer, use your mouse to drag and drop them in the
desired order.
To indent one or more idea spaces by one level, select the idea spaces you wish to
indent, and then press the Tab key.
Use the Shift-Tab key combination to out-dent the selected idea spaces.
To rename an idea space, choose Organizer > Rename Idea Space from the main menu,
and then type the new name.
Copying idea spaces
To copy idea spaces in the Organizer, hold down the Option key while you use your
mouse to drag and drop them in the desired location. You can also use the standard copy
and paste techniques to copy idea spaces within a project or between projects.
Choose Edit > Duplicate to quickly make a copy of the selected idea spaces and paste
them immediately in the Organizer.
"
Curio User Manual"
16
If an idea space has child idea spaces associated with it and is collapsed when copied or
duplicated, all child idea spaces will be copied also. If an idea space is expanded, then
only the selected child idea spaces will be copied or duplicated.
Hoisting idea spaces
You can hoist an idea space to act as the root of the Organizer so that its child idea
spaces temporarily become top-level idea spaces. Hoisting allows you to focus on just
one section of your overall Curio project.
To hoist the selected idea space, choose Organizer > Hoist from the main menu.
The name of the hoisted idea space will appear in the title bar of the Organizer and all of
its child idea spaces will become top-level idea spaces in the Organizer until you unhoist. Any new idea spaces you create at the top level will automatically become children
of the hoisted idea space.
To un-hoist a hoisted idea space, simply choose Organizer > Unhoist from the main
menu. If you have multiple idea spaces hoisted, then you can choose Organizer >
Unhoist All to get back to the true root of the project's Organizer.
Displaying previews and labeling idea spaces
You can toggle on and off the display of previews in the organizer. You can also adjust
the size of the previews displayed.
To change the display of previews in the Organizer, choose File > Project Properties, and
then click on General in the resulting Project Properties dialog. Choose the desired
preview size from the Organizer Previews popup menu. Choose None to turn off idea
space previews.
Click Make Global Default to set the selected preview size as the default size for all new
projects.
You can associate a label with your idea spaces. When an idea space is labeled, the
thumbnail image of the idea space in the organizer view displays a border using the label
color. This allows you to visually flag certain idea spaces. The label colors and associated
titles are customizable to fit your needs.
To label the selected idea spaces, choose the desired label from the Organizer > Label
submenu. Choose None to remove a label.
Deleting idea spaces
To remove an idea space, select it and then press the Delete key. Curio will ask you for
confirmation before deleting it unless itʼs blank.
Defining Your Goals [Pro]
Have you ever spent hours of hard work developing an idea only to discover itʼs not what
you originally intended? Identifying the goals of any creative project should always be the
first step. The more detail used in defining the goals, the more youʼll be able to focus your
efforts in the right direction.
Each Curio project can have an associated dossier, which is a list of categorized
questions and answers designed to help you identify and focus on the goals,
requirements, and background information related to your creative project. The list of
categories and questions is fully customizable on a per project basis. You can even save
a dossier as a template to reuse in other Curio projects.
"
Curio User Manual"
17
But what questions do you ask? The hardest part of creating a dossier is determining
what questions you need answered. Curio comes packaged with a number of dossier
templates to help you get started, including templates for a creative brief, product plan,
screenplay, training plan, and video production. Use them as they are or customize them
to fit your specific needs.
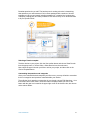
Selecting a Dossier template
To add a dossier to your project, click the View toolbar button and choose Show Dossier
from the popup menu, or choose View > Show Dossier from the main menu.
Next, select the type of dossier you'd like to add to your project, and then click on the
Choose Template button.
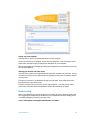
Customizing the questions and categories
Once you've selected the basic template you'd like to use, you may still wish to customize
the list of categories and questions contained within your dossier.
To modify the list of questions or categories in your dossier, choose Edit Questions... from
the Dossier view's action menu. The action menu is displayed when you click on the
button with the gear icon located in the upper right corner of the dossier view, also known
as the actions button.
"
Curio User Manual"
18
Saving your own template
You may wish to reuse your customized dossier in other projects.
To save your dossier as a template, choose Save as Template... from the Dossier view's
action menu, and then supply a name and a description for your template.
The saved template only includes the categories and questions, not the answers you may
have already supplied.
Sharing your dossier with other users
You may wish to share your completed dossier with other members on your team, so they
can have the answers you've acquired at their fingertips as they work on different aspects
of your project.
To export your dossier to a standalone file that you can share, choose Export Dossier...
from the Dossier view's action menu.
To import a dossier into your project, choose Import Dossier... from the Dossier view's
action menu, and then locate the standalone dossier file created by the export.
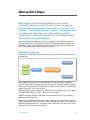
Brainstorming
Once you've defined your project's goals and constraints, it's time to develop some ideas.
This is typically the time when you would turn to your whiteboard and start making notes
or scribbling diagrams. But now you've got Curio!
Curio's idea spaces are like giant whiteboards, only better.
"
Curio User Manual"
19
Just like on a whiteboard, you can write or draw anything anywhere within an idea space.
Use Curio's List tool to create outlines and to-do lists. Use the Mind Map tool to map out
ideas and concepts. Draw diagrams using the shape and line tools. Simply double-click a
shape to label it with text. Use Curio's brush tools to draw freehand sketches. If you're
using a graphic tablet, the brush tools are pressure-sensitive for a more realistic look and
feel.
Unlike on a whiteboard, you can easily rearrange items in an idea space with drag and
drop simplicity. You can also incorporate files, images, movies, sounds, Address Book
contacts, iCal events, web links, web page archives, and PDF documents along with your
notes and sketches.
That's not all! Through the magic of LinkBack, you can even incorporate data from other
LinkBack-enabled applications, like OmniGroup's OmniGraffle.
Curio's idea spaces also support tons of advanced features like tags, flags, figure
actions, resources, start and due dates, completion percentages, and priorities.
Let's take a look at some of the things you can do in a Curio idea space!
Working with Collections
Collection figures are a special type of figure that contains other figures. Curio has two
collection figures: Mind Maps and Lists. Both can be very effective ways to explore your
ideas during the brainstorming process. Working with both is very similar.
Creating a new mind map or list
To create a new mind map or list in the current idea space, simply click the Mind Map or
List button in the toolbar. Alternatively, you can select one or more existing figures within
an idea space, and then choose Arrange > Collect into Mind Map or Collect into List from
the main menu.
"
Curio User Manual"
20
Creating new mind map or list items
To create a new item in a collection figure, select an existing item, and then press the
Command-Return key combination. The new item will be created as a sibling of the
selected item, unless itʼs a list item that already has children, in which case the new item
will be created as the first child of the selected item.
To create a new child item in a collection, select an existing item, and then press the
Command-Option-Return key combination. The new item will be created as a new child
of the selected item.
Indenting and out-denting mind map or list items
To indent an item in a collection, select the item you wish to indent and press the Tab key.
Press the Shift-Tab key combination to out-dent the selected item.
Deleting items from a mind map or list
Select the item(s) you wish to delete, and then press the Delete key.
Drag and drop support
You can also use the mouse to rearrange items within a collection, add items, remove
items, or move items from one collection to another.
Styling mind maps or lists
You can also style the collection figure itself, just like any other figure on an idea space.
Simply select the collection, then use the Inspector to choose its color, border style,
border color, bullet style, toggle the display of checkboxes, etc.
Drawing Diagrams
Another common activity during the brainstorming process is drawing diagrams and flow
charts. Curioʼs Shape tool provides an easy way to draw a wide variety of shapes from
rectangles to clouds, and the Line tool makes it easy to draw various types of lines
connecting those shapes.
"
Curio User Manual"
21
Drawing a shape
Select the shape you wish to draw from the Shape tool's popup menu, then click and
drag within the idea space to draw the shape.
Adding a text label
Using the selection tool, double-click on the shape to which you wish to add a text label,
and then start typing. The text will automatically be centered within the shape.
Curio's Line tool makes it easy to draw lines and a variety of arrows. By default, lines will
stick to other figures, allowing you to easy connect two figures with a line.
Drawing a line
Select the type of line you wish to draw from the Line tool's popup menu, and then click
and drag within the idea space to draw the line.
You can connect two figures by clicking on the first figure, and then dragging the line to
the second figure. Once connected, you can independently move the figures around the
idea space and the connecting line will grow, shrink, and adjust it's position as needed.
Styling shapes and lines
The Inspector provides numerous ways to further customize the look of shapes and lines.
Sketching
Whether you're artistically inclined or not, sometimes the best way to communicate an
idea is by sketching a picture.
"
Curio User Manual"
22
Curio comes with a variety of brush tools, such as a pencil, ballpoint pen, felt tip pen,
highlighter, and paintbrush. Using these tools, you can sketch anywhere on the idea
space canvas.
Drawing
Select a drawing tool from the Brush tool's popup menu, and then use your mouse or
stylus to start drawing on the idea space.
If you're using a graphic tablet, Curio's brush tools are pressure-sensitive for a more
realistic look and feel.
Customizing a drawing tool
Use the Inspector to choose the color, size, and opacity of the selected brush.
Erasing portions of a drawing
Click on the Eraser tool in the toolbar, and then use your mouse or stylus to erase
portions of your sketch. Just like with the brush tools, you can adjust the size of the
eraser using the Inspector.
Another way to erase portions of your drawing is to select the portion you wish to erase,
using the Selection tool, and then press the Delete key to clear all markings within the
selected region.
Selecting just portions of your drawing
Using the Selection tool, hold down the Command and Option keys while dragging a
selection region to select only your sketches and not other figures.
"
Curio User Manual"
23
Seeking Inspiration and Researching
Looking for inspiration? Need a seven letter word that rhymes with Apple? How about a
font that has something to do with elephants? While brainstorming on a project, you often
need to seek out inspiration or research certain topics. Nowadays, the Internet is the
place to go and Curioʼs Sleuth makes it easy.
Sleuth is an Internet search tool that interfaces with a wide variety of popular
websites.
Sleuth saves you time because you only have to enter your search phrase once, then
execute your search on each individual site with the click of a button. Your search results
are displayed just as they would be in your favorite web browser. Simply drag the results
that most inspire you and drop them onto an idea space or directly into your project's
Library.
Opening Sleuth
Click the Sleuth button in Curio's toolbar.
Searching
Type the word or phrase you wish to search for in the search field at the top of Sleuth's
window, then select the website you'd like to search from the sites popup menu.
Executing the same search on a different site
Select the site you wish to search from the sites popup menu. You could also use the up/
down arrows next to the sites popup menu to quickly search the previous/next site in the
list.
When you find a result you like, simply drag and drop it into a Curio idea space.
"
Curio User Manual"
24
Managing Your Assets
Any documents, images, website bookmarks, and QuickTime media that you add
to your project are considered assets. Each asset exists only once within the project
but can be placed multiple times within an idea space or even on different idea spaces.
Because they are all instances of the same asset, you can change any of its properties
such as title, note, or rating and all instances of that asset will immediately reflect the
changes.
By default, assets are stored embedded within your project. Embedded assets are
actually copied into the project document and do not maintain a link to the original file.
However, assets can also be stored as aliases to the original file. Curio will be able to
track and find your file as you move it around your hard disk. Simply hold down the
Option key when dragging in a file to create an alias to it.
Curio's project library makes managing your assets a breeze!
Showing the Library
Click on the View button in the toolbar and then choose Show Library from the popup
menu, or choose View > Show Library from the main menu.
Displaying details about an asset
Select the asset, and if the Shelf is not currently displayed, click on the Shelf button in the
toolbar, and then click on the Inspector view at the top of the Shelf to display the asset
inspector.
Opening an asset in its default application
Simply double-click on the asset. You can Control-click on an asset, then choose an
application from the Open With submenu of the context-menu to open an asset using a
different application.
"
Curio User Manual"
25
Renaming an asset
To rename an asset in the Library, select it, and then click on the title to enter edit mode.
Type the new name and press Return. You can also Control-click on the asset and
choose Rename from the context-menu.
Previewing an image-based asset
For a quick preview of any image-based asset in the Library, hold down the Option key
then click on the asset.
To change the display of previews in the Library, choose File > Project Properties, and
then click on General in the resulting Project Properties dialog. Choose the desired
preview size from the Library Previews popup menu. Choose None to turn off asset
previews.
Click Make Global Default to set the selected preview size as the default size for all new
projects.
Embedding an aliased asset
Select the asset, then Control-click on it and choose Embed within Project from the
context-menu.
Finding assets
To locate an aliased asset in the Finder, select the asset in the Library and choose Asset
> Reveal in Finder from the main menu.
Control-click on the asset and choose Idea Spaces from the context-menu to see a list of
idea spaces where the selected asset is used. Choose one of the idea spaces listed to
open that idea space.
To locate an asset in the Library thatʼs associated with a figure in an idea space, select
the figure, then choose Asset > Reveal in Library from the main menu. If the Library is
already visible, then you can simply select the figure and the Library will automatically
select and display the associated asset.
Deleting an asset
To delete an asset from a project, select it in the Library and press the Delete key.
Customizing the Library View
There are a variety of ways to customize the display of assets in the library.
Filtering the list of assets
Choose an option from the library filter menu located at the bottom right corner of the
library:
"
•
Project – displays all of the assets contained in the project document.
•
Selected Idea Space – displays only the assets contained on the current idea
space.
•
Selected Tree – displays assets contained on the current idea space and its
children idea spaces.
•
Unused Assets – displays the list of assets that are contained in your project
document but are not being used in an idea space.
Curio User Manual"
26
Sorting your assets
Click on a column header to sort the list by that value. Click the column header again to
sort in the opposite order.
Showing or hiding columns
Control-click on the column header, then select the columns you wish to show or hide
from the resulting context-sensitive popup menu.
You can also rearrange the columns by dragging their headers with your mouse.
Tracking Your Projects
Curioʼs Project Center makes juggling multiple projects at one time a breeze. Track only
the projects you wish and categorize them anyway you choose.
Adding and removing projects
To add a project, drag it from the Finder into the Project Center or choose Organizer >
Project Center > Add Existing Project... from the main menu.
To remove a project, simply switch to the "All Tracked Projects" category, select the
project, and then press the Delete key.
Note this doesnʼt remove the project permanently from your hard disk. The only way to do
that is from within the Finder.
The "Opened Recently" category is a special category that always shows you a list of
your most recently saved projects. It is completely under the control of the File > Open
Recent menu. Therefore to add a project to this category you simply have to open it via
"
Curio User Manual"
27
File > Open or by double-clicking it in the Finder. Likewise, to remove a project from the
list you have to send the file to the Trash via the Finder.
Opening a project in the same window
Click on the project in the Project Center's list.
Opening a project in a separate window
Hold the Option key down while clicking on the project in the Project Center's list, or just
double-click on the project.
Categorizing projects
To modify the list of categories that a project belongs to, Control-click on the project in the
Project Center, then check/uncheck the desired categories from the Categorize submenu
of the context-menu.
Adding and removing categories
Choose Curio > Preferences from the main menu, then switch to the Project Center
preferences panel. Add a category, by typing a name, then clicking the Add button.
Remove a category by selecting it in the list and pressing the Delete key.
Customizing a projectʼs icon
By default, Curio displays the project document icon next to a projectʼs name in the
Project Center. You can change the icon displayed by opening the project, then choosing
File > Project Properties from the main menu. Drag a custom image to the image well
located at the top of the General properties section. Double-click the image to edit it.
Press the Delete key to clear the image.
Sharing Your Ideas
Once you've developed some ideas that you would like to share with your colleagues for
feedback, Curio gives you a variety of methods you can use:
Share via Mail
Curio gives you two different ways to share a project or selected idea spaces via email
using the File > Mail As menu. If the receiver also owns Curio, you can mail your project
as an archived project document.
If the receiver doesn't have Curio, you can mail your project as a PDF document, easily
viewable across platforms.
Exporting and publishing
You can also export an entire project or selected idea spaces in several different formats
including JPEG, PNG, TIFF, PDF, and HTML using the File > Export As menu.
If you have an Apple MobileMe account, you can even publish an HTML version of your
idea spaces directly to your iDisk via File > Publish to MobileMe.
Also, you can export your idea spaces as images to iPhoto, then use iPhotoʼs
Photocasting feature to share your ideas.
"
Curio User Manual"
28
Presentation [Pro]
Hookup a projector and click the Presentation toolbar button to use Curioʼs built-in
presentation mode to present your ideas in a full-screen slideshow format to a group.
Clippings
Lastly, using the Edit > Copy As menu, you can copy any selected figures and sketches
in an idea space to the clipboard as a TIFF image or PDF document, then paste it into
any application that supports those formats, like iChat or Microsoft Word.
Searching, Archiving, and Encrypting
Searching
Curioʼs powerful and intuitive Search Shelf makes finding everything except your car keys
as easy as possible. Choose Edit > Show Search from the main menu, and then start
typing the text youʼre looking for into the search field.
Curio dynamically filters the list of assets and idea spaces as you type to show you only
what matches your search criteria. Figures that donʼt match your search criteria fade to
make the matching figures standout.
You can also search for all assets and figures that have been associated with a specific
flag, rating, tag, priority, resource, start date, or due date. And you can search for assets
of a specific type or based on when they were last modified.
And, using Curioʼs timestamp feature to define milestones in your project, you can base
searches relative to a project milestone.
Curio can even search the contents of a projectʼs assets, taking advantage of Spotlightʼs
extensible technology.
"
Curio User Manual"
29
Included Spotlight plug-in
Curio also includes a plug-in that allows Spotlight to include Curio projects when
searching your system.
Flashlight
Speaking of Spotlight, Curio comes with a search feature that allows you to quickly locate
assets on your local system using Spotlight technology. To search for local files, simply
click on the flashlight icon at the top of the shelf, then enter your search criteria and click
on the Search button.
Archiving projects
When you've finished your project, Curio makes archiving quick and easy to do. Choose
File > Create Archive to save your project as a standalone archive with all of the assets
embedded for safekeeping.
Then, for extra security, use the Finder to archive and burn your project file to CD or DVD
for offsite storage.
Encrypting projects [Pro]
If youʼd like to secure your project, you can choose File > Set Password to set a
password and encrypt its contents.
When a project is encrypted the following restrictions are imposed:
"
You cannot see the status of the project through the Project Center or Status shelf
(since that would reveal the contents of the "next due" item) until it has been loaded.
You cannot use Quick Look in the Finder to see a preview or thumbnail of an
encrypted project (since that would reveal its contents).
Curio User Manual"
30
You cannot use Spotlight to search for items in the project (since that would reveal its
contents).
Internally, Curio is using openssl's AES-128 support to handle the encryption and
decryption.
WARNING: If you forget your password, your data will be lost. Zengobi cannot decrypt
the project for you.
IMPORTANT NOTE: Any embedded assets, including documents, images, and audio
and video recordings, will not be encrypted. If you need to encrypt everything in your
Curio project — including all embedded assets — we'd recommend using either a volume
protected with FileVault, or an encrypted disk image that you use to store your Curio
projects (perhaps one disk image per client, for example). Alternatively, you can use an
application such as Knox which can automate the creation and sizing of encrypted disk
images.
"
Curio User Manual"
31
The Dossier [Pro]
Curioʼs Dossier feature helps you define the goals and
constraints of your projects and keeps that information at your
fingertips while you work.
When starting a new project, you need to have a clear understanding of your goals. What
is the desired end result? What requirements must be met? Who is your target audience?
What limitations are imposed on your project? Answering questions like these can help
you crystallize your objectives and jumpstart your problem solving. Having these answers
readily available while you work can help keep you focused. But knowing what questions
you need to ask yourself or your client can be a challenge.
Curio comes with a number of dossier templates to get you started. Each template
contains a series of categorized questions designed to help you think about a specific
type of project. Once added to your project, the list of questions and categories is fully
customizable. You can even create your own dossier templates once you've identified the
series of questions that works best for your type of project. Once you've answered the
questions in the dossier, you should have a better understanding of your creative project.
What is a Dossier?
A dossier is a collection of categorized questions and answers that can help you
accurately define the goals and constraints of your project. In the world of Curio, a
dossier takes the form of a simple form with collapsible sections that can be accessed by
choosing View > Show Dossier from the main menu.
Curio includes a number of dossier templates to help you get started. You can also create
your own templates to use in future projects. Once you select a template to use as the
basis for a project's dossier, you can further customize it to meet project-specific needs
without modifying the original template.
Adding a Dossier to a Project
Each Curio project can have one dossier associated with it.
To switch to the Dossier view, do one of the following:
Choose View > Show Dossier (or press Command-Shift-D).
Click the View button in the project windowʼs toolbar, and then choose Show Dossier
from the popup menu.
The first time you attempt to switch to the Dossier view within a project window, Curio will
ask you to choose a template to use as the starting point for the projectʼs dossier. You
can always change the template later if you wish.
To choose a Dossier template:
1. Select a template from the list of templates on the left side of the Choose Template
dialog. As you change the selection, you can read the description of the template on
the right to help you decide if itʼs the template you want.
"
Curio User Manual"
32
2. Click Choose Template to add the selected template to your Curio project.
If you chose the “Blank” template, then you will immediately see a new dialog that allows
you to name your blank dossier and add categories and questions to it, otherwise you will
see the chosen dossier form.
Customizing a Dossier
The first thing you might want to do is customize the list of categories and questions
contained by your dossier to fit your projectʼs specific needs. Youʼll notice that thereʼs a
little button in the upper right hand corner of the dossier form view that has a picture of a
gear on it. Thatʼs the actions button, and, by clicking it, you can access a menu of
dossier-related actions.
Note that Curio may have parental controls enabled that prevent dossier customization.
Please see the Curio Parental Controls section for more details.
To edit a dossierʼs questions and categories:
1. Click on the actions button to reveal the actions popup menu.
2. Choose “Edit Questions…” from the actions menu.
3. Make modifications in the “Edit Dossier” dialog by doing any of the following:
•
•
Reorder categories and questions by dragging them to their new location.
•
Move questions between categories by dragging them to their new location.
•
Edit the title of a question or category by double-clicking it and typing the new
title.
•
Show or hide categories or questions by clicking the check box next to the item.
•
Add new categories by clicking the “Add Category” button.
•
Add new questions by selecting a category or question and clicking the “Add
Question” button (or press the Return key).
•
To change the size of a questionʼs edit field, choose the size from the Input
Height popup. Small means a single-line edit field, medium means a multi-line
edit field approximately 5 lines high, and large means a multi-line edit field
approximately 10 lines high.
•
Delete categories and questions by selecting them then pressing the Delete key.
•
To change the title of the dossier, type a new title in the Title field.
Click Update to save your changes.
There are a couple of rules that are enforced when editing a dossier. First, a category can
only contain questions, not other categories. Second, a question must belong to a
category.
Creating a Dossier Template
Once youʼve created a dossier that fits your needs, you may want to reuse it in other
similar projects. Curio allows you to save your dossier as a template that you can use as
the basis for dossiers that you create for other projects.
"
Curio User Manual"
33
To save a dossier as a template:
1. Click on the actions button to reveal the actions popup menu.
2. Choose “Create Template…” from the actions menu.
3. In the “Save Template” dialog, type title and description for your template.
4. You can optionally associate a custom image with your template by dragging an
image to the image-well located to the left of the title field.
5. Click Save.
The template will be saved to the "Library/Application Support/Curio/Dossier Templates"
folder in your Home directory.
To share a dossier template with other users working on the same machine, simply move
the dossier template file to the "/Library/Application Support/Curio/Dossier Templates"
folder. Create the folder if it doesn't already exist.
To share a dossier template with other users working on the same network, simply move
the dossier template file to the "/Network/Library/Application Support/Curio/Dossier
Templates" folder. Create the folder if it doesn't already exist.
Exporting Dossiers and Templates
Once you've completed answering the questions in a dossier, you may desire to share
your dossier with other Curio users who may be working on the same project. Curio
allows you to export your dossier's questions and answers to an external file that other
Curio users can import into any project they wish. You may also export the questions of
the current dossier as a template.
To export a dossier:
1. Choose “Export > Dossier…” from the actions popup menu.
2. Provide the name and location of the export file.
3. Click Export.
The dossier will be exported to the name and location that you specified. You may share
the resulting file with other Curio users who can then import the dossier into their
projects.
You can also save a dossier in rich-text format.
To save a dossier in rich-text format:
1. Choose “Export > In Rich Text Format…” from the actions popup menu.
2. Provide the name and location of the RTF file.
3. Click Export.
Although there's no way to import a dossier from a rich-text format document, this option
allows you to easily tweak the look of the dossier before printing or open it in Microsoft
Word to convert it into a Word document, thus making it easier to share a dossier with coworkers or clients who do not have Curio.
To export a dossier template:
1. Choose “Export > Template…” from the actions popup menu.
2. Provide the name and location of the export file.
"
Curio User Manual"
34
3. Click Export.
Importing Dossiers and Templates
Once you have an exported dossier or dossier template, Curio makes it easy to import it
into an existing project.
To import a dossier:
1. Choose “Import > Dossier…” from the actions popup menu.
2. Locate the exported dossier file.
3. Click Open.
Your current dossier's questions and answers will be replaced with the contents of the
dossier you imported. An even easier way to import a dossier is to simply drag the
exported dossier file onto the dossier view of your project.
To import a dossier template:
1. Choose “Import > Template…” from the actions popup menu.
2. Locate the exported dossier template file.
3. Click Open.
Sharing Dossiers and Templates
Once you have created a unique dossier template, you can easily share the template with
friends or the Curio Community Center.
The Curio Community Center (http://www.zengobi.com/curio/community/) permits easy
sharing and exchanging of many customizable features of Curio. You can quickly
discover new, useful dossier templates and easily add them to your Curio installation.
To send a dossier to a friend via mail:
• Choose “Send Dossier to Friend…” from the actions popup menu.
The dossier is automatically exported and added to a new mail message for you to
address. Your recipient can import the dossier simply by double-clicking the attachment
or follow the Import > Dossier steps as described above.
To send a dossier template to a friend via mail:
• Choose “Send Template to Friend…” from the actions popup menu.
The questions from the current dossier are automatically exported as a template and
added to a new mail message for you to address. Your recipient can import the template
simply by double-clicking the attachment or follow the Import > Template steps as
described above.
To send a dossier template to the Curio Community Center:
• Choose “Send Template to Community Center…” from the actions popup menu.
The questions from the current dossier are automatically exported as a template and
added to a new mail message addressed to Zengobi. You can optionally specify that we
attribute the submission to you and include a web link to your website. We will review
your submission before posting it to the Community Center.
"
Curio User Manual"
35
To visit the Curio Community Center:
• Choose “Visit Community Center…” from the actions popup menu.
Your web browser will be opened to the Curio Community Center website. There you can
quickly discover newly submitted dossier template designs. If you find one that sounds
interesting, download the template and double-click the resulting download to
automatically add it to your Curio installation or follow the Import > Template steps as
described above.
"
Curio User Manual"
36
The Idea Space
A Curio project can contain an unlimited number of blank
canvases, called idea spaces, onto which you can place
anything: text, images, web links, movies, music, and
documents of any type. You can also generate mind maps,
outlines, to-do lists, diagrams, and sketches to help flesh out
your ideas.
Curio allows you to organize your idea spaces hierarchically. You can rearrange,
duplicate, and even copy idea spaces between projects with ease.
What is an Idea Space?
Simply stated, an idea space is just a blank canvas. Like a giant whiteboard, you can
write or draw anything anywhere within an idea space. However, unlike a whiteboard, you
can also add images, documents, web links, movies, sounds, address book records, mail
messages, and iCal events. Plus, once added to an idea space, you can easily rearrange
items by simply dragging them around the canvas.
Configuring an Idea Space
The idea space, itself, can be configured in a number of ways. You can set a background
color or image, choose from a variety of grid styles or customize your own, and change
the dimensions and sizing behavior of the idea space. You can change all of these
options using the idea space Inspector, located on the Shelf along the right side of the
project window.
To display the idea space Inspector:
1. If the Shelf isnʼt visible, choose View > Show Shelf (or press Command-Shift-I).
2. Within the Shelf, make sure the Inspector view is selected by clicking on the
Inspector button at the top.
3. Make sure the idea space you wish to configure is selected, and not a figure on the
idea space, by clicking on the background of the idea space.
Modifying the background of an idea space
You can change the background color and image of any idea space.
To change the background of an idea space:
1. To change the background color, click on the color well in the Background section of
the idea space Inspector and choose a different color.
2. To change the background image, drag an image from the Finder or another
application to the image well in the Background section of the idea space Inspector.
"
Curio User Manual"
37
You can adjust the opacity of the selected background image using the opacity slider.
Click the Clear button next to the image well to remove the background image.
You can also change the way the background image is scaled. You can choose to have
the image tiled over the whole idea space, centered within each page of idea space, or
stretched to fit each page of the idea space either proportionally or not.
You can change the color used to display page breaks by clicking on the page break
color well and choosing a new color. To show page breaks, choose View > Show Page
Breaks.
Modifying the notepaper/grid of an idea space
An idea space can display a layout grid to help you with drawing and arranging figures
within the idea space. You can change the grid spacing and color of any idea space.
Grids can also be created which look like various notepaper styles.
To change the notepaper/grid properties of an idea space:
1. Open the Notepaper/Grid section of the idea space Inspector if itʼs not already
displayed.
2. Adjust the spacing of the major and minor grid lines using the Major Size and Minor
Size sliders.
3. Change the color of the major and minor grid lines using the color wells next to the
Major Size and Minor Size sliders.
4. Independently toggle the visibility of the vertical and horizontal grid lines using the
Visibility checkboxes.
5. Independently toggle whether or not figures should snap to the vertical and horizontal
grid lines using the Snap checkboxes.
You can also choose from several predefined grid styles by selecting the style from the
Style popup menu.
Defining notepaper/grid styles
Curio allows you to easily create and re-use notepaper/grid styles, which include major
and minor grid lines and background color.
To save the current attribute settings as a new notepaper/grid style:
1. Click on the Actions button to the right of the Style popup, it looks like a little gear.
2. Choose the Save As menu item.
3. Enter a name, or select an existing style name, and press Save. Note that changing
an existing style wonʼt retroactively change all idea spaces that use that style. It will
only change newly created idea spaces.
To remove a list style:
1. Select the style you wish to remove in the Style popup.
2. Click on the Actions button to the right of the Style popup, it looks like a little gear.
3. Choose the Remove menu item. Note that you can only remove styles that you have
created, not the style that are bundled with Curio.
"
Curio User Manual"
38
Sharing notepaper/grid styles
Once you have created a unique notepaper/grid style, you can easily share it with friends
or the Curio Community Center.
The Curio Community Center (http://www.zengobi.com/curio/community/) permits easy
sharing and exchanging of many customizable features of Curio. You can quickly
discover new, useful notepaper/grid styles and easily add them to your Curio installation.
To send the current notepaper/grid style to a friend via mail:
• Choose “Send to Friend…” from the style actions popup menu.
The style is automatically exported and added to a new mail message for you to address.
Your recipient can import the style simply by double-clicking the attachment or by
dragging it to the Notepaper/Grid Inspector.
To send the current notepaper/grid style to the Curio Community Center:
• Choose “Send to Community Center…” from the style actions popup menu.
The style is automatically exported and added to a new mail message addressed to
Zengobi. You can optionally specify that we attribute the submission to you and include a
web link to your website. We will review your submission before posting it to the
Community Center.
To visit the Curio Community Center:
• Choose “Visit Community Center…” from the style actions popup menu.
Your web browser will be opened to the Curio Community Center website. There you can
quickly discover newly submitted notepaper/grid styles. If you find one that sounds
interesting, download the style and either double-click the resulting download or drag it to
the Notepaper/Grid Inspector to easily add it to your Curio installation.
Modifying the size of an idea space
An idea space can be as big as you want it to be. It can even be configured to grow
automatically as you add new items to it. You can change the size of any idea space
using the Inspector.
To change the size of an idea space:
1. Open the Dimensions section of the Display Inspector if itʼs not already expanded.
2. Adjust the size of the idea space in pixels, screens, or printed pages by either typing
in the new value or using the stepper to the right of the current value.
3. Click Set to apply the changes.
Click Shrink to Minimum to reduce the size of the idea space to its minimum values
based the content currently displayed in the idea space. This calculation takes into
consideration the chosen unit of measurement. For example, if you choose Pages as
your unit of measurement, then Shrink to Minimum will reduce the idea space to the
fewest whole number of pages required to display the current content.
You can also set the idea space to automatically increase in size as needed by pages,
screens, and pixels. Vertical and horizontal preferences can be set separately. If an idea
space is set to automatically grow in size, then as content is placed beyond the current
borders of the idea space, it will automatically grow to accommodate it.
Click Load Default to reset the current dimensions to the default setting.
"
Curio User Manual"
39
Click Save As Default to save the current dimensions as your new default idea space
size.
Note: Increasing the size of the idea space will increase the amount of memory Curio
uses to display the idea space. Decreasing the size will reduce the amount of memory
required.
Customizing the transition used for an idea space in a presentation
Each idea space can have its own custom slide transition when being displayed in
presentation mode. The default is to use the transition specified in the Presentation
Preferences panel.
To assign a custom transition to an idea space:
1. Open the Transition section of the Display Inspector if itʼs not already expanded.
2. Choose the type of transition youʼd like to use from the Type popup menu.
3. Choose the desired transition from the Effect popup menu.
You can turn off the slide transition for this idea space by choosing None from the Type
popup menu. You can go back to using the default slide transition by choosing Default
from Preferences from the Type popup menu.
Zooming in and out on the idea space canvas
Sometimes when youʼre fleshing out ideas it helps to zoom in on an idea space for more
detailed work or to zoom out so you can see the whole picture at once.
To zoom in or out:
• Choose a zoom level from the pop-up menu located in the bottom right corner of the
idea space view, or choose View > Zoom > Zoom In, Zoom Out, Zoom Out to Fit,
Actual Size from the main menu.
You can also zoom in and out of the idea space using the mouse. To zoom in using the
mouse, press the Spacebar and Command keys simultaneously and then click the
mouse to increase the zoom level. To zoom out using the mouse, press the Spacebar
and Option keys simultaneously and then click the mouse to decrease the zoom level.
The pointer will change to a magnifying glass with either a plus sign or a minus sign to
indicate whether youʼre increasing or decreasing the zoom level.
You can also quickly zoom to fit the idea space within the view by holding down the Q
key. When you release the Q key, the view will return to its previous zoom level centered
where the mouse was last positioned. This mechanism provides a quick way to navigate
a large idea space.
Changing how snap guides appear
Snap guides appear whenever you drag a figure into alignment with another figure on the
idea space. You can choose to have snap guides show at the edges of figures and the
center of figures, or you can turn them off.
Snap guides also appear when resizing figures that haven't been rotated by non-right
angles.
To show or hide snap guides:
• Choose Arrange > Show Snap Guides from the main menu.
"
Curio User Manual"
40
You can toggle on and off the display of edge and center snap guides independently by
choosing Arrange > Edge Snap and Arrange > Center Snap from the main menu.
You can also change the color of the snap guides.
To change the color of the snap guides:
1. Choose Curio > Preferences from the main menu.
2. Click on Idea Space in the Preference window to display the idea space preferences.
3. Choose a new color for the snap guides using the Snap Guide color well.
Drawing Shapes
Curio provides tools you can use to add shaped figures to your idea spaces, including
arrows, rectangles, rounded rectangles, circles, octagons, hexagons, trapezoids,
brackets, vertical brackets, triangles, diamonds, semicircles, ovals, underline, jaggy
badge, and clouds.
The Shape tool on the toolbar has an arrow located in the lower right portion of the
button. When you click on the arrow, or press and hold the toolbar button down, a menu
displays the list of predefined shapes you can choose. Once you choose a shape, your
choice is reflected by the button's image. Simply clicking the button will reselect the
displayed shape.
To draw a shape:
1. Click on the Shape tool in the toolbar (hold the button down to display a popup menu
of shape choices).
2. Change any style attributes that you wish to make the default for this shape using the
Figure Inspector.
3. Click and drag an area on the idea space to draw the shape.
4. Repeat step 3 to draw multiple shapes using the same style.
You can fine-tune the curves and angles of the chosen shape using the vertical slider
located next to the shapes palette in the Figure Inspector. You can also fine-tune the
margin surrounding the content of the shape using the Margin slider in the Figure
Inspector.
Double click on the shape to add text.
Drawing Lines
The Line tool on the toolbar has an arrow located in the lower right portion of the button.
When you click on the arrow, or press and hold the toolbar button down, a menu displays
the list of predefined lines you can choose. Once you choose a line, your choice is
reflected by the button's image. Simply clicking the button will reselect the displayed line.
To draw a line:
1. Click on the Line tool in the toolbar (hold the button down to display a popup menu of
line choices).
2. Change any style attributes that you wish to make the default for this line using the
Figure Inspector.
3. Click and drag an area on the idea space to draw the line.
"
Curio User Manual"
41
4. Repeat step 3 to draw multiple lines using the same style.
To draw a multipoint line:
1. Click on the Line tool in the toolbar (hold the button down to display a popup menu of
line choices).
2. Change any style attributes that you wish to make the default for this line using the
Figure Inspector.
3. Click and drag an area on the idea space to draw the line.
4. Before you release the mouse button hold down the Option key. When you release
the mouse you'll find that you've dropped a midpoint and now you're placing a new
endpoint. Continue holding down Option to keep dropping midpoints as you release
the mouse. If you're done, just release the Option key before you drop your last point.
5. Repeat step 3 to draw multiple multipoint lines using the same style.
Connecting figures with lines
By default, Curioʼs lines are “sticky”, which means that the endpoints of the lines try to
stick to any figure they encounter. Once stuck to a figure, the line will stretch, shrink, and
shift as necessary when the figure is repositioned on the idea space.
Each figure shape has a set of logical connection points around its edge. Since each
shape is different, the connection points are different for each. There are a variety of
ways to attach the endpoint of a line to a figure. You can connect it to the nearest
connection point, to a specific connection point, to the center of the figure, or to any
position within the figure. You can also easily toggle off stickiness on the fly.
To connect a line endpoint or midpoint to a figure:
1. Drag the endpoint or midpoint on the line.
2. As you hover that point over another figure, the figure will glow. The glow determines
how the line will stick:
a. Closest Connection Point: If you hover the point near the edge of the
figure, youʼll see the figure glow purple and the connection points for that
figure will be displayed along the edges. Releasing the mouse will
dynamically connect the line to the closest connection point even if the
figure is rotated or moved.
b. Specific Connection Point: If you can hover over a specific connection
point to stick it directly to that one and remain stuck to that specify
connection point even if the figure is rotated or moved.
c.
Towards the Center: If you hover the point closer to the center of the
figure, it will glow green indicating that the line will be connected against
the edge of the figure pointing towards the figureʼs center.
d. Specific Position: If you press the Command key while hovering the point
over the figure, it will glow orange and you can connect the line to a
specific position on the figure. Note the position will scale appropriately if
the figure itself is scaled. Also note that if you stick a line to a position on
another line it will also scale if the line is scaled.
e. Non-Sticky Point: If you press the Control key the figure will stop glowing
and the line will not stick to the figure at all. The Control key temporarily
disables the sticky feature.
"
Curio User Manual"
42
As described above for multipoint lines, if you also hold down the Option key during the
creation of a new line then you can create a multipoint line on-the-fly where any of the
points on that line can be stuck to other figures using the normal sticky techniques. Note
this Option key trick only works when dragging out brand new lines, not editing existing
lines.
Working with midpoints
While you can create a multipoint line on-the-fly using the technique described above,
you can also modify an existing line to add or remove midpoints.
Each midpoint can be connected to other figures as described in the “Connecting figures
with lines” section above.
To insert a midpoint:
• Right-click on the line and choose Insert Midpoint from the popup menu.
To remove a midpoint:
• Right-click on the midpoint and choose Remove Midpoint from the popup menu.
To remove all midpoints:
• Right-click on the line and choose Remove All Midpoints from the popup menu.
Modifying lines
You can change several line specific attributes using the inspector or Inspector Bar.
To add an arrowhead:
• Choose a new arrowhead style for the lineʼs starting point (green selection handle) or
ending point (red selection handle) using the popups in the Lines section of the
Shape inspector. You can also click the Fill checkbox to fill the arrowhead if
permitted. The slider next to those checkboxes can be used to adjust the size of the
arrowhead.
To modify the line thickness:
• Type in a new thickness in the Shape inspector, or use the spinner control next to the
thickness edit field, or press the [ or ] keys on your keyboard to decrease or increase
the current thickness.
To modify the line dash pattern:
• Choose a new dash style from the popup near the thickness field in the Shape
inspector.
To modify the line type (straight, curved, orthogonal):
• Click on the popup in the Lines section of the Shape inspector to change the line type
from a normal straight line to a curved (spline) line or orthogonal line .
Adding Text
You can place text anywhere you want on an idea space by adding a text figure. There
are actually three different methods you can use when creating a text figure. The first
method creates a text figure that automatically resizes itself horizontally and vertically as
you type to accommodate your text. The second method creates a text figure with a fixed
"
Curio User Manual"
43
width and automatically wraps the text and sizes the figure vertically as you type to
accommodate your text. The third method gives you complete control over the width and
height of the figure, but the text is clipped if the figure is too small to display it.
To create a text figure that sizes itself horizontally:
1. Click on the text tool in the toolbar.
2. Click anywhere in the idea space and start typing.
To create a text figure with a specific width:
1. Click on the text tool in the toolbar.
2. Click and drag your mouse in the idea space to create a text figure with the desired
location and width.
3. Start typing.
To create a freeform text figure:
1. Draw a shape using the shape tool as described previously.
2. Double-click on the shape to convert it into a freeform text figure.
3. Start typing.
You can convert any text figure into a freeform text figure using the Text section of the
Figure Inspector. Check the box labeled “Allow full control of figure size”. Uncheck the
box to convert it back into a standard text figure where you control the width, but the
height is automatically adjusted to display all of the text.
Attached Text Figures
If a text figure is selected or is being edited, then you can quickly create an attached
figure – that is, a text figure with a sticky line attaching the current figure and the new
figure – by simply holding down the Command key when clicking on the idea space
background.
By default, the line connecting the current figure and the new figure will have an
arrowhead pointing to the new figure (a unidirectional line). However, other connecting
lines are also possible as described below.
To create an attached text figure with a unidirectional connecting line:
1. Edit or select an existing text figure.
2. Click on the idea space background while pressing the Command key.
To create an attached text figure with a bidirectional connecting line:
1. Edit or select an existing text figure.
2. Click on the idea space background while pressing the Command+Shift keys.
To create an attached text figure with a nondirectional connecting line:
1. Edit or select an existing text figure.
2. Click on the idea space background while pressing the Command+Option key.
"
Curio User Manual"
44
Working with Figures on an Idea Space
Anything you add to an idea space, with the exception of scribbles created using the
brush tools, is a figure. There are several different types of figures that can be created
including mind maps, lists, images, shapes, text figures, boxed note text figures, sticky
note text figures, PDF figures, movies, music figures, web links, figure groups, and
documents.
Selecting figures
Before you can do anything with a figure in an idea space, you need to select it first.
When you select a figure, it appears surrounded by a blue highlight and possibly
selection handles (tiny squares that you can use to size and rotate the figure with your
mouse).
To select a figure:
1. Click on the Select tool in the toolbar (the button with an arrow on it).
2. Click on the figure you wish to select.
You can select multiple figures by holding down the Shift or Command key while clicking
on additional figures.
You can also select a group of figures by selecting a region of the idea space canvas.
Press and hold the mouse button down on the idea space background, then drag the
mouse to create the selection region. Any figures or sketches in the region will be
selected. By holding down the Option key while dragging, only figures will be selected. By
holding down the Command and Option keys while dragging, only sketches will be
selected.
You can select all figures and sketches within an idea space by choosing Edit > Select All
from the main menu.
If a figure within a list is currently selected, then choosing Edit > Select All will select all of
the figures within the list.
Adjusting the location and size of figures
You can change the location and size of any figure on an idea space.
To change the location of a figure:
• Simply drag the figure using the mouse to the new location on the idea space.
For more exact control over the location of a figure, you can use the controls of the
Geometry Inspector.
To change the size of a figure:
1. Select the figure.
2. Use the mouse to drag one of the figureʼs selection handles (tiny squares located
around the edge of the selected figure). If you have the size tool tip preference turned
on, then Curio will display the current width and height of the figure as you change its
size.
To resize a figure proportionally, hold down the Shift key while you drag the selection
handle. To quickly restore a figure to its natural size, press the N key.
"
Curio User Manual"
45
Note that image figures are automatically assumed to be proportional by default.
Therefore the Proportional checkbox in the Geometry inspector will be checked by
default.
For more exact control over the size of a figure, you can use the controls of the Geometry
Inspector.
Check out the section on Multi-touch Support in the chapter titled “Integrating with Other
Applications” if you own a MacBook model that supports multi-touch gestures.
Rotating figures
You can rotate any figure, except for collection figures like lists and mind maps, to any
angle on the idea space.
To rotate a figure:
1. Select the figure.
2. Hold down the Command key, and then use the mouse to drag one of the figureʼs
selection handles. If you have the rotational tool tip preference turned on, then Curio
will display the current angle of rotation to you as you rotate the figure.
To quickly rotate a figure in 45° increments, simply press the R key (hold down the Shift
key to rotate the figure in a clockwise direction). To quickly set the rotation angle of a
figure to 0°, press the Z key.
You can exert more control over the exact rotation angle and rotate multiple figures at
once by using the controls of the Geometry Inspector.
Check out the section on Multi-touch Support in the chapter titled “Integrating with Other
Applications” if you own a MacBook model that supports multi-touch gestures.
Flipping Images
You can flip any image figure either vertically or horizontally to create a mirror image of
that figure.
To flip an image figure:
1. Select the figure.
2. In the Geometry inspector, click on one of the green arrowed buttons next to the
Natural Size button to flip the image either horizontally or vertically. If you hover the
mouse over the button, a tooltip will be displayed which tells you which button flips in
which direction.
So to create a mirror image of a figure, youʼd first create a copy of the image and then flip
the copy either vertically or horizontally.
Layering figures
Each figure on the idea space is on its own level, so if two figures overlap, one of them
will cover the other. You can adjust which figure lies on top of the other by moving figures
forward or back in the stack of figures.
To move a figure forward or back:
1. Select the figure.
"
Curio User Manual"
46
2. Choose Arrange > Send Backward or Arrange > Bring Forward to move a figure one
position closer to the front or back of the stack. Choose Arrange > Send to Back or
Arrange > Bring to Front to move a figure to the very bottom or top of the stack.
Grouping figures
Once you have placed figures on the idea space canvas in the order and arrangement
that you like, you can group them together so that they can be moved, rotated, or copied
and pasted as a single unit. If the group of figures does not contain a text figure, you can
also resize the group as a single unit. A group of figures can also contain other groups.
To group figures:
1. Select the figures you wish to group. Hold down the Command key to select multiple
figures.
2. Choose Arrange > Group from the main menu.
To ungroup figures, select the group and choose Arrange > Ungroup from the main
menu.
Locking figures to an idea space
You can lock figures on an idea space so that they will not be accidentally moved as you
continue to work.
To lock a figure:
• Select the figure and choose Arrange > Lock from the main menu.
To edit or move a locked figure, you must first unlock it by choosing Arrange > Unlock
from the main menu.
Aligning figures
Curio provides several tools to help you align figures neatly on an idea space. Snap
guides appear whenever you drag a figure into alignment with another figure on the idea
space. You can choose to have snap guides show when the edges of figures align and
when the centers of figures align. You can also turn them off. Snap guides also appear
when you resize a figure that hasnʼt been rotated by non-right angles.
To show or hide snap guides:
• Choose Arrange > Show Snap Guides from the main menu. You can toggle the
appearance of edge and center snap guides independently by choosing Arrange >
Edge Snap and Arrange > Center Snap from the main menu.
You can change the color of the snap guides using the Snap Guides color well in the Idea
Space preferences panel.
To automatically align figures:
1. Select the figures you wish to align.
2. Choose one of the alignment options from the Arrange > Align submenu.
To evenly distribute figures:
1. Select the figures you wish to distribute.
2. Choose one of the distribution options from the Arrange > Distribute submenu.
"
Curio User Manual"
47
Changing Figure Properties
Each type of figure has a default style associated with it that defines the font attributes,
border attributes, and fill attributes of the figure.
You can change any of these attributes for any figure using the Figure Inspector. You can
even redefine the default style for a particular type of figure.
To display the figure Inspector:
1. If the Shelf isnʼt visible, choose View > Show Shelf (or press Command-Shift-I).
2. Within the Shelf, make sure the Inspector view is selected by clicking on the
Inspector button at the top.
3. Make sure the figures you wish to configure are selected.
4. Within the Inspector shelf, click on Figure to display the Figure Inspector.
Changing the border and fill colors of a figure
You can change the border style, thickness, and color of any figure drawn in an idea
space. You can also change the fill color used when drawing simple shapes and text
figures.
To change a figureʼs border and fill colors:
1. Open the Shape section of the Figure Inspector if itʼs not already displayed.
2. Choose another border color by clicking on one of the colors in the color panel or by
using the associated color well.
3. Change the border thickness by typing a new value in the edit field next to the border
style popup menu, or click the stepper to the right of the edit field to increase or
decrease the pen width by 1 point. The maximum value allowed is 10 points.
4. Change the border style by clicking on the border style popup menu and choosing a
new option.
5. Change the fill color by selecting the fill type (None, Solid, or Gradient), then use the
associated color well to choose a fill color. You can choose one of the predefined
colors by clicking on the color in the color palette. For gradient fills, you can change
the angle of the gradient by dragging the angle wheel or typing a new value in the
angle edit field.
Changing the shape of figures
You can change the shape of any figure on an idea space, except for lines and collection
figures like mind maps and lists.
To change the shape of a figure:
1. Open the Shape section of the Figure Inspector if itʼs not already displayed.
2. Click on the desired shape button, such as the Triangle, Hexagon, or Cloud.
Some shapes allow you to modify their corner attributes using the Corners slider, which is
the vertical slider located to the right of the shapes palette in the Figure Inspector. You
can also adjust a shape's margin using the Margin slider. The margin determines the
distance between a shapeʼs edge and its contents.
"
Curio User Manual"
48
Adjusting the opacity of figures
Any figure on the idea space canvas, including text, can be made to appear more
transparent or more opaque. You can adjust the figure's opacity in the Figure Inspector
pane.
To adjust the opacity of a figure:
1. Open the Shape section of the Figure Inspector if itʼs not already displayed.
2. Drag the Opacity slider to the left to make the figure more transparent. Drag the
Opacity slider to the right to make the figure more opaque.
Adding shadows to figures
You can add shadows to any figure in your idea space, including simple shapes, images,
text, list,s, mind maps, movies, and other graphics.
To add a shadow to a figure:
1. Open the Shape section of the Figure Inspector if itʼs not already displayed.
2. Select the shadow checkbox.
To quickly toggle on and off a figureʼs shadow, simply select the figure(s) and press ShiftS.
Changing text attributes
You can change the font style and size, text color, and alignment for any text in your idea
space using the Figure Inspector.
To change the font style, size, text color, and alignment:
1. Select the text figure or the text within the figure that you wish to format.
2. Using the Text section of the Figure Inspector, change the text color by clicking on
one of the colors in the color panel or by using the associated color well.
3. Change the font by choosing a font from the Font popup menu.
4. Change the font size by selecting a size from the size popup menu or typing a new
value in the size text field.
5. Click the Bold, Italic, Underline, and Strikethrough buttons to toggle their settings.
6. Change the horizontal text alignment by clicking on one of the horizontal alignment
buttons.
7. Change the vertical text alignment by clicking on one of the vertical alignment
buttons.
8. Force an exact line height for the selected text by entering a point value into the Line
Height field. Press the Auto button to allow line height to be automatically determined
by the system. Press the From Grid button to set the line height to the same as the
grid spacing (particularly useful with notebook paper style vertical-only grid
snapping).
If youʼve selected a figure that displays text, then your changes will be applied to all of the
figureʼs text. If youʼve selected text within the figure, then your changes will only be
applied to the selected text.
Ordinarily, Curio controls the height of a text figure based on the width. You can adjust
the width, and Curio will automatically adjust the height of the text figure to assure the
"
Curio User Manual"
49
figure is only as tall as it needs to be to display all of the text. If you wish to assert full
control over both the width and height of the text figure, check the box labeled "Allow full
control over figure size". Text will be clipped as necessary based on the size of the figure.
Changing asset figure attributes
Figures associated with an asset, like an image or a document, are called asset figures,
and they have some special attributes associated with them. You can control whether a
preview of the asset is displayed or the assetʼs icon, and you can control how big you
want the icon to be. In the case of a PDF figure, you can even choose which page of a
multi-page PDF document is displayed when previewed.
To change asset figure attributes:
1. Select the asset figure.
2. Using the Asset Figures section of the Figure Inspector, click Preview to view a
preview of the asset within the idea space or click Icon to view the asset as an icon.
Some asset types arenʼt capable of being previewed within Curio.
3. Use the Icon Size slider to adjust the size of the icon displayed.
4. When a PDF asset figure is selected, you can type the page number of a multi-page
PDF to display in the preview or use the stepper to the right of the PDF Page field to
increase or decrease the page number being displayed.
5. Check the box labeled Share when duplicated to ensure that only one copy of the
asset is stored within the Curio project even when the asset figure is duplicated.
Uncheck the box to ensure a copy of the underlying asset is created when the figure
is duplicated.
Setting the default style of figures
You can set a default style for each of the following figure types:
•
Text
•
Images
•
PDF documents
•
Movies
•
Music and sound
•
Web links
•
Documents
•
Groups
•
Lists
•
Mind maps
•
Tables
•
Index Cards
Attributes included in the style definition include all text attributes, border shape, color,
thickness, and pattern, fill color and style, interior margin, opacity value, corners value,
the visibility of shadows, to-do checkboxes, and ratings, and icon size.
"
Curio User Manual"
50
To set the default style of a figure type:
1. Select a figure of the appropriate type in an idea space.
2. Configure its settings how you want them.
3. Choose Format > Set as Default Style for Figure from the main menu.
Any new figures of the given type will be created using the default style you set.
Creating and Using Figure Styles
In addition to setting the default style of a figure, you can also create new named styles
and use them to quickly change the selected figures attributes. A named style falls under
one of four categories based on the type of figure from which it was generated: list style,
mind map style, table style, line style, or basic figure style.
To create a new figure style:
1. Select a figure in an idea
space.
2. Configure the attributes
how you want them.
3. In the Style inspector,
located at the bottom of the Figure inspector view, click on the action button (looks
like a gear) next to the popup menu.
4. Choose Save As from the resulting popup menu, then type a name when requested
for one. Click Save to save the new style.
To apply a figure style to a figure:
1. Select a figure in an idea space.
2. Choose the named style from the Choose popup menu in the Style inspector. You
can also use the Style popup menu in the Inspector Bar.
The style popup menu will only display the named figure styles appropriate for the
selected figure. For example, if you have selected a line figure, then only the named line
styles will be displayed.
To remove a figure style:
1. Select the style you wish to remove in the Style popup.
2. Click on the Actions button to the right of the Style popup (looks like a gear).
3. Choose the Remove menu item. Note that you can only remove styles that you have
created, not the styles that are bundled with Curio.
Collection figures, level styles, and branch colors
List and mind map figures are considered collection figures because they collect a group
of figures and arrange them in a specific hierarchical format.
Collection figures support an additional feature called level styles. When enabled, any
style change you make to a figure on a specific hierarchical level will automatically be
reflected by all other figures on that same level.
"
Curio User Manual"
51
On top of that, collection figures support branch coloring where certain color attributes
can be shared between all figures on a hierarchical branch. These colors will override the
colors specified by any applicable level styles.
To enable level styles:
1. Select a collection figure in an idea space.
2. Check the box titled Support level styles in the Collection Options section of the Style
inspector.
You can disable level styles for specific levels by selecting a figure on each level you wish
to disable level styles for and checking the box titled “Except for the selected levels”. You
can also disable level styles for specific figures by selecting the figures and checking the
box titled “Except for the selected figures”.
You can use the selected figure to define the style for all figures on the same level or to
define the default style for figures on levels with undefined styles.
To use a figure to define the style for a level:
1. Select a figure in the collection figure at the level for which you wish to define a style.
2. Configure the figureʼs attributes as you wish.
3. Click the button titled “This level” under the “Use the selected figure as the style for:”
section of the Collection Options in the Style inspector.
To use a figure to define the style for any undefined level:
1. Select a figure in the collection figure at the level for which you wish to define a style.
2. Configure the figureʼs attributes as you wish.
3. Click the button titled “Any undefined level” under the “Use the selected figure as the
style for:” section of the Collection Options in the Style inspector.
To enable branch color overrides:
1. Select a collection figure in an idea space.
2. Check the box titled Support branch color overrides in the Collection Options section
of the Style inspector.
When branch colors are enabled then specific colors such as pen color, fill color, gradient
colors, and text color are shared between all figures on a branch.
You can specify colors manually simply by selecting any figure in a branch and changing
its color. Automatically all other figures within that branch with adopt the same coloring.
To help you get started, you can also choose an existing color palette as described
below.
To specify a default branch color palette:
1. Select a collection figure in an idea space.
2. The branch color overrides checkbox must be enabled, then you can choose a
palette from the popup under that checkbox.
Note the popup will only show you the first five colors found in the palette, although all
colors will be used for branch coloring when the palette is selected. The colors are
repeated as needed to make sure each branch is colored.
"
Curio User Manual"
52
To import a color swatch into the color swatches palette menu:
• Choose “Import…” from the color swatches actions popup menu. Or drag and drop
one or more color swatch files directly to this area of the inspector.
Supported color swatch formats include Adobe Swatch Exchange (.ase) files. You can
find some of these files from sites such as http://kuler.adobe.com and http://
www.colourlovers.com.
From Kuler, youʼll want to click on the little document icon that has a downwards-pointing
arrow to download the ase-formatted file.
From ColourLovers, youʼll need to register with their site then you can click on the ASE
button next to a color palette to download it.
The color swatches popup also supports a Curio Color Swatch (.curioColorSwatch) file
with a carriage-return delimited list of hex color values (like #aa22ff).
For either format, the title of the swatch is the title of the file.
To remove a color swatch from the color swatches palette menu:
1. Select a color swatch in the color swatches palette menu.
2. Choose “Remove…” from the color swatches actions popup menu.
Sharing named styles
Once you have created a unique style, you can easily share it with friends or the Curio
Community Center.
The Curio Community Center (http://www.zengobi.com/curio/community/) permits easy
sharing and exchanging of many customizable features of Curio. You can quickly
discover new, useful figure styles and easily add them to your Curio installation.
To send the current figure style to a friend via mail:
• Choose “Send to Friend…” from the style actions popup menu.
The style is automatically exported and added to a new mail message for you to address.
Your recipient can import the style simply by double-clicking the attachment or by
dragging it to the Style Inspector.
To send the current figure style to the Curio Community Center:
• Choose “Send to Community Center…” from the style actions popup menu.
The style is automatically exported and added to a new mail message addressed to
Zengobi. You can optionally specify that we attribute the submission to you and include a
web link to your website. We will review your submission before posting it to the
Community Center.
To visit the Curio Community Center:
• Choose “Visit Community Center…” from the style actions popup menu.
Your web browser will be opened to the Curio Community Center website. There you can
quickly discover newly submitted figure styles. If you find one that sounds interesting,
download the style and either double-click the resulting download or drag it to the Style
Inspector to easily add it to your Curio installation.
"
Curio User Manual"
53
Associating Meta Data with Figures
You can associate a variety of meta data with any figure within an idea space. You can
adorn them with check boxes, a variety of flags, and ratings. You can associate
keywords, resources, dates, and notes with them. All of this can be accomplished using
the Meta Inspector.
To display the meta inspector:
1. If the Shelf isnʼt visible, choose View > Show Shelf (or press Command-Shift-I).
2. Within the Shelf, make sure the Inspector view is selected by clicking on the
Inspector button at the top.
3. Make sure the figures you wish to configure are selected.
4. Within the Inspector shelf, click on Meta to display the Meta Inspector.
Changing the display of adornments
You can adorn a figure with a variety of flags, to-do checkboxes, rating stars, priorities,
and actions to make it visually standout within an idea space. The location and size of the
adornments can be customized on a per figure basis.
Adornment options:
1. Select the figure(s) you wish to modify.
2. In the Adornments section of the Meta Inspector, use the Size slider to adjust the size
of the adornments.
3. Use the position wheel to select the location for the adornments. Note that some
collections, like lists or mind maps, may force the adornment position to be in a
specific location.
4. Check the box labeled Display within shape border to display the adornment within
the figureʼs shape; otherwise it will be displayed outside of the shape.
5. Check the box labeled Show to-do checkboxes / % complete to display a checkbox
or percent complete indicator. You can also click the Show Checkmark item in the
Flags popup in the Inspector Bar.
6. Check the box labeled Show start and due date adornments to display start date and
due date adornments which include color-coded jewels which match the Status shelf
jewels and Project Center jewels.
7. Check the box labeled Show actions adornment (if one is set) to display a jump
adornment if the user has an associated action. Simply clicking that adornment will
perform the associated action.
8. Check the box leveled Show ratings adornment to display the figureʼs rating.
To associate a figure with various flag meta data:
1. Select the figure(s) you wish to modify.
2. To assign a priority to a figure, use the Priority slider in the Flags section of the Meta
Inspector to adjust the priority level or use the Rating popup in the Inspector Bar.
3. To assign a rating to a figure, click on the rating stars located in the Flags section of
the Meta Inspector or use the Rating popup in the Inspector Bar.
"
Curio User Manual"
54
4. Set the completion percentage for a figure by typing a new value in the % complete
field located in the Flags section of the Meta Inspector, or use the stepper to the right
of the field to increase or decrease the value. Or use the Checkmark popup in the
Inspector Bar. Note that you can also click the From Resources checkbox next to the
% complete indicator in the inspector to indicate that the percentage should be
automatically determined based on the status of the assigned resources.
5. Set a decoration flag by drag-and-dropping an image into the decoration image well
in the Flags section of the Meta Inspector or double-click the image well to show the
standard Apple image panel. These decorations arenʼt searchable — unlike custom
flags you create in the Preferences > Flags window — but this is handy way to
quickly associate an image decoration with your figure. Like the other adornments
you can change the size of this image via the Adornment Options size slider
described above.
6. To assign flags to a figure, click on the appropriate flag buttons located in the Flags
section of the Meta Inspector or choose a flag from the Flags popup in the Inspector
Bar. You can quickly remove all flags by clicking the Clear All Flags button in the
Flags section of the Meta Inspector.
Figures within groups will not display flags, checkboxes, ratings, or priorities.
Tagging figures
You can associate user-defined keywords, also known as tags, with assets and figures in
your project. Later, youʼll learn how you can search your project for assets and figures
based on tags.
To associate a tag with a figure or an asset:
1. Select the figures or assets you wish to tag (either in an idea space or in the Library).
2. Check the tags you wish to associate with the selected figures and assets in the Tags
section of the Meta Inspector.
You can quickly add new tags by typing the tag name in the field just below the list of tags
in the Tags section of the Meta Inspector, and then clicking Add Project Tag or pressing
Return. You can also create your own tag sets using the Tag Preferences discussed later.
To manage a projectʼs tags, click the “Edit…” button in the Tag Inspector (or choose File >
Project Properties from the main menu, then click on Tags). You can add new tags by
typing the tag name in the edit field below the list and clicking Add. You can delete a tag
by selecting it and pressing the delete key. You can merge multiple tags by selecting
them in the list, then choosing the name of the tag you wish to merge them into from the
Merge popup menu, and then click Merge.
Assigning dates to figures
You can assign a start date, due date, duration, and completion percentage to any figure
within an idea space.
To assign a start date, due date, and duration to a figure:
1. Select the figures you wish to modify.
2. To assign a start date, check the box labeled Start date, and then click in the date
control to choose a date from the popup calendar.
3. To assign a due date, check the box labeled Due date, and then click in the date
control to choose a date from the popup calendar. If you have a Start date assigned
"
Curio User Manual"
55
to this figure, then you can select Start Date + Duration from the Determine popup
menu to have Curio calculate the due date based on the chosen start date and the
assigned duration.
4. To assign a duration to a figure, simply type the new value in the Duration field. You
can use the popup menu to the right of the Duration field to choose Days, Weeks, or
Months. If you have Start and Due dates assigned to this figure and the Due date is
determined Automatically or by Start Date + Duration, then Curio will automatically
update the due date to reflect your duration changes.
You can also set many of these options via the Inspector Bar.
How Curio calculates start dates, due dates, completion percentages within a
collection figure:
If a figure is contained within a collection figure such as a List or a Mind Map, then some
of this information can automatically be calculated by Curio based on the hierarchy.
Choose Automatically from the appropriate Determine popup menu to have Curio attempt
to automatically calculate the date. You can always override any date automatically
calculated by Curio by choosing the Manually Specified option from the Determine popup
menu and specifying the date directly.
Note that you can tell Curio to use the Manually Specified option be default by checking
the Idea Space preference titled “Start and due dates default to manual entry mode” in
Curioʼs preferences.
1. If a figure has children, then the completion percentage will be computed via its
children. Else, if any resources have assigned completion percentage values then
they will be used in the computation. Else, the user can specify a completion
percentage value directly.
2. If a figureʼs start date is specified as “When Parent Starts” via its Determine popup
menu and the figure has a parent with an assigned start date, then the start date will
be inherited from the parent figure. If a figureʼs start date is specified as “When
Previous Ends”, and the figure has a previous sibling figure, then the start date will be
determined by the previous siblingʼs due date. If the start date is specified as
“Manually Specified”, then you can enter any date you choose.
3. If a figure has children and the due date is determined by “When Children End”, then
the due date will be set to the greatest due date of itʼs children. Else, if the due date
can is determined by “Start Date + Duration”, then it will be computed using those
values (note that due dates will automatically skip weekends if durations are specified
in days). Otherwise, the user can specify a due date directly, by choosing “Manually
Specified” from the Determine popup menu..
4. If a figure has children, then the duration will be computed from the figureʼs start and
due dates which were determined as described above. This is a great way to see, at
a glance, how long a project will take. The units will automatically be in days, and
therefore will be adjusted to not include weekend days.
Associating resources with your project
You can associate resources with your projects via the Project Properties dialog. You can
drag and drop people from your Address Book or any vCard files directly into the
resources list, or you can manually enter names.
"
Curio User Manual"
56
To add resources to a project:
1. Click the “Edit Resources…” button in the Resources Inspector, or choose File >
Project Properties from the main menu, then click on Resources.
2. Type a name in the Name field. You can optionally type an email address into the
Email Address field. You can optionally drag an image to the image well located to
the right of the Name field.
3. Click Add.
If you have people in your Address Book or if you have vCard files of people you want to
add as resources, you can drag and drop them directly into the Resources list.
To update a previously added resource, select the resource in the list, update the
information in the Name and Email fields or the image well, and then click Update.
To delete a resource, select the resource in the list and press the Delete key.
Assigning resources to figures
After associating resources with your project, you can assign them to figures within an
idea space. You can even supply a completion percentage for each assigned resource.
Curio will show the individual images of up to five resources as figure adornments. If you
have more than five resources associated with a figure, then a single icon will be used to
represent them all.
To assign resources to a figure:
1. Select the figure(s) you wish to assign resources.
2. Check the box next to each resource you wish to assign to the selected figure(s) in
the Resources section of the Meta Inspector.
3. Double-click the completion percentage next to each resource to type a new value.
Adding notes to figures and assets
You can associate notes with figures and assets in your project.
To associate a note with a figure or an asset:
1. Select the figures or assets you wish to associate with a note (either in an idea space
or in the Library).
2. Type the note in the Notes field of the Meta Inspector.
When a figure has an associated note then a note adornment is automatically displayed.
You can hover the mouse over the adornment to easily read the note.
Setting figure actions
You can assign an action to a figure within an idea space so that double-clicking that
figure can navigate your idea spaces, jump to any figure, create an email, or even launch
a file, an URL, or some AppleScript.
To set the action for a figure:
1. Select the figure you wish to assign an action.
2. Choose the desired action from the Type popup menu in the Actions section of the
Extras Inspector.
3. Based on the chosen action, fill out the remaining fields.
"
Curio User Manual"
57
4. Click Set to set the action for the selected figure. You can restore its default doubleclick behavior by clicking Restore.
If you specify a jump action to an idea space or figure, Curio will still be able to find it
even if the destination is later moved. If the jump action goes to a location in another
project it will open that project in separate window.
To activate the action:
• Double-click the figure.
or...
•
Click its adornment.
If the figure is a text figure, and you wish to edit it, you need to click-click it. This same
technique is used to rename files in the Finder. Itʼs a bit slower than a double-click since
a double-click would activate the action.
Note that if you export your project as HTML, certain actions will not work through the
browser interface. Open File actions will not work if the file is not within Curio's asset
library, and AppleScript actions are simply not supported for launching in browsers for
security reasons.
Linking Figures
Curio has several methods for linking figures together including jump actions, jump
anchors, idea space links, and external hyperlinks.
Creating jump actions
You can assign a jump action to a figure so that double-clicking that figure can navigate
to a specific idea space or even a specific figure — even in another project!
To set a jump action for a figure:
1. Select the target figure or idea space.
2. Choose Edit > Copy from the main menu.
3. Select the figure(s) to which you wish to assign the jump action.
4. Choose Edit > Paste As > Jump Action to set the jump action.
If the figure is moved, Curio will still be able to find it and jump to its new location.
See the section above on Figure Actions for more information regarding how actions work
in Curio.
Adding and using jump anchors
As an alternative to assigning a figure a jump action, you can use a jump anchor to jump
to different locations. A jump anchor is a simple icon you can place anywhere on an idea
space.
To add a jump anchor:
1. Select the target figure or idea space.
2. Choose Edit > Copy from the main menu.
3. Go to the idea space where you want to place the anchor.
"
Curio User Manual"
58
4. Choose Edit > Paste As > Jump Anchor from the main menu.
Curio will create a jump anchor figure. You can click and drag this figure anywhere. You
can also copy & paste it, duplicate it, or change its attributes in the Inspector.
To use a jump anchor:
• Double-click on the jump anchor.
Curio will bring you to the jump target with that figure centered in the screen.
Adding idea space links
You can also create links between idea spaces even from different projects by adding an
idea space link figure.
To add an idea space link figure:
• Drag the idea space from the Organizer of a project window and drop it onto an idea
space.
The new figure will display a preview of the represented idea space unless the
represented idea space is the same as the idea space on which it was placed or is from a
different Curio project. If the represented idea space is the same as the idea space on
which it was placed, Curio will display a distinctive “you are here” icon. If the represented
idea space is from a different Curio project, Curio will display a distinctive “external
project” icon.
You can right-click on the resulting figure and choose “Show as Icon” then give the figure
an appropriate title like “Click here to learn more”.
Copying external hyperlinks
You can easily create hyperlinks to figures or idea spaces within a Curio project for use
outside of Curio, for example in a browser web page or another application.
Creating an external hyperlink to an idea space:
• Right-click on the idea space background and choose Copy As > External Hyperlink.
Creating an external hyperlink to a figure on an idea space:
• Right-click on a figure and choose Copy As > External Hyperlink.
An URL of the form “curio://projectPath/ideaspace=uuid/figure=uuid” will be added to the
clipboard for pasting elsewhere.
You can even use that URL within Curio in two ways:
1. Simply paste the URL to create an URL asset figure. You can rename the figure and
the underlying URL will remain in place — you can see it via the Action inspector
under the Extras tab.
or...
2. You can create a text hyperlink within Curio by selecting some text and choosing
Format > Text > Add Link and pasting the URL into the dialog that appears.
Please note that since the project path is included in that URL then renaming a project or
moving it into a different directory structure will break any external hyperlinks.
"
Curio User Manual"
59
Recording video and audio assets
You can record video and audio assets and insert them into the current idea space.
To insert a new video or audio recording into the current idea space:
• Choose Insert > Recording > Video Recording or Audio Recording from the main
menu.
Curio will create a new recording asset and automatically insert it into the active idea
space, then open a recording window. Press the Record button when youʼre ready to
start recording, then press it again when you finished. Curio will ask you for a title for the
new recording, then close the recording window.
Playing multimedia assets
You can playback QuickTime movies, VR animations, music, and sounds directly within
an idea space.
To play a QuickTime or sound asset:
• Double-click the asset figure in the idea space to activate the QuickTime viewer in
place.
Once the QuickTime viewer is activated, you can interact with it as you normally would.
Press the play button to play a movie or a sound, click and drag your mouse to navigate
a VR animation.
If the asset figure was originally displayed at an angle, the asset figure will automatically
change it's orientation to a 0º angle of rotation while activated and return to it's original
rotation when deactivated.
Using Brushes and Pens
Inevitably, while brainstorming or thinking through an idea, you may need to sketch
something out when the keyboard just wonʼt do. Fortunately, Curio has sketching tools
built right in, so you donʼt have to stop and launch another application when inspiration
strikes!
Curio comes with several styluses to use when drawing, including a pencil, ballpoint, felt
tip, paint brush, and highlighter. Each stylus has different settings for color, line thickness,
and opacity that have been configured to mimic the real world object that it represents.
For example, a pencil typically draws a thin grey line which is somewhat opaque,
whereas a highlighter pen draws a much thicker line which is more transparent and
typically light green or yellow. You can change the color, brush thickness, and opacity of
any stylus.
Many of the styluses are also fully pressure-sensitive when used with a graphics tablet
whereby the brush size and color saturation may change while you are drawing based on
the pressure applied to the pen.
While sketching, your scribbles will appear on top of all other figures and items on the
idea space. The scribble layer acts as an onionskin appearing on top of your idea space.
"
Curio User Manual"
60
Creating a Scribble
To draw with a pen or brush:
1. Click on the Brush tool in the toolbar and choose the brush or pen you want to use.
Note for super-responsive mouse handling the idea space will temporarily go into
Quick Render mode where shadows are hidden and text rendering is optimized.
2. If the Shelf isnʼt visible, choose View > Show Shelf (or press Command-Shift-I) so
you can see the Brushes inspector.
3. In the Inspector, you can optionally modify the brush to the size and size you wish to
use.
4. Begin drawing in the idea space. While in scribble mode, you can continue to change
the brush attributes or choose a different brush or pen from the toolbar.
When you choose a non-brush or eraser tool on the toolbar the idea space Quick Render
mode will end and shadows and high-resolution text formatting will be restored.
To erase a portion of your drawing:
There are several ways to erase something in your scribble layer.
1. Use the select tool in the toolbar (looks like a mouse arrow pointer) to drag-select a
region. You can hold down the Option and Command keys while dragging to select
only your scribble and not any figures or other items on the idea space.
2. Press the delete or backspace key on your keyboard, or choose Edit > Delete.
or
•
Click on the Eraser tool in the toolbar and “draw” where you want to erase. You can
even change the size of the eraser using the Inspector.
or
•
If you are using a graphics tablet that has a pen with an eraser tip, you can simply
turn the pen over to erase a portion of your drawing.
Modifying Brush Attributes
Using the Brushes inspector, you can customize several brush attributes. You can also
select a different brush or the eraser directly from the Brush inspector without having to
use the toolbar.
To change the brush size:
• Drag the Size slider. Note that if the brush is pressure-sensitive then this size is the
maximum size given a maximum amount of pressure.
To change the brush opacity:
• Drag the Opacity slider.
To enable or disable brush color pressure sensitivity:
• Check or uncheck the “Color is pressure-sensitive” checkbox.
To enable or disable brush size pressure sensitivity:
• Check or uncheck the “Size is pressure-sensitive” checkbox.
"
Curio User Manual"
61
To choose a brush color:
• Click on the color in the color matrix. You can also click the large color well on the left
side of the matrix to select a custom color using the standard Apple Colors panel.
You can customize each color in the color matrix by simply double-clicking on a color
cell. And, lastly, you can click on one your most recently used dozen colors, which
are listed in a row below the color matrix.
Any changes you make to a particular stylusʼ attributes will automatically be saved and
restored after restarting Curio. If you wish to switch a brushes settings back to the default
settings, then select the brush and click on the Reset Brush button located in the Brushes
inspector.
Working with Scribbles
To convert a scribble to an image figure:
1. Using the select tool in the toolbar (looks like a mouse arrow pointer) drag-select a
region. You can hold down the Option and Command keys while dragging to select
only your scribble and not any figures or other items on the idea space.
2. Choose Edit > Convert Selection to Image Figure.
You now have an image figure that you can treat as a normal figure on the idea space:
give it a border, move it above or below other figures, or even add it to a list or mind map.
To convert a figure to a scribble:
1. Using the select tool in the toolbar (looks like a mouse arrow pointer) select or more
figures.
2. Choose Edit > Convert Selection to Scribble.
You can now use the scribble layerʼs pens, brushes, and eraser to modify the figure.
To mark your scribble layer as private:
1. Click on the Brush tool in the toolbar.
2. If the Shelf isnʼt visible, choose View > Show Shelf (or press Command-Shift-I) so
you can see the Permissions inspector.
3. Enable the Private checkbox.
When the private setting is enabled, your scribble layer will not be printed, exported,
published to MobileMe, or presented in a slideshow.
The Inspector Bar
Many of the most common figure attributes and meta data discussed in the earlier
sections of this chapter can also be accessed via the Inspector Bar, a horizontal control
bar that resides just below the toolbar buttons within the project window.
To show or hide the Inspector Bar:
• Choose View > Show (or Hide, if already displayed) Inspector Bar.
The Inspector Bar gives you quick access to the figure styles, font, shape, and border
attributes, along with meta data like tags, flags, checkboxes, priority, rating, and various
date related attributes without taking up valuable horizontal screen space. Great for
laptops!
"
Curio User Manual"
62
Inserting Dates and Times
Curio provides any easy way for you to insert the current date and time.
To insert a combined date and time stamp:
• Choose Insert > Current DateTimeStamp. The DateTimeStamp is dynamically replaced
in the menu bar with the actual date and time. Note the format of this combined date
and time string is based on the last used individual date and time stamp items as
described below.
To insert a date stamp:
• Choose Insert > Date > DateStamp. The DateStamp entries are all dynamically
replaced in the menu bar with the actual date. The top entry in the Date submenu is the
last selected date format. It has an associated keyboard shortcut for quickly inserting
the current date in a style you prefer.
To insert a time stamp:
• Choose Insert > Time > TimeStamp. The TimeStamp entries are all dynamically
replaced in the menu bar with the actual time. The top entry in the Time submenu is the
last selected time format. It has an associated keyboard shortcut for quickly inserting
the current time in a style you prefer.
Inserting Variables
Curio allows you to insert special variables which are filled out dynamically.
To insert a variable:
• Choose Insert > Variable > Variable.
The potential values for Variable are as follows:
1. Project title.
2. Idea space title.
3. Idea space date added — in short, medium, or long formats.
4. Idea space time added — in short or medium formats.
5. Figure date added — in short, medium, or long formats.
6. Figure time added — in short or medium formats.
These variables will be visible in raw form when editing the text figure. For example, the
project title in raw form is {%ProjectTitle}. However, when you stop editing, they will be
dynamically replaced with the appropriate information.
Creating and Using Figure Stencils [Pro]
Curio adds support for figure stencils where you can create, re-use, and share frequently
used figures and grouped figures.
Stencils can be any type of figure, here are some ideas:
•Boilerplate text items of various font size and shape enclosures.
•Boilerplate mind map or list templates.
"
Curio User Manual"
63
•Various types of lines and arrows drawn using different colors and endpoint
styles.
•Geographic maps.
•Network diagram elements.
•User interface design elements.
•Website design elements.
Basically any type of frequently used figure is a perfect candidate to become a stencil.
Using Figure Stencils:
• To access the Stencils view in any project window, make sure the Shelf is visible (click
on the Shelf toolbar button if it isnʼt), then click on the Stencils button (the icon that
looks like a stencil) within the Shelf view.
• To create a new stencil entry, you first need to create an idea space filled with the
figures you want to add to as a stencil. All the figures must be on the same idea space.
For instance, you can create an idea space named “Apple” filled with images of Apple
products including Macs, iPods, etc, dragged over from Apple's website. In the idea
space, add a little text caption to each image with a certain nice font and size. For each
image and text item pairing, select them and group them together.
• Next, simply drag and drop your idea space filled with stencil figures from the Organizer
into the Stencils view. All the figures on that idea space are copied into the Stencil
library. The stencil title will be the same as the original idea space title. Your original
idea space containing the stencil figures is no longer needed and can be discarded if
you wish.
• To use one of the stencils, you can either
• Drag-and-drop the entry representing the entire collection over to your idea space
to copy all the figures over, or
• Double-click the stencil collection to view the individual top-level figures which
make up that collection, then drag-and-drop just the stencil figure you want back to
your idea space.
• If you need to make some changes to your stencil simply right-click on the item and
choose “Edit Stencil” from the popup menu.
• To delete a stencil, select it, then press the Delete key.
• To share a stencil with a friend, control-click (or right-click) on the stencil, and choose
“Send to Friend” from the resulting popup menu. The stencil will be packaged up and
attached to an email message for you to address and send.
• To share a stencil with Zengobiʼs Curio Community Center, control-click (or right-click)
on the stencil, and choose “Send to Community Center” from the resulting popup
menu. The stencil will be packaged and attached to an email message already
addressed appropriately for you to send.
• If you receive a stencil either via email or via the Curio Community Center, simply
double-click it to view it within Curio as a self-contained project. If you like it, you can
simply drag-and-drop that idea space into your own Stencils shelf.
"
Curio User Manual"
64
Grouping Stencils into Collections:
• To add a new collection, click on the action button next to the Collection popup menu
and choose “Add...” from the resulting popup menu. A dialog will be presented asking
you for the name of the new collection. Type the name, then click Add.
• To rename a collection, choose the collection from the Collection popup menu, then
click on the action button next to the menu and choose “Rename...” from the resulting
popup menu. A dialog will be presented asking you for the new name. Type the name,
then click Rename.
• To delete a collection, choose the collection from the Collection popup menu, then click
on the action button next to the menu and choose “Delete...” from the resulting popup
menu. A dialog will be presented asking you to confirm the deletion. Click Delete to
delete the collection. Deleting the collection will not delete the stencils in the collection.
• To add a stencil to a collection, control-click (or right-click) on the stencil, then choose
the collection you wish to add it to from the resulting popup menu. Collections that this
stencil belong to will have a check mark next to them.
• To remove a stencil from a collection, control-click (or right-click) on the stencil, then
choose the collection you wish to remove it from from the resulting popup menu.
To Find a Figure Stencil:
• To view the stencils in a collection, simply choose the collection from the Collection
popup menu. Stencils that have not been added to a collection can be displayed by
choosing the “(uncategorized)” menu option. Or you can display all stencils by choosing
the “(show all stencils)” menu option.
• To sort the stencils being displayed, choose how you would like to sort them from the
Sort By popup menu. Stencils can be sorted by title, most recently used, and date
added to the Stencils shelf.
• You can also zoom in or out to view the stencils larger or smaller respectively.
Creating and Using Idea Space Templates [Pro]
Curio allows you to create idea space templates that can be used as blueprints to create
new idea spaces in any project.
Using Idea Space Templates:
• To access the Idea Space Templates view in any project window, make sure the Shelf
is visible (click on the Shelf toolbar button if it isnʼt), then click on the Idea Space
Templates button (the icon that looks like an idea space) within the Shelf view.
• To add a new template to the list, simply drag and drop an idea space from the
Organizer into the Idea Space Templates view.
• To create a new idea space in the current project using one of the templates, simply
double-click on the template. The new idea space will be added as a sibling to the
currently selected idea space. You can also drag and drop the template from the Idea
Space Templates view into the Organizer at any location you choose. You can also use
the New toolbar popup menu, which lists the five most recently used templates as well
as the five newest templates.
• To delete a template, select it, then press the Delete key.
"
Curio User Manual"
65
• To share a template with a friend, control-click (or right-click) on the template, and
choose “Send to Friend” from the resulting popup menu. The template will be packaged
up and attached to an email message for you to address and send.
• To share a template with Zengobiʼs Curio Community Center, control-click (or rightclick) on the template, and choose “Send to Community Center” from the resulting
popup menu. The template will be packaged and attached to an email message
already addressed appropriately for you to send.
• If you receive a stencil either via email or via the Curio Community Center, simply
double-click it to view it within Curio as a self-contained project. If you like it, you can
simply drag-and-drop that idea space into your own Stencils shelf.
Grouping Idea Space Templates into Collections:
• To add a new collection, click on the action button next to the Collection popup menu
and choose “Add...” from the resulting popup menu. A dialog will be presented asking
you for the name of the new collection. Type the name, then click Add.
• To rename a collection, choose the collection from the Collection popup menu, then
click on the action button next to the menu and choose “Rename...” from the resulting
popup menu. A dialog will be presented asking you for the new name. Type the name,
then click Rename.
• To delete a collection, choose the collection from the Collection popup menu, then click
on the action button next to the menu and choose “Delete...” from the resulting popup
menu. A dialog will be presented asking you to confirm the deletion. Click Delete to
delete the collection. Deleting the collection will not delete the assets in the collection.
• To add a template to a collection, control-click (or right-click) on the template, then
choose the collection you wish to add it to from the resulting popup menu. Collections
that this template belong to will have a check mark next to them.
• To remove a template from a collection, control-click (or right-click) on the template,
then choose the collection you wish to remove it from from the resulting popup menu.
To Find an Idea Space Template:
• To view the templates in a collection, simply choose the collection from the Collection
popup menu. Templates that have not been added to a collection can be displayed by
choosing the “(uncategorized)” menu option. Or you can display all templates by
choosing the “(show all templates)” menu option.
• To sort the templates being displayed, choose how you would like to sort them from the
Sort By popup menu. Templates can be sorted by title, most recently used, and date
added to the Idea Space Templates shelf.
• You can also zoom in or out to view the idea space templates larger or smaller
respectively.
"
Curio User Manual"
66
Making Lists
Making to-do lists and outlining ideas is a natural part of
brainstorming. Curio's List tool makes it a breeze to generate
lists and outlines of any kind right on an idea space. And Curio's
lists can contain more than just text; you can add images,
documents, movies, sound clips, and any other type of figure
that Curio supports.
Creating a List
You can create list figures within an idea space. A list figure is a special type of figure that
contains other figures and automatically arranges them into a hierarchical list.
To create a list:
• Click on the List toolbar button or choose Insert > List.
A new list figure will be created and centered in the visible portion of the current idea
space. The new list figure will contain a single text figure that will automatically be
selected for immediate editing.
To collect a selection of figures into a list:
1. Select one or more unlocked figures.
2. Choose Arrange > Collect Into > List, or hold the Option key down while pressing the
List toolbar button.
A new list figure containing the selected figures will be created and centered in the visible
portion of the idea space.
Converting a Mind Map into a List
If you have a Curio mind map then you can convert it into a list.
To convert a mind map into a list:
1. Select the list figure.
2. Choose Arrange > Convert Into > List.
Importing a List
If you are working with a 3rd party outlining application, such as OmniOutliner, you can
bring a list into Curio as a list collection.
If you have a large list to import, you can use that applicationʼs export to OPML (Outline
Processor Markup Language) functionality to create an export file, which Curio can
import.
"
Curio User Manual"
67
To import an OPML file as a Curio list:
1. Choose Insert > File, or drag-and-drop an OPML file from the Finder into Curio.
2. Curio will ask you if you which to convert the file into a list figure. Click the “Convert to
List“ button; otherwise Curio will simply treat the file as a normal document asset.
Alternatively, you can choose to import only specific lines of text from the other
application, assuming those lines can be copied into the clipboard with each line
separated with carriage returns, and, optionally, using tabs for indenting lines
hierarchically.
To paste a carriage-return separated and tab-indented list from the clipboard as a
Curio list:
1. Within the 3rd party application, select one or more lines of text and choose Edit >
Copy.
2. Within Curio, choose Edit > Paste As > List.
Exporting a List
If you need to put a copy of your list into a 3rd party outlining application, such as
OmniOutliner, you can use Curioʼs Export and Copy capabilities.
To export a Curio list as an OPML file:
1. Make sure the list figure itself is selected, not a figure within the list.
2. Choose File > Export Selected Figures As > OPML and enter a file name.
To export a Curio list as a carriage return delimited, tab-indented text file:
1. Make sure the list figure itself is selected, not a figure within the list.
2. Choose File > Export Selected Figures As > Text and enter a file name.
To export a Curio list as a carriage return delimited, tab-indented rich text file:
1. Make sure the list figure itself is selected, not a figure within the list.
2. Choose File > Export Selected Figures As > RTF and enter a file name.
To copy a Curio list as carriage return delimited, tab-indented text:
1. Make sure the list figure itself is selected, not a figure within the list.
2. Choose Edit > Copy As > Text. Both RTF and plain text versions of the text are
placed onto the clipboard.
Modifying List Properties
Lists behave like other figures found on the idea space, so you can follow the instructions
provided earlier for changing a list figureʼs border, fill color, position, and other common
figure attributes. Simply make sure the list itself is selected, and not an item within the
list, before using the Inspector to change those figure properties. See the Collection
figures and level styles section above for more information.
Additionally, there are some properties specific to lists that can be found in a special list
inspector panel.
"
Curio User Manual"
68
To display the list Inspector:
1. If the Shelf isnʼt visible, choose View > Show Shelf (or press Command-Shift-I).
2. Within the Shelf, make sure the Inspector view is selected by clicking on the
Inspector button at the top.
3. Make sure the list figure you wish to configure is selected.
4. Within the Inspector, make sure the Display tab is selected then you should see the
List panel.
To add or remove a list title:
• If your list doesnʼt already have a title you can click on the “Add Title” button. If your
list already has a title then click the “Remove Title” button.
The attributes of the list title can be customized and will be stored when you save a list
style. The list title is technically on the 0th level of the list hierarchy.
To change the list prefix:
• Click on the Prefix popup, and choose a prefix enumeration scheme.
The enumeration scheme determines the symbol or counting method used for the various
hierarchical levels within your list.
You can also modify certain layout features on a level-by-level basis. This means you can
make figures at one hierarchical level look different than those on a different hierarchical
level.
To specify whether a list has collapsible levels:
• Toggle the “Allow expanding/collapsing” checkbox.
If a list has collapsible levels then the appropriate disclosure triangles or placeholder
bullets will be displayed alongside each item, as appropriate.
List Preferences
In addition to the properties listed above, there are some list-related global preferences
which can be changed via Curio > Preferences > Idea Space > Collections.
Inserting New Text Figures into a List
Now that you have a list, you can easily add new text figures within the list.
To insert a new text figure as a next sibling:
1. Select a list item.
2. Insert a next sibling by choosing Insert > Text Next Sibling or typing CommandReturn. However, following a convention used in other outliners, if the selected item
has a child then this will actually create a new first child.
As a shortcut, if you are current editing a list item, you can simply type Return to create a
new next sibling. If you want to actually insert a carriage return within the edited text
figure, then type Option-Return.
To insert a new text figure as a previous sibling:
1. Select a list item.
"
Curio User Manual"
69
2. Insert a previous sibling by choosing Insert > Text Previous Sibling or typing
Command-Shift-Return.
As above, you can simply type Shift-Return to create a new previous sibling.
To insert a new text figure as a child:
1. Select a list item.
2. Insert a new first child by choosing Insert > Text Child or typing Command-OptionReturn.
Working with List Figures
Figures can be easily rearranged and dragged into or out of a list.
Indenting list items via keyboard:
1. Select one or more list figures.
2. Press the Tab key to indent the figures one level.
To move a set of figures contained by a list figure to a higher level in the hierarchy, follow
the same steps listed above but press Shift-Tab on the keyboard.
If you want to actually insert a tab within an edited text figure, then type Option-Tab.
Rearranging list items via drag-and-drop:
1. Select one or more list figures and begin to drag them.
2. As you drag the items around, a line will appear showing you where they will be
placed in the list, including their hierarchical level. Notice that rearranging an item
with children also moves the children.
3. Release the mouse button to drop the items into the list. If the Option key was held
down during the drag then a copy of the selected figures will be created.
To add new items to a list via drag-and-drop:
1. Select figures from elsewhere in Curio, the Finder, or another application and drag
them into Curio onto the list figure.
2. As you drag the items around a line will appear showing you where they will be
placed in the list, including their hierarchical level.
3. Release the mouse button to drop the items into the list. If the drag began within
Curio, and the Option key was held down during the drag, then a copy of the selected
figures will be created.
List figures also support cut, copy, paste, and duplicate for adding and removing figures.
To remove list items:
1. Select the list items you wish to remove.
2. Press the Delete or Backspace key or choose Edit > Delete.
3. Any children will automatically be removed as well.
To prune off a branch in the list into a brand new linked-to list:
• Right-click on a figure in the list and choose Prune To Linked Collection.
"
Curio User Manual"
70
Curio will then create a new list, of the same style as the current list, where the selected
parent becomes the title of the new list and all of its children will be hierarchically
arranged underneath.
The children of the original parent are then removed and the original parent itself
becomes a jump action which, when clicked, will zip you to the new collection. The new
collection can remain on the current idea space or it can be cut and pasted onto a
different idea space, and the jump action will still track it down. The root of the new
collection will automatically gain a jump action to jump you back to the parent collection
when clicked.
"
Curio User Manual"
71
Making Mind Maps
Mind mapping is a wonderful technique for discovering
connections between words and ideas, and encourages an
easy brainstorming approach starting with just one idea. This
one idea — be it a word, phrase, or image — is expanded upon
by adding associated ideas in a radial fashion around the
central idea. You then take each of those associated phrases
and list ideas associated with them.
This method for brainstorming allows you to concentrate on just one idea at a time. As
your mind map grows, you can easily visualize how seemingly disparate concepts are
interrelated. In time, you will find the key ideas from all around your mind map that you
can use to continue forward towards your project goals.
Mind Map Terminology
A mind mapʼs central figure is called the “central topic”. This is the main idea or focus of
the mind map.
Surrounding the central topic, in a circular fashion, are the main topics or branches.
These are your initial, primary topics or ideas that come to mind when thinking about the
central topic. For example, if the central topic is “Apple” then the branches surrounding it
might include “Mac”, “iPod”, and “iPhone”.
Subtopics appear under the branch in a linear fashion. For example, for the “iPod” branch
you might include “Music”, “Videos”, and “Games” as subtopics.
Subtopics can have subtopics, and those can have subtopics, etc, so your resulting
branches can be quite large.
Topics and subtopics within Curio can be almost anything, not simply text. For example:
images, videos, files, web links, audio recordings, Mail messages, iCal events, and more!
And, like any figure within Curio, each figure within a mind map can include one or more
flags, tags, and other meta data information.
"
Curio User Manual"
72
Mind Map Layout
In general, Curio handles the arrangement of all the figures in the mind map. This frees
your mind to brainstorm and not worry about layout.
As you will read in the Working with Mind Maps section, you can reorganize the topics
and subtopics very easily via drag-and-drop. So the ordering of topics and subtopics can
be quickly changed, with Curio handling the actual layout. And, as you will read more
about later, Curio also allows you to manually position the branches themselves around
the central topic.
Creating a Mind Map
You can create mind map figures within an idea space. A mind map figure is a special
type of figure that contains other figures and automatically arranges them into radial mind
map.
To create a mind map:
• Click on the Mind Map toolbar button or choose Insert > Mind Map.
A new mind map figure will be created and centered in the visible portion of the current
idea space. The new mind map figure will contain a single text figure that will
automatically be selected for immediate editing.
To collect a selection of figures into a mind map:
1. Select one or more unlocked figures.
2. Choose Arrange > Collect into Mind Map, or hold the Option key down while pressing
the Mind Map toolbar button.
A new mind map figure containing the selected figures will be created and centered in the
visible portion of the idea space.
If only one figure was selected, then the new mind map will use that figure as the central
topic.
If more than one figure was selected, then the new mind map will have a placeholder text
figure as the central topic, and all selected figures will be added as children to that central
figure.
Converting a List into a Mind Map
If you have a Curio list then you can convert it into a mind map.
To convert a list into a mind map:
1. Select the mind map figure.
2. Choose Arrange > Convert Into > Mind Map.
Importing a Mind Map
If you are working with a 3rd party outlining application, such as OmniOutliner, you can
bring a list into Curio as a mind map collection.
If you have a large list to import, you can use that applicationʼs export to OPML (Outline
Processor Markup Language) functionality to create an export file, which Curio can
import.
"
Curio User Manual"
73
To import an OPML file as a Curio mind map:
1. Choose Insert > File, or drag-and-drop an OPML file from the Finder into Curio.
2. Curio will ask you if you which to convert the file into a mind map figure. Click the
“Convert to Mind Map“ button; otherwise Curio will simply treat the file as a normal
document asset.
Alternatively, you can choose to import only specific lines of text from the other
application, assuming those lines can be copied into the clipboard with each line
separated with carriage returns, and, optionally, using tabs for indenting lines
hierarchically.
To paste a carriage-return separated and tab-indented list from the clipboard as a
Curio mind map:
1. Within the 3rd party application, select one or more lines of text and choose Edit >
Copy.
2. Within Curio, choose Edit > Paste As > Mind Map.
Exporting a Mind Map
If you need to put a copy of your mind map into a 3rd party outlining application, such as
OmniOutliner, you can use Curioʼs Export and Copy capabilities.
To export a Curio mind map as an OPML file:
1. Make sure the mind map figure itself is selected, not a figure within the mind map.
2. Choose File > Export Selected Figures As > OPML and enter a file name.
To export a Curio mind map as a carriage return delimited, tab-indented text file:
1. Make sure the mind map figure itself is selected, not a figure within the mind map.
2. Choose File > Export Selected Figures As > Text and enter a file name.
To export a Curio mind map as a carriage return delimited, tab-indented rich text
file:
1. Make sure the mind map figure itself is selected, not a figure within the mind map.
2. Choose File > Export Selected Figures As > RTF and enter a file name.
To copy a Curio mind map as carriage return delimited, tab-indented text:
1. Make sure the mind map figure itself is selected, not a figure within the mind map.
2. Choose Edit > Copy As > Text. Both RTF and plain text versions of the text are
placed onto the clipboard.
You can turn off the use of tabs as indentions by using Curio > Preferences, clicking the
Idea Space icon, and un-checking “Copy As Text uses tabs to indent”.
Modifying Mind Map Properties
Mind maps behave like other figures found on the idea space, so you can follow the
instructions provided earlier for changing a mind map figureʼs border, fill color, position,
and other common figure attributes. Simply make sure the mind map itself is selected,
and not an item within the mind map, before using the Inspector to change those figure
properties. See the Collection figures and level styles section above for more information.
"
Curio User Manual"
74
Additionally, there are some properties specific to mind maps that can be found in a
special mind map inspector panel.
To display the mind map Inspector:
1. If the Shelf isnʼt visible, choose View > Show Shelf (or press Command-Shift-I).
2. Within the Shelf, make sure the Inspector view is selected by clicking on the
Inspector button at the top.
3. Make sure the mind map figure you wish to configure is selected.
4. Within the Inspector, make sure the Display tab is selected then you should see the
Mind Map panel.
To specify the types of lines drawn in the mind map:
• Choose a line style from the Lines matrix of buttons.
Curio supports straight, curved, elbow, and rounded elbow line styles.
Mind Map Preferences
In addition to the properties listed above, there are some mind map-related global
preferences which can be changed via Curio > Preferences > Idea Space > Collections.
Inserting New Text Figures into a Mind Map
Now that you have a mind map, you can easily add new text figures within the mind map.
To insert a new text figure as a next sibling:
1. Select a mind map item.
2. Insert a next sibling by choosing Insert > Text Next Sibling or typing CommandReturn.
As a shortcut, if you are current editing a mind map item, you can simply type Return to
create a new next sibling. If you want to actually insert a carriage return within the edited
text figure, then type Option-Return.
Note that the root figure cannot have a sibling, so a new last child will be created instead.
To insert a new text figure as a previous sibling:
1. Select a mind map item.
2. Insert a previous sibling by choosing Insert > Text Previous Sibling or typing
Command-Shift-Return.
As above, you can simply type Shift-Return to create a new previous sibling.
To insert a new text figure as a child:
1. Select a mind map item.
2. Insert a new last child by choosing Insert > Text Child or typing Command-OptionReturn.
Working with Mind Map Figures
Figures can be easily rearranged and dragged into or out of a mind map.
"
Curio User Manual"
75
Also, branches themselves can be manually positioned around the central topic. For
those branches you didnʼt manually position, Curio will make sure branches it controls will
be placed so they will not overlap your manually positioned branches.
To add new sibling items to a mind map via keyboard:
1. Select a mind map figure.
2. Press the Command-Return key to create a new next sibling or Command-ShiftReturn to create a previous sibling of the selected figure. If you are currently editing
an existing figure then you can just press Return or Shift-Return.
To add new child items to a mind map via keyboard:
1. Select a mind map figure.
2. Press the Tab key to create a new child of the selected figure.
To add new items to a mind map via drag-and-drop:
1. Select figures from elsewhere in Curio, the Finder, or another application and drag
them into Curio onto the mind map figure.
2. As you drag the items around the guides described above will appear showing you
where they will be placed in the mind map.
3. Release the mouse button to drop the items into the mind map. If the drag began
within Curio, and the Option key was held down during the drag, then a copy of the
selected figures will be created.
Mind Map figures also support cut, copy, paste, and duplicate for adding and removing
figures.
To remove mind map items:
1. Select the mind map items you wish to remove.
2. Press the Delete or Backspace key or choose Edit > Delete.
3. Any children will automatically be removed as well.
Rearranging mind map items via drag-and-drop:
1. Select one or more mind map figures and begin to drag them.
2. As you drag the items around, and hover over an existing figure, guides will help you
determine where they (and their children) will be placed.
a. If you hover the mouse near the top of an existing figure, a red line will
appear indicating that, if you drop the items, they will be inserted as previous
siblings to this figure.
b. If you hover the mouse near the bottom of an existing figure, a red line will
appear indicating that, if you drop the items, they will be inserted as next
siblings to this figure.
c.
If you hover over the middle of an existing figure, it will glow to indicate that, if
you drop the items, they will be added as new children to this figure.
3. Release the mouse button to drop the items into the mind map. If the Option key was
held down during the drag then a copy of the selected figures will be created.
"
Curio User Manual"
76
Manually positioning branches under the central topic via drag-and-drop:
1. Select the topic figure at the top of a branch under the central topic and drag it.
2. As you drag the item around a target symbol will appear showing you where it will be
manually positioned in the mind map. Other branches that remain as automatically
positioned items will automatically adjust their placement to ensure no overlap
occurs.
To reset the branch positioning so automatic layout is resumed:
1. Click anywhere within the mind map so the mind map inspector is available.
2. Choose the Arrange > Reset Layout menu item.
To cut or copy a branch into a new mind map:
1. Click a figure within the mind map.
2. Choose the Edit > Copy menu item which will copy this parent figure plus any child
figures automatically. If you choose Edit > Cut then the existing branch will also be
removed.
3. Go to another mind map or create a new mind map. Note that if you hold down Shift
when clicking on the Mind Map toolbar button you will get an empty mind map with no
default central topic figure.
4. Select the node you would like to paste the copied branch as a child branch.
Alternatively, you can select the mind map figure itself and the copied branch will be
pasted as a child branch of the central topic figure. If no central topic figure exists,
and you are just pasting one branch then the branchʼs parent figure will become the
central topic, else a default central topic will be created and the multiple branches will
be pasted as children underneath.
5. Choose the Edit > Paste menu item.
To prune off a branch in the mind map into a brand new linked-to mind map:
• Right-click on a figure in the mind map and choose Prune To Linked Collection.
Curio will then create a new mind map, of the same style as the current mind map, where
the selected parent becomes the central topic of the new mind map and all of its children
will be hierarchically arranged underneath.
The children of the original parent are then removed and the original parent itself
becomes a jump action which, when clicked, will zip you to the new collection. The new
collection can remain on the current idea space or it can be cut and pasted onto a
different idea space, and the jump action will still track it down. The root of the new
collection will automatically gain a jump action to jump you back to the parent collection
when clicked.
Working with MindMeister
You can share Curioʼs list and mind map data with the MindMeister website for webbased mind mapping.
To bring a MindMeister mind map into Curio as a mind map or list hierarchy:
1. In MindMeister, right-click on a node and choose Copy As > Text then select the text
outline that appears in the popup dialog then Edit > Copy that into the clipboard.
"
Curio User Manual"
77
2. In Curio, use the Edit > Paste As > Mind Map or Edit > Paste As > List to paste in a
new mind map or list, respectively. Note that you can select a node in an existing
collection and use this same technique to paste the outline as a new branch.
To bring a Curio mind map or list into MindMeister as a mind map:
1. In Curio, use the File > Export Selected Figures As > Text to create a text file
containing the selected mind map or list hierarchy into the clipboard as a text outline.
2. In MindMeister, click the Import on the main screen and choose the file you created
on your hard disk.
Working with FreeMind
You can share Curioʼs list and mind map data with the FreeMind Java-based mind
mapping application.
To bring a FreeMind mind map into Curio as a mind map or list hierarchy:
1. In FreeMind, click on a node and choose Edit > Copy which will place a text outline of
the branch hierarchy into the clipboard.
2. In Curio, use the Edit > Paste As > Mind Map or Edit > Paste As > List to paste in a
new mind map or list, respectively. Note that you can select a node in an existing
collection and use this same technique to paste the outline as a new branch.
To bring a Curio mind map or list into FreeMind as a mind map hierarchy:
1. In Curio, use the Edit > Copy As > Text to copy a mind map or list hierarchy into the
clipboard as a text outline.
2. In FreeMind, click on a node and choose Edit > Paste which will paste the hierarchy
as a new branch in your FreeMind mind map.
"
Curio User Manual"
78
Making Tables
Curioʼs table feature is an excellent way to show a grid or
matrix of data. The data could be several text figures, numbers,
or even complex figures such as images and movies. When
you need to show tabular data, tables are the answer.
Many times the overriding criteria to determine if something should be in a list or a table
is whether multiple columns would be useful in showing your data. If so, then a table
might be more appropriate. On the other hand, if need to show a single “column” of
information and/or the information needs to be displayed hierarchically then lists are more
appropriate.
Creating a Table
You can create table figures within an idea space. A table figure is a special type of figure
that contains other figures and automatically arranges them into a matrix of rows and
columns.
To create a table:
• Click on the Table toolbar button or choose Insert > Table.
A new table figure will be created and centered in the visible portion of the current idea
space. The new table will contain three rows and three columns by default.
Importing a Table
You can tabular data from Apple Numbers, Microsoft Excel, or many other 3rd party
applications, directly into Curio as a table collection.
Just use that applicationʼs export to CSV (Comma Separated Value) functionality to
create an export file, which Curio can import.
To import a CSV file as a Curio table:
1. Choose Insert > File, or drag-and-drop a CSV file from the Finder into Curio.
2. Curio will ask you if you which to convert the file into a table figure. Click the “Convert
to Table“ button; otherwise Curio will simply treat the file as a normal document asset.
To paste a tab delimited information from the clipboard into a Curio table:
1. Within the 3rd party application, select a range of rows and columns and choose Edit
> Copy.
2. Within Curio, choose Edit > Paste As > Table to paste into the currently selected table
or it can automatically create a new table.
"
Curio User Manual"
79
Exporting a Table
If you need to put a copy of your table into a 3rd party application, you can use Curioʼs
Export and Copy capabilities.
To export a Curio table as a CSV file:
1. Make sure the table figure itself is selected, not a figure within the table.
2. Choose File > Export Selected Figures As > CSV and enter a file name.
To copy a Curio table as tab delimited text:
1. Make sure the table figure itself is selected, or a range of cells within the table is
selected.
2. Choose Edit > Copy.
Modifying Table Properties
Tables have several properties which you can modify using the Table Inspector.
You can save the look of your table as a custom named-style using the Style inspector.
See the Creating and Using Figure Styles section in this user manual for more
information.
To display the table Inspector:
1. If the Shelf isnʼt visible, choose View > Show Shelf (or press Command-Shift-I).
2. Within the Shelf, make sure the Inspector view is selected by clicking on the
Inspector button at the top.
3. Make sure the table figure you wish to configure is selected.
4. Within the Inspector, make sure the Display tab is selected then you should see the
Table panel.
To modify the number of body rows or columns in the table:
• Either type in a number or use the up/down stepper control to increase or decrease
the number of body rows or columns. Body cells are those cells which arenʼt
considered as a header or footer.
To control the visibility of row or column headers or footers:
• Check one of the appropriate checkboxes to show or hide a row header or footer, or
a column header and footer. If showing, the additional cells will be created either at
the start or end of the rows or columns as appropriate.
To define a default figure style for table cells:
1. Select a figure cell within the table.
2. Click one of the style buttons in the table Inspector: “Body”, “Row Header”, “Row
Footer”, “Column Header”, “Column Footer”.
3. All cells of that same type will immediately adopt the new style.
To ignore figure styles for specific figure cells:
1. Select one or more figure cell within the table.
"
Curio User Manual"
80
2. Check the “Except for the selected figures” checkbox in the table Inspector.
Table Context Menu
Right-clicking on the table will show a context menu with lots of frequent table operations
which you can quickly activate. The context menu is smart and will show you only those
operations permissible based on the selected cells within the table.
Working with Table Figures
Figures can be easily rearranged and dragged into or out of a table.
To edit a figure cell:
• Double-click the cell or select it and press the Return key.
To move between figures cells:
• Press Tab or Shift-Tab or move forwards or backwards. You can also use the arrow
keys on your keyboard to navigate around the cells.
To add new items to a table or rearranging table items via drag-and-drop:
1. Select figures from elsewhere in Curio, the Finder, or another application and drag
them into Curio onto the table figure.
2. As you drag the items around the table, the currently cell you are hovering over will
highlight so you know where the dropped items will be placed. Note you will be
replacing the contents of the hovered-over item with the dropped figures or data.
3. Release the mouse button to drop the items into the table. If the drag started from
this table or another table then the added items will retain their same row and column
separation from each other, and Curio will automatically increase the number or rows
or columns as necessary to fit the newly placed items. If the drag started from figures
selected on the idea space or from the Finder, then the tableʼs column count will
remain fixed but Curio will expand the number of rows as necessary to linearly place
all the items dropped.
Table figure cells also support cut, copy, paste, and duplicate for adding and removing
figures.
To drag a figure out of the table:
• Simply drag the figure out of the table and you can drop it on the idea space or
directly into another collection such as a list or mind map. The table cell is cleared
and replaced with a boilerplate text figure unless Option is held down in which a copy
was generated.
To select specific figure cells:
1. Select the first cell then hold Shift while clicking the last cell and all the cells within
the rectangular region defined by those two cells will be selected.
2. Or, click on the first cell, then hold Command while clicking other cells to select a
disjointed number of cells.
To select specific rows or columns:
1. Select the figure cells in the rows or columns you wish to select.
"
Curio User Manual"
81
2. Right-click and choose Select Row or Select Column, as appropriate.
To delete the contents of figure cells:
1. Select the figure cells you wish to clear.
2. Press the Delete or Backspace key or choose Edit > Delete.
To delete specific rows or columns:
1. Select the figure cells in the rows or columns you wish to delete.
2. Right-click and choose Delete Row or Delete Column, as appropriate.
To resize rows or columns:
1. Select the table — or specific rows and columns — and enter values into the Column
Width and Row Height fields in the table Inspector if you want all row and columns to
have the same sizing.
2. Or, hover the mouse over the row and column separating lines such that the mouse
pointer becomes a resize pointer. Then click and drag to resize that row or column.
3. Or, click on the table then drag one of its resize handles. While the table resizes all
rows and columns will resize proportionally. Note that certain cells may have
minimum sizes due to the display of adornments such as checkboxes and flags.
"
Curio User Manual"
82
Making Index Cards
Curioʼs index cards are a fantastic new way to create snippets
of ideas, thoughts, and notes. You can even place images and
other asset figures on an index card.
Index cards and note cards have been an indispensable system for collecting notes used
by students, writers, and creative types for years. Curio now adds this system for
managing your thoughts to its idea spaces.
Creating an Index Card
You can create index card figures within an idea space. Like lists, mind maps, and tables,
an index card figure is a collection of figures. In this case, a title text figure and a body
text figure. However, you can drag another figure, such as an image figure, into the body
area to replace its contents.
To create an index card:
• Click on the Index Card toolbar button or choose Insert > Index Card.
A new index card figure will be created and centered in the visible portion of the current
idea space.
Exporting an Index Card
If you need to put a copy of your index card into a 3rd party application, you can use
Curioʼs Export and Copy capabilities.
To export a Curio index card as text:
1. Make sure the index card figure itself is selected, not a figure within the index card.
2. Choose File > Export Selected Figures As > Text and enter a file name.
To copy a Curio index card as text:
1. Make sure the index card figure itself is selected, not a figure within the index card.
2. Choose Edit > Copy As > Text.
Modifying Index Card Properties
Tables have several properties you can adjust using inspectors found in the Shelf.
You can save the look of your index card as a custom named-style using the Style
inspector. See the Creating and Using Figure Styles section in this user manual for more
information.
To adjust general index card properties:
1. If the Shelf isnʼt visible, choose View > Show Shelf (or press Command-Shift-I).
2. Make sure the index card figure you wish to configure is selected.
"
Curio User Manual"
83
3. Use the Figure inspector to adjust the border coloring and pen width. Here you can
also adjust the fill background coloring.
To adjust an index cardʼs title properties:
1. If the Shelf isnʼt visible, choose View > Show Shelf (or press Command-Shift-I).
2. Make sure the index cardʼs title figure is selected. If nothing is selected, click once to
select the index card itself, then click again on the title figure to select it.
3. Use the Figure inspector to adjust its fill background coloring. Use the Text inspector
to adjust its font attributes and coloring.
To adjust an index cardʼs body properties:
1. If the Shelf isnʼt visible, choose View > Show Shelf (or press Command-Shift-I).
2. Make sure the index cardʼs body figure is selected. If nothing is selected, click once
to select the index card itself, then click again on the body figure to select it.
3. Use the Figure inspector to adjust its fill background coloring. Use the Text inspector
to adjust its font attributes and coloring. By default the spacing of body lines is based
on the font height, however you may want to expand this using the Line Height field
in the Text inspector.
Index Cards have several additional properties which you can modify using the Index
Card Inspector.
To display the index card Inspector:
1. If the Shelf isnʼt visible, choose View > Show Shelf (or press Command-Shift-I).
2. Within the Shelf, make sure the Inspector view is selected by clicking on the
Inspector button at the top.
3. Make sure the index card figure you wish to configure is selected.
4. Within the Inspector, make sure the Display tab is selected then you should see the
Index Card panel.
To modify the visibility of coloring of the title line:
• Uncheck the title line checkbox to hide the line. Use the associated color well to
change its coloring.
To modify the visibility of coloring of the body lines:
• Uncheck the body lines checkbox to hide the lines. Use the associated color well to
change their coloring.
Working with Index Card Figures
Note that an index card is resizable but not scrollable. This means any text that grows
past its bounds will be automatically clipped when it's not being edited.
To edit an index card title or body figure:
• Double-click the figure within the index card.
"
Curio User Manual"
84
To replace the contents of an index card:
• You can drag-and-drop or paste another figure into the body area of an index card.
Using this technique an index card can contain images or any other type of asset
figure.
"
Curio User Manual"
85
Gathering Assets
An important phase of any project involves collecting
information from a variety of sources. Anything you add to a
project is considered an asset, and Curio provides you with a
number of tools to help you locate and add these assets to your
projects.
Curio makes it easy to create a heterogeneous collection of information and arrange it in
a way that makes sense to you. Images, documents, movies, web links, snippets of text,
mail messages, iCal events, and Address Book entries can all be collected within a Curio
project and placed anywhere within an idea space.
The Asset Library
Every project has an asset library where all embedded assets are stored along with links
to all externally referenced assets. Using the Library, you can very quickly find out what
assets have been added to your project, in which idea spaces they are currently being
used, when they were added, last modified, or created, whether they are aliased or
embedded, their size, and their type.
To access the Library:
• Click on the View toolbar button, then choose Show Library from the popup menu, or
choose View > Show Library from the main menu.
The Library view will appear beneath the idea space view. You can sort the list of assets
by simply clicking the column header of the column you wish to sort by. Click that same
column to reverse the sort order.
Using the popup in the lower right corner of the Library view, you can filter the list of
assets to display all the assets in the project, only the assets on the selected idea space,
only the assets on the selected idea space and any child idea spaces, or only assets that
are not used on any idea space.
Using the Library:
• To open an asset in its default application, simply double-click on the asset.
• To open an asset in another application, control-click (or right-click) on the asset and
choose the desired application from the Open With submenu of the resulting popup
menu.
• To rename an asset, select it, then click on the title to enter edit mode. Type the new
name and press Return. You can also control-click (or right-click) on the asset and
choose Rename from the resulting popup menu.
• To embed an aliased asset, control-click (or right-click) on the asset and choose Embed
within Project from the resulting popup menu.
• To delete an asset from the project, select it, then press the Delete key.
"
Curio User Manual"
86
• For a quick preview of any image-based asset, hold down the Option key, then click on
the asset you wish to preview.
• To change the display of previews in the Library view, choose File > Project Properties
from the main menu, then click on General in the resulting Project Properties sheet.
Choose the desired preview size from the Library Previews popup menu. Choose None
to turn off asset previews. You can click the Make Global Default button to set the
selected preview size as the default size for all new projects.
• To retrieve an embedded asset from a project, simply drag it out of the Library view into
the Finder. A copy of the asset will be created in the location you specified.
• To add an asset to an idea space, simply drag it from the Library and drop it onto the
desired idea space.
Finding Assets:
• To find the location of an aliased asset in the Finder, select the asset in the Library,
then choose Asset > Reveal in Finder from the main menu.
• To see a list of the idea spaces where an asset is used, control-click (or right-click) on
the asset and choose the Idea Spaces submenu from the resulting popup menu. To
open one of the listed idea spaces, simply choose it from the menu.
• To locate an asset in the Library thatʼs associated with a figure in an idea space, select
the figure, then choose Asset > Reveal in Library from the main menu. If the Library is
already visible, then simply selecting the figure within the idea space will automatically
highlight the associated asset in the Library.
• To find an asset by name, make sure the Library is visible, then use the Search shelf
view to search your project for the title of the asset. The list of assets will be filtered to
only display the matching assets.
Using Sleuth to Search the Web
Sleuth can help you research ideas by giving you easy access to almost any search
engine available on the Internet. You can quickly look up images, definitions, rhyming
words, translations, and general information related to any topic. You only have to fill in
the search field once, and then visit the sites that most interest you. When you find
something you want to remember, simply drag and drop it into an idea space.
To use Sleuth:
1. Click on Sleuth in the toolbar.
2. Type a word or phrase in the search field located at the top of the Sleuth window.
3. Press return to perform the search on the currently selected website, or choose a
different site from the site popup menu located to the right of the search field.
The search results will be displayed in the bottom part of the Sleuth window. You can
explore your search results as you would any website. You can use the back and forward
arrows at the top of the Sleuth window to navigate web pages. Drag images, selected
text, and web links from the Sleuth window to any idea space or the project library to
save the results you like. You can grab the URL of the currently displayed page by
dragging it from the status area located at the bottom of the Sleuth window.
To see search results for the same word or phrase on a different site, click on the site
menu and choose another site. You can also click on the up and down arrows next to the
"
Curio User Manual"
87
site menu to perform the same search on the previous and next sites within a category
respectively.
To see search results for a different word or phrase on the same site, type a new word or
phrase into the search field and press the return key.
Click on the magnifying glass in the search field to display a menu of previous words or
phrases for which you have searched. Choose a word or phrase from the history menu to
repeat the search on the selected site.
Adding search sites to Sleuth
Sleuth comes with built-in support for a number of the most popular Internet search sites.
It also supports a flexible architecture that allows you to add additional Internet search
sites to its list of supported sites.
Adding your own websites to Curio's Sleuth tool can be as simple as drag and drop. It all
depends on how search information is sent to the site's server.
An HTML form uses one of two methods to send information via HTTP to the server:
GET or POST. When the GET method is used, all of the search criteria are passed to the
server via the request URL. This makes it easy for Sleuth to extract the information
needed directly from the request URL and automatically create a new site.
When the POST method is used, most of the search criteria are passed to the server in
the body of the HTTP request. In this situation, Sleuth is unable to extract the necessary
information from the resulting request URL to automatically create a new site. However, if
you're familiar with HTML and you have access to the HTML code for the search form
you want to add to Sleuth, you can easily create a new site manually.
Note that Curio may have parental controls enabled that prevent Sleuth customization.
Please see the Curio Parental Controls section for more details.
To add a new search site based on the GET method:
1. In Sleuthʼs main window, click on the Customize button (the one with the pencil icon)
to switch over to the Sleuth configuration view.
2. Choose a collection from the list located along the left side of the window.
3. In a web browser of your choosing, go to the desired websiteʼs search page and
execute a search for the word “Fish”. Searching for the word “fish” will allow you to
skip step 5.
4. After the search results are returned, drag the resulting URL from your web browserʼs
address field and drop it into the list of sites on the right side of the Sleuth window.
You can position exactly where youʼd like the new site to appear in the list.
5. If Sleuth cannot automatically determine your search phrase, a dialog will appear
asking you to select which word or phrase for which you searched. Select the word
from the popup menu and click Choose. If your search phrase does not appear in the
list, click None of the Above.
6. The site information form will be displayed with the information Sleuth was able to
extract. Type the name you want to give this site in the Name field.
7. Click Save.
Creating a Sleuth site manually is a relatively simple task as well. It all depends on how
easy it is to determine the various input parameters required by the search site.
"
Curio User Manual"
88
To add a new search site based on the POST method:
1. In Sleuthʼs main window, click on the Customize button (the one with the pencil icon)
to switch over to the Sleuth configuration view.
2. Choose a collection from the list located along the left side of the window.
3. Click the “+” button located under the list of sites on the right side of the window to
add a new site.
4. In the site information dialog, type a name for the site, type the action URL, select
POST from the method popup menu, and add the necessary input parameters for
this search engine.
5. Click Save.
The value for the search phrase input parameter should always be set to "%%PHRASE%
%". Sleuth will automatically replace this value with your search phrase when you
execute a search. Take a look at how other sites are configured by double-clicking on
them in the sites list for other examples.
You can delete the selected site by pressing the Delete key.
Adding search site collections
You can add your own collections to Sleuth, too. You can even rearrange the existing
collections and move search sites from one collection to another.
To add a new search site collection:
1. In Sleuthʼs main window, click on the Customize button (the one with the pencil icon)
to switch over to the Sleuth configuration view.
2. Click the “+” button located under the list of collections on the left side of the window
to add a new collection.
3. Type the name for the new collection.
You can populate your new collection by creating new Sleuth sites or by dragging sites
from another collection and dropping them onto your new collection.
You can delete the selected collection by pressing the Delete key.
Enabling and disabling search sites and collections
The list of searchable sites available through Sleuth can get lengthy. You may wish to trim
down the list of sites displayed by Sleuth to only those sites that most interest you. Curio
allows you to enable and disable sites on an individual or collection basis.
To enable or disable a search site:
1. In Sleuthʼs main window, click on the Customize button (the one with the pencil icon)
to switch over to the Sleuth configuration view.
2. Enable or disable a search site or collection by clicking the checkbox next to the item
in the list.
Sharing Sleuth sites
Once you have created a useful Sleuth search site, you can easily share the site with
friends or the Curio Community Center.
"
Curio User Manual"
89
The Curio Community Center (http://www.zengobi.com/curio/community/) permits easy
sharing and exchanging of many customizable features of Curio. You can quickly
discover new, useful Sleuth search sites and easily add them to your Curio installation.
To send a Sleuth site to a friend via mail:
1. In Sleuthʼs main window, click on the Customize button (the one with the pencil icon)
to switch over to the Sleuth configuration view.
2. Choose a Sleuth site.
3. Click the “Send to Friend” button.
The Sleuth site is automatically exported and added to a new mail message for you to
address. Your recipient can import the dossier simply by double-clicking the attachment
or by dragging it directly to the Customize Sleuth window.
To send a Sleuth site to the Curio Community Center:
1. In Sleuthʼs main window, click on the Customize button (the one with the pencil icon)
to switch over to the Sleuth configuration view.
2. Choose a Sleuth site.
3. Click the “Send to Community Center” button.
The Sleuth site is automatically exported and added to a new mail message addressed to
Zengobi. You can optionally specify that we attribute the submission to you and include a
web link to your website. We will review your submission before posting it to the
Community Center.
To visit the Curio Community Center:
1. In Sleuthʼs main window, click on the Customize button (the one with the pencil icon)
to switch over to the Sleuth configuration view.
2. Choose a Sleuth site.
3. Click the “Visit to Community Center” button.
Your web browser will be opened to the Curio Community Center website. There you can
quickly discover newly submitted Sleuth sites. If you find one that sounds interesting,
download the Sleuth site and double-click the resulting download to automatically add it
to your Curio installation or drag it directly to the Customize Sleuth window.
The Scrapbook
Curioʼs Scrapbook is a cross-project repository for assets you frequently use, such as
commonly referenced images, standard contracts, and idea inspiring websites. The
Scrapbook is available from within any project window via the Scrapbook shelf view. You
can group your Scrapbook assets into any number of custom categories for easy lookup.
Using the Scrapbook:
• To access the Scrapbook in any project window, make sure the Shelf is visible (click on
the Shelf toolbar button if it isnʼt), then click on the Scrapbook button (the icon that
looks like an open book) within the Shelf view.
• To add an asset to the Scrapbook, simply drag and drop it into the Scrapbook view
from the Finder or from most other applications.
"
Curio User Manual"
90
• To add an asset from a Curio project to the Scrapbook, select the asset, then choose
Asset > Copy to Scrapbook from the main menu.
• To delete an asset from the Scrapbook, select it, then press the Delete key.
• To copy an asset from the Scrapbook into a Curio project, drag and drop it into an idea
space.
• To open an asset in itʼs default application, simply double-click on it.
• To open an asset in another appropriate application, control-click (or right-click) on the
asset and choose the application from the Open With submenu.
Grouping Assets into Collections:
• To add a new collection, click on the action button next to the Collection popup menu
and choose “Add...” from the resulting popup menu. A dialog will be presented asking
you for the name of the new collection. Type the name, then click Add.
• To rename a collection, choose the collection from the Collection popup menu, then
click on the action button next to the menu and choose “Rename...” from the resulting
popup menu. A dialog will be presented asking you for the new name. Type the name,
then click Rename.
• To delete a collection, choose the collection from the Collection popup menu, then click
on the action button next to the menu and choose “Delete...” from the resulting popup
menu. A dialog will be presented asking you to confirm the deletion. Click Delete to
delete the collection. Deleting the collection will not delete the assets in the collection.
• To add an asset to a collection, control-click (or right-click) on the asset in the
Scrapbook, then choose the collection you wish to add it to from the Collections
submenu of the resulting popup menu. Collections that this asset belong to will have a
check mark next to them.
• To remove an asset from a collection, control-click (or right-click) on the asset in the
Scrapbook, then choose the collection you wish to remove it from from the Collections
submenu of the resulting popup menu.
To Find an Asset in the Scrapbook:
• To view the assets in a collection, simply choose the collection from the Collection
popup menu. Assets that have not been added to a collection can be displayed by
choosing the “(uncategorized)” menu option. Or you can display all assets in the
Scrapbook by choosing the “(show all assets)” menu option.
• To sort the assets being displayed, choose how you would like to sort them from the
Sort By popup menu. Assets can be sorted by title, last modified date, and date added
to the Scrapbook.
• You can also zoom in or out to view the assets larger or smaller respectively.
Collecting Snippets from Anywhere
Sleuth is great for when youʼre in Curio and actively working on a project and searching
for something specific. However, sometimes you find a snippet of information, an image,
or a web address ideal for one of your projects while youʼre leisurely surfing the web or
working on a different project. Launching Curio, locating and opening the appropriate
project so you can drag and drop that information into it interrupts your train of thought.
Wouldnʼt it be nice if you could just press a hot-key combination and have Curio store
"
Curio User Manual"
91
that snippet of information away for you until youʼre ready for it? Curioʼs Scrapbook
service letʼs you do just that.
Adding snippets
There are several ways to add a snippet to Curioʼs Scrapbook. You can use the system
service that is automatically installed for you when you first launch Curio. You can use the
PDF print service that is also automatically installed for you when you first launch Curio.
You can drag and drop snippets directly into the Scrapbook from almost anywhere.
Lastly, you can use a web browser bookmarklet to grab a WebArchive of the current
website and place it into the Scrapbook.
To add a snippet using the system service:
1. Select the image, text, document, web address, etc. that you wish to add.
2. Choose Add to Curio Scrapbook from the Services menu located under the active
application menu. You can also press Shift-Command-X as long as that hot-key
combination doesnʼt conflict with a hot-key used by the active application.
To add a snippet using the PDF print service:
1. From within any application that supports printing, choose File > Print from the main
menu.
2. Click the PDF button located at the bottom of the Print dialog, and choose Save PDF
to Curio Scrapbook from the popup menu.
Your document will be saved as a PDF file and stored in Curioʼs Scrapbook repository as
an uncategorized asset.
To add a snippet using the a browser bookmarklet:
A bookmarklet is a bit of Javascript stored as a bookmark in your browser. Clicking it
actually executes the Javascript code. In our case, it tells Curio's Scrapbook service to
create a WebArchive of the specified web page and place it into the Scrapbook.
First, you must create the bookmarklet using these steps:
1. Run Curio 4.0.3 or greater at least one time - that way it knows how to handle the
bookmarklet.
2. Create a bookmark with the following address:
javascript:window.location='curioservice://grabWebArchive/url='+escape(window.location);
Next time you surf to a web page you wish to archive in Curio, simply click the newly
created bookmark and a WebArchive will be generated and placed into your Scrapbook
as an uncategorized asset. You will hear the familiar Snippet "chirp" sound when it is
finished. Curio does not have to be running for this feature to work as it all happens
behind the scenes.
Using snippets
After adding some snippets, the next time you run Curio, you can view the list of snippets
using the Scrapbook shelf view. If the snippet was added via the Snippet service, then it
will appear in the “(uncategorized)” collection.
Review the section above on how to use the Scrapbook to discover the many ways you
can manipulate the snippet.
"
Curio User Manual"
92
Finding Local Files with Flashlight
Appleʼs Spotlight is great, but sometimes it can be overkill. Curio comes with a new tool
called Flashlight that is based on Spotlight technology. It lets you very quickly locate files
on your local hard drives based on the title, document type, last modified date, and even
text within the document.
To search for files using Flashlight:
1. If the Shelf isnʼt visible, choose View > Show Shelf (or press Command-Shift-I).
2. Within the Shelf, make sure the Flashlight view is selected by clicking on the
Flashlight button at the top.
3. Type the text you wish to search for in the Title field.
4. If you wish to search for this text within the text of documents in addition to the within
the title, check the box labeled Include File Contents.
5. If you wish to search for a specific kind of document, choose the kind from the Kind
popup menu.
6. If you wish to search for a file based on the last time it was modified, choose the
appropriate range from the Last Modified popup menu.
7. Click Search.
The results are displayed below the search criteria with previews when possible.
To add one of the results to your project, simply drag and drop it from the results list into
an idea space or directly into your projectʼs Library.
To open a document in the list, using Its default application, double-click on it. You can
open it using another application by Control-clicking on it and choosing the desired
application from the Open With submenu.
To locate a result in the file-system, Control-click on it and choose Reveal in Finder from
the context-menu.
Click the Clear button to clear the list of results and reset the search criteria.
Spread PDF
Curio has a special feature you can use with PDF assets called Spread PDF. If you have
a multi-page PDF file that you would like to spread across multiple idea spaces each
displaying a different page of the PDF, Curio makes it super simple.
To automatically spread a PDF file across multiple idea spaces:
1. Create a new idea space (you can use an existing idea space).
2. Add the PDF asset to the idea space. At this point, you can layout the idea space any
way you wish. This idea space will be used as a template when creating the
subsequent idea spaces. Any other figures that you add to this idea space will be
replicated on all the other idea spaces.
3. Control-click (or right-click) on the idea space in the Organizer, then choose Spread
PDF from the resulting popup menu or choose Organizer > Spread PDF from the
main menu.
Curio will generate a copy of the selected idea space for each subsequent page in the
PDF document and automatically update the PDF figure to display the appropriate page.
"
Curio User Manual"
93
If you put multiple instances of the same PDF asset on the original idea space, Curio will
be smart about using the additional instances to display additional pages of the PDF.
For example, if you wanted to display two pages of a PDF on each idea space, create
two instances of the PDF asset on the original idea space. Then set the first instance to
display page 1 of the PDF, via the PDF Page edit field in the Asset Figure inspector, and
the second instance to display page 2. Then follow the steps above to spread the PDF
over the appropriate number of idea spaces.
You can also start on a number other than page 1 within the PDF. Set the PDF figure to
display page 25 and Spread PDF will spread from page 25 through the number of pages
in the PDF.
Note that you can only have one multipage PDF asset on an idea space in order to use
this feature.
"
Curio User Manual"
94
Managing Your Tasks
Part of staying on top of a project is being able to quickly find
out what and when you need to do things. Curio provides a
number of features to help you manage and track the tasks
related to your projects.
Curioʼs Status shelf, project center, iCal synchronization, and date management features
all work in concert to make sure you donʼt miss a beat.
Review the chapter titled “The Idea Space” to find out how to use Curioʼs Meta Inspector
to assign start and due dates to figures.
Using the Status Shelf [Pro]
Curioʼs Status shelf view packs a lot of information into a compact display. The first thing
youʼll notice are the bar graphs displayed at the top of the shelf. These bar graphs give
you a very quick overview of the relative quantity of tasks starting or due and their dates
relative to today. Thereʼs a pair of graphs for the current project and a pair for all of the
projects in a specified Project Center category. If you click on one of the bar graphs, the
settings are automatically changed to display the appropriate list of tasks grouped to
reflect the bar graph you clicked on.
Below the graphs, thereʼs a list of the specific tasks to start or that are due broken down
into a grouping that you specify.
To use the Status Shelf:
• To jump to any particular task, simply click on it in the list. If the task is from a different
project, Curio will automatically switch to that project. Hold down the Option key while
clicking on the task if you want Curio to open the project in a separate window.
• To change the list of projects being searched, choose a different project center
category from the Search popup menu, or choose “Only This Project” to restrict the
search to the current project. You can also choose “All Tracked Projects” from the
Search popup to search all projects that are currently tracked by the Project Center.
• To change how the tasks are grouped, choose the desired grouping from the Group By
popup menu. You can group by the following criteria:
• Date
You can group tasks by “Action Items” (tasks with a start and/or due date assigned
to them, or items that have a checkbox next to them), by “Start Date”, or by “Due
Date”.
• Rating
• Priority
• Tag Set
For example, you might choose to group tasks by the GTD (“Getting Things Done”)
tag set, in which case any tasks that have been tagged with one or more of the
GTD tags will appear under the appropriate tags.
"
Curio User Manual"
95
By default, Curio will alert you of tasks that have a start date associated with them and it
is currently past the start date and the completion percentage of the task is zero percent.
You can tell Curio to assume that such tasks have already been started by unchecking
the General preference titled “Warn if items are past start date but are 0% done”.
Also, by default, Curio will include items with checkmarks (aka to-do items) which are
unchecked but have no start or due dates. If you want to only include to-do items that
have start or due dates then uncheck the “Include items with no start or due dates”
checkbox in the General preference.
The colored jewel representing the Status shelf view is always colored appropriately for
the current project. Itʼs the same color displayed next to the project name in the Project
Center. If you hover over the jewel in the Status shelf title bar or if you hover over the
project in the Project Center, a tooltip will show you the most critical items in the project.
Synchronizing Your Tasks with iCal
Curio allows you to automatically synchronize a projectʼs tasks with your iCal calendar
and to-do list.
To synchronize a project with iCal:
1. Choose File > Project Properties from the main menu.
2. Click on the Sync tab in the Project Properties sheet.
3. Check the box titled Synchronize project with iCal.
Curio will create a new calendar within iCal using the projectʼs name. Items in Curio will
appear in iCal using the following logic:
•
Any task that has a start date will be added to iCal as an iCal calendar event.
•
Else if any task that has an unchecked checkbox next to it or only has a due
date will be added to iCal as an iCal to-do item.
Changes made within Curio will be synchronized into iCal only when you save the
project. So, if you make lots of changes within Curio and then close the project without
saving then none of those changes will appear in iCal.
However, when you first open a project, it will immediately synchronize with iCal to
retrieve any changes made from within iCal. And while the project is open, if changes
continue to be made in iCal, Curio will immediately reflect those changes within the
project.
Using the project properties sheet, you can also tell Curio to automatically add an alarm
to events and to-do items when it adds them to iCal. You can set the number of days prior
to the start of an event or due date of a to-do item and the approximate time of day youʼd
like to be reminded.
Note that, by default, Curio will include unchecked figures that have no start or due dates.
If you want to require start or due dates then uncheck the “Sync items with no start or due
dates” checkbox. On a related note you may want to check out the “Include items with no
start or due dates” checkbox in the General preferences regarding the Status shelf.
If the calendar ever gets out-of-sync with your project, you can click the Reset Calendar
button to have Curio recreate the calendar based on the current information in your
project.
Note that if you are using MobileMe to synchronize your calendars between multiple
computers, be sure to check the box titled “Synchronizing Calendars using MobileMe”.
"
Curio User Manual"
96
Curio needs to know that the events and to-do items will have the same unique ids in
iCal, so that it can synchronize your project appropriately on each of your computers.
“Getting Things Done” in Curio
“Getting Things Done” is a popular method of task management in use today. Using the
Meta Inspector discussed in the chapter titled “The Idea Space” and Curioʼs built-in GTD
tags, you can very easily implement the “Getting Things Done” methodology within your
Curio projects.
For example, you may have several days of meeting notes spread over multiple idea
spaces within a project. At each meeting, you made a list of action items and tagged
them appropriately. Some you may have tagged as “active”, others “nextAction”, and still
others “waitingOn”. Using the Search shelf view, you can easily find a list of all the items
you tagged “active”. But even better, you can use the Status shelf view and group your
tasks by the GTD tag set. In a single list, youʼll see all the items you tagged with GTD
tags, broken down into each category appropriately. Youʼll instantly know what your
current active items are, what your next actions are, and what items are on hold, waiting
for input from an external source.
You can use Curioʼs tagging system, Search shelf, and Status shelf to implement a wide
variety of task management methodologies.
"
Curio User Manual"
97
Searching Your Project
You can search a Curio project for figures and assets matching
a variety of search criteria.
When searching for the specified text, Curio will search an asset's title, URL, associated
tags and notes.
Using Mac OS X's Spotlight technology, Curio will also search the content of your
project's assets for matching words. Content searching is case-insensitive and only
matches whole words. Building the search term index is generally very quick and
documents are only re-scanned if a change is detected.
You can disable Spotlight-based asset scanning through Curioʼs preferences. Choose
Curio > Preferences from the main menu, then switch to the General preferences panel.
Uncheck the “Search asset contents for words” checkbox to disable the scanning of asset
contents using Spotlight.
Note that due to Spotlight limitations, if an asset is a package file (a file which is actually
a directory containing files within it), then Curio cannot use Spotlight to search within that
package file.
Performing a Search
To search a project:
1. Choose Edit > Show Search from the main menu (or press Command-F), or simply
click on the Search icon at the top of the Shelf.
2. You can choose a saved search from the popup near the top of the Search shelf, or
perform a custom search by filling out one or more of the search criteria below.
Checking on the criteria checkbox will expand that panel to show its options. Criteria
choices include:
a. Text — Text specified will be used to perform a case-insensitive search. If
asset contents are searched using Spotlight as described above, then whole
words must be used.
b. Flags — You can choose to search for only unchecked or checked items. You
may also select one or more flags that must be associated with each
returned result.
c.
Tags — All available tags are displayed, organized by tags local to this
project or by global tag set name. Select one or more tags that must be
associated with each returned result.
d. Resources — Select one or more resources that must be associated with
each returned result.
e. Rating — Select a star rating, plus choose whether an item must have rating
equal to, less than or equal to, or greater than or equal to the specified rating.
"
Curio User Manual"
98
f.
Priority — Select a priority, plus choose whether an item must have priority
equal to, less than or equal to, or greater than or equal to the specified
priority.
g. Asset Type — Narrow your search down to a specific type of asset.
h. Modified — Select a date range for when matching items were last modified.
If available, you can also choose a predefined project timestamp. With
named project timestamps, you can easily find items modified since “Beta
Release 3” or “Client Review”.
i.
Start Date — Select a date range for when matching items will need to start
as specified by their start date meta data.
j.
End Date — Select a date range for when matching items will be due as
specified by their due date meta data.
Once you have set all of the options you wish to search for, click the Begin Search
button. A list of the matching figures within the current Project will be displayed. You can
group the matching figures by a number of options by choosing the appropriate option
from the Group By popup menu. You can even group the results by a specified tag set.
To jump to a specific result, simply click on the item in the result list. The figure will be
momentarily highlighted within its idea space. Non-matching figures are automatically
faded into the background so that the matching figures stand out better.
Also, the list of assets displayed in the Library will be filtered to only display assets that
match your criteria.
To cancel a search:
• Click the “Cancel Search” button in the Search shelf.
Search tips:
• If you use the Search shelf to search for some text that starts with a pound sign (#)
then we'll look for the word as a tag. Thus, searching for #legal will do a search for
a tag named legal. Note that normally text searching for just legal would return
any results which contain that word in the figure's text, asset contents, notes, and
tag. Thus, prefacing it with a pound sign is a fast shortcut to choosing it from the
Search shelf's Tags list since it will only return an exact tag match.
"
•
The Curio Spotlight importer has been updated to include any used tags and #tags
with a project's scanned metadata. This means if the tag legal was used in a
project then legal and #legal will be in the resulting Spotlight metadata.
•
All of those changes means that if you use Spotlight to search for #legal, you'll see
all projects that use the Curio tag #legal, and if you then choose one of those
projects from Spotlight's results list, Curio will launch and open that project and
automatically do a tag search for legal.
•
If you search for some text in the Search shelf, find some results, and then doubleclick on an asset figure in the idea space to launch it, the search text will be sent to
the launched application. This means if you search for the word fisherman using
the Search shelf, and find that it's in one of your embedded PDFs, then you can
double-click the PDF and the fisherman search phrase will get passed to Preview
so it will automatically search for fisherman upon opening the PDF.
Curio User Manual"
99
Working with Saved Searches
If you frequently find yourself performing the same search, Curio allows you to save that
search criteria for easy reuse.
To use a saved search:
1. Choose Edit > Show Search from the main menu (or press Command-F), or simply
click on the Search icon at the top of the Shelf.
2. Choose a saved search from the popup near the top of the Search shelf.
To save your search criteria:
1. Choose Edit > Show Search from the main menu (or press Command-F), or simply
click on the Search icon at the top of the Shelf.
2. Fill out the Search shelf with your search criteria.
3. Click on the Actions button to the right of the saved searches popup, it looks like a
little gear, and choose the Save As menu item and then specify a name that
describes this search criteria. If you are refining an existing saved search, then you
can choose the Save menu item instead.
To remove your search criteria:
1. Choose Edit > Show Search from the main menu (or press Command-F), or simply
click on the Search icon at the top of the Shelf
2. Choose a saved search from the popup near the top of the Search shelf.
3. Click on the Actions button to the right of the saved searches popup, it looks like a
little gear, and choose the Remove menu item.
Timestamps
Project timestamps allow you to create named milestones in your projectʼs history. Then
you can use the Search shelf to find items modified since that milestone.
For example, you can easily find items modified since “Beta Release 3” or “Client
Review”.
To create a project timestamp:
1. Choose File > Project Properties from the main menu.
2. Click on Timestamps in the Project Properties dialog.
3. Type the name in the Name field, choose a date and time using the Date and Time
fields, then click Add to add the timestamp to the list
To edit a timestamp:
• Select it in the list, and then type a new name and/or modify the date and time fields,
then click Update.
Click Reset to clear the name field and set the date and time fields to the current date
and time.
To remove a timestamp:
• Select it in the list and press the Delete key.
"
Curio User Manual"
100
Sharing Your Project
Curio has many ways to share your project or only specific idea
spaces.
A full presentation mode with transitions can be used in group brainstorming sessions.
You can share the project or specific idea spaces with others using Curioʼs numerous
export options. Or simply print your project with smart options for fitting your idea spaces
onto the printed page.
Note that any idea spaces, figures, or scribbles marked as Private via their Inspector will
not be presented, exported, or printed! The only exception to this rule is if you mail your
entire project as a Curio project via File > Mail As > Curio Project.
Presentation Mode
You can show your idea spaces on your computerʼs display, or use a projector to share it
with a large group.
To show a presentation:
1. Choose View > Show Presentation (or click on Presentation in the toolbar).
2. Use the arrow keys to navigate through your idea spaces.
Navigating your projects during a presentation is easy and flexible.
To navigate or interact with your presentation:
Action
Key
End Presentation
Esc
Next idea space
First idea space
Right Arrow, Down Arrow, Page Down, Spacebar, MouseClick (when pointer is hidden)
Left Arrow, Up Arrow, Page Up, Option-Mouse-Click
(when pointer is hidden)
Home
Last idea space
End
Back in history
[, Backspace, Cmd-Left Arrow
Forward in history
], Cmd-Right Arrow
Toggle scaling on and off
S
Select a figure
Mouse-Click (when pointer is visible)
Open a figure's asset or
perform the figure's action
Set a rating
Mouse-Double-Click (when pointer is visible)
Scroll the idea space
Click and drag the background (when pointer is visible)
Previous idea space
0 through 5 (when a figure is selected)
Presentation Mode Preferences
Curioʼs presentation mode has many options which you can customize.
"
Curio User Manual"
101
To show the presentation mode preferences:
Choose the Curio > Preferences menu item, then click the Presentation icon.
Here are the preferences you can change:
Choose whether or not the mouse is initially hidden.
Choose whether or not the idea spaces are initially scaled. You can also determine if
only the part of idea space that contains figures or scribbles is displayed, or if the
entire idea spaces, included any unused areas, is displayed.
Choose which screen your idea spaces will be displayed during a presentation.
Choose whether the presentation should simply end after the last slide, or stay on
that last slide.
Choose the selection color.
Choose a transition to be used between idea spaces.
Presentation Mode Transitions
You can easily change the transition to be used as your navigate from idea space to idea
space.
To change the presentation mode transition:
1. Choose the Curio > Preferences menu item, then click the Presentation icon.
2. Choose a type in the Transition popup, and then choose a specific type of transition
in the lower popup.
Curio supports several types of transitions including Quartz Composer and Core Image
plus the Macʼs internal Native transitions. You can also choose None if you donʼt want
any transition to be used between slides.
Note that some Quartz Composer and Core Image filters may require newer machines
and graphics cards for optimum performance.
Note that you can override the default transition on a per-idea-space basis using the
Transition inspector under the Display view as discussed under the section titled
“Customizing the transition used for an idea space in a presentation” in the chapter titled
“The Idea Space”.
Quartz Composer Transitions
Quartz Composer is an application from Apple which allows users to create amazing
graphical effects. It is included with Appleʼs developer tools which are available on your
Mac OS X install disks.
Curio comes bundled with several built-in Quartz Composer transitions. You can even
create your own custom Quartz Composer transitions and place them in your ~/
Application Support/Curio/Transitions directory and they'll be available within Curio.
Your Quartz Composer composition will be passed three parameters from Curio:
1. source — the source image (the idea space you are navigating to)
2. destination — the destination image (the idea space you are navigating to)
3. isGoingBackwards — a Boolean indicating if the user is going back or forward to that
destination. This may influence the type of transition direction you want to show.
More information about Quartz Composer can be found here:
"
Curio User Manual"
102
http://developer.apple.com/graphicsimaging/quartz/quartzcomposer.html
Sharing Through Mail
You have two options depending on if you want to share your entire Curio project and the
recipients also have Curio, or if you want to share specific idea spaces in a crossplatform format that doesn't require Curio.
To share specific idea spaces or your entire Curio project via email:
1. Optionally select specific idea spaces in the Organizer that you wish to mail.
2. Choose File > Mail As > Curio Project.
3. Click on Mail All if you want to attach your entire project, else click Mail Selected to
only attach the selected idea spaces.
Curio will create a copy of your project or just the selected idea spaces, embed all
referenced assets, compress it, and add it as an attachment to a new email message in
Mail, Eudora, or Entourage.
From there you can specify recipients, add more to the body of the message, and send it
away.
To share specific idea spaces as PDF's via email:
1. Optionally select specific idea spaces in the Organizer that you wish to mail.
2. Choose File > Mail As > PDF.
3. Click on Mail All if you want to export all idea spaces, else click Mail Selected to only
export the selected idea spaces.
Curio will create a PDF document containing the specified idea spaces and add it as an
attachment to a new email message in Mail, Eudora, or Entourage.
From there you can specify recipients, add more to the body of the message, and send it
away.
Note that PDF generation will use the idea space print options specified in Curio's
Preferences including whether to fit each idea space to a single page and if the
background and grid should be printed.
Exporting
You can export your Curio project to one of many file formats to share your ideas with
others across different platforms.
HTML
When it's time to share your ideas with coworkers, clients, or friends, you can export your
idea spaces to HTML files which can be viewed using a web browser.
To publish your idea spaces as an HTML project:
1. Optionally select specific idea spaces in the Organizer that you wish to publish.
2. Choose File > Export As > HTML.
3. Click on Export All if you want to export all idea spaces, else click Export Selected to
only export the selected idea spaces.
"
Curio User Manual"
103
4. Choose a location to export the idea spaces. If you are only exporting one idea
space, also supply a filename to use. Otherwise, since exporting an idea space to
HTML will result in creating multiple files, it's best to create a new folder in which to
locate the exported files.
5. Choose the template to use.
6. If you want Curio to generate a frameset which mimics Curio's project window's
appearance, check the box titled "Generate frameset".
7. If your project has an associated Dossier, you can choose to export it as well.
8. Choose the image type and select whether idea spaces should be scaled to a max
width. For JPEG files, you can also choose the quality of the resulting images. The
better the quality, the larger the file size.
9. Click Export.
An image of each idea space will be created along with an HTML file which references
that image and contains an image map referencing each asset in the idea space. Any
assets contained by an exported idea space will be copied into an "Assets" folder under
the location you specified.
Also, if you exported more than one idea space, an index file will be created which
contains a link to each idea space's HTML file along with a thumbnail image of the idea
space.
Finally, if requested, a frameset will be generated which contains the index file in the left
frame and the first exported idea space in the right frame. As you click on the links in the
index file, the contents of the right frame will update to display the appropriate idea space
page.
If you've exported these idea spaces to the same location before, only the modified or
new idea spaces and assets will be exported. This significantly reduces the time it takes
to update a previously exported project.
PDF Files
Your entire project, or perhaps only specific idea spaces, can be exported as a crossplatform PDF document. Use Apple Preview, Adobe Acrobat, or any other PDF viewing
application to view or print the resulting document.
To create a PDF document using Export:
1. Optionally select specific idea spaces in the Organizer that you wish to export.
2. Choose File > Export As > PDF.
3. Click on Export All if you want to export all idea spaces, else click Export Selected to
only export the selected idea spaces.
4. Type a name and choose a location for the file.
5. Optionally change parameters such as whether Curio should automatically scale idea
spaces to fit a single printed page. When doing this, Curio can also optionally rotate
between landscape and portrait modes for that page to minimize the scaling.
Additionally, the idea space background and grid may be printed as well.
6. Click Export.
To create a PDF document of your entire project using Print:
1. Optionally select specific idea spaces in the Organizer that you wish to export.
"
Curio User Manual"
104
2. Choose File > Print.
3. Click on Print All if you want to export all idea spaces, else click Print Selected to only
export the selected idea spaces.
4. In the Print dialog, click “Save as PDF.”
5. Type a name and choose a location for the file.
6. Optionally change parameters such as whether Curio should automatically scale idea
spaces to fit a single printed page. When doing this, Curio can also optionally rotate
between landscape and portrait modes for that page to minimize the scaling.
Additionally, the idea space background and grid may be printed as well. You can
access these options by clicking on the “Copies & Pages” popup and choosing
“Curio”.
7. Click Export.
Image Files
You can export your project, or only specific idea spaces, as image files in various
formats including JPEG, PNG, and TIFF.
To create idea spaces as image files:
1. Optionally select specific idea spaces in the Organizer that you wish to export.
2. Choose File > Export As > Image.
3. Click on Export All if you want to export all idea spaces, else click Export Selected to
only export the selected idea spaces.
4. Choose a location to export the idea spaces. If you are only exporting one idea
space, also supply a filename to use. Otherwise, since exporting an idea space as
images will result in creating multiple files, it's best to create a new folder in which to
locate the exported files.
5. Choose the image type and select whether idea spaces should be scaled to a max
width. For JPEG files, you can also choose the quality of the resulting images. The
better the quality, the larger the file size.
6. Click Export.
iPhoto Album
You can export your idea spaces to an iPhoto album, then use iPhoto's photocasting
feature to share your album.
To export your idea spaces to an iPhoto album:
1. Optionally select specific idea spaces in the Organizer that you wish to export.
2. Choose File > Export As > iPhoto Album.
3. Click on Export All if you want to export all idea spaces, else click Export Selected to
only export the selected idea spaces.
4. Choose an iPhoto album or type the name of an album to create.
5. If you want Curio to remove all of the existing pictures in the specified album before
importing the new images, check Remove current contents of album. Warning:
Images are removed from the album and from the iPhoto Library
"
Curio User Manual"
105
6. Choose the image type and select whether idea spaces should be scaled to a max
width. For JPEG files, you can also choose the quality of the resulting images. The
better the quality, the larger the file size.
7. Click Export.
Each idea space will be exported as an image file then imported into iPhoto and added to
the album you specified.
Images that Curio removes from an album will appear in iPhoto's trash in case you need
to retrieve them.
MobileMe iDisk
If you have a MobileMe account with iDisk support, you can use Curio to publish your
idea spaces to your iDisk as HTML.
To publish your idea spaces to your MobileMe iDisk:
1. Optionally select specific idea spaces in the Organizer that you wish to publish.
2. Choose File > Publish To MobileMe.
3. Click on Publish All if you want to export all idea spaces, else click Publish Selected
to only export the selected idea spaces.
4. Choose the template to use.
5. If you want Curio to generate a frameset which mimics Curio's project window's
appearance, check the box titled "Generate frameset".
6. Choose the image type and select whether idea spaces should be scaled to a max
width. For JPEG files, you can also choose the quality of the resulting images. The
better the quality, the larger the file size.
7. Click Publish.
Curio will first generate the HTML necessary to display your selected idea spaces. Then
Curio will upload the HTML files to your iDisk's "Sites" folder. Once the upload has
completed, you will be notified of the URL to use to visit your published project.
To view your project on the web, click the View Page Now button in the confirmation
dialog or use your web browser to visit the URL specified.
If you've published these idea spaces before, only the modified or new idea spaces and
assets will be published. This significantly reduces the time it takes to update a previously
published project.
Exporting Selected Figures
You can also choose to exported only the figures that are currently selected on the
current idea space.
To export specific figures as plain text:
1. Select one or more figures you wish to export.
2. Choose File > Export Selected Figures As > Text and enter a file name.
Curio will choose a logical text representation for all the selected figures, even
automatically grabbing a text outline of a list, mind map, or index card or tabbed-delimited
text for tables.
"
Curio User Manual"
106
To export specific figures as a rich text format (RTF) file:
1. Select one or more figures you wish to export.
2. Choose File > Export Selected Figures As > RTF and enter a file name.
Curio will choose a logical text representation for all the selected figures, even
automatically grabbing a text outline of a list, mind map, or index card or tabbed-delimited
text for tables.
To export specific figures as a single image file:
1. Select one or more figures you wish to export.
2. Choose File > Export Selected Figures As > TIFF (or PDF, JPG, or PNG) and enter a
file name.
To export a specific list or mind map figure as an OPML file:
1. Make sure the collection figure itself is selected, not a figure within the collection
otherwise you will only get the tree under that selected node.
2. Choose File > Export Selected Figures As > OPML and enter a file name.
To export a specific table figure as a comma-separated value (CSV) file:
1. Select the table figure you wish to export.
2. Choose File > Export Selected Figures As > CSV and enter a file name.
Printing
You can easily print your Curio project, or perhaps only specific idea spaces.
To print your idea spaces:
1. Optionally select specific idea spaces in the Organizer that you wish to export.
2. Choose File > Print.
3. Click on Print All if you want to export all idea spaces, else click Print Selected to only
export the selected idea spaces.
4. Optionally change parameters such as whether Curio should automatically scale idea
spaces to fit a single printed page. When doing this, Curio can also optionally rotate
between landscape and portrait modes for that page to minimize the scaling.
Additionally, the idea space background and grid may be printed as well. You can
access these options by clicking on the “Copies & Pages” popup and choosing
“Curio”.
5. Click Print.
Note that you can permanently change those Curioʼs print options via the Curio
preferences panel.
To permanently change Curioʼs print options:
1. Choose the Curio > Preferences menu item, then click the Idea Space icon.
2. Change one or more of the options under the Printing section.
"
Curio User Manual"
107
Integrating With Other Applications
Like man, no application is an island. Curio understands this
fact and strives to integrate efficiently with other applications
you may own.
Curio integrates with other applications in several ways so that you can integrate all sorts
of information into your Curio projects.
The Evernote Shelf
Curio integrates seamlessly with Evernote with the bundled Evernote shelf so you can
quickly search for snippets youʼve collected outside of Curio and easily drag and drop
those items into your idea spaces.
What Is Evernote?
Evernote is a multi-platform product and service from Evernote Corporation which allows
you to easily capture information in any environment using whatever device or platform
you find most convenient, and makes this information accessible and searchable at any
time, from anywhere.
Evernote has client applications for Mac OS X, iPhone and iPod Touch, Microsoft
Windows, Windows Mobile, and even a web-based solution.
Data collected on any of these clients are automatically synchronized between each
other via the evernote.com service.
All clients are free and the service is free with some restrictions. Users can also upgrade
to a premium service plan for more features.
To learn more about Evernote go to http://www.evernote.com.
Using the Evernote Shelf
To log into the Evernote service:
1. Once you have your Evernote account established through their website, http://
www.evernote.com, click on the Evernote shelf icon within Curio.
2. Enter your Evernote username and password. If requested, this information can be
remembered for quick access in the future. Your password is stored in your Apple
Keychain for safety.
3. Click the Login to log into Evernote.
To search for Evernote items:
1. All search terms are optional but can include one or more of the following: search
text, notebook, tag, kind, and last modified date. Search text is wildcarded at the end
(so searching for the word ever will find evernote, for example) unless the phrase is
quoted.
"
Curio User Manual"
108
2. You can also specify how the results should be sorted when displayed and what
zoom level should be used for the resulting preview images.
The results are automatically refreshed as you make your selection changes. You may
also click the Refresh button to force a refresh.
To add an Evernote note to an idea space:
• Drag the note from the Evernote shelf and drop it into an idea space.
To use Quick Look on an Evernote note:
• Press the Spacebar to activate Quick Look on the selected Evernote note.
To open an Evernote note:
• Double-click an Evernote note to open it with the Finder.
Unique Features of the Evernote Shelf
Curio doesnʼt simply embed the Evernote note into the idea space. We take it one step
further.
Tags
Your Evernote tags and notebook names are automatically synchronized with two special
Curio global tag sets: “Evernote Tags” and “Evernote Notebooks”. These new tag sets
can be found in the Curio Preferences > Tags window.
Then, when a note is dragged from the Evernote shelf into the idea space, the Evernote
tags and containing notebook names are mapped their Curio tag counterparts.
This tag mapping feature allows you to use the Curio Inspector Bar or Search shelf to
quickly find figures on your idea spaces collected via Evernote.
Character recognition data
The Evernote service will automatically scan any images for handwritten or typed words.
When an image note is dragged into Curio, that character recognition information is
embedded as meta data in the resulting Curio asset figure. This feature allows you to use
Curioʼs Search shelf to find those images on your idea spaces using the same search
phrases.
Limitations of the Evernote Shelf
The Evernote shelf is currently unidirectional so you cannot make changes to any of your
Evernote notes from within Curio. Please use one of their free clients to make any
changes.
Adding and Using Instant Document Templates
You can create new documents of any type from within an idea space using document
templates. This comes in handy when you want to quickly expand upon some ideas in a
new TextEdit document or perform some advanced drawing in a new Photoshop
document.
To create a new instant document in an idea space:
• Choose the document you wish to create from the Insert > Instant Document
submenu.
"
Curio User Manual"
109
A copy of the chosen template document is automatically embedded in your project and
added to the current idea space. Simply double-click the document to launch it in its
native application.
You can add your own document templates to the Insert > Instant Document submenu.
To add a new instant document template:
1. You first need to create a document that you wish to use as a template. Launch the
appropriate application, such as Photoshop or Word, then create a new document
and save it anywhere on your hard disk. The name of this file will be used as the
template name later in step #3. Alternatively, if thereʼs an existing document you wish
to use as a template then you can skip this step.
2. Choose Insert > Instant Document > Add File as Instant Document from the main
menu.
3. In the Open dialog, locate and select the document you wish to add as a template
and click the Add button.
A copy of the document you selected is created in your Home directory's Library/
Application Support/Curio/External Document Templates folder. The document's name is
also added to the document templates submenu.
You can create multiple template documents of the same type, but make sure they have
descriptive names so you can tell them apart in the document templates submenu.
To remove a custom template, choose Insert > Instant Document > Remove Instant
Document from the main menu, and then choose the template to remove and click
Remove.
Adding Content from a LinkBack-enabled Application
You can paste content copied from any application that supports the LinkBack server
application-programming interface (API) into any idea space. The content will be
displayed in the idea space as it would appear in the other application and when you
double-click the figure, Curio will automatically launch the other application to allow you
to edit the content.
To add content from a LinkBack-enabled application:
1. In the LinkBack-enabled application, copy the content you wish to add to an idea
space.
2. In Curio, choose Edit > Paste from the main menu to paste the content into the
selected idea space of the active project.
A visual representation of the content will be added to the idea space. Double-click on the
figure to launch the other application and edit the related-content. When you save your
changes within the other application, they will automatically be reflected within your idea
space.
Adding iCal Events to Idea Spaces
You can drag and drop events from iCal into idea spaces.
To add an iCal event to an idea space:
• Drag the event from iCal and drop it into an idea space.
"
Curio User Manual"
110
Curio will maintain a link to the original event in iCal, if possible. Double-click the iCal
event figure to open iCal and display details about the event. If iCal cannot find the event,
it will offer to add it as a new event. This is useful if you want to share events with other
users by sending your Curio project to them.
Note: iCal entries are found via the event name. To insure correct operation, entries in
iCal that are added to Curio should have unique event names. Once added to Curio you
can rename the title of the figure Curio creates to anything you want, but the event in iCal
must keep its original name.
Adding Address Book Contacts to Idea Spaces
You can drag and drop contacts from Address Book into idea spaces.
To add an Address Book contact to an idea space:
• Drag the contact from Address Book and drop it into an idea space.
Curio will maintain a link to the original contact in Address Book, if possible. Double-click
the Address Book contact figure to open Address Book and display details about the
contact. If Address Book cannot find the contact, it will offer to add it as a new contact.
This is useful if you want to share contacts with other users by sending your Curio project
to them.
Note: Address Book entries are found via the email address. To insure correct operation,
entries in the Address Book that are added to Curio should have unique email addresses.
Grabbing Web Archives
You can grab a web archive of any web page added to your idea space.
To grab a web archive of a web page:
1. Select an URL figure within an idea space.
2. Choose Asset > Grab Web Archive from the main menu.
Curio will attempt to contact the specified web address, create an archive of the web
page, and automatically embed the archive within your project. Curio also generates a
thumbnail representation of the web page and associates that with the web archive asset.
You can also drag and drop other web archives, created by Safari or other web browsers,
into a Curio idea space and Curio will automatically generate a nice thumbnail image to
display.
Also see the section on Scrapbook to learn more about the handy browser bookmarklet
that can grab a WebArchive from your browser directly into your Scrapbook library with a
single click.
WebView Figures and Google Docs Integration
If an archive of a web page isnʼt live enough for you, Curio offers a WebView figure that
you can add to any idea space. The WebView figure is like adding an internet browser
window to your idea space.
To add a WebView figure to an idea space:
• Choose Insert > WebView from the main menu.
"
Curio User Manual"
111
While in “edit” mode, you can surf the web the way you would in a normal browser. When
youʼre done, click the Done button in the upper right corner of the figure. If you want to
save your current location as the location to display in this WebView figure, click the Save
URL button. If you do not click the Save URL button, then the WebView figure will go
back to displaying the original web page content when you exit edit mode.
You can resize a WebView figure only when you are not in edit mode. After resizing the
figure, Curio will refresh the contents of the figure appropriately. This may take a few
seconds, as Curio must retrieve the contents from the specified website again.
The addition of WebView figures allows Curio to integrate more tightly with Web 2.0
based websites like Google Docs.
To add a new Google Doc to an idea space:
1. Choose Insert > Google Docs from the main menu.
2. Curio will create a new WebView and automatically attempt to visit the Google Docs
home base. You may need to sign in with your username and password.
3. Create a new document of your choosing or open an existing document.
If you want this specific document to be displayed in the WebView when you exit edit
mode, be sure to click the Save URL button, otherwise the WebView will display the
Google Docs home base.
Adding Mail Messages to Idea Spaces
There are two different ways to add Mail messages to an idea space. You can add them
as Mail message documents, represented by an icon and named using the subject of the
message, or you can add the text of the mail message as a text figure, including basic
header information.
To add a Mail message as a document:
1. In Mail, select the messages you wish to copy and choose Edit > Copy from the main
menu.
2. In Curio, choose Edit > Paste to paste the mail messages as documents within the
selected idea space of the active project.
The Mail message file is actually embedded into your Curio project, so you can delete the
message in Mail and Curio will still retain its copy. If you double-click on the Mail
message figure in Curio, Mail will open the message and youʼll be able to perform all of
the normal actions that you can perform on a Mail message such as replying and
forwarding.
Note that if you select the mail message figure and choose to display it as a preview
instead of an icon (using the Asset Figure inspector in the Display view), Curio will use
Appleʼs Quick Look to render a nice preview of the mail message. Though the preview
may not display all of the message text.
To add a Mail message as a text figure:
1. In Mail, select the message you wish to copy and choose Edit > Copy from the main
menu.
2. In Curio, create a new text figure, and then choose Edit > Paste from the main menu
to paste the text of the message into the newly created text figure.
"
Curio User Manual"
112
The advantage to copying a Mail message in this way is that you can read the text of the
message directly from within the idea space. However, no link is created between the
newly created text figure and the actual message in Mail.
Taking Screen Snapshots
Curio includes an easy-to-use mechanism for taking quick screen snapshots of another
applicationʼs window, or a rectangular region of another window. The resulting snapshot
can be immediately added to your idea space, or stored in your Snippets library, or
clipboard. All preferences can be easily changed on-the-fly as necessary.
To set your snapshot preferences:
1. Click and hold down the mouse while pressing the Snapshot toolbar button.
2. Choose whether a window or rectangular selection should be taken. You can also
choose whether the snapshot will be added directly to the idea space, or to your
Snippets library, or to the clipboard.
You can also make these snapshot preference changes via the Insert menu.
To take a snapshot:
• Click the Snapshot toolbar button.
If you chose the window snapshot preference then your mouse pointer will become a
camera icon. Simply hover the mouse over a window and click the mouse button to take
the snapshot.
If you chose the rectangular selection snapshot preference then your mouse pointer will
become a cross-hair. Click and drag out a region to take the snapshot.
You can cancel the snapshot operation by pressing the Escape key.
Curio will automatically hide itself by default so its out of the way when you take your
picture. It will restore itself when you finish taking the picture or cancel the operation. You
can turn off the auto hide feature via the Snapshot buttonʼs popup menu.
Quick Look Integration
Curio integrates with Mac OS Xʼs Quick Look feature in a variety of ways.
To preview assets figures with Quick Look:
1. Select one or more assets figures in an idea space.
2. Tap the Spacebar key to bring up the Quick Look preview. If the selected figure is a
parent node in a collection such as a mind map or list then spacebar will expand/
collapse that branch. So you have to press Option-Spacebar instead.
A window will popup displaying the contents of the first selected asset. If youʼre
previewing multiple assets, use the buttons along the bottom to move from one item to
the next.
Press Spacebar again or click on the X in the windowʼs title bar to close the window and
resume working with Curio.
To display a Quick Look preview of an asset within an idea space:
1. Select one or more assets in an idea space.
"
Curio User Manual"
113
2. In the Asset Figure inspector, under Display, select Show as Preview by clicking the
appropriate radio button.
A Quick Look preview image will be generated for each of the selected assets to be
displayed within the idea space.
Also, if you set the Show as type to icon and set the icon size to 128 pixels or greater,
then Curio will use a Quick Look generated thumbnail of the document as the icon.
Multi-touch Support
If you have one of Appleʼs MacBook models that support multi-touch gestures via the
trackpad, then you can enjoy added benefits through Curio.
To use a multi-touch gesture:
• Use 3 fingers to swipe up or down to go to the previous or next idea space.
•
Use 3 fingers to swipe left or right to go backwards or forwards in history.
•
Select a figure, and using 2 fingers, pinch them together to shrink the figure or
expand your fingers to grow the figure.
•
Select one or more figures, and using 2 fingers on the trackpad, rotate the figure by
rotating your fingers counterclockwise or clockwise.
To use a multi-touch gesture while in Presentation Mode:
• Use 3 fingers to swipe up or down to go to the previous or next idea space.
•
Use 3 fingers to swipe left or right to go backwards or forwards in history.
•
Using 2 fingers, pinch them together to scale the idea space to fit the screen, or
expand your fingers to turn scaling off.
Apple Remote Support
If you have one of Appleʼs iMac or MacBook models that includes a 6-button remote
control, then you can enjoy added benefits through Curio.
To use a multi-touch gesture while in Presentation Mode:
• Press the previous or next buttons to go to the previous or next idea space, or press
the minus or plus buttons to go backwards or forwards in history.
"
•
Press the play/pause button to toggle scaling mode.
•
Press the menu button to stop the slideshow.
Curio User Manual"
114
Migrating into Curio
Move your work from other applications into Curio.
After using Curio, youʼll find its innovative and intuitive interface fun and productive. If you
have existing notes and research youʼve stored in another note-taking application, Curio
makes it fast and easy to migrate that data into a Curio project.
From AquaMinds NoteTaker
Curio can import an AquaMinds NoteTaker notebook into a Curio project.
To import a notebook from AquaMinds NoteTaker:
1. In NoteTaker, choose File > Export NTML > Notebook.
2. In the resulting dialog make sure "Include Local Attachments" is checked but make
sure "Separate Pages Files" is unchecked. In the XSL Transform popup, "NTML"
should be selected. Then type in a name to save the export under and click Save.
3. This will create a folder on your hard disk.
4. Now launch Curio and either create a new project or open a project you want to
import your NoteTaker notebook into. The sections and pages of the NoteTaker
notebook will be inserted after the currently selected idea space.
5. Choose File > Import > NoteTaker NTML Folder and choose your exported folder
then click Import.
There are some limitations of the importer as follows:
1. For speed reasons, none of the generated idea spaces have previews that show up
in the Organizer. However, the preview will automatically appear as you step through
the idea spaces manually.
2. NoteTaker supports a mix of text and graphics within the same "cell". Curio doesn't
support that. So those items are turned into sibling entries in the resulting list.
3. No text style information is transferred over. All lists are in the default list style within
Curio.
4. Internally referencing links are not transferred over.
"
Curio User Manual"
115
Curio Preferences
Curio offers many advanced settings that allow you to
personalize your Curio experience.
Many global settings can be modified via Curio Preferences, and some can even be
overridden on a per-project basis via Project Properties.
General Preferences
To access Curioʼs general preferences choose the Curio > Preferences menu item, then
click on the General icon.
Startup options:
• Check “Create untitled project” if a new untitled project should be created when Curio
is launched.
•
Check “Open previously opened project” if a new untitled project should be created
when Curio is launched.
Project options:
• Check “On open, close any unused untitled windows” if, after opening a project, any
untouched untitled windows should be automatically closed.
•
Check “Start with the window maximized” if a new window should be maximized by
default.
•
Check “Auto save periodically (override in Project Properties)” if you want Curio to
automatically save your project every few seconds. Generally, roughly 30 seconds
after your last change to the project, Curio will look for a 2 second idle period where
you arenʼt doing anything like scrolling around, then it will automatically save all
changes to your project. Note that if you quit or close the project, auto-save will not
automatically save those last changes. This way you actually have a brief safety
window if you inadvertently make a non-undoable change, such as deleting a bunch
of idea spaces, since you can simply close the project without saving those last
changes. Also note that this auto-save property can be overridden on a per-project
basis via the projectʼs Project Properties.
•
Check “Search asset contents for words” if you want to Curio to search within the
assets of a project when Search is used.
Status options:
• Check “Warn if items are past start date but are 0% done” if you want Curio to alert
you about tasks that have been assigned a start date that is currently in the past and
the task has a completion percentage equal to zero percent.
•
"
Check “Include items with no start or due dates” if you want Curio to include to-do
items that have unchecked checkmarks but have neither a start nor due date. On a
related note you may want to check out the “Sync items with no start or due dates”
checkbox in the Sync section of the Project Properties regarding iCal syncing.
Curio User Manual"
116
Organizer options:
• Check “Enter creates a new idea space (instead of renaming)” if you want the Enter
key to create a new idea space under the current idea space. If unchecked, pressing
Enter will allow you to rename the idea space title, akin to pressing Enter in the
Finder with a file selected.
•
Check “Auto-hide based on mouse movements” if you want the Organizer to hide if
the mouse if over the idea space content, and automatically reappear if the mouse if
moved towards the left edge of the screen.
Full screen options:
• Check “Hide Organizer” if you want the Organizer to automatically hide if the user
goes into full screen mode.
•
Check “Hide Shelf” if you want the Shelf to automatically hide if the user goes into full
screen mode.
•
Check “Hide Library” if you want the Library to automatically hide if the user goes into
full screen mode.
•
Change the “Toolbar” popup to change its state when entering into full screen mode.
Mini mode options:
• Check “Scale to fit” if you want the projectʼs idea space view to automatically scale its
contents so all is viisble when you enable mini mode.
•
Change the “Toolbar” popup to change its state when entering into mini mode.
Idea Space Preferences
To access Curioʼs idea space preferences choose the Curio > Preferences menu item,
then click on the Idea Space icon.
General options:
• Choose the “Search results highlight color” color well to change that search highlight
color.
•
Click the color well to change the color used for snap guides when dragging figures
around the idea space.
Scribble options:
• Check “Use crosshair pointer for small brushes” if you want the brush pointer to
switch to a crosshair pointer when the brush is sized to two pixels or less. The
crosshair pointer may be easier to see than a really small brush pointer.
Dates options:
• Check “Start and due dates default to manual entry mode” if you want new figures to
automatically default to using manual entry mode for assigning start and due dates. If
unchecked, Curio will attempt to determine the start and due dates automatically by
default.
•
"
Check “Skip weekends when determining due dates” if you want Curio to ignore
weekends when calculating due dates and durations.
Curio User Manual"
117
Editing options:
• Check “Check spelling as you type” if you want the Macʼs spell checking system to
check your typed text when you are editing a text figure.
•
Check “Check grammar with spelling” if you want the Mac to check grammar while
itʼs checking spelling.
•
Check “Correct spelling automatically” if you want the Mac to automatically replace
misspelled text with the corrected spelling. This option is only available in Mac OS X
10.6 (Snow Leopard) or later.
•
Check “Text replacement” if you want the Mac to automatically replace text shortcuts
specified in System Preferences > Language & Text > Text. This option is only
available in Mac OS X 10.6 (Snow Leopard) or later.
•
Check “Smart quotes” to automatically replace straight quotes with curly quotes while
you are typing.
•
Check “Smart dashes” to automatically replace double dashes with an em dash while
you are typing. This option is only available in Mac OS X 10.6 (Snow Leopard) or
later.
•
Check “Smart links” to automatically recognize URLʼs in your typed text and convert
them into clickable hyperlinks.
Printing options:
These printing options can be overridden on-the-fly via the Print dialogʼs “Curio” options.
These options are also used as defaults during Exporting to PDF.
•
Check “Fit each idea space to a single printed page” if idea spaces should be scaled
smaller, if necessary, to fit to a single printed page.
•
Check “Auto rotate to minimize scaling” if, while scaling as described above, it should
try to minimize the scaling factor by automatically rotating the idea space to either
portrait or landscape mode.
•
Check “Print background” if the idea space background color or image should be
printed.
•
Check “Print grid” if the idea space grid should be printed.
•
Check “Print header and footer” if the header and footer should be printed.
•
Change the “Header” and “Footer” fields if youʼd like custom print headers and
footers. In addition, the following variables, shown with an example output, will be
dynamically replaced as appropriate.
{%ProjectTitle} = My Project Name
{%IdeaSpaceTitle} = This Idea Space Title
{%IdeaSpaceNumber} = 2
{%IdeaSpaceNumberWithSheetInfo} = 2 (1 / 4)
Note the idea space number is not necessary its page number since that could vary
depending on if the idea space fits to a single printed page.
In situations where a single idea space spans across several printed pages, the idea
space number would be the same on each one of those pages. To help with that,
Curio supports {%IdeaSpaceNumberWithSheetInfo} and couple of helper variables:
"
Curio User Manual"
118
{%IdeaSpaceSheetNumber}
{%IdeaSpaceNumberOfSheets}
If the idea space fits on a single page then {%IdeaSpaceNumberWithBreakInfo} is
simply replaced with the idea space number ({%IdeaSpaceNumber}).
Else, where the idea space spans across multiple sheets it is replaced with this:
{%IdeaSpaceNumber} ({%IdeaSpaceSheetNumber} / {%IdeaSpaceNumberOfSheets})
For example, the 3rd sheet out of 9 sheets that makes up idea space #26 would
show 26 (3 / 9) as its footer.
Tooltip options:
• Check “Show position, size, rotation tooltips” if you want Curio to show geometric
information while you are resizing or creating a figure.
•
Check “Show informational hover tooltips” if you want Curio to show various
information about a figure, after a brief delay, if you hover the mouse over the figure.
Collection options:
• Check “Copy as Text uses tabs to indent” if you want tabs to be used for indention
levels if a collection is copied using Edit > Copy As > Text. Otherwise, no indenting is
done.
•
Check “Mind maps shrink as nodes collapse” if you want the mind map figure to
shrink and grow as mind map nodes are collapsed or expanded. Note, however, if
you manually resize a mind map then it will not automatically shrink when collapsed.
Deleting the last instance of an asset options:
• Several instances of an asset, such as a movie, document, or image, can exist in
multiple places in various idea spaces. When you delete the last instance of an asset
figure, you can determine what Curio does with the asset that remains. Choose
whether the asset should be permanently removed, or kept in Unused Assets within
the Library, or if you should be asked each time this comes up.
Project Center Preferences
To access Curioʼs Project Center preferences choose the Curio > Preferences menu
item, then click on the Project Center icon.
Here you can add or remove categories to the Project Center. This window also shows
you how many projects are assigned to the category. Note that a project can be assigned
to one or more categories.
To add a category to the Project Center:
• Type in a name and click the Add button.
To remove a category from the Project Center:
• Select a category then press the Delete key.
"
Curio User Manual"
119
Tag Preferences
To access Curioʼs Tag preferences choose the Curio > Preferences menu item, then click
on the Tag icon.
Here you can add or remove global tag sets to Curio. These tag sets will appear in the
figureʼs Tag Inspector and in the Inspector Bar.
The left box on the left lists the available tag sets, including tag sets which come bundled
with Curio.
To add a tag set:
• Type in a tag set name under the left list box and click the Add button.
To hide a tag set:
• Clear the “Visible” checkbox next to the tag set name.
To delete a tag set:
• Select the tag set name and press the Delete or Backspace key.
To change the sort order of the tag sets:
• If the “Keep tag sets sorted” checkbox is checked then the tag sets will be listed in
alphabetical order. If it is unchecked, you can manually rearrange the tag sets via
drag-and-drop.
The list box on the right shows the tags within the selected tag set.
To add a tag to a tag set:
• With the appropriate tag set selected, type in a tag name under the right list box and
click the Add button.
To remove a tag from a tag set:
• With the appropriate tag set selected, select the tag you wish to remove and press
the Delete or Backspace key.
To change the sort order of the tags within a tag set:
• If the “Keep tags sorted in this set” checkbox is checked then the tags will be listed in
alphabetical order. If it is unchecked, you can manually rearrange the tags via dragand-drop.
Flag Preferences
To access Curioʼs Flag preferences choose the Curio > Preferences menu item, then
click on the Flag icon.
Here you can add or remove global flag sets to Curio. These flag sets will appear in the
figureʼs Flag Inspector and in the Inspector Bar.
The left box on the left lists the current user-created flag sets.
A great place to find images suitable for flags is http:///www.iconarchive.com among
many other icon repositories.
"
Curio User Manual"
120
To add a flag set do one of the following:
• Type in a flag set name under the left list box and click the Add button, or
•
Drag a folder which contains images from the Finder into the left list box. Note that
the name of the resulting flag set will be set to the folderʼs name.
To delete a flag set:
• Select the flag set name and press the Delete or Backspace key.
To rename a flag set:
• Double-click the flag set name, rename it, and press Enter.
To export and import a flag set:
• You can drag a flag set from the left list box out to the Finder to create a folder with
all the flag images within. You can then send that to another Curio user and they can
simply drag it into their flag set list box. The globally unique identifiers of the flags will
be the same so shared Curio projects will be able to use the same flags.
The image browser box on the right shows the flags within the selected flag set.
To add a flag to a flag set:
• With the appropriate flag set selected, drag in an image file from the Finder into the
right image browser box. Ideally drag in an icns image file (one with an extension of
icns) or other scalable image, otherwise the best-possible bitmap image scaling will
be used. Note that the name of the flag, which will be displayed in the Inspector Bar
and other places, is taken from the name of the image file itself.
To remove a flag from a flag set:
• With the appropriate flag set selected, select the flag image you wish to remove and
press the Delete or Backspace key.
To change the sort order of the flags within a flag set:
• Simply drag and drop the images within the right image browser box.
Presentation Preferences
To access Curioʼs presentation mode preferences choose the Curio > Preferences menu
item, then click on the Presentation icon.
Scaling options:
• Choose whether the idea spaces should be scaled to fit the screen, or if scroll bars
should appears as needed to scroll around the window. If the mouse pointer is visible
then you can click anywhere in the idea space to scroll around, as well. You can
toggle this on-the-fly during the presentation by pressing the S key.
•
"
Check “Use minimum idea space bounds” if the unused bottom and right portions of
the idea space should be cropped off when the idea space is displayed. If
unchecked, then the entire idea space is displayed including unused portions.
Curio User Manual"
121
When done options:
• Check “Exit presentation after last slide” if the presentation should immediately end if
you try to progress past the last slide, otherwise the presentation will remain on the
last slide.
Selection options:
• Click the color well to change the selection color that is used to highlight any selected
figures (note that the pointer must be visible to select figures).
Transition options:
• You can take advantage of native, Core Image Filter, and Quartz Composer
transitions when using presentation mode. You can even create your own custom
Quartz Composer compositions and place them in your ~/Application Support/Curio/
Transitions directory and they'll be available within Curio. The set transition will be
used between all slides of the presentation.
Label Preferences
To access Curioʼs Organizer label preferences choose the Curio > Preferences menu
item, then click on the Label icon.
Here you can modify the colors and text associated with the Organizerʼs idea space
labels.
You associate a label with an idea space in the Organizer by control-clicking or rightclicking on an idea space and choosing a label. The label color will be used to highlight
the idea space so it stands out in the Organizer.
To modify a labelʼs color:
• Click the appropriate color well and choose a new color.
To modify a labelʼs text:
• Enter a new text string into the appropriate field.
Dossier Preferences
To access Curioʼs Dossier preferences choose the Curio > Preferences menu item, then
click on the Dossier icon.
Printing options:
• Check “Include unanswered questions” if you want the printed dossier to include
questions which are still unanswered, otherwise only answered questions are printed.
•
Additionally, if “Include blank space for unanswered questions” is checked then a
blank area will be printed for unanswered questions. This is useful if you want to
bring the printout into a meeting and answer the questions on paper before entering
them back in Curio.
Curio Parental Controls
Curio includes parental control preferences for disallowing customization features and
also includes a built-in Sleuth profanity filter, both of which can be useful in a classroom
setting.
"
Curio User Manual"
122
To access Curioʼs parental control preferences choose the Curio > Preferences menu
item, then click on the Parental Controls icon.
To gain access to the parental control settings you must first click the lock near the
bottom of the window, and then enter your computerʼs administrator username and
password. When you are finished making changes, be sure to click the lock again to
prevent further changes.
Dossier options:
• Check “Disallow customizing dossier questions” to disable the ability to customize
dossier questions.
Sleuth options:
• Check “Disallow customizing Sleuth sites” to disable the ability to customize Sleuth
sites.
•
Check “Block search queries which contain profanity” to disallow search queries that
contain profanity.
•
Check “Block search results which contain profanity” to disallow search results that
contain profanity.
•
Check “Enable KidSafe sites” to automatically reconfigure Sleuthʼs list of available
sites to include kid-friendly sites and exclude the more professional sites.
To edit the Sleuth profanity phrase list:
• Click the “Edit Profanity” button.
After clicking that button, a dialog will appear. On the left is a list of all built-in phrases
that are disallowed. You can choose one or more phrases and click the “Allow” button to
mark them as non-profane.
You can also enter one or more disallowed phrases into the list on the lower right corner
of the window. Simply type in a phrase and click the plus button. You can click on a
phrase in that list and press the backspace or delete key to remove a phrase.
Appearance Preferences
To access Curioʼs appearance preferences choose the Curio > Preferences menu item,
then click on the Appearance icon.
An appearance theme contains the colors used for painting various elements within the
Curio user interface (UI).
Switching to a different appearance theme:
• Themes bundled with Curio that you cannot change have a lock icon next to them.
You can click on a theme and your UI will change to showcase that theme.
Adding an appearance theme:
• To create a new theme you need to select an existing theme, type in a new name in
the field under the theme list, and click the “Create Copy” button.
•
You can then change the colors for that theme as described below.
Removing an appearance theme:
• Select an unlocked theme then press the Delete or Backspace key.
"
Curio User Manual"
123
Changing theme color attributes:
• Click on a color well next to the described attribute and choose a new color. While
you are picking a new color you will see the UI dynamically update with that new
color.
To send the active appearance theme to a friend via mail:
• Click the “Send to Friend” button.
The appearance theme is automatically exported and added to a new mail message for
you to address. Your recipient can import the appearance theme simply by doubleclicking the attachment or by dragging it directly to the Appearance Preference window.
To send the active appearance theme to the Curio Community Center:
• Click the “Send to Community Center” button.
The appearance theme is automatically exported and added to a new mail message
addressed to Zengobi. You can optionally specify that we attribute the submission to you
and include a web link to your website. We will review your submission before posting it
to the Community Center.
To visit the Curio Community Center:
• Click the “Visit to Community Center” button.
Your web browser will be opened to the Curio Community Center website. There you can
quickly discover newly submitted appearance themes. If you find one that sounds
interesting, download the appearance theme and double-click the resulting download to
automatically add it to your Curio installation or drag it directly to the Appearance
Preference window.
"
Curio User Manual"
124