1
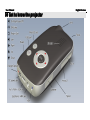
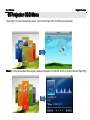
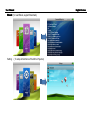
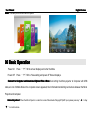
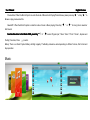
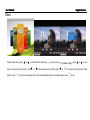
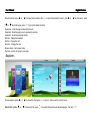
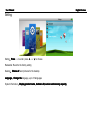
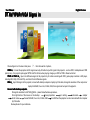
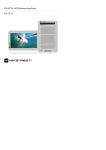
User Manual
English Version
Foreword
In order for you to use the projector easily, please read this manual carefully before using! Hope you have a good time with it!
01 Features
640X480 pixels Micro-Projector based on LCoS (3M) technique
Illuminated with high effective RGB 3-Color LED Light with a lifetime more than 20,000 hours
Playing High Definition AV files in format of RMVB/AVI/FLV/3GP/ MP4/DAT and MKV
Support VGA/YpbPr/AV input, Display for DVD player, set-top Box, Iphone,PSP and Multi-media Player and the like
Built-in full frequency domain Hi-fi speaker, IR Remote control
Max projection display: 200 inches (diagonal), High illuminance
Compatible with Audio files in format of MP3、WMA、WAV、APE、FLAC、OGG、AAC;
External Micro SD Card with capacity of 128MB-2GB, Built-in 2GB-8GB memory space
Automatically slideshow of pictures in format of JPEG, BMP and GIF,
Compatible with Ebook Reader, and Bookmark
Background Music playing makes it possible for users to enjoy music while reading
Suport Mobile HDD, compatible with XP, Vista and Windows 7,
Multi-languages OSD
USB 2.0 jack
User Manual
English Version
02
Notices
02Notices
This User’s Manual is intended to provide users wtith the technical data of Mobile Micro-projector Operational instruction and Attentions and
Cautions. Please make sure to read this User’s Manual before operating.
Please do not use or store this Micro-Projector under High temperature, high humidity and dusts.
Due to precise optical system installed, please try to avoid drop or violent bump against the Micro-Projector to prevent damage to the system and
does not work well.
Please adjust the volume to a comparatively low level before you put in the Earphone in case instant heavy load causes bad damage to
earphone.
Please recharge the Micro-Projector under below conditions,
a. System shutdown automatically
b. System shutdown automatically and repeat when reset, c. No reaction when pressing on the keys.
A 3.7V lithum Polymer Batter is used to the Mirco-projector, which can be recharged repeatedly. But, for the first time, please use the
Micro-Projector till battery is out of power, Charge the battery for more than 8 hours and repeat it for more than 2 times in order to activate the
battery completely and extend battery lifetime. You can charge the Battery in two ways as follows,
1. Computer USB Jack: Recharge the battery through computer USB Jack. Just connect the Micro-Projector and computer by a USB Cable
and charge the battery no matter the Macro-projector does operate or not. While recharging the battery, LED indicator flashes in color of
“Red+Blue”, and become “ Green+Blue”when the battery is full.
2. Power adapter: Just connect the power adapter to the DC port of the Micro-projector and Recharge the battery no matter the
Macro-projector does operate or not. While recharging the battery, LED indicator flashes in color of “Red+Blue”, and become “ Green+Blue”when
the battery is full.
In the course of Recharge, Power adapter and the Micro-Projector will become a little bit hot. This does not mean any malfunction or damage.
User Manual
English Version
Notes
Notes: This Micro-Projector should not be recharged with other model of power Adapter. Otherwise serious damage could happen to this
Micro-Projector. The producer is not liable to any damage to the Micro-projector due to incorrect operation. If you need more power
adapter, please feel free to contact us.
Please do never disconnect the cables while fomatization or dowmload/upload. This may lead to program errors.
We are not liable to any data loss because of damge to Micro-Projector, Repair or other reasons. Please operate the Micro-projector according to
Instruction stated in this Manual.
Please do not dismantle the Projector, do not clean the surface of this product with Alcohol, Thinner or other chemical detergent.
Do not operate this product where electronic device is prohibited in area or environment, such as aircraft and hospital.
Please do not use this product while driving or walking to avoid traffic accident.
The enclosure could feel a little bit hot when the Micro-Projector operates. This is caused by heat generated from the working LED light and does
no bad effect to the functionality of Projector.
Sound of air flow could be found when Micro-projector operates. The mini fans rans to disperse heat. This does not mean any bad malfunction.
Please try to make the ambient temperature as low as possible when you use the Micro-Projector. This is good for heat disperse.
A dim display will be found if the Projector is out of focus. Please adjust the scale close to lens till a clear picture is found.
Our company reserves the right to change and improve the product and the Specifications of the product is subject to change without
prior notice.
User Manual
English Version
03 Contents
Features……………………………………………………………………………………………………………..01
Notices..... …………………………………………………………………………………………………………..02
Contents..... …………………………………………………………………………………………………………04
Get to know the projector..... ………………………………………………………………………………………05
OSD..... ………………………………………………………………………………………………………………06
Operations..... ……………………………………………………………………………………………………….09
AV/YpbPr/VGA .。 ………………………………………………………………………………………………….16
Battery charging ..... …………………………………………………………………………………………………19
TroubleShooting List..... …………………………………………………………………………………………….19
Technical parameters..... ……………………………………………………………………………………………..20
Notes:
Thank you for choosing our Products. Please read this User’s Manual before Operating The Micro-Projector. We may make changes to the
functions or opeation without prior notice. If you have any questions, please visit our website or contact us for help directly, we will do our best to
help you.
User Manual
04 Get to know the projector
English Version
User Manual
English Version
05 Projector OSD Menu
Signal Input ( to connect Audio/Video players, such as DVD Player, PSP, Cell Phone and Computer)
Music: ( to Play various Music files, support Lossless compression Format APE and FLAC, Built-in Microsoft PlayFX(R))
User Manual
Video: (To play Various Video files, including 720P High definition Video files)
Explorer
Explorer:: To Browse all files stored in the Micro-Projector and MicroSD card)
English Version
User Manual
Ebook: ( To read Ebook, support Bookmark)
Setting: ( To setup all functions of the Micro-Projector)
English Version
User Manual
English Version
Photo
Photo:: To browse picture stored in Micro-Projector
06 Basic Operation
Power On: Press “
” till the screen displays and enter the Menu
Power Off: Press “
” till the “Save setting and power off” Screen displays.
Connect to Computer and download /Upload Files: When Connectting the Micro-projector to Computer with USB
cable, an icon of Mobile Disk on the computer screen appeared, then informaton transferring can be done between the Micro
Projector and computer.
Volume Adjustment: When the Micro-Projector is under the mode of Movie/Audio Playing/AV/YpbPr Input, please press key “
“
“ to control volume.
“ or Key
User Manual
English Version
Previous/Next: When the Micro-Projector is under the mode of Movie/Audio Playing/Picture Browse, please press key “
“ or Key “
“ to
Browse or play previous/next file..
Rewind/FF: When the Micro-Projector is under the mode of movie or Music playing, Press Key “
“ or “
“ for a long time to rewind or
fast forward.
Function Selection: In the Master OSD, press Key “
“Setting” Functions, Press
” or”
” to select “Signal Input”, “Music” Video” “ Photo” “ Ebook”., Explorer and
to enter.
Battery: There is a Lithum Polymer Battery with high capapity. The Battery endurance varies depending on different Volume, File Format and
Keys operation.
Music:
User Manual
Choose music menu,press
English Version
or
down or turn up the voice volume,press
Repeat mode
Play mode
MSEQ:3D Bass LEQ
EQ sel:Normal, MSEQ, rock, pop
User EQ setup
Display:lyric, freq chart
to choose all music, artist, my favorite, etc. Then press
to go to music player menu:
to play. press
or
to turn
User Manual
English Version
Video:
Choose Video menu,press
or
to choose the file, then press
down or turn up the voice volume,press
rewind,press
or
to play,press
to choose previous or next file, press
to pause or play,press
or
or
to turn
for a long time to fast forward or fast
to go to the video player menu, then choose different menus to setup the player, press
to exit.
User Manual
English Version
Photo:
Choose picture menu, press
Press
to choose the picture, press
to open it,press
to get the browser menu, then choose to enlarge, shorten, turn left/right, etc.
E-book:
or
for previous and next picture.
User Manual
Choose E-book, press
or
English Version
or
to choose txt documents, click
to another page. press
to open the document to read,use
or
key to browse,press
to go into the below functions:
Page jump:Input the page number then press ok
Savemark:Store the page so as to read easily next time;
Loadmark:Go to the bookmark directly
Delmark:Delete the bookmark
Set font:Change the font
Set color:Change the color
Browser mode:set browser mode
Flip time:set time for going to next page
Explorer:
Choose explorer, press
Delete files: press
or
or
to choose file, then press
to choose the file, press
to open it(make sure the correct format)
。
for a while till the window of delete displayed,then click
.
User Manual
English Version
Setting:
Press
Setting:Press
to enter. press
or
to choose
Restorable: Revert to the factory setting
Choose different pictures for the desktop
Desktop:Choose
Change the language, up to 18 languages
Language
Language:Change
Display product name, hardware ID, version and memory capacity
System Information:Display
capacity.
User Manual
English Version
07 AV/YPbPr/VGA Signal in
Choose Signal in in the menu then press
,then there will be 3 options,
CVBS in
in:Connect the projector with AV signal source by AV cable to input AV signal to the projector,such as DVD, mobilephone and STB
(set-top box),the projector just support NTSC and PAL format, when playing, change your DVD or STB to these two format.
YPbPr or YCbCr in
in:Input color difference signal to the projector by AV cable connecting with DVD, game player machine or HD player,
including 480i, 480p, 576i and 576p, such kind of color difference signals.
VGA in
in:Input VGA signal to the projector, connect with desktop computer or laptop by VGA cable, change the resolution of the computer or
laptop to 640x480, true color, 32 bits, 60Hz, then signal can be input to the projector.
Connect with desktop computer
computer:
Change the resolution to 640*480 @ 60Hz:please follow the below procedure,
Click right button of the mouse on the desktop
choose properties
go to setting
advanced
adapter
list all modes
choose '640x480, true color, 32 bits, 60Hz'
click OK then the projector can be connected with the computer
by VGA cable.
Below pictures for your reference:
User Manual
English Version
Change the resolution of the laptop to '640x480, true color, 32 bits, 60Hz' the same way with desktop compute, then
change the video out mode of the laptop(please refer to your laptop operation manual)
,
User Manual
Output setting
Choose the second monitor like the below picture
1、Output
setting:Choose
English Version
User Manual
English Version
Choose the second monitor, and then change the resolution to '640x480, true color, 32 bits, 60Hz',but under
the second monitor, the contents in the desktop of the computer can not be displayed, move the file to the left or right to display.
08 Battery charging
Charging by power adapter, connect the projector with 100-240V power by using power adapter, the power signal light is red at the
beginning, once full the light will become green.
Charging by USB cable, connect the projector with computer by using USB cable, during charging, the signal light will be red and blue
together, once full the light will become green,(Note:It will take more time than charging by power adapter.)
09 Problems shooting
Blurring image
Adjust the focus gear till the image clear
Check the lens of the projector, make sure it is clean.
Can't turn on
Lower battery, recharge the battery
Make sure the power adapter connected under proper way
No sound
Check the voice button, make sure the volume is above 0
Check the audio out jack, make sure it is clean;
Make sure the file is correct format and undamaged;
Display of garbage characters:
User Manual
English Version
Make sure the correct language setting
Make sure the resolution of the computer is
640 x 480 ,True color(32 bit)
,60Hz
s
10 Technical Parameter
Parameters
Technical Parameters
Optical engine
Brightness
Lamp life
Resolution
Projection size
Project distance
Contrast
Screen ratio
Focus
Memory
Slot
LCOS ( 3M),RGB 3-color display
20~50 lm
More than 20,000hrs
640 x 480
5~200 inches
40~450cm
200:1
4:3
Manual
2GB~8GB
Micro SD card
Video
MPEG4, AVI, RM, RMVB, FLV, WMV, 3PG, MP4,MKV, 720P Decoding
Music
MP3. WMA, WAV,APE, FLAV, AAC,AC3,OGG
Picture
JPEG,BMP,GIF
Signal in
3-in-1 AV , VAG, YPbPr
Speaker
Built-in 1w stereo
Language
USB
Multi-language,
USB2.0 high speed,up to 4MB/S;
Battery
2100mAh lithium battery
Power
DC5V
Weight
132 g
Size
Fittings
4A
120 x 65 x 29 mm
Specification, Battery, Tripod, Power Adapter, AV cable, USB cable
VGA cable