1
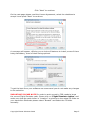
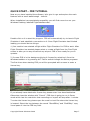
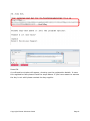
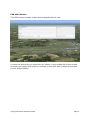
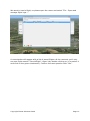
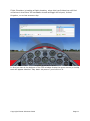
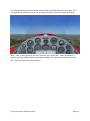
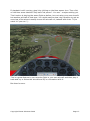
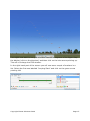
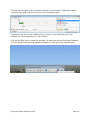
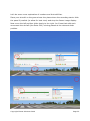
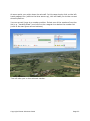
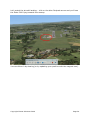
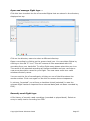
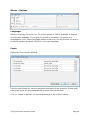
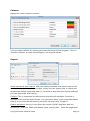
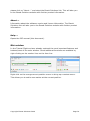
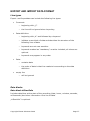
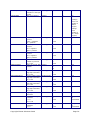
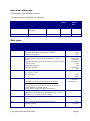
Eszett Solutions Sz - Flight Data Recorder Version 1.2 INTRODUCTION ________________________________________________________________ 3 SYSTEM REQUIREMENTS ________________________________________________________ 3 Version History ___________________________________________________________________ 4 Version 1.0 ____________________________________________________________________ 4 Version 1.1 ____________________________________________________________________ 4 Version 1.2 ____________________________________________________________________ 4 INSTALLATION _________________________________________________________________ 4 UNINSTALL ____________________________________________________________________ 6 QUICK START – FDR TUTORIAL __________________________________________________ 7 OPERATION DETAILS __________________________________________________________ 26 Recording ____________________________________________________________________ 26 Menus - File __________________________________________________________________ Open and manage flight logs...: __________________________________________________ Recently used flight logs: ______________________________________________________ Export flight log: _____________________________________________________________ Import flight log: _____________________________________________________________ 26 27 27 28 28 Menus - Options ______________________________________________________________ Language: __________________________________________________________________ Fonts: ______________________________________________________________________ Colours: ____________________________________________________________________ Export: _____________________________________________________________________ Import: _____________________________________________________________________ More Options...:______________________________________________________________ 29 29 29 30 30 31 32 Menus - Info __________________________________________________________________ License key...: _______________________________________________________________ About...: ____________________________________________________________________ Help...: _____________________________________________________________________ 33 33 34 34 Main window _________________________________________________________________ 34 EXPORT AND IMPORT DATA FORMAT ___________________________________________ 37 Line types ____________________________________________________________________ 37 Data blocks ___________________________________________________________________ 37 Copyright Eszett Solutions 2009 Page 1 Data block #StartInfo _________________________________________________________ 37 Data block #Data _____________________________________________________________ 38 Data block #Markups _________________________________________________________ 41 Data types ____________________________________________________________________ 41 FREQUENTLY ASKED QUESTIONS_______________________________________________ 42 FURTHER INFORMATION, SUPPORT ____________________________________________ 42 Copyright Eszett Solutions 2009 Page 2 INTRODUCTION Welcome and thank you very much for purchasing (or trying) Sz – Flight Data Recorder (named "FDR" throughout this document). FDR is a great tool (though small in size) for Flight Simulator X to record your flights and play them back in various form. FDR especially is a great alternative to the "video" and "instant replay" functions of Flight Simulator. Not only can you record and play back the flight with your user aircraft, you can also freely move through the recording time line, set markers (and save them), view the flight from 3rd person view and even show the complete flight path in one big frozen image. The possibilities of FDR are unlimited: Monitor your flying, take a close look especially at critical phases like takeoff and landings, practice aerobatic manoeuvres and share the recording log with your friends or a judge. Take screenshots of the flight path from your most successful aerobatic figure or tough weather landing, print them out and collect them in a "hall of fame" of best manoeuvres ever. Improve your flying skills or simply have fun – FDR will help you to track and record your flights. SYSTEM REQUIREMENTS Flight Simulator X with Service Pack 2 or Acceleration Expansion Pack installed Windows XP SP2 or Windows Vista with the Microsoft .NET Framework 2.0 installed 10 MB of Hard Disk Space For the Tutorial Flight: FSX default S300 and C172 installed. For displaying the manual: Adobe Acrobat Reader Copyright Eszett Solutions 2009 Page 3 Version History Version 1.0 November 2008 Basic functionality Version 1.1 January 2009 Data range for recording and playback expanded New functionality added: Data Import-/Export Conversion tool “FRC to FDR Converter” included (see separate manual) Version 1.2 December 2009 Extended data set for recording and exporting If you are interested in getting your own set of data recorded, please contact us INSTALLATION To install the program double-click on SzFlightDataRecorder.en-us.msi. A Welcome screen will appear. Copyright Eszett Solutions 2009 Page 4 Click "Next" to continue. On the next page please read the License Agreement, select the checkbox to accept it and press "Next" to continue. A new page will appear, offering you a choice of features to install, some of them being mandatory, some of them being optional. To get the best from your software we recommend you do not make any changes to the selection. IMPORTANT! PLEASE NOTE! In order to work correctly, FDR needs to know the correct Flight Simulator path. Please click on "Flight Simulator Addon" and make sure that the path shown in "Location" is pointing to the actual FS folder on your hard disk. Otherwise please select "Browse" and select the FS folder manually. Copyright Eszett Solutions 2009 Page 5 If you are happy with the installation path click "Next" to continue the installation. Click on "Install" to begin the installation process. On a Windows Vista system with User Account Control enabled another message box will appear, asking you to confirm the installation. Please do so. When installation has finished a final message box will appear. Click "Finish" to exit the installer. UNINSTALL To uninstall the program you can do either of the following: 1) Run the setup program again. You will be offered the options to Change, Repair or Remove the software. To uninstall the program select "Remove". 2) In Windows enter the Control Panel by selecting the Control Panel link from the Windows Start menu. Select Add/Remove programs. In the list of installed programs select Sz-FlightDataRecorder. Double-click on the entry to start the uninstall. Copyright Eszett Solutions 2009 Page 6 QUICK START – FDR TUTORIAL Now as you have installed the software, let's give it a go and explore the main features with a small walkthrough - tutorial. When installation has completed successfully you will find a new icon on your Windows Desktop, labelled FlightDataRecorder. Double-click on it to start the program. FDR will automatically try to launch Flight Simulator X and establish a connection to it. Once Flight Simulator has finished loading you should do two things: 1) You need to have started a flight within Flight Simulator for FDR to work. After Flight Simulator has started please select or create a flight from the Free Flight screen to take you to any aircraft at any airport. FDR is then ready for you to operate. 2) In case FDR is in the background bring it forward by selecting it from the Windows taskbar or by pressing ALT-Tab to switch through the active programs. The first time when starting FDR you will be prompted with a menu to enter a license key. If you already have obtained a license key please enter it as described below. Otherwise close the window with "Cancel". FDR then is going to run in Demo mode which has the restriction that recordings or import will stop after 1 minute. To enter the license key please open the email or text file where the license key is located. Select the key between the words "StartOfKey" and "EndOfKey" copy it and paste it into the FDR key field. Copyright Eszett Solutions 2009 Page 7 Press OK. A confirmation window will appear, showing you the registration details. In case this registration fails please check the steps above. If you have reason to assume the key is not valid please contact the key supplier. Copyright Eszett Solutions 2009 Page 8 FDR Main Screen The FDR screen is pretty simple and straightforward to use: A menu bar at the top, an area with two sliders in the middle-left of the screen, an area (yet empty) with position markers to the right and a couple of symbols (icons) at the bottom. Copyright Eszett Solutions 2009 Page 9 We want to load a flight, so please open the menu and select "File - Open and manage flight logs..." A new window will appear with a list of saved flights. At the moment you'll only see one flight named "TutorialFlight". Open it by double-clicking on it (or select it and click on the green checkmark). Confirm the next question with "Yes". Copyright Eszett Solutions 2009 Page 10 Flight Simulator is loading a flight situation; when this has finished we will find ourselves in the Extra 300 aerobatic aircraft at Biggin Hill airport, United Kingdom, on a clear summer day. In the icon bar at the bottom of the FDR window locate the green arrow (a tooltip text will appear labelled "Play back 1st person") and click on it. Copyright Eszett Solutions 2009 Page 11 The FDR window will now reduce its size and the flight playback will start. You can watch the takeoff, a turn right, some aerobatic maneuvre and a landing. Now – this is not going to be very exciting you might say. Flight Simulator X itself is offering Flight Video and Instant Replay to record and playback flights. OK - now let's get into some detail... Copyright Eszett Solutions 2009 Page 12 If playback is still running, stop it by clicking on the blue square icon. Then click on the blue arrow labelled "Play back 3rd person". You see – maybe nothing yet. This function is playing the same flight as before, but not using your own aircraft but another aircraft of that type. You might want to slew into a position to get an overview of the airport runway to see the aircraft roll, takeoff and climb. Try to catch it if you can :-) This is a great feature to pre-record a flight in your own aircraft and then play it back and try to follow the aircraft and fly in a formation with it. But there's more. Copyright Eszett Solutions 2009 Page 13 Stop the playback and select the eye shaped icon, labelled "Show freeze images". Suddenly you will see the sky full with Extra 300 aircraft, appearing in intervals, showing the entire recording from takeoff to landing. For the moment please ignore the fact that the aircraft is landing on the opposite runway where it has started – we wouldn't do this in reality at our local airfield, but it's good to see for demonstration purposes. Copyright Eszett Solutions 2009 Page 14 You might now want to see just a certain fraction or segment of the flight. Stop the display (click on the blue box) and then click on the blue arrow pointing up. This will re-enlarge the FDR window. In the right hand part of the screen you will now see a couple of markers in a list. Select the first one labelled "Looping Start" and click on the green arrow pointing left. Copyright Eszett Solutions 2009 Page 15 This will set the start of the playback interval to the marker. Select the marker "Looping End" and click on the green arrow pointing right. The green time line in the middle of the screen is now restricted to a time between 01:06 minutes and 01:46 minutes. Click on the Eye icon to show the aircraft. In case you cannot find them instantly you can jump to the current marker position by clicking on the magnet icon. Copyright Eszett Solutions 2009 Page 16 You'll now see the aircraft from looping start to looping end. The interval between the aircraft at the moment is set to 1 second flying time. You might now want to watch certain phases of the flight in some more detail. Copyright Eszett Solutions 2009 Page 17 Stop the display (click on the blue box), enlarge the FDR window again (if it's reduced) and open the menu "Options - More Options...". You'll see a couple of settings here – don't be bothered for the moment, for now we only want to change one item. Set "Freeze image interval" from the default value 1 second to 1/8 second. This will give us the highest detail when playing back. Copyright Eszett Solutions 2009 Page 18 Confirm with OK and press the Eye icon again to show the aircraft. It might take a while to build up the display but you will see the aircraft from looping start to looping end in their full recording density. Now in theory you could have the entire flight displayed to this detail, however this would be causing quite some impact on performance. All the aircraft need to be drawn into the screen and the Flight Simulator graphics engine needs to display them all – you can imagine that this would mean quite some fps load. To help with this FDR is offering a feature to replace the original aircraft with a dummy paper airplane which is light on performance. Copyright Eszett Solutions 2009 Page 19 Open the Options menu (as descibed above) and from the drop down list "Aircraft for freeze images" select "Small dummy". Go back to show the freeze images (=Eye icon). You'll see a series of paper planes where the Extra aircraft have been. Now with these replacement aircraft we can try to show the entire flight (we wouldn't dare to do this with the Extra 300). Bring up the full FDR screen (Blue Arrow up) and move the start and end slider to the start and end of the flight recording (you need to stop the playback for that). Copyright Eszett Solutions 2009 Page 20 Click on "Show freeze images" and – voilá! Quite impressive, isn't it? If you are into rollercoaster design – this is something for you! Copyright Eszett Solutions 2009 Page 21 Let's do some more exploration of markers and their abilities. Place your aircraft on the ground near the place where the recording starts. Hide the panel if possible (to allow for best view) and stop the freeze image display. Now move the left position slider slowly to the right. You'll see that with each movement the aircraft (the Extra 300) is being placed at the relevant slider position. Copyright Eszett Solutions 2009 Page 22 At some point you might loose the aircraft. In this case simply click on the left hand magnet icon (next to the blue arrow up), this will take you to the current aircraft position. You can as well jump to a marker position. Select one of the markers from the list (e.g. "Landing Start") and click on the magnet icon below the marker list (next to the two green arrow buttons). This will take you to the relevant marker. Copyright Eszett Solutions 2009 Page 23 Let's watch the aircraft landing... click on the blue Playback arrow and you'll see the Extra 300 flying towards the runway. You can follow it by slewing (or by updating your position with the magnet icon). Copyright Eszett Solutions 2009 Page 24 In case you wish to slow down a certain phase of the flight simply select the playback rate by choosing a value from the drop down list next to the blue "Stop" button. A value of 1/16 will give you a very slow playback rate. The perfect landing and rollout are ending our little tutorial. Copyright Eszett Solutions 2009 Page 25 OPERATION DETAILS This chapter describes FDR operation in detail – the menus, options and custom settings that can be made. Recording Recording a flight is a one-clicker literally. Press the red round "Record" button to start the recording. The FDR window will automatically minimize itself and the recording will start in the background. Stop the recording by clicking on the blue "Stop" button. The recorded flight will be saved to the Hard Disk. FDR will not only save the flight movements; it will also store the startup situation (the aircraft, starting location, day/time and weather settings) and save it with the flight. In the list of recordings the new recorded flight will appear with a name like 20081006_160445 which is the date and time of the recording (2008, 6th October, 16:04:45). Menus - File Copyright Eszett Solutions 2009 Page 26 Open and manage flight logs...: Click this item to select the list of recorded flights that are stored in the directory displayed on top. Click on the directory name to select a different directory. Open a recording by clicking on the green check icon. You can delete flights by clicking on the red "X" icon. This will remove all files associated with this recording from your hard disk. To edit a flight name please select the pen icon. The name of the selected recording will become editable and you can enter a new more descriptive name for your flight. The new name must be a valid windows directory name. You can sort the list of recordings by clicking on one of the titles above the marker entries. Click once again on the title to reverse the sort sequence. In column „Imported“ you will see a checkbox ticked (selected) in case the relevant flight has been imported from external data (and not been recorded by FDR). Recently used flight logs: A file history of recently used recordings (recorded or played back). Select an entry to easily load a recording into FDR. Copyright Eszett Solutions 2009 Page 27 Export flight log: With this item you can export flight data form the current flight log as text. All the data (and only the data) between the two sliders will be exported, including all user defined markers in that area. You can export data into a text file or into the Windows clipboard. From the clipboard you can paste the values directly into other applications like a text editor or a spreadsheet in order to edit or analyse them. The next box will show the current export options. For details please see the options menu item “Export:”. When you are happy with the settings press “OK” to continue. When exporting to a file you can now select a new or existing text file to export the data to. You can find the export data format described in detail in chapter “EXPORT AND IMPORT DATA FORMAT”. Import flight log: With this item you can import flight data from an external text file or from the Windows clipboard. Please note that the data structure and format need to match the format as described in chapter “EXPORT AND IMPORT DATA FORMAT”. The next screen will show you the current import settings. For details please see the options menu item “Import:”. When you are happy with the settings press “OK” to continue. When importing from a file you can now browse for the text file to import from. When import has been completed successfully, the new flight log will be loaded in Sz - Flight Data Recorder. In case Flight Simulator is running a simulation you will be asked if the current flight shall be used as starting situation for the flight you have just imported. Please adjust the current flight in Flight Simulator before you acknowledge this question. Especially the aircraft in use, its position and the time of day should match the imported data. Copyright Eszett Solutions 2009 Page 28 Menus - Options Language: Select a language from the list. The initial release of FDR is available in English and German language. If you wish to provide a translation of menus and messages for your native language please contact us; we will provide you with a toolkit to create a program version in your own language. Fonts: Opens the font selector window. You can select fonts for various parts and elements of the program. Please note that larger fonts will not automatically enlarge the window size. Click on "Reset to default" to reset the settings to the original values. Copyright Eszett Solutions 2009 Page 29 Colours: Opens the colour selector window. You can select colours for various parts and elements of the program. Click on "Reset to default" to reset the settings to the original values. Export: Show options at each export: With this setting selected, the export options will be shown every time you export data, giving you the opportunity to check and adjust them before exporting data. If you want to stay with the current settings you can deactivate this setting. Culture: This is important for determining the decimal separator (comma or decimal point) and the date format. You can select either your current Windows setting or an international setting (normally identical with „English“). Output structure: Here you can select the column (field) separator and the alignment. „Justified, filled with blanks“ does exactly that – fields are separated Copyright Eszett Solutions 2009 Page 30 with spaces and strings are embedded in double quotes. You can also select a tab-separated format. Unit for altitude: Select feet or Meters. Export interval: This is the time interval between two data sets. Selecting “As recorded” will export the data just the same way they have been recorded. The other settings are exporting data in their relevant intervals, with an interpolation of the data to match the time stamp. The preview area will show you a sample of the export data format, depending on the current settings. „<t>“ means „tabulator“. Import: Show options at each import: With this setting selected, the export options will be shown every time you export data, giving you the opportunity to check and adjust them before exporting data. If you want to stay with the current settings you can deactivate this setting. Culture: This is important for determining the decimal separator (comma or decimal point) and the date format. You can select either your current Windows setting or an international setting (normally identical with „English“). The preview area shows the date and decimal number format that are expected for this import. No further settings are required here (as opposed to the Export options window. The import module will automatically care for the data separation (tab or blank separated). The unit for „altitude“ will be determined form the header line. Copyright Eszett Solutions 2009 Page 31 More Options...: Recording interval: Indicates how often the flight data is being captured. Select from a range between 1/8 second and 2 seconds. Freeze image interval: Indicates the interval between two aircraft in freeze image display mode. Select from a range between 1/8 second and 4 seconds or select "As recorded". Aircraft for freeze images: Select "Original" to use the original aircraft from the flight. To display the paper airplane select "Small dummy", "Medium dummy" or "Large dummy". Do this in order to gain performance or in case the original aircraft is no longer available. Recording data level: Select the data set to be recorded. Data sets other than “Normal” can be used to record and export an extended data set. Use the export interval “As recorded” in this case. If you are interested in getting your own set of data recorded, please contact us Size of current position marker (pixels): With the number selectors you can adjust the width and height of the "current position marker" in the time line window. Default size is 2x30 pixels. Size of user defined markers (pixels): Adjust the width and heigth of the "user defined markers" in the time line window. Default size is 2x30 pixels. Copyright Eszett Solutions 2009 Page 32 Output Directory: Indicates the path where the recorded flight are being saved to. Click on the path name to select a different output path. Show marker list: Check (select) to show the list, uncheck to hide it. Start FS at program startup: When selected, FDR is trying to launch Flight Simulator X when started. Activate FS when in compressed mode: When selected, FDR is trying to bring Flight Simulator into the foreground (and – if necessary – open the FS window in case it's minimized) every time when entering the compressed mode (the "minidisplay"). Play back looped: When selected, the playback will start all over again when finished. Load Flight in FS when loading recording (always, never, ask): Normally you should allow FDR to load the flight situation to place your user aircraft at the starting point of the recording. Sometimes however you might want to watch the flight from your current position without being placed there (e.g. from an observer's position) or simply save yourself waiting for the flight loading to finish. Please note however that you might not be able to see the flight when it is out of range from your current position. Compressed display - show when playing a flight / showing freeze images / recording a flight: Select the situations when you wish FDR to switch from full display mode to the compressed "mini-display". Transparency: Select a transparency value for the FDR mini window when it's in compressed mode. Position: Select a position (relative to the screen) for the FDR mini window. Menus - Info License key...: When FDR is running in demo mode you can select this item to enter a license key to register the software. For information about how to obtain a license key Copyright Eszett Solutions 2009 Page 33 please click on "About..." and select the Eszett Solutions link. This will take you to the Eszett Solutions website with further product information. About...: Information about the software version and license information. The Eszett Solutions link will take you to the Eszett Solutions website with further product information. Help...: Opens the PDF manual (this document). Main window In the Tutorial Flight we have already explored the most important features and buttons/icons of the main window. Some additional functions are available by right-clicking on the marker lines on the time-line. Right-click on the orange current position cursor to bring up a context menu. This allows you to add a new marker at the current position. Copyright Eszett Solutions 2009 Page 34 Right-clicking on any of the red markers brings up a context menu with additional options to edit or delete the marker, set the start and end interval to the marker or jump to the marker position. These are identical to the functions on the relevant icons below the marker list. You can sort the marker list entries by time or Info (up- and downwards) by clicking on the titles above the marker entries (labelled "Time" and "Info"). Here you see different sortings – from left to right: Time (increasing), time (decreasing), Info (alphabetically). Connection icon: In the bottom left corner of the window (next to the name of the currently active recording) you can see an icon indicating the status of the connection to Flight Simulator X. This can be one of the following: The connection is established and working. The connection is interrupted. Either Flight Simulator is not running, or it has not initialized loading yet, or there is a problem with the SimConnect interface. If a connection has been working and then suddenly is getting lost, it cannot be restored. You'd need to close and restart FDR to reconnect. Copyright Eszett Solutions 2009 Page 35 The connection is established but the simulation is interrupted. This may be the case when Flight Simulator is loading a flight, is showing the Main Opening Screen or when one of the FS menus is open. Copyright Eszett Solutions 2009 Page 36 EXPORT AND IMPORT DATA FORMAT Line types Export- and Importdata can include the following line types: Comment: o beginning with „//“ o the line will be ignored when importing Data definition: o beginning with „#“ and followed by a keyword o initiates a new block of data and describes the structure of the following lines of data o keywords are not case sensitive o keywords marked as "mandatory" must be included; all others are optional o keywords may appear in any order Data: o contains data o the order of data in that line needs to be according to the data definition empty line o will be ignored Data blocks Data block #StartInfo Includes date/time at the start of the recording (date, hours, minutes, seconds, milliseconds) and other information. One line of data. „#Startinfo“ is optional. Copyright Eszett Solutions 2009 Page 37 Key word Description Data type Range of values Mandatory / default value date system date of start of recording date current system date time system time of start of recording time current system time milliSec milliseconds of start of recording integer recordFreq recording frequency in seconds floating point 0 to 999 0 calculated from imported data Data block #Data Includes all recorded flight data. One line per recording interval. „#Data“ is a mandatory data block. Key word Description Data type timestamp(sec) seconds since start of recording title of recorded aircraft as specified in aircraft.cfg latitude in degrees north = positive, south = negative longitude in degrees west = negative east = positive true heading in degrees floating point nonnegative Mandatory Used in / default play back value mandatory yes string mandatory yes floating point -89.999999 to +89.999999 floating point -180 to +180 floating point 0 to +359.999999 floating point -1000 feet to 50000 feet floating point -1000 feet to 50000 feet floating point -90 to +90 mandatory yes mandatory yes 0 yes mandatory yes 0 no 0 yes floating point -180 to +180 0 yes boolean false no aircraft latitude longitude heading altitude(ft) / altitude(m) altitude in feet / in meters aboveGround(ft) / aboveGround(m) altitude in feet / in meters pitch pitch angle in degrees forward = positive backward=negative bank angle in degrees left = positive right = negative on ground flag bank onground Copyright Eszett Solutions 2009 Range of values Page 38 verticalSpeed(ft/min) Vertical speed floating point indication in feet per minute engine1Rpm rpm of 1st engine integer elevatPct aileronPct rudderPct spoilersHandlePct flapsHandleIdx flapsTrailLeftPct flapsTrailRightPct flapsLeadLeftPct flapsLeadRightPct isGearRetractable gearCenterPct gearLeftPct 0 no 0 no floating point -100 to +100 0 (change from 0 to greater 0 starts engine, change from greater 0 to 0 stops engine) yes floating point -100 to +100 0 yes floating point -100 to +100 0 yes floating point 0 to +100 integer 0 to 20 Percent left trailing floating point 0 edge flap extended to full = 100 +100 Percent right trailing floating point 0 edge flap extended to full = 100 +100 Percent left leading floating point 0 edge flap extended to full = 100 +100 Percent right leading floating point 0 edge flap extended to full = 100 +100 flag if gear can be boolean retracted percent center gear floating point 0 extended to in = 0 +100 out = 100 percent left gear floating point 0 extended to in = 0 +100 0 yes 0 yes 0 yes 0 yes 0 yes 0 yes false no 0 yes, if retractable 0 yes, if retractable elevators position in percent down = negative up = positive ailerons position in percent left = negative right = positive rudder position in percent left = negative right = positive spoiler handle position in percent full = 100 Index of current flap position Copyright Eszett Solutions 2009 Page 39 gearRightPct gearHandlePos lightCabin lightLogo lightWing lightRecogn lightPanel lightStrobe lightTaxi lightLanding lightBeacon lightNav smoke slew simRate out = 100 percent right gear extended in = 0 out = 100 flag if gear handle is applied flag if cockpit / cabin lights are on flag if logo lights are on flag if wing lights are on flag if recognition lights are on flag if panel lights are on flag if strobe lights are on flag if taxi lights are on flag if landing lights are on flag if beacon lights are on flag if navigation lights are on flag if smoke system is activated flag if slew is active FS time acceleration factor floating point 0 to +100 0 yes, if retractable boolean false yes boolean false yes boolean false yes boolean false yes boolean false yes boolean false yes boolean false yes boolean false yes boolean false yes boolean false yes boolean false yes boolean false yes boolean floating point 0.25 to 128 false 1 no no All data is being recorded as supplied by Flight Simulator. When playing back the data, it will depend on the aircraft (type, model) if and how the data can be set and activated. Example The minimum amount of data required for a flight is for example: #Data timestamp(sec) 0,000 aircraft "Extra 300S Paint1" latitude 51.3242224 longitude 0.0272696 altitude(ft) 611.5161 As there's only one line of data, the aircraft can be displayed as a freeze image, but not as a continuous flight. Copyright Eszett Solutions 2009 Page 40 Data block #Markups Contains the user defined markers. The data blocks „#Markups“ is optional. Key word Description Data type Range of values Mandatory / default value timestamp(sec) seconds since start of recording floating point nonnegative mandatory info text of markup multiline string mandatory Data types Data type Remarks integer integer number without decimal point or thousand separator leading sign optional floating point number with optional decimal places decimal point according to selected import / export culture thousand separator optional, according to selected import / export culture leading sign optional exponent optional boolean „0“ or „false“ = false „1“ or „true“ = true case insensitive string must not contain any tabulators or line breaks multiline string if importing / exporting with blank as separator: The string is surrounded by double quotes. A string must be surrounded by double quotes, if it contains blanks or double quotes. Double quotes within the string are doubled. same as „string“ additionally line breaks are exported as string „\n“ and the string „\n“ is imported as line break date day, month, year according to selected import / export culture time hours, minutes, seconds separated by colon seconds optional Copyright Eszett Solutions 2009 Examples 1234 +1234 -1234 100 +100.0000 123456.78 -123,456.78 -0.123 -.123 123.45e+6 5E2 0 1 false TRUE Aircraft "Aircraft 1" "Aircraft ""1"" " "line1\nline2" 05/31/2009 14:40 14:40:50 Page 41 FREQUENTLY ASKED QUESTIONS Question: Where and how exactly is the recorded data stored? Answer: For each newly recorded flight one directory is created in the output directory specified in the program options. This directory is initially named with a time stamp and may be renamed via the "Open and manage flight logs..." dialog. In this flight log directory the following files are stored: SzFDR.fltlog: the actual recorded flight data SzFDR.fltsum and SzFDR.fltedt: Files used by FDR to manage the data. SzFDR.FLT, SzFDR.FSSAVE and SzFDR.WX: The Flight Simulator "Flight" files. Please note you cannot (and should not) edit any of these files manually. This may result in breaking the consistency of the flight and the recording. Question: When running the program a message appears saying „Could not load file or assembly 'Microsoft.FlightSimulator.SimConnect, Version=10.0.61259.0 [...]“. The program won’t start. Answer: The program requires Flight Simulator X with Service Pack 2 or the Acceleration Expansion Pack installed. Please install Service Pack 2. You’ll find full download details on the Eszett Solutions website in our Support – Downloads area. Question: When running the program a message appears saying „Could not load file or assembly 'Microsoft.FlightSimulator.SimConnect, Version=10.0.61259.0 [...]“. The program won’t start. But I have FSX Acceleration Expansion Pack or Service Pack 2 installed. Answer: Please reinstall SimConnect. Download the installer from the FAQ section of the Eszett Solutions website and run it. FURTHER INFORMATION, SUPPORT For further information about Sz – Flight Data Recorder please visit our website www.eszett-solutions.com where you can find product and purchase details, updates, additional files and information about Sz – Flight Data Recorder. Copyright Eszett Solutions 2009 Page 42 For technical support please have a look at the latest FAQ on the website or contact us via the web form provided in section "Support". For sales enquiries and especially key replacements please do not contact us direct but the provider / webshop where you have obtained your registration key. Copyright Eszett Solutions 2009 Page 43