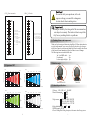
1
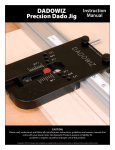
LED MOVING HEAD LIGHT WASH USER ÊÊÓ ¹Ó Ë ÃË µ ÷ é ¹MANUAL Ãà à µÊ Ê ÷é Ê Ó ¹ Ã Ë Ã µ Ê ÷ é *** Due to our product updating, we will not do a future notice if the user manual has any changes. Sorry for any inconvenient caused! *** 11 Maintain and clean Note: After using the fixture for a long time, it will have dirty phenomenon. It will affect to use the fixture and the brightness of the light, so we suggest you to maintain and clean the lights regularly. 1. Advantage of maintain the light: 1) 2) 3) 4) Good maintain will make sure the brightness of the light; Good maintain will make the lights using for a longer time; Good measure to make sure the function of the light stable; Good maintain will make you free from worry, save money and save effort. 2. The way on how to maintain the fixture: 1) Note: Electronic component in the light such as: circuit main board, powersupply, led cannot wash clean or use the tool with fluid substance to clean; 2) Please clean the fixture on a fixed time which can be depends on your environment and the frequency you use the light, usually at least 4-6 months you need to clean one time; 3) Please disconnect the power before you clean the fixture; 4) Please clean the fixture just when the fixture in a stable mode; 5) Please take off the cover to clean the lens and fan; 6) It is better to use soft cloth, small brush, and blower gun to clean the fixture; 7) LED moving head is a modern energy conservation and environmental protection product; please make sure the voltage you use is stable on the rated voltage; 8) LED moving head is frontier hi-tech energy conservation and environmental; protection lighting product, please make sure the voltage you used is around the rated voltage. 12 Statement 1.This fixture is tested by our factory and the quality will be good and also good packed before shipping. Any damages caused by the disregard of this user manual are not subject to warranty. The dealer with not accept liability for any resulting defects or problems. 2. Due to our product updating, we will not do a future notice if the user manual has any changes. 9 CH13 Reset/auto mode CH14 X/Y set the 100 255 81-95 16-80 0-15 no action sound active mode no action auto mode no action reset(prepare time 3 seconds) no action horizontal/vertical closed light running no action 192-255 Y axis reverse direction 128-191 X/Y axis reverse directi on at the same time 64-127 X axis forward direction 0-63 X/Y axis forward directi on at the same time 0 0 100 255 241-255 191-240 176-190 126-175 111-125 96-110 Be careful with your operations, with a dangerous voltage you can suffer a dangerous electric shock when touching wires. 1 Checking fixture and components Thank you for choosing our led moving head light. If follow the introductions given in this manual, we are sure you will enjoy the device for a long period of time.Unpack your led moving head light, check carefully the content of the box and contact immediately your forwarder in case of damage. The following items are included in the box: 3m/ 3-pin DMX cable: 1pc User manual: 1pc Led moving head light: 1pc 0 0 Damages caused by the disregard of this user manual are not subject to warranty. The dealer with not accept liability for any resulting defects or problems. 2 Rotation angle 10 Spectrum CRT 0-280 0-540 /0-630 Red Blue 1500 3 650 420 120 LUX 260 3550 3 Beam opening(m) Beam opening(m) 2 1 0 25 1 2 2100 1260 620 270 LUX 2 1 0 25 1 Pan:0-540 or 0-630 2 3 1 2 3 4 5 6 7 8 9 3 10 Distance(m) 1 Green 3200 3 1900 950 630 3 4 5 6 7 8 9 10 Distance(m) White 260 LUX 1530 3 Beam opening(m) Beam opening(m) 2 1 0 2 25 1 2 1800 980 240 LUX 430 2 1 0 25 1 2 3 1 2 3 4 5 6 7 8 9 10 Distance(m) 8 3 1 2 3 4 5 6 7 8 9 10 Distance(m) Tilt:0-280 3 Technical specifications 1 Voltage 100V-240V AC 50/60HZ. 2 Power consumption 150W 360W 260W 3 Light source R24+G28+B28+W28*1W R24+G28+B28+W28*3W R/G/B LED 3 in 1*72*3W 25 4 Light Included angle: 15 5 DMX channel 14CH 6 X axis 540deg and 630deg for option, it has auto closed-loop system 1 CH9 255 Green color 100 100 0 CH11 255 0 0 0 White color CH12 100 255 R/G/B/W macro function 100 0 251-255 R/G/B/W 100% output at the same time 239-250 Blue color all light+red color from dark to light, green color from light to dark 227-238 Red color all light+green color+blue color from dark to light 215-226 Blue color all light, red color from light to dark 203-214 Blue color all light, red color from dark to light White color from dark to light, linear adjustable 2 255 Blue color Blue color from dark to light, linear adjustable 4 Installation and operation The person who install and operate this fixture should have relevant technical qualifications.Pls read and follow this manual carefully before you install and operate the fixture. Damages and loss caused by the disregard of this user manual are not subject to warranty. The dealer with not accept liability for any resulting defects or problems. 1. This fixture is indoor energy-saving and environment-protecting product. Please keep from moisture and dust. 2. please do not take apart the cover or change equipment personally. 3. When open the box, please take out the foam which used for shipping.4. This fixture is with good quality and good packed before we ship out. Please do not take apart the cover or change equipment personally. 4. Please install the fixture in proper place to make sure use it safely and not shake the fixture to make sure get good effect. Please pay attention to shock it. Please avoid violent collision when installing. 5. Please do not connect the power cable to other cable, especially highvoltage fence. 6. The power, voltage that you used should be consistent with the label showed on light. Please make sure effective voltage is not higher or lower than the light required. 7. Please make sure the power cable is connecting well. 8. Please check the fixture and accessories in a regular time. 9. Please disconnect the light if you do not use it or when you clean it. 10. The protection level of this fixture is 1 level. Please connect yellow/green color cable to the ground. 11. Please make sure the power you use suit for the fixture before using, and the light is not external power, please do not connect the fixture into external dimmer device. CH10 Green color from dark to light, linear adjustable 7 Y axis 280deg, it has auto closed-loop system 8 Horizontal, Vertical independent linear speed adjustable 9 Fine tunning: X/Y axis 16bit accurate positioning can set X/Y forward and reverse on the controller 10 Dimmer: 10-100% linear dimmer 11 Strobe: 1-10times/S (it has common strobe, thunder strobe, Radom strobe, sudden dark and lightstrobe, sudden light and dark strobe) linear adjustable 12 RGB256*256*256color mixing 13 Control mode:DMX512 signal,Master/Slave,Work Auto And Sound active 14 light closing&position fixing function 14 can edit X/Y forward and reverse direction for single light or group light on the controller 16 Size of fixture 360mm*220mm*430mm 17 Size of package 410mm*330mm*450mm 18 N. W 9KG 19 G.W 11KG 191-202 Green color all light, b lue color from light to d ark 179-190 Green color all light, blue color from dark to light 167-178 Red color all light, blue color from dark to light 155-166 White color all light, blue color from dark to light 150-154 White color all light, green color from dark to light 100-149 White color all light, red color from dark to light 95-99 nine colors cycle grudual chaning, from sl ow to fa st 50-94 nine colors cycle jumping, from sl ow to fast 0 0 7 0 0-4 inaction CH5: X/Y speed 255 12. Please do not shot the eyes directly in a close range. Please do not let the unqualified people near to the fixture when the light is working (Such as child, epilepsy patients) 13.Please install the light more than 3 meters from inflammable place 14. Please put the light in the room with good ventilation 15. The max temperature for this fixture is 25-40 centigrade CH6: RGB strobe 100 255 100 X/Y scanning speed adjustable, from slow to fast 196-255 gradual dark strobe, fr om s low to fa st 3Ð º ¾Í 5Ð ¿ ¾Ö ØÏ Æ² ßÍ å£ · ¹̈ ¡ «¢ Ä £̧ µ ©× Ä» ª» 192-195 no action 133-191 gradual light strobe, fr om s low to fa st Parameterof DMX Signal In/Out 129-132 no action Connection of Signal cables(3chips and 5Chips) A. DMX512 control connecing sketch map 70-128 impluse thunder strobe, fr om s low to fast 66-69 no action Setup address : 7-65 common strobe from s low to fa st 0 5 Fixture connection 0 0 0 0-6 no action 001 015 029 Light QTY *14+1 B. Work Auto o r M aster/Slave control connecting s tetch manp Master Slave Slave Slave 6 Hook installation 3 CH7:R/G/B/W general dimmer CH8: RED color 2 255 100 255 100 Red color from dark to light, linear adjustable R/G/B/W dimmer from dark to light, linear adjustable 0 0 0 6 1 4 1 2 3 4 5 0 3 lug hook and chassis hook safey rope Fast lock installed in the hole finish hook installing 7 DMX channel description 9 DMX channel content Function Channel Function Channel CH1:PAN scanning CH1 X axis scanning(0-540/630) CH8 Red color CH2 Y axis scanning(0-280) CH9 Green color CH3 X axis fine scanning 16 bit CH10 Blue color CG4 Y axis fine scanning 16 bit CH11 White color CG5 X/Y axis scanning speed CH12 RGBW color setting CH6 RGBW strobe CH13 Closed light running+reset+auto mode Ch7 RGBW dimmer Ch14 255 CH2:TILT scanning 100 255 100 PAN scanning 540deg/630deg TILT scanning 280deg X/Y axis forward and reverse 8 Display operation LCD display operation DMX addr Enter-up/down address setting Vdlue 001-512 Enter Press menu back to last main menu confirmation Pan invert Enter-up/down PAN Setup YES Or NO Enter Press menu back to last main menu confirmation Pan angle Enter-up/down pan setting 540 Or 630 Enter Press menu back to last main menu confirmation Tilt invert Enter-up/down PAN Setup YES Or NO Enter Press menu back to last main menu confirmation Mode Enter-up/down mode setting DMX512 Enter Press menu back to last main menu DMX mode Servitor Enter Press menu back to last main menu Slave mode Autometism Enter Auto mode 0 0 0 CH3:PAN fine tunning 255 0 CH4: TILT fine tunning 100 255 100 Press menu back to last main menu PAN fine tunning 16bit Manua Restore Enter-up/down channel setting Enter-up/down Device reset CH TILT fine tunning 16bit Enter up/down to choose channel XX Data:xxx Enter Press menu back to last main menu Confirmation Motor Enter All motors reset Factory Enter revert to default settings 4 0 0 0 5 0