1
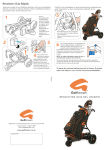
EZiCaddy
EZi3 User Manual
Your EZiCaddy EZi3 Trolley
Identifying the parts of your EZi3
1.
2.
3.
4.
5.
6.
7.
8.
9.
10.
11.
12.
13.
14.
15.
16.
17.
Front Wheel
Camlock Lever
Lower Bungee Strap
Bottom Bag Stay
Front Wheel Release Lever (on Right-Hand side of trolley)
Quick Release Lever for wheel
Rear Wheel
Motor
Battery
Unfolding Release Lever and Battery Release Lever (Battery Catch)
Lower/Main Spar
Upper Bungee Strap
Upper Bag Stay
Height Adjustment Screw
Folding Release Lever
Upper Spar
Handle, Controls and Display
Page 2
The new EZiCaddy EZi3
Congratulations on your purchase of the new EZi3 - a brand new powered
trolley from a brand new company. New maybe, but one founded by two of
the most experienced professionals in the business, with over 50 years’
experience in electric golf trolleys between us. From the earliest stages of
development, the mantra has been ‘make it easy’ – easy to open, easy to fold,
easy to carry, easy to manoeuvre, easy plug’n’play battery, easy to operate,
even easy-on-the-eye. Every little detail was designed and engineered to be
‘easy’. We hope you enjoy your new trolley and welcome your feedback and
comments.
Your new cart has also been designed for easy, minimum maintenance. Please
read these instructions carefully, and your new EZiCaddy trolley should give
you many years of faithful service.
Finding your trolley Serial Number
The serial number for your EZi3 trolley can be found on the underside of the
main spar. The same number is on the box you received with your trolley.
Please keep this box for shipping purposes.
Your EZiCaddy trolley is simple to maintain:
•
•
•
•
•
Store in a dry protected place.
Never jet-wash it or immerse it in water.
Avoid using detergents, oils or solvents on it.
Wipe clean whenever it gets wet or wipe with a damp cloth when it
gets dirty.
Occasionally remove the wheels and apply grease to the axle.
Page 3
Initial Assembly
When you first receive your trolley, you will need to attach the front wheel
assembly. Push the plastic plug of the front wheel assembly into the main spar.
Take care to have the bag support plate facing upwards. Then use the spanner
provided and a pozi-drive screwdriver to secure the front wheel assembly to the
main spar using the two nuts and bolts provided. Fully tighten to prevent
movement. Please note the sequence of washers and spacers.
Folding and unfolding your trolley
To unfold the upper section of your trolley, depress the release lever 10 and pull
the handle away from the main spar. Continue unfolding until the upper spar
clicks into place. To unfold the bottom bag-stay section, depress the release lever
5 and pull the wheel away from the main spar. Continue unfolding until the
bottom bag-stay clicks into place.
To fold your trolley, make sure you have removed your battery. Then depress
lever 15 to release the upper handle section and continue folding until it clicks
closed. Then depress lever 5 to release the front wheel and continue folding until
it clicks into place.
The folded trolley is designed to be stable standing upright or flat on its back.
Never put your trolley into your car boot with the battery plugged in. It could get
switched on.
Page 4
Adjusting the handle height
Your EziCaddy has 6 height adjustment settings. To adjust the handle height, first
fold the trolley. Then unscrew the locking screw 14 by about 6 mm until the
handle adjuster plate can be lifted off the teeth below. This then allows you to
select one of the 6 available handle heights. Move the plate forward to raise the
handle height and backwards to reduce the handle height. Please note that the
adjustment plate cannot be moved if the trolley is open. Finally, re-do screw 14
tightly.
Fitting the plug-n-play battery
To fit the battery, hold it vertically and, from the rear of the trolley, present it base
downwards to the main chassis. The notch in the base of the battery will locate in
the recess of the chassis. The top of the battery can then be pushed firmly
forwards to engage with the battery catch at the top of the battery.
To release the battery, press the battery release lever at the top and pull the
battery out of its docking station.
Always remove the battery before folding your trolley.
Page 5
Adjusting the front wheel.
If the steering of your trolley gets knocked out of alignment, it can usually be
corrected using the front wheel adjustment nut. Tracking / poor steering can
also be affected by the way you load your bag. This is why an anti-twisting
“cart bag” often provides a better driving experience.
Lift the cam-lock lever 2 to release it. Rotate the front wheel adjustment nut
clockwise to make the trolley go more to the right and anticlockwise to get it
to track more to the left. When you are happy that it is tracking correctly,
push back the cam-lock lever 2 to fix it back in position. The cam-lock needs
to grip very firmly to prevent subsequent movement.
Removing the main wheels.
You might occasionally want to take off the main wheels either for cleaning
purposes or to squeeze your trolley into a tighter space.
Press button 6 to allow you to release and pull off the wheel. Replace the
wheel by sliding the wheel into the clutch, align the wheel so that it starts to
engage properly and then push until you hear the engagement click
The upper and lower bag stays
The upper and lower bag stays are designed to accommodate a wide range of
golf-bag shapes and sizes. Ideally, you will be using a “Cart-Bag” with
symmetrically balanced pockets and an anti-twist base.
To lock the base of your bag in place, stretch the bungee strap 3 over the
bottom of the bag. This strap is not adjustable because most bag bases have
the same dimensions.
To hold the top of your bag in place, stretch the upper bungee straps 12 and
clip in place as shown.
Page 6
EZiCaddy Charger
Only use this charger with your EZiCaddy Standard battery or EZiCaddy
Lithium battery. It recognises which EZiCaddy battery you are using and
adjusts accordingly. Do not use a non-EZiCaddy charger with your EZiCaddy
battery or vice versa; a mismatch of battery and charger could cause damage.
Your charger should be placed on a hard surface, in a dry, well-ventilated
place. Do not charge in direct sunlight. Unplug it from the mains supply
before connecting or disconnecting the battery.
Do not open the charger casing there are no serviceable components inside
Always check that the charger casing and cables are in a good condition.
Connect your battery to your charger when you first receive it and,
thereafter, as soon as possible after use.
2. Plug in and switch on at the mains supply. The red light will come on.
3. After several hours, according to the initial charge on the battery, the
red light will go out and the green light will come on.
4. We recommend that you leave your battery “on charge” until your
next game.
5. Never leave the charger connected to the battery with the mains
supply switched off
1.
Page 7
EZiCaddy Battery
Your EZiCaddy battery is designed to play 18 holes. Avoid exceeding 18 holes
on one charge to maximise battery life. If you regularly want to play more
than 18 holes, please buy another battery.
Always remember to charge your battery after use, even if you have only
played a few holes, and then leave it on charge until your next game.
Page 8
Using your EZiCaddy EZi3
When you have fitted your battery and secured your bag, you are ready to go.
•
•
•
•
•
•
•
Depress and release the control knob on the handle to turn on the
power.
Rotate the control knob clockwise to increase the power.
Rotate the control knob anti-clockwise to reduce the power.
Depress and release the control knob on the handle to turn off the
power.
If you turn off the power when moving, the trolley will remember your
power setting. On turning the trolley back on, it will gradually
accelerate back to that setting.
If you have turned off the power when moving and do not want to
start off with the same setting, simply rotate the control knob about
half-a-turn anti-clockwise.
Your trolley will always forget its power setting and revert to zero if
you disconnect the battery.
ADF Mode
Your EZi3 features a convenient Automatic Distance Function. This is
particularly useful when you want to, say, send off your trolley by itself
towards the next tee whilst you go on to the green or if you need to play a
bunker shot and want to send on your trolley ahead. But please be very
mindful of people and obstacles that might end up in your path
You will need to power off the trolley when moving, so that it remembers the
speed at which you were travelling.
Page 9
Hold down the control button for at least 3 seconds and then release it. Then
quickly and sharply press the control button once, twice or three times.
Your EZi3 will then start off on its own accord and travel for roughly 15
seconds, 30 seconds or 45 seconds according to how many times you pressed
the button.
When you return to your EZi3 it will still remember the speed at which you left
it and will accelerate to that speed when you next depress the control button.
Page 10
Page 11
EZiCaddy
Unit 4L Sparrow Way
Lakesview International Business Park
Canterbury Kent CT3 4JH
United Kingdom
Contact us via:
Freephone 0800 849 1345
International +44 1227 714600
eMail: [email protected]
www.ezicaddy.com
EZi3 Manual v 1.06 A5 booklet
Page 12