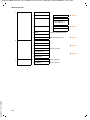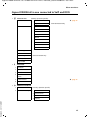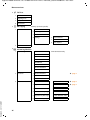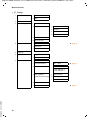
1
Gigaset DX800A all in one / en / A31008-xxxx-xxxx-x-xxxx / DX800A-aio-III-ReleaseNotesIVZ.fm / 30.11.2011
Gigaset DX800A all in one – New and updated functions
Gigaset DX800A all in one –
New and updated functions
This document is a supplement to the user guide (full version) and the user guide
for the Web configurator for the Gigaset DX800A all in one phone:
In the time since the user guides were completed, the functionality of this device
has been increased. These changes are described in this document.
Contents
Overview of the new and updated functions . . . . . . . . . . . . . . . . . . . . . . . . 2
Description of new and updated functions . . . . . . . . . . . . . . . . . . . . . . . . . . 3
Connecting a phone or a doorline to the FAX port . . . . . . . . . . . . . . . . . . . . . . . . . . . . . 3
Answering machine:
Recording two user specific announcements for the answer & record mode . . . . 6
Internal Hold Mode when making a call to several users (ISDN/VoIP) . . . . . . . . . . . . 8
Configuring an internal subscriber without a send connection . . . . . . . . . . . . . . . . . 8
Changing the dialling mode, switching to tone dialling (analogue fixed line) . . . . 9
Delete functionality from a function key . . . . . . . . . . . . . . . . . . . . . . . . . . . . . . . . . . . . . . 10
Extended IP configuration via Web configurator . . . . . . . . . . . . . . . . . . . . . . . . . . . . . . 10
Further base settings via Web configurator . . . . . . . . . . . . . . . . . . . . . . . . . . . . . . . . . . . 10
Editing Bluetooth GSM connections via Web configurator . . . . . . . . . . . . . . . . . . . . . 12
Supplements to „Defining dialling plans“ . . . . . . . . . . . . . . . . . . . . . . . . . . . . . . . . . . . . . 13
Downgrading the firmware . . . . . . . . . . . . . . . . . . . . . . . . . . . . . . . . . . . . . . . . . . . . . . . . . . 13
Changed structure of the Web configurator menu . . . . . . . . . . . . . . . . . . . . . . . . . . . . 14
Supplements and corrections to several functions . . . . . . . . . . . . . . . . . . . . . . . . . . . . 15
Function no longer in use – the Gigaset.net assistant
(country-/provider-specific) . . . . . . . . . . . . . . . . . . . . . . . . . . . . . . . . . . . . . . . 17
Information on operating Gigaset VoIP telephones with routers with
Network Address Translation (NAT) . . . . . . . . . . . . . . . . . . . . . . . . . . . . . . . . 18
1. Changing the port numbers for SIP and RTP on your VoIP phone . . . . . . . . . . . . 18
2. Setting port forwarding on the router . . . . . . . . . . . . . . . . . . . . . . . . . . . . . . . . . . . . . . 19
Menu overviews . . . . . . . . . . . . . . . . . . . . . . . . . . . . . . . . . . . . . . . . . . . . . . . . . . 20
Version 4.1, 21.11.2007
Gigaset DX800A all in one connected to VoIP and analogue fixed line . . . . . . . . . 20
Gigaset DX800A all in one connected to VoIP and ISDN . . . . . . . . . . . . . . . . . . . . . . . 25
1
Gigaset DL500A / en / A31008-xxxx-xxxx-x-xxxx / Rel3_Saturn.fm / 30.11.2011
Overview of the new and updated functions
Overview of the new and updated functions
New and extended functions
u Extended possibility to connect devices to the FAX port:
u
u
u
u
u
u
u
u
u
Instead of the fax machine you can connect an analogue phone or a door bell
with two-way intercom to your Gigaset’s FAX port. ¢ page 3
From now on you can make internal calls via the Fax port and transfer calls to
other handsets.
Two personal announcements can be saved for each answering machine.
Now, you can record for each local answering machine two announcements for
the advisory mode. When activating the answering machine you can select
which announcement shall be used. ¢ page 6
External call held internally on your device
When making a call via ISDN or VoIP: Dependant from the settings of your phone
external calls (during toggling or an external consultation call) are internally
held on your phone or on the phone exchange of your provider. During the
internal hold both ISDN/VoIP lines are busy. ¢ page 8
Configuring an internal subscriber without a send connection.
You can configure your phone or each of the registered handsets so that you
cannot make external calls. But you can accept external calls and make calls to
an internal subscriber. ¢ page 8
Changing the dialling mode when you are connected to an analogue PABX.
You can change the dialling mode via base station’s menu or via Web configurator. ¢ page 9
The Web configurator allows additional IP settings for the base station. So you
can define a device name by which the base station can be addressed within the
local network. ¢ page 10
Further settings of the base station can be made via Web configurator: Enabling
the registration mode, changing system PIN and activating VoIP status message
display. ¢ page 10
Via Web configurator you can change Bluetooth GSM connections’ names in the
Known Devices list and delete the GSM connections from the list. ¢ page 12
After the first firmware update you can downgrade the firmware to the previous
version. ¢ page 13
The structure of the Web configurator menu has changed. ¢ page 14
Function no longer in use
u When you open the gigaset.net directory for the first time, you are no longer
Version 4.1, 21.11.2007
prompted to create your own Gigaset.net entry. ¢ page 17
2
Gigaset DL500A / en / A31008-xxxx-xxxx-x-xxxx / Rel3_Saturn.fm / 30.11.2011
Description of new and updated functions
Description of new and updated functions
Connecting a phone or a doorline to the FAX port
This section extends the section „Connecting/Using other devices - connecting a fax machine
(ISDN)“ in the user guide for your Gigaset phone.
Instead of a fax machine you can connect an analogue telephone or a corded analogue doorline interface device (Doorline Type 2) to the base via the FAX port.
phone or fax machine
3
doorline
1
2
1. Insert one end of the connection cable (6 pin with 2 mini western jacks 6/6) from
the rear into the recess in the housing of your phone.
2. Plug the jack into the fax port on the base (labelled: FAX).
3. Connect the connection cable to the port on the analogue phone/the doorline
intercom.
You do not explicitly have to register the device to the base. It is automatically "registered", once you have activated the FAX port on the base. The device is added to
the list of internal parties with the internal name INT 8. The internal number 8 can
not be changed.
When activating the FXS port you have to specify the type of device you want to
connect to the port.
Activating/deactivating the FAX port
Version 4.1, 21.11.2007
This section replaces the section „Configuring the system settings - Activating/deactivating
the Fax port (ISDN)“ in the user guide for your Gigaset phone.
To register a fax machine/a phone or a doorline to the base, you must activate the
FAX port, i.e. set the port to Telephony / Fax or Doorline mode.
The FAX port is deactivated by default.
When you activate the FAX port, it is regarded as registered. The internal number 8
is assigned to it/the connected device. INT 8 is displayed in the list of internal parties (even if there is no device connected).
v ¢ ÏSettings ¢ System ¢ FXS Port
3
Gigaset DL500A / en / A31008-xxxx-xxxx-x-xxxx / Rel3_Saturn.fm / 30.11.2011
Description of new and updated functions
¤ You can enter data in the following fields:
Mode:
Telephony / Fax
Activate the FXS port. You can connect a fax machine or an analogue phone to
the FXS port.
You can assign external and internal connections to the FAX port. The first MSN
in the configuration (ISDN) or the analogue fixed line will be assigned to the FAX
port as a send connection automatically. All configured connections of the
phone are assigned to the FAX port as receive connections.
You can change this assignment.
Doorline
Activate the FXS port. You can connect a corded, analogue doorline interface,
working with DTMF codes.
Only internal connections are possible via the FAX port. Neither send nor receive
connections are assigned to it.
Therefore dialling from the doorline device is restricted to * (asterisk) for a collective call and the digits 1-7 for calls to the corresponding internal subscriber.
To enable calls from doorline these digits or “*” should be assigned as DTMF
codes to selected keys of the device during configuration process. Default values of doorline DTMF codes depend on the selected country.
Doorline calls are shown as regular internal calls.
Off
Deactivate the FAX port. INT 8 will be removed from the internal list. It is no
longer possible to establish a connection to/via FAX port.
To control the doorline device the base station must send different DTMF codes to
the doorline device. When you have selected the Doorline mode, the following
fields are displayed in which you can enter the needed codes (4 characters maximum, permitted are the digits 0..9 and the special characters “#” , “*”).
Door Open Code:
Insert a DTMF code for triggering the door opening mechanism.
Door Connect Code:
Insert a DTMF code for accepting the call and connecting the audio channel.
Door Disconnect Code:
Insert a DTMF code for ending the call and disconnecting the audio channel.
Version 4.1, 21.11.2007
¤ Press the §Save§ display key to save the settings.
4
Gigaset DL500A / en / A31008-xxxx-xxxx-x-xxxx / Rel3_Saturn.fm / 30.11.2011
Description of new and updated functions
Doorline calls
Prerequisite: Incoming and outgoing doorline calls are only possible if FXS Port is
set to Doorline mode.
Please note
Incoming doorline calls are signalled as regular internal calls from internal subscribers. The internal name of the FXS port INT 8 is displayed.
Call from doorline
The call from the doorline device can be started either to all internal subscribers
(collective call) or to a selected internal subscriber.
If the doorline device initiates a call to an internal subscriber, which is not reachable,
the doorline device stays in busy state.
If the doorline device initiates a call to an internal subscriber, which is in the call
state, the internal call waiting from doorline is presented.
The incoming doorline call is signalled on the base station/handset.
¤ Pick up the receiver or press the handsfree key d to send the Door Connect
Code to the doorline device. You can talk to the caller.
In this state any internal or external call waiting is signalled to the base station/
handset. You cannot accept or react to it.
¤ Press the §Open Door§ display key to open the door.
The Door Open Code is sent to the doorline device. The door is opened.
¤ Put the receiver on hook/press the red end key T to close the connection.
The Door Disconnect Code is sent to the doorline device.
Call to doorline
To call the doorline proceed as follows:
¤ Press the u control key.
The phone tries to initiate an internal call.
¤ Select INT 8 for the doorline device.
¤ Pick up the receiver or press the handsfree key d.
If the doorline device is available, you are connected with the doorline.
¤ Press the §Open Door§ display key to open the door.
The Door Open Code is sent to the doorline device. The door is opened.
If the doorline device is busy:
¤ Press the red end key T to return to idle state.
Please note
Version 4.1, 21.11.2007
u The doorline device accepts calls automatically.
u If the receiver is on hook the handsfree mode is automatically switched on.
5
Gigaset DL500A / en / A31008-xxxx-xxxx-x-xxxx / Rel3_Saturn.fm / 30.11.2011
Description of new and updated functions
Notes on the FXS port in Telephony / Fax mode
When connecting a multifunction device (fax/phone) or a phone to the FXS port,
you must observe the following:
u There is no ringing tone when you pick up.
u CLIP is not supported for incoming calls.
u If the answering machine takes a call on the device's receive connection, it continues to ring.
u If a receive connection is only assigned to the fax machine/phone, then calls to
the corresponding number will not be entered in the call lists (it is not possible
to delete the entries from the base or a handset).
u To call an internal subscriber or to make an internal consultation call during an
external call enter an „R“ in front of the corresponding internal number.
u Other internal functions such as "internal transfer" are not supported.
Notes on the FXS port in Doorline mode
u If one of the participants of the internal call is a doorline device, an incoming
external or internal call is not signalled (as call waiting) to any of the participants.
If no other handset can present the call, the caller hears the busy tone.
u An incoming call from the doorline device during an internal or external call is
presented as regular internal call waiting. Before you can accept the call from the
doorline device you have to end the external/internal call.
Answering machine:
Recording two user specific announcements for the answer &
record mode
Recording an announcement
Version 4.1, 21.11.2007
This section amends the section „Operating the base’s answering machine - Operating via the
base - Recording a personal announcement/advisory“ in the user guide for your Gigaset
phone.
For each answering machine you now can record two personal announcements for
the answer and record mode and one advisory message for answer only mode.
You can record the two announcements as follows:
v ¢ Ì ¢ Announcements ¢ Record Announcemnt.
q
If necessary, select answering machine and press §OK§.
q
Select Announcement 1 /Announcement 2 and press §OK§.
§OK§
Press the display key to start the recording.
You hear the ready tone (short tone).
¤ Now say your announcement (at least 3 seconds).
§End§
Press the display key to end the recording.
After recording, the announcement is played back for you to check. You can rerecord the announcement with §New§.
6
Gigaset DL500A / en / A31008-xxxx-xxxx-x-xxxx / Rel3_Saturn.fm / 30.11.2011
Description of new and updated functions
Playing back announcements
This section amends the section „Operating the base’s answering machine - Operating via the
base - Playing back announcements“ in the user guide for your Gigaset phone.
You can play back the announcements as follows:
v ¢ Ì ¢ Announcements ¢ Play Announcement
q
If necessary, select answering machine and press §OK§.
q
Select Announcement 1 /Announcement 2 and press §OK§.
If the selected announcement has not been recorded or has been deleted, the prerecorded announcement is played back instead.
Activating answering machine, selecting an announcement
This section amends the section „Operating the base’s answering machine - Operating via the
base - Activating/deactivating and setting answering machine mode“ in the user guide for
your Gigaset phone.
v ¢ Ì ¢ Activation
q
If necessary, select answering machine (μ= on).
§OK§
Press the display key.
¤ You can enter data in the following fields:
Activation:
Select On or Off to activate/deactivate the answering machine.
Mode:
Select Answer & Record, Answer only or Alternating.
If Answer & Record or Alternating is selected:
Answer & Record with:
Select Announcement 1 /Announcement 2.
If the selected announcement has not been recorded or has been deleted, the
pre-recorded announcement is used instead of that.
If Alternating mode is selected:
Record from:
Enter hours/minutes for the start of the period in 4-digit format.
(The time must be set.)
Record until:
Enter hours/minutes for the end of the period in 4-digit format.
§Save§
Press the display key.
Please note
Version 4.1, 21.11.2007
If no system time is available, the answering machine changes from Alternating
or Answer & Record mode to Answer only mode until the system time is available again.
7
Gigaset DL500A / en / A31008-xxxx-xxxx-x-xxxx / Rel3_Saturn.fm / 30.11.2011
Description of new and updated functions
Internal Hold Mode when making a call to several users (ISDN/
VoIP)
Your ISDN/VoIP connection offers you two telephone lines that you can use at the
same time. For this reason you have the following two options to hold an external
participant during an external consultation call or during call swapping:
u Hold connection externally: The call is put on hold in the telephone exchange.
Therefore your second ISDN/VoIP line can be used by another party.
u Hold connection internally: The call is put on hold in your base station. In this
case both ISDN lines or both VoIP lines are occupied. If the second ISDN/VoIP line
is in use by another party, an external consultation call or accepting a waiting
call is not possible.
To activate/deactivate the internal hold mode, select
v ¢ Ï Settings ¢ Telephony ¢ Internal Hold Mode (³= On)
By factory default, the Internal Hold Mode is deactivated, i.e. external calls are held
on the telephon exchange (central office of the net provider).
Please note
If the function Internal Hold Mode is activated, you cannot connect the two
participants with one another (no call transfer).
Configuring an internal subscriber without a send connection
This section extends the section „Configuring the system settings- Assigning send and receive
connections to internal parties - Assigning a send connection“ in the user guide for your
Gigaset phone.
You can configure your phone or each of the registered handsets so that you cannot make external calls. You can only make calls to internal subscribers.
v ¢ ÏSettings ¢ Telephony ¢ Send Connections
Select and press §OK§.
~
Enter the system PIN if necessary and press §OK§.
A list of the internal parties (base, handsets, device connected to the FAX port INT8
– where applicable) is displayed.
q
Select the internal party that should not be allowed to set up external
calls and press the display key §OK§.
r
Select No outgoing calls to block all outgoing calls from this internal
party.
§Save
Press the display key to save the changes.
Version 4.1, 21.11.2007
Please note
If you select No outgoing calls, all outgoing calls, calls to the network mailbox
and sending of SMS, E-Mail or fax from this internal party is blocked.
If the internal subscriber tries to make an external call, to send an SMS and so on
the message Not possible is displayed.
8
Gigaset DL500A / en / A31008-xxxx-xxxx-x-xxxx / Rel3_Saturn.fm / 30.11.2011
Description of new and updated functions
Changing the dialling mode, switching to tone dialling
(analogue fixed line)
Changing the dialling mode (analogue fixed line)
This section extends the chapter „Connecting the base to the PABX“ in the user guide for your
Gigaset phone. It applies to connections via the analogue fixed line.
Changing the dialling mode is only necessary if the PABX the phone is connected
to requires it; see the PABX user manual.
The following dialling modes can be selected:
u Tone dialling (Tone),
u Pulse dialling (Pulse).
Regardless of the setting options above, after dialling or during a call, the phone
automatically switches to tone dialling (DTMF) e.g., for controlling an answering
machine remotely.
v ¢ Ï Settings ¢ Telephony ¢ Dialling Mode
q
Select dialling mode and press §OK§ (Ø = set value).
Please note
Tone dialling (DTMF) is now the most common dialling mode. Pulse dialling
mode (PD) is used only for a few old PABXs.
Changing the dialling mode via Web configurator
This section extends the section „Telephony – Connections - Setting the fixed line network
connection“ in the user guide for the Web configurator.
You can additionally switch between tone and pulse dialling mode via the Web
configurator:
¤ Open the Settings ¢ Telephony ¢ Connections Web page.
¤ Select Edit in the Fixed Line Connection area.
¤ For Dialling mode select
Pulse dial for Pulse dialling mode
DTMF for Tone dialling mode
¤ Select Set to save your settings.
Switching temporarily to tone dialling (DTMF)
Version 4.1, 21.11.2007
This section extends the chapter „Connecting the base to the PABX“ in the user guide for your
Gigaset phone. It applies to connections via the analogue fixed line.
If your PABX still operates with pulse dialling (PD), but you need tone dialling for a
connection (e.g., to listen to the network mailbox), you must switch to tone dialling
for the call.
Prerequisite: You are conducting a call or have already dialled an external number.
*
Press the star key.
After the call ends, pulse dialling is automatically reactivated.
9
Gigaset DL500A / en / A31008-xxxx-xxxx-x-xxxx / Rel3_Saturn.fm / 30.11.2011
Description of new and updated functions
Delete functionality from a function key
This section amends the section „Setting up the base- Changing key assignments“ in the user
guide for your Gigaset phone.
To delete the functionality from a function key proceed as follows:
¤ Press and hold the function key until a list of possible key assignments is displayed.
¤ Press the display key §Clear§ to delete the key assignment.
Extended IP configuration via Web configurator
This section extends the section „IP Configuration – Connecting to the LAN“ in the user guide
for the Web configurator.
Defining a name for the base station in the network
Instead of the local IP address you can use this name to address the base station
within the local network.
¤ Open the Settings ¢ IP Configuration Web page.
¤ Click the Show Advanced Settings button to show additional fields.
In the Remote Management area
¤ In the Device Name in the Network field enter a name for your base station (up
to 75 characters).
¤ Click on the Set button to save the changes.
The device name of the base station is displayed on the Status page of the Web
configurator.
Further base settings via Web configurator
Via the Web configurator page Settings ¢ Management ¢ Miscellaneous you
can additionally make the following base settings:
u Enabling registration mode on the base station
u Changing the system PIN
u Activating VoIP status message display
Registering handsets
You can register up to six handsets with your phone. The registration must be initiated on the phone and the handset.
Version 4.1, 21.11.2007
¤ Open the Settings ¢ Management ¢ Miscellaneous Web page.
¤ Click on the Start Registration button to enable registration mode on the base
station. Registration mode is active for approximately 60 seconds.
After that, you are prompted to start the registration on the handset.
¤ Start the registration on the handset within 60 seconds as described in the
handset’s user manual.
10
Gigaset DL500A / en / A31008-xxxx-xxxx-x-xxxx / Rel3_Saturn.fm / 30.11.2011
Description of new and updated functions
Once registration is complete, the handset returns to idle status. The display shows
the internal number for the handset, e.g., INT 2. The handset is added to the list of
registered handsets on the Status tab.
Changing system PIN of the phone
Protect the system settings of your phone with a 4-digit PIN known only to you.
Before changing important system settings and when logging into the Web configurator, you are prompted to enter the system PIN.
The default setting for the PIN is 0000.
¤ Open the Settings ¢ Management ¢ Miscellaneous Web page.
¤ Enter a new 4-digit system PIN for the base station in the New PIN field (four digits from 0 to 9).
¤ Click on the Set button, the new PIN is enabled.
Activating VoIP status message display
You can display VoIP status messages on your telephone when there are VoIP connection problems. These messages give you information on the status of a connection and contain a provider-specific status code that helps the service team to analyse the problem.
A table with possible status codes and their meaning can be found in the phone's
detailed user guide,
¤ Open the Settings ¢ Management ¢ Miscellaneous Web page.
¤ Click on the Yes / No option next to Show VoIP status on handset to enable or
Version 4.1, 21.11.2007
¤
disable the message display.
Select Set to save the changes.
11
Gigaset DL500A / en / A31008-xxxx-xxxx-x-xxxx / Rel3_Saturn.fm / 30.11.2011
Description of new and updated functions
Editing Bluetooth GSM connections via Web configurator
This section extends the section „Telephony – Connections: Configuring phone connections“
in the user guide for the Web configurator.
In the list with all possible connections on the Settings ¢ Telephony
¢ Connections Web page the GSM mobile phones being included in the Known
Devices list on the base are displayed.
For each GSM connection, the Bluetooth name is displayed with which the corresponding mobile phone is stored in the Known Devices list as well as its status.
Possible values for the status are:
Active
Bluetooth is activated on the base. The mobile phone is registered with the base,
i.e. it appears in the Known Devices list. However, the mobile phone is not yet
activated. The Connect Mobile option is not set for this mobile phone. No calls
can be made from the base via the corresponding GSM connection.
Connected
The mobile phone is displayed in the Known Devices list and is active. The
Connect Mobile option is set for this mobile phone.
Bluetooth is off
Bluetooth is deactivated on the base.
Editing/deleting Bluetooth GSM connections
¤ Open the Settings ¢ Telephony ¢ Connections Web page.
¤ Select the Edit button next to the GSM connection that you want to edit.
Connection Name or Number
Enter the number of the mobile phone or define a name for the GSM connection
(max. 16 characters). This name is displayed on the base e.g., in the Known
Devices list, in the lists for receive/send connections and in the call lists as
receive connection (number that the caller dialled).
¤ Select Set to save the changes.
Or:
¤ Click the Cancel button to reject the changes you have made.
Then you return to the list of connections.
Or:
¤ Click the Delete Connection button to delete the GSM connection from the con-
Version 4.1, 21.11.2007
figuration. You can no longer be contacted via this phone number or make calls
via this connection.
If the connection you have deleted was the send connection of an internal subscriber, then a new send connection will automatically be assigned to this internal subscriber. This is the fixed line network number if the phone is connected
to the analogue fixed line network.
12
Gigaset DL500A / en / A31008-xxxx-xxxx-x-xxxx / Rel3_Saturn.fm / 30.11.2011
Description of new and updated functions
Supplements to „Defining dialling plans“
This section extends the „Telephony – Dialling Plans - Defining dialling plans – cost control“ in
the user guide for the Web configurator.
Blocking numbers
You can define numbers that are not allowed to be dialled at the base station as well
as at any registered handset.
You define such dialling plans as follows:
Phone Number
Enter the number or the first digits of the phone number which should not be
dialled (max. 15 digits).
Connection
Select Block from the list.
¤ Click on the Add button. The dialling plan is activated immediately.
If you try to dial the number, Not possible is displayed.
The option „Use Area Codes“
When defining a dialling plan you can establish that for each call via VoIP the local
area code shall precede. For that activate the option Use Area Codes corresponding to your dialling plan
Downgrading the firmware
This section extends the section „Management – Firmware Update: Updating the base's
firmware“ in the user guide for the Web configurator.
You can reload the firmware version that was loaded before the last update on the
phone.
¤ Open the Settings ¢ Management ¢ Firmware Update Web page.
¤ Select the Downgrade Firmware button. The text above this button shows the
Version 4.1, 21.11.2007
version of the firmware that will be reloaded.
¤ In the following dialog box, click the OK button to confirm the prompt.
The firmware is reloaded to the phone. The new firmware is overwritten. Your connection to the Web configurator is terminated, and the base is rebooted.
This process can take up to 3 minutes.
13
Gigaset DL500A / en / A31008-xxxx-xxxx-x-xxxx / Rel3_Saturn.fm / 30.11.2011
Description of new and updated functions
Changed structure of the Web configurator menu
The structure of the web configurator menu has changed. Changes are marked
orange
Home
Settings
IP Configuration
Telephony
Connections
Audio
Number Assignment
Call Divert
Dialling Plans
Network Mailboxes
Advanced Settings
E-Mail
Info Services
(country-specific)
Online Directory
(country-specific)
Directory Transfer
Management
Date & Time
Miscellaneous
Save & Restore
Firmware Update
Version 4.1, 21.11.2007
Status
14
Device
Gigaset DL500A / en / A31008-xxxx-xxxx-x-xxxx / Rel3_Saturn.fm / 30.11.2011
Description of new and updated functions
Supplements and corrections to several functions
u Cancelling an incoming call:
u
u
u
u
Version 4.1, 21.11.2007
u
To cancel an incoming call, replace the receiver. For VoIP and ISDN calls you have
additionally the possibility to press the red end key T or the display key
§Reject§.
Display during an incoming call with CNIP (country-specific):
If the number of the caller is stored in your directory, the caller’s number (not the
CNIP information) is replaced by the corresponding directory entry.
Both, CNIP and directory name replacement may be shown together.
Making calls using network services (country-/provider-specific):
– For some functions, you must press the softkey §Send§ instead of §OK§ or §Save§ to
submit changes.
– Cancelling ringback (ISDN):
To cancel ringback early select v ¢ Ç Select Services ¢ Ringback Off
§OK§. Ringback is cancelled. You do not need to press any other key.
Searching for subscribers in the Gigaset.net directory:
There is no display key §Search§ available to start a search in the directory.
You can start a search as follows:
v ¢ Î Contacts ¢ Online Directories ¢ Gigaset.net
Gigaset.net name:
Enter the name or part of a name (max. 25 characters).
§Options§ ¢ Search
Select and press §OK§, to start the search.
Using Bluetooth devices:
Adding the data device/mobile phone to the known devices list:
If the new device fails to register, the list of known devices will only remain
unchanged if no device was selected to be replaced.
Connecting headsets:
You can connect a wire-bound headset and a Bluetooth headset to the base at
the same time. In this case you cannot use a function key with the wire-bound
headset.
Changing the default connection:
When you switch the analogue fixed network over to ISDN or vice versa some
messages are displayed. The only available display key is §OK§ and not any longer
§No§ and §Yes§. You can only agree to the system messages.
15
Gigaset DL500A / en / A31008-xxxx-xxxx-x-xxxx / Rel3_Saturn.fm / 30.11.2011
Description of new and updated functions
u Function/display key assignments:
Version 4.1, 21.11.2007
Additionally to the listed functions in the user manual you can assign the SMS
menu to a function key for a quick access:
¤ Press and hold a function/display key.
¤ Select More Functions... and press §OK§.
¤ Select SMS and press §OK§.
u Activating the screensaver Info Services:
For using the Info Services screensaver you do not have to activate the display
of info services via the Web configurator any longer as a prerequisite.
Depending on the information feed selected for the screensaver, a display key
appears on the right (e.g., §More§) for calling up further functions. To return to idle
display, proceed as follows:
¤ Press and hold the red end key T.
¤ Start dialling ~.
u Changing the ISDN connection
If your base had already been connected to ISDN and you want to change the
ISDN connection (new MSNs), you have manually to delete till now saved MSNs
on the base. Please do the following:
¤ Start the ISDN wizard via the menu :
v ¢ ÏSettings ¢ Connection Wizard ¢ ISDN
¤ Delete the MSNs saved on the base.
¤ Finish the ISDN wizard.
¤ Restart the ISDN wizard via the menu and start the automatic MSN assignment.
16
Gigaset DL500A / en / A31008-xxxx-xxxx-x-xxxx / Rel3_Saturn.fm / 30.11.2011
Function no longer in use – the Gigaset.net assistant (country-/provider-specific)
Function no longer in use – the Gigaset.net assistant
(country-/provider-specific)
When you open the gigaset.net directory for the first time, you are no longer
prompted to create your own Gigaset.net directory entry.
To create your own entry in the Gigaset.net directory, proceed as follows:
¤ Select v ¢ Î Contacts ¢ Online Directories ¢ Gigaset.net and press §OK§,
to open the Gigaset.net directory.
¤ Select §Options§ ¢ Own details and press §OK§.
§Change§
Press the display key.
~
Enter the name that you would like to be listed under in the Gigaset.net
directory and press §OK§. The name may contain a maximum of 25 characters.
If an entry with this name already exists, the message Nickname exists! Please
choose another one is displayed. You are prompted to enter a name again.
To delete the entry You can delete the name with Ñ and press §OK§.
Data protection notice
Version 4.1, 21.11.2007
If you enter a nickname at this point, it is stored on a central Gigaset server. The
nickname appears in the Gigaset.net directory, and other subscribers that use
the Gigaset.net service can call you using this nickname.
By entering your data, you agree to having your data saved. If you do not
wish this to happen, you can cancel the operation at this point.
Further information about the Gigaset.net service data saved can be found at
www.gigaset.net/privacy-policy
17
Gigaset DL500A / en / A31008-xxxx-xxxx-x-xxxx / Rel3_Saturn.fm / 30.11.2011
Information on operating Gigaset VoIP telephones with routers with
Information on operating Gigaset VoIP telephones
with routers with Network Address Translation (NAT)
In general no special telephone or router configuration is required when operating
a Gigaset VoIP phone with NAT router. The configuration settings described in this
section are only necessary if you encounter one of the following problems.
Typical problems caused by NAT
u No incoming calls are possible via VoIP. Calls to your VoIP phone number are not
put through.
u Outgoing calls via VoIP are not connected.
u A connection is established with the other party, but you cannot hear them and/
or they cannot hear you.
Possible solution
1 Change the port numbers of the communication ports (SIP and RTP ports) on
your phone ( ¢ "1. Changing the port numbers for SIP and RTP on your VoIP
phone").
2 In some cases, you must also define port forwarding for the phone's communication ports on the router ( ¢ "2. Setting port forwarding on the router").
1. Changing the port numbers for SIP and RTP on your VoIP
phone
On your VoIP phone, define different (local) port numbers for the SIP and RTP ports
(between 1024 and 49152).
u These numbers must not be used by any other application or host in the LAN.
u They must be considerably higher or lower than the SIP and RTP port numbers
that you usually use (and are preset on the phone).
This procedure is particularly useful if additional VoIP phones are connected to the
router.
To change the SIP and RTP port numbers on your VoIP phone, proceed
as follows:
¤ Connect your PC's browser to the Web configurator of the phone and log in.
¤ Open the Web page Settings ¢ Telephony ¢ Advanced Settings and change
Version 4.1, 21.11.2007
the settings for the SIP and RTP ports.
To help you remember the new port numbers (e.g. for router configuration), you
can choose port numbers that are very similar to the standard settings, e.g.
SIP port
49060
instead of 5060
RTP port
49004 to 49010 instead of 5004 to 5010
¤ Save the changes on your phone.
18
Gigaset DL500A / en / A31008-xxxx-xxxx-x-xxxx / Rel3_Saturn.fm / 30.11.2011
Information on operating Gigaset VoIP telephones with routers with
¤ Wait for the active VoIP connections to be re-registered. To do so, switch to the
Web page Settings ¢ Telephony ¢ Connections to see the Status of your
VoIP connections.
¤ Check to see whether the problem persists. If it does, perform step 2.
2. Setting port forwarding on the router
To ensure that your specified SIP and RTP port numbers are used on the WAN interface with the public IP address, you must define port forwarding rules for the SIP
and RTP ports on the router.
To define port forwarding on the router, proceed as follows:
The terms used in the following can vary from router to router.
To release a port, you must enter the following details (example):
Protocol
Public port
Local port
Local host (IP)
UDP
49060
49060
192.168.2.10
for SIP
UDP
49004–49010
49004–49010
192.168.2.10
for RTP
Protocol
Enter UPD as the protocol to be used.
Public port
Port number/port number range on the WAN interface
Local port
The SIP and RTP port numbers set on the phone.
In the new firmware version for Gigaset VoIP telephones, you can set a RTP port
range. In this case, you must also define corresponding port forwarding for this
range.
Local host (IP)
Local IP address of your phone in the LAN.
Version 4.1, 21.11.2007
To enable the router to perform this port forwarding, the DHCP settings of the
router must ensure that the phone is always assigned the same local IP address –
i.e. the DHCP does not change the IP address assigned to the phone during operation. Alternatively, you can assign a fixed (static) ID address to the phone. However,
you must ensure that this IP address is not within the address range reserved for
DHCP and is not assigned to any other LAN subscriber.
19
Gigaset DX800A all in one / en / A31008-xxxx-xxxx-x-xxxx / menutree_Saturn-DX800A.fm / 30.11.2011
Menu overviews
Menu overviews
Instead of scrolling to locate a menu function, you can select a function more quickly by
opening the menu and keying in a digit combination (or shortcut).
Example:
¤ To open the main menu press v when the base is in idle status.
¤ Press O 3 2 for "Set ringer melody volume."
Gigaset DX800A all in one connected to VoIP and analogue
fixed line
1 Ç Select Services
Automatic Recall
Next Call
¢ page 15
(country-/provider-specific)
Fixed line connection only
Withhold Number
Send Number
Call Waiting
(country-/provider-specific)
Fixed line connection only
Withhold No. Next
Call
(country-/provider-specific)
Fixed line connection only
Call Divert
Internal
Fixed Line
IP1
IP2
:
IP6
Call Waiting
Withhold # All Calls
Network Mailbox
Fixed line connection only
Call Protection
Fixed Destination
Call
Unknown Call Reject.
Transfer (ECT)
Version 4.1, 21.11.2007
Ringback Off
20
Fixed line connection only
Gigaset DX800A all in one / en / A31008-xxxx-xxxx-x-xxxx / menutree_Saturn-DX800A.fm / 30.11.2011
Menu overviews
2 ò
Bluetooth
1 Activation
2 Search for Headset
3 Search for Mobile
4 Search for Data
Device
¢ page 15
5 Known Devices
6 Own Device
3 É Additional Features
1 Info Centre
3 Resource Directory
(country-/provider-specific)
1 Screensavers
2 Caller Pictures
3 Sounds
4 Capacity
4 Ê Call Lists
1 All Calls
2 Outgoing Calls
3 Accepted Calls
4 Missed Calls
5 Ë Messaging
1 SMS
(country-/provider-specific)
1 New SMS
2 Incoming
3 Draft
4 Settings
1 Service Centres
2 Notification
4 Status Report
Version 4.1, 21.11.2007
2 E-mail
21
Gigaset DX800A all in one / en / A31008-xxxx-xxxx-x-xxxx / menutree_Saturn-DX800A.fm / 30.11.2011
Menu overviews
6 Ì Answering Machine
1 Play Messages
Net AM: Fixed Line
Net AM: IP1
Net AM: IP2
:
Net AM: IP6
Answer Machine 1
Answer Machine 2
Answer Machine 3
3 Activation
¢ page 7
1 Answer Machine 1
2 Answer Machine 2
3 Answer Machine 3
5 Announcements
1 Record Announcemnt.
Answer Machine 1 to 3
2 Play Announcement
Answer Machine 1 to 3
3 Delete Announcemnt.
Answer Machine 1 to 3
4 Record Advisory Msg.
Answer Machine 1 to 3
5 Play Advisory Message
Answer Machine 1 to 3
6 Delete Advisory Msg.
Answer Machine 1 to 3
6 Recordings
7 Call Screening
1 Desktop Phone
2 Handset
Network Mailboxes
Net AM: Fixed Line
Fixed line connection only
Net AM: IP1
Net AM: IP2
:
Net AM: IP6
Set Key 1
Net AM: Fixed Line
Net AM: IP1
Net AM: IP2
:
Net AM: IP6
Version 4.1, 21.11.2007
Answer Machine
22
Fixed line connection only
¢ page 6
¢ page 7
Gigaset DX800A all in one / en / A31008-xxxx-xxxx-x-xxxx / menutree_Saturn-DX800A.fm / 30.11.2011
Menu overviews
7 Í Organiser
1 Calendar
2 Alarm Clock
3 Missed Alarms
8 Î Contacts
1 Directory
2 Online Directories
1 Gigaset.net
(country-/provider-specific)
2 Online Directory
The online directories available are displayed with provider-specific names
(country-/provider-specific)
3 Yellow Pages
4 Prv.NetDir
¢ page 17,
¢ page 16
9 Ï Settings
1 VoIP Wizard
2 Date/Time
3 Audio Settings
1 Call Volume
2 Ringer Settings
1 Volume
2 Melodies
3 Time Control
4 Anon. Call Silencing
3 Advisory Tones
4 Music on hold
4 Display
1 Screensaver
¢ page 16
2 Info Ticker
3 Backlight
5 Language
6 Registration
1 Register Handset
Version 4.1, 21.11.2007
2 De-register Handset
23
Gigaset DX800A all in one / en / A31008-xxxx-xxxx-x-xxxx / menutree_Saturn-DX800A.fm / 30.11.2011
Menu overviews
7 Telephony
1 Area Codes
3 Send Connections
INT 1 ... INT 8
4 Receive Connections
INT 1 ... INT 8
¢ page 8
Answer Machine 1 ...
Answer Machine 3
5 Dialling Mode
4 Tone
¢ page 9
5 Pulse
6 Recall
Fixed line connection only
7 Access Code
8 Internal Hold Mode
8 System
VoIP connections only
1 Reset
2 DECT Interface
¢ page 3
3 FXS Port
4 Repeater Mode
country-specific
5 Local Network
¢ page 13
6 Update Firmware
7 System PIN
Version 4.1, 21.11.2007
9 Eco Mode
24
¢ page 8
1 Eco Mode
country-specific
2 Eco Mode+
country-specific
Gigaset DX800A all in one / en / A31008-xxxx-xxxx-x-xxxx / menutree_Saturn-DX800A.fm / 30.11.2011
Menu overviews
Gigaset DX800A all in one connected to VoIP and ISDN
1 Ç Select Services
(country-/provider-specific)
Next Call
Withhold Number
Keypad Control
Call Divert
¢ page 15
ISDN connection only
Internal
MSN1
MSN2
:
MSN10
IP1
IP2
:
IP6
Call Waiting
Withhold # All Calls
Busy on Busy
ISDN connection only
Transfer (ECT)
Ringback Off
2 ò
Bluetooth
1 Activation
2 Search for Headset
3 Search for Mobile
4 Search for Data
Device
¢ page 15
5 Known Devices
6 Own Device
3 É Additional Features
1 Info Centre
(country-/provider-specific)
3 Resource Directory
1 Screensavers
2 Caller Pictures
3 Sounds
Version 4.1, 21.11.2007
4 Capacity
25
Gigaset DX800A all in one / en / A31008-xxxx-xxxx-x-xxxx / menutree_Saturn-DX800A.fm / 30.11.2011
Menu overviews
4 Ê Call Lists
1 All Calls
2 Outgoing Calls
3 Accepted Calls
4 Missed Calls
5 Ë Messaging
(country-/provider-specific)
1 SMS
1 New SMS
2 Incoming
3 Draft
4 Settings
1 Service Centres
2 Notification
4 Status Report
2 E-mail
6 Ì Answering Machine
1 Play Messages
Net AM: ISDN
ISDN connection only
Net AM: IP1
Net AM: IP2
:
Net AM: IP6
Answer Machine 1
Answer Machine 2
Answer Machine 3
3 Activation
¢ page 7
1 Answer Machine 1
2 Answer Machine 2
3 Answer Machine 3
Version 4.1, 21.11.2007
5 Announcements
26
1 Record Announcemnt.
Answer Machine 1 to 3
2 Play Announcement
Answer Machine 1 to 3
3 Delete Announcemnt.
Answer Machine 1 to 3
4 Record Advisory Msg.
Answer Machine 1 to 3
5 Play Advisory Message
Answer Machine 1 to 3
6 Delete Advisory Msg.
Answer Machine 1 to 3
¢ page 6
¢ page 7
Gigaset DX800A all in one / en / A31008-xxxx-xxxx-x-xxxx / menutree_Saturn-DX800A.fm / 30.11.2011
Menu overviews
6 Recordings
7 Call Screening
1 Desktop Phone
2 Handset
Network Mailboxes
Net AM: ISDN
Net AM: IP1
Net AM: IP2
:
Net AM: IP6
Set Key 1
Net AM: ISDN
Net AM: IP1
Net AM: IP2
:
Net AM: IP6
Answer Machine
7 Í Organiser
1 Calendar
2 Alarm Clock
3 Missed Alarms
8 Î Contacts
1 Directory
2 Online Directories
1 Gigaset.net
(country-/provider-specific)
2 Online Directory
The online directories available are displayed with provider-specific names
3 Yellow Pages
¢ page 16
¢ page 17
Version 4.1, 21.11.2007
4 Prv.NetDir
27
Gigaset DX800A all in one / en / A31008-xxxx-xxxx-x-xxxx / menutree_Saturn-DX800A.fm / 30.11.2011
Menu overviews
9 Ï Settings
1 Connection Wizard
1 ISDN
2 VoIP
2 Date/Time
3 Audio Settings
1 Call Volume
2 Ringer Settings
1 Volume
2 Melodies
3 Time Control
4 Anon. Call Silencing
3 Advisory Tones
4 Music on hold
4 Display
¢ page 16
1 Screensaver
2 Info Ticker
3 Backlight
5 Language
6 Registration
1 Register Handset
2 De-register Handset
7 Telephony
1 Area Codes
3 Send Connections
INT 1 ... INT 8
4 Receive Connections
INT 1 ... INT 8
¢ page 8
Answer Machine 1 ...
Answer Machine 3
5 Dialling Mode
(ISDN connection only)
1 Auto. Tone Dial
2 Auto. Keypad
3 Dial of * and #
6 Access Code
Version 4.1, 21.11.2007
7 Internal Hold Mode
28
¢ page 8
Gigaset DX800A all in one / en / A31008-xxxx-xxxx-x-xxxx / menutree_Saturn-DX800A.fm / 30.11.2011
Menu overviews
8 System
1 Reset
2 DECT Interface
¢ page 3
3 FXS Port
4 Repeater Mode
(country-specific)
5 Local Network
¢ page 13
6 Update Firmware
7 System PIN
9 Eco Mode
Version 4.1, 21.11.2007
Issued by
Gigaset Communications GmbH
Frankenstr. 2a
D-46395 Bocholt
1 Eco Mode
(country-specific)
2 Eco Mode+
(country--specific)
© Gigaset Communications GmbH 2011
All rights reserved. Subject to availability.
Rights of modification reserved.
www.gigaset.com
This user guide is made from 100% recycled paper.
29