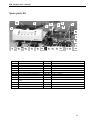
1
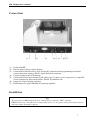
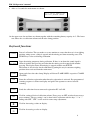
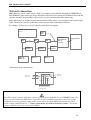
BIOMIXER
BM 330
Operator’s Manual
Ljungberg & Kögel AB
BM 330 Operator’s manual
Important notes
Warranty
Ljungberg&Kögel AB hereby warrants to the original purchaser that Biomixer BM330 is manufactured in a professional and
quality manner and, when properly used, will be free from all defects in material and workmanship, for a period of 12 months
after delivery from Ljungberg&Kögel AB. The warranty includes equipment or components that proves to have faults during
the warranty period.
Ljungberg&Kögel AB will without cost for the customer, repair or replace the faulty equipment. The warranty is not valid if
the equipment has been repaired by anyone else than qualified personnel, approved by Ljungberg&Kögel AB. The warranty
is not valid for the battery since it is considered to be an expendable supply. The warranty is not valid if the equipment has
been changed in any way that according to Ljungberg&Kögel AB:s opinion, affects the reliability or stability of the
instrument. The warranty is not valid when the serial number has been changed, crossed-out or been removed, or if the fault
has been caused by misuse or abnormal use. In these cases Ljungberg&Kögel AB or their representative will inform the
customer about the decision, and if wished by the client, will repair the equipment for normal rate. An estimated price can be
given on request. One important condition for this warranty to be effective is that the BM330 is used in accordance with the
instructions in this operators manual.
The operator’s manual
This operator’s manual is written for the person or persons responsible for the operation of Biomixer
BM330. The methods and routines are developed and tested to ensure a reliable, safe and efficient
operation of BM330. It is important that the operator has studied and fully understood the contents of
this manual before using BM330.
This blood mixer is a precision weighing instrument.
In order to maintain high accuracy the mixer should be handled with care and the scale must not
be overloaded.
Abelko Innovation is committed to develop high-quality equipment and technical services to all our customers.
We welcome any inputs on technical issues that are encountered so that they can be resolved quickly and in the
most appropriate manner. Please submit your comments/feedbacks through your local distributors or
alternatively email us directly at [email protected]
BM330 is developed and manufactured by Abelko Innovation, Industrivägen 17, SE- 972 54 Luleå Sweden.
Tel +46-(0)920-220360. Fax +46-(0)920-220068. Email: [email protected], www.abelko.se
Abelko Innovation also manage logistics, service and technical support.
BM330 is owned and marketed by Ljungberg & Kögel AB, Box1032, SE-251 10 Helsingborg,
Tel+46-(0)42-139860, fax +46 (0) 42-132181, [email protected] , www.ljungberg-kogel.com
Spare parts are to be ordered by Ljungberg & Kögel.
2
BM 330 Operator’s manual
Revision history:
Rev 2005-12-23: Page 13: Collection may continue if something falls on tray. Collection time is measured until pressing Pause. Page 19: Do not use
bleach. Page 21: Collected volume 50-999ml
Re 2007-02-02: More languages included, A-version English, Spanish, Swedish, B-version English, Swedish, Danish. Page 2 : Battery excluded from
warranty. Page 9 : Min flow before alarm now settable. Page 11 : Blocking function to press START before scanning barcode introduced. Page 12-13
Different Notes. Page 22 Cable mixer-junction box now included.
Rev 2008-03-14: Signal converter and LAN material has been removed from Spare Parts page 22. See separate spare parts for USB Start Kit for network.
Rev 2008-09-08: Page 10 &19, position of reference weight
Rev 2009-08-21: Page 18, Up to 31 mixers left out, Ritex and Westermos signal converters expired and are left out. Page 7: Battery charger BM12-12
is left out. Spelling control with some changes has been made in the whole document. Page 23, change year of directive. Page 21
technical data battery charger changed
Rev 2010-02-24
Page 12, Warning for use of mobiles removed, not needed any longer.
Rev 2010-08-09
Page 2, elucidation of manufacturer and marketing companies, Page 23, change back year of directive
Rev 2012-11-13
Page 2, Added Abelko Innovation commitment concerning technical feedback
Rev 2013-06-0
Page 22: 10 hours operation time changed to 12 hours
Rev 2014-04-17
Page 24: Updated address of DoC.
Page 8: Added note about transport and placement
3
BM 330 Operator’s manual
Table of contents.
Important notes .......................................................................................................................................... 2
Warranty ................................................................................................................................................. 2
The operator’s manual ............................................................................................................................ 2
Revision history: ..................................................................................................................................... 3
System description ...................................................................................................................................... 5
Programmability ..................................................................................................................................... 5
Network connection ................................................................................................................................ 5
Flexibility................................................................................................................................................ 5
Features ....................................................................................................................................................... 5
Connections ................................................................................................................................................ 7
Installation .................................................................................................................................................. 7
Battery charger (mains adapter) .............................................................................................................. 8
Barcode reader ........................................................................................................................................ 8
Local Area Network (LAN) .................................................................................................................... 8
Battery charging...................................................................................................................................... 8
Start-up ................................................................................................................................................... 8
Keyboard functions ..................................................................................................................................... 9
Setup ......................................................................................................................................................... 10
Collection without barcode reader registration......................................................................................... 13
Power on ............................................................................................................................................... 13
Setting of desired volume ..................................................................................................................... 13
Start of collection. ................................................................................................................................ 13
Pause during collection. ........................................................................................................................ 14
Termination of blood collection ........................................................................................................... 14
Collection with barcode reader ................................................................................................................. 15
Registration before collection. .............................................................................................................. 15
Registration after collection.................................................................................................................. 16
Send data to PC ........................................................................................................................................ 17
Alarm and error messages ........................................................................................................................ 17
Alarm and error messages before and during collection ...................................................................... 17
Remaining error messages .................................................................................................................... 18
Network connection .................................................................................................................................. 19
Service and maintenance .......................................................................................................................... 20
Cleaning ................................................................................................................................................ 20
Calibration (check of weighing accuracy) ............................................................................................ 20
LCD contrast setting ............................................................................................................................. 20
Change of battery................................................................................................................................. 20
Tray parking position ............................................................................................................................ 21
Trouble shooting and actions ................................................................................................................ 21
Technical specifications ........................................................................................................................... 21
Cable to programming PC .................................................................................................................... 21
Cable to registration PC........................................................................................................................ 21
Technical data ....................................................................................................................................... 22
Spare parts list .......................................................................................................................................... 23
MDD Declaration ..................................................................................................................................... 24
4
BM 330 Operator’s manual
System description
Programmability
BM330 is today the most complete and flexible blood mixer offering a complete system for blood
collection and registration to meet the demands of today and in the future for total quality control and
complete traceability.
It’s unique programming capability makes the blood enters free to choose their own strategy for
collection monitoring and later change it according to new global or local regulations or after their own
wishes.
Network connection
BM330 is also prepared to be connected to a local area network (LAN) for transferring registration and
collection data to a central host computer, so called ”On-line registration”.
This will minimize the risk of exchanging blood bags and offers new and improved possibilities to
quickly adapt the succeeding blood analyze in an optimal way.
Flexibility
Since BM330 is powered by a mains adaptor or an internal rechargeable battery with 12 hours capacity
it can also be used in a conventional way, with or without barcode-reader, as stationary as well as
mobile collection units.
Features
Barcode-reader connection
For quickly registration of donor, blood bags, operator etc.
Network connection
Immediate transfer of scanned barcode information together with collected data i.e. volume, flow, time,
alarms and events to a central PC or host computer.
Programmable registration function
The customer can, with a simple setup-program on PC, by his own decision how the registration
function should be, i.e. what kind of information and the sequence to be scanned by the barcode-reader.
Data storage for collection data
There are data storage for 100-1000 collections depending on the amount of registration data. Stored
data can later be sent to a computer or be written on a paper. The memory is circular, i.e. when memory
is filled the oldest data will be replaced.
Adjustable alarm levels
Alarm levels for min/max flow and time, clock settings and other adjustments are easily set by setup
menus from keyboard. The settings are stored in a non-volatile memory.
Battery for mobile use
Built in rechargeable battery for about 12 hours operation.
5
BM 330 Operator’s manual
Large display
Large LCD display with 2x20 characters for continues display of set volume, collected volume, flow
and time during collection. The display also shows alarms and guides the operator during the
registration. The text on display can be selected in different languages.
Automatic calibration
Calibration is done automatically by using a calibration weight.
Quick choice of preset volumes
By pressing the ”SET”-button you can quickly and easily choose between two preset collection
volumes.
Accurate volume measuring
The collected blood is measured with a weighing sensor and converted to volume with the factor of
1/1.06 which is the specific gravity for normal blood. The measuring accuracy is better than + 1 %.
Automatic taring
BM330 automatically deducts the weight of the blood bag and anticoagulant solution. All types of
bluebags or set of blood bags can be used.
Homogeneous mixing
The tray is moving in a well-tested seesaw motion to agitate and mix blood and anticoagulant in an
efficient way.
Continues blood flow check
BM330 checks the blood flow continuously during the collection. If the flow is below or exceeds the
set alarm limits, alarm will sound and be shown on display.
Check of collection time
Collection time is checked and if set limit is passed the alarm will sound and be displayed.
Automatic stop
When the predetermined volume of blood has been collected the tube clamp closes automatically and a
ready-signal sounds to inform of the completion of donation sequence.
6
BM 330 Operator’s manual
Connections
(1
(1)
(2)
(3)
(4)
(5)
(6)
(7)
(2)
(3)
(4)
(5)
(6) (7)
Switch ON/OFF.
Inlet for battery charger (mains adaptor).
Connection for barcode reader. Also used for PC connection when programming the barcode
reader registration sequence. RS232, 9-pole Dsub male connector.
Contrast setting for the LCD window.
Connection for local area network (LAN) where up to 31 mixers can be connected to a central PC
or host computer for data transfer online. RS485, 6/4 modular jack.
Output for external display (optional).
Potentiometer for gain calibration of measuring amplifier.
Installation
• All connections to BM330 must be done with the power switch in ”OFF” position.
• If BM330 has been cooled down to a temperature below +2 ºC, please wait at least 2 hours before
start up to make the damp evaporate.
7
BM 330 Operator’s manual
Battery charger (mains adapter)
Check that the chargers AC supply voltage marking agrees with the local mains supply.
Connect the charger to the inlet marked ”Charger inlet” and connect it to the mains output.
The charger should always be connected to keep the battery fully charged.
Only chargers marked with Ljungberg&Kögel AB type BM-12-12 may be used.
Barcode reader
Connect the barcode reader to the RS232 connector.
Always use barcode readers recommended by Ljungberg&Kögel AB. Connection of other barcode
readers may damage the reader as well as the mixer!
Local Area Network (LAN)
Connect the RS485-cable to the input marked ”RS485”. For further instructions see chapter” Network
connection”
Battery charging
If the mixer is to be used mobile (without access to mains supply) the battery must be charged. Connect
the charger and charge the batteries for at least 6 hours if battery is emptied to <20%.
The capacity is shown on display and when it drops to less than 30% it should be recharged.
When capacity drops below 20% start of collection is prohibited and an alarm is activated (see also the
chapter Alarms and error messages . Started collection can however be completed.
If BM330 is to be used stationary with access to mains supply the charger should always be connected.
Placement
In stationary conditions, it is recommended to use the mixer with BIOLIFT 410 (separate manual).
BIOLIFT 410 is a mobile table, with a moving shelf (up and down) designed to fit the mixer.
Transport
Before transporting the mixer, it should be set in parking mode. In the main menu, press the
RESET key. The mixer should be transported in a transport case suitable for BM330 (available by
Ljungberg & Kögel).
Start-up
Put the switch in” ON”- position.
Now the BM330 functions are automatically checked and possible errors are indicated on display and
with an intermittent sound-signal.
The following checks are made:
• The clock and memory are checked.
• The stepping-motor operating the tube clamp are driven to its starting position (fully open).
• The tray makes one seesaw motion and stops in the weighing position.
• The display shows the start menu:
V2.18B (ENG,SWE,DAN)
Lab123
The upper row shows the current program version and the languages included and lower row shows
the mixer ID if it is programmed (see BM330 configuration program user’s manual).
8
BM 330 Operator’s manual
• After ca 3 seconds the main menu are shown:
22/3 14:51 BATT=98%
SET=450,CLAMP OPEN
On the upper row date and time are shown together with the remaining battery capacity in %. The lower
row shows the set collection volume and the tube clamp position.
Keyboard functions
START
PAUSE
AL.OFF
Start of collection. The tray makes a seesaw motion to secure that the tray is in weighing
position, taring occurs, clamp is opened and the mixing and time measuring starts. The
START-key is also used during calibration.
Stops the mixing temporary during collection. If there is an alarm the sound-signal is
silenced with the first pressing and after that the mixing can be stopped with another
pressing. The display shows that mixing is stopped with the text PAUSE.
This button is also used to check calibration by putting the tray in constant weighing
position when activated from the main menu.
CLAMP
Opens and closes the tube clamp. Display will show CLAMP OPEN respective CLAMP
CLOSED.
NEW
Starts the collection registration when barcode registration is activated. Pre-programmed
scanning sequence is shown on display and guides the operator to correct barcode
scanning.
SEND
Sends the collection data to connected registration PC via LAN.
SET
Used for setting of desired collection volume. Every press on SET switches between two
preset volumes. The pre-setting’s can be done before collection with the keys ”+” or ”-”
ending with SET. ”SET” is also used for some setup adjustments.
+
-
Used for increasing a value on display.
Used for decreasing a value on display.
9
BM 330 Operator’s manual
RESET
SETUP
Stops already started registration with barcode reader. Can also be used to end a started
collection when being in PAUSE-mode. Also stops settings in setup-menus for return to
main menu. A press on RESET in main menu makes the tray take its parking position.
Used for setting of alarm limits, clock adjustment, calibration, barcode reader,
communication parameters etc.
Setup
Settings of alarm limits and functions are done in SETUP-menus which are in English no matter of
choice of language for the collection menus. Scrolling through the menus is done with SETUP key.
Settable values or functions are shown blinking and increasing/decreasing is done with the keys + and -.
Scrolling between different input areas in the same menu is done with the SET key. The lower row gives
a guide for what keys to press. The SETUP can be stopped with RESET at any moment.
This are the existing SETUP menus:
•
•
•
•
•
•
•
•
•
•
•
•
Clock settings.
Min collected volume before flow alarm
Alarm limit low flow.
Alarm limit high flow.
Alarm limit collection time.
Sound level for alarm signal, (buzzer).
Calibration.
Communication speed.
Barcode reader connected.
Obligation scan before start
Programming mode.
Choice of language.
Note ! Changed values and functions are saved in memory when next menu is selected with ”SETUP”
or when SETUP-function is interrupted with the RESET key.
Clock setting.
22/3 1997 16:30
CHANGE WITH +/- SET
The mixer has a real time clock for precise time registration. Set the right minute, hour, year, month and
day. Confirm the settings with a press on ”SET” .
Setting of min volume for Flow Alarm.
Alarm limit low flow
10
MIN VOL FL AL: 50
CHANGE WITH +/CHANGE WITH +/LOW FLOW: 20 ML/MIN
CHANGE WITH +/-
BM 330 Operator’s manual
Alarm limit high flow
HIGH FLOW:350 ML/MIN
CHANGE WITH +/-
Alarm limit collection time
TIME ALARM: 10 MIN
CHANGE WITH +/-
Sound level buzzer
BUZZER VOLUME: 15
CHANGE WITH +/-
The sound level from the buzzer is set with a value between 0-31. The buzzer starts sounding when
”+”or ”-” are pressed and sounds until the menu is left. Setting a value less than ca 12 can cause the
buzzer to cease.
Calibration.
CALIBRATION VOLUME
PRESS START
Make sure the tray is empty and moves freely. Start the calibration by pressing ”START”, after which
zero balancing and taring is done. The display shows:
PUT 450 ML ON TRAY
PRESS SET WHEN READY
Put the reference weight for 450 ml on the tray, (make sure that the reference weight is placed in the
centre of the tray), and press ”SET”.
Note! The reference weight must be 450 ml i.e. 477g. (450x1.06). Reference weights can be ordered
from Ljungberg & Kögel AB.
TARE=102 VOL=441>450
OK PRESS SETUP
The calibration is now performed automatically and the result is shown on display.
The value TARE is the measured tare (dead weight) and should be between 50 and 150. (This value
corresponds to the weight of the scale after automatic zero positioning and is only of technical interest
if there should be any fault during calibration process).
VOL is the read volume and should be close to the referens weight 450 ml. The ratio for 450/(read
volume) gives a conversion factor.
The BM330 microprocessor automatically adjusts the read volume to be 450 ml by multiplying with this
conversion factor and the calibration is done when ”SETUP” is pressed.
If the divergence is to big (more then ±20%) an error message is shown :
TARE=102 VOL=349>450
ERR ADJUST GAIN
11
BM 330 Operator’s manual
If this happens, manual adjustment with the potentiometer GAIN must be performed. This GAINpotentiometer is accessible behind a plastic cover on the side of the mixer. Remove the plastic cover and
adjust with a small screwdriver until the read value becomes 450 ml. Remove the reference weight and
make a new taring by pressing once on RESET and after that START again. Put the reference weight
back again and repeat adjustments until the read value is within ±5ml.
Note! Always end with automatic calibration, without adjusting GAIN, to get the correct conversion
factor.
Communication speed.
BAUD RATE: 9600
CHANGE WITH +/-
This settings are for both the barcode reader (RS232) and the local network (RS485).
Barcode reader connected.
BARCODE-READER YES
CHANGE WITH +/-
Enable /disable block function for Start.
OBLIGATION SCAN: NO
CHANGE WITH +/-
Program mode.
PROGRAM MODE
ENTER WITH START
Activate the program mode with a press on ”START”. The display will show:
PROGRAM MODE
SEND SETUP FROM PC
Now the mixer is ready for programming of the scanner sequence from the programming PC through the
RS232 input (see also: BM330 configuration program user’s manual).
Note! By pressing ”SEND” at this moment the actual scanning sequence settings in the mixer can be
sent to the PC.
Language.
LANGUAGE:ENGLISH
CHANGE WITH +/-
Note! The language setting is only for collection menus, not the setup menus.
12
BM 330 Operator’s manual
Collection without barcode reader registration.
Power on
• Turn on the mixer by setting the switch ON/OFF in ON position. Let the starting sequence proceed as
described in chapter Start-up for automatic check of functions and possible error indications. Check
battery condition when the main menu is shown:
22/3 14:51 BATT=98%
SET=450,CLAMP OPEN
Setting of desired volume
• Two standard volumes can be preset. Selection and change of this volumes can be made in the main
menu.
22/3 14:51 BATT=98%
SET=450,CLAMP OPEN
A press on ”SET” makes the set volume change between the two preset volumes.
With a press on ”+” or ”-” this values can be changed. The set volume starts to blink on display and
further presses on ”+” or ”-” makes the value increase or decrease. If the key is pressed continuously
more then 1 second a rapid change with 10-ml each step will occur. To replace the earlier preset value
the changed settings must be confirmed with a press on ”SET”.
Start of collection.
• Place the blood bag or sets of blood bags on the tray so that the tube inlet of blood bags is upwards
when the tray is in home position.
• Put the tube in the tube clamp and leave at least 25 cm of tube free between the clamp and the tray
allowing the tube to move with no affection to the weighing accuracy.
• Press ”CLAMP” to close the tube clamp. CLAMP CLOSED is shown on display.
22/3 14:51 BATT=98%
SET=450,CLAMP CLOSED
• Perform venipuncture.
• Press ”START” to begin collection. The tray makes a seesaw motion to secure freewheel, tare is
deducted, clamp will open and mixing starts.
Note! Do not touch the scale, tubes or blood bags during taring process since this may cause a faulty
reading of the tare!
Note! If “OBLIGATION SCAN” is set to Yes in the setup menu the collection can not be started before
barcode data has been scanned properly.
The regular menu during collection shows:
VOLUME SET FLOW TIME
123 (450) 57 03:12
VOLUME = current collected volume in ml.
SET
= set volume in ml.
13
BM 330 Operator’s manual
FLOW
TIME
= measured flow in ml/min.
= time in minutes and seconds since start of collection.
Pause during collection.
• In case you have to pause the trays movement during collection, press ”PAUSE AL.OFF”. The tray
will stop in its weighing position, the clamp remains open and the measuring continuous. A press on
”CLAMP” will close the clamp. The display will show:
VOL=234 FL=56 03:35
PAUSE,CLAMP CLOSED
• The mixing will continue again with another press on ”PAUSE AL.OFF” and the clamp will open
automatically if closed.
• In the PAUSE-state the current collection can be interrupted with a press on ”RESET”. To avoid
interruption by mistake it has to be confirmed with an additional press on ”RESET” according to the
menu:
STOP COLLECTION?
YES:RESET
NO:SET
Note! An interrupted collection will be registrated as ” collection interrupted”.
Termination of blood collection
• When internal calculations by the microprocessor, based on current flow, shows that next mixing
cycle will imply that remaining volume will be less then 10 ml the trays movement will stop. The
volume is measured continuous and when 1 ml remains the clamp closes.
• A continuous ready signal sounds. The display shows:
VOL=450 FL=0
07:05
READY,CLAMP CLOSED
The sound signal can be silenced with ”PAUSE, AL. OFF”
Note! The mixing continues and the collection time is measured until Pause/Alarm off is pressed.
• Free the tube by pressing ”CLAMP”. The display will show:
COLLECTION COMPLETED
PRESS SEND
Note! If “CLAMP” is not pressed within 2 minutes from collection stopped the clamp will open
automatically and the mixer will make one cycle to ensure the blood in the tube is not coagulated. This
will increase the collected blood volume to be more than set volume. This will be repeated every two
minutes until “CLAMP” is pressed.
• Data from the collection are transferred to the registration-PC with a press on ”SEND”. If there is no
registration-PC connected, collection is concluded with a press on ”RESET” instead. The collection
data is stored in the memory and can later be transferred to a registration-PC.
• During the collection all possible errors are also registered. Those can be taring error, motor error,
low battery, flow fail or time fail. More about error handling in the chapter: Alarm- and error
messages,
14
BM 330 Operator’s manual
Note! Collection data are always registered and stored in BM330 irrespective of the fact that using
barcode reader or not. Data can be transferred after each collection or after any number of collections.
When the memory is filled the oldest collection data are overwritten. See chapter ”Send data to PC”.
Note! If something falls on the scale making the set volume reached, the collection can be continued
after removal of the object and pressing “Start” button.
Collection with barcode reader
When barcode reader is used for scanning information concerning the collection, a predefined scanning
sequence has to pass through. The scanning sequence is normally divided in two parts, one before
collection and one after collection. The programming of the scanning sequence is done from a PC with
the use of a windows program, see ”BM330 configuration program, user’s manual”
The collection is done in the same way as chapter ”Collection without barcode reader registration”.
Near the mixer there must be a barcode table with all the necessary barcodes for general functions for
the scanning. This includes the barcode for reverse (undo) in the scanning sequence (REW) and the
barcode to stop repeated questions which has been defined in the configuration.
There must also be the barcodes for scanning additional information for instance if the collected blood
should pass some extra (additional) tests.
The barcode for this program table are written in ”Code 128”-format. The barcode table can be made by
customer or ordered from Ljungberg&Kögel AB.
Registration before collection.
Note! The barcode reader must be selected in the SETUP menus, see chapter ”Setup”.
The scanning sequences starts with a press on ”NEW” and the pre-programmed text strings for the
desired registrations are displayed.
The text strings displayed is guiding the operator through the sequence. In the mixer the barcode
scannings are verified regarding number of characters. When the scanning is correct, ”OK” is shown, a
bleep sounds and the next scanning can be done. Incorrect scanning indicates with the text ”ERR”, 3
bleep sounds and a repeated reading can be done.
Barcode scanning in progress can be interrupted by a press on ”RESET” for return to main menu.
If wrong data is scanned and you wish to erase (undo) the scanned information, just scan the barcode for
reverse (REW).
Example of scanning sequence.
NAT. INSURANCE NR
5012069117
OK
The donor’s national insurance number are scanned.
SIGNATURE 1?
MRO
The operators ID from barcode.
OK
COLLECTION NUMBER?
9702131222
OK
A unique collection number created in association with the
donor’s registration.
COMPONENT CODE?
311
Informs about the type of collection (blood or serum).
OK
BATCHNR BLOOD BAGS?
1234-1231
OK
Batch number from blood bags.
REGISTRATION READY!
VOL=450,CLAMP OPEN
15
BM 330 Operator’s manual
Scanning sequence before collection is ready.
The registration can be stopped (interrupted) by a press on ”RESET”. Interruption must be confirmed by
an additional press on ”RESET” :
STOP REGISTRATION?
YES:RESET
NO:SET
The registration can also be stopped by turning the power off. In both cases already scanned, but not
completed, information is erased.
When registration before collection is done the blood collection can proceed in the same way as in
chapter: Collection without barcode reader registration.
Registration after collection.
When the preset volume is collected a ready signal sounds which can be silenced with a press on
”PAUSE AL.OFF”. A press on CLAMP opens the clamp and this will also start the pre-programmed
scanning sequence after collection.
Example on scanning sequence :
EXTRA TESTS?
42 BLOOD GROUPING OK
EXTRA TESTS?
43 ANTI-HBC
OK
EXTRA TESTS?
45 ANTI-HTLV
OK
EXTRA TESTS?
NO
OK
Repeated scanning has been selected to specify some additional
tests to be done with the blood. These are read from the
barcode table.
Repeated scanning sequence is stopped with a predefined
barcode for stop. See BM330 configuration program user’s
manual.
COLLECTION RESULT
0
OK
Collection result 0 =ok, 1= failed
SIGNATURE 2?
ABC
The operator concluding the collection.
DONATION READY
PRESS SEND
OK
The registration and collection is completed and the
information can be sent to a registration-PC, see chapter Send
data to PC.
Note! A press on ”RESET” makes the mixer return to main menu and registered data is stored in
memory. The stored data can anytime be sent to a PC through the local area network or directly.
16
BM 330 Operator’s manual
Send data to PC
• All stored information can be transferred to the LAN (Local Area Network) after completed
collection by pressing ”SEND”. ”SEND” can also be activated from main menu. Display shows:
DATA TRANSMIT ACTIVE
• Each separate collection is sent in a data batch and the transfer is acknowledged by registration PC.
• When all collection data is sent the display shows:
DATA TRANSMIT READY
• Up to 31 mixers can be connected to the LAN (RS485). When SEND is activated from several
mixers at the same time the transfer will be queued to avoid collision. If transmit is in progress from
one mixer the other waits until the line is free. The display shows:
LINE BUZY WAIT
• If the line is free and a data batch is sent to PC the mixer expects an acknowledgement from the PC.
If no acknowledgement arrives in spite of 3 repetitions an error signal sounds and an error message is
shown:
DATA TRANSMIT ERROR
Note! If transmission by any reason fails the stored data are preserved in memory and will be sent the
next time a transfer is activated.
Alarm and error messages
Low flow and high flow alarm and alarm for exceeding max collection time is announced with a
blinking corresponding text in the main menu and an intermittent sound signal. Other error messages are
shown with a blinking text on the lower row with an intermittent sound signal, two short signals with a
pause. The sound signal is silenced with a press on ”PAUSE AL.OFF”.
Alarm and error messages before and during collection
Battery alarm
If the battery capacity drops below 20% a warning is given with a sound signal and a blinking text :
”BATTERY<20%” . If a collection has started it can be completed but no further collections can be
started without battery recharging. Charge of battery can be done at the same time as collection.
If a battery alarm occur the battery should at once be recharged. If recharging can’t be done the
mixer has to be turned off because deep discharge is shortening the batteries length of life and
storage collection data in memory may get lost.
17
BM 330 Operator’s manual
Taring error
Automatic tare deduction is always done before collection. If this fails an error message is given with
blinking text and sound. Collection can not proceed. Check that the tray is in its weighing position and
moves freely.
Motor error
If the mixing motor do not start or not find the home-position (weighing position) there is an error
message and collection is stopped. Check that the tray can move freely.
Flow alarm
If the blood flow is below or exceeds the set limits an alarm is given with FLOW blinking in the
collection main menu and an intermittent signal sounds. Flow alarm will be stored in collection data
memory. Flow alarm are prohibited during the first 50 ml of collection because blood flow disturbance
is liable to occur.
Time alarm
If collection time exceeds set time limit, an alarm is activated with TIME blinking on the collection
main menu and an intermittent signal sounds. Time alarm is stored in collection data memory.
Volume=EEE
Indicates overweight, measuring range is exceeded. Check if something is weighing down the tray.
Volume= - - Indicates underweight. Measuring range is below limit. The tray has become lighter since tare deduction
(by any reason) or is touching something when it is in the weighing position.
Remaining error messages
Setup error.
When the mixer is powered on all settings and functions are checked. If the setup, stored in non-volatile
memory (EEPROM), has been changed i.e. checksum is not the expected, ”SETUP ERROR” is
displayed and a new setup has to be done. See chapter Setup.
Data error.
Stored data from collections are checked at power on. This data are stored in a memory supplied from
the built in battery and from a backup-capacitor (BUC). If the battery voltage is to low or if it is
disconnected for more than 24 hours there is a risk for lost data. ”DATA ERROR” can be restored by
turning the power off and on again.
Input error.
If the clock is set to an unreasonable value, for instance 31 Feb., this can not be accepted and ”INPUT
ERROR” is indicated.
Clock error.
The clock is repeatedly checked and if there is any fault detected ”CLOCK ERROR” occurs. The fail is
probably restored after a new setting.
18
BM 330 Operator’s manual
Network connection
BM330 mixers can be connected in a LAN to a common registration PC through an USB/RS485 or
RS232/RS485 signal converter. Every individual collection can be transferred without delay to the PC
with the windows program BM330 Information program running for further processing.
The LAN consists of suitable located junction boxes for the mixers wired together with a twisted pair
cable. The mixers connects to this boxes with a 4-parts cable with modular contacts.
See chapter: Technical specification for the cable detail description.
JB1-JBn = junction boxes
(Nodes)
JBn
RS485
cable
JB2
modularcable 6/4
Mixer n
(Max 31)
USB/RS485 or
RS232/RS485
Signal
converter
JB1
modularcable 6/4
modularcable 6/4
Mixer 2
RegistrationPC
Mixer 1
Connections in the junction box:
R S485
lin e in
R S485
lin e o u t
GND B
p1 p2
A GND
p3
p4
M o d u la rja c k 6 /4
to B M 3 3 0
Note! The signal converter shall have galvanic isolation between RS485 line and USB/RS232 line. It is
the person who installs the LAN that is responsible for the installation and that connected external
equipment (converter and PC) comply with relevant safety standard, EN60950, and that the whole
system comply with EN 60601-1-1, ”Safety requirements for medical electrical systems”. If in doubt,
contact qualified technician or Ljungberg&Kögel.
19
BM 330 Operator’s manual
Service and maintenance
Cleaning
BM330 tray, keyboard and cover can be cleaned with a soft cloth and a mild detergent. The tray should
be kept steady during cleaning and no violence must be used in order to keep the weighing accuracy.
Do not use liquids with bleach since this may affect the plastic cover quality and make it fragile.
Calibration (check of weighing accuracy)
The weighing accuracy should be checked regularly e.g. once per month with a reference weight
corresponding to 450 ml (477g). We recommend usage of reference weights from Ljungberg & Kögel
AB.
1. Start-up the mixer and let it warm up for about 5 min. (It takes some minutes for the measuring
circuits to stabilise for highest accuracy).
2. Press the key ”PAUSE ALARM OFF”. Now is a normal taring (zero balancing) done and after this
the mixer is in a continuous weighing position. Check that the VOL value reads 0 ± 1 ml.
3. Put the reference weight 450 ml on the tray and read the result. Note! The reference weight must be
placed in the centre of the tray.
4. If the divergence is to large an adjustment must be done, see chapter ”Setup-Calibration”
5. End calibration with a press on ”RESET”
Notes!
• In this ”continuous weighing mode” the mixer operates like a scale, showing the weight placed on
tray adjusted for the specific gravity of blood ( /1.06).
• If the mixer have been exposed to a big temperature difference, e.g. been moved from a cold
environment to a warm, it must have some time to obtain a stable temperature.
LCD contrast setting
If the display shows weak or unsharp characters the contrast may be adjusted with a little screwdriver
turning the potentiometer inside the plastic cover marked ”LCD CONTRAST”.
Change of battery
When the battery no longer is sufficient for one day collections it has to be changed.
• Turn the mixer off with the switch ON/OFF and pull out the contact from the charger.
• Place the mixer so it supports against the pillars on the backside.
• Unscrew the 2 screws holding the battery hatch.
• Take out the battery and change it to the new one that must be of the same type : Sonnenschein A512
3,5S or of a similar type. Connect the red wire to + and the black to • Put the battery back and screw up the hatch.
The battery contains lead and worn out batteries must be left to a recycling station.
20
BM 330 Operator’s manual
Tray parking position
During transportation of BM330 the tray should be placed in horizontal position by pressing ”RESET”
(from the main menu). Repeated press on ”RESET” or power off and on again will cancel the parking
position.
Trouble shooting and actions
When more advanced troubleshooting is needed, down to circuit level, we refer to the technical
documentation with circuit scheme, component placing, parts list, trouble shooting guide etc. which can
be ordered from Ljungberg&Kögel AB.
Ljungberg&Kögel AB also supports technical training for service personnel.
Technical specifications
Cable to programming PC
A null modem-cable shall be used for PC-connection via RS232.
To BM330
9-pole D-sub female
(1)
2 ( RX )
3 ( TX )
(4)
5 (GND)
(6)
7 (RTS)
8 (CTS)
9 (+5V)
Signaldirection
To PC
9-pole D-sub female
To PC
25-pole D-sub female
⇐
⇒
3 ( TX )
2 ( RX )
2 ( TX )
3 ( RX )
⇔
5 (GND)
7 (GND)
⇒
⇐
⇒
8 (CTS)
7 (RTS)
5 (CTS)
4 (RTS)
Note! To the same contact is the barcode-reader connected. Pin 9 in the 9-pole contact is the power
supply (+5V) for the barcode-reader.
Cable to registration PC
This PC is connected to the LAN via a USB/RS485 signal converter, type ADAM-4561 or other isolated
converter complying with safety standards for medical equipment. The converter must be strapped for
TX controlling the data flow from PC.
Junction boxes are mounted on the wall closed to each mixer, and the mixer connects to this box with a
4-pole straight cable with modular 6/4 in each end. See chapter Network connection.
This is the connection for the 4-pole modular cable:
BM330 4-pole Modular contact
p1 (GND)
p2 (A)
p3 (B)
p4 (GND)
We recommend twisted pair cable with shield and return wire, e.g. type Alpha Wire 5471C, ELFA art.
no. 55-752-04. The return wire and the shield shall be connected to p1, p4 (GND) in every junction box.
The cable for a direct connection of a BM330 to a 485 converter is shown below. The modular contact
is seen from contact side.
21
BM 330 Operator’s manual
RS232/RS485-Converter
Line-connection
P1
P2
B
A
P3
P4
Signal ground
Technical data
Power supply.........................................................
Mains adaptor, 100-240VAC, BM12-12, (14V/1A
(also operates as a battery charger) and/or internal
battery 12V/3.5Ah for approximately 12 hours
operation between charges.
Power consumption...............................................
Max 10VA
Fuses (built in)....................................................... PTC (self recovery for overload protection)
Collected volume................................................... (Collected blood) 50-999 ml. (PCB Version -02)
Accuracy................................................................ <1% of max weight ±1 ml.
Taring range .......................................................... 0-600g
Mixing cycle..... .................................................... 16 cycles/min.
Data storage...........................................................
32.000 characters
Tube clamp operation............................................
Linear step motor
Mixing plate operation........................................... AC-driven synchronous motor
PC connection........................................................ RS232 for programming, 9-pole Dsub male
Network connection............................................... RS485 (multidrop), 6/4 modular
Barcode reader connection..................................... RS232, 9-pole Dsub male
Extra output............................................................ External display,6/6 modular, (optional)
Relative humidity incl. storage and transportation. 10-95 %, not condensing
Operating temperature............................................. +10 - + 40 °C.
Storage and transportation temperature................... - 40 - + 70 °C.
Dimensions ............................................................. 290 (L) x 253 (W) x 150 (H) mm.
Weight… ................................................................ 4.8 kg incl. battery.
Protective classification........................................... Class II, type B.
Symbol:
.............................................................. Protection type B equipment
0413
22
BM 330 Operator’s manual
Spare parts list
18
15
9
7
8
11
5
10
2
28
1
40
3
12
33001-00
33002-00
33003-00
33005-00
33006-00
33007-00
33008-00
33009-00
33010-00
33011-00
33012-00
25
26
27
29
Chassis, bottom plate
Cover
Pillars, 2 pcs
Load cell complete with stop screws
Circuit board complete
Motor plate
Motor 24VAC/50-60 Hz
Driver wheel complete with magnet
Roller with screw and housing
Position sensor, complete
Step motor complete with piston
(clamp)
33015-00 Bearing rod
33018-00 Scale (mixing tray)
33022-00 Rubber foot, 4 pcs.
30
31
41
32
39
6
24
33024-00
33025-00
33026-00
33027-00
33028-00
33029-00
33030-00
33031-00
33032-00
33033-00
33033-10
Plastic cover, 2 pcs
Display
Keyboard
Battery charger BM12-12
Battery 12V/3.5Ah
On/off switch
Charger inlet
9-pole D connector
Modular 6/6 connector, 2 pcs
Barcode reader (not in picture)
Cable barcode reader (not in picture)
33039-00
33040-00
33041-00
IC MAX 3222 RS232 circuit
IC LTC485 RS485 circuit
IC 80C32 CPU
22
23
BM 330 Operator’s manual
MDD Declaration
DECLARATION OF CONFORMITY
according to the
LFVS 2003:11 corresponding to the Medical Devices Directive, 93/42/EEC
STANDARDS TO WHICH CONFORMITY IS DECLARED:
EN 60 601-1 (SEMKO certificate 9725103/01)
EN 60 601-1-2 (Enator test report TR 976119)
Including: EN 55011 Kl B, EN 61000-4-2, EN 61000-4-3, EN 61000-4-4, EN 61000-4-5
Manufacturer:
Address:
Telephone:
Telefax:
Abelko Innovation
972 54 Luleå
+46 920-220360
+46 920-220068
Marketing:
Adress:
Telephone:
Telefax:
Ljungberg&Kögel AB
Box 1032, 251 10 Helsingborg
+46 042-139860
+46 042-132181
Type of Equipment:
Model:
Product class:
Blood mixer
BM330
Class 1m
I, the undersigned, hereby declare that the equipment specified above conforms to the above Directive
and Standards.
Date of issue: 17 April 2014
Signature:
/ Thommy Lundström
Position/title: President
24
BM 330 Operator’s manual
Ljungberg & Kögel AB
25