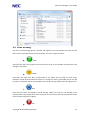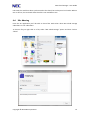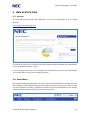
1
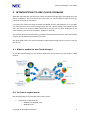
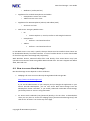
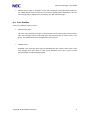
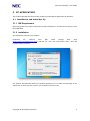
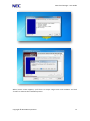
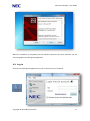
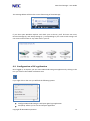
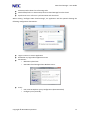
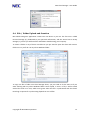
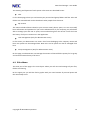
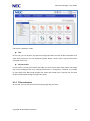
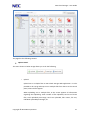
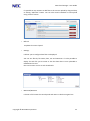
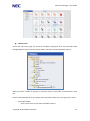
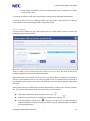
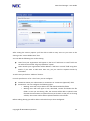
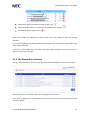
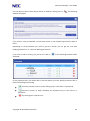
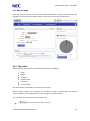
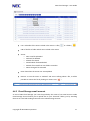
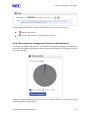
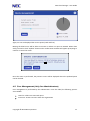
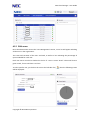
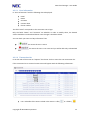
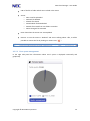
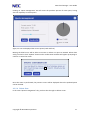
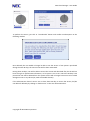
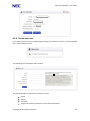
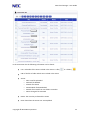
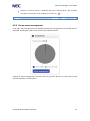
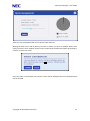
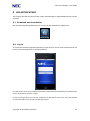
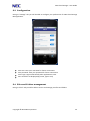
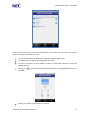
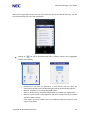
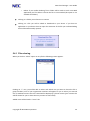
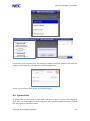
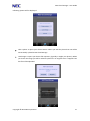
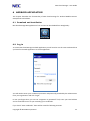
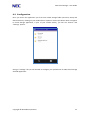
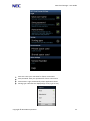
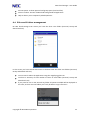
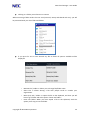
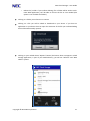
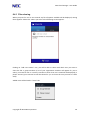
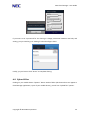
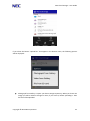
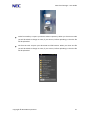
NEC CLOUD STORAGE User Guide Version: R03.1 2013 NEC Cloud Storage – User Guide 1 INTRODUCTION ............................................................................................................... 5 1.1 1.2 2 INTRODUCTION TO NEC CLOUD STORAGE ........................................................... 6 2.1 2.2 2.3 2.4 3 GOALS OF THIS DOCUMENT ........................................................................................... 5 TERMS, ACRONYMS AND ABBREVIATIONS .................................................................... 5 WHAT IS NEEDED TO USE CLOUD STORAGE? ................................................................ 6 TECHNICAL REQUIREMENTS .......................................................................................... 6 HOW TO ACCESS CLOUD STORAGE?.............................................................................. 7 USER PROFILES.............................................................................................................. 8 PC APPLICATION ............................................................................................................ 9 3.1 INSTALLATION AND INITIAL SET UP ............................................................................. 9 3.1.1 HW Requirement................................................................................................... 9 3.1.2 Installation ............................................................................................................. 9 3.2 LOG IN ......................................................................................................................... 11 3.3 CONFIGURATION OF PC APPLICATION......................................................................... 12 3.4 FILE / FOLDER UPLOAD AND CREATION ..................................................................... 14 3.5 ICONS MEANING .......................................................................................................... 15 3.6 FILE SHARING .............................................................................................................. 16 4 WEB APPLICATION ...................................................................................................... 18 4.1 ACCESS ........................................................................................................................ 18 4.2 MAIN MENU ................................................................................................................ 18 4.3 FILES MENU................................................................................................................. 19 4.3.1 Files submenu...................................................................................................... 20 4.3.2 My Shared files submenu .................................................................................... 27 4.4 MY ACCOUNT .............................................................................................................. 29 4.4.1 My profile............................................................................................................ 29 4.4.2 Transaction list .................................................................................................... 30 4.4.3 Cloud Storage email account ............................................................................... 31 4.4.4 Personal quota management (Only for administrators) ....................................... 32 4.5 USER MANAGEMENT (ONLY FOR ADMINISTRATORS)................................................. 33 4.5.1 Edit users ............................................................................................................. 34 4.5.2 Create new user ................................................................................................... 39 4.6 GROUP MANAGEMENT (ONLY FOR ADMINISTRATORS) .............................................. 40 4.6.1 Group Transaction history ................................................................................... 41 4.6.2 Group quota management ................................................................................... 43 5 IOS APPLICATION ......................................................................................................... 45 5.1 DOWNLOAD AND INSTALLATION ................................................................................. 45 5.2 LOG IN ......................................................................................................................... 45 5.3 CONFIGURATION ......................................................................................................... 46 5.4 FILES AND FOLDERS MANAGEMENT ............................................................................ 46 5.4.1 Files sharing ........................................................................................................ 49 5.5 UPLOAD FILES ............................................................................................................. 50 6 ANDROID APPLICATION ............................................................................................. 52 6.1 DOWNLOAD AND INSTALLATION ................................................................................. 52 Copyright © 2013 NEC Corporation 2 NEC Cloud Storage – User Guide 6.2 LOG IN ......................................................................................................................... 52 6.3 CONFIGURATION ......................................................................................................... 53 6.4 FILES AND FOLDERS MANAGEMENT ............................................................................ 55 6.4.1 Files sharing ........................................................................................................ 58 6.5 UPLOAD FILES ............................................................................................................. 59 Copyright © 2013 NEC Corporation 3 NEC Cloud Storage – User Guide Disclaimer The information provided in this document is subject to change without notice. We do not take any responsibility for incidental or consequential losses caused by any execution or use, nor damages caused by any of the failures explained in this document. The information on functions, configuration methods, and design methods explained in this document are applicable to limited areas and are not applicable to all environments. Copyright NEC Cloud Storage is a trademark or registered trademark of NEC Corporation. Other system names, company names, and product names mentioned in this document are trademarks or registered trademarks of the respective companies. The use of the ® symbol and TM symbol are omitted in this document. Copyright © 2013 NEC Corporation 4 NEC Cloud Storage – User Guide 1 Introduction 1.1 Goals of this document This document describes from end user perspective all features and possibilities that NEC Cloud Storage offers. By “end user” we mean the customers who access the NEC Cloud Storage in order to manage storage and company users. 1.2 Terms, acronyms and abbreviations The following describes definitions and abbreviations that are used in this document. Acronyms and Full Spelling and Definition Abbreviations CS NEC Cloud Storage Copyright © 2013 NEC Corporation 5 NEC Cloud Storage – User Guide 2 INTRODUCTION TO NEC CLOUD STORAGE With NEC Cloud Storage you will enjoy private and shared storage space. Everything you store will be available on your local device and "the cloud", so you'll be able to access it from any computer with Internet connection. It provides with network storage accessible via Mobile Devices, USB modems, PC or via Web. You will have access to your own storage space and also a group storage area shared with the users you want. This solution enables information sharing, not only with employees of the same company, but also with customers, suppliers or partners. The solution allows secure data sharing, available from distributed locations and the possibility of easily sharing without the limitations of email. This quick guide covers the main functionality of NEC Cloud Storage and is for users to start up the service. 2.1 What is needed to use Cloud Storage? To use NEC Cloud Storage you just need an application for the device you are using or a Web browser. 2.2 Technical requirements NEC Cloud Storage service provides many access points: • Application for Windows PCs o Windows XP SP3 (x86, x64) o Windows Vista Copyright © 2013 NEC Corporation 6 NEC Cloud Storage – User Guide o Windows 7 (32 bits, 64 bits) • Application for Android Smartphones and tablets o Smartphones: Version 2.3 or later. o Tablets: Version 4.3 or later. • Application for iOS Smartphones (iPhone) and tablets (iPad) o Version 4.3 or later. • Web access: Using any Web browser: o PC: o Smartphones: o Internet Explorer 7, 8 and 9, Firefox 17 and Google Chrome 23. Safari 5.1.7 and 6 and Firefox 5. Tablets: Safari 5.1.7 and 6 and Firefox 15. In case Web access is not used, a specific client per device must be installed. Those clients can be downloaded directly from Web interface. In case of mobile devices it can be downloaded for free from App Store and Google Play respectively. With Windows devices, Microsoft Office files used directly from Virtual Drives may have sporadic inconsistencies while saving Office 2003 and older files. This won’t happen with Office 2007, 2010 and over. 2.3 How to access Cloud Storage? NEC Cloud Storage access depends on the used device: • Webpage: All users can access directly through NEC Cloud Storage URL: http://www.neccloudstorage.com/ If you are the administrator of your company and you bought the application in your Service Provider Marketplace, you can also access NEC Cloud Storage from the Marketplace. Please remember, if you modify credential inside NEC Cloud Storage, you’ll always have to access it using above URL. • PC: Access with credentials (user/password) directly in the PC client. To download PC client you may have to access the webpage (http://www.neccloudstorage.com/) and click on the “PC client” icon on the top of the page. Copyright © 2013 NEC Corporation 7 NEC Cloud Storage – User Guide • Mobile devices (iOS or Android): Access with credentials (user/password) directly in the mobile device client. Previously you’ll need to download the application, for free, from Google Play or Apple Store, just looking for “NEC Cloud Storage”. 2.4 User Profiles There are 2 different types of users: • Administrator User This user is the company manager or administrator and also the Group account owner. This user manages both the personal space and shared space for all the users in his group. The administrator also manages other users’ quota. • Standard User Standard users have the same rights as administrator but cannot create other users and manage their own quota or disk space. Standard Users have access to both personal folder and shared group folder. Copyright © 2013 NEC Corporation 8 NEC Cloud Storage – User Guide 3 PC APPLICATION This chapter describes the functionality of NEC Cloud Storage PC application for Windows. 3.1 Installation and Initial Set Up 3.1.1 HW Requirement Operating system of PC must be Windows XP SP3 or Windows 7, and the service requires more than 1GB RAM. 3.1.2 Installation The installation procedure is as follows. Download the software from NEC Cloud Storage Web page (http://www.neccloudstorage.com/). Execute the “.exe” file and choose “Run”, then the installer will be launched. The installer automatically detects all needed components to run NEC Cloud Storage in the specific PC, so when you click “Install”, the installation process starts. Copyright © 2013 NEC Corporation 9 NEC Cloud Storage – User Guide When license screen appears, you’ll have to accept usage terms and condition and click “Install” to continue the installation process. Copyright © 2013 NEC Corporation 10 NEC Cloud Storage – User Guide When the installation is completed, you’ll be asked to reboot the PC. Once restarted, you can start using NEC Cloud Storage PC application. 3.2 Log in Click on Cloud Storage PC application on your PC and enter your credential Copyright © 2013 NEC Corporation 11 NEC Cloud Storage – User Guide The message below will show the correct functioning of Cloud Storage: If you then open Windows Explorer and check your PC drives, you’ll find two new units, Personal Storage (Z:) and Group Storage (Y:); corresponding to your new virtual storage. You can access and use them as any other drive in your PC. 3.3 Configuration of PC application Once logged in, at anytime, you can access NEC Cloud Storage PC application by clicking on the icon you’ll find in the taskbar notification area. If you right click on the icon you will find the following options Configure NEC Cloud Storage: It will open again login application Start/Stop: Allows you to start and stop PC application Copyright © 2013 NEC Corporation 12 NEC Cloud Storage – User Guide Execution tasks: Show a list of running tasks Work offline/online: It disconnects/connects Cloud Storage from the Cloud Synchronize now: it forces a synchronization with the Cloud When clicking “Configure NEC Cloud Storage”, PC application will be opened showing the following configuration alternatives: Login: Connect or exit PC application Remember my login when application starts Parameters: o Maximum upload size o Start NEC Cloud Storage when Windows starts. Proxy: o User Internet Explorer proxy configuration (Recommended) o Configure proxy manually. Copyright © 2013 NEC Corporation 13 NEC Cloud Storage – User Guide 3.4 File / Folder Upload and Creation NEC Cloud Storage PC application creates two new drives in your PC. The first one is called Personal Storage (Z:), dedicated to your personal information, and the second one is Group Storage (Y:), where you will have files and folders shared among your company. To create a folder in any of those virtual drives you just need to open the drive and create a folder on it as you’ll do it in any other Windows folder. To copy one file or folder into Cloud Storage drives, you just need to do the same as if you were working with any other Windows folder. Once copied, in case is a file, it will be saved with a blue mark in its icon, which turns green when the file is synchronized with the Cloud. How long it requires for synchronizing depends on size of files. Copyright © 2013 NEC Corporation 14 NEC Cloud Storage – User Guide 3.5 Icons meaning Any file on Cloud Storage drives is created with specific icons that explain the status of each file in terms of synchronization and accessibility. There are 4 types of marks: Green Files with this mark are stored on the local cache of your PC and already synchronized to the storage in the Cloud Yellow Files with this mark have been synchronized to the Cloud, but not kept on local cache, therefore cannot be accessed when off-line. To change this state, just double click on the file to open it and the file will be downloaded to local cache, turning yellow marks into green ones. Blue Files with this mark are copied on Cloud Storage folders on local PC, and pending to be synchronized to the Cloud. Once a user connects to the Internet, files are synchronized to the cloud and the mark turns to green. Red Copyright © 2013 NEC Corporation 15 NEC Cloud Storage – User Guide Files with this mark have been synchronized to the Cloud, but not kept on local cache. When a user is off-line, this red mark shows that file is not available to use. 3.6 File Sharing From the PC application you’ll be able to share files with either other NEC Cloud Storage subscribers or non-subscribers. To share a file just right click on a file, select “NEC Cloud Storage” option and then click on “Share” Copyright © 2013 NEC Corporation 16 NEC Cloud Storage – User Guide On the share menu, firstly you select permissions. You can share a file with Read/Write or Read Only rights, and set a password to protect it. Secondary you select the users with whom you want to share the file. You can share a file with existing subscribers of Cloud Storage. You can share a file with non-subscribers of Cloud Storage by entering their email addresses. If information in the fields is not correct because either the user does not exist or email addresses have invalid formats, an error message will be shown. Once you have fulfilled all the fields, you just click “Share” and file will be sent. A file can be shared with more than one user at once by introducing in the list as many users as needed. For Cloud Storage subscribers, a file shared is stored on the folder named “Shared with me”, and it does not consume quote of the subscriber. It consumes the quote of the user who shared the file originally. If the file is shared with external users, a link is sent via email to those users. Copyright © 2013 NEC Corporation 17 NEC Cloud Storage – User Guide 4 WEB APPLICATION 4.1 Access To access NEC Cloud Storage Web application, just enter the following link in your Web browser: http://www.neccloudstorage.com You will need to enter your credential (username and password) provided by the administrator of your organization and click “Log in” In case you forgot those, you can use “Forgotten my password?” link, enter you email address and an email will be sent to you reminding you them. 4.2 Main Menu NEC Cloud Storage Web application main menu offers multiple alternatives, among them are: the possibility to download PC application (clicking on computer icon), direct link to Android and iOS applications (clicking on Android and iPhone icons) and download the user manual (clicking on pdf document on the right side of the blue menu) Copyright © 2013 NEC Corporation 18 NEC Cloud Storage – User Guide The meaning and objective of each option in the menu are described herein: Files It’s the home page, where you can browse your personal and group folders and files. Files and folders are accessible and can be shared with other people from this menu. My account This menu includes all data related to your account: Email, phone, quote, etc. You can modify basic information and password. If you are the administrator of your company you will also be able to manage your disk size or quota, even unsubscribing from the service. You’ll also have the history of all your transactions in the application. User management (Only for Administrator users) In this section, an administrator can view a list of users belonging to his company. Status and basic user profile can be managed here. New users and its quota can also be managed from here. Group management (Only for Administrator users) On this page, an administrator can manage the amount of shared folder capacity for his group and view transaction history of all users. 4.3 Files Menu The main part of this page is the central part where you will view and manage all your files, folders and sharing. On the upper part you will also find a graphic with your total amount of personal quota and the one already in use. Copyright © 2013 NEC Corporation 19 NEC Cloud Storage – User Guide Files menu is divided in 2 tabs: Files On this tab, you can browse your personal and group folders and also all files and folders that were shared with you. You can download, upload, delete, review, move, copy and share files and folder from here. My shared files In this section, you will find all files and folder you have shared with other people. All shared files can be managed from here, checking information or modifying it, if desired. It’s possible to share with other NEC Cloud Storage user inside and outside your company and also with people outside Cloud Storage through their emails. 4.3.1 Files submenu On this tab, you can operate almost everything regarding your data. Copyright © 2013 NEC Corporation 20 NEC Cloud Storage – User Guide The page has the following sections. Options Panel. The menu shown in below image allows you to do the following. o Upload Upload one or multiple files to NEC Cloud Storage Web application. It’s also possible to do a Drag and Drop one or multiple files from the PC to the central panel, where all files appear. When uploading one or multiple files, in the screen appears all information regarding that uploading: Total number of files uploaded, total size of those files, total uploaded percentage, total size uploaded, files names, file size, individual uploaded percentage, etc. Copyright © 2013 NEC Corporation 21 NEC Cloud Storage – User Guide It’s possible at any moment to add files to the current upload by drag and drop or clicking “Add Files” button. You can also cancel individual or total upload using “Cancel” button. o Refresh It updates the central panel. o Settings It allows you to configure how files are displayed. You can sort files by file name, date, size and extension. It’s also possible to display for each file just its name or also the date when it was uploaded or modified and its size. Files can be seen as a list or with thumbnails o Maximize/Minimize It shows in full screen the central panel and returns it back to original size Copyright © 2013 NEC Corporation 22 NEC Cloud Storage – User Guide Folders panel On the left side of the page, the structure of folders is displayed. As in any other NEC Cloud Storage application there are three main folders: Personal, Group and Shared with me. When you select a folder to operate or view files within it, that folder is marked with a pink line. Herein is described which are the options that each folder offers when you right click in them: o Documents folder: - Share: You’ll share all your files and folders under it. Copyright © 2013 NEC Corporation 23 NEC Cloud Storage – User Guide o Personal folder: - Share: You’ll share all files and folders under it. - New subfolder: Create a folder under Personal one o Group folder: - Share: You’ll share all files and folders under it. - New subfolder: Create a folder under Personal one o Subfolders under Personal folder or Group folder: - Share: You’ll share all your files and folders under it - New subfolder: Create a folder under the one you are selecting - Rename: Change folder name. The folder name cannot contain any of the following characters: \ / : * ? " < > | Folder name cannot end in dot (.) - Delete: When you delete a folder this cannot be restore, please be sure before deleting. o ‘Shared with me’ folder: - Share: You’ll share all files and folders under it. o Subfolders under ‘Shared with me’ folder: - Share: You’ll share all your files and folders under it - New subfolder: Create a folder under the one you are selecting - Rename: Change folder name. The folder name cannot contain any of the following characters: \ / : * ? " < > | Folder name cannot end in dot (.) - Delete: When you delete a folder this cannot be restore, please be sure before deleting. Central panel In the central panel you’ll find all the files inside the folder you have selected in the folders panel. Depending on what you’ve configured in the options panel your files will be displayed in different ways (list, thumbnails, with size, with date...). When you right click on a file you will find the following options: o o - Download: It downloads the file to your device Share: You’ll be able to share the file. Sharing options are described further on. Rename: Change file name. The folder name cannot contain any of the following characters: \ / : * ? " < > | File name cannot end in dot (.) Copyright © 2013 NEC Corporation 24 NEC Cloud Storage – User Guide o Delete: When you delete a file this can be restored from “Transaction list” option in “My account” tab. If you drag and drop any file to the central panel, that file will be uploaded automatically. To move or copy any file to a different folder you just need to drag and drop it from the Central panel to the corresponding folder in the folders panel. 4.3.1.1 Sharing To share a file or folder you just need to right click on it, select “Share” option, and then the following window will be opened: A file or folder can be shared with more than one user at once, and also several times establishing different permissions and/or passwords. When you share a file or folder for the first time you will be able to configure a password to protect it and expiration time in the “Security options” box. The password can be viewed at any moment and can also be sent to the user with whom you are sharing, going to “My Shared files” tab. When you share a file or folder that has been shared before, instead of the “Security options” box, you’ll find a “Shared with these users” box, where you’ll be able to: Check which permission did you assign to each user ( ) Check what observations or comments you added to the sharing ( ) Stop sharing with a specific user ( ). If there is only one user, you won’t be able to stop sharing with him within this box, you’ll have to go to “My Shared files” and delete the sharing from there. Copyright © 2013 NEC Corporation 25 NEC Cloud Storage – User Guide After setting the security options you’ll be able to add as many users as you want to the sharing in the “Invite collaborators” box. You can add the following user to the sharing: Users from your organization will appear in the list of “Add user or email” field. You can select them all with “All group members” option. Users outside your organization will be added in “Add user or email” field using their emails. If you want to add more than one, you just need to separate emails by semicolons. To add a user just click on “Add user” button. For each specific user or for a list of user you can configure: Comments: Write your observations or comments on “Comments (optional)” field. Permissions: You can configure the following rights: o Reading: users will only be able to see and download the file/folder o Writing: users will have rights to see, download, rename and delete the file folder. In case you are sharing a file, the receiver will be able to upload a new file with the same name to replace the one you shared. In case you are sharing a folder, the receiver will be able to upload new files to the folder. Before ending sharing you will be able to recheck what you have configured: Copyright © 2013 NEC Corporation 26 NEC Cloud Storage – User Guide Check which permission did you assign to each user ( ) Check what observations or comments you added to the sharing ( Stop sharing with a specific user ( ) ). Once all the fields are fulfilled, the button ‘Share’ has to be clicked to make the sharing effective. In the case of adding users that have NEC Cloud Storage, those could access shared files in the folder ‘Shared with me’. If the file is shared with users that don’t have NEC Cloud Storage service, once the file is shared, a link is sent via email. 4.3.2 My Shared files submenu Going to “My Shared files” tab you’ll manage all the files and folder you have already shared. Shared elements are ordered by the time remaining to its expiration. If you want to delete one or more elements, just click on the check box at the left side of them and click “Delete”. Copyright © 2013 NEC Corporation 27 NEC Cloud Storage – User Guide You can obtain a URL to share directly the file or folder by clicking the icon window will appear . The following If you click on “Copy to clipboard” you will have the link in your clipboard (just need to paste it later). Depending on the permissions you want to give the receiver you can get the “Link with Reading permissions” or “Link with Writing permissions”. If you want to edit a sharing, you just have to click on displayed: and the following window will be In this properties box, you will be able to see with whom you have already shared the file or folder and manage that sharing: Check the password you set to the sharing (only in case there is a password) Send the receiver an email reminding the password (only in case there is a password) Stop sharing with a specific user. Copyright © 2013 NEC Corporation 28 NEC Cloud Storage – User Guide 4.4 My account From ‘My account’ tab, you can check your account information, change access password and manage your quota (only for administrators). You can also access the transaction list. 4.4.1 My profile When accessing ‘My account’ the following information is displayed: Email Name Surname Creation date Password Phone number The field “Email” corresponds to the username for login. Only the fields “Name” and “Surname” are editable. In order to modify them, the desired values should be introduced and button ‘Save changes’ should be clicked. You can check you status on “My information” box This means your account is active Copyright © 2013 NEC Corporation 29 NEC Cloud Storage – User Guide This means your account is not active and you will be able only to download files. 4.4.1.1 Change password The password is also modifiable from ‘My account’ screen. I order to do so, click on ‘Change password’ and introduce the current password and the new password twice. Then click on ‘Save changes’ to update the password. This new password will be used from now on, on all applications: PC, Webpage and mobile devices. 4.4.2 Transaction list In the left side of the screen an “Options” box shows a link to access the user transaction list. If the transaction list is accessed a new screen will appear with the following information: Copyright © 2013 NEC Corporation 30 NEC Cloud Storage – User Guide Icon: indentifies if the item involved in the action is a file ( ) or a folder ( ) URL of the file or folder which was involved in the action Action: o o o o o o New: new file uploaded Deleted: file deleted. Shared: file shared Downloaded: file downloaded Moved: file moved from one folder to another Name Changed: file renamed Date: date when the action was accomplished Restore: In case the action is “Deleted” and we are talking about a file, it will be possible to restore the file by clicking on restore icon ( ) 4.4.3 Cloud Storage email account As user of NEC Cloud Storage you have the possibility the create a free email account inside Cloud Storage that will allow you to upload files to your “Personal” folder, just by attaching them to an email and sending that email to this Cloud Storage account. Copyright © 2013 NEC Corporation 31 NEC Cloud Storage – User Guide Cloud Storage email account is created automatically and at any moment you can: Delete your account Create a new account: It changes the account name 4.4.4 Personal quota management (Only for administrators) In the right side panel of ‘My account’, the information about quota management is displayed numerically and graphically. Purchased quota is displayed, detailing the used amount and the still available amount. Clicking on ‘Quota management’ we will access the purchase process for new quota, having also the capability to reduce quota. Copyright © 2013 NEC Corporation 32 NEC Cloud Storage – User Guide Again, we can see displayed the current quota (used and free). Moving the blue bar we will be able to increase or reduce our quota as wanted. When done we’ll just need to click “Update” button and a confirmation windows will appear prompting to confirm or cancel the action. Once the action in performed, the previous screen will be displayed where the updated quota can be checked. 4.5 User Management (Only for Administrators) User management is performed by the administrator. From this label, the following options are available: Users list: Chek users state and quota Creat user: Create new user within the organization Copyright © 2013 NEC Corporation 33 NEC Cloud Storage – User Guide 4.5.1 Edit users Once the administrator access the ‘User Management’ section, a user list will appear including all the users in the organization. The name and surname of the users are listed, as well as a bar indicating the percentage of quota available for each user. Each user status can also be checked in the list. If a user is active “State” column will show a green round, if not it will show a red one. To edit a specific user, just click on the icon at the left side of it ( will be displayed: Copyright © 2013 NEC Corporation ), then the following screen 34 NEC Cloud Storage – User Guide 4.5.1.1 User information In “User information” both the following data is displayed: Email Name Surname Creation date Phone number The field “Email” corresponds to the username use to login. Only the fields “Name” and “Surname” are editable. In order to modify them, the desired values should be introduced and button ‘Save changes’ should be clicked. You can check you status on “My information” box This means the user is active This means the user is not active and you will be able only to download files. 4.5.1.2 Transaction list In the left side of the screen an “Options” box shows a link to access the user transaction list. If the transaction list is accessed a new screen will appear with the following information: Icon: indentifies if the item involved in the action is a file ( Copyright © 2013 NEC Corporation ) or a folder ( ) 35 NEC Cloud Storage – User Guide URL of the file or folder which was involved in the action Action: o o o o o o New: new file uploaded Deleted: file deleted. Shared: file shared Downloaded: file downloaded Moved: file moved from one folder to another Name Changed: file renamed Date: date when the action was accomplished Restore: In case the action is “Deleted” and we are talking about a file, it will be possible to restore the file by clicking on restore icon ( ) 4.5.1.3 User quota management In the right side panel the information about user’s quota is displayed numerically and graphically. Copyright © 2013 NEC Corporation 36 NEC Cloud Storage – User Guide Clicking on ‘Quota management’ we will access the purchase process for new quota, having also the capability to reduce quota. Again, we can see displayed the current quota (used and free). Moving the blue bar we will be able to increase or reduce our quota as wanted. When done we’ll just need to click “Update” button and a confirmation windows will appear prompting to confirm or cancel the action. Once the action in performed, the previous screen will be displayed where the updated quota can be checked. 4.5.1.4 Delete User In the same “Quota management” tab, you have also the right to delete a user. Copyright © 2013 NEC Corporation 37 NEC Cloud Storage – User Guide To perform the action, just click in “Unsubscribe” button and confirm unsubscription in the following window. Once deleted, the user would no longer be able to use the service. If new quota is purchased during the next 30 days, the user account will be then reactivated. During those 30 days, user will be able to access the service and download files, but he will not have the right to upload new information, as his quota is set to zero. Once the 30 days have passed the user will be deleted from the system and he will no longer have access to his Cloud Storage account in any device (PC, Web and mobile devices). If the administrator doesn’t want a user to have those 30 days to access the service, he/she can delete if definitely by clicking on “Delete user” in the User Information box: Copyright © 2013 NEC Corporation 38 NEC Cloud Storage – User Guide 4.5.2 Create new user If you want to add new users to NEC Cloud Storage, you will have to click on “Create standard user” inside “New user” box. The following form will appear when clicked: The following fields are required to create a new user: Email Name Surname Password / Confirm password: It has to be entered twice Copyright © 2013 NEC Corporation 39 NEC Cloud Storage – User Guide Phone Number Once clicked on ‘Register’, you will have to confirm the creation. When done, user will be finally created. 4.6 Group Management (Only for Administrators) From the Group Management label, if you are an administrator, you can perform the following actions: See all users transaction list in a consolidated view. See Group quota Manage Group quota Copyright © 2013 NEC Corporation 40 NEC Cloud Storage – User Guide 4.6.1 Group Transaction history In this menu, administrators can check transaction history of all users. Copyright © 2013 NEC Corporation 41 NEC Cloud Storage – User Guide In the transaction list the following information can be found: Icon: indentifies if the item involved in the action is a file ( ) or a folder ( ) URL of the file or folder which was involved in the action Action: o o o o o o New: new file uploaded Deleted: file deleted. Shared: file shared Downloaded: file downloaded Moved: file moved from one folder to another Name Changed: file renamed Name: The use who performed the action Date: date when the action was accomplished Copyright © 2013 NEC Corporation 42 NEC Cloud Storage – User Guide Restore: In case the action is “Deleted” and we are talking about a file, it will be possible to restore the file by clicking on restore icon ( ) 4.6.2 Group quota management In the right side panel group quota is displayed numerically and graphically. Purchased quota is displayed, detailing the used amount and the still available amount. Clicking on ‘Quota management’ we will access the purchase process for new quota, having also the capability to reduce quota. Copyright © 2013 NEC Corporation 43 NEC Cloud Storage – User Guide Again, we can see displayed the current quota (used and free). Moving the blue bar we will be able to increase or reduce our quota as wanted. When done we’ll just need to click “Update” button and a confirmation windows will appear prompting to confirm or cancel the action. Once the action in performed, the previous screen will be displayed where the updated quota can be checked. Copyright © 2013 NEC Corporation 44 NEC Cloud Storage – User Guide 5 iOS APPLICATION This chapter describes the functionality of NEC Cloud Storage for Apple Mobile Devices: iPhone and iPad. 5.1 Download and installation NEC Cloud Storage iOS application is free and can be downloaded from Apple Store: 5.2 Log in To access NEC Cloud Storage iOS application you will need to use the same credential that you have for the Web application or the PC application. You will need to enter your credential (username and password) provided by the administrator of your organization and click “Login” In case you forgot those, you can use “Forgotten my password?” link, enter you email address and an email will be sent to you reminding you them. Copyright © 2013 NEC Corporation 45 NEC Cloud Storage – User Guide 5.3 Configuration Going to “Settings” tab you will be able to configure your preferences for NEC Cloud Storage iOS application: Save user: Save your username for future connections Save password: Save your password for future connections Auto Login: Login automatically when applications starts Sort: How files are displayed (by name, type or size) 5.4 Files and Folders management Going to “Files” tab you will be able to access and manage your files and folders. Copyright © 2013 NEC Corporation 46 NEC Cloud Storage – User Guide In the initial screen there are several alternatives to be done with the three root folders (Personal, Group and Shared with me): You can search within the application using the magnifying glass icon. To update files and folders, just drag down the screen. You have a summary of total number of items of each folder (Personal, Group and Shared with me) Clicking on available) you will be presented with folder options (only highlighted options are Clicking on a folder you will access its content Copyright © 2013 NEC Corporation 47 NEC Cloud Storage – User Guide When accessing a folder under the root ones (Personal, Group and Shared with me), you will be presented with your list of files and folders Clicking on you will be presented with files or folders options (only highlighted options are available) o o o o o Download: If you have an application in your device that can open the extension of the file you are downloading that will be automatically opened Rename: It allows you to change file/folder name. Share: It allows sharing a file with people inside or outside your organization. Move: It copies the file to the clipboard, and then you will have to go a folder and select option “Paste”. Paste: When you have copied a file to the clipboard, with these options you’ll copy it in the folder. Copyright © 2013 NEC Corporation 48 NEC Cloud Storage – User Guide o Delete: If you confirm deleting, file or folder will be send to trash. From Web application you’ll be able to recover the file in case needed (this option is not available for folders). Clicking on a folder you will access its content Clicking on a file you will be asked to download to your device. If you have an application in your device that can open the extension of the file you are downloading that will be automatically opened 5.4.1 Files sharing When you click on “Share” option on any file the following screen appears: Clicking on “+” icon, you will be able to select with which user you want to share the file: a group member (a list of your organization member will appear for you to select), an external user (a window to enter that user’s email will be displayed), a phone contact (your contacts list will be shown for you to chose the one you want to share with). Added users will be listed in “Users” tab. Copyright © 2013 NEC Corporation 49 NEC Cloud Storage – User Guide If you want to set a password for the sharing or change permission between read only and writing, you just need to go to “Options” tab and configure them. Finally, you just have to click “Share” to complete sharing. 5.5 Upload Files To upload a file you firstly have to select where you want to store it, to do so, just navigate in your “Files” tab to the folder you want, and when you are inside it select the button “Upload file” that appear in the bottom menu. Copyright © 2013 NEC Corporation 50 NEC Cloud Storage – User Guide Following options will be displayed: Take a photo: It opens your device camera. When you take the photo that one will be automatically upload to NEC Cloud Storage Load image: It opens your device file repository (typically in Apple your photos). When you chose one image you will be asked to upload it in its original size or cropped. Then the file will be uploaded. Copyright © 2013 NEC Corporation 51 NEC Cloud Storage – User Guide 6 ANDROID APPLICATION This chapter describes the functionality of NEC Cloud Storage for Android Mobile Devices: Smartphones and Tablets. 6.1 Download and installation NEC Cloud Storage iOS application is free and can be downloaded from Google Play: 6.2 Log in To access NEC Cloud Storage Android application you will need to use the same credential that you have for the Web application or the PC application. You will need to enter your credential (username and password) provided by the administrator from your organization and click “Login” In case you forgot those, you can use “Forgotten my password?” link, enter you email address and an email will be sent to you reminding your credentials. If you check “Save credentials” these will be saved for following accesses. Copyright © 2013 NEC Corporation 52 NEC Cloud Storage – User Guide 6.3 Configuration Once you access the application you’ll see main Cloud Storage folder (Personal, Group and Shared with me). Clicking on your mobile device “Options” button (this button does not appear in Cloud Storage application, is part of your mobile device), you will see “Search” and “Settings” options. Going to “Settings” tab you will be able to configure your preferences for NEC Cloud Storage Android application: Copyright © 2013 NEC Corporation 53 NEC Cloud Storage – User Guide Save user: Save your username for future connections Save password: Save your password for future connections Autoconnect: Login automatically when applications starts Sorting type: How files are displayed (by name, type or size) Copyright © 2013 NEC Corporation 54 NEC Cloud Storage – User Guide Account quota: It shows personal and group space (used and free) Version number: Version of NEC Cloud Storage Android application Help: It directs you to Frequently Asked Questions. 6.4 Files and Folders management On NEC Cloud Storage main screen you have the three root folders (Personal, Group and Shared with me). In this screen you have several alternatives to be done with the three root folders (Personal, Group and Shared with me): You can search within the application using the magnifying glass icon. You have a summary of total number of items of each folder (Personal, Group and Shared with me) If you press for one or two seconds any folder all options available will be displayed. In this case, as there are root folders you’ll only be able to copy a file into it Copyright © 2013 NEC Corporation 55 NEC Cloud Storage – User Guide Clicking on a folder you will access its content When accessing a folder under the root ones (Personal, Group and Shared with me), you will be presented with your list of files and folders If you press for one or two seconds any file or folder all options available will be displayed. o o o o Rename File / Folder: It allows you to change file/folder name. Share File: It allows sharing a file with people inside or outside your organization. Move (Cut) File / Folder: It copies the file to the clipboard, and then you will have to go a folder and select option “Paste into folder”. Paste into folder: When you have copied a file to the clipboard, with this option you’ll copy it into the folder. Copyright © 2013 NEC Corporation 56 NEC Cloud Storage – User Guide o Delete File / Folder: If you confirm deleting, file or folder will be send to trash. From Web application you’ll be able to recover the file in case needed (this option is not available for folders). Clicking on a folder you will access its content Clicking on a file you will be asked to download to your device. If you have an application in your device that can open the extension of the file you are downloading that will be automatically opened Clicking on your mobile device “Options” button (this button does not appear in Cloud Storage application, is part of your mobile device), you will see “Refresh” and “New Folder” options. Copyright © 2013 NEC Corporation 57 NEC Cloud Storage – User Guide 6.4.1 Files sharing When you press for one or two seconds any file all options available will be displayed, among them appears “Share File”. When you select it the following screen appears: Clicking on “Add new contact” icon, you will be able to select with which user you want to share the file: a group member (a list of your organization member will appear for you to select), an external user or custom (a window to enter that user’s email will be displayed), a phone contact (your contacts list will be shown for you to chose the one you want to share with). Added users will be listed in “Users” tab. Copyright © 2013 NEC Corporation 58 NEC Cloud Storage – User Guide If you want to set a password for the sharing or change permission between read only and writing, you just need to go to “Settings” tab and configure them. Finally, you just have to click “Share” to complete sharing. 6.5 Upload Files Clicking on your mobile device “Options” button inside a folder (this button does not appear in Cloud Storage application, is part of your mobile device), you will see “Upload file” options. Copyright © 2013 NEC Corporation 59 NEC Cloud Storage – User Guide If you select the button “Upload file” that appear in the bottom menu, the following options will be displayed: Photograph from Gallery: It opens your device images repository. When you chose one image you will be asked to change its name, if you want to, before uploading it. Then the file will be uploaded. Copyright © 2013 NEC Corporation 60 NEC Cloud Storage – User Guide Video from Gallery: It opens your device videos repository. When you chose one video you will be asked to change its name, if you want to, before uploading it. Then the file will be uploaded. File from SD card: It opens your device SD card file browser. When you chose one file you will be asked to change its name, if you want to, before uploading it. Then the file will be uploaded. Copyright © 2013 NEC Corporation 61 NEC Cloud Storage – User Guide NEC Cloud Storage User Guide 2013, Version r03.1 NEC Corporation Copy or alteration is prohibited without permission of NEC Corporation. Copyright © 2013 NEC Corporation 62