1
Courier 2 User Manual
User Manual
Courier 2
User Manual
Subject:
Courier 2.0 – User Manual
Owner:
Derek van Wyk
Storage:
P:\Product user manuals
Version:
02/061004
Description:
User Manual
Date:
06/10/2004
Attached Files:
None
TABLE OF CONTENTS
INTRODUCTION .......................................................................................................................................... 3
SYSTEM LAYOUT ....................................................................................................................................... 4
1. GLOBAL PRODUCT FUNCTIONALITY ..................................................................................................... 5
1.1 Manage Account: ............................................................................................................................... 5
1.2 Manage lists: ..................................................................................................................................... 5
1.3 Manage Templates:............................................................................................................................ 6
1.4 Manage Batches: ............................................................................................................................... 6
1.5 Account Reports: ............................................................................................................................... 6
1.6 Account Settings: ............................................................................................................................... 6
1.7 Tools: ................................................................................................................................................ 6
2. MANAGE LISTS FUNCTION..................................................................................................................... 7
2.1 Creating a New List and Adding Recipients Individually ........................................................................ 8
2.2
Creating and Importing a Mailing / SMS List................................................................................... 9
2.3 Adding recipients to existing lists....................................................................................................... 12
2.4 Editing List Properties ....................................................................................................................... 14
2.5 Editing recipient properties................................................................................................................ 14
2.6 Deleting a list ................................................................................................................................... 15
2.7 Deleting a recipient........................................................................................................................... 15
2.8 Deactivating a recipient .................................................................................................................... 15
2.9 Activating a Recipient ....................................................................................................................... 16
2.10 Removing Duplicates (list level)....................................................................................................... 16
2.11 Exporting a list (All recipients or deactivated recipients) .................................................................... 17
2.12 Making a copy of an existing list ...................................................................................................... 17
3. MANAGE TEMPLATES FUNCTION ....................................................................................................... 18
3.1 Creating a new template................................................................................................................... 19
3.2 Creating HTML content for a template ............................................................................................... 19
3.3 Creating text content for a template................................................................................................... 34
MWEB Business
www.mwebbusiness.co.za
1
Version: 02/061004
Copyright © MWEB Business
Courier 2
User Manual
3.4 Creating SMS content for a template ................................................................................................. 34
3.5 Uploading an HTML or text file: ......................................................................................................... 35
3.6 Adding an attachment:...................................................................................................................... 36
3.7 Using Attributes In Templates: .......................................................................................................... 37
3.8 Editing a sample template: ................................................................................................................ 38
3.9 Editing a template: ........................................................................................................................... 39
3.10 Deleting a template:........................................................................................................................ 41
4. MANAGE BATCHES FUNCTION ........................................................................................................... 42
4.1 Creating a new email batch............................................................................................................... 42
5. ACCOUNT SETTINGS........................................................................................................................... 50
5.1
Changing Your Account Properties: ............................................................................................. 50
5.2
Creating an Account User: .......................................................................................................... 52
MWEB Business
www.mwebbusiness.co.za
2
Version: 02/061004
Copyright © MWEB Business
Courier 2
User Manual
INTRODUCTION
This user manual is aimed at providing a good product comprehension and is the user manual for
MWEB Business’ Courier product. This document will cover all the features of the product, will
explain in detail how to set up lists and templates, create batches, add new users, delete users, draw
reports and also learn how to read these reports.
Courier is in short a message management product enabling a customer to send any type of mail or
SMS communication to an internal or external recipient base. The concept of message management
is about managing email / SMS lists, message content and email / SMS batches to an internal or
external recipient base. Logically, Courier behaves like a mass messaging system on the customer’s
side while the SMTP and SMS servers are situated in MWEB Business’ high tech data centre. These
servers are capable of handling large quantities of messages at a specific point in time, thus allowing
all customers to be offered an equal type of service. Courier also provides server-based solutions to
the key issues like, for instance, up-to-date recipient lists, instant communication with your recipient
base, reporting on failed messages, instant unsubscription, and scheduling of email / SMS batches.
This product is easy to administer and configure to a company’s individual needs and requirements.
What adds to this product’s ease of use is the fact that it can be administered remotely. This product
is a web based application and can thus be administered from anywhere in the world. Courier offers
the type of message management solution companies have been waiting for since the popularity of
the Internet.
MWEB Business
www.mwebbusiness.co.za
3
Version: 02/061004
Copyright © MWEB Business
Courier 2
User Manual
SYSTEM LAYOUT
Please note: The creation of the email and SMS batch is managed within one structured area and not
split into two separate functions as described above
MWEB Business
www.mwebbusiness.co.za
4
Version: 02/061004
Copyright © MWEB Business
Courier 2
User Manual
1. GLOBAL PRODUCT FUNCTIONALITY
1.1 Manage Account:
The “Manage Accounts” page allows for an account holder to:
•
Set up and manage mail and SMS lists,
•
Set up and manage content templates,
•
Create and manage batches,
•
Administer account setting, account reports and account tools
1.2 Manage lists:
This feature allows an account holder to create or import new mailing and/or SMS lists or to manage
existing lists. The feature also allows the account holder to drill deeper into the different lists and the
account holder has the ability to edit information up to a recipient level. An account holder could also
export a list with all current recipients and a list with all deactivated recipients.
MWEB Business
www.mwebbusiness.co.za
5
Version: 02/061004
Copyright © MWEB Business
Courier 2
User Manual
1.3 Manage Templates:
In order for an account holder to either edit or manage templates, he/she must make use of the
“Manage Templates” feature. This feature will allow an account holder to create, upload or manage
an HTML or text template. A file could also be uploaded to be attached to the template.
1.4 Manage Batches:
The “Manage Batches” feature only comes into action after an account holder has set up a mailing /
SMS list(s) and template(s) and is ready to send a message to a selected list. This feature also
allows for management of loaded batches as well as the creation of new ones.
1.5 Account Reports:
Using this feature the account holder has the ability to view usage and billing reports, as well as
batch reports. Batch reports show all the information about sent batches. Also available here after 7
days, are detailed error reports in exportable .CSV file formats.
1.6 Account Settings:
To set up general account properties, account users or just deactivating an account, the account
holder can make those changes here.
1.7 Tools:
This feature is for customers who have their own mail / SMS management system and would like to
use the mCentre Message engine in sending out their mail / SMS’s. They will then send all their
information to the message engine via an XML feed. The XML scripting and coding can be set up via
this feature.
MWEB Business
www.mwebbusiness.co.za
6
Version: 02/061004
Copyright © MWEB Business
Courier 2
User Manual
2. MANAGE LISTS FUNCTION
This feature allows an account holder to create or import new mailing or SMS lists or to manage
existing lists. The feature also allows the account holder to drill deeper into the different lists and the
account holder has the ability to edit information up to a recipient level.
Add New List:
This feature allows for the creation of an email / SMS list and then to add recipients one by one to this
list.
Import List:
This feature allows for the importing of a list which is created using a spreadsheet application, i.e.
Microsoft Excel, and then saved as a .CSV file format.
Search Lists:
This feature allows for the importing of a list which is created using a spreadsheet application, i.e.
Microsoft Excel, and then saved as a .CSV file format.
MWEB Business
www.mwebbusiness.co.za
7
Version: 02/061004
Copyright © MWEB Business
Courier 2
User Manual
Attributes:
This is an extremely important feature in the Courier system. Attributes could really be called
placeholders” since that is exactly what they are. An attribute allows for an account holder to personalise
the content of an email message so that each recipient receives a “unique” message.
For example: When you want to avoid sending a generic message starting with “Dear customer”, you
can set up an attribute (placeholder) with the name “Name”. You can then enter a recipient name next to
the “Name” attribute. When you compile your message you will insert the attribute called “Name” next to
the heading “Dear”. When the message arrives at the recipient it will contain the name that was found
under the “Name” attribute for that specific recipient i.e. it will then say “Dear John” or “Dear Sarah”.
Attributes can also be used in SMS templates, but can only effectively be used if the 160 character
restriction is adhered to.
List Type:
This feature allows an account holder to see what type of list it is, i.e. whether it is a mail only,
cellphone only or mail and cellphone list. If the list contains only email addresses, then it will be
displayed as a “Mail Only” list. If the list contains only cellular numbers, then it will be displayed as a
“Cellphone Only” list. If the list contains both email addresses and cellular numbers, then it will be
displayed as a “Mail and Cellphone” list.
2.1 Creating a New List and Adding Recipients Individually
MWEB Business
www.mwebbusiness.co.za
8
Version: 02/061004
Copyright © MWEB Business
Courier 2
User Manual
1.
Type in the required list name next to the “Add New Name” menu, and click on the “Go” button
2.
The name of your new list is displayed in the block reading “List Name” (number 1) with 10 available
attribute slots (number 2) below it. You may enter an attribute name if required.
3.
Click on the “Submit” button and you will return to the “Manage Lists” page
4.
Your list should now appear at the bottom of the screen displaying the List Name, List Type, Date
Modified, Number of Recipients, Number of Attributes and actions available for that list. At this point
there will not be any recipients in the list
5.
Click on the “Manage Recipients” icon next to the list that you have just created
6.
You now want to start adding recipients. Click on the “Add a Recipient” button
7.
On the page that follows you may now enter the recipient email address, mobile number (if
applicable), recipient display name, preferred email type (i.e. HTML or text) and, if you have created
attributes, enter the appropriate information next to it.
8.
After you have done that, click on the “Submit” button and you will have created a new recipient.
9.
Follow the exact same procedure for adding another recipient.
2.2
Creating and Importing a Mailing / SMS List
In order to get your list to work in Courier, there is a certain format it needs to be in, in order
for the system to read it correctly.
2.2.1
Setting up the mailing / SMS list outside of Courier:
1.
Open you spreadsheet program
2.
Create a new file or open an existing mailing list
3.
Name the column, which contains or will contain the email addresses,
“Emailaddress”. This is a compulsory column if there is not a “cellnumber” column
MWEB Business
www.mwebbusiness.co.za
9
Version: 02/061004
Copyright © MWEB Business
Courier 2
User Manual
4.
Name the column, which contains or will contain the cellular numbers,
“Cellnumber”. This is a compulsory column if there is not an “emailaddress” column
5.
Name the column, which will indicate the recipient email preference (i.e. HTML or
text), “Emailtype”. You may indicate the preference by typing either the words
“HTML” or “Text” or just by using the first letter of the words i.e. “H” or “T”. This is
not a compulsory column and should only be used when changing recipient mail
preferences automatically on list import
6.
Name the column, containing the email display name for the recipient,
“Displayname”. This is not a compulsory column and is only used for identification
of recipients and can not be used as an attribute
Please note!
These above-mentioned column names must be used exactly as is, but is not
case-sensitive. Also note that either the “Emailaddress” or “Cellnumber” column
must contain at least one value. There is no restriction on the placement order
of the different columns
7.
Additional information like customer number; gender; age etc. will become
attributes of that list
8.
Additional information like customer number; gender; age etc. will become
attributes of that list
Please note!
You may only have a maximum of 10 attributes per list
9.
After you have created the list, click on “File”
10. Click on “Save As”
11. Type in the name that you want your list to be. After you have done that, select
from the “Save As Type:” list the “CSV (Comma delimited) (*.CSV)” format, and
click on the “Save” button
12. Close the program and go to the “Manage Lists” section on the Courier interface.
MWEB Business
www.mwebbusiness.co.za
10
Version: 02/061004
Copyright © MWEB Business
Courier 2
User Manual
2.2.2
1.
Importing the newly created / edited list:
Next to the “Import List” menu (number 1), type in the name you want the list to have
in the “List Name” block (number 2). It is compulsory to give the list a name
2.
Click on the “Browse” button next to the “File Name” block below the “List Name”
block and find the created mailing list (in the CSV format) on your computer
3.
Click on the “Open” button and the file will be displayed in the “File Name” block
4.
Click on the “Go” button in the “Import List” row
MWEB Business
www.mwebbusiness.co.za
11
Version: 02/061004
Copyright © MWEB Business
Courier 2
User Manual
5.
A window will pop-up telling you would that the selected file is now ready to be
imported. If you are sure that you want to continue, click on the “Import ” button. If
you are unsure about importing the specific file, click on the “Cancel” button
6.
After the importing of the list has been completed, the list menu will automatically be
updated with the newly imported list
7.
Your list is now successfully imported
Please note!
If there were difficulties in importing your list and it doesn’t display in your list menu,
then please double check that you have correctly named the different “system
columns” (i.e. “Emailaddress”, “cellnumber”, “displayname”, and “emailtype”) and
also that there are no open spaces in either your “emailaddress” or “cellnumber”
columns respectively
2.3 Adding recipients to existing lists
1.
On the “Manage Lists” page, click on the “Manage Recipients” icon next to the list that
you would like to add a recipient(s) to, as demonstrated at number 1
2.
You now want to start adding recipients. Click on the “Add a Recipient” button as
demonstrated at number 2 on the next page
MWEB Business
www.mwebbusiness.co.za
12
Version: 02/061004
Copyright © MWEB Business
Courier 2
User Manual
3.
On the page that follows you may now enter the recipient email address,recipient
cellular number , recipient display name, what format the recipient would like to receive
the mail in, and if you have created attributes, enter the appropriate information next to it
MWEB Business
www.mwebbusiness.co.za
13
Version: 02/061004
Copyright © MWEB Business
Courier 2
User Manual
4.
After you have done that, click on the “Submit” button and you will have created a
recipient
5.
Follow the exact same procedure for adding another recipient
2.4 Editing List Properties
1.
On the “Manage Lists” page, click on the “Edit” icon next to the list that you would like to
modify
2.
In the next screen you will be able to change the name of the list as well as editing,
adding or deleting attributes
3.
When you are done with the changes, click on the “Submit” button to continue
4.
You will be taken back to the “Manage Lists” page
2.5 Editing recipient properties
1.
On the “Manage Lists” page, click on the “Manage Recipients” icon next to the list that
you would like to edit a recipient(s)
2.
On the page that follows, click on the “Edit” icon next to the name of the recipient that
you would like to edit
3.
You can now make changes to the email address, cellphone number, the display name,
select in which format the recipient would like to receive his mail message, and change
the information in the attribute fields
4.
When you have made the necessary changes, click on the “Submit” button to return to
the “List” page
MWEB Business
www.mwebbusiness.co.za
14
Version: 02/061004
Copyright © MWEB Business
Courier 2
User Manual
2.6 Deleting a list
1.
In order to delete a list completely from the account, go to the “Manage Lists” page
2.
Click on the “Delete” icon next to the list you would like to delete
3.
The list will be deleted from the account
2.7 Deleting a recipient
1.
In order to delete a recipient completely from a list, go to the “Manage Lists” page
2.
Click on the “Manage Recipient” icon next to the list which you would like to delete a
recipient from
3.
Click on the “Delete” icon next to the recipient you would like to delete
4.
The recipient will be deleted from the list
2.8 Deactivating a recipient
1.
Deactivating a recipient doesn’t delete the recipient from the list, but temporarily
removes him from the list until he is activated again
2.
In order to deactivate a recipient from a list, go to the “Manage Lists” page
5.
Click on the “Manage Recipient” icon next to the list which you would like to deactivate a
recipient from
3.
On the following page, click on the “Deactivate” icon next to the recipient that you would
like to deactivate
4.
The recipient will now be deactivated and disappear from the list
MWEB Business
www.mwebbusiness.co.za
15
Version: 02/061004
Copyright © MWEB Business
Courier 2
User Manual
2.9 Activating a Recipient
1.
In order to activate the recipient again, either go to the search box and type in the name
of the recipient and click on “Go” or alternatively click on the “Deactivated” button next to
the search block and click on the “Go” button to continue
2.
The recipient (s) should now appear
3.
Click on the “Activate” icon next to the recipient and the required recipient will appear in
the list again as activated
4.
Deselect the “Deactivated” block next to the search box
5.
Click on the “Manage Recipients” link
6.
You will be returned to the list with all the active recipients
2.10 Removing Duplicates (list level)
1.
In order to remove duplicate email addresses or cellular numbers from a list, click on the
“Remove duplicates” button next to the required list
2.
A pop-up box will appear confirming that duplicates in the list will be removed.
3.
Click on the “Ok” button to continue with the operation and on the “Cancel” button to cancel
the operation
4.
Once you have clicked on the “Ok” button a confirmation pop-up box will appear
confirming the removal of the duplicates
5.
The page containing all the lists will automatically be updated and refreshed
Please note!
Removal of duplicates on a list level permanently deletes the duplicate email addresses from
the selected list.
MWEB Business
www.mwebbusiness.co.za
16
Version: 02/061004
Copyright © MWEB Business
Courier 2
User Manual
2.11 Exporting a list (All recipients or deactivated recipients)
1.
To export a mailing / SMS list as a .CSV file to your computer so that you could make
changes to it, go to the “Manage Lists” page
2.
Click on either the “Download All Recipients” icon or on the “Download Inactive Recipients”
icon next to the list you would like to export.
Please note!
The “Download All Recipients” icon allows you to download a .CSV file of all recipients in that
list (activated and deactivated). The “Download Inactive Recipients” icon allows you to
download a .CSV file of all deactivated recipients
3.
You will be prompted for a location to save the file to
4.
You may now change the file name to what you would like the export file to be or leave it as
is
5.
Click on the “Save” button
6.
The file will be saved to the specified location
Please note!
In order to upload the updated list again, please follow the steps for importing a list
2.12 Making a copy of an existing list
1.
In the event that you would like to make a copy of an existing list for whatever reason, go to
the “Manage Lists” page
2.
Click on the “Copy” block next to the list that you would like to make a copy of
3.
After you have done that, go to the “Add New List” tab and enter the required list name for
the copied list in the “List Name” text box and tick the “Copy” block next to the text box as
well
4.
Click on the “Go” button
5.
An exact copy of the selected list will have been made under the new name specified
MWEB Business
www.mwebbusiness.co.za
17
Version: 02/061004
Copyright © MWEB Business
Courier 2
User Manual
3. MANAGE TEMPLATES FUNCTION
In order for an account holder to either edit or manage templates, he/she must make use of the
“Manage Templates” feature. This feature will allow an account holder to create, upload or manage an
HTML or text template. A file could also be uploaded to be attached to the template.
1. Add New Template:
This allows for the creation of a template name and message subject and then to add the
content to this.
2. Search Template:
This feature allows you to search for any created template in your account
3. Sample Templates:
There is some sample templates created to give you an idea of what a newsletter could look
like. These sample templates can be copied and edited for your own use.
4. HTML Editor :
The HTML editor allows for the creation of a new or editing of an existing HTML format
message template. This editor will be discussed in detail a bit later in this manual.
MWEB Business
www.mwebbusiness.co.za
18
Version: 02/061004
Copyright © MWEB Business
Courier 2
User Manual
5. Text Editor (number 7):
The Text editor allows for the creation of a new or editing of an existing TEXT format message
template.
6. SMS Editor (number 8):
The SMS editor allows for the creation of a new or editing of an existing text format message
template with a total character limit of 160 characters.
Please note!
Attributes can be added as long as their values (i.e. the content which they represent) do not
exceed the 160 character limit.
3.1 Creating a new template
1.
On the “Manage Template” page, type in the desired name of the template in the “Template
Name” box
2.
Type in the desired message subject in the “Subject” field
3.
Click on the “Go” button
4.
The newly created template will now appear in the template list at the bottom of the page
3.2 Creating HTML content for a template
1.
On the “Manage Templates” page, click on the “HTML Editor” icon next to the template to
which you would like to add content to
2.
The HTML editor window will open
MWEB Business
www.mwebbusiness.co.za
19
Version: 02/061004
Copyright © MWEB Business
Courier 2
User Manual
3.
Create your HTML content in the HTML editor window (number 4) by using the functions
(number 3). Click on the “Attributes” button (number 2) to add attributes to the template
4.
After you have finished creating the content, click on the “Preview” (number 6) tab at the
bottom of the HTML editor window to view the finished content template
5.
When you are satisfied with the look of the content, click on the “Save” button (number 1) at
the top left corner of the screen
6.
Close the HTML Editor
7.
You will be directed back to the “Manage Templates” page
MWEB Business
www.mwebbusiness.co.za
20
Version: 02/061004
Copyright © MWEB Business
Courier 2
User Manual
Functionality of HTML Editor:
Cut (Ctrl+X)
To cut a portion of the document, highlight the desired portion and click the 'Cut' icon
(keyboard shortcut - CTRL+X).
Copy (Ctrl+C)
To copy a portion of the document, highlight the desired portion and click the 'Copy' icon
(keyboard shortcut - CTRL+C).
Paste (Ctrl+V)
To paste a portion that has already been cut (or copied), click where you want to place
the desired portion on the page and click the 'Paste' icon (keyboard shortcut - CTRL+V).
To paste from Microsoft Word, click on the drop down icon next to the Paste Icon.
Undo (Ctrl+Z)
To undo the last change, click the 'Undo' icon (keyboard shortcut - CTRL+Z). Each
consecutive click will undo the previous change to the document.
Redo (Ctrl+Y)
To redo the last change, click the 'Redo' icon (keyboard shortcut - CTRL+Y). Each
consecutive click will repeat the last change to the document.
Remove Text Formatting
This command allows you to select a specific portion of text and remove any of the
formatting which it contains. To remove any text formatting select the desired portion of
text and Click the 'Remove Text Formatting' button.
Bold (Ctrl+B)
To bold text, select the desired portion of text and click the 'Bold' icon (keyboard
shortcut - CTRL+B). Each consecutive click will toggle this function on and off.
Underline (Ctrl+U)
To underline text, select the desired portion of text and click the 'Underline' icon
(keyboard shortcut - CTRL+U). Each consecutive click will toggle this function on and
off.
MWEB Business
www.mwebbusiness.co.za
21
Version: 02/061004
Copyright © MWEB Business
Courier 2
User Manual
Italic (Ctrl+I)
To convert text to italic, select the desired portion of text and click the 'Italic' icon
(keyboard shortcut - CTRL+I). Each consecutive click will toggle this function on and off.
Insert Number List
To start a numbered text list, click the 'Insert Numbered List' icon. If text has already
been selected, the selection will be converted to a numbered list. Each consecutive click
will toggle this function on and off.
Decrease Indent
To decrease indent of a paragraph, click the 'Decrease Indent' icon. Each consecutive
click will move text further to the left
Increase Indent
To increase indent of a paragraph, click the 'Increase Indent' icon. Each consecutive
click will move text further to the right.
Superscript
To convert text to superscript (vertically aligned higher): Select the desired portion of
text and click the 'Superscript' icon. Each consecutive click will toggle this function on
and off.
Subscript
To convert text to subscript (vertically aligned lower): Select the desired portion of text
and click the 'Subscript' icon. Each consecutive click will toggle this function on and
off.
Align Left
To align to the left, make a selection in the document and click the 'Align Left' icon.
Align Center
To align to the center, make a selection in the document and click the 'Align Center'
icon.
Align Right
To align to the right, make a selection in the document and click the 'Align Right' icon.
MWEB Business
www.mwebbusiness.co.za
22
Version: 02/061004
Copyright © MWEB Business
Courier 2
User Manual
Justify
To justify a paragraph or text, make a selection in the document and click the 'Justify'
icon.
Insert Horizontal Line
To insert a horizontal line, select the location to insert the line and click the 'Insert
Horizontal Line' icon.
Create or Modify Link
To create a hyperlink, select the text or image to create the link on, then click the
'Create or Modify Link' icon. ('Link Information') will contain existing link information, if
the object you selected already had a link. You can also type the full URL of the page
you want to link to in the URL text box. You can also enter the target window
information (optional) and an anchor name (if linking to an anchor - optional).
When finished, click the 'Insert Link' button to insert the HyperLink you just created, or
click 'Remove Link' to remove an existing link. Clicking 'Cancel' will close the window
and take you back to the editor.
To modify an existing hyperlink, select the link and click on the 'Create or Modify Link'
icon. The HyperLink window will appear. Make your changes and select the 'Insert
Link' button. Select the remove link to remove an existing link.
Insert / Modify Anchor
To insert an anchor, select a desired spot on the web page you are editing and click
the 'Insert / Modify Anchor' icon. In the dialogue box, type the name for the anchor.
When finished, click the 'Insert Anchor' button to insert the anchor, or 'Cancel' to close
the box.
To modify an anchor select the Anchor (displayed as small yellow box when
Guidelines are switched on) and click the 'Insert / Modify Anchor' icon. Make your
changes and hit the 'Modify Anchor' button or click 'Cancel' to close the window.
Create Email Link
To create an email link, select text or an image on the web page you are editing
where you would like the link to appear. Click the 'Create Email Link' icon. In the
MWEB Business
www.mwebbusiness.co.za
23
Version: 02/061004
Copyright © MWEB Business
Courier 2
User Manual
dialogue box, type the email address for the link and the subject of the email.
When finished, click the 'Insert Link' button to insert the email link, or 'Cancel' to close
the box.
Font
To change the font of text, select the desired portion of text and click the 'Font' dropdown menu.
Select the desired font (choose from Default - Times New Roman, Arial, Verdana,
Tahoma, Courier New or Georgia).
Font Size
To change the size of text, select the desired portion of text and click the 'Size' dropdown menu.
Select the desired size (text size 1-7).
Format
To change the format of text, select the desired portion of text and click the 'Format'
drop-down menu.
Select the desired format (choose from Normal, Superscript, Subscript and H1-H6).
Style
To change the style of text, images, form objects, tables, table cells etc select the
desired element and click the 'Style' drop-down menu, which will display all styles
defined in the style-sheet.
Select the desired style from the menu.
Note: this function will not work if there is no style-sheet applied to the page.
Font Color
To change the colour of text, select the desired portion of text and click the 'Colour'
drop-down menu.
Select the desired colour from the large selection in the drop-down menu.
MWEB Business
www.mwebbusiness.co.za
24
Version: 02/061004
Copyright © MWEB Business
Courier 2
User Manual
Highlight Color
To change the highlighted colour of text, select the desired portion of text and click
the 'Highlight' drop-down menu.
Select the desired colour from the large selection in the drop-down menu.
Table Functions
To insert or modify a table or cell, select the 'Table Functions' icon to display a list of
available Table Functions.
If a Table Function is NOT available, you will need to select, or place your cursor
inside the table you wish to modify.
Insert Table
To insert a table, select the desired location, then click the 'Insert Table' icon.
A new window will pop-up with the following fields: Rows - number of rows in table;
Columns - number of columns in table; Width - width of table; BgColour - background
colour of table; Cell Padding - padding around cells; Cell Spacing - spacing between
cells and Border - border around cells.
Fill in table details then click the 'Insert Table' button to insert table, or click 'Cancel' to
go back to the editor.
Modify Table Properties
To modify table properties, select a table or click anywhere inside the table to modify,
then click the 'Modify Table Properties' icon.
A pop-up window will appear with the table's properties. Click the 'Modify Table
Properties' button to save your changes, or click 'Cancel' to go back to the editor.
Note: this function will not work if a table has not been selected.
Modify Cell Properties
To modify cell properties, click inside the cell to modify, then click the 'Modify Cell
Properties' icon.
MWEB Business
www.mwebbusiness.co.za
25
Version: 02/061004
Copyright © MWEB Business
Courier 2
User Manual
A pop-up window will appear with the cells' properties.
Click the 'Modify Form Properties' button to save your changes, or click 'Cancel' to go
back to the editor.
Note: this function will not work if a cell has not been selected and does not work
across multiple cells.
Insert Column to the Right
To insert a column to the right of your cursor, click inside cell after which to insert a
column, then click the 'Insert Column to the Right' icon.
Each consecutive click will insert another column after the selected cell.
Note: this function will not work if a cell has not been selected.
Insert Column to the Left
To insert column to the left of your cursor, click inside cell before which to insert a
column, then click the 'Insert Column to the Left' icon.
Each consecutive click will insert another column before the selected cell.
Note: this function will not work if a cell has not been selected
Insert Row Above
To insert row above, click inside cell above which to insert a row, then click the 'Insert
Row Above' icon.
Each consecutive click will insert another row above the selected cell.
Note: this function will not work if a cell has not been selected.
Insert Row Below
To insert row below, click inside cell below which to insert a row, then click the 'Insert
Row Below' icon.
Each consecutive click will insert another row below the selected cell.
Note: this function will not work if a cell has not been selected.
MWEB Business
www.mwebbusiness.co.za
26
Version: 02/061004
Copyright © MWEB Business
Courier 2
User Manual
Delete Row
To delete a row, click inside cell which is in the row to be deleted, then click the
'Delete Row' icon.
Note: this function will not work if a cell has not been selected.
Delete Column
To delete a column, click inside cell which is in the column to be deleted, then click
the 'Delete Column' icon.
Note: this function will not work if a cell has not been selected
Insert Column
To insert a column, click inside cell which is in the column to be inserted, then click
the 'Insert Column' icon.
Note: this function will not work if a cell has not been selected
Decrease Column Span
To decrease column span, click inside cell who's span is to be decreased, then click
the 'Decrease Column Span' icon.
Each consecutive click will further decrease the column span of the selected cell.
Note: this function will not work if a cell has not been select
Form Functions
To insert or modify a Form, select the 'Form Functions' icon to display a list of
available Form Functions.
If a Form Function is NOT available, you will need to place your cursor inside the
Form you wish to modify.
Insert Form
To insert a form, select desired position then click the 'Insert Form' icon.
A new window will pop-up with the following fields: Name - name of form; Action -
MWEB Business
www.mwebbusiness.co.za
27
Version: 02/061004
Copyright © MWEB Business
Courier 2
User Manual
location of script that processes the form and Method - post, get or none.
Fill in form details or leave blank for a blank form.
When finished, click the 'Insert Form' button to insert form, or click 'Cancel' to go
back to the editor.
Modify Form Properties
To modify form properties, click anywhere inside the form to modify, then click the
'Modify Form Properties' icon.
A pop-up window will appear with the form's properties.
Click the 'Modify Form Properties' button to save your changes, or click 'Cancel' to go
back to the editor. Note: this function will not work if a form has not been selected.
Insert / Modify Text Field
To insert a text field, select desired position then click the 'Insert/Modify Text Field'
icon.
A pop-up window will appear with the following attributes: Name - name of text field;
Character width - the width of the text field, in characters; Type - type of text field
(Text or Password); Initial value - initial text in field and Maximum characters maximum number of characters allowed.
Set the attributes then click the 'Insert Text Field' button to insert text field, or click
'Cancel' to go back to the editor.
To modify a text field's properties, select desired text field and click the 'Insert/Modify
Text Field' icon.
A pop-up window will appear with the text field's attributes.
Modify any attributes desired, then click the 'Modify Text Field' button to save
changes, or click 'Cancel' to go back to the editor.
MWEB Business
www.mwebbusiness.co.za
28
Version: 02/061004
Copyright © MWEB Business
Courier 2
User Manual
Insert / Modify Text Area
To insert a text area, select desired position then click the 'Insert/Modify Text Area'
icon
A pop-up window will appear with the following attributes: Name - name of text area;
Character width - the width of the text area, in characters; Initial value - initial text in
area and Lines - number of lines allowed in the text area.
Set the attributes then click the 'Insert Text Field' button to insert the text area, or click
'Cancel' to go back to the editor.
To modify a text area's properties, select desired text area and click the 'Insert/Modify
Text Area' icon.
A pop-up window will appear with the text area's attributes.
Modify any attributes desired, then click 'Modify Text Area' button to save changes, or
click 'Cancel' to go back to the editor.
Insert / Modify Hidden Area
To insert a hidden field, select desired position then click the 'Insert/Modify Hidden
Field' icon.
A pop-up window will appear with the following attributes: Name - name of hidden
field and Initial value - initial value of hidden field.
Set the attributes then click the 'Insert Hidden Field' button to insert the hidden field,
or click 'Cancel' to go back to the editor.
To modify a hidden field's properties, select desired hidden field and click the
'Insert/Modify Hidden Field' icon.
A pop-up window will appear with the hidden field's attributes.
Modify any attributes desired, then click 'Modify Hidden Field' button to save changes
or click 'Cancel' to go back to the editor.
MWEB Business
www.mwebbusiness.co.za
29
Version: 02/061004
Copyright © MWEB Business
Courier 2
User Manual
Insert / Modify Button
To insert a button, select desired position then click the 'Insert/Modify Button' icon.
A pop-up window will appear with the following attributes: Name - name of text area;
Type - type of button (Submit, Reset or Button) and Initial value - initial text on the
button.
Set the attributes then click 'Insert Button' to insert button, or click 'Cancel' to go back
to the editor.
To modify a button's properties, select desired button and click the 'Insert/Modify
Button' icon.
A pop-up window will appear with the button's attributes.
Modify any attributes desired, then click 'Modify Hidden Field' button to save changes
or click 'Cancel' to go back to the editor.
Insert / Modify Checkbos
To insert a checkbox, select desired position then click the 'Insert/Modify Checkbox'
icon.
A pop-up window will appear with the following attributes: Name - name of checkbox;
Initial state - checked or unchecked and Initial value - value of checkbox.
Set the attributes then click the 'Insert Checkbox' button to insert the checkbox, or
click 'Cancel' to go back to the editor.
To modify a checkbox' properties, select desired checkbox and click the 'Insert/Modify
Checkbox' icon.
A pop-up window will appear with the checkbox' attributes.
Modify any attributes desired, then click 'Modify Checkbox' button to save changes or
click 'Cancel' to go back to the editor.
MWEB Business
www.mwebbusiness.co.za
30
Version: 02/061004
Copyright © MWEB Business
Courier 2
User Manual
Insert / Modify Radio Button
To insert a radio button, select desired position then click the 'Insert/Modify Radio
Button' icon.
A pop-up window will appear with the following attributes: Name - name of radio
button; Initial state - checked or unchecked and Initial value - value of radio button.
Set the attributes then click 'Insert Radio Button' to insert the radio button, or click
'Cancel' to go back to the editor.
To modify a checkbox' properties, select desired checkbox and click the 'Insert/Modify
Radio Button' icon.
A pop-up window will appear with the checkbox' attributes.
Modify any attributes desired, then click 'Modify Radio Button' button to save changes
or click 'Cancel' to go back to the editor.
Insert / Modify Image
If an image is NOT selected, clicking this icon will open the Image Manager.
If an image IS selected, then clicking this icon will open the 'Modify Image Properties'
popup window.
To modify the image properties of the selected image, set the required attributes and
click the 'Modify Image Properties' button.
Insert Special Characters
To insert a special character, click the 'Insert Special Character' icon.
A pop-up window will appear with a list of special characters.
Click the icon of the character to insert into your webpage
Modify Page Properties
To modify page properties, click the 'Modify Page Properties' icon.
A pop-up window will appear with page attributes: Page Title - title of page;
MWEB Business
www.mwebbusiness.co.za
31
Version: 02/061004
Copyright © MWEB Business
Courier 2
User Manual
Description - description of page; Background Image - The URL of the image
curently set as the page background image; Keywords - keywords page is to be
recognized by; Background Colour - the background colour of page; Text Colour colour of text in page and Link Colour - the colour of links in page. When finished
modifying, click the 'Modify Page' button to save changes, or click 'Cancel' to go
back to the editor.
Clean up HTML Code
To clean HTML code, click the 'Clean HTML Code' icon.
This will remove any empty span and paragraph tags, all xml tags, all tags that have
a colon in the tag name (i.e. ) and remove style and class attributes.
This is useful when copying and pasting from Microsoft Word documents to remove
unnecessary HTML code.
Paste for Microsoft Word (Ctrl + D)
To Paste from Microsoft Word: Copy your desired text from Microsoft Word and
Click the drop down icon next to the Paste icon. Select the 'Paste from MS Word
Option'. This will remove the tags that Microsoft Word automatically places and
removes most formatting as well all in the one action.
Insert Custom HTML
There may be a list of available items to insert that you can preview and choose
from. This list will usually contain customized items in HTML such as logos and
formatted text specific to your site. To preview an item, click on the item in the list,
and the item will appear the preview field below. To select the item, click on it and
choose ‘insert HTML’.
Show / Hide Guidelines
To show or hide guidelines, click the 'Show/Hide Guidelines' icon.
This will toggle between displaying table and form guidelines and not showing any
guidelines at all.
Tables and cells will have a broken grey line around them, forms will have a broken
red line around them, while hidden fields will be a pink square when showing
guidelines.
Note that the status bar (at the bottom of the window) will reflect the guidelines mode
currently in use.
MWEB Business
www.mwebbusiness.co.za
32
Version: 02/061004
Copyright © MWEB Business
Courier 2
User Manual
Source Mode
To switch to source code editing mode, click the 'Source' button at the bottom of the
editor. This will switch to HTML code editng mode.
To switch back to WYSIWYG Editing, click the 'Edit' button at the bottom of the
editor.
This is recommended for advanced users only.
Preview Mode
To show a preview of the page being edited, click the 'Preview' button at the bottom
of the editor.
This is useful in previewing a file to see how it will look exactly in your browser,
before changes are saved.
To switch back to editing mode, click the 'Edit' button at the bottom of the editor.
Image Manager
The Image Manager is where you can preview, insert, delete and upload your image
files.
You can perform general maintenance on your images from the Image Manager –
insert, set as background, upload, view, and delete images.
Viewing an Image
To view an image, select the desired image and click on the 'View' link.
The image will be shown in a pop-up window in it's full size.
Close the window to return to the Image Manager.
Inserting an Image
To insert an image, click the 'Insert' link in the image browser next to the image to be
inserted.
Deleting an Image
To delete, select the desired image and click on the 'Delete' link.
You will be prompted for confirmation of the deletion.
If you are sure you wish to delete the selected image, click 'OK'.
Clicking on 'Cancel' will take you back to the Image Manager.
MWEB Business
www.mwebbusiness.co.za
33
Version: 02/061004
Copyright © MWEB Business
Courier 2
User Manual
Uploading an Image
To upload an image, click the 'Browse' button to open a 'Choose File' box that allows
you to select a local image to upload.
Once the file has been selected, click 'OK' to begin uploading the file, or click
'Cancel' to be taken back to the Image Manager. Upon successful upload of the
image, it will appear in the Image Manager.
3.3 Creating text content for a template
1.
On the “Manage Templates” page, click on the “Text Editor” icon next to the template to
which you would like to add content to
2.
The Text Editor window will open
3.
Create your text content in the Text Editor
4.
When you are satisfied with the look of the content, click on the “Submit” button at the
bottom of the screen
5.
You will be directed back to the “Manage Templates” page
3.4 Creating SMS content for a template
1.
On the “Manage Templates” page, click on the “SMS Editor” icon next to the template to
which you would like to add content to
2.
The SMS Editor window will open
3.
Create your text content in the SMS Editor
4.
When you are satisfied with the look of the content, click on the “Submit” button at the
bottom of the screen
5.
You will be directed back to the “Manage Templates” page
MWEB Business
www.mwebbusiness.co.za
34
Version: 02/061004
Copyright © MWEB Business
Courier 2
User Manual
Please note!
Attributes can be added as long as their values (i.e. the content which they represent) do not
exceed the 160 character limit. When adding the attributes and one of the values pushes the
character limit past 160 characters, the whole batch will be cancelled.
3.5 Uploading an HTML or text file:
1.
In order for you to upload an already created content template, go to the “Manage
Templates” page and type in the desired name of the template in the “Template Name”
box
2.
Type in the desired message subject in the “Subject” field
3.
Click on the “Go” button
4.
The newly created template will now appear in the template list at the bottom of the page
5.
Click on the “Edit Template” button which appears next to the template of choice
MWEB Business
www.mwebbusiness.co.za
35
Version: 02/061004
Copyright © MWEB Business
Courier 2
User Manual
6.
On the screen that follows, you’ll see the template name, the subject field of the message,
the date it was created/modified and the size of the content in the template
7.
Browse for the HTML file on your computer by clicking on the “Browse” button next to the
“HTML Body” text box. Browse for a text file on your computer by clicking on the “Browse”
button next to the “Text Body” text box. To Browse for the SMS body of your SMS message
click on the “Browse” button next to the “SMS Body” text box.
8.
Once the required file has been found, click on the “Upload” button next to the appropriate
text box
9.
The size of the message will now be displayed in the “Message Size” row
10. If you want to add an attachment to this message, browse for the file on your computer by
clicking on the “Browse” button next to the “Add Attachment” text box
11. Once the required file has been found, click on the “Upload” button below the text box
12. Click on the “Submit” button to return to the “Manage Templates” page
3.6 Adding an attachment:
1.
On the “Manage Templates” page, click on the desired template name, which appears in the
template list, to which you would like to add an attachment
2.
On the screen that follows, browse for the attachment file on your computer by clicking on
the “Browse” button next to the “Add Attachment” text box at the bottom of the screen
3.
Once the required file(s) have been found, click on the “Upload” button below the text box
4.
The size of the message will now be displayed in the “Size” column
5.
Click on the “Submit” button to return to the “Manage Templates” page
MWEB Business
www.mwebbusiness.co.za
36
Version: 02/061004
Copyright © MWEB Business
Courier 2
User Manual
3.7 Using Attributes In Templates:
Please note!
In order to insert attributes in templates, attributes must already have been created in the
relevant mailing list(s). The system will read the attributes pertaining to a specific mailing list.
Attributes can be used on new or existing templates. This feature applies to HTML, Text and
SMS content, although SMS content has a 160 character limit
1.
On the “Manage Templates” page, click on the “HTML Editor” icon next to the template to
which you would like to add attributes to
2.
The HTML Editor window will open
3.
Move the mouse cursor next to the word in your content copy where you would like to place
the attribute i.e. next to “Dear…”
4.
Click on the “Attributes” icon (number 2) at the top left of the screen
MWEB Business
www.mwebbusiness.co.za
37
Version: 02/061004
Copyright © MWEB Business
Courier 2
User Manual
5.
An attributes window will appear with system attributes and a list attributes drop down men
6.
If you want to make use of a system attribute, click on the “Copy and Paste Tag” next to the
relevant attribute
7.
If you want to make use of list attributes, select the relevant list from the “List Tags From”
drop down menu
8.
After selecting the relevant list, all the created attributes in the specific list will be displayed
below
9.
Click on the “Copy and Paste Tag” next to the relevant attribute you would like to insert
10. The selected attribute will automatically be inserted next to the mouse cursor in the content
copy
11. To add another attribute, follow the same process as before
12. After you have finished adding the attributes, click on the “Preview” tab (number 6) at the
bottom of the HTML editor window to view the finished content template
13. When you are satisfied with the look of the content, click on the “Save” (number 1) button at
the top left corner of the screen
14. Close the HTML Editor
15. You will be directed back to the “Manage Templates” page
3.8 Editing a sample template:
1.
On the “Manage Templates” page, tick the “Copy” box next to the sample template which
you would like to edit
2.
Type in the desired name for the new template in the “Name” box
3.
Type in the desired message subject in the “Subject” field
MWEB Business
www.mwebbusiness.co.za
38
Version: 02/061004
Copyright © MWEB Business
Courier 2
User Manual
4.
Tick the “Make Copy of Selected Template” box next to the “Name” text box
5.
Click on the “Go” button
6.
An exact copy of the sample template will now appear in the template list at the bottom of
the page
7.
Click on the “HTML Editor” button next to the copy of the sample template
8.
The HTML Editor window will pop-up where you can make the required changes
9.
Click on the “Save” icon at the top left of the window after you have made the required
changes to the template
10. Close the HTML Editor window
11. You will be returned to the “Manage Templates” page
3.9 Editing a template:
On the “Manage Templates” page, go to the template list at the bottom of the page
1. Changes to a template name, subject or attachment:
2.
1.
Please click on the template name in the template list
2.
Make the required changes
3.
After you have made the required changes, click on the “Submit” button
4.
You will be directed back to the “Manage Templates” page
Changes to the HTML content:
1.
Click on the “HTML Editor” icon next to the desired template
2.
The HTML Editor window will open
MWEB Business
www.mwebbusiness.co.za
39
Version: 02/061004
Copyright © MWEB Business
Courier 2
User Manual
3.
Make the required changes to the template
4.
Click on the “Save” icon at the top left of the window after you have made the required
changes to the template
3.
5.
Close the HTML Editor window
6.
You will be directed back to the “Manage Templates” page
Changes to the Text content:
1.
Click on the “Text Editor” icon next to the desired template
2.
The Text Editor window will open
3.
Make the required changes to the template
4.
When you are satisfied with the look of the content, click on the “Submit” button at the
bottom of the screen
5.
4.
You will be directed back to the “Manage Templates” page
Changes to the SMS content:
6.
Click on the “SMS Editor” icon next to the desired template
7.
The SMS Editor window will open
8.
Make the required changes to the template
9.
When you are satisfied with the look of the content, click on the “Submit” button at the
bottom of the screen
10. You will be directed back to the “Manage Templates” page
MWEB Business
www.mwebbusiness.co.za
40
Version: 02/061004
Copyright © MWEB Business
Courier 2
User Manual
3.10 Deleting a template:
1.
In order to delete a template, go to the “Manage Templates” page
2.
Click on the “Delete” icon next to the template which you would like to delete
3.
The template will be deleted and the template list updated accordingly
MWEB Business
www.mwebbusiness.co.za
41
Version: 02/061004
Copyright © MWEB Business
Courier 2
User Manual
4. MANAGE BATCHES FUNCTION
The “Manage Batches” feature only comes into action after an account holder has set up a mailing list(s)
and a template(s) and is ready to send a message to a selected list. This feature also allows for
management of loaded batches as well as the creation of new ones.
4.1 Creating a new email batch
Please note!
You must have set up at least one list and one template in order to make use of this feature
1.
On the “Manage Batches” page, either click on the hyperlinked name “Create a New Batch”
2.
You will be directed to the following page where you have to make the required selections
for the batch to be created
3.
Please go through each of the following steps and make sure that you are happy with the
selection:
MWEB Business
www.mwebbusiness.co.za
42
Version: 02/061004
Copyright © MWEB Business
Courier 2
User Manual
1. Batch Name:
Please type in the name that you would like the specific batch to be called in the text box
next to “Batch Name”.
2. Use Template:
Select the appropriate list from the “Use Template” drop down menu.
3. Sending Priority:
This section deals with the sending priorities associated with you email and or sms batch.
The section is broken down into three sections which enables you to perform the following:
•
Send to all Message Types (Send to HTML, TEXT and SMS enabled recipients
simultaneously)
•
You can also choose to prioritise which recipient base you would like to send your
communication to. This priority structures enables you to identify which recipient
base you would like to select as your first base, second base and third base, for
example: Send to HTML recipients first, then to TEXT recipients secondly and then
to SMS lastly.
MWEB Business
www.mwebbusiness.co.za
43
Version: 02/061004
Copyright © MWEB Business
Courier 2
User Manual
Please Note!
Should a recipient be enabled to receive an HTML, TEXT and SMS version of your
communication and also have the necessary contact details for each of these
services enabled, depending on the priority level selected, the Courier service will
only send the communication to the medium that has been selected as the first
medium to send to.
4. Use List:
Select the required template from the “Use List” drop down menu.
5. Reply-to Address:
If you require the “Reply-to Address” to be different than that of the account holder, you may
change it to another one
Please note: The email address must be from the same domain name i.e. if your email
address is [email protected], then you won’t be able to enter the email address
[email protected]
6. From Display Name:
You may change your “From Display Name” to anything that you prefer. By default it will be
the same name as your account name.
7. From Address:
You may change your “From Address” to anything that you prefer. By default it will be left
blank. The sub-domain name can not be changed.
8. Importance:
Select to flag the importance of an email being sent out. By default it will be on “Normal”.
9. Start Time and Date:
You can either choose to send your batch immediately (Within the next available time slot)
or you can select a start time and date by clicking on the “Calendar” icon. The earliest time
for a batch to be sent is 1 hour from the time of batch creation. This is to allow for the
system to load and calculate the number of batches to be sent. Batches can be scheduled
for any time in the future.
MWEB Business
www.mwebbusiness.co.za
44
Version: 02/061004
Copyright © MWEB Business
Courier 2
User Manual
Please note!
When you create a batch between 8:00 and 8:29, you will be able to schedule and send it
at 9:00 already. If you however load it after 8:29, the earliest time you would be able to
schedule it is at 10:00. The system can not work in increments of 30 minutes, only 1 hour
increments. This means that the system can only go 9:00, 10:00, 11:00, 12:00 etc. and not
9:30, 10:30, 11:30, 12:30 etc.
10. Remove Duplicates:
You may select to have duplicate email addresses “removed” from the list used in this
batch.
Please note!
Email addresses at this level are only “ignored” and are not physically removed from the
original list. This type of “removal” only takes place on the batch level
11. Enable View Track:
By enabling this you will be able to see the number of times the message have been read.
12. Enable Link Track:
By enabling link tracking the system will calculate the number of times recipients have
clicked on the links in the message. Each link is calculated separately and can be
downloaded as a CSV file after 7 days.
13. Enable Unsubscribe Link:
This feature is by default enabled in order to comply with the ECT Act of South Africa. The
Act states that all email sent to recipients must contain an unsubscribe link should the
recipient decide not to receive the email anymore.
14. Embedded Images:
When enabling this feature, the images would be visible whether the recipient is online or
offline. It will however increase the size of a mail message considerably since the images
are saved in the message body. Otherwise the images will be stored on a web server and
will only be visible when the recipient is viewing the message online.
MWEB Business
www.mwebbusiness.co.za
45
Version: 02/061004
Copyright © MWEB Business
Courier 2
User Manual
15. Delivery Failure Action:
This feature allows you to decide what should be done with emails which bounce back due
to an email address that doesn’t seem to exist. You have the option for them to be
automatically deleted, deactivated or not to take any action at all.
16. Quick Text:
This feature allows for you to add a last minute attribute value. When you set up a template
and need to put in a date, but you are not sure about the correct date at the time of
compiling the template, then you may insert a quick text attribute (found under “System
Attributes”) so that when you load the batch you may enter the text for that attribute. It will
then immediately replace the attribute with the appropriate text.
Once you have made your selection, click on the “Submit” button to continue.
4.
After you have made your selection, please click on “Submit” to continue
5.
The next page will allow you to test your batch and confirm the batch to be sent
MWEB Business
www.mwebbusiness.co.za
46
Version: 02/061004
Copyright © MWEB Business
Courier 2
User Manual
1. Batch Name:
Name of the batch to be tested and or sent
2. Batch ID:
This is the ID number of the given batch
3. Batch Status:
This represents the status of the batch sending
4. Selected Template to Use :
This is the name of the selected template that will be used
5. Template ID:
This is the ID number of the template
6. Selected List to Use :
This is the name of the selected list that will be used
7. List ID:
The is the ID number of the given list
MWEB Business
www.mwebbusiness.co.za
47
Version: 02/061004
Copyright © MWEB Business
Courier 2
User Manual
8. This Batch is scheduled to be sent at:
This field represents the selected date and time at which the batch needs to be sent
9. Message Template Sizes:
This field represents the template types and template sizes that are going to used in the
batch
10. Message type sending priority:
This field presents the sending priority of your email and sms messages
11. Additional sizes:
This field represents the sizes of additional content attached to the batch (attachments,
embedded images and quick text)
12. Additional email settings:
This field represents additional email settings such as reply-to-address, from display
name, from address, importance level, removal of duplicates (duplicate email entries in your
list), enable view track (view the number of recipients that have read your email message),
enable link track (view the number of recipients have clicked on the redirect links in your
email message), enable unsubscribe link ( a link that offers recipients the option to
unsubscribe to the email message), embedded images (images from an alternative source
embedded in the body of the email)
13. Projected recipient breakdown:
This field displays a structured breakdown of what type of message your recipients are
going to receive and whether they are successful, deactivated or blocked. The field also
identifies how many of your recipients have duplicated entries on your list and what the
original list count is
14. Total batch sizes:
This field gives you an indication of the types of batches you have selected to be sent and
the sizes of each batch respectively. The field also indicates the Batch usage cost.
14. Tested:
This field indicates whether the selected batch/es have been tested yet or not
MWEB Business
www.mwebbusiness.co.za
48
Version: 02/061004
Copyright © MWEB Business
Courier 2
User Manual
It is recommended that every batch is tested before being sent out. This will allow you to
pick up any problems with emails before sending them out to the recipient list
6.
After you have made sure that the details are correct and that the batch size is acceptable,
then click on the “Confirm Batch” button to accept the batch and continue. If you are not
happy with the batch for whatever reason, click on the “Cancel and Delete Batch” button to
delete the batch
Please note!
If you have not clicked on the confirm batch button and exit the browser window, then that
batch’s status will remain as “Pending Confirmation”. You may click on this batch at a later
stage to reschedule and confirm for sending
MWEB Business
www.mwebbusiness.co.za
49
Version: 02/061004
Copyright © MWEB Business
Courier 2
User Manual
5. ACCOUNT SETTINGS
5.1
Changing Your Account Properties:
1.
On the “Manage Account” page, select the “Account Properties” box from the “Account
Settings” menu
1. Account Key:
Your account’s unique number in the database (office use only – changes can not be made
by account holder or user)
2. Account Name:
The name of your account
3. Belongs To:
The email address of the account holder that this account belongs to (office use only –
changes can not be made by account holder or user)
MWEB Business
www.mwebbusiness.co.za
50
Version: 02/061004
Copyright © MWEB Business
Courier 2
User Manual
4. Sender’s Domain:
This is your created sub-domain from which all future message will be sent from (office use
only – changes can not be made by account holder or user)
5. Type:
This is the type of service you are making use of (office use only – changes can not be
made by account holder or user)
6. Expiry Date:
This is the date at which your account will expire unless changed (office use only – changes
can not be made by account holder or user)
7. Suspend:
When an account or additional usage has not been paid, the account will be suspended
(office use only – changes can not be made by account holder or user)
8. Traffic / SMS Cost:
This is the price at which additional email traffic / SMS’s will be charged (office use only –
changes can not be made by account holder or user)
9. Standard Traffic / SMS’s:
This is the traffic / SMS limit included in the chosen package. When this limit has been
exceeded additional usage will be charged at the set amount in point 8 (office use only –
changes can not be made by account holder or user)
10. My Traffic / SMS Warning:
This is a warning that will notify you that the limit which you have specified here has been
reached
11. My Traffic / SMS Limit:
This is a warning that will notify you that the limit which you have specified here has been
reached
12. System Traffic / SMS Limit:
This is a system limit which is implemented per month and can not be exceeded. To change
this you would need to speak to the ASP administrator (office use only – changes can not
be made by account holder or user)
MWEB Business
www.mwebbusiness.co.za
51
Version: 02/061004
Copyright © MWEB Business
Courier 2
User Manual
13. Oracle Customer No:
This is your MWEB Business customer number (office use only – changes can not be made
by account holder or user)
2.
On the page that follows, you may change your “Account Name”, “My Traffic Warning” and
“My Traffic Limit”
3.
Your “My Traffic Warning” is the limit that you set to warn you that you are getting closer to
your “My Traffic Limit”
4.
Your “My Traffic / SMS Limit” is the maximum amount of email that you may send per
month. This traffic limit can not be more than the “System Traffic / SMS Limit”. If you need
the system traffic limit changed, please chat to your sales consultant
5.
After you have made the necessary changes, click on the “Submit” button to return to the
“Manage Account” page.
5.2
Creating an Account User:
1.
On the “Manage Account” page, select the “Account Users” box from the “Account Settings”
menu
2.
On the page which follows, click on the “Add an Account User” button
3.
Type in the email address of the new user
4.
Type in the full name of the new account user
MWEB Business
www.mwebbusiness.co.za
52
Version: 02/061004
Copyright © MWEB Business
Courier 2
User Manual
5.
Select whether or not to send a notification email to the newly created account user to
inform him/her of their new account on Courier
6.
Enter the cellular number for the user
7.
Click on the “Submit” button to return to the “Manage Account” page
Contact Information
Should you experience any difficulty understanding the processes as explained in this manual, please feel free
to call:
MWEB Business Customer Care
0860 100 154 (24 hours)
or
Email ([email protected])
MWEB Business
www.mwebbusiness.co.za
53
Version: 02/061004
Copyright © MWEB Business

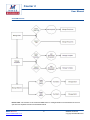
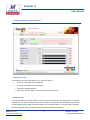

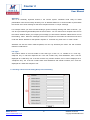

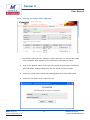
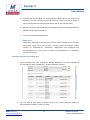
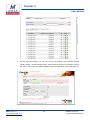


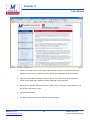


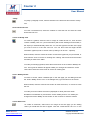


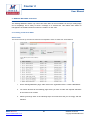
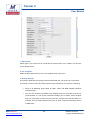


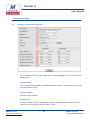

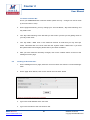

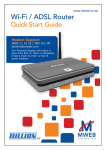
![CURSA [1ex] Catalogue and Table Manipulation](http://vs1.manualzilla.com/store/data/005911996_1-56034bbec42ed74359b0b23f04aae37f-150x150.png)