1
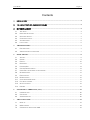
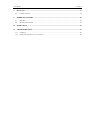
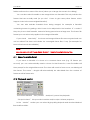
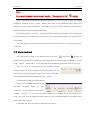
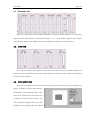
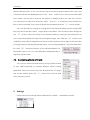
User Manual
Page: 2
User Manual
Contents
1
INSTALLATION .............................................................................................................................................4
2
THE 4 MAIN PARTS OF LASER CONTROLLER.........................................................................................4
3
EDITOR/FRAMELISTS...................................................................................................................................4
4
5
6
7
3.1
THE TOOLS..............................................................................................................................................4
3.2
BACKGROUND IMAGES ...........................................................................................................................5
3.3
SELECTING OBJECTS ................................................................................................................................5
3.4
CHANGING COLOR ................................................................................................................................5
3.5
ACCENTUATION ......................................................................................................................................6
3.6
LOCAL MENU ..........................................................................................................................................6
THE FRAME AREA....................................................................................................................................7
4.1
EDIT FRAME LISTS ......................................................................................................................................7
4.2
ADDING FRAMES TO YOUR SHOW ............................................................................................................7
SHOW EDITOR...........................................................................................................................................8
5.1
TRACKS ..................................................................................................................................................8
5.2
SCENES ...................................................................................................................................................8
5.3
EFFECTS .................................................................................................................................................10
5.4
ROTATIONS............................................................................................................................................11
5.5
POSITION/SIZE .......................................................................................................................................12
5.6
COLOR/INTENSITY EFFECTS ....................................................................................................................12
5.7
COMPOSE A SHOW FROM MULTIPLE SCENES ..........................................................................................13
5.8
OVERVIEW AREA ...................................................................................................................................15
5.9
EFFECT TRACKS ......................................................................................................................................15
5.10
RELEASE SHOWS ....................................................................................................................................16
5.11
SHOW FROM ILDA FILELIST.....................................................................................................................17
5.12
PLAYBACK CONTROL ............................................................................................................................17
5.13
MUSIC PLAYBACK..................................................................................................................................18
5.14
PREVIEW ...............................................................................................................................................19
GEOMETRIC CORRECTION (UGC)....................................................................................................19
6.1
GEOMETRY TAB ....................................................................................................................................20
6.2
COLOR TAB ...........................................................................................................................................20
6.3
ATTENUATION TAB..................................................................................................................................20
THE LIVE PLAYER .................................................................................................................................21
7.1
EFFECTS ...............................................................................................................................................21
7.2
MIDI CONTROL .....................................................................................................................................22
7.3
CONTROLLING EFFECTS WITH MIDI ........................................................................................................23
User Manual
8
SETTINGS..................................................................................................................................................23
8.1
9
Page: 3
OTHER SETTINGS ..................................................................................................................................24
HARDWARE SUPPORT ..........................................................................................................................25
9.1
DRIVERS ...............................................................................................................................................25
9.2
MULTIPLE PROJECTORS ..........................................................................................................................26
10
KNOWN BUGS..........................................................................................................................................26
11
TROUBLESHOOTING ............................................................................................................................26
11.1
GENERAL ..............................................................................................................................................26
11.2
PROBLEMS WITH MUSIC VISUALIZATION ...............................................................................................26
Page: 4
User Manual
1
Installation
Start the program setup.exe from the CD.
Note:
Win98 will ask for a driver. Cancel the installation, and then start Laser Controller. You
may have to restart the computer to activate the driver.
If you have problems during installation, see section “troubleshooting” below.
Windows® and TrueType® are registered trademarks of Microsoft.
2
The 4 main parts of Laser Controller
Preview
Editor/
Framelists
Show Editor
Scene/Effects
3
3.1
Editor/Framelists
The tools
Rectangle, eclipse, line
click and drag.
Page: 5
User Manual
Polyline, Bspline
Free hand
left click for each point, right click to set last point.
press left mouse button and drag.
Press the ctrl key to round the current coordinates to multiples of 100.
When finished drawing, the object is selected and the tool “Select” is activated. If
you want to draw multiple objects of the same kind, you can hold down the shift key
while clicking the tool button. It is then locked until you select another tool. You can
click on the canvas to
invert this behavior in the settings; see below Text, beam
position.
3.2
Background images
You can load a background image by clicking on the
creating logos. Turn the background image on/off with
3.3
button. This is useful when
the button.
Selecting objects
Click on, or close to, the object (at a corner point or the lines in between) to select
objects. You can drag an object to another place, or change the shape by dragging
the markers at the corners. When you hold down the alt key while selecting an object
you can change the size of the object (e.g. polylines).
You can centre selected objects (e.g. text) from the local menu (right mouse button).
To select/unselect multiple objects hold down the ctrl-key.
You can group objects by pressing the “group objects” button. Ungroup with the
“ungroup objects” button.
To select a single object within a group hold down the shift key.
Copy/cut/paste objects with the buttons above the layer list.
If you select a text object you can edit the text, or change the font.
3.4
Changing color
Color selected objects by clicking a color on the color
User Manual
Page: 6
pick. The color in the top left corner is black, by coloring objects (or parts of them) black,
they will be blanked.
Double click to change a color. You can save / load a palette from the local menu
(right mouse button) of the color pick area.
The selected color stays active, new objects will be drawn in the active color.
If you want to color only parts of the frame use the “Select rectangle”
tool to
select a rectangular region, and then click on a color.
3.5
Accentuation
Change the value to increase the brightness of line points along
an object.
Press the “pick color” button then a color on the color pick (see above) to change
the color of these points.
Tip:
select an accentuation color, and then change the object to black if you want to
show only the intermediate points.
Changing the accentuation of beams will increase the time the beam is displayed, it
will then appear brighter.
3.6
Local menu
You can also use background images to recolor objects. In the folder “colors” of
the program folder you will find example background images. When the background
image is loaded select “Recolor from background” from the local menu (right mouse
button) of the editor area. If no selection is active all objects will be recolored. You can
select objects and/or regions, to recolor the selected objects/regions/regions of the
selected objects only.
You can centre selected objects by choosing “Center objects” from the local
menu.
“Copy point” from the local menu annotates a point from the selected objects or
the current location for later use in the show editor, for example as rotation centers.
User Manual
4
4.1
Page: 7
The frame area
Edit frame lists
The frame area shows all the frames in the current frame list. Right click on a frame,
or use the menu, to add/delete/clear frames or open/save frame lists.
Double click on a frame to open it in the editor.
You can copy/paste frames between frame lists. To select the frames click on the
start frame, then hold shift and click on the end frame, the selected frames are marked
with red frame numbers. To copy/paste click the right mouse button.
Use Ctrl+Tab and Shift+Ctrl+Tab, or the arrow buttons (see picture), to
move to the next/previous frame list. Ctrl+F4, or the cross button, close the
current framelist.
4.2
Adding frames to your show
Drag a frame to a scene/track to include the frame in the current
show. To add multiple frames, add one as described before then
adjust the frames start/end value of the scene to the desired values.
As an alternative you can select a sequence of frames (click on the
first frame, then hold shift and click on the last frame) and drag the
whole sequence to a scene or an empty part of a track. The frames
that are currently used in the selected scene are marked with a red frame in the frame
list, selected frames have red numbers. Change the repeat value if you want to repeat
the frame sequence more then once in the scene.
Frames are saved in the .FRA format. This format saves the object information. You
can also save in ILDA (.ild) or older frame formats (.FL*). The object information will then
be lost; the frames are saved as an (unstructured) list of points. Use this option to export to
other editors or for playback on the live player.
To export complete shows use the “Save output to file” button (see “Preview”
further below).
Page: 8
User Manual
5
Show editor
A show is a collection of scenes. Scenes can be added onto tracks that are shown
on the timeline:
5.1
Tracks
On start up you will see one track on the timeline (the white rectangle).
To add tracks use
To select a track click on the text to the left of it (“Std.
projector” in the image below.) The text of the selected track will be displayed on white
background.
The checkbox to the left controls visibility of the track, uncheck to temporarily disable
the track.
5.2
Scenes
To add a scene to the timeline use.
The scene will be added on the leftmost empty spot of the selected track and will be
1 second long. You can also add a scene by dropping a frame onto the timeline. The
frame will then automatically become the start frame of that scene.
A scene can contain frames from the open frame lists or text (both static and
scrolling).
The buttons on the bottom right let you select the type of scene:
Pause: nothing will be displayed. Use this to temporarily disable a scene.
Play frames: the scene will display the frames sequentially from start to end value.
Page: 9
User Manual
Morph start to end: the scene will morph start to end frame, ignoring all frames in
between (in case the frames you want to morph are not consecutive in your frame list).
Morph all frames: the scene will morph each two consecutive frames, from start to
end value.
See “Frame area” above on how to add frames to scenes.
Text: you can enter text in the text area below the
buttons and select whether the text should be scrolling
or static.
For scrolling text you can adjust the speed with the
slider either relative to the scene’s length (a value of
10 means once from right to left, -20 2 times from left to right, etc.), or absolute (so if you
change the length of the scene the scrolling speed won’t change). For static text the
slider will change the horizontal position of the text. The options “scroll” and “absolute”
will not be visible when the laser controller window is very small, you can change them
from the local menu in the text edit field.
To change the font click
(for TrueType® fonts) or
for simple fonts from our
older LaserPainter software. Currently the same font will be used for all scenes displaying
text.
Clock: displays the current time.
Comment: no display, text is show on the timeline. Use this to mark sections in your
show.
Each scene has a position and length on the track, which is
shown on the lower left of the screen. Adjust the values with the spin
edits, or drag the scene or its borders to the desired values. Holding
the Ctrl key while dragging a scene or its start/end will snap the
values to the tick marks.
To select a scene simply click on it. Select multiple scenes with
ctrl. Selected scenes can be saved from the local menu.
Page: 10
User Manual
Tip:
From the local menu (right mouse button) a selected scenes can be saved as a show.
From there you can also load a show into the current show. That way you can
copy/paste scene sequences between shows.
With the spin edit “timeline” you can change the length of the timeline.
5.3
Effects
The content of each scene can be manipulated by assigning effects. The effect
editor appears underneath the timeline when a scene is selected.
The tab labeled GEO contains adjustments for rotations, size, and position of the
scene, each with a start and end value. The scene content will smoothly change from
start to end value over its duration.
To lock start/end value while changing, hold shift key while changing the start value.
To repeat the effect more than once adjust the “Rep” spin edit next to that value pair.
Double clicking the rotation handles sets the value to 90, 180, 270, 360 degrees if the
value was 0, 90, 180, 270 degrees respectively, and to 0 otherwise. Holding the shift key
will turn counter clockwise (negative angles). Holding the Ctrl key when changing will
round the values to multiples of 5 degrees.
Double clicking the move/size areas will rest the size to 100/100% if it was changed,
otherwise the position will be set to 0/0. (So two double clicks will reset the values.)
Click on the
below.
Button to change Move/scale controls to sliders, as in the image
User Manual
Page: 11
Double clicking the sliders (in the lower part, where the tick marks are) will reset the
values.
When you check smooth start (end) the effect will not start (end) abruptly, but will
slowly start and then accelerate (decelerate).
5.4
Rotations
The following example uses a small rectangle in the upper half of the
frame.
Let’s add a full rotation about z. The scenes will then look as
following:
To Change the centre of the rotation you can right click on the rotation handle.
From the menu select “center from selection”. This allows you to change the
rotation centre to the corner points or the centre of the currently selected object(s) in the
editor window. So, select the rectangle in the editor and use “center” form the local
menu of the rotation handle. The scene will look like this:
User Manual
5.5
Page: 12
Position/Size
To move the frames you drag the grey
areas in the Move/Scale area. For example,
to move the frame (the one we have
rotated in the example before) from top left
to bottom right:
If you drag the border of the grey areas
you can change the size of the frame:
5.6
Color/intensity effects
The tab labeled “COL” selects color and intensity effects for the selected scene.
Use the Fade in/out sliders to fade in/out the scene from/to black. The sliders show
percent of the scene length. Add a flashing by entering the desired on and of time,
values of 25/25 give one second on and one second off. Check “To” to change flashing
speed, values of 0/25 and 25/0 will start with a black scene, then increase flashing until
User Manual
Page: 13
the scene is permanently on. Check layers that you want to disable in the scene. With
the color morphed you can select a color range that is changed into another color
range. The settings in the image below select the whole range (second dial is turned one
time), to be morphed once around the color circle (the lower two dials are turned one
and two times respectively).
Tip:
You can select this setting (one complete morph) from the local menu (right mouse
button) of the dials. Also set the dials to zero from the local menu.
Draw in/out: select draw in out to turn on/off a scene point by point.
Recolor a scene: either rainbow or pick a single color. To pick
a color click the button, then select a color from the colors in the
frame editor. The button then will be reset, if you want to pick a
different color you will have to click it again. If you want to abort the
operation, press the button again. Re coloring rainbow can be repeated by changing
the value below the checkbox.
5.7
Compose a show from multiple scenes
Here we have our example from above copied to the second track and then
changed movement from bottom right to top left. An ellipse rotating around Y-axis with
movement and stretching. And a scrolling text together with it.
User Manual
Page: 14
Note:
when saving shows that use frames from the (unnamed) “editor” frame list, you
should first save the frame list. Otherwise the show has no reference to the frames,
and you will have to assign frames to scenes manually when reloading that show.
A selected scene can be copied/pasted. It will be pasted at the current time
position on the current track (to change these see below) if you use the paste button.
You can also right click and paste at the current mouse position.
You can select/unselect multiple scenes by holding the Ctrl button. Multiple scenes
can be moved or copied/pasted. Press Ctrl+A to select all scenes.
From the local menu you can swap/assign the start/end effects of a scene. This can
be helpful when copying scenes as in the following simple example:
We start with a simple rotation:
Copy the scene 3 times:
User Manual
Page: 15
Now from the local menu select “Change effects” and then “Set all to end vals”
for the second scene, “Reverse all effects” for the third and “Set all to start vals” for the
last scene.
Now we have a rotation to the right followed by a static picture, then rotation back,
and static again.
Scenes can overlap, although this is not recommended. When scenes overlap you
may not be able to access a scene by clicking it, you can use “Bring to front” and
“Send to back” from the local menu to change the stacking order of the scenes. You
can turn off scene overlap in the settings. Scenes then can only be moved to areas that
are large enough to hold the complete scene(s).
5.8
Overview area
Located above the track area there is an overview of the current show. Green lines
indicate scenes; the currently selected scene is shown in red. On the bottom and right a
white line shows the currently visible track area (the “ruler” below the tracks). A red line
on the bottom shows the area between begin/end marker. You can also click on the
overview to position the time marker. In the image above you can see one scene on
track one and 3 scenes (the second of which is selected) on track two. If there are more
than 7 tracks, the rest will not be displayed.
5.9
Effect tracks
You can add effect tracks and place effects on those independently from scenes.
This is quite helpful when a certain effect should span over more than one scene, or only
part of the scene.
Select the track for which you want to add an effect track (click on the label). Then
Page: 16
User Manual
add an effect track with the
Button, and then add an effect with the
Button.
The following picture shows an example with an effect reaching over two scenes:
Add single effects by clicking on the desired effect on the list on the right. In the
example 2 rotations were added. Use the check boxes below the effects to turn them off;
the checkbox on the left disables all effects. To delete effects use the local menu (right
mouse button).
5.10 Release shows
Normally a show is composed of frames
from different frame lists, and the show
keeps references to these with the full file
path on your computer (which may not exist
on a different computer). When you want to
give the show to someone else you can
create a releasable show (Menu/File). Laser
Controller then copies all the frame lists used
in the show, together with the show file, and
music file (when “ Include music ”
is
checked) into one folder, and replaces the
references to the original file paths to the
local folder “.\”.
The folder will be located in a folder named “release” of your Laser Controller
User Manual
Page: 17
folder and have the name of the show (unless you change the name in the dialog).
You can also select framelists to be merged into one framelist. This only includes the
frames that are actually used (so you don’t have to give away other frames which
happen to be in the same original framelist).
You can also exclude framelists from being merged, for example a framelist
containing beams to gratings, which have to be adjusted to the location. It’s easier if
they stay in one short framelist, instead of being spread over a large one. The frame file
format you can select only applies to the merged framelist.
If you check “read only” the show and merged frame file are encrypted and can
not be edited. This does not include the unmerged frame files, if any (for example for
beams that have to be editable).
Note:
you also can not edit these shows. So don’t delete the original show files.
5.11 Show from ILDA filelist
If you have a framelist of a show at a constant frame rate (e.g. 25 frames per
second), you can automatically create a show for that frame list, Laser Controller will
then prompt for the original frame rate. The show will consist of one scene, containing all
the frames. The scene’s length will automatically be calculated from the number of
frames and the frame rate.
5.12 Playback control
The buttons labeled “Play control” start/end / pause the playback.
“Output to laser” lets you select monitor and/or output to laser projector.
In the “Mode” section you can select high quality playback and whether blanked
lines shall be visible.
Page: 18
User Manual
Note:
If you want to export a show to use it, use the “Save output to file”
button.
When both play and pause buttons are pressed you can set and/or drag a position
marker by clicking on the “ruler” below the tracks or the overview area above the
tracks. If a song is selected about 1 second of the song will be played. You can press
Ctrl+B and Ctrl+E to set a begin/end marker.
The buttons in the “Source” section select the part of the timeline that is displayed:
All of the show, the currently selected scene, the current editor frame, or from start to
end marker.
You can add perspective, this only affects 3D frames, or when you rotate about the
x- or y axis.
5.13 Music playback
You can load a song to be played with the show.
Press the
button to
enable music playback. To delete the song right click on the song title and select “Clear
song”, select “Set marks” to set the begin/end marker to 0 and the end of the song.
You can press the space key to put markers on the
timeline while the show is played back. This allows you to
put scenes to specific positions along the music. The marks
will be displayed as black triangles on the “ruler”.
To delete the marks press Ctrl+space.
If you have installed Winamp in the
standard
program
folder
of
your
computer, or have Winamp plug-ins in
a folder “plug-ins” in the Laser Controller folder, you can display the waveform of the
song, as in the picture (Options/other options). See troubleshooting for problems with
newer Winamp versions.
If possible use .wav format to increase performance.
User Manual
Page: 19
5.14 Preview
If not in playback mode the preview area shows an overview of the frame editor.
When zoomed, as in the image above, you can drag the visible area; the visible area of
the frame editor will be adjusted accordingly.
Otherwise the preview area will display the current show when monitor output is
enabled. If you have set the show to be displayed on more than one physical projector,
you can select the output you want to preview from a list above the preview area.
6
Geometric correction (UGC)
Press one of the buttons to the left to enter the geometric (and
color) corrections.
To the left you can select the physical
projector for which the adjustments should
apply.
Here you can also change the orientation
of the output (e.g. for front/back projection).
Click “Rest values” to set all sliders to zero,
or “ Old values ” to restore the values at
program start.
User Manual
6.1
Page: 20
Geometry tab
Here you can adjust for geometric distortions of your projection plane. You can also
adjust the size and position. The button labeled “0” to the bottom right of each slider
pair sets both sliders to 0. Holding shift while adjusting scale locks the two sliders.
6.2
Color tab
Here you can adjust the minimum output level (in case one of your lasers needs a bit
more than 0V to start) and maximum output level (in case one of the colors is too bright)
of each color channel.
6.3
Attenuation tab
Here you can define areas where the output power is reduced (e.g. the audience
area). To define such an area draw a
rectangle in the drawing editor, then
enter the output level and press use.
A value of 0 turns of laser output. You
can combine multiple areas as in the
example to the right, here the effect
Page: 21
User Manual
of attenuation is smoothened by an additional area with less attenuation. You can turn
on the laser output, so you can directly see the area, but make sure that no one is in the
area while you are adjusting!
7
The live player
Click
to open the live player screen:
In the live player you can quickly switch laser output between pre loaded frame lists.
You can either use the function keys on your keyboard, the mouse, or a MIDI device
attached to your computer.
Use these buttons to close the live player, open frame
lists, and to load /save compilations of frame lists, including
effects.
7.1
Effects
You can add effects to the output: you can change size and position of the output
(the control to the right is applied before the rotations, the one to the left afterwards).
Page: 22
User Manual
You can also add rotations about the 3 axis, either with the sliders, or with your
computer
keyboard.
The x, y,
and
z
key
add rotations
about
the
respective
axis, pressing
again will increase the rotation speed. Holding the shift while pressing the keys decreases
the speed, control key resets the rotation. The threshold value to the right of the sliders
changes the stepping angle between rotations by 15°, e.g. a value of 3 lets the picture
rotate in steps of 90°.
Pressing r (changing the PicRep slider) increases the frame repeat rate, thus slowing
down the speed of the animations.
Pressing s (changing the Sin X slider) adds a sine wave, pressing again increases the
speed.
For both the modifier keys (shift and control) work as described above.
You can recolor the frames selecting a single color from the color circle, or applying
rainbow colors. Flash adds flashing.
7.2
MIDI control
Check the Midi device checkbox to activate MIDI control. You can select
responding to a
single or any MIDI
channel. When enabled you can select your input device from the list.
Pressing a key on the MIDI keyboard starts output of a frame list. The output stops
when the key is released. When hold is checked output continues until you start a new
frame list. The key representing the MIDI note 0 stops output, the notes 1..48 start the
corresponding frame lists. Counting then starts again (49=stop, 50 first frame list, etc.).
User Manual
Page: 23
Offset shifts the notes, so you can set the start to the left of your keyboard. The note and
channel received are displayed next to the “Key” label, so you can see whether MIDI
input works, and on which channel the device is sending. When you click the L button
you can teach in offset and channel (unless “any ch.” is checked): Press the leftmost
key on your keyboard. If you want to abort the operation press the “L” button again.
You can also select a range or a single slot in the frame list table and the assign MIDI
keys for these frame lists. Select “assign keys to framelists” form the drop down list right to
the “P” button, select the slot(s) in the frame list table (use shift plus the arrow keys on
your computer keyboard to select a rectangular range), then click the “P” button, and
a MIDI key. Keys will be assigned from top to bottom and then left to right to the selection.
To assign a key for stopping playback select “Key to stop playback” from the dropdown
list, click “P” and press the key on the MIDI keyboard. The
keyboard layout can be saved/loaded independently or
together with a session.
7.3
Controlling effects with MIDI
You can use the Pitch bend and (up to six) Control wheels
of your MIDI keyboard to change different effects during
playback. Select the effect from the dropdown list. To assign
the control wheels, press the “L” button left to the list and
then move the wheel.
8
Settings
Color and output settings will be explained in chapter “Hardware support”.
Page: 24
User Manual
8.1
Other settings
Break up native frames:
when checked point oriented
frames
(.ild,
separated
.fra)
will
into
be
different
objects at blanking points, if
not they will be treated as
one
object
memory).
(needs
Has
no
less
effect
on .fra frames.
Interpolate blanking: long
blanking
jumps
will
be
interpolated. (Point oriented
frames (.ild, .fra) only.)
Auto scroll: the timeline
will scroll to the right when
playback reaches the end of
the visible area.
Use UGC when exporting: when checked the “save output to file” function will use
the current UGC settings.
No scene overlap: when checked a scene moved over another will not overlap, but
stop when reaching that scene (and jump over it when moved far enough).
Paste scenes relative: when checked scenes will be pasted (from the local menu) on
the track under the mouse pointer, if not on the track where they were copied from.
Show framelist: when checked clicking a scene will change the frame list tab to the
frame list that is used in that scene.
Close framelists: when checked closing a show/opening a new show will close all
current frame lists.
Create backups: when checked saving framelists/shows will create a copy of the
old show (same file extension with a leading “~”).
Page: 25
User Manual
Auto lock zoom in: when checked the “zoom in” tool will stay selected until another
tool is selected.
Auto lock tools: when checked (frame editor) tools stay selected until you select a
different one. (Shift will force “one shot mode”.)
Use Winamp: uses Winamp (if installed) instead of Windows Mediaplayer for music
playback.
Visualize music: use winamp plug-ins to display the waveform of the song. (See
troubleshooting for problems with newer Winamp versions.)
Default framelist format: use this format if not otherwise specified.
Redraw delay: on older PCs redrawing the timeline when scrolling may occur too
soon, so that scrolling is interrupted. Increase this value if you have this problem.
Invert blanking: well guess.
Analog blanking: if your laser supports analog blanking, fading will be output to the
blanking port.
Map intensity: colors will be translated into different shades of intensity on the
blanking port.
9
9.1
Hardware support
Drivers
You must select the output device
“USB-Box”
from
“Settings/Output
output to laser.
Output
device
settings”
in
before
Page: 26
User Manual
9.2
Multiple projectors
To use multiple projectors select the tracks
you want to assign to
a different projector.
Then right click on
the track label (“Std.
projector ” ) and select “ Change logical
projectors”. In the dialog enter a name for the
logical projector and assign it to the tracks. Then
select an output device/channel and assign it to
the logical projectors. This two step assignment lets you easily change the assignment if
the number of projectors changes. The names of the logical projectors will be displayed
on the track label.
10 Known bugs
Win ME/98: tracks are not displayed correctly when zoomed in/out.
Windows Vista: can’t work in this OS.
Undo isn’t working correctly.
11 Troubleshooting
11.1 General
Make sure you have the latest Windows updates.
If possible, try on a different computer.
11.2 Problems with music visualization
Laser Controller uses the input plug-ins of Winamp to visualize music, if Winamp is
installed on your computer. Unfortunately newer plug-ins requires additional .DLLs, that is
not within the normal search path of Windows, or cause other errors when used by other
programs. Therefore you may receive error messages about missing DLLs, after you turn
on music visualization (in “Settings.../Other settings”). There are two ways to fix this:
User Manual
Page: 27
Copy the DLLs that are missing from the Winamp to the Laser Controller program
folder. If you still get error messages (especially other than missing DLLs), you can create
a folder “plug-ins” in the Laser Controller program folder, and copy the plug-ins into that
folder (they are located in a folder “plug-ins” of the Winamp program folder and start
with “in_”). You may have to copy missing DLLs into the Laser Controller folder, as above).
That way you can use only those plug-ins that work (and/or that you need). Or, of course,
you can try to get plug-ins from older Winamp versions.