1
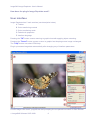
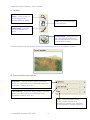
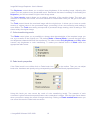
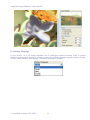
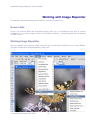
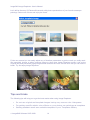
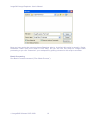
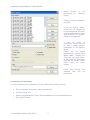
ImageSkill Software
Image Repainter v1.5
User’s Manual
Table of Contents
Introduction.............................................................................................................................................2
Features at glance ..............................................................................................................................2
System Requirements ........................................................................................................................2
Registering ImageSkill Image Repainter ............................................................................................2
Getting Technical Support ..................................................................................................................3
Getting Started .......................................................................................................................................4
Recoloring overview ...........................................................................................................................4
What is the problem? ......................................................................................................................4
Installing and uninstalling....................................................................................................................7
User interface .....................................................................................................................................8
A. Toolbar........................................................................................................................................9
Current template preview window shows from what image the color atmosphere is taken ............9
C. Color transferring mode............................................................................................................10
D. Fade brush properties ..............................................................................................................10
E. Interface language ....................................................................................................................11
Working with Image Repainter .............................................................................................................12
Source data ......................................................................................................................................12
Starting Image Repainter..................................................................................................................12
Tips and tricks...................................................................................................................................14
Scripting (Actions) feature ................................................................................................................15
FAQ and Troubleshooting ....................................................................................................................19
I can’t find Image Repainter in graphic host’s effect menu. ..............................................................19
I can’t run Image Repainter or Image Repainter is grey out in graphic host’s effect menu. .............19
ImageSkill Image Repainter: User’s Manual
Introduction
Image Repainter is a color transfer Photoshop-compatible plug-in for Windows designed by
ImageSkill Software that can work as with commercial software like Adobe Photoshop, Adobe
Photoshop Elements, Corel (Jasc) Paint Shop Pro, and Microsoft Digital Image Suite as free like
software IrfanView, XnView. A new version 1.5 of the Image Repainter has an improved user-friendly
interface allowing users to adjust, if necessary, the automatic recoloring result by tuning the
brightness and color transfer controls. Besides, new to version 1.5 the fade brush and multilingual
interface support were added.
Image Repainter allows you to make a photo to be «slightly brighter», or «slightly more colorful»
taking main colors and brightness from the photo you like. It is very useful for recoloring of a series of
image shots, especially where slightly different lighting and camera settings produced unnatural color
effects in each photo like gray color appearance in your seaside photos while it should to be blue.
Image Repainter is of rare class of tools which «just understand you». You only give it the image you
want to fix and a «template image», which color content is close to what you want see on the photo to
be fixed. Image Repainter will change the color content of the work image in a smart, fast and pretty
way. You can do a global color change or local one. In the latter case you only need to select any
particular area of an image where color change should be done. Extra fade brush can help you if
necessary easily and intuitively obvious correct the result.
Features at glance
•
Very simple and intuitive user interface with only a few controls
•
Almost instant image recoloring
•
Performs brightness and/or color transfer globally or locally (within a given selection)
•
Fade brush for local original color restoration
•
Multilingual interface
•
16-bit image support
System Requirements
Computer
Pentium 400MHz
Operation System
Win98, Win200, Win2003, Win XP, Win NT3, Win NT4
Hard Drive
you must have free space about 3 Mb
RAM
64Mb
Miscellaneous
mouse or other pointing device
You must have suitable graphic host software (see below)
Registering ImageSkill Image Repainter
You can order full version of this plug-in via ShareIt and RegNow services (all of them accept
PayPal). If you purchase Image Repainter through these services you receive user name and unlock
key. Please, enter them carefully without additional blanks. Use copy-paste method.
If you have any trouble with unlock key, send email to [email protected]
© ImageSkill Software 2007-2008
2
ImageSkill Image Repainter: User’s Manual
Registered users receive our email newsletter containing information about new product releases and
updates, free downloads, articles, tips, and special offers.
Just now, we upgrade our products for registered customer free of charge.
Getting Technical Support
If you have any troubles with installation, questions, feature requests or notes, please just contact us
in one of the following ways:
E-Mail: [email protected]
Web site: http://forum.imageskill.com
© ImageSkill Software 2007-2008
3
ImageSkill Image Repainter: User’s Manual
Getting Started
Recoloring overview
What is the problem?
It is amazing but human memory can save any view in details while your photo looks like sometimes
as colorless shadow of it. You remember that seaside is looking blue as in the below example left,
while your photo in the below example right can be far enough from your memory - it is rather gray
and looks unnatural.
Your memory clearly feels the difference between the original view and its photocopy, How to restore
this copy to recall your feeling safe? The easy way is to apply something like Automatic contrast
enhancement tool in Pain Shop Pro to make the photo slightly brighter. You see that enhanced result
in the below example left looks better but unfortunately such tool fails to reproduce the original color
content. The problem is the following. The photo is initially colorless and there is no simple way to
make it more colorful. The possible solution of this problem is to transfer color statistics from
appropriate template or prototype image to image to be restored. It will be enough to use the template
image as shown in the above example right.
© ImageSkill Software 2007-2008
4
ImageSkill Image Repainter: User’s Manual
The next your wish to change color somewhere in the image may be some funny. For instance, you
would like to recolor girl’s hat in the below example left. All you need to do is to select the hat using
Magic Wand or something like that. After the selection is done (right picture below) you can choose
an appropriate image which color content will be used for color transferring. Let it be the autumn
landscape as in the below example left. The result of local recoloring is shown in the right picture
below.
Sometimes you wish to apply a color atmosphere of your favorite painter to your photo. It is not so
easy in general but the color transfer is possible and can produce believable results in some special
cases like in the example below. The template image is a reproduction of “An Unknown Woman” by
Kramskoy.
© ImageSkill Software 2007-2008
5
ImageSkill Image Repainter: User’s Manual
Look at one more example below where the template image was a reproduction of Aivazovsky.
© ImageSkill Software 2007-2008
6
ImageSkill Image Repainter: User’s Manual
There are many techniques for making this job, but here the matter concerns how to do it with
ImageSkill Image Repainter that is of rare class of tools which «just understand you». You only give
it the image you want to fix and a «sample image», which color spectrum is close to what you want
see on the original picture. Image Repainter will change the color content of the work image
in a smart, fast and pretty way. All examples of recoloring given above were produced with Image
Repainter.
Installing and uninstalling
Run setup file. Installer finds suitable graphic hosts. Choose one of them from list. If you want to
install plug-in in other folder, select item "Other path" and set path. In this case you must set "Plug-ins
path" of your graphic host to setup folder.
Plug-in’s installer automatically detects the following graphic host applications:
•
Adobe Photoshop 7, CS, CS2, CS3
•
Adobe Photoshop Elements 2, 3, 4, 5
•
Jasc Paint Shop Pro 7, 8, 9
•
Corel Paint Shop Pro (Photo) X, X1, X2
•
Corel Photo Paint 11,12
•
Xara Xtreme
•
Microsoft Digital Image Suite 2006
•
Macromedia Fireworks 2004, 8
•
Ulead PhotoImpact 8,9,10,11,12
Plug-in can work under the following graphics host properly
•
XnView 1.8 and older
•
IrfanView
•
Corel Painter
Plug-in may be compatible with other graphic hosts as well.
In order to uninstall plug-in run uninstaller (file uninstall.exe) or use Add and Remove Programs item
in the Control Panel or Start Menu.
© ImageSkill Software 2007-2008
7
ImageSkill Image Repainter: User’s Manual
How does the plug-in Image Repainter work?
User interface
Image Repainter has 5 main sections (see description below):
A: Toolbar
B: Color transferring controls
C: Color transferring mode
D: Fade brush properties
E: Interface language
Pressing the “OK” button causes returning to graphic host with applying object extracting.
Pressing the “Cancel” button causes a return to graphic host keeping source image unchanged.
The ”Help” button runs short HTML help.
Plug-in processes image data automatically after changing any of interface parameters.
Current image zoom factor, progress bar and prompting line are placed into bottom of main window.
© ImageSkill Software 2007-2008
8
ImageSkill Image Repainter: User’s Manual
A. Toolbar
Zoom – zoom in and out
of the image when
working with fine details
Pan – let you scroll image
in any direction
Fade brush – click this
tool for correction the
result
Preferences – Using this item
you can change preferences
like chessboard size and color,
and selection viewing.
Current template preview window shows from what image the color atmosphere is taken
B. Color transferring controls
Brightness – Using this slider (within [-100,100]
range) you can produce more pleasant brightness
impression. Default value is 0.
Color intensity – Using this slider (within [-100,100]
range) you can produce more pleasant color
impression. Default value is 0.
Fade – Using this slider (within
[0,100] range) sometimes is
desirable for getting more pleasant
visual impression. Default value is 0.
© ImageSkill Software 2007-2008
9
ImageSkill Image Repainter: User’s Manual
The Brightness control allows you to adjust mean brightness of the resulting image. Adjusting this
control you can produce more perceivable result. Remember that extra increasing or decreasing the
Brightness, you will lose details in light or dark image areas.
The Color intensity control allows you to adjust a saturation of the resulting image. The more you
increase or decrease this control, the more saturated or unsaturated colors you will get in the result
image.
The Fade control blends the recolored image with the original one. It allows you to leave a certain
amount of original colors in the processed image, preventing it from over-recoloring and making it
more lifelike. The Fade zero setting corresponds to processed image viewing, while a setting of 100
shows solely the original image.
C. Color transferring mode
The Mode control gives you a possibility to choose what characteristics of the template image you
can try to transfer to the original one. The default Mode is Normal Mode. It means that both color
and brightness characteristics will be transferred. The other modes Only brightness and Only color
concern only brightness or color transferring. To select your desired choice of Mode check the
appropriate radio button.
D. Fade brush properties
If the Fade brush is not visible click on Fade brush icon
in the toolbar. Then you can adjust
brush size, hardness and opacity using corresponding controls in the Brush properties section.
Using this brush you can correct the result of color transferring locally. The example of such
correction is given below where partial flowers color restoration is shown. Click the right mouse button
when you want to restore the result of image recoloring. Clicking on Reset marked area button you
can cancel the result of Fade brush correction.
© ImageSkill Software 2007-2008
10
ImageSkill Image Repainter: User’s Manual
E. Interface language
A new version 1.5 of the Image Repainter has a multilingual interface allowing users to choose
interface language from drop list, if necessary. Just now interface language support exists for English,
French, Italian, Russian, and Spanish. The default language is English.
© ImageSkill Software 2007-2008
11
ImageSkill Image Repainter: User’s Manual
Working with Image Repainter
All example commands and image are valid for Corel Paint Shop Pro X.
Source data
Plug-in can process RGB and Grayscale images with 8 or 16 bits/channel only with or without
transparency. If you have image in other mode (CMYK, LAB etc) – Image Repainter will be disabled
in “Effect” menu.
Starting Image Repainter
Run your graphic host; open an image. Now you can run the Image Repainter plug-in using "Effects>Plugins->Image Skill->Image Repainter” menu item.
© ImageSkill Software 2007-2008
12
ImageSkill Image Repainter: User’s Manual
ImageSkill Image Repainter is started now. On first start of Image Repainter after its installing the
Current template window has nothing but message that you should select some template image to
be displayed. In order to do it you only need to click on Current template window.
By default the plug-in will look for template images in root folder C. If there are some images there
you can select on of them as a template or can change folder.
If there are no images in root folder C you receive a message meaning that you need to click OK
button and choose a directory where images are located.
© ImageSkill Software 2007-2008
13
ImageSkill Image Repainter: User’s Manual
Let it will be directory G:\Painters\Aivasovsky with photo reproductions of your favorite seascape
paintings. Select one of them and enjoy the result.
Follow our manual you can easily adjust any of interface parameters to get the result you really need.
We especially choose a rather colorless image to show how Image Repainter works. Look at the
original (left) and processed (right) images below and see the result. We are sure that you can make it
better. Try and enjoy Image Repainter.
Tips and tricks
The following tips will help you to get the best results when using Image Repainter.
•
Do not use original and template images having very narrow color histograms
•
For getting specific artistic color effects on your photos use paintings as templates
•
Getting pleasant result save suitable template in your Templates Gallery
© ImageSkill Software 2007-2008
14
ImageSkill Image Repainter: User’s Manual
Scripting (Actions) feature
Some graphic hosts support scripting feature. In Corel (Jasc) Paint Shop Pro 8, 9, X, X1 it named as
“scripts”, in Adobe PhotoShop 6, 7, CS, CS2 – “actions”.
Using this option you can batch process a few images.
You have to create script (action) at first.
•
Open an image.
•
Start script recording (“File->Script->Start Recording” or button on script tool bar).
•
Run Image Repainter plug-in (“Effects->Plugins->Image Skill-> Image Repainter”)
•
Adjust plug-in parameter for achieve desirable result. Press OK button.
•
Save script recording (“File->Script->Save Recording” or button on script tool bar).
Save script as “ImageRepainter.PspScript” for example.
© ImageSkill Software 2007-2008
15
ImageSkill Image Repainter: User’s Manual
Now you have script that executes Image Repainter plug-in, by default this script is saved in “ScriptRestricted” folder (see more detail in PSP help). So you can use this script for images batch
processing or you can “Customize” your workspace by placing a button for this script to a toolbar.
Batch Processing
Run Batch Process command (“File->Batch Process”).
© ImageSkill Software 2007-2008
16
ImageSkill Image Repainter: User’s Manual
Select
images
to
be
processed by “Browse”
button.
Choose “Image Repainter”
as script.
If you run script in “Silent”
mode, then all images will
be processed with the same
plug-in parameters as script
was recorded. The plugin’s
dialog is not appeared.
If you run script in
“Interactive” mode, you will
be able to adjust plugin’s
parameters in the plugin’s
dialog.
Result
will
be
saved
depending on chosen Save
Mode option. Choose the
Copy and set output folder.
In this case the processed
files will be saved in that
folder with the same
names.
Press “Start” button. The
selected
files
will be
processed.
Customize your workspace
You can customize your workspace in Corel (JASC) Paint Shop Pro family.
•
Run “Customize” command (“View->Customize”)
•
Choose “Script” tab
•
Select “ImageRepainter” script, select desirable icon form thumbnails below
•
Press “Bind” button.
© ImageSkill Software 2007-2008
17
ImageSkill Image Repainter: User’s Manual
Now you can place this button on any toolbar for Image Repainter quick launch.
NOTE: Adobe Photoshop 7, CS, CS2 have the similar possibilities for scripting creation and batch
processing. For details see Abode Photoshop help.
© ImageSkill Software 2007-2008
18
ImageSkill Image Repainter: User’s Manual
FAQ and Troubleshooting
I can’t find Image Repainter in graphic host’s effect menu.
Check is there plug-in in “Plug-Ins” graphic host’s folder, or set path to plug-in using graphic host‘s
“Preferences” option. Re-run your graphic application.
I can’t run Image Repainter or Image Repainter is grey out in
graphic host’s effect menu.
Graphic hosts disable the plug-in if the current image is not suitable for use with Magic Denoiser.
Image must be in RGB or Grayscale format with 8 or 16 bit/channel. If image has CMYK, LAB or
something other format, you have to convert it to RGB or Grayscale.
NOTE:
If you did not find answer on your questions, write your questions to [email protected] or send
them to support forum http://forum.imageskill.com
© ImageSkill Software 2007-2008
19