1
ECE 2035
Project 2: Angry Monkeys v1.0
Fall 2013
Angry Monkeys
In the game of Angry Birds, the player sling-shots some rather surly birds of various sizes,
shapes, and colors at a structure of rocks, wood, glass, and pigs. Points are gained by damaging
the structure and destroying pigs.
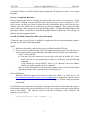
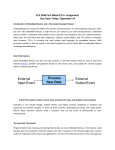
Figure 1. A typical Angry Monkeys game world.
The goal of this project is to program the mbed microcontroller to run a much simpler (and less
copyright infringing) game in the genre of Angry Birds that we’ll call Angry Monkeys. You will
start with the embedded design you built in the in-class workshop exercise and a software
framework that provides all of the necessary tools you need to play the game. The game will
start with the mbed establishing a connection with the front-end python program via serial
communication. The front-end program will draw the game world and send a copy of the world
1
ECE 2035
Project 2: Angry Monkeys v1.0
Fall 2013
to the mbed. Then, you will develop the game engine and I/O interfaces to allow a user to play
the game.
Part 1A: Completing Hardware
Before beginning this project, you must first ensure that your circuit is wired correctly. Please
complete the workshop exercise and Homework 3 that was given in class on October 21, 2013.
Once you are sure that your circuit is wired correctly, download the project files from the class
website. Place the python files in a directory on your host computer. Then, import the mbed
project files into a new program in your mbed cloud compiler. Compile the mbed program files
and copy the binary to your mbed. Then run the python script on your host pc. This will get you
familiar with the program structure.
Part 1B: Establish Connection with Front-end Program
To play the game, you will need to establish a connection with the front-end python program.
You can use one of the following methods:
Serial:
1. Make sure the mbed is connected to your pc with the provided USB cord.
2. Next you need to find the name of the port address associated with your mbed device.
Open a terminal and type the following command to list all available serial connections:
◦ Linux: ls /dev/ttyACM*
▪ You may not have permission to access the serial port by default on a Linux
install. You can set your permissions to allow use of the port with the following
command:
“sudo chmod 666 /dev/ttyACM[#]” where [#] is replaced by the port address
number you found using the above ls command
◦ Mac: ls /dev/tty.usbmodem*At the front-end's startup screen, click the serial button
and enter the name of the serial port that you found in step 2.
Serial on Windows:
Windows needs the right serial drivers to detect the mbed as a serial device. See
http://mbed.org/handbook/Windows-serial-configuration for instructions. Once the driver
is installed, you can look in the Windows device manager to find the COM port number
of the mbed.
You should test your connection by printing a message to the console of the front-end program.
In the mbed program files you downloaded in Part 1A, you are given a function (in main.cpp) to
print to this console. This function works just like the C-Standard “printf” function. It's
prototype is given below:
void print(const char *format, …);
2
ECE 2035
Project 2: Angry Monkeys v1.0
Fall 2013
Part 2: Implement Angry Monkeys
Now that you have completed the preliminary steps, you will develop the game engine and
control interface needed to play a game of Angry Monkeys with the mbed. The front end will
load a game world and send a sparse array representation of the world to the mbed. Your
program will need to do three things: use the pushbuttons to take in user inputs, calculate the
game physics and collisions based on user inputs and the game state, and provide hints for how
to hit the monkeys.
A number of functions that will be needed to send messages to the front end are provided in the
mbed shell. A list of their usage and functionality can be found in ‘Messaging Functions.pdf’ in
the project files.
Part 2A: User inputs
The first step is to retrieve user inputs via the pushbuttons to determine a shot trajectory. You
should use two pushbuttons to move the shot angle up and down, one pushbutton to toggle the
shot power between high and low, and one pushbutton to trigger a shot.
The angle should be limited to 0-90 degrees, and the power should toggle between the high and
low values defined by PHIGH and PLOW in the provided mbed shell. The angle and power
inputs should be printed on the LCD screen attached to the mbed, as well as sent to the front end
using the paaUpdate(power, angle) function.
Part 2B: Game Engine
The next step is to create the game engine that calculates the animations and collision detection
for the cannon shots based on user inputs and game world state. The guidelines for your game
engine are as follows:
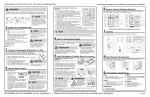
1. Game World Array:
An example game world can be seen in Figure 1. The cannonball and shot indicator are
not part of the world array. The game world is made up of a tree, which is comprised
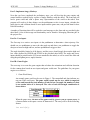
of tree and branch tiles, and monkeys. Each tile has a strength, the number of shots
it can sustain before it is destroyed. The color of each tile/strength combination is
shown below:
Type/Strength
1 2 3 4 5
Tree
Branch
Monkey
When the game starts, the state of the game world is given to you as a sparse array in
a format similar to the sparse vectors in Homework 2. The array will be in the following
format:
int world[N];
3
ECE 2035
Project 2: Angry Monkeys v1.0
Fall 2013
where
world[0]
world[1]
world[i*4+2] for
i = 0,1,2,...
world[i*4+3] for
i = 0,1,2,...
world[i*4+4] for
i = 0,1,2,...
world[i*4+5] for
i = 0,1,2,...
world[1]-1
world[1]-1
world[1]-1
world[1]-1
Total size of array (#rows *
#columns)
Number of non-empty squares
Row index of ith non-empty square
Column index of ith non-empty
square
Type of object in ith non-empty
square
Strength of the ith non-empty square
The type field will be an ASCII character code corresponding to ‘M’, ‘T’, or ‘B’ for
monkeys, tree trunks, and branches respectively. ‘M’, ‘T’, and ‘B’ are ASCII codes 77,
84, and 66. The strength field will be an integer 1-5. It can be assumed that the game
world is always square.
As an example, take the sparse array:
{9, 3, 1, 1, 77, 3, 2, 0, 66, 1, 2, 2, 84, 5}
This would represent a 3x3 array with 9 total squares. 3 of the 9 squares are non-empty.
The first non-empty tile is a monkey with strength 3 at row 1, column 1. The second nonempty tile is a branch with strength 1 at row 2, column 0. The final non-empty tile is a
tree with strength 5 at row 2, column 2.
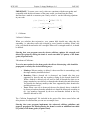
2. Shot Physics:
Shot trajectories should be calculated using the kinematic equations for projectiles.
Gravity will be defined in the mbed shell as GRAVITY. The time-based kinematic
equations for a projectile initially located at x=0, y=0 are as follows:
1
2
y ( t )= v y ∙ t− G R AV I T Y ∙ t
2
x ( t ) =v x ∙ t It may be useful to rearrange these by substituting t = x ( t ) into y ( t ) to give:
vx
y ( x )= vy
1
x
x− G R AV I T Y ∙
vx
2
vx
2
( )
Additionally, v x and v are given by:
y
v x =P O W E R∙ cos ( A N G L E )
v y = P O W E R ∙sin ( A N G L E )
Where POWER and ANGLE are determined by user inputs. Sine and cosine functions
can be found in the <math.h> standard C library.
4
ECE 2035
Project 2: Angry Monkeys v1.0
Fall 2013
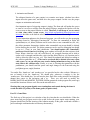
IMPORTANT: To ensure your x and y values are consistent with the auto-grader and
compatible with the discrete nature of the game world, you should use the floor()
function from <math.h> to truncate your x and y values i.e. use the following equations
in your code:
1
2
y ( t )= f l o o r (v y ∙ t− G R AV I T Y ∙ t )
2
x (t)= f l o o r ( v x∙ t ) vy
1
x
y ( x )= f l o o r
x− G R A V I T Y ∙
vx
2
vx
(
2
( ))
3. Collisions:
3A Basic Collisions:
When you calculate shot trajectories, your cannon balls should stop when they hit
something, i.e. when they reach a tile occupied by a tree, branch, or monkey. When a tile
is hit, you should decrement the tile’s strength. When a tile’s strength reaches 0, it should
be deleted.
Showing that your program correctly detects collisions, updates tile strength, and
deletes tiles properly during the demo is worth one third (15 points) of the demo
grade (45 points total).
3B Advanced Collisions:
To receive more points for the demo grade, the effects of destroying a tile should be
propagated to nearby tiles in the following ways:
Monkeys: When a monkey is deleted, it does not affect its surroundings; only
the single monkey should be deleted.
b. Branches: When a branch tile is destroyed, any branch tiles that were
supported by that tile and any monkeys sitting on the branch should fall.
When a branch is deleted you will need to find all branch tiles that are no
longer attached to a tree directly or through other branch tiles and delete them.
You should also find any monkeys that were supported by those branch tiles
and delete them as well.
c. Trees: When a tree tile is destroyed, the tree tiles directly above it should all
be destroyed and any branches attached to it should be destroyed according to
(b.). Any monkeys supported by the tree and branches deleted in this way
should be deleted as well.
a.
The ‘Collision Examples.pdf’ file included in the project files shows some before and
after pictures of collisions that you can use as example cases.
Showing that your program implements the advanced collision guidelines and
properly propagates tile deletion during the demo is worth an additional one third
(15 points) of the demo grade (45 points total).
5
ECE 2035
Project 2: Angry Monkeys v1.0
Fall 2013
4. Animation and Sounds:
The ultimate function of a game engine is to examine user inputs, calculate how those
inputs affect the game state, and then drive the proper outputs. In this case, the proper
outputs are animations and sounds.
One important aspect of triggering outputs is timing. The front-end will update the screen
as soon as it receives a message from the mbed. Playing a sound on the speaker will also
occur as soon as the proper function is called. Therefore, it will be up to you to control
at what times these events occur. http://mbed.org/handbook/Homepage#time-andinterrupts has links to the built-in mbed functions that can be used for timing.
To send animation updates to the front-end program, you will need to use the messaging
functions found in ‘Messaging Functions.pdf’. To draw the cannonball in flight, the
updateShot(row, col, delete) function can be used to draw a new cannonball at (row, col);
the delete parameter determines whether other cannonballs on screen should be deleted
before drawing the new ball. The delete parameter can be used for debugging but should
be set to 1 (True) in your final submission. You should update the cannonball’s
position at least 4 times as it is flying; more updates will make the shot trajectory look
better. When a shot hits a tile, the colorTile(row, col, strength) function can be used to
update a tile’s strength (and therefore color) and the deleteTile(row, col) function can be
used to delete the object at (row, col). Tiles should be updated and deleted according to
the collision guidelines in (3.). Tiles can be recolored and/or deleted all at once when
a hit occurs, or you can add your own creative timing/animations as long as the final
state follows the collision rules. Finally, as a user is selecting shot parameters with the
pushbuttons, you should send the power and angle changes to the front-end using the
paaUpdate(power, angle) function.
Two audio files ‘bomb.wav’ and ‘monkey.wav’ are provided on the class website. Whenever a
tree or branch is hit, the ‘bomb.wav’ file should play; whenever a monkey is hit, the
‘monkey.wav’ files should play. You will need to place these files on the microSD card using the
adapter that comes in the packaging and a pc. Then, you will need to modify the
BOMB_WAVFILE and MONKEY_WAVEFILE define statements in the program file (main.cpp)
to match the locations of these wave-files on the microSD drive.
Showing that your program signals correct animations and sounds during the demo is
worth one third (15 points) of the demo grade (45 points total).
Part 2C: Game Hints
The final step of this project is to calculate a hint for what shot the user should take. When the
game starts and your program receives the world, before the game engine starts running, your
program should first find the location of the leftmost monkey in the game world and calculate a
power and angle combination that will destroy that monkey.
6
ECE 2035
Project 2: Angry Monkeys v1.0
Fall 2013
You can choose to either:
a. Provide a hint that hits the left-most monkey directly. Correctly providing this
hint is worth 30 out of 45 possible points for hint accuracy. Or:
b. Provide a hint that destroys the branch on which the left-most monkey sits. Your
hint should target the branch tile that destroys the entire branch, the branch tile
that forms the joint between branch and tree. Correctly providing this hint is
worth 45 out of 45 possible points for hint accuracy.
Your hints do not need to account for another object being in the way of the target i.e. as long as
the shot you specify would pass through the location that you specify if the world was
totally empty, it is considered correct. The location you specify must also correctly point to
the left-most monkey or the corresponding branch joint. To report a hint to the front-end, you
should call the hint(row, col, power, angle) function with the proper shot parameters and
location.
Comments on calculating hints:
As you may realize, there are many combinations of power and angle that would send a
projectile through a give location. To help bound the problem, the possible shot power is limited
to one of two values and the angle is limited to 0-90 degrees. However, even with these
restrictions, there are multiple correct answers.
Additionally, the closed form solution for calculating a hint is rather complex. The equation of a
shot curve is shown again below:
y= vy
1
x
x− G R AV I T Y ∙
vx
2
vx
2
( )
Substituting vx and vy with power and angle terms and using the monkey location for x and y:
y m o n k e y = xmo n k e y
P O W E R ∙sin θ
1
x
− G R AV I T Y ∙
P O W E R ∙cos θ m o n k e y 2
P O W E R∙ cos θ
(
y m o n k e y = tan θ ∙ x m o n k e y −
2
)
1 G R AV I T Y
sec 2 θ ∙ x 2m o n k e y
2 P O W E R2
As can be seen, even for a fixed power and location, solving for the required angle involves
some rather nasty trigonometry. With this in mind, you will likely have to come up with an
iterative method that finds the right shot trajectory. You should not simply check every
power/angle combination, but rather make an educated guess about a possible power/angle
combination and then make iterative changes to the angle until the correct trajectory is obtained.
It is also possible that you could create your own novel algorithm for finding hints.
Project Submission
For your solution to be properly received and graded, there are a few requirements.
1.
Rename your main.cpp file to P2.cpp and upload it to the submission site before the
scheduled due date, 9:00pm on Wednesday, 13 November 2013. There will be a one
hour grace period, after which no submitted material will be accepted.
7
ECE 2035
2.
Project 2: Angry Monkeys v1.0
Fall 2013
You must demonstrate your system working properly to a TA for checkoff before 5:00
p.m. on Tuesday, 26 November 2013. (A Doodle schedule will be available to sign-up
for checkoff appointment.)
You should design, implement, and test your own code. Any submitted project containing
code (other than the initial setup code) not fully created and debugged by the student
constitutes academic misconduct.
Project Grading: The project weighting will be determined as follows:
part
P2-1
description
due date
Angry Monkeys Program
(rename main.cpp to P2.cpp and upload)
Technique and Style
Wednesday, 13 November 2013
before 9 p.m.
10
Hint Accuracy:
P2-2
percent
45
-
Direct monkey hint – 30 points
-
Branch joint hint – 45 points
Angry Monkeys Game
Before Tuesday,
(TA Checkoff: signup for appointment time)
26 November 2013 @ 5 p.m.
Animations and Sounds
15
Basic Collisions
15
Advance Collisions
15
total
100
References
MIPS vs ARM summary: www.ece.gatech.edu/~linda/2035/projects.html
Mbed Pin Input/Output Tutorial: www.ece.gatech.edu/~linda/2035/projects.html
3. Mbed Pinout:
http://mbed.org/nxp/lpc2368/quick-reference/
1.
2.
4. Mbed-NXP Pinout:
http://mbed.org/users/synvox/notebook/lpc1768-pinout-with-labelled-mbed-pins/
5.
Mbed Handbook: http://mbed.org/handbook/Homepage/
6. NXP-LPC1768 User’s Manual:
http://www.nxp.com/documents/user_manual/UM10360.pdf
8