1
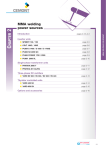
CARWASH
Steam generator for cleaning
and sanitizing the interior of vehicles
PATENTN.BO2005A000507
Bieffe Srl Via Levato 1/1-1/3 61100 Pesaro
Tel. 0039 0721281857 Fax 0039 0721281880
www.bieffeitalia.it [email protected]
We have been creating and manufacturing steam generators and ironing
boards for more than 20 years.
We apply our knowledge and experience to several fields: sewing,
household, catering, cosmetics, etc...
Mr. Farinelli thanks you
Information, descriptions and illustrations contained in this manual are not binding.
BIEFFE maintains the right to introduce any necessary change. Sept. 2012
12
MADE IN ITALY: BIEFFE Company manufactures the whole range of its products
in Pesaro using components made in Italy as well as entirely recyclable materials.
BEFORE USE
At delivery:
The machine CARWASH cod.BF310 is packed together with its standard accessories in a
single carton box.
Upon receipt of the goods, check that the package is intact and not damaged. Verify that the
product-label on the side of the box and the contents of the package correspond with the
quality and quantity as indicated in the delivery note.
Package contents:
Machine body complete with trolley and basket (Pz.1)
Steel drum (Pz.1)
Cover steel drum complete with floating(Pz.1)
Standard accessories (Pz.14)
User's Manual (Pz.1)
In case of a mismatch, you must immediately inform Bieffe srl.
For any contact with Bieffe srl, with its service centers or dealers, please refer to the type of
machine, serial number (eg Mod.CARWASH Cod.BF310 n.serial ...) applied to the back of
the machine.
CAUTION
DO NOT REMOVE SAFETY DEVICE AND PROTECTIVE COVER
BEFORE MAINTENANCE AND SERVICE MAKE SURE THAT APLLIANCE IS
UNPLUGGED FROM ELECTRIC OUTLET AND BOILER IS COOL AND NOT
UNDER PRESSURE
CONSUMER NOTICE:
The BIEFFE product you have purchased is subject to Directive 2002/96/EC of the European Parliament and the Council of the European Union on waste electrical and electronic
equipment (WEEE) and, in jurisdictions adopting that Directive, is marked as being put on
the market after August 13, 2005, and should not be disposed of as unsorted municipal
waste. Please utilize your local WEEE collection facilities in the disposition of this product
and otherwise observe all applicable requirements.
2
11
OPERATING AND SAFETY INSTRUCTIONS
• After the removal of the package make sure of the appliance’s integrity. In case of doubt
do not operate the appliance but take it to a qualified service person for examination and
repair. Plastic bags, polystyrene, etc…, must be kept out of the children’s reach.
• Before connecting appliance, make sure that data on the plate are the same as the power
supply network. The voltage appliance is of 230V monophasic with a plug of 16A+T.
• Plug appliance into grounded outlet of sufficient power as provided for by the safety regulations in force.
• Do not touch appliance with wet or damp hands.
• Always disconnect appliance from electrical outlet when not in use.
• This appliance is only and exclusively for its intended use so the manufacturer can not be
held responsible for any probable damage due to an illegitimate use.
• Never unscrew the safety valve cap during use.
• Before cleaning and maintenance make sure that appliance is disconnected from outlet. Do
not wash the appliance, do not immerse in water. Before filling the boiler, make sure that
appliance is unplugged.
• In case of failure or operational defect, turn off appliance, disconnect from electrical outlet.
Do not disassemble or attempt to repair the appliance. Incorrect re-assembly or repair
could cause a risk of fire, electric shock, or injury to persons when the appliance is used.
Any repair must be executed by qualified service persons authorized by the manufacturer.
Ask for exclusive use of original spare-parts.
• Installation must be executed according to manufacturer’s instructions (space for ventilation, room temperature).
• Do not operate appliance with damaged cord or hose, but let it made replaced.
• Turn off the two boiler switches, and unplug the boiler when finished operating. It is not
necessary to empty the boiler of remaining water. it is important to unscrew for only 1 turn
the safety cap to let the boiler depressurize.
• Do not remove safety device and protective cover.
• Do not service while appliance operates.
• Before servicing make sure that appliance is unplugged from electrical outlet.
• The non-observance of the above OPERATING AND SAFETY INSTRUCTIONS could
prejudice safety.
Have a good job.
10
3
TROUBLESHOOTING
MACHINE DETAILS
For any different anomaly not included in the enclosed list, get in touch with the after-sale
service centre.
Features:
Continuous steam
Hot water 40°
Hot air 70°
Hot air seats to 50°
Automatic recharge
Ozonization
ANOMALY
TECHNICAL DATA
Boiler
Boiler power
Pressure switch
Vacuum power
Hot air power
Fusto inox
Water tanks
Ozonization
Weight
Carton box dimensions
ACTION
The safety tap (13) is closed
Turn the tap to open position
No pressure in the boiler
Wait for the gauge to at least
4BAR
the steam valve in the handle
is broken
Get in touch with a customer
service center
No pressure in the boiler
Wait for the gauge to at least
4BAR
the steam valve in the handle
is broken
Get in touch with a customer
service center
From the steam gun (13)
steam is released without
pressing the button
the steam valve in the handle
is broken
Close the safety tap (14) and
get in touch with a customer
service center
Tthe vacuum engine changes
noise or begins to vibrate
Water in stainless steel (1)
exceeds the maximum level
Turn off the machine and empty
the steel drum (1)
No water flows from the drain
valve under the car.
The tap is blocked by
limestone
Insert a screwdriver into the tap
to free it from impurities
Water/steam inlet badly
inserted
Place and lock the steam/water
inlet
O-ring seals consumed
Replace the O-ring
Activating the switch (16) on
the gun, the engine vacuum
will not turn on
Water/steam inlet badly
inserted
Place and lock the steam/water
inlet
No hot air comes out
thermostat is out of work
Get in touch with a customer
service center
No steam comes from the
steam gun (13)
Protective equipment:
Non-return valve applied to the output of the steam outlet.
Protective guard on the safety cap.
2 thermostats and 1 pressurestat for the safety of the boiler.
Safety thermostat of hot air.
Protection thermostat pump.
Floating protection rof vacuum motor.
Audible signal for low water.
Power
CAUSE
230/220V 50/60 Hz (only for BF310 and BF310Z)
380V 50/60 Hz (only for BF310PL and BF310PLZ)
3lt
1000W+1000W+1000W
5BAR
1400W
1400W
20LT
10LT+10LT
(only for BF310Z and BF310PLZ)
55KG
83x59xh95cm
4
No steam comes from the gun
Pratika CVK21
Leaks in the spine steam /
water (9)
9
INSTRUCTIONS: DRY SEAT
• Cover the seat with the seat dry bag CVK32.
STANDARD ACCESSORIES
31
32
• Insert the inlet (31) of the flex hose hot air CVK10, in the
hot air outlet (32).
• Turn the power switch (22) to position "1".
• Insert the terminal (33) in the bag CVK32.
• Turn on the switch (28) to operate the hot air, or turn on the
switch (15) on the Pratika handle CVK21.
Cod.CVK20
Pratika nozzle
inject/extrac.
Cod.CVK21
Pratika Handle
inject/extrac. 4mt
Cod.CVAC
Nozzle Chewing-gum
inject/extrac.
INSTRUCTIONS: DETERGENT NEBULIZATION WITH HOT AIR
• The detergent nebulization with hot air is the best way to
cleanse the tissues before being washed with hot water and
steam.
33
31
• Insert the inlet (31) of the flex hose hot air CVK10, in the
hot air outlet (32).
Cod.CVK10
• Turn the power switch (22) to position "1".
Flex hose for hot air
• Fill the air nebulizer CVK53 with a detergent solution.
3,5mt
• Insert the terminal (33) in the air nebulizer CVK53 .
• Turn on the switch (28) to operate the hot air, or turn on the
switch (15) on the Pratika handle CVK21.
• Allow the cleaning agent to work on the fabrics before
washing with hot water and steam.
Cod.CVG3
PVC insert
for CVG1
Cod.CVG2
Rubber insert
for CVG1
Cod.CVK53
Air nebulizer
Cod.CVG1
Insert holder
inject/extrac.
150mm
INSTRUCTIONS: OZONATION
• Insert the inlet (31) of the flex hose hot air CVK10, in the
ozone outlet (34).
• Turn the power switch (22) to position "1".
Cod.CVC
Extraction nozzle
140mm
Cod.MGL
PVC brush D.20
for MGK04
Cod.CVE
Extraction lance
Cod.MGLS
Bristles brush D.20
for MGK04
Cod.MGK04
Konfort steam lance
For steam gun
Cod.CVK32
Seat dry bag
35
• Insert the terminal (33) inside the car.
• Turn the timer ozone (35) depending on the size of the car.
31
34
8
Cod.CVK10
Flex hose hot air
3,5mt
Cod.CVK53
Air nebulizer
5
Cod.CVK55
Bottles holder
3
2
4
SETTING UP
INSTRUCTIONS: INJECTION/EXTRACTION
• Place the stell drum (1) in its housing on the machine.
Close the steel drum with the cover floatholder (2), lock the
cover with the two hooks.
• Turn the power switch (22) the "2". If the boiler is empty a
pump starts to load the boiler with water from the tank (5).
• When the boiler is full and the pump does not work, you
can turn on the second heater switch (23) to get a better
and long lasting steam performance. DO NOT RUN THE
SECOND resistance when the boiler is not FULL.
• Insert the vacuum hose (3) into the cover (2). Insert the gun
support (4) in its housing on the handle.
8
• Open the door on the back of the machine. Fill the tanks (5)
and (6) of water. WARNING: DO NOT USE DISTILLED
WATER. The WATER SENSORS DO NOT WORK with
water free of minerals. Make sure that the charging hoses
are in their tanks in contact with water. Close the door. If
one of the tanks is empty or one of the tubes is not in
contact with water, the machine does not work.
1
• Connect the injection/extraction Pratika handle cod.CVK21
to the machine. Insert the vacuum inlet (7) to the vacuum
outlet (8). Insert the steam/water inlet (9) to the steam/
water outlet (10).
3
5
6
• Before plugging into groud outlet make sure that the
draining tap (11) and the safety cap (21) are closed and all
switches are off. The general switch (22) must be set on
"0".
• Connect the power cord (12) to an electrical outlet.
• Wait until the steam ready lamp (24) is active and/or the
pressure gauge (25) reaches 4 ATM. to start working.
• To get steam with the steam gun (13), check that the tap
(14) is open. Press the button on the gun.
• To get steam with the Pratika Handle turn the lever (26)
left to the "steam" position and press the lever (15).
Legenda
1 Steel drum
2 Cover floatholder
3 Vacuum hose
4 Gun support
5 Boiler tank
6 Hot water tank
7 Vacuum inlet
8 Vacuum outlet
9 Steam/water inlet
10 Steam/water outlet
11 Draining tap
12 Power cord
13 Steam gun
14 Steam gun tap
15 Steam/water lever
16 Vacuum switch
• To dispense hot water with the tube Pratika turn the lever 21 Safety cap
(26) right to the "hot", turn on the switch (27) on the 22 General power switch
23 II heater switch
control panel and press the lever (15).
24 Steam ready lamp
• On Pratika handle press the switch (16) to operate the 25 Pressure gauge
exhauster.
26 Steam/water lever
• For a good job you should loosen the dirt with steam and 27 Water switch
28 Vacuum switch
hot water. Then suck the debris. All the dirt will go into the
steel drum.
31 Flex hose inlet
32 Hot air outlet
33 Flex hose terminal
34 Ozone outlet
35 Ozone timer
25
Cod.CVK21
Pratika Handle
inject/extrac. 4mt
21
13
10
16
12
28
27
14
15
22
Control Board
13
9
7
6
26
7
23
24