1
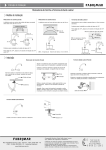
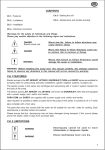
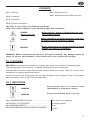
GB
CONTENTS
Ch.1- Features
Ch.5 - Starting the unit
Ch.2 - Limitations
Ch.6 - Maintenance and trouble shooting
Ch.3 - Installation
Ch.4 - Electrical connection
Warnings for the safety of individuals and things.
Please pay careful attention to the following signs and indications.
DANGER
Electric shock risk
Warns that the failure to follow directions may
cause electric shock.
DANGER
Warns that failure to follow directions could cause serious risk to persons or things.
WARNING
Warns that failure to follow directions could
damage the pump or installation.
WARNING: Before installing this pump read this manual carefully. Any damage caused by
failure to observe any directions in this manual will not be covered by warranty.
CH. 1 FEATURES
PRATIKA® electropumps are suitable for pumping clear water that contains no dissolved gases.
The electropumps in this series are multiphase centrifugal type and submergible.
The parts that come into contact with the water are all suitable for use with water for cooking. Each
electropump is carefully tested and packed.
Please ensure that the electropump has not been damaged during transport; if this occurs please
phone the dealer, within 8 days from purchase date.
CH. 2 LIMITATIONS
WARNING
Electropump cannot be used to move
inflammable or dangerous liquids.
WARNING
Ensure electropump never runs dry.
MAX. TEMPERATURE OF LIQUID..........................................
MAX.ON/OFF CYCLES/HOUR..............................................
MAX. IMMERSION DEPTH.....................................................
MAXIMUM DIMENSION OF SOLID OBJECTS PUMPED..........
40°C continuous operation
30 equally spaced
10 m
1,5 mm
5
GB
Please refer to fig.1
The linear measures in chart are in millimetres
TYPE
See Fig.
PRATIKA®
MIN. PRIMING
LEVEL
MIN. DRAINAGE
LEVEL
START LEVEL
STOP LEVEL
A
B
C
D
60 mm
50 mm
490 mm
260 mm
WEIGHT
Kg.
9
If the pump is equipped with an H05 power supply cable it is not suitable for use with pools, ponds or
similar.
If the pump is equipped with an H07 power supply cable it is only suitable for use with pools if no one
is in the water.
CH. 3 INSTALLATION
DANGER
Electric shock risk
When installing, please ensure pump is disconnected
from electrical supply.
WARNING
Make sure that float switch turns off pump, when at
min. level of liquid
WARNING
Make sure no obstacles are in the way of float switch,
when it is in motion.
Please use handlebar to move or lift pump.
Please use a non-return valve in case pump is connected to fixed installation with rigid piping; this will
avoid liquid circulating when pump has been turned off; it is advisable to install a quickly disconnecting
connection on the delivery pipe to make it easier to disconnect the pump for cleaning and maintenance.
Please use flexible pipe connected to the pump by means of plastic fittings in case of temporary use of
pump.
Use a rope to immerse pump and fasten it to pump's handlebar.
The automatic PRATIKA® model is equipped with a pre-set float switch (See fig.1) to change the
adjustement increase or decrease the free piece of float switch cable by making it slide through the
proper seat on the handlebar.
There can be particular requirements for pumps used in or next to pools, garden ponds or similar
places.
CH. 4 ELECTRICAL CONNECTION
WARNING
Ensure tension and frequency of electropump
(read plate) and power supply are same.
DANGER
Installer must make sure that electric current
network has ground wire conforming to current
laws.
Electric shock risk
DANGER
Electric shock risk
6
Make sure that electric current network is
provided with a high-sensitivity circuit breaker
,=30 mA (DIN VDE 0100T739).
GB
Single phase version
Single phase pumps are equipped with plugs with double ground contact at top end of power supply
cord; in this case grounding is done when plugging in.
Overload protection
Single phase PRATIKA® range pumps have a built-in thermal overload with automatic reset . Further
protection devices are not required.
CONNECTION DIAGRAMS:
A) Single phase pump without float switch
B) Single phase pump with float switch
See diagrams Fig.2
See Fig. 2
1) START ( green )
5) POWER SUPPLY CORD 9) WHITE
2) RUN ( red )
6) GROMMET
10) LIGHT BLUE < LINE >
3) COMMON ( black )
7) PLUG
11) BROWN < LINE >
4) CAPACITOR
8) YELLOW-GREEN
12) FLOAT SWITCH
CH. 5 STARTING THE UNIT (See Fig. 1)
WARNING
Use the electropump for the type of uses listed on
the plate.
WARNING
Do not let electropump run dry, the hydraulic parts
and seal could be damaged.
WARNING
Do not run the electropump with the interception
valve on delivery completely closed.
Before starting the electropump, connect the pipe to the (1" ¼) delivery inlet, using the provided plastic
fitting or other commercial pipe fittings.
Connections must be made so as to avoid losses.
Start the pump by inserting the plug in an appropriate outlet.
CH.6 MAINTENANCE AND TROUBLE SHOOTING
DANGER
Electric shock risk
Before doing any operation, make sure machine is
disconnected from electric power supply.
DANGER
Electric shock risk
Power cord must be replaced by manufacturer or
by Customer service, using special tools.
Under normal conditions electropumps in the PRATIKA® series do not need any maintenance.
Occasionally it may be necessary to clean the filter or other hydraulic parts.
If the electropump is not going to be used for long periods of time (e.g. an entire season) it should be
emptied completely, rinsed with clean water and put in a dry place.
7
GB
Cleaning the filter
- if the water being drawn is not perfectly clean, it may be necessary to clean the pump using a steel
brush to scrap accumulated dirt off the outer surface, afterwards, without dismantling the pump,
rinse the filter with clean water.
If this is not sufficient then clean the hydraulic parts.
Cleaning the hydraulic parts
- unscrew nuts holding the filter;
- in sequence remove the filter and suction flange;
- holding the impeller still, unscrew the locking nuts;
- remove the impellers and diffusors one at a time;
- by loosening the tie rods, it is possible to disassemble the delivery flange to gain access to the
mechanical seal;
- carefully wash the parts;
- to assemble follow steps in reverse order.
PROBLEM
POSSIBLE CAUSE
THE ELECTROPUMP DOES 1) No power.
NOT PUMP WATER THE
MOTOR DOES NOT RUN
2) Motor protection tripped.
3) Defective condenser.
4) Shaft blocked.
THE MOTOR RUNS BUT THE 1) It is taking on air.
ELECTROPUMP DOES NOT
PUMP LIQUID
REMEDY
1) Check if there is power and if the plug is
plugged in properly.
2) Verify the cause and reset the switch. If the
thermal has tripped wait until the system has
cooled.
3) Replace the condenser.
4) Verify the cause and unblock the
electropump.
1) - Make sure that the joints are airtight.
- Check that the level of liquid has not
dropped below the minimum priming level.
2) Wrong rotation direction.
2) Reset the rotation direction.
3) Suction grate blocked.
4) Non return valve blocked.
3) Clean suction grate.
4) Clean or replace valve.
THE ELECTROPUMP STOPS 1) Power supply does not conform to 1) Check the voltage on the power supply
AFTER RUNNING FOR A data on plate.
conductor cables.
SHORT PERIOD OF TIME
BECAUSE ONE OF THE
2) A solid object is blocking the impellers. 2) Dismantle the electropump and clean it.
THERMAL MOTOR PROTECTION DEVICES TRIPS
3) The liquid is too thick.
3) Change electropump type.
If the problem has not been eliminated after carrying out the above operations contact the closest
service centre.
8