1
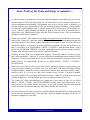
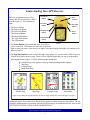
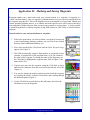
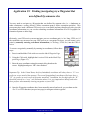
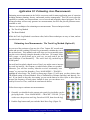
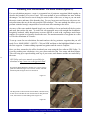
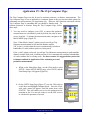
The Garmin eTrex Venture HC:
An Introductory Handbook for Natural
Resource Managers
Prepared by: The Virginia Geospatial Extension Program
GPS: An Introduction and the Basics
This handbook is intended to provide you with a
basic understanding of how your Garmin Venture
HC GPS receiver can help to support your day to
day business needs. For detailed information about
this receiver, refer to the owner‟s manual that is
included with you GPS receiver (a digital version of
your owner‟s manual can also be downloaded from
the Garmin website: (http://www8.garmin.com/
manuals/eTrexLegendHCx_OwnersManual.pdf).
When purchasing your GPS, it comes with a detailed owner‟s manual, and a quick start user‟s
guide. In addition, your GPS receiver also comes
with a USB cable. This cable can be attached to
your computer. This will enable you to download
or upload coordinates, and can facilitate field data
collection.
A digital version of this manual is available for
download on the Virginia Geospatial Extension Program website: http://www.cnr.vt.edu/gep/tools.html
The Venture HC GPS receivers are fairly rugged.
However, these receivers are small computers, and
they should therefore be treated with care. For example, never store the GPS receiver in
direct
sunlight or in hot areas (car trunks). When you are
not using your GPS receiver for long periods of
time (over 2 months), it is recommended that you
remove the batteries. The Venture HC GPS is fully
water resistant and dust proof, however, it does not
float! You should clean the outside of your GPS
receiver by simply running cool water over it, or by
wiping it off with a moist rag.
Table of Contents
Some Tricks of the Trade..................................2
Understanding Your GPS Receiver ..................3
Getting Started: Using Your GPS Unit .............5
Application #1: Marking and Saving
Waypoints ......................................................6
Application #2: Finding (Navigating to)
a Waypoint .....................................................7
Application #3: Finding (Navigating to) a
Waypoint defined by someone else ...............8
Application #4: Area Measurements
Option-1: The Track Log Method .................9
Option-2: The Route Method (in office)......11
Application #5: The Trip Computer Page.......12
The Map Page and Acknowledgements..........15
In addition, it should be noted that the GPS has an
internal antennae. The antennae is located at the top
of the GPS receiver (above “eTrex”). Do not obstruct the antennae when you are operating your
GPS! Most GPS receivers do not work inside,
underground, or underwater. In order to get the best
reception, your GPS receiver will require an unobstructed view of the sky! However with new high
sensitivity GPS chip, the Venture HC can receive
consistently strong signals under dense tree canopy.
Marketing material suggests that this GPS receiver
will require new batteries (#2 AA) after approximately 17 hours of use. You may want to keep spare
batteries handy.
The Virginia Geospatial Extension Program
1
Some Tricks of the Trade and things to remember…
You know enough to be dangerous! Please note that this handout is intended to give you a working knowledge of GPS to the degree that you can collect data for use in forestry and natural resources management and planning. This handout does not give you the skills or authority of a
licensed land surveyor. Applications of GPS for recording property boundaries, zoning boundaries and other legal boundaries such as setbacks requires the involvement of a licensed land surveyor. Likewise, legally binding calculations of property area must also be performed by licensed surveyors. Measurements taken with this GPS do contain errors. These measurements
should be considered to be estimates!
Update your software. The Garmin website (http://www.garmin.com) provides free software updates for the Venture HC (and other models). Garmin has created a downloadable program that
automatically checks for software updates and will download them to your unit. The software is
called Web Updater. To maximize its area measurement capabilities, be sure that software up to
date. To check this, go to: MAIN MENU >SETUP > SYSTEM > push the Menu button > select
& click on SOFTWARE VERSION. If needed, download the latest software version using Web
Updater, then upload it to your unit using the supplied USB cable.
Enabling WAAS (Wide Area Augmentation System) will usually improve accuracy of your
unit‟s area calculations. However, if you have difficulty in maintaining contact with the WAAS
satellite (#35 in our area) because of tree cover or other terrain obstacles, you may be better off to
disable WAAS. To enable/disable WAAS, go to: MAIN MENU > SETUP > SYSTEM >
WAAS/EGNOS.
Wait for accuracy after you turn on your unit. Before marking waypoints or laying tracks, give
your receiver time (usually just a minute or two) to “settle down” and make full contact with the
available satellites. When the accuracy reading on the satellite page becomes relatively steady usually at 10-15 ft. (3-5 m) or so - then you are ready to put it to work. If WAAS is enabled,
wait until satellite #35 is providing differential correction - small D‟s will show up on several
satellite strength bars. You should then get accuracy readings of about 10 ft (3 m).
The Venture HC allows measurements to be displayed in your choice of units. Go to: MAIN
MENU > SETUP > UNITS > DISTANCE/SPEED to initially select from Nautical (nm, kt, ft),
Nautical (nm, kt, m), Statute, Metric, and Yards. If you wish to change from one measurement
system to another, the unit automatically and instantly handles the conversions.
You can connect your Garmin Legend to a personal digital assistant (PDA) or other hand-held
device using the download cable. You may also require an adaptor, depending on the type of
port that is supported by your PDA.
An Introduction to GPS
2
Understanding Your GPS Receiver
There are six buttons on your eTrex
Venture HC that you need to be familiar with (Figure 1). These buttons include:
1.
2.
3.
4.
5.
6.
7.
The Power Button
The Page/Quit Button
The Zoom-out Button
The Zoom-in Button
The Menu/Find Button
The Click-Stick button
The GPS antenna
3. Zoom-out
button
7. GPS
antenna
4. Zoom-in
button
2. Page/Quit
button
5. Menu/Find
button
1. Power
button
6. Click-Stick
button
Figure 1
1. The Power button is the button that turns your GPS receiver on and off. This button will also turn on the backlight (so that you can use your receiver at night). Note that using the backlight will consume your
batteries faster!!!
2. The Page/Quit button is used to scroll through various pages (i.e. screens) on the GPS receiver or
to back out or quit a menu or page. There are four different pages that you can cycle through by
pressing this button (Figure 2). These different pages include the:
Satellite Page (only appears at start up when acquiring satellite signals)
Map Page
Compass Page
Main Menu Page
Satellite Page
Map Page
Compass Page
Main Menu
Figure 2: By pushing the Page/Quit button, the user can toggle through one of four GPS pages or screens.
Additional pages can be added by using the Page Sequence option within the Setup Menu. The applications (functionalities) associated with these different pages are summarized in the next section
(GETTING STARTED: USING YOUR GPS RECEIVER).
The Virginia Geospatial Extension Program
3
3. The Zoom-out button: From the Map Page pressing this button will enable you to zoom out on
the map. From any other page, press to scroll or move a highlighted slider up.
4. The Zoom-in button: From the Map Page pressing this button will enable you to zoom in on the
map. From any other page, press to scroll or move a highlighted
slider down.
5. The Menu/Find button: Press and release to view the Options Menu
for a page or press and hold to display the Find Menu from any page.
Figure 3
The Click-Stick works like a
computer mouse
6. The Click-Stick (mouse): The Click-Stick (Figure 3) is very similar to a computer mouse. The Click-stick will enable you to navigate to different menu options by pushing the click-stick in a direction (left or right; up or down).
Furthermore, you can use the Click-Stick as a button (by pressing it straight down or “in”) to activate highlighted selections. Pushing the Click-Stick “in” is similar to clicking your mouse, or hitting the “enter” key on a computer keyboard.
An Introduction to GPS
4
Getting Started: Using Your GPS Receiver
Your GPS receiver has many capabilities and functionalities. This section of the handbook is intended to show you how to get started using the GPS and to introduce you to some of the major GPS
capabilities that can directly support your day to day extension needs. After you become comfortable with the basic GPS capabilities that are listed in this handbook, you may want to refer to your
owner‟s manual to learn even more about your GPS receiver!
Getting started...
Turn on your GPS receiver by pushing the power button. The satellite page will automatically appear
(Figure 4).
The outer circle
represents the horizon.
The number of each overhead
satellite is shown.
The inner circle is a
location 45 degrees
from the horizon.
The strength of each
satellite signal is shown.
Figure 4
It normally takes a couple of minutes for the GPS receiver to “home-in” on the satellites, and to determine a location. Initially, the status window may read: Wait…tracking satellites. The GPS receiver will be ready to use when the satellite page disappears and the map page is showing .
The satellite page can be seen at any time by going to the Menu Page and selecting Satellite Page.
After the GPS receiver is ready to navigate, a location (x, y coordinates) and error (±24ft) for the location will appear in the upper section of the satellite page (see Figure 4).
Your GPS receiver has now been initialized, and is ready for use to support your extension application needs. The GPS receiver can be used, for example, to:
identify and mark areas within tree stands for future reference (research plots, areas of infestation, etc.).
estimate area measurements of a field/ tree stand (estimate fertilizer application needs)
estimate the perimeter of a field/ tree stand (estimating fence line lengths)
The Virginia Geospatial Extension Program
5
Application #1: Marking and Saving Waypoints
Waypoints enable you to mark and record your current location as a waypoint. A waypoint is a
“virtual” location marker. Once a waypoint is established and saved, you can easily navigate back to
the waypoint using the GPS. This can be helpful to locate research plots in a large stand, identify and
relocate potential pollution sources, or to identify and mark specific areas with in an area that have
been impacted by blight or disease (that you may want to return to at a later date). It is also possible
to upload Waypoints to a desktop computer (using DNR Garmin or GPS Utility or similar software
program).
To mark and save your current location as a waypoint:
1. Walk to the point where you want to obtain a waypoint (a location on
a stand experiencing drainage problems, an area with in an orchard
that may require additional attention, etc.).
2. Press down and hold the Click-Stick until the Mark Waypoint Page
appears (See Figure 5).
3. This GPS automatically assigns 3 digit numbers to waypoints (in this
example, it assigned 001 as the waypoint name). You can customize
the name of the waypoint. To change the name of the Waypoint, use
the Click-Stick to highlight the waypoint name field (in Figure 5, the
name field is 001).
Figure 5
4. Type the new name for the waypoint, using the Click-Stick to select
and enter the characters from the on-screen keyboard and select OK
(Figure 6).
5. You can also change the marker symbol associated with the waypoint
by selecting the marker (with the Click-Stick) and scrolling through
the different options (Figure 7).
Figure 6
6. Use the Click-Stick to scroll down to the OK button, and select the
OK button to save the Waypoint.
Figure 7
An Introduction to GPS
6
Application #2: Finding (navigating to) a Waypoint
Your GPS can serve as an “automatic pilot” to navigate you back to a previously defined Waypoint!
To navigate back to a previously defined waypoint, follow these steps…
1. Press and hold the MENU/FIND button on the left side of the GPS receiver (Figure 1)
2. On the FIND menu, select Waypoints using the Click-Stick (Figure 8)
3. Use the Click-Stick to select the desired waypoint from the list (Waypoints are typically
listed alphabetically).
4. Select the „Go To‟ option to create a direct line of travel to the Waypoint (Figure 9).
Bearing
Pointer
Compass
Ring
Figure 8
Figure 9
Figure 10
Figure 11
The map page is the default navigation page (Figure 10). At the top of the page there will be navigational directions. These directions will indicate a cardinal direction that will take you to your destination (Waypoint).
To use the Compass Page for navigation (Figure 11), hit the Page Button and go to the Compass
Page. The arrow in the center of the compass serves as the bearing pointer, which directs you to the
destination waypoint. The navigation page also informs you that you are 0.14 miles from the waypoint. At your current speed (0 miles/hour), you will reach the next destination in approximately 4
seconds and 4 seconds.
To stop navigating press the Menu button and select Stop navigation.
The Virginia Geospatial Extension Program
7
Application #3: Finding (navigating to) a Waypoint that
was defined by someone else
You may need to navigate to a Waypoint that was defined by someone else (i.e.. a landowner or
other constituent, a county official, a fellow extension agent or fellow extension specialist). This
person may have used a different GPS receiver (or even model) and may therefore provide you with
coordinate information (or, you can also obtaining coordinate information off of a Geographic Information System or other map).
Obviously, your GPS receiver can not navigate you to a coordinate pair (i.e. lat./ long, UTM, etc.) if
the coordinates are not stored on your GPS receiver as a waypoint. However, you can create a waypoint by manually entering coordinate information (i.e. lat/long., UTM, etc.) into the GPS receiver.
To create a waypoint by manually by entering its coordinates, follow these
steps:
1. Press in and hold the Click-stick to access the Mark Waypoint Page
2. Using the Click-stick, highlight the Location Field on the Mark Waypoint Page (Figure 12).
3. Enter the new coordinates using the numerical keyboard on the
screen. Highlight and press „OK‟ when finished.
Figure 12
Important Tip: In the United States, the first (latitudinal) coordinate will always have a “N” as a
prefix (as we are north of the equator). The second (longitudinal) coordinate will always have a
“W” as a prefix (as we are west of the prime meridian). In addition, the first digit after the “W”
should be entered as a “zero” (see illustration above). It is very important to identify and select
these prefixes when manually entering waypoints on your GPS!
4. Once the Waypoint coordinates have been manually entered and saved, you can then use the
„Go To’ or FIND function (see previous page) to navigate to that waypoint!
An Introduction to GPS
8
Application #4: Estimating Area Measurements
Estimating area measurements in the field is a necessary task for many application areas of extension
including business planning, forestry, and natural resource management. This GPS receiver has the
capability to estimate area measurements, even of curved and irregularly shaped polygons! The following procedure will not only generate area measurements, but will also provide perimeter measurements as well.
There are two techniques for estimating area measurements. These techniques include:
The Track Log Method
The Route Method
While the Track Log Method is used most often, both of these techniques are easy to learn, and are
described in this section.
Estimating Area Measurements: The Track Log Method (Option #1)
As you travel the perimeter of an area, the eTrex Venture HC records track
points and uses the resulting GPS track log to internally calculate the size of
the enclosed tract. This method works well when you can reasonably transport the receiver directly along the boundary of the tract. [If swamps, lakes,
cliffs, gorges, or grizzly bears get in your way, you may need to use the
route technique as an alternative!]. The active track log can hold up to
10,000 points.
On small and irregularly shaped tracts of land, you might want to increase
the track log interval - the frequency at which tracks points are recorded.
Figure 13
Otherwise, you will lose accuracy when the receiver occasionally “cuts
corners” as you travel the boundary. Go to: MAIN MENU > TRACKS >
highlight & select Setup. The Track Log Setup page (Figure 13) will open, you have choices here.
The default setting is Record Method: Auto (a combination of distance and time) and Interval: Normal. If you choose to keep the Auto setting, you can set the Interval to More Often or Most Often to
increase the frequency of track points. Instead of Auto, you can choose to record by Distance or Time, each with its own Interval choices.
Follow these steps to estimate area measurements:
1. Generally you should clear the current active track log just before you begin laying tracks. Go to: MAIN MENU > TRACKS > CLEAR. [If you
wish to save the previous track log, first select SAVE, then clear the log].
2. Push the Page button until you reach the Main Menu Page (Figure 13).
The Virginia Geospatial Extension Program
9
Figure 14
4. Use the Click-stick to scroll down and highlight the Tracks option.
5. Press the Menu button and select Area Calculation. The Area Calculation page should open (Figure 15).
6. The Area Calculation page will look very similar to the Map Page, BUT
will have a Start option at the bottom (see Figure 16).
7. You may need to reset the Area Calculation. This is done by hitting
the Menu button and selecting the RESET option.
Figure 15
8. Press <Start> and begin walking around the perimeter of the field/
parking lot / forest plot / etc. that you want to calculate an area calculation. The screen displays your progress. Zoom in or out as appropriate
to view your tracks.
9. Slightly before you return to your starting point, click on STOP. Your
receiver will automatically complete the loop with a straight shot from
your current position to your starting point. The enclosed area value
will be displayed in appropriate units. To change units, highlight and
click on the unit abbreviation to bring up a selectable list of choices
(square feet, square yards, square meters, hectares, square miles, etc.)
(Figure 17).
Figure 16
Figure
10. To see the area calculation or if the calculated solution is of value to
you, press <SAVE>. The Saved Track page will open (Figure 18).
However, before you hit save, you should record the data elsewhere. Once
a track log is saved, the total number of track points is condensed (to a
maximum of 500). The Venture HC allows a maximum of 10 saved tracks.
11. Don‟t despair if heavy tree cover causes you to occasionally lose contact with the satellites as you track. The GPS will “connect the dots”
and link your recorded track points in an attempt to estimate the enclosed area. View the saved track screen to decide whether or not the
integrity of the track was maintained.
Figure 17
12. To view all of your saved tracks, go to: MAIN MENU > TRACKS.
Figure 18
An Introduction to GPS
10
Estimating Area Measurements: The Route Method (Option #2)
For area calculation purposes, a route is a sequential set of perimeter waypoints linked together to
describe the boundary of a tract of land. The route method of area calculation has some definite
advantages. You don‟t need to travel along the entire border of the tract, as long as you can mark
the major corners and turns of the boundary line. For very large tracts and for areas with severe terrain restrictions, this may be the only practical GPS technique. The route method also allows you to
perform estimated acreage comparisons of several tracts after returning to the office.
Accuracy of the route method depends largely on your ability to locate and mark all the key twists
and turns that enclose the tract. It works best on rectangular areas with straight-line boundaries.
Irregularly bordered, oddly shaped tracts are more difficult to work with, requiring a much larger
number of waypoints to accurately describe the tract. The maximum number of waypoints in a route
is 250 with a maximum of 50 routes.
To set up a route for area calculation, first mark and save the key perimeter waypoints that you will
need. Go to: MAIN MENU > ROUTE. Click on NEW and then on the highlighted blank to insert
the first waypoint. Continue adding sequential waypoints until the route is complete.
Once you have returned to the office download your route using the free software GPS Utility. To
view the resulting area calculation, view your routes and select the View menu and then Reports.
This will being up a report detailing each leg of your route, total distance and the area enclosed by
the route.
e 15
GPS Utility and a user manual are available for
download at http://www.cnr.vt.edu/gep/tools.html
By using the Route Method to calculate area, a series of Waypoints are identified (Figure 19) at corners, at turns, and other
definition points along the area to be measured.
Figure 19
The Waypoints are then associated with a Route, and GPS Utility
is later used to calculate the area measurement for that particular
route, based on the associated Waypoints (Figure 20).
Figure 20
The Virginia Geospatial Extension Program
11
Application #5: The Trip Computer Page
The Trip Computer Page can also be used to estimate perimeter, or distance measurements. The
Trip Computer Page is not as applicable to extension agents as the previous described options for
estimating area and perimeter (see Application #4). However, this functions associated with the
Trip Computer Page is something that you should be familiar with. To
estimate perimeter or distance using the Trip Computer Page, follow
these steps.
1. You may need to configure your GPS, to ensure that perimeter
measurements are calculated in yards (by default, the units of measure are in miles). To change the measurement units, navigate to the
MAIN MENU page (Figure 25).
Note: If the default “statute” option is used, you will get Trip
Odometer measurements in feet until the distance reaches
528' (0.1mi.), at which time the receiver automatically switches to
hundredths of a mile (without yards ever being used).
Figure 25
If the “yards” option is selected, you will get Trip Odometer measurements in yards until the
distance reaches 1000 yards, at which time the receiver automatically switches to hundredths
of a mile (without feet ever being used). For these reasons, it is suggested that you use the
techniques outlined in Application #4 for estimating area and
perimeter measurements.
a. While on the Main Menu Page, use the Click-stick to select
SETUP. On the SETUP MENU page, select UNITS, and the
Units Setup Page will appear (Figure 26).
Figure 26
b. On the UNITS Setup Page (Figure 27), use the Click-stick to
scroll down and highlight Distance/Speed. Press the Clickstick, and a menu will appear. From the menu items, select
STATUE. This will enable you to view the perimeter measurements in feet. You are now ready to use the GPS receiver
to calculate the perimeter of an area.
Figure 27
An Introduction to GPS
12
2. After you have configured the unit to measure the perimeter in
statue, push the Page button until you reach the MAIN MENU and
then select the Trip Comp. icon. The TRIP COMPUTER PAGE
should open (Figure 28).
Figure 28
3. To estimate the perimeter of an area, you will be working with the Trip Odometer function on
the TRIP COMPUTER PAGE.
4. Make sure that before you begin, that the Trip Odometer is set to
“zero”. If the odometer is not set to zero, then follow these steps:
a. Use the Menu/Find button to bring up the Trip Computer Menu
options The MENU selection looks like Figure 29.
Figure 29
b. Press straight down on the Click-stick to open the RESET page. This will open the RESET
page. The RESET page is illustrated in Figure 30.
Figure 30
The Virginia Geospatial Extension Program
13
c. Use the Click-stick to highlight the RESET TRIP DATA option. Press down on the Clickstick to select it (note: the Odometer only displays units in miles).
d. Then use the Click-stick to scroll down to the Apply button, and press down on the Clickstick to reset the odometer.
e. Your TRIP Odometer is now set to zero and is ready for use! Press the PAGE BUTTON
and navigate to the TRIP COMPUTER PAGE (Figure 31).
6. Now that your Trip Odometer is set to zero, begin walking around
the field (parking lot, or any feature...). Notice that the odometer
changes as you walk. When you complete walking around the field,
you will need to make note of the Trip Odometer reading.
Figure 31
An Introduction to GPS
14
The MAP Page
So far, you have seen how the different pages on the GPS receiver can support some of your day to
day business application needs. The MAP PAGE, however, is a page that has not been summarized
yet. The MAP PAGE enables you to visualize your WAYPOINTS and TRACKS as maps that are
located on screen. You have the ability to zoom in and out of these maps to obtain more or less detail.
Your GPS receiver has some reference data (major streets and interstates) built into the GPS receiver. You can also obtain (i.e. purchase) digital topographic maps that can be downloaded to your
GPS unit for reference purposes (from GARMIN). However, you need to be aware that the topographic maps available for your GPS receiver are 1:24,000 but they are only available in sections of
the United States. Remember that you only have 24 MB of memory on your GPS so if you buy multiple extra maps you will have to take off what you are not using to put new maps on.
For additional information about the Extension Agent GPS Program, please contact:
John McGee
Virginia Geospatial Extension Specialist
319 Cheatham Hall (0324)
Blacksburg, VA 24061
http://www.cnr.vt.edu/gep
(540) 231-2428
[email protected]
The Extension Agent GPS Program is supported by
Virginia Cooperative Extension and
the Virginia Geospatial Extension Program
in partnership with:
The Virginia Tech Department of Forest Resources and Environmental Conservation
Virginia Tech College of Natural Resources
Additional Acknowledgements:
Mike Clifford, Sr. Extension Agent Emeritus, c/o Nottoway Extension Office, Nottoway, VA 23955
The Virginia Space Grant Consortium
The New Hampshire Geospatial Extension Program
The Virginia Geospatial Extension Program
15