1
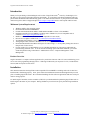
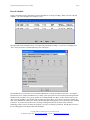
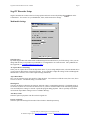
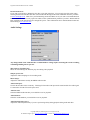
SageTV RecorderTM Installation & User Manual
Version 1.5
Copyright 2004 Frey Technologies, LLC All rights reserved
For additional support, go to www.sage.tv/support.html or email us at [email protected]
Table of Contents
Introduction..............................................................................................................3
Minimum System Requirements ............................................................................3
Product Overview ...................................................................................................3
Installation ................................................................................................................3
SageTV Recorder Quick Start................................................................................4
Using SageTV Recorder ..........................................................................................5
Watching TV ..........................................................................................................6
Recording TV .........................................................................................................6
Record Schedule .....................................................................................................7
SageTV Recorder Setup ..........................................................................................8
Multimedia Settings................................................................................................8
Video Settings.........................................................................................................9
Audio Settings ......................................................................................................10
Sources Settings....................................................................................................11
Troubleshooting Guide..........................................................................................13
Questions about Setup & Installation ...................................................................13
Questions about Watching Live TV .....................................................................13
Questions about Recording...................................................................................14
Copyright 2004 Frey Technologies, LLC All rights reserved
For additional support, go to www.sage.tv/support.html or email us at [email protected]
SageTV Recorder Installation & User’s Manual
Page 3
Introduction
Thank you for purchasing or downloading the trial version of SageTV RecorderTM from Frey Technologies, LLC.
We hope you enjoy SageTV Recorder and all its functionality. If you need any help during installation and setup
please utilize this manual and troubleshooting guide or our online discussion forum. If your questions still remain
unanswered, please submit a Support Request at www.sage.tv/request.html and we will respond within 72 hours.
Minimum System Requirements
Windows 98SE or later operating system
Recommended minimum 64MB RAM
Genuine Intel Pentium III 600 MHz or AMD Athlon 600 MHz or faster or VIA 800MHz
Installed compatible TV tuner/MPEG-2 encoding card or USB device (a list of compatible cards is
available at www.sage.tv/srrequirements.html)
MPEG-2 Software Decoder (bundled with the compatible TV tuner cards)
DirectX v9.0 or higher available from www.microsoft.com/windows/directx/
Java Runtime Environment v1.4.0 or higher available from java.sun.com/getjava
Analog/Digital Cable, Satellite or Broadcast TV for recording television
Recommended minimum 20 GB Free disk space for video storage, i.e. Great Quality Setting takes about 2
GB per hour of video stored
For best results, Frey recommends that you use a dedicated partition for video storage and format the
partition using 64k block sizes. To access the 64k formatting option in Windows 2000/XP, you need to
format the partition using Control Panel > Administrative Tools > Computer Management > Disk
Management.
Product Overview
SageTV Recorder is a computer software application for your PC that interacts with a TV tuner card allowing you to
receive television programming through your PC. With SageTV Recorder you can pause live TV, rewind and fastforward, and record your favorite shows.
Installation
This manual assumes that the SageTV Recorder compatible TV tuner/MPEG-2 encoding card or device has been
installed and is functioning properly. If not, please follow the installation instructions that shipped with your card
prior to installing SageTV Recorder. We recommend installing all of the software applications that came with your
card for testing purposes.
To install SageTV Recorder, run the executable (.EXE) file you downloaded after purchasing SageTV Recorder to
install SageTV Recorder on your computer. During installation you will need to specify the following installation
options:
Copyright 2004 Frey Technologies, LLC All rights reserved
For additional support, go to www.sage.tv/support.html or email us at [email protected]
SageTV Recorder Installation & User’s Manual
Page 4
Install Options:
If you will be using a Provideo 256 Series card, choose
to install the additional files here.
If you plan on using the Hauppauge PVR-250, PVR350 or USB PVR2 remote control to control SageTV
Recorder, tell SageTV Recorder to configure support
for those remotes here. Details on the configured
buttons are available on our website at
www.sage.tv/support.html.
If Java Runtime Environment v1.4 or later is not installed, the installer will install automatically. Once installation
is complete, launch the SageTV Recorder application and input your name and license key. After inputting your
license key SageTV Recorder will launch automatically.
SageTV Recorder Quick Start
When SageTV Recorder is run for the first time it will automatically recognize the installed TV tuner/MPEG-2
Encoding card on your PC. You should see video through the SageTV Recorder Video window right away. If the
Preview window is not visible, hit the Live Preview button,
to launch it. If video is not immediately visible,
Copyright 2004 Frey Technologies, LLC All rights reserved
For additional support, go to www.sage.tv/support.html or email us at [email protected]
SageTV Recorder Installation & User’s Manual
press the Select Source button,
Page 5
to switch between RF, Composite and S-video inputs. You should now see
video and have full timeshifting functionality at your fingertips. If you want to play back a previously recorded
video or audio file, select it through the file open window
. If you installed the Hauppauge remote
configurations at installation, you can also begin using the remote control for playback and timeshifting.
Using SageTV Recorder
Here’s a breakdown of each control panel button:
- Preview – launches the SageTV Recorder Video window (Ctrl + W)
- Record – records the current channel or the video you are watching (Ctrl + R)
- Stop – stops recording the current video (Ctrl + S)
- Source – changes the video source from RF, S-video or Composite (right-click
for options)
- Encoding – changes the Video Encoding or Recording Quality setting (rightclick for options)
- Scheduler – shortcut to SageTV Recorder Scheduler
- Setup – launches the setup options window (Alt + F7)
- File Open – to select any file for playback (Ctrl + O)
- Play/Pause – toggle for Play/Pause functionality (Ctrl + Space)
- Frame Step – steps through video frame by frame (Ctrl + N)
- Skip Forward – skips forward in 10 second increments (Ctrl + Left)
- Skip Back – skips back in 10 second increments (Ctrl + Right)
- Play Rate – press once to play video at 2:1 rate, twice for ½:1 rate, third time to
return to normal play rate (Ctrl + P)
You can also use the slider bar located at the bottom of the control panel to quickly jump around within recorded
video during playback. During full screen playback in SageTV Recorder, you can still use the keyboard commands
shown above or the preconfigured remote control commands for the Hauppauge supported remotes.
Copyright 2004 Frey Technologies, LLC All rights reserved
For additional support, go to www.sage.tv/support.html or email us at [email protected]
SageTV Recorder Installation & User’s Manual
Page 6
Watching TV
To watch TV through SageTV Recorder you must first open the Video window and then enter the channel to view.
This allows you to watch any channel immediately. However, if you wish to perform timeshifting functionality, you
must press Record to begin recording the current video stream. Now you have full timeshifting capability to Pause,
Skip Forward or Back and change the Play Rate. You can also change channels and the video will continue to
record until you stop the current recording.
The SageTV Recorder Video window can be resized by dragging the corners or you can quickly change the size
with a “right-click” of the mouse and choosing from the following options:
Unzoom (Ctrl + O)
Zoom x ¼ (Ctrl + 1)
Zoom x ½ (Ctrl + 2)
Zoom x 2 (Ctrl + 3)
Full Screen (Ctrl + F)
Once you stop the current recording, you will be prompted to either Save the file or just cancel if you don’t want to
save what was being recorded. You can then access the recorded file by using the File Open button.
Recording TV
There are a number of options for recording through SageTV Recorder:
Record Now – records the current video stream (Ctrl + R)
Record Schedule – opens the SageTV Recorder Scheduler to view scheduled recordings
Select File – select a file name to save as once recording is stopped
Record for Time – enter duration to record in HH:MM:SS format
Record for Size – enter file size to record in megabytes (MB)
Record Until Stopped – record current video stream until stopped
These options are accessible by “right-clicking” on the Record button. If you try to close SageTV Recorder by
clicking the “X” and recordings are pending, SageTV Recorder will be minimized to your System Tray. This will
also release the tuner/capture device for use by another application if necessary.
Copyright 2004 Frey Technologies, LLC All rights reserved
For additional support, go to www.sage.tv/support.html or email us at [email protected]
SageTV Recorder Installation & User’s Manual
Page 7
Record Schedule
SageTV Recorder includes a Scheduler to perform individual or recurring recordings. When you select “Record
Schedule” you will be brought to the following screen:
The SageTV Recorder Scheduler shows you all upcoming scheduled recordings. To enter new recordings select
“New” on the screen above and the following screen will appear:
The Schedule Event screen allows you to schedule individual or recurring recordings for the future. Tell SageTV
Recorder the source, channel and date for the recording. Then specify the Time the recording should begin and the
Duration of the recording. Now specify whether this recording should recur daily, weekly, custom weekly (select
days to record), monthly or just schedule this recording once as specified. If you select to recur this recording, the
same Time and Duration will be used. Specify the Encoding (Recording Quality) to be used and give this recording
a file name. If you have chosen this to be a recurring recording then the same file name will be used but a
numbering sequence will be used after the file name every time a recording is performed. Hit OK and you will see
this recording appear in the SageTV Recorder Scheduler.
Copyright 2004 Frey Technologies, LLC All rights reserved
For additional support, go to www.sage.tv/support.html or email us at [email protected]
SageTV Recorder Installation & User’s Manual
Page 8
SageTV Recorder Setup
SageTV Recorder has a robust selection of setup options and can be accessed by hitting the
Control Panel. You can now set your Multimedia, Video, Audio and Sources settings.
button on the
Multimedia Settings
Video Directory:
By default SageTV Recorder adds a folder within the SageTV Recorder directory for Video storage. Here you can
change that directory to any folder on your hard drive or a mapped drive on a home network. UNC pathnames are
also supported (i.e. \\COMPUTER\ShareName\Folder )
AV Capture Device and Setting:
Select your AV Capture device from the drop down menu. If you are using multiple tuners, select the default device
you are using for this instance of SageTV Recorder. If you would like to adjust the settings of the card through the
manufacturer’s software, select Video Capture Settings (Advanced).
Aspect Ratio Mode:
Here you can select the aspect ratio mode for Video playback. You can choose to Fill the screen, Force 4x3, Force
16x9 or Use Source. The default setting is to fill the screen.
Zoom Effects:
You have the ability to adjust the percentage at which the video is zoomed during playback. The default setting is
107 because it allows for overscan to the television set so you have no black borders on the video during playback.
You can modify these settings to “Stretch” a particular program during playback. This is especially useful when
used with the Aspect Ratio settings to remove “Window Boxing”.
Auto Resize Video:
Select this option to playback video files at their original size.
Preview on Startup:
Select this option for the SageTV Recorder Video window to launch upon startup.
Copyright 2004 Frey Technologies, LLC All rights reserved
For additional support, go to www.sage.tv/support.html or email us at [email protected]
SageTV Recorder Installation & User’s Manual
Page 9
Pentium 4/Celeron Fix:
Only used with Provideo series cards: Implements a fix for bugs caused by the Provideo cards in conjunction with
the Pentium 4 or Celeron processor. Any change to this setting requires an application restart to take effect.
Enable TV Out for PVR 350
Select if you are using the TV Out functionality of the PVR-350 card. To initialize you must first run the WinTV
2000 Application and then shutdown the WinTV 2000 application before launching SageTV Recorder. The new
Hauppauge drivers for the PVR-350 should alleviate this extra initialization step.
Enable Encoding Server:
Select if you are using SageTV Recorder to enable a remote encoder across a network in conjunction with SageTV.
Video Settings
Video settings allow you to specify the filters used to playback a video stream. Any changes to these settings
require restarting the current recording or disabling/enabling the live preview.
Rendering Filter:
Rendering Filter is the filter used to render the video. Use the Default setting unless you are experiencing problems;
then choose the Overlay setting.
Video Decoder:
Select the Video Decoder that you would like SageTV Recorder to use when decoding MPEG-2 video. These
options are related to the MPEG-2 decoders that are installed on your PC. They are commonly installed with video
cards, DVD players or TV tuner/Capture cards.
If you are using the Xcard as your video decoder select it from the list and set the Rendering Filter to default. Also
confirm that the Audio Decoder and Renderer are set to default as well.
DirectX Video Acceleration:
Here you can modify the MPEG settings as they relate to Video Acceleration. Choose a MPEG mode and then
specify whether or not you want to use a specific Deinterlacing mode. Leave this setting at default unless you are
experiencing problems with Video Acceleration.
Copyright 2004 Frey Technologies, LLC All rights reserved
For additional support, go to www.sage.tv/support.html or email us at [email protected]
SageTV Recorder Installation & User’s Manual
Page 10
Dscaler Deinterlacer:
If you want to use Dscaler to Deinterlace the video, select this option here. You can only select this option when
selecting the Elecard Video Decoder filter (not included with the SageTV Recorder installation but freely available
at www.moonlight.co.il). Then select your Deinterlacing mode and whether or not you want to use Double Refresh
Rate or Odd Field First. You may experience audio & video synchronization problems if you have “Double Refresh
Rate” enabled on a PC that doesn’t have enough CPU power. More information can be obtained about Dscaler and
Deinterlacing at www.dscaler.com/.
Audio Settings
Any changes made to the Audio Decoder or Audio Renderer settings require restarting the current recording
or disabling/enabling the live preview.
Mute Audio on Fast/Slow Play:
Mutes the sound during Fast and Slow play rates during video playback.
Samples per Second:
Adjusts the Audio sampling rate for recording audio.
Bitrate (kbps):
Adjusts the Audio Bitrate used by the MPEG audio encoder.
Audio Patch Input:
Used for the Provideo Series cards only. Tells SageTV Recorder what input on the sound card the live audio signal
is connected to from the TV tuner/Capture card.
Audio Decoder:
Select the MPEG Audio Decoder you would like to use for playback.
Audio Renderer:
Select the Audio Renderer you would like to use for playback.
Audio Playback Delay (msec):
Adjusts the Audio Playback Delay if you are experiencing a delay during playback during audio and video.
Copyright 2004 Frey Technologies, LLC All rights reserved
For additional support, go to www.sage.tv/support.html or email us at [email protected]
SageTV Recorder Installation & User’s Manual
Page 11
Sources Settings
IR Transmit:
Select the device name and COM port if you are using an IR Transmitter to send commands to your cable or satellite
set-top box.
S-Video or Composite:
Specify if you are using Composite or S-Video as your video source. Select from the drop down the device you are
using or select add/edit to program a new device or edit an existing one. A device is your cable box or satellite
receiver that is connected to your capture card. If your device is not listed, choose “Add a Device” and follow the
directions to program the IR transmitter for control of that device. After you add a device, you should add the 0-9
remote codes to it. These will be used to change the channels on your set-top box or receiver. You may also need to
program an “Enter” or similar button, as mentioned in the following section.
If you choose to Edit a current device, you have the following options:
Copyright 2004 Frey Technologies, LLC All rights reserved
For additional support, go to www.sage.tv/support.html or email us at [email protected]
SageTV Recorder Installation & User’s Manual
Page 12
You can now modify the following:
Channel Digits – maximum number of digits for input for your device (i.e. if the highest channel you
have is 999, then it’s 3 digits)
Button Delay – time delay (in milliseconds) between individual IR signals that are sent by SageTV
Recorder to your set-top receiver (i.e. when SageTV Recorder is changing the receiver channel to
“12”, this is the delay between sending the “1” and the “2”)
Sequence Delay – time delay between channel changes (i.e. SageTV Recorder just finished changing
your receiver channel to 12, this is the delay before SageTV Recorder may change the channel again)
Channel Enter – if you are required to press an ‘Enter’ button after entering the channel digits for the
device to accept the command, create a remote code for that button using ‘New’ and then select that
remote code here
New – press to enter a new remote code for programming
Rename – press to rename a remote code
Reprogram – press to reprogram a remote code for your set-top box or receiver
Test – press to test a remote code by sending it to your set-top box or receiver
Remove – press to remove a remote code
Once the settings are changed, click Apply, and then OK to save any changes.
TV Tuner Input:
Specify what type of RF connection if you are using this input as your video source. Then click “Auto Tune” to
tune the available channels.
Channel Setup:
Click to change the names of available channels as shown below:
Copyright 2004 Frey Technologies, LLC All rights reserved
For additional support, go to www.sage.tv/support.html or email us at [email protected]
SageTV Recorder Installation & User’s Manual
Page 13
Troubleshooting Guide
This Troubleshooting Guide should be your first reference for any questions or problems you are having with
SageTV Recorder. As new troubleshooting items are added, they will be available online at
www.sage.tv/troubleshooting.html. For additional support, you can post your questions in our discussion forum at
forums.sage.tv/forums/. If your question still remains unanswered, submit a support request at
www.sage.tv/request.html and we will reply within 72 hours.
Questions about Setup & Installation
SageTV Recorder is having problems controlling my cable box.
For SageTV Recorder to control your cable box you must use a third party IR transmitter like the Actisys
IR-200L available through Frey’s website. You can setup & configure the IR-200L through the Setup >
Sources.
I have the IR-200L configured properly but it’s missing some of my channel changes.
The IR-200L needs to be positioned so that your cable box can receive the Infrared commands that are sent
by the transmitter. Look to see where the Infrared receiver is on your cable box and position the IR-200L
so that it’s sending the commands to that Infrared receiver within the cable box. You may have to try a few
different positions to get the best results.
SageTV Recorder is having problems controlling my satellite receiver.
For SageTV Recorder to control your satellite receiver you must either use the Actisys IR-200L as
explained above for cable box control or a serial cable. If you are using a serial cable to control your
satellite receiver, please consult the 3rd party support section of our website at www.sage.tv/3rdparty.html.
Questions about Watching Live TV
I’m not getting any video through SageTV Recorder.
First check all your video connections to and from the PC. Also check to make sure you have the correct
connection/source selected in SageTV Recorder. Then launch the application that came with your TV
tuner/Capture card and see if you get any video there. If not follow the troubleshooting instructions from
the manufacturer. If you see video through the installed application, try using a different Video Decoder
for SageTV Recorder. The Video Decoder settings are accessible in Setup under the Video tab. You can
also check the discussion forum for other discussions related to your setup or create a new post.
I’m not getting any audio through SageTV Recorder.
First check all your audio connections to and from the PC. Then launch the application that came with
your TV tuner/Capture card and see if you hear any audio there. If not follow the troubleshooting
instructions from the manufacturer. If you hear audio through the installed application, try using a different
Audio Decoder for SageTV Recorder. The Audio settings are accessible in Setup under the Audio tab.
You can also check the discussion forum for other discussions related to your setup or create a new post.
The audio and video are out of sync during playback.
Try changing channels or restarting SageTV Recorder. If that doesn’t work, shut down SageTV Recorder
and reboot your computer. If you are still having problems on a regular basis, you can modify the Audio
Playback Delay in Setup.
Copyright 2004 Frey Technologies, LLC All rights reserved
For additional support, go to www.sage.tv/support.html or email us at [email protected]
SageTV Recorder Installation & User’s Manual
Page 14
I’m getting audio and video but the video is of poor quality, stuttering, hesitating, etc.
Try another video renderer or video decoder in Setup > Video. You must restart SageTV Recorder for
these settings changes to take effect.
Questions about Recording
Can SageTV Recorder record while my PC is not on?
For SageTV Recorder to record programs your PC must be on and the SageTV Recorder application must
be running.
Can I watch a program while it is being recorded?
Yes, you can watch a program as it is being recorded. Just launch the SageTV Recorder Video window by
button.
pressing the
Can I watch a different program while one is being recorded?
No, SageTV Recorder is not capable of recording one show while watching another. However, if you are
running multiple tuners you can run separate instances of SageTV Recorder to perform two recordings at
one time.
Copyright 2004 Frey Technologies, LLC All rights reserved
For additional support, go to www.sage.tv/support.html or email us at [email protected]