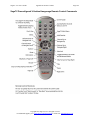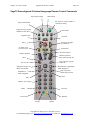
1
SageTV
TM
&
SageTV Client
Version 7.0
User’s Guide
Document Revision: 7.0-F
TM
SageTV V7.0 User’s Guide
Table of Contents
Page 2
Table of Contents
Chapter 1: Introduction ..........................................................................................8
How to use this Document.......................................................................................................... 8
Minimum System Requirements................................................................................................. 8
Product Overview ....................................................................................................................... 9
Navigational Tips........................................................................................................................ 9
Chapter 2: Installation and Setup ....................................................................... 11
Before Installing SageTV ......................................................................................................... 11
Before Installing SageTV Client............................................................................................... 11
Upgrading to a Newer Version ................................................................................................. 11
SageTV and SageTVClient Installation.................................................................................... 12
License Key Registration.......................................................................................................... 14
Starting SageTV........................................................................................................................ 15
Controlling SageTV’s Service Mode Options ...................................................................... 15
Start the SageTV User Interface ........................................................................................... 17
Starting SageTV Client ............................................................................................................. 18
Configure SageTV Client to Connect to the Server.............................................................. 18
Initial Configuration.................................................................................................................. 19
SageTV Quick Start Guide ....................................................................................................... 19
Sleeping, Waking, and Exiting SageTV ............................................................................... 19
Using Windows Power Management with SageTV ............................................................. 21
Watching Live TV ................................................................................................................ 21
Scheduling a Manual Recording........................................................................................... 22
Creating a Favorite................................................................................................................ 23
Intelligent Recordings........................................................................................................... 23
Watching a Recording........................................................................................................... 24
Chapter 3: SageTV Menus................................................................................... 25
Using the SageTV Menu Interface ........................................................................................... 25
Keyboard............................................................................................................................... 25
Mouse.................................................................................................................................... 27
Remote Control..................................................................................................................... 27
Entering Text via Remote Control........................................................................................ 28
Global Menu Features............................................................................................................... 28
The Menu Header and Footer ............................................................................................... 29
The Default Pop-up Menu: Video Menu Options................................................................. 30
SageTV Recording Types Indicators .................................................................................... 31
The SageTV Menus .................................................................................................................. 31
Main Menu............................................................................................................................ 32
Instant Search........................................................................................................................ 39
SageTV Recordings .............................................................................................................. 40
Copyright 2010 SageTV, LLC All rights reserved
For additional support, go to www.sagetv.com/support.html or email us at [email protected]
SageTV V7.0 User’s Guide
Table of Contents
Page 3
Recording Detail ................................................................................................................... 45
Airing and Video Options Dialog ......................................................................................... 46
Grouped Airings and Videos Options Dialog....................................................................... 50
Program Guide ...................................................................................................................... 53
Program Information............................................................................................................. 58
Series Information................................................................................................................. 59
Additional Airings ................................................................................................................ 60
Airing History ....................................................................................................................... 61
Recording Schedule .............................................................................................................. 62
Search.................................................................................................................................... 66
Search Results....................................................................................................................... 67
Browse By Category............................................................................................................. 70
Favorites Manager ................................................................................................................ 71
Favorite Details..................................................................................................................... 74
Create Timed Recording ....................................................................................................... 77
Recording Conflicts .............................................................................................................. 78
Music Browser ...................................................................................................................... 79
Song Detail............................................................................................................................ 87
Create Playlist ....................................................................................................................... 88
Photo Browser....................................................................................................................... 89
Video Browser ...................................................................................................................... 92
Video Detail .......................................................................................................................... 99
File Browser........................................................................................................................ 100
Video Conversions.............................................................................................................. 103
New Drive Detected............................................................................................................ 104
Record Command Options Dialog...................................................................................... 105
Online Services ................................................................................................................... 108
Weather ............................................................................................................................... 109
5-Day Forecast .................................................................................................................... 110
YouTube Video................................................................................................................... 111
Google Video ...................................................................................................................... 112
TV Show Editorials............................................................................................................. 113
Plugin Manager................................................................................................................... 114
Plugin Detail ....................................................................................................................... 118
Plugin Configuration........................................................................................................... 119
Chapter 4: Media Playback ............................................................................... 120
Supported Media Types .......................................................................................................... 120
Using the SageTV Media Playback Interface......................................................................... 120
A Note About Time Scroll Playback Mode........................................................................ 122
Video Playback ................................................................................................................... 123
DVD Playback .................................................................................................................... 131
Music Playback................................................................................................................... 135
Picture Viewing .................................................................................................................. 139
Chapter 5: Configuring SageTV........................................................................ 142
Copyright 2010 SageTV, LLC All rights reserved
For additional support, go to www.sagetv.com/support.html or email us at [email protected]
SageTV V7.0 User’s Guide
Table of Contents
Page 4
SageTV Setup ......................................................................................................................... 142
Configuration Wizard ......................................................................................................... 143
Configuration Wizard: General and User Interface Options .............................................. 144
Configuration Wizard: Media Center Options.................................................................... 152
Configuration Wizard: Configure TV Recording ............................................................... 154
Configuration Wizard: Configure Video Playback............................................................. 157
Source Wizard Summary .................................................................................................... 158
Source Setup ....................................................................................................................... 159
Source Details ..................................................................................................................... 165
Channel Setup ..................................................................................................................... 168
Remap Channel................................................................................................................... 173
Add Channel to Lineup....................................................................................................... 176
Channel Scan Results.......................................................................................................... 177
Channel Manager ................................................................................................................ 178
Parental Controls................................................................................................................. 179
Parental Control Restrictions .............................................................................................. 180
Detailed Setup: General Settings ........................................................................................ 181
Detailed Setup: Multimedia Settings .................................................................................. 185
Detailed Setup: Video/Audio Settings ................................................................................ 190
Detailed Setup: DVD Settings ............................................................................................ 193
Detailed Setup: Commands Settings................................................................................... 195
Detailed Setup: Server Settings .......................................................................................... 197
Detailed Setup: Advanced Settings..................................................................................... 199
Detailed Setup: Customize Settings.................................................................................... 204
System Information............................................................................................................. 215
System Messages ................................................................................................................ 216
SageTV Commands ................................................................................................................ 217
Sending Commands via Keystrokes ................................................................................... 217
Sending Commands via Infrared Codes ............................................................................. 217
Sending Commands via Windows Messages ..................................................................... 217
Sending Commands via Multimedia Keyboards and Remotes........................................... 218
List of All SageTV Commands........................................................................................... 219
Chapter 6: Troubleshooting Guide ................................................................... 229
General Crashes and Errors .................................................................................................... 229
Video Issues ............................................................................................................................ 231
Audio Issues............................................................................................................................ 232
Installation............................................................................................................................... 232
Customizations........................................................................................................................ 233
Infrared Devices...................................................................................................................... 234
License .................................................................................................................................... 234
EPG ......................................................................................................................................... 235
International ............................................................................................................................ 235
Misc......................................................................................................................................... 235
Client – Server Connection..................................................................................................... 236
Copyright 2010 SageTV, LLC All rights reserved
For additional support, go to www.sagetv.com/support.html or email us at [email protected]
SageTV V7.0 User’s Guide
Table of Contents
Page 5
Chapter 7: Frequently Asked Questions .......................................................... 237
General.................................................................................................................................... 237
Setup & Installation ................................................................................................................ 237
Watching Live TV .................................................................................................................. 238
Recording Programs................................................................................................................ 239
The SageTV EPG service ....................................................................................................... 240
Configuration & Customization.............................................................................................. 241
Firewall Settings ..................................................................................................................... 241
Chapter 8: Version History................................................................................ 243
Version 7.0.............................................................................................................................. 243
Version 6.6.............................................................................................................................. 246
Version 6.5.............................................................................................................................. 247
Version 6.4.............................................................................................................................. 248
Version 6.3-B.......................................................................................................................... 249
Version 6.3-A.......................................................................................................................... 249
Version 6.2.............................................................................................................................. 250
Version 6.1.............................................................................................................................. 251
Version 6.0.............................................................................................................................. 251
Appendix A: SageTV Properties Settings......................................................... 253
Configurable properties for SageTV Version 2.0 and later .................................................... 253
Appendix B: Adding Channel Logos ................................................................ 259
Appendix C: Managing Recording Files .......................................................... 260
Where to Store the Next Recording ........................................................................................ 260
No More Free Space ............................................................................................................... 260
Automatic Cleanup of Live TV .............................................................................................. 261
Appendix D: SageTV Command Line Parameters ......................................... 263
Appendix E: Remote Controls........................................................................... 265
SageTV Remote ...................................................................................................................... 265
Programming the STP-HD300 Remote Control ................................................................. 265
SageTV STP-HD300 Remote Control Layout ................................................................... 266
SageTV STX-HD100 and STP-HD200 Remote Control Layout ....................................... 267
Hauppauge Remote................................................................................................................. 268
Hauppauge Remote Control Installation Instructions......................................................... 268
SageTV Configuration Options for the Hauppauge Remote .............................................. 268
SageTV Preconfigured 34 button Hauppauge Remote Control Commands ...................... 269
SageTV Preconfigured 45 button Hauppauge Remote Control Commands ...................... 270
Streamzap Remote .................................................................................................................. 271
Streamzap PC Remote Control Installation Instructions .................................................... 271
Copyright 2010 SageTV, LLC All rights reserved
For additional support, go to www.sagetv.com/support.html or email us at [email protected]
SageTV V7.0 User’s Guide
Table of Contents
Page 6
SageTV Configuration Options for the Streamzap Remote ............................................... 271
SageTV Preconfigured Streamzap Remote Control Commands ........................................ 273
Appendix F: Infrared Receivers & Transmitters ............................................ 274
Evation’s IRMan (www.evation.com).................................................................................... 274
ACTiSYS IR-200L (www.actisys.com/ac200-220.html)....................................................... 274
USB-UIRT (www.usbuirt.com).............................................................................................. 275
Hauppauge IR Blaster ............................................................................................................. 275
Appendix G: Network Encoding ....................................................................... 276
Appendix H: Custom Recording Quality Settings........................................... 277
Appendix I: Playing DVDs and BDs from the Hard Drive............................. 278
Playing Hard Drive Based DVDs ........................................................................................... 278
Playing Hard Drive Based Blu-rays........................................................................................ 279
Appendix J: Using the SendMessage Utility..................................................... 281
Usage....................................................................................................................................... 281
Example Use ........................................................................................................................... 282
Appendix K: Closed Captions............................................................................ 284
Appendix L: Customization Development ....................................................... 285
SageTV Studio ........................................................................................................................ 285
Sharing Customizations via Plugins ....................................................................................... 285
Appendix M: SageTV Media Extenders........................................................... 286
Media Extender Installation................................................................................................ 286
Registering Media Extender Licenses ................................................................................ 286
Enable the Media Extender Server ..................................................................................... 286
Enable Connection to the Media Extender Server.............................................................. 286
SageTV HD Theater, models STP-HD200 and STP-HD300 ................................................. 287
SageTV HD Media Extender, model STX-HD100 ................................................................ 287
Hauppauge MediaMVP .......................................................................................................... 287
MVP Supported Media Types ............................................................................................ 288
Restart MVP After Installing a SageTV Upgrade .............................................................. 288
Using SageTV Studio with a Media Extender (optional) ....................................................... 288
Appendix N: SageTV Placeshifter Client ......................................................... 289
SageTV Placeshifter Client Installation.............................................................................. 289
Registering Placeshifter Licenses ....................................................................................... 289
Enable the Placeshifter Server ............................................................................................ 289
Enable Remote Access to your SageTV server .................................................................. 289
Copyright 2010 SageTV, LLC All rights reserved
For additional support, go to www.sagetv.com/support.html or email us at [email protected]
SageTV V7.0 User’s Guide
Table of Contents
Page 7
Create Placeshifter users ..................................................................................................... 290
Placeshifter Client Connections.............................................................................................. 290
Adding a Server .................................................................................................................. 290
Placeshifter Settings............................................................................................................ 290
Placeshifter Login ............................................................................................................... 291
Placeshifter Client Media Playback ........................................................................................ 292
Using SageTV Studio with a Placeshifter Client (optional) ................................................... 292
Appendix O: User Interface Themes ................................................................ 293
Adding Custom Images to an Existing Theme ....................................................................... 293
Creating a New Theme ........................................................................................................... 293
Appendix P: Operating System Differences..................................................... 295
SageTV for Windows ............................................................................................................. 295
SageTV for Mac...................................................................................................................... 295
SageTV for Linux OEM Edition............................................................................................. 295
Appendix Q: Third Party Software Libraries ................................................. 297
Apache License....................................................................................................................... 297
GNU LESSER GENERAL PUBLIC LICENSE v2.1 ............................................................ 300
GNU GENERAL PUBLIC LICENSE v2............................................................................... 308
Copyright 2010 SageTV, LLC All rights reserved
For additional support, go to www.sagetv.com/support.html or email us at [email protected]
SageTV V7.0 User’s Guide
Chapter 1: Introduction
Page 8
Chapter 1: Introduction
Thank you for purchasing or downloading the trial version of SageTV from SageTV, LLC.
SageTV is the most innovative and intelligent Media Center software and service for the PC.
SageTV offers more features than any standard PVR, as well as features not offered with any
other PC-based PVR software. We hope you enjoy SageTV and all of its functionality. If you
need any help during installation and setup please utilize this Guide, the Support section of our
website at www.sagetv.com/support.html and our online discussion forums at
forums.sagetv.com/forums. If your questions still remain unanswered, please submit a support
request at www.sagetv.com/request.html and we will respond to your inquiry within 72 hours.
Throughout the manual, the following formatting is used:
Commands are displayed in red. Clicking on the text while viewing the manual in PDF
form will jump to the description of that command. Example command: Select.
Cross references to menus and other links are displayed in blue. Click on the text to jump
to the referenced location. Example reference: Chapter 1: Introduction.
Links to web sites and email are displayed in blue and underlined. Example site:
www.sagetv.com.
How to use this Document
Rather than trying to read or browse this entire document at once, it is suggested that new users
start by simply reviewing this chapter and Chapter 2: Installation and Setup, which will provide
an overview of the installation process and how to start SageTV. Chapter 2 also contains the
SageTV Quick Start Guide, which will cover the basics of using SageTV.
For additional help during the initial setup, see Chapter 5: Configuring SageTV.
Information regarding setting up or using a Media Extender or the Placeshifter client is covered
in Appendix M: SageTV Media Extenders and Appendix N: SageTV Placeshifter Client.
Later, for additional information about SageTV usage, use the Table of Contents to find details
about the various menus (Chapter 3: SageTV Menus), playback (Chapter 4: Media Playback),
and assorted appendices at the end of the guide.
A list of the changes in the latest version can be found in Chapter 8: Version History.
Minimum System Requirements
Windows 98SE or later operating system
Recommended minimum 256MB RAM
Copyright 2010 SageTV, LLC All rights reserved
For additional support, go to www.sagetv.com/support.html or email us at [email protected]
SageTV V7.0 User’s Guide
Chapter 1: Introduction
Page 9
Genuine Intel Pentium III 600 MHz, AMD Athlon 600 MHz or faster or VIA 800MHz
Installed compatible TV tuner MPEG-2 or MPEG4/DivX encoding card or USB device.
(As of version 3.0, SageTV is now able to use both hardware and software encoders;
check the list of compatible cards and devices at www.sagetv.com/requirements.html.)
PCI/AGP bus graphics card with overlay. NOTE: While it is recommended that your
graphics card drivers support DirectX9 for optimum performance, it is not required.
DirectX v9.0 or higher available from www.microsoft.com/windows/directx
Java Runtime Environment v1.4 or higher available from java.sun.com/getjava
Analog or Digital Cable, Satellite, or Broadcast TV for recording television
Internet Connection (for Programming Guide Data Service)
20 MB Free disk space for SageTV application, database, and documentation
Recommended minimum 20 GB Free disk space for video storage, i.e. Great Quality
Setting takes about 2 GB per hour of video stored
For best results, SageTV recommends that you use a dedicated partition for video
storage.
Currently, SageTV provides electronic programming guide data service (the "EPG
Service") for the US and Canada to End Users at no charge. End User acknowledges that
SageTV reserves the right to discontinue provision of the EPG Services or may
separately charge End Users for provision of the EPG Service.
Product Overview
SageTV is a computer software application and service for your PC that interacts with a TV
tuner/MPEG-2 encoding card allowing you to receive television programming through your PC.
With SageTV you can pause live TV or rewind and fast-forward while recording. The SageTV
EPG service adds an approximately 14 day integrated programming guide that lists all upcoming
programs based on your service provider. This service also gives you a Favorites ManagerTM,
One-Touch Recording and Intelligent RecordingsTM (a SageTV exclusive), which records
programs based on your prior viewing habits. SageTV also supports the playback of most
standard non-proprietary media file types including your Music, Photos and Video collection. In
addition, SageTV will support multiple tuner devices to record more than one show at a time.
With the addition of SageTV Client, you can extend the same functionality of SageTV to any PC
on your network. With SageTV Client you can also stream Live and Recorded MPEG-2 Video
and Music. SageTV Extenders can be used to extend your viewing to any TV on your local
network without the need for additional PCs. Use SageTV Placeshifter to access your home
SageTV content from any remote location via the internet. More information about SageTV,
SageTV Client, SageTV Placeshifter, and SageTV Extenders is available on our website at
www.sagetv.com.
Navigational Tips
Before you use SageTV there are a few Navigational Items we want to point out when using the
application:
SageTV uses the Left and Right commands to allow you quick navigation through
menus. Most menus can be exited by using Left and most items can be selected by using
Copyright 2010 SageTV, LLC All rights reserved
For additional support, go to www.sagetv.com/support.html or email us at [email protected]
SageTV V7.0 User’s Guide
Chapter 1: Introduction
Page 10
Right. Two places where this doesn’t hold true are in the Live TV Guide and during
Media Playback. When using SageTV with a mouse, the left arrow icon in the upper lefthand corner of the screen is for Back. Instead of implementing a right arrow icon, items
can just be selected with the mouse by left-clicking on them.
SageTV uses the TV command to allow you to jump quickly between the currently
playing media and the last menu you viewed. This command is linked to the “Back”,
“Exit”, or “TV” buttons on the supported remotes (see: Appendix E: Remote Controls)
and to “Ctrl-V” with the keyboard.
Throughout many of the menus in SageTV are different viewing options to display video
preview windows, change sorting options, and to provide options menus when media is
playing. The Options command provides quick access to these menus and is linked to
“Ctrl-O” on the keyboard and right-click on the mouse. The linked remote codes are
shown at the end of this document in Appendix E: Remote Controls.
When playing back Music, the Channel Up and Channel Down commands are used to
switch tracks. When playing back a DVD, the same commands are used to switch
chapters.
Clicking on the SageTV logo at any time will bring you to the Main Menu.
Copyright 2010 SageTV, LLC All rights reserved
For additional support, go to www.sagetv.com/support.html or email us at [email protected]
SageTV V7.0 User’s Guide
Chapter 2: Installation and Setup
Page 11
Chapter 2: Installation and Setup
Before Installing SageTV
Prior to installing SageTV, it is recommended that you first install the compatible TV
tuner/MPEG-2 encoder card or USB devices which you plan to use with SageTV. Please follow
the installation instructions that shipped with your devices prior to installing SageTV. We
recommend installing all of the software applications that came with your devices for testing
purposes. Once these devices have been installed, make sure they are functioning properly with
the software that came with them. A list of compatible cards and devices is available at
www.sagetv.com/requirements.html.
Before Installing SageTV Client
The SageTV Client software will only function when it is able to connect to the SageTV
software across a network connection; therefore, SageTV should already be installed and running
on a separate PC before installing and configuring SageTV Client. Before you use the SageTV
Client software, you will need to enable the client-server functionality of SageTV on the server.
From the Main Menu of SageTV, select Setup, then select Detailed Setup, choose the Server
tab, and “Enable” the SageTV Server option.
Once the server is enabled and you have made a note of the server name or IP address for the PC
where SageTV is installed, you can now proceed with installing and running the SageTV Client
software on a separate PC. You need to have a separate licensed copy of the SageTV Client for
each PC you plan to use it on.
Upgrading to a Newer Version
If you are already using SageTV and wish to install a newer version, there are three basic steps to
follow:
1. Exit SageTV – Before installing a new version, you must first exit SageTV or
SageTVClient completely; do not just put it to sleep. See Exiting SageTV for exiting the
UI portion. Note: If you are using service mode, the installer will stop the service
automatically; however, you will still need to close the UI before running the installer.
2. Install the New Version – Once SageTV is no longer running, simply run the new
installer. The installation process will automatically uninstall the previous version of
SageTV, so there is no need to manually uninstall the old version first, unless you are
using Windows Home Server, in which case you should uninstall the old version of
SageTV before running the SageTV for WHS installer. Important: Make sure the
Copyright 2010 SageTV, LLC All rights reserved
For additional support, go to www.sagetv.com/support.html or email us at [email protected]
SageTV V7.0 User’s Guide
Chapter 2: Installation and Setup
Page 12
installer uses the same destination folder that the previous version used. Usually, the
installer will detect this folder automatically, but be sure to check that it is correct.
3. Start SageTV – After the installation process is complete, you may restart SageTV and
continue using it as before.
Notes:
If using a Hauppauge MediaMVP as a SageTV Media Extender, be sure to unplug the MVP,
then plug it in again after installing a SageTV upgrade. This will force a full reboot of the MVP
so that any media extender changes will be used by the MVP.
If using SageTV in service mode and the service was configured to log in as a user with a
password, be sure to reconfigure the username and password after the upgrade installation, since
the installation process may clear those settings.
SageTV and SageTVClient Installation
Note that SageTV requires Java Runtime Environment v1.4 or later. If it is not installed, the
installer will install Java automatically.
To install either SageTV or SageTV Client, run the executable (.EXE) file you downloaded after
purchasing the software. Installation will proceed as follows:
1) Introduction. Click Next.
2) Read the License Agreement. If
you accept the agreement, click that
option and then Click Next.
Installation will not proceed unless
the agreement is accepted.
Copyright 2010 SageTV, LLC All rights reserved
For additional support, go to www.sagetv.com/support.html or email us at [email protected]
SageTV V7.0 User’s Guide
Chapter 2: Installation and Setup
Page 13
3) Enter your personalization information
and choose whether SageTV will be
available to anyone on the computer, or
only to the chosen user. Then select Next.
4a) Choose the destination folder where
the software is to be installed. When
installing an upgrade, be sure this
folder is the same as the one used by
the previous version.
4b) If you will be using a Provideo 256
Series card, select the option to install
the additional files for those cards.
4c) If you will be using the infrared remote control from the Hauppauge 350, 250, 150,
USB2, or other Hauppauge tuners with a remote, select the option to configure the support
for that remote control device. The Hauppauge remote software must be installed prior to
installing SageTV in order for support for the remote to be configured by this installer.
Note: Installing an upgrade will modify the remote’s configuration file. If you have
customized that configuration file, save a copy of it before installing an upgrade.
Copyright 2010 SageTV, LLC All rights reserved
For additional support, go to www.sagetv.com/support.html or email us at [email protected]
SageTV V7.0 User’s Guide
Chapter 2: Installation and Setup
Page 14
Installation is ready to begin. Select Next
when done making choices:
5a) Choose whether to view the setup
documentation after installation is complete.
5b) Choose whether to run the SageTV
Service Control application after installation
is complete. See Controlling SageTV’s
Service Mode Options. Note: SageTV only;
this option will not be available for
SageTVClient or on older Windows
versions such as 95, 98, or Me.
5c) Choose whether to allow the SageTV installer to modify the Windows firewall settings so
that it has access to your network.
6) Installation is complete. Click
on Finish.
License Key Registration
Once installation is complete, launch SageTV or SageTV Client in order to register the software.
The first time SageTV is launched, you will be presented with a reminder to enter your license
key:
If you are using the 21-day trial of SageTV, just click OK to bypass the license key screen. If
you have already purchased the software and have received your license key, select Enter Key.
Copyright 2010 SageTV, LLC All rights reserved
For additional support, go to www.sagetv.com/support.html or email us at [email protected]
SageTV V7.0 User’s Guide
Chapter 2: Installation and Setup
Page 15
After selecting the Enter Key button, you will be asked to enter your license key, as it was
received in an email from SageTV when you purchased the software.
To activate your registration of SageTV, enter your name and
license key exactly as it was provided to you.
Tip: An easy way to enter this information without accidentally
making a mistake is to select the key in the email you received,
copy it to the Windows clipboard (Ctrl+C), then paste it into the
entry field for the key in the above dialog (Ctrl+V).
Starting SageTV
SageTV (not SageTV Client) can be run in two different modes:
Single Mode – SageTV’s default mode of operation is to use a single program:
o SageTV.exe – When service mode is disabled, this single application will handle
displaying the user interface along with performing all core recording, scheduling,
etc., functionality. When used in this mode, all recording will stop if this
application is exited.
Service Mode – SageTV’s optional mode of operation is to run two separate programs.
o SageTVService.exe – A Windows service application that runs out of sight, with
no user interface visible. This service begins running automatically when
Windows starts and is the program that handles all recording, scheduling, and
other behind-the-scenes functions.
o SageTV.exe – The application that displays the user interface for you to interact
with. This program can be exited while still allowing the service to continue
recording and performing all its other functions.
Note: SageTV will not run in Service Mode when
using an operating system that does not use services.
Service Mode is available on the newer Windows
versions such as NT, 2000, XP, Vista, and Windows
7. The service will not be installed and will not be
available when using Windows versions such as 95,
98, or Me.
When viewing the list of running
processes on a PC, two of each
SageTV process will be listed, so you
will see two SageTV.exe and/or two
SageTVService.exe processes.
Controlling SageTV’s Service Mode Options
As mentioned above, SageTV’s optional mode of operation is to run a service to control all
recording and core functionality, and a separate application for the user interface. The service is
Copyright 2010 SageTV, LLC All rights reserved
For additional support, go to www.sagetv.com/support.html or email us at [email protected]
SageTV V7.0 User’s Guide
Chapter 2: Installation and Setup
Page 16
set to begin running automatically when Windows starts. To control the service, run the SageTV
Service Control application: go to Start > All Programs > SageTV, and click on
SageTVServiceControl. Note: This program will run automatically after installation is complete,
if the option to do so was checked in step 5b of the installation process.
This program will display a window with the following options:
Use SageTV Service: Yes/No – Choose the Enable or
Disable buttons beneath this option to turn service mode on
or off. Note: If the service mode is disabled, the user
interface application will control all functionality that the
service would otherwise have performed, but the user
interface application would have to be restarted in order for
it to take over that functionality.
SageTV Service State: Started/Stopped – Choose Start
to start the service if it is not yet started. Choose Stop to
stop the service if it is already running. Note: Stopping the
service will prevent shows from being recorded.
Run Service as User: LocalSystem/UserName – By default, a service runs only on the
local system, so it does not have access to any network drives. If you wish to have
SageTV access a drive on another computer on your network, you will have to select
Change User in order to enter the name of a user account on your computer and the
user’s password – the user account must have a password in order for the service to be
able to use that account. See below for details regarding accessing network drives while
using the service.
Enable Service Recovery – Check this option to configure the service to automatically
restart if it stops running due to some system error.
Refresh – Refresh the information displayed in this window.
About – Displays information about configuring the service.
Accessing Network Drives with the SageTV Service
If you wish to have SageTV access any network drives, keep in mind that a service cannot
access mapped drives, therefore network drives must be configured in SageTV as UNC Paths.
See Detailed Setup: General Settings regarding configuring video and media center import
directories.
UNC paths use a format of: \\ServerName\ShareName\DirectoryName, where ServerName is
the network name of the PC to be accessed, ShareName is the name of the shared path on the
networked PC, and DirectoryName is the name of the subdirectory below the shared location.
Copyright 2010 SageTV, LLC All rights reserved
For additional support, go to www.sagetv.com/support.html or email us at [email protected]
SageTV V7.0 User’s Guide
Chapter 2: Installation and Setup
Page 17
Note: As mentioned above in the description of the SageTV Service Control application, the
service must be configured to use a user account in order to access UNC paths on the
network. The user account must have a password or else the service will be unable to start. To
create or change a user account in Windows, go to the Control Panel and run the application to
control user accounts and passwords. Also, make sure that the shared network directories
grant write permission, or else SageTV will not be able to store any recordings.
Should I Use SageTV in Service Mode?
It is not required that SageTV run in Service Mode. The advantage of using the service is that the
ability to record TV shows is not dependent on running the user interface portion of the program.
This means that the user interface portion can be started or exited any time you wish. Also, if
some error caused the user interface portion to stop running, your recordings that are in progress
would not be affected.
One disadvantage of using the service is that it cannot be used to access network mapped drives.
If you are already using mapped drives, it is recommended that you either convert them to use
UNC paths or not use the service. Remember: accessing UNC paths requires that the service be
configured to use a user account with a password.
Changing Property File Settings in Service Mode
When running SageTV in Service Mode, the SageTV Service uses Sage.properties for its
properties, while the SageTV UI uses SageClient.properties.
When not using the Service Mode, the SageTV UI will get its settings from Sage.properties.
See Appendix A: SageTV Properties Settings for more details.
Start the SageTV User Interface
Regardless of whether SageTV is configured to run as a service or not (above), starting the user
interface portion is always the same: to start SageTV, do one of two things:
Double click on the SageTV icon on your Windows desktop.
or
Go to Start > All Programs > SageTV, and click on SageTV.
The program will then launch, displaying the SageTV splash screen telling you that the program
is loading. Once initialization is complete, it will display its Main Menu.
Note: If SageTV is already running, but sleeping in the system tray, when you start it, it will
wake itself from the system tray rather than start running another copy of the program.
Copyright 2010 SageTV, LLC All rights reserved
For additional support, go to www.sagetv.com/support.html or email us at [email protected]
SageTV V7.0 User’s Guide
Chapter 2: Installation and Setup
Page 18
Starting SageTV Client
SageTV Client does not have a service mode like SageTV (above) does, so it can only be run as
a non-service Windows application. Remember: to use SageTV Client, SageTV must be
installed on another computer on your network and configured to act as a server; see Before
Installing SageTV Client.
To start SageTV Client (SageTVClient.exe), do one of two things:
Double click on the SageTVClient icon on your Windows desktop.
or
Go to Start > All Programs > SageTV, and click on SageTVClient.
The program will then launch, displaying the SageTV Client splash screen telling you that the
program is loading. Once initialization is complete, it will display its Main Menu.
Notes: If SageTV Client is already running,
but sleeping in the system tray, when you
start it, it will wake itself from the system
tray rather than start running another copy of
the program.
When viewing the list of running processes on
a PC, two of each SageTV process will be
listed, so you will see two SageTVClient.exe
processes.
Configure SageTV Client to Connect to the Server
Since SageTV Client must always connect to SageTV on the server computer, you will be asked
to select a server from the list presented when the client is launched, or to input the name or IP
address of the SageTV server. Note: If the server and/or client systems are using a firewall to
protect your networked PCs, you will need to allow SageTV and SageTVClient permission to get
through that firewall. Depending on the firewall, you may need to specify which ports should be
opened. For the client – server connection, those ports are 7818 and 42024. Port 8270 is used
when the client is automatically looking for the address of any available servers.
After choosing the server or inputting the name or IP
address of the server, for example: HTPC if that is the
name of the server system, or 172.16.1.33 if that is the IP
address, select OK to continue.
Normally, you will be asked to enter this information
every time SageTV Client is launched; however, you may wish to configure SageTV Client to
automatically connect to the server on its own. To do that, from the Main Menu of SageTV
Client, select Setup, then select Detailed Setup, choose the General tab, and select the button
next to Automatically Connect to Server. That option will then change from displaying No to
displaying the name or IP address of the server, which you previously entered when SageTV
client was started.
Copyright 2010 SageTV, LLC All rights reserved
For additional support, go to www.sagetv.com/support.html or email us at [email protected]
SageTV V7.0 User’s Guide
Chapter 2: Installation and Setup
Page 19
Initial Configuration
Important: For the setup process to complete successfully, please be sure your computer is
connected to the internet before continuing with the Configuration Wizard. In addition, if you are
using a firewall, SageTV needs to be able to get through the firewall to download the EPG data
via port 7760. That port may need to be opened in the firewall to allow SageTV through. See
Firewall Settings for more port information.
The first time that SageTV is run, you will be asked to complete the entire Configuration
Wizard, where you will set various program options, including your country, language, user
interface style settings, and video capture device configuration. For a step-by-step description of
this process, please see the Configuration Wizard.
You must finish the entire Configuration Wizard, or else the wizard process will continue to
restart automatically. Also, if your configuration settings are ever cleared somehow, you will
automatically be taken to the Configuration Wizard again.
SageTV Quick Start Guide
From this point on, “SageTV” will be used to reference both SageTV and SageTV Client, since
the user interface for both programs is the same, except where noted. To help start using
SageTV, the following sections will cover the basics of putting SageTV to sleep, waking it again,
or exiting it, along with simple walkthroughs for watching live TV, scheduling a manual
recording, creating a Favorite, and watching a recorded show. For information about starting
SageTV, see Starting SageTV or Starting SageTV Client.
Sleeping, Waking, and Exiting SageTV
SageTV has three states it may be in:
Running: The SageTV display is visible. While running, you can interact with SageTV,
making use of the menus and its media playback capabilities.
Sleeping (or Standby mode): The SageTV display is either not visible or is shown in its
screen saver state. If the screen saver is not used, the SageTV window will be minimized
to an icon in the system tray, next to the Windows taskbar.
Closed: SageTV is not running at all.
How the State of SageTV affects Creating TV Recordings
The state of SageTV Client does not affect the ability of SageTV to be able to record TV shows.
Copyright 2010 SageTV, LLC All rights reserved
For additional support, go to www.sagetv.com/support.html or email us at [email protected]
SageTV V7.0 User’s Guide
Chapter 2: Installation and Setup
Page 20
If using the SageTV Service (see Controlling SageTV’s Service Mode Options) and the service
is running, TV recordings will continue regardless of the state of the SageTV user interface. If
the service is stopped, no TV shows will record.
If not using the SageTV Service, SageTV will only record TV shows if it is Running or
Sleeping.
Sleeping SageTV
The Power command may be used to put SageTV to sleep or into standby mode. By default, that
command is assigned the Ctrl+Z keystroke. Or, you may use the Standby option on the Main
Menu.
If SageTV is running in full screen mode when you put it to sleep, it may switch to its screen
saver or minimize itself to the system tray on the Windows taskbar, depending on the
configuration options. (See Screen Saver Options in Detailed Setup: General Settings.) If it is
running in a window, it will minimize itself to the system tray. Putting SageTV to sleep will stop
any live TV that is not a scheduled recording. While sleeping, all shows scheduled to be recorded
will still be recorded.
It is not necessary to put SageTV to sleep, but doing so causes it to hide its window from view,
making it easier to focus on using your computer for something else, and also causes it to stop
recording live TV, all while SageTV continues to record your scheduled shows. See How the
State of SageTV affects Creating TV Recordings, above.
Waking SageTV
While SageTV is sleeping in screen saver mode, click the mouse, press any key, or press any
remote button to awaken SageTV. If it is sleeping in the system tray, you may right click on the
icon to see the following options:
Restore SageTV – Wake SageTV and display its window again.
Exit SageTV – Close SageTV completely. It will no longer be running and will be
unable to record any upcoming shows.
Cancel – Cancel and close the pop-up menu. This has no effect on SageTV.
Exiting SageTV
To exit SageTV while its window is open, instead
of putting it to sleep, you may use Alt+F4 on the
keyboard, or click on the X on the upper right
corner of the window if SageTV is in windowed
mode.
See Detailed Setup: Customize Settings
for an option regarding putting SageTV
to sleep instead of exiting it when using
ALT+F4 or clicking on the X.
Note: Exiting SageTV instead of putting it to sleep may affect its ability to create TV recordings.
See How the State of SageTV affects Creating TV Recordings.
Copyright 2010 SageTV, LLC All rights reserved
For additional support, go to www.sagetv.com/support.html or email us at [email protected]
SageTV V7.0 User’s Guide
Chapter 2: Installation and Setup
Page 21
Using Windows Power Management with SageTV
SageTV interacts with Windows power management settings while running, automatically
handling the following situations:
The Windows screen saver will be disabled while the SageTV interface is active (such as
when playing a video or when there is user activity on the menus), and the monitor will
not power-off.
If Windows is configured to go into standby mode after a period of inactivity, SageTV
will set a timer for the system to resume operations in time to record a Favorite or
Manual Recording. If needed, all capture devices and video hardware will be reinitialized
so that SageTV will continue to be able to use them. Note: SageTV will not wake the
system for Intelligent Recordings.
Watching Live TV
The first thing to remember about watching live TV is that SageTV is always recording, since it
first saves shows as recordings on your hard drive. Then, SageTV plays the recording from that
file. So, Live TV goes from the encoder card to your hard drive, then gets read by SageTV,
decoded, and shown on the SageTV Video Playback display. Due to this process, live TV viewed
through SageTV may be a few seconds behind when compared to connecting your cable TV or
satellite line directly to your TV. The benefits, however, are that you get full use of SageTV’s
PVR functionality, including: pausing TV playback, rewinding, fast forwarding, saving the
recording for later viewing, and so on.
If you wish to watch live TV, the simplest ways to do so are to start SageTV and then use the
Watch Live TV option on the Main Menu, or use the TV or Live TV commands. Either one of
those will take you immediately from the Main Menu to live TV. When starting live TV in this
way, however, playback begins on the last used channel. It is easy to change channels at that
point by entering a channel number, then using the Select command (Enter key). You can also
use the Channel Up or Channel Down commands (Page Up/Page Down keys). See Video
Playback for more playback details.
To begin watching a show you select as live TV, rather than simply starting on the last used
channel, select Program Guide from the Main Menu to see a grid layout of the TV program
listings. (Note: If you have just recently set up SageTV, it may take a few minutes for the guide
data to be downloaded, so parts of the guide may say “No Data”.) Scroll through the grid to find
a currently airing show that you wish to watch and Select it with the Enter key, then select Watch
Now (or use the Play command while the show is highlighted). Playback of that show will begin.
For more details about using the program listings, see: Program Guide. Again, see Video
Playback for playback details.
Once live TV is started, it will continue recording until you do one of the following three actions:
Copyright 2010 SageTV, LLC All rights reserved
For additional support, go to www.sagetv.com/support.html or email us at [email protected]
SageTV V7.0 User’s Guide
Chapter 2: Installation and Setup
Page 22
Put SageTV to sleep. Unscheduled recordings of live TV will stop, but all scheduled
recordings will continue while SageTV is sleeping.
Watch a prerecorded show.
Use the Stop command to stop the playback of the currently playing video. When you use
Stop while watching an unscheduled recording (live TV), the recording will cease. Using
Stop while watching a scheduled recording will only stop playback of that recording; the
actual recording process will continue.
Live TV will record at the default Recording Quality, as set in Detailed Setup: Multimedia
Settings. If you happen to be watching a scheduled recording as it is being recorded, the
recording will continue at the quality it was already set to use. Note: the recording quality setting
applies to analog tuners, which digitize the analog TV signal; digital tuners simply save the
digital TV stream as it is received and are thus not affected by any recording quality setting.
Watching Live TV When a Scheduled Recording Starts
While watching Live TV, if a scheduled Manual Recording or Favorite (described later in this
section) is coming up on a different channel and the tuner being used for Live TV is needed to
record that show, then a pop-up dialog will be shown about 5 minutes before the needed channel
change, asking whether it is OK for SageTV to change the channel for the upcoming recording.
You can choose whether to allow the channel change, but if you do not respond, then SageTV
will change the channel when needed. Note: If an Intelligent Recording (also described later in
this section) is coming up, that IR show will be ignored and live TV will automatically continue.
Scheduling a Manual Recording
A Manual Recording is a recording resulting from using the Record command to instruct
SageTV to record a specific airing of a show. These recordings have the highest priority of all
recording types and will never be automatically deleted by SageTV; for example: they will not
be deleted to make room for new recordings. If you wish to delete such a recording, use the
Delete option on the Airing and Video Options Dialog for the recording.
As an example of creating your first Manual Recording, from the Main Menu, use the Right
arrow or Select command (Enter key) to choose the TV > Program Guide menu item. Scroll
through the TV program listings to find a show you would like to record. While that show is
highlighted, use the Record command (Ctrl+Y) and then select Record this show to
immediately mark it as a show to record, or use the Select command, choose Record Options,
then select Record this show.
To see that the show has been scheduled for recording, return to the Main Menu, choose TV >
Recording Schedule. Scroll through the list of scheduled recordings to see the one you just
added. Manual Recordings have bold titles and have a Manual Recording icon on them.
Copyright 2010 SageTV, LLC All rights reserved
For additional support, go to www.sagetv.com/support.html or email us at [email protected]
SageTV V7.0 User’s Guide
Chapter 2: Installation and Setup
Page 23
Creating a Favorite
Favorites are shows that you want SageTV to record every time they are aired. You can specify
that SageTV record the airings based on whether they are a first run, rerun, either first run or
rerun, or on a specific channel, along with other options. SageTV will only record one airing of
each episode, rather than recording every single airing, as long as the guide data for the show
contains enough information for it to be able to tell one episode from another. Also, once an
episode has been watched, it will remember that the episode was watched, even if the recording
is later deleted, and will not record the same episode again. Taking all this into account, SageTV
will attempt to create a recording schedule so that it can record as many unique airings of the
show as it can. If it is unable to record one or more of the airings due to conflicts with other
scheduled recordings, you will be notified of such conflicts and can decide what action to take on
the Recording Conflicts menu.
Scheduled Manual Recordings take precedence over Favorites, while Favorites have a higher
priority over Intelligent Recordings. You can manage your Favorites from the Favorites Manager
and can choose a Favorite from that menu to go to the Favorite Details menu where you will be
able to set the options for that Favorite.
To create your first Favorite, you could go through a similar process as with Scheduling a
Manual Recording, above. However, to try something new, use the Right arrow to choose
Search > TV Airings > Search Titles from the Main Menu. On the Search menu, begin typing
the name of a series that you regularly watch. When you see its title in the list on the right hand
side of the screen, select it to see its future airings. Choose one of the airings. In the resulting
pop-up menu, choose Record Options, then select Add this show as a Favorite. The show will
be added as a new Favorite and you will then be taken to the Favorite Details menu, where you
can view the default settings for that Favorite and change them. When done, choose Back from
the Favorite Details menu. You have now created a Favorite.
To see that the show has been scheduled for recording, return to the Main Menu, choose TV >
Recording Schedule to view the Recording Schedule. Scroll through the list of scheduled
recordings to see the entries for the Favorite you just created. Favorites have bold titles and have
a Favorite icon on them.
Intelligent Recordings
SageTV offers unique functionality like no other PVR application on the market. With SageTV,
you can have programs automatically recorded for you based on your past viewing habits.
Intelligent Recording decisions are based on which shows you have watched and which shows
you have marked as Don’t Like. This data is then used to find other shows in the program guide
that may be similar to the shows you have watched. SageTV will then add them to the list of
scheduled recordings. Once recorded, you can watch the show, mark it as Don’t Like, delete it,
or just leave it there and let SageTV delete it when it needs room for new recordings.
Copyright 2010 SageTV, LLC All rights reserved
For additional support, go to www.sagetv.com/support.html or email us at [email protected]
SageTV V7.0 User’s Guide
Chapter 2: Installation and Setup
Page 24
This is an extremely powerful feature that many of our users take advantage of, but which we set
to “Disabled” by default, since your first few weeks of using the application may produce very
inconsistent results because there is not a lot of watched history for the profiler to make its
decisions. We recommend you give this feature a try after you’ve been using SageTV for a few
weeks to see what it records for you. This feature will manage any remaining disk space that’s
left against your Favorites and Manual Recordings and will not delete any of those recordings to
make room for Intelligent Recordings. In addition, Intelligent Recordings are scheduled with the
lowest priority, so these recordings will not be added to the schedule at the expense of missing a
Favorite or a Manual Recording.
When you are ready to give Intelligent Recording a try, enable the Intelligent Recording option
at Detailed Setup: General Settings.
Watching a Recording
Now that you have scheduled at least one Manual Recording and created a Favorite, the next step
would be to watch a recording. That’s one of the best parts of SageTV: you don’t need to watch
the show while it is airing. Simply leave SageTV running, or put it to sleep (see: Sleeping
SageTV), and SageTV will record your shows for you while you do something else. Remember:
SageTV cannot record any shows if it is not running and if your computer is not turned on.
After giving SageTV some time to record one of your shows, choose TV > Recordings from the
Main Menu. That will take you to the SageTV Recordings menu, the list of all TV shows that
SageTV has already recorded or is in the process of recording. To begin watching a recording,
simply use the Select command (Enter key) while a show is highlighted, then choose Watch
Now from the pop-up menu.
For information regarding control of SageTV while playing a video, see Video Playback’s
Playback Commands.
Copyright 2010 SageTV, LLC All rights reserved
For additional support, go to www.sagetv.com/support.html or email us at [email protected]
SageTV V7.0 User’s Guide
Chapter 3: SageTV Menus
Page 25
Chapter 3: SageTV Menus
Using the SageTV Menu Interface
The SageTV User Interface can be navigated using a keyboard, mouse, or remote control device.
The basic use of each device is as follows.
Keyboard
For basic SageTV usage, you will simply use the Left, Right, Up, and Down arrows on the
keyboard to navigate the menus. If there is no selectable item to the right of the currently
highlighted item, using the Right arrow will select the highlighted item. You may also use the
Select command (Enter key) to select the highlighted item. If there is no item to the left of the
currently highlighted item, using the Left arrow will take you back to the previous or parent
menu. As shortcuts, use the Info command (Ctrl+I) to jump to the detailed information for an
item or browse into a group of items, or use the Play command (Ctrl+D) to start playback
without first opening the options menu for a playable item or group.
SageTV is initially configured with keystrokes assigned to the most often used commands. Those
and all other commands available for controlling SageTV may be customized by assigning your
preferred keystrokes to them. Please see the SageTV Commands customization section for full
details of all the available commands, their default keys, and how to customize their
assignments. Some default commands are listed below. Note that you can customize these
commands to use the keystrokes you prefer, so the keys listed here are the ones SageTV uses
when initially installed.
Command
Keystroke
Function
Left
Left arrow
Moves the menu focus to the item towards the left of the currently
highlighted item. If there is no such item, it will return you to the
previous menu.
Right
Right arrow
Moves the menu focus to the item towards the right of the
currently highlighted item. If there is no such item, it will select the
item and proceed to the next screen.
Up
Up arrow
Moves the menu focus to the item above the currently highlighted
item. Many menus will wrap from top to bottom if there is no item
above the current one.
Down
Down arrow
Moves the menu focus to the item below the currently highlighted
item. Many menus will wrap from bottom to top if there is no item
below the current one.
Copyright 2010 SageTV, LLC All rights reserved
For additional support, go to www.sagetv.com/support.html or email us at [email protected]
SageTV V7.0 User’s Guide
Chapter 3: SageTV Menus
Page 26
Command
Keystroke
Function
Select
Enter
Selects the currently highlighted item and proceeds to the next
screen.
Info
Ctrl+I
Views the detailed information for the highlighted show or browse
into a group of items.
Play
Ctrl+D
If the currently highlighted item or group of items is playable, start
playback of that item or group.
Options
Escape,
Ctrl-O
Toggles the display of the Options pop-up menu for the current
menu.
Back
Alt+Left
Moves Back to the previous menu.
Forward
Alt+Right
Moves Forward to the next menu, after having used the Back
command.
Page Right
Ctrl+F,
F8
Moves one page to the right while in the Program Guide.
Page Left
Ctrl+A,
F7
Moves one page to the left while in the Program Guide.
Page Up
Page Up,
F5
Moves one page up in the menus or in the Program Guide.
Page Down
Page Down,
F6
Moves one page down in the menus or in the Program Guide.
Home
Home
Moves directly to the Main Menu.
TV
Ctrl+V
Toggles between the Playback view and the current menu. If there
is no media currently playing, live TV playback will begin.
Guide
Ctrl+X
Moves directly to the Program Guide.
Power
Ctrl+Z
Puts SageTV to sleep.
Watched
Ctrl+W
Toggles whether the highlighted show is marked as Watched.
Favorite
Ctrl+K
Toggles whether the highlighted show is a Favorite. If it is already
a favorite, you will be asked to confirm removing it as a Favorite.
Don’t Like
Ctrl+J
Toggles the Don’t Like setting for the currently highlighted show
or recording. SageTV will not record shows that you mark as
Don’t Like, unless it is a manual recording. If Intelligent
Recording in enabled, shows marked as Don’t Like are not
considered for recording and will influence which other shows
may not be recorded.
Record
Ctrl+Y
Toggles whether the highlighted show should be scheduled as a
Manual Recording.
Copyright 2010 SageTV, LLC All rights reserved
For additional support, go to www.sagetv.com/support.html or email us at [email protected]
SageTV V7.0 User’s Guide
Chapter 3: SageTV Menus
Page 27
Command
Keystroke
Function
Full Screen
Ctrl+Shift+F
Toggles whether SageTV should make its Window full screen or
not.
Num 0 – 9
0–9
Used to enter channel changes.
Delete
Delete
Asks for confirmation to delete the currently highlighted recording,
or all the recordings in the highlighted group.
Mouse
Using the mouse in SageTV consists simply of moving the cursor to point to the menu item to be
selected and clicking on it, as is usual when using the mouse in Windows programs. Since not all
commands can be accessed via mouse buttons, such as page left, page right, page up, or page
down on the Program Guide screen for example, many menus have mouse icons to assist in
navigation. However, in order to make use of those icons, they must first be enabled. From the
Main Menu of SageTV, select Setup, then select Detailed Setup, choose the General tab, and
“Enable” the option to Show Mouse Icons. (See Detailed Setup: General Settings.)
Besides left-clicking on menu items, SageTV also supports other mouse buttons.
Mouse button
Function
Left Button
Select the currently highlighted item and proceed to the next screen.
Right Button
Toggles the display of the Options pop-up menu for the current menu.
Middle Button
During playback: Uses the Play/Pause command to toggle between paused &
playing. If playing, playback will pause. If paused, playback will resume.
Scroll Wheel
Rolling the mouse wheel up or down performs Page Up or Page Down,
respectively. *
Back Button
On a 5-button mouse, moves Back to the previous menu. *
Forward Button
On a 5-button mouse, moves Forward to the next menu, after having used the
Back command. *
* Note: Certain mouse buttons may function differently if you have configured your mouse
differently in your operating system.
Remote Control
SageTV can be controlled with a remote control either indirectly by using an external program
that interacts with the remote control device and then sends commands to the SageTV program
or directly by using an IR receiver that SageTV supports.
Copyright 2010 SageTV, LLC All rights reserved
For additional support, go to www.sagetv.com/support.html or email us at [email protected]
SageTV V7.0 User’s Guide
Chapter 3: SageTV Menus
Page 28
Indirect control
Indirect remote control involves using the remote’s receiver with another program, which
receives codes from the remote and then sends the appropriate command to SageTV. Examples
of this style of remote control include using the Hauppauge remote and software, the Streamzap
remote and software, or just about any remote and receiver with a third-party control program
such as Girder (www.promixis.com).
SageTV is preconfigured to use the SageTV remote with the SageTV HD extenders, or the
Hauppauge and Streamzap remotes with their original software. For details on how they are
configured, see the layouts of those remotes in the appendix, where there is also information
regarding customizing those remotes. For basic usage, they function similarly to using the
keyboard: use the arrow buttons to navigate, and the OK button to select the currently
highlighted menu item. In Appendix E: Remote Controls, see:
SageTV STP-HD300 Remote Control Layout
SageTV STX-HD100 and STP-HD200 Remote Control Layout
SageTV Preconfigured 34 button Hauppauge Remote Control Commands
SageTV Preconfigured 45 button Hauppauge Remote Control Commands
SageTV Preconfigured Streamzap Remote Control Commands
Direct Control
Direct remote control involves using an IR receiver that SageTV supports so that SageTV can
receive the remote codes directly and act on them without having to use another program to send
the commands to SageTV. SageTV can use the USB-UIRT (www.usbuirt.com) or Evation’s
IRMan (www.evation.com) to directly receive codes from an infrared remote control device.
This will require that you configure how you want SageTV to react to every button you wish to
use on the remote. For details on that procedure, please see the Link Infrared/Keystroke to
SageTV Command option in Detailed Setup.
The SageTV Media Extenders all come with a remote that can be used to control SageTV while
using an extender. See Appendix M: SageTV Media Extenders.
Entering Text via Remote Control
The number pad on a remote can be used to enter text. For details, see Numeric Text Input.
Global Menu Features
All menus consist of a header at the top of the screen, a footer at the bottom, with the menu
choices displayed on the rest of the screen between the header and footer. Some portions of the
menu areas may only be selected by left-clicking on them with the mouse – such hot-spots are
Copyright 2010 SageTV, LLC All rights reserved
For additional support, go to www.sagetv.com/support.html or email us at [email protected]
SageTV V7.0 User’s Guide
Chapter 3: SageTV Menus
Page 29
mouse shortcuts that are also accessible through regular commands via keyboard or remote input.
The rest of the menu options may be selected by using the mouse, keyboard, or remote buttons.
The Menu Header and Footer
The icon in the header is used to move back to the previous
menu by left-clicking on it with the mouse. For the Main
Menu, this icon is only visible when there is media currently
playing; clicking on the icon will return you to the
appropriate media playback display.
The header may show
status indicator icons,
depending on SageTV’s
current status. See below.
The rest of the header consists of the menu title and the current day and time.
The Main Menu also displays the weather if a weather location is configured.
The footer contains status information on the left
and a tip on the right. In the image above, the tip
indicates that the Options command can be used
to configure options on the menu.
Clicking on the
logo icon
takes you back to the Main Menu
from any submenu.
Status Indicator Icons
The Menu Header is used to display various status indicator icons:
– Shown during text entry to indicate the next numeric text input mode. Click on
one of these icons, or use the Pause command, to switch to the next input mode:
switch to Upper Case input mode.
- switch to Lower Case input mode.
- turn
numeric text input Off. See Numeric Text Input.
– Shown when SageTV is currently recording. Click on the icon to jump to the
Recording Schedule.
– Shown when SageTV is currently scanning the Media Center Import Directories
for imported media.
Copyright 2010 SageTV, LLC All rights reserved
For additional support, go to www.sagetv.com/support.html or email us at [email protected]
SageTV V7.0 User’s Guide
Chapter 3: SageTV Menus
Page 30
,
,
– Shown when important status and information messages are available.
The color of the icon indicates the severity of the most important message, where blue =
information; yellow = warning; and red = error. The messages may be viewed on the
System Messages menu; click on the icon to jump to that menu.
– Shown when there are any unresolved recording schedule conflicts. Click on the
icon to go to the Recording Conflicts menu, where all conflicts are shown.
– Shown when recording schedule conflicts still exist, but they have all been
resolved. (The
and
icons will never be displayed together.) Resolved conflicts
may exist after manually resolving a conflict or if you have previously instructed SageTV
how to always resolve a specific conflict type. Example: if you previously chose to
always have a specific favorite override another specific favorite, new conflicts for that
situation will automatically be resolved during the scheduling process, but SageTV will
still list the resolved conflict in case you wish to override the standard resolution for a
particular recording. As with the unresolved conflict icon, click on the icon to go to the
Recording Conflicts menu.
– Shown only when mouse icons are enabled (see Detailed Setup: General Settings)
and SageTV is in Windowed mode; click on this icon to expand the SageTV window to
use Full Screen mode. (Same as the Full Screen command.)
– Shown only when mouse icons are enabled and SageTV is in Full Screen mode;
click on this icon to reduce the SageTV window to use Windowed mode. (Same as the
Full Screen command.)
– Shown only when mouse icons are enabled; click on this icon to put SageTV to
sleep. (Same as the Power command or the Standby option on the Main Menu.)
The Default Pop-up Menu: Video Menu Options
On nearly every menu, you may use the Options command to view configuration choices for that
menu. Some menus have options menus specific for their possible settings, but most use the
default general purpose Video Menu Options choices.
For details regarding this pop-up menu and samples of how video playback appears in a window
or as the menu background, see Video Menu Options, in Detailed Setup.
Copyright 2010 SageTV, LLC All rights reserved
For additional support, go to www.sagetv.com/support.html or email us at [email protected]
SageTV V7.0 User’s Guide
Chapter 3: SageTV Menus
Page 31
SageTV Recording Types Indicators
Throughout SageTV, wherever recordings or airings are listed, certain markings or icons are
used to provide information about those shows.
Font Styles
Manual Recordings and Favorites use bold text for their titles.
If a show’s entry in a list is displayed in a normal font style, that show has not been completely
watched. If a show has been watched, its list entry will be shown in italics.
Marker Icons
Icon markers may be displayed on a show’s entry in a list or near its detailed information display
to indicate the following:
– A recording is live TV, or an Intelligent Recording.
– A recording is a Manual Recording.
– A recording is a Favorite.
– The airing is currently recording.
– A show is a High Definition TV airing or recording.
– A show is a First Run.
– A show is an Archived Recording.
– A show has been Watched.
– A show has been marked as Don’t Like.
Notes: The red Recordings icons are also displayed on the Program Guide grid to indicate which
shows are in the Recording Schedule and will be recorded.
For show entries in lists, various marker icons will be shown on each show’s list entry. The
round recording type icons will always be shown when needed, but the other indicators can be
turned off, if desired, in Detailed Setup: Customize Settings. See Show recording status marker
icons in lists.
The SageTV Menus
The Main Menu is the first screen you will see when SageTV starts and is the access point for all
of SageTV’s features. Since that is the case, let’s begin with that menu on the next page.
Following that are descriptions of all the other menus, except for the ones having to do with
configuration. For configuration menus and details, see Chapter 5: Configuring SageTV.
Copyright 2010 SageTV, LLC All rights reserved
For additional support, go to www.sagetv.com/support.html or email us at [email protected]
SageTV V7.0 User’s Guide
Chapter 3: SageTV Menus
Page 32
Main Menu
The Main Menu is the gateway to all the features of SageTV. From this starting point, you
access all the submenus and features of SageTV. The Main Menu consists of a top level menu,
shown on the left side of the screen, and up to two sublevels opened to the right of the top level.
Navigation
Using the keyboard or a remote, the Main Menu is navigated using the Left, Right, Up, and
Down arrows and the Select command. Use the Right arrow to open a sublevel menu; use the
Left arrow to close a sublevel menu. Use the Select command to open a sublevel menu or
activate an item (see below). The Home command will close all sublevels and return focus to the
top level menu.
Using a mouse, simply move the mouse cursor to the desired item and select it, or move the
cursor over an arrow icon to open the sublevel menu for an item. Move the mouse cursor over a
higher level submenu to close the sublevel.
An item without a submenu have no icon next to the menu item title; use the Right arrow or
Select the item to activate it. An item with a submenu will have one of these arrow icons next to
it:
– An arrow without an asterisk indicates that the item has a submenu and no default
action. Use the Right arrow or Select the item to open the sublevel menu.
– An arrow with an asterisk indicates that the item has a submenu and has a default
action. Use the Right arrow to open the sublevel menu, or Select the item to activate the
item’s default action and jump to another menu.
Menu Choices
The top menu level and their submenus consist of the following choices:
TV – Contains choices related to TV airings and recordings. Default action: jump to the
SageTV Recordings menu, at the last-used view. The TV sublevel menu contains:
o Recordings – Contains choices for all available views of the existing recordings.
Default action: jump to the SageTV Recordings menu, at the last-used view.
o Watch Live TV – Go to the Video Playback display and start watching live TV.
Playback of a currently recording show or the current show on the last viewed
channel will be started.
Copyright 2010 SageTV, LLC All rights reserved
For additional support, go to www.sagetv.com/support.html or email us at [email protected]
SageTV V7.0 User’s Guide
Chapter 3: SageTV Menus
Page 33
o Program Guide – Go to the Program Guide, where you can see the grid layout
for the TV schedule for the channels you can receive. The guide shows the
schedule of upcoming shows for approximately the next two weeks. From the
guide, you may choose shows to record or to watch now.
o Recording Schedule – Contains choices for all available recording schedule
views. Default action: jump to the Recording Schedule, which displays a list of all
TV shows that are scheduled to be recorded, at the last-used view.
o Schedule Recordings – Contains choices for items related to adding recordings
to the schedule. Default action: none. Its sublevel choices are:
Manage Favorites – Go to the Favorites Manager, where you can add
new Favorites or select an existing Favorite whose settings can be viewed
or changed.
Create Timed Recording – Go to the Create Timed Recording screen,
where you can schedule a one-time or recurring recording for a defined
time period on a specific channel.
Browse by Category – Go to the Browse By Category menu, where you
can view a listing of upcoming shows, sorted by the shows’ categories.
Resolve Conflicts – Go to the Recording Conflicts menu to see the list of
recording conflicts and choose how to handle those conflicts and similar
ones in the future.
o TV Show Editorials – Go to the TV Show Editorials menu, where you can view
brief editorial comments about selected upcoming TV shows.
Videos – Contains choices related to imported videos. Default action: jump to the Video
Browser at the last-used view. The Videos sublevel menu contains:
o Titles – Opens the Video Browser, viewing non-DVD/BD imported videos.
o DVD/BD – Opens the Video Browser, viewing imported DVD/BD videos.
o Category – Opens the Video Browser, viewing imported videos grouped by
category.
o Playlists – Default action: Opens the Video Browser, viewing video playlists.
This item also opens a sublevel menu containing choices for all available video
playlists. In the sublevel menu, choose a playlist for options to play or view the
playlist.
Copyright 2010 SageTV, LLC All rights reserved
For additional support, go to www.sagetv.com/support.html or email us at [email protected]
SageTV V7.0 User’s Guide
Chapter 3: SageTV Menus
Page 34
o Folders – Opens the Video Browser, viewing imported videos by their folder
structure, as the files are found on your hard drive.
o Play DVD – SageTV will play a DVD that is in the DVD drive on your computer.
It will not able to play a DVD that is in the DVD drive of another computer on
your network. If it finds a DVD, DVD Playback will begin. If no DVD is found, a
notification will be displayed. Note: Not available on extenders and Placeshifter
clients.
o Video Conversions – Go the Video Conversions screen, where you can view the
status of all current, upcoming, and past video conversion processes.
Music – Contains choices related to imported music. Default action: jump to the Music
Browser at the last-used view. The Music sublevel menu contains:
o Songs – Opens the Music Browser, viewing all imported songs.
o Albums – Opens the Music Browser, viewing imported music grouped by album.
o Artists – Opens the Music Browser, viewing imported music grouped by artist.
o Genres – Opens the Music Browser, viewing imported music grouped by genre.
o Years – Opens the Music Browser, viewing imported music grouped by year.
o Playlists – Default action: Opens the Music Browser, viewing music playlists.
This item also opens a sublevel menu containing choices for all available music
playlists. In the sublevel menu, choose a playlist for options to play or view the
playlist.
o Folders – Opens the Music Browser, viewing imported music by their folder
structure, as the files are found on your hard drive.
Photos – Contains choices related to imported photos. Default action: jump to the Photo
Browser. The Photos sublevel menu contains:
o Browse Photos – Opens the Photo Browser.
o Start Slideshow – View a slideshow of all the imported photos, in the sort order
chosen in the Photo Browser.
o Random Slideshow – View a slideshow of all the imported photos, in random
order.
Search – Contains choices related to searching for media or browsing the file system.
Default action: none. The Search sublevel menu contains:
Copyright 2010 SageTV, LLC All rights reserved
For additional support, go to www.sagetv.com/support.html or email us at [email protected]
SageTV V7.0 User’s Guide
Chapter 3: SageTV Menus
Page 35
o TV Airings – Default action: go to the Search menu, at the last-used TV Airings
search style. The TV Airings sublevel menu contains options to:
Search Titles
Search People
Search Descriptions
Search All Fields
o Videos – Default action: go to the Search menu, at the last-used Videos search
style. The Videos sublevel menu contains options to:
Search Titles
Search People
Search Descriptions
Search All Fields
o Music – Default action: go to the Search menu, at the last-used Music search
style. The Music sublevel menu contains options to:
Search Song Titles
Search Album Titles
Search Artists
o Photos – Go to the Search menu, at the search Photos by Title view.
o Online Videos – Default action: go to the Google Video Search menu to search
Google Video content. The Online Videos sublevel menu contains options to:
Search Google Keywords – search Google Video by keywords.
Search YouTube Keywords – search YouTube Video by keyword.
Search YouTube Users – search YouTube Video by user.
o Browse File Systems – Go to the File Browser, where you can browse the
SageTV server’s files, local files, network files, import library paths, or recording
paths, depending on the available file systems and media paths.
Online – Contains choices related to online media. Default action: jump to the Online
Services menu. Note: The availability of and access to the various online video choices is
controlled by the Online Video Access option in Detailed Setup: Customize Settings. The
Online sublevel menu contains:
o Weather – Go to the Weather menu, where you can view the current conditions
and 5-day forecast for your local area. Note: If you have not yet done so, you will
first be asked to configure your weather report location; see Step G16: Weather
Report Configuration. Once your location is configured, you will proceed to the
Weather menu.
o YouTube Videos – Go to the YouTube Video menu, where you can choose
YouTube Videos from various categories.
Copyright 2010 SageTV, LLC All rights reserved
For additional support, go to www.sagetv.com/support.html or email us at [email protected]
SageTV V7.0 User’s Guide
Chapter 3: SageTV Menus
Page 36
o Channels.com – Go to the Channels.com Web Shows menu, where you can view
Channel.com’s categorized dynamic feeds listing a collection of the best shows on
the web.
o More Online Services – Go to the Online Services menu, where various online
videos can be viewed.
o Get Hulu Application or Launch Hulu Desktop – The option to Get or Launch
the Hulu desktop application is available when using SageTV on a Windows
server or client UI, depending on whether the Hulu desktop application is
installed.
Setup – Contains choices related to configuring SageTV and status information. Default
action: none. The Setup sublevel menu contains:
o Configuration Wizard – Configure SageTV’s essential options via the
Configuration Wizard.
o Detailed Setup – Go to Detailed Setup, where you can configure all the setup
options available within SageTV.
o SageTV Plugins – Default action: none. This menu contains choices for
accessing all available and installed user created plugins for SageTV. The
SageTV Plugins sublevel menu contains:
All Available Plugins – Go to the Plugin Manager showing all available
plugins created by SageTV users.
Server Installed Plugins – Go to the Plugin Manager showing all user
created plugins installed on the SageTV server. This option is shown on
SageTV Clients running on a different PC than the SageTV server, which
can install plugins on the server.
Client Installed Plugins – Go to the Plugin Manager showing all user
created plugins installed on the local client. This option is shown on
SageTV Clients running on a different PC than the SageTV server, which
can install plugins on the local client PC.
Installed Plugins – Go to the Plugin Manager showing all installed user
created plugins. This option is shown on the SageTV server UI and on
extender and Placeshifter clients connected to the server.
Note: Use of these plugins is at your own risk. The plugins presented are
created and supported by other SageTV users. SageTV does not test or verify
the operation of any of the plugins in any way and does not provide technical
Copyright 2010 SageTV, LLC All rights reserved
For additional support, go to www.sagetv.com/support.html or email us at [email protected]
SageTV V7.0 User’s Guide
Chapter 3: SageTV Menus
Page 37
support for plugins. Questions about any plugin should be directed to the
user who created it, using the SageTV user-to-user forum at.
forums.sagetv.com/forums
o Setup Video Sources – Configure new or existing recording sources via the
Source Wizard Summary.
o Help – Default action: none. The Help sublevel menu contains options to:
View SageTV PDF Manual – On a Windows system, asks whether to
open the PDF manual in another window.
View Menu Header Information – Displays a dialog describing the
various sections of the header and footer bars at the top and bottom of
every menu screen. The currently described area is outlined at the top or
bottom of the screen.
View TV Indicators and Markers – Displays a dialog that describes all
the various ways that TV airings and recordings are marked to indicate
their status.
View TV Category Colors – Displays a dialog that shows the
background colors used for various TV airing categories. The existing
categories and their colors may be edited, or additional categories may be
added. This option is also available as the TV Category Background
Colors option in Detailed Setup: Customize Settings.
o Toggle Full Screen – Toggle whether SageTV is displayed in a window or
whether it is displayed full screen.
o Parental Controls – Go to Parental Controls, where you can control the types of
TV shows requiring a password for viewing. If you have set and enabled a
password for parental controls, you will be asked to enter the password after
selecting this menu item. If the wrong password is entered, access to Parental
Controls will be denied.
o Scan Imported Media – Tells SageTV to check all the Media Center Import
Directories, as defined in Detailed Setup: General Settings, to refresh its list of
imported media files.
o System Information – View the current status of the SageTV system on the
System Information screen.
o System Messages – View the current messages on the System Messages menu.
Copyright 2010 SageTV, LLC All rights reserved
For additional support, go to www.sagetv.com/support.html or email us at [email protected]
SageTV V7.0 User’s Guide
Chapter 3: SageTV Menus
Page 38
Exit – Contains choices related to exiting SageTV. Default action: none. The Exit
sublevel menu contains:
o Standby – Put SageTV to sleep. See Sleeping SageTV.
o Exit SageTV – Exits the SageTV application or powers off an extender. See
Exiting SageTV.
Tips: 1) Begin typing numbers or letters to start an Instant Search. 2) Use the Info command to
jump directly to the System Information display.
Copyright 2010 SageTV, LLC All rights reserved
For additional support, go to www.sagetv.com/support.html or email us at [email protected]
SageTV V7.0 User’s Guide
Chapter 3: SageTV Menus
Page 39
Instant Search
While on most navigation menus, such as the Main Menu, a search for any media type may be
started simply by entering any alphanumeric characters via keyboard or remote. The Instant
Search mode on Navigation Menus option in Detailed Setup: Customize Settings controls
whether the Instant Search feature is enabled and how it works while on navigation menus.
When the feature is enabled, start entering numbers or letters while on a navigation menu. If the
search should begin immediately, you will jump to the Search menu right after the first character
is entered. Otherwise, a text entry dialog will open, allowing more text to be entered before
starting the search. When done entering text, choose Search Now to jump to the Search menu
and start the search, or choose Cancel to cancel the search and close the text entry dialog.
The initial search results shown on the Search menu will be for the search style in use the last
time the Search menu was used.
If Instant Search is used while on the YouTube Video or Google Video menus, the online video
search results will be shown after choosing Search Now in the text entry dialog.
Copyright 2010 SageTV, LLC All rights reserved
For additional support, go to www.sagetv.com/support.html or email us at [email protected]
SageTV V7.0 User’s Guide
Chapter 3: SageTV Menus
Page 40
SageTV Recordings
Parent Menu: Main Menu.
The SageTV Recordings screen lists all the TV shows that SageTV has recorded, including
completed recordings, currently recoding shows, and partially recorded shows if they are Manual
recordings. Entries in the list may be individual recordings or groups containing multiple
recordings.
Highlighting an individual recording will cause some of its recording information to be displayed
to the right of the recording list. Highlighting a group will use the area to the right to display the
group name, the number of the group’s recordings, and the titles of the first several items in the
group.
The upper right corner of the screen is used to display video previews or thumbnails for the
highlighted recording or group of recordings.
See SageTV Recording Types Indicators for a description of the show indicator markers.
Selecting an Individual Recording
After highlighting an individual recording, you may use the Select command or left-click on it to
view the list of possible actions to perform for that recording; see the Airing and Video Options
Dialog for details. To see the full details for a recording, highlight an individual recording and
then use the Right arrow or the Info command to go to the Recording Detail screen for that
recording.
The Play command may be used to initiate playback of the highlighted recording.
Selecting a Group of Recordings
After highlighting a group of recordings, use the Select command or left-click on a it to view the
list of possible actions to perform for the entire group of recordings; see the Grouped Airings and
Videos Options Dialog for details. To browse the list of recordings in the group, highlight a
group and then use the Right arrow or the Info command. Note: Use of the Select command or
the Info command to open the group options dialog can be switched while the dialog is open; see
the details for the dialog.
The Play command can be used to add all the recordings in the group to the Now Playing playlist
and begin playback
Copyright 2010 SageTV, LLC All rights reserved
For additional support, go to www.sagetv.com/support.html or email us at [email protected]
SageTV V7.0 User’s Guide
Chapter 3: SageTV Menus
Page 41
The sorting method used while browsing a group of recordings can be set separately from the
overall view of all recordings. While viewing the group, use the Options command to access the
Sorting option.
SageTV Recordings Views
The SageTV Recordings menu is preconfigured with four views, each with individual sorting,
grouping, and filtering options. Each of these four views can be reconfigured and renamed. Up to
four additional views may be added. Use the Options command to change the current view or
add more views. See SageTV Recordings Options.
The four initial viewing styles are:
All Recordings – List all recordings.
Current Recordings – Lists only non-archived recordings.
Archived Recordings – Lists only archived recordings.
Recorded Movies – Lists only recordings from the “Movie” category, or those using the
Alternate Movie category name.
Tips: 1) Each of the viewing styles can be customized and its customized settings will be
remembered for that view. Each view can be renamed, and custom settings can be selected via
the Sorting Options, Grouping Options, and Filtering Options dialogs. 2) Use the Smooth FF,
Skip Fwd #2, Smooth Rew, or Skip Bkwd #2 commands to jump to the next or previous view.
SageTV Recordings Options
Use the Options command to display the various options available on this menu. The options list
can be exited by using the Options command again or via the Left arrow. The choices are:
Views – The available viewing styles are listed below the Views title. The current view is
highlighted. Select any view to switch to that viewing style.
Filters – Three quick access filters are shown for Manual Recordings
, Favorites
,
and Other
recordings. Each time the filter is selected, it changes between ignoring the
filter, filtering to include recordings of that type, or filtering to exclude recordings of that
type. Notes: “Other” is anything that is not a Favorite or Manual Recording, including
Intelligent Recordings or Live TV that is not a Manual Recording or Favorite.
Menu Options – Display the SageTV Recordings Menu Options dialog, below.
Copyright 2010 SageTV, LLC All rights reserved
For additional support, go to www.sagetv.com/support.html or email us at [email protected]
SageTV V7.0 User’s Guide
Chapter 3: SageTV Menus
Page 42
Search – Go to the consolidated Search menu, with the search style starting with the last
used TV search style.
Sorting – Open the Sorting Options dialog, below.
Grouping – Open the Grouping Options dialog, below.
Filtering – Open the Filtering Options dialog, below.
Recording Schedule – Go to the Recording Schedule.
Imported Videos – Go to the Video Browser.
SageTV Recordings Menu Options
The SageTV Recordings Menu Options dialog is used to configure additional options for the
menu. The options are:
Number of Columns – Set the number of columns used to display the list of recordings.
Number of Rows – Set the number of rows used to display the list of recordings.
Airing List Font Size – Set the font size used to display the list of recordings.
Number of Views – Set the number of viewing styles, from 4 to 8.
Rename the <View Name> view – Opens a dialog where a new name for the current
view can be entered.
Reset all settings for the <View Name> view – Resets the grouping, sorting, and filter
options, along with the view name for the current view.
Video Menu Options – Displays the Options menu found on most screens, where you can
set when and how video playback is shown on menus. See its full explanation for details.
Close – Exit the pop-up menu.
Sorting Options
The Sorting Options dialog contains a list of options for sorting the recording list. If a recording
list entry is a group, the first entry in the group’s list is used when determining the group’s sort
rank. Choose from the sorting options listed below:
Oldest/Newest First – Recordings are simply sorted by their recording date.
Copyright 2010 SageTV, LLC All rights reserved
For additional support, go to www.sagetv.com/support.html or email us at [email protected]
SageTV V7.0 User’s Guide
Chapter 3: SageTV Menus
Page 43
Title A-Z/Z-A – Sorting is performed on the recorded shows’ titles.
Category – The name of each show’s category is used for sorting. As usual, there is a
choice for reversing this sort.
Orig. Air Date – The recorded show’s original airing date is used for sorting, in oldestto-most recent or most recent-to-oldest (reversed) order.
Channel Name A-Z/Z-A – The name of the channel where each show was recorded is
used for sorting.
Intelligent – The list will be sorted by SageTV’s recording priority. Manual recordings
are listed before Favorites, then Intelligent Recordings and live TV, followed by watched
shows, with shows marked as Don’t Like listed last. Within each of those sections, the
newer recordings are listed first. The Reversed form of this style simply reverses the sort
order.
ShowID – The recording’s ShowID is used for sorting, in ascending or descending
(reversed) order.
Reverse Sort Order – When checked, the recording list will be sorted in reverse order.
Close – Close the pop-up list without changing the current setting.
Grouping Options
The Grouping Options dialog displays a list of options for how the list of recordings are to be
grouped:
No Grouping – The list of recordings will not be grouped together at all. Every entry in
the list will be an individual recording; there will be no group entries.
Title – Shows with the same title will be grouped together and there will be a group entry
in the list with that title.
Channel Name – Recordings will be grouped according to the name of the channel
where they were recorded.
Category – Recordings will be grouped according to the name of their categories, as
displayed in the detailed information section on the Recording Detail screen.
Close – The standard choice to make when you wish to exit the pop-up menu without
changing the current setting.
Copyright 2010 SageTV, LLC All rights reserved
For additional support, go to www.sagetv.com/support.html or email us at [email protected]
SageTV V7.0 User’s Guide
Chapter 3: SageTV Menus
Page 44
Filtering Options
The Filtering Options dialog displays a list of filter options used to determine which types of
recordings are to be shown in the recording list.
Select each of the following filtering options to toggle between not filtering by that
criteria, only include recordings which match the criteria, or exclude recordings which
match the criteria.
o
o
o
o
o
o
o
o
Manual Recordings
Favorites
Not Manual Recording or Favorite
Archived Recordings
First Runs
HDTV Recordings
Watched Recordings
Recordings marked Don’t Like
Categories Filtered – Select this option to choose the list of categories to be filtered.
When at least one category is selected, you can choose whether the categories are to be
Included or Excluded.
Clear all filters – Clear all filters so that all recordings are included.
Close – Close the dialog.
Copyright 2010 SageTV, LLC All rights reserved
For additional support, go to www.sagetv.com/support.html or email us at [email protected]
SageTV V7.0 User’s Guide
Chapter 3: SageTV Menus
Page 45
Recording Detail
The Recording Detail screen displays the full information for a recording.
Full details for the recording are shown on the left side of the screen. The data may fill more than
the space on a single screen. If so, you will be able to scroll down to see the rest of the
information.
The right size of the screen is used to display a combination of the recording’s thumbnail, series
image, or channel logo (if there is one); however, if video is displayed in a window on menus,
the video may be shown instead of an image in the upper right corner.
Use the Select command (Enter key) to display the list of possible actions to perform for the
recording; see the Airing and Video Options Dialog for details.
Use the Back command or the Left arrow to return to the previous menu.
Using the Options command will display the Video Menu Options dialog, which is the regular
Options menu found on most screens. See its full explanation for details.
Copyright 2010 SageTV, LLC All rights reserved
For additional support, go to www.sagetv.com/support.html or email us at [email protected]
SageTV V7.0 User’s Guide
Chapter 3: SageTV Menus
Page 46
Airing and Video Options Dialog
When the the Select command is used on an airing (such as in the Program Guide), an existing
recording (the SageTV Recordings menu), or an imported video (the Video Browser), a pop-up
dialog containing all of the available actions that may be performed will appear. This dialog may
be used in its Basic or Advanced form. Basic mode shows a single column of options, while
Advanced uses two columns, with additional options in the second column.
The actions in this dialog are dynamically added or removed, depending on what may be done at
that moment. For example, “Watch Now” will appear for a show that is currently airing, an
existing recording, or an imported video, but it would not appear for a show in the Program
Guide if that airing has already finished airing and was not recorded, or if the airing has not yet
begun.
The possible actions for an airing, recording, or imported video are listed below.
Basic Options
Watch Now – Begin watching the video file. The screen will switch to the Video
Playback or DVD Playback display, depending on the type of video. When the dialog is
open, the Play command is a shortcut for this action, as indicated by the Play icon on the
button.
Record Options – For TV shows, show the Record Command Options Dialog, where
you can choose from the various recording options currently available. When the dialog
is open, the Record command is a shortcut for this action, as indicated by the Record icon
on the button. Not available for imported videos.
View Recording Details – Jumps to the detailed information screen appropriate for the
current video: the Recording Detail, Program Information, or Video Detail screen. When
the dialog is open, the Info command is a shortcut for this action, as indicated by the Info
icon on the button.
View Series Information – If there is series information for an airing, this option is
displayed. Select it to jump to the Series Information screen, where more information
about the series will be displayed, such as a description of the series, its history, and list
of cast members.
Edit User Categories – Use this option to assign user defined categories to a recording,
Favorite, or Manual Recording. The option will be available for an existing recording or
for any not yet recorded airing that is a Favorite or a Manual Recording. After selecting
this option, you may be asked whether to edit the User Categories for the recording, the
Favorite that applies to the airing, or to the Manual Recording, if more than one of those
apply. After the User Category editing dialog opens, select one or more categories to be
assigned. While the dialog is open, you can add new user defined categories or resort the
Copyright 2010 SageTV, LLC All rights reserved
For additional support, go to www.sagetv.com/support.html or email us at [email protected]
SageTV V7.0 User’s Guide
Chapter 3: SageTV Menus
Page 47
category list to place the selected ones at the top. Choose Done once all assignments have
been made or select Cancel to close the dialog without changing the category
assignments. The Delete command can be used while a category is highlighted to remove
it from the list of user defined categories. If the category is still in use in the SageTV
database, it will remain in the list, however. Note: The SageTV Recordings menu can be
filtered to optionally include or exclude recordings based on their categories and/or user
categories.
Edit Video Information – Use this option to assign MPAA ratings and Categories for an
imported video. Selecting this option opens a dialog displaying the current MPAA rating
and category assignments, if any. Choose which information to edit, then choose or clear
the MPAA rating, or set categories for the video. While setting the categories, you can
also add a new category, choose whether to also list TV categories to choose from, or
resort the category list to place the selected ones at the top. Choose Done once all
assignments have been made or select Cancel to close the dialog without changing the
category assignments. The Delete command can be used while a category is highlighted
to remove it from the list of user added categories. If the category is still in use in the
SageTV database, it will remain in the list, however.
Delete this Recording – Available for existing recordings that are not currently being
recorded, use this option to remove a video from SageTV and delete it from the
computer’s disk drive. When the dialog is open, the Delete command is a shortcut for this
action. Not available for imported videos. A pop-up menu contains the deletion choices:
o Delete it Now – Delete the recording, leaving all Watched, Don’t Like, etc.,
markers intact.
o Delete it because it is the wrong recording – Delete the recording, clearing all
tracking information about the recorded airing. Use this option if the recorded
show is not what was, in fact, recorded. An incorrect recording may happen
because of a last-minute program scheduling change by a network, which is not
reflected in the guide data SageTV uses, for example.
o Delete it because I don’t like it – Delete the recording, setting the Don’t Like
marker at the same time.
o Don’t delete it – Cancels the deletion process and closes the pop-up menu
without deleting the recording.
Delete this Imported File – Available for imported videos only, use this option to
remove an imported video from SageTV and delete it from the computer’s disk drive.
You will be asked to confirm the deletion. When the dialog is open, the Delete command
is a shortcut for this action. Not available for SageTV recordings. Note: Deletion of
imported videos may be disabled in the pop-up Options Menu in the Video Browser
menu.
Browse DVD Folder – This option is shown if the imported video is a DVD, and there
are additional imported videos in the DVD’s folder structure.
Copyright 2010 SageTV, LLC All rights reserved
For additional support, go to www.sagetv.com/support.html or email us at [email protected]
SageTV V7.0 User’s Guide
Chapter 3: SageTV Menus
Page 48
Advanced Options – Shown only when using Basic mode, select this option to switch to
Advanced mode. A second column of options will be shown, showing additional choices
based on the status of the video. The dialog will continue to be shown in Advanced mode
every time a video is selected, until Basic mode is chosen.
Basic Options – Shown only when using Advanced mode, select this option to switch to
Basic mode. Only a single column of basic options will be shown, with the available
choices based on the status of the video. The dialog will continue to be shown in Basic
mode every time a video is selected, until Advanced mode is chosen. Note: Basic or
advanced mode can also be configured via the Options menu mode for videos and
recordings option in Detailed Setup: Customize Settings.
Close – Closes the options dialog without performing any action.
Advanced Options
Future Airings – Go to the Additional Airings menu, where upcoming airings for this
show will be displayed. All future airings in the EPG will be listed, usually covering
approximately the next two weeks. Existing recordings and past airings will also be
listed. Not available for imported videos.
Past Airings – Go to the Airing History menu, where historical airings for this show will
be displayed. All past airings for which SageTV has stored information will be listed,
including the existing recordings and future airings. Not available for imported videos.
Don’t Like – (If the recording is tagged as Don’t Like, a checkmark will be displayed on
the button.) Select this option to tell SageTV that you Don’t Like the show, or clear that
status. When the dialog is open, the Don’t Like command is a shortcut for this action, as
indicated by the Don’t Like icon on the button. Not available for imported videos.
Watched – (If the video is Watched, a checkmark will be displayed on the button.) Select
this option to set or clear a SageTV Recording, Airing, or Imported Video as having been
Watched. When the dialog is open, the Watched command is a shortcut for this action, as
indicated by the Watched icon on the button.
Archived – (If the recording is archived, a checkmark will be displayed on the button.)
Select this option to add or remove archived recording status for a completed SageTV
Recording. The location for the recording file will not be changed on the computer’s disk
drive, but the recording will now be archived or not. SageTV will never automatically
delete any archived recordings. Additionally, when a recording is unarchived, it will be
marked as a Manual Recording in order to prevent SageTV from deleting it in the near
future. Not available for imported videos. Note: The SageTV Recordings menu can be
filtered to optionally include archived and/or non-archived recordings.
Copyright 2010 SageTV, LLC All rights reserved
For additional support, go to www.sagetv.com/support.html or email us at [email protected]
SageTV V7.0 User’s Guide
Chapter 3: SageTV Menus
Page 49
Convert – Choose this option to convert a recording or imported video to another video
format. Note: Only completed recordings and videos capable of being converted will
include the conversion option.
List of Recent Video Playlists – If any videos have been recently added to a video
playlist, the last few selected playlists may be displayed for faster repeated selection of
those playlists. Only available for imported videos.
Add To Video Playlist... – Displays a list of video playlists that the current video may be
added to. (Note: DVDs and BDs will not be added to playlists.)
Play a Playlist... – Allows choosing which video playlist to play now, or you may choose
to view all video playlists in the Video Browser.
More by People in Show... – If there are people named in the credits for a selected airing
or imported video, this option is shown. Select it to see a list of people with credits in the
video. Select a name to search for additional airings or videos containing a credit for that
person. The list of additional airings will be shown on the Search Results menu. In
addition, the Favorite command while highlighting a name to either add a Favorite for
that person’s name or edit the Favorite if it already exists. If a Person Favorite already
exists for a name, there will be a Favorite icon next to the name. After using the Favorite
command, SageTV will jump to the Favorite Details menu.
Copyright 2010 SageTV, LLC All rights reserved
For additional support, go to www.sagetv.com/support.html or email us at [email protected]
SageTV V7.0 User’s Guide
Chapter 3: SageTV Menus
Page 50
Grouped Airings and Videos Options Dialog
Use either the Select or Info command on a group of airings or recordings, or a group of
imported videos, to open a pop-up dialog containing all of the available actions that may be
performed on the entire group. The use of Select or Info is controlled by an option in the dialog
or via the For grouped items: Select opens options dialog, Info browses into group option in
Detailed Setup: Customize Settings.
Like the options for an individual video, the actions in this dialog are dynamically added or
removed, depending on what may be done at that moment. For example, “Play all Recordings
Now” will appear for a group of recordings or imported videos, but it would not appear for a
group of Past Airings.
The possible actions for a group of recordings or imported videos are listed below.
Right Column
The right column of options is available for any group of airings, recordings, or imported videos.
Browse Recordings, Airings, or Videos – Jump to a view of the videos in this grouping.
When the dialog is open, the Info command is a shortcut for this action, as indicated by
the Info icon on the button.
Play all Recordings/Videos Now – Adds all of the recordings or imported videos in the
folder and its subfolders to the Now Playing video playlist, begins playback of the
playlist, and jumps to the appropriate playback screen. The Now Playing list will be
cleared before adding the group. If any other media is currently playing, it will be
stopped before playback of the group begins. When the dialog is open, the Play command
is a shortcut for this action, as indicated by the Play icon on the button. Note: If all or
none of the recordings/videos have been watched, they will all be automatically added to
the playlist. If some recordings/videos have been watched, then a dialog will ask whether
to play only the videos that have not yet been watched or all the videos.
Play all Videos in this folder – Plays only the imported videos in the selected folder
instead of all the videos in the folder and its subfolders.
Add Favorite – If all the TV airings in the group have the same title (they might be
different episodes of that title) and they do not belong to a Favorite, this option will be
available. Select this option to add a Favorite for the title and jump to the Favorite Details
menu. The Favorite command is a shortcut for this action when the option is available.
Favorite Options – If all the TV airings in the group are from a single existing Favorite,
this option will be available. Select this option then choose whether to Remove this
Favorite or Adjust Favorite Options. The Favorite command is a shortcut for this
action when the option is available.
Copyright 2010 SageTV, LLC All rights reserved
For additional support, go to www.sagetv.com/support.html or email us at [email protected]
SageTV V7.0 User’s Guide
Chapter 3: SageTV Menus
Page 51
Delete all Recordings – Use with Caution! After using this command for a group of
recordings, you will be given the option to:
o
o
o
o
Delete all the recordings in the group.
Delete only the Watched recordings in the group.
Delete only the group’s recordings that are marked Don’t Like.
Cancel - do not delete anything.
Because this deletion process will delete multiple recordings, you will be asked to
confirm your choice. Once started, the process will pause slightly between each deletion,
giving you the chance to cancel the action. Remember: any recordings deleted before you
cancel the process will remain deleted! When the dialog is open, the Delete command is a
shortcut for this action, as indicated by the red X icon on the button.
Set/Clear all Watched – Sets or clears the Watched status for all airings in the group,
after confirmation. When the dialog is open, the Watched command is a shortcut for this
action, as indicated by the Watched icon on the button.
Set/Clear all Don’t Like – Sets or clears the Don’t Like status for all airings in the
group, after confirmation. When the dialog is open, the Don’t Like command is a shortcut
for this action, as indicated by the Don’t Like icon on the button.
Set/Clear all Archived – Sets or clears the archived status for all recordings in the group.
Select this option to add or remove archived recording status for completed SageTV
Recordings. The location for the recording file will not be changed on the computer’s
disk drive, but the recording will now be archived or not. SageTV will never
automatically delete any archived recordings. Additionally, when a recording is
unarchived, it will be marked as a Manual Recording in order to prevent SageTV from
deleting it in the near future. Not available for imported videos. Note: The SageTV
Recordings menu can optionally list archived and/or non-archived recordings.
Edit User Categories – Use this option to assign user defined categories to a group of
recordings, Favorites, or Manual Recordings. The option will be available for existing
recordings or for any not yet recorded airings that are Favorites or Manual Recordings.
After selecting this option, you may be asked whether to edit the User Categories for the
recordings, the Favorites that apply to the airings, or to the Manual Recordings, if more
than one of those apply. After the User Category editing dialog opens, select one or more
categories to be assigned. While the dialog is open, you can add new user defined
categories or resort the category list to place the selected ones at the top. Toggle the
Mode to set all items in the group to use the same set of selected categories, remove
selected categories from all items in the group, or add the selected categories to the items
without changing their existing category assignments. If the existing categories are
mixed, you will be asked to confirm the change when assigning the same categories for
an entire group. Choose Done once all assignments have been made or select Cancel to
close the dialog without changing the category assignments. The Delete command can be
Copyright 2010 SageTV, LLC All rights reserved
For additional support, go to www.sagetv.com/support.html or email us at [email protected]
SageTV V7.0 User’s Guide
Chapter 3: SageTV Menus
Page 52
used while a category is highlighted to remove it from the list of user defined categories.
If the category is still in use in the SageTV database, it will remain in the list, however.
Note: The SageTV Recordings menu can be filtered to optionally include or exclude
recordings based on their categories and/or user categories.
Edit Video Information – Use this option to assign MPAA ratings and Categories for a
group of imported videos. Selecting this option opens a dialog displaying the current
MPAA rating and category assignments, if any. Choose which information to edit, then
choose or clear the MPAA rating, or set categories for the videos. If the MPAA ratings or
category assignments are mixed, you will be asked to confirm making a change for the
entire group. While setting the categories, you can also add a new category, choose
whether to also list TV categories to choose from, or resort the category list to place the
selected ones at the top. Toggle the Mode to set all items in the group to use the same set
of selected categories, remove selected categories from all items in the group, or add the
selected categories to the items without changing their existing category assignments.
Choose Done once all assignments have been made or select Cancel to close the dialog
without changing the category assignments. The Delete command can be used while a
category is highlighted to remove it from the list of user added categories. If the category
is still in use in the SageTV database, it will remain in the list, however.
Select opens group options dialog, Info browses group – Selecting this option toggles
whether the Select command or the Info command opens the dialog when a group is
highlighted and the other is used to browse into a highlighted group. Note: This setting
can also be configured via the For grouped items: Select opens options dialog, Info
browses into group option in Detailed Setup: Customize Settings.
Close – Closes the options dialog without performing any action.
Left Column
The left column of options is available for a group of recordings or imported videos.
List of Recent Video Playlists – If any videos have been recently added to a video
playlist, the last few selected playlists will be displayed for faster repeated selection of
those playlists.
Add To Video Playlist... – Displays a list of video playlists that the current video may be
added to. (Note: DVDs and BDs will not be added to playlists.)
Play a Playlist... – Allows choosing which video playlist to play now, or you may choose
to view all video playlists in the Video Browser.
Convert all Recordings, or Videos – Choose this option to convert the entire group of
recordings or imported videos to another video format. Note: Only completed recordings
and videos capable of being converted will be converted as part of a group conversion.
Copyright 2010 SageTV, LLC All rights reserved
For additional support, go to www.sagetv.com/support.html or email us at [email protected]
SageTV V7.0 User’s Guide
Chapter 3: SageTV Menus
Page 53
Program Guide
Parent Menu: Main Menu.
The Program Guide displays the TV programming schedule in a grid layout, covering a short
time in the past and extending approximately two weeks into the future. Each page of the grid
displays TV programming for the next 1 ½ hours. If channel logos are available, they will be
displayed next to each channel’s number and name. See Appendix B: Adding Channel Logos.
The current time is depicted by a vertical yellow line on the time bar. Airings that are scheduled
to be recorded will be marked with a red dot indicator.
Highlighting an airing will cause the airing’s description to be shown at the top of the screen,
which may also contain additional markers. See SageTV Recording Types Indicators for a
description of the show indicator markers.
The upper right corner of the screen is used to display the video preview or a thumbnail for the
highlighted airing.
The Left command can usually be used to return to the previous or parent menu, but on this
menu, it is used to navigate the guide grid. To return to the previous menu, use the Back
command. Or, use the Home command to jump to the Main Menu.
Note: If you have configured multiple sources using different Programming Guide Data
providers in the Source Setup, you may see multiple entries with the same channel number,
representing the fact that those multiple sources use the same channel number for different
networks. Alternatively, if the same network is available on both sources, but on different
channel numbers, that network may be listed only once using only one of those channel numbers.
For example: CNN may be on both sources: as channel 6 on one and channel 25 on the other. In
this case, CNN will be displayed as channel 6 or 25, but not both; however, CNN will actually
still be available from both sources on the proper channels. SageTV will internally track which
channel belongs to each source. If all sources use the same channel lineup, all channels are listed
only once.
Navigation Commands
Most standard SageTV commands are available while viewing the Program Guide. The
commands listed below are those that are used to navigate the TV program guide.
Command
Keystroke
Function
Left
Left arrow
Highlights the show to the left of the current one, scrolling
the grid if needed.
Right
Right arrow
Highlights the show to the right of the current one, scrolling
the grid if needed.
Copyright 2010 SageTV, LLC All rights reserved
For additional support, go to www.sagetv.com/support.html or email us at [email protected]
SageTV V7.0 User’s Guide
Chapter 3: SageTV Menus
Page 54
Command
Keystroke
Function
Up
Up arrow
Highlights the show above the current one, scrolling the grid
if needed.
Down
Down arrow Highlights the show below the current one, scrolling the grid
if needed.
Page Right
Skip Fwd
Smooth FF
Ctrl+F,
F8
Scrolls the grid one page forward, to see the program listings
for the next 1 ½ hour time period.
Page Left
Skip Bkwd
Smooth Rew
Ctrl+A,
F7
Scrolls the grid one page backward, to see the program
listings for the previous 1 ½ hour time period.
Page Up
Page Up,
F5
Scrolls the grid one page up, to see the previous five
channels.
Page Down
Page Down,
F6
Scrolls the grid one page down, to see the next five channels.
Select
Enter
Displays the Airing and Video Options Dialog, where the list
of possible actions that can be performed will be shown.
Play
Ctrl+D
If no media is currently playing, using the Play command on
a show that is currently airing will cause SageTV to begin
viewing the show.
Info
Ctrl+I
Displays the Program Information screen for the highlighted
show.
Watched
Ctrl+W
Toggles the Watched status for the highlighted show.
Favorite
Ctrl+K
Adds the highlighted show as a Favorite if it is not one
already. If it is already a Favorite, you will be asked whether
to remove it from the Favorites list.
Don’t Like
Ctrl+J
Toggles the Don’t Like status for the highlighted show.
Record
Ctrl+Y
Displays the Record Command Options Dialog, where you
can choose from the various recording options currently
available.
Home
Home
Moves directly to the Main Menu.
Options
Escape,
Ctrl-O
Toggles the display the pop-up options menu; see below for
full details.
Num 0 – 9
+ Select
0-9
+ Enter
Enter one or more numbers followed by the Select command
to jump to that channel number.
Skip Fwd #2
Ctrl+F8
Jump ahead 1 day in the guide.
Skip Bkwd #2
Ctrl+F7
Jump back 1 day in the guide.
Copyright 2010 SageTV, LLC All rights reserved
For additional support, go to www.sagetv.com/support.html or email us at [email protected]
SageTV V7.0 User’s Guide
Chapter 3: SageTV Menus
Page 55
Command
Keystroke
Function
Num 0 – 9
+ Page Right or
+ Skip Fwd or
+ Smooth FF or
+ Skip Fwd #2
0-9
+ Ctrl+F or
Enter one or more numbers followed by the Page Right, Skip
Fwd, Smooth FF, or Skip Fwd #2 command to jump ahead
that many days in the guide.
Num 0 – 9
+ Page Left or
+ Skip Bkwd or
+ Smooth Rew or
+ Skip Bkwd #2
0-9
+ Ctrl+A or
+ Ctrl+F8
Enter one or more numbers followed by the Page Left, Skip
Bkwd, Smooth Rew, or Skip Bkwd #2 command to jump
back that many days in the guide.
+ Ctrl+F7
Mouse Navigation
Scrolling may be performed with the mouse by left-clicking on the arrow icons, , , , and ,
to scroll the list left, right, up, and down, by one complete page. The arrow buttons on either side
of the day’s date may be used to scroll one day at a time. The larger direction icons, and ,
indicate that the show’s timeslot continues in that direction; they are not mouse action buttons.
Left-click on a show to display the Airing and Video Options Dialog, where the list of possible
actions that can be performed will be shown.
A right-click will display this menu’s custom pop-up options menu. See below for details.
TIP: Updating the Guide Data
SageTV will automatically update its programming data once every 24 hours; however, if you
wish to force an update of the guide data, go to Channel Setup or the Channel Manager menu,
then select any channel twice so that its enabled/disabled status is toggled back to its original
setting, then exit the menu. This will not change which channels you can receive, but SageTV
will then go online to refresh the programming data. The Channel Manager menu can be
accessed via this menu’s options menu, below.
Program Guide Options
Use the Options command to display the various options available on this menu. The options list
can be exited by using the Options command again or via the Left arrow. The choices are:
Menu Options – Display the Program Guide Menu Options dialog, below.
Channel Manager – Jump to the Channel Manager menu, where channels can be
enabled or disabled and the logical channel numbers (the numbers shown in the guide
grid) can be remapped.
Copyright 2010 SageTV, LLC All rights reserved
For additional support, go to www.sagetv.com/support.html or email us at [email protected]
SageTV V7.0 User’s Guide
Chapter 3: SageTV Menus
Page 56
Search – Jump to the consolidated Search menu, with the search style starting with the
last used TV search style.
SageTV Recordings – Jump to the SageTV Recordings menu, at the last-used view.
Recording Schedule – Jump to the Recording Schedule, which displays a list of all TV
shows that are scheduled to be recorded, at the last-used view.
Program Guide Menu Options
The Program Guide Menu Options dialog is used to configure additional options for the menu.
The options are:
Number of Rows – Sets the number of channel rows displayed on the grid.
Number of Columns – Sets the number of time columns displayed on the grid.
Column duration – Sets the number of minutes each time column represents in the grid.
Font Size – Sets the size of the font used to display the show listings in the grid. If you
have increased the number of columns and/or rows, you may wish to decrease the font
size.
Channel Sorting – Select this option for a pop-up dialog where you can choose the
Channel Sorting Options:
o Channel Sorting Style – Select this option to toggle whether the channels are
sorted by Number or Name.
o List channels in reverse – Select this option to toggle the order, either ascending
or descending, in which the channels are listed.
Display channel logos if available? – Selecting this option toggles whether channel
logos will be displayed, when they are available. See Appendix B: Adding Channel
Logos.
Display channel number and name on – Selecting this option toggles whether the
channel number and name will be displayed on 1 or 2 lines. For single line display, the
number and name are displayed side by side; for two line display, they are displayed with
the number above the name.
Use vertical wrap-around scrolling in the Program Guide grid – Choose whether the
Program Guide grid should wrap vertically from the last channel to the first channel when
scrolling up or down. This option is also available in Detailed Setup: Customize Settings.
Copyright 2010 SageTV, LLC All rights reserved
For additional support, go to www.sagetv.com/support.html or email us at [email protected]
SageTV V7.0 User’s Guide
Chapter 3: SageTV Menus
Page 57
Video Menu Options – Displays the Options menu found on most screens, where you can
set when and how video playback is shown on menus. See its full explanation for details.
Close – Exit the pop-up menu.
Copyright 2010 SageTV, LLC All rights reserved
For additional support, go to www.sagetv.com/support.html or email us at [email protected]
SageTV V7.0 User’s Guide
Chapter 3: SageTV Menus
Page 58
Program Information
The Program Information screen displays the full information for airings in the Program
Guide.
Full details for the airing are shown on the left side of the screen. The data may fill more than the
space on a single screen. If so, you will be able to scroll down to see the rest of the information.
The right size of the screen is used to display a combination of the airing’s thumbnail, series
image, or channel logo (if there is one); however, if video is displayed in a window on menus,
the video may be shown instead of an image in the upper right corner.
Use the Select command (Enter key) to display the list of possible actions to perform for the
airing; see the Airing and Video Options Dialog for details.
Use the Back command or the Left arrow to return to the previous menu.
Using the Options command will display the Video Menu Options dialog, which is the regular
Options menu found on most screens. See its full explanation for details.
Copyright 2010 SageTV, LLC All rights reserved
For additional support, go to www.sagetv.com/support.html or email us at [email protected]
SageTV V7.0 User’s Guide
Chapter 3: SageTV Menus
Page 59
Series Information
The Series Information screen displays the extended information for a series, when it is
available. Not all series have information available.
The series information is shown on the left side of the screen. Some of the information that may
be displayed includes a description of the series, its history, and list of cast members. The data
may fill more than the space on a single screen. If so, you will be able to scroll down to see the
rest of the information.
The lower right part of the screen is used to display the series image (if there is one).
The upper right corner is used to display the video preview, if video is displayed in a window on
menus and a video is playing.
Use the Back command or the Left arrow to return to the previous menu.
Using the Options command will display the Video Menu Options dialog, which is the regular
Options menu found on most screens. See its full explanation for details.
Copyright 2010 SageTV, LLC All rights reserved
For additional support, go to www.sagetv.com/support.html or email us at [email protected]
SageTV V7.0 User’s Guide
Chapter 3: SageTV Menus
Page 60
Additional Airings
The Additional Airings screen lists all the future airings for a show.
Highlighting a show will cause some of its detailed information to be displayed on the right side
of the screen. Use the Select command or left-click on an airing to see options for it; see the
Airing and Video Options Dialog for details.
See SageTV Recording Types Indicators for a description of the show indicator markers.
The first two entries in the list allow accessing the Past Airings and the Current Recordings for
the show, if any such airings or recordings were found. Select a group to display the Grouped
Airings and Videos Options Dialog.
The layout and use of this menu is similar to the Search Results menu. See that menu’s details
regarding its configuration options.
Copyright 2010 SageTV, LLC All rights reserved
For additional support, go to www.sagetv.com/support.html or email us at [email protected]
SageTV V7.0 User’s Guide
Chapter 3: SageTV Menus
Page 61
Airing History
The Airing History screen lists all the past airings for a show that are still in the SageTV
database. Not all data for previous airings will be saved. If SageTV has no reason to store the
details of a show, such as the show was never watched, not marked as Don’t Like, is not a
Favorite, etc., then its data will be removed from the database at some point after it is no longer
listed in the current EPG listings.
Highlighting a show will cause some of its detailed information to be displayed on the right side
of the screen. Use the Select command or left-click on an airing to see options for it; see the
Airing and Video Options Dialog for details.
See SageTV Recording Types Indicators for a description of the show indicator markers.
The first two entries in the list allow accessing the Current Recordings and the Future Airings for
the show, if any such recordings or airings were found. Select a group to display the Grouped
Airings and Videos Options Dialog.
The layout and use of this menu is similar to the Search Results menu. See that menu’s details
regarding its configuration options.
Copyright 2010 SageTV, LLC All rights reserved
For additional support, go to www.sagetv.com/support.html or email us at [email protected]
SageTV V7.0 User’s Guide
Chapter 3: SageTV Menus
Page 62
Recording Schedule
Parent Menu: Main Menu.
The Recording Schedule displays a list of all the TV shows scheduled to be recorded. You may
scroll through the list, using the directional arrows, along with the Page Up and Page Down
commands.
SageTV will automatically determine the upcoming recording schedule for up to the next 14
days. Manual recordings can be scheduled as far into the future as there is guide data in the
Program Guide, usually about 12-14 days. In addition, if the scheduler is set to cover fewer days
than the EPG data covers, the automatic scheduler can schedule a show to be recorded beyond
the initial number of days if it conflicts with other shows during that time period and if it will be
aired again during the extended time that the guide covers. See Number of Days to Schedule
Recordings in Detailed Setup: Customize Settings.
Highlighting an individual airing will cause some of its information to be displayed above the
list. Select or left-click on an airing to view the list of possible actions to perform for that airing;
see the Airing and Video Options Dialog for details. Use the Info or Right arrow commands to
view the Program Information for a highlighted show.
The upper right corner of the screen is used to display video previews or thumbnails for the
highlighted airing.
See SageTV Recording Types Indicators for a description of the show indicator markers.
Recording Schedule Views
The Recording Schedule menu is configured with three views. Use the Options command to
change the current view. See Recording Schedule Options. The three viewing styles are:
Interleaved – Scheduled recordings are simply presented in a list, without any blank
space for time periods where no recordings are scheduled.
Group by Day – Airings are grouped by day, then a 2-column list of each day and the
highlighted day’s scheduled recordings is shown.
Parallel – A column for each installed capture device is used to display shows in the time
slot where they will be recorded for each device.
Tip: Use the Smooth FF, Skip Fwd #2, Smooth Rew, or Skip Bkwd #2 commands to jump to the
next or previous view.
Copyright 2010 SageTV, LLC All rights reserved
For additional support, go to www.sagetv.com/support.html or email us at [email protected]
SageTV V7.0 User’s Guide
Chapter 3: SageTV Menus
Page 63
Recording Schedule Options
Use the Options command to display the various options available on this menu. The options list
can be exited by using the Options command again or via the Left arrow. The choices are:
Views – The available viewing styles are listed below the Views title. The current view is
highlighted. Select any view to switch to that viewing style.
Filters – Three quick access filters are shown for Manual Recordings
, Favorites
,
and Other
recordings. Each time the filter is selected, it changes between ignoring the
filter, filtering to include recordings of that type, or filtering to exclude recordings of that
type. Notes: “Other” is anything that is not a Favorite or Manual Recording, including
Intelligent Recordings or Live TV that is not a Manual Recording or Favorite.
Recording Conflicts – Go to the Recording Conflicts menu. This option is displayed
only when there are unresolved or resolved recording schedule conflicts. If there are no
conflicts, this option will not be visible.
Menu Options – Display the Recording Schedule Menu Options dialog, below.
Search – Go to the consolidated Search menu, with the search style starting with the last
used TV search style.
SageTV Recordings – Go to the SageTV Recordings menu.
Imported Videos – Go to the Video Browser.
Recording Schedule Menu Options
The Recording Schedule Menu Options dialog is used to configure additional options for the
menu. The options are:
Max Number of Tuner Columns – This option is only available while using the
Parallel viewing style; use it to set the maximum number of tuner columns shown on the
screen at once.
Number of Rows – Set the number of rows used for the list of scheduled recordings.
Grid or Airing List Font Size – Set the font size used to display the list of scheduled
recordings.
Video Menu Options – Displays the Options menu found on most screens, where you can
set when and how video playback is shown on menus. See its full explanation for details.
Close – Exit the pop-up menu.
Copyright 2010 SageTV, LLC All rights reserved
For additional support, go to www.sagetv.com/support.html or email us at [email protected]
SageTV V7.0 User’s Guide
Chapter 3: SageTV Menus
Page 64
Notes about Scheduled Recordings
Recording a show only once
SageTV will use a show’s ShowID to determine whether that show was recorded or watched
previously. If each episode of a series has a unique ShowID, then SageTV will be able to track
the data for each individual show. However, some series only provide a single ShowID for every
episode in the series, which means that SageTV will not be able to tell one show from another.
If SageTV is able to track each individual show, those shows will not be recorded again if they
are already recorded or marked as Watched. The Watched status markers are remembered even
after a recording is deleted, so as long as the show has a unique ShowID, SageTV will know not
to record it again. Note: Using the Record command will override this and force SageTV to
record a show again regardless of its current status.
ShowID Prefixes
There are at least four types of ShowIDs that are seen in SageTV:
MV – Move ID. Each movie has its own ID. Note: Keep an eye on multi-part movies or
miniseries. Sometimes, the EPG data provider does not assign unique IDs to each part of
the overall movie; if this happens, SageTV may not know that Part 1 is not the same as
Part 2 and may only record one of the parts.
EP – Episode ID. Most series have a unique ID assigned to each episode of that series.
When this is the case, SageTV will be able to know that an episode has already been
recorded.
SH – Series ID. A series will have its own base ID, usually with the last four digits set to
0000. Some series have no unique ID for each episode. When this is the case, every
episode of the series will be assigned the same ID, forcing SageTV to record every airing
due to its inability to tell them apart.
SP – Sports ID. Each Sports show should have its own ID.
Scheduling up to 14 Days in Advance
As mentioned above, by default, SageTV will automatically schedule shows to be recorded for
up to the next 14 days. If the scheduling lookahead time is less than the time covered by the EPG
data and a conflict prevents a show from being recorded during that scheduling time period, the
scheduler will look as far into the future as it has EPG data to try to find another airing of that
same show. If another airing is found beyond the scheduling time, that airing may be added to
the schedule to resolve a conflict. Note: The scheduler time limit applies only to the shows that
SageTV automatically schedules to record, via Favorites or Intelligent Recordings. You may use
the Record command to tell SageTV to record any show that is currently in the EPG data, which
covers approximately the next two weeks. See Number of Days to Schedule Recordings in
Detailed Setup: Customize Settings.
Copyright 2010 SageTV, LLC All rights reserved
For additional support, go to www.sagetv.com/support.html or email us at [email protected]
SageTV V7.0 User’s Guide
Chapter 3: SageTV Menus
Page 65
Why A Favorite May not be Scheduled to Record
Sometimes, an airing that you believe should be scheduled to record because it is one of your
Favorites is not added to the recording schedule. There could be a variety of reasons why this is
the case; among those reasons:
Is the airing title shown in Bold font? If not, then it doesn't fit any of your Favorites’
settings and will not be recorded as a Favorite.
If it is already recorded & sitting in the list of SageTV Recordings, it won't be recorded
again.
If the episode is marked as 'Watched' or the airing is marked 'Don't Like', SageTV won't
record it again. (Watched shows are displayed in italics.)
Is it a ReRun & your Favorite is set for First Runs only, or vice-versa?
Is the Favorite set for a specific channel, but the show is aired on a different channel?
Was a specific timeslot set for the Favorite, but the airing is outside that timeslot?
Is a value set for the Favorite's Keep At Most option and that limit has been reached?
(New recordings will cease if this is the case and AutoDelete is set to No.)
It may be scheduled to record during another airing. Check future airings.
There is a conflict and that favorite was deemed to be a lower priority than another
favorite or manual recording, so it was skipped. (Check the Recording Conflicts menu for
conflicts.)
Copyright 2010 SageTV, LLC All rights reserved
For additional support, go to www.sagetv.com/support.html or email us at [email protected]
SageTV V7.0 User’s Guide
Chapter 3: SageTV Menus
Page 66
Search
The Search menu consolidates all types of media searches into a single menu. From this menu,
you can search for TV airings, Videos (recordings or imported videos), Music, Photos, and
Online Videos.
Above the text entry field and the search results are two category bars: use the top bar to choose
the media type to be searched, then use the lower bar to choose how to search that media type.
Tip: Use the Smooth FF, Skip Fwd #2, Smooth Rew, or Skip Bkwd #2 commands to jump to the
next or previous search style.
The lower left portion of the screen contains the characters you can Select to enter as search text.
You can also simply type using the keyboard, then arrow over to the results list. Text may be
entered from a remote’s number pad via Numeric Text Input. Use Back to return to the previous
menu, Erase to clear the last character entered (or use Backspace on the keyboard, or the Stop
command on a remote), and Clear to clear the entire entry field.
The list of search results on the right side of the screen is updated a short time after input stops.
Select one of the results to see the Search Results for an airing, to open a pop-up options dialog
for a media item, or to view a photo. At the top of most search results lists will be an item
offering to view all items found.
The following search types are available:
TV – Search TV airings, including recordings and past or future airings. Search by:
o title
o people
o description
o all fields
Videos – Search videos, including recordings and imported videos. Search by:
o title
o people
o description
o all fields
Music – Search the music collection by:
o song title
o album title
o artist
Photos – Search photos by:
o title
Online Videos – Select this search type to search Google Video content.
Copyright 2010 SageTV, LLC All rights reserved
For additional support, go to www.sagetv.com/support.html or email us at [email protected]
SageTV V7.0 User’s Guide
Chapter 3: SageTV Menus
Page 67
Search Results
The Search Results screen lists the results of a TV search from the Search menu. All future
airings that match the search criteria will be displayed. Highlighting a show will cause some of
its detailed information to be displayed on the right side of the screen. Use the Select command
or left-click on an airing to see options for it; see the Airing and Video Options Dialog for
details.
See SageTV Recording Types Indicators for a description of the show indicator markers.
The first two entries in the list allow accessing the Past Airings and the Current Recordings for
the show, if any such airings or recordings were found. Select a group to display the Grouped
Airings and Videos Options Dialog.
The upper right corner of the screen is used to display the video preview or a thumbnail for the
highlighted airing.
Search Results Options
Use the Options command to display the various options available on this menu. The options list
can be exited by using the Options command again or via the Left arrow. The choices are:
Clear All filters – Clear all filters so that all search result items are included.
Filters – Two rows of filter icons are displayed:
, Don’t Like
, First Run
, HDTV
, and Archived
o The Watched
filters are initially turned off. Select an item once to filter so that only items
matching that criteria are included. Select the item a second time to filter out any
airings matching that status. Select it a third time to disable the filter.
o Three filters are shown for Manual Recordings
, Favorites
, and Other
recordings. Each time the filter is selected, it changes between ignoring the filter,
filtering to include recordings of that type, or filtering to exclude recordings of
that type. Notes: “Other” is anything that is not a Favorite or Manual Recording,
including Intelligent Recordings or Live TV that is not a Manual Recording or
Favorite.
Menu Options – Display the Search Results Menu Options dialog, below.
Search – Go to the consolidated Search menu, with the search style starting with the last
used TV search style.
Sorting – Open the Sorting Options dialog, below.
Copyright 2010 SageTV, LLC All rights reserved
For additional support, go to www.sagetv.com/support.html or email us at [email protected]
SageTV V7.0 User’s Guide
Chapter 3: SageTV Menus
Page 68
SageTV Recordings – Jump to the SageTV Recordings menu, at the last-used view
Imported Videos – Go to the Video Browser.
Search Results Menu Options
The Search Results Menu Options dialog is used to configure additional options for the menu.
The options are:
Number of Rows – Set the number of rows used to display the list of airings.
Airing List Font Size – Set the font size used to display the list of airings.
Video Menu Options – Displays the Options menu found on most screens, where you can
set when and how video playback is shown on menus. See its full explanation for details.
Close – Exit the pop-up menu.
Sorting Options
The Sorting Options dialog contains a list of options for sorting the search results list. The Past
Airings and Current Recordings groups are always shown as the first two items in the list.
Choose from the sorting options listed below:
Oldest/Newest First – Airings are simply sorted by their airing date.
Title or Episode A-Z/Z-A – Sorting is performed on the shows’ titles or episode names.
If all items in the search results have the same title, then they will be sorted by episode
name.
Title A-Z/Z-A + Oldest/Newest First – Airings are sorted by their titles, with items
having the same title sorted by airing date.
Category – The name of each show’s category is used for sorting. As usual, there is a
choice for reversing this sort.
Orig. Air Date – Each airing’s original airing date is used for sorting, either in oldest-tomost recent or most recent-to-oldest (reversed) order.
Channel Name A-Z/Z-A – The name of the channel where each show airs is used for
sorting.
Copyright 2010 SageTV, LLC All rights reserved
For additional support, go to www.sagetv.com/support.html or email us at [email protected]
SageTV V7.0 User’s Guide
Chapter 3: SageTV Menus
Page 69
Intelligent – The list will be sorted by SageTV’s recording priority. Manual recordings
are listed before Favorites, then Intelligent Recordings and live TV, followed by watched
shows, with shows marked as Don’t Like listed last. Within each of those sections, the
newer airings are listed first. The Reversed form of this style simply reverses the sort
order.
ShowID – The airing’s ShowID is used for sorting, in ascending or descending (reversed)
order.
Reverse Sort Order – When checked, the search result list will be sorted in reverse
order.
Close – Close the pop-up list without changing the current setting.
Copyright 2010 SageTV, LLC All rights reserved
For additional support, go to www.sagetv.com/support.html or email us at [email protected]
SageTV V7.0 User’s Guide
Chapter 3: SageTV Menus
Page 70
Browse By Category
The Browse By Category screen lists all the future airings for shows, sorted by their categories.
If shows belong to more than one category, they will be listed in multiple categories.
Note: If any of the channels in your EPG air HDTV content, there will be an HDTV category
listed on this menu, which will contain all future HDTV airings. While this is not a true category,
it has been added to enable browsing all HDTV airings.
The left-hand pane displays a scrollable list of all the categories for upcoming shows currently
listed in the EPG. Highlight a category name to see a list of upcoming shows for that category.
Select a category name to display the Grouped Airings and Videos Options Dialog for the group
of airings in that category. Tip: While an item in the left column is highlighted, enter a letter or
number to jump to the next category that starts with that letter. Numeric input will jump to the
next letter based on the Numeric Text Input settings.
When a category name is highlighted, the upcoming airings for that category are listed in the
right-hand pane, sorted by airing time. Highlighting an airing in the right side list will cause
some of its detailed information to be shown at the top of the screen. Use the Select command or
left-click on an airing to see options for it; see the Airing and Video Options Dialog for details.
The upper right corner of the screen is used to display the video preview or a thumbnail for the
highlighted airing.
Copyright 2010 SageTV, LLC All rights reserved
For additional support, go to www.sagetv.com/support.html or email us at [email protected]
SageTV V7.0 User’s Guide
Chapter 3: SageTV Menus
Page 71
Favorites Manager
The Favorites Manager lists all the current favorites and has options for adding new ones,
sorting the list, and assigning User Categories to Favorites.
The right side of the screen contains the current list of favorites, sorted by the selected Sort
option (see below). Select a favorite from the list to go to the Favorite Details menu for that
favorite. Use the Right arrow or click on the icon to enable changing the favorite’s priority.
See Adjusting a Favorite’s Priority, below.
The left side contains some actions that can be performed:
New by Title – Adds a new favorite by searching for and choosing the title of the show
to be added. Simply type in part of the title you wish to add as a favorite, then select it
from the list shown on the right side of the screen.
New by Actor – Adds a new favorite by searching for and choosing the name of the actor
to be added. Simply type in part of the name you wish to add as a favorite, then select it
from the list shown on the right side of the screen.
New by Category – Adds a new favorite by choosing a category to be added. Simply
scroll through the list of categories presented and select the one you wish to add as a
favorite
New by Keyword – Adds a new favorite by entering a keyword phrase. After selecting
the Add Favorite button when adding a new Keyword Favorite, a pop-up menu will ask
what parts of a show’s description will be searched for the specified keyword. Select
from:
o All Fields – All the major show description fields are searched for the keyword:
title, episode, description, year, people (actor, producer, etc.), category,
subcategory, miscellaneous info (i.e. Stereo, Series Premiere, Season Premiere,
etc.), expanded ratings (i.e., adult language, violence, etc.), language and channel
name.
o Title Only – Only the title of a show will be searched for the keyword.
o Cancel – Close the pop-up menu and return to editing the keyword. (The Options
command will also close the menu without making a selection.)
When entering keywords, keep in mind that Keyword Favorites follow these rules:
o The keyword is tested against the chosen fields for each show’s description. (See
below for further details on types of keyword favorites.)
Copyright 2010 SageTV, LLC All rights reserved
For additional support, go to www.sagetv.com/support.html or email us at [email protected]
SageTV V7.0 User’s Guide
Chapter 3: SageTV Menus
Page 72
o Keywords are not case sensitive: BOB is the same as bob.
o If multiple keywords are entered, all words in the keyword phrase must be found
in a show’s description for it to be included; however, order does not matter: star
trek = trek star.
o The quote character (“) can be used to delineate exact phrases to match: “star
trek” will find all the various Star Trek series and movies, but “trek star” will
not.
o The asterisk (*) is used to match any extra characters in a word or none: Len* can
also match Len.
o The Question mark (?) is used to match any single character: Len? will match
Leno, but not Len.
o Keywords must match a whole word: Len will not find Leno, but Len? or Len*
will.
Sort by: Priority – Toggles whether the list of Favorites is sorted by Priority (default)
or Title. Note: when sorted by title, the priority cannot be adjusted. See Adjusting a
Favorite’s Priority, below.
Assign User Categories – Use this option to assign the same User Categories to multiple
Favorites at once. A dialog listing all Favorites will be shown. Select each Favorite to be
assigned a specific set of User Categories, then select Edit User Categories. After the
User Category editing dialog opens, select one or more categories to be assigned. While
the dialog is open, you can add new user defined categories or resort the category list to
place the selected ones at the top. Toggle the Mode to set all items in the group to use the
same set of selected categories, remove selected categories from all items in the group, or
add the selected categories to the items without changing their existing category
assignments. If the existing categories are mixed, you will be asked to confirm the change
when assigning the same categories for an entire group. Choose Done once all
assignments have been made or select Cancel to close the dialog without changing the
category assignments. The Delete command can be used while a category is highlighted
to remove it from the list of user defined categories. If the category is still in use in the
SageTV database, it will remain in the list, however. Note: The SageTV Recordings
menu can be filtered to optionally include or exclude recordings based on their categories
and/or user categories.
Back – Return to the previous menu.
Adjusting a Favorite’s Priority
In cases of scheduling conflicts, favorites are prioritized according to their position in the list of
favorites: those with a lower number have priority over the higher numbered ones. Thus, favorite
Copyright 2010 SageTV, LLC All rights reserved
For additional support, go to www.sagetv.com/support.html or email us at [email protected]
SageTV V7.0 User’s Guide
Chapter 3: SageTV Menus
Page 73
#1 has priority over favorite #2 if a scheduling conflict arises where not all Favorites can be
recorded. While viewing the Favorites list sorted by Priority, you can enter a mode to change the
priority of a favorite by using the Right arrow while it is highlighted, or by clicking on the
icon with the mouse. The highlighted favorite will change its display to include additional icons.
While in priority change mode, you may do the following:
Use the Left arrow, or click on the
icon, to exit priority change mode.
Use the Up arrow, or click on the icon, to move the favorite up in the list, to a lower
numbered position so that it has higher priority. This option will not be available if the
favorite is in the #1 position.
Use the Down arrow, or click on the icon, to move the favorite down in the list, to a
higher numbered position so that it has lower priority. This option will not be available
if the favorite is in the last position.
Notes:
To help determine why a Favorite airing may not be scheduled to record, see Notes about
Scheduled Recordings.
When the Favorites list is sorted by Title, their relative priorities cannot be adjusted.
Copyright 2010 SageTV, LLC All rights reserved
For additional support, go to www.sagetv.com/support.html or email us at [email protected]
SageTV V7.0 User’s Guide
Chapter 3: SageTV Menus
Page 74
Favorite Details
The Favorite Details menu lists all the current settings for the favorite listed near the top of the
screen. Select any of the settings buttons to be presented with a pop-up dialog containing options
for changing the setting. If you wish to cancel a pop-up without making any changes, use the
Options command (keys: Escape or Ctrl+O; mouse: right-click) to dismiss the dialog. The
selectable options on this menu are:
First/ReRuns – Every favorite can be set to record only the
first runs of each airing, only the reruns, or both first runs
and reruns. The button displays the current setting. Note:
Setting the favorite to record reruns means that it will record
unwatched older airings of a show that are aired again; it will
not automatically record airings that are already marked as
Watched.
IMPORTANT: If a setting
fails to ‘stick’ when selected,
it could mean that another
Favorite already exists using
the same limitation criteria.
Channel – A favorite can be set to record on any channel or only on one or more selected
channels.
When there is no channel limitation set, all channels that air the Favorite show will be displayed
near the top of the list, along with information about whether the airings on that channel only
occurred in the past or whether there are future airings listed in the current EPG data. Once a
channel limit has been set, airings of the Favorite can only be checked for the channel(s) the
Favorite is limited to, so in order to see whether other channels also air the Favorite, choose Any
to clear the selection and update the list of channels. The Refresh Channel List option can be
used to update the channel list by determining which channels have airings and moving all
selected channels to the top of the list.
AutoDelete – The Automatic setting allows SageTV to automatically delete recordings of this
favorite as needed. The Manual setting tells SageTV to never delete any recordings of this
favorite, in which case you will have to delete the recordings with the Delete command when
you no longer want to keep them.
Keep At Most – This option instructs SageTV to keep no more than the specified number of
recordings for this favorite, if AutoDelete is set to Automatic. When AutoDelete is set to
Manual, SageTV will stop recording new shows when the specified number of recordings is
reached (up to 63); however, if another recording is already in progress, it will also be recorded.
It is possible to have extra recordings created until the recording schedule is fully updated.
Manually delete one of the recordings to allow SageTV to record another show. To keep all
recordings of a favorite, set this value to 0.
Start Time and Stop Time – You may choose to add padding to the beginning or end of each
recording of a favorite in order to make sure that the entire show is recorded. At times, a station’s
clock differs from SageTV’s clock and a show may start slightly before a recording begins, or
Copyright 2010 SageTV, LLC All rights reserved
For additional support, go to www.sagetv.com/support.html or email us at [email protected]
SageTV V7.0 User’s Guide
Chapter 3: SageTV Menus
Page 75
finish slightly after the recording ends. Adding padding time will enable the start and end of the
show to be recorded.
Note: Adding extra time to the beginning or end of recordings may cause the recording to
conflict with other shows which might need to record during the padded time period. Especially
when using only single tuner, be careful that your padding time is not interfering with the
scheduling of other recordings. Be sure to check the Recording Conflicts screen for conflict
information. If a conflict occurs, you will be notified with the conflict icon
on the menu
header. You can click on the icon to go directly to the Recording Conflicts screen.
When adjusting the start or stop padding time, pop-up dialogs are displayed. Use the Left
and Right arrow commands, or left-click on the and icons, to adjust the time by a
single minute at a time. Use the Page Left (Ctrl+A) and Page Right (Ctrl+F) commands,
or left-click on the and icons, to adjust the time by 15 minutes at a time. When done,
use the Select command (Enter), or left-click on the time, to accept the changes and close
the dialog. To cancel the changes, use the Options command (Escape or Ctrl+O), or right
click anywhere.
Recording Quality – Allows setting the recording quality to be used for every recording of the
favorite. A pop-up menu of recording quality choices will be shown. Note: SageTV supports the
use of multiple capture devices using multiple recording formats, such as MPEG2 and
MPEG4/DivX. If the recording quality is set to one that is not available to all capture devices, a
Favorite may be limited to recording only on those devices that can use the specified recording
quality, depending on how the Enforce recording quality in schedule option is set in Detailed
Setup: Customize Settings.
Automatic Conversion – Use this option to configure a favorite to automatically convert new
recordings when the recordings are completed. In the Automatic Conversions dialog, choose the
Format, Quality, whether to delete the original recording when the conversion is done, and the
folder where the converted recordings should be stored. After making your selections, choose
Use Settings Below to configure the favorite’s automatic conversion settings. Choose Don’t
Convert to stop automatically converting the recordings for the favorite. Or, choose Cancel
Changes to close the dialog without making any changes to this setting.
Keyword – Select this option to edit the keyword for an existing Keyword Favorite or add a
keyword to any other type of favorite. The keyword for non-Keyword Favorites can be removed
by editing the keyword and clearing it. See the Favorites Manager for keyword details.
User-Defined Categories – Use this option to assign user defined categories to a Favorite. After
the User Category editing dialog opens, select one or more categories to be assigned to the
favorite. While the dialog is open, you can add new user defined categories or resort the category
list to place the selected ones at the top. Choose Done once all assignments have been made or
select Cancel to close the dialog without changing the category assignments. The Delete
command can be used while a category is highlighted to remove it from the list of user defined
categories. If the category is still in use in the SageTV database, it will remain in the list,
Copyright 2010 SageTV, LLC All rights reserved
For additional support, go to www.sagetv.com/support.html or email us at [email protected]
SageTV V7.0 User’s Guide
Chapter 3: SageTV Menus
Page 76
however. Note: The SageTV Recordings menu can be filtered to optionally include or exclude
recordings based on their categories and/or user categories.
Advanced Options – Select this button for a pop-up dialog of additional options:
Limit to Parental Rating – If set, this forces the Favorite to only include airings that
have the specified Parental Rating, such as TVY, TVG, TVPG, etc.
Limit to shows Rated – If set, this forces the Favorite to only include airings that have
the specified Rating, such as G, PG, R, etc.
Limit to Day – If set, the Favorite will only be recorded when it airs on the specified day.
Limit to Hour – If set, the Favorite will only be recorded when its airing falls within the
specified hour. Note: The airing does not have to be completely contained with the
specified hour; only some part of the airing must be within that hour.
Clear or Set Watched Status – Choose this option to be able to Set or Clear the
Watched status for all episodes of the Favorite. You will then be asked to confirm the
action before SageTV will proceed. While all the episodes are being processed, a
progress dialog will be shown and you will be able to stop the action. Notes: 1) This
option is only available for Favorites that have a show Title; it will not be available for
Actor, Category, or Keyword Favorites. 2) Only episodes that qualify under the current
Favorite’s settings will be affected. So, if the Favorite is limited to a specific airing Day,
then only shows that air on that day will have their Watched status set or cleared.
Additional Airings – Go to the Additional Airings menu, where upcoming airings for this
favorite will be displayed. All future airings in the EPG that meet the criteria of the favorite’s
settings will be listed, usually covering approximately the next two weeks. Note: If a favorite is
limited to a specific channel, only those airings of the show on that channel will be displayed.
Remove Favorite – If you wish to remove a favorite, perhaps because the show no longer airs,
select this option. A confirmation dialog will be shown, asking whether it really ought to be
deleted.
Back – Issues the Back command to return to the screen where you previously were.
Copyright 2010 SageTV, LLC All rights reserved
For additional support, go to www.sagetv.com/support.html or email us at [email protected]
SageTV V7.0 User’s Guide
Chapter 3: SageTV Menus
Page 77
Create Timed Recording
Timed recordings will record during the time period you specify, regardless of what the EPG
says is airing at that time. You will need to specify a channel, start time, and stop time for the
recording.
Channel Selection
To select the channel for the recording, use the Up, Down, Page Up, and Page Down commands
to scroll through the list. After highlighting the desired channel, use the Right arrow to select the
channel and proceed to selecting the start time. Mouse: Click on the
and
icons to scroll
with the mouse. Left-click on the desired channel.
Start and Stop Time
After choosing the channel, choose the recording’s start and stop times. Use the Up and Down
commands to adjust the date, hour, minute, and AM/PM settings. After setting each option,
continue to the next field by using the Right arrow. After setting all fields, use the Right arrow to
continue to the next screen, where you will select the Recurrence option. Mouse: Point to each
field and adjusting the values by clicking on the and icons, which will appear. When done,
click on the far right icon to continue to the Recurrence menu:
Recurrence
Choose how often this timed recording should be scheduled:
Once – The recording will be scheduled one time only.
Daily – The recording will be scheduled to occur at the same time every day.
Weekly (Specify Days) – A pop-up menu will appear, where you can choose which days of the
week to schedule the timed recording. Select each day when the recording should occur, then
select Done.
Weekly – The recording will be scheduled on the same day and at the same time every week.
Canceling a Timed Recording
To cancel a timed recording, go to the Recording Schedule and select one of the entries for the
timed recording (or the only one, if it doesn’t recur). On the Program Information screen, select
Record Options. In the resultant pop-up, select Cancel Recording. Note: All occurrences of the
selected timed recording will be deleted, not just the individual schedule entry that was chosen.
Copyright 2010 SageTV, LLC All rights reserved
For additional support, go to www.sagetv.com/support.html or email us at [email protected]
SageTV V7.0 User’s Guide
Chapter 3: SageTV Menus
Page 78
Recording Conflicts
On the Recording Conflicts screen, the number of resolved and unresolved recording conflicts
is shown, along with the list of recording conflicts. The recording conflict list displays airings
that cannot be recorded due to conflicts with other airings. Select a conflict to view the Conflict
Resolution Options screen for that conflict.
During the scheduling process, SageTV makes an attempt to record all the shows that it is asked
to record, including deciding which of multiple airings of a show is the best one to record so that
it causes the fewest conflicts with other shows that are to be recorded; however, there are times
where no amount of shuffling of the recording schedule will allow every single requested
recording to be included in the schedule. In these cases, SageTV creates a conflict notification,
indicates the conflict on all the menu headers with the
or
icon, and adds the conflict
information to the Recording Conflicts menu with the same icon next to the list item.
For a conflict that still exists, but for which you have chosen what action to take, the
icon
will be shown next to its list entry. This could also apply for new automatically resolved
conflicts, such as when a choice was previously made to always have a specific favorite override
another specific favorite. If all conflicts have been handled, but conflicts still exist, the
icon
will be shown on the menu header.
If there are no conflicts at all, then no conflict icon will be shown on the menu header.
Conflict Resolution Options
Once a conflict is selected from the list of recording conflicts, a grid showing the other airings in
conflict with the one selected is shown at the bottom of the screen, and various conflict
resolution options are shown in the upper portion of the screen. The resolution options vary,
depending on the circumstances that caused the conflict, but selecting any option will resolve the
conflict: the conflict will still be listed, but it will not have the icon indicating that attention is
needed.
While viewing the Conflict Resolution Options screen, you may select any airing shown in the
grid to view the Airing and Video Options Dialog for that airing.
After you have chosen an option for dealing with the conflicts, the
visible.
notification icon will be
Note: It is not necessary to select any option for a conflict. SageTV will continue to record the
rest of the shows that are in the recording schedule, only skipping those shows that are listed as
conflicts.
Copyright 2010 SageTV, LLC All rights reserved
For additional support, go to www.sagetv.com/support.html or email us at [email protected]
SageTV V7.0 User’s Guide
Chapter 3: SageTV Menus
Page 79
Music Browser
The Music Browser is where all imported music is presented for browsing and playback. Its
parent menu is the Main Menu.
To play music in SageTV, add the base directory where your music files are stored as one of the
Media Center Import Directories, as defined in Detailed Setup: General Settings. SageTV will
then search it and all of its subdirectories for music files and will add them to SageTV’s list of
music.
Note: SageTV can import and play several different music file formats and codec types. See
Chapter 4’s list of Supported Media Types.
Music Browser Layout
The Music Browser presents your music according to the View currently chosen. The current
view is included in the menu title.
On the left side of the screen is a list of all the music choices, grouped according to the current
view. Select a list entry for all available functions that can be performed on that group, or to
browse that group. See the Music Browser Song Options dialog. the right side of the screen
contains information about the currently highlighted music item.
At the bottom of the screen is an area where information on the currently playing media is
displayed. While music is playing, you may use the standard transport control commands to play,
pause, FF, REW, etc., or use the mouse to click on the transport icons. When no media is
playing, the browser area expands to fill this space.
Music Browser Usage
When using the music browser, it may help to think of it in the sense that you are always
working with a set of songs. The initial browser screen contains the entire collection of songs in
your music import directories. The collection of songs may be viewed as a simple list of song
titles, or grouped by various criteria, such as by Album or by Artist. (See the Music Browser
Options, below for a complete list of choices.) Simply Select an entry in a list to see a pop-up
menu of options for that song or group of songs, including a choice to browse that group. Tips:
1) Use the Info command to quickly browse down into a highlighted group of songs. 2) To
quickly jump to an item in a list, enter the letter or number that it starts with.
When you browse a group of songs, you are now working with only the sub-collection of songs
in that group, and the Music Browser Options will then contain choices to view the songs by the
currently available groupings. Example: if you browse a year, all the songs in the group will be
from a single year, so when you browse that group, the ‘Years’ option will not be available.
Copyright 2010 SageTV, LLC All rights reserved
For additional support, go to www.sagetv.com/support.html or email us at [email protected]
SageTV V7.0 User’s Guide
Chapter 3: SageTV Menus
Page 80
As you browse deeper into your song collection, the status line above the list of music items will
contain the history of how the song list has been narrowed down to its current collection.
To return to a previous collection of songs, use the Back command.
At any point, when you Select a song or group of songs, the pop-up options menu will contain
various options to play the songs, add them to a playlist, and so on. See the Music Browser Song
Options dialog.
In addition to browsing your music collection, the main music browser screen also contains
Views that allow you to see all the music playlists or browse the music files by folder.
Music Browser Views
The Music Browser menu is configured with seven views. Use the Options command to change
the current view. See Music Browser Options, below. The viewing styles are:
Songs – Lists all the individual song titles.
Albums – Lists all the songs, grouped by the albums they belong to.
Artists – Lists all the songs, grouped by their Artist(s). Tip: Use the Options command
to select the Artists to list. You can choose Artist, Album Artist, and/or Composer. If
nothing is selected, Artist will be used. See the Music Browser Menu Options.
Genres – Lists all the songs, grouped by their genre.
Years – Lists all the songs, grouped by the albums they belong to.
Playlists – Lists and manages all the music playlists. (Only on the main music browser
screen.)
Folders – Browse your music files by the music import folders where the files can be
found on your hard drive. (Only on the main music browser screen.)
Tip: Use the Smooth FF, Skip Fwd #2, Smooth Rew, or Skip Bkwd #2 commands to jump to the
next or previous view.
Music Browser Options
Use the Options command to display the various options available on this menu. The options list
can be exited by using the Options command again or via the Left arrow. The choices are:
Copyright 2010 SageTV, LLC All rights reserved
For additional support, go to www.sagetv.com/support.html or email us at [email protected]
SageTV V7.0 User’s Guide
Chapter 3: SageTV Menus
Page 81
Views – The available viewing styles are listed below the Views title. The current view is
highlighted. Select any view to switch to that viewing style.
Menu Options – Display the Music Browser Menu Options dialog.
Search – Go to the consolidated Search menu, with the search style starting with the last
used Music search style.
Mode: <Playback Style> – Indicates the current playback mode style. Select to toggle
between the four playback modes:
o Normal Playback – Play all songs in order a single time.
o Repeat – Play all songs in order; repeat when all songs have been played.
o Repeat + Shuffle – Play all songs in random order; repeat when all songs have
been played.
o Shuffle – Play all songs in random order a single time.
Imported Videos – Go to the Video Browser.
Imported Photos – Go to the Photo Browser.
Previous Song – Jump to the previous song in the playlist. Note: Only available when
music is playing.
Next Song – Jump to the next song in the playlist. Note: Only available when music is
playing.
Visualizations – Go to the music visualization on the Music Playback screen. Note: Only
available when music is playing.
Music Browser Menu Options
The Music Browser Menu Options dialog is used to configure additional options for the menu.
The options are:
Customize the music browser by adjusting the number of rows and columns displayed,
the size of the font used, or the number of albums thumbnails shown on each row when
the display uses only a single column. Note: Note all views can display multiple
columns.
In the Artists view, you can configure which people to list as artists: the people credited
in the music files as Artist, Album Artist, and/or Composer.
For the Folder view, choose whether to list each music import folder separately, or
combine all music import folders into a single folder tree.
Copyright 2010 SageTV, LLC All rights reserved
For additional support, go to www.sagetv.com/support.html or email us at [email protected]
SageTV V7.0 User’s Guide
Chapter 3: SageTV Menus
Page 82
Enable or disable Shuffle Playback.
Enable or disable Repeat Playback.
Open the Advanced Options dialog, which has options for:
o Configure Media Center Import Directories – Jumps to the Configuration
Wizard step for editing the Media Center Import Directories.
o Refresh Imported Media – Causes SageTV to check all import directories to
refresh its list of imported media files.
Set the Video Menu Options.
Close the dialog.
Note about the “Now Playing” Playlist for Music
Special Note: All music, except for other playlists and the Play All Songs playlist option, is
played using the temporary Now Playing playlist. While the content of most playlists is shared
with all SageTV clients that connect to your SageTV server, the content of this special playlist is
limited to each individual client and will be reset as needed or when SageTV restarts. Any time a
song or group of songs is played, it will be playing from this playlist, rather than as an individual
song. At any time, you may add additional songs to the list, or play some other music ‘now’
instead of adding it to this list.
Other playlists may be played individually or as part of the Now Playing playlist, but the Now
Playing playlist may not be added to other playlists.
Music Browser Song Options
When the the Select command is used on a song or group of songs, a pop-up dialog containing
all of the available actions that may be performed will appear. Note: If a group contains a very
large number of songs, it may automatically browse into that group rather than show the options
dialog.
The actions in this dialog are dynamically added or removed, depending on what may be done at
that moment. The possible actions are listed below.
Browse <song grouping> – Browse into a group of songs, viewing only the songs which
belong to that group.
View Song Detail – View the Song Detail screen for a single song.
Copyright 2010 SageTV, LLC All rights reserved
For additional support, go to www.sagetv.com/support.html or email us at [email protected]
SageTV V7.0 User’s Guide
Chapter 3: SageTV Menus
Page 83
Add to Now Playing Queue – Add the song group to the Now Playing playlist. This
option is available when that playlist is currently playing.
Add to Current Playlist – Add the song group to the currently playing playlist. This
option is available when a playlist other than the Now Playing playlist is currently
playing.
Play Now – Play the song group now. If the Now Playing playlist is already in use, it
will be cleared before playback of these songs is started.
View Visualizations – Go to the music visualization on the Music Playback screen.
Note: Only available when music is playing.
List of Recent Music Playlists – If any music has been recently added to a music
playlist, the last few selected playlists may be displayed for faster repeated selection of
those playlists.
Add To Playlist... – Displays a list of music playlists that the songs may be added to.
Select opens group options dialog, Info browses group – Selecting this option for a
group of songs toggles whether the Select command or the Info command opens the
dialog when a group is highlighted and the other is used to browse into a highlighted
group. Note: This setting can also be configured via the For grouped items: Select opens
options dialog, Info browses into group option in Detailed Setup: Customize Settings.
Close – Closes the options dialog without performing any action.
Music Playlist Options
The first playlist list entry is Add New Playlist. Select this item to jump to the Create Playlist
screen.
The second playlist list entry is Play All Songs. Select this item to play all the songs in the entire
music collection. A dialog will open with options for how to play the entire collection. The
default option depends on the current shuffle and repeat playback settings. Use the Play
command as a shortcut to play all songs with the current default option:
Randomly play all songs – Plays all songs in random order. This is the default option
when shuffled playback is enabled.
Play in order: start from the first song – Plays all songs starting with the first song in
the collection and continuing in order. This is the default option when shuffle playback is
disabled and repeat playback is disabled.
Copyright 2010 SageTV, LLC All rights reserved
For additional support, go to www.sagetv.com/support.html or email us at [email protected]
SageTV V7.0 User’s Guide
Chapter 3: SageTV Menus
Page 84
Play in order: start from a random album – Plays all songs starting with a random
album in the collection and continuing in order. This is the default option when shuffle
playback is disabled and repeat playback is enabled.
When the Select command is used on any other playlist entry, a pop-up dialog containing all of
the available actions that may be performed will appear. As with other such dialogs, the actions
in this dialog are dynamically added or removed, depending on what may be done at that
moment.
The possible actions for each music playlist are listed below.
Add to Now Playing Queue – Add the playlist to the Now Playing playlist, when it is
currently playing. Note: Not available for the Now Playing playlist.
Play Now – Play the playlist without adding it to the Now Playing playlist.
Rename this Playlist – Rename the current playlist, using the Create Playlist screen. The
Now Playing playlist will have an option to Copy to a New Playlist instead, since it
cannot be renamed.
Clear this Playlist – Allows for the deletion of the playlist, or for removing all of its
segments. Notes: The Now Playing playlist may not be deleted, nor may a playlist be
deleted or cleared while it is playing.
View Visualizations – Go to the music visualization on the Music Playback screen.
Note: Only available when music is playing.
List of Recent Music Playlists – If any music has been recently added to a music
playlist, the last few selected playlists may be displayed for faster repeated selection of
those playlists. Not available for the Now Playing playlist.
Add To Playlist... – Displays a list of music playlists that the playlist may be added to.
Not available for the Now Playing playlist.
Close – Closes the options dialog without performing any action.
Music Playlist Segment Options
When highlighting a playlist, the playlist’s segments will be displayed on the right side of the
screen. While highlighting a segment, you may use the Right arrow to change the order of the
segments in the playlist, or use the Select command to see a list of actions that may be
performed.
Copyright 2010 SageTV, LLC All rights reserved
For additional support, go to www.sagetv.com/support.html or email us at [email protected]
SageTV V7.0 User’s Guide
Chapter 3: SageTV Menus
Page 85
Change the segment order
While a segment is highlighted, use the Right arrow, or click on the icon, to change the
segment’s position in the playlist. When the segment reorder mode is entered, the
highlighted segment will change its display to include additional icons. While in reorder
mode, you may do the following:
Use the Left arrow, or click on the
icon, to exit reorder mode.
Use the Up arrow, or click on the icon, to move the segment up in the list, to a
lower numbered position. This option may not be available if the segment is in the
#1 position, or if the segment before it is currently playing.
Use the Down arrow, or click on the
icon, to move the segment down in the
list, to a higher numbered position. This option may not be available if the
segment is in the last position.
Note: Re-order mode may not be available for the currently playing segment or those
before it in the list.
Segment Options
When the Select command is used on a playlist segment, a pop-up dialog containing all
of the available actions that may be performed will appear:
Convert Segment – Allows converting a multi-song segment into its individual
components. Example: An album segment could be converted so that all of its
individual songs are playlists segments instead of the whole album being one
segment.
View Segment Detail – Allows viewing or browsing the detailed information for
the current segment.
Delete this segment – Removes the current segment from the playlist.
Play this Segment Now – If the playlist is already playing, this choice allows
jumping playback to the current segment.
Play this playlist here – If the playlist is not currently playing, starts playback of
the playlist at the current segment.
Cancel – Closes the options dialog without performing any action.
Copyright 2010 SageTV, LLC All rights reserved
For additional support, go to www.sagetv.com/support.html or email us at [email protected]
SageTV V7.0 User’s Guide
Chapter 3: SageTV Menus
Page 86
Album Thumbnails
SageTV can load thumbnail images to represent albums. For each album, SageTV will look for
its accompanying thumbnail image by checking for album art associated with the songs on the
album. The thumbnails are considered to be album art, not song art, so the first song on the
album that is found to have art will have its art used for every song on the album. The images
may be associated with the album in one of three ways; they may be: 1) embedded in the MP3
files; 2) stored as a separate file with the same song file name, but with an extension of .gif, .png,
.jpg, .jpeg, or .jpe.; or 3) stored as a separate file in the same location as the music file, named
folder.jpg (or .gif, .png, .jpeg, or .jpe).
Remember that thumbnail image files are also imported into the Photo Browser, if a parent
directory of the file’s location is also configured to import pictures. To prevent this, you could
set the Import Library Directory to only import Music files (see Media Center Import
Directories, in Detailed Setup: General Settings), or you could set each image file’s “Hidden”
attribute. (Right click on the image file in Windows Explorer, select Properties, then check the
box next to Hidden.)
Copyright 2010 SageTV, LLC All rights reserved
For additional support, go to www.sagetv.com/support.html or email us at [email protected]
SageTV V7.0 User’s Guide
Chapter 3: SageTV Menus
Page 87
Song Detail
The Song Detail screen displays the full information for an imported music file.
Details for the imported song are shown on the left side of the screen. The data may fill more
than the space on a single screen. If so, you will be able to scroll down to see the rest of the
information.
A thumbnail may be displayed in the lower right corner, if there is one. If video is displayed in a
window on menus, the video may be shown in the upper right corner.
Use the Select command (Enter key) to display the list of possible actions to perform for the
song; see the Music Browser Song Options dialog for details.
Use the Back command or the Left arrow to return to the previous menu.
Using the Options command will display the Video Menu Options dialog, which is the regular
Options menu found on most screens. See its full explanation for details.
Copyright 2010 SageTV, LLC All rights reserved
For additional support, go to www.sagetv.com/support.html or email us at [email protected]
SageTV V7.0 User’s Guide
Chapter 3: SageTV Menus
Page 88
Create Playlist
On the Create Playlist menu, enter the name of a new playlist, then Select Done to when you are
finished.
Use the characters or number in the middle of the screen to enter text. You can also simply type
using the keyboard, or text may be entered from a remote’s number pad via Numeric Text Input.
Use Back to return to the previous menu, Erase to clear the last character entered (or use
Backspace on the keyboard, or the Stop command on a remote), and Clear to clear the entire
entry field.
Copyright 2010 SageTV, LLC All rights reserved
For additional support, go to www.sagetv.com/support.html or email us at [email protected]
SageTV V7.0 User’s Guide
Chapter 3: SageTV Menus
Page 89
Photo Browser
The Photo Browser lists all imported pictures that SageTV finds in the Media Center Import
Directories, as defined in Detailed Setup: General Settings. Pictures found in subdirectories
under the import directories are listed in subfolders in the Photo Browser. Its parent menu is the
Main Menu.
Note: SageTV can import and display JPEG, GIF, PNG, and TIFF files.
Photo Browser Layout
The layout of the Photo Browser is very similar to the Music Browser, except that photos are
browsed using only the Folder View. Across the top of the screen, the current folder is displayed.
Photo Browser Usage
When first entering the browser, the root picture import folders are displayed. From there, you
may use Select, Info, or Right to browse into a folder. Once in a subfolder, use Left or Back to
return to the subfolder’s parent folder. If you leave the Photo Browser, it will remember the last
folder viewed when you return.
While a picture is highlighted:
Use Select, Right, or Play to view the individual picture on the Picture Viewing screen.
Tip: While viewing a single image, if there are other images in the same folder, you may
scroll through them without having to return to the browser in between, or use Play while
viewing the image to start slideshow viewing mode.
Use Info to view some detailed information about the picture.
Tip: To quickly jump to an item in a list, enter the letter or number that it starts with.
Photo Browser Options
Use the Options command to display the various options available on this menu. The options list
can be exited by using the Options command again or via the Left arrow. The choices are:
Slideshow – View a slideshow of all the imported photos, just the photos in the current
folder, or all photos in the current folder and its subfolders. The option to play the
slideshow in random order may be changed before starting the slideshow. The images
will be shown on the Picture Viewing screen.
Copyright 2010 SageTV, LLC All rights reserved
For additional support, go to www.sagetv.com/support.html or email us at [email protected]
SageTV V7.0 User’s Guide
Chapter 3: SageTV Menus
Page 90
Slideshow Options – Display the pop-up Photo Browser Slideshow Options dialog,
where the various options for slideshows can be set.
Menu Options – Display the pop-up Photo Browser Menu Options dialog.
Sort: <Sort Style>) – Indicates the current sort mode style. Select to switch to the next
sorting style.
o Up/Down by Filename – Sort the photos by their filenames, in either ascending
or descending order.
o Up/Down by Date – Sort the photos by their file dates, in either ascending or
descending order.
Search – Go to the consolidated Search menu, with the search style starting with the
photo search style.
SageTV Recordings – Jump to the SageTV Recordings menu, at the last-used view.
Imported Videos – Go to the Video Browser.
Imported Music – Go to the Music Browser.
Photo Browser Menu Options
The Photo Browser Menu Options dialog is used to configure additional options for the menu.
The options are:
Customize the photo browser by adjusting the number of rows and columns displayed,
the size of the font used, or the number of picture thumbnails shown on each row when
the display uses only a single column.
Choose whether to list each photo import folder separately, or combine all photo import
folders into a single folder tree.
Choose whether to autorotate JPEG images when they are displayed.
Generate Photo Thumbnails – Forces SageTV to create thumbnails for all imported
images. SageTV will automatically create the thumbnails as they are needed; however, by
using this option to tell SageTV to create all the thumbnails, they won’t need to be
created as you browse through your images. Creating the thumbnails now will take some
time, but the benefit will be fewer delays as you browse your pictures later.
Copyright 2010 SageTV, LLC All rights reserved
For additional support, go to www.sagetv.com/support.html or email us at [email protected]
SageTV V7.0 User’s Guide
Chapter 3: SageTV Menus
Page 91
Open the Advanced Options dialog, which has options for:
o Configure Media Center Import Directories – Jumps to the Configuration
Wizard step for editing the Media Center Import Directories.
o Refresh Imported Media – Causes SageTV to check all import directories to
refresh its list of imported media files.
Set the Video Menu Options.
Close the dialog.
Photo Browser Slideshow Options
Selecting the Slideshow Options item from Photo Browser Options displays a pop-up menu of
all the configurable slideshow options:
Enlarge Pictures to Fill the Screen – Choose whether SageTV should enlarge pictures
that are smaller than the display area so that they fill the screen. Enlarged pictures will
still retain their original shape, so they will not look stretched more in one direction than
another.
Automatically Advance Slideshow – This is a toggle option between Yes and No,
determining whether the slideshow will advance to the next image on its own or if input
is needed. See Picture Viewing for commands to manually advance the slideshow. Note:
When the slideshow is active as the screen saver, the slideshow will automatically
advance regardless of this setting.
Slide Duration – The number of seconds SageTV will pause before automatically
continuing to the next image, if the above option is set to Yes. Enter a time value and
press Enter. Use the Options command (Ctrl+O, Escape, right-click) to cancel this dialog
without changing the current time setting.
When Slideshow is Finshed – Tells SageTV what to do when the slideshow is done.
Another pop-up menu will appear with the possible choises: Go to Picture Library, or
Restart Slideshow. Choose Do Nothing or use the Options command to keep your
current setting. Note: When the slideshow is active as the screen saver, the slideshow will
restart after displaying the last image.
Slideshow Transitions – Toggles between None, Fade, and Pan/Zoom/Fade.
Slideshow Transition Duration – Sets the transition duration time. Enter the number of
seconds to use for the duration.
Done – Close the slideshow options dialog.
Copyright 2010 SageTV, LLC All rights reserved
For additional support, go to www.sagetv.com/support.html or email us at [email protected]
SageTV V7.0 User’s Guide
Chapter 3: SageTV Menus
Page 92
Video Browser
The Video Browser lists all imported videos that SageTV finds in the Media Center Import
Directories, as defined in Detailed Setup: General Settings. Its parent menu is the Main Menu.
Note: SageTV can import and play several different video file formats and codec types. See
Chapter 4’s list of Supported Media Types.
Video Browser Layout and Usage
The layout of the Video Browser is very similar to the Music Browser, presenting your imported
videos according to the View currently chosen.
On the left side of the screen is a list of all the video choices. Use the arrow keys to highlight an
item in a list, then Select a list entry for all available functions that can be performed on that
video or group of videos. See the Airing and Video Options Dialog and Grouped Airings and
Videos Options Dialog for details. See Video Playlist Options for options available in the
Playlist view.
Tips: 1) Use the Info command to view Video Detail for a video or to browse a group of videos.
2) To quickly jump to an item in a list, enter the letter or number that it starts with.
When an item on the left is highlighted, information about that video or the group of videos will
be displayed on the right.
In addition to browsing your imported videos, the video browser screen also contains Views that
allow you to see all the video playlists and browse the video files by folder or by category
Video Browser Views
The Video Browser menu is configured with five views. Use the Options command to change the
current view. See Video Browser Options, below. The viewing styles are:
Titles – Lists all the imported videos that are not DVD or BD, sorted by title.
DVDs/BDs – Lists all the imported DVDs and BDs, sorted by title. For information
regarding importing DVDs and BDs stored on your hard drive, see Appendix I: Playing
DVDs and BDs from the Hard Drive.
Categories – Lists all the imported videos, grouped by category. A video will be listed in
each of its assigned categories, so if it has more than one category assigned to it, it will be
listed in multiple categories.
Copyright 2010 SageTV, LLC All rights reserved
For additional support, go to www.sagetv.com/support.html or email us at [email protected]
SageTV V7.0 User’s Guide
Chapter 3: SageTV Menus
Page 93
Playlists – Lists and manages all the video playlists.
Folders – Browse your video files by the video import folders where the files can be
found on your hard drive.
Tip: Use the Smooth FF, Skip Fwd #2, Smooth Rew, or Skip Bkwd #2 commands to jump to the
next or previous view.
Video Browser Options
Use the Options command to display the various options available on this menu. The options list
can be exited by using the Options command again or via the Left arrow. The choices are:
Views – The available viewing styles are listed below the Views title. The current view is
highlighted. Select any view to switch to that viewing style.
Menu Options – Display the Video Browser Menu Options dialog.
Mode: <Playback Style> – Indicates the current playback mode style for a video
playlist. Select to toggle between the four playback modes for video playlists:
o Normal Playback – Play all videos in order a single time.
o Repeat – Play all videos in order; repeat when all videos have been played.
o Repeat + Shuffle – Play all videos in random order; repeat when all videos have
been played.
o Shuffle – Play all videos in random order a single time.
Search – Go to the consolidated Search menu, with the search style starting with the last
used video search style.
SageTV Recordings – Go to the SageTV Recordings menu.
Imported Music – Go to the Music Browser.
Imported Photos – Go to the Photo Browser.
Video Browser Menu Options
The Video Browser Menu Options dialog is used to configure additional options for the menu.
The options are:
Customize the video browser by adjusting the number of rows and columns displayed,
the size of the font used, or the number of video thumbnails shown on each row when the
display uses only a single column. Note: Not all views can display multiple columns.
Copyright 2010 SageTV, LLC All rights reserved
For additional support, go to www.sagetv.com/support.html or email us at [email protected]
SageTV V7.0 User’s Guide
Chapter 3: SageTV Menus
Page 94
For the Folder view, choose whether to list each video import folder separately, or
combine all video import folders into a single folder tree.
Enable or disable Shuffle Playback for video playlist playback.
Enable or disable Repeat Playback for video playlist playback.
Open the Advanced Options dialog, which has options for:
o Configure Media Center Import Directories – Jumps to the Configuration
Wizard step for editing the Media Center Import Directories.
o Refresh Imported Media – Causes SageTV to check all import directories to
refresh its list of imported media files.
o Choose whether recorded files found by SageTV in video import directories
should be considered to be recordings or imported videos. Imported video will be
displayed on this menu, while recordings will be listed on the SageTV Recordings
menu.
o Choose whether to Allow Video Deletion while using the video browser. You
may want to disable the file deletion option in order to prevent accidentally
deleting imported videos.
Set the Video Menu Options.
Close the dialog.
Note about the “Now Playing” Playlist for Videos
Special Note: Videos may optionally be played using the temporary Now Playing playlist.
While the content of most playlists is shared with all SageTV clients that connect to your
SageTV server, the content of this special playlist is limited to each individual client and will be
reset as needed or when SageTV restarts.
Other playlists may be played individually or as part of the Now Playing playlist, but the Now
Playing playlist may not be added to other playlists.
Video Browser Video Options
When the the Select command is used on an imported video, a pop-up dialog containing all of
the available actions that may be performed will appear. See the Airing and Video Options
Dialog for details.
Copyright 2010 SageTV, LLC All rights reserved
For additional support, go to www.sagetv.com/support.html or email us at [email protected]
SageTV V7.0 User’s Guide
Chapter 3: SageTV Menus
Page 95
Video Browser Folder Options
While using the Folder view and the Select command is used on a subfolder that contains videos,
not just more subfolders, a pop-up dialog containing all of the available actions that may be
performed will appear if the options dialog for a single video is set to Advanced mode. See the
Grouped Airings and Videos Options Dialog for details.
If the folder contains no videos or 1 video, the Select command will automatically browse into
that folder. To return to the subfolder’s parent, use the Back command, or Left arrow.
You may organize your imported videos into any folder layout you wish, but if you wish to more
effectively browse by folder, a useful style might be something like this:
<SageTV Media Center Import Directory root>
Z[[\<Genre 1>\
]
Z[[\<Movie Title 1>\
]
]
Z[[\<Movie Filename>
]
]
^[[\<thumbnail image> -- “folder.jpg” or “Movie Filename.jpg”
]
]
]
^[[\<Movie Title 2>\
]
Z[[\<Movie Filename>
]
^[[\<thumbnail image>
^[[\<Genre 2>\
^[[\<Movie Title>\
Z[[\<Movie Filename>
^[[\<thumbnail image>
Video Playlist Options
The first playlist list entry is Add New Playlist. Select this item to jump to the Create Playlist
screen.
When the Select command is used on any other playlist entry, a pop-up dialog containing all of
the available actions that may be performed will appear. As with other such dialogs, the actions
in this dialog are dynamically added or removed, depending on what may be done at that
moment.
The possible actions for each video playlist are listed below.
Play Now – Play the playlist and proceed to the Video Playback or DVD Playback
display, depending on the type of video.
Rename this Playlist – Rename the current playlist, using the Create Playlist screen. The
Now Playing playlist will have an option to Copy to a New Playlist instead, since it
cannot be renamed.
Copyright 2010 SageTV, LLC All rights reserved
For additional support, go to www.sagetv.com/support.html or email us at [email protected]
SageTV V7.0 User’s Guide
Chapter 3: SageTV Menus
Page 96
Clear this Playlist – Allows for the deletion of the playlist, or for removing all of its
segments. Notes: The Now Playing playlist may not be deleted, nor may a playlist be
deleted or cleared while it is playing.
List of Recent Video Playlists – If any video has been recently added to a video playlist,
the last few selected playlists may be displayed for faster repeated selection of those
playlists. Not available for the Now Playing playlist.
Add To Playlist... – Displays a list of video playlists that the playlist may be added to.
Not available for the Now Playing playlist.
Close – Closes the options dialog without performing any action.
Video Playlist Segment Options
When highlighting a playlist, the playlist’s segments will be displayed on the right side of the
screen. While highlighting a segment, you may use the Right arrow to change the order of the
segments in the playlist, or use the Select command to see a list of actions that may be
performed.
Change the segment order
While a segment is highlighted, use the Right arrow, or click on the icon, to change the
segment’s position in the playlist. When the segment reorder mode is entered, the
highlighted segment will change its display to include additional icons. While in reorder
mode, you may do the following:
Use the Left arrow, or click on the
icon, to exit reorder mode.
Use the Up arrow, or click on the icon, to move the segment up in the list, to a
lower numbered position. This option may not be available if the segment is in the
#1 position, or if the segment before it is currently playing.
Use the Down arrow, or click on the
icon, to move the segment down in the
list, to a higher numbered position. This option may not be available if the
segment is in the last position.
Note: Re-order mode may not be available for the currently playing segment or those
before it in the list.
Segment Options
When the Select command is used on a playlist segment, a pop-up dialog containing all
of the available actions that may be performed will appear:
Copyright 2010 SageTV, LLC All rights reserved
For additional support, go to www.sagetv.com/support.html or email us at [email protected]
SageTV V7.0 User’s Guide
Chapter 3: SageTV Menus
Page 97
Convert Segment – Allows converting a multi-video segment into its individual
components. Example: A video playlist segment could be converted so that all of
its individual videos are playlists segments instead of the whole playlist being one
segment.
View Segment Detail – Allows viewing or browsing the detailed information for
the current segment.
Delete this segment – Removes the current segment from the playlist.
Play this Segment Now – If the playlist is already playing, this choice allows
jumping playback to the current segment.
Play this playlist here – If the playlist is not currently playing, starts playback of
the playlist at the current segment.
Cancel – Closes the options dialog without performing any action.
Video Thumbnails
SageTV can load a thumbnail image to represent each imported video. For each imported video,
SageTV will look for its accompanying thumbnail image by checking for a file with the same
name, but with an extension of .gif, .png, .jpg, .jpeg, or .jpe. If there is no such matching image
file, SageTV will check the video file’s location for an image file named folder.jpg (or .gif, .png,
.jpeg, or .jpe) to use as its thumbnail. A few things to keep in mind:
If multiple videos in the same directory have no matching thumbnail file (same filename
with different extension), the folder.jpg thumbnail (if one is found) will be used for each
video.
Only videos use thumbnails. In the above folder layout, “Genre 1” will be displayed in
the Video Library as a folder icon containing “2 items”. (This is also visible in the
screen captures previously shown.) Thus, thumbnails found in a directory containing no
videos are not used in the Video Library.
Thumbnails for DVDs stored on the hard drive can be placed in same location as the
VIDEO_TS directory, inside the VIDEO_TS directory, or named the same as the DVD
title + picture extension in the same location as the DVD’s title-named directory. (see:
Appendix I: Playing DVDs and BDs from the Hard Drive)
Thumbnails for BDs stored on the hard drive can be placed in the same location as the
BDMV directory, inside the BDMV directory, named the same as the BD title + picture
extension in the same location as the BD’s title-named directory, or may be automatically
determined from the BD’s metadata if its optional BDMV\META directory contains a
Copyright 2010 SageTV, LLC All rights reserved
For additional support, go to www.sagetv.com/support.html or email us at [email protected]
SageTV V7.0 User’s Guide
Chapter 3: SageTV Menus
Page 98
thumbnail as part of its metadata. (see: Appendix I: Playing DVDs and BDs from the
Hard Drive)
Thumbnail images are also imported into the Photo Browser, if a parent directory of the
file’s location is also configured to import pictures. To prevent this, you could set the
Import Library Directory to only import Video files (see Media Center Import
Directories, in Detailed Setup: General Settings), or you could set each image file’s
“Hidden” attribute. (Right click on the image file in Windows Explorer, select Properties,
then check the box next to Hidden.)
If no thumbnail file is found for an imported video, SageTV will attempt to create a
thumbnail from the video’s content, if possible.
Copyright 2010 SageTV, LLC All rights reserved
For additional support, go to www.sagetv.com/support.html or email us at [email protected]
SageTV V7.0 User’s Guide
Chapter 3: SageTV Menus
Page 99
Video Detail
The Video Detail screen displays the full information for an imported video.
Details for the imported video are shown on the left side of the screen. The data may fill more
than the space on a single screen. If so, you will be able to scroll down to see the rest of the
information.
A thumbnail may be displayed in the lower right corner, if there is one. If video is displayed in a
window on menus, the video may be shown in the upper right corner.
Use the Select command (Enter key) to display the list of possible actions to perform for the
song; see the Airing and Video Options Dialog for details.
Use the Back command or the Left arrow to return to the previous menu.
Using the Options command will display the Video Menu Options dialog, which is the regular
Options menu found on most screens. See its full explanation for details.
Copyright 2010 SageTV, LLC All rights reserved
For additional support, go to www.sagetv.com/support.html or email us at [email protected]
SageTV V7.0 User’s Guide
Chapter 3: SageTV Menus
Page 100
File Browser
The File Browser lists all browsable file systems and media paths that SageTV has access to. Its
parent menu is the Main Menu.
File Browser Layout and Usage
The layout of the File Browser presents the browsable file system choices or currently-browsed
file system. At the bottom of the screen is text showing brief help for the currently highlighted
item on the screen.
Also at the bottom of the screen is an area where information on the currently playing media is
displayed. While music is playing, you may use the standard transport control commands to play,
pause, FF, REW, etc., or use the mouse to click on the transport icons. When no media is
playing, the browser area expands to fill this space.
When first entering the File Browser, a list of browsable file systems or media paths is
displayed. Select the files to browse by using the Right arrow or Select command. The display
will then change to show the files and folders for the selected file system type. Continue using
Right or Select to browse further into folders or to select files for available options to perform on
those files. See File Browser File Options.
Some folders also have actions that can be performed on them – use the Info command to open
the options dialog for folders. See File Browser Folder Options.
To browse up the folder level, use the Left arrow or the Back command.
Tip: Use the Skip Fwd #2 and Smooth FF, or the Skip Bkwd #2 and Smooth Rew commands, to
switch to the next/prev file system type without returning to the list of available file systems.
File Browser Options
Use the Options command to display the various options available on this menu. The options list
can be exited by using the Options command again or via the Left arrow. The choices are:
Menu Options – Display the pop-up File Browser Menu Options dialog.
Choose File System – Return to the list of available file systems to browse. This option
is available only when browsing a file system.
Refresh Folders – Refresh the currently displayed file system or folder information.
Sort by: <Sort Style> – Rotate through the available file sorting styles of by file name,
size, date, or type. This option is available only when browsing a file system.
Copyright 2010 SageTV, LLC All rights reserved
For additional support, go to www.sagetv.com/support.html or email us at [email protected]
SageTV V7.0 User’s Guide
Chapter 3: SageTV Menus
Page 101
Sort Direction – Toggle between sorting in ascending or descending order. This option
is available only when browsing a file system.
Hidden Files: <Setting> – Toggles whether hidden files are shown. Files marked as
hidden by an operating system are normally not visible in a file browser. This option is
available only when browsing a file system.
Enter Network Path – Allows entering a specific path to browse. This
available only when browsing a network file system.
option is
SageTV Recordings – Go to the SageTV Recordings menu.
Imported Videos – Go to the Video Browser.
Imported Music – Go to the Music Browser.
Imported Photos – Go to the Photo Browser.
Search – Go to the consolidated Search menu, with the search style starting with the last
used search style.
File Browser Menu Options
The File Menu Options dialog is used to configure additional options for the menu. The options
are:
Number of Rows – Configure the number of rows of files and folders that are displayed.
Font Size – Configure the maximum font size used for the file and folder display.
Clients Can Browse All File Types – (SageTV server only) Configures whether clients
will be allowed to browse all file types or only media files.
File Types Shown in Browser – Toggles between displaying all file types or only media
files, if the client is allowed to choose.
Allow File Deletion – Toggles whether files can be deleted while using the file browser.
Video Menu Options – Accesses the standard Video Menu Options dialog.
Close – Close the options dialog.
File Browser File Options
When the the Select command is used on a file, a pop-up dialog containing all of the available
actions that may be performed will appear.
Copyright 2010 SageTV, LLC All rights reserved
For additional support, go to www.sagetv.com/support.html or email us at [email protected]
SageTV V7.0 User’s Guide
Chapter 3: SageTV Menus
Page 102
The actions in this dialog are dynamically added or removed, depending on what may be done at
that moment. The possible actions are listed below. Note: If the only available option for a file is
playing it, selecting the file will cause SageTV to try to play it.
Copy this file – Allows copying the file to various destinations.
Play this file – Play the file, if possible. Use the Play command as a shortcut for this
option.
View more options – For imported media files or recorded TV shows, this option allows
access to the full pop-up dialog with additional actions to perform on the media file. Use
the Info command as a shortcut for this option.
Delete this file – Delete the file, if possible. Use the Delete command as a shortcut for
this option. Note: File deletion may be turned off in the File Browser Menu Options
dialog.
Close – Close the options dialog.
File Browser Folder Options
When the the Info command is used on a folder, a pop-up dialog containing the following
options will be shown, when any of the options are available for the highlighted folder:
Copy this folder – Allows copying all the files in the folder to various destinations.
Modify/Remove this Import Directory – If the highlighted directory is a root import
path, the types of files imported from that path can be modified or the import path can be
removed. These options are only available for root import paths, not folders that happen
to be subfolders of an import path.
Add as a new Import Directory – If the folder is not already an import path, but it could
be, this option to add it as an import directory will be available.
Modify/Remove this Recording Directory – If the highlighted directory is a recording
path, the options for the recording path can be modified or the recording path can be
removed.
Add as a new Recording Directory – If the folder is not already a recording path, but it
could be, this option to add it as a recording directory will be available.
Close – Close the options dialog.
Copyright 2010 SageTV, LLC All rights reserved
For additional support, go to www.sagetv.com/support.html or email us at [email protected]
SageTV V7.0 User’s Guide
Chapter 3: SageTV Menus
Page 103
Video Conversions
The Video Conversions screen displays the status of all recent video conversion jobs. Its parent
menu is the Main Menu.
The video currently being converted is shown first in the list, along with its percent complete
status. The videos waiting to be converted are listed next, in the order they will be converted.
Finally, all the previously converted videos are listed.
Highlight a video, then use the Right arrow to view its Recording Detail.
Select a video in the list for a pop-up dialog containing a list of actions that may be performed,
depending on the status of the video and its conversion process. Those options may be:
Play Original Video or Recording – Start playback of the original imported video or
SageTV recording. Available if the original video still exists.
Play Converted Video – Start playback of the converted video. Available if the
conversion has completed and the converted video still exists.
Cancel this conversion – If the conversion process has not yet completed, this option
will cancel the conversion process.
Clear this completed conversion – If the conversion process has completed, this option
will clear this item from the list.
Clear all completed conversions – Clear all completed conversions from the list.
Close – Closes the options dialog without performing any action.
Using the Options command will display the Video Menu Options, which is the regular Options
menu found on most screens. See its full explanation for details.
Copyright 2010 SageTV, LLC All rights reserved
For additional support, go to www.sagetv.com/support.html or email us at [email protected]
SageTV V7.0 User’s Guide
Chapter 3: SageTV Menus
Page 104
New Drive Detected
When SageTV detects a new drive, such as when a Compact Flash card is inserted into a card
reader, an options menu will appear, asking what should be done:
Copy Media from <drive> – For this 2-step process: 1) A file browser will be shown.
Either select an individual file to be copied or choose Copy All Files in order to copy all
the files in a directory. 2) Then, another file browser will be shown, where you can
choose which Media Center Import Directory should be used as the file copy destination.
The files will then be copied form the new drive to the selected import library location.
Copy Media to <drive> – A file browser will be shown, where you can choose file(s)
from a Media Center Import Directory, which will then be copied to the drive shown.
Play Media from <drive> – A file browser will be shown, where you can choose a
media file to be played from the drive shown.
Close – Do nothing at this time – Closes the pop-up menu and does nothing else. The
Options command could also be used to close this pop-up menu.
Note: You may choose whether to enable this pop-up dialog via the Display pop-up when a new
drive detected option in Detailed Setup: Customize Settings.
Copyright 2010 SageTV, LLC All rights reserved
For additional support, go to www.sagetv.com/support.html or email us at [email protected]
SageTV V7.0 User’s Guide
Chapter 3: SageTV Menus
Page 105
Record Command Options Dialog
When the Use expanded options for the Record command option is enabled in Detailed Setup:
Customize Settings, use of the Record command will cause a pop-up options menu appear with
various record options for the highlighted show. Depending on the state of the highlighted show,
the following options may be available:
Record this show – Available if the show is not already a scheduled Manual Recording,
this choice causes the show to be added to the recording schedule as a Manual Recording.
If the airing is a Favorite with padding, then a dialog will be shown, asking whether the
Manual Recording should inherit the Favorite’s padding times. Note: If you schedule a
manual recording, SageTV will automatically check to see if it conflicts with any other
manual recordings. If it does, you will be shown a conflict notification dialog with the
following options:
o Don’t do anything – Ignore the new recording choice and keep the currently
scheduled manual recording instead.
o Record my new selection – Cancel the other manual recording and schedule the
new selection instead.
Record one of N future airings – If additional future airings of the show are available,
selecting this option will display a list of all those future airings. Choose the future airing
you wish to record, or choose Cancel to record none of them. Note: The additional future
airings are matches by comparing the ShowID values so that only the same episodes of a
series are displayed. i.e.: the future airings listed here should all be the same show.
Cancel this Recording – Available if the show is already a scheduled Manual
Recording, this choice causes the scheduled recording to be cancelled. Note: If the show
is also a Favorite, it will first be removed from the schedule when its Manual Recording
status is cleared. Then, when the recording schedule is recalculated, it is possible that the
airing may be re-added to the schedule as a scheduled Favorite recording.
Adjust Recording Options – Available if the show is already a scheduled Manual
Recording, this choice causes the Record Options (below) for Manual Recordings to be
shown, where you can change some settings for the recording.
Add Manual Recording status for this show – Available if the show is already fully
recorded and it is not a Manual Recording, this choice will mark the show as a Manual
Recording. (SageTV will not automatically delete such recordings.)
Remove Manual Recording status for this show – Available if the show is already
fully recorded and it is already a Manual Recording, this choice will tell SageTV that the
show is no longer a Manual Recording.
Copyright 2010 SageTV, LLC All rights reserved
For additional support, go to www.sagetv.com/support.html or email us at [email protected]
SageTV V7.0 User’s Guide
Chapter 3: SageTV Menus
Page 106
Add this show as a Favorite – Available if the show is not already a Favorite, this
choice causes the show to be added as a new title-based Favorite. (For more information
about Favorites, see Creating a Favorite.) After the Favorite has been added, you will
proceed to the Favorite Details menu, where the Favorite’s options can be set.
Remove this Favorite – Available if the show is already a Favorite, this choice causes
SageTV to confirm whether you wish to remove the Favorite associated with this show.
Adjust Favorite Options – Available if the show is already a Favorite, this choice sends
you to the Favorite Details menu, where the Favorite’s options can be set.
Using the Record command again while this dialog is open will automatically select Record this
show or Cancel this Recording, depending on circumstances. Similarly, using the Favorite
command while the dialog is open will automatically select Add this show as a Favorite or
Remove this Favorite, depending on whether the show is already a Favorite or not.
Adjust Recording Options for Manual Recordings
For current or future airings that have been marked as Manual Recordings, a pop-up recording
options menu is displayed.
Close – Close the pop-up options list without making any changes.
Cancel Recording – Clears the Manual Recording setting for this show. It may still be
recorded if it is a Favorite.
Adjust Start Time – For shows that have not yet started recording, this allows the
recording’s start time to be adjusted. A pop-up menu will be shown; see details below.
Adjust Stop Time – Allows adjusting a scheduled or current recording’s stop time. A
pop-up menu will be shown; see details below.
Adjusting the Start and Stop Times:
When adjusting the start or stop time for a manual recording, pop-up dialogs are
displayed. Use the Left and Right arrow commands, or left-click on the and icons, to
adjust the time by a single minute at a time. Use the Page Left (Ctrl+A) and Page Right
(Ctrl+F) commands, or left-click on the and icons, to adjust the time by 15 minutes
at a time. When done, use the Select command (Enter), or left-click on the time, to accept
the changes and close the dialog.
Change Recording Quality – Allows adjusting a scheduled recording’s quality setting to
be changed. A pop-up menu of recording quality choices will be shown. Note: SageTV
supports the use of multiple capture devices using multiple recording formats, such as
Copyright 2010 SageTV, LLC All rights reserved
For additional support, go to www.sagetv.com/support.html or email us at [email protected]
SageTV V7.0 User’s Guide
Chapter 3: SageTV Menus
Page 107
MPEG2 and MPEG4/DivX. If the recording quality is set to one that is not available to
all capture devices, a Manual Recording will be limited to recording only on those
devices that can use the specified recording quality.
Copyright 2010 SageTV, LLC All rights reserved
For additional support, go to www.sagetv.com/support.html or email us at [email protected]
SageTV V7.0 User’s Guide
Chapter 3: SageTV Menus
Page 108
Online Services
The Online Services menu contains links to other menus providing information or services from
online sources. Its parent menu is the Main Menu.
Weather – Go to the Weather menu, where you can view the current conditions and 5-day
forecast for your local area. Note: If you have not yet done so, you will first be asked to
configure your weather report location; see Step G16: Weather Report Configuration. Once your
location is configured, you will proceed to the Weather menu.
YouTube Video – Go to the YouTube Video menu, where you can select to see lists of
YouTube Videos from various categories, and play the videos within SageTV. Note: The
availability of and access to the YouTube Video menu is controlled by the Online Video Access
option in Detailed Setup: Customize Settings.
Google Video – Go to the Google Video menu, where you can select to see lists of Google
Videos from various categories, and play the videos within SageTV. Note: The availability of
and access to the Google Video menu is controlled by the Online Video Access option in
Detailed Setup: Customize Settings.
Channel.com Web Shows – Go to the Channels.com Web Shows menu, where you can view
Channel.com’s categorized dynamic feeds listing a collection of the best shows on the web.
Additional Online Video Categories – Various additional categories of online video content are
listed. Choose a category for a list of online sources, then choose a source in order to view a list
of videos from that source. Note: Some online “video” feeds provide audio-only content. The
screen listing the downloadable content will place an audio symbol in the upper right corner of
the audio-only items.
Back to Main Menu – Return to the Main Menu.
Tip: Fully downloaded online video and audio-only files may be saved from the Video Playback
or Music Playback screen by using the Record command or the Save Downloaded File option in
the pop-up options dialog during playback. The files will become imported media, available for
playback from the Video Browser or Music Browser.
Note: Once per day, SageTV will check for an update for the online video definition files that
are used to define the online media available on this menu. The check is performed after
returning to the Main Menu. The System Information screen contains a line for the ‘Online
Videos version’. See the Automatic Update Checks set of options.
Copyright 2010 SageTV, LLC All rights reserved
For additional support, go to www.sagetv.com/support.html or email us at [email protected]
SageTV V7.0 User’s Guide
Chapter 3: SageTV Menus
Page 109
Weather
The Weather menu contains an overview of the current conditions at your chosen location,
along with a short term forecast for the next couple days. The choices on this menu include:
Options – The same as using the Options command, this button presents a pop-up menu where
you can choose Change the Weather Configuration (see Step G16: Weather Report
Configuration) or Video Menu Options (see the regular Video Menu Options menu). You may
also choose Close to exit the menu.
5-Day Forecast – Go to the 5-Day Forecast menu, where you can see an overview of your entire
local 5-day forecast.
Back to Main Menu or Online Services – Return to the Main Menu or Online Services menu,
depending on which menu was visited before viewing this menu.
Short Term Forecast
The short term forecast area contains an overview of the forecast for either Today, Tonight, and
the next day, or Tonight and the next two days. Around mid-afternoon, the forecast for “Today”
is no longer shown.
Select one of the forecast entries to see the detailed forecast for that day, as shown below.
Forecast Details
After selecting a forecast overview button, the detailed forecast for that day and night will be
shown. Note: For the current day, the details for “Today” are no longer shown after midafternoon.
While viewing the forecast details, Select one of the following buttons:
< Day – Show the forecast details for day prior to the currently displayed day.
Day > – Show the forecast details for day after to the currently displayed day.
Close – Close the pop-up forecast details dialog.
Tip: You may use the available buttons to change which day’s forecast details are described
above. Additionally, you may simply use the Up/Down and Page Up/Down commands to change
which day’s forecast is shown.
Copyright 2010 SageTV, LLC All rights reserved
For additional support, go to www.sagetv.com/support.html or email us at [email protected]
SageTV V7.0 User’s Guide
Chapter 3: SageTV Menus
Page 110
5-Day Forecast
The 5-Day Forecast menu contains an overview the entire 5-day forecast for your location.
Select one of the forecast entries to see the Forecast Details for that day.
To return to the Weather menu, use the Left arrow or the Back command.
Copyright 2010 SageTV, LLC All rights reserved
For additional support, go to www.sagetv.com/support.html or email us at [email protected]
SageTV V7.0 User’s Guide
Chapter 3: SageTV Menus
Page 111
YouTube Video
The YouTube Video menu allows access to online videos from YouTube, listing them for
playback with SageTV. Its parent menu is the Main Menu or Online Services menu.
This menu displays selected categories of YouTube Videos. Choose an item from the menu to
view a list of available videos from that category on the next screen: YouTube Video Search
Results, below.
The Search item allows you to search for specific videos you may wish to view by specifying
the keywords or the user for the YouTube Video search. Note: The search results initially
displayed will be for the last YouTube search type selected: keyword or user.
Use the Back menu item to return to the Online Services menu.
YouTube Video Search Results
The list of available videos is shown on the screen. Each video will display its description and
thumbnail when available. Use the Play or Select commands to play the highlighted video. After
a short delay to begin downloading the video, playback will begin on the Video Playback
display. When the video ends, you will return either to the YouTube Video Search Results or to
the YouTube Video menu.
The category bar above the video list contains other video categories, for easy access to some
other categories without having to return to the main YouTube Video menu. Simply select a
category to download and view its list of videos. Tips: Use the Smooth FF, Skip Fwd #2,
Smooth Rew, or Skip Bkwd #2 commands to jump to the next or previous category. Use the Info
command to view the full description of a video in a dialog.
Note: The list of videos for a category is cached after it is downloaded, so you can quickly
switch between categories without having to wait for the list to download again. After several
minutes, the video list will be downloaded again the next time that category is viewed.
To return to the YouTube Video menu, use the Left arrow or the Back command.
Tip: Fully downloaded online video and audio-only files may be saved from the Video Playback
or Music Playback screen by using the Record command or the Save Downloaded File option in
the pop-up options dialog during playback. The files will become imported media, available for
playback from the Video Browser or Music Browser.
Copyright 2010 SageTV, LLC All rights reserved
For additional support, go to www.sagetv.com/support.html or email us at [email protected]
SageTV V7.0 User’s Guide
Chapter 3: SageTV Menus
Page 112
Google Video
The Google Video menu allows access to online videos from Google, listing them for playback
with SageTV. Its parent menu is the Online Services menu.
This menu displays selected categories of Google Videos. Choose an item from the menu to view
a list of available videos from that category on the next screen: Google Video Search Results,
below.
The Search item allows you to search for specific videos you may wish to view.
Use the Back menu item to return to the Online Services menu.
Google Video Search Results
The list of available videos is shown on the screen. Each video will display its description and
thumbnail when available. Use the Play or Select commands to play the highlighted video. After
a short delay to begin downloading the video, playback will begin on the Video Playback
display. When the video ends, you will return either to the Google Video Search Results or to
the Google Video menu.
The end of the list may contain a More Search Results entry. Select it to view a list of more
videos.
The category bar above the video list contains other video categories, for easy access to some
other categories without having to return to the main Google Video menu. Simply select a
category to download and view its list of videos. Tips: Use the Smooth FF, Skip Fwd #2,
Smooth Rew, or Skip Bkwd #2 commands to jump to the next or previous category. Use the Info
command to view the full description of a video in a dialog.
Note: The list of videos for a category is cached after it is downloaded, so you can quickly
switch between categories without having to wait for the list to download again. After several
minutes, the video list will be downloaded again the next time that category is viewed.
To return to the Google Video menu, use the Left arrow or the Back command.
Tip: Fully downloaded online video and audio-only files may be saved from the Video Playback
or Music Playback screen by using the Record command or the Save Downloaded File option in
the pop-up options dialog during playback. The files will become imported media, available for
playback from the Video Browser or Music Browser.
Copyright 2010 SageTV, LLC All rights reserved
For additional support, go to www.sagetv.com/support.html or email us at [email protected]
SageTV V7.0 User’s Guide
Chapter 3: SageTV Menus
Page 113
TV Show Editorials
The TV Show Editorials menu provides access to brief editorials about selected upcoming TV
shows. Scroll through the list of TV shows, then use the Select or Info commands to read the full
editorial on the TV Show Highlight screen.
To return to the Main Menu, use the Left arrow or the Back command.
TV Show Highlight
The editorial, airing date, and other information for the TV show on the left side of the screen.
The data may fill more than the space on a single screen. If so, you will be able to scroll down to
see the rest of the information.
The right size of the screen is used to display a combination of the show’s thumbnail and series
image (if there are images); however, if video is displayed in a window on menus, the video may
be shown instead of an image in the upper right corner.
Use the Select command (Enter key) to display the list of possible actions to perform for the
show:
Record a Future Airing – Shown when future airings of the show are available, use this
option to view a list of future airings that you may choose to record.
View Airing Details – Shown when there are airings of the show available, use this
option to jump to the Program Information screen to display detailed information about
the airing.
Close – Close the dialog.
Use the Back command or the Left arrow to return to the previous menu.
Using the Options command will display the Video Menu Options dialog, which is the regular
Options menu found on most screens. See its full explanation for details.
Copyright 2010 SageTV, LLC All rights reserved
For additional support, go to www.sagetv.com/support.html or email us at [email protected]
SageTV V7.0 User’s Guide
Chapter 3: SageTV Menus
Page 114
Plugin Manager
The Plugin Manager menu will be titled All Available Plugins or one of the Installed Plugins
styles, depending on the item chosen on the Main Menu or the viewing style chosen in this menu
via the Options command. On this menu, you can choose which user created plugins to install
and configure those that you have installed.
To return to the Main Menu, use the Left arrow or the Back command.
Note: Use of these plugins is at your own risk. The plugins presented are created and
supported by other SageTV users. SageTV does not test or verify the operation of any of
the plugins in any way and does not provide technical support for plugins. Questions about
any plugin should be directed to the user who created it, using the SageTV user-to-user
forum at: forums.sagetv.com/forums
Note: Plugin developers can download the plugin system documentation from:
http://download.sagetv.com/DevelopingSageTVPlugins.doc
Plugin Manager Layout and Usage
The Plugin Manager displays a list of plugins with a category bar across the screen above the list.
The list of plugins will be All Available Plugins which are all plugins available for installation
or upgrade, or one of the Installed Plugins styles, which lists the plugins installed locally or on
the SageTV server. Select a plugin to see the options for that plugin (see: Plugin Options), use
the Options command to access the menu’s options or change the viewing style (see: Plugin
Manager Options), or choose an item from the category bar to change the category for the listed
plugins (see: Plugin Manager Categories).
Plugin Manager Options
Use the Options command to display the various options available on this menu. The options list
can be exited by using the Options command again or via the Left arrow. The choices are:
Other
Views
style:
o
o
Plugin Views – The available viewing styles are listed below the Other Plugin
title. The current view is highlighted. Select any view to switch to that viewing
All Available Plugins – Available on all clients; lists all user created plugins.
Server Installed Plugins – Available on SageTV Clients running on a different
PC than the SageTV server, where plugins can be installed locally or on the
SageTV server; lists all plugins installed on the server.
o Client Installed Plugins – Available on SageTV Clients running on a different
PC than the SageTV server, where plugins can be installed locally or on the
SageTV server; lists all plugins installed locally.
Copyright 2010 SageTV, LLC All rights reserved
For additional support, go to www.sagetv.com/support.html or email us at [email protected]
SageTV V7.0 User’s Guide
Chapter 3: SageTV Menus
Page 115
o Installed Plugins – Available on the SageTV server UI and on extender and
Placeshifter clients connected to the server, where plugins are only installed on
the server; lists all installed plugins.
Beta Versions: Show/Hide – Toggles whether plugins tagged as beta by their authors are
shown or hidden. Available when viewing All Available Plugins.
Incompatible Plugins: Show/Hide – Toggles whether incompatible plugins are shown
or hidden. Available when viewing All Available Plugins.
Updated Only: Yes/No – Toggles whether the plugin list contains only the installed
plugins that have been updated since they were installed.
Sort by: <Sort Style> – Indicates the current sorting mode style for the plugin list. Select
to toggle between the three sorting styles:
o Plugin Name – Sort by the name of the plugin.
o Author Name – Sort by the name of each plugin’s author.
o Recently Changed – Sort by the last-changed date for each plugin, with the most
recently changed plugins listed first.
Disable All Plugins – Use this option to disable all plugins that can be disabled.
Available when viewing Installed Plugins.
Uninstall All Plugins – Use this option to uninstall all installed plugins. Available when
viewing Installed Plugins.
Menu Options – Displays the standard Video Menu Options. See its full explanation for
details.
Restart SageTV – Select this option to restart SageTV. This option is only shown after
plugin changes that require a restart of SageTV in order to complete the plugin change.
Plugin Manager Categories
The category bar displayed above the list of plugins is used to change the category for type of
plugins to be listed. The currently listed category type is highlighted. Choose from:
General – General plugin type that usually adds additional functionality.
Full UI Package – Full UI replacement STV packages. After installed a plugin of this
type, the UI could be changed to use it via the SageTV Full UI Package (.STV or .XML
File) option in Detailed Setup: Advanced Settings.
UI Modification – Plugins that modify the functionality of a full UI STV package. After
installation, this type of plugin can usually be enabled or disabled.
Theme – Plugins that contain one or more alternate themes to modify the appearance of
the UI. After installing a plugin of this type, you may be asked whether to change to the
Copyright 2010 SageTV, LLC All rights reserved
For additional support, go to www.sagetv.com/support.html or email us at [email protected]
SageTV V7.0 User’s Guide
Chapter 3: SageTV Menus
Page 116
newly added them. Themes can also be changed via the Select the User Interface Theme
option in Detailed Setup: Advanced Settings.
Images – Plugins that contain additional images to use with SageTV, such as channel
logos.
Library – Plugins that are usually dependencies of other plugins and which usually have
no purpose if installed on their own.
All – All plugin types combined.
Plugin Options
After selecting a plugin, various options will be displayed in a dialog depending on whether the
plugin can be installed or updated, is already installed, etc. The options are:
Close – Close the dialog.
View Plugin Details – View the plugin details on the Plugin Detail menu. The Info
command can be used as a shortcut to view the plugin details.
View screenshots – If the plugin has screenshots available, use this option to view them.
View videos – If the plugin has videos available, use this option to view them.
View URLs – If the plugin has webpage URLs available, use this option to view them.
This option is only available on SageTV or SageTV Client UIs running on Windows.
Configure Plugin – If an installed plugin has configuration options, use this option to
jump to the Plugin Configuration menu where the plugins settings can be configured.
Reset Plugin Configuration – If an installed plugin is configurable, use this option to
reset its configuration settings.
Disable Plugin – If an installed plugin can be disabled, use this option to disable it.
Enable Plugin – If an installed plugin is disabled, use this option to enable it.
Uninstall Plugin – Use this option to uninstall an installed plugin.
Update Plugin – If an installed plugin has been updated, use this option to install the
update.
View Updated Plugin Details – This option is available when viewing Installed Plugins
and is used to view the details for an updated plugin on the Plugin Detail menu. Note:
Using the View Plugin Details option would display the details for the already-installed
plugin; this option shows the details for the updated plugin.
Copyright 2010 SageTV, LLC All rights reserved
For additional support, go to www.sagetv.com/support.html or email us at [email protected]
SageTV V7.0 User’s Guide
Chapter 3: SageTV Menus
Page 117
Install Plugin – This option is available when viewing All Available Plugins; use it to
install a plugin.
Copyright 2010 SageTV, LLC All rights reserved
For additional support, go to www.sagetv.com/support.html or email us at [email protected]
SageTV V7.0 User’s Guide
Chapter 3: SageTV Menus
Page 118
Plugin Detail
The Plugin Detail menu displays the full information for a plugin.
Full details for the plugin are shown on the screen. The data may fill more than the space on a
single screen. If so, you will be able to scroll down to see the rest of the information.
Use the Select command (Enter key) to display the list of possible options for the plugin; see the
Plugin Options dialog for details.
Use the Back command or the Left arrow to return to the previous menu.
Using the Options command will display the Video Menu Options dialog, which is the regular
Options menu found on most screens. See its full explanation for details.
Copyright 2010 SageTV, LLC All rights reserved
For additional support, go to www.sagetv.com/support.html or email us at [email protected]
SageTV V7.0 User’s Guide
Chapter 3: SageTV Menus
Page 119
Plugin Configuration
The Plugin Configuration menu displays the configuration options for a plugin.
Select the current setting to the right of a configuration item to change the setting. The list of
configuration options may fill more than the space on a single screen. If so, you will be able to
scroll down to see the rest of the options.
Use the Back command or the Left arrow to return to the previous menu.
Using the Options command will display the Video Menu Options dialog, which is the regular
Options menu found on most screens. See its full explanation for details.
Copyright 2010 SageTV, LLC All rights reserved
For additional support, go to www.sagetv.com/support.html or email us at [email protected]
SageTV V7.0 User’s Guide
Chapter 4: Media Playback
Page 120
Chapter 4: Media Playback
Supported Media Types
SageTV supports many current video, music and photo formats:
File Formats – AVI, ASF, MKV, MOV, MP4, QuickTime, MPEG-1, MPEG-2 PS,
MPEG-2 TS, M2TS, BDMV Folder (BluRay), BluRay ISO, DVD ISO, DVD
VIDEO_TS, VOB, M4A, MP3, FLAC, OGG, FLV, WAV, WMA
Video Codecs – MPEG1, MPEG2, MPEG4, XVID, H264*, WMV9, VC1*, MJPEG,
FlashVideo (some formats may require an external decoder to be installed)
Audio Codecs – MP2, MP3, AAC, AAC-HE, ALAC, WMA, WMAPro, PCM, Vorbis,
FLAC, DolbyDigital, DolbyTrueHD, DTS, DTS-HD/MA (some formats may require an
external decoder to be installed)
CC/Subtitle Formats – EIA-608 (NTSC/ATSC/QAM Closed Captioning), SRT,
SSA/ASS, SAMI, .sub (Subviewer/MicroDVD), DVD, multiple languages supported in
all formats (NOTE: HD media extenders support additional subtitle formats beyond this.)
Playlist Formats – M3U, WPL, ASX, WAX, WVX
Picture Formats – JPEG, PNG, GIF, TIFF
Using the SageTV Media Playback Interface
SageTV supports the basic media types of video, DVD/BD, music, and pictures. Each type has
its own specialized playback interface. While most of the playback interfaces are similar in terms
of which commands are available, there are some differences to be aware of. Therefore, each of
the four interfaces will be described below, along with the most commonly used commands. See
the full list of commands for a complete description of all available commands. The basic media
types that can be played or viewed are:
Videos – Videos include SageTV recordings of TV shows and videos that have been
imported into the Video Browser. SageTV looks for library videos in the Media Center
Import Directories, as defined in Detailed Setup: General Settings. For details about
playing videos, see Video Playback.
DVD – DVDs can be played from a DVD drive in the same computer SageTV is running
on. DVDs cannot be played over a network from a DVD drive on another computer.
Copyright 2010 SageTV, LLC All rights reserved
For additional support, go to www.sagetv.com/support.html or email us at [email protected]
SageTV V7.0 User’s Guide
Chapter 4: Media Playback
Page 121
DVDs stored on a hard drive can be played by SageTV. (see: Appendix I: Playing DVDs
and BDs from the Hard Drive.) For details about playing DVDs, see DVD Playback.
Music – The Music Browser can play music files stored on the computer in any of the
Media Center Import Directories, as defined in Detailed Setup: General Settings. For
details about playing music, see Music Playback.
Pictures – Pictures may be viewed individually or as a slideshow in the Photo Browser.
As with music and library videos, SageTV looks for pictures in the Media Center Import
Directories, as defined in Detailed Setup: General Settings. For details about viewing
pictures, see Picture Viewing.
Copyright 2010 SageTV, LLC All rights reserved
For additional support, go to www.sagetv.com/support.html or email us at [email protected]
SageTV V7.0 User’s Guide
Chapter 4: Media Playback
Page 122
A Note About Time Scroll Playback Mode
One command that is not listed in the playback sections below, because it is not assigned to a
keystroke by default, is the Time Scroll command, which offers another way to jump forward or
backward while playing media, in addition to the Skip Forward, Skip Bkwd, Skip Fwd #2, and
Skip Bkwd #2 commands. It operates quite differently from those commands, however.
The first use of the Time Scroll command enters time scroll mode. If playback has not been
paused, playback will continue while the time indicator will change color. While in this mode,
you may:
Use the Skip Forward and Skip Bkwd commands to move the time indicator icon
forward/backward 2 minutes 30 seconds for each time one of these commands is used.
(This time is adjustable via the Fast Forward & Rewind times option.) For now, playback
will continue at the current time; only the time indicator will move.
Use the Skip Fwd #2 and Skip Bkwd #2 commands to move the time indicator icon
directly to the end or beginning of the media, respectively. For now, playback will
continue at the current time; only the time indicator will move.
To exit time scroll mode:
Use the Time Scroll command a second time to exit time scroll mode and begin playback
at the time indicator icon’s current location. If you have jumped to the end of the media,
playback of that media will end. If playback was paused, it will still remain paused after
exiting time scroll mode. Note: the time indicator icon does not move on its own while in
time scroll mode; if you let playback continue for a short period without using any FF or
REW commands and then exit time scroll mode using the command a second time,
playback will jump back to where the indicator was.
Do nothing for a short delay period, or use commands such as Pause, Play, or Play/Pause,
to cancel time scroll mode and continue playback at the current playback location,
regardless of where the time indicator icon is currently shown.
If you wish to make use of the time scroll mode functionality, you will need to assign a key or
remote control IR code to it. See the Link Infrared/Keystroke to SageTV Command option in
Detailed Setup.
Copyright 2010 SageTV, LLC All rights reserved
For additional support, go to www.sagetv.com/support.html or email us at [email protected]
SageTV V7.0 User’s Guide
Chapter 4: Media Playback
Page 123
Video Playback
During video playback, the On-Screen Display (OSD) will appear after using most playback
control commands and will turn off after a short timeout period. Alternatively, you can use the
Info or Select command to toggle the OSD on or off. Note: Only certain portions of the OSD
may be shown, depending on the current status and the command used. Tip: To change the
timeout period, see Inactivity Timeout and OSD AutoHide in Detailed Setup: Customize
Settings.
OSD Top
The upper left displays the channel where a recording aired, or the current channel for live TV. If
playback is live TV, the
and
icons can be used to change the channel with the mouse. If
SageTV has been configured to use channel logos, the channel logo will be displayed when
available. Note: This section displays the video thumbnail, if available, when playing imported
video files.
The middle section of the top displays an abbreviated form of the recording’s or imported
video’s detailed information, including the show title, episode name, date and time when the
show was recorded, and a description of the show’s contents. The titles for Manual Recordings
and Favorites will be shown using bold text.
The upper right displays the current day and time, along with a volume indicator showing
whether the volume has been muted or is audible. The volume may be controlled with the mouse
by clicking on the volume bar. Clicking on the volume icon will turn the sound on or off.
OSD Bottom
The bottom contains the time bar display (see below for details) showing the current point of
playback along with the overall length of the recording or imported video, and mouse icons to
control playback, if mouse icons have been enabled. To control whether mouse icons are shown,
use the Show Mouse Icons option in Detailed Setup: General Settings. Using the mouse, clicking
on any point on the time bar moves the playback point to that position. Clicking on the icons
performs these functions:
Skip Bkwd #2
Skip Bkwd
Stop
Skip Forward
Pause or
Skip Fwd #2
Play
OSD Time Bar
The time bar is used to indicate the length of the recording or imported video, the current
playback position, and such status information as the section that has been watched, recorded,
and/or not recorded.
Copyright 2010 SageTV, LLC All rights reserved
For additional support, go to www.sagetv.com/support.html or email us at [email protected]
SageTV V7.0 User’s Guide
Chapter 4: Media Playback
Page 124
The time bar always displays “0:00:00” as the beginning at the far left (click on that number to
jump to the start of the video) and the video’s duration to the far right (click on that number to
jump to the end of the video).
If a recording has been padded so that the recording extends beyond the start/end of the show’s
actual airing time, that padding will be displayed on the time bar also, to the left/right of the
vertical marker bars for the start/end times.
The colors on the time bar display represent the four possible indicator states. Note: The time
bar has slightly different coloring in the padded areas.
Red – This is the portion of the show that is in the past and has not been recorded. If you
have changed the channel and then returned to a previously watched channel during the
same show, you may notice that there is a red section to indicate the portion of the show
not recorded in between recorded sections.
White – This part of the show has been viewed and is now considered Watched by
SageTV. If you exit a show that has not yet been completely watched, SageTV will
remember how much you have watched and continue from that point the next time you
watch that recording.
Green – This is the remainder of the show that has already been recorded, but not yet
watched.
Clear – This represents the portion of the show that has not yet been recorded since it is
beyond the current time and thus has not aired yet. You cannot fast forward into the clear
section, since it represents the future.
Playback Commands
Most SageTV commands are available during video playback. The most commonly used ones
and their default key assignments are listed below. Please see Appendix E: Remote Controls for
the default Hauppauge and Streamzap remote layouts and remember that you can customize your
key assignments for every command. The SageTV Commands customization section contains
full details of all the available commands, their default keys, and how to customize their
assignments.
Command
Keystroke
Function
Pause
Ctrl+S
Pause playback. If already paused, advance one frame.
Play
Ctrl+D
Resume playback if paused.
Copyright 2010 SageTV, LLC All rights reserved
For additional support, go to www.sagetv.com/support.html or email us at [email protected]
SageTV V7.0 User’s Guide
Chapter 4: Media Playback
Page 125
Command
Keystroke
Function
Play/Pause
Ctrl+Shift+S, Toggles between paused & playing. If playing, playback will
Middle Mouse pause. If paused, playback will resume.
Button
Stop
Ctrl+G
Closes the file and stops playback. You will be returned to the
Main Menu. For additional information, see the explanation for
the Close File option, below.
Skip Forward
Ctrl+F
Fast Forward 10 seconds. (This time is adjustable via the Fast
Forward & Rewind times option.)
Skip Bkwd
Ctrl+A
Rewind 10 seconds. (This time is adjustable via the Fast
Forward & Rewind times option.)
Skip Fwd #2
Ctrl+F8
Fast Forward 2:30 – 2 minutes, 30 seconds. (This time is
adjustable via the Fast Forward & Rewind times option.)
Skip Bkwd #2
Ctrl+F7
Rewind 2:30. (This time is adjustable via the Fast Forward &
Rewind times option.)
Channel Up
Page Up,
Ctrl+Up
If watching live TV, change to the next higher channel number.
Channel Down Page Down,
Ctrl+Down
If watching live TV, change to the next lower channel number.
Volume Up
Increase audio volume.
Ctrl+R,
Ctrl+Right
Volume Down Ctrl+E,
Ctrl+Left
Decrease audio volume.
Mute
Ctrl+Shift+M Toggle audio mute on or off.
TV
Ctrl+V
Return to the previous menu.
Home
Home
Moves directly to the Main Menu.
Guide
Ctrl+X
Moves directly to the Program Guide.
Power
Ctrl+Z
Puts SageTV to sleep.
Info
Ctrl+I,
Left Mouse
Button
Toggles the OSD on or off.
Left
Left
When the OSD is on, this toggles whether the show’s full
description is displayed.
Right
Right
When the OSD is on, this toggles whether the show’s full
description is displayed.
Copyright 2010 SageTV, LLC All rights reserved
For additional support, go to www.sagetv.com/support.html or email us at [email protected]
SageTV V7.0 User’s Guide
Chapter 4: Media Playback
Page 126
Command
Keystroke
Function
Watched
Ctrl+W
Toggles whether the remainder of the show is marked as
Watched or not.
Don’t Like
Ctrl+J
Toggles whether show is marked as Don’t Like or not.
Record
Ctrl+Y
Toggles whether the show should be marked as a Manual
Recording. If you are watching live TV, use this command to
force SageTV to continue recording the show and save it for
future viewing.
This command can also be used to save a fully downloaded
online video file.
Full Screen
Ctrl+Shift+F
Toggles whether SageTV should make its Window full screen
or not.
Options
Escape,
Ctrl-O,
Right Mouse
Button
Toggles the display of the Options pop-up menu for playback
option choices. See the detailed description, below.
Num 0 – 9
0–9
Used to enter channel changes. While watching live TV, enter
the channel number you wish to watch, then use the Select
command (Enter key).
Video Playback Options Menu
Using the Options command while playing a SageTV recording or imported video will cause a
pop-up menu to appear with additional options:
Cancel – Cancel the pop-up and close it. Using the Options command has the same result.
Detailed Info – Use this option while watching a recording to jump directly to the Recording
Detail menu for the recording being played or the Video Detail menu for an imported video.
Subtitles – If the video contains subtitles, this option toggles whether subtitles are to be
displayed. Subtitles are enabled if this option is checked.
Subtitle Language – If the video contains multiple subtitle languages, this option will be
available for choosing which language to use for subtitles.
Save Downloaded File – When playing a downloaded video media file, this option will be
available after the file has been completely downloaded. The downloaded video will be saved as
an imported video and may be played from the Video Browser. Use the Record command as a
shortcut for this option.
Copyright 2010 SageTV, LLC All rights reserved
For additional support, go to www.sagetv.com/support.html or email us at [email protected]
SageTV V7.0 User’s Guide
Chapter 4: Media Playback
Page 127
Shuffle Video Playback – This selection reflects whether random playback of the current video
playlist is enabled or disabled. Selecting this item will toggle shuffled playback on and off.
Repeat Video Playback – This selection reflects whether repeat playback of the current video
playlist is enabled or disabled. Selecting this item will toggle repeat playback on and off.
Main Menu – Go directly to the Main Menu.
Video Library – Go directly to the Video Browser menu to view imported videos. Available
when playing an imported video.
SageTV Recordings – Go directly to the SageTV Recordings menu to view the list of
recordings. Available when playing a recording.
Program Guide – Go directly to the Program Guide to view the grid showing the list of shows
on each channel. Available when playing a recording.
Recording Schedule – Go directly to the Recording Schedule to view upcoming recordings.
Available when playing a recording.
Standby – Stops playback and puts SageTV into standby (or sleep) mode.
BD Title Select – When playing a Blu-ray video, this option opens a dialog where the list of
Blu-ray tiles are listed. The currently playing title is marked; select a title from the list to start
playing that title.
Stop Playback – Closes the file and stops playback. You will be returned to the screen where
playback was initiated. If that is not possible, then you will jump to the Program Guide, SageTV
Recordings, or Video Browser menu, depending on the video that was playing. Use the Stop
command as a shortcut for this option. Notes:
If you are watching live TV, this command will also stop the recording process.
If the live TV that you are watching is a show that was scheduled to record, the recording
will continue; only playback will stop.
If you are watching a prerecorded show, no recording process is affected.
Next Chapter – If the video contains multiple chapters, this option will be available to jump to
the next chapter.
Previous Chapter – If the video contains multiple chapters, this option will be available to jump
to the previous chapter.
Record this show – This option’s name can change depending on the status of the recording.
While watching live TV, use this option to toggle whether to record and keep the show. While
Copyright 2010 SageTV, LLC All rights reserved
For additional support, go to www.sagetv.com/support.html or email us at [email protected]
SageTV V7.0 User’s Guide
Chapter 4: Media Playback
Page 128
watching an existing recording, this option will mark or unmark the Manual Recording status for
the recording. Use the Record command as a shortcut for this option.
Jump to Beginning – Jump to the beginning of the video. While this dialog is open, use the Skip
Bkwd #2 command as a shortcut for this option.
Jump to End – Jump to the end of the video. While this dialog is open, use the Skip Fwd #2
command as a shortcut for this option.
Audio Language – If the video contains multiple languages, this option will be available for
choosing which language to use during playback.
Aspect Ratio Mode – Displays another pop-up menu where you can choose which aspect ratio
to use for playback. See the Aspect Ratio Mode selection dialog.
Captions (Off/CC1/CC2) – Toggles between the Closed Caption display settings, when
available. Also see Appendix K: Closed Captions.
Caption & Subtitle Options – If subtitles and/or closed captions are available, this option will
be shown, allowing setting various caption and subtitle options.
Toggle Full Screen – Toggles whether SageTV should make its Window full screen or not.
Video Playback Completion Options
Since SageTV will not automatically delete a Manual Recording or a Favorite with AutoDelete
turned off, when such a recording completes playback after being fully watched, an options
menu will be shown to ask whether to delete the recording. Choose from:
Delete this recording now – The recording will be deleted immediately.
Delete this recording when space is needed – (Shown only for Manual Recordings.)
The recording will have its Manual Recording status cleared so that SageTV sees it as
just a regular recording. Note: If the recording is also a Favorite with AutoDelete turned
off, SageTV will still not be able to delete the file automatically.
Do not delete this recording – The recording will not be deleted; it will be left as-is.
Note: Using the Options command will also close this menu without deleting the
recording.
Note: This dialog can also be configured to ask for all recordings or to never be shown. See Ask
to delete recording at end of playback?, in Detailed Setup: Customize Settings.
Copyright 2010 SageTV, LLC All rights reserved
For additional support, go to www.sagetv.com/support.html or email us at [email protected]
SageTV V7.0 User’s Guide
Chapter 4: Media Playback
Page 129
Aspect Ratio Mode selection dialog
This dialog displays a list of the available aspect ratio modes that can be used for video playback.
In addition, custom aspect ratio modes can be created and edited when using a SageTV HD
Extender. The Aspect Ratio Mode dialog has the following choices:
Close – Cancel and close this menu.
Add new custom AR Mode – (HD Extender only) Create a new custom aspect ratio
mode, with its default settings copied from a list of existing aspect ratio modes.
Fill – Stretch the video to fill the SageTV playback area.
Source – Use the video source information to determine the playback aspect ratio.
4x3 – Force playback to fit the video into a 4x3 ratio area, stretching or shrinking the
video to do so. (Not an option on the HD Extender)
16x9 – Force playback to fit the video into a 16x9 ratio area, stretching or shrinking the
video to do so. (Not an option on the HD Extender)
ZoomA – (HD Extender only) Uses the complete screen in vertical direction.
ZoomB – (HD Extender only) Zooms into the 16:9 part of a 4:3 show inside a 16:9
broadcast.
ZoomC – (HD Extender only) Expands 16:9 content within a 4:3 video stream for
playback on a 16:9 TV.
Fill Wide – (HD Extender only) Stretches 4:3 content within a 16:9 video stream to fill
the screen on a 16:9 TV.
On an HD Extender, any custom aspect ratio modes will be listed in alphabetical order
after the “Fill Wide” AR mode.
Aspect ratio notes when using the HD Extender only: Use the Right arrow while any aspect
ratio is highlighted for more options:
Set as the default Aspect Ratio mode – Tells SageTV to use this aspect ratio mode as
the initial AR mode whenever video playback starts.
Delete this Custom AR mode – (Custom AR mode only) Allows the deletion of a
custom aspect ratio mode.
Rename this Custom AR mode – (Custom AR mode only) Allows a custom aspect ratio
mode to be renamed.
Copyright 2010 SageTV, LLC All rights reserved
For additional support, go to www.sagetv.com/support.html or email us at [email protected]
SageTV V7.0 User’s Guide
Chapter 4: Media Playback
Page 130
Edit this Custom AR mode – (Custom AR mode only) Opens a dialog where the custom
aspect ratio mode settings can be configured.
Return to Aspect Ratio mode list – Close the aspect ratio mode options and returns to
the list of aspect ratio modes that can be used for video playback.
Copyright 2010 SageTV, LLC All rights reserved
For additional support, go to www.sagetv.com/support.html or email us at [email protected]
SageTV V7.0 User’s Guide
Chapter 4: Media Playback
Page 131
DVD Playback
During DVD playback, DVD menus that are not part of the SageTV interface may be navigated
by using the directional arrow keys and using the Select command to make menu selections.
Those are the DVD’s built-in menus that are shown on any DVD playback device and are not
specific to SageTV. During playback of a DVD video, however, SageTV presents its own
interface for controls such as pause, fast forward, rewind, etc.
During DVD playback, the On-Screen Display (OSD) will appear after using most playback
control commands and will turn off after a short timeout period. Alternatively, you can use the
Info or Select command to toggle the OSD on or off. Note: Only certain portions of the OSD
may be shown, depending on the current status and the command used. Tip: To change the
timeout period, see Inactivity Timeout and OSD AutoHide in Detailed Setup: Customize
Settings.
OSD Top
The upper part of the OSD displays the DVD playback status information, including the DVD
title, current chapter, and other current settings. The
and
icons can be used to change the
chapter with the mouse. The DVD’s thumbnail will be shown in the upper left corner, if a
thumbnail is available.
The upper right displays the current day and time, along with a volume indicator showing
whether the volume has been muted or is audible. The volume may be controlled with the mouse
by clicking on the volume bar. Clicking on the volume icon will turn the sound on or off.
OSD Bottom
The bottom contains the time bar display (see below for details) showing the current point of
playback along with the overall length of the video, and mouse icons to control playback, if
mouse icons have been enabled. To control whether mouse icons are shown, use the Show
Mouse Icons option in Detailed Setup: General Settings. Using the mouse, clicking on any point
on the time bar moves the playback point to that position. Clicking on the icons performs these
functions:
Skip Bkwd #2
Skip Bkwd
Stop
Skip Forward
Pause or
Skip Fwd #2
Play
OSD Time Bar
The DVD time bar is used to indicate the length of the video, the current playback position, and
the section that has been watched.
Copyright 2010 SageTV, LLC All rights reserved
For additional support, go to www.sagetv.com/support.html or email us at [email protected]
SageTV V7.0 User’s Guide
Chapter 4: Media Playback
Page 132
The time bar always displays “0:00:00” as the beginning at the far left (click on that number to
jump to the start of the video) and the video’s duration to the far right (click on that number to
jump to the end of the video).
The DVD playback time bar uses two colors:
White – This part of the DVD has been viewed.
Green – This is the remainder of the DVD that has not yet been watched.
Playback Commands
Most SageTV commands are available during DVD
playback. The most commonly used ones and their default
key assignments are listed below. Please see Appendix E:
Remote Controls for the default Hauppauge and Streamzap
remote layouts and remember that you can customize your
key assignments for every command. The SageTV
Commands customization section contains full details of all
the available commands, their default keys, and how to
customize their assignments.
Note: In addition to the usual
playback commands, there
are additional DVD-specific
commands that are not
originally assigned to any
keys. To use them, you will
need to assign keys or remote
buttons to those commands.
Command
Keystroke
Function
Pause
Ctrl+S
Pause playback. If already paused, advance one frame.
Play
Ctrl+D
Resume playback if paused.
Play/Pause
Ctrl+Shift+S, Toggles between paused & playing. If playing, playback will
Middle Mouse pause. If paused, playback will resume.
Button
Stop
Ctrl+G
Closes the file and stops playback. You will be returned to the
Main Menu. For additional information, see the explanation for
the DVD Stop option, below.
Skip Forward
Ctrl+F
Fast Forward 10 seconds. (This time is adjustable via the Fast
Forward & Rewind times option.)
Skip Bkwd
Ctrl+A
Rewind 10 seconds. (This time is adjustable via the Fast
Forward & Rewind times option.)
Skip Fwd #2
Ctrl+F8
Fast Forward 2:30 – 2 minutes, 30 seconds. (This time is
adjustable via the Fast Forward & Rewind times option.)
Skip Bkwd #2
Ctrl+F7
Rewind 2:30. (This time is adjustable via the Fast Forward &
Rewind times option.)
Copyright 2010 SageTV, LLC All rights reserved
For additional support, go to www.sagetv.com/support.html or email us at [email protected]
SageTV V7.0 User’s Guide
Chapter 4: Media Playback
Command
Keystroke
Function
Channel Up
Page Up
Ctrl+Up
Jump to the next DVD chapter.
Channel Down Page Down,
Ctrl+Down
Jump to the previous DVD chapter.
Volume Up
Increase audio volume.
Ctrl+R,
Ctrl+Right
Volume Down Ctrl+E,
Ctrl+Left
Page 133
Decrease audio volume.
Mute
Ctrl+Shift+M Toggle audio mute on or off.
TV
Ctrl+V
Return to the previous menu.
Home
Home
Moves directly to the Main Menu.
Guide
Ctrl+X
Moves directly to the Program Guide.
Power
Ctrl+Z
Puts SageTV to sleep.
Info
Ctrl+I,
Left Mouse
Button
Toggles the OSD on or off.
Full Screen
Ctrl+Shift+F
Toggles whether SageTV should make its Window full screen
or not.
Options
Escape,
Ctrl-O,
Right Mouse
Button
Toggles the display of the Options pop-up menu for playback
option choices. See the detailed description, below.
Num 0 – 9
0–9
Used to enter the DVD chapter to play. Enter the chapter
number you wish to watch, then use the Select command (Enter
key).
DVD Playback Options Menu
Using the Options command will cause a pop-up menu to appear with additional options and
DVD playback controls.
Cancel – Cancel the pop-up and close it. Using the Options command has the same result.
Detailed Info – Use this option to jump directly to the Video Detail menu for an imported DVD.
DVD Menu – Jump to the DVD’s menu.
Copyright 2010 SageTV, LLC All rights reserved
For additional support, go to www.sagetv.com/support.html or email us at [email protected]
SageTV V7.0 User’s Guide
Chapter 4: Media Playback
Page 134
DVD Return – Returns the display from a submenu to its parent menu.
Subtitles – Toggles whether DVD subtitles are to be displayed. Subtitles are enabled if this
option is checked.
Subtitle Language – Displays a pop-up menu where you can choose which language to use for
subtitles.
Main Menu – Go directly to the Main Menu.
Standby – Stops playback and puts SageTV into standby (or sleep) mode.
DVD Stop – Closes and stops DVD playback. You will be returned to the screen where playback
was initiated. If that is not possible, then you will jump to the Main Menu. Playback will be
ended, so you will be unable to use the Back command to return to viewing the DVD.
DVD Next Chapter – Jump to the next chapter.
DVD Previous Chapter – Jump to the previous chapter.
Audio Language – Displays a pop-up menu where you can choose which language to use for
audio playback.
Jump to Beginning – Jump to the beginning of the video. While this dialog is open, use the Skip
Bkwd #2 command as a shortcut for this option. This option is available while playing the movie
portion of a DVD.
Jump to End – Jump to the end of the video. While this dialog is open, use the Skip Fwd #2
command as a shortcut for this option. This option is available while playing the movie portion
of a DVD.
Aspect Ratio Mode – Displays another pop-up menu where you can choose which aspect ratio
to use for playback. See the Aspect Ratio Mode selection dialog.
Captions (On/CC1/CC2) – Toggles between the Closed Caption display settings.
Caption & Subtitle Options – If subtitles and/or closed captions are available, this option will
be shown, allowing setting various caption and subtitle options.
Toggle Full Screen – Toggles whether SageTV should make its Window full screen or not.
Copyright 2010 SageTV, LLC All rights reserved
For additional support, go to www.sagetv.com/support.html or email us at [email protected]
SageTV V7.0 User’s Guide
Chapter 4: Media Playback
Page 135
Music Playback
During music playback, the On-Screen Display (OSD) will appear after using most playback
control commands and will turn off after a short timeout period. Alternatively, you can use the
Info or Select command to toggle the OSD on or off. Note: Only certain portions of the OSD
may be shown, depending on the current status and the command used. Tip: To change the
timeout period, see Inactivity Timeout and OSD AutoHide in Detailed Setup: Customize
Settings.
The background consists of a visualization effect that changes with the music, or information
about the currently playing song.
OSD Top
The upper part of the OSD displays the music playback status information, including the song
title, artist, album, and track information. Playlist information will be displayed only when
and
icons can
playing a Playlist. If album art is available, the image will be displayed. The
be used to change to the next or previous song with the mouse.
The upper right displays the current day and time, along with a volume indicator showing
whether the volume has been muted or is audible. The volume may be controlled with the mouse
by clicking on the volume bar. Clicking on the volume icon will turn the sound on or off.
OSD Bottom
The bottom contains the time bar display (see below for details) showing the current point of
playback along with the overall length of the song, and mouse icons to control playback, if
mouse icons have been enabled. To control whether mouse icons are shown, use the Show
Mouse Icons option in Detailed Setup: General Settings. Using the mouse, clicking on any point
on the time bar moves the playback point to that position. Clicking on the icons performs these
functions:
Skip Bkwd #2
Skip Bkwd
Stop
Skip Forward
Pause or
Skip Fwd #2
Play
OSD Time Bar
The time bar is used to indicate the length of the song, the current playback position, and the
section that has been played.
The time bar always displays “0:00:00” as the beginning at the far left (click on that number to
jump to the start of the song) and the video’s duration to the far right (click on that number to
jump to the end of the song).
Copyright 2010 SageTV, LLC All rights reserved
For additional support, go to www.sagetv.com/support.html or email us at [email protected]
SageTV V7.0 User’s Guide
Chapter 4: Media Playback
Page 136
The music playback time bar uses two colors:
White – This part of the song has been played.
Green – This is the remainder of the song that has not yet been played.
Playback Commands
Most SageTV commands are available during music playback. The most commonly used ones
and their default key assignments are listed below. Please see Appendix E: Remote Controls for
the default Hauppauge and Streamzap remote layouts and remember that you can customize your
key assignments for every command. The SageTV Commands customization section contains
full details of all the available commands, their default keys, and how to customize their
assignments.
Command
Keystroke
Function
Pause
Ctrl+S
Pause playback.
Play
Ctrl+D
Resume playback if paused.
Play/Pause
Ctrl+Shift+S, Toggles between paused & playing. If playing, playback will
Middle Mouse pause. If paused, playback will resume.
Button
Stop
Ctrl+G
Closes the file and stops playback. You will be returned to the
Main Menu. For additional information, see the explanation for
the Close File option, below.
Skip Forward Ctrl+F
Fast Forward 10 seconds. (This time is adjustable via the Fast
Forward & Rewind times option.)
Skip Bkwd
Ctrl+A
Rewind 10 seconds. (This time is adjustable via the Fast Forward
& Rewind times option.)
Skip Fwd #2
Ctrl+F8
Fast Forward 2:30 – 2 minutes, 30 seconds. (This time is
adjustable via the Fast Forward & Rewind times option.)
Skip Bkwd #2 Ctrl+F7
Rewind 2:30. (This time is adjustable via the Fast Forward &
Rewind times option.)
Channel Up
Jump to the next track in the playlist, album, or song list,
depending on where playback was started. If random playback is
enabled, the next song selection will be randomly chosen.
Page Up,
Ctrl+Up
Channel Down Page Down,
Ctrl+Down
Jump to the previous track. See comments for Channel Up, above.
Copyright 2010 SageTV, LLC All rights reserved
For additional support, go to www.sagetv.com/support.html or email us at [email protected]
SageTV V7.0 User’s Guide
Chapter 4: Media Playback
Command
Keystroke
Function
Volume Up
Ctrl+R,
Ctrl+Right
Increase audio volume.
Volume Down Ctrl+E,
Ctrl+Left
Page 137
Decrease audio volume.
Mute
Ctrl+Shift+M Toggle audio mute on or off.
TV
Ctrl+V
Return to the previous menu.
Home
Home
Moves directly to the Main Menu.
Guide
Ctrl+X
Moves directly to the Program Guide.
Power
Ctrl+Z
Puts SageTV to sleep.
Info
Ctrl+I,
Left Mouse
Button
Toggles the OSD on or off.
Record
Ctrl+Y
Saves a fully downloaded audio-only online media file.
Full Screen
Ctrl+Shift+F Toggles whether SageTV should make its Window full screen or
not.
Options
Escape,
Toggles the display of the Options pop-up menu for playback
Ctrl-O,
option choices. See the detailed description, below.
Right Mouse
Button
Num 0 – 9
0–9
Used to enter the track number to play. While a song is playing,
either enter a 2-digit number or a single digit followed by Select
to jump to that track number on the current album or the song
number in a playlist.
Music Playback Options Menu
Using the Options command will cause a pop-up menu to appear with additional options:
Cancel – Cancel the pop-up and close it. Using the Options command has the same result.
Album Details – Jumps to the Music Browser view for the current song’s album.
Song Details – Jumps to a screen displaying the detailed information for the current song.
Save Downloaded File – When playing a downloaded audio media file, this option will be
available after the file has been completely downloaded. The downloaded audio-only file will be
saved as an imported music file and may be played from the Music Browser. Use the Record
command as a shortcut for this option.
Copyright 2010 SageTV, LLC All rights reserved
For additional support, go to www.sagetv.com/support.html or email us at [email protected]
SageTV V7.0 User’s Guide
Chapter 4: Media Playback
Page 138
Shuffle Music Playback – This selection reflects whether random playback of the current music
playlist is enabled or disabled. Selecting this item will toggle shuffled playback on and off.
Repeat Music Playback – This selection reflects whether repeat playback of the current music
playlist is enabled or disabled. Selecting this item will toggle repeat playback on and off.
Main Menu – Go directly to the Main Menu.
Music Browser – Go directly to the Music Browser menu.
Standby – Stops playback and puts SageTV into standby (or sleep) mode.
Stop Playback – Closes and stops music playback. You will be returned to the Music Browser.
Playback will be ended, so you will be unable to use the Back command to return to the music
playback display.
Jump to Beginning – Jump to the beginning of the song.
Jump to End – Jump to the end of the song.
Visualization: Graphics/Song Info – This selection toggles between using a graphical
visualization background, or displaying the current song’s information as the background. Note:
If graphical visualizations are not available for the current playback device, this option will
remain set to Song Info.
Toggle Full Screen – Toggles whether SageTV should make its Window full screen or not.
Copyright 2010 SageTV, LLC All rights reserved
For additional support, go to www.sagetv.com/support.html or email us at [email protected]
SageTV V7.0 User’s Guide
Chapter 4: Media Playback
Page 139
Picture Viewing
Viewing pictures in SageTV consists of viewing an individual image or a series of images,
shown as a slideshow. Whether you have chosen to view an individual image or a slideshow,
only a single image is displayed on the screen at one time. Images are shown full size, unless
they are too large to fit inside the SageTV window, in which case they will be shrunk to fit the
space available while retaining their original proportions. Images smaller than the screen may
optionally be enlarged to fill the screen.
Images whose dimensions
match
the
SageTV
window will completely
fill the display area.
This image is full sized
and does not exceed the
SageTV window size. No
resizing is needed.
This image is larger than
the SageTV window. It
has been resized to fit the
vertical dimension.
If picture viewing is started as a slideshow, the Photo Browser Slideshow Options will be used to
determine whether the slideshow will automatically advance to the next image, and how long
each image is displayed.
If picture viewing is started by selecting a single image in the Photo Browser menu, the selected
image will be displayed, but all images from the same folder will be sent to the picture viewer. If
there are multiple images in the folder, slideshow mode can be started by using the Play
command.
While slideshow mode is active or paused, Skip Forward, Skip Bkwd, and other commands
listed below can be used to manually browse to the next or previous images in the slideshow or
folder list.
Commands
A limited number of commands are available during picture viewing. The available commands
and their default key assignments are listed below. Please see Appendix E: Remote Controls for
the default Hauppauge and Streamzap remote layouts and remember that you can customize your
key assignments for every command. The SageTV Commands customization section contains
full details of all the available commands, their default keys, and how to customize their
assignments.
Copyright 2010 SageTV, LLC All rights reserved
For additional support, go to www.sagetv.com/support.html or email us at [email protected]
SageTV V7.0 User’s Guide
Chapter 4: Media Playback
Page 140
Command
Keystroke
Function
Pause
Ctrl+S
Pauses slideshow playback. If music is also playing, music
playback will also pause.
Play
Ctrl+D
Resumes slideshow playback if paused. If music playback has
been paused, it will also resume.
Stop
Ctrl+G
Ends picture viewing and returns to the Photo Browser.
Select
Enter
Toggles the display of the Options pop-up menu for picture
option choices. See the detailed description, below.
Up
Page Up
Skip Forward
Skip Fwd #2
Smooth FF
Up Arrow
Page Up
Ctrl+F
Ctrl+F8
Proceeds to the next image in the slideshow. If the current
image is the last one, the slideshow will restart if the slideshow
options are set to do so, or the slideshow will end.
Down
Page Down
Skip Bkwd
Skip Bkwd #2
Smooth Rew
Down Arrow
Page Down
Ctrl+A
Ctrl+F7
Returns to the previous image, if not viewing the first image.
Info
Ctrl+I
View detailed information about the picture.
Back
Alt+Left
Ends viewing the image and returns to the Photo Browser.
Left
Left Arrow
Issues the Back command.
Escape
Issues the Back command.
Options
Ctrl-O,
Right Mouse
Button
Toggles the display of the Options pop-up menu for picture
option choices. See the detailed description, below.
Home
Home
Moves directly to the Main Menu.
Mouse Control
While viewing an image, mouse control consists of the following:
Left or Right Button – Toggles the display of the Options pop-up menu for picture option
choices. See the detailed description, below.
Scroll Wheel – Scrolls to the next or previous image if viewing a slideshow or if multiple
images are available in the current image’s folder when not viewing a slideshow.
Back Button – Ends viewing the image and returns to the Photo Browser.
Copyright 2010 SageTV, LLC All rights reserved
For additional support, go to www.sagetv.com/support.html or email us at [email protected]
SageTV V7.0 User’s Guide
Chapter 4: Media Playback
Page 141
Options Menu While Viewing a Single Image or a Slideshow
Using the Options or Select command while viewing an image will cause a semi-transparent
menu to appear with these options:
Close Menu – Closes the semi-transparent menu.
Next – Displays the next image from the same folder or the next slideshow image, if there is one
after the current image.
Previous – Displays the previous image from the same folder or the previous slideshow image, if
there is one before the current image.
Slideshow – If a slideshow is paused, the Play command will resume the slideshow.
Pause – If a slideshow is playing, the Pause command will pause the slideshow.
Thumbnails – Ends picture viewing or the slideshow and returns to the Photo Browser. Use the
Stop command as a shortcut.
Info – View detailed information about the picture. Use the Info command as a shortcut.
Rotate (lossless) – If the picture is a JPG file, this option will allow lossless rotation of the
picture file.
Hide Tip – If unchecked, a tip will be displayed in the upper right corner of the screen when
slideshow mode is paused. If checked, the tip will not be displayed.
Regenerate Thumbnail – Forces the thumbnail for the photo being viewed to be regenerated.
Slideshow Options – Display the pop-up Photo Browser Slideshow Options dialog, where the
various options for slideshows can be set.
Copyright 2010 SageTV, LLC All rights reserved
For additional support, go to www.sagetv.com/support.html or email us at [email protected]
SageTV V7.0 User’s Guide
Chapter 5: Configuring SageTV
Page 142
Chapter 5: Configuring SageTV
SageTV Setup
Initial SageTV setup consists of using the Configuration Wizard to configure SageTV, which
includes setting various options and configuring TV recording and playback. Part of the
Configuration Wizard consists of the Source Setup, used to configure the encoding devices.
Once SageTV is configured, options may later be adjusted for all the source capture devices,
certain channels may be enabled or disabled through the Channel Setup and Channel Manager
menus, Parental Controls may be changed, and various options may be configured in Detailed
Setup. All of these setup options are reached through the Setup submenu on the Main Menu.
In addition to the options that you can from within SageTV, there are some additional advanced
settings that can be changed by editing the Sage.properties or SageClient.properties file. Some of
these advanced settings are explained in Appendix A: SageTV Properties Settings.
Copyright 2010 SageTV, LLC All rights reserved
For additional support, go to www.sagetv.com/support.html or email us at [email protected]
SageTV V7.0 User’s Guide
Chapter 5: Configuring SageTV
Page 143
Configuration Wizard
The main Configuration Wizard menu provides options to complete the entire configuration
wizard, or just certain parts of it:
Complete the Entire Configuration Wizard – Configure all of SageTV’s essential options.
The first time SageTV is started, this process will automatically begin. Configuration starts with
Step 1 of the Configuration Wizard: General and User Interface Options and continues through
all configuration steps.
Set the General and User Interface Options – Configure only the settings within this section
of the configuration wizard. Go to Step 1 for this section: Configuration Wizard: General and
User Interface Options.
Set the Media Center Options – Configure only the settings relating to importing media files.
Go to Step 1 for this section: Configuration Wizard: Media Center Options.
Configure TV Recording – Configure only the settings regarding TV recording, including the
video recording directories and capture device configuration using the Source Setup. Go to Step
1 for this section: Configuration Wizard: Configure TV Recording.
Configure Video Playback – Configure only the settings regarding playing TV recordings. Go
to Step 1 for this section: Configuration Wizard: Configure Video Playback.
Return to the Main Menu – Return to the Main Menu.
Tip: All of the current properties settings are saved whenever this menu is exited.
Copyright 2010 SageTV, LLC All rights reserved
For additional support, go to www.sagetv.com/support.html or email us at [email protected]
SageTV V7.0 User’s Guide
Chapter 5: Configuring SageTV
Page 144
Configuration Wizard: General and User Interface Options
This portion of the Configuration Wizard handles configuring the basic options and proceeds
through the following steps:
Step G1: Choose Your Country
Select your country from the list shown.
Step G2: Choose Your Language
Select your language from those in the list.
Step G3: Choose Whether to Enable the SageTV Server (server only)
This option is only available in SageTV, not SageTVClient; enabling it allows SageTV to act as
a server so that it can talk to any SageTV Clients that may be installed on other computers on
your network. If you plan to use SageTVClient on another computer on your network, you must
enable SageTV to act as a server. The options are:
Yes – Enable the server so that I can use SageTV Client
No – Disable the server. I do not plan to use SageTV Client
Step G4: Choose Whether to Enable the Media Extender and Placeshifter Server (server
only)
This option is only available in SageTV, not SageTVClient, when the SageTV Server option is
already enabled (above); enabling it allows SageTV to act as a server for Media Extenders and
Placeshifter Clients. If you plan to use a Media Extender or a Placeshifter Client, you must
enable this server option. The options are:
Yes – Enable use of an extender or Placeshifter client
No – Disable use of an extender or a Placeshifter client
Copyright 2010 SageTV, LLC All rights reserved
For additional support, go to www.sagetv.com/support.html or email us at [email protected]
SageTV V7.0 User’s Guide
Chapter 5: Configuring SageTV
Page 145
Step G5: Manage the Placeshifter Users
Available when the Media Extender and Placeshifter Server is enabled, you may configure the
Placeshifter users from this screen. Note: At least 1 Placeshifter user will need to be created in
order to be able to use the Placeshifter client from a remote location.
The options are:
Configure Placeshifter users – See the Manage Placeshifter Users dialog in the Detailed
Setup: Server Settings menu.
Continue – Continue the Configuration Wizard process.
Step G6: Configure the Placeshifter Internet Connection (server or media extender only)
In order to use a Placeshifter Client from a remote location, your local network’s router/firewall
needs to be configured to allow access to your SageTV server from remote locations. It must be
configured to forward all communication that comes from the internet and arrives at a specific
port on your router so that the data received is sent to your local SageTV server. This
configuration can be done manually on the router, or SageTV can be configured to automatically
handle keeping access to the SageTV server open if your router has UPnP (Universal Plug and
Play) capability.
IMPORTANT NOTES:
-
After entering this Configuration Wizard screen, SageTV will take a short time to check
the current port forwarding configuration settings and options. You may exit the screen
by using the Continue button while this is happening, but the Configure Placeshifter
Connection button will not function until the check has been completed.
-
If UPnP configuration fails, but your router does have UPnP capabilities, make sure that
UPnP is enabled on the router or check to see if there is a firmware update for the router.
-
Refer to your router’s documentation regarding how to manually configure port
forwarding or how to enable UPnP.
-
If you manually configure port forwarding, you may need to also assign a static IP
address for your SageTV server. If using UPnP, SageTV will monitor the local server’s
IP address and update the UPnP settings accordingly.
The available options are:
Configure Placeshifter Connection – After the initial configuration check has been
completed, you may select this option to configure port forwarding on your router.
Copyright 2010 SageTV, LLC All rights reserved
For additional support, go to www.sagetv.com/support.html or email us at [email protected]
SageTV V7.0 User’s Guide
Chapter 5: Configuring SageTV
Page 146
Choose a port forwarding configuration method, then check external connections by
selecting the Test Placeshifter Connection option.
o Automatic UPnP Configuration – Allow SageTV to use default values when
using UPnP port forwarding. If a custom external port was previously set, it will
be reset if this option is chosen. SageTV will report whether UPnP configuration
was successful.
o Advanced UPnP Configuration with Port Selection – If you have a need to use
a different external port than the default 31099, this setting allows you to use a
specific port with UPnP port forwarding. SageTV will report whether UPnP
configuration was successful.
o Manual Configuration – If your router does not have UPnP capability, or if you
prefer not to use UPnP, then this option will allow you to specify the external port
to use, then information about what port to forward will be displayed.
Copy Locator ID to System Clipboard – Select this option to see the Locator ID for the
server and to copy it to the system clipboard. This ID can be used by the place shifting
client to find the server so that you do not need to know your actual IP address. Notes:
When using a Media Extender, this button will only allow viewing the Locator ID. The
Locator ID is also displayed on the System Information display.
Test Placeshifter Connection – Once port forwarding has been configured, either
manually or via UPnP, use this option to test the connection. The remote Locator ID
server will be asked to attempt contacting your SageTV server. When the test is
complete, the results will be shown.
Continue – Select this button to continue with the next step of the Configuration Wizard,
or to return to Detailed Setup if that is how you arrived at this screen.
Step G7: Select the SageTV Startup Option
Choose whether SageTV should automatically be loaded at Windows startup, and how to run it if
it should be loaded. Note: if using service mode, this option only affects the SageTV User
Interface. The service uses its own options regarding running at Windows startup.
No – Don’t Load SageTV – SageTV will not start when Windows does.
Yes – Load SageTV in Full Screen mode – When Windows starts, SageTV will also
start and will run in full screen mode.
Yes – Load SageTV into the System Tray – When Windows starts, SageTV will be
started in sleep, or standby, mode. It will not open a window on the Windows Desktop,
but will only be visible as an icon in the system tray.
Copyright 2010 SageTV, LLC All rights reserved
For additional support, go to www.sagetv.com/support.html or email us at [email protected]
SageTV V7.0 User’s Guide
Chapter 5: Configuring SageTV
Page 147
Step G8: Adjust Display Aspect Ratio
SageTV uses the Display Aspect Ratio to determine how best to display any graphics or video
content. You may choose from a few pre-set choices, or use the Left and Right arrows to adjust
the circle until it appears round. To adjust using larger increments, use the Skip Forward and
Skip Bkwd commands. Once the circle appears round, Select the Done button to continue.
Step G9: Adjust User Interface Overscan, Part 1
When viewing SageTV on a TV, the user interface may not fit the screen dimensions correctly.
Use this 2-part overscan adjustment to resize the interface so that it is entirely visible on the TV.
Note: This configuration step is skipped when using SageTV on a desktop computer.
Part 1 consists of positioning the upper left corner of the display such that the blinking red &
yellow corner marker is visible on the screen. Use the Left, Right, Up, and Down arrows to
position the corner. To adjust using larger increments, use the Skip Forward, Skip Bkwd, Page
Up, and Page Down commands. Once the corner is positioned, Select the “Done – Top Left”
button to continue with part 2.
Step G10: Adjust User Interface Overscan, Part 2
This step continues the process of resizing the interface so that it is entirely visible on the TV.
Part 2 consists of positioning the lower right corner of the display such that the blinking red &
yellow corner marker is visible on the screen. Use the Left, Right, Up, and Down arrows to
position the corner. To adjust using larger increments, use the Skip Forward, Skip Bkwd, Page
Up, and Page Down commands. Once the corner is positioned, Select the “Done – Bottom
Right” button to continue the configuration wizard.
Step G11: Display Videos on Menus?
SageTV is capable of displaying a video preview window or background on some menus.
Choose when you wish to have videos displayed on the menus:
Never show videos on menus – Tells SageTV that video playback should never be
displayed on any menus.
If a video is playing, show it on menus – This will activate videos on menus only if a
video currently happens to be playing.
Copyright 2010 SageTV, LLC All rights reserved
For additional support, go to www.sagetv.com/support.html or email us at [email protected]
SageTV V7.0 User’s Guide
Chapter 5: Configuring SageTV
Page 148
Always show videos on menus – Video preview/background display will always be
active. If there is currently no media playing, SageTV will initiate live TV playback.
Step G12: Choose Style for Videos on Menus
If you chose to allow videos to be displayed on menus in the step above, then you will be asked
how such videos should be displayed:
Display videos as the background – Videos will be shown as the full sized background
behind any active menu where such video is allowed to be displayed.
Display videos in the preview window – Videos will be shown in the preview window
area for any menu where there is room for such a preview window.
Step G13: Select Remote Control
Choose the remote control you plan to use with SageTV, if any:
No Remote or External Setup – If you do not plan to use a remote with SageTV, or if
you plan to use a remote with a setup that is completely outside SageTV, then select this
option. An externally configured remote might be one where the remote’s receiver is used
directly with Girder: It is configured to control SageTV, but SageTV itself does not
control it in any way.
Hauppauge 34 Button Remote – If you are using the older 34 button style Hauppauge
remote with the Hauppauge IR receiver and software, select this option to have SageTV
configure itself to respond properly to that remote. See: SageTV Preconfigured 34 button
Hauppauge Remote Control Commands. Note: Adding support for the Hauppauge
remote must have been selected during SageTV and SageTVClient Installation.
Hauppauge 45 Button Remote – If you are using the newer 45 button style Hauppauge
remote with the Hauppauge IR receiver and software, select this option to have SageTV
configure itself to respond properly to that remote. See: SageTV Preconfigured 45 button
Hauppauge Remote Control Commands. Note: Adding support for the Hauppauge
remote must have been selected during SageTV and SageTVClient Installation.
StreamZap Remote – If you are using the StreamZap remote and its software, select this
option. See: SageTV Preconfigured Streamzap Remote Control Commands. Note:
SageTV does not directly control the StreamZap remote; this option simply lets SageTV
know that remote is in use.
MCE Remote – If you are using an MCE style remote, select this option to configure
SageTV to directly recognize all the buttons for this type of remote.
Copyright 2010 SageTV, LLC All rights reserved
For additional support, go to www.sagetv.com/support.html or email us at [email protected]
SageTV V7.0 User’s Guide
Chapter 5: Configuring SageTV
Page 149
USB-UIRT Receiver + Any Remote – If you are using a USB-UIRT receiver directly
through SageTV, select this option. SageTV will configure itself to control the USBUIRT and receive commands via that device. In the next step, you will be asked to
configure your remote by associating its buttons with your preferred SageTV commands.
Evation’s IRMan Receiver + Any Remote – If you are using an IRMan receiver
directly through SageTV, select this option. You will then be asked which serial port
(COM port) is being used by the IRMan. SageTV will configure itself to control the
IRMan and receive commands via that device. In the next step, you will be asked to
configure your remote by associating its buttons with your preferred SageTV commands.
Step G14: Assign Remote Control Commands
If an IR receiver, such as the USB-UIRT or IRMan, was chosen to be controlled by SageTV in
the previous step, you will be presented with a list of commands so that you can configure the
buttons on your remote to control SageTV. For each button on your remote, decide which
SageTV command to associate it with, then select that command from the list and teach the
remote’s button to SageTV. For more details, see: Link Infrared/Keystroke to SageTV
Command. The process is the same as the one described there.
Step G15: Enable Intelligent Recording?
Choose whether to use SageTV’s Intelligent Recording feature. See SageTV Quick Start Guide:
Intelligent Recordings for details of how this works. For a completely new SageTV installation,
you may want to wait a few weeks before enabling Intelligent Recording in order to build a
viewing history that SageTV can refer to when deciding what shows to record for you. Or, you
can enable it now and simply choose whether to watch any of the shows that get recorded.
No – Only record the shows I specifically ask for – SageTV will only schedule
recordings for shows that are Manual Recordings or Favorites.
Yes – Allow SageTV to schedule additional recordings – During times when SageTV
is not scheduled to record a Manual Recording or a Favorite, SageTV will be free to
schedule recordings for shows that it thinks you may wish to watch.
Step G16: Weather Report Configuration
Choose your location and units to be used when displaying your local weather conditions and 5day forecast. (See the Weather menu.)
Configure the weather report location – You will be asked to enter your zip code or
city name, then SageTV will present a list of matching locations, if any are found.
Choose the entry that is closest to your location.
Copyright 2010 SageTV, LLC All rights reserved
For additional support, go to www.sagetv.com/support.html or email us at [email protected]
SageTV V7.0 User’s Guide
Chapter 5: Configuring SageTV
Page 150
Configure the weather report units – Choose whether the weather units should be
displayed using English (degrees Fahrenheit, miles per hour, etc.) or Metric (degrees
Celsius, kilometers per hour, etc.) units.
Continue – If using the Configuration Wizard, continue to the next configuration step. If
you arrived at this screen from the Weather menu, return to viewing your local weather
conditions.
Step G17: Set Parental Controls
Depending on whether Parental Controls are already enabled, some of the following options will
be available:
Disable Parental Controls – If parental controls are enabled, this option allows you to
disable them.
Modify Parental Restrictions settings – If parental controls are enabled, this option
allows you to modify them, by proceeding to the next Configuration Wizard step.
Enable Parental Controls – If parental controls are disabled, this option allows you to
enable them.
Clear the Parental Lock Code – If parental controls are disabled, this option allows you
to clear the current Parental Lock Code. If you wish to change the current code, you
could disable parental controls, clear the lock code, then enable the parental controls
again – at which point you will be asked to enter a new lock code.
Continue Wizard, keeping the current settings – Select this option if you want to
continue using the current Parental Controls settings. If you are completing the entire
Configuration Wizard, you will proceed to step 1 of Configuration Wizard: Media Center
Options. Otherwise, you will return to the home menu of the Configuration Wizard.
Note that you will be asked to enter the Parental Lock Code where appropriate. For more details,
see: Parental Controls.
Step G18: Set Parental Restrictions
If you chose to modify the parental restrictions in the previous step, the Configuration Wizard
will continue with this menu, where you can do the following:
Modify Parental Restrictions – A table of possible restrictions will be shown. Select
those options that should be restricted. For more details, see Parental Control
Restrictions.
Copyright 2010 SageTV, LLC All rights reserved
For additional support, go to www.sagetv.com/support.html or email us at [email protected]
SageTV V7.0 User’s Guide
Chapter 5: Configuring SageTV
Page 151
Return to Parental Controls – Returns to the previous step, where you can set the
overall Parental Controls options.
Continue Wizard – Select this option to continue the rest of the wizard. If you are
completing the entire Configuration Wizard, you will proceed to step 1 of Configuration
Wizard: Media Center Options. Otherwise, you will return to the home menu of the
Configuration Wizard.
Copyright 2010 SageTV, LLC All rights reserved
For additional support, go to www.sagetv.com/support.html or email us at [email protected]
SageTV V7.0 User’s Guide
Chapter 5: Configuring SageTV
Page 152
Configuration Wizard: Media Center Options
This portion of the Configuration Wizard handles configuring the options pertaining to the
imported media libraries and consists of the following steps:
Step MC1: Configure the Media Center Import Directories
This menu is where you will configure SageTV’s Media Center Import Directories, the locations
where SageTV will search for media files that it will make available for playback or viewing in
the Video Browser, the Photo Browser, or the Music Browser.
SageTV can import and play several different music file formats and codec types. See Chapter
4’s list of Supported Media Types.
Existing Media Center Import Directories
The middle portion of the screen contains a scrollable list of the existing Media Center Import
Directories and their current allowable imported media types. From this list, select:
Left side: Name of a Media Center Import Directory – Select a directory name from
the list to see an option to remove that directory from those that SageTV will scan for
media to import. Note: No media files will be deleted from the computer’s hard drive.
Right side: Media Type Selections – Choose a button under a media type to enable or
disable the importation of media files of that type from the associated media center
import directory. You will be asked to confirm your choice if you are disabling a media
type. Note: If all media types are disabled for an import directory, that directory
will be removed from the list.
Add New Directory
Select this button to add a new Media Center Import Directory. Browse to the directory to be
added and choose Select Current. For accessing network drives while using the SageTV
service, see: Accessing Network Drives with the SageTV Service.
After selecting a new directory, you will be asked to specify which media types are to be
imported from the directory:
Import Videos – Select this option to toggle between allowing Video files to be imported
from the selected directory or not. The option is enabled when this button is checked.
Import Music – Select this option to toggle between allowing Music files to be imported
from the selected directory or not. The option is enabled when this button is checked.
Copyright 2010 SageTV, LLC All rights reserved
For additional support, go to www.sagetv.com/support.html or email us at [email protected]
SageTV V7.0 User’s Guide
Chapter 5: Configuring SageTV
Page 153
Import Pictures – Select this option to toggle between allowing Picture files to be
imported from the selected directory or not. The option is enabled when this button is
checked.
Done – Add the path – Accept the import directory and the selected media types that
may be imported from that location. The directory will be added to the list of Media
Center Import Directories.
Cancel – Do not add this path – Cancel the process of adding the new directory. The
selected directory will not be added to the list of Media Center Import Directories.
Continue
Select this button to tell the wizard to continue: If you are completing the entire Configuration
Wizard, you will proceed to step 1 of Configuration Wizard: Configure TV Recording.
Otherwise, you will return to the home menu of the Configuration Wizard.
Copyright 2010 SageTV, LLC All rights reserved
For additional support, go to www.sagetv.com/support.html or email us at [email protected]
SageTV V7.0 User’s Guide
Chapter 5: Configuring SageTV
Page 154
Configuration Wizard: Configure TV Recording
This portion of the Configuration Wizard handles configuring TV recording and proceeds
through the following steps:
Step R1: Set Analog Video Format
Select your video format: choose either NTSC or PAL.
Step R2: Video Recording Directories
This menu is where you will configure SageTV’s Video Recording Directories, where SageTV
stores the recordings that it creates. SageTV supports the use of multiple folders on multiple
drives as well as using mapped drives or UNC paths across a network, and will automatically
handle determining which Video Recording Directory to use when making a recording; see:
Where to Store the Next Recording.
Existing Video Recording Directories
The middle portion of the screen contains a scrollable list of the existing Video Recording
Directories and their current diskspace usage rules. From this list, select:
Left side: Name of a Video Directory – Select a directory name from the list to see
options to:
o Change the directory path – To change the path, browse to the directory to be
used and choose Select Current. It is recommended that you not specify more
than one directory for each drive or partition being used to store SageTV
recordings. For accessing network drives while using the SageTV service, see:
Accessing Network Drives with the SageTV Service.
o Remove this directory – If you choose to remove the directory, SageTV will ask
for confirmation before removing the directory from SageTV’s list of Video
Recording Directories. New recordings will no longer be stored in that directory.
Note: The existing recordings that are already in that directory will remain and
those recordings will still be listed in the SageTV Recordings menu. SageTV will
not delete the directory or any files on your hard drive.
o Cancel – Close the pop-up menu without changing anything.
Right side: Diskspace Usage Rule – Select the current diskspace usage rule for a
directory in order to modify its settings. From the resulting pop-up menu, you may:
Copyright 2010 SageTV, LLC All rights reserved
For additional support, go to www.sagetv.com/support.html or email us at [email protected]
SageTV V7.0 User’s Guide
Chapter 5: Configuring SageTV
Page 155
o Set the Diskspace Rule – The current setting is displayed in a button next to this
option. Choose the current setting’s button to change how the Diskspace Size
setting (below) will be used:
Use Only – SageTV will use only the amount of space specified for this
directory.
Leave Free – SageTV will leave the specified amount of disk space free.
Use All – All available disk space will be used; the Diskspace Size setting
is ignored for this directory.
Note: When using the Use Only or the Leave Free settings, be sure the
specified amount of disk space actually exists. For example: don’t tell SageTV
to use 20GB of space or to leave 20GB free, if the drive only has 15GB
available for SageTV to use when you create the new video directory.
o Set the Diskspace Size – Use the Plus and Minus signs to set the diskspace
usage for this video directory. See the Diskspace Rule (above) to determine how
this value will be used.
o Accept this Rule – Save the changes and close the pop-up menu.
o Cancel – Close the pop-up menu without changing anything.
Add New Directory
Select this button to add a new Video Recording Directory. Browse to the directory to be added
and choose Select Current. It is recommended that you not specify more than one video
directory for each drive or partition being used to store SageTV recordings, otherwise SageTV
could report that more space is available than there actually is when you view the System
Information display. For accessing network drives while using the SageTV service, see:
Accessing Network Drives with the SageTV Service.
After selecting a new directory, you will be asked to define the Diskspace Usage Rule for the
new directory. See directly above for a description of the options.
Continue
Select this button to continue with the next step of the Configuration Wizard, or to return to
Detailed Setup if that is how you arrived at this location.
Step R3: Source Setup Wizard Introduction
Before configuring your capture devices, you will be shown a screen with basic instructions
regarding how to proceed in the next step.
Copyright 2010 SageTV, LLC All rights reserved
For additional support, go to www.sagetv.com/support.html or email us at [email protected]
SageTV V7.0 User’s Guide
Chapter 5: Configuring SageTV
Page 156
Step R4: Source Wizard Summary
This step is really a multiple-part step consisting of the entire Source Wizard Summary, where
you will be able to edit any of your existing sources or add any new sources. (See the Source
Wizard Summary for full details.)
When you have completed configuring all of your capture devices (sources), choose Finish
Source Setup. If you are completing the entire Configuration Wizard, you will proceed to step 1
of Configuration Wizard: Configure Video Playback. Otherwise, you will return to the home
menu of the Configuration Wizard.
Copyright 2010 SageTV, LLC All rights reserved
For additional support, go to www.sagetv.com/support.html or email us at [email protected]
SageTV V7.0 User’s Guide
Chapter 5: Configuring SageTV
Page 157
Configuration Wizard: Configure Video Playback
This portion of the Configuration Wizard handles configuring video playback settings. There is
only a single step for this portion of the Configuration Wizard. The options for this screen are:
Video Playback Setting
If the current setting is not Custom, use the < and > buttons to change the current playback
configuration setting between these choices: Basic, Medium, Standard, and Advanced. As the
option is changed, a synopsis of the current setting will be shown in the information display area
at the top of the screen. If the video playback configuration has been changed in Detailed Setup
to a setting that does not match one of the four listed above, the setting will be listed here as
Custom.
Test Video Playback: <status>
After choosing a video playback setting, select this option to test it. During the resulting full
screen playback test, you will be asked whether playback is working properly on your system.
Reset Video Playback Settings
If a custom playback setting has been set in Detailed Setup, this option will be available and may
be used to reset the playback settings to Medium.
Continue with the current Video Playback settings
When you are done configuring video playback, select this option to continue. If a test of the
current video playback settings has either failed or not been run, you will be asked to confirm
that you wish to continue anyway.
If you are completing the entire Configuration Wizard, you will now proceed to the Main Menu.
Otherwise, you will return to the home menu of the Configuration Wizard.
Copyright 2010 SageTV, LLC All rights reserved
For additional support, go to www.sagetv.com/support.html or email us at [email protected]
SageTV V7.0 User’s Guide
Chapter 5: Configuring SageTV
Page 158
Source Wizard Summary
The Source Wizard Summary displays a list of the current recording sources and allows the
addition of new sources. SageTV supports multiple recording sources, so all configured sources
will be listed here.
Select the Add New Source button if you have another source to be configured. You will then
proceed through the Source Setup to set up the new source.
When you have finished setup, select the Finish Source Setup button to return to the Main
Menu, or to continue the Configuration Wizard if that is currently active.
If you wish to see the details of one of the existing sources, select the desired source to go to
Source Details, where you can view and change its configuration details.
Copyright 2010 SageTV, LLC All rights reserved
For additional support, go to www.sagetv.com/support.html or email us at [email protected]
SageTV V7.0 User’s Guide
Chapter 5: Configuring SageTV
Page 159
Source Setup
The Source Setup Wizard is used to configure a new recording source for SageTV. Using the
SageTV interface while going through the setup steps is the same as for the general SageTV
menus. See Using the SageTV Menu Interface for more information.
SageTV is capable of using more than one recording source. Simply follow the step by step
instructions provided below to configure one source at a time, until all sources have been
configured.
Multiple sources can be configured to use the same or different Programming Guide Data
providers, starting in step 7, below -- not all capture devices have to use the same channel lineup.
For example: you could have your local cable connected to one capture device and have a
satellite service such as DirecTV connected to another device. Then, in the Program Guide, you
may see multiple entries with the same channel number, representing the fact that those multiple
sources use the same channel number for different networks. Alternatively, if the same network
is available on both sources, but on different channel numbers, that network may be listed only
once using only one of those channel numbers. For example: CNN may be on both sources: as
channel 6 on one and channel 25 on the other. The Program Guide will display CNN as channel
6 or 25, but not both; however, CNN will actually still be available from both sources on the
proper channels. SageTV will internally track which channel belongs to each source. If all
sources use the same channel lineup, all channels are listed only once.
Note: Be sure to have the SageTV computer connected to the internet before using the
Source Setup Wizard. SageTV uses that connection to download information for the
available TV services and to download the programming guide data, in order to have TV
listings. If you are using a firewall, SageTV needs to be able to get through the firewall to
download the EPG data via port 7760. That port may need to be opened in the firewall to
allow SageTV through. See Firewall Settings for more port information.
Step 1: Select Device
Choose which capture device to configure for the new recording source. Continue to step 2A.
Step 2A: Select Device Input
Choose the input type used by the selected device. (What capture device input is connected?)
The choices presented here can change, depending on the capabilities of the device used as the
source.
Component – Continue to step 3A.
Composite – Continue to step 3A.
Copyright 2010 SageTV, LLC All rights reserved
For additional support, go to www.sagetv.com/support.html or email us at [email protected]
SageTV V7.0 User’s Guide
Chapter 5: Configuring SageTV
Page 160
S-Video – Continue to step 3A.
Digital TV Tuner – Continue to step 3B.
TV Tuner – Continue to step 3B.
Select an input to see a preview of the video from that input. Select it again to continue to the
next step. Note: The video preview is not shown for digital tuners.
Notes:
A) If the capture device is a software encoder, you will proceed to step 2B before continuing
to step 3.
B) The FM Radio input is not supported at this time.
C) When configuring a DVB tuner, you will choose your region or provider before
continuing to step 3.
Step 2B: Select Audio Input
If the capture device is a software based encoder, then the audio input will need to be selected.
After selecting one of the choices, it will be highlighted and a video preview will be displayed.
Once the correct audio input has been selected, select it again to proceed to the section of step 3
decided by your choice in step 2A.
Step 3A: Select the Component, Composite, or S-Video Tuning Option
Choose the tuning option for composite or s-video input types:
Use External Receiver – Continue to step 5.
Don’t Configure Tuning – Continue to step 7.
Step 3B: Select the TV Tuner Tuning Option
Choose the tuning option for a TV Tuner input type (options may vary depending on TV tuner
type):
Use Tuner for Cable TV – Continue to step 7.
Use Tuner with Antenna – Continue to step 7.
Use External Receiver – Continue to step 4.
Don’t Configure Tuning – Continue to step 4.
Copyright 2010 SageTV, LLC All rights reserved
For additional support, go to www.sagetv.com/support.html or email us at [email protected]
SageTV V7.0 User’s Guide
Chapter 5: Configuring SageTV
Page 161
Step 4: Choose the RF Channel
When using a TV Tuner on the capture device to connect to an external receiver, the capture
device must know what channel to tune to in order to receive the external receiver’s output.
Enter the channel number here, then press Return.
If you are using an external receiver, continue to step 5.
If you previously chose not to configure tuning, continue to step 7.
Step 5: Select the Tuning Plugin
When using an external receiver, SageTV needs a way to change the channels on that device.
This is accomplished via either a serial connection directly to that device or by using an infrared
emitter to send IR signals to it, just like its remote control would do.
Choose the tuning plugin:
DirecTV Serial Control – Choose the COM port the receiver is connected to, then
continue to step 7.
USB-UIRT – Continue to step 6.
ACTiSYS IR200L – Choose the COM port it is connected to, then continue to step 6.
Other – Other tuning plugins may be listed, depending on what is installed, such as the
Hauppauge IR Blaster that comes with some new tuner cards. Select the appropriate
plugin for your device and continue with the on-screen instructions.
Step 6: Select the Cable Box or Satellite Receiver
If your receiver is listed here, select it and continue to step 7.
If the receiver is not listed here, you will need to teach SageTV the infrared codes so that it can
control the device. Choose Add New Device and then continue to step 6A.
Step 6A: Name the New Receiver Device
Name the new device that your IR tuning plugin will control. Simply type the name you wish to
use and press Return. Continue to step 6B. Note: Do not use any spaces in the name that is
entered here.
Copyright 2010 SageTV, LLC All rights reserved
For additional support, go to www.sagetv.com/support.html or email us at [email protected]
SageTV V7.0 User’s Guide
Chapter 5: Configuring SageTV
Page 162
Step 6B: Teach SageTV the IR Codes from the Receiver’s Remote Control
In order for SageTV to be able to control a new receiver device, it needs to be taught the codes
from the receiver’s IR remote control. Follow the instructions shown on the screen to teach
SageTV the numbers 0 – 9 from the receiver’s remote. When done, continue to step 7.
SageTV displays a notification once a code has been successfully learned. If the IR code is not
learned properly, SageTV will ask to try to relearn the code.
Note: For best results, make sure the remote is using fresh batteries and hold it just a few inches
away from IR transceiver. Push and hold the button down until SageTV acknowledges that the
code has been learned.
Note: Due to some problems with the Actisys IR-200L driver, you may notice a crash in SageTV
when setting up a new device. This is outside of our control and we are limited by the third party
nature of this driver. Please be patient and try again after restarting SageTV.
Step 7: Choose Whether to use Programming Guide Data
Choose whether to have SageTV automatically download TV programming guide data for this
source:
Use US, Canada, or XMLTV Guide Data – Continue to step 8.
Use tvtv Services Guide Data – Follow the on-screen instructions for entering your tvtv
account details and continue to Step 10.
Do Not Use Programming Guide Data – Continue to Step 10.
Use or Copy an Existing Channel Lineup for this Source – An existing lineup already
in use by another tuner may be selected for use with this tuner, or the lineup may be
copied to a separately configurable lineup for this tuner. This selection will complete the
setup of this source.
Note: For more information regarding using the XMLTV plugin for programming data, see our
website at sagetv.com/configuration.html.
Step 8: Select Provider Type
Choose the provider type for the programming guide data:
Cable or Satellite – If connecting to a cable or satellite input, continue to step 9A.
Local Broadcast – If the TV signal is received “Over-The-Air”, continue to step 9B.
Copyright 2010 SageTV, LLC All rights reserved
For additional support, go to www.sagetv.com/support.html or email us at [email protected]
SageTV V7.0 User’s Guide
Chapter 5: Configuring SageTV
Page 163
Step 9A: Select Cable or Satellite Provider (Part 1: Zip/Postal Code)
Enter your zip or postal code so that SageTV can find providers for your area. If you have
previously entered a zip or postal code, you can either select that one or enter a new one. Note:
For Canadian postal codes, use the Pause command (Ctrl+S) on your remote to switch the
display to enter text via the displayed number pad.
Step 9A: Select Cable or Satellite Provider (Part 2: Select Provider)
From the zip or postal code previously entered, SageTV downloads a list of cable and satellite
providers for your area. Scroll through the list and select your provider. If your provider is not
listed, use the Left arrow to return to the previous step and try using a different zip code that is
nearby.
If the selected provider is already in use by another tuner, you will be asked whether to use the
same channels as other sources using that lineup, or to copy the channels to a new lineup where
separate channels can be enabled & disabled. If the same channels are used, source setup will
continue to the next step, otherwise the channels will be copied to a new lineup for the tuner
being configured and source setup will continue to Step 10.
Step 9A: Select Cable or Satellite Provider (Part 3: Select Service Level)
Select the service level, either Basic Service or Extended Basic Service, that most closely
matches the service you subscribe to from your provider. If you don’t know what service you
subscribe to, select Extended Basic Service for a complete channel lineup.
Continue to Step 10.
Step 9B: Select Local Broadcast Market
If you are receiving your TV signal “Over-The-Air”, select your local broadcast market. Scroll
through the list of areas and select the one that best describes the area from which you receive
your broadcast stations.
If the selected local lineup is already in use by another tuner, you will be asked whether to use
the same channels as other sources using that lineup, or to copy the channels to a new lineup
where separate channels can be enabled & disabled.
Continue to Step 10.
Note: If the local broadcast market is not listed for a Canadian location, return to step 8, choose
Cable or Satellite as the provider type, enter your postal code in step 9A, then see if your local
area is listed.
Copyright 2010 SageTV, LLC All rights reserved
For additional support, go to www.sagetv.com/support.html or email us at [email protected]
SageTV V7.0 User’s Guide
Chapter 5: Configuring SageTV
Page 164
Step 10: Choose the Channels to Receive
At this point, you will enter the Channel Setup menu, where you can manage the channel lineup
used by the source being configured. You can choose which channels are enabled, scan for
available channels, remap channels, and so on. For complete details, see Channel Setup.
When entering the Channel Setup menu while configuring a new digital TV tuner, you will be
asked to start the recommended channel scan. All digital TV tuners need to perform a channel
scan in order to make sure they can properly tune the enabled channels on their lineup.
When you are done, select Done with Channel Setup.
You have now completed the Source Setup for this source and will be returned to the Source
Wizard Summary, where you can either add another source or complete the setup process and
continue using SageTV.
Copyright 2010 SageTV, LLC All rights reserved
For additional support, go to www.sagetv.com/support.html or email us at [email protected]
SageTV V7.0 User’s Guide
Chapter 5: Configuring SageTV
Page 165
Source Details
From the Source Details menu, it is possible to view the status of a source, calibrate it, and
change its configuration. The available options on the left are:
Channel Setup – Go to Channel Setup to view and change the list of enabled channels for the
lineup associated with this source. Changing the channels in the lineup will affect all sources that
use the same lineup.
Color Calibration – This option is available only for local sources; it is not available for
Network Encoders, nor is it available for Digital TV Tuners and certain other sources. SageTV
will begin playback of the last tuned channel with the color calibration options displayed over
the image. The brightness, contrast, saturation, hue, and sharpness or audio level settings can all
be configured, with any changes appearing on screen within a few seconds after a setting is
changed. Due to this slight delay between making a change and seeing its results, please wait a
short time between adjustments. The on-screen choices are:
Minus/Plus signs – Decreases/Increases the value for the adjacent setting.
Revert – Restore a setting to its value when the current calibration session was initiated.
Default – Restore a setting to its default value, regardless of what it was when the current
calibration session was initiated.
Done – Finish calibration and return to the Source Details menu.
tvtv Status – This option will only be available when using tvtv guide data for the current
source. Select it to see the tvtv account status information display.
DVB Region or Provider – This option will only be available when using a DVB tuner for the
current source. Select it to choose from a list of available regions or providers.
Remove Source – If you no longer wish to use a recording source, use this option to delete it.
SageTV will ask for confirmation before deleting the source.
Back to Summary – Return to the Source Wizard Summary.
Source Options
In addition to the above menu items, the following configuration options may be available on the
right hand side of the screen, depending on the configuration of the source. (Use the Right arrow
to navigate to these items from the menu list and Select one, or just left-click any of them.)
Input Type – A pop-up menu will appear with a list of available choices for this source’s input
type. The list of available inputs can change, depending on the capabilities of the device used as
the source. If a source has been configured to be able to connect to an external receiver via a
specific channel on the tuner, that option is added to the list. To exit this pop-up menu without
Copyright 2010 SageTV, LLC All rights reserved
For additional support, go to www.sagetv.com/support.html or email us at [email protected]
SageTV V7.0 User’s Guide
Chapter 5: Configuring SageTV
Page 166
making any changes, use the Options command (default: Ctrl+O; Escape; or right-click with the
mouse).
RF Channel – If the Input Type is set to use the tuner on a specific channel to receive its input
from an external receiver, you will be able to change that channel here. Type in the channel
number that the external receiver is set to use for its output and press Return.
Cable/Antenna – Toggles whether the source is configured to use a cable input or an antenna
input.
EPG Lineup – Jumps to the Setup Wizard: Step 7, where you can change the lineup that this
source is configured to use. Note: When the new lineup configuration is done, you will be
returned to the Source Wizard Summary.
Tuner Control – This option is available when the source has been configured to use an IR
tuning plugin to control an external receiver in Setup Wizard: Step 5. A pop-up menu will appear
with these options:
Change Tuning Device – Displays a pop-up menu with a scrollable list of tuning devices
that may be used with the tuning plugin selected in step 5 of Source Setup. Either select
the name of a device to use or choose Cancel to close the pop-up menu without making a
change.
Test Infrared Code – Displays a pop-up menu with a scrollable list of all the infrared
codes that may be used. select any code to test it to see if it is correctly received by the
external receiver. When done, choose the Close list entry, or use the Options command.
Reprogram Infrared Code –
Displays a pop-up menu that is Note: For best results, make sure the remote is using
similar to the one for testing fresh batteries and hold it just a few inches away
the codes. Select any code you from IR transceiver. Push and hold the button down
wish to reprogram. You will until SageTV acknowledges that the code has been
see an on-screen prompt for learned.
reprogramming that code. When done with all codes needing to be reprogrammed,
choose the Close list entry, or use the Options command.
Learn New Command – Additional infrared commands can be learned by using this
option. In the pop-up dialog, type the name of the new IR command and press Return.
You will then proceed through the process of teaching the code to SageTV, as shown
above.
Remote Control Options – Another pop-up menu will appear with options for
configuring how SageTV will use the IR transmitter to control the external receiver. See
the Remote Control Options dialog for details, below.
Copyright 2010 SageTV, LLC All rights reserved
For additional support, go to www.sagetv.com/support.html or email us at [email protected]
SageTV V7.0 User’s Guide
Chapter 5: Configuring SageTV
Page 167
Close – Closes the pop-up menu. The Options command may also be used to close this
menu.
Audio Input – If the tuner captures audio separately from the video (most software encoder
devices), this option will be available. Select it to change the audio input source, then select the
audio input from the pop-up menu that lists the available inputs.
Remote Control Options
By choosing the Remote Control Options menu item from the Tuner Control pop-up menu,
you may configure additional options for how SageTV uses the IR transmitting device to control
an external receiver.
Digits per Channel – Specifies the number of digits that SageTV will transmit to change
to a new channel. Type in the number and press Return in the pop-up dialog. Example: If
you enter 3 for the number of digits, then when changing to channel 7, SageTV will send
“007”. Use 0 to transmit the actual number of digits in the channel number. Example:
When changing to channel 7, SageTV will send “7”.
Channel Change Prefix Code – Tells SageTV to always transmit the specified code
before transmitting the digits for a channel change. A pop-up menu with all the IR codes
will be displayed. Choose one to use as the prefix code, or choose None to close the popup without selecting a code. The Options command will also close the pop-up without
making a selection.
Channel Change Confirm Code – Tells SageTV to always transmit the specified code
after transmitting the digits for a channel change. A pop-up menu with all the IR codes
will be displayed. Choose one to use as the confirm code, or choose None to close the
pop-up without selecting a code. The Options command will also close the pop-up
without making a selection.
Delay Between Codes – Tells SageTV how much time to delay between IR code
transmissions. Type the number of milliseconds to delay between transmissions and press
Return. (There are 1000 milliseconds in 1 second.) Use the Options command to close the
dialog without changing the current setting.
Delay Between Channel Changes – Tells SageTV how much time to delay between
each channel change. Type the number of milliseconds to delay between channel changes
and press Return. (There are 1000 milliseconds in 1 second.) Use the Options command
to close the dialog without changing the current setting.
IR Blaster Repeat Factor – Tells SageTV how many times to repeat the IR code being
sent.
Close – Closes the pop-up menu. The Options command may also be used to close this
menu.
Copyright 2010 SageTV, LLC All rights reserved
For additional support, go to www.sagetv.com/support.html or email us at [email protected]
SageTV V7.0 User’s Guide
Chapter 5: Configuring SageTV
Page 168
Channel Setup
Channel Setup and the related Remap Channel, Add Channel to Lineup, Channel Scan Results,
and Channel Manager menus provide the tools used to manage a channel lineup.
Notes:
The list of enabled or disabled channels is linked to a channel lineup, not a capture device
source, so if multiple sources use the same lineup, changing which channels are enabled
in the lineup will affect all sources using that lineup. If you wish to enable/disable a
different set of channels, then choose to copy an existing lineup in Setup Wizard: Step 7,
where you begin choosing the EPG lineup for a source.
If the channel lineup is associated with a digital tuner, then a signal strength meter will be
shown below the description area while a channel is being previewed. The signal strength
display will be updated every few seconds.
When entering the Channel Setup menu while configuring a new digital TV tuner, you
will be asked to start the recommended channel scan. All digital TV tuners need to
perform a channel scan in order to make sure they can properly tune the enabled channels
on their lineup.
To edit which channels are enabled on multiple lineups at one time, use the Channel
Manager menu, accessed from the Program Guide menu.
Tip: Any changes made to the channel lineup will force SageTV to go online to refresh the
programming data. Thus, if you wish to have SageTV update the channel listings in the Program
Guide, simply toggle any channel twice so that its enabled/disabled status is set back to its
original value and then select Done with Channel Setup.
The first few items shown on this menu are options for managing the lineup. Those options are
followed by a list of all the channels that are part of the lineup.
The options at the start of the list include:
Done with Channel Setup
When Channel Setup is complete, highlight this entry in the list and Select it. You will be
returned to Source Details, unless you are in the middle of the Source Setup, in which case you
will be returned to the Source Wizard Summary, instead.
Copyright 2010 SageTV, LLC All rights reserved
For additional support, go to www.sagetv.com/support.html or email us at [email protected]
SageTV V7.0 User’s Guide
Chapter 5: Configuring SageTV
Page 169
Edit Channel Lineup
Highlight this option to access the sub-options that will shown on the right side of the menu:
Clear all Remapped Channels – Use this option to clear all remapped channels on this
lineup. Note: Clearing remapped channels will also remove any manually added channels
and certain channels added during a digital tuner channel scan.
Enable All Channels – Enable every channel in the lineup, after confirming the action.
Disable All Channels – Disable every channel in the lineup, after confirming the action.
Add Channel to Lineup – Use this option to add a channel to the lineup, if it isn’t
already part of the lineup. If the desired channel exists on another lineup, then consider
remapping the desired station to a channel on this lineup, described further below.
Selecting this option will jump to the Add Channel to Lineup menu. Note: To remove an
added channel, select its Remap this Channel button and use the Delete command while
highlighting its Logical Channel button in order to reset its logical channel number. The
channel will be removed from the lineup and will be removed from the database during
the next EPG update, if the channel is not referenced by other database objects such as
recordings or past airings.
Channel Sorting Method
Highlight this option to see the channel sorting options listed to the right. You may choose to sort
the channel list by Channel Number, Channel Name, or Channel Description. The enabled
channels can be placed at the front of the list by checking the List Enabled Channel First
option. Tip: The sorting method can be changed from anywhere in the channel list via the
Options command.
Scan for Available Channels
The option to scan for available channels is available for digital and analog TV tuners which are
not tuned using an external converter box. When this option is highlighted, the right side of the
screen will display when the last scan was performed and offer options to Scan for available
channels now and, if a scan has already been performed for the tuner, an option to View
modified channels from the last scan results.
Selecting Scan for available channels now opens a dialog with these options:
Start a Full Channel Scan – Perform a full channel scan, which remaps channels to
match the scan data, enables all found channels, and disables all non-tunable channels.
This type of scan can be performed at any time, but should be used when the tuner is first
being configured and at any time when you believe that many channels have changed.
Copyright 2010 SageTV, LLC All rights reserved
For additional support, go to www.sagetv.com/support.html or email us at [email protected]
SageTV V7.0 User’s Guide
Chapter 5: Configuring SageTV
Page 170
Start an Update Channel Scan – Perform an update channel scan, which tries to
preserve existing channel mappings and tries not to enable or disable existing channels.
This type of scan should be performed only after a full channel scan has been performed
and you believe that most channels have not changed.
Skip Encrypted Channels – Available only for DVB tuners. Before choosing the scan
type to perform, check this option if the channel scan should ignore channels marked as
encrypted.
During a channel scan, SageTV will scan through all channels to automatically determine which
channels can be received. If the tuner is not a digital TV tuner, you will see a preview window of
each channel as it is scanned. While the scan is being performed, a pop-up dialog will show the
scan progress. Select the Stop button to cancel the scan. Note: After scanning using a digital
tuner, it may be necessary to remap stations to match a found channel with its EPG data; see
below and the Remap Channel menu..
After the channel scan completes, if any channel modifications were found by the scan, they
results will be shown on the Channel Scan Results menu.
Channel List
Below the general options is a list of the available channels where you can enable or disable any
channel, depending on whether you can actually receive, or want to receive, that channel. If a
channel has a green dot next to it, it is enabled, listed in the Program Guide, and may be used by
SageTV to record TV shows. Channels without green dots are not enabled and are not used by
SageTV. To toggle an individual channel’s enabled/disabled state, highlight the desired channel
and Select it by pressing Return or left-clicking it with the mouse or use the Don’t Like
command.
When a channel item is highlighted, the right side of the menu will display the channel’s details
and options to:
Remap this Channel – If you want to remap a channel’s station, logical channel number,
or physical channel number, select this option to jump to the Remap Channel menu.
Notes:
o The logical channel number only affects the number SageTV displays in places
such as the Program Guide. The logical number can be set to any number without
affecting SageTV’s ability to tune the channel.
o The physical channel number is the number that SageTV uses when tuning a
channel. The physical channel number must be the correct number, or else
SageTV may not be able to tune the channel properly, so it cannot be set to any
desired value.
o Digital TV tuners often need to have each channel’s station and/or physical
channel number remapped in order to tune a channel properly. The channel scan
Copyright 2010 SageTV, LLC All rights reserved
For additional support, go to www.sagetv.com/support.html or email us at [email protected]
SageTV V7.0 User’s Guide
Chapter 5: Configuring SageTV
Page 171
should automatically determine the physical channel number, but the station may
need manual correction.
o The station ID shown in the channel details area can be used to tell whether
SageTV may be able to automatically receive EPG listings from Zap2it for that
channel. If the ID is greater than or equal to 10,000, the ID is in the Zap2it range.
If the ID is below 10,000, the station may need to be remapped in order to receive
EPG listings for the channel.
Preview this Channel – Select this option, or use the Play command, to start a preview
of the currently highlighted channel. Use the Stop command to stop playback of the
preview. The preview should remain active while using the Channel Setup related menus,
but will automatically stop when jumping to a different menu.
Channel Setup Options
Use the Options command to open this menu’s options dialog, with these options affecting this
menu:
Channel Sorting Method – Choose to sort the channel list by Channel Number,
Channel Name, or Channel Description. The enabled channels can be placed at the
front of the list by checking the List Enabled Channel First option. This sorting option
affects how channels are listed on this menu and the channel order used on the Remap
Channel menu.
Automatically Enable Channels Newly Added to EPG Lineups – Choose whether
channels that have been added to an EPG lineup are automatically enabled or not. The
option is initially enabled, but you may wish to disable it if new channels are often not
viewable on your system. This option is also available in Detailed Setup: Customize
Settings.
Remapping Stations for EPG data using ATSC or QAM Digital Tuners
SageTV is often not able to automatically determine the Zap2it station call letters when
configuring an ATSC or QAM digital tuner source. When this happens, the Program Guide may
either contain No Data for some channels or it may list EPG data only for the next couple days
from the broadcast stream. While configuring these channels, you should highlight the channel in
Channel Setup, choose Remap this Channel, then remap the station, choosing the station name
that matches the listings for your lineup on the Zap2it website. See the Remap Channel menu for
details. Example: a scan might find WCBS-DT, but the actual Zap2it name for the channel is
WCBSDT, so WCBSDT may need to be selected from the list of stations when remapping the
station. Zap2it stations have IDs greater than or equal to 10,000.
When configuring the SiliconDust HDHomeRun (HDHR) on a Windows PC for QAM tuning,
channel setup includes first using SiliconDust’s channel editor to scan and remap channels.
Copyright 2010 SageTV, LLC All rights reserved
For additional support, go to www.sagetv.com/support.html or email us at [email protected]
SageTV V7.0 User’s Guide
Chapter 5: Configuring SageTV
Page 172
SageTV can then use that data to automatically remap the QAM channels for an HDHR tuner.
For ATSC tuning, the HDHR scans for channels in SageTV just like any other digital ATSC
tuner. This setup process is kept up to date in the hardware section of the SageTV forums:
http://forums.sagetv.com/forums/forumdisplay.php?f=9
The topic titled “Tuner Configuration Tips & Instructions” links to the HDHR instructions and to
tips about configuring other tuners:
http://forums.sagetv.com/forums/showthread.php?t=35004
Copyright 2010 SageTV, LLC All rights reserved
For additional support, go to www.sagetv.com/support.html or email us at [email protected]
SageTV V7.0 User’s Guide
Chapter 5: Configuring SageTV
Page 173
Remap Channel
The Remap Channel menu is used to remap the station, logical channel number, or physical
channel number for a channel.
The left side of the menu contains the main options for remapping the station or channel
numbers:
Remap Station – When this option is highlighted, the list of all stations in the database
are listed to the right. Select the station that should be associated with the channel being
remapped. Tips: The station list sorting method is configurable by using the Options
command; see below for more details about the station sorting options. When any station
is highlighted, enter letters or numbers to jump to the station name, number, or show that
starts with that letter or number. The currently highlighted station’s ID and EPG
information are listed above the station list. IDs greater than or equal to 10,000 are in the
range provided by Zap2it; those station may have downloadable EPG data available.
Remap Channel # – When this option is highlighted, the following options are available
to the right:
o Enabled – Select this option to enable or disable the channel on this lineup. The
channel is enabled if this option is checked.
o Logical Chan # – Select this option to enter a new logical channel number, which
is the number SageTV displays in places such as the Program Guide.
o Physical Chan # – Select this option to enter a new physical channel number, if it
is different from the logical number. The physical channel number is the number
that SageTV uses when tuning a channel. If this value is incorrect, SageTV will
not be able to tune the channel. For more information about remapping digital
channels, see Remapping Channels for Digital Tuners.
Use the Delete command to reset the logical or physical channel numbers while
those options are highlighted. If the channel was previously added to the lineup,
then resetting its logical number will cause the channel to be removed from the
lineup and it will be removed from the database during the next EPG update, if
the channel is not referenced by other database objects such as recordings or past
airings.
Along the bottom of the screen are the following options:
Exit – Exit the menu and return to the previous menu.
< Chan – When available, use this button to go to the previous channel in the lineup’s
list of channels. The Smooth Rew or Skip Bkwd #2 commands may be used as shortcuts.
Copyright 2010 SageTV, LLC All rights reserved
For additional support, go to www.sagetv.com/support.html or email us at [email protected]
SageTV V7.0 User’s Guide
Chapter 5: Configuring SageTV
Page 174
> Chan – When available, use this button to go to the next channel in the lineup’s list of
channels. The Smooth FF or Skip Fwd #2 commands may be used as shortcuts.
Preview – Use this button, or the Play command, to start a preview of the current
channel. Use the Stop command to stop playback of the preview. The preview should
remain active while using the Channel Setup related menus, but will automatically stop
when jumping to a different menu.
– Use this button, or the Options command, to open this menu’s options dialog. See
Channel Remapping Options, below.
Channel Remapping Options
button or the Options command to open this menu’s options dialog, with these
Use the
options affecting this menu:
Channel Sorting Method – Choose to sort the current lineup’s channel list by Channel
Number, Channel Name, or Channel Description. The enabled channels can be placed
at the front of the list by checking the List Enabled Channel First option. This sorting
option will affect movement to the next and previous channels and also affects the sort
order on the Channel Setup menu.
Station List Sorting Method – Choose whether the station list on the right side of the
screen is sorted by the Currently Airing Show Title, Channel Number, or Station
Name. Tip: While a preview is active, if you recognize the show being played, sort the
station list by the currently airing show title. If EPG data is available for the highlighted
station, the currently airing show will be displayed above the station list.
Include stations with no EPG data access – This option is only available when using
SageTV’s built-in EPG data provided by Zap2it. When this option is checked, then all
stations are included in the station list. When it is not checked, then stations that do not
have Zap2it IDs are filtered out of the list. (Zap2it IDs are those greater than or equal to
10,000.)
Remapping Channels for Digital Tuners
When configuring a digital tuner source, Channel Setup will first perform a channel scan. The
scan results will be saved as a table in a .FRQ file in the SageTV installation directory, such as
“FusionHDTV, Transport Stream Capture-0.frq”. The information found in this table is what
SageTV uses for digital channel tuning and can be used as a reference when remapping digital
channels.
Copyright 2010 SageTV, LLC All rights reserved
For additional support, go to www.sagetv.com/support.html or email us at [email protected]
SageTV V7.0 User’s Guide
Chapter 5: Configuring SageTV
Page 175
When remapping a digital channel, in many cases the physical channel remapping can simply be
set to the channel index number for the desired channel. This number matches the “ch:index”
field, or the first number on a line in the .frq file, and is valid for ATSC, QAM, DVB-C, DVB-S,
and DVB-T.
ATSC and QAM physical channels can alternatively be specified by entering a channel number
in the “major-minor” format. The major number is the call sign number of the station in the USA
and the minor number is the sub channel. The two numbers are entered with a dash between
them, such as “58-2”.
The above two cases are the usual methods of remapping digital channels. More advanced
remapping methods are listed below. If further help is needed for such remappings, contact
SageTV technical support (www.sagetv.com/support.html) or talk to other users on the SageTV
online forums (forums.sagetv.com/forums).
For ATSC or QAM, 3 numbers separated by dashes: “physical channel number-major numberminor number”. Tuning using this method is independent of the channel scan table file listed
above.
For DVB-C or DVB-T, 3 numbers separated by dashes: “ONID-SID-TSID”. ONID is the
original network ID, SID is the service ID, and TSID is the transport stream ID. The ONID, SID,
and TSID values can be found via third party channel scanning utilities or public information
found on the internet for the station. Tuning using this method is independent of the channel scan
table file listed above.
For DVB-C or DVB-T, 4 numbers separated by dashes: “ONID-SID-TSID-index”. ONID is the
original network ID, SID is the service ID, and TSID is the transport stream ID. The ‘index’
value is the index of the channel in the channel scan table. If the index is a valid index entry in
the FRQ file and the table’s ‘control bits’ field is 1 for that index, then the scan table information
is used to tune the channel; otherwise, the “ONID-SID-TSID” values are used for tuning. The
ONID, SID, and TSID values can be found via third party channel scanning utilities or public
information found on the internet for the station.
Copyright 2010 SageTV, LLC All rights reserved
For additional support, go to www.sagetv.com/support.html or email us at [email protected]
SageTV V7.0 User’s Guide
Chapter 5: Configuring SageTV
Page 176
Add Channel to Lineup
This menu is accessed from the Channel Setup menu and is used to manually add a new channel
to a lineup by filling in the following fields:
Station Name – Enter the call sign of the new channel. This is the station name, as is
usually used for TV listings.
Station ID – If you know the station ID, enter it here, or leave this field blank if you do
not know the ID. If you know the Zap2it ID for the station, use that value so that SageTV
can automatically download EPG listings for the channel, if SageTV has access to the
channel’s listings. Note: SageTV may not be able to download listings for channels that
are over-the-air only, but listings should be available for any channel that Zap2it includes
as part of any cable or satellite lineup.
Logical (Guide) Channel Number – Enter the logical channel number, which is the
number SageTV displays in places such as the Program Guide.
Physical (Tuning) Channel Number – If the physical number is different from the
logical number, enter it here. The physical channel number is the number that SageTV
uses when tuning a channel. If this value is incorrect, SageTV will not be able to tune the
channel.
After entering the new channel information, choose from the following options along the bottom
of the screen:
Cancel – Cancel the new channel addition and return to the previous menu.
Add – Done – Add the new channel and return to the previous menu.
Add – Again – Add the new channel, reset the fields, and remain on this menu so that
another channel can be added.
Reset – Reset all the new channel entry fields and start over.
Notes:
If you know the station ID, enter that value first. If the ID matches an existing channel in the
database, its information will be entered into the other fields. You can add channels from other
lineups to the current lineup this way, or even edit existing channels.
If the name of an existing channel is entered, its information will be entered into the other fields.
To remove an added channel from a lineup, highlight its entry on the Channel Setup menu, then
choose to remap it. On the Remap Channel menu, highlight its logical channel number and reset
it by using the Delete command to reset the logical channel number mapping. The channel will
be removed from the lineup and will be removed from the database during the next EPG update,
if the channel is not referenced by other database objects such as recordings or past airings.
Copyright 2010 SageTV, LLC All rights reserved
For additional support, go to www.sagetv.com/support.html or email us at [email protected]
SageTV V7.0 User’s Guide
Chapter 5: Configuring SageTV
Page 177
Channel Scan Results
After performing a channel scan on the Channel Setup menu, the list of channels modified as a
result of the scan can be reviewed on this menu. After reviewing the modified channels, use the
Back command or select Done Reviewing Scan.
When a channel scan result item is highlighted, the channel’s details will be displayed to the
right, along with the following selectable options:
Enabled – Select this option to enable or disable the channel on this lineup. The channel
is enabled if this option is checked.
Remap this Channel – If you want to remap a channel’s station, logical channel number
of physical channel number, select this option to jump to the Remap Channel menu.
Preview this Channel – Select this option, or use the Play command, to start a preview
of the currently highlighted channel. Use the Stop command to stop playback of the
preview. The preview should remain active while using the Channel Setup related menus,
but will automatically stop when jumping to a different menu.
Selecting the scan result item will display a pop-up dialog with the following possible options,
where applicable:
Enable Channel – This is an alternate way to choose whether the channel is enabled.
The channel is enabled if this option is checked.
Clear Remapped Channel – Use this option to clear all of the channel’s remappings.
Note: this could result in the channel being removed from the lineup if it was previously
added to the lineup.
Map Logical (Guide) # from X to Y – Map the logical channel number from one value
to the other.
Map Physical (Tuning) # from X to Y – Map the physical channel number from one
value to the other. Note: Mapping the physical channel number to the wrong value can
result in SageTV not being able to tune the channel. You may want to preview the
channel before and/or after choosing to remap the physical number.
Remap this Channel – Select this option to jump to the Remap Channel menu.
Close – Exit the dialog.
Copyright 2010 SageTV, LLC All rights reserved
For additional support, go to www.sagetv.com/support.html or email us at [email protected]
SageTV V7.0 User’s Guide
Chapter 5: Configuring SageTV
Page 178
Channel Manager
The Channel Manager lists all available channels on all channel lineups to allow choosing which
lineups have each channel enabled, instead of editing each individual lineup in Channel Setup in
order to enable or disable channels. In addition, the logical channel numbers (the numbers shown
in the guide grid) can be remapped. This menu is accessed via the Options command on the
Program Guide menu.
The left side contains some actions that can be performed:
Sort by: <Sort Style> – Toggles whether the list of Channels is sorted by Number
(default) or Name.
Reverse order: Yes/No – Toggled whether the channel list is sorted in reverse order.
Back – Return to the previous menu.
The right side of the screen contains the list of all channels, sorted by the selected Sort option
and order. Each channel item display’s the channel number, name, description (when available),
and how many lineups contain the channel. Enabled channels have a checkmark icon next to
them, are shown in the Program Guide, and may be used by SageTV when scheduling
recordings. Disabled channels do not have a marker, are not shown in the guide, and are not used
for recording.
Select a channel item or use the Don’t Like command on it in order to enable or disable it. If the
channel is available only on a single lineup, then the channel will toggle between enabled and
disabled. If the channel is available on multiple lineups, then a dialog will be shown where you
can choose Enable on All Lineups, Disable on All Lineups, or choose each individual lineup
where you want it to be enabled or disabled.
Select the Remap button to the right of a channel item to remap that channel’s logical number.
The logical channel number only affects the number SageTV displays in places such as the
Program Guide. The logical number can be set to any number without affecting SageTV’s ability
to tune the channel.
Copyright 2010 SageTV, LLC All rights reserved
For additional support, go to www.sagetv.com/support.html or email us at [email protected]
SageTV V7.0 User’s Guide
Chapter 5: Configuring SageTV
Page 179
Parental Controls
The Parental Controls options can be used to prevent others from watching selected types of
shows unless they know the lock code. Initially, SageTV’s Parental Controls menu displays the
controls as disabled. Once the controls are enabled, the options on this menu will change
accordingly.
The choices on this menu are:
ENABLE Parental Controls – Available when parental controls are disabled, this option
enables the controls. If a lock code has not been previously entered, SageTV will ask for a new
lock code and for confirmation of that code. When presented with the pop-up dialog, type in the
desired lock code and press Return. SageTV will not show what you type, but will display
asterisks for each character typed. Enter the code a second time to confirm it. If the second entry
does not match the first, SageTV will not accept the new lock code.
DISABLE Parental Controls – Available when parental controls are enabled, this option
disables the controls. Any restrictions that were previously set will be retained, but no lock code
will need to be entered to watch shows that are restricted.
Change Parental Lock Code – Use this option to change the lock code. Changing the lock code
also causes the parental controls to be enabled. As with ENABLE Parental Controls, above,
you will be asked to enter the new lock code twice to confirm it. If the second entry does not
match the first, SageTV will not accept the new lock code.
Clear Parental Lock Code – Available when a lock code has already been entered and parental
controls are disabled, use this option to clear the current lock code. If you later decide to enable
the parental controls again, you will need to enter a new lock code.
Modify Parental Restrictions – Go to the Parental Control Restrictions menu, where you can
specify which types of shows require the entry of the lock code before they can be watched. The
restrictions can be configured regardless of whether the parental controls are enabled or not, but
will only be used when the controls are enabled.
Back to Main Menu – Return to the Main Menu.
Copyright 2010 SageTV, LLC All rights reserved
For additional support, go to www.sagetv.com/support.html or email us at [email protected]
SageTV V7.0 User’s Guide
Chapter 5: Configuring SageTV
Page 180
Parental Control Restrictions
Parent Menu: Parental Controls.
The Parental Control Restrictions menu is used to configure SageTV to ask for the parental
control lock code when attempting to play media that matches the restrictions and to control
access to some setup menus.
Use the arrow keys to highlight any criteria and use Select to turn that criteria on. Or, simply leftclick on the desired criteria. This screen displays a marked checkbox next to all the restrictions
that have been set.
If Parental Controls have been enabled, attempting to watch a recording that meets any of the
chosen criteria or enter any of the protected setup menus will require the entry of the lock code
before SageTV will play the recording or enter the setup menu. If the correct lock code is
entered, then SageTV will begin playback of the recording or enter the setup menu.
If the wrong lock code is entered, SageTV will display a notification that the lock code was
incorrect and will also display a playback error due to the parental code check having failed.
Copyright 2010 SageTV, LLC All rights reserved
For additional support, go to www.sagetv.com/support.html or email us at [email protected]
SageTV V7.0 User’s Guide
Chapter 5: Configuring SageTV
Page 181
Detailed Setup: General Settings
From the General Settings configuration menu, you can reach the other setup options by
highlighting Multimedia, Video/Audio, DVD, Commands, Server, Advanced, or Customize in
the right-hand column.
Highlight any setup subject in the left-hand column to view its options, or choose Main Menu to
return to the Main Menu.
On the right-hand column, highlight an option’s setting to see its description at the bottom of the
screen. Select the setting to change its option.
The General Settings are:
Video Recording Directories
The Video Recording Directories are where SageTV stores the recordings that it creates. SageTV
supports the use of multiple folders on multiple drives as well as using mapped drives or UNC
paths across a network, and will automatically handle determining which Video Directory to use
when making a recording; see the next option, below. Choose modify to go to the Configuration
Wizard step for editing the Video Recording Directories, where you will see a list of existing
Video Recording Directories and to be able to add or remove directories. When you are done on
that menu, you will be returned to Detailed Setup.
Video Recording Path Optimization Style
Choose the method SageTV will use when determining where to store a new recording. Select
one of these options:
Optimize for Space – Choose a recording path by selecting the recording directory with
the most available free space. This is the default option.
Optimize for Bandwidth – Choose a recording path by trying to spread simultaneous
recordings between multiple recording directories so that all current recordings aren’t
being written to the same hard drive at once. Consider trying this setting if you have
many recording devices and want to try reducing the bandwidth required by a hard drive
when recording many airings at once. Note: When optimizing for bandwidth and there is
not enough free space for a new recording, SageTV may delete recordings that are the
lowest priority in the recording directory it selects to store the new recording, but the
deleted recordings may not be the lowest priority of all existing recordings.
Also see: Where to Store the Next Recording.
Copyright 2010 SageTV, LLC All rights reserved
For additional support, go to www.sagetv.com/support.html or email us at [email protected]
SageTV V7.0 User’s Guide
Chapter 5: Configuring SageTV
Page 182
Media Center Import Directories
The Media Center Import Directories are used to tell SageTV where to find already-existing
media files on your computer, such as videos, music files, and pictures. SageTV supports the use
of multiple folders on multiple drives as well as using mapped drives or UNC paths across a
network. Choose modify to go to the Configuration Wizard step for editing the Media Center
Import Directories, where you will see a list of existing Media Center Import Directories and to
be able to add or remove directories. When you are done on that menu, you will be returned to
Detailed Setup.
Automatic Library Rescan Frequency
Set the delay time, in hours, before SageTV automatically rescans the Media Center Import
Directories for new imported media again. Set this value to 0 in order to only rescan at startup or
when manually initiated.
Intelligent Recording
Enable this option to begin using SageTV’s Intelligent Recording feature. See SageTV Quick
Start Guide: Intelligent Recordings for details of how this works.
Note: When Intelligent Recording is disabled, live TV recordings will be automatically deleted
shortly after the show’s airing has completed and you have stopped watching it. This autodeletion of live TV will not affect shows that have been scheduled to record, whether you watch
them live or not. (See Automatic Cleanup of Live TV.) However, disabling the Intelligent
Recording feature will not delete all the existing Intelligent Recordings.
Autodial if Needed for Internet
Enable this option if SageTV should try to establish a dial-up connection when an Internet
connection is needed to update the programming guide information. If you are using an alwayson type of connection, or if you wish to control all access to the internet, leave this option
disabled.
Sync System Clock with SageTV Server
Enable this feature if you want to synchronize your PC system clock with the SageTV server.
This is highly recommended because the SageTV server is synchronized with the US Military
Atomic clock for accuracy. If you have already configured such an atomic clock synchronization
utility on your computer, enabling this option isn’t needed.
Note: While this will ensure that your PC system clock is set to the correct time, TV stations’
clocks may still be set differently. To make sure your Favorites and Manual Recordings record
an entire show, you may wish to consider using padding on some of your recordings, particularly
those aired on stations that regularly begin shows early or end them late. See Record Options for
Manual Recordings and Start Padding and Stop Padding for Favorites.
Copyright 2010 SageTV, LLC All rights reserved
For additional support, go to www.sagetv.com/support.html or email us at [email protected]
SageTV V7.0 User’s Guide
Chapter 5: Configuring SageTV
Page 183
Animation Options
Choose settings for the various animation options:
Animation system – Choose whether to enable or disable the animation system. This
setting will determine whether additional animation options described below are
displayed.
Menu transitions – Controls whether the menus use an animation effect when moving
from one menu to another.
Dialog transitions – Controls whether animation effects are used when dialogs open or
close.
Focus transitions – Controls whether animation effects are used to move the highlight
image when focus changes from one item to another.
OSD transitions – Controls whether the playback OSD uses animation effects when
being shown or hidden.
Thumbnail transitions – Controls whether thumbnail transitions occur on various menus
when a single item represents a group of media choices.
Cycle through subgroup items – When a group of items is highlighted, such as a group
of recordings on the SageTV Recordings menu, this option controls whether SageTV
cycles through the items one by one in the group info area.
Screen Saver Options
Opens a dialog where various screen saver options can be set. The options are as follows”
Screen Saver on Sleep – When enabled, this option will use SageTV’s built-in Screen
Saver when you put SageTV to Sleep while it is running in Full Screen Mode. If this
option is disabled or if SageTV is running in a window instead of full screen, SageTV
will minimize to an icon in the system tray when it is put to sleep. SageTV will continue
recording your programs while in Sleep Mode, but any live TV that is not a scheduled
recording will stop. See Sleeping SageTV.
Screen Saver Timeout – Enter the Timeout period that SageTV will wait before starting
the screen saver. Type in the number of minutes and press Return. Use the Options
command (Ctrl+O, Escape, right-click) to cancel the pop-up without changing the current
value. If the Timeout setting is not 0, the Screen Saver will launch based on the Timeout
setting specified. This setting is used mostly in case you walk away from the application
and don’t want to be concerned with any screen burn. The screen saver will only start if
SageTV is at a menu or if video playback is paused; it will not start if a video is actively
playing.
Copyright 2010 SageTV, LLC All rights reserved
For additional support, go to www.sagetv.com/support.html or email us at [email protected]
SageTV V7.0 User’s Guide
Chapter 5: Configuring SageTV
Page 184
Screen Saver Style – Choose whether to use a moving SageTV Logo or a Photo
Slideshow as the screen saver when music is not playing. The Photo Slideshow will use
all imported pictures if there are two or more pictures (the same list viewable in the Photo
Browser). Note: if music is playing, the music information will be displayed as the screen
saver.
Random Screen Saver Slideshow Order – Choose whether images are viewed in
random order while playing a slideshow. Note: this setting affects screen saver
slideshows and regular slideshows.
Show Mouse Icons
This setting comes enabled by default to show you all the available mouse control icons spread
throughout the application. If you are not going to use a mouse to control SageTV you can
disable those icons here. Disabling this option will not prevent the use of a mouse with SageTV:
a mouse can still be used to select menu items; there will just be no special-purpose mouse icons.
Automatically Connect to Server (Client only)
Note: This option is only available when using SageTVClient.
When SageTVClient starts, you will be asked to enter the IP address or computer name of the
SageTV server computer system on your network. Instead of entering this information every
time SageTVClient is run, enable this option to automatically connect to the server. When
enabled, this option will change from displaying No to displaying the name or IP address of the
server, which you entered when SageTVClient started. See Configure SageTV Client to Connect
to the Server.
Copyright 2010 SageTV, LLC All rights reserved
For additional support, go to www.sagetv.com/support.html or email us at [email protected]
SageTV V7.0 User’s Guide
Chapter 5: Configuring SageTV
Page 185
Detailed Setup: Multimedia Settings
From the Multimedia Settings configuration menu, you can reach the other setup options by
highlighting General, Video/Audio, DVD, Commands, Server, Advanced, or Customize in the
right-hand column.
Highlight any setup subject in the left-hand column to view its options, or choose Main Menu to
return to the Main Menu.
On the right-hand column, highlight an option’s setting to see its description at the bottom of the
screen. Select the setting to change its option.
The Multimedia Settings are:
Aspect Ratio Mode
This option sets the default Aspect Ratio Mode that will be used during video playback. Select
the setting next to this option and choose a setting from the pop-up menu:
Fill – Stretch the video to fill the SageTV playback area. (Initial setting.)
Source – Use the video source information to determine the playback aspect ratio.
4x3 – Force playback to fit the video into a 4x3 ratio area, stretching or shrinking the
video to do so.
16x9 – Force playback to fit the video into a 16x9 ratio area, stretching or shrinking the
video to do so.
Note: The aspect ratio mode is set during playback for HD extenders. While on the Video
Playback screen, use the Options command to choose or edit the aspect ratio mode.
Aspect Ratio Settings
Select Modify to be presented with a pop-up menu containing the available adjustments for the
selected Aspect Ratio Mode. The Stretch setting is used to determine the amount the video
image is stretched in the horizontal and vertical dimensions in order to fit the screen, while the
Offset settings are used to determine where the video image is placed. Each mode stores its own
values for the settings presented here.
Select any of the Stretch or Offset values to change their settings. Enter the new value in the
pop-up dialog and press Return. Use the Options command (Ctrl+O, Escape, right-click) to close
the dialog without changing the current value.
Copyright 2010 SageTV, LLC All rights reserved
For additional support, go to www.sagetv.com/support.html or email us at [email protected]
SageTV V7.0 User’s Guide
Chapter 5: Configuring SageTV
Page 186
The Stretch values may be greater than 100% initially to allow for overscan and hide the black
borders that might otherwise be visible around the edges of TV recordings.
If you find that the upper left corner of the image is not in the correct location, use the Offset
settings to change where that corner is positioned. Use positive values to move the video
playback image to the right or down; use negative values to move the image to the left or up.
Use Close or the Options command to exit the pop-up menu.
Note: To get instant feedback regarding the Aspect Ratio settings as you make changes, make
sure that a video is playing and that video playback is set to display on menus as the background.
See Video Menu Options, below.
Overscan Settings:
Use the Overscan Settings option to modify the placement of the SageTV User Interface.
Through a series of two full screen menus, you will first adjust the location of the upper left
corner of the user interface, then you will adjust the location of the lower right corner of the user
interface. When you are done, the user interface will completely fill the SageTV display.
Select Adjust to go to the 2-step Configuration Wizard process to Adjust the User Interface
Overscan. When you have completed both steps, you will be returned to Detailed Setup.
Display Aspect Ratio Settings
SageTV uses the Display Aspect Ratio to determine how best to display any graphics or video
content. Select Adjust to jump to the Adjust Display Aspect Ratio screen where this ratio is set.
On that screen, you may choose from a few pre-set choices, or manually adjust the circle until it
appears round. When done, you will be returned to Detailed Setup.
Output Resolution
If SageTV is able to use multiple output resolutions, select this option to choose which resolution
to use.
Native Output Resolution Switching
If SageTV is able to automatically change the output resolution mode to match the resolution of
the video being played, this option will be available. Select the option to enable or disable it.
Recording Quality
Select Set Quality to see a pop-up dialog where you can set the default recording quality for
SageTV overall, or for each individual capture device.
Copyright 2010 SageTV, LLC All rights reserved
For additional support, go to www.sagetv.com/support.html or email us at [email protected]
SageTV V7.0 User’s Guide
Chapter 5: Configuring SageTV
Page 187
Default Quality: The setting near the top of the dialog is SageTV’s overall default setting. This
default recording quality will be used for all new recordings that are created using a capture
device that does not have its own default quality setting.
Individual Capture Devices: If the setting next to a capture device is Not Set, then that device
will use the overall Default Quality (above) when a new recording is made. If a capture device
has its own default setting, then new recordings made using that device will use its own default
setting rather than the overall setting. If the setting next to a capture device is Digital Tuner,
then a default recording cannot be set for the tuner because digital tuners simply save the digital
stream as it is received.
The default recording quality settings mentioned above are used for all new recordings made by
SageTV, but they may be customized for individual Manual Recordings or for Favorites. See
Record Options for Manual Recordings and Recording Quality for Favorites.
Select the current setting to the right of Default Quality or any Capture Device for a pop-up
menu of recording quality choices. Choose one of the recording qualities listed, or use the
Options command to close the pop-up without changing the setting. There is no “correct” choice;
the quality setting you choose is a matter of personal preference and amount of hard drive space
available. The lower quality settings will use less drive space and allow more shows to be
recorded, but at the expense of reduced video quality. On the other hand, higher quality
recordings can use disk space very quickly. It is recommended that you try a few settings to see
which you are comfortable with. You may want to choose a medium quality setting as your
default, then adjust your Favorites or Manual Recordings to higher or lower quality settings,
based on their needs. For example: cartoons usually still look OK at lower quality recording
rates, while sports may need very high quality settings to retain details during the fast motion
scenes.
Notes: To add custom settings to this list, see Appendix H: Custom Recording Quality Settings.
Any change to the default Recording Quality will not take effect until a new recording starts.
Enable TV Out for PVR-350
This option is only available when using a Hauppauge PVR-350 encoder/decoder tuner card.
Enable this if you are using the TV Out functionality of the PVR-350 card to view MPEG video.
Enable UI on TV Out of PVR-350
This option is only available when using a Hauppauge PVR-350 encoder/decoder tuner card.
Enable this if you are using the TV Out of the PVR-350 to view the SageTV User Interface on
your TV. After enabling this setting for the first time, reboot your computer for the settings to
take effect. If, upon starting SageTV, the UI is not appearing on the TV Out, video must be
activated for the TV Out to initialize. The best way to do this is to use the TV command (Ctrl-V)
to initiate live TV playback.
Copyright 2010 SageTV, LLC All rights reserved
For additional support, go to www.sagetv.com/support.html or email us at [email protected]
SageTV V7.0 User’s Guide
Chapter 5: Configuring SageTV
Page 188
Hardware Decoding Only:
This option is only available when using a Hauppauge PVR-350 encoder/decoder tuner card.
Enabling this option disables software video rendering to the Windows Desktop. Now video will
only be shown through the TV Out of the PVR-350.
Video Menu Options
The Video Menu Options determines whether video playback can be displayed while using a
menu and, if so, whether the video will be displayed in a window in the upper right corner or as
the background of the menu. Not all menus can have video played in a window and a few may
have background playback disabled also.
When you select the Modify button next to this option name, a pop-up menu will appear with the
settings you can change. This pop-up menu is the same as the one that is displayed on nearly
every menu when you use the Options command; in fact, using the Options command on this
menu displays the pop-up menu also. Some menus have options menus specific for their possible
settings, but most use the default general purpose Video Menu Options menu, or at least make
those options available. See: The Default Pop-up Menu: Video Menu Options.
Selecting the button next to Display Video on Menus displays a secondary pop-up menu, where
three choices are presented:
Never – Video playback will never be displayed on a menu, regardless of whether one is
currently playing or not.
If Active – Video playback will be displayed on a menu only if there is currently a video
being played. When no video playback is active, no video will be shown on the menu.
Always – Video playback will always be shown on menus. If there is no active video
currently, live TV will be shown.
Selecting the button next to Video Menu Style also displays a secondary pop-up menu, where
two additional choices are presented:
Background – If video playback is shown on menus, it will be shown as the background
for the entire menu. The menu will appear on top of the video.
Window – If video playback is shown on menus, it will be displayed as a small window
in the upper right-hand corner. Not every menu has the space needed for displaying video
in a window; in those cases, the video will not be shown. The Main Menu is one such
menu. Tip: Left click with a mouse on the video playing in the preview window to jump
to the video playback screen. The TV command may be used to perform this action at
any time using the keyboard or remote.
Copyright 2010 SageTV, LLC All rights reserved
For additional support, go to www.sagetv.com/support.html or email us at [email protected]
SageTV V7.0 User’s Guide
Chapter 5: Configuring SageTV
Page 189
Finally, use Close to close the pop-up menu when done making selections
Example images showing video playback while using a menu:
Note: While video is playing on a menu, the commands that control playback continue to
function. Please see Chapter 4: Media Playback for media playback details, or see the List of All
SageTV Commands for complete details on all available commands. An additional point to
remember is that some commands are combo commands, which function differently depending
on whether SageTV is at a menu or on a playback screen. While on a menu, the playback
versions of those commands may not function since the menu versions take precedence.
UI Language
The current language setting will be displayed next to the UI Language option. Select the
current setting to see a list of available language choices for the SageTV user interface and select
your preferred language. If a translation file for that language is available, SageTV will use its
translations when displaying text on the screen.
Default Audio Language
Select this option to set the default audio language used during playback when a media file has
multiple audio languages available.
Default Subtitle Language
Select this option to set the default subtitle language used during playback when a media file has
multiple subtitle languages available, or select None to show no subtitles (default).
SageTV Window is Always On Top
This option is available only on a SageTV or SageTV Client UI while using on Windows.
Selecting this option toggles whether the SageTV window will always be on top of other
windows. Note: for a SageTV Placeshifter window, right click on the Placeshifter window to
select its ‘Always On Top’ option.
Copyright 2010 SageTV, LLC All rights reserved
For additional support, go to www.sagetv.com/support.html or email us at [email protected]
SageTV V7.0 User’s Guide
Chapter 5: Configuring SageTV
Page 190
Detailed Setup: Video/Audio Settings
From the Video/Audio Settings configuration menu, you can reach the other setup options by
highlighting General, Multimedia, DVD, Commands, Server, Advanced, or Customize in the
right-hand column.
Highlight any setup subject in the left-hand column to view its options, or choose Main Menu to
return to the Main Menu.
On the right-hand column, highlight an option’s setting to see its description at the bottom of the
screen. Select the setting to change its option.
Note: When playback is currently in progress, choose Reload Media Player after making any
changes.
The Video/Audio Settings are:
Video Renderer
The Video Renderer is the filter used to render the video to the screen from the source during
playback. Choose the setting displayed next to the option to see a pop-up menu listing the
possible settings: Default, Overlay, VMR9, and EVR. SageTV is initially set to use Overlay. If
there are problems with this setting, try the Default mode instead. The EVR option is only listed
if EVR is available on your system.
If you are running a newer graphics card with 3D acceleration, give VMR9 or EVR a try, which
will also provide partial transparency to the On-Screen Display over video.
Note: Using VMR9 or EVR requires 3D Acceleration to be Enabled in the Detailed Setup:
Advanced Settings configuration menu. If it is not enabled, Overlay will be used instead. If 3D
Acceleration is not enabled when you choose the VMR9 or EVR setting here, you will be asked
whether to enable 3D Acceleration. If you choose not to do so, the renderer will not be changed
to VMR9 or EVR.
MPEG2 Video Decoder Filter
A pop-up menu lists all the available video decoders, which are used to decode the MPEG2formatted video data. The list of decoders depends on the MPEG-2 decoders that are installed on
your PC related to your video card, DVD player and TV tuner/Capture card. Select the video
decoder that you would like SageTV to use for MPEG-2 video playback.
Note: If you are using the Sigma Designs Xcard as your video decoder, select it from the list and
set the Video Renderer to default. Also confirm that the Audio Renderer and MPEG2 Audio
Decoder Filter are set to default as well.
Copyright 2010 SageTV, LLC All rights reserved
For additional support, go to www.sagetv.com/support.html or email us at [email protected]
SageTV V7.0 User’s Guide
Chapter 5: Configuring SageTV
Page 191
SageTV MPEG Video Decoder uses DXVA (hardware acceleration)
This option is available if the MPEG2 video decoder filter is set to use the SageTV MPEG Video
Decoder. Select this option to enable or disable DXVA when that decoder is used. Enabling this
option allows the decoder to use the video card’s hardware assisted decoding during video
playback.
H.264 Video Decoder Filter
When using SageTV on a Windows system, you may choose this option to select the decoder
filter used for playback of H.264 format videos. If no H.264 decoders are listed, but you know
one has been installed on the PC, then choose “List all decoders” so see a list of all decoders.
VC1 Video Decoder Filter
When using SageTV on a Windows system, you may choose this option to select the decoder
filter used for playback of VC1 format videos. If no VC1 decoders are listed, but you know one
has been installed on the PC, then choose “List all decoders” so see a list of all decoders.
Media Player for non-MPEG Files
When using SageTV on a Windows system, you may choose the decoder to use for non-MPEG
video playback, such as for MKV, AVI, MP4, OGG, etc. Choose to always use DirectShow, the
SageTV Player, or a combination of the SageTV Player for online videos and DirectShow for all
other non-MPEG videos.
Dscaler Deinterlacer Filter
If you want to use Dscaler to deinterlace the video, enable this option. You can only select this
option when selecting the Elecard Video Decoder filter (not included with the SageTV
installation, but freely available at www.elecard.com) or the SageTV MPEG Video Decoder.
Then select your Deinterlacing mode and whether or not you want to use Double Refresh Rate or
Odd Field First. You may experience audio & video synchronization problems if you have
Double Refresh Rate enabled on a PC that doesn’t have enough CPU power. More information
can be obtained about Dscaler and Deinterlacing at www.dscaler.com.
Audio Renderer
The Audio Renderer is the filter used to render the audio after it has been decoded. Select a
renderer from the pop-up menu showing the list of the available choices, which depends on what
has been installed on your computer, related to DirectX and your sound card.
MPEG2 Audio Decoder Filter
A pop-up menu lists all the available audio decoders, which are used to decode the MPEG2formatted audio data. The list of decoders depends on the MPEG-2 audio decoders that are
Copyright 2010 SageTV, LLC All rights reserved
For additional support, go to www.sagetv.com/support.html or email us at [email protected]
SageTV V7.0 User’s Guide
Chapter 5: Configuring SageTV
Page 192
installed on your PC related to your video card, DVD player and TV tuner/Capture card. Select
the audio decoder that you would like SageTV to use for MPEG-2 audio playback.
Note: If you are using the Sigma Designs Xcard as your video decoder, set both the Audio
Renderer and Audio Decoder Filter to default. See MPEG2 Video Decoder Filter for Xcard
settings there.
HD Audio Decoder Filter
When using SageTV on a Windows system, you may choose this option to select the decoder
filter used for playback of videos with HD audio. If no HD audio decoders are listed, but you
know one has been installed on the PC, then choose “List all decoders” so see a list of all
decoders.
Audio Playback Delay
If you are having problems with audio playback not being synchronized with video playback,
you can set the Audio Playback Delay in order to get them to be synchronized. In the pop-up
dialog, enter the number of milliseconds to delay the audio playback and press Return. (There
are 1000 milliseconds in 1 second.) Use the Options command (Ctrl+O, Escape, right-click) to
close the dialog without changing the current setting.
HD Audio Output
Choose whether to enable HD audio output. If enabled, then SageTV will output the
DolbyTrueHD or DTS-HD/MA streams when present. If disabled, then SageTV will output the
AC3 or DTS streams instead.
Reload Media Player
This button will appear only if playback is currently in progress. After making any changes,
select this button to reload the media player so that the changes can take effect.
Copyright 2010 SageTV, LLC All rights reserved
For additional support, go to www.sagetv.com/support.html or email us at [email protected]
SageTV V7.0 User’s Guide
Chapter 5: Configuring SageTV
Page 193
Detailed Setup: DVD Settings
From the DVD Settings configuration menu, you can reach the other setup options by
highlighting General, Multimedia, Video/Audio, Commands, Server, Advanced, or Customize in
the right-hand column.
Highlight any setup subject in the left-hand column to view its options, or choose Main Menu to
return to the Main Menu.
On the right-hand column, highlight an option’s setting to see its description at the bottom of the
screen. Select the setting to change its option.
Note: When playback is currently in progress, choose Reload Media Player from Detailed
Setup: Video/Audio Settings after making any changes.
The DVD Settings are:
DVD-ROM Drive
Toggle this option between Yes and No, to tell SageTV whether the computer has a DVD drive
installed and you want SageTV to access it for playback of local DVDs.
DVD Video Renderer
The DVD Video Renderer is the filter used to render the video to the screen from the source
during playback. Choose the setting displayed next to the option to see a pop-up menu listing the
possible settings: Default, Overlay, VMR9, and EVR. SageTV is initially set to use VMR9 for
DVD playback. If there are problems with this setting, try the Overlay mode instead. The EVR
option is only listed if EVR is available on your system.
If you are running a newer graphics card with 3D acceleration, VMR9 or EVR will provide
partial transparency to the On-Screen Display over video.
Note: Using VMR9 or EVR requires 3D Acceleration to be Enabled in the Detailed Setup:
Advanced Settings configuration menu. If it is not enabled, Overlay will be used instead. If 3D
Acceleration is not enabled when you choose the VMR9 or EVR setting here, you will be asked
whether to enable 3D Acceleration. If you choose not to do so, the renderer will not be changed
to VMR9 or EVR.
DVD Video Decoder Filter
A pop-up menu lists all the available DVD video decoders, which are used to decode the DVD
video data. The list of decoders depends on the MPEG-2 decoders that are installed on your PC
related to your video card, DVD player and TV tuner/Capture card. Select the video decoder that
you would like SageTV to use for DVD video playback.
Copyright 2010 SageTV, LLC All rights reserved
For additional support, go to www.sagetv.com/support.html or email us at [email protected]
SageTV V7.0 User’s Guide
Chapter 5: Configuring SageTV
Page 194
Notes: A) The DVD video decoder needs to be able to decrypt the CSS encryption found on
most DVDs. If the video decoder does not have this capability, it will not be able to play
encrypted DVD video data. B) SageTV cannot use the Sigma Designs Xcard for DVD playback.
DVD Audio Renderer
The Audio Renderer is the filter used to render the audio after it has been decoded. Select a
renderer for DVD playback from the pop-up menu showing the list of the available choices,
which depends on what has been installed on your computer, related to DirectX and your sound
card.
DVD Audio Decoder Filter
A pop-up menu lists all the available audio decoders, which are used to decode the DVD audio
data. The list of decoders depends on the decoders that are installed on your PC related to your
video card, DVD player and TV tuner/Capture card. Select the audio decoder that you would like
SageTV to use for DVD audio playback.
Copyright 2010 SageTV, LLC All rights reserved
For additional support, go to www.sagetv.com/support.html or email us at [email protected]
SageTV V7.0 User’s Guide
Chapter 5: Configuring SageTV
Page 195
Detailed Setup: Commands Settings
From the Commands Settings configuration menu, you can reach the other setup options by
highlighting General, Multimedia, Video/Audio, DVD, Server, Advanced, or Customize in the
right-hand column.
Highlight any setup subject in the left-hand column to view its options, or choose Main Menu to
return to the Main Menu.
On the right-hand column, highlight an option’s setting to see its description at the bottom of the
screen. Select the setting to change its option.
The Commands Settings are:
Link Infrared/Keystroke to SageTV Command
Choosing this option will display a scrollable list of all SageTV commands in the middle of the
screen. When a command is highlighted, its keyboard and infrared code assignments are
displayed in a list in the right-hand column.
To link new keystrokes or IR codes to a command, Select that command.
After choosing a command for key/IR code assignment, SageTV will display instructions for you
to press the key or remote button to be assigned to the shown command. Any keyboard input at
this point is considered to be a key assignment. You can cancel this process by clicking on the
Cancel button with the mouse.
If a key or IR code already assigned to a different command is entered, SageTV will ask for
confirmation regarding whether to reassign the key or IR code. Choose Yes to continue with the
reassignment; No to cancel the reassignment. Using the Options command (Ctrl+O, Escape,
right-click) also cancels the reassignment.
For a complete list of commands, see SageTV Commands.
Notes:
If you are using a third party Infrared Receiver such as the IRMan or USB-UIRT, you
will need to link every IR code to the commands in SageTV. To enable the use of either
of these IR receivers, see Remote Control Configuration, below.
SageTV will only learn IR codes when it is directly using the IR receiver, such as those
mentioned above. If you are using the Hauppauge or Streamzap receivers, for example,
SageTV cannot learn the IR codes directly from the remotes.
Copyright 2010 SageTV, LLC All rights reserved
For additional support, go to www.sagetv.com/support.html or email us at [email protected]
SageTV V7.0 User’s Guide
Chapter 5: Configuring SageTV
Page 196
More than one key or IR code can be assigned to each command, but no two commands
can share the same key or IR code.
Some remotes use a toggle code where pressing the same key repeatedly results in the
remote emitting two separate codes, toggling between then for each button press. For
these remotes, you will need to teach both codes for each button to SageTV. Teach the
first code to SageTV, then without pressing any other remote button in between, teach the
second code to SageTV. In between those 2 button presses, use either the keyboard or
mouse to control SageTV.
Show SageTV Commands linked to Infrared/Keystroke
Choosing this option will display instructions for you to press a key or remote button to see
which command, if any, it is assigned to.
Unlink Infrared/Keystroke from SageTV Command
Choosing this option will display instructions for you to press a key or remote button that you
wish to unlink from a command. Once a key or button is pressed, SageTV will ask to confirm the
request. If you select No or use the Options command, the unlink process will be cancelled.
Remote Control Configuration
The Remote Control Configuration option will display your current setting. To change it, select
the button to proceed to the Configuration Wizard step to Set your Remote Control. Once you
have completed that one part of the Configuration Wizard, you will be returned to Detailed
Setup.
Copyright 2010 SageTV, LLC All rights reserved
For additional support, go to www.sagetv.com/support.html or email us at [email protected]
SageTV V7.0 User’s Guide
Chapter 5: Configuring SageTV
Page 197
Detailed Setup: Server Settings
From the Server Settings configuration menu, you can reach the other setup options by
highlighting General, Multimedia, Video/Audio, DVD, Commands, Advanced, or Customize in
the right-hand column.
Highlight any setup subject in the left-hand column to view its options, or choose Main Menu to
return to the Main Menu.
On the right-hand column, highlight an option’s setting to see its description at the bottom of the
screen. Select the setting to change its option.
The Server Settings are:
SageTV Server
This option is only available in SageTV, not SageTVClient, and toggles between Enabled and
Disabled. If you plan to use SageTVClient on another computer on your network, you must
enable SageTV to act as a server.
Media Extender and Placeshifter Server
This option is only available in SageTV, not SageTVClient, when the SageTV Server option
(above) is enabled; it opens a dialog when selected, where you may choose to toggle the setting
between Enabled and Disabled. Enable this option if you plan to connect a Media Extender,
such as the SageTV STX-HD100, STP-HD200, or Hauppauge MediaMVP, or a Place Shifting
client to your SageTV server. Note: changes to this setting won’t take effect until the SageTV
server (the above option) is restarted, so you will be asked whether to restart the SageTV
Server when this option is changed. In the dialog, choose Yes to change the option and restart
the SageTV Server, choose No to change the option without restarting the SageTV Server, or
choose Cancel to leave the setting as it is.
For details on Media Extenders, see Appendix M: SageTV Media Extenders.
For details on the Placeshifter Client, see Appendix N: SageTV Placeshifter Client.
Configure Placeshifter Internet Connection
In order to use a Placeshifter Client from a remote location, your local network’s router/firewall
needs to be configured to allow access to your SageTV server from remote locations. This
configuration can be done manually on the router, or SageTV can be configured to automatically
handle keeping access to the SageTV server open if your router has UPnP (Universal Plug and
Play) capability. For details about configuring the router, see Step G6: Configure the Placeshifter
Internet Connection (server or media extender only) in the Configuration Wizard. When you are
done on that menu, you will be returned to Detailed Setup.
Copyright 2010 SageTV, LLC All rights reserved
For additional support, go to www.sagetv.com/support.html or email us at [email protected]
SageTV V7.0 User’s Guide
Chapter 5: Configuring SageTV
Page 198
Manage Placeshifter Users
Select Configure to view, add, or manage Placeshifter users. After selecting Configure, a dialog
will be shown where new Placeshifter users can be added and existing users can be managed. If a
user is disabled, the user name will still exist, but that user will not be able to log on via a place
shifter client. Note: when a new user is created on the server, the STV assigned for that user will
be the STV currently in use on the server. If a new user is created from a client, then the default
STV will be assigned.
After selecting a user name, a dialog will be shown where various user settings can be
configured, or the user can be removed completely. You can set the user’s STV, change the
password, disable/enable the user, or remove the user.
Placeshifter Locator ID
Select the View option to see the Locator ID for the server, along with an option to copy it to the
system clipboard. This ID can be used by the place shifting client to find the server so that you
do not need to know your actual IP address. Note: The Locator ID is also displayed on the
System Information display.
Allow Placeshifter clients to automatically login
Choose whether Placeshifter clients can be configured to automatically login.
Media Extender Conversion Quality
Choose whether to use Standard or High quality when video needs to be transcoded for
playback on a Media Extender. Standard is SVCD quality, while High is DVD quality.
Copyright 2010 SageTV, LLC All rights reserved
For additional support, go to www.sagetv.com/support.html or email us at [email protected]
SageTV V7.0 User’s Guide
Chapter 5: Configuring SageTV
Page 199
Detailed Setup: Advanced Settings
From the Advanced Settings configuration menu, you can reach the other setup options by
highlighting General, Multimedia, Video/Audio, DVD, Commands, Server, or Customize in the
right-hand column.
Highlight any setup subject in the left-hand column to view its options, or choose Main Menu to
return to the Main Menu.
On the right-hand column, highlight an option’s setting to see its description at the bottom of the
screen. Select the setting to change its option.
The Advanced Settings are:
Load at Windows Startup
Select the setting next to this option and choose a setting from the pop-up menu:
No – Do not start SageTV automatically when the computer starts.
Yes – in Full Screen mode – Start SageTV automatically when the computer starts, and
start it running in full screen mode.
Yes – sleeping in the System Tray – Start SageTV automatically when the computer
starts, but start it in Sleep mode, minimized to the system tray.
Video Orbiting Duration
Use this setting if you have a Widescreen TV or HDTV and wish to shift the 4:3 image
horizontally in the 16:9 screen area. The time controls how quickly the screen moves away from
and back to its starting position. A value of 0 disables this feature. The image shifts quickly with
low values and slowly with large values.
In the pop-up dialog, enter the number of minutes for the orbiting duration and press Return. Use
the Options command (Ctrl+O, Escape, right-click) to close the dialog without changing the
current setting.
3D Acceleration
This option toggles between Enabled and Disabled. Enable 3D Acceleration for better
performance if you are using a Graphics card that support DirectX9 and 3D Acceleration. 3D
Acceleration cannot be enabled if you are using the OSD through the TV-out of the PVR-350.
Copyright 2010 SageTV, LLC All rights reserved
For additional support, go to www.sagetv.com/support.html or email us at [email protected]
SageTV V7.0 User’s Guide
Chapter 5: Configuring SageTV
Page 200
If enabling this option fails and you are not using the OSD through the TV-out of the PVR-350,
then you should make sure that your video card drivers and DirectX installations are up to date.
Also, note that 3D Acceleration require a video card with at least 32 MB RAM.
Note: This option must be enabled in order to use VMR9 or EVR as the Video Renderer in
Detailed Setup: Video/Audio Settings or as the DVD Video Renderer in Detailed Setup: DVD
Settings. If VMR9 or EVR is the renderer for either of those settings, you will be asked to
confirm whether to disable 3D Acceleration. If you choose to disable it, any VMR9 and EVR
settings will automatically be changed to use Overlay instead.
Use Full Screen Exclusive Mode
This option will only appear if 3D Acceleration is enabled, above. When using 3D
Acceleration, you will have a choice of how SageTV will operate when run in Full Screen mode.
Normally, SageTV will still act as a regular Windows application, except that it covers the entire
screen; however, when using full screen exclusive mode, SageTV will attempt to gain exclusive
control of the screen, just as a Windows game run in full screen mode would do. When
successful, this exclusive control of the display is intended to provide smoother video playback,
especially with the VMR9 renderer. But, exclusive mode is not always available, depending on
certain system settings and the video card that is being used. If you turn this option on and
experience playback problems, turn it back off.
Overlay Color Keying
This option toggles between Enabled and Disabled. When using Overlay as the Video Renderer
in Detailed Setup: Video/Audio Settings or as the DVD Video Renderer in Detailed Setup: DVD
Settings, enable Color Keying if you want the On-Screen Display to have transparency.
Optimized Image Loader
Choose whether to have the optimized image loader Enabled or Disabled. Enable it for faster
loading of larger images; disable it only if images are not loaded properly.
Rescan Existing Library Files
Choose this option to force SageTV to rescan the entire library and perform format detection and
metadata importing again for all imported media.
Automatic Update Checks
Choose whether SageTV can automatically perform the checks for updates listed below. When
enabled, SageTV will perform these checks once per day after jumping to the Main Menu.
Check for and install updates for the lists of online videos – When enabled, SageTV
will check for updates for online video feeds listed on the Online Services menu. If an
update is found, it will be downloaded and installed.
Copyright 2010 SageTV, LLC All rights reserved
For additional support, go to www.sagetv.com/support.html or email us at [email protected]
SageTV V7.0 User’s Guide
Chapter 5: Configuring SageTV
Page 201
Check for and notify when updates are available for the STV, installer, or extender
firmware – When enabled, SageTV will check for updates for the STV, new versions of
SageTV, and new firmware versions if an extender is in use. If an update is found, a
system message will be generated for viewing on the System Messages menu.
Include notifications for installer and firmware beta updates – If the above option to
check for new installer and extender firmware versions is enabled, this option will be
available. When enabled, SageTV will include checking for new beta versions. If a beta
update is found, a system message will be generated for viewing on the System Messages
menu.
Check for STV Update
Select Update to see if there is an update available for the default STV file set. The current
version number is shown directly below this option’s title. Note: The default STV file
(SageTV3.xml or SageTV7.xml) must be the currently loaded application package for the
update to proceed. This option may be used to install fixes or add new features, but frequent
updates are not expected.
If an STV file set update is available, a dialog will list any change notes for the new version and
ask for confirmation to download and install the update. After performing an update, it is
suggested that you check for another update in case one update was required before the next
update could be installed.
Revert to the default STV
When using a customized STV, this option can be used as a shortcut to change back to the
default STV provided in the SageTV installer.
Reload last custom STV
When using the default STV, this option can be used as a shortcut to change back to the last-used
custom STV, if one has been previously loaded.
Manage STVI plugins
Note: This option is no longer enabled by default. Use the Plugin Manager instead.
In addition to being able to specify which SageTV custom interface file (STV) to use, see below,
it is also possible to load one or more STVI import modules that will add or change functionality
of an existing interface file. See below for information where import modules may be found
online. Note: Before importing an STVI module, especially for the first time, make backup
copies of wiz.bin and Sage.properties and/or SageClient.properties.
Copyright 2010 SageTV, LLC All rights reserved
For additional support, go to www.sagetv.com/support.html or email us at [email protected]
SageTV V7.0 User’s Guide
Chapter 5: Configuring SageTV
Page 202
After selecting the option to manage the plugins, the STVI Plugin Manager dialog will open.
From there, you may choose from the following actions:
Rest the base STV to the current STV if it is not already the base used for imports or it is
not the plugin managed STV that already has the imports.
Remove any existing plugins – select a plugin from the list to remove it.
Add a new STVI plugin file – select to choose a new import in a file browser dialog.
Automatically prompt for rebuild – Check this option to have SageTV automatically
check to see if the base STV or any of the import files have changed since the last time
the plugin managed STV was built. The check will be performed when SageTV starts or
when an STV is loaded.
Force Rebuild and Reload STV File with plugins – Select this option to immediately
import all the plugins into the base STV.
Load Existing STV with plugins – If the base STV is loaded and the plugin managed
STV exists, this option allows quickly reloading the plugin managed STV without
rebuilding again. (If the automatic prompt for rebuild option is enabled, then the check
will be performed after the managed STV has been loaded.)
Close – Exit the dialog. The status of the plugin managed STV will be checked when the
dialog closes and you may be prompted to rebuild if it is out of date.
Note: The process of importing the selected plugins may take a few minutes, depending on how
many plugins are in the list and how complex each one is. When the rebuild process is done, the
resulting updated Application Package will be saved as a new XML file, it will remain loaded as
the current Application Package, and SageTV will return to the Main Menu.
SageTV Full UI Package (.STV or .XML File)
SageTV is capable of using custom files that define what the user interface looks like and what
capabilities it contains. The appearance and functionality is defined in SageTV application
package files, which have a file extension of STV or XML.
Choose this option to open a dialog where you can choose a new STV file to use as the SageTV
interface.
To find custom STV files, please see:
The SageTV Customizations forum is one of the forums on the SageTV site, where
some users who have created custom STVs have posted information about those STV
files and may answer questions about them.
(forums.sagetv.com/forums/forumdisplay.php?f=27)
Copyright 2010 SageTV, LLC All rights reserved
For additional support, go to www.sagetv.com/support.html or email us at [email protected]
SageTV V7.0 User’s Guide
Chapter 5: Configuring SageTV
Page 203
Import UI Modification (.STVi File)
Note: Use the Plugin Manager instead if the desired import is available there.
In addition to being able to specify which SageTV custom interface file (STV) to use, it is also
possible to load STVi update modules that will add or change functionality of an existing
interface file. See above for information where import modules may be found.
Note: Before importing an STVi module, make backup copies of wiz.bin and Sage.properties
and/or SageClient.properties.
After choosing the Application Package Import file, you will be asked to confirm whether to
proceed with the import process. If you choose to proceed, SageTV will import the selected file
and save the resulting updated Application Package as a new XML file, then load it as the
current Application Package and return to the Main Menu.
Select the User Interface Theme
Select this option to choose which set of graphics (theme) is to be used for the user interface. A
dialog will open, displaying a list of the available themes along with a description and preview of
the currently highlighted theme, if a description and preview image are available. SageTV
installs with the Standard theme.
For more information about themes and how to create custom themes, see: Appendix O: User
Interface Themes. Additional user created themes may be found on the SageTV online forums at
forums.sagetv.com/forums and may be available in the Plugin Manager.
Debug Logging
Choose whether to enable debug logging on the SageTV server, and local client if using a client.
SageTV will need to be restarted after changing this setting.
Copyright 2010 SageTV, LLC All rights reserved
For additional support, go to www.sagetv.com/support.html or email us at [email protected]
SageTV V7.0 User’s Guide
Chapter 5: Configuring SageTV
Page 204
Detailed Setup: Customize Settings
From the Customize Settings configuration menu, you can reach the other setup options by
highlighting General, Multimedia, Video/Audio, Commands, Server, or Advanced in the righthand column. Note that there are more options than can fit on a single screen, so you will need to
scroll down the list to see some choices.
Highlight any setup subject in the left-hand column to view its options, or choose Main Menu to
return to the Main Menu.
On the right-hand column, highlight an option’s setting to see its description at the bottom of the
screen. Select the setting to change its option.
The Customize Settings are:
Fast Forward & Rewind times
Select Configure for a pop-up options menu where you can set the times for the fast forward and
rewind commands. Select any of the choices to set the jump times associated with these
commands:
Fast Forward – The current Skip Forward time is displayed and may be changed.
Fast Forward 2 – The current Skip Fwd #2 time is displayed and may be changed.
Rewind – The current Skip Bkwd time is displayed and may be changed. Rewind times
are negative values. If you enter a positive value, it will automatically be changed to a
negative one.
Rewind 2 – The current Skip Bkwd #2 time is displayed and may be changed. Rewind
times are negative values. If you enter a positive value, it will automatically be changed
to a negative one.
Time Scroll – The current Time Scroll time is displayed and may be changed. For details
about using Time Scroll, see: A Note About Time Scroll Playback Mode.
Inactivity Timeout and OSD AutoHide
Select Configure for a pop-up options menu where you can set the options for the playback OSD
autohide functionality after a timeout period:
Enable Inactivity Timeout and hide the OSD after timeout? – Select this setting to
toggle between:
o Yes – Enable the inactivity timeout timer and allow the OSD to automatically
hide itself if there is no user activity during the timeout period, or
Copyright 2010 SageTV, LLC All rights reserved
For additional support, go to www.sagetv.com/support.html or email us at [email protected]
SageTV V7.0 User’s Guide
Chapter 5: Configuring SageTV
Page 205
o No – Disable the inactivity timeout and OSD autohide feature
Inactivity Timeout – If the Inactivity Timeout is enabled, above, select this option to
configure the time out period.
Automatically Enable Channels Newly Added to EPG Lineups
Choose whether channels that have been added to an EPG lineup are automatically enabled or
not. The option is initially enabled, but you may wish to disable it if new channels are often not
viewable on your system. This option is also available on the Channel Setup menu via the
Options command. When a new channel is added, a system message will be generated for
viewing on the System Messages menu.
Power Management settings
Select Configure for a pop-up options menu where you can set the options for SageTV’s power
management timings:
Idle timeout – Set the time for how long SageTV can be idle with no user input or video
playback before allowing the operating system's settings for going into standby to take
over. To reset this value, enter 0.
Server wake up time prior to starting a new recording – Set this value to the time it
takes for your SageTV server system to wake itself up and return to actively running.
SageTV will schedule the server system to wake up this much time prior to when a
scheduled recording is to begin.
Font Size Limitation Settings
Select Configure for a pop-up options menu where you can set the options for font size
limitations:
Smallest font size – Use this option to set the smallest font size that SageTV will use in
the user interface. If you find some of the text in the UI too small to read, try increasing
this value. To reset this value, enter 0.
Minimum shrunk font size – SageTV will shrink some text to fit in its allotted space.
Use this option to set the minimum font size text can be shrunk to. To reset this value,
enter 0.
Numeric Text Input Settings
Numeric text input is a method used for entering text using only the numeric keypad on a remote
and is similar to how text is entered via a telephone’s keypad. Each number is assigned a few
characters or symbols. Then, when entering text, do the following:
Copyright 2010 SageTV, LLC All rights reserved
For additional support, go to www.sagetv.com/support.html or email us at [email protected]
SageTV V7.0 User’s Guide
Chapter 5: Configuring SageTV
Page 206
1. Press a number repeatedly to cycle through that number’s available characters until the
desired character is reached. The number will be available as the last character in the
cycle.
2. To accept the current character, you may do one of the following:
a. wait until the input is accepted
b. press another number to accept the current character and begin cycling through
the characters for the new number
c. use the Play command to accept the current character.
3. To enter more characters, return to step 1.
On the screens where numeric text input is available, a keypad
will be displayed showing all the numbers and the characters
assigned to them. During data entry, the entered number’s list of
characters will be displayed below the entry field and the current
character will be highlighted. The default assignments are:
1 – various symbols and 1
2 – ABC2
3 – DEF3
4 – GHI4
5 – JKL5
6 – MNO6
7 – PQRS7
8 – TUV8
9 – WXYZ9
0 – Space and 0
Stop command – Clear the last input.
Play or Play/Pause command – Accept the current input character.
Pause command – Toggle Numeric Text Input mode between Upper Case, Lower Case,
and Off.
Select Configure for a pop-up options menu where you can set the options for SageTV’s
numeric text input feature. Note: The below options to reconfigure the numeric keys and their
hints are not available on clients that cannot use keyboards, such as media extenders.
Use Numeric Text Input – Choose whether Numeric Text Input will be enabled by
default when a text entry field is in use. Note: You may use the Pause command to
change the Numeric Text Input mode while entering data.
Delay time before auto-accept – This is the amount of time without any input before
SageTV will automatically accept the currently highlighted character. Enter the number
of milliseconds for this delay. (There are 1000 milliseconds in 1 second.)
Configure the upper case numeric keys – Select these options to see or configure the
list of the current upper case character assignments for each number.
Copyright 2010 SageTV, LLC All rights reserved
For additional support, go to www.sagetv.com/support.html or email us at [email protected]
SageTV V7.0 User’s Guide
Chapter 5: Configuring SageTV
Page 207
Configure the upper case hint text – Select these options to see or configure the list of
the upper case text that is displayed beneath each number on the number pad.
Configure the lower case numeric keys – Select these options to see or configure the
list of the current lower case character assignments for each number.
Configure the lower case hint text – Select these options to see or configure the list of
the lower case text that is displayed beneath each number on the number pad.
Close – Close the dialog.
Online Video Options
This item opens a dialog where options for online videos can be configured:
Online Video Access
This option is used to control access to the Online Services menu and its online video
feeds. Choose from these three options:
Always Enabled – The online video menus will always be available.
Always Disabled – The online video menus will never be available and will not
appear in the Online Services menu.
Determined by Parental Controls – The online video menu items will be
available, but access is controlled by the Parental Controls options. If Parental
Controls are enabled, the correct code must be entered to enter the online video
menus. If Parental Controls are not enabled, online video menus may be entered
without any code required.
YouTube Video Quality
This option is used to control the highest resolution video that SageTV will attempt to
download when playing a YouTube video. If a higher resolution is not available, SageTV
will automatically try playing the next lower resolution. Low bandwidth Internet
connections may work better using a lower resolution setting here. Choose from these
three options as the first resolution to try:
HD 1080p
HD 720p
SD High Resolution
SD Low Resolution
Copyright 2010 SageTV, LLC All rights reserved
For additional support, go to www.sagetv.com/support.html or email us at [email protected]
SageTV V7.0 User’s Guide
Chapter 5: Configuring SageTV
Page 208
Channel.com Options
This option is used to configure options for the Channels.com item on the Online
Services menu. Configure these options:
Languages – Select the languages you wish to allow in the Channels.com feeds,
or choose Allow Any Language.
Allow Adult Content – Choose whether the Channels.com feeds can include
those with adult content. If Parental Controls are enabled, the correct code must
be entered in order to enable this option. If Parental Controls are not enabled, this
option can be toggled on or off without any code required.
Temporary File Storage Location
Choose the location where temporary files are to be stored when playing online media.
Reset Temporary File Storage Location
If the Temporary File Storage Location has been customized, use this option to clear it.
Mouse Auto-Repeat Rate
Use this option to configure settings used when a mouse button is clicked and held over a mouseable icon, such as a list scroll arrow. Set the time (in milliseconds) for:
Delay before first repeat – Sets the amount of time to wait while the mouse button is
held before automatically issuing the first repeated mouse click.
Period between repeats – Sets the amount of time to wait while the mouse button is held
before automatically issuing each subsequent repeated mouse click.
Ignore Leading Articles During Text Sorting
Use this option to configure whether articles at the beginning of text, such as ‘a’, ‘an’, and ‘the’,
are ignored while sorting text, along with which articles can be ignored. After selecting this
option, a dialog will be shown with settings that can be changed:
Ignore leading articles while sorting – Toggle whether the leading articles are ignored
while sorting.
List of leading words to ignore – Use this option to configure which words are
considered leading articles to be ignored.
Copyright 2010 SageTV, LLC All rights reserved
For additional support, go to www.sagetv.com/support.html or email us at [email protected]
SageTV V7.0 User’s Guide
Chapter 5: Configuring SageTV
Page 209
Instant Search mode on Navigation Menus
This option controls whether and how Instant Search functions while on a navigation menus
(menus like the Main Menu). Select this option to open a dialog with these choices:
Instantly start searching – Jump to the Search menu as soon as any alphanumeric
characters are entered.
Use dialog for more text entry – When alphanumeric characters are entered, open a
dialog to allow further input before starting the search.
Do not use Instant Search – Disable the use of Instant Search.
Maximum Results per Search
Sets the maximum number of search results per search. The default value is 1000. Increasing this
number can cause searches to take longer.
Action to take when SageTV Window is closed
When you exit the SageTV Window, either by clicking on the X in the upper right corner or by
pressing Alt+F4 on the keyboard, SageTV can either exit or go into sleep/standby mode. Select
this button to choose whether that action will result in exiting the program (Exit SageTV) or
putting SageTV to sleep (Sleep SageTV).
Video Background Color
The Video Background Color is the color SageTV displays on the Video Playback screen in
areas not covered by the video being played. For example: a 4x3 image won’t cover the entire
screen for a 16x9 display, and vice-versa. Choosing to Modify this setting opens an external
dialog box where you can select a new color to display in the areas outside the video.
Focus follows mouse movement
If you interact with SageTV using a mouse, SageTV can automatically change the user interface
element focus to the item that the mouse cursor is pointing to. Selecting this option toggles
between turning this feature on or off.
Delete Live TV files when not using Intelligent Recording
Choose whether SageTV should automatically delete live TV recordings shortly after the show
has finished airing and you have stopped watching the recording. By default, this will be on. If
you disable live TV autodeletion, the recordings will still be deleted when more disk space is
needed for a new recording.
Copyright 2010 SageTV, LLC All rights reserved
For additional support, go to www.sagetv.com/support.html or email us at [email protected]
SageTV V7.0 User’s Guide
Chapter 5: Configuring SageTV
Page 210
Use aggressive negative profiling for Intelligent Recordings
Only available when Intelligent Recordings have been enabled in Detailed Setup: General
Settings; this option tells SageTV to give more consideration to shows that have been marked as
Don’t Like, so that SageTV is less likely to record similar shows.
Include episode names in filenames
Selecting this item toggles between enabling or disabling adding the episode name of a show to
the filename generation when a show is recorded.
Remove padding on back to back Favorites
Choose whether back to back Favorites that are on the same channel should have their
overlapping padding removed. If padding is not removed, then such shows cannot be recorded by
a single tuner; if there is only one tuner, overlapping Favorites on the same channel will generate
a conflict, causing one to either be recorded at a later airing or not recorded at all.
Add ShowID as part of Movie Favorites
Choose whether to add the Show ID as a keyword when creating a Favorite for a movie. Using
the ShowID as part of the Favorite would help limit the Favorite to that specific movie, not other
movies or shows with the same title.
Reset watched shows when played again
Choose whether an already-watched recording should have its Watched status reset when you
start watching it again. By clearing the Watched status, SageTV will be able to track your lastwatched position again, in case you stop playback before the end of the recording.
Always ask whether to resume or restart partially watched videos
Choose whether to always resume at the last-played position when starting playback of a
partially watched video or whether SageTV should always ask whether to resume or restart at the
beginning.
Always start video playlist items from the beginning
Choose whether video playlist items will always start from the beginning while playing the
playlist or whether each video should start at its last-played position.
Detect repeat airings with non-unique IDs
Choose whether SageTV should try to detect when airings that have the same non-unique generic
ShowID are actually the same show. (See Notes about Scheduled Recordings for more details
about ShowIDs.) If set to Yes, SageTV will attempt to detect whether such airings are, in fact,
Copyright 2010 SageTV, LLC All rights reserved
For additional support, go to www.sagetv.com/support.html or email us at [email protected]
SageTV V7.0 User’s Guide
Chapter 5: Configuring SageTV
Page 211
the same show. If set to No, SageTV will treat all shows with the same SH-based ShowID as if
they are all different shows.
Automatically add converted videos to database
Choose whether SageTV should automatically add converted videos to the SageTV database. If
you regularly convert videos for use on a different media player instead of in SageTV, you may
wish to leave them out of the database. Note: Converted videos that are replacing the original
videos or are being placed in a recording or import folder will be added to the database
regardless of this setting.
Enforce recording quality in schedule
Choose whether SageTV should assign Manual Recordings and Favorites that have been
configured to use specific recording qualities only to a tuner that can record using that specified
quality. Example: If a Favorite is set to use an MPEG quality, this setting determines whether
that Favorite can only be recorded by a tuner than can record using MPEG, or whether it can be
recorded by any available tuner, such as the Hauppauge HD-PVR, which records in H.264
format.
Number of Days to Schedule Recordings
Configure how many days into the future SageTV will schedule Favorites and Intelligent
Recordings, if IR is enabled. If the scheduler is set to cover fewer days than the EPG data covers,
the automatic scheduler can schedule a show to be recorded beyond the initial number of days if
it conflicts with other shows during that time period and if it will be aired again during the
extended time that the guide covers. By default, SageTV is configured to schedule for the next
14 days, covering all EPG data. Note: Manual Recordings can be scheduled for any time by the
user and are not covered by this option.
Enable MPEG4 timeshifting (requires hardware encoder)
Selecting this option shows a dialog asking whether to allow live timeshifted playback while
recording in an MPEG4 recording quality, such as MPEG4 or DivX. If this option is disabled,
you will not be able to watch the show until the recording has completed. Note: timeshifting
MPEG4 recordings is only available when using a hardware based encoder.
Always tune channel
Selecting this option shows a dialog asking whether to have SageTV always force a channel
tuning event every time a recording is to start, even if the next recording is on the same channel
as the last recording. When using an IR blaster to tune an external converter box, enabling this
option can help if the IR blaster sometimes changes the channel incorrectly or if the converter
box is sometimes reset or has its channel changed by another method, such as direct user control.
Copyright 2010 SageTV, LLC All rights reserved
For additional support, go to www.sagetv.com/support.html or email us at [email protected]
SageTV V7.0 User’s Guide
Chapter 5: Configuring SageTV
Page 212
Channel Entry Options
Select Configure for a pop-up options menu where you can set the channel entry options:
Auto-accept after timeout – If enabled, SageTV will automatically change to the
selected channel after the input timeout period has passed without further input.
Max Channel Digits – Enter the maximum number of digits which a channel may
contain. After entering this number of digits, the channel change will occur without
pressing Enter or OK. If 0 (zero) is entered, then SageTV will automatically determine
the number of digits in the largest channel number.
DirecTV Fast Serial Channel Changes
Select this option to toggle between Fast and Normal mode for channel changing when
controlling DirecTV boxes via a serial cable.
Show recording status marker icons in lists
Selecting this option toggles whether the various marker icons are shown next to a show’s name
for each show entry in a list, such as the list shown on the SageTV Recordings menu. For a
description of the various marker icons, see Marker Icons.
Ask to delete recording at end of playback?
Select this option to choose when to be asked whether to delete recordings as soon as they have
finished playing, via the Video Playback Completion Options dialog. You can select to be asked
only for recordings that SageTV cannot automatically delete (Manual Recordings and Favorites
with AutoDelete turned off), for all recordings, or never.
Use expanded options for the Record command
Selecting this option toggles whether the expanded pop-up options dialog is shown when the
Record command is used. When enabled, use of the Record command causes the Record
Command Options Dialog to be shown, where you can add or cancel a Manual Recording, adjust
the recording’s options, add or remove a Favorite, or adjust the Favorite’s settings. When this
setting is disabled, use of the Record command simply toggles whether a show is a Manual
Recording or not.
Options menu mode for videos and recordings
Selecting this option toggles whether the Airing and Video Options Dialog uses Basic or
Advanced mode.
Copyright 2010 SageTV, LLC All rights reserved
For additional support, go to www.sagetv.com/support.html or email us at [email protected]
SageTV V7.0 User’s Guide
Chapter 5: Configuring SageTV
Page 213
For grouped items: Select opens options dialog, Info browses into group
Selecting this option toggles whether the Select command or the Info command opens the
Grouped Airings and Videos Options Dialog for a group of airings or imported videos. Toggling
also affects which of those command is a shortcut to browse into the group.
Alternate Movie category name
SageTV color-codes Movies in the Program Guide, the SageTV Recordings menu, and other
menus where the shows are listed. If your EPG does not mark movies as “Movies”, select this
option to enter the phrase uses for movies. By default, the alternate name is “Film”.
Display pop-up when a new drive detected
Select this option to toggle whether the New Drive Detected dialog is shown when SageTV
detects a new driver, such as when a Compact Flash card is inserted.
Display OSD between Playlist Segments
Select this option to configure whether the OSD will be shown on the playback screen when a
playlist changes to another item in the playlist. The option is set independently for video and
music playlists.
Reset Disabled Warnings
Resets all disabled warning messages, such as the warning about trying to set the default
recording quality when digital tuners are configured.
Use wrap-around scrolling in single column vertical lists
Selecting this option displays a dialog where you can choose whether most single column
vertical lists should wrap vertically from the last item to the first item when scrolling up or down.
Choose Enabled or Disabled.
Use vertical wrap-around scrolling in the Program Guide grid
Selecting this option displays a dialog where you can choose whether the Program Guide grid
should wrap vertically from the last channel to the first channel when scrolling up or down.
Choose Enabled or Disabled.
Use ‘Fixed Focus’ in single column non-wrapped vertical lists
Selecting this option displays a dialog where you can choose whether single column vertical
lists, such as those used in the imported media browsers, should try to keep focus on the item in
the center of the screen. Choose Always On, Always Off, or Automatic. For the Automatic
Copyright 2010 SageTV, LLC All rights reserved
For additional support, go to www.sagetv.com/support.html or email us at [email protected]
SageTV V7.0 User’s Guide
Chapter 5: Configuring SageTV
Page 214
setting, the option will be disabled on desktop UIs and enabled on extender UIs, where a remote
is used instead of a mouse or keyboard.
TV Category Background Colors
Selecting this option displays a dialog that shows the background colors used for various TV
airing categories. The existing categories and their colors may be edited, or additional categories
may be added. This option is also available via the Setup -> Help submenu on the Main Menu.
RC5 Repeat Detection
This option is available for HD Extenders Only. Choose whether repeat detection is enabled
when using a remote that uses the RC5 IR protocol, which toggles its code each time the same
button is pressed. The SageTV and Hauppauge remotes properly toggle their RC5 codes, so this
option should remain enabled for those remotes. If you have a customized remote which does not
toggle the RC5 codes, then try disabling this option.
Copyright 2010 SageTV, LLC All rights reserved
For additional support, go to www.sagetv.com/support.html or email us at [email protected]
SageTV V7.0 User’s Guide
Chapter 5: Configuring SageTV
Page 215
System Information
The System Information screen displays information about the status and configuration of your
SageTV system. Its parent menu is the Main Menu.
At the top of the screen is a button whose function is to go Back to Main Menu. Next to it is a
button to jump to the System Messages menu.
Below the button area, the rest of the screen is dedicated to the display of various system
information statistics. The information shown will cover much more than a single screen, so be
sure to use the Down arrow to highlight and scroll the information display to see the rest of the
information.
Tip: Use the Info command (Ctrl+I) to write the System Information details to a text file
(SystemInfo.txt) in your SageTV directory. This file may be requested if you contact SageTV
Technical Support.
Notes:
At times, the System Information may take a short time to fully update itself. While the data is
being updated, there will be an “Updating” message displayed after the “System Status” and
“System Configuration Details” section headers. Wait until the information has finished updating
before using the Info command to write the System Information details to a text file.
If using tvtv for your TV listings, click on the tvtv logo at the top to check your tvtv account
status.
This menu is quickly accessible from the Main Menu via the Info command.
Copyright 2010 SageTV, LLC All rights reserved
For additional support, go to www.sagetv.com/support.html or email us at [email protected]
SageTV V7.0 User’s Guide
Chapter 5: Configuring SageTV
Page 216
System Messages
The System Messages screen displays messages from SageTV about various situations that the
user should be aware of.
On the left are a few options:
Back – Return to the previous menu.
Reset Alert – Resets to the alert level, clearing the alert icon from the menu header.
Delete All – Choose this option to delete all current system messages.
To the right is the list of all current system messages, with the newest messages listed first.
Highlight a message to see its description displayed at the bottom of the screen. Some messages
have actions that can be performed; Select a message to see any options for a message. Use the
Delete command to delete the currently highlighted message.
The icon to the left of each message indicates its alert level:
No Icon – General message; lowest level of importance.
– Information
– Warning
– Error
If a new message with a higher alert level than the existing alert level is added, then the menu
header will be updated to display an alert icon. See: Status Indicator Icons. To clear the alert
level, choose Reset Alert on the left side of this menu.
Copyright 2010 SageTV, LLC All rights reserved
For additional support, go to www.sagetv.com/support.html or email us at [email protected]
SageTV V7.0 User’s Guide
Chapter 5: Configuring SageTV
Page 217
SageTV Commands
Except when using a mouse to simply point to and click on menu choices, SageTV is controlled
through the use of its commands. Whether the commands are sent via keystrokes, through
infrared codes by directly using a supported IR receiver with SageTV, or by sending Windows
messages from a 3rd-party application, the commands you can use are all the same. When
SageTV is installed, it automatically configured support for some commands to be sent from the
keyboard or from a Hauppauge or Streamzap remote. It is up to you to configure the usage of
any additional commands.
Most SageTV commands are individual commands that perform one function at a time. A few
commands are combo commands, which perform a function depending on the current SageTV
context. For example: “Left/Volume Down” will function as a Left command when on a menu,
or as Volume Down during media playback.
Sending Commands via Keystrokes
Keystrokes are sent directly to SageTV by using the keyboard, or by using a 3rd-party application
that mimics sending keyboard input to SageTV, such as the Hauppauge remote control software.
The commands that keystrokes are assigned to can be configured in Detailed Setup by using the
option to link a keystroke to a command. See: Link Infrared/Keystroke to SageTV Command.
Sending Commands via Infrared Codes
When using Evation’s IRMan (www.evation.com) or a USB-UIRT (www.usbuirt.com), SageTV
can directly receive codes from an infrared remote control. Like keystrokes, these infrared codes
can be assigned to commands in Detailed Setup by using the option to link an infrared code to a
command. See: Link Infrared/Keystroke to SageTV Command.
Sending Commands via Windows Messages
SageTV can also be controlled by events sent as Windows messages through the SendMessage
Windows API function call. When sending a command event via SendMessage, the following
parameters must be used:
Parameter
To Control SageTV or Placeshifter
To Control SageTVClient
Window Class:
SageApp
SageClientApp
Window Name:
SageWin
SageWin
Message ID:
WM_USER + 234 (1258)
WM_USER + 234 (1258)
wParam:
0 (not used)
0 (not used)
lParam:
Event number
Event number
The event numbers for each command are listed in the List of All SageTV Commands, below.
Copyright 2010 SageTV, LLC All rights reserved
For additional support, go to www.sagetv.com/support.html or email us at [email protected]
SageTV V7.0 User’s Guide
Chapter 5: Configuring SageTV
Page 218
Sending Commands via Multimedia Keyboards and Remotes
SageTV can also respond to certain media control buttons on multimedia keyboards or remotes.
These buttons actually send WM_APPCOMMAND messages that contain the command. The
following multimedia buttons/WM_APPCOMMAND commands are recognized by SageTV:
Button
WM_APPCOMMAND command
SageTV command
Back
APPCOMMAND_BROWSER_BACKWARD
Back
Forward
APPCOMMAND_BROWSER_FORWARD
Forward
Play
APPCOMMAND_MEDIA_PLAY
Play
Play/Pause
APPCOMMAND_MEDIA_PLAY_PAUSE
Play/Pause
Pause
APPCOMMAND_MEDIA_PAUSE
Pause
Stop
APPCOMMAND_MEDIA_STOP
Stop
Record
APPCOMMAND_MEDIA_RECORD
Record
Forward
APPCOMMAND_MEDIA_FASTFORWARD
Skip Forward / Page Right
Rewind
APPCOMMAND_MEDIA_REWIND
Skip Bkwd / Page Left
Next Track
APPCOMMAND_MEDIA_NEXTTRACK
Channel Up / Page Up
Prev Track
APPCOMMAND_MEDIA_PREVIOUSTRACK Channel Down / Page Down
Chan Up
APPCOMMAND_MEDIA_CHANNEL_UP
Chan Down
APPCOMMAND_MEDIA_CHANNEL_DOWN Channel Down / Page Down
Vol Up
APPCOMMAND_VOLUME_UP
Volume Up
Vol Down
APPCOMMAND_VOLUME_DOWN
Volume Down
Mute
APPCOMMAND_VOLUME_MUTE
Mute
Channel Up / Page Up
Copyright 2010 SageTV, LLC All rights reserved
For additional support, go to www.sagetv.com/support.html or email us at [email protected]
SageTV V7.0 User’s Guide
Chapter 5: Configuring SageTV
Page 219
List of All SageTV Commands
Command
Default
Keystroke
Left
Event
#
Description
Left
2
Moves the menu focus to the item towards the left of
the currently highlighted item. If there is no such item,
it will return you to the previous menu.
Right
Right
3
Moves the menu focus to the item towards the right of
the currently highlighted item. If there is no such item,
it will select the item and proceed to the next screen.
Up
Up
4
Moves the menu focus to the item above the currently
highlighted item. Many menus will wrap from top to
bottom if there is no item above the current one.
Down
Down
5
Moves the menu focus to the item below the currently
highlighted item. Many menus will wrap from bottom
to top if there is no item below the current one.
Pause
Ctrl+S
6
Pauses playback. For videos: if already paused,
advance one frame.
Play
Ctrl+D
7
Resumes playback if paused.
Skip Fwd
&
Page Right
Ctrl+F
8
Combo command
Playback: Fast Forward 10 seconds. (This time is
adjustable in Detailed Setup: Customize Settings.)
Menus: Moves one page to the right.
Skip Bkwd
&
Page Left
Ctrl+A
9
Combo command
Playback: Rewind 10 seconds. (This time is adjustable
in Detailed Setup: Customize Settings.)
Menus: Moves one page to the left.
Time Scroll
10 See A Note About Time Scroll Playback Mode. The
first use of this command enters time scroll mode.
Then, use the Skip Fwd & Skip Bkwd commands to
jump forward/backward 2:30. (This time is adjustable
in Detailed Setup: Customize Settings.) Or, use the
Skip Fwd #2 & Skip Bkwd #2 commands to jump to
the end or beginning of the video, respectively.
Use this command again to exit time scroll mode and
jump to the new playback location. Use the Play
command while in time scroll mode to cancel the time
scroll jump.
Copyright 2010 SageTV, LLC All rights reserved
For additional support, go to www.sagetv.com/support.html or email us at [email protected]
SageTV V7.0 User’s Guide
Chapter 5: Configuring SageTV
Event
#
Page 220
Command
Default
Keystroke
Description
Channel Up
&
Page Up
Page Up
11 Combo command
Playback: If watching live TV, change to the next
higher channel number. If playing a DVD, jump to the
next DVD chapter. If playing music, jump to the next
track.
Menus: Moves one page up.
Channel Down
&
Page Down
Page Down
12 Combo command
Playback: If watching live TV, change to the next
lower channel number. If playing a DVD, jump to the
previous DVD chapter. If playing music, jump to the
previous track.
Menus: Moves one page down.
Volume Up
Ctrl+R
13 Increases audio volume.
Volume Down
Ctrl+E
14 Decreases audio volume.
TV
Ctrl+V
15 If on a menu: jumps to media playback. If no playback
is occurring, live TV will start.
If viewing playback: jumps to the most recently viewed
menu.
Play Faster
Ctrl+M
16 For DVD playback: increases playback speed.
Play Slower
Ctrl+N
17 For DVD playback: decreases playback speed.
Guide
Ctrl+X
18 Jumps to the Program Guide. If you have scrolled the
guide away from the current time, use this command
again to return to the current time in the guide.
Power
Ctrl+Z
19 Puts SageTV to sleep if it is awake, or awakens
SageTV if it is sleeping.
Select
Enter
20 Selects the currently highlighted item in a SageTV
menu and performs whatever function is appropriate
when that item is selected.
Copyright 2010 SageTV, LLC All rights reserved
For additional support, go to www.sagetv.com/support.html or email us at [email protected]
SageTV V7.0 User’s Guide
Command
Default
Keystroke
Watched
Ctrl+W
Chapter 5: Configuring SageTV
Event
#
Page 221
Description
21 Toggles the currently highlighted show, recording, or
imported video as having been completely watched or
not. If the show has a unique show ID, SageTV will
remember that you have watched the show and will not
record it again. If Intelligent Recording in enabled,
watched shows are considered to be shows that you
like.
This command can also be used on groups of shows. A
confirmation dialog will ask whether to Set or Clear the
Watched status for all shows in that group.
Favorite
Ctrl+K
22 Marks the currently highlighted show or recording as a
Favorite and creates a new entry for that show in the
Favorites Manager, if the show is not currently a
Favorite. If the show is already a Favorite, it will be
removed from your list of Favorites after you confirm
the removal.
Don't Like
Ctrl+J
23 Toggles the Don’t Like setting for the currently
highlighted show or recording. SageTV will not record
shows that you mark as Don’t Like, unless it is a
manual recording. If Intelligent Recording in enabled,
shows marked as Don’t Like are not considered for
recording and will influence which other shows may
not be recorded.
Notes: To turn Intelligent Recording on or off, see the
Intelligent Recording option at Detailed Setup: General
Settings.
This command can also be used on groups of shows. A
confirmation dialog will ask whether to Set or Clear the
Don’t Like status for all shows in that group.
Info
Ctrl+I
24 While in a menu: jumps to the detailed information
screen for a highlighted video.
During playback: Toggles the On Screen Display
(OSD) on or off.
Copyright 2010 SageTV, LLC All rights reserved
For additional support, go to www.sagetv.com/support.html or email us at [email protected]
SageTV V7.0 User’s Guide
Command
Default
Keystroke
Record
Ctrl+Y
Chapter 5: Configuring SageTV
Event
#
Page 222
Description
25 This command is used to add or remove a scheduled
Manual Recording, or even a Favorite. See the Record
Command Options Dialog to see the various choices
available when this command is used.
Shows marked as a Manual Recording take priority
over all other types of recordings and will never be
automatically deleted by SageTV. Shows listed in the
Program Guide that are marked as Manual Recordings
will be added to the upcoming recording schedule.
Mute
Ctrl+Shift+M
26 Toggles audio playback on or off.
Full Screen
Ctrl+Shift+F
27 Toggles whether SageTV should make its Window full
screen or not.
Home
Home
28 Jumps to the Main Menu.
Options
Escape,
Ctrl+O
29 Toggles the display of the Options pop-up menu for the
current menu or media playback type.
Num 0
0, Num0
30 Enters the number 0.
Used to enter channel changes during media playback.
While watching live TV, enter the channel number you
wish to watch, then use the Select command. During
DVD playback, this jumps to the specified chapter.
During music playback, it jumps to the track number.
In the Program Guide, enter a number followed by
Select to jump to that channel in the listings. Or, enter a
number and then use the Page Right or Page Left
command to jump ahead/back that many days in the
guide.
Num 1
1, Num1
31 Enters the number 1.
Num 2
2, Num2
32 Enters the number 2.
Num 3
3, Num3
33 Enters the number 3.
Num 4
4, Num4
34 Enters the number 4.
Num 5
5, Num5
35 Enters the number 5.
Num 6
6, Num6
36 Enters the number 6.
Num 7
7, Num7
37 Enters the number 7.
Num 8
8, Num8
38 Enters the number 8.
Copyright 2010 SageTV, LLC All rights reserved
For additional support, go to www.sagetv.com/support.html or email us at [email protected]
SageTV V7.0 User’s Guide
Command
Default
Keystroke
Num 9
9, Num9
Chapter 5: Configuring SageTV
Event
#
Page 223
Description
39 Enters the number 9.
Search
40 Jumps to the Search.
Setup
41 Jumps to the Detailed Setup.
Library
42 Jumps to the Video Browser menu.
Power On
43 Wakes SageTV if it is sleeping.
Power Off
44 Sleeps SageTV if it is running.
Mute On
45 Turns audio playback OFF.
Mute Off
46 Turns audio playback ON.
Aspect Ratio
Fill
47 During video playback, stretch the video to fill the
SageTV playback area.
Aspect Ratio
4x3
48 During video playback, force playback to fit the video
into a 4x3 ratio area, stretching or shrinking the video
to do so.
Aspect Ratio
16x9
49 During video playback, force playback to fit the video
into a 16x9 ratio area, stretching or shrinking the video
to do so
Aspect Ratio
Source
50 During video playback, use the video source
information to determine the playback aspect ratio.
Right
&
Volume Up
Ctrl+Right
51 Combo command
Menus: Moves the menu focus to the item towards the
right of the currently highlighted item. If there is no
such item, it will select the item and proceed to the next
screen.
Playback: Increases audio volume.
Left
&
Volume Down
Ctrl+Left
52 Combo command
Menus: Moves the menu focus to the item towards the
left of the currently highlighted item. If there is no such
item, it will return you to the previous menu.
Playback: Decreases audio volume.
Copyright 2010 SageTV, LLC All rights reserved
For additional support, go to www.sagetv.com/support.html or email us at [email protected]
SageTV V7.0 User’s Guide
Chapter 5: Configuring SageTV
Command
Default
Keystroke
Up
&
Channel Up
Ctrl+Up
53 Combo command
Menus: Moves the menu focus to the item above the
currently highlighted item. Many menus will wrap from
top to bottom if there is no item above the current one.
Playback: If watching live TV, change to the next
higher channel number. If playing a DVD, jump to the
next DVD chapter. If playing music, jump to the next
track.
Down
&
Channel Down
Ctrl+Down
54 Combo command
Menus: Moves the menu focus to the item below the
currently highlighted item. Many menus will wrap from
bottom to top if there is no item below the current one.
Playback: If watching live TV, change to the next
lower channel number. If playing a DVD, jump to the
previous DVD chapter. If playing music, jump to the
previous track.
Page Up
F5
55 Moves one page up.
Page Down
F6
56 Moves one page down.
Page Right
F8
57 Moves one page to the right.
Page Left
F7
58 Moves one page to the left.
Play/Pause
Ctrl+Shift+S
59 Toggles between paused & playing. If playing,
playback will pause. If paused, playback will resume.
Previous
Channel
Event
#
Page 224
Description
60 During media playback, switches to the previously
playing media. That could be the previously watched
channel while watching live TV, the previously viewed
recording or video, or the previously played song.
Skip Fwd #2
Ctrl+F8
61 Fast Forward 2:30 – 2 minutes, 30 seconds. (This time
is adjustable in Detailed Setup: Customize Settings.)
Skip Bkwd #2
Ctrl+F7
62 Rewind 2:30. (This time is adjustable in Detailed
Setup: Customize Settings.)
Live TV
63 From a menu: Jumps to live TV playback.
During playback: Jumps playback to the current time
for live TV.
DVD Reverse
Play
64 Toggles DVD playback between forward play and
reverse play.
Copyright 2010 SageTV, LLC All rights reserved
For additional support, go to www.sagetv.com/support.html or email us at [email protected]
SageTV V7.0 User’s Guide
Command
Default
Keystroke
Chapter 5: Configuring SageTV
Event
#
Page 225
Description
DVD Next
Chapter
65 Jumps to the next DVD chapter.
DVD Prev
Chapter
66 Jump to the previous DVD chapter.
DVD Menu
67 Jumps to the DVD’s menu.
DVD Title Menu
68 Jump to the DVD’s title menu.
DVD Return
69 Returns the DVD display from a submenu to its parent
menu.
DVD Subtitle
Change
70 Changes to the next DVD subtitle language, if others
are available.
DVD Subtitle
Toggle
71 Toggles whether DVD subtitles are displayed.
DVD Audio
Change
72 Changes to the next DVD audio language, if others are
available.
DVD Angle
Change
73 Changes to the next DVD playback angle, if others are
available.
DVD
74 Initiates DVD playback if SageTV finds a DVD in the
DVD drive on your computer.
Back
Alt+Left
75 SageTV remembers the sequence of menus and
playback screens you viewed. Use Back to jump back
to the previous SageTV screen you were viewing in
that sequence.
Forward
Alt+Right
76 SageTV remembers the sequence of menus and
playback screens you viewed. After using the Back
command to jump back in that sequence of screens, use
Forward to return to the screens ahead of the current
one. Forward will not do anything if there are no
screens to jump forward to.
Customize
Ctrl+Shift+F12
77 Opens SageTV Studio, where you can edit STV files.
See SageTV Studio for more information about Studio.
(Not available during a trial period.)
Custom1
78 Performs a custom command when using a custom
STV, if this command has been assigned a function.
Custom2
79 Performs a custom command when using a custom
STV, if this command has been assigned a function.
Copyright 2010 SageTV, LLC All rights reserved
For additional support, go to www.sagetv.com/support.html or email us at [email protected]
SageTV V7.0 User’s Guide
Command
Default
Keystroke
Chapter 5: Configuring SageTV
Event
#
Page 226
Description
Custom3
80 Performs a custom command when using a custom
STV, if this command has been assigned a function.
Custom4
81 Performs a custom command when using a custom
STV, if this command has been assigned a function.
Custom5
82 Performs a custom command when using a custom
STV, if this command has been assigned a function.
Delete
Delete
83 Available for all videos except a currently recording
video, use this option to remove a video from SageTV
and delete it from the computer’s disk drive. A pop-up
menu will ask for deletion confirmation.
Note: This command can be used on grouped lists of
recordings. A confirmation process will double-check
that you wish to delete all the recordings, all of the
watched recordings, or all of the not liked recordings in
the highlighted group. Once the deletion process
begins, you will have the option to cancel it, but any
recordings deleted up to that point will already be
deleted.
Music Jukebox
84 Jumps to the Music Browser menu.
Recording
Schedule
85 Jumps to the Recording Schedule.
SageTV
Recordings
86 Jumps to the list of SageTV Recordings.
Picture Library
87 Jumps to the Photo Browser.
Video Library
88 Jumps to the Video Browser.
Stop
Ctrl+G
89 Stops playback of the current media and closes the
playback file. If you are on a playback screen, you will
be returned to the Main Menu.
If you are watching live TV and the show is not a
scheduled recording, the recording process will stop
also.
Eject
90 Not used by SageTV under Windows.
Stop/Eject
91 Not used by SageTV under Windows.
Input
92 Not used by SageTV under Windows.
Copyright 2010 SageTV, LLC All rights reserved
For additional support, go to www.sagetv.com/support.html or email us at [email protected]
SageTV V7.0 User’s Guide
Command
Default
Keystroke
Chapter 5: Configuring SageTV
Event
#
Page 227
Description
Smooth FF
93 Toggles Smooth Fast Forward mode when playing
recordings on a Media Extender and during DVD
playback on a PC with some DVD decoders. No effect
during playback of recordings on a Windows system.
Smooth Rew
94 Toggles Smooth Rewind mode when playing
recordings on a Media Extender and during DVD
playback on a PC with some DVD decoders. No effect
during playback of recordings on a Windows system.
-
- (dash)
95 The dash is used when entering ATSC TV sub
channels, such as channel 5-1.
Aspect Ratio
Toggle
96 Changes the Aspect Ratio to the next setting.
Full Screen On
97 Enters full screen mode.
Full Screen Off
98 Exits full screen mode.
Right
&
Skip Fwd
99 Combo command:
Menus: Moves the menu focus to the item towards the
right of the currently highlighted item. If there is no
such item, it will select the item and proceed to the next
screen.
Playback: Fast Forward 10 seconds. (This time is
adjustable in Detailed Setup: Customize Settings.)
Left
&
Skip Bkwd
100 Combo command:
Menus: Moves the menu focus to the item towards the
left of the currently highlighted item. If there is no such
item, it will return you to the previous menu.
Playback: Rewind 10 seconds. (This time is adjustable
in Detailed Setup: Customize Settings.)
Up
&
Volume Up
101 Combo command:
Menus: Moves the menu focus to the item above the
currently highlighted item. Many menus will wrap from
top to bottom if there is no item above the current one.
Playback: Increases audio volume.
Down
&
Volume Down
102 Combo command:
Menus: Moves the menu focus to the item below the
currently highlighted item. Many menus will wrap from
bottom to top if there is no item below the current one.
Playback: Decreases audio volume.
Online
103 Jumps to the Online Services menu.
Copyright 2010 SageTV, LLC All rights reserved
For additional support, go to www.sagetv.com/support.html or email us at [email protected]
SageTV V7.0 User’s Guide
Command
Default
Keystroke
Chapter 5: Configuring SageTV
Event
#
Page 228
Description
Video Output
104 Toggles through the available output resolutions that
SageTV can use.
Scroll Left
105 Scrolls a scrollable table or panel so that one item
comes into view from the left.
Scroll Right
106 Scrolls a scrollable table or panel so that one item
comes into view from the right.
Scroll Up
107 Scrolls a scrollable table or panel so that one item
comes into view from the top.
Scroll Down
108 Scrolls a scrollable table or panel so that one item
comes into view from the bottom.
Copyright 2010 SageTV, LLC All rights reserved
For additional support, go to www.sagetv.com/support.html or email us at [email protected]
SageTV V7.0 User’s Guide
Chapter 6: Troubleshooting Guide
Page 229
Chapter 6: Troubleshooting Guide
This Troubleshooting Guide should be your first reference for any questions or problems you are
having with SageTV. As new troubleshooting items are added, they will be available online at
www.sagetv.com/troubleshooting.html. For additional support, you can post your questions in
our discussion forum at forums.sagetv.com/forums. If your question still remains unanswered,
submit a support request at www.sagetv.com/request.html and we will reply within 72 hours.
General Crashes and Errors
If you are receiving errors that contain this phrase, “Problem utilizing the specific capture
configuration”.
You might not be using a supported capture card. Please check our System Requirements
page at www.sagetv.com/requirements.html.
If you are experiencing random crashes, lockups or freezes in SageTV:
Be sure you have the latest drivers installed for your TV Tuner/Capture card. You may
also want to try upgrading your video card drivers and updating your motherboard's
BIOS to the latest version.
Sage crashes on startup or going to Live TV. And/or I get Java errors on startup.
Remove all versions of Java from Add/Remove programs. Install the newest version of
Java into its default directory. To download Java, go to java.sun.com/getjava.
If you download the trial versions of SageTV and you get the following message; "Corrupt
installation detected, check source media or re-download":
You must update your Windows Installer to the latest version. Use the "Windows
Update" feature of your operating system or go to www.microsoft.com and choose
"Windows Update" from the left menu.
If your system hangs or reboots after exiting SageTV:
You need to upgrade to the latest version of your Java Runtime Environment from
java.sun.com/getjava. This is a bug with Java Runtime version 1.4.1_01.
I have a little box that bounces around the screen.
Your Elecard Video Decoder (www.elecard.com) trial has expired. Use a different
decoder or purchase the Elecard Video Decoder.
Copyright 2010 SageTV, LLC All rights reserved
For additional support, go to www.sagetv.com/support.html or email us at [email protected]
SageTV V7.0 User’s Guide
Chapter 6: Troubleshooting Guide
Page 230
If upon starting SageTV, you are getting stuck at "Priming Seeker" on the splash screen,
try the following solutions in order:
Check your video file directories to see if there are any "0kb" files and delete them and
restart SageTV.
Delete your sage.properties file and restart SageTV. Note that you will have to go back
through the Source Setup to restore your configuration settings.
Uninstall SageTV and delete the SageTV folder, then reinstall SageTV.
I'm receiving the error message "There was a MPEG-2 video error in playback details:
Failed connecting video stream to overlay mixer ErrCode = 0x80040217".
Go into your Detailed Setup and click on the Video tab. Change the Rendering Filter
from Overlay to Default or vice versa. Then choose "Reload Media Player" for version 2
or later.
I'm getting an error during startup of SageTV "Initializing DirectShow Recording Graph:
There was a problem utilizing the specific capture configuration. Unable to connect analog
video cross streams ErrCode = 0x0040217".
Some other process is using the capture card. Make sure there are no other instances of
Sage running in the system tray or any other capture programs running.
I'm using the Hauppauge PVR-USB2 capture device. I'm getting this error message
"Failed running the graph for encoding ErrCode=0&80070017".
There is a specific USB patch from Microsoft that corrects this error. Run Windows
Update (windowsupdate.microsoft.com) and run all current patches.
Is there a debugging console for SageTV?
The console can be used to troubleshoot problems. You can do this by creating a new
DWORD value in the registry. Go to start, run and type in regedit. Here's the path:
“\HKEY_LOCAL_MACHINE\SOFTWARE\Frey Technologies\Common”.
Right click on the Common folder and select New – DWORD Value. Name it
"consolewin" without the quotes and hit enter. Now double click on consolewin and
change the value from 0 to 1. This will open up a DOS window for debugging when you
start SageTV.
What does the following error message mean? "There was a problem with the Shared
Async Reader Filter. Failure loading file ErrCode=0x80004005".
If you are getting this error with SageTV Client then try to connect to SageTV by IP
address instead of the computer name. If you are not using SageTV Client and this
happens with SageTV, then update to the newest version of Java from
java.sun.com/getjava.
Copyright 2010 SageTV, LLC All rights reserved
For additional support, go to www.sagetv.com/support.html or email us at [email protected]
SageTV V7.0 User’s Guide
Chapter 6: Troubleshooting Guide
Page 231
If your system crashes unexpectedly for any reason while SageTV is running and SageTV
does not recognize the TV Tuner/Encoding card upon restart, perform the following:
Shut down SageTV and open the Sage.properties file from the SageTV directory.
Find the line "mmc/ignore_encoders" and delete the related device that's listed. Note: If
a supported capture device is added to this property line, inform SageTV (at
www.sagetv.com/support.html).
Save the changes and restart SageTV.
Video Issues
I get sound, but my Video is black.
You might not be using a supported capture card. Please check our System Requirements
page at www.sagetv.com/requirements.html.
Go to the display settings for your video card. You more than likely have the Overlay
surface set to be on the monitor only, so video will show up as black on your TV.
Make sure you have a Video Decoder installed and selected in your Detailed Setup ->
Video. Try a different Video Decoder. Also try uninstalling SageTV and deleting the
SageTV folder. Reinstall SageTV. In V2 or later, you can also try disabling Overlay
Color Keying.
I can't tune to channels above 14.
Go to Setup > Source Setup and select the affected source. On the Source Details menu,
make sure the Cable/Antenna setting is Cable instead of Antenna.
If you experience a "black and white" picture using the S-video or composite input on your
PVR-350:
Upgrade to the newest Hauppauge drivers and choose one of the new inputs.
My reception is poor, but it looks fine under WinTV. I'm using the Coaxial input on the
capture card.
Go to Setup > Source Setup and select the affected source. On the Source Details menu,
check the Cable/Antenna setting. Change it from Antenna to Cable or vice versa. Restart
SageTV and change channels to make sure it worked. Also make sure to do a scan for
channels in Channel Setup.
Copyright 2010 SageTV, LLC All rights reserved
For additional support, go to www.sagetv.com/support.html or email us at [email protected]
SageTV V7.0 User’s Guide
Chapter 6: Troubleshooting Guide
Page 232
Poor or snowy picture quality on certain channels or all.
Sometimes the use of a Signal Amplifier can work. Also, change out the cables you are
using. If you are using a splitter try using a different splitter.
What can I do to improve the performance of the video quality? (For Hauppauge users)
Try out our registry performance increase for Hauppauge users. This works when you are
also using the InterVideo NonCSS Video Decoder for Hauppauge as the selected Video
Decoder in SageTV Recorder/SageTV.
Just change these registry settings to 1 while SageTV is shutdown:
o HKLM\Software\Intervideo\Custom\Hauppauge\VideoDec\Dxva
o HKLM\Software\Intervideo\Custom\Hauppauge\VideoDec\Hwmc
For the newer decoders the location is:
o HKLM\Software\IviSDK4Hauppauge\Common\VideoDec\Dxva
o HKLM\Software\IviSDK4Hauppauge\Common\VideoDec\Hwmc
Audio Issues
I get video, but I’m not getting any audio.
You might not be using a supported capture card. For a list of requirements, see the latest
requirements listed on the SageTV website at www.sagetv.com/requirements.html.
The audio stops being recorded after a certain amount of time. It's fine after I restart
SageTV.
Sometimes MSN Messenger can cause this problem. Make sure you disable MSN
Messenger. Also, other USB devices can cause this as you plug in and unplug them.
Installation
What software is necessary to run SageTV?
For a list of requirements, see the latest requirements listed on the SageTV website at
www.sagetv.com/requirements.html.
How do I do a clean reinstall of SageTV?
Go to Add/Remove programs and uninstall Sage. Then delete the SageTV folder.
Reinstall SageTV.
Copyright 2010 SageTV, LLC All rights reserved
For additional support, go to www.sagetv.com/support.html or email us at [email protected]
SageTV V7.0 User’s Guide
Chapter 6: Troubleshooting Guide
Page 233
What files are necessary to backup so that I don't lose my settings and recordings?
SageTV automatically backs up your configuration and data files. If you wish to keep an
extra backup, you can backup your Sage.properties and Wiz.bin files. Note: If you are
doing a clean install of SageTV to repair a problem, remember that the properties file
may have been the source of the problem, so do not restore it after reinstalling in this
case.
I want to create a new machine for Sage and I want to keep all my favorites and settings
intact. How do I do this?
Check the FAQ for this topic in the SageTV discussion forum at:
http://forums.sagetv.com/forums/showthread.php?t=30697
What Video Decoder and Audio Decoders are defaults on my system?
Play an MPEG-2 video in Window Media Player, and then click on File –> Properties.
That will list what Video Decoder and Audio Decoder WMP uses. These are the default
Decoders.
Customizations
I can't play DVD's through Sage. What can I do?
Be sure to have selected a DVD compatible Video Decoder and an Audio Decoder. For
example the SageTV Decoder, InterVideo NonCSS Video Decoder for Hauppauge, or the
Elecard Video Decoder are not DVD compatible.
How do I keep the SageTV window always in front of open applications?
Open up SageTV in windowed mode and right click on the blue bar at the top. Click on
Video Always on Top. Or, see the SageTV Window is Always On Top option in
Detailed Setup: Multimedia Settings.
How come when I play DVD’s I get Closed Captioning?
This can happen when using the Default Decoders. You need to choose another Decoder.
How do I get 5.1 sound from DVD playback?
It depends on your setup. You will need a sound card that supports 5.1 out and DVD
Decoders. To get ideas for a setup you can search our discussion forums at
forums.sagetv.com/forums.
Can I use my cable provider's guide instead of the guide built into SageTV?
This is not possible. SageTV needs to use its own guide to work.
Copyright 2010 SageTV, LLC All rights reserved
For additional support, go to www.sagetv.com/support.html or email us at [email protected]
SageTV V7.0 User’s Guide
Chapter 6: Troubleshooting Guide
Page 234
Is there a way to automatically skip commercials?
No there isn't. You can set the interval of how much time it skips when you skip forward.
It can be 10, 30, or 120 seconds. The default is 10 seconds. See the Fast Forward &
Rewind times option in Detailed Setup: Customize Settings.
When I play a file in my video library, does SageTV stream the data to the client machines?
Yes it does.
Is there a way to export my recording schedule?
Yes. Make sure SageTV is closed and open up your Sage.properties file and look for this
line, "scheduler_export_file=". Type in the path to your file after the "=" sign.
Infrared Devices
How do you configure the Hauppauge remote control?
The receiver plugs into the back of the PVR card. Then, make sure you install the IR
Remote application from the Hauppauge CD or website. There should be a little remote
control icon in your system tray. After the IR Remote application has been installed and
is working, make sure to check the box that says, "Configure support for the Hauppauge
PVR-250/350 IR Remote Control", in step 4 during SageTV installation. Check to make
sure your batteries are good. If for some reason you install/reinstall the IR Remote
application after you have installed SageTV you must then reinstall SageTV. See details
for the Hauppauge Remote in the Appendix.
If you are using an Actisys IR-200L:
Make sure you uninstall any software related to the Actisys prior to installing SageTV or
SageTV Recorder. SageTV and SageTV Recorder will install the appropriate .DLL file
needed to recognize the IR-200L.
If you are experiencing problems with the Actisys IR-200L learning your remote codes:
Try a different learning method. The different learning methods are "press", "tap, tap",
"press, tap" and "tap, press".
License
My trial period has run out. Can I get an extension?
There is no way to extend your trial. You will need to reformat your computer or use
another computer to try the software again. Or, the trial period is sometimes reset when a
new version of SageTV is released.
Copyright 2010 SageTV, LLC All rights reserved
For additional support, go to www.sagetv.com/support.html or email us at [email protected]
SageTV V7.0 User’s Guide
Chapter 6: Troubleshooting Guide
Page 235
I have a valid key for SageTV Client, but I get license errors when I connect to the server.
What can I do?
Restart your server.
If you are using the SageTVClient on more than one PC and accidentally entered the same
license key from another PC you will get an error message – "Unable to connect to the
SageTV Server".
To enter the correct license key, open your SageTV folder, right-click on the
SageTVClient.exe file and create a new shortcut. Then right-click on the shortcut and go
to Properties. Then enter in the Target line at the end after the quotes a space and then the
word REGISTER. The correct entry will look like this:
"C:\Program Files\SageTV\SageTV\SageTVClient.exe" REGISTER.
Then you will be prompted to enter the new license key. After your correct license key is
accepted, you can delete the shortcut you just created.
EPG
My SageTV can't connect to the EPG Server to gather the guide information. What can I
do?
Make sure you don't have any Firewall protection applications running. Something like
ZoneAlarm or Windows XP built in Internet Connection Firewall. If you do, you can
open one port on your Firewall protection program. The port is 7760.
International
I don't live in the United States. Is there any way I can get guide data for my Sage?
Go to our configuration page in the Support section of our web
(www.sagetv.com/configuration.html) and get the XMLTV EPG Data Plugin.
site
Misc.
Can I record in either MPEG1 or MPEG2 formats?
Yes you can, but MPEG1 only supports playback and record, no time shifting. There's a
link on the configuration page of our web site (www.sagetv.com/configuration.html)
regarding creating a custom recording quality that uses MPEG1 instead of MPEG2 when
using a Hauppauge encoding card. See: www.sagetv.com/2_papers/HPquality.txt.
Copyright 2010 SageTV, LLC All rights reserved
For additional support, go to www.sagetv.com/support.html or email us at [email protected]
SageTV V7.0 User’s Guide
Chapter 6: Troubleshooting Guide
Page 236
Is there a debugging console for SageTV?
The console can be used to troubleshoot problems. You can do this by creating a new
DWORD value in the registry. Go to start, run and type in regedit. Here's the path:
“\HKEY_LOCAL_MACHINE\SOFTWARE\Frey Technologies\Common”
Right click on the Common folder and select New – DWORD Value. Name it
"consolewin" without the quotes and hit enter. Now double click on consolewin and
change the value from 0 to 1. This will open up a DOS window for debugging when you
start SageTV.
Client – Server Connection
My SageTV Client is unable to connect to the server. What should I check?
Make sure the client is trying to connect to the correct IP address of the SageTV server.
The System Information screen on the server lists its address and hostname. Try using
that address or hostname when connecting with the client.
Make sure that SageTV and SageTV Client are allowed to communicate through ports
42024 and 7818. You may need to check the firewall for both computers to make sure
those ports have been opened for those programs.
Copyright 2010 SageTV, LLC All rights reserved
For additional support, go to www.sagetv.com/support.html or email us at [email protected]
SageTV V7.0 User’s Guide
Chapter 7: Frequently Asked Questions
Page 237
Chapter 7: Frequently Asked Questions
Many questions that SageTV users ask are answered in the following sections. Additional
answers can be found in our discussion forum at forums.sagetv.com/forums and the forum’s
FAQ topic at http://forums.sagetv.com/forums/showthread.php?t=1601. If you need answers to a
technical support issue, submit a support request at www.sagetv.com/request.html and we will
reply within 72 hours.
General
Is it normal for two SageTV processes to be running on my PC?
Yes, when viewing the list of running processes on your PC, two of each SageTV process
will be listed, so you will see two SageTV.exe, two SageTVService.exe, and/or two
SageTVClient.exe processes depending on how SageTV is running on your PC.
Setup & Installation
SageTV is having problems controlling my cable box.
For SageTV to control your cable box you must use a third party IR transmitter like the
Actisys IR-200L available through SageTV’s website. You can setup & configure the IR200L through the Source Setup. There you need to teach the IR-200L the commands to
change channels on your cable box.
I have the IR-200L configured properly but it’s missing some of my channel changes.
The IR-200L needs to be positioned so that your cable box can receive the Infrared
commands that are sent by the transmitter. Look to see where the Infrared receiver is on
your cable box and position the IR-200L so that it’s sending the commands to that
Infrared receiver within the cable box. You may have to try a few different positions to
get the best results. You may also need to adjust the delay times between IR codes sent to
your box.
SageTV is having problems controlling my satellite receiver.
For SageTV to control your satellite receiver you must either use the Actisys IR-200L as
explained above for cable box control, a USB-UIRT, or a serial cable. If you are using a
serial cable to control your satellite receiver, make sure you’ve selected this option during
the Source Setup.
Copyright 2010 SageTV, LLC All rights reserved
For additional support, go to www.sagetv.com/support.html or email us at [email protected]
SageTV V7.0 User’s Guide
Chapter 7: Frequently Asked Questions
Page 238
SageTV is not recognizing my remote control through my IRMan or USB-UIRT receiver.
Check to make sure you have the correct COM or USB port selected in Setup > Detailed
Setup > Commands > Remote Control Configuration.
Watching Live TV
I’m not getting any video through SageTV.
First check all your video connections to and from the PC. Also check to make sure you
have the correct connection/source selected in SageTV in the Source Setup. Then launch
the application that came with your TV tuner/capture card and see if you get any video
there. If not, follow the troubleshooting instructions from the manufacturer. If you see
video through the manufacturer’s application, try using a different video decoder within
SageTV. You can access the MPEG2 Video Decoder Filter settings at Setup > Detailed
Setup > Video. If the problem persists then check the discussion forum
(forums.sagetv.com/forums) for other discussions related to your setup or create a new
post.
I’m not getting any audio through SageTV.
First check all your audio connections to and from the PC. Then launch the application
that came with your TV tuner/Capture card and see if you hear any audio there. If not
follow the troubleshooting instructions from the manufacturer. If you hear audio through
the manufacturer’s application, try using a different MPEG2 Audio Decoder Filter within
SageTV. You can access the Audio Decoder settings at Setup > Detailed Setup > Audio.
If the problem persists then check the discussion forum (forums.sagetv.com/forums) for
other discussions related to your setup or create a new post.
The audio and video are out of sync during playback.
Try changing channels or putting SageTV to sleep and restoring it. If that doesn’t work,
shut down SageTV and reboot your computer. If you are still having problems on a
regular basis, you can modify the Audio Playback Delay in Setup > Detailed Setup >
Audio.
I’m getting audio and video but the video is of poor quality, stuttering, hesitating, etc.
Try another Video Renderer or MPEG2 Video Decoder Filter from Setup > Detailed
Setup > Video. You must put SageTV to sleep or restart for these settings changes to take
effect.
I’m trying to select a program to view from the Live TV guide but it won’t play.
Check to make sure you are selecting a program within the current time slot. Programs on
Live TV are only available for viewing within their original time slots. If SageTV
recorded a program it would appear under Sage Recordings.
Copyright 2010 SageTV, LLC All rights reserved
For additional support, go to www.sagetv.com/support.html or email us at [email protected]
SageTV V7.0 User’s Guide
Chapter 7: Frequently Asked Questions
Page 239
Recording Programs
Can SageTV record while my PC is not on?
For SageTV to record programs your PC must be on and the SageTV application must be
running. You can put SageTV to sleep instead of shutting down the application, then
SageTV will appear in your Taskbar/System Tray. SageTV will then be able to perform
all recordings and you will be free to use your PC for other operations. See Sleeping
SageTV.
Can I watch a program while it is being recorded?
Yes, you can watch a program as it is being recorded. To view the program either select
Program Guide from the Main Menu and select the specific program in the listings, or go
to SageTV Recordings and select the currently recording show.
Can I watch a different program while one is being recorded?
Yes, you can watch one program while it is recording another as long as it’s a previously
recorded program. If you are using multiple tuners, you can also watch different “Live”
programs at the same time.
What if I want to record two programs on at the same time?
SageTV supports the use of multiple tuners to record more than one channel at a time.
Install the additional tuner cards according to the manufacturer’s instructions, then launch
SageTV and go through the Source Setup to configure the additional tuners. You will
then be able to schedule as many recordings at the same time as the number of tuners
installed and configured for SageTV to use.
What if I set up conflicting recordings?
SageTV has extensive Conflict Resolution that will prompt you of any Favorites or
Manual Recordings that are scheduled to be recorded at the same time. You will then be
able to tell SageTV the priority of these recordings. When shows are aired at multiple
times, SageTV will automatically record another airing to fit both programs in, when
possible. For information about conflict notifications, see: Recording Conflicts.
Some of my programs especially sporting events are being cut off at end, how can I fix this?
SageTV records programs based on their allocated time span by the networks. Some
events can go past their allocated time on occasion. To alleviate this you must “pad” the
beginning or end of a program when you specify it to be recorded. To add padding, go to
the Recording Schedule, select a show, then choose Record Options to adjust its start or
stop time. (Select Record if Record Options isn’t visible.) View the Favorite Details of a
Favorite to always add padding for those recordings.
Copyright 2010 SageTV, LLC All rights reserved
For additional support, go to www.sagetv.com/support.html or email us at [email protected]
SageTV V7.0 User’s Guide
Chapter 7: Frequently Asked Questions
Page 240
How do I record a Pay-Per-View event?
You can browse Pay-Per-View events by utilizing the guide within your cable box or
satellite receiver. Once you find what event you are going to order, submit your order and
then add that channel to SageTV in the Channel Setup. Now you can specify it for
recording at the airing time from the Program Guide. Once the event is over remove the
channel from the Channel Setup screen again.
The SageTV EPG service
The Program Guide is not getting updated programming information.
First go to the System Information screen to see when SageTV last updated the Program
Guide data. You can access this through Setup > System Information. If it says the last
attempt failed, check your internet connection or the Autodial if Needed for Internet
option located within Setup > Detailed Setup > General.
A portion of my Program Guide says “No Data”.
This means that the station has not provided programming data for that period or you’ve
gone past the amount of data available for approximately the next 14 days. Also, if you
have just finished configuring SageTV, it may not have had time to download all the
guide data.
Some of my channels are not appearing in the Program Guide.
Go to Setup > Setup Video Sources > choose the configured tuner for the channel in
question > Channel Setup and see if you have that channel selected for viewing. If the
channel does not appear in the lineup there is a discrepancy between Zap2it, our
Programming Data provider and your service provider. Please send us an email at
[email protected] so we can contact Zap2it directly.
Some of my ATSC, QAM, or other digital tuner channels have no or limited EPG data.
The channels may not be mapped to the correct station names. See the information about
Remapping Stations for EPG data using ATSC or QAM Digital Tuners, in chapter 5’s
section for Channel Setup.
I’m behind a firewall and I’m having problems accessing the SageTV EPG service. What
ports do I need to have open on the firewall to allow SageTV to communicate to the server?
SageTV uses port 7760 in TCP/IP mode.
Copyright 2010 SageTV, LLC All rights reserved
For additional support, go to www.sagetv.com/support.html or email us at [email protected]
SageTV V7.0 User’s Guide
Chapter 7: Frequently Asked Questions
Page 241
Configuration & Customization
My PC clock is out of sync with my programs.
You can have your PC system clock sync up with the SageTV guide server, which is set
to the Atomic clock on a daily basis. This option is available in Setup > Detailed Setup >
General.
Firewall Settings
What ports do I need to open in my firewall for SageTV?
These are the ports that should be opened:
o 7760 (TCP) – This port must be opened for SageTV to be able to connect to the
EPG server so that it can download program listings for the Program Guide.
o 42024 and 7818 (TCP) – These ports must be opened on both the SageTV and
SageTVClient systems in order for the server to be able to communicate with the
client.
o 8270 (UDP) – This port is used for automatic server discovery when SageTV
Client starts. This port is not required to be open, since you can simply enter the
IP address or name of the server computer to connect to when the client starts.
(See Configure SageTV Client to Connect to the Server.) Also, you can configure
SageTV to automatically connect to the same server every time it starts. See
Detailed Setup: General Settings to set that option.
o 8000 (TCP) – This port is only used on a Linux installation of SageTV in order to
contact SageTV for license activation.
What ports do I need to open in my firewall for SageTV network encoders?
These are the ports that should be opened when using network encoders:
o 8271 (UDP) – Should be opened on the SageTV server; used by the server to find
network encoders.
o 6969 (TCP) – Should be opened on any SageTV network encoders; used by the
network encoder to talk to the SageTV server.
What ports do I need to open in my firewall for the Media Extender?
The following ports are used by any Media Extender:
o 31100 (UDP) – For discovering the SageTV server after booting.
o 31099 (TCP) – For SageTV usage after fully booted and SageTV is loaded.
In addition, the following ports are also used by a Hauppauge MediaMVP Media
Extender:
o 16867 (UDP) – For booting the MVP Media Extender.
o 16869 (UDP) – For booting the MVP Media Extender.
o 16881 (UDP)
Copyright 2010 SageTV, LLC All rights reserved
For additional support, go to www.sagetv.com/support.html or email us at [email protected]
SageTV V7.0 User’s Guide
Chapter 7: Frequently Asked Questions
Page 242
What ports do I need to open in my firewall for the Placeshifter Client?
The following port is used by a Placeshifter Client:
o 31099 (TCP) – For SageTV usage. This port should be opened on your
firewall/router and forwarded to the computer that is running the SageTV server.
o 31100 (UDP) – For SageTV Placeshifter usage. The Placeshifter uses this port to
auto-discover SageTV servers on the local network.
o 8018 (TCP) – For SageTV Placeshifter usage. When using a Locator ID to locate
your SageTV server, your server uses this port to register its Locator ID and the
Placeshifter client uses this port to contact the Locator server to find your server.
Note: If an IP address is used instead of a Locator ID, this port does not need to
be used.
o 7818 (TCP) – For SageTV Placeshifter usage. When the Placeshifter is set to not
transcode the video over a local network connection, this port is used to stream
the media.
Can the Media Extender or Placeshifter Client port be customized?
If the default port is changed, then a Media Extender will not be able to connect to the
server, however a Placeshifter client will still be able to connect. The default port 31099
can be configured in sage.properties on the SageTV server computer via this property:
o extender_and_placeshifter_server_port
However, if your goal is to change the external port number on your router/firewall, a
better solution is to use UPnP port forwarding configuration (see the Configure
Placeshifter Internet Connection configuration wizard in the Detailed Setup: Server
Settings menu) and choose a custom external port number. This will keep the internal
port as 31099, allowing Media Extenders to still be able to connect to the server.
When using a Placeshifter Client with a custom external port number, the Locator ID will
be able to automatically connect using that port. If you have your Placeshifter client
connect directly to your IP address by adding a new Placeshifter server in the SageTV
Placeshifter Servers Manager (see Placeshifter Client Connections), specify the address
of the server followed by “:port”, such as:
o <your IP address>:31099
Copyright 2010 SageTV, LLC All rights reserved
For additional support, go to www.sagetv.com/support.html or email us at [email protected]
SageTV V7.0 User’s Guide
Chapter 8: Version History
Page 243
Chapter 8: Version History
Listed below are some of the changes to SageTV and this document for versions 6.0 and later,
shown in no particular order for each version. This change list does not represent every change;
it is only meant to highlight some of them.
Version 7.0
Redesigned the user interface, with new layouts and options on most menus. The default
STV file is now SageTV7.xml instead of SageTV3.xml. Use the Options command to
explore the options available on menu.
Seamless recording/playback transitions between shows when watching Live TV
DirectShow demux filter for handling MKV, MP4 and FLV media types
New 'Effects' rendering system with support for more advanced and easier to use
animations (layers are no longer needed)
Background image loading system allows for faster loading of thumbnails and other
image resources w/out interfering with UI responsiveness.
Support added for playback of ISO DVD & BDMV (BluRay) files on all platforms that
support non-ISO playback (on Windows this requires the free application Virtual Clone
Drive to be installed).
New Pan/Zoom style slideshow transition effects.
SageTV recordings now have their full metadata embedded into the file.
When viewing the list of running processes on a PC, two of each SageTV process will be
listed, so you will see two SageTV.exe, two SageTVService.exe, and/or two
SageTVClient.exe processes depending on how SageTV is running on a PC.
Added the Plugin Manager menu and its related menus; used to simplify installing
customizations developed by other SageTV users.
Added the SageTV HD Theater, model STP-HD300, to Appendix M: SageTV Media
Extenders.
The list of Supported Media Types has been updated.
Added support for Blu-ray video playback; see Playing Hard Drive Based Blu-rays.
Copyright 2010 SageTV, LLC All rights reserved
For additional support, go to www.sagetv.com/support.html or email us at [email protected]
SageTV V7.0 User’s Guide
Chapter 8: Version History
Page 244
Added several new options to the Detailed Setup menu, including these options in these
sections of Detailed Setup:
o General
Video Recording Path Optimization Style – Option to affect how SageTV
chooses which recording directory to use to store the next recording.
Animation Options – Updated for the new animation system and to
enable/disable additional options.
o Multimedia
Default Audio Language
Default Subtitle Language
SageTV Window is Always On Top
o Video / Audio
VC1 Video Decoder Filter
Media Player for non-MPEG Files
HD Audio Decoder Filter
HD Audio Output
o Advanced
Automatic Update Checks – Set options regarding automatically checking
for online video, STV, SageTV, and extender firmware updates.
o Customize
Font Size Limitation Settings
Online Video Options - Expanded the set of options to include options for
Channels.com online videos and setting the temporary file storage location
for use when playing online videos.
Ignore Leading Articles During Text Sorting – New options related to
ignoring articles at the beginning of text, such as ‘a’, ‘an’, and ‘the’, when
sorting.
Add ShowID as part of Movie Favorites – An option to help limit a
Favorite to a specific movie.
Always ask whether to resume or restart partially watched videos
Automatically add converted videos to database
Number of Days to Schedule Recordings – Set the number of days
SageTV looks ahead when creating a recording schedule.
For grouped items: Select opens options dialog, Info browses into group –
Toggles whether the Select or Info command is used to open the options
dialog for a group vs browsing into the group.
Use wrap-around scrolling in single column vertical lists
Use vertical wrap-around scrolling in the Program Guide grid
Use ‘Fixed Focus’ in single column non-wrapped vertical lists
TV Category Background Colors – Adds another way to access the option
to set the background colors for TV airings; already available via the
Setup -> Help submenu on the Main Menu.
Copyright 2010 SageTV, LLC All rights reserved
For additional support, go to www.sagetv.com/support.html or email us at [email protected]
SageTV V7.0 User’s Guide
Chapter 8: Version History
Page 245
Changes to the Favorite Details menu:
o The Keep At Most setting can now be set up to 63.
o User-Defined Categories can be assigned to Favorites.
o The Automatic Conversion option can be used to automatically convert a
Favorite after its recording completes.
o When changing the settings for a Favorite, if a change will result in the Favorite
being the same as another Favorite, the change will not take effect and a message
will be shown.
o Any Favorite can have a Keyword added.
The default scheduling lookahead time is now 14 days. See Scheduling up to 14 Days in
Advance under the Notes about Scheduled Recordings. The setting can be changed via
the Number of Days to Schedule Recordings option.
STP-HD200 and STP-HD300 extenders can use graphical visualizations on the Music
Playback screen.
Added the More by People in Show option to the Airing and Video Options Dialog;
used to find more airings by people with credits for a show or add/change that person’s
Favorite.
Added Edit User Categories and Edit Video Information options to the Airing and
Video Options Dialog and Grouped Airings and Videos Options Dialog; used to edit user
defined categories for recordings and MPAA rating and category for imported videos.
The Check for STV Update option in Detailed Setup: Advanced Settings, used to check
for, download, and install updates for the default user interface, is now available on
Windows Vista and Windows 7 systems even if UAC is enabled.
Added the Channel Manager menu, used to enable or disable channels from all lineups in
one place.
Overhauled the UI theme system; see: Appendix O: User Interface Themes.
The Video Playback Options Menu and DVD Playback Options Menu now have options
to Jump to Beginning and Jump to End.
Added Enter Network Path to the File Browser Options when browsing a network file
system in the File Browser menu.
The SageTV Recordings menu can filter by user defined categories as part of its Filtering
Options dialog.
The number of views on the SageTV Recordings menu can be configured from 4 to 8 via
the Number of Views option in the SageTV Recordings Menu Options dialog.
Copyright 2010 SageTV, LLC All rights reserved
For additional support, go to www.sagetv.com/support.html or email us at [email protected]
SageTV V7.0 User’s Guide
Chapter 8: Version History
Page 246
The Parental Control Restrictions menu allows restricting access to setup related menus.
Added Channel.com Web Shows to the Online Services menu.
The Video Browser menu now has a Category view, which groups all imported videos
by their categories.
The Video Browser Menu Options dialog’s Advanced Options now has an option to
choose whether recorded files found by SageTV in video import directories should be
considered to be recordings or imported videos.
Version 6.6
Added the System Messages menu, where important SageTV system status and
information messages are listed. Alert icons are displayed on the menu header when new
system messages have been added. See Status Indicator Icons.
The Channel Setup series of menus have been reorganized and improved. There are too
many changes to be listed here. See the Channel Setup, Remap Channel, Add Channel to
Lineup, and Channel Scan Results menus for full details about their usage.
The folder view of the Music Browser menu can now be configured to display the music
import folders separately or combined into a single tree view.
Added Always start video playlist items from the beginning option in Detailed Setup:
Customize Settings.
Added “Maximum Results per Search” option in Detailed Setup: Customize Settings.
Added “Debug Logging” option in Detailed Setup: Advanced Settings.
Added the “H.264 Video Decoder Filter” option in Detailed Setup: Video/Audio Settings.
Added the “Reload last custom STV” option in Detailed Setup: Advanced Settings.
During Picture Viewing, use of the Pause and Play commands will also pause and resume
music playback if music is playing while viewing a slideshow.
Added the “Allow Placeshifter clients to automatically login” option in Detailed Setup:
Server Settings.
Slideshows may be played in random order via an option available when starting a
slideshow on the Photo Browser menu, or via the “Random Screen Saver Slideshow
Order” option in the Screen Saver Options dialog in Detailed Setup: General Settings.
Copyright 2010 SageTV, LLC All rights reserved
For additional support, go to www.sagetv.com/support.html or email us at [email protected]
SageTV V7.0 User’s Guide
Chapter 8: Version History
Page 247
Added support to recognize Blu-ray (BD) disks in the Video Browser and other
appropriate places.
Default recording quality settings can no longer be set for digital tuners via the
“Recording Quality” option in Detailed Setup: Multimedia Settings. Also, when trying to
configure recording quality settings there or via the Record Options for Manual
Recordings and Recording Quality for Favorites, the user is warned if only digital tuners
are in use or if there is a mixture of digital and analog tuners. The warning can be
disabled after viewing it.
Added the Reset Disabled Warnings option in Detailed Setup: Customize Settings.
The “Automatically Enable Channels Newly Added to EPG Lineups” option in Detailed
Setup: Customize Settings is also available on the Channel Setup menu via the Options
command.
When setting a Manual Recording for an airing that is a padded Favorite, a dialog will
ask whether the Manual Recording should inherit the Favorite’s start and end padding.
Closed captions are now supported; see Appendix K: Closed Captions.
The Video Playback Options Menu and DVD Playback Options Menu now have
additional subtitle and closed caption options.
The Aspect Ratio Mode selection dialog now has the “ZoomC” and “Fill Wide” aspect
ratio modes for HD Extenders only.
Version 6.5
Added the SageTV HD Theater, model STP-HD200, to Appendix M: SageTV Media
Extenders. And, added references to using the new SageTV STP-HD200 HD Theater as
an extender, in places where only the STX-HD100 had been mentioned.
Added information for Remapping Stations for EPG data using ATSC or QAM Digital
Tuners as part of the Channel Setup description.
Added Display OSD between Playlist Segments option in Detailed Setup: Customize
Settings. Configure whether the OSD will appear on the playback menu when a music or
video playlist changes to a different playlist item.
Added RC5 Repeat Detection option in Detailed Setup: Customize Settings, for HD
extenders only. This option can be used if you have a customized remote that does not
properly toggle the codes for the RC5 IR protocol.
The Remote Control Options dialog in the Source Details menu now includes an option
to set the IR Blaster Repeat Factor.
Copyright 2010 SageTV, LLC All rights reserved
For additional support, go to www.sagetv.com/support.html or email us at [email protected]
SageTV V7.0 User’s Guide
Chapter 8: Version History
Page 248
Like the Music Browser menu already did, the File Browser menu now displays the
playback information and controls at the bottom of the screen only when media is
playing; when nothing is playing, the browser content expands to fill the space.
Added an option to Clear all Remapped Channels in the Edit Channel Lineup dialog on
the Channel Setup menu.
During video playback, if the video contains multiple subtitle languages, the pop-up
Options menu will contain a choice for selecting the subtitle language to use.
Version 6.4
Added more information about the Aspect Ratio Mode selection dialog, where the aspect
ratio mode can be selected during playback and where custom aspect ratio modes can be
created and edited while using the STX-HD100 or STP-HD200 HD extender.
Added the Revert to the default STV option in Detailed Setup: Advanced Settings, used
to load the default STV when a custom STV is currently loaded.
After choosing the EPG data provider in Source Setup, if the lineup is already in use by
another source using a different physical input type, the user is asked whether to use the
same channel lineup or to copy the channels to a separately configurable lineup.
Added a new File Browser menu, where you can browse the SageTV server’s files, local
files, network files, import library paths, or recording paths, depending on the available
file systems and media paths.
The General tab on the Placeshifter Settings dialog now has a selection for Local
Filesystem Security, determining the SageTV server’s level of access to files on the
Placeshifter’s computer.
When available, EXIF information is displayed when viewing the detailed information
dialog for a photo.
Added a “Regenerate Thumbnail” option to the Options Menu While Viewing a Single
Image or a Slideshow to force the photo’s thumbnail to be regenerated.
When rotating a photo from the Options Menu While Viewing a Single Image or a
Slideshow, if the photo has camera orientation data, there will be an option to autorotate
the image to its correct orientation.
Due to changes in the weather.com information feed, the Weather menu now contains a
5-day forecast.
The Favorites Manager can list all the Favorites sorted by Priority or by Title.
Copyright 2010 SageTV, LLC All rights reserved
For additional support, go to www.sagetv.com/support.html or email us at [email protected]
SageTV V7.0 User’s Guide
Chapter 8: Version History
Page 249
On the Recording Schedule menu, added an option to configure the number of tuner
columns displayed in the Parallel schedule viewing mode.
Added the DirecTV Fast Serial Channel Changes option in Detailed Setup: Customize
Settings to allow choosing Fast or Normal mode for changing DirecTV channels via
serial cable.
Version 6.3-B
Fully downloaded online video and audio-only files may be saved from the Video
Playback or Music Playback screen by using the Record command or the Save
Downloaded File option in the pop-up options dialog during playback. The files will
become imported media, available for playback from the Video Browser or Music
Browser.
Favorites can be limited to multiple channels on the Favorite Details menu, instead of
being limited to only a single channel.
Imported DVD files no longer need to be in the VIDEO_TS subdirectory; see: Appendix
I: Playing DVDs and BDs from the Hard Drive.
On the Program Guide, the Skip Fwd #2 and Skip Bkwd #2 commands can be used to
jump 1 day ahead or back, respectively. Or, enter a number before using those commands
to jump by that many days.
Version 6.3-A
The trial usage period is now 21 days.
Added the SageTV HD Media Extender, model STX-HD100, to Appendix M: SageTV
Media Extenders.
The Favorite command is now available for grouped TV airings or recordings. See
Grouped Airings and Videos Options Dialog for more information.
Added new options in Detailed Setup: Multimedia Settings for Output Resolution and
Native Output Resolution Switching.
Added the SageTV MPEG Video Decoder uses DXVA (hardware acceleration) option in
Detailed Setup: Video/Audio Settings, which is used to enable or disable hardware
assisted video decoding when using the SageTV MPEG Video Decoder.
Copyright 2010 SageTV, LLC All rights reserved
For additional support, go to www.sagetv.com/support.html or email us at [email protected]
SageTV V7.0 User’s Guide
Chapter 8: Version History
Page 250
Version 6.2
Added a new appendix to cover some of the SageTV differences on the various operating
systems which can be used with SageTV. See: Appendix P: Operating System
Differences.
Added a new consolidated Search menu, where you can search for any type of media.
Added Instant Search, where search text can be entered while on a navigation menu
before jumping to the Search menu. Also added the Instant Search mode on Navigation
Menus option in Detailed Setup: Customize Settings, used to configure how the Instant
Search feature works while on navigation menus.
The Remote Control Options dialog in the Source Details menu now includes an option
to set a Prefix Code, which is transmitted before transmitting the digits for a channel
change.
The TV Show Editorials and TV Show Highlight menus now include markers on the
editorials to indicate which shows are scheduled to be recorded, along with which ones
are first runs, watched, etc.
The YouTube Video and Google Video content lists are cached for several minutes, so
that the same category can be viewed again without having to wait for the list to
download again every time that category is selected. In addition, their search results
menus have a category bar providing quick access to some other categories without
leaving the search results menu.
The Music Browser menus display the playback information and controls at the bottom
of the screen only when media is playing; when nothing is playing, the browser content
expands to fill the space.
Added the Channel Entry Options in Detailed Setup: Customize Settings, where autoaccept after timeout can be enabled and the maximum number of digits in a channel can
be set.
Added the Optimized Image Loader option in Detailed Setup: Advanced Settings; when
enabled, the option allows for faster loading of larger images.
The Video Detail screen for imported videos can now display details about a video, if
metadata has been imported along with the video.
Can jump to the System Information display from the Main Menu by using the Info
command.
Copyright 2010 SageTV, LLC All rights reserved
For additional support, go to www.sagetv.com/support.html or email us at [email protected]
SageTV V7.0 User’s Guide
Chapter 8: Version History
Page 251
Version 6.1
Added YouTube Video link to the Online Services menu.
The Placeshifter client can now be controlled by remote control. It can use an IRMan or
USB-UIRT IR receiver, and can respond to MCE remotes, multimedia keyboards, and
commands sent via Windows messages. See Placeshifter Settings to use an IRMan or
USB-UIRT, and see SageTV Commands for information about using messages or
multimedia keyboards and remotes.
Added notes about hard drive based DVD playback to Appendix I: Playing DVDs and
BDs from the Hard Drive.
When a music item is highlighted in the Music Browser, the Play command can be used
as a shortcut to add the music to any currently playing playlist. Previously, this shortcut
was only available when the Now Playing playlist was playing. Also, when music is
added to a playlist, a semi-transparent message is temporarily shown, confirming that the
action has been taken.
Moved the Server options from Detailed Setup: Advanced Settings to the new Detailed
Setup: Server Settings menu.
The Photo Browser can now sort pictures by filename or file date, in either ascending or
descending order.
The Stop command may be used while on the Channel Setup menu to stop playback of
the channel video preview.
Version 6.0
The Online Services menu is now accessible from the Main Menu, and has been extended
to include links to the Google Video and TV Show Editorials menus.
A pop-up dialog has been added to provide options to be performed on an entire group of
airings or videos. See the Grouped Airings and Videos Options Dialog for details.
The new Series Information screen provides more information about a series, such as a
description of the series, its history, and list of cast members. Only available when a
series has such data to be viewed.
Videos may be converted from one format to another. The current status of all conversion
processes can be viewed on the new Video Conversions screen.
During video playback, if the video contains multiple languages, the pop-up Options
menu will contain a choice for selecting the language to use.
Copyright 2010 SageTV, LLC All rights reserved
For additional support, go to www.sagetv.com/support.html or email us at [email protected]
SageTV V7.0 User’s Guide
Chapter 8: Version History
Page 252
During music playback, the background visualization can be changed to show
information about the currently playing song.
A Photo Slideshow may be used as the Screen Saver Style setting in the Screen Saver
Options dialog in Detailed Setup: General Settings. Also, if music is playing, the music
information will be displayed as the screen saver.
The settings to be used when a mouse button is clicked and held over an icon are
configured via the new Mouse Auto-Repeat Rate option in Detailed Setup: Customize
Settings.
The MVP Media Extender can play imported DVDs in the video library. See MVP
Supported Media Types.
Left-clicking on the video preview window while video playback is active in that window
will cause SageTV to jump to the playback screen.
Added the Adjust Display Aspect Ratio screen to both Detailed Setup: Multimedia
Settings and Configuration Wizard: General and User Interface Options.
During Picture Viewing for a single picture, if there are additional pictures in the same
folder as the current picture, you can scroll through the pictures without leaving the
viewing screen.
The Picture Viewing screen has been updated to treat all picture viewing as a slideshow.
If a slideshow is started, it will play according to the slideshow option settings. If a single
image is viewed, a slideshow of all images in the current folder will begin in paused
mode, with the selected image displayed. From this paused state, the Play command can
be used to switch to active slideshow mode. Additionally, the options available while
viewing pictures have been expanded and displayed as a transparent overlay on top of the
current picture.
The Shift+Ins keystroke can be used to paste the text contents of the system clipboard
into a text entry field.
When configuring a DVB tuner source, the DVB region or provider will be selected from
a list presented after choosing the Device Input during Source Setup. And, after the
source has been added, there will be an option to choose the DVB region or provider on
the Source Details menu.
Additional information has been added for remapping digital channels. See Remapping
Channels for Digital Tuners.
Copyright 2010 SageTV, LLC All rights reserved
For additional support, go to www.sagetv.com/support.html or email us at [email protected]
SageTV V7.0 User’s Guide
Appendix A: SageTV Properties Settings
Page 253
Appendix A: SageTV Properties Settings
In addition to the customization settings available on the Detailed Setup menus, SageTV has
additional advanced settings that can changed by editing the properties file, found in your
SageTV directory.:
When using SageTV in Service Mode, the service will use Sage.properties while the UI
will get its settings from SageClient.properties.
When not using Service Mode, SageTV uses only Sage.properties.
SageTVClient uses SageClient.properties.
The Media Extender and Placeshifter clients use properties files located in the clients
directory, found in your SageTV installation directory. Notes: The clients folder may not
exist after installing SageTV; it is automatically created when it is needed, as a remote
client connects. Not all properties affect these remote clients.
Some of the properties file settings correspond to settings made within SageTV. We recommend
saving a copy of your existing properties file before editing it.
To change any of the settings in the properties file, you must first exit the service, SageTV, or
SageTVClient completely; do not just put it to sleep. See Exiting SageTV for exiting the UI
portion and Controlling SageTV’s Service Mode Options for stopping the service. If you do not
exit SageTV first, any changes will be overwritten the next time SageTV exits and the new
settings will never be used. After exiting, you can edit the properties file in any basic text editor,
such as Windows Notepad with Word Wrap turned off. When done, save the file and restart
SageTV or SageTVClient.
Note: You will need to precede any of the three special characters ‘:’ (colon), ‘=’ (equal sign), or
‘\’ (backslash) with a ‘\’ backslash before using them in a property value. However, when the
equal sign is used to assign a property value, it does not need the extra backslash.
Configurable properties for SageTV Version 2.0 and later
actisys_irtune_global_preroll
amount of time in milliseconds to wait after a channel switch before performing any
external tuning operation
always_autotune
true/false to allow autotuning for best frequency
Copyright 2010 SageTV, LLC All rights reserved
For additional support, go to www.sagetv.com/support.html or email us at [email protected]
SageTV V7.0 User’s Guide
Appendix A: SageTV Properties Settings
Page 254
antialias_text
whether or not to use antialiasing for rendering text
antialias_text_point_size_min
if antialiasing text is enabled, fonts below this point size will not be antialiased
epg/epg_import_plugin
Java class name for EPG plugin
close_video_on_pvr350osd_reset
if the PVR350 OSD reports an error this will also close the MediaPlayer before trying to
reset the 350 OSD
disable_desktop_ui_rendering
disables drawing the UI to the desktop window when 3D Acceleration is Disabled in the
Detailed Setup: Advanced Settings configuration menu
epg/logo_dir
directory to use for importing channel logos in .jpg, .gif. or .png format
java2d_render_higher_quality
enables high quality rendering when the 3D renderer is disabled
load_at_startup_runnable_classes
list of classes to create instances of and create threads for at SageTV startup. The classes
must implement “Runnable”.
media_player_uses_system_volume
if set to false will use the media player's volume controls instead of the windows system
volume controls
minimum_video_memory_for_dx9
the minimum amount of VRAM of computer needs to have to allow 3D acceleration to
be enabled
mmc/country_code
number that specifies which country's tuning frequencies to use for channel tuning; use
the international telephone code for your country.
mmc/feature_mask_disable
allows disabling of certain hardware multimedia functions, a value of 8 will disable the
Hauppauge Micronas hack which may be causing PAL users some problems
Copyright 2010 SageTV, LLC All rights reserved
For additional support, go to www.sagetv.com/support.html or email us at [email protected]
SageTV V7.0 User’s Guide
Appendix A: SageTV Properties Settings
Page 255
mmc/ignore_encoders
list of the capture devices for SageTV to ignore, these will NOT show up in the list of
capture devices
mmc/encoders/XXX/encoder_merit
used to determine which capture device is 'preferred' when all other things are equal;
higher numbers mean higher priority
mmc/encoders/XXX/never_stop_encoding
will cause SageTV to never stop recording on that capture device, helps fix problems
with the PVR350 TV output crashing
mmc/video_format_code
Can be one of the following values:
•
0
AnalogVideo_None
•
1
AnalogVideo_NTSC_M
•
2
AnalogVideo_NTSC_M_J
•
4
AnalogVideo_NTSC_433
•
16
AnalogVideo_PAL_B
•
32
AnalogVideo_PAL_D
• 128
AnalogVideo_PAL_H
• 256
AnalogVideo_PAL_I
• 512
AnalogVideo_PAL_M
• 1024
AnalogVideo_PAL_N
• 2048
AnalogVideo_PAL_60
SageTV interprets anything below 8 to be NTSC and anything >= 8 to be PAL.
quick_menu_sizes
list the SageTV window sizes available for quick access when you right-click on the
window’s title bar, separating WxH options with commas. The property is initially set for
two sizes: 640x480,320x240. Heights will be automatically corrected for PAL users.
sagetv_port
port to use for TCP/IP connections between the SageTV Client & SageTV
scheduler_export_file
set to write a file out with the current Sage recording schedule, can be used to create a
simple web page to show SageTV's current scheduled recordings
seeker/channel_change_ask_advance
amount of time before SageTV needs to change the channel that it will ask, in
milliseconds
Copyright 2010 SageTV, LLC All rights reserved
For additional support, go to www.sagetv.com/support.html or email us at [email protected]
SageTV V7.0 User’s Guide
Appendix A: SageTV Properties Settings
Page 256
seeker/max_duration_encoder_reset
the maximum amount of time that can pass before resetting a non-multiplexed MPEG
encoder, in milliseconds
seeker/music_library_import_filename_extensions
list of music filename extensions that are valid for Library importing
seeker/picture_library_import_filename_extensions
list of picture filename extensions that are valid for Library importing
seeker/use_errant_dir
Set to true to move errant recordings to a subfolder called “errant” in the existing Video
Directory. If false, the unrecognized recordings will be imported into the Video Library
instead.
seeker/video_library_import_filename_extensions
list of video filename extensions that are valid for Library importing
startup_delay
causes a sleep when the app loads before it does anything, can help with loading at
startup issues
time_zone
can be used to force a time zone setting; set to the ID for your TimeZone, either an
abbreviation such as "PST", a full name such as "America/Los_Angeles", or a custom ID
such as "GMT-8:00", without quotes.
ui/disable_2d_double_buffering
disables double buffering in the UI when not using the 3D renderer
ui/fixed_resolution_height
height for the PVR350 OSD in pixels, set to 576 to use the PVR350 OSD in PAL format,
also set the DWORD registry variable:
HKEY_LOCAL_MACHINE\SOFTWARE\Frey Technologies\Common\NTSC=0
ui/focus_follows_mouse
if true then items will obtain the focus when the mouse cursor moves over them
ui/frame_decoration
This setting has an effect on how the SageTV window looks. 0=standard frame, 1=frame
with no title bar (can't be moved), or 2=frame with no border or title (can't be moved or
resized).
Copyright 2010 SageTV, LLC All rights reserved
For additional support, go to www.sagetv.com/support.html or email us at [email protected]
SageTV V7.0 User’s Guide
Appendix A: SageTV Properties Settings
Page 257
ui/system_memory_2dimage_cache_size
minimum bounds to use when maintaining the system memory image cache
ui/system_memory_2dimage_cache_limit
maximum bounds to use when maintaining the system memory image cache
ui/text_shadow_always
if true, text shadowing will always be used.
ui/text_shadow_never
if true, text shadowing will never be used. Will be overridden if ui/text_shadow_always
is also set to true.
ui/thumbnail_folder
folder to store thumbnails created by SageTV for imported picture files
ui/thumbnail_height
height to use when generating thumbnails
ui/thumbnail_width
width to use when generating thumbnails
ui/video_memory_image_cache_limit
the maximum amount of VRAM that SageTV will use to cache 3D textures
videoframe/additional_audio_filters
additional options for the Audio Decoder Filters. Semicolons separate additional
FilterName entries.
videoframe/additional_video_filters
additional options for the Video Decoder Filters. Semicolons separate additional
FilterName entries.
videoframe/disable_visualizations
true/false for music visualizations
videoframe/local_encoding_to_playback_delay
the amount of time SageTV should wait after starting recording of a file to start playing it
back if the capture device is not a network encoder
Copyright 2010 SageTV, LLC All rights reserved
For additional support, go to www.sagetv.com/support.html or email us at [email protected]
SageTV V7.0 User’s Guide
Appendix A: SageTV Properties Settings
Page 258
videoframe/network_encoding_to_playback_delay
the amount of time SageTV should wait after starting recording of a file to start playing it
back if the capture device is a network encoder
videoframe/skip_dvd_menus
when playing back a DVD SageTV will attempt to skip over any DVD Menus and start
playing the movie directly, sometimes this is not allowed by the DVD
videoframe/time_behind_live_to_disable_skip_forward
the amount of time you can be behind 'live TV' for SageTV to not allow you to try to skip
forward anymore
videoframe/time_to_start_into_tv_file_playback
amount of time to start after the beginning of anything recorded from TV, used to avoid
seeing the channel change at beginning of a recording
videoframe/volume_step
fraction to increase the volume by for volume adjustments (scale of 1-100)
wizard/clear_profile
will remove all information from the database concerning things you've watched or
recorded and all of your favorites
wizard/clear_watched
will remove all information from the database about things you've watched with SageTV
wizard/widget_db_file
the STV file that SageTV should load for its application definition, including the full path
to the file.
Copyright 2010 SageTV, LLC All rights reserved
For additional support, go to www.sagetv.com/support.html or email us at [email protected]
SageTV V7.0 User’s Guide
Appendix B: Adding Channel Logos
Page 259
Appendix B: Adding Channel Logos
SageTV supports the use of channel logo images in the Program Guide, or nearly any place
where the channel name is displayed. The logos are stored in the directory specified by the
epg/logo_dir property, by default this would be a subdirectory named "ChannelLogos" in your
SageTV directory. SageTV can import logos stored in the JPEG (.jpg), GIF (.gif), or PNG (.png)
formats.
To add a logo for a channel, first determine the channel name: simply look
at the Program Guide to see the name displayed under the channel
number. In the screen portions shown, channel 39 is TBS. The channel
name is then used as the name of the image file to be used as the logo: if
the file happens to be a JPEG image, the filename would be: “tbs.jpg”,
without the quotes. Place a copy of that file in the logo directory. If
SageTV is already running, it will automatically find the file and begin
using it as the logo for TBS, so there is no need to restart SageTV.
However, sometimes there may be a delay before new logos are
recognized and loaded. If you wish to have the logos loaded and used immediately, you can exit
and restart SageTV.
SageTV does not provide channel logos. You may either create the images yourself or download
them from various web sites, such as www.satlogo.com. Search the internet for other logo
sources.
Copyright 2010 SageTV, LLC All rights reserved
For additional support, go to www.sagetv.com/support.html or email us at [email protected]
SageTV V7.0 User’s Guide
Appendix C: Managing Recording Files
Page 260
Appendix C: Managing Recording Files
SageTV can automatically manage the disk space for all the video recording directories
configured in Detailed Setup: General Settings, including deleting old recordings to make room
for new ones. Or, if you prefer, you can manage the recordings yourself, removing recordings
you no longer wish to keep by using the Delete command. Either way, if you do happen to run
out of available disk space in all your video recording directories, SageTV will still
automatically remove recordings when it needs to do so to make space for new ones. Note: If
there is not enough space available to create a new recording and none of the existing
recordings may be deleted automatically, then SageTV will be unable to record additional
shows until you delete some recordings.
Where to Store the Next Recording
When SageTV prepares to record a new show, it first must decide where to store the recording.
When there is a single recording to be active: if there is enough free space already available
for the expected size of that single recording, SageTV will simply choose to store the recording
in the video directory that has the most space available. Thus: the video directory with the most
space available for use by SageTV will always be used first. Remember: when determining the
amount of space available in a directory, SageTV will take into account the space you may have
specified that it should not use on that drive. If the free space is 40GB, but you told SageTV to
leave 15GB free for that video directory, only 25GB is available.
When multiple recordings are active at the same time: depending on the Video Recording
Path Optimization Style setting, SageTV may decide to store the next new recording in the
recording directory with the most available free space (the default Optimize for Space setting)
or it may try to spread simultaneous recordings across multiple recording directories so that not
all recordings are being written to the same drive at the same time (optional Optimize for
Bandwidth setting). Note: When optimizing for bandwidth and there is not enough free space
for a new recording, SageTV may delete recordings that are the lowest priority in the recording
directory it selects to store the new recording, but the deleted recordings may not be the lowest
priority of all existing recordings.
Note: It is recommended that you not specify more than one video directory for each drive or
partition being used to store SageTV recordings, otherwise SageTV could report that more space
is available than there actually is when you view the System Information display.
No More Free Space
At some point, if you allow SageTV to manage your recording files for you, there will not be
enough space available for a new recording. When this happens, SageTV will automatically
Copyright 2010 SageTV, LLC All rights reserved
For additional support, go to www.sagetv.com/support.html or email us at [email protected]
SageTV V7.0 User’s Guide
Appendix C: Managing Recording Files
Page 261
delete an existing recording to make room for another one. Which show gets deleted is
determined by the relative priorities of all recording types, with lower priority recordings being
deleted before those with a higher priority. From highest to lowest, the priority rankings are:
Manual Recordings and Favorites with AutoDelete off. Note: These types of recordings
are never automatically deleted.
Favorites with AutoDelete on
Intelligent Recordings
Watched Shows
Live TV
Recordings marked as Don’t Like
This ranking means that recordings marked as Don't Like are deleted first; then Live TV; then
shows marked as watched; then Intelligent Recordings; then deletable Favorites. If two shows
have the same priority, the older of the two will be deleted first. Some further notes:
Manual Recordings are never automatically deleted by SageTV.
Favorites with AutoDelete set to ‘No’ (Manual) are never automatically deleted by
SageTV.
Archived SageTV Recordings are never automatically deleted by SageTV.
Intelligent Recordings will not be scheduled in place of Manual Recordings or
Favorites, nor will any unwatched deletable Favorites be deleted to make room for
new Intelligent Recordings.
When optimizing for bandwidth and there is not enough free space for a new
recording, SageTV may delete recordings that are the lowest priority in the
recording directory it selects to store the new recording, but the deleted recordings
may not be the lowest priority of all existing recordings.
If there is not enough space available to create a new recording and none of the
existing recordings may be deleted automatically, then SageTV will be unable to
record additional shows until you delete some recordings.
Automatic Cleanup of Live TV
When used with the Intelligent Recording feature disabled, SageTV is initially configured to
automatically delete all Live TV recordings that are not scheduled Favorites or Manual
Recordings. So, if you were to watch Live TV, the recording file used while the show is airing
will be saved to your drive; however, shortly after it finishes airing and you stop watching the
recording, it will be deleted. If the Live TV that you watch happens to be an in-progress
recording of a scheduled Favorite or Manual Recording, that show will not be deleted
immediately after the show is over.
Copyright 2010 SageTV, LLC All rights reserved
For additional support, go to www.sagetv.com/support.html or email us at [email protected]
SageTV V7.0 User’s Guide
Appendix C: Managing Recording Files
Page 262
When the Intelligent Recording feature is enabled, this auto-cleanup feature is not enabled, so all
recordings will remain on your drive until SageTV needs room for additional recordings. This
means that all the partial Live TV files that might have been created when channel flipping will
still be on your drive, but they will be some of the first files deleted when additional space is
needed. So, don’t worry that the files are wasting space: they will eventually be deleted, just not
as soon as if auto-cleanup were active.
Note: If the Intelligent Recording feature is disabled, existing Intelligent Recordings will not
automatically be deleted immediately. Similarly, if you were to delete or change a Favorite’s
settings or if you were to clear a recording’s Manual Recording setting, the recording will not be
automatically deleted immediately. Existing recordings will remain until space is needed or until
you delete the recording.
If you wish to disable auto-cleanup permanently, see the option to Delete Live TV files when not
using Intelligent Recording, found in Detailed Setup: Customize Settings. Again: while some
files will not be deleted immediately, SageTV will delete the unneeded files when more space is
required.
Copyright 2010 SageTV, LLC All rights reserved
For additional support, go to www.sagetv.com/support.html or email us at [email protected]
SageTV V7.0 User’s Guide
Appendix D: SageTV Command Line Parameters
Page 263
Appendix D: SageTV Command Line Parameters
SageTV and SageTVClient can accept a few command line parameters when they are run. To do
so, simply add one of the parameters listed below to the command line when the exe file is
started, whether you do so at a command line prompt, in a Windows shortcut, in a batch file, or
in some other form of script. Note that the character in front of some of the parameters is a single
dash (‘-‘, without the quotes) without any space between the dash and the parameter. There is, of
course, a space between the exe path and the parameter.
If you wish to create a shortcut where you can use a parameter, open your SageTV folder, rightclick on the SageTV.exe or SageTVClient.exe file and create a new shortcut. Then right-click on
the shortcut and go to Properties. In the Target line at the end after the quotes, enter a single
space and then the desired parameter. The correct entry will look like this, with “parameter”
equal to whatever parameter you used:
"C:\Program Files\SageTV\SageTV\SageTV.exe" parameter
or
"C:\Program Files\SageTV\SageTV\SageTVClient.exe" parameter
The parameters are:
-event #
Sends the # command message to an already running copy of the same exe. See the List
of All SageTV Commands for the event number for each command.
Note: If the exe is not already running, using this parameter will have no effect. Also, it
will only send a single event number each time the exe is started, so do not use a series of
parameters such as “-event # –event #”.
An alternative to using this parameter is to use the user-provided SendMessage utility,
which can send multiple messages to SageTV or SageTVClient each time it is run. See
Appendix J: Using the SendMessage Utility
-dvd
This sends the same command to SageTV as using the -event parameter with the DVD
command (-event 74). This could be used to tell SageTV to go to DVD mode as part of
DVD autoplay when a DVD is inserted into the drive.
-awake
Used to awaken an already running copy of the program that is currently sleeping. If
SageTV is not already running, SageTV will not start. This is the same as sending the
-event parameter with the Power On command (-event 43).
Copyright 2010 SageTV, LLC All rights reserved
For additional support, go to www.sagetv.com/support.html or email us at [email protected]
SageTV V7.0 User’s Guide
Appendix D: SageTV Command Line Parameters
Page 264
Compare to: Running the exe with no parameters while it is already sleeping also wakes
SageTV, and it also starts SageTV if it wasn’t already running.
-client
For SageTV only: starts SageTV in client mode; often used when configuring a second
full installation of SageTV as a network encoder. See Appendix G: Network Encoding.
-connect hostname
For SageTVClient only: causes it to connect to the specified server when it starts.
-startup
When the property "ui/startup_type=2" is also set, this disables the splash screen and
loads SageTV in the system tray.
-stv filepath
Used to specify which STV file is to be used when SageTV starts. For the filepath listed
after the –stv parameter, use the full path to the STV file to be used. If there are spaces in
the full path, enclose the entire path in quotes. Note: The SageTV installer associates the
.STV file extension for the SageTV application. If SageTV is not running, you can
double-click on an STV file to automatically start SageTV and load that STV as the user
interface.
-properties filepath
Used to specify which properties file should be used when SageTV starts. For the
filepath listed after the –properties parameter, use the full path to the properties file to
be used. If there are spaces in the full path, enclose the entire path in quotes.
REGISTER
Note the all-capital letters. This causes the license key dialog to come up so you can
change the key SageTV or SageTVClient is using. The current license is cleared from the
PC. If the trial period is over, SageTV and SageTVClient will not run until a valid license
has been entered. See License Key Registration
Copyright 2010 SageTV, LLC All rights reserved
For additional support, go to www.sagetv.com/support.html or email us at [email protected]
SageTV V7.0 User’s Guide
Appendix E: Remote Controls
Page 265
Appendix E: Remote Controls
Among the remotes that can be used to control SageTV are the SageTV remote that comes with
the SageTV HD extenders, the Hauppauge remote that comes with many Hauppauge tuners, the
StreamZap remote, and nearly any remote that can be used with a general purpose infrared
receiver, such as the USB-UIRT mentioned in Appendix F: Infrared Receivers & Transmitters.
SageTV Remote
The SageTV remote comes with the HD media extenders sold by SageTV: the STX-HD100, the
STP-HD200, and the STP-HD300. The remotes that comes with these extenders are
preconfigured to control SageTV, as shown in the layouts shown on the following pages, and can
be reconfigured using the Link Infrared/Keystroke to SageTV Command option in Detailed
Setup: Commands Settings.
Programming the STP-HD300 Remote Control
The remote included with the HD Theater model STP-HD300 has three programmable buttons
for TV Power, TV Vol+, and TV Vol-. To program these buttons for the infrared (IR) codes to
control your TV, follow these steps:
1) Press and hold the Rmt Setup button on the remote until the red LED in the front emitter
window shifts to a brighter output, about 2 or 3 seconds. Once the red LED is in its
brighter state, the remote is in learning mode.
2) While in learning mode, press a button to learn the code from your TV remote: either TV
Power, TV Vol+, or TV Vol-. After pressing one of the buttons, the red LED will begin
blinking.
3) Hold the TV’s remote so that its IR emitter is about 1 to 2 inches from the IR window on
the HD Theater remote, then press and hold the button to be learned until the red LED on
the HD Theater remote stops blinking. While learning the IR code, the red LED will
blink faster, then stop blinking once the code is learned.
4) After learning an IR code, the HD Theater remote will still be in learning mode. You can
repeat steps 2 and 3 to learn additional codes from the TV remote. Exit learning mode by
pressing Rmt Setup again or wait about 10 seconds.
5) Once the HD Theater remote has learned the codes for your TV and has exited learning
mode, test the results by using the HD Theater remote to control your TV’s power and
volume functions. If the buttons do not work properly, repeat the IR code learning
process to try learning the IR code again.
Notes: Only infrared (IR) codes of approx 38KHz can be learned. The HD Theater remote does
not support learning radio (RF) signals or 56KHz IR signals.
Copyright 2010 SageTV, LLC All rights reserved
For additional support, go to www.sagetv.com/support.html or email us at [email protected]
SageTV V7.0 User’s Guide
Appendix E: Remote Controls
Page 266
SageTV STP-HD300 Remote Control Layout
Power On/Off
Toggle between playing
media & the last menu
Client: Program Guide
On: Jump to Main Menu
Off: Power On to last-used mode
TV Vol Up (programmable)
Music Menu
TV Vol Down (programmable)
Photo Menu
Client: SageTV Recordings
Networked Media Player:
Video Menu
Numeric entry keypad
- (dash)
Toggle Numeric Text
Entry mode
Change Audio
language
Go to the DVD’s Menu
Volume Up/Down
Channel Up/Down
Page Up/Down in menus
Options
Mute
Go Back to the
previous screen
Information
Select
Navigate Left, Right,
Up, and Down.
Watched
Client: Favorite
Record
Play
Pause
Stop currently playing
media file
Skip Back
Skip Forward
Smooth REW
Smooth FF
Skip Back #2
Delete
Skip Forward #2
Toggle Aspect Ratio mode
Change Video Out resolution
Don’t Like
TV Power (programmable)
Set up TV Power & Volume Buttons
Copyright 2010 SageTV, LLC All rights reserved
For additional support, go to www.sagetv.com/support.html or email us at [email protected]
SageTV V7.0 User’s Guide
Appendix E: Remote Controls
Page 267
SageTV STX-HD100 and STP-HD200 Remote Control Layout
Power On/Off
Toggle between playing
media & the last menu
Client: Program Guide
Main Menu
Search Menu
Music Menu
Online Services Menu
Photo Menu
Client: SageTV Recordings
Stand-alone: Video Menu
Numeric entry keypad
- (dash)
Toggle Numeric Text
Entry mode
Change Audio
language
Previous Channel
Volume Up/Down
Channel Up/Down
Page Up/Down in menus
Options
Mute
Go Back to the
previous screen
Information
Select
Navigate Left, Right,
Up, and Down.
Watched
Client: Favorite
Record
Play
Pause
Stop currently playing
media file
Skip Back
Skip Forward
Smooth REW
Smooth FF
Skip Back #2
Delete
Skip Forward #2
Toggle Aspect Ratio mode
Change Video Out resolution
Don’t Like
Return to DVD menu’s parent
Go to the DVD’s Menu
Copyright 2010 SageTV, LLC All rights reserved
For additional support, go to www.sagetv.com/support.html or email us at [email protected]
SageTV V7.0 User’s Guide
Appendix E: Remote Controls
Page 268
Hauppauge Remote
Hauppauge Remote Control Installation Instructions
In order to use the Hauppauge remote with SageTV, you must first install the Hauppauge remote
control software before installing SageTV. Then, when SageTV is installed, be sure to check the
option to configure support for the Hauppauge remote control in step 4 of the SageTV install
process. Then, during the Configuration Wizard, use the Set your Remote Control step to set
which Hauppauge remote you are using, or go to Detailed Setup: Commands Settings and use the
Remote Control Configuration option. The default button layouts are shown on the next pages.
SageTV Configuration Options for the Hauppauge Remote
Using its initial setup, the Hauppauge remote simply sends keystrokes to SageTV, so it will only
work when SageTV has Windows focus – when it is the active application receiving keyboard
input. An easy way to customize this remote, then, is to use the Link Infrared/Keystroke to
SageTV Command option in Detailed Setup: Commands Settings. Simply reassign a command
by pressing the remote button instead of pressing a key on the keyboard when prompted to do so.
For further information about configuring the remote to be able to wake SageTV when it is
sleeping, to work when SageTV does not have focus, or even to use the remote to control other
applications, please go to our discussion forum at forums.sagetv.com/forums.
Copyright 2010 SageTV, LLC All rights reserved
For additional support, go to www.sagetv.com/support.html or email us at [email protected]
SageTV V7.0 User’s Guide
Appendix E: Remote Controls
Page 269
SageTV Preconfigured 34 button Hauppauge Remote Control Commands
Copyright 2010 SageTV, LLC All rights reserved
For additional support, go to www.sagetv.com/support.html or email us at [email protected]
SageTV V7.0 User’s Guide
Appendix E: Remote Controls
Page 270
SageTV Preconfigured 45 button Hauppauge Remote Control Commands
SageTV Recordings
Music Menu
SageTV Main Menu
Put SageTV in Sleep Mode to
continue recording
Toggle between playing
media & the last menu
Photo Menu
Program Guide
Not Used
Navigate Left, Right,
Up, and Down.
Select
Go Back to the
previous screen
Information
Previous Channel
Volume Up/Down
Mute
Channel Up/Down
Page Up/Down in menus
Record
Stop currently playing
media file
Skip Back or Page Left
MVP: Smooth Rew
Skip Forward or Page Right
MVP: Smooth FF
Skip Forward #2
MVP: Skip Forward
Skip Back #2
MVP: Skip Back
Pause
Play
Numeric entry keypad
- (dash)
Not Used
Don’t Like
Watched
Favorite
Options
Copyright 2010 SageTV, LLC All rights reserved
For additional support, go to www.sagetv.com/support.html or email us at [email protected]
SageTV V7.0 User’s Guide
Appendix E: Remote Controls
Page 271
Streamzap Remote
Streamzap PC Remote Control Installation Instructions
DO NOT plug the USB infrared receiver into your PC yet.
Step 1:
Install the provided AAA batteries
Step 2:
If your PC is off, turn it on and wait for it to finish booting
Step 3:
Download the latest Streamzap drivers from www.streamzap.com/downloads and run the
exe.
Step 4:
Follow the on-screen instructions. When the software asks you to plug in the USB
infrared receiver, do so.
Step 5:
Wait for Windows to detect the hardware and install the device drivers. This can take
anywhere from a few seconds to a minute or longer on slow computers. On Windows XP,
always choose to “Install the software automatically”.
Step 6:
Once the hardware is properly installed, a full-screen slide show will appear to introduce
you to your new PC Remote.
If you need help installing the Streamzap PC Remote, please see www.streamzap.com/support.
SageTV Configuration Options for the Streamzap Remote
If you are using the Streamzap PC Remote control with SageTV, you can customize the Red,
Green, Yellow and Blue buttons to control SageTV commands. To assign these buttons to
SageTV, right-click on the Streamzap application running in the System Tray and select
“Settings”. You’ll be presented with the following screen:
Copyright 2010 SageTV, LLC All rights reserved
For additional support, go to www.sagetv.com/support.html or email us at [email protected]
SageTV V7.0 User’s Guide
Appendix E: Remote Controls
Page 272
If you would like your Streamzap remote to mirror the settings on the diagram located on the
next page, then assign the QuickLaunch buttons according to the following:
Red
Toggle Mouse Mode On/Off to take advantage of the mouse functionality of the
Streamzap remote
Green (SageTV “Info” command)
c:\Program Files\SageTV\SageTV\SageTV.exe -event 24
Yellow (SageTV “Options” command)
c:\Program Files\SageTV\SageTV\SageTV.exe -event 29
Blue (SageTV “Guide” command)
c:\Program Files\SageTV\SageTV\SageTV.exe -event 18
The path of SageTV.exe should be the same as where it is installed on your PC if it varies from
the above. For a list of the complete event commands available for SageTV, see the List of All
SageTV Commands. If you need help configuring your Streamzap PC Remote for SageTV,
please contact us at [email protected]. For help from other users regarding using the
Streamzap remote with Girder (www.promixis.com), please go to our discussion forum at
forums.sagetv.com/forums.
Copyright 2010 SageTV, LLC All rights reserved
For additional support, go to www.sagetv.com/support.html or email us at [email protected]
SageTV V7.0 User’s Guide
Appendix E: Remote Controls
SageTV Preconfigured Streamzap Remote Control Commands
Copyright 2010 SageTV, LLC All rights reserved
For additional support, go to www.sagetv.com/support.html or email us at [email protected]
Page 273
SageTV V7.0 User’s Guide
Appendix F: Infrared Receivers & Transmitters
Page 274
Appendix F: Infrared Receivers & Transmitters
SageTV has built-in support for use of Evation’s IRMan (www.evation.com) to receive
commands from infrared (IR) remote controls, the ACTiSYS IR-200L (www.actisys.com/ac200220.html) to transmit IR codes to change channels on cable and satellite converter boxes, or a
USB-UIRT (www.usbuirt.com) to handle both IR reception and transmission. In addition,
SageTV can now use the IR transmitter that is included with some of the newer Hauppauge
encoder devices.
Evation’s IRMan (www.evation.com)
To use the IRMan to receive remote control IR codes for control of SageTV, first install it and its
software, following its instructions. Then, in SageTV, configure the COM port it is connected to
in Detailed Setup: Commands Settings by using the Remote Control Configuration option. After
that, use the Link Infrared/Keystroke to SageTV Command option to assign the buttons on your
remote to each SageTV command that you wish to use.
ACTiSYS IR-200L (www.actisys.com/ac200-220.html)
If you will be using the Actisys IR-200L with SageTV to control an external set-top device, then
please follow these instructions before installation:
1. DO NOT install the Actisys Software or Drivers that come with the IR-200L. If you
install this software, you will experience problems using the IR-200L with the Sage
software. The appropriate drivers for the IR-200L were already installed when you
installed the Sage software.
2. Shut down any instances running of SageTV and turn off your PC.
3. Install the IR-200L into any open Serial port on the back of your PC
4. Turn your PC on and launch SageTV to then setup the IR-200L. Configure the recording
source via the Source Setup and choose the IR-200L in Step 5: Select the Tuning Plugin.
If you have any questions about installing the IR-200L, make a post to our discussion forum at
forums.sagetv.com/forums or submit a support request at www.sagetv.com/request.html.
Note: SageTV supports the use of multiple Actisys IR-200L transmitters, with each one installed
on a separate COM port. When using the Setup Wizard, select a different transmitter COM port
in Step 5: Select the Tuning Plugin for each source.
Copyright 2010 SageTV, LLC All rights reserved
For additional support, go to www.sagetv.com/support.html or email us at [email protected]
SageTV V7.0 User’s Guide
Appendix F: Infrared Receivers & Transmitters
Page 275
USB-UIRT (www.usbuirt.com)
The software and drivers for the USB-UIRT are available on-line at:
www.usbuirt.com/getstart.htm. There you will find resources to help you get up and running
quickly with your USB-UIRT. Support for this product, as well as the latest software updates,
user guides, and FAQ’s can be found at: www.usbuirt.com/support.htm.
If you will be using the USB-UIRT with SageTV to control an external set-top device, then
configure the recording source via the Source Setup and choose the USB-UIRT in Step 5: Select
the Tuning Plugin.
If you will be using the USB-UIRT to receive remote control IR codes for control of SageTV,
configure the port it is connected to in Detailed Setup: Commands Settings by using the Remote
Control Configuration option. After that, use the Link Infrared/Keystroke to SageTV Command
option to assign the buttons on your remote to each SageTV command that you wish to use.
If you have any questions about installing the USB-UIRT, make a post to our discussion forum
at forums.sagetv.com/forums in the Hardware Support section or submit a support request at
www.sagetv.com/request.html.
Controlling multiple set-top devices using the same IR code set: Recent versions of this
device can be used to control three separate external devices with its capability for 3-zone output.
SageTV does not have built-in support for these zones, but there are instructions from a SageTV
user on our online discussion forums on how to make use of them.
See: http://forums.sagetv.com/forums/showthread.php?postid=48916#post48916
Using Multiple USB-UIRT devices: While SageTV does not have built-in support for using
multiple USB-UIRT devices, a user on our online discussion forums has posted information
about a new driver that uses a customization which allows multiple devices to be used.
See: http://forums.sagetv.com/forums/showthread.php?p=115534#post115534
Hauppauge IR Blaster
Some of the newer encoder devices from Hauppauge now include an IR transmitter. To have
SageTV use it, first use the Hauppauge IR Blaster Configuration application to configure the
transmitter. Then, when configuring the recording source via the Source Setup, choose the
Hauppauge IR Blaster in Step 5: Select the Tuning Plugin.
Notes: Due to Hauppauge driver limitations, multiple blasters can not be used. In addition, it
may not be possible to use the blaster if there are multiple encoders and only one has a blaster.
SageTV does not use the MCE IR blaster portion of the Hauppauge MCE kits, which come with
the MCE remote + blaster.
Copyright 2010 SageTV, LLC All rights reserved
For additional support, go to www.sagetv.com/support.html or email us at [email protected]
SageTV V7.0 User’s Guide
Appendix G: Network Encoding
Page 276
Appendix G: Network Encoding
SageTV can be used to control recordings made with an encoding device that is installed on
another computer on the same network. Two full installations of SageTV are used for this
purpose:
For the installation of SageTV that is going to be the network encoder, set this property:
enable_encoding_server=true. Start this installation of SageTV. Note: To also use
SageTV on this system as a client, start a second instance of SageTV.exe, using the ‘client’ command line parameter. See Appendix D: SageTV Command Line Parameters.
For the main installation of SageTV (the one that is to be the server for all your clients),
set this property: network_encoder_discovery=true. Start SageTV.
Note: Each installation of SageTV will require a separate registration license.
Note: The SageTV server will need access through any software firewall for port 8271
(UDP), while the network encoders will need access for port 6969 (TCP). These ports
are the same no matter how many network encoder devices are in use, on one or multiple
computers. See Firewall Settings for more port information.
Previous method, using SageTVRecorder:
SageTVRecorder is used on the networked PC to control the encoding device, while SageTV
instructs SageTVRecorder regarding which shows are to be recorded. When used in this way,
SageTV will make use of the network encoder as if it were a local encoder, with the entire
process being transparent to the user once it is all configured.
For further information regarding setting up a network encoding in this manner, please see the
SageTV Configuration web site at www.sagetv.com/configuration.html. Look for the section
titled: Setting Up Network Encoders.
Note: SageTVRecorder is no longer updated and does not support the use of newer encoding
devices. It is recommended that SageTV now be used for this purpose, above.
Copyright 2010 SageTV, LLC All rights reserved
For additional support, go to www.sagetv.com/support.html or email us at [email protected]
SageTV V7.0 User’s Guide
Appendix H: Custom Recording Quality Settings
Page 277
Appendix H: Custom Recording Quality Settings
SageTV comes configured with several recording quality settings built in, any of which may be
chosen as the default recording quality by using the Recording Quality option in Detailed Setup:
Multimedia Settings. Additional recording quality settings may be added by editing the
properties file, though some care must be used when creating these new settings to make sure
they will work correctly.
For further information regarding creating such custom recording settings, please see the
SageTV Configuration web site at www.sagetv.com/configuration.html. Look for the
Configuration Paper titled: Hauppauge Cards & Recording Quality.
For sample custom settings and help in creating new ones, please use our discussion forum at
forums.sagetv.com/forums.
Note: Starting with SageTV version 2.1, the seeker/encoding_qualities properties are no longer
used; only the mmc/python2_encodings settings are needed to specify recording qualities.
These properties are described in the online document mentioned above.
Copyright 2010 SageTV, LLC All rights reserved
For additional support, go to www.sagetv.com/support.html or email us at [email protected]
SageTV V7.0 User’s Guide Appendix I: Playing DVDs and BDs from the
Hard Drive
Page 278
Appendix I: Playing DVDs and BDs from the Hard
Drive
Playing Hard Drive Based DVDs
After using various software that is available for storing DVDs that you own on your hard drive,
it is possible to play those DVD images from within SageTV while still retaining the DVD
menus and DVD Playback options. To do so, store the DVD data as a subdirectory of one of
SageTV’s Media Center Import Directories, as defined in Detailed Setup: General Settings.
Within that subdirectory, the DVD video data can be stored directly in the subdirectory, stored in
a further VIDEO_TS subdirectory, or stored as an ISO disk image file. The DVD will then be
listed as an imported video file in the Video Browser as “DVDTitle” and will be played as a
DVD, where “DVDTitle” is the name of the folder where the DVD files exist or is the name of
the .iso file.
Example using a DVD VIDEO_TS subdirectory structure: If the media center import directory is
“E:\DVD” and your DVD is called “DVDTitle”, the directory tree would contain:
E:\DVD\DVDTitle\
^[[\VIDEO_TS\ (Note: the VIDEO_TS subdirectory is optional)
Z[[\VIDEO_TS.BUP
Z[[\VIDEO_TS.IFO
Z[[\VIDEO_TS.VOB
Z[[\VTS_01_0.BUP
Z[[\VTS_01_0.IFO
Z[[\VTS_01_0.VOB
Z[[\VTS_01_1.VOB
^[[\folder.jpg (optional)
And so on, with additional numbered VTS_##_#.BUP, .IFO, and .VOB files.
The optional folder.jpg file will be used as the DVD’s thumbnail image. See Video Thumbnails
for additional DVD thumbnail options.
DVD Notes:
A DVD file structure is recognized if the parent folder name is VIDEO_TS or if the
directory contains at least the 'VIDEO_TS.IFO' file.
When using an ISO DVD image file on a Windows installation of SageTV, the “Virtual
CloneDrive” software must be installed and configured.
SageTV Client needs to be able to read the DVD files directly in order to play hard drive
based DVDs. To accomplish this, either 1) the import directory will need to be a UNC
path and the client PC must have permission to access that UNC path, or 2) the client PC
Copyright 2010 SageTV, LLC All rights reserved
For additional support, go to www.sagetv.com/support.html or email us at [email protected]
SageTV V7.0 User’s Guide Appendix I: Playing DVDs and BDs from the
Hard Drive
Page 279
will need to map a drive letter to match the same drive letter where the server PC
imported the DVD. For help using UNC paths or mapped drive letters, please consult
your Windows documentation or see our online discussion forums at
forums.sagetv.com/forums.
A Media Extender can play non-encrypted hard drive based DVDs (home-made DVDs,
for example); it is not capable of decoding encrypted DVD content.
The Hauppauge MVP does not have DVD playback capabilities when used as a SageTV
extender.
The Placeshifter client, including a media extender being used in Placeshifter mode, does
not have DVD playback capability.
DVDs cannot be added to playlists.
Playing Hard Drive Based Blu-rays
Blu-rays (BDs) stored on a hard drive can also be played in SageTV without the Blu-ray menu
structure. BDs are played as imported Videos (see Video Playback). Playback starts with the
BD’s longest playlist. During playback, use the Options command to access the Video Playback
Options Menu, where the BD Title Select option can be used to choose the BD title you wish to
play.
SageTV can recognize BDs stored in a subdirectory of one of SageTV’s Media Center Import
Directories, as defined in Detailed Setup: General Settings. Within that subdirectory, the BD
video data can be stored in a further BDMV subdirectory or stored as an ISO disk image file.
The BD will then be listed as an imported video file in the Video Browser as “BDTitle” and will
be played as a BD video, where “BDTitle” is the name of the folder where the BD files exist or
is the name of the .iso file.
Example using a BD BDMV subdirectory structure: If the media center import directory is
“E:\BD” and your BD is called “BDTitle”, the directory tree would contain:
E:\BD\BDTitle\
^[[\BDMV\
Z[[\index.bdmv
Z[[\MovieObject.bdmv
Z[[\META\ (optional)
]
^[[\metadata files (optional)
Z[[\PLAYLIST\
]
^[[\xxxx.mpls files
Z[[\STREAM\
]
^[[\xxxx.m2ts files
^[[\folder.jpg (optional)
Subdirectories other than those listed above may exist. If the optional META subdirectory exists,
then SageTV will check it for information about the Blu-ray, such as the video’s title and
thumbnail.
Copyright 2010 SageTV, LLC All rights reserved
For additional support, go to www.sagetv.com/support.html or email us at [email protected]
SageTV V7.0 User’s Guide Appendix I: Playing DVDs and BDs from the
Hard Drive
Page 280
The optional folder.jpg file will be used as the BD’s thumbnail image. See Video Thumbnails for
additional BD thumbnail options.
BD Notes:
When using an ISO BD image file on a Windows installation of SageTV, the “Virtual
CloneDrive” software must be installed and configured.
The STP-HD200 and STP-HD300 HD Theater media extenders can play non-encrypted
hard drive based BDs; they are not capable of decoding encrypted BD content.
The STX-HD100 HD Media Extender does not officially support BD playback, but many
BDs should play on it, though not all content or features will be available.
The Hauppauge MVP does not have BD playback capabilities when used as a SageTV
extender.
SageTV and SageTV Client can play BDs if compatible decoders are installed and the PC
hardware is powerful enough. Windows 7 includes such decoders, but the PC’s cpu and
video card need to be powerful enough to use those decoders for BD playback; if they are
not, a better decoder or PC hardware may be needed.
The Placeshifter client, including a media extender being used in Placeshifter mode, does
not have BD playback capability.
BDs cannot be added to playlists.
Copyright 2010 SageTV, LLC All rights reserved
For additional support, go to www.sagetv.com/support.html or email us at [email protected]
SageTV V7.0 User’s Guide
Appendix J: Using the SendMessage Utility
Page 281
Appendix J: Using the SendMessage Utility
When SageTV is installed, SendMessage.exe (version 2.2) is also placed in your SageTV
directory. If that file is not in your SageTV directory it may be downloaded from the attachment
to this forum post: http://forums.sagetv.com/forums/showthread.php?p=125680&postcount=1
This utility was created by a SageTV user and is provided by SageTV “as-is”. Use of this
utility is not supported by SageTV’s technical support. If you need help using this utility,
please go to our discussion forum at forums.sagetv.com/forums.
The SendMessage utility can be used to send commands to SageTV as Windows messages, using
the command event numbers. See: Sending Commands via Windows Messages. While SageTV
itself can also do this with its -event parameter, SendMessage has a few advantages:
1. The SendMessage exe file is smaller than the SageTV exe file, so it will load and run
faster.
2. Unlike the -event parameter, the SendMessage utility is capable of sending multiple
commands each time the program is run, making it easier to ‘batch process’ a series of
commands.
3. SendMessage can be used to send messages to any Windows program.
Usage
If SendMessage is run without any parameters, it will display a dialog with a brief outline of its
usage instructions. The utility uses the following command line format:
SendMessage WindowClass WindowName MsgID wParam lParam <repeat param list> …
The above-referenced Sending Commands via Windows Messages section lists the values to be
used for each of those parameters in order to send command event numbers to SageTV or
SageTVClient. To send multiple messages, simply send another series of those five parameters
after the first five.
In addition to those parameters, default values for each parameter can be defined when you wish
to send multiple messages: once a default value is set, that value can be skipped in the list of
parameters for additional messages to be sent. To define default values, use the following
options. Note that the values are not case sensitive (-c is the same as –C):
-C WindowClass – Define the window class name to receive multiple messages.
-N WindowName – Define the name of the window to receive multiple messages.
Copyright 2010 SageTV, LLC All rights reserved
For additional support, go to www.sagetv.com/support.html or email us at [email protected]
SageTV V7.0 User’s Guide
Appendix J: Using the SendMessage Utility
Page 282
-M MsgID – The Windows message number to be sent; decimal value.
-W wParam – The message’s wParam value to be sent; decimal value.
-L lParam – The message’s lParam value to be sent; decimal value.
-D DelayTime – Time, in milliseconds, to delay between each message sent. This
parameter is not usually needed, but was added in case such a delay was ever desired.
Any parameters that contain spaces, perhaps the WindowClass or WindowName of some
application, can be enclosed in quotes, such as: -C “Window Class”.
Example Use
To show how the parameters might be put into use to control SageTV, let’s take a look at a
common desire: to have SageTV go directly to a menu that currently has no direct-access
command. The Plugin Manager’s All Available Plugins menu is one such location. The
following series of commands will go to that location from anywhere within SageTV:
Home – Event number 28; go to the Main Menu.
Page Down – Event number 56; Page Down to make sure the bottom menu item is
highlighted.
Up – Event number 4; arrow Up to the Setup menu item.
Right – Event number 3; arrow into the Setup submenu.
Page Up – Event number 55; Page Up to make sure the top submenu item is highlighted.
Down, Down – Event number 5; arrow Down to the SageTV Plugins menu item.
Right – Event number 3; arrow into the SageTV Plugins submenu.
Page Up – Event number 55; Page Up to make sure the top submenu item is highlighted.
Select – Event number 20; Select the All Available Plugins submenu item to go to that
menu.
Putting all the above options together, SendMessage can be used as follows to issue this series of
commands for SageTV:
SendMessage.exe -C SageApp -N SageWin -m 1258 -W 0 42 28 56 4 3 55 5 5 3 55 20
Copyright 2010 SageTV, LLC All rights reserved
For additional support, go to www.sagetv.com/support.html or email us at [email protected]
SageTV V7.0 User’s Guide
Appendix J: Using the SendMessage Utility
Page 283
In this example, SageApp is the name of the window class receiving the message; SageWin is
the name of the window to receive the message; 1258 is the message ID number; 0 is the
wParam value; and “42 28 56 4 3 55 5 5 3 55 20” is the series of command event numbers to
send to SageTV.
Note: To control SageTVClient, use SageClientApp instead of SageApp.
Copyright 2010 SageTV, LLC All rights reserved
For additional support, go to www.sagetv.com/support.html or email us at [email protected]
SageTV V7.0 User’s Guide
Appendix K: Closed Captions
Page 284
Appendix K: Closed Captions
Closed Captioning is available in SageTV. To view Closed Captions while watching a SageTV
recording, check the following:
You must be using a capture device that supports embedding Closed Captioning data in
the recording file. ATSC and QAM tuners support Closed Captions. Also, some analog
tuners support CC. Hauppauge analog tuners generally support CC, though certain newer
device driver versions may be required.
For analog capture devices, the Recording Quality, in Detailed Setup: Multimedia
Settings, must be set to use a DVD-style recording quality. If you create a custom
recording quality (see Appendix H: Custom Recording Quality Settings), make sure that
the custom setting uses 10, 13, or 14 as the outputstreamtype.
Use the Options command during Video Playback to view the pop-up Video Playback
Options Menu. The Captions option will show the current CC status: Captions (Off),
Captions (CC1), and Captions (CC2). Select the option to cycle through the choices.
Most captions will display using the CC1 option, though some stations may use CC2.
CC can not be displayed through the Hauppauge PVR-350’s TV-out, the Hauppauge
MVP, or while using Placeshifter via a remote connection.
CC will not display if using Overlay as the Video Renderer and Overlay Color Keying is
Enabled. In addition, some MPEG2 Video Decoder Filter settings also cannot display
CC text.
If you are using VMR9 and can't get CC to show up, try setting this registry value:
HKLM\SOFTWARE\Frey Technologies\SageTV\DirectX9\YUVMixing=0
Copyright 2010 SageTV, LLC All rights reserved
For additional support, go to www.sagetv.com/support.html or email us at [email protected]
SageTV V7.0 User’s Guide
Appendix L: Customization
Development
Page 285
Appendix L: Customization Development
SageTV Studio
SageTV Studio is the application used to edit the STV files that define the entire SageTV user
interface. Since version 4.0, this application is available from within SageTV after the license
key has been entered. (See License Key Registration.) Use the Customize command to open
SageTV Studio for live editing of the currently loaded STV.
SageTV Studio usage documentation and information can be found at the following links:
A full user guide for Studio is available, which contains details about the Studio
language, its interface & usage, and tutorials/examples to help learn how to use Studio.
Download this PDF document from:
http://download.sage.tv/SageTVStudio_UserGuide.pdf
To go along with the Studio user guide, there is an accompanying STV that is used for
the tutorials in the guide. Download this STV from:
http://download.sage.tv/Studio_Tutorials.xml
See our forum at forums.sagetv.com/forums for discussions with other SageTV Studio
users regarding available customizations and Studio usage tips.
Sharing Customizations via Plugins
Customizations developed for SageTV can be shared with other SageTV users via the Plugin
Manager menu. Plugin developers can download the plugin system documentation from:
http://download.sagetv.com/DevelopingSageTVPlugins.doc
Copyright 2010 SageTV, LLC All rights reserved
For additional support, go to www.sagetv.com/support.html or email us at [email protected]
SageTV V7.0 User’s Guide
Appendix M: SageTV Media Extenders
Page 286
Appendix M: SageTV Media Extenders
Instead of building an entire computer to act as a SageTV Client, a Media Extender, such as the
SageTV HD Theater (models STP-HD200 and STP-HD300), SageTV HD Media Extender
(model STX-HD100), or the Hauppauge MediaMVP, may be used instead. Such a device is
connected to the SageTV server PC via your computer’s local network and allows the SageTV
User Interface to be used on another TV with just a small quiet device instead of a larger, noisier,
computer.
Media Extender Installation
SageTV Media Extender support is built into the SageTV installation, so no extra steps are
needed.
Registering Media Extender Licenses
When using the SageTV STP-HD200 or STP-HD300 HD Theater with SageTV version 6.5
and later, there is no need to register a media extender license on the server. Other
extenders still need a media extender license registered on the server.
In order to use a SageTV Media Extender past the trial usage period, a license key must be
entered on the SageTV server for each extender to be used simultaneously.
To enter your license, on a Windows SageTV server system, go to the Windows Start button,
then select All Programs > SageTV > Register SageTV Media Extender License. Enter your
license in the dialog that appears.
To enter your license, on a Mac SageTV server system, go to System Preferences > SageTV >
Licenses. Select the plus (+) symbol to add an additional license.
Note: It is recommended that you exit SageTV on the server computer before entering a
Media Extender license. (If using service mode, stop the service.)
Enable the Media Extender Server
To enable your SageTV server to act as a Media Extender Server, enable the SageTV Server
option in the Detailed Setup: Server Settings menu and make sure the Media Extender and
Placeshifter Server is also enabled on that screen.
Enable Connection to the Media Extender Server
In order for the Media Extender to be able to connect to your SageTV server, it may need
permission to get through any firewall that may be running on the server. See Firewall Settings
for more information on which ports to open.
Copyright 2010 SageTV, LLC All rights reserved
For additional support, go to www.sagetv.com/support.html or email us at [email protected]
SageTV V7.0 User’s Guide
Appendix M: SageTV Media Extenders
Page 287
SageTV HD Theater, models STP-HD200 and STP-HD300
For details about using the STP-HD200 or STP-HD300 SageTV HD Theater, please refer to the
manual that is included in the box with that device. The STP-HD200 and STP-HD300 can be
used as an extender connected to a SageTV server or as a standalone device not connected to a
server. The manual can also be downloaded in PDF format:
http://download.sage.tv/SageTV_HD200_Manual.pdf
http://download.sage.tv/SageTV_HD300_Manual.pdf
SageTV HD Media Extender, model STX-HD100
For details about using the STX-HD100 SageTV HD Media Extender, please refer to the manual
that is included in the box with that device. The manual can also be downloaded in PDF format:
http://download.sage.tv/SageTV_HD100_Manual.pdf
Hauppauge MediaMVP
For information about the MVP, see the Hauppauge web site:
http://www.hauppauge.com/pages/products/data_mediamvp.html
To use an MVP with SageTV, make sure that no other MVP server software is currently running
on any PC on your network. The Hauppauge MVP software does not need to be installed, and if
it is, make sure it is not running.
Follow these steps to start using your MVP with SageTV:
1. Enable the Media Extender and Placeshifter Server, as described at the beginning of this
appendix. Then, connect the MVP to a TV and your local network, as described in the
following steps.
2. Plug either the MVP’s svideo or composite outputs into the appropriate input on your
TV. (Choose the one your TV uses; svideo provides the better TV image, if both are
available.)
3. Connect the MVP’s Left + Right audio outputs to the TV’s L + R audio inputs that are
associated with the video input used above.
4. Connect the local network cable to the MVP. The network will need to have a DHCP
server in order for the MVP to acquire a network address.
5. Turn the TV on and set it to use the input to which the MVP has been connected.
6. Finally, connect the MVP’s power adapter cord.
7. After a short startup delay, the SageTV interface will appear on your TV.
Repeat the above steps for additional MVPs connected to the same server.
Copyright 2010 SageTV, LLC All rights reserved
For additional support, go to www.sagetv.com/support.html or email us at [email protected]
SageTV V7.0 User’s Guide
Appendix M: SageTV Media Extenders
Page 288
MVP Supported Media Types
As a SageTV Media Extender, the MVP is capable of playing the following media types:
Videos – MPEG files. The MVP is not able to natively play HDTV content, but it can be
transcoded for playback.
DVD – The MVP is not capable of decoding encrypted DVD content, so it can not be
used for DVD-ROM viewing. But, non-encrypted DVD images imported into the video
library (home-made DVDs, for example) can be played on the MVP with full use of the
DVD’s menus.
BD – The MVP is not capable of playing Blu-ray content.
Music – MP3 files; other formats may be transcoded.
Pictures – Any picture format that SageTV can use; see the Supported Media Types for
Pictures.
In addition to the native support for the video and music formats listed above, SageTV will
attempt to transcode other media formats to a type that the MVP can play. Transcoding may not
be available for all possible media formats. The Media Extender Conversion Quality can be
configured in Detailed Setup: Server Settings.
Restart MVP After Installing a SageTV Upgrade
After installing a SageTV upgrade, be sure to unplug the MVP, then plug it in again. This will
force a full reboot of the MVP so that any media extender changes will be used by the MVP.
(Using the power off button on the remote will not force a full reboot, because it puts the MVP
into a soft power off mode.)
Using SageTV Studio with a Media Extender (optional)
Using the Customize command while using a Media Extender opens Studio on the server
computer that the extender is connected to.
Note: If the server is running in service mode, it may still be possible to open a Studio window
by configuring the service to interact with the Desktop. This requires knowledge of how to use
Windows utilities to configure the service in this way.
Copyright 2010 SageTV, LLC All rights reserved
For additional support, go to www.sagetv.com/support.html or email us at [email protected]
SageTV V7.0 User’s Guide
Appendix N: SageTV Placeshifter Client
Page 289
Appendix N: SageTV Placeshifter Client
SageTV’s Placeshifter Client can be used to connect to your SageTV system via a network
connection, either locally or via the internet while away from home. It allows the full SageTV
User Interface to be used at a remote location, with media playback over the internet possible,
including playback of live or recorded TV shows.
SageTV Placeshifter Client Installation
Run the Placeshifter Client installer on any system where you wish to use it, then follow the onscreen instructions.
Registering Placeshifter Licenses
In order to use the SageTV Placeshifter Client past the trial usage period, a license key must be
entered on the SageTV server for each Placeshifter to be used simultaneously.
To enter your license, on a Windows SageTV server system, go to the Windows Start button,
then select All Programs > SageTV > Register SageTV Media Extender License. Enter your
license in the dialog that appears.
To enter your license, on a Mac SageTV server system, go to System Preferences > SageTV >
Licenses. Select the plus (+) symbol to add an additional license.
Note: It is recommended that you exit SageTV on the server computer before entering a
Placeshifter license. (If using service mode, stop the service.) Note: The Placeshifter Client
uses the same type of license as the Media Extender. See Appendix M: SageTV Media
Extenders.
Enable the Placeshifter Server
To enable your SageTV server to act as a Placeshifter Server, enable the SageTV Server option
in the Detailed Setup: Server Settings menu and make sure the Media Extender and Placeshifter
Server is also enabled on that screen.
Enable Remote Access to your SageTV server
For the Placeshifter Client to be able to access your SageTV server from a remote location, it
must be able to connect through your firewall/router. SageTV can setup this connection via the
Configure Placeshifter Internet Connection configuration wizard in the Detailed Setup: Server
Settings menu. Notes: The configuration wizard will open and forward port 31099 to the
computer that is running the SageTV server. See Firewall Settings for more port information.
Copyright 2010 SageTV, LLC All rights reserved
For additional support, go to www.sagetv.com/support.html or email us at [email protected]
SageTV V7.0 User’s Guide
Appendix N: SageTV Placeshifter Client
Page 290
Create Placeshifter users
Before the Placeshifter Client can connect to your SageTV server, at least one Placeshifter user
must be created. See the Manage Placeshifter Users option in the Detailed Setup: Server Settings
menu.
Placeshifter Client Connections
Once the Placeshifter Client has been installed and the server configured to allow Placeshifter
access (see above), then run SageTVPlaceshifter on the remote system. This will open the
SageTV Placeshifter Servers Manager.
From the servers manager screen, you can choose what server to connect to, add other servers to
look for, and configure some Placeshifter client settings.
While any local network servers may be found automatically, your SageTV server may not be
listed if you are at a remote location. In this case, select the Add button to specify the location of
your SageTV server. See Adding a Server, below.
To configure some the Placeshifter options, choose the Settings button. See Placeshifter
Settings, below.
Double-click on a server to connect to, or highlight one and select the Connect button. See
Placeshifter Login, below.
Adding a Server
Specify the location of a new server in the dialog that opens after selecting Add from the
SageTV Placeshifter Servers Manager. In the dialog, create a name for the server, then enter
either the Locator ID or the internet address of your SageTV server. By using the Locator ID,
you do not need to remember the address to your home system, but you will need to know the
server’s Locator ID. This information can be found in the server’s Detailed Setup: Server
Settings menu, or on its System Information display.
Placeshifter Settings
After selecting the Settings option from the SageTV Placeshifter Servers Manager screen, the
following options are available:
General – On the General settings tab, choose whether to exit the Placeshifter client when
closing the SageTV connection. If this option is not checked, the SageTV Placeshifter Servers
Manager will reopen after closing the SageTV connection.
Copyright 2010 SageTV, LLC All rights reserved
For additional support, go to www.sagetv.com/support.html or email us at [email protected]
SageTV V7.0 User’s Guide
Appendix N: SageTV Placeshifter Client
Page 291
The custom SageTV title bar can be enabled, allowing an option to set the window to Always on
Top and to show the streaming statistics in the title bar after connecting. Note that enabling the
custom title bar may disable some Operating System functionality of the window, and it may not
look the same as other windows.
Choose whether to enable 3D Acceleration or video post processing.
To use an IRMan or USB-UIRT IR receiver for remote control of the Placeshifter user interface
once connected, select the USB or COM port where the receiver is connected.
Select an option for Local Filesystem Security, which determines the SageTV server’s access to
the files local to the Placeshifter system.
Streaming – On the Streaming settings tab, choose how SageTV will transcode media for
remote playback. You can use SageTV’s dynamic streaming system to adjust the playback
bitrate automatically, stream without transcoding (usually only on a local network), or manually
select the streaming settings. If manually specifying the settings, the options at the bottom will
be enabled and can be set to your preference.
About – Displays some information about the Placeshifter application, including the version
number.
Placeshifter Login
After choosing a server to connect to, the SageTV Placeshifter Servers Manager will close and
the Placeshifter login screen will open. On this screen, enter a valid username and password, then
press Enter or select the Login button. If the username and password combination is valid, then
the STV assigned to that user in the Manage Placeshifter Users option in the Detailed Setup:
Server Settings menu will be loaded, and regular SageTV usage begins.
Notes: If the login screen sits idle for too long, or if an incorrect username and password
combination is entered too many times, the login screen will automatically close.
When connecting via a local network connection, a username and password may not be
requested.
If the Allow Placeshifter clients to automatically login option in Detailed Setup: Server Settings
on the SageTV server has been enabled, then the Placeshifter client will be able to enable
automatic login while entering the username and password.
Copyright 2010 SageTV, LLC All rights reserved
For additional support, go to www.sagetv.com/support.html or email us at [email protected]
SageTV V7.0 User’s Guide
Appendix N: SageTV Placeshifter Client
Page 292
Placeshifter Client Media Playback
The Placeshifter Client can play most media via its transcoding feature, streaming the content to
the remote location for playback. However, DVD and BD playback is not supported, and
transcoding for certain other formats may not be available.
Using SageTV Studio with a Placeshifter Client (optional)
Using the Customize command while using a Placeshifter Client opens Studio on the server
computer that the Placeshifter is connected to.
Note: If the server is running in service mode, it may still be possible to open a Studio window
by configuring the service to interact with the Desktop. This requires knowledge of how to use
Windows utilities to configure the service in this way.
Copyright 2010 SageTV, LLC All rights reserved
For additional support, go to www.sagetv.com/support.html or email us at [email protected]
SageTV V7.0 User’s Guide
Appendix O: User Interface Themes
Page 293
Appendix O: User Interface Themes
The graphics used for the SageTV user interface and some other settings are loaded as theme
sets, via the Select the User Interface Theme option in Detailed Setup: Advanced Settings.
SageTV installs with the Standard theme.
Additional user created themes may be found on the SageTV online forums at
forums.sagetv.com/forums or may be available via Theme category in the Plugin Manager.
Adding Custom Images to an Existing Theme
If all you want to do is change a few images without creating an entirely new theme, then simply
add the new images to the User Images subdirectory of an existing theme directory, naming the
files the same as the filenames of the images being replaced. After adding images to that
subdirectory, reload the current theme via the Select the User Interface Theme option in Detailed
Setup: Advanced Settings. Note: If existing images in that subdirectory have been changed, you
may need to restart SageTV to see the new images in the user interface.
It is better to place your custom images in the User Images subdirectory instead of in the
theme’s base directory because the files in the base directory will be replaced when a SageTV
update is installed (if replacing files in the Standard theme) or when a theme plugin update is
installed (if replacing files in a custom theme). The files in the User Images subdirectory are not
replaced by the SageTV installer. If a custom theme replaces files in that subdirectory, inform
the theme’s author so the author’s custom files can be placed in the proper location.
Creating a New Theme
To create an entirely new theme, simply create a new directory under the <install
dir>\SageTV\STVs\SageTV7\Themes directory, using the name of your new theme. You can
change one or more UI image files by placing new versions of images in the custom theme
directory and you can create a theme.properties file to change one or more properties. If an
image file or a property setting is not found, the one from the default Standard theme will
automatically be used.
Exceptions:
The ProgressBar<N>.png files must be a full set of 5, #1-5.
If you change the weather icons, you have to provide a full set and use theme.properties
in the custom theme directory to specify the offset path from where the current STV is
located to the weather icons.
Copyright 2010 SageTV, LLC All rights reserved
For additional support, go to www.sagetv.com/support.html or email us at [email protected]
SageTV V7.0 User’s Guide
Appendix O: User Interface Themes
Page 294
As the default UI changes, new graphics are being put in the theme directories, but those are not
the only images you can place in your own theme -- you can change almost any image found in
the <install dir>\SageTV\STVs\SageTV7 or Standard theme directories. When loading a
theme, each image is searched for by checking the current theme directory and its “User Images”
subdirectory, the default theme directory and its “User Images” subdirectory, then the STV's
directory. However, not all images in the STV directory are currently in use by the default STV.
Additional Theme Notes:
See the theme.properties file in the default Standard theme directory for additional
comments about various theme settings. The first section of the file documents the
possible theme settings.
To determine which images are being used and where they are loaded from, check the
debug log for a list of themed images. Debug logging can be enabled via the Debug
Logging option in Detailed Setup: Advanced Settings.
If a custom theme contains an image file named preview.jpg, that will be the preview
image shown in the theme selection dialog when the theme is highlighted; see the Select
the User Interface Theme option.
In the new theme’s custom theme.properties, add a property line named
Description/<ThemeName>=, where ThemeName is the name of the new theme,
followed by a short description of the theme. Users will see this description in the theme
selection dialog when the theme is highlighted.
The focus highlight images are actually drawn behind the regular button backgrounds or
fill colors, so it works better if the button background images are semi-transparent.
Copyright 2010 SageTV, LLC All rights reserved
For additional support, go to www.sagetv.com/support.html or email us at [email protected]
SageTV V7.0 User’s Guide
Appendix O: User Interface Themes
Page 295
Appendix P: Operating System Differences
SageTV is available for multiple operating systems, including Windows, Mac, and Linux. While
SageTV operates similarly on all available systems, there are a few differences that a user may
need to be aware of. Those differences are covered below.
SageTV for Windows
Most of this manual covers the use of SageTV on a Windows system, since that is the first OS
usable with SageTV.
SageTV for Mac
SageTV for the Mac has these differences:
Service mode is always used, so the service will use Sage.properties while the UI will
get its settings from SageClient.properties. (See below for the locations of these files.)
All photos will be imported from iPhoto.
All finished recordings and completed recording conversions will be exported to iTunes.
There is support for the MacMini and Hauppauge remotes.
Since the Mac already includes a DVD decoder, a DVD decoder does not need to be
installed before DVD playback is possible.
The locations of some of the files are different. These locations are:
o Properties, database, and STV related files:
/Library/Application Support/SageTV/Data
o External plugin libraries: /Library/Application Support/SageTV/PlugIns
o Helper tools: /Library/Application Support/SageTV/Tools
o Logs: /Library/Logs/SageTV
SageTV for Linux OEM Edition
These are some of the differences for SageTV for Linux:
Service mode is always used.
Copyright 2010 SageTV, LLC All rights reserved
For additional support, go to www.sagetv.com/support.html or email us at [email protected]
SageTV V7.0 User’s Guide
Appendix O: User Interface Themes
Page 296
The Linux UI is the Placeshifter client. As with all Placeshifter clients, DVD and BD
playback is not available on the Placeshifter client. But, a media extender client can play
non-encrypted imported DVDs and BDs.
The properties and database files are stored in the standard location: in the SageTV server
installation directory, and its “clients” subdirectory for the remote clients’ properties
files. The server install directory is: /opt/sagetv/server/
Copyright 2010 SageTV, LLC All rights reserved
For additional support, go to www.sagetv.com/support.html or email us at [email protected]
SageTV V7.0 User’s Guide
Appendix P: Operating System Differences
Page 297
Appendix Q: Third Party Software Libraries
Source code for the third party software libraries included in this product can be downloaded
from:
http://download.sagetv.com/pubcode/sagetv
Apache License
The following software may be included in this product: SBBI UPnP Library. Use of this
software is governed by the terms of the license below:
Apache License
Version 2.0, January 2004
http://www.apache.org/licenses/
TERMS AND CONDITIONS FOR USE, REPRODUCTION, AND DISTRIBUTION
1. Definitions.
"License" shall mean the terms and conditions for use, reproduction,
and distribution as defined by Sections 1 through 9 of this document.
"Licensor" shall mean the copyright owner or entity authorized by
the copyright owner that is granting the License.
"Legal Entity" shall mean the union of the acting entity and all
other entities that control, are controlled by, or are under common
control with that entity. For the purposes of this definition,
"control" means (i) the power, direct or indirect, to cause the
direction or management of such entity, whether by contract or
otherwise, or (ii) ownership of fifty percent (50%) or more of the
outstanding shares, or (iii) beneficial ownership of such entity.
"You" (or "Your") shall mean an individual or Legal Entity
exercising permissions granted by this License.
"Source" form shall mean the preferred form for making modifications,
including but not limited to software source code, documentation
source, and configuration files.
"Object" form shall mean any form resulting from mechanical
transformation or translation of a Source form, including but
not limited to compiled object code, generated documentation,
and conversions to other media types.
"Work" shall mean the work of authorship, whether in Source or
Object form, made available under the License, as indicated by a
copyright notice that is included in or attached to the work
(an example is provided in the Appendix below).
"Derivative Works" shall mean any work, whether in Source or Object
form, that is based on (or derived from) the Work and for which the
editorial revisions, annotations, elaborations, or other modifications
represent, as a whole, an original work of authorship. For the purposes
of this License, Derivative Works shall not include works that remain
Copyright 2010 SageTV, LLC All rights reserved
For additional support, go to www.sagetv.com/support.html or email us at [email protected]
SageTV V7.0 User’s Guide
Appendix P: Operating System Differences
separable from, or merely link (or bind by name) to the interfaces of,
the Work and Derivative Works thereof.
"Contribution" shall mean any work of authorship, including
the original version of the Work and any modifications or additions
to that Work or Derivative Works thereof, that is intentionally
submitted to Licensor for inclusion in the Work by the copyright owner
or by an individual or Legal Entity authorized to submit on behalf of
the copyright owner. For the purposes of this definition, "submitted"
means any form of electronic, verbal, or written communication sent
to the Licensor or its representatives, including but not limited to
communication on electronic mailing lists, source code control systems,
and issue tracking systems that are managed by, or on behalf of, the
Licensor for the purpose of discussing and improving the Work, but
excluding communication that is conspicuously marked or otherwise
designated in writing by the copyright owner as "Not a Contribution."
"Contributor" shall mean Licensor and any individual or Legal Entity
on behalf of whom a Contribution has been received by Licensor and
subsequently incorporated within the Work.
2. Grant of Copyright License. Subject to the terms and conditions of
this License, each Contributor hereby grants to You a perpetual,
worldwide, non-exclusive, no-charge, royalty-free, irrevocable
copyright license to reproduce, prepare Derivative Works of,
publicly display, publicly perform, sublicense, and distribute the
Work and such Derivative Works in Source or Object form.
3. Grant of Patent License. Subject to the terms and conditions of
this License, each Contributor hereby grants to You a perpetual,
worldwide, non-exclusive, no-charge, royalty-free, irrevocable
(except as stated in this section) patent license to make, have made,
use, offer to sell, sell, import, and otherwise transfer the Work,
where such license applies only to those patent claims licensable
by such Contributor that are necessarily infringed by their
Contribution(s) alone or by combination of their Contribution(s)
with the Work to which such Contribution(s) was submitted. If You
institute patent litigation against any entity (including a
cross-claim or counterclaim in a lawsuit) alleging that the Work
or a Contribution incorporated within the Work constitutes direct
or contributory patent infringement, then any patent licenses
granted to You under this License for that Work shall terminate
as of the date such litigation is filed.
4. Redistribution. You may reproduce and distribute copies of the
Work or Derivative Works thereof in any medium, with or without
modifications, and in Source or Object form, provided that You
meet the following conditions:
(a) You must give any other recipients of the Work or
Derivative Works a copy of this License; and
(b) You must cause any modified files to carry prominent notices
stating that You changed the files; and
(c) You must retain, in the Source form
that You distribute, all copyright,
attribution notices from the Source
excluding those notices that do not
the Derivative Works; and
of any Derivative Works
patent, trademark, and
form of the Work,
pertain to any part of
(d) If the Work includes a "NOTICE" text file as part of its
distribution, then any Derivative Works that You distribute must
Copyright 2010 SageTV, LLC All rights reserved
For additional support, go to www.sagetv.com/support.html or email us at [email protected]
Page 298
SageTV V7.0 User’s Guide
Appendix P: Operating System Differences
include a readable copy of the attribution notices contained
within such NOTICE file, excluding those notices that do not
pertain to any part of the Derivative Works, in at least one
of the following places: within a NOTICE text file distributed
as part of the Derivative Works; within the Source form or
documentation, if provided along with the Derivative Works; or,
within a display generated by the Derivative Works, if and
wherever such third-party notices normally appear. The contents
of the NOTICE file are for informational purposes only and
do not modify the License. You may add Your own attribution
notices within Derivative Works that You distribute, alongside
or as an addendum to the NOTICE text from the Work, provided
that such additional attribution notices cannot be construed
as modifying the License.
You may add Your own copyright statement to Your modifications and
may provide additional or different license terms and conditions
for use, reproduction, or distribution of Your modifications, or
for any such Derivative Works as a whole, provided Your use,
reproduction, and distribution of the Work otherwise complies with
the conditions stated in this License.
5. Submission of Contributions. Unless You explicitly state otherwise,
any Contribution intentionally submitted for inclusion in the Work
by You to the Licensor shall be under the terms and conditions of
this License, without any additional terms or conditions.
Notwithstanding the above, nothing herein shall supersede or modify
the terms of any separate license agreement you may have executed
with Licensor regarding such Contributions.
6. Trademarks. This License does not grant permission to use the trade
names, trademarks, service marks, or product names of the Licensor,
except as required for reasonable and customary use in describing the
origin of the Work and reproducing the content of the NOTICE file.
7. Disclaimer of Warranty. Unless required by applicable law or
agreed to in writing, Licensor provides the Work (and each
Contributor provides its Contributions) on an "AS IS" BASIS,
WITHOUT WARRANTIES OR CONDITIONS OF ANY KIND, either express or
implied, including, without limitation, any warranties or conditions
of TITLE, NON-INFRINGEMENT, MERCHANTABILITY, or FITNESS FOR A
PARTICULAR PURPOSE. You are solely responsible for determining the
appropriateness of using or redistributing the Work and assume any
risks associated with Your exercise of permissions under this License.
8. Limitation of Liability. In no event and under no legal theory,
whether in tort (including negligence), contract, or otherwise,
unless required by applicable law (such as deliberate and grossly
negligent acts) or agreed to in writing, shall any Contributor be
liable to You for damages, including any direct, indirect, special,
incidental, or consequential damages of any character arising as a
result of this License or out of the use or inability to use the
Work (including but not limited to damages for loss of goodwill,
work stoppage, computer failure or malfunction, or any and all
other commercial damages or losses), even if such Contributor
has been advised of the possibility of such damages.
9. Accepting Warranty or Additional Liability. While redistributing
the Work or Derivative Works thereof, You may choose to offer,
and charge a fee for, acceptance of support, warranty, indemnity,
or other liability obligations and/or rights consistent with this
License. However, in accepting such obligations, You may act only
on Your own behalf and on Your sole responsibility, not on behalf
Copyright 2010 SageTV, LLC All rights reserved
For additional support, go to www.sagetv.com/support.html or email us at [email protected]
Page 299
SageTV V7.0 User’s Guide
Appendix P: Operating System Differences
Page 300
of any other Contributor, and only if You agree to indemnify,
defend, and hold each Contributor harmless for any liability
incurred by, or claims asserted against, such Contributor by reason
of your accepting any such warranty or additional liability.
END OF TERMS AND CONDITIONS
APPENDIX: How to apply the Apache License to your work.
To apply the Apache License to your work, attach the following
boilerplate notice, with the fields enclosed by brackets "[]"
replaced with your own identifying information. (Don't include
the brackets!) The text should be enclosed in the appropriate
comment syntax for the file format. We also recommend that a
file or class name and description of purpose be included on the
same "printed page" as the copyright notice for easier
identification within third-party archives.
Copyright [yyyy] [name of copyright owner]
Licensed under the Apache License, Version 2.0 (the "License");
you may not use this file except in compliance with the License.
You may obtain a copy of the License at
http://www.apache.org/licenses/LICENSE-2.0
Unless required by applicable law or agreed to in writing, software
distributed under the License is distributed on an "AS IS" BASIS,
WITHOUT WARRANTIES OR CONDITIONS OF ANY KIND, either express or implied.
See the License for the specific language governing permissions and
limitations under the License.
GNU LESSER GENERAL PUBLIC LICENSE v2.1
The following software may be included in this product: libswscale, JCIFS, JDIC, libav, pthread,
libhdhomerun. Use of any of this software is governed by the terms of the license below:
GNU LESSER GENERAL PUBLIC LICENSE
Version 2.1, February 1999
Copyright (C) 1991, 1999 Free Software Foundation, Inc.
51 Franklin Street, Fifth Floor, Boston, MA 02110-1301 USA
Everyone is permitted to copy and distribute verbatim copies
of this license document, but changing it is not allowed.
[This is the first released version of the Lesser GPL. It also counts
as the successor of the GNU Library Public License, version 2, hence
the version number 2.1.]
Preamble
The licenses for most software are designed to take away your
freedom to share and change it. By contrast, the GNU General Public
Licenses are intended to guarantee your freedom to share and change
free software--to make sure the software is free for all its users.
This license, the Lesser General Public License, applies to some
specially designated software packages--typically libraries--of the
Copyright 2010 SageTV, LLC All rights reserved
For additional support, go to www.sagetv.com/support.html or email us at [email protected]
SageTV V7.0 User’s Guide
Appendix P: Operating System Differences
Free Software Foundation and other authors who decide to use it. You
can use it too, but we suggest you first think carefully about whether
this license or the ordinary General Public License is the better
strategy to use in any particular case, based on the explanations below.
When we speak of free software, we are referring to freedom of use,
not price. Our General Public Licenses are designed to make sure that
you have the freedom to distribute copies of free software (and charge
for this service if you wish); that you receive source code or can get
it if you want it; that you can change the software and use pieces of
it in new free programs; and that you are informed that you can do
these things.
To protect your rights, we need to make restrictions that forbid
distributors to deny you these rights or to ask you to surrender these
rights. These restrictions translate to certain responsibilities for
you if you distribute copies of the library or if you modify it.
For example, if you distribute copies of the library, whether gratis
or for a fee, you must give the recipients all the rights that we gave
you. You must make sure that they, too, receive or can get the source
code. If you link other code with the library, you must provide
complete object files to the recipients, so that they can relink them
with the library after making changes to the library and recompiling
it. And you must show them these terms so they know their rights.
We protect your rights with a two-step method: (1) we copyright the
library, and (2) we offer you this license, which gives you legal
permission to copy, distribute and/or modify the library.
To protect each distributor, we want to make it very clear that
there is no warranty for the free library. Also, if the library is
modified by someone else and passed on, the recipients should know
that what they have is not the original version, so that the original
author's reputation will not be affected by problems that might be
introduced by others.
_
Finally, software patents pose a constant threat to the existence of
any free program. We wish to make sure that a company cannot
effectively restrict the users of a free program by obtaining a
restrictive license from a patent holder. Therefore, we insist that
any patent license obtained for a version of the library must be
consistent with the full freedom of use specified in this license.
Most GNU software, including some libraries, is covered by the
ordinary GNU General Public License. This license, the GNU Lesser
General Public License, applies to certain designated libraries, and
is quite different from the ordinary General Public License. We use
this license for certain libraries in order to permit linking those
libraries into non-free programs.
When a program is linked with a library, whether statically or using
a shared library, the combination of the two is legally speaking a
combined work, a derivative of the original library. The ordinary
General Public License therefore permits such linking only if the
entire combination fits its criteria of freedom. The Lesser General
Public License permits more lax criteria for linking other code with
the library.
We call this license the "Lesser" General Public License because it
does Less to protect the user's freedom than the ordinary General
Public License. It also provides other free software developers Less
of an advantage over competing non-free programs. These disadvantages
Copyright 2010 SageTV, LLC All rights reserved
For additional support, go to www.sagetv.com/support.html or email us at [email protected]
Page 301
SageTV V7.0 User’s Guide
Appendix P: Operating System Differences
are the reason we use the ordinary General Public License for many
libraries. However, the Lesser license provides advantages in certain
special circumstances.
For example, on rare occasions, there may be a special need to
encourage the widest possible use of a certain library, so that it becomes
a de-facto standard. To achieve this, non-free programs must be
allowed to use the library. A more frequent case is that a free
library does the same job as widely used non-free libraries. In this
case, there is little to gain by limiting the free library to free
software only, so we use the Lesser General Public License.
In other cases, permission to use a particular library in non-free
programs enables a greater number of people to use a large body of
free software. For example, permission to use the GNU C Library in
non-free programs enables many more people to use the whole GNU
operating system, as well as its variant, the GNU/Linux operating
system.
Although the Lesser General Public License is Less protective of the
users' freedom, it does ensure that the user of a program that is
linked with the Library has the freedom and the wherewithal to run
that program using a modified version of the Library.
The precise terms and conditions for copying, distribution and
modification follow. Pay close attention to the difference between a
"work based on the library" and a "work that uses the library". The
former contains code derived from the library, whereas the latter must
be combined with the library in order to run.
_
GNU LESSER GENERAL PUBLIC LICENSE
TERMS AND CONDITIONS FOR COPYING, DISTRIBUTION AND MODIFICATION
0. This License Agreement applies to any software library or other
program which contains a notice placed by the copyright holder or
other authorized party saying it may be distributed under the terms of
this Lesser General Public License (also called "this License").
Each licensee is addressed as "you".
A "library" means a collection of software functions and/or data
prepared so as to be conveniently linked with application programs
(which use some of those functions and data) to form executables.
The "Library", below, refers to any such software library or work
which has been distributed under these terms. A "work based on the
Library" means either the Library or any derivative work under
copyright law: that is to say, a work containing the Library or a
portion of it, either verbatim or with modifications and/or translated
straightforwardly into another language. (Hereinafter, translation is
included without limitation in the term "modification".)
"Source code" for a work means the preferred form of the work for
making modifications to it. For a library, complete source code means
all the source code for all modules it contains, plus any associated
interface definition files, plus the scripts used to control compilation
and installation of the library.
Activities other than copying, distribution and modification are not
covered by this License; they are outside its scope. The act of
running a program using the Library is not restricted, and output from
such a program is covered only if its contents constitute a work based
on the Library (independent of the use of the Library in a tool for
writing it). Whether that is true depends on what the Library does
Copyright 2010 SageTV, LLC All rights reserved
For additional support, go to www.sagetv.com/support.html or email us at [email protected]
Page 302
SageTV V7.0 User’s Guide
Appendix P: Operating System Differences
and what the program that uses the Library does.
1. You may copy and distribute verbatim copies of the Library's
complete source code as you receive it, in any medium, provided that
you conspicuously and appropriately publish on each copy an
appropriate copyright notice and disclaimer of warranty; keep intact
all the notices that refer to this License and to the absence of any
warranty; and distribute a copy of this License along with the
Library.
You may charge a fee for the physical act of transferring a copy,
and you may at your option offer warranty protection in exchange for a
fee.
_
2. You may modify your copy or copies of the Library or any portion
of it, thus forming a work based on the Library, and copy and
distribute such modifications or work under the terms of Section 1
above, provided that you also meet all of these conditions:
a) The modified work must itself be a software library.
b) You must cause the files modified to carry prominent notices
stating that you changed the files and the date of any change.
c) You must cause the whole of the work to be licensed at no
charge to all third parties under the terms of this License.
d) If a facility in the modified Library refers to a function or a
table of data to be supplied by an application program that uses
the facility, other than as an argument passed when the facility
is invoked, then you must make a good faith effort to ensure that,
in the event an application does not supply such function or
table, the facility still operates, and performs whatever part of
its purpose remains meaningful.
(For example, a function in a library to compute square roots has
a purpose that is entirely well-defined independent of the
application. Therefore, Subsection 2d requires that any
application-supplied function or table used by this function must
be optional: if the application does not supply it, the square
root function must still compute square roots.)
These requirements apply to the modified work as a whole. If
identifiable sections of that work are not derived from the Library,
and can be reasonably considered independent and separate works in
themselves, then this License, and its terms, do not apply to those
sections when you distribute them as separate works. But when you
distribute the same sections as part of a whole which is a work based
on the Library, the distribution of the whole must be on the terms of
this License, whose permissions for other licensees extend to the
entire whole, and thus to each and every part regardless of who wrote
it.
Thus, it is not the intent of this section to claim rights or contest
your rights to work written entirely by you; rather, the intent is to
exercise the right to control the distribution of derivative or
collective works based on the Library.
In addition, mere aggregation of another work not based on the Library
with the Library (or with a work based on the Library) on a volume of
a storage or distribution medium does not bring the other work under
the scope of this License.
Copyright 2010 SageTV, LLC All rights reserved
For additional support, go to www.sagetv.com/support.html or email us at [email protected]
Page 303
SageTV V7.0 User’s Guide
Appendix P: Operating System Differences
3. You may opt to apply the terms of the ordinary GNU General Public
License instead of this License to a given copy of the Library. To do
this, you must alter all the notices that refer to this License, so
that they refer to the ordinary GNU General Public License, version 2,
instead of to this License. (If a newer version than version 2 of the
ordinary GNU General Public License has appeared, then you can specify
that version instead if you wish.) Do not make any other change in
these notices.
_
Once this change is made in a given copy, it is irreversible for
that copy, so the ordinary GNU General Public License applies to all
subsequent copies and derivative works made from that copy.
This option is useful when you wish to copy part of the code of
the Library into a program that is not a library.
4. You may copy and distribute the Library (or a portion or
derivative of it, under Section 2) in object code or executable form
under the terms of Sections 1 and 2 above provided that you accompany
it with the complete corresponding machine-readable source code, which
must be distributed under the terms of Sections 1 and 2 above on a
medium customarily used for software interchange.
If distribution of object code is made by offering access to copy
from a designated place, then offering equivalent access to copy the
source code from the same place satisfies the requirement to
distribute the source code, even though third parties are not
compelled to copy the source along with the object code.
5. A program that contains no derivative of any portion of the
Library, but is designed to work with the Library by being compiled or
linked with it, is called a "work that uses the Library". Such a
work, in isolation, is not a derivative work of the Library, and
therefore falls outside the scope of this License.
However, linking a "work that uses the Library" with the Library
creates an executable that is a derivative of the Library (because it
contains portions of the Library), rather than a "work that uses the
library". The executable is therefore covered by this License.
Section 6 states terms for distribution of such executables.
When a "work that uses the Library" uses material from a header file
that is part of the Library, the object code for the work may be a
derivative work of the Library even though the source code is not.
Whether this is true is especially significant if the work can be
linked without the Library, or if the work is itself a library. The
threshold for this to be true is not precisely defined by law.
If such an object file uses only numerical parameters, data
structure layouts and accessors, and small macros and small inline
functions (ten lines or less in length), then the use of the object
file is unrestricted, regardless of whether it is legally a derivative
work. (Executables containing this object code plus portions of the
Library will still fall under Section 6.)
Otherwise, if the work is a derivative of the Library, you may
distribute the object code for the work under the terms of Section 6.
Any executables containing that work also fall under Section 6,
whether or not they are linked directly with the Library itself.
_
6. As an exception to the Sections above, you may also combine or
link a "work that uses the Library" with the Library to produce a
work containing portions of the Library, and distribute that work
Copyright 2010 SageTV, LLC All rights reserved
For additional support, go to www.sagetv.com/support.html or email us at [email protected]
Page 304
SageTV V7.0 User’s Guide
Appendix P: Operating System Differences
under terms of your choice, provided that the terms permit
modification of the work for the customer's own use and reverse
engineering for debugging such modifications.
You must give prominent notice with each copy of the work that the
Library is used in it and that the Library and its use are covered by
this License. You must supply a copy of this License. If the work
during execution displays copyright notices, you must include the
copyright notice for the Library among them, as well as a reference
directing the user to the copy of this License. Also, you must do one
of these things:
a) Accompany the work with the complete corresponding
machine-readable source code for the Library including whatever
changes were used in the work (which must be distributed under
Sections 1 and 2 above); and, if the work is an executable linked
with the Library, with the complete machine-readable "work that
uses the Library", as object code and/or source code, so that the
user can modify the Library and then relink to produce a modified
executable containing the modified Library. (It is understood
that the user who changes the contents of definitions files in the
Library will not necessarily be able to recompile the application
to use the modified definitions.)
b) Use a suitable shared library mechanism for linking with the
Library. A suitable mechanism is one that (1) uses at run time a
copy of the library already present on the user's computer system,
rather than copying library functions into the executable, and (2)
will operate properly with a modified version of the library, if
the user installs one, as long as the modified version is
interface-compatible with the version that the work was made with.
c) Accompany the work with a written offer, valid for at
least three years, to give the same user the materials
specified in Subsection 6a, above, for a charge no more
than the cost of performing this distribution.
d) If distribution of the work is made by offering access to copy
from a designated place, offer equivalent access to copy the above
specified materials from the same place.
e) Verify that the user has already received a copy of these
materials or that you have already sent this user a copy.
For an executable, the required form of the "work that uses the
Library" must include any data and utility programs needed for
reproducing the executable from it. However, as a special exception,
the materials to be distributed need not include anything that is
normally distributed (in either source or binary form) with the major
components (compiler, kernel, and so on) of the operating system on
which the executable runs, unless that component itself accompanies
the executable.
It may happen that this requirement contradicts the license
restrictions of other proprietary libraries that do not normally
accompany the operating system. Such a contradiction means you cannot
use both them and the Library together in an executable that you
distribute.
_
7. You may place library facilities that are a work based on the
Library side-by-side in a single library together with other library
facilities not covered by this License, and distribute such a combined
library, provided that the separate distribution of the work based on
Copyright 2010 SageTV, LLC All rights reserved
For additional support, go to www.sagetv.com/support.html or email us at [email protected]
Page 305
SageTV V7.0 User’s Guide
Appendix P: Operating System Differences
the Library and of the other library facilities is otherwise
permitted, and provided that you do these two things:
a) Accompany the combined library with a copy of the same work
based on the Library, uncombined with any other library
facilities. This must be distributed under the terms of the
Sections above.
b) Give prominent notice with the combined library of the fact
that part of it is a work based on the Library, and explaining
where to find the accompanying uncombined form of the same work.
8. You may not copy, modify, sublicense, link with, or distribute
the Library except as expressly provided under this License. Any
attempt otherwise to copy, modify, sublicense, link with, or
distribute the Library is void, and will automatically terminate your
rights under this License. However, parties who have received copies,
or rights, from you under this License will not have their licenses
terminated so long as such parties remain in full compliance.
9. You are not required to accept this License, since you have not
signed it. However, nothing else grants you permission to modify or
distribute the Library or its derivative works. These actions are
prohibited by law if you do not accept this License. Therefore, by
modifying or distributing the Library (or any work based on the
Library), you indicate your acceptance of this License to do so, and
all its terms and conditions for copying, distributing or modifying
the Library or works based on it.
10. Each time you redistribute the Library (or any work based on the
Library), the recipient automatically receives a license from the
original licensor to copy, distribute, link with or modify the Library
subject to these terms and conditions. You may not impose any further
restrictions on the recipients' exercise of the rights granted herein.
You are not responsible for enforcing compliance by third parties with
this License.
_
11. If, as a consequence of a court judgment or allegation of patent
infringement or for any other reason (not limited to patent issues),
conditions are imposed on you (whether by court order, agreement or
otherwise) that contradict the conditions of this License, they do not
excuse you from the conditions of this License. If you cannot
distribute so as to satisfy simultaneously your obligations under this
License and any other pertinent obligations, then as a consequence you
may not distribute the Library at all. For example, if a patent
license would not permit royalty-free redistribution of the Library by
all those who receive copies directly or indirectly through you, then
the only way you could satisfy both it and this License would be to
refrain entirely from distribution of the Library.
If any portion of this section is held invalid or unenforceable under any
particular circumstance, the balance of the section is intended to apply,
and the section as a whole is intended to apply in other circumstances.
It is not the purpose of this section to induce you to infringe any
patents or other property right claims or to contest validity of any
such claims; this section has the sole purpose of protecting the
integrity of the free software distribution system which is
implemented by public license practices. Many people have made
generous contributions to the wide range of software distributed
through that system in reliance on consistent application of that
system; it is up to the author/donor to decide if he or she is willing
to distribute software through any other system and a licensee cannot
Copyright 2010 SageTV, LLC All rights reserved
For additional support, go to www.sagetv.com/support.html or email us at [email protected]
Page 306
SageTV V7.0 User’s Guide
Appendix P: Operating System Differences
impose that choice.
This section is intended to make thoroughly clear what is believed to
be a consequence of the rest of this License.
12. If the distribution and/or use of the Library is restricted in
certain countries either by patents or by copyrighted interfaces, the
original copyright holder who places the Library under this License may add
an explicit geographical distribution limitation excluding those countries,
so that distribution is permitted only in or among countries not thus
excluded. In such case, this License incorporates the limitation as if
written in the body of this License.
13. The Free Software Foundation may publish revised and/or new
versions of the Lesser General Public License from time to time.
Such new versions will be similar in spirit to the present version,
but may differ in detail to address new problems or concerns.
Each version is given a distinguishing version number. If the Library
specifies a version number of this License which applies to it and
"any later version", you have the option of following the terms and
conditions either of that version or of any later version published by
the Free Software Foundation. If the Library does not specify a
license version number, you may choose any version ever published by
the Free Software Foundation.
_
14. If you wish to incorporate parts of the Library into other free
programs whose distribution conditions are incompatible with these,
write to the author to ask for permission. For software which is
copyrighted by the Free Software Foundation, write to the Free
Software Foundation; we sometimes make exceptions for this. Our
decision will be guided by the two goals of preserving the free status
of all derivatives of our free software and of promoting the sharing
and reuse of software generally.
NO WARRANTY
15. BECAUSE THE LIBRARY IS LICENSED FREE OF CHARGE, THERE IS NO
WARRANTY FOR THE LIBRARY, TO THE EXTENT PERMITTED BY APPLICABLE LAW.
EXCEPT WHEN OTHERWISE STATED IN WRITING THE COPYRIGHT HOLDERS AND/OR
OTHER PARTIES PROVIDE THE LIBRARY "AS IS" WITHOUT WARRANTY OF ANY
KIND, EITHER EXPRESSED OR IMPLIED, INCLUDING, BUT NOT LIMITED TO, THE
IMPLIED WARRANTIES OF MERCHANTABILITY AND FITNESS FOR A PARTICULAR
PURPOSE. THE ENTIRE RISK AS TO THE QUALITY AND PERFORMANCE OF THE
LIBRARY IS WITH YOU. SHOULD THE LIBRARY PROVE DEFECTIVE, YOU ASSUME
THE COST OF ALL NECESSARY SERVICING, REPAIR OR CORRECTION.
16. IN NO EVENT UNLESS REQUIRED BY APPLICABLE LAW OR AGREED TO IN
WRITING WILL ANY COPYRIGHT HOLDER, OR ANY OTHER PARTY WHO MAY MODIFY
AND/OR REDISTRIBUTE THE LIBRARY AS PERMITTED ABOVE, BE LIABLE TO YOU
FOR DAMAGES, INCLUDING ANY GENERAL, SPECIAL, INCIDENTAL OR
CONSEQUENTIAL DAMAGES ARISING OUT OF THE USE OR INABILITY TO USE THE
LIBRARY (INCLUDING BUT NOT LIMITED TO LOSS OF DATA OR DATA BEING
RENDERED INACCURATE OR LOSSES SUSTAINED BY YOU OR THIRD PARTIES OR A
FAILURE OF THE LIBRARY TO OPERATE WITH ANY OTHER SOFTWARE), EVEN IF
SUCH HOLDER OR OTHER PARTY HAS BEEN ADVISED OF THE POSSIBILITY OF SUCH
DAMAGES.
END OF TERMS AND CONDITIONS
_
How to Apply These Terms to Your New Libraries
If you develop a new library, and you want it to be of the greatest
Copyright 2010 SageTV, LLC All rights reserved
For additional support, go to www.sagetv.com/support.html or email us at [email protected]
Page 307
SageTV V7.0 User’s Guide
Appendix P: Operating System Differences
Page 308
possible use to the public, we recommend making it free software that
everyone can redistribute and change. You can do so by permitting
redistribution under these terms (or, alternatively, under the terms of the
ordinary General Public License).
To apply these terms, attach the following notices to the library. It is
safest to attach them to the start of each source file to most effectively
convey the exclusion of warranty; and each file should have at least the
"copyright" line and a pointer to where the full notice is found.
<one line to give the library's name and a brief idea of what it does.>
Copyright (C) <year> <name of author>
This library is free software; you can redistribute it and/or
modify it under the terms of the GNU Lesser General Public
License as published by the Free Software Foundation; either
version 2.1 of the License, or (at your option) any later version.
This library is distributed in the hope that it will be useful,
but WITHOUT ANY WARRANTY; without even the implied warranty of
MERCHANTABILITY or FITNESS FOR A PARTICULAR PURPOSE. See the GNU
Lesser General Public License for more details.
You should have received a copy of the GNU Lesser General Public
License along with this library; if not, write to the Free Software
Foundation, Inc., 51 Franklin Street, Fifth Floor, Boston, MA 02110-1301
USA
Also add information on how to contact you by electronic and paper mail.
You should also get your employer (if you work as a programmer) or your
school, if any, to sign a "copyright disclaimer" for the library, if
necessary. Here is a sample; alter the names:
Yoyodyne, Inc., hereby disclaims all copyright interest in the
library `Frob' (a library for tweaking knobs) written by James Random Hacker.
<signature of Ty Coon>, 1 April 1990
Ty Coon, President of Vice
That's all there is to it!
GNU GENERAL PUBLIC LICENSE v2
The following software may be included in this product: MPlayer, DScaler, AC3Filter,
FFMPEG, faac, faad2, x264, xvidcore, vecmath.jar. Use of any of this software is governed by
the terms of the license below:
GNU GENERAL PUBLIC LICENSE
Version 2, June 1991
Copyright (C) 1989, 1991 Free Software Foundation, Inc.,
51 Franklin Street, Fifth Floor, Boston, MA 02110-1301 USA
Everyone is permitted to copy and distribute verbatim copies
of this license document, but changing it is not allowed.
Preamble
The licenses for most software are designed to take away your
freedom to share and change it. By contrast, the GNU General Public
Copyright 2010 SageTV, LLC All rights reserved
For additional support, go to www.sagetv.com/support.html or email us at [email protected]
SageTV V7.0 User’s Guide
Appendix P: Operating System Differences
License is intended to guarantee your freedom to share and change free
software--to make sure the software is free for all its users. This
General Public License applies to most of the Free Software
Foundation's software and to any other program whose authors commit to
using it. (Some other Free Software Foundation software is covered by
the GNU Lesser General Public License instead.) You can apply it to
your programs, too.
When we speak of free software, we are referring to freedom, not
price. Our General Public Licenses are designed to make sure that you
have the freedom to distribute copies of free software (and charge for
this service if you wish), that you receive source code or can get it
if you want it, that you can change the software or use pieces of it
in new free programs; and that you know you can do these things.
To protect your rights, we need to make restrictions that forbid
anyone to deny you these rights or to ask you to surrender the rights.
These restrictions translate to certain responsibilities for you if you
distribute copies of the software, or if you modify it.
For example, if you distribute copies of such a program, whether
gratis or for a fee, you must give the recipients all the rights that
you have. You must make sure that they, too, receive or can get the
source code. And you must show them these terms so they know their
rights.
We protect your rights with two steps: (1) copyright the software, and
(2) offer you this license which gives you legal permission to copy,
distribute and/or modify the software.
Also, for each author's protection and ours, we want to make certain
that everyone understands that there is no warranty for this free
software. If the software is modified by someone else and passed on, we
want its recipients to know that what they have is not the original, so
that any problems introduced by others will not reflect on the original
authors' reputations.
Finally, any free program is threatened constantly by software
patents. We wish to avoid the danger that redistributors of a free
program will individually obtain patent licenses, in effect making the
program proprietary. To prevent this, we have made it clear that any
patent must be licensed for everyone's free use or not licensed at all.
The precise terms and conditions for copying, distribution and
modification follow.
GNU GENERAL PUBLIC LICENSE
TERMS AND CONDITIONS FOR COPYING, DISTRIBUTION AND MODIFICATION
0. This License applies to any program or other work which contains
a notice placed by the copyright holder saying it may be distributed
under the terms of this General Public License. The "Program", below,
refers to any such program or work, and a "work based on the Program"
means either the Program or any derivative work under copyright law:
that is to say, a work containing the Program or a portion of it,
either verbatim or with modifications and/or translated into another
language. (Hereinafter, translation is included without limitation in
the term "modification".) Each licensee is addressed as "you".
Activities other than copying, distribution and modification are not
covered by this License; they are outside its scope. The act of
running the Program is not restricted, and the output from the Program
is covered only if its contents constitute a work based on the
Copyright 2010 SageTV, LLC All rights reserved
For additional support, go to www.sagetv.com/support.html or email us at [email protected]
Page 309
SageTV V7.0 User’s Guide
Appendix P: Operating System Differences
Program (independent of having been made by running the Program).
Whether that is true depends on what the Program does.
1. You may copy and distribute verbatim copies of the Program's
source code as you receive it, in any medium, provided that you
conspicuously and appropriately publish on each copy an appropriate
copyright notice and disclaimer of warranty; keep intact all the
notices that refer to this License and to the absence of any warranty;
and give any other recipients of the Program a copy of this License
along with the Program.
You may charge a fee for the physical act of transferring a copy, and
you may at your option offer warranty protection in exchange for a fee.
2. You may modify your copy or copies of the Program or any portion
of it, thus forming a work based on the Program, and copy and
distribute such modifications or work under the terms of Section 1
above, provided that you also meet all of these conditions:
a) You must cause the modified files to carry prominent notices
stating that you changed the files and the date of any change.
b) You must cause any work that
whole or in part contains or is
part thereof, to be licensed as
parties under the terms of this
you distribute or publish, that in
derived from the Program or any
a whole at no charge to all third
License.
c) If the modified program normally reads commands interactively
when run, you must cause it, when started running for such
interactive use in the most ordinary way, to print or display an
announcement including an appropriate copyright notice and a
notice that there is no warranty (or else, saying that you provide
a warranty) and that users may redistribute the program under
these conditions, and telling the user how to view a copy of this
License. (Exception: if the Program itself is interactive but
does not normally print such an announcement, your work based on
the Program is not required to print an announcement.)
These requirements apply to the modified work as a whole. If
identifiable sections of that work are not derived from the Program,
and can be reasonably considered independent and separate works in
themselves, then this License, and its terms, do not apply to those
sections when you distribute them as separate works. But when you
distribute the same sections as part of a whole which is a work based
on the Program, the distribution of the whole must be on the terms of
this License, whose permissions for other licensees extend to the
entire whole, and thus to each and every part regardless of who wrote it.
Thus, it is not the intent of this section to claim rights or contest
your rights to work written entirely by you; rather, the intent is to
exercise the right to control the distribution of derivative or
collective works based on the Program.
In addition, mere aggregation of another work not based on the Program
with the Program (or with a work based on the Program) on a volume of
a storage or distribution medium does not bring the other work under
the scope of this License.
3. You may copy and distribute the Program (or a work based on it,
under Section 2) in object code or executable form under the terms of
Sections 1 and 2 above provided that you also do one of the following:
a) Accompany it with the complete corresponding machine-readable
Copyright 2010 SageTV, LLC All rights reserved
For additional support, go to www.sagetv.com/support.html or email us at [email protected]
Page 310
SageTV V7.0 User’s Guide
Appendix P: Operating System Differences
source code, which must be distributed under the terms of Sections
1 and 2 above on a medium customarily used for software interchange; or,
b) Accompany it with a written offer, valid for at least three
years, to give any third party, for a charge no more than your
cost of physically performing source distribution, a complete
machine-readable copy of the corresponding source code, to be
distributed under the terms of Sections 1 and 2 above on a medium
customarily used for software interchange; or,
c) Accompany it with the information you received as to the offer
to distribute corresponding source code. (This alternative is
allowed only for noncommercial distribution and only if you
received the program in object code or executable form with such
an offer, in accord with Subsection b above.)
The source code for a work means the preferred form of the work for
making modifications to it. For an executable work, complete source
code means all the source code for all modules it contains, plus any
associated interface definition files, plus the scripts used to
control compilation and installation of the executable. However, as a
special exception, the source code distributed need not include
anything that is normally distributed (in either source or binary
form) with the major components (compiler, kernel, and so on) of the
operating system on which the executable runs, unless that component
itself accompanies the executable.
If distribution of executable or object code is made by offering
access to copy from a designated place, then offering equivalent
access to copy the source code from the same place counts as
distribution of the source code, even though third parties are not
compelled to copy the source along with the object code.
4. You may not copy, modify, sublicense, or distribute the Program
except as expressly provided under this License. Any attempt
otherwise to copy, modify, sublicense or distribute the Program is
void, and will automatically terminate your rights under this License.
However, parties who have received copies, or rights, from you under
this License will not have their licenses terminated so long as such
parties remain in full compliance.
5. You are not required to accept this License, since you have not
signed it. However, nothing else grants you permission to modify or
distribute the Program or its derivative works. These actions are
prohibited by law if you do not accept this License. Therefore, by
modifying or distributing the Program (or any work based on the
Program), you indicate your acceptance of this License to do so, and
all its terms and conditions for copying, distributing or modifying
the Program or works based on it.
6. Each time you redistribute the Program (or any work based on the
Program), the recipient automatically receives a license from the
original licensor to copy, distribute or modify the Program subject to
these terms and conditions. You may not impose any further
restrictions on the recipients' exercise of the rights granted herein.
You are not responsible for enforcing compliance by third parties to
this License.
7. If, as a consequence of a court judgment or allegation of patent
infringement or for any other reason (not limited to patent issues),
conditions are imposed on you (whether by court order, agreement or
otherwise) that contradict the conditions of this License, they do not
excuse you from the conditions of this License. If you cannot
Copyright 2010 SageTV, LLC All rights reserved
For additional support, go to www.sagetv.com/support.html or email us at [email protected]
Page 311
SageTV V7.0 User’s Guide
Appendix P: Operating System Differences
distribute so as to satisfy simultaneously your obligations under this
License and any other pertinent obligations, then as a consequence you
may not distribute the Program at all. For example, if a patent
license would not permit royalty-free redistribution of the Program by
all those who receive copies directly or indirectly through you, then
the only way you could satisfy both it and this License would be to
refrain entirely from distribution of the Program.
If any portion of this section is held invalid or unenforceable under
any particular circumstance, the balance of the section is intended to
apply and the section as a whole is intended to apply in other
circumstances.
It is not the purpose of this section to induce you to infringe any
patents or other property right claims or to contest validity of any
such claims; this section has the sole purpose of protecting the
integrity of the free software distribution system, which is
implemented by public license practices. Many people have made
generous contributions to the wide range of software distributed
through that system in reliance on consistent application of that
system; it is up to the author/donor to decide if he or she is willing
to distribute software through any other system and a licensee cannot
impose that choice.
This section is intended to make thoroughly clear what is believed to
be a consequence of the rest of this License.
8. If the distribution and/or use of the Program is restricted in
certain countries either by patents or by copyrighted interfaces, the
original copyright holder who places the Program under this License
may add an explicit geographical distribution limitation excluding
those countries, so that distribution is permitted only in or among
countries not thus excluded. In such case, this License incorporates
the limitation as if written in the body of this License.
9. The Free Software Foundation may publish revised and/or new versions
of the General Public License from time to time. Such new versions will
be similar in spirit to the present version, but may differ in detail to
address new problems or concerns.
Each version is given a distinguishing version number. If the Program
specifies a version number of this License which applies to it and "any
later version", you have the option of following the terms and conditions
either of that version or of any later version published by the Free
Software Foundation. If the Program does not specify a version number of
this License, you may choose any version ever published by the Free Software
Foundation.
10. If you wish to incorporate parts of the Program into other free
programs whose distribution conditions are different, write to the author
to ask for permission. For software which is copyrighted by the Free
Software Foundation, write to the Free Software Foundation; we sometimes
make exceptions for this. Our decision will be guided by the two goals
of preserving the free status of all derivatives of our free software and
of promoting the sharing and reuse of software generally.
NO WARRANTY
11. BECAUSE THE PROGRAM IS LICENSED FREE OF CHARGE, THERE IS NO WARRANTY
FOR THE PROGRAM, TO THE EXTENT PERMITTED BY APPLICABLE LAW. EXCEPT WHEN
OTHERWISE STATED IN WRITING THE COPYRIGHT HOLDERS AND/OR OTHER PARTIES
PROVIDE THE PROGRAM "AS IS" WITHOUT WARRANTY OF ANY KIND, EITHER EXPRESSED
OR IMPLIED, INCLUDING, BUT NOT LIMITED TO, THE IMPLIED WARRANTIES OF
Copyright 2010 SageTV, LLC All rights reserved
For additional support, go to www.sagetv.com/support.html or email us at [email protected]
Page 312
SageTV V7.0 User’s Guide
Appendix P: Operating System Differences
MERCHANTABILITY AND FITNESS FOR A PARTICULAR PURPOSE. THE ENTIRE RISK AS
TO THE QUALITY AND PERFORMANCE OF THE PROGRAM IS WITH YOU. SHOULD THE
PROGRAM PROVE DEFECTIVE, YOU ASSUME THE COST OF ALL NECESSARY SERVICING,
REPAIR OR CORRECTION.
12. IN NO EVENT UNLESS REQUIRED BY APPLICABLE LAW OR AGREED TO IN WRITING
WILL ANY COPYRIGHT HOLDER, OR ANY OTHER PARTY WHO MAY MODIFY AND/OR
REDISTRIBUTE THE PROGRAM AS PERMITTED ABOVE, BE LIABLE TO YOU FOR DAMAGES,
INCLUDING ANY GENERAL, SPECIAL, INCIDENTAL OR CONSEQUENTIAL DAMAGES ARISING
OUT OF THE USE OR INABILITY TO USE THE PROGRAM (INCLUDING BUT NOT LIMITED
TO LOSS OF DATA OR DATA BEING RENDERED INACCURATE OR LOSSES SUSTAINED BY
YOU OR THIRD PARTIES OR A FAILURE OF THE PROGRAM TO OPERATE WITH ANY OTHER
PROGRAMS), EVEN IF SUCH HOLDER OR OTHER PARTY HAS BEEN ADVISED OF THE
POSSIBILITY OF SUCH DAMAGES.
END OF TERMS AND CONDITIONS
How to Apply These Terms to Your New Programs
If you develop a new program, and you want it to be of the greatest
possible use to the public, the best way to achieve this is to make it
free software which everyone can redistribute and change under these terms.
To do so, attach the following notices to the
to attach them to the start of each source file
convey the exclusion of warranty; and each file
the "copyright" line and a pointer to where the
program. It is safest
to most effectively
should have at least
full notice is found.
<one line to give the program's name and a brief idea of what it does.>
Copyright (C) <year> <name of author>
This program is free software; you can redistribute it and/or modify
it under the terms of the GNU General Public License as published by
the Free Software Foundation; either version 2 of the License, or
(at your option) any later version.
This program is distributed in the hope that it will be useful,
but WITHOUT ANY WARRANTY; without even the implied warranty of
MERCHANTABILITY or FITNESS FOR A PARTICULAR PURPOSE. See the
GNU General Public License for more details.
You should have received a copy of the GNU General Public License along
with this program; if not, write to the Free Software Foundation, Inc.,
51 Franklin Street, Fifth Floor, Boston, MA 02110-1301 USA.
Also add information on how to contact you by electronic and paper mail.
If the program is interactive, make it output a short notice like this
when it starts in an interactive mode:
Gnomovision version 69, Copyright (C) year name of author
Gnomovision comes with ABSOLUTELY NO WARRANTY; for details type `show w'.
This is free software, and you are welcome to redistribute it
under certain conditions; type `show c' for details.
The hypothetical commands `show w' and `show c' should show the appropriate
parts of the General Public License. Of course, the commands you use may
be called something other than `show w' and `show c'; they could even be
mouse-clicks or menu items--whatever suits your program.
You should also get your employer (if you work as a programmer) or your
school, if any, to sign a "copyright disclaimer" for the program, if
necessary. Here is a sample; alter the names:
Copyright 2010 SageTV, LLC All rights reserved
For additional support, go to www.sagetv.com/support.html or email us at [email protected]
Page 313
SageTV V7.0 User’s Guide
Appendix P: Operating System Differences
Yoyodyne, Inc., hereby disclaims all copyright interest in the program
`Gnomovision' (which makes passes at compilers) written by James Hacker.
<signature of Ty Coon>, 1 April 1989
Ty Coon, President of Vice
This General Public License does not permit incorporating your program into
proprietary programs. If your program is a subroutine library, you may
consider it more useful to permit linking proprietary applications with the
library. If this is what you want to do, use the GNU Lesser General
Public License instead of this License.
Copyright 2010 SageTV, LLC All rights reserved
For additional support, go to www.sagetv.com/support.html or email us at [email protected]
Page 314