1
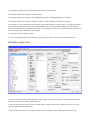
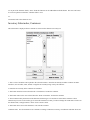
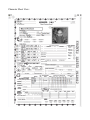
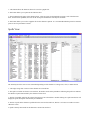
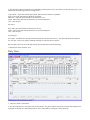
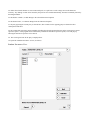
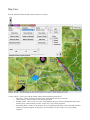
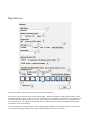
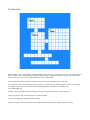
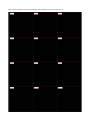
Campaign Management Software For AD&D First Edition
User's Manual
Version 1.0.016
Introduction:
Dungeon Maestro's purpose is to automate all of the drudgery for Dungeon Masters, keeping track of
stats, XP, spells, supplies, game time, travel distances, etc. etc.
It is NOT intended to replace pen and paper, old school Dungeons and Dragons, but is meant to allow
the DM to run the game with as little paperwork and looking up "stuff" in books as possible.
It was designed to be customizable for any campaign, but the default setup is based in the World of
Greyhawk.
This is intended for use with First Edition AD&D, there is some material from Unearthed Arcana
included, but it's still an open question to me to include UA stuff at all.
This is a 'beta test' release, there may still be bugs, and there are no warranties.
The program can be downloaded from http://50.116.10.164/dnd
This is a non-profit, freebie, love of the game project that I hope some of you may find useful. If you
do use it, any suggestions, feedback, and ideas for improvement would be very much appreciated and
those suggestions may very well make it into later versions.
Definitions:
Some definitions of terms in Dungeon Maestro may differ a bit from what you are familiar with as a Dungeon Master, or
may be used in a different context.
Cache- an inventory that is not associated with a character. A cache can be anything from a treasure chest to the contents of
a dungeon room. Caches are connected and are a part of maps, whether those maps are of dungeons, buildings, countries,
etc.
Character- in Dungeon Maestro a character is a collection of stats and an inventory, this data is used to keep track of the
character in your campaign
Inventory- a list of items, plus amounts of coins (platinum, gold, silver etc.)
Non-player character – a character usually controlled by the Dungeon Master, not a player. In Dungeon Maestro there is a
subtle difference between “monster” NPCs and “henchman” NPCs. For example, “monster” NPCs are created in and only
exist in parties, where “henchmen” NPCs are actually full characters, but are assigned an NPC status for purposes of
experience point awards etc.
Party- a group of characters, at least one of which will be your player characters
Map- an adventuring area plus the contents of that area. A map can be anything from the entire game world (a parent map)
to a dungeon, building, or other areas (child maps)
Module- a party taken together with a map would be considered a module in the pen and paper sense of the word
Tabs:
The various sections of Dungeon Maestro are separated into different pages, accessed by clicking on the appropriate tab.
The tabs are organized in the order of maps, caches, parties, and characters. Only when a map tab is selected are the tabs for
its child caches visible, and only when a party tab is selected are the tabs for the child character tabs visible.
Character View:
1- Indicates if this character is an NPC, for purposes of awarding experience points.
2- The character's name is entered here
3- The character's race is selected here
4- The character's gender is selected here
5- The character's class is entered here. The following boxes are for selecting the character's other classes for multi-classed
or dual-classed characters
6- The check above each character class is for selecting which class is the “active” class for dual-classed characters. The
checks are automatically set for multi-classed characters
7 – The character's alignment is selected here
8- The character's calculated saving throws are displayed here. Race, class, and level are taken into account here, but not
any temporary adjustments such as those from spells etc.
9- Level and current experience points for each level is displayed here. When edited, the current level will be calculated
from experience, or experience calculated from level depending on which number is edited. The +/- button adds or
subtracts from the experience point number
10- Currently earned, but not allocated experience is entered here. This is for tracking experience earned during an
adventure for example, before the DM is ready to grant experience and/or levels prior to training
11- The character's attributes are displayed here, with corresponding information for each attribute from the Player's
Handbook
12- The character's maximum and current hitpoints are displayed here. The +/- button next to the display is for adding or
subtracting from the current hitpoint total. Clicking on the current hit points box will bring up another window, in which the
hitpoints for the character can be edited for each level of experience
Note: For the following entries, the armor, weapons, etc. equipped by the character, each item must exist in the character's
carried inventory before it can be selected on this screen. (See Details/Inventory screen section below)
13- Experience awarded to an opponent for defeating this character is displayed here. The calculated value can be
overridden by typing a number in the box. To go back to the calculated value, enter a zero in the box. Special and
exceptional abilities used in the experience calculation are listed as “XspcYExc” , where X is the number of special
abilities, and Y the number of exceptional abilities
14- The helmet currently worn by the character is selected here
15- The armor worn by the character is selected here. The entry under the +/- symbol is for entering the magical adjustment
of the armor
16- The shield currently equipped by the character is selected here. The entry under the +/- symbol is for entering the
magical adjustment of the shield
17- A ring worn on the character's left hand is selected here. If the ring is a “ring of protection”, the entry under the +/symbol is for entering the magical adjustment of the ring. The magical adjustment has no effect on any other type of ring.
18- A ring worn on the character's right hand is selected here, with the same effects as entered for the previous (left hand)
ring
19 – The character's calculated armor class is displayed here, in the format of front armor class / unshielded armor class /
rear armor class
20- The character's calculated movement rate is displayed here, taking into account the armor worn and encumbrance
21 – The character's primary equipped weapon is selected here. This is considered to be the weapon currently “in hand”.
The entry under the +/- symbol is for entering the magical adjustment of the weapon. If the weapon is a missile weapon,
matching ammunition from the character's inventory will be automatically selected in the “Ammunition” equipment slot.
(see (25) below)
22- This button quickly swaps the selected primary and secondary weapons. Similar buttons swap positions of the other
equipped weapons of the character
23- The character's secondary (or off hand weapon) is selected here
24- The character's other equipped weapons are selected here and in the following box. These secondary weapons are
meant to indicated sheathed or otherwise quickly accessible weapons (such as a dagger in a boot etc.)
25- Ammunition for the character's primary weapon is selected here, if applicable. The selection can also be changed to
another stack of ammunition from the character's inventory if needed. Note- no ammunition is selectable from this box if
the character's primary weapon is not a missile weapon. Also, if the primary weapon is throwable, such as a spear or
dagger, the weapon will be displayed in both boxes
26- Ammunition that has been fired or thrown can be selected here for recovery back into the character's inventory
27- This button recovers the ammunition selected in the above box back into the character's inventory
28- The equipped weapons of the character are listed here, with “to hit vs. armor class” entries, as well as the damage values
for each weapon
29- The number of attacks per round calculated for the character is displayed here
30- This button displays the character's “Character Sheet”
31- This button displays the character's “Spell Management” screen (see Spell Management Screen below)
32- This button displays the character's “Details / Inventory” screen (see Details / Inventory Screen below)
33- This button “re-rolls” the attributes for the character, based on the character's selected class(es). Once the character has
been saved to disk, this button becomes the “Grant Earned XP” button, which automatically adds the earned experience
points to the character's current experience point total(s). If the character increases a level, the character will not increase in
level a second time unless this button is pressed again.
34- This button saves the character to disk
35 - The list of languages known by the character is displayed here. This list can be edited by clicking on this box.
Details/Inventory View:
1- This list contains all of the available items that can be bought by or given to the character. Click on the list to select the
desired item. The items are listed in alphabetical order
2- These check boxes hide or show the prices of items, and the weight of each item for encumbrance purposes, as well as
experience point values for magical items
3- These check boxes hide and reveal different categories of items, making it easier to find a specific item in the list
4- This button transfers the selected item into the character's inventory
5- This button buys the selected item and transfers the item into the character's inventory. The cost of the item is deducted
from the coins in the character's inventory
6- The list displays the items in the character's inventory. Clicking on any item in the list selects the item. Items stored in a
container, such as a backpack, are shown below the container in the list. Clicking on some items, such as containers or
scrolls opens a subwindow on the right side of the screen for additional properties of the item. (See scrolls and containers
sections below for more information)
7- This box allows you to change the name of an item selected in the character's inventory.
HINT – You can create custom items that are not part of the available item list by finding an item with properties and weight
appropriate to your desired item, and renaming the item. For example in my campaign, one of the players wanted to keep a
“goblin head”. I simply added an item of 5 g.p. encumbrance to the character's inventory, and renamed it to “goblin head”
8- This box allows you to enter the amount of experience points received by selling the item
9- This button allows you to increase or decrease the amount of the selected inventory
10- The box allows you to modify the magical adjustment of the selected item. Of course this only has an effect on
weapons, armor, shields, and rings of protection
11- The button causes similar items in the inventory to be stacked together as one item in the list. For example, 5 arrows
and 12 arrows would be collapsed into a single item of 17 arrows. Only items with the same magical adjustment will stack
together, so 5 +1 arrows will not stack with 12 +2 arrows
12- These boxes allow you to change the amounts of the various types of coins the character is carrying. The small round
radio buttons allow you to select the type of coin for other functions, such as transferring to another character. Note: The
values for each coin type listed here are the TOTALS for each type of coin carried by the character, irregardless of what
container the coins are actually in.
13- This button exchanges the amount of coins in the character's inventory for the smallest possible amount of higher value
coins. The highest value coin type is based on which type of coin is currently selected. For example, with “gold” selected,
400 copper pieces + 100 silver pieces would be exchanged into 7 gold pieces. Any “change” left over remains in the
character's inventory. Coins in different containers will be adjusted to reflect the new amounts of each type of coin.
14- The total encumbrance of the character is displayed here, with the limits on movement rate, based on the character's
strength attribute also displayed
15- Gives the selected inventory item to the character or cache selected in the list below (see 16)
16- Selects the character or cache to give the selected inventory item to. If the selected item is a container, all of the
container's (including coins) will also be transferred to the selected character or cache.
17- Drops the selected inventory item. The item cannot be recovered after dropping it. All items and coins in a selected
container will also be dropped.
18- Drops all items in the character inventory. The items cannot be recovered, so use this button with caution
19- Adds a weapon to the character's weapons of proficiency. The weapon can be selected from either the Available Items
or Inventory Items lists
20- Removes a selected weapon of proficiency
21- This area allows editing of various character details that are displayed on the Character Sheet. Depending on the
inventory item selected, another type of subwindow may be displayed here. (See below)
22- As part of the character details, “notes” about the character can be added/edited with this button. The notes can be also
be viewed or printed out from the “Character Sheet” views.
2324- Returns back to the Character View
Inventory Subwindow, Containers:
This subwindow is displayed when a container is selected in the character's inventory list:
1- This is a list of items that can be placed in the selected container. Items that are already in another container are NOT
listed here, nor are helms, armor, shields or rings that are currently being worn by the character.
2- Items that are currently in the container are listed here.
3- This button transfers an item selected in the “Carried Items” list into the container.
4- This button removes the item selected from the “Items in Container” list from the container.
5- These buttons modify the amount of the character's different types of coins that are stored in this container. These
amounts may be some or all of each type of coin in the character's inventory, but do not change the actual totals of each coin
the character has, it simply indicates “where” those coins are stored.
6- This button moves ALL of the character's coins into this container.
Container Notes: You do not HAVE to use containers to manage a character's inventory, encumbrance and other factors are
unchanged regardless of the use of containers. The can be useful for keeping things organized and quickly moving items
from character to character. However, if a character has a “bag of holding” or “portable hole”, using a container is the only
way the program can calculate encumbrance correctly. These two magic items were a major reason for the implementation
of containers in the first place.
Inventory Subwindow, Scrolls:
This subwindow is displayed when a scroll is selected in the character's inventory list:
The example scroll shown above indicates that the scroll contains 5 spells: Three copies of “magic missile”, and one copy of
“burning hands” and “knock”. The casting level of each spell is listed after the spell name.
The buttons below the list allow the character to cast the spell, or add the spell to his or her spellbook. Additional spells can
be added to the scroll with the “Add Spell” button, and spells can be deleted with the “Delete Spell” button.
Note: Scrolls created for the “Magic Items” list will have random spells automatically assigned to the scroll. These can be
edited or modified as you see fit.
Inventory Subwindow, Other Magical Items:
Other magic items, such as rings, rods, staves or wands can contain spells and have a subwindow of their own:
The above example is a “wand of magic missiles” which currently has 81 charges. The buttons below the spell list can be
used to cast the selected spell, add a spell to the item or delete a spell from the item. The number of charges in the item can
be directly edited in the “Charges” box.
Character Sheet View:
1- This button allows the character sheet to be saved as a graphic file
2- This button allows you to print out the character sheet
3- These buttons flip the pages of the character sheet. There are pages for the backside (inventory) side of the character
sheet, the character's spellbook, and a list of the scroll spells the character currently has available.
4- This button allows you to select a graphic file for the character's portrait. It is recommended that the picture be 200x200
pixels in size for performance reasons
Spells View:
The actual layout of this screen varies somewhat depending on if the character is a magic-user, cleric, or multi-classed.
1- The magic using class or classes of the character are selected here
2- The spell level within each class is selected here, the number on the tab in parentheses following the spell level indicates
the number of spells memorizable by the character for that level
3- The list of available spells for the selected class and level are selected here. Double clicking on a spell from this list will
display the spell's description from the Player's Handbook.
4- The list of spells in the character's spellbook for the selected class and level, this list is of course not visible on a cleric
character's screen
5- Spells currently memorized for the character's current class and level
6- The functions of these four buttons varies depending on the character's class, and which list is selected on the screen. The
buttons have the following functions for magic-users:
Copy to Book – copies the selected spell from the spell list into the character's spellbook
Erase- removes the spell from the character's spell book
Memorize – makes the spell available for the character to cast
Forget- removes the spell from the character's list of memorized spells
Cast – casts the spell
For clerics:
Pray- makes the spell available for the character to cast
Forget- removes the spell from the character's list of memorized spells
Cast – casts the spell
For both types:
Save spells- The character's currently memorized spells are saved for later recovery. This allows the character's spells for
the “next day” can be reset quickly, assuming no changes in spell selection are desired.
Recover spells- Recovers the saved spell list back into the character's memorized spell list
7- Returns back to the Character View
Party View:
1- The party's name is entered here
2- The main map the party is associated with is selected here. For player character parties this would at least initially be the
main game world map. For NPC/Monster parties, this would usually be a dungeon or other child map.
3- Currently earned, but not awarded, experience points for the party. Usually this is the experience earned by the party for
the current adventure. The +/- button is used to add or subtract amounts from earned experience.
4- this button grants the value in the earned experience box to the characters in the party. NPC characters receive half
experience when this is done automatically by using this button
5- The current campaign calendar is selected here, which is used by the rest of the program for time keeping purposes.
Three default calendars are included with the software : Gregorian (real life), Greyhawk, and Ancient Gregorian (6th
century)
7- The current segment in game time. The + and – buttons increase and decrease the current segment.
8- The current round in game time. The + and – buttons increase and decrease the current round
9- This button allows the current game time to be edited – segment, round, turn, day, month, and year. Game time can also
be set to run concurrent with real time from the “Start Clock” button on the time editing window.
10- If a log is being kept of the party's activities, a view of the log is accessed here (see Log View below)
11- The list of characters in this party, both PC and NPC. Quick reference information as to armor class, current hitpoints,
selected weapon, to hit armor class numbers, damage inflicted and available ammunition are all displayed here. Each
character in the party can be clicked on and selected for actions that affect or that are the actions of the selected character
alone
12- a Monster Manual defined NPC can be created and added to the party by hitting this button
13- A previously created character can be added to the party using this button.
14- A member of the party can be removed by using this button. A Monster Manual type NPC will be erased completely if
removed from the party, other types of characters will simply be “detached” from the party
15- A Monster Manual type NPC can be copied using this button, for later pasting a copy of that NPC into this or another
party. This function is mainly used for creating groups of similar “mooks”
16- Pastes a previously copied NPC into the party
17- Starts a log for the party's activities, if the party does not have a log. If the party does have a log, this button allows a
logging event to be inserted into the log
18- This button heals the party of all damage to hitpoints
19- The button saves the party to disk
20- Indicates that the selected character hit a character selected on the opponent party list with a melee attack . This will
automatically bring up a screen to enter the amount of damage inflicted by the blow. This control is inactive for characters
that are currently dead
21- Indicates that the selected character missed a character selected on the opponent party list with a melee attack. Has no
other consequences other than a sound effect
22- Indicates that the selected character hit a character selected on the opponent party list with a missile attack . This will
automatically bring up a screen to enter the amount of damage inflicted by the blow, and the amount of ammunition the
attacking character has available will be reduced. This control is inactive for characters that are currently dead
23- Indicates that the selected character missed a character selected on the opponent party list with a missile attack. The
amount of ammunition the attacking character has available will be reduced, there are no other consequences other than a
sound effect
24- Allows the selected character to cast a memorized spell, or a spell from a scroll or magic item in the character's
inventory. Any damage or other effects caused by the spell are not recorded automatically, but must be manually entered by
the Dungeon Master
25- this button “wounds”, or adds damage to the selected character's hitpoints
26- this button “heals”, or subtracts damage from the character's hitpoints
27- the party opposing the current party is selected here, other controls for the opposing party are identical to their
counterparts listed above
28- this control adds experience points awardable for killing the selected opponent character to the current party's earned
experience points. If the program cannot automatically calculate the amount of experience points, a box will pop up
allowing the amount of experience to be entered.
29- The current game time for the party is displayed here
30- Opens the “Random Encounter” screen. (see below)
Random Encounters View:
Random encounters for the current party can be created from this screen:
1- Selects the random encounter table to be rolled against. These tables are from pages 174-180 in the Dungeon Master's
Guide.
2- Selects the level (for a dungeon encounter) or terrain type of the encounter table.
3- Forces the die roll to a specific number. This is useful if you wish to pick a specific type of encounter from one of the
tables.
4- The list of monsters in the random encounter party is displayed here.
5- This button rolls for the encounter, either randomly or using the value from the “force roll” entry above. Subsequent rolls
will REPLACE the list of monsters.
6- This button rolls for the encounter, either randomly or using the value from the “force roll” entry above. Subsequent rolls
will ADD to the list of monsters.
7- This button clears the list of monsters
8- This button cancels the random encounter
9 - This button creates an opponent party from the list of randomly generated monsters, ready to battle your player party
Map View:
Press the button that looks like this to show the map view controls:
1- Party Controls – select a party with the listbox, and the following buttons become active
– Place Party – allows you to place the party on the map by double clicking on a location
– Center on Party- centers the map view on the party's location
– Plot Party Route – allows you to set a series of waypoints that the party will travel through, this always starts
from the party's current location, press the “escape” key to stop creating waypoints
– Extend Party Route – allows you to add to the series of waypoints that the party will travel through, but starts
from the last entered waypoint, not the party's current location, press the “escape” key to stop creating
waypoints
2- Character controls – select a character from the active party with the listbox, and the following buttons become active:
– Place Character – allows you to place the character at a different location from the rest of the party
– Center on Character – centers the map view on the character's location
– Reparty Character – forces the character's location back to that of the rest of the party
3- Cache controls - select a cache from the active party with the listbox, and the following buttons become active
– Place Cache - – allows you to place the cache on the map by double clicking on a location
– Center on Cache- centers the map view on the cache's location
– Add Cache – creates a new cache on this map
– Delete Cache – deletes the currently selected cache from the map
4- The current view scale of the map can be changed by sliding this control
5- switches to “Map Edit” mode, see the section below
6- allows you to save the current map, including caches, to disk
7- Checking these boxes will show or hide parties, routes, caches, or child maps
8- pushing this button will advance the party's game time by one full day, and assuming a route has been plotted, the party
will travel along that route for that day. If the party reaches the end of the route before the end of the day, the travel time
will stop at less than the full 24 hours
9- hides the map view controls
Other Map Functions:
Many of the items displayed on the maps can be accessed by double clicking on them. Double clicking on a party, for
example, will jump to the party view screen for that party. This is also true of characters and caches.
Holding down the SHIFT key, then left clicking the mouse and dragging to another location on the map will display the
distance (in miles or feet, as appropriate) between the two points.
Map Edit View:
This screen is used to create and modify the maps used in Dungeon Maestro.
There are two types of maps that can be used with the program. “Bitmap” based maps are simply a bitmap image, such as
the Flanaess map shown above. There are also “tile” based maps, used as dungeons or other structures. Tile based maps are
created and edited in the Dungeon Maestro software. The two types can be combined, with the tiles of the map drawn on
top of a bitmap image. He example tile based map below was created with the tile editor, and a light blue bitmap image
was loaded to server as the backdrop.
It is also possible to have Dungeon Maestro create a random dungeon, inhabited with monsters and treasure, by entering a
few parameters and hitting a single button. See the “Random Dungeon Creation” section below.
Tile Based Map:
Before creating a map, you will need to create the graphic image of the map as a bmp, png, or jpg file. You will also need to
decide whether or not to split the graphic image into smaller bitmaps. A good rule of thumb is if your map is much larger
than twice the size of your screen, you should break it up into smaller images.
You will also need to know the distance (in miles or feet) between two different points on your map.
It is beyond the scope of this manual how exactly to split up your map, the maps included with the software were cropped
into smaller images using a set of software tools called ImageMagick. This software is available from
www.imagemagick.org
Example: (this is probably a smaller map than one that you would do this with, but is only an example)
Using it to split up a map of 1024x768 pixels in a command shell:
convert Azril_Main.png -crop 256x256 Azril-%d.png
yielded 12 images of 256x256 pixels, the files would be named Azril-0.png, Azril-1.png through Azril-11.png
Those images can then be entered into a Dungeon Maestro Map (see the edit settings above)
Each “cell” in the map is assigned a bitmap by double RIGHT clicking inside each cell. You will then be prompted to load a
bitmap file for each cell.
Map Edit Screen Controls:
1 – Enter the name of your map
2- Enter the number of rows and columns of bitmap cells. If your map has only a single bitmap, enter 1 row and 1 column
3- Enter the size of each of your bitmap cells here, in pixels (screen dots)
4- Enter the scale of your map here. This can be automatically calculated if you know the distance between two points on
your map, and hit the Autoscale Map button (see 6 below)
5- Select the scale of your map here, in either miles or feet. For example, dungeon maps would generally be in feet, world
maps would be in miles.
6- Map scale can be automatically calculated if you know the distance between two points on your map and hit this button
7- Parent map selection – if the current map is a sub-map of a larger map, the parent map can be selected here (assuming the
parent map is loaded). A map of the City of Grewhawk, for example, would be a child map of a map of the Flanaess.
8- The World of Greyhawk boxed set included tables tables for creating weather conditions. The system used calculated
weather based off the distance from the 40 degrees north line of latitude of the world. For the program to use this system,
you enter the Y coordinate of 40 degrees north on your map in this box. In the included Greyhawk map, this line is at
2000Y. The X and Y coordinates of the mouse pointer are displayed in the lower left hand corner of the map view. Of
course for any map type other than your main world map there is no reason to enter this data.
9- To generate weather conditions, it is also necessary for the program to know how many miles are in one degree of
latitude. For the Greyhawk map this is 70 miles. (the real world value for Earth is approximately 69 miles). One way of
calculating this value is to take the circumference of your game world (25200 miles for Greyhawk) and divide by 360
(degrees).
10- This checkbox activates the tile editing function for the current map.
11- Selects the “level” of a randomly created dungeon. This level corresponds to the “Dungeon Level” column from the
bottom of page 174 of the Dungeon Master's Guide.
12- Percentage of room occupancy for a randomly generated dungeon, this is the percentage chance that any room in the
dungeon will be inhabited by a monster.
13- This button crates a random dungeon tile map using the entered parameters. See the “Random Dungeon Creation”
section below.
14- Tiles to be added to the map are selected by clicking on a particular tile here. The tile is added to the map by double
LEFT clicking on the map where you wish the tile to be drawn. Double RIGHT clicking on a tile on the map erases the tile.
15 - Shows or hides a tile grid on the map, this is useful for making sure corridors, doors, etc. line up correctly as you are
editing your map.
Random Dungeon Creation:
This level corresponds to the “Dungeon Level” column from the bottom of page 174 of the Dungeon Master's Guide.
Dungeon Maestro can create a random dungeon including monsters from the map edit window.
To create a dungeon, create a new map from the menu bar. Enter values for bitmap cell rows and columns ( 1 and 1 is
recommended) and a pixel size for the map in both the X and Y directions (maximum of 1024x1024 is recommended), and
check the “Tiles” checkbox.
Select a level for your dungeon appropriate to the player characters in your campaign. (See DUNGEON RANDOM
MONSTER LEVEL DETERMINATION MATRIX (d20) on page 174 of the Dungeon Master's Guide ).
Set a percentage of the rooms that should be occupied in your dungeon (from 0, no monsters, to 100, monsters in every
room)
Hit the “Generate Random Dungeon” button to create the map and populate it.
The program will attempt to fill the entire map with the dungeon, up to a maximum of 30 inhabited rooms and 128
monsters, so be aware that the larger the map, the more “stuff” will be created. Depending on your computer's memory,
you may be able to create larger dungeons using values larger than what is recommended above. Monster treasure will be
rolled automatically from the Treasure Types listed for each monster from the Monster Manual. It is possible that
adventuring character types may appear as well, with magical items and other gear determined from the random DMG
tables.
The dungeon itself will be created as a tile map, with a cache associated with each room. The inhabitants of the dungeon
(monsters and NPC's both) are created as a party, with subparties created for each room of the dungeon. Until the dungeon
has been saved to disk for the first time, you can continue to re-generate the dungeon as you see fit.
Placement of secret doors and exits/entrances is left to you as a final step, as well as reviewing the magical items, treasure,
and number and types of monsters present in the dungeon. The map, monster party, and monsters can be edited just as they
would be if you had created them manually.
Sound Board View:
Soundboards can be used during your game session to create sound effects both automatically (such as when an arrow hits a
target during combat) or when the desired button is clicked on a soundboard screen :
1- There are six “pages” of sound effects available for each soundboard, selected by clicking on these tabs.
2- This control selects between “Play Sounds” mode and “Edit Sounds” mode. Each of the sound effect buttons can be
mapped to a .wav file sound effect on your hard drive. When in edit mode, a file selection window will open to assign a
sound effect to the button, when in play mode, the sound effect will be played.
3- This button activates the “Map Weapon Sound Effects” screen, see below.
4- This button activates the “Map Spell Sound Effects” screen, see below.
5- The name of the currently selected soundboard page can be changed here.
Map Weapon Sound Effects View:
Sound effects that are automatically played during combat (such as from the Party View) are “mapped”, or assigned to each
weapon from this screen :
1- Select the weapon to map a sound effect to from this list. Multiple weapons can be selected at the same time if desired.
2- Click this box to assign the sound effect to the event of a melee (hand) weapon hitting a target. Boxes 2,3,4, and 5 can be
checked or unchecked in any combination you choose. The list below the checkbox displays the sound effects currently
mapped to the weapon.
3- Click this box to assign the sound effect of a melee weapon missing a target.
4- Click this box to assign the sound effect of a ranged (bow, crossbow, sling etc. ) weapon hitting a target. Some weapons
such as daggers, hand axes, etc. can be both ranged and melee weapons, and can have sound effects assigned for both melee
and ranged attacks.
5- Click this box to assign the sound effect of a ranged weapon missing a target.
6- The sound effect you wish to assign to a weapon is selected from this list. The sound effect names are from the labels
assigned to sound effect buttons on a soundboard screen (see above)
7- By default, the sound effects shown in the above list only come from the “Combat” page of the soundboard, click this
box to show ALL defined sound effects in the list.
8- Click this button to assign the selected sound effect to the selected weapon.
9- Click this button to remove the sound effects from the selected weapon.
10- This button saves your current sound effect mappings, and returns to the soundboard screen.
Map Spell Sound Effects View:
Sound effects that are automatically played when spells are cast (such as from the Party View) are “mapped”, or assigned to
each spell from this screen :
1- Select the spell to map a sound effect to from this list. Multiple spells can be selected at the same time if desired.
2- This list displays the currently assigned sound effect for each spell.
3- The sound effect you wish to assign to a spell is selected from this list. The sound effect names are from the labels
assigned to sound effect buttons on a soundboard screen (see above)
4- By default, the sound effects shown in the above list only come from the “Spells” page of the soundboard, click this box
to show ALL defined sound effects in the list.
5- Check one of these boxes to select the type of spells to assign sound effects to (Magic Users, Clerics, Druids, Illusionists)
6- Click this button to assign the selected sound effect to the selected spell.
7- Click this button to remove the sound effects from the selected spell.
8- This button saves your current sound effect mappings, and returns to the soundboard screen.
Acknowledgments:
Special thanks to Anna B. Meyer, for graciously allowing me to include some of her beautiful World of Greyhawk maps in
Dungeon Maestro. www.ghmaps.net
This software and manual are dedicated to the memory of my Dad, who left us too soon in January 2014. We still had
games to play Pop.