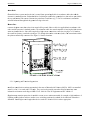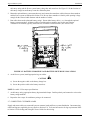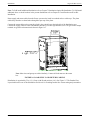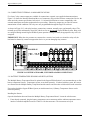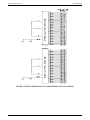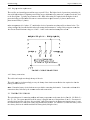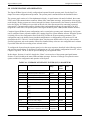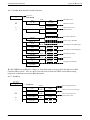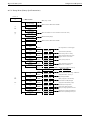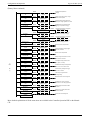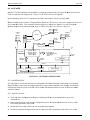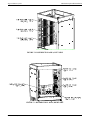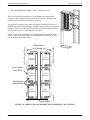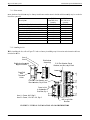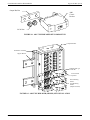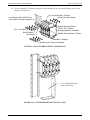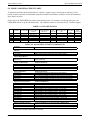
1
Sageon III™ Base System
Product Manual
600A
PM 990-8800-50, Issue 3
sageon3_base-man.pdf
1200A
UNIPOWER, LLC
65 Industrial Park Road
Dunlap, TN 37327
Customer Service, Voice: (800) 440-3504
Customer Service, Fax: (423) 949-3647
Field Service: (800) 299-3907
Web site – http://www.unipowerco.com
Front Matter
Sageon III Base System
Sageon III Power Plant Parts List
Descriptions
Base System
84" Welded Cabinet, Controller, LVBD w/by-pass switch, 600A Rectifier Shelf, Five(5)
Customer Specified External Alarms
84" Welded Cabinet, Controller, 600A Rectifier Shelf, Five(5) Customer Specified
External Alarms
Factory Installed Options
No AC breakers (NO AC Breakers for the 600A Rectifier Shelf)
AC Breakers (Provides Twelve(12) 20A AC Breakers for the 600A Rectifier Shelf)
Rectifier Expansion (Addition 600A Rectifier Shelf to increase Total System Capacity to
1200A)
Rectifier Expansion w/Breakers (Include Rectifier Expansion Package B03 and Twentyfour(24) 20A AC Breakers)
Battery Expansion (Provides Interface Connections for Four(4) Battery Temperature
Probes, Four(4) External Current Transducers)
Communication (Remote Communication Using TCP/IP SNMP )
Distribution Tiers & Ground Return/Battery Landing
Tier 1 Group-A (AM1) Group-B (AM1), Ground Return; Eight(8) battery connections
3/8" on 1" C-C
Tier 1 Group-A (AM1) Group-B (AM1); Tier 2 Group-A (AM1) Group-B (AM1), Ground
Return, Eight(8) battery connections 3/8" on 1" C-C
Tier 1 Group-A (AM1) Group-B (AM1); Tier 2 Group-A (GJ1) Group-B (GJ1), Ground
Return, Eight(8) battery connections 3/8" on 1" C-C
Tier 1 Group-A (AM1) Group-B (AM1); Tier 2 Group-A (AM1) Group-B (AM1); Tier 3
Group-A (AM1) Group-B (AM1), Ground Return, Eight(8) battery connections 3/8" on 1"
C-C
Tier 1 Group-A (AM1) Group-B (AM1); Tier 2 Group-A (AM1) Group-B (AM1); Tier 3
Group-A (GJ1) Group-B (GJ1), Ground Return, Eight(8) battery connections 3/8" on 1"
C-C
PM990-8800-50, Issue 3
i
Part Numbers
SAGEON3.A01
SAGEON3.A02
SAGEON3.B01
SAGEON3.B02
SAGEON3.B03
SAGEON3.B04
SAGEON3.C01
SAGEON3.D01
SAGEON3.E01
SAGEON3.E02
SAGEON3.E03
SAGEON3.E04
SAGEON3.E05
Front Matter
Sageon III Base System
RECEIVING INSTRUCTIONS
&
GENERAL EQUIPMENT INFORMATION
Please Note: For your protection, the following information and the product manual should be read and
thoroughly understood before unpacking, installing, or using the equipment.
UNIPOWER, LLC presents all equipment to the delivering carrier securely packed and in perfect
condition. Upon acceptance of the package from us, the delivering carrier assumed responsibility for its
safe arrival to you. Once you receive the equipment, it is your responsibility to document any damage the
carrier may have inflicted, and to file your claim promptly and accurately.
1.
PACKAGE INSPECTION
1.1
Examine the shipping crate or carton for any visible damage: punctures, dents, and any other signs of
possible internal damage.
1.2
Describe any damage or shortage on the receiving documents, and have the carrier sign their full name.
1.3
If your receiving freight bill notes that a Tip-N-Tell is attached to your freight, locate it. If the Tip-N-Tell
arrow has turned even partially blue, this means the freight has been tipped in transport. Make sure the
carrier notes this on your receipt before you sign for the freight.
2.
EQUIPMENT INSPECTION
2.1
Within fifteen days, open the crate and inspect the contents for damages. While unpacking, be careful not
to discard any equipment, parts, or manuals. If any damage is detected, call the delivering carrier to
determine appropriate action. They may require an inspection.
*SAVE ALL SHIPPING MATERIAL FOR THE INSPECTOR TO SEE!
2.2
After the inspection has been made, call UNIPOWER. We will determine if the equipment should be
returned to our plant for repair, or if some other method would be more expeditious. If it is determined
that the equipment should be returned to UNIPOWER, ask the delivering carrier to send the packages
back to UNIPOWER at the delivering carrier's expense.
2.3
If repair is necessary, we will invoice you for the repair so that you may submit the bill to the delivering
carrier with your claim form.
2.4
It is your responsibility to file a claim with the delivering carrier. Failure to properly file a claim for
shipping damages may void warranty service for any physical damages later reported for repair.
3.
HANDLING
Equipment can be universally heavy or top-heavy. Use adequate humanpower or equipment for handling.
Until the equipment is securely mounted, be careful to prevent the equipment from being accidentally
tipped over.
4.
NAMEPLATE
Each piece of UNIPOWER equipment is identified by a part number on the nameplate. Please refer to
this number in all correspondence with UNIPOWER.
PM990-8800-50, Issue 3
ii
Sageon III Base System
5.
Front Matter
INITIAL SETTINGS
All equipment is shipped from our production area fully checked and adjusted. Do not make any
adjustments until you have referred to the technical reference or product manual.
6.
SPARE PARTS
To minimize downtime during installation or operation, we suggest you purchase spare fuses, circuit
boards and other recommended components as listed on the Recommended Spare Parts List in the back of
the product manual. If nothing else, we strongly recommend stocking spare fuses for all systems.
PM990-8800-50, Issue 3
iii
Front Matter
Sageon III Base System
ISSUE HISTORY
Issue
Page(s)/
Sections
Altered
3
All
Description
Updated manual with UNIPOWER logo & verbiage.
See ECN 20082 (WD 2/17/15)
Approved/
Date
DBW
2/19/15
PROPRIETARY AND CONFIDENTIAL
The information contained in this product manual is the sole property of UNIPOWER, LLC. Reproduction of the
manual or any portion of the manual without the written permission of UNIPOWER, LLC is prohibited.
© Copyright UNIPOWER, LLC 2015
DISCLAIMER
Data, descriptions, and specifications presented herein are subject to revision by UNIPOWER, LLC without
notice. While such information is believed to be accurate as indicated herein, UNIPOWER, LLC makes no
warranty and hereby disclaims all warranties, express or implied, with regard to the accuracy or completeness of
such information. Further, because the product(s) featured herein may be used under conditions beyond its
control, UNIPOWER, LLC hereby disclaims and excludes all warranties, express, implied, or statutory, including
any warranty of merchantability, any warranty of fitness for a particular purpose, and any implied warranties
otherwise arising from course of dealing or usage of trade. The user is solely responsible for determining the
suitability of the product(s) featured herein for user’s intended purpose and in user’s specific application.
Throughout the remainder of this manual, “UNIPOWER” will mean “UNIPOWER, LLC.”
PERSONNEL REQUIREMENTS
Installation, setup, operation, and servicing of this equipment should be performed by qualified persons
thoroughly familiar with this Product Manual and Applicable Local and National Codes. A copy of this manual is
included with the equipment shipment.
PM990-8800-50, Issue 3
iv
F
Front Matter
Sageon III B
Base System
Tablee of Contentts
11.0 INTRODU
UCTION ............................................................................................................................................................... 1-1 1.1 PRODUC
CT DESCRIPT
TION ............................................................. ................................................................................. 1-1 1.2 SPECIFIC
CATIONS ........................................................................... ................................................................................. 1-5 1.2.1 Powerr system Physical Specificatio
ons ........................................ ................................................................................. 1-5 1.2.2 Powerr system Environmental Speccifications .............................. ................................................................................. 1-5 1.2.3 Powerr system Electrrical Specificattions....................................... ................................................................................. 1-6 1.2.4 Generral Specificatio
ons ................................................................ ................................................................................. 1-6 1.2.5 Bus Specifications ....................................................................... ................................................................................. 1-6 1.2.6 EMC Specifications .................................................................... ................................................................................. 1-7 1.2.7 Rectiffier Specificatio
ons ............................................................... ................................................................................. 1-8 1.2.8 Safety
y Specifications ................................................................... ................................................................................. 1-9 1.3 ABBREV
VIATIONS AN
ND ACRONYM
MS ......................................... ............................................................................... 1-10 1.4 REFEREN
NCE PUBLICATIONS ...................................................... ............................................................................... 1-11 1.4.1 Monittoring Specifications ........................................................... ............................................................................... 1-11 1.4.2 Alarm
m Specifications ................................................................... ............................................................................... 1-11 1.5 PRODUC
CT SUPPORT ..................................................................... ............................................................................... 1-12 22.0 INSTALLA
ATION ................................................................................................................................................................. 2-1 2.1 INSTALL
LATION SUM
MMARY ........................................................ ................................................................................. 2-2 2.2 REFEREN
NCE MATERIIAL .............................................................. ................................................................................. 2-2 2.2.1 Tools And Accessorries................................................................ ................................................................................. 2-2 2.2.2 Selectting and Sizing
g DC Power Caables ...................................... ................................................................................. 2-3 2.2.3 Torqu
ue Specification
ns.................................................................. ................................................................................. 2-4 2.3 SELECTIING A LOCAT
TION............................................................ ................................................................................. 2-5 2.4 MOVING
G AND ANCH
HORING THE POWER
P
SYST
TEM .............. ................................................................................. 2-5 2.5 CONNEC
CTING AC PO
OWER TO THE
E POWER SYSTEM............ ................................................................................. 2-7 2.5.1 Lightn
ning and Transsient Suppression .......................................... ................................................................................. 2-8 2.5.2 User'ss AC Electricall Service Panell ............................................. ................................................................................. 2-9 2.5.3 AC Cabling ................................................................................. ................................................................................. 2-9 2.6 CONNEC
CTING BATTE
ERY CABLES
S ............................................. ............................................................................... 2-10 2.7 CONNEC
CTING CUSTO
OMER LOADS ............................................ ............................................................................... 2-11 2.7.1 Load Return
R
Cables ..................................................................... ............................................................................... 2-14 2.7.2 Load Supply Cabless, AM1 Type Breaker
B
Distribu
ution .............. ............................................................................... 2-14 2.7.3 Load Supply Cabless, GJ1 Type Breaker Distributtion ................ ............................................................................... 2-16 2.8 CONNEC
CTING EXTER
RNAL ALARM
M ANNUNCIA
ATORS .......... ............................................................................... 2-17 2.9 BATTER
RY TEMPERATURE SENSO
ORS AND KIT
TS (OPTION) . ............................................................................... 2-17 2.10 INSTAL
LLING A BAT
TTERY CURRENT TRANSD
DUCER (OPTIION) ...................................................................... 2-19 2.11 SAGEON BATTERY MONITOR (O
OPTION) ............................... ............................................................................... 2-20 ONITOR SYS
STEM (OPTION
N).......................................... ............................................................................... 2-21 2.12 SITE MO
2.13 COMMU
UNICATIONS
S ................................................................... ............................................................................... 2-21 2.14 INSTAL
LLING AND REMOVING
R
RECTIFIERS
R
......................... ............................................................................... 2-21 2.15 CONFIG
GURATION ........................................................................ ............................................................................... 2-23 2.15.1 Geneeral Description .................................................................. ............................................................................... 2-23 33.0 COMMISS
SIONING ............................................................................................................................................................. 3-1 3.1 PREPARA
ATION ............................................................................... ................................................................................. 3-1 3.2 COMMIS
SSIONING A SYSTEM
S
..................................................... ................................................................................. 3-1 3.3 OVERVIE
EW OF EXTE
ERNAL WIRIN
NG CONNECT
TIONS ........... ................................................................................. 3-3 3.4 FACTOR
RY SUPPLIED
D CONFIGURA
ATIONS ................................ ................................................................................. 3-3 3.4.1 Singlee phase – indiv
vidual protected
d external feed
ds .................... ................................................................................. 3-3 3.4.2 Surge protection req
quirements .................................................... ............................................................................... 3-10 3.4.3 Batterry connections ..................................................................... ............................................................................... 3-10 3.5 TEMPER
RATURE SENS
SORS ........................................................... ............................................................................... 3-10 3.6 AUXILIA
ARY RELAY CONNECTION
C
NS ......................................... ............................................................................... 3-11 3.7 CONTRO
OLLER POWE
ER CONNECT
TIONS .................................... ............................................................................... 3-11 3.8 FRONT PANEL
P
USB COMMUNICA
C
ATIONS CONN
NECTION ..... ............................................................................... 3-11 3.9 REMOTE
E COMMUNIC
CATION CON
NNECTION............................ ............................................................................... 3-12 3.9.1 TCP/IIP and Sagevieew Interface .................................................. ............................................................................... 3-12 3.10 BATTER
RY DISTRIBU
UTION MODU
ULE ....................................... ............................................................................... 3-13 3.11 ADDING
G AUXILIARY EXPANSIO
ON MODULES
S ..................... ............................................................................... 3-13 P
PM990-8800-5
50, Issue 3
v
F
Front Matter
Sageon III B
Base System
44.0 CONFIGU
URATION AN
ND OPERATION .......................................................................................................................... 4-1 4.1 THE “HO
OME” SCREEN
N .................................................................. ................................................................................. 4-3 4.2 USING THE
T
OPERATO
OR PANEL PU
USH BUTTON
NS .................. ................................................................................. 4-3 4.3 READING THE OPERA
ATOR PANEL
L SYSTEM ST
TATUS LEDS ................................................................................ 4-4 ESSAGES ................................................... ................................................................................. 4-5 4.4 READING ALARM ME
M
SCREEN
NS ............................................................... ................................................................................. 4-7 4.5 HOME MENU
4.5.1 Sageo
on Battery Mon
nitor .............................................................. ............................................................................... 4-11 4.5.2 Site Monitor
M
................................................................................ ............................................................................... 4-12 4.6 RECT (R
RECTIFIER) MENU
M
SCREEN
NS ......................................... ............................................................................... 4-12 4.7 BATT ME
ENU SCREEN
NS ................................................................. ............................................................................... 4-14 4.7.1 Batterry Temperaturee Compensation............................................ ............................................................................... 4-15 4.7.2 Equalization ................................................................................ ............................................................................... 4-16 4.7.3 Low Voltage
V
Battery
y Disconnect (LVBD)-(LVLD
D Screens) ..... ............................................................................... 4-18 4.7.4 Batterry Discharge Test
T (BDT) Screeens ....................................... ............................................................................... 4-18 4.7.5 BDT Results
R
Screen
n .................................................................... ............................................................................... 4-19 4.7.6 BDT Results
R
Screen
n, Additional Details
D
..................................... ............................................................................... 4-20 4.7.7 BDT Disabled
D
............................................................................. ............................................................................... 4-20 4.8 ALARM LOG SCREEN
NS ................................................................ ............................................................................... 4-20 N BATTERY MONITOR
M
SETUP ...................................... ............................................................................... 4-21 4.9 SAGEON
4.9.1 Frequency of Measu
urement ......................................................... ............................................................................... 4-21 4.9.2 Batterry Cell Measurrements ......................................................... ............................................................................... 4-21 4.10 COMMIISSIONING THE CONTROL
LLER .................................... ............................................................................... 4-21 4.11 OPERATION .................................................................................. ............................................................................... 4-22 ARY OF CON
NTROLLER FR
RONT PANEL
L CONTROLS ............................................................................... 4-22 4.12 SUMMA
4.13 NAVIGA
ATING CONT
TROLLER FUN
NCTIONS ............................. ............................................................................... 4-23 4.13.1 Basee Menu (System
m Level Functiions)....................................... ............................................................................... 4-23 4.13.2 Rectifier Menu (Reectifier Specificc Functions) .......................... ............................................................................... 4-26 4.13.3 Alarm
m Log ................................................................................. ............................................................................... 4-26 4.13.4 Batteery Menu (Batttery Specific Functions)
F
............................... ............................................................................... 4-27 55.0 SAGEVIEW
W ......................................................................................................................................................................... 5-1 5.1 CONFIGU
URATION .......................................................................... ................................................................................. 5-1 5.1.1 SageV
View benefits: ..................................................................... ................................................................................. 5-1 5.2 MONITO
ORING ................................................................................. ................................................................................. 5-2 5.3 SECURIT
TY ....................................................................................... ................................................................................. 5-2 5.4 CABLE AND
A
NETWORK CONNEC
CTIONS .................................. ................................................................................. 5-2 5.5 LOCAL CONNECTION
C
N, STANDAR
RD ........................................... ................................................................................. 5-2 5.6 REMOTE
E CONNECTIO
ON, ETHERN
NET, OPTION .......................
.
................................................................................. 5-2 5.7 PC REQU
UIREMENTS ...................................................................... ................................................................................. 5-2 5.8 INSTALL
LING SAGEVIEW ............................................................. ................................................................................. 5-2 66.0 MAINTEN
NANCE ................................................................................................................................................................. 6-1 6.1 CIRCUIT
T BOARD HAN
NDLING...................................................... ................................................................................. 6-1 6.2 PERIODIIC MAINTENA
ANCE .......................................................... ................................................................................. 6-1 6.3 TROUBL
LESHOOTING
G .................................................................... ................................................................................. 6-2 6.3.1 Reading Rectifier Sttatus Led Codees............................................ ................................................................................. 6-2 6.4 REPLACING A RECTIIFIER ........................................................... ................................................................................. 6-3 6.5 REPLACING THE SAG
GEON III CON
NTROL UNIT (SCU) ........... ................................................................................. 6-3 6.5.1 Config
guration Consiiderations ..................................................... ................................................................................. 6-3 6.6 REPLACING AN AC BACK
B
PLANE
E BOARD .............................. ................................................................................. 6-4 6.7 TO REMO
OVE A RECT
TIFIER MODU
ULE ........................................ ................................................................................. 6-7 6.8 TO INSERT A RECTIF
FIER MODULE ........................................... ................................................................................. 6-7 77.0 DISTRIBU
UTION OPTIO
ON KIT INST
TALLATION ........................................................................................................ 7-1 7.1 AM1 DIS
STRIBUTION,, TIERS 2 AND
D 3, GROUPS A & B .......... ................................................................................. 7-4 7.1.1 Kit Co
ontents ................................................................................ ................................................................................. 7-5 7.1.2 Installling the kit .......................................................................... ................................................................................. 7-5 7.2 GJ1 DIST
TRIBUTION, TIERS
T
2 AND
D 3, GROUPS A & B ............ ................................................................................. 7-6 7.2.1 Kit Co
ontents ................................................................................ ................................................................................. 7-7 7.2.2 Installling the Kit.......................................................................... ................................................................................. 7-8 88.0 CIRCUIT BREAKER AND
A
FUSE KIIT INSTALLA
ATION ............................................................................................ 8-1 PE BREAKER
R KITS .......................................................... ................................................................................. 8-1 8.1 AM1 TYP
P
PM990-8800-5
50, Issue 3
vi
SSageon III Basee System
Frront Matter
8.1.1 Kit Co
ontents ................................................................................ ................................................................................. 8-1 8.1.2 Installling the Kit.......................................................................... ................................................................................. 8-1 8.2 GJ1 TYPE
E BREAKER KITS ............................................................ ................................................................................. 8-3 8.2.1 Kit Co
ontents ................................................................................ ................................................................................. 8-3 8.2.2 Installling the Kit.......................................................................... ................................................................................. 8-3 99.0 SPARE AN
ND REPLACE
EMENT PAR
RTS ........................................................................................................................... 9-1 Lisst of Tables
T
TABLE 2-1
T
TABLE 2-2
T
TABLE 2-3
T
TABLE 2-4
T
TABLE 2-5
T
TABLE 4-1
T
TABLE 4-2
T
TABLE 4-3
T
TABLE 4-4
T
TABLE 6-1
T
TABLE 6-2
T
TABLE 6-3
T
TABLE 7-1
T
TABLE 9-1
T
TABLE 9-2
WIRE
W
SIZING ...................................................................... ................................................................................. 2-4 TO
ORQUE SPEC
CIFICATIONS
S, STEEL FAST
TENERS ....... ................................................................................. 2-4 CIIRCUIT BREA
AKER SELEC
CTION, AC PO
OWER ............. ................................................................................. 2-9 BA
ATTERY TEM
MPERATURE SENSOR CON
NNECTIONS ............................................................................... 2-18 BA
ATTERY CUR
RRENT TRAN
NSDUCER CO
ONNECTIONS
S .............................................................................. 2-20 SU
UMMARY OF
F DEFAULT SYSTEM
S
(SCU
U) PARAMETE
ERS ......................................................................... 4-1 RE
EADING OPE
ERATOR PAN
NEL SYSTEM STATUS LED
DS ............................................................................. 4-5 OPERATOR PA
ANEL ANNUN
NCIATED ALA
ARM MESSA
AGES ........................................................................ 4-6 SB
BM BOARDS NEEDED FOR VARIOUS BATTERY
B
CO
ONFIGURATIIONS .............................................. 4-21 ALARM MESSAGES AND ERROR
E
CODE
ES ................... ................................................................................. 6-2 RE
ECTIFIER LE
ED CODES ................................................... ................................................................................. 6-2 RE
ECTIFIER PO
OSITION ADD
DRESSES 1 TH
HROUGH 24 .. ................................................................................. 6-4 IN
NSTALLABLE
E DISTRIBUT
TION TYPES BY
B TIER AND
D GROUP ................................................................. 7-2 LIIST DRIVEN PCB’S
P
.......................................................... ................................................................................. 9-1 MAJOR
M
REPLA
ACEMENT CO
OMPONENTS ...................... ................................................................................. 9-1 Listt of Figures
F
FIGURE 1-1 SAGEON
S
III BASE
B
SYSTEM
M ............................................ ................................................................................. 1-1 F
FIGURE 1-2 SIMPLIFIED
S
BLOCK
B
DIAG
GRAM, -48V POWER SYSTE
EM........................................................................... 1-4 F
FIGURE 1-3 600A
6
PLANT ...................................................................... ................................................................................. 1-8 F
FIGURE 1-4 1200A
1
PLANT
T .................................................................... ................................................................................. 1-8 F
FIGURE 2-1 POWER
P
SYST
TEM DIMENSIONS .................................... ................................................................................. 2-6 F
FIGURE 2-2 PLANT
P
BASE..................................................................... ................................................................................. 2-7 F
FIGURE 2-3 RETURN
R
BUS
S LOCATIONS
S ............................................ ................................................................................. 2-8 F
FIGURE 2-4 AC
A INPUT CAB
BLING WITH
H RECTIFIER ON/OFF
O
OPTIION........................................................................ 2-10 F
FIGURE 2-5 BATTERY
B
CH
HARGE BUS AND
A
BATTER
RY RETURN B
BUS LOCATIO
ONS ............................................... 2-11 F
FIGURE 2-6 LOAD
L
SUPPLY
Y AND RETU
URN CABLING
G.................... ............................................................................... 2-12 F
FIGURE 2-7 DISTRIBUTIO
D
ON GROUP ID
DENTITIES AN
ND LOCATIO
ONS......................................................................... 2-13 F
FIGURE 2-8 DISTRIBUTIO
D
ON AREA, TOP VIEW, AM1
1 TYPE BREA
AKER DIST. S
SHOWN .......................................... 2-13 F
FIGURE 2-9 DISTRIBUTION
D
N CABLE RO
OUTING ................................. ............................................................................... 2-14 F
FIGURE 2-10 AM1 TYPE DISTRIBUTIO
D
ON LUGGING ...................... ............................................................................... 2-15 F
FIGURE 2-11 GJ1 TYPE BR
REAKER DIST
TRIBUTION ASSEMBLIES
A
S, TYPICAL ........................................................... 2-16 F
FIGURE 2-12 GJ1 TYPE BR
REAKER DIST
TRIBUTION WIRING
W
........ ............................................................................... 2-16 F
FIGURE 2-13 INTERFACE
I
BOARD,
B
CUS
STOMER ALA
ARM CONNEC
CTIONS ................................................................. 2-17 F
FIGURE 2-14 TEMPERATU
URE SENSOR
R LOCATION .......................
.
............................................................................... 2-19 F
FIGURE 2-15 TYPICAL
T
BA
ATTERY CURR
RENT TRANS
SDUCER ....... ............................................................................... 2-20 F
FIGURE 2-16 RECTIFIERS .................................................................... ............................................................................... 2-21 F
FIGURE 2-17 SAGEON
S
III BASE
B
SYSTEM
M ........................................... ............................................................................... 2-24 F
FIGURE 2-18 CONNECTION
C
NS ON CONT
TROLLER BACKPLANE .... ............................................................................... 2-24 F
FIGURE 2-19 TEMPERATU
T
URE CONCEN
NTRATOR BOARD.............. ............................................................................... 2-25 F
FIGURE 2-20 SAGEON
S
III BOARD
B
LOCA
ATIONS ................................ ............................................................................... 2-25 F
FIGURE 3-1 SINGLE PHASE FEED CUST
TOMER WIRIING (PHASE T
TO NEUTRAL
L)...................................................... 3-4 F
FIGURE 3-2 SINGLE PHASE FEED CUST
TOMER WIRIING (PHASE T
TO PHASE)............................................................. 3-5 F
FIGURE 3-3 SP
PLIT SINGLE
E PHASE FEED
D CUSTOMER
R WIRING (PH
EUTRAL) .......................................... 3-6 HASE TO NE
F
FIGURE 3-4 Y-THREE
Y
PHA
ASE FEED U-CONNECTED
D RECTIFIERS
S CUSTOMER
R WIRING (PH
HASE TO PHA
ASE) .. 3-7 F
FIGURE 3-5 Y-THREE
Y
PHA
ASE FEED CU
USTOMER WIR
RING (PHASE
E TO NEUTRA
AL) ................................................... 3-8 F
FIGURE 3-6 U-THREE
U
PHA
ASE FEED CU
USTOMER WIIRING (PHAS E TO PHASE))........................................................ 3-9 F
FIGURE 3-7 SU
URGE PROTE
ECTION ....................................................... ............................................................................... 3-10 F
FIGURE 3-8 MULTIPLE
M
AL
LARM BOARD
D ............................................ ............................................................................... 3-11 F
FIGURE 3-9 BATTERY
B
DIS
STRIBUTION MODULE (BD
DM) ............... ............................................................................... 3-13 F
FIGURE 4-1 OPERATOR
O
PA
ANEL ........................................................... ................................................................................. 4-3 P
PM990-8800-5
50, Issue 3
vii
Front Matter
Sageon III Base System
FIGURE 5-1 NETWORK CONNECTIONS .......................................................................................................................... 5-1 FIGURE 6-1 REPLACING THE SCU (SAGEON III CONTROL UNIT) ............................................................................. 6-3 FIGURE 6-2 REMOVING RECTIFIER MODULE ............................................................................................................... 6-7 FIGURE 7-1 DISTRIBUTION LOCATION BY TIER AND GROUP ................................................................................. 7-1 FIGURE 7-2 DISTRIBUTION AREA, LEFT SIDE.............................................................................................................. 7-3 FIGURE 7-3 DISTRIBUTION AREA, RIGHT SIDE ........................................................................................................... 7-3 FIGURE 7-4 ORIENTATION OF DISTRIBUTION ASSEMBLIES, -48V SYSTEMS....................................................... 7-4 FIGURE 7-5 TYPICAL INSTALLATION OF AM1 DISTRIBUTION ................................................................................ 7-5 FIGURE 7-6 DISTRIBUTION ASSEMBLIES, GJ1 ............................................................................................................. 7-7 FIGURE 7-7 GJ1 DISTRIBUTION KIT (W/ BREAKER KIT) ............................................................................................ 7-9 FIGURE 8-1 AM1 TYPE BREAKER KIT COMPONENTS ................................................................................................ 8-2 FIGURE 8-2 AM1 TYPE BREAKER (SHOWN) KIT INSTALLATION ............................................................................ 8-2 FIGURE 8-3 GJ1 TYPE BREAKER KIT COMPONENTS .................................................................................................. 8-4 FIGURE 8-4 GJ1 TYPE BREAKER KIT INSTALLATION ................................................................................................ 8-4 PM990-8800-50, Issue 3
viii
Sageon III Base System
Introduction
1.0 INTRODUCTION
This Product Manual describes installation, operation, and servicing of UNIPOWER Sageon III Base Systems.
The Sageon III Base System is available as a -48V, seven foot high system in two ratings: the 600-ampere and
1200-ampere (max). A view of the system is provided on the cover of this manual and in Figure 1-1 (below).
FIGURE 1-1 SAGEON III BASE SYSTEM
This manual contains text of descriptions, procedures, and supporting illustrations in reference to the Sageon III
Base System. It includes the front matter and chapters 1 through 9.
1.1 PRODUCT DESCRIPTION
The Sageon III Base System is intended for Cellular, PCS, and other applications that demand stable, reliable,
high current, DC operating power. Sageon III can supply the voltage and currents shown in the following table.
PM990-8800-50, Issue 3
1-1
Introduction
Sageon III Base System
Sageon
Cabinet
Rack Height
Plant Output
Voltage
7-foot Tower,
Figure 1-1
7 Feet
(213.36 cm)
-48 Vdc
-48 Vdc
Plant Output
Current
(max)
600A
1200A (max)
As indicated above, the Power System is divided into two areas: distribution and power conversion. The system is
shown in Figure 1-1. It provides 12 power conversion positions at 600A or 24 power conversion positions at
1200A for rectifiers and 6 distribution groups (in 3 distribution tiers) with a user-specified quantity of AM1
circuit breakers, & GJ1 circuit breakers..
Power Conversion
Plug-in rectifier models are available in –48V. It employs modular switched-mode rectifier technology for highly
efficient, low cost, reliable operation. Each –48V rectifier can source up to 50A. The quantity of rectifiers is
determined by the user to accommodate the application. A maximum of 24 rectifiers can be installed in a unit.
Distribution
A unit can include up to 60, 5-100A AM1 circuit breakers. Up to 8, 100-450A GJ1 circuit breakers can be
installed, however, each group of 4 GJ1 type breakers reduces the available AM1 positions by 10.
Circuit breaker and fuse kits are ordered separately to accommodate the application. For AM1 type breakers, the
load supply and return connections use two-hole wire lugs for 1/4" studs (5/8" center-to-center). The supply cable
is bolted to a distribution assembly that has two 1/4-20 studs and the return connection is bolted to the return bus
bar that also has 1/4" studs.
Where higher current GJ1 type breakers are specified, the load supply connection is a 3/8" ring lug bolted directly
to the breaker terminal. The return connection is bolted to the return bus bar using a two-hole lug for 3/8" bolts
(1" center-to-center).
Battery Strings
Battery charge and battery return can facilitate eight sets of 2-hole lug wiring for 3/8 inch diameter studs on 1
inch centers.
Operator Panel
Mounted in the system is a modular, hot-swappable controller which includes a high-resolution 2-line digital
display for monitoring of the Sageon III Base System output current and voltage. Six push buttons are available
for operating the Sageon III Base System, selecting display information, and for changing editable parameters. A
complete System configuration can be created at the operator panel. Three System status LEDs are provided.
Communications
PC-based configuration and monitoring is available with the UNIPOWER SageView™ software. SageView is a
tool to exchange configurations and operating data between the Sageon III Base System and the PC on which
SageView is running. Local PC access is provided through a supplied USB-B connector on the front panel of the
controller using the SageView software.
Remote PC access across an Ethernet network is also standard. The PC must be running SageView software and
have a unique IP address on the network. An Ethernet RJ-45 jack is provided for connecting to your company’s
PM990-8800-50, Issue 3
1-2
Sageon III Base System
Introduction
intranet or to the Internet. A unique IP address is required for each Sageon III Base System. Remote access is also
available via an SNMP/Ethernet board.
Alarms
Activation of customer-supplied alarm annunciators is accommodated by form-C relays. The relay state is user
selectable between normal mode (normally de-energized) and failsafe mode (Normally energized). These relays
provide for external annunciation of the alarms and are fully user configurable. Refer to SageView help for
configuring these relays.
Block Diagram Description
A simplified block diagram of a 48V Sageon III Base System is shown in Figure 1-2. Single-phase or three-phase
power is supplied from the user’s AC electrical service panel.
PM990-8800-50, Issue 3
1-3
Introduction
Sageon III Base System
FIGURE 1-2 SIMPLIFIED BLOCK DIAGRAM, -48V POWER SYSTEM
PM990-8800-50, Issue 3
1-4
SSageon III Basee System
Inntroduction
T
The LVBD triip voltage is set
s using the operator
o
paneel push buttonns and menus. An LVBD bbypass switchh is
pprovided. This switch bypaasses (i.e. defe
feats) the SCU
U LVD in casee of SCU maiintenance, uppgrading, or fa
failure.
T
The Sageon IIII Base System
m operation can
c be monito
ored at the op erator panel oon the front oof the Sageon III Base
S
System, at a PC
P connected to the operator panel, or at
a a PC conneccted to the Saageon III Basee System oveer an
E
Ethernet netw
work. The Sag
geon III Base System configuration can be performedd from the opeerator panel oor at a PC.
P
Printed circuitt boards below
w distribution
n area contain
n terminals foor user connecctions to alarm
m relays, batteery
ttemperature compensation sensors, com
mmunications, and other intternal and extternal functioons. In additioon, most
ssignals destineed for the SCU are routed first to the BD
DM board or backplane booard.
T
The operator panel
p
providees user accesss to the config
guration and m
monitoring caapabilities of tthe SCU. Forr security,
a parameter lo
ock feature is included and
d PC access caan require a ppassword. A P
PC that is to bbe connected to the
S
Sageon III Baase System mu
ust have the optional
o
SageView softwarre installed annd operating.
11.2 SPECIFIC
CATIONS
T
This section contains
c
physiical, environm
mental, and ellectrical speciifications for the Power syystem and its m
major
aassemblies.
1.2.1 Pow
wer system Phy
ysical Specifiications
Dimension
D
Width
h
Depth
h
Heigh
ht
Weigh
ht
7-fooot Tower
24.46" (62.11 cm)
21.48" (54.66 cm)
84" (213.4 ccm)
Contact the factory
Dimension
D
Width
h
Depth
h
Heigh
ht
Weigh
ht
Reectifier
8.5" (215.900 mm)
10” (254 mm
m)
1 RU
5.1 lbs (2.3 kg)
IIMPORTAN
NT: The Poweer system is sh
hipped withou
ut Rectifiers iinstalled. Connsequently, thhe plant is topp heavy
aand can topplee if mishandleed. Refer to Section
S
2.4 Moving
M
and Annchoring the P
Power system
m before attem
mpting to
m
move the Pow
wer system.
1.2.2 Pow
wer system Env
vironmental Specifications
S
s
T
Temperature
Operating .....................
.
...................... -25° to +70°°C (-15° to +1158°F)
Sustained Full
F Power ......................... -25° to +50°°C (-15° to +1122°F)
Storage................................................ -40° to +85°°C (-40° to +1185°F)
S
Shipping and Handling
Power sysstem .................................. Shipped fullly assembled on a skid dessigned to withhstand the shoock and
vibration no
ormally encouuntered in shippping and hanndling
Rectifier Modules
M
............................. Encased in protective
p
foaam and shippeed in individuual boxes
H
Humidity .................................................. 0 to 95% no
on-condensingg
P
PM990-8800-5
50, Issue 3
1-5
IIntroduction
Sageon III Baase System
Note
When
W
operatin
ng the Power System in an extremely low
w humidity eenvironment ((<10%),
ad
dditional site ESD (Electro
ostatic Dischaarge) mitigatioon is recomm
mended. The iinstallation
off ESD conducctive floor covering or coaating per ANS
SI EOS/ESD S
S7.1 and use of
diissipative foo
ot straps per ANSI
A
EOS/ES
SD S9.1 whennever servicinng the equipm
ment is
reecommended.. The use of an
a anti-static wrist
w
strap peer EOS/ESD S
S1.0 Wrist Strraps is
allways recomm
mended and iss mandatory whenever
w
serv
rvicing the Poower System iin an
ex
xtremely low humidity con
ndition.
A
Altitude .................................................... 9,800 feet (3
3,000m); Conntact the factoory for deratinng above speccification
H
Heat Dissipatiion ..................................... 1070 BTU/H
Hr. maximum
m @ full load,, per Rectifierrs
C
Cooling
Distribution ...................................... Convection cooling
M
............................. Fan forced air,
a front to baack with builtt-in over tempperature power
Rectifier Modules
limiting
A
Audible Noisee ......................................... 66dB for a fully
f
loaded pplant per NEB
BS GR-63-CO
ORE
1.2.3 Pow
wer system Eleectrical Specifications
IInput
A
AC Power Inp
put ...................................... See Section 1.3.8 Rectifi er Specificatiions for voltage and currennt
B
Battery String
gs ........................................ 4 maximum
m
B
Battery String
g Connectionss..................... 8 pairs of 3//8" studs (1" ccenter-to-centter) for 2-holee lugs
O
Output
P
Plant Power Output
O
(max) ...................... 1200A at 48
8 Vdc; 1000A
A at 56 Vdc
D
Distribution
Power sysstem, Total ......................... 1200A maxiimum
Individual Group, AM1 ................... 1000A maxiimum
Individual Group, GJ1 ..................... 1200A maxiimum
1.2.4 Geneeral Specificaations
B
Battery Temperature Comp
pensation ....... Adjustable 0.1
0 to 6 mV/°°C/cell
1.2.5 Bus Specification
ns
B
Bus Structure Amperage Rating
R
............. Per Americaan National S
Standards Insttitute’s Telecoommunicationns
Protection Specifications
S
s (ANSI T1.311-1991) amppere tables
C
Charge Bus Voltage
V
Drop ...................... 0.05V maxim
mum
D
Discharge Voltage Drop ......................... 0.25V maxim
mum
P
PM990-8800-5
50, Issue 3
1-6
SSageon III Basee System
Inntroduction
1.2.6 EMC
C Specificatio
ons
E
Emissions:
Category
Harmonics
Conductted RF – AC Port
Conductted RF – DC Port
Radiated
d RF
Tested Too
IEC 6100
00-3-2; EN610
000-3-2; AS/NZ
ZS 61000-3-2
CISPR 22 (1997); EN55022 (1998); A
AS/NZS 3548 (1997)
CISPR 22 (1997
CISPR 22 (1997); EN55022 (1998); A
AS/NZS 3548 (1997)
Class
A
B
A
B
IImmunity:
Category
Electrostatic Dischargee
(ESD)
Radiated
d RF
Electricaal Fast Transien
nt
(EFT)
Category
Surge Prrotection
Tested Too
IEC 6100
00-4-2; EN 610
000-4-2
(Air 8 kV
V, Contact 6 kV
V
IEC 6100
00-4-3; EN 610
000-4-3
(10V/m, 80-1000 MHz, 1 kHz 80% A
AM)
Hz 80% AM)
(10V/m, 1-2 GHz, 1 kH
IEC 6100
00-4-4; EN 610
000-4-4
(1 kV on
n AC lines)
(1 kV on
n DC lines)
(0.5 kV on
o signal lines – indoor)
Criterion
n
Tested Too
ANSI C6
62.41-1991 category B3 – AC
C lines
(Combination Wave 6 kV/3
k
kA; Ringg Wave 6 kV/500A)
Criterion
n
00-4-5; EN 610
000-4-5: (Impuulse)
IEC 6100
(6 kV/3 kA
k Common Mode
M
[CM] on AC lines)
(6 kV/3 kA
k Differentiall Mode [DM] oon AC lines)
(0.5 kV/0
0.25 kA CM & DM on DC linnes)
Conductted RF
Voltage Dip,
Interrupttions
P
PM990-8800-5
50, Issue 3
00-4-12; EN 61
1000-4-12: (Riing Wave)
IEC 6100
(6 kV/500A, 100 kHz CM
C & DM on A
AC lines)
(2 kV CM
M, 1 kV DM on
n DC lines)
IEC 6100
00-4-6; EN 610
000-4-6
(3V on AC,
A load and co
omms lines)
IEC 6100
00-4-11; EN 61
1000-4-11
(Level: 100% dip for 10
0 ms)
3
dip for 500
0 ms)
(Level: 30%
(Level: 100% dropout for
f 5s)
1-7
A
A
A
A
A
B
A
A
A
A
B
A
B
IIntroduction
Sageon III Baase System
1.2.7 Recttifier Specificcations
FIGURE 1-3 600A PL
LANT
FIGURE 1-4
1 1200A P LANT
IInput: 48V Reectifiers
R
Rated Input
Range, No
ominal ............................... 208-240 Vaac
Range, To
olerance ............................. 185-275 Vaac
Connectio
on ....................................... Single phasee; Phase-to-P
Phase or Phasee-to-Neutral
Current .............................................. 13.1 @ 208 Vac; 11.3 @ 240; 16A maax @ 120V oor below
Frequency
y......................................... 45-66 Hz
E
Extended Inpu
ut (with outpu
ut de-rating)
Low ................................................... 85-185 Vac
High .................................................. 275-285 Vaac
G
Guaranteed Sttart ..................................... 90 Vac
S
Soft Start .................................................. 8 seconds raamp-up to fulll load
E
Efficiency ................................................ Greater than
n 90% @ >500% load, 230 V
Vac input, 255°C (77°F)
...................... Greater than
P
Power Factor.....................
.
n 0.98 at 50%
% to 100% of rrated load
P
Protection
P
PM990-8800-5
50, Issue 3
1-8
SSageon III Basee System
Inntroduction
Internal Protective
P
Dev
vices .............. Double Fuseed (input)
External Protective
P
Deevice .............. Thermal circcuit breaker ((input)
Fully Prottected ................................. 440 Vac, ind
definitely
Over-Volttage Shutdow
wn .................. 300 Vac
Under-Vo
oltage Shutdown ................ 85 Vac
S
Service ..................................................... Hot swappaable (i.e. Can bbe installed inn or removedd from an operrating
Sageon III Base
B
System)
O
Output, 48V Rectifiers
R
F
Float Voltage
Nominal .............................................. 54.2 Vdc
Range.................................................. 42-58 Vdc
E
Equalize Volttage .................................... 45-59.9 Vdcc
C
Current Limitt .......................................... 10% to 110%
% of rated ouutput
T
Temperature Derating
D
............................. 25A @ 158°°F (70°C)
O
Output Rectiffiers
P
Power Limit ............................................. Foldback cu
urrent limitingg
S
Static Regulattion
Line .................................................... Better than +/-0.05%
+
Load.................................................... Better than +/-0.05%
+
D
Dynamic Reg
gulation ............................... +/-2% for 10
0% to 90% too 10% step load change
+/-1% of fin
nal value withhin 1 ms of steep change
+/-0.2% for a 25% step cchange in AC input voltagee
E
Electrical Noiise ...................................... <0.96 mV RMS
R
Psophom
metrically weighted
W
Wide-Band Noise
N
................................... <10 mV RM
MS (10 kHz-1 00 MHz)
P
Peak-to-Peak Ripple ............................... <100 mV (1
10 kHz-100 M
MHz)
L
Load Sharing .......................................... <+/-5% of full
f scale withh active currennt sharing froom SCU
P
Protection
Internal .............................................. Fuse
Over Currrent .................................... Can sustain a short circuiit at output teerminals indeffinitely
Temperatu
ure ..................................... Gradual red
duction of pow
wer limit if heeatsink tempeerature exceedd preset
limit
S
SCU program
mmable
Battery menu
m
.................................... Float and eq
qualize voltagges
Rectifier menu
m .................................. Current limiit, high and loow voltage alarm limits, H
HVSD, and HV
VSD reset
1.2.8 Safety Specificatiions
T
The following
g were used as guidelines in
i the specificcations of all ccomponents aand wiring, w
with particularr attention
tto safety ratin
ngs and OI-28 flammability
y requirementts.
•
Underwritters Laborato
ory Standards of Safety (UL
L 60950)
•
Bellcore Network
N
Equiipment-Build
ding System (G
GR-1089-CO
ORE)
P
PM990-8800-5
50, Issue 3
1-9
Introduction
Sageon III Base System
1.3 ABBREVIATIONS AND ACRONYMS
ABBREVIATION, ACRONYM OR SYMBOL
ANSI
MEANING
American National Standards Institute
AWG
BATT
CEV
CM
DIP
EMC
EMI
ESD
FA
HVA
IEC
IEEE
LED
LSD
LVA
LVD
NEC
NEMA
PCB
REC/RECT
RBOC
RFA
SBM
SSM
SCU
SMR
UBC
UL
UPS
PM990-8800-50, Issue 3
American wire gauge
Battery
controlled environment vault
circular mils
dual in-line package
electromagnetic compliance (or compatibility)
electromagnetic interference
electrostatic discharge
fuse and breaker alarm
normally energized high voltage alarm
International Electrical Commission
Institute of Electrical and Electronic Engineers
light emitting diode
least significant digit
low voltage alarm
low voltage disconnect
National Electric Code
National Electrical Manufacturers Association
printed circuit board
Rectifier (see SMR)
Regional Bell Operating Company
rectifier failure alarm
Sageon™ Battery Monitor
Sageon™ Site Monitor
Sageon™ Control Unit
Switch-Mode Rectifier (see REC/RECT)
Uniform Building Code
Underwriters Laboratory
Uninterruptible Power System
1-10
S
Sageon III Basee System
Inntroduction
1.4 REFERE
ENCE PUBLICATIONS
DOCU
UMENT NUMB
BER
ANSI C 39.1
ANSI T1.311-1991
T
ANSI/IEEE C 62.41-1
1980
IEC 80
01-2
NEC 1993
No Nu
umber
No Nu
umber
PUB 77350
7
PE-7-1
1985
STD 487-1980
TR-EO
OP-000151
TR-EO
OP-000154
TR-NW
WT-000063
TR-TS
SY-000078
UL489
9
TITLE
Requirrements for Eleectrical Analog Indicating Instrruments
DC Po
ower Systems - Telecommuniccations Environnment Protectionn
IEEE Guide for Surge Voltages in L
Low-Voltage AC
C Power Circuiits, ANSI
IEC Electromagnetic
E
Compatibility for Industrial-P
Process Measureement and
Contro
ol Equipment, October
O
1987
NEC Handbook
H
1993
3, National Firee Protection Asssociation
OI-28 Standards
Centraal Office Teleco
ommunications Equipment Enggineering Standdards, Decembeer
1984
U S West
W Telecommu
unications Equiipment Installattion & Removaal Guidelines,
May 1990
1
Comm
munications Typ
pe Battery Charrgers, NEMA/A
ANSI
IEEE Guide For The Protection of W
Wire-Line Comm
munications Faacilities Servingg
Electrical Power Stattions
Bellco
ore Generic Req
quirements for 224-, 48-, 130-, & 140-Volt Cenntral Office
Powerr system Rectifiiers, May 1985
Bellco
ore Generic Req
quirements for 224-, 48-, 130-, & 140-Volt Cenntral Office
Powerr system Contro
ol and Distributiion, May 1985
Bellco
ore Network Eq
quipment-Buildiing System Genneric Equipmennt Requirementss,
Issue 4,
4 July 1991
Bellco
ore Generic Phy
ysical Design R
Requirements forr Telecommuniication Productss
and Eq
quipment
UL Molded
M
Case Circuit Breaker Ennclosures, May 1984
11.4.1 Monitorring Specificaations
O
Operator paneel voltage and
d current ........ 2-line digitaal display
O
Operator paneel accuracy
Voltage accuracy
a
.............................. 0.50% +/- leeast significannt digit
Current acccuracy .............................. 1%
S
System status .......................................... Green, yello
ow, and red L
LEDs
L
Local Commu
unications ........................... USB (SageV
View requiredd)
R
Remote Comm
munications ....................... Ethernet/SN
NMP
11.4.2 Alarm Specifications
S
s
E
Each of follow
wing alarms is annunciated
d by a lighted
d LED on the operator paneel and by a reelay state channge.
R
Relay contact output termin
nals are on th
he alarm PCB in the distribbution.
A
A. User Alarm
m Annunciatio
on
F
Five user prog
grammable reelays. One forrm C contactss rated 1A ressistive @ 24V
Vdc, 0.5A resiistive @ 48Vdc.
B
B. Rectifier Front Panel
T
Three status LEDs
L
(Green, Amber, and Red) are locaated on the Reectifier front ppanel.
C
C. Battery Cu
urrent Temperrature
B
Battery Temperature Senso
or Input.......... Compensatiion and alarm
m annunciationn, 1ambient, 11-4 battery
B
Battery Current Transducerr Input ........... 1-4 battery strings;
s
accurracy 1%
U
User connectiions .................................... No. 6 screw
w terminals; luugless compreession type
PM990-8800--50, Issue 3
1-11
Introduction
Sageon III Base System
D. Sageon Battery Monitor
Battery strings......................................... 4 maximum
Battery voltage ....................................... 75V maximum
Cells (single cell or monoblock)............. 24 maximum per SBM board
Cell voltage............................................. 2V, 4V, 6V or 12V (maximum input 3.33V, 6.66V, 10V, and 20V
respectively)
Accuracy ................................................. +/-10mV at 0°C to 40°C
Resolution ............................................... 5mV per cell (2V, 4V, and 6V ranges)
10mV per cell (12V range)
Sampling interval.................................... 1-60 minutes
SBM boards ............................................ 4 maximum
Interconnection ....................................... 16-conductor ribbon cable; 30 feet (10m) maximum length
E. Site Monitor
Analog inputs ......................................... 8
Signal range ............................................ 0-5V
Input protection ...................................... Over-voltage and reverse polarity
Signal scaling and alarm levels .............. Scale factor and low and high alarm thresholds are user programmable at
operator panel
Digital inputs .......................................... 12
Signal source .......................................... Voltage free contacts
Logic of digital input .............................. User defined from operator panel
Control outputs ....................................... 4
Output signal source ............................... Voltage free form C relay contact; 1A @ 30 Vdc
1.5 PRODUCT SUPPORT
Product support can be obtained using the following addresses and telephone numbers.
UNIPOWER, LLC
65 Industrial Park Road, Dunlap, TN 37327
Customer Service, Voice: (800) 440-3504
Customer Service, Fax: (423) 949-3647
Field Service: (800) 299-3907
Web site –
http://www.unipowerco.com
When contacting UNIPOWER, please be prepared to provide:
1. The Power system part number and serial number - see the equipment nameplate
2. Your company’s name and address
3. Your name and title
4. The reason for the contact
5. If there is a problem with Power system operation:
•
Is the problem intermittent or continuous?
•
What actions were being performed prior to the appearance of the problem?
•
What actions have been taken since the problem occurred?
PM990-8800-50, Issue 3
1-12
SSageon III Basee System
IInstallation
22.0 INSTAL
LLATION
T
This chapter describes
d
instaalling a Sageo
on™ III Poweer system. If qquestions or pproblems arisee during instaallation,
pplease refer to
o Section 1.6 Product
P
Supp
port and contaact a UNIPOW
WER Field Seervice techniccian for assisttance.
T
The Power sy
ystem is factorry assembled and tested. GJ1
G circuit breeakers specifiied on the ordder are factoryy
installed. AM1 circuit breaakers specified
d on the orderr are shipped in protectivee packaging foor on-site insttallation.
R
Rectifiers specified on the order are ship
pped in separaate, protectiv e packages foor on-site insttallation.
T
The Power sy
ystem is design
ned for top-en
ntry of distrib
bution and bat
attery cabling.. AC input cabbling can enteer the
pplant through any lower sid
de/rear panelss or through th
he bottom of the plant wheen the plant iss located on aan
eelevated floorr. All cabling is user-suppliied.
WARNIING
Electrical
E
sh
hock hazard
d
Hazardous
H
vo
oltage can cause
c
death or serious in
njury.
Remove
R
pow
wer from all wires
w
and terrminals befo
ore working o
on
equipment.
e
IIMPORTAN
NT: All wiring
g must meet th
he National Electrical
E
Codde and other aapplicable inddustry and loccal codes.
T
The Breaker/F
Fuse Layout label
l
on the in
nside of the door to the disstribution areaa lists all distrribution posittions. The
label providess space for yo
ou to write breeaker/fuse currrent rating annd part numbber. Label entrries should bee
ccompleted beffore beginnin
ng the installattion to help en
nsure that thee correct break
aker/fuse is inserted in eachh
pposition.
R
Rectifier Position Addresss
E
Each rectifier position is faactory-assigneed a unique, sequential
s
adddress within th
the Sageon IIII Base System
m. The
S
System operattor uses this address
a
when configuring and
a operatingg the System tto identify annd access a sppecific
R
Rectifier. Thee AC Backplaane board at eaach rectifier position
p
has oone DIP switcch on which thhe address is set. See
tthe illustration
n below.
IIMPORTAN
NT: Do not ch
hange the facto
ory-set switch
hes. If inadveertently changged, go to Secction 6.6 for a
pprocedure to set
s the switch
hes to the prop
per address.
P
PM990-8800-5
50, Issue 3
2-1
IInstallation
Sageon III Baase System
O
Opening the Distribution Area Door
D
During installlation, it will be
b necessary to open the distribution
d
arrea door to insstall load suppply and returnn cables,
bbattery cabless, and alarm wires.
w
Lift thee paddle surro
ounding the kkey lock, rotatte it 90 degreees, and open tthe door.
K
Keys are tied just
j inside thee door.
22.1 INSTALL
LATION SUM
MMARY
A typical instaallation sequeence is provid
ded below. Reeferences to aappropriate seections in thiss manual are iincluded.
11. Review th
he list of user--supplied tools and accesso
ories in Secti on 2.2.
22. Select a lo
ocation for the Power systeem. See Sectiion 2.3.
33. Select batttery, AC inpu
ut, and distrib
bution wire sizzes based on current and leength of run. See Section 22.2.
44. Move the Power system
m and accomp
panying assem
mblies to the selected locaation. Anchor the Power syystem to
the floor. See Section 2.4.
2
55. Install AC
C input wiring
g between thee user’s AC ellectrical serviice panel and the Power syystem. See Seection 2.5.
66. Connect the
t AC input wiring
w
to AC terminals in bottom sectioon. See Sectioon 2.5.4.
77. Install batttery cabling. See Section 2.6.
2
88. Route and
d connect supply and return
n cabling to customer’s
c
loaads. See Secttion 2.7.
99. Connect external
e
alarm
m annunciatorrs. See Section
n 2.8.
110. Input/Con
nnect options:: Battery Tem
mperature Sen
nsors, Battery Current Trannsducers, Sageon Battery M
Monitor,
Site Moniitor, and comm
munications (SNMP).
(
See Sections 2.9 through 2.133.
111. Install Rectifiers. See Section
S
2.14.
112. Commissiion the plant. See Chapter 3 Commissio
oning and Chaapter 4 Confiiguration and Operation.
22.2 REFEREN
NCE MATER
RIAL
T
This section contains
c
lists, tables, and methods
m
that are
a referencedd in subsequennt proceduress. Three subseections
ccomprise the Reference
R
Maaterial section
n.
•
Tools and
d Accessories – Read the in
ncluded list fo
or a preview oof the user-suupplied items that will be rreferenced
during thee installation and servicing
g procedures.
•
Selecting and Sizing DC
D Power Cab
bles – Proper cable sizing iis critical to ssystem perform
mance. This ssection
provides a formula and
d table that sim
mplify cable selection.
s
•
Torque Sp
pecifications – The torque specification
n table in this subsection is referenced inn procedures that
include haardware.
2.2.1 Toolls And Accessories
T
To install the Sageon III Baase System, th
he following user-suppliedd items should be availablee.
•
Equipmen
nt to move Po
ower system to installation site
•
Floor anch
hors to securee the Power system
•
Conduit and/or
a
overheaad wire rackss for cabling
•
Standard insulated
i
insttallation toolss (e.g. hand to
ools, socket seet, cable cutteers, cable insuulation strippeers)
P
PM990-8800-5
50, Issue 3
2-2
SSageon III Basee System
IInstallation
•
Torque wrench
w
to ensu
ure correct tig
ghtening of haardware; see T
Table 2-2 for torque speciffications
•
Electrical service panel circuit break
kers
•
Digital Vo
oltmeter with
h: 4-1/2 digit display
d
•
Cables an
nd lugs; appro
opriate crimping tools:
AM1 Circuit Break
ker Distribution uses Two--hole lugs forr 1/4" threadeed studs (5/8" center-to-cennter) and
GJ1 Circuit
C
Breakeer Distribution uses Singlee hole lugs forr 3/8" bolt.
Returrn bus uses Tw
wo-hole lugs for 1/4" threaaded studs (5//8" a center-too-center) and two-hole luggs for 3/8"
thread
ded studs (1" center-to-cen
nter).
Batterry Charge and
d Discharge Buses
B
use Tw
wo-hole lugs fo
for 3/8" threadded studs (1" center-to-cennter).
•
Conduit, conduit
c
conneectors, and co
onduit bendin
ng tools
•
Anti-Statiic Service Kitt with static dissipative
d
maat and wrist sttrap for handlling electronicc circuit boardds (e.g.
Interface Board)
B
(availlable from eleectronic supplly sources)
2.2.2 Selecting and Sizing DC Poweer Cables
P
Protective circcuits, overall system performance, and safety
s
dependd on the propeer sizing of D
DC cables for current
aand acceptable DC voltagee drop. The minimum
m
size allowable is the larger of the wire size per the Natioonal
E
Electrical Cod
de or the calcu
ulated wire siize.
U
Use the follow
wing method to
t determine the wire size..
11. Calculate the minimum
m area in circu
ular mils (CM
M) required foor copper wiree using the foollowing form
mula:
22.2 x I x L
CM =
V
wheree:
CM = minimum arrea of circularr mils in the cable
c
I = maximum curreent (in amps)
L = on
ne-way cablee length (in feet)
V = allowable
a
loop
p voltage drop
p (in volts)
Exam
mple: Assume a maximum output
o
curren
nt of 100 ampeeres, an allow
wable loop vooltage drop off 0.25
volts, and a distancce of 50 feet between
b
the Power
P
system
m and the loadd.
I = 10
00 amperes
L = 50 feet
V = 0.25
0 volts
(22.2)(100
0)(50)
CM =
(0.25)
CM = 440,000 circcular mils
22. After calcculating the minimum
m
areaa in circular mils,
m select thee proper coppper wire size ffrom Table 2--1; always
choosing the next largeer wire size iff the area ratin
ng falls betweeen values. F
For the above example, seleect 500
MCM wirre.
P
PM990-8800-5
50, Issue 3
2-3
IInstallation
Sageon III Baase System
33. Determinee the minimum wire size for
f ampacity according
a
to tthe code authoority having jjurisdiction inn your
location.
44. Select thee larger of the sizes calculaated for voltag
ge drop or am
mpacity.
TABLE 2--1 WIRE SIIZING
SIZE
AWG NO..
AREA
IN CM
14
12
10
8
6
4
2
1/0
2/0
4/0
350 MCM
500 MCM
750 MCM
4,110
6,530
10,380
16,510
26,250
41,740
66,370
105,500
133,100
211,600
350,000
500,000
750,000
CURRENT
CARRYING
CAPACITY*
OPEN ENC
CLOSED
AIR
15
15
20
20
30
30
45
45
70
65
100
85
135
115
0
185
150
210
175
0
300
230
425
310
0
380
0
525
660
475
DIA
A BARE
CO
OND
INC
CHES
RHW
W DIA
OVE
ER INS
INC
CHES
RHW
W
BEN
ND
RAD
DIUS
INC
CHES
0.0664
0.0 81
0.1002
0.1446
0.1 84
0.2332
0.2992
0.3773
0.4 18
0.5228
0.6 81
0.8 14
0.9998
0.199
0.211
0.244
0.311
0.400
0.455
0.511
0.633
0.688
0.788
0.988
1.122
1.344
0.955
1.055
1.200
1.555
2.000
2.255
2.555
3.155
3.400
3.900
4.900
5.600
6.700
* Data based on NEC
N
Handbook
k 2011, Table 310
0-17 adjusted fo
or 50°C (122°F) ambient temperaature.
2.2.3 Torq
que Specificattions
P
Proper plant performance
p
requires
r
that the
t hardware employed duuring installatiion be tightenned securely bbut not
oover tightened
d. Use a torqu
ue wrench to ensure
e
that haardware is tigghtened to thee specificationn provided in Table 222.
TAB
BLE 2-2 TOR
RQUE SPEC
CIFICATION
NS, STEEL F
FASTENERS
S
Bolt Size
4-40
4-48
6-32
6-40
8-32
8-36
10-24
10-32
1/4-20
1/4-28
5/16-18
5/16-24
3/8-16
3/8-24
7/16-14
7/16-20
1/2-13
1/2-20
9/16-12
9/16-18
P
PM990-8800-5
50, Issue 3
Inch/Pounds
4.5
5.4
9.0
10.8
17.1
18.0
24.3
27.9
59.4
70.2
118.8
129.6
216.0
248.4
324.0
378.0
540.0
594.0
756.0
864.0
Foot/Pound
ds
0.375
0.450
0.750
0.900
1.425
1.500
0.025
2.325
4.950
5.850
9.9
10.8
18.0
20.7
27.0
31.5
45.0
49.5
63.0
72.0
2-4
Newton-M
Meters
0.511
0.611
1.022
1.222
1.933
2.033
2.755
3.155
6.711
7.933
13.442
14.664
24.440
28.007
36.661
42.771
61.001
67.111
85.442
98.662
Sageon III Base System
Installation
2.3 SELECTING A LOCATION
Install the Power system in a location that provides the following.
•
Access to a source of reliable, stable, electrically clean AC power
•
A dry, well ventilated room that meets the conditions stated in Section 1.2.2 Power system Environmental
Specifications
•
Sufficient access for plant installation and servicing (refer to NEC and local codes)
•
Sufficient ceiling height to permit use of overhead cable trays and conduit for AC input cables and DC load
supply and return cables
•
A level, flat floor capable of supporting the weight of the Power system and accepting bolts or other usersupplied hardware to securely anchor the plant
•
A pest and varmint free area
2.4 MOVING AND ANCHORING THE POWER SYSTEM
The Power system is heavy (up to 1,000 lbs (453 kg)) and it is top heavy. An improperly handled Power system
can topple. Proper handling equipment is required to transport the plant. The unit dimensions are given in Figure
2-1. Figure 2-2 shows the Power system base and the floor mounting hole pattern.
Floor Mounting: The Power system must be permanently anchored. Install one anchor in each floor corner.
Mounting slots are provided in each corner to allow for ease of anchoring. Mark and drill holes where shown in
Figure 2-2. UNIPOWER offers several seismic zone hardware kits.
WARNING
Tip Over/Crush Hazard
Power system tip over can cause death or serious injury.
Keep the Power system vertical.
Power system is heavy and also top heavy. Use a forklift or other equipment to move
or transport the Power system.
PM990-8800-50, Issue 3
2-5
Installation
Sageon III Base System
Caution: Do not block rear panel grille. A blocked grille will limit the flow of cooling air and can
result in equipment overheating and failure. Minimum clearance behind and to the sides of the
plant must be 2" (5 cm).
FIGURE 2-1 POWER SYSTEM DIMENSIONS
PM990-8800-50, Issue 3
2-6
Sageon III Base System
Installation
FIGURE 2-2 PLANT BASE
Caution: Do not block rear panel grille. A blocked grille will limit the flow of cooling air and can result in equipment
overheating and failure. Minimum clearance behind the Plant is 2" (5 cm).
To move and mechanically secure the Power system:
1. Prepare the installation site. Install floor anchors (see Figure 2-2 for mounting pattern) as needed.
2. Carefully transport the Power system to the installation site. If possible, protective wrapping should remain in
place until the move is completed.
•
Since the plant is shipped bolted to a skid, a forklift is typically used for transport to the installation site.
•
A lift point is provided in each rack corner, near the top, for an overhead crane or other lifting equipment.
•
Be careful not to bend or otherwise damage the side and rear panels.
•
Be careful not to mar or otherwise damage the front bezels.
3. Set the Power system in place.
4. Securely fasten the Power system to the floor.
2.5 CONNECTING AC POWER TO THE POWER SYSTEM
Connect single-phase power, through a circuit breaker, to each input in plant. See Section 1.2.7 Rectifier
Specifications for voltage and current requirements. See section 3.4 for more on connections.
User’s AC Electrical
Service Panel
Single-Phase AC
Power to Power
System
A ground is required with the AC power connections for safety and for limiting EMI/RFI emissions.
PM990-8800-50, Issue 3
2-7
IInstallation
Sageon III Baase System
P
Plant Rack:
G
Ground the Po
ower system rack
r
to the sitte’s central frame ground aapplicable in accordance w
with codes andd the
ccustomer’s staandard practicce. Unthreadeed holes for bolting an eartth/safety grouund wire to thhe rack are proovided in
tthe top and bo
ottom, both on
n rear. Remov
ve the paint frrom a small aarea (e.g. 1.5 iin/3.8 cm diaameter) aroundd the
sselected holess and through--bolt the grou
und wire lug to
t the rack.
R
Return Bus:
C
Connect the plant
p
return bu
us to the site’ss central officce ground. Seelect a cable size applicablee in accordannce with
ccodes and the customer’s standard practtice. The miniimum cable ssize must be ccapable of carrrying the fauult current
ffrom any instaalled device. Since this is typically
t
a hig
gh current connnection, secuure the wire llug to a 3/8" sstud on
tthe return bus (battery) or bolt
b the wire lug
l to 3/8" through hole onn the return bbus (loads). Thhe return busees within
tthe plant are electrically
e
co
onnected. See Figure 2-3 fo
or bus locatioons.
FIGU
URE 2-3 RET
TURN BUS L
LOCATION
NS
2.5.1 Ligh
htning and Traansient Supprression
R
Rectifiers con
ntain basic transient suppreession in the form
f
of Metall Oxide Varisstors (MOVs). MOVs are iinstalled
ffrom L1 to L2
2, L1 to earth,, and L2 to eaarth. They aree sized to proovide protectioon from line ttransients in aan
industrial environment according to AN
NSI C62.41-19
991 for Class B3 equipmennt and IEC 611000-4-5.
S
Supplementarry transient prrotection is neeeded in a mo
ore severe envvironment witth, for exampple, a high inccidence of
lightning strik
kes (indirect or
o direct) and//or severe swiitching transi ents beyond tthe levels inddicated in the aabove
sstandards. Insstall higher raated suppressiion devices to
o the AC electtrical service where appropriate.
P
PM990-8800-5
50, Issue 3
2-8
SSageon III Basee System
IInstallation
2.5.2 Userr's AC Electriical Service Panel
P
T
The AC electrrical service panel
p
and wiring from the service panell to the Powerr system is suupplied by thee user.
11. Electrical shock hazard
d – Remove power
p
from alll involved wiires and termiinals before pproceeding.
22. Determinee the number of AC breakeer positions needed.
n
Allow
w one breakerr position for each Rectifieer
to be instaalled in the Po
ower system. Alternatively
y, up to two R
Rectifiers can be fed from oone breaker pprovided
the breakeer and wiring meet local an
nd national ellectrical code requirementss. Power systeem terminals will
accept 6-1
12 AWG (13.6-3.3 mm2).
33. Run the needed
n
quantitty of AC pow
wer cables from
m the servicee panel to the Power system
m.
Label each breaker possition and botth ends of eacch AC power cable with thhe Power systeem number annd
rectifier position
p
addreess to which itt will be conn
nected (e.g. P11R1 = Powerr system 1, Reectifier positioon
address 1)). Rectifier po
ositions are nu
umbered from
m top to bottoom as shown bbelow.
Rectifier
Section
Rectifier 1
Rectifier 3
↓
↓
Rectifier
R
“n-1
1”
Recttifier 2
Recttifier 4
↓
↓
Rectiffier “n”
44. At each brreaker positio
on in the AC panel,
p
install a delayed-tripp circuit breaaker for each ccable. Refer tto Table
2-3 for breaker recomm
mendation.
55. Ensure that all circuit breakers
b
are in
n the Off position.
66. Connect the
t power cab
bles to the serv
vice panel.
TA
ABLE 2-3 CIIRCUIT BRE
EAKER SEL
LECTION, A
AC POWER
Reectifiers Pow
wered
1
2
Break
ker Rating
20A
40A
2.5.3 AC Cabling
C
T
This section describes
d
conn
necting the AC
A input cablees within the P
Power system
m. An AC inpuut cable can eenter the
pplant several ways:
w
•
Through either
e
the low
wer section sid
de panel or low
wer rear paneel of the cabinnet.
•
Upward th
hrough the op
pen base of th
he rack.
F
For each ordered Rectifier,, connect an AC
A input cablle to the AC ttermination bllock located iin the lower ssection of
tthe unit.
IIMPORTAN
NT: Do not ch
hange the facto
ory-set rectifiier position adddress. The aaddress is set oon the AC Baackplane
bboard.
P
PM990-8800-5
50, Issue 3
2-9
Installation
Sageon III Base System
System Wiring
L1 L2
RECT 1
L1 L2
RECT 1
L1 L2
RECT 2
L1 L2
RECT 3
L1 L2
RECT 4
L1 L2
RECT 5
L1 L2
RECT 6
L1 L2
RECT 7
L1 L2
RECT 8
L1 L2
RECT 9
L1 L2
L1 L2
L1 L2
RECT 10
RECT 11
RECT 12
Line1
Line2
Ground
User Wiring
AC Cable from User's
AC Electrical Service
Panel
FIGURE 2-4 AC INPUT CABLING WITH RECTIFIER ON/OFF OPTION
2.6 CONNECTING BATTERY CABLES
Routing the stiff, heavy gauge battery cables is difficult. Two people may be needed. Exercise extreme caution to
avoid a short circuit across the battery terminals.
WARNING
Arcing hazard
Arcing can cause equipment damage, load interruptions, and personal injury.
Remove watch and jewelry. Use insulated tools and extreme caution when working with a
battery string.
Carefully insulate unterminated battery cable ends.
At the Power system, battery cables connect to the battery charge bus and return bus. Three battery charge and
battery return bus options are available to facilitate 2-hole lug wiring: 3/8 inch diameter studs on 1 inch centers
for a single tier, 3/8 inch diameter studs on 1.75 inch centers for a single tier and 3/8 inch diameter studs on 1.75
inch centers for three tiers.
Installing the Battery Cables:
This procedure includes the installation of up to four optional battery current transducers. Transducer mounting
and wiring information is found in Section 2.10. Ignore references to transducers in the following procedure if not
part of your installation.
If the installation includes a battery disconnect switch, modify the procedure accordingly.
1. Determine the correct battery cable size and shortest cable run. See Section 2.2.2 Selecting and Sizing DC
Power Cables. The top of the distribution section is open for easy access when routing battery cables between
PM990-8800-50, Issue 3
2-10
Sageon III Base System
Installation
the battery string and the Power system battery charge bus and return bus. See Figure 2-5 for the location of
the battery charge bus and battery return bus within the plant.
2. Mount the optional battery current transducer(s) and connect the transducer cable(s) between the transducer
and the Power system as indicated in Section 2.10. Be sure that a transducer’s battery cable opening is large
enough for the selected cable diameter and the number of cables.
3. Run cables between the plant and battery string 1. Route either battery cable (+ or -) through the optional
battery current transducer; all battery cables routed through a transducer must be the same polarity.
Transducers are marked, typically with an arrow, to indicate current direction. (See section 2.10)
FIGURE 2-5 BATTERY CHARGE BUS AND BATTERY RETURN BUS LOCATIONS
4. At the Power system, install appropriate lugs on cables.
CAUTION
a) Secure the negative cable to the battery charge bus.
b) Secure the positive cable to the battery return bus.
NOTE: See table 2-2 for torque specifications.
5. At the battery string, appropriate battery lugs/terminals/clamps. Confirm polarity and connect the wires to the
battery string terminals.
6. Repeat the above steps for each battery string to be connected.
2.7 CONNECTING CUSTOMER LOADS
Supply and return cables are connected between customer loads and Power system distribution. Interconnecting
cables and lugs are supplied by the user. Refer to Section 2.2.1 Tools and Accessories for lug requirements. Refer
to Section 2.2.2 Selecting and Sizing DC Power Cables for cable sizing.
PM990-8800-50, Issue 3
2-11
Installation
Sageon III Base System
Note: To field install additional distribution refer to Chapter 7 Distribution Option Kit Installation. To field install
additional fuses or circuit breakers in the present distribution refer to Chapter 8 Circuit Breaker and Fuse Kit
Installation.
Route supply and return cables from the Power system to the loads in overhead racks or cable trays. The plant
cables drop from the overhead racks through the open top of the plant.
Connect the return cables to the return bus (loads), the vertical bus to the right side of the distribution area.
Connect the supply cables to either a distribution assembly (for AM1 type breakers) or a GJ1 type breaker output
terminal. A typical load connection is shown in Figure 2-6.
Note: Other tiers and groups are cabled similarly. Connect all load returns to the return
bus.
FIGURE 2-6 LOAD SUPPLY AND RETURN CABLING
Distribution is organized by Tier (1-3), Group (A & B) and position (1-10). See Figure 2-7. The Breaker/Fuse
Layout label on the rear of the distribution area door is for recording breaker/fuse current rating and part number.
PM990-8800-50, Issue 3
2-12
Sageon III Base System
Installation
BATTERY
DISCHARGE
BUS
DISTRIBUTION
GROUPS A & B
ON EACH TIER
LEFT SIDE
FIGURE 2-7 DISTRIBUTION GROUP IDENTITIES AND LOCATIONS
Distribution Group Orientation:
Orientation of a group determines the routing of the supply cables. Figure 2-8 shows the orientation of AM1
distribution assemblies, using their output studs (circled) as points of reference. Groups A & B are always
oriented as shown.
FIGURE 2-8 DISTRIBUTION AREA, TOP VIEW, AM1 TYPE BREAKER DIST. SHOWN
PM990-8800-50, Issue 3
2-13
IInstallation
Sageon III Baase System
2.7.1 Load
d Return Cablles
T
Terminate all load return cables at the reeturn bus (loaads) shown inn Figure 2-6. T
This bus is located on the rright of
tthe distributio
on area and co
onsists of up to
t three verticcally mountedd plates. The pplates have paairs of 1/4" annd 3/8"
tthreaded studss for 2-hole lu
ugging. Use th
he 1/4" studs for lower currrent loads prrotected with AM1 type brreakers.
T
The 3/8" studss are for high
her current loaads protected by GJ1 type bbreakers.
2.7.2 Load
d Supply Cables, AM1 Typ
pe Breaker Distribution
Distribu
ution
Cabliing
Tier 3
Group A
G
Tier 3
Group B
Tier 2
Group
G
A
Tier 2
Group B
Tier 1
Group A
G
Tier 1
Group B
Left Rear Corner of Rack
Left Front Corner of Rack
C
Connect custo
omer load sup
pply cabling in
n order by Tier, Group, annd position nuumber as show
wn on the
B
Breaker/Fuse Layout label on the insidee of the distrib
bution area dooor. Cables arre routed toward the nearesst rack
ccorner and theen upward, ass shown in Fig
gure 2-9.
Fuse Ala
arm
(FA) Wire
CD00031a
Distribution
Assemb
blies
Bus Barss
Distribution, Rack Left
ft Side
FIGURE 2-9 DISTRIIBUTION CA
ABLE ROUT
TING
P
PM990-8800-5
50, Issue 3
2-14
Sageon III Base System
1.
2.
Installation
Select a starting point, Tier 1, Group A Position 1 is recommended. Use appropriate lugs on the load
supply and return cables.
Dress the cable as shown in Figure 2-9, toward the front or rear of the rack according to the orientation
of the distribution assembly. Dress the cable away from rack assembly hardware to avoid possible
chafing of the cable insulation.
Battery Discharge Bus Bar
Distribution Assembly
Alarm Strip
Mounting Bracket
Holes for
Securing Cable
Paired Output Studs
Circuit Breaker or Fuse –
Note orientation:
Short Mounting Surface
Long Mounting Surface
(Output Terminal)
Load Supply Cable,
See Detail Below
Alarm Connection
Bus Bar
Circuit Breaker or Fuse –
Note mounting surface
orientation.
Load Supply Cable and
2-Hole Lug
1/4-20 Nuts
Detail of Load Supply Cable Connection
FIGURE 2-10 AM1 TYPE DISTRIBUTION LUGGING
3.
4.
5.
6.
Move to Group A, Position 2 and repeat the above steps. Repeat the steps until all positions in Tier 1,
Group A are cabled.
Move to Tier 1, Group B, and cable the positions.
Perform the above steps for Tiers 2 and 3.
Bundle and secure cables as follows. Two cable-securing tabs are provided in each distribution
assembly mounting bracket. See Figures 2-10 and 7-2 for cable securing locations
1) All Group A – Bundle cabling from all tiers at the left front of the rack.
2) All Group B – Bundle cabling from all tiers at the left rear of the rack.
PM990-8800-50, Issue 3
2-15
IInstallation
Sageon III Baase System
2.7.3 Load
d Supply Cables, GJ1 Typee Breaker Disstribution
W
When ordered
d, GJ1 type diistribution asssemblies are always
a
the uppper-most disttribution asseemblies in a pplant since
nno more distriibution can bee installed abo
ove a GJ1 typ
pe assembly. Cable routingg and connecttion are show
wn in
F
Figure 2-12. Connect
C
the to
op breaker terrminals to useer loads. The bottom breakker terminals are bolted to the
bbattery dischaarge bus at thee factory.
Distrib
bution Assembliess
Tier 3, Grp
G A
Tier 3, Grp B
Fuse Alarm
m
(FA) Wire
e
Fuse
e Alarm
(FA
A) Wire
Tier 2
Group A
Tier 2
Group B
Tier 1
Group A
Tier 1
Group B
Bus Ba
ars
Left Rear Corner of Rack
Left Front Corner of Rack
Distributio
on
Assembliies
FIGURE
F
2-11
1 GJ1 TYPE
E BREAKER
R DISTRIBU
UTION ASSE
EMBLIES, T
TYPICAL
11.
Select a sttarting point, the lowest Grroup letter, Position 1 is reecommended..
22.
For the lo
oad supply cab
ble end, use a single-hole lug
l for a 3/8" bolt. See Figgure 2-12.
33.
Bolt the su
upply cable end
e to the breaaker terminall using 3/8" haardware per ffigure 2-12.
44.
Repeat thee above stepss for each GJ1
1 type breakerr in the Groupp
55.
Repeat thee above stepss for each GJ1
1 type breakerr group.
GJ1
1 Circuit Breakker, 4 Places
3/8 N
Nut and Flat W
Washer
Loa
ad Supply Cab
ble with 3/8 Lug
g
and Output Term
minal Hardware
e
Braccket Mounting Screw
12-2
24 x 3/4, 2 Placces
Mounting Bracket, U-Shaped
3/8 x 1 He
ex Bolt
Bevel Wash
her
Flat Wa
asher
Brea
aker Mounting Bar, 2 Places
Bus Bar, L
L-Shaped
Breaker
B
Input T
Terminal Hardw
ware
FIGU
URE 2-12 GJ1
G TYPE BR
REAKER DIISTRIBUTIO
ON WIRING
G
P
PM990-8800-5
50, Issue 3
2-16
Sageon III Base System
Installation
2.8 CONNECTING EXTERNAL ALARM ANNUNCIATORS
Five form C relay contact outputs are available for connection to external, user-supplied alarm annunciators.
Figure 2-13 shows the Interface Board and the row of connectors (X6) provided for these connections. Review the
alarm and relay contact specifications in Section 1.2.11 Alarm Specifications to ensure compatibility with
external annunciators and other equipment before proceeding. Alarm relay outputs are provided for remote
annunciation of fault conditions. All relays are user programmable through the SageView software.
As shown in Figure 2-13, each relay has three connections: common, normally open, and normally closed. The
normally open (NO) and normally closed (NC) labels are for an un-powered Sageon III Base System. Relay coils
are energized during normal Sageon III Base System operation. During an alarm, the appropriate relay coil is deenergized.
IMPORTANT: When the relay contacts are connected to a reactive load, such as a solenoid or relay coil, the
load must be shunted by a transient suppression device to prevent damaging relay contacts.
FIGURE 2-13 INTERFACE BOARD, CUSTOMER ALARM CONNECTIONS
2.9 BATTERY TEMPERATURE SENSORS AND KITS (OPTION)
The Multiple Battery Temperature Board is optional in the Sageon III distribution. It can accommodate up to four
battery temperature sensors. Temperature sensors are ordered separately. If ordered with the system, the sensors
are connected to the Multiple Battery Temp Board and the sensors and wires then coiled and tied to the return bus.
If not ordered with the Sageon III Base System, an Ambient and one (1) Battery Temperature Sensor can be
ordered separately.
Installing the Sensors:
Open the distribution door and locate the Multiple Battery Temperature Board. Locate the coiled sensors.
1. If not already connected, plug the battery temperature sensor connectors and the ambient temperature sensor
into the Controller backplane board. See Table 2-4 for the connectors. The connectors are keyed.
PM990-8800-50, Issue 3
2-17
Installation
Sageon III Base System
TABLE 2-4 BATTERY TEMPERATURE SENSOR CONNECTIONS
Sensor
Connector
Battery String 1 Temperature
X1 in Figure 2-19
Battery String 2 Temperature
X2 in Figure 2-19
Battery String 3 Temperature
X3 in Figure 2-19
Battery String 4 Temperature
X4 in Figure 2-19
Ambient Temperature
X3 in Figure 2-18
2. Select a location for mounting the ambient temperature sensor ring lug. The temperature of this mass should
have a fairly long thermal time constant (e.g. temperature should not cycle with short-term temperature
changes due to normal environmental heating and cooling cycles). Typically this could be a nearby equipment
rack the Sageon III system is mounted adjacent to.
3. Fasten the ambient temperature sensor to the selected point using appropriate user-supply hardware.
4. Route the 4 battery temperature sensors to the battery string(s). Typically somewhere close to the string
midpoint.
5. Determine which battery posts will have sensors attached. Suggested location is shown in the battery string
drawing, figure 2-14.
Note: The highest of the four battery temperature readings is used for compensation. Locate a sensor at the
warmest battery, generally one at the center of a battery group.
6. Determine the charge/discharge status of the battery string. Connecting the sensors may result in a momentary
battery string open circuit when the terminal bolt is removed.
CAUTION: DO NOT proceed if the battery string is being charged or discharged at a high rate. Continue
only when the charge or discharge rate is at a safe level.
7. Remove the bolt holding the inter-cell battery strap in place. Insert the bolt through the battery temperature
sensor ring lug, through the strap, and into the battery terminal. Tighten the bolt as recommended by the
battery manufacturer.
8. Repeat steps 6 and 7 to install the remaining battery temperature sensors.
9. Bundle and secure excess wiring.
10. Enable compensation using the operator panel push buttons and menus or a PC running SageView.
11. If installing the Sensor Kit, get the compensation chart label. Remove the backing from the label and place the
label on the inside of the distribution area door.
PM990-8800-50, Issue 3
2-18
Sageon III Base System
Installation
+
+
+
+
+
+
+
+
+
+
+
+
+
+
+
+
+
+
+
+
+
+
CD00036a
Temperature
Sensor 1
+
+
FIGURE 2-14 TEMPERATURE SENSOR LOCATION
2.10 INSTALLING A BATTERY CURRENT TRANSDUCER (OPTION)
The optional battery current transducer senses the battery current for display on the operator panel. When
installed, the battery current transducer also allows the user to configure the SCU to limit the recharge current to
the battery string in order to extend battery life; and set a fixed, repeatable discharge current for battery discharge
tests.
Install one battery current transducer per battery string (up to four transducers). If not ordered with the Sageon III
Base System, a Battery Current Transducer Kit is available.
To install a transducer kit:
1
Mount the transducer(s) with user-supplied hardware. Figure 2-15 shows a typical transducer. Often,
transducers are mounted on the battery rack. The location must allow for convenient routing of one or more
battery cables, or intercell connectors, through each of the transducers. The three possible installation options
are:
a. If transducer is installed on the positive lead(s) of the battery string, the arrow will point toward
the battery string’s positive post.
b. If the transducer is installed on the negative lead of the battery string, the arrow will point toward
the power system – away from the battery string’s negative post.
c. If the transducer is installed on one of the intercell connectors the arrow on the transducer will
always point to the positive post of the next battery cell in the battery string. If the intercell strap
will not fit through the current transducer, the strap may be replaced with a short cable, lugged on
both ends that will fit through the transducer; consult the factory.
2
Open the distribution door and locate the supplied battery current transducer cables; there is one cable per
transducer. The 4-conductor cables are coiled and tied to the return bus (loads) in the distribution area of the
Sageon III Base System. The length of the supplied cables is 4 ft. (29.1m).
PM990-8800-50, Issue 3
2-19
Installation
Sageon III Base System
3
Refer to Table 2-5 and connect the battery current transducer cable(s) to the Battery Distribution Module
connector(s). See Figure 3-14 for a view of the Battery Distribution Module.
4
Route the cable through overhead cable trays to the transducer. Connect the cable to the transducer.
Direction of Positive Current
Flow with Batteries Charging
Top View
1 / 25
Dimensions are
inches / mm.
Connector
4-pin
2.5 / 64
CD00039a
Side View
6 / 152
FIGURE 2-15 TYPICAL BATTERY CURRENT TRANSDUCER
TABLE 2-5 BATTERY CURRENT TRANSDUCER CONNECTIONS
Battery Current Transducer
1
2
3
4
Battery Distribution Module Board
X22 in Figure 3-12
X18 in Figure 3-12
X17 in Figure 3-12
X12 in Figure 3-12
2.11 SAGEON BATTERY MONITOR (OPTION)
The UNIPOWER Sageon Battery Monitor (SBM) is an add-on System for the Sageon III Control Unit (SCU). It
is used to monitor individual cells of a battery during float or equalization operation, or during a discharge. Each
SBM unit is capable of monitoring up to 24 cells or monoblocks. Up to four SBM units can be used to monitor up
to 4 battery strings of 24 cells or monoblocks each.
Using the ability of the SCU to communicate to a remote or local PC, cell voltage data accumulated during a
discharge can be transferred to a PC and saved. The cell voltages can also be viewed in real time when the SCU is
connected to a PC. The SageView software that is running on the PC can display the cell voltage data in various
convenient formats to ascertain the state of health of batteries.
In addition to the real time or historical representation of the data on SageView, the cell voltages can also be
observed in real time on the SCU display.
In the event that the battery behaves in a way that is less than ideal during a test or actual discharge, a number of
pre-programmed parameter levels are used to generate alarms. Alarms are annunciated on the SCU front panel by
a LED and screen message and remotely via voltage free contacts or via the USB communications port that can
connect directly to a PC locally or remotely via a modem or Ethernet.
PM990-8800-50, Issue 3
2-20
Sageon III Base System
Installation
Refer to the Sageon Battery Monitor Manual (PM990-4209–00) for detailed information.
2.12 SITE MONITOR SYSTEM (OPTION)
The Site Monitor System is used to monitor the status of equipment external to the Sageon III Base System. It has
12 digital inputs, 8 analog inputs, and 4 form-C user assignable alarm relay contacts. Digital inputs are often used
to monitor site security, such as door or window openings, or other on/off function, such as a pump switch or
motor starter. Analog inputs frequently used to monitor a fuel level or other variable such as a voltage, current, or
frequency.
Refer to the Sageon Site Monitor Application Note (AN103-4012–00) for detailed information.
2.13 COMMUNICATIONS
Communication choices include operator panel mounted USB (standard) and an Ethernet network (optional) with
or without SNMP support .The following devices can access the SCU and the data it has stored for System
configuration, System operation, and troubleshooting alarm events:
•
Connect a local PC running SageView (included) to the SCU by way of the operator panel mounted USB
connector and a user-supplied USB-A plug to USB-B plug cable.
•
Connect a remote (i.e. network connected) PC running SageView (included) to the SCU by way of the
company’s intranet or the Internet.
•
Connect a remote (i.e. network connected) PC running standard SNMP based monitoring software (customer
supplied) to the SCU by way of the company’s intranet or the Internet.
For additional information about SageView, refer to Chapter 5.
IMPORTANT: Always consult your company’s network administrator before connecting local or remote
equipment to the SCU or to the company network. Security must be a primary concern.
Consult your company’s network administrator about system communication and data compatibility,
communications cable specifications, cable routing, and methods of connecting to a network.
2.14 INSTALLING AND REMOVING RECTIFIERS
When ordered with a Sageon III Base System, each Rectifier is shipped in a separate package. A Rectifier is
shown in Figure 2-16.
FIGURE 2-16 RECTIFIERS
A Rectifier can be installed or removed “hot” (i.e. with AC power and DC load applied) with no interruption of
Sageon III Base System service. When removing a Rectifier, there must be sufficient remaining rectifier current
capacity to supply the load.
PM990-8800-50, Issue 3
2-21
IInstallation
Sageon III Baase System
WARNING
G
Elecctrical shock hazard
h
Hazardous
H
volltage can causse death or seerious injury.
y be present att the Rectifierr Switch Asseembly
240 VAC may
an
nd AC Backp
plane.
Always
A
use insulated tools.
IInstalling a Reectifier:
11. Remove a Rectifier fro
om its shippin
ng container. Save
S
the packkaging materiials.
22. Select a position in wh
hich to install the Rectifier.
33. The optional AC break
ker should be in the OFF po
osition.
44. To install a Rectifier:
t voltage an
nd current rattings of the reectifier. Use oonly 48V recttifiers in the ssystem.
1) Note the
2) Slide the Rectifier slowly into th
he Housing until
u
the Rectiifier’s rear connnectors just engage the H
Housing
conneectors. Fully seat
s the Rectiffier in the Ho
ousing to propperly engage tthe connectorrs.
55. Check to be
b sure that th
he locking meechanism hass engaged witth the rectifierr.
66. If step 3 was
w performed
d: Apply pow
wer to the new
wly installed rrectifier by turrning on the A
AC breaker.
77. Repeat thee preceding steps for each Rectifier to be
b installed.
T
To commissio
on the Rectifieer(s), go to Chapter 3 Com
mmissioning.
R
Removing a Rectifier:
R
11. Optional: Remove pow
wer from the Rectifier.
R
Set the breaker too the OFF poosition.
22. Lift the lo
ocking mechaanism.
33. Grasp the rectifier hand
dle and pull th
he Rectifier forward
f
1"[255 mm] to 2"[550 mm].
44. Grasp the Rectifier and
d pull it straig
ght out from th
he Housing. T
The Rectifier weighs approoximately 5 lbbs
(2.3kg).
55. Set the Reectifier aside and attach a tag
t stating its operating staatus (e.g. OK,, needs serviccing).
CAUTION
Elecctrical shock hazard
h
After
A
removing a rectifier, be
b careful nott to touch the rear
co
onnector. Th
he rectifier will take approx
ximately 1-2
minutes
m
to selff discharge. The
T red LED will flash durring
th
his time.
P
PM990-8800-5
50, Issue 3
2-22
SSageon III Basee System
IInstallation
22.15 CONFIG
GURATION
22.15.1 Generaal Description
n
S
Sageon III Baase systems arre turn-key DC uninterrupttible power suupply solutionns (DC UPS) for poweringg 48VDC
ttelecommuniccations and in
ndustrial equip
pment. The Power
P
plant pprovides integgrated battery managementt
ffunctions for a range of batttery types (V
VRLA, floodeed Lead-acid, NiCad, Ni-M
MH, Li-polym
mer) to enable easy
ccommissionin
ng of a DC UP
PS or it can be used as a sttandalone DC
C source whenn no batteries are used.
T
The Power plaant provides the
t following
g integrated feeatures:
•
•
•
•
•
•
Power Distribution
D
Battery Charge
C
Curreent Limiting (o
opt)
Battery Temperature
T
Sensing (opt))
Accuratee Temperaturee Compensateed Float
and Equaalization Volttages (opt)
Moduless for Monitoriing Site Statu
us and
Battery Cell
C Voltagess (opt)
AC Breaakers (opt)
P
PM990-8800-5
50, Issue 3
•
•
•
•
•
•
n+1 Reddundant Recttifiers
Short C
Circuit and Reeverse Polarityy Protection
Monitorring and Conttrol Module ((Controller)
Super C
Capacitor Baccked Real-tim
me System
Clock
Remotee Communicaation capabilitty, including
Web-baased Protocolss (opt)
All Recctifiers and thee Controller aare hot-swap
and plugg-and-play caapable
2-23
Installation
Sageon III Base System
FIGURE 2-17 SAGEON III BASE SYSTEM
FIGURE 2-18 CONNECTIONS ON CONTROLLER BACKPLANE
(1)
(2)
(3)
(4)
(5)
(6)
(7)
(8)
Remote communications module connection (14-way ribbon)*
Auxiliary peripheral module (relays, battery cell monitor, etc) connection (16-way ribbon)*
Battery (& load) distribution module connection (34-way ribbon)*
Ambient temperature sensor connection
Battery temperature sensor connection *
Rectifier isolated communications connection (10-way ribbon)*
Standalone system voltage connection (Controller power and voltage sensing)
Load circuit breaker trip detection circuitry connection*
PM990-8800-50, Issue 3
2-24
Sageon III Base System
Installation
Notes:
* Devices and cable connections are pre-wired as part of the supplied and tested Power plant
TEMP4 TEMP3 TEMP2 TEMP1
FIGURE 2-19 TEMPERATURE CONCENTRATOR BOARD
FIGURE 2-20 SAGEON III BOARD LOCATIONS
PM990-8800-50, Issue 3
2-25
Sageon III Base System
Commissioning
3.0 COMMISSIONING
This chapter describes commissioning a Power System. Individual system settings can vary widely so it is
important that those performing the commissioning fully understand the system at hand. Modify these procedures
as needed to accommodate the installed equipment and your company’s commissioning procedures.
3.1 PREPARATION
Perform the following steps prior to commissioning a Power system.
1. Gather system wiring diagrams, battery data sheets, and other site documentation for ready reference should it
be needed.
2. Complete all installation steps. Refer to Chapter 2 Installation, as necessary.
3. Review the steps in Section 3.2 Commissioning a System.
4. Become familiar with operator panel LEDs, front panel displays, push buttons, and menus by reading Chapter
4 Configuration and Operation.
5. Start up configuration parameter values:
•
Battery String Connected to Plant – The string will power the SCU prior to starting the first Rectifier,
assuming at least a minimal battery charge, and the SCU 2-line display and status LEDs will be active.
You may then use the operator panel to change many of these default parameter values to accommodate
the application. See Table 4-1 for a list of default parameters and values.
•
No Battery String Connected to Plant– When the first Rectifier starts and powers the SCU, the SCU will
load a default plant configuration. You may then use the operator panel to change many of these default
parameter values to accommodate the application. See Table 4-1 for a list of default parameters and
values.
Alternatively, edit the configuration parameter values, or load a new configuration, from a PC connected to
the USB port on the plant operator panel or from a PC connected to an Ethernet network (an IP address must
be entered). The PC must be running the optional SageView™ plant monitor software.
6. Become familiar with the Rectifier LED codes in Section 6.3 Troubleshooting.
7. The system may be commissioned with the battery string(s) connected or disconnected, however, consider the
configuration statements in paragraph 5 above.
8. Finally, perform the steps in Section 3.2 Commissioning a System.
3.2 COMMISSIONING A SYSTEM
This procedure assumes a newly installed system that includes connected batteries and loads.
1. Before applying AC power, check that:
•
All AC input cables are connected to the correct terminals and that connections are tight
•
All load (supply and return) and battery cables are correctly connected and that connections are tight;
check polarity as well
•
All alarm wiring is correct and tight, and that alarm annunciators function
•
The System housing and return bus are connected to the site earth ground
PM990-8800-50, Issue 3
3-1
Commissioning
Sageon III Base System
2. Read the operator panel display and note LED indications.
•
If a connected battery string is supplying sufficient power to the SCU, the operator panel 2-line display
will be active and show System voltage and current. The LEDs should also be active with an alarm
showing since all Rectifiers are Off. The factory-installed or uploaded configuration will specify the
number of Rectifiers. See Table 4-1 for default parameters and values.
•
If a battery string is not connected or the string cannot supply sufficient power, the SCU will not be
operating. There will be no operator panel display or lighted LEDs until a Rectifier is started later in this
Section.
3. Ensure that the circuit breakers in the user’s AC electrical service panel are Off..
4. Disconnect all loads from the system by turning Off all load breakers.
5. The Rectifier On/Off breaker of each Rectifier, is set to Off. See Figure 2-4.
6. Turn On power to Rectifier 1.
The top-most left Rectifier in the stack will perform a power-up self-test lighting the three LEDs on the
rectifier. After a brief period, the red and yellow LEDs will extinguish and green LED will remain lighted
(Float mode). Refer to the following note and to Section 6.3 Troubleshooting should the red or yellow LEDs
remain lighted.
Yellow LED Note: When starting the System for the first time, it may be necessary for the rectifiers to supply
significant current for initial battery charging. A lighted yellow LED on a rectifier may not be due to a
rectifier problem but rather indicate that the rectifier is operating in the over-current mode due to a discharged
battery string. If this is the case, continue with the procedure to bring additional Rectifiers on-line.
7. Read the rectifier current and voltage on the operator panel 2-line
display. The Red LED on the panel will be lighted unless the
number of operating Rectifiers equals the number of Rectifiers in
the System configuration, in which case the Green LED will be
lighted. Refer to Section 6.3 Troubleshooting as needed.
155A 54.2V
FL
8. Connect a 10 to 50A load to the System through a distribution breaker or fuse. Refer to Chapter 4
Configuration and Operation and use the operator panel push buttons and menus to:
1) Turn Off battery temperature compensation. (Note: If the float voltage is set at high or low battery
temperature with battery temperature compensation turned On, compensation may adjust the System
voltage by as much as 2 volts.)
2) Connect the load to the System by closing the distribution breaker.
9. Repeat Steps 7 through 10 until all Rectifiers are on-line and taking load. As Rectifiers are brought on-line,
the load may be increased.
10. At the operator panel, verify that each Rectifier is sharing current and the Sageon III Base System voltage is
set to the desired Float voltage, generally –54.2 Vdc ±½ volts.
11. Configure the Sageon III Base System as described in Chapter 4 Configuration and Operation. If the
configuration has been created on a PC and is to be uploaded to the operating Sageon III Base System, also
refer to Chapter 5 SageView.
12. Thoroughly test the new configuration to ensure that all configurable parameters are correct. Test the alarm
circuits to ensure correct activation.
13. As needed, operate the system for 15-20 hours to charge the battery string(s) before placing the system online.
PM990-8800-50, Issue 3
3-2
SSageon III Basee System
Commissioning
33.3 OVERVIIEW OF EXT
TERNAL WIR
RING CONN
NECTIONS
S
SD-SAGEON
N3.AXX draw
wings at the baack of this maanual show thhe internal andd interface scchematic for thhe
S
Sageon III Baase System wiith distributio
on. For the pu
urpose of indiicating how a system is connnected, the ssame
sschematic app
plies to other Power
P
plant products.
p
T
The system sh
hown is for a –48V system
m where the po
ositive side off the DC bus is tied to grouund, usually oon the
ccommon returrn bar. It is allso possible to
o float the ou
utput, but undeer these condditions, there iis no guaranteee that all
vvoltages on th
he DC bus willl stay below the Safety Ex
xtra-Low Volltage (SELV) limits with reespect to grouund
dduring fault co
onditions.
33.4 FACTOR
RY SUPPLIED
D CONFIGU
URATIONS
P
Power plant in
nternal AC diistribution, are configured with each recctifier AC linee being terminated in an inndividual
bblock terminaal. The ground
ding wire con
nnects to the block
b
terminall.
33.4.1 Single phase
p
– indiviidual protecteed external feeds
C
Connect each of the circuitt breaker protected phase wires
w
to the inndividual term
minal blocks, labeled L1, thhat feed
eeach rectifier. Connect thee neutral (or phase
p
2) wiress to the terminnal labeled L22 for each recctifier.
P
PM990-8800-5
50, Issue 3
3-3
Commissioning
Sageon III Base System
FIGURE 3-1 SINGLE PHASE FEED CUSTOMER WIRING (PHASE TO NEUTRAL)
PM990-8800-50, Issue 3
3-4
Sageon III Base System
Commissioning
FIGURE 3-2 SINGLE PHASE FEED CUSTOMER WIRING (PHASE TO PHASE)
PM990-8800-50, Issue 3
3-5
Commissioning
Sageon III Base System
FIGURE 3-3 SPLIT SINGLE PHASE FEED CUSTOMER WIRING (PHASE TO NEUTRAL)
PM990-8800-50, Issue 3
3-6
Sageon III Base System
Commissioning
FIGURE 3-4 Y-THREE PHASE FEED U-CONNECTED RECTIFIERS CUSTOMER WIRING (PHASE
TO PHASE)
PM990-8800-50, Issue 3
3-7
Commissioning
Sageon III Base System
FIGURE 3-5 Y-THREE PHASE FEED CUSTOMER WIRING (PHASE TO NEUTRAL)
PM990-8800-50, Issue 3
3-8
Sageon III Base System
Commissioning
FIGURE 3-6 U-THREE PHASE FEED CUSTOMER WIRING (PHASE TO PHASE)
PM990-8800-50, Issue 3
3-9
C
Commissioning
g
Sageon III Baase System
33.4.2 Surge protection
p
requ
uirements
T
The rectifiers are internally
y protected fo
or surges up to
o 6kV/3kA. F
For higher levvels of protecction, particularly for
ssites with high
h incidence of lightning orr switching su
urges, additionnal surge prottection is requuired on the A
AC feed
tto the Power plant.
p
Typicaally surge arreestors with a 10kA-40kA
1
rrating are requuired with thee highest leveel of
pprotection beiing provided when
w
arrestorrs are connectted between pphase-neutral (x3 phases) aand between
pphase/neutral--earth (x 3 ph
hases).
O
Other arrangeements (for 3--phase “Y”) with
w similar leevels of protecction are alsoo possible as sshown below.. The
vvoltage rating
g of the arresto
or should be selected
s
based
d on the maxiimum AC volltage likely too appear on thhe line.
T
The arrestor should limit th
he voltage to <1200V
<
– 14
400V at the raated maximum
m pulse currennt.
FIG
GURE 3-7 SURGE PRO
OTECTION
33.4.3 Battery connections
T
The cables aree brought out through the top
t of the unit.
T
This cable mu
ust be sized acccordingly to carry the batttery short circcuit current fo
for the time reequired to cleaar the
bbattery protecction devices.
N
Note: Ensuree the battery circuit
c
breakerrs are open beefore connectting the batterries. Connectt the switchedd cable
cconnections fiirst, followed by the comm
mon return cab
ble connectio ns.
33.5 TEMPER
RATURE SEN
NSORS
T
The optional sensors
s
for measuring
m
amb
bient and batteery temperatuure are the sam
me device (Paart No. 385-55941-03, 006, -15, -30). The system auto-detects
a
if
i the sensor is plugged intoo one of the ppositions (4) oor (5). If no ssensor is
installed, the Controller
C
wiill show “Not Available” in
n the menu iteems for the teemperature m
measurements.. Locate
tthe ambient seensor on a maass with a fairrly long therm
mal time consttant. (see Secction 2.9) Loccate the battery sensor
oon a battery block in the middle
m
modulee of the battery
y bank (likelyy hot zone).
P
PM990-8800-5
50, Issue 3
3-10
Sageon III Base System
Commissioning
3.6 AUXILIARY RELAY CONNECTIONS
FIGURE 3-8 MULTIPLE ALARM BOARD
The user configurable auxiliary relays contacts are shown above. (See section 1.4.2 for contact ratings)
The pin configuration is: (Pin 1 shown in Figure 3-11)
Relay #
Pin #
Pin function
1
N.O. (normally open)
1
2
N.C. (normally closed)
3
C (common)
4
N.O.
2
5
N.C.
6
C
7
N.O.
3
8
N.C.
9
C
10
N.O.
4
11
N.C.
12
C
13
N.O.
5
14
N.C.
15
C
The relays, being user configurable, can be
arranged to activate for multiple alarm conditions
or a single alarm only. The logic can be inverted
for individual relays so that one becomes a
controller failure indicator (use the normally
closed contact as this will also indicate if the relay
power has failed).
3.7 CONTROLLER POWER CONNECTIONS
Power for the Controller and its peripherals is derived from the DC bus or the highest charged battery. The
Battery distribution module has reverse polarity protection circuit that also serves to provide an
“or-ing” of the highest supply voltage for the Controller. No additional user connections are required to power
the Controller or provide system voltage regulation, if the battery distribution module is used.
3.8 FRONT PANEL USB COMMUNICATIONS CONNECTION
The front USB port on the Controller is configured as USB-slave and has a B-type connector. A standard USB Ato-B cable is required. The Controller can only communicate via the USB port to a PC running the Sageview
software.
PM990-8800-50, Issue 3
3-11
C
Commissioning
g
Sageon III Baase System
T
The USB conn
nection requires that a USB
B driver be in
nstalled on thee PC. The firsst time the Coontroller is pllugged
into the PC viia the USB po
ort, a Microso
oft® Windows dialogue boox will appearr asking the uuser to install the
C
Controller US
SB Interface drivers.
d
The Microsoft®
M
Windows
W
operaating system should be ablle to find the drivers
aautomatically on the Sagev
view CD-ROM
M, assuming it is in the CD
D-ROM drivee of the PC.
IIf Sageview iss running wheen the unit is plugged in, a Windows diaalogue box w
will appear askking the user if they
w
wish to conneect to the unit immediately. Otherwise th
he user will nneed to select the Controlleer from the avvailable
ccontroller USB
B devices in USB
U section in the Connecction Setup.
33.9 REMOTE
E COMMUN
NICATION CO
ONNECTION
N
T
The remote co
ommunication
ns module is:
P/N
385
5.4015.32
Desccription
Ethern
net TCP/IP Intterface Card w
w/SNMP
T
The following
g sections desscribe the inteerfaces in morre detail and ccover some off the set up reequirements ffor the
m
more advanceed interfaces.
T
Termination of
o the line witth resistors geenerally is nott required. Hoowever, if higgh rate of dataa corruption is
eexperienced (sslow data upd
date in monito
oring program
m), line terminnation resistoors should be installed at booth ends
oof the network
k. The value of
o the resistorrs depends on
n the gauge off the twisted ppair and shouuld be equal (oor closest)
tto line charactteristic imped
dance. I.e. for a twisted paiir of 24AWG wires characcteristic impeddance of 100oohm – use
a 100ohm resiistor.
33.9.1 TCP/IP and Sageview
w Interface
T
The interface is a 10/100BA
ASE-T Ethern
net adaptor. The
T TCP/IP pport sends Conntroller data oover a networrk to a PC
rrunning Sagev
view control and
a monitorin
ng software. The Sageview
w interface prrovides this fu
function for upp to 2
P
PCs on the neetwork simultaaneously as well
w as provid
ding SNMP trraps on alarmss, system time synchronizaation to a
gglobal clock if access to thee internet is available,
a
and a simplified system statuss Webpage (H
HTTP). If dirrect
cconnection to a PC network
k port is requ
uired, a cross-o
over networkk cable shouldd be used. Too set up Sagevview,
ffollow the instructions on the
t installation CD.
T
To enable netw
work access on
o the TCP/IP
P port, an IP address
a
must be assigned tto the port. Iff access over tthe
IInternet is con
nsidered, the gateway
g
addrress must be programmed
p
aas well. Theree are several m
methods to doo that,
ttwo are recom
mmended and are described
d in section 7..1. Other opeerating param
meters of the innterface are pprepprogrammed and
a should no
ot be changed
d. Factory deffault IP addresss is 192.168.10.60.
T
To be able to assign a netw
work address, the Ethernet address (referrred to also ass hardware adddress or MA
AC ID) of
tthe interface must
m be know
wn. On the Pow
wer plant top cover is a sm
mall label indiicating the MAC ID similaar to one
sshown below.
N
Note: The inteerface IP addrress cannot bee changed until the Power plant has beeen commissiooned and the C
Controller
is operational.
The MA
AC ID can haave
format 00-20-4A-24
4-BB-42
or 00:20:4A:24:BB:52.
P
PM990-8800-5
50, Issue 3
3-12
Sageon III Base System
Commissioning
3.10 BATTERY DISTRIBUTION MODULE
The battery distribution module is capable of handling up to four battery strings.
COM
NO. 4
AUX SW
NO. 3
AUX SW
NO. 2
AUX SW
NO. 1
AUX SW
AUX SW
Connect the current transducer signal cable to the appropriately labeled connector on the circuit board.
FIGURE 3-9 BATTERY DISTRIBUTION MODULE (BDM)
3.11 ADDING AUXILIARY EXPANSION MODULES
Modules such as the Sageon Battery Monitor and site monitor are daisy chained from the unused ribbon cable
connection provided on the Auxiliary programmable relay board. All of these expansion modules are required to
be mounted external to the Power plant, and a single 16-way ribbon cable connected to the available box-header.
For more detailed installation information for each of these modules, refer to the Sageon Battery Monitor
Operation Manual (PM990-4209-00) and the Sageon Site Monitor Application Note (AN103-4012-00).
PM990-8800-50, Issue 3
3-13
Sageon III Base System
Configuration and Operation
4.0 CONFIGURATION AND OPERATION
The Sageon III Base System is locally configured and operated from the operator panel. See the SageView
chapter for remote configuration and operation. The operator panel is mounted below the distribution doors.
The operator panel consists of a 2-line alphanumeric display, six push buttons with tactile feedback, three status
LEDs, and a USB communications connector. Menus, data, status/alarm messages, and parameter values appear
on the display. Display contents are selected using the six buttons. System status is also shown by the three LEDs
below the display. A USB-B port is provided on the left side of the operator panel for connecting a personal
computer (PC). Operator panel operation, displayed data, and communications are all controlled by the SCU
(Sageon III Control Unit). The operator panel is the Sageon III Base System’s HMI (human machine interface).
Complete Sageon III Base System configurations can be created at the operator panel. Alternatively, the System
can be configured from a personal computer (PC) running SageView System Monitor software. When the System
is initially powered, the configuration stored in the SCU provides the System operating parameters. This
configuration can be the default, factory-installed configuration or a configuration you created on a PC and
uploaded to the SCU. Table 4-1 lists the default values; note that some default values will vary with customer
specified equipment, such as the number of Rectifiers installed. Many values are user configurable and a column
is provided in the table for recording of user-selected values.
To configure the System from the operator panel, review the screen sequences described in the following sections
and enter the requested data. To download a configuration to a PC or to upload a configuration from a PC, refer to
Chapter 5 SageView. The SCU must be powered during any configuration efforts.
In this chapter, Sections 4.1 and 4.2 describe the “Home” screen and use of the operator panel push buttons.
Sections 4.3 and 4.4 address the status LEDs and alarm messages. Sections 4.5 through 4.9 explore the menu
options available for configuration and operation of the System.
TABLE 4-1 SUMMARY OF DEFAULT SYSTEM (SCU) PARAMETERS
Parameter
Description
48V System
Range
48V
System
Default
30-99°C
55°C
Base (Home) System Menu
Amb Tmp Alm Ambient temperature alarm level
Volts High
System output volts high threshold
48-65V
57.5V
Volts Low
System output volts low threshold
44-54V
48.0V
No. of RECs
Set number of Rectifiers in system
0-225
1
Num Batteries
Number of battery strings installed
1-4
1
FS Batt 1
Battery current transducer full scale
rating
10-30,000A
100A
FS Batt 2
Battery current transducer full scale
rating
10-30,000A
100A
FS Batt 3
Battery current transducer full scale
rating
10-30,000A
100A
FS Batt 4
Battery current transducer full scale
rating
10-30,000A
100A
SCU #
SCU access code (7 digits)
0-9999999
0000000
Date
Current system date
Battery Monitor menu (after enabling Battery Monitor)
Bat Config
PM990-8800-50, Issue 3
Various
Battery monoblock size x number (see
SBM section of manual for more detail) Configurations
4-1
2V x 24
User
Value
Configuration and Operation
Parameter
Sageon III Base System
Description
48V System
Range
48V
System
Default
SBM Batteries Number of battery banks to be
monitored
1-4
1
Vhi Cell
Cell high voltage alarm
2.0-16.0V
2.5V
Vlow Cell
Cell low voltage alarm
1.0-12.0V
1.8V
+dVc Cell
Cell positive deviation alarm
5-99%
10%
-dVc Cell
Cell negative deviation alarm
5-99%
10%
RECT V high
Rectifier high voltage alarm
48-65V
57.5V
RECT V low
Rectifier low voltage alarm
44-54V
48V
RECT Menu
RECT HVSD
Rec. high voltage shutdown
48-66V
57.5V
RECT limit
Rectifier current limit
4-60A
60A
B Dis Alarm
Battery discharge alarm threshold
44-52V
47.0V
Disch I Diff
Battery string discharge current
difference alarm
5-99A
20A
Batt T Alarm
Battery temperature alarm threshold
30 to 90°C
40°C
Bat Rated
Ampere-hour rating of batteries
20-9,999AH
BTC
Battery temperature coefficient
0-6 mV/°C
/cell
0 mV
Number Cells
Number of chemical cells in battery
string
4 - 24
24
B I Lim
Vb<Vdd
Battery charging current limit for
Vb<Vdd
5-999A
50A
Vdd Level
Battery deep discharge voltage threshold 40-47V
45V
B I Lim
Vb<VfI
Battery charging current limit between
Vdd & VfI
5-999A
50A
Sys Float
System float voltage (Vfl)
48-58V
54.2V
Sys Drop
System voltage drop
0.0-2.0V
0.5V
Equalization
Enable/disable Eq function
On/Off
On
FS Load I
Full Scale Load Current sensor value
50 – 3000
100
Load Sensor
Enable/disable Load Sensor
On/Off
Off
B I Lim
Vb>VfI
Battery charging current limit in
equalize Vb>VfI
5-999A
50A
Sys Equal
System equalize voltage (Veq)
50-61V
56V
V Start Eq
Enable/disable discharge voltage
initiation of Eq
On/Off
Off
V Eq trigger
Discharge voltage threshold for Eq
charging
44-50V
48V
Q Start Eq
Enable/disable battery charge depletion
trigger
On/Off
Off
Q disch Trig
Charge depletion threshold for Eq
charging
5-999AH
15AH
Eq End Current Equalization termination for I bat < Eq
End
1-2,000A
5A
Eq duration
3-48Hr
20Hr
BATT Menu
PM990-8800-50, Issue 3
Maximum duration of Equalization
charging
4-2
User
Value
Sageon III Base System
Configuration and Operation
Parameter
Description
48V System
Range
48V
System
Default
Eq period
Time between periodic Equalization
charging
0-52wk
12 Wk
Manual
Stop/Start Eq
Force stop/start of Equalization charging Toggle state
LVDS Trip
Battery voltage below which LVDS will 40-48V
open
42.6V
BDT Per
Period between consecutive discharge
tests
0-365 days
0 days
BDT Time
Time of day to begin BDT (hr:min)
00:00-23:59
02:00
BDT Dur
Maximum duration of BDT
5-1,440 min
180 min
BDT Curr
Discharge test current
0-5,000A
50A
BDT End V
Battery voltage limit to terminate BDT
36-48V
44V
BDT End Q
Battery capacity limit to terminate BDT 25-9,995AH
300AH
Temp Sen
Alarm
Enable/disable temp. sensor failure
alarm
On
On/Off
User
Value
4.1 THE “HOME” SCREEN
The Home screen, shown at right, is the default screen. It shows Sageon
155A 54.2
III Base System output current and voltage. This screen also shows the
FL
present mode: FLoat or EQualize. If an activity such as battery discharge
is being performed, the current and voltage are displayed continuously
while the second line alternates between the mode and the activity status, for example “BDT in progress.”
The Home screen is the first to appear when power is applied to the System. Since the Home screen is the default
screen, the display will revert to the Home screen from any other screen if an operator panel push button is not
pressed for approximately one minute. Section 4.5 describes in detail the selections available from the Home
screen.
4.2 USING THE OPERATOR PANEL PUSH BUTTONS
Use the six buttons to view System data, individual rectifier data, battery data, or the alarm log. In addition,
programmable parameter values can be viewed and changed. Each button is described below.
The HOME screen shows the System voltage and current. The data will initially be located in the center of the
display and after a brief period will scroll right to left. From the HOME screen, press “up arrow” or “down arrow”
to move through the series of menus described in Section 4.5.
RECT
BATT
LOG
INC
DEC
ENTER
FIGURE 4-1 OPERATOR PANEL
RECT (RECTifier) – Press to access a menu of rectifier related parameters as well as to view the output current
and heat sink temperature of each rectifier. See Section 4.6 for the screens displayed in the RECT menu.
PM990-8800-50, Issue 3
4-3
Configuration and Operation
Sageon III Base System
BATT (BATTery) – Press to access a menu of battery parameters. See Section 4.7 for the screens displayed in the
BATT menu.
LOG – Press to view a menu of the 99 most current alarms in chronological order. Section 4.8 shows the screens.
The alarm log number and alarm description are displayed first. Two seconds later, the alarm log number and the
date and time of the alarm occurrence are displayed. These two screen then alternate at a two second rate.
(Increment) – Press the “up-arrow” to scroll through a menu, selected using an SMR, BATT, or LOG
button, from the first menu screen to the last. When editing a flashing parameter, press to increase the
parameter value.
(Decrement) – Press the “down-arrow” scroll through a menu, selected using an SMR, BATT, or LOG
button, from the last menu screen to the first. When editing a flashing parameter, press to decrease the
parameter value.
(Enter) – With a editable parameter displayed, press Enter to cause the value to flash indicating that the
“up arrow” or “down arrow” button can be used to change that value. Press ENTER to store the edited
value.
When setting a parameter with multiple digits (e.g. access code, time, date), set the left-most digit as described
above. Then press ENTER to cause the second digit to flash. Press “up arrow” or “down arrow” to set the flashing
digit to the desired value. Repeat until each digit is set to the desired value.
When an alarm condition exists and you are prompted to press ENTER, the ENTER button will cause alarm
details to be displayed.
CAUTION
Setting correct parameter values is critical. Incorrect values can result in unsatisfactory
performance, unexpected shutdown, and other unanticipated performance characteristics.
Moving from one menu to another:
To move from any menu to any other menu, simply press the desired button.
To move to the Home menu from any other button, press the button for the current menu. For example, if battery
parameters are presently being displayed, press BATT to access the Home menu.
To change a parameter when the security function is activated:
A “Panel Locked” message will appear when an attempt is made to alter any parameter while security is activated.
The security On/Off selection is located in the HOME menu, Section 4.5.
To change a parameter, simultaneously press and hold the “up arrow”, “down arrow” and ENTER buttons for 3
seconds. Parameters may now be changed as described above.
4.3 READING THE OPERATOR PANEL SYSTEM STATUS LEDS
The table below describes the indications presented by the system status LEDs.
PM990-8800-50, Issue 3
4-4
Sageon III Base System
Configuration and Operation
TABLE 4-2 READING OPERATOR PANEL SYSTEM STATUS LEDS
Symbol
LED Color
3
Green
State
On
System OK
Off
A failure or alarm condition exists
Flashing
!
x
Amber
Red
Meaning
Alarm - Alarm condition exists in the system or a Rectifier
On
Plant is in Equalize Mode
Off
No alarm condition exists in the Sageon III Base System
On
Rectifier Shutdown - One or more Rectifiers has shut down
Off
All Rectifiers are operating
If all three LEDs are Off:
•
There may be no System output or battery string DC to power the SCU
•
The SCU may have failed
•
There may be no AC power to the System
•
On initial startup; all 3 LEDs may be off for approximately 10 seconds while the system boots up.
4.4 READING ALARM MESSAGES
If an alarm exists, an alarm message will alternate with the Home screen
(the status LEDs will also indicate the presence of an alarm). The alarm
message will display for two seconds every six seconds. A sample alarm
message is shown below.
3 Alarms
Press ENTER
This message states that three alarms exist and they can be viewed by
Alarm 1
pressing the ENTER button. When the button is pressed, the name and
Amb Temp High
description of the most recent alarm are displayed, as shown below. Press
either the “up arrow” or “down arrow” button to view remaining alarms.
Pressing ENTER, or not pressing any button for ten seconds, will display the Home screen.
To read the time and date of any alarm, press the LOG button and use the “up arrow” or “down arrow” button to
scroll to the desired alarm(s).
A list of all operator panel annunciated messages is found in Table 4-3.
PM990-8800-50, Issue 3
4-5
Configuration and Operation
Sageon III Base System
TABLE 4-3 OPERATOR PANEL ANNUNCIATED ALARM MESSAGES
Alarm Name
SMR Alarm
SMR Urgent
SMR HVSD
UNIT OFF
No Response
Power Limit
No Load
Current Limit
Voltage High
Voltage Low
UNCAL SMR
EEPROM Fail
Fan Fail
Relay Fail
No Demand
H/S Temp High
Temp Sensor Fail
Vref Fail
AC Volt Fault
AC Freq Fault
Battery switch
Cct Breaker
LVDS Open
Sys Volts High
Sys Voltage Low
Cell V High
Cell V Low
Cell %dev High
Cell %dev Low
Range SMR
Site Monitor
Battery Disch
Disch Tst Fail
SMR Comms Fail
Amb Temp High
Batt Temp High
Batt Temp Sens
Batt I-Limit
Bat Sym Alarm
Equalize
Comment
Combination of one or more SMR alarms
One or more SMRs have shut down
SMR shut down due to output over-voltage
SMR is off
A particular SMR is not responding to the SCU
SMR is in Power Limit
SMR output current less than minimum for SMR type
SMR in current limit
Voltage measure by SMR too high
Voltage measure by SMR too low
SMR internal adjustment for current sharing out of limits
EEPROM failed (SCU or SMR)
SMR internal fan failure alarm
SMR output relay contacts failure
Control loop in SMR not in normal state
SMR heatsink temperature too high
Temperature sensor in SMR microprocessor circuit failed
Voltage reference in SMR microprocessor faulty
None of the SMRs are responding (AC failure assumed), or if AC monitor
is used, AC voltage is out of limits
AC frequency lower or higher than preset value
One or more battery switches open
Fuse or circuit breaker in load distribution open
Low Voltage Disconnect switch open
System output voltage too high
System output voltage too low
One or more cells being monitored by SBM are too high
One or more cells being monitored by SBM are too low
One or more cells being monitored by SBM are too high % deviation from
the mean battery cell voltage
One or more cells being monitored by SBM are too low % deviation from
the mean battery cell voltage
SMR parameter range error. SCU could not overwrite values
Alarm preset from the site monitor System. See site monitor menu for
details of alarm channel
Batteries are discharging
Battery discharge test failed to reach a programmed end point
One or more SMRs are not responding
Ambient temperature higher than preset limit
Battery temperature higher than preset limit
Battery temperature sensor not connector or failure
Battery charging current is being limited to preset value
Battery discharge currents from battery strings not sharing load equally
System is in equalize mode
Table Notes: FL = LED Flashing; On = LED On Steady
PM990-8800-50, Issue 3
4-6
LED ON/FL
Amber (FL)
Amber+Red
Amber+Red
Amber+Red
Amber (FL)
Amber (FL)
Amber (FL)
Amber (FL)
Amber (FL)
Amber (FL)
Amber (FL)
Amber (FL)
Amber (FL)
Amber (FL)
Amber (FL)
Amber (FL)
Amber+Red
Amber+Red
Amber+Red
Amber (FL)
Amber (FL)
Amber (FL)
Amber (FL)
Amber (FL)
Amber (FL)
Amber (FL)
Amber (FL)
Amber (FL)
Amber (FL)
Amber (FL)
Amber (FL)
Amber (FL)
Amber (FL)
Amber (FL)
Amber (FL)
Amber (FL)
Amber (FL)
Amber (FL)
Amber (FL)
Amber (On)
Sageon III Base System
Configuration and Operation
4.5 HOME MENU SCREENS
With the Home screen displayed, pressing the “up arrow” or “down arrow” button will move through a series of
screens showing ambient temperature, a series of editable parameters (e.g. float voltage high and low, security,
number of batteries), and enabling and disabling of auxiliary parameters (e.g. battery cell voltage monitoring).
The following map summarizes the available menu screens.
Home Screen
System current, voltage and mode
Ambient temperature
3-Phase AC Monitor option
Programmabl
Ambient temperature alarm
Voltage, high alarm
Voltage, low alarm
Failsafe Alarms: on/off
Bat Cur Sensor: on/off
Security: on/off
Password setup
Test indicators
When viewing another
screen, the Home
screen will reappear
in ~60 seconds if no
button is pressed.
Number of Rectifiers (SMRs)
Number of battery strings connected
Full scale battery current
Load sensor on/off
FS Load Current
Access code (7 digit number)
Date format
Date/time set
Alarm report: on/off
Daily report: on/off
Daily report time
Modem on/off
Phone numbers 1, 2, and 3
Audio alarm: on/timeout/off
Cct input: no/nc/disable*
Battery switch: no/nc/disable*
LVDS: no/nc/disable*
Auxiliary units, press ENTER
1-ph AC monitor: on/off
3-ph AC monitor: on/off
Sageon III Battery Monitor: on/off
Battery configuration
Number of batt strings monitored
Cell voltage high/low/differential
Site monitor, press ENTER
Outputs 1-4, on/off status
*no = normally open; nc = normally closed
Note: The screen examples in this and subsequent sections will vary with System voltage, loads, environment,
battery quantity, type, and condition, included System options, and other factors.
PM990-8800-50, Issue 3
4-7
Configuration and Operation
Sageon III Base System
Note: Screens for options will not be viewable unless the option is installed and/or enabled.
Access the screen series shown here by pressing the “up arrow” button. Press the “down arrow” button to access
the screens in reverse order.
155A 54.2V
FL
Home screen
“C” indicates that the battery temperature compensation is active
Ambient temperature is displayed in degrees Centigrade
155A 54.2V
FLC
Ambient Temp
31°C
Ambient Temp Alarm
45°C
Ambient temperature alarm level
3-Ph AC1 Volts
216V
3-Phase AC monitor voltage, current, and frequency
Use “up arrow” or “down arrow” to scroll through the three AC inputs
for each parameter. AC monitor option must be installed to view these
screens.
Programmable parameters:
This series of screens contain programmable parameters. To change a
parameter value:
1. Scroll to the desired screen using the “up arrow” or “down arrow” button.
2. Press the ENTER button; the selected value will flash.
3. Use the “up arrow” or “down arrow” button to edit that value. Press ENTER to store the new value or to
move to the next number to be set in a series of numbers.
Volts High Alarm
Float voltage high level: Set to the desired high alarm value.
57.5V
Float voltage low level: Set to the desired low alarm value.
Volts Low Alarm
48.0V
Failsafe Alarms: When Failsafe alarms are on, all alarm relays will be
normally energized when no alarm condition is present. Relays will
de-energize when an alarm occurs.
Failsafe Alarms
On
Battery current sensor: When Battery current sensor is turned on, the
controller will read battery current from the installed battery current
transducers.
Bat Cur Sensor
On
Security on/off toggle: When security is On, no parameter values may
be edited. Without first entering the password; this menu will not
appear if a password has not been set.
Security
On
PM990-8800-50, Issue 3
4-8
Sageon III Base System
Configuration and Operation
Password Setup: The Sageon systems are shipped without a password set
by default. Enter a password to prevent unauthorized changes to system
parameters.
Password Setup
Press ENTER
Controller features password security for setting of parameter. A valid
password is an alphanumerical code having minimum three and
maximum eight characters.
Wrong Password
Panel Locked
Units leave the factory without a pre-programmed password and the security function is not active. To activate the
security, a password must be programmed. Once that is done, security can be enabled.
When the security function is active any changes to the system settings can be done only after a valid password
was entered. When the ENTER key is pressed to change a parameter, the display will show a message “Enter
Password” on the top line and a blinking cursor on the right hand side of the bottom line. Using INC and DEC
keys scroll to the first character of the password and press ENTER. The character will be substituted by an
asterisk (*) displayed to the left of the cursor. Enter all characters of the password the same way. If the password
is less than eight characters long press ENTER again after last character. If the entered password was correct the
display will return to the selected parameter ready for modification. If the entry was incorrect following will be
displayed.
There is no limit on password entry re-tries. To abort password entry any of the top row buttons should be
pressed. The display will return to the selected parameter. Once unlocked, the security is disabled until there is no
keypad activity for >1 minute.
Display test: All LEDs on the rectifiers and operator panel will flash
when ENTER is pressed, and the screen will alternate between the
SCU software version and an all pixels on screen (not shown).
Test Indicators
Press ENTER
Number of SMRs (Rectifiers) in system: This number must be entered
to prevent the operator panel from indicating that some SMRs are not
responding.
Number of SMRs
15
Number of battery strings: Set to the number of connected battery
strings.
Num of Batteries
2
Battery current transducer full-scale rating: Set to the full-scale rating
of the battery current transducer.
FS Batt Current
200A
Load sensor: On = SCU displayed System current is derived from the
voltage across System shunt.
Load Sensor
ON
Off = SCU displayed System current is the sum of the Rectifier
currents.
FS Load
2500A
Full Scale Load Current: Set to the full scale rating of the installed
plant system shunt.
SCU Access Code (i.e. System ID): Type a unique 7 digit number for
each Sageon III Base System in your network. Be sure to record your
access code(s) and store in a secure location.
PM990-8800-50, Issue 3
4-9
Access Code
1252636
Configuration and Operation
Sageon III Base System
Date format: Set the date format: DD/MM/YYYY, MM/DD/YYYY,
or YYYY/MM/DD.
Date Format
MM/DD/YYYY
Clock set: Set the date and time. Note that this is a 24-hour clock.
Date 12/31/2012
Time 21:58:34
Alarm report on/off toggle: When on, the system will dial the Phone 1
number, see the Phone 1 screen below. If there is no answer, Phones 2
and 3 will be dialed in turn. The cycle will continue until a connection
is made. See Note following Phone 3 below.
Alarm Report
On
Daily report on/off toggle: When on, the system will log in to the
telephone numbers below at the time set in the following screen and
download the status and all operating parameters. See Note following
Phone 3 below.
Daily Report
On
Time of daily report: Note that is a 24-hour clock.
Daily Report
15:15
Modem enable on/off toggle: The Phone number screens will appear
only when the modem is toggled on.
Modem
On
Phone 1: Set the first number to be dialed when an alarm occurs. Up to
20 digits can be stored. Numbers longer than 10 digits are shown on
two screens.
Phone 1
0398887788
Second screen example.
Phone 1 Cont
2323
Phone 2: This number will be dialed when the above number does not
answer.
Phone 3: This number will be dialed should the previous number not
answer.
Phone 2
0398880033
Phone 3
0398880003
Note: To send Alarm Report or Daily Report to a local PC, set the Report to On and Modem to Off.
Audio alarm on/off toggle: Set to On to audibly annunciate an alarm.
Press ENTER to silence (acknowledge) the alarm.
Audio Alarm
On
Circuit breaker auxiliary contact input: Configure options are
normally closed, normally open, or disabled (not used).
Cct Input
Used – N/C
PM990-8800-50, Issue 3
4-10
SSageon III Basee System
Connfiguration andd Operation
B
Battery circuit breaker auxiliary contactt circuit input: Configuratioon
ooptions are no
ormally closed
d, normally open
o
or disabled (not used)).
Bat Sw IInput
Used – N/O
B
Battery low voltage discon
nnect switch auxiliary
a
contaact circuit inpput:
C
Configuration
n options are normally
n
clossed, normally open or disabbled
((not used).
LVDS IInput
Used – N/O
P
Press ENTER
R to access thee Sageon Batttery Monitor, and the Sageeon
S
Site Monitor. Press “up arrrow” to go to the top of thee menu string .
Auxiliaryy Units
Press EN
NTER
N
Note: Screenss for installed options (e.g. Sageon Batteery Monitor, Site
M
Monitor) appeear next. If no
o options are installed,
i
the HOME screeen will
aappear.
44.5.1 Sageon Battery Mon
nitor
N
Note: See Secction 4.9 Sageeon Battery Monitor
M
Setup for additionaal
information.
W
When battery cell voltage monitoring
m
is included in software,
s
the
w
window at rig
ght will appeaar next.
B
Battery monittor on/off togg
gle: Press EN
NTER to displlay the currennt
O
On/Off status (flashing). Prress “up arrow
w” or “down arrow” to sett the
ddesired state, then press EN
NTER to storee.
Battery M
Monitor
Press EN
NTER
Battery M
Monitor
Onn
T
The following
g screens will not appear iff Off has been
n entered.
B
Battery config
guration: Set the
t number of cells in a baattery string aand
tthe number off battery strings connected to the monito
or. See Sectioon
44.9 Sageon IIII Battery Mon
nitor Setup fo
or details.
Bat Coonfig
24 ceells
A
After pressing
g ENTER, “cu
urrent configu
uration” will flash. Scroll tthrough
tthe available configuration
c
ns and press ENTER
E
again once the corrrect
bbattery type iss chosen.
B
Battery strings: Set the num
mber of conneected battery strings. The
m
maximum is four.
f
SBM Batteries
2
N
Note: This nu
umber must eq
qual to or be less
l that the Num
N
of Batterries entered inn the Home, P
Programmablle
P
Parameters seeries of screen
ns.
H
High voltage alarm thresho
old: Set the ceell voltage abo
ove which ann
aalarm will be generated.
L
Low voltage alarm
a
thresho
old: Set the ceell voltage bellow which an
aalarm will be generated.
P
PM990-8800-5
50, Issue 3
4-11
Cell Vhii Alm
2.48V
Cell Vloo Alm
1.44V
C
Configuration and
a Operation
Sageon III B
Base System
D
Delta positivee voltage thresshold: Set thee percentage of
o nominal ceell
vvoltage by wh
hich any indiv
vidual cell volltage can exceeed the nominnal.
A
Above this vaalue, an alarm
m will be generrated.
Cell +dV
Vc Al
10%
%
D
Delta negativee voltage threeshold: Set thee percentage of nominal ceell
vvoltage by wh
hich any indiv
vidual cell volltage can be less
l than the
nnominal. Belo
ow this value,, an alarm willl be generated.
Cell -dV
Vc Al
10%
%
44.5.2 Site Mo
onitor
W
When the Sitee Monitor is in
ncluded in thee software, th
he window at right
w
will appear neext.
S
Site monitor on/off
o
toggle: Press ENTER
R to display the
t current Onn/Off
sstatus (flashin
ng). Press “up arrow” or “d
down arrow” to
t set the desiired
sstate, then preess ENTER to
o store.
Site Moonitor
Press EN
NTER
Site Moonitor
Onn
C
Contact the faactory for add
ditional detailss concerning this feature.
44.6 RECT (R
RECTIFIER) MENU
M
SCRE
EENS
E
Enter this seriies of menus by
b pressing th
he REC (SMR
R) button. Preess “up arrow
w” or “down aarrow” to select the
R
Rectifier num
mber (i.e. rectiffier position address)
a
and press
p
ENTER
R. Press “up aarrow” to scrooll through thee screens
in the order sh
hown. Repeatt for each Recctifier. The following map summarizes tthe available menu screenss.
RECT Bu
utton
Select Recctifier number* (1-24); reaad
number, current,
c
and teemperature
Press ENT
TER for firmw
ware version
Float voltaage
Equalizatiion voltage
Programm
mable
Voltaage, high/low
w alarm
Voltaage, high volttage shutdownn
Curreent limit
Faultt, reset SMR
* The Rectifieer number is the
t “rectifier position
p
addrress” of the tar
arget
R
Rectifier (e.g. SMR “4”).
S
SMR no respo
onse: A No Response
R
messsage appears when the targget
R
Rectifier is no
ot installed, no
ot connected, not switched
d On, or is
ffaulty.
SMR1
No Responnse
S
SMR initial diisplay: When
n a Rectifier iss online and operating
o
nnormally, its output
o
currentt and heatsink
k temperaturee are shown.
SMR1
92A 299°C
S
SMR version and temperatture: Press entter display Reectifier’s
ssoftware versiion.
SMR1
G1045aa
S
SMR output current:
c
Press the “up arrow
w” button to display
d
the
ooutput currentt from other Rectifiers.
R
SMR2
91A
P
PM990-8800-5
50, Issue 3
4-12
Sageon III Base System
Configuration and Operation
Float voltage: This parameter is globally (and indirectly) set in the
Batt menu. It cannot be changed in this screen.
Equalization voltage: This parameter is globally (and indirectly) set
in the Batt menu. It cannot be changed in this screen.
SMR Float
54.2V
SMR Equalize
57.0V
Programmable Parameters:
The following screens allow access to the SMR programmable
parameters. Note that the parameter values apply to ALL installed SMRs.
To change a parameter value:
1. Scroll to the desired screen using the “up arrow” or “down arrow” button.
2. Press the ENTER button; the selected value will flash.
3. Use the “up arrow” or “down arrow” button to edit that value. Press ENTER to store the new value.
SMR high voltage alarm threshold:
SMR V high Alarm
57.0V
SMR low voltage alarm threshold:
SMR V low Alarm
48.0V
SMR high voltage (DC) shutdown:
SMR HVSD
58.0V
SMR current limit:
SMR I Limit
50A
Fault reset: Press ENTER to reset latched alarms, such as HVSD. The
Rectifier will restart unless damaged or faulty.
Note: Pressing “up arrow” button will display the HOME screen.
PM990-8800-50, Issue 3
4-13
Reset SMR Fault
Press ENTER
Configuration and Operation
Sageon III Base System
4.7 BATT MENU SCREENS
Enter this series of menus by pressing the BATT button. Press the “up arrow” button to scroll through the screens
in the order presented. Repeat the series for each battery string. The following map summarizes the available
menu screens.
BATT Button
Battery string (1-4) current*
Battery string temperature
Estimated charge (1-4)
Programmable
Battery discharge alarm voltage
Battery temperature alarm
Battery Ah rating
BTC on/off
BTC Temperature coefficient
BTC Temperature compensation nominal
Number of cells per string
Battery charge current limit: <Vdd
Battery deep discharge voltage: Vdd
Battery charge current limit: from Vb<Vfl
System float voltage
System voltage drop
Equalization on/off
Charge current limit: >Vfl
Equalization voltage
Equalization trigger voltage
Equalization no trigger voltage
Equalization trigger charge: Ah
Equalization trigger discharge rate: Ah
Equalization no trigger discharge rate: Ah
Equalization end charge current
Equalization end charge: Ah
Equalization end duration: hours
Equalization auto-initialize: weeks
Equalization end: manual
Equalization start: manual
LVDS trip voltage
LVDS mode: auto/closed/open
Temperature sensor alarm on/off
Discharge current and battery voltage
BDT period: 0-365 days
BDT start time: hours, minutes
BDT duration: hours, minutes
BDT current: 0-5000A
BDT end voltage
BDT end charge: Ah
BDT alarm reset
BDT end, manual
Last BDT results: pass, fail, abort, etc.
Last BDT time/date; duration
Last BDT battery string voltage and charge
* Press ENTER to
read individual cell
voltages if SBM
option is installed
and enabled.
Complete descriptions for testing vented lead
acid and VRLA batteries are beyond the
scope of this manual but are discussed in
detail in IEEE STD-450-2002 (or its latest
revision) and IEEE 1188-1996, respectively,
battery specific manuals, and other
professional society standards.
It is important to recognize that standby
batteries/cells are designed for emergency
standby operation and excessive testing or
cycling of a battery can materially shorten
the life of a battery.
PM990-8800-50, Issue 3
4-14
SSageon III Basee System
Connfiguration andd Operation
IMPO
ORTANT: Th
he number off the target baattery string (ee.g.
Batterry 1) must be entered!
B
Battery 1 currrent:
Press ENT
TER to display
y cell voltages for selected
d string if
Battery Mo
onitor option is installed an
nd enabled. Press
P
“up arrow
w” or
“down arro
ow” to scroll through
t
cells.
B
Battery 2 currrent: If additio
onal battery strings are con
nnected, set thhe
nnumber of thaat string; a maaximum of fou
ur battery striings may be
cconnected.
B
Battery tempeerature: This screen
s
shows the highest battery
b
ttemperature when
w
temperatture sensors are
a installed on
o the battery
sstring.
Battery 1
12A
Battery 2
11A
Battery Teemp
31°C
If sensors are
a not installled, Sensor Not
N Attached will
w be display
ayed.
Estimated Q Bat 1
300Ahh
E
Estimated battery charge:
B
Battery dischaarge alarm thrreshold: Set to
o the voltage to which the
bbattery string falls during discharge.
d
Wh
hen battery vo
oltage reachess
tthis value, an alarm will bee generated.
B
Battery dischaarge current differential
d
thrreshold: The allowable
bbattery string discharge currrent difference is entered at this screenn.
A reasonable value is 20% of the total discharge
d
currrent. An alarm
m is
ggenerated wheen the differential exceeds the value enttered.
Battery Dischh Alarm
47.0V
V
Disch I D
Diff
20A
When two or more batteery strings aree connected, the
t value in thhis
screen is reead by the SC
CU when an AC
A outage occcurs and the bbattery
strings are supplying the load currentt. A differencce in dischargge
current is an
a indication of the state of the battery strings.
s
B
Battery over temperature
t
alarm thresholld: Set the maaximum
aallowable batttery temperatu
ure.
A
Ampere-hour battery rating
g: Set the batttery string’s A/H
A rating.
Batt Temp A
Alarm
50°C
Battery Raating
500Ahh
44.7.1 Battery Temperaturee Compensatio
on
Batt Temp C
Comp
Off
B
Battery tempeerature compeensation on/offf toggle:
B
Battery tempeerature compeensation (BTC
C): Enter the temperature
t
ccompensation
n coefficient in
n mV per deg
gree C per celll in this screeen.
T
The allowablee range is 0.1 to 6 mV/Celll/°C. If the vaalue is less thaan
00.1, the displaay will show Off.
O See “BTC
C Notes” belo
ow.
P
PM990-8800-5
50, Issue 3
4-15
BTC Coeff
C/°C
3.2 mV/C
C
Configuration and
a Operation
Sageon III B
Base System
F
For Liberty 10
000 batteries, enter 3.6 mV
V/C/°C (2 mV
V/C/°F). Norm
mal
ooperating tem
mperature is 25
5°C (77°F).
B
BTC nominal temperature: When batterry temperaturee compensatioon
is active, typee the temperatture at which system voltag
ge is NOT
ccorrected. Thiis temperaturee must be betw
ween 18°C an
nd 27°C. Notte
tthat compensaation range is 10-35°C. Seee the Notes below.
B
Battery cells per
p string: Sett the number of physical ceells in a stringg.
BTC Nom
minal
20°C
Number off Cells
12
BTC Notees:
1) If the battery temperature sensor is not conneected, compennsation is
based
d on the ambieent temperatu
ure sensor.
2) If batttery and ambiient temperatu
ure sensors arre connected,,
compensation is baased solely on
n the battery sensor.
s
n temperature compensatio
on is active, th
he SMR voltaage setting
3) When
is auto
omatically ad
djusted by thee SCU as need
ded.
B
Battery chargiing current lim
mit: Set the maximum
m
batttery charge
ccurrent when the voltage accross the two battery string
gs is less thann
tthe deep disch
harge voltage (Vdd).
BILim Vb<
<Vdd
34A
Vdd Levvel
21.0V
V
B
Battery deep discharge
d
voltage (Vdd):
B
Battery chargiing current lim
mit: Set the cu
urrent when the
t battery
vvoltage is betw
ween Vdd and
d the float voltage (Vfl). This
T current iss
ttypically high
her than that for
fo the deeply discharge battery.
S
System float voltage:
v
Set th
he system outtput voltage at
a the output bbus
bbar terminals.
S
System voltag
ge drop: Set th
he maximum voltage drop as defined byy:
m
maximum recctifier output – system floatt voltage. A ty
ypical value iis
00.6V.
44.7.2 Equalizzation
BILim Vbb<Vfl
52A
System F
Float
54.2V
V
System V D
Drop
0.6V
Equalizattion
On
E
Equalization on/off
o
toggle:
IIf equalization
n in off, the fo
ollowing screeens will not appear.
a
B
Battery chargiing current lim
mit: Set the maximum
m
equ
ualization
ccharging curreent (Vbattery > Vfloat). Th
his applies wh
hen batteries are
bbeing equalizeed.
E
Equalization voltage:
v
Set th
he maximum voltage reach
hed during
eequalization of
o the batteries.
P
PM990-8800-5
50, Issue 3
4-16
BILim Vbb>Vfl
25A
System Equualize
57.5V
V
Sageon III Base System
Configuration and Operation
Equalization on/off toggle:
On – voltage trigger
Off – ampere/hour trigger
Volts Start Eq
On
Equalization trigger, voltage: Set the voltage at which equalization
will be initialized, during battery discharge.
Volts Eq Trig
48.0V
Equalization on/off trigger:
On – voltage trigger
Off – ampere/hour discharge trigger
Volts Start Eq
Off
Equalization A/h on/off toggle:
On – ampere/hour discharge trigger
Off – voltage trigger
Q Start Eq
On
Equalization trigger, A/h: Equalization is initialized when the charge
supplied to the load exceeds the value set in this screen.
Equalization A/h on/off toggle:
On – ampere/hour discharge trigger
Off – voltage trigger
Qdis Trig
10Ah
Q Start Eq
Off
Equalization termination: Equalization can be terminated based on
charging current or charging time.
If equalization is to end at a specific charging current, set that
current in this screen.
EQ End Current
25A
If equalization is to end after a specific time, reduce the value in this
screen to less than 5% of the A/H rating of the battery string. The ampere
value entered will be replaced by Off.
Equalization termination time: Set the period of equalization. If
equalization is to be based only on the A/h discharge method, set
the period to maximum: 48 hours.
Force equalization: If equalization does not occur due to battery
discharge, set the period after which equalization should be forced.
Equalization manual termination: To manually terminate
equalization, at this screen press ENTER. The system must be in
equalization mode for this screen to appear.
When ENTER is pressed, the system reverts to Float mode and
the screen changes to that shown at right, ready for manual
equalization manual start. The system must be in Float mode for
this screen to appear.
PM990-8800-50, Issue 3
4-17
EQ Duration
20 hours
EQ Period
12 Weeks
Manual Stop EQ
Press ENTER
Manual Start EQ
Press ENTER
C
Configuration and
a Operation
Sageon III B
Base System
44.7.3 Low Vo
oltage Battery
y Disconnect (LVBD)-(LV
VLD Screens))
L
LVBD switch
h trip voltage: Set to establiish the voltag
ge at which thhe
bbatteries will be
b disconnectted from the load
l
to preven
nt excessivelyy
ddischarging th
he battery string (LVLD).
LVLD Trrip
45.0V
L
LVBD Off/On
n: Set to Off or
o On depend
ding on wheth
her or not youur
ssystem has LV
VBD.
Loow Voltage L
Load Dis.
On
NOTE: LV
VDS screens have
h
no functtioned controll over the
contactor; use LVLD sccreens.
T
Temperature sensor
s
alarm toggle: Set to
o On when sen
nsors are
cconnector. Sett to Off if sen
nsors are not connected.
c
Temp. Sen. A
Alarm
On
N
Note: Battery discharge tesst screens are shown next; go to Sectionn 4.7.1.
IIf the test screeen shows Off
ff, the Last BD
DT screen app
pears next; seee
S
Section 4.7.2.
44.7.4 Battery Discharge Teest (BDT) Scrreens
T
The battery diischarge test performs
p
a peeriodic, contro
olled dischargge of the connnected batteryy string(s). Thhe test
cconfirms batteery string cap
pacity and usees the customeer loads to disscharge the battery string(ss) so no batteery strings
nneed to be dissconnected an
nd individually
y loaded, as would
w
be the case in a typiical manual discharge test.
T
To access testt parameters, press the BAT
TT button and then press ““down arrow”” to access thhe following sscreens.
W
While the testt is in progresss:
•
The displaay will alternate between the
t Home screeen and the
BDT in Progress screen
n shown at rig
ght.
•
The system
m alarms Batttery Discharg
ge, Voltage Low
L and SMR
R
Voltage Low.
L
•
Low Load
d alarm will be
b suppressed
d.
•
SMR alarrms will be sh
hown in the SM
MR status.
T
Test time interval: The inteerval between
n tests can be set to 0-365
ddays.
t zero, the au
utomatic execcution of the test
t is disable d (set
When set to
to Off). Diisplay messag
ges below will be shown on
nly if the test is
enabled.
T
Time of test: Set
S the time of
o day the testt is to be perfo
formed. This iis a
224-hour clock
k.
T
Test duration:: Set the durattion of the tesst. Duration can be set from
m5
m
minutes to 24 hours in incrrements of 5 minutes.
m
D
Discharge ratee: Set the ratee of dischargee. Rate can bee set from 0 too
55000A. If ratee is set to zero
o, the control function is diisabled and thhe
bbattery will diischarge undeer full load cu
urrent.
P
PM990-8800-5
50, Issue 3
4-18
50A 54.11V
BDT in Proggress
BDT Perriod
14 Dayys
BDT Tiime
17:355
BDT Durration
1h30m
min
BDT Cuurrent
50A
A
SSageon III Basee System
Connfiguration andd Operation
Note: The total load sup
pplied by the system during the test musst
exceed thee desired batteery discharge current by att least 10%.
Rectifiers will
w supply th
he additional load, leaving the battery sttring to
supply a usser defined cu
urrent to the load.
l
E
End of test: Seet the battery voltage that will
w terminatee the test if
rreached before the test duraation set abov
ve.
her ended by test duration or end voltagge,
At the end of test, wheth
harging of thee battery
normal opeeration is resttored and rech
string(s) iss begun. The test
t result willl be “Fail.” Battery
B
string end
of voltage depends upon
n system volttage: 48V sysstem 36V to
48V
BDT Endd V
47.0V
BDT Endd Q
500Ahh
B
Battery end off capacity: Seet the remainin
ng battery cap
pacity at whicch the
ttest must end. Capacity can
n be set from 25Ah to 9995
5Ah. If rate iss set to
zzero, the contrrol function iss disabled and
d the battery will
w dischargee under
ffull load curreent.
R
Reset of failed
d test alarm: This
T messagee appears wheen the precediing test
ffails and is no
ot reset. Press ENTER to reeset the alarm
m and hide thee
m
message.
A
Abort MBT: This
T screen iss available wh
hen a discharg
ge test has beeen
sstarted.
BDT Alaarm Reset
Press E
ENTER
BDT inn Progress
ENTER
R to abort
44.7.5 BDT Reesults Screen
T
The final screen contains a brief test result message. The message
aappears on thee second line of the Last BDT
B
display. Each
E
messagee is
eexplained belo
ow.
Lastt BDT
N
N/A
N
N/A – Not Av
vailable: No teest has been performed.
p
P
Passed – Test ran for progrrammed durattion without reaching
r
an “E
End V” or “E
End Q” value.
F
Failed – Test terminated prrematurely aft
fter reaching an
a “End V” orr “End Q” vaalue before thee test durationn expired.
T
This will trigg
ger a “BDT Fail” alarm.
A
AC Lost – Test terminated due to loss of
o AC supply. Detected by the AC moniitor or by all S
SMRs being O
Off.
C
Cell V Low – A cell in a baattery string discharged
d
beelow a safe levvel. Alarm isssued. Availabble only whenn BDM is
aactive. BDT flagged
f
as hav
ving failed.
N
No Control – Test aborted due to loss off control of reectifiers. No aalarm issued.
L
Low Load – Test
T aborted due
d to load cu
urrent being to
oo low to conntrol dischargee current. No alarm issuedd.
S
SMR Overloaad – Test aborrted due to loaad current beiing too high tto support conntroller discharge. No alarm
m issued.
U
User Aborted – Test termin
nated manuallly by user fro
om the SCU.
P
PM990-8800-5
50, Issue 3
4-19
C
Configuration and
a Operation
Sageon III B
Base System
44.7.6 BDT Reesults Screen, Additional Details
D
T
To view addittional details about the preceding test, press
p
ENTER while viewinng one of the above Last B
BDT
sscreens. Thesee sub-menu details
d
appear on the second
d line of the L
Last BDT scrreen.
009/12/2012 – States the datte of precedin
ng test in a daay/month/yearr format.
D
Dur 1h18min – Provides th
he duration off preceding teest.
E
EndV 47.0V – Shows the battery string
g voltage when test was terrminated.
E
EndQn 380A
Ah – States thee remaining estimated capaacity of the baattery string aat the time thee test was term
minated,
w
where “n” is the
t number off the string.
44.7.7 BDT Disabled
T
The battery diischarge test function
f
is dissabled for 2 minutes
m
if anyy of the follow
wing has occuurred. If an auutomatic
ttest is schedulled during thiis period, it will
w be perform
med at the nexxt opportunityy, at the BDT Time.
•
SCU has recently
r
been
n powered up.
•
An AC su
upply failure has
h been reco
orded.
44.8 ALARM LOG SCREE
ENS
A
An alarm log resides in SC
CU memory an
nd these alarm
ms can be vieewed by mom
mentarily presssing the Alarm
ms Log
bbutton. The fo
ollowing map summarizes the available menu screenns.
LOG Butto
on
d
Alarm number and description
Alarm date and timee
Clear alarm
a
log
IInitial Alarm Log
L screen: Log
L 1 is the most
m recent alaarm. Previouss
aalarms are num
mber in sequeence, 2 throug
gh “n.” The second line
pprovides the alarm
a
name.
Log 1
AC Freqq Fault
P
Press and hold
d the “up arro
ow” button for 2 seconds to
o display the
ppreceding alarrm (Log 2). Press
P
again to display the preceding
p
alarrm,
L
Log 3.
Log ““n”
Alarm N
Name
M
Momentarily (less than 2 seconds) presss the “up arrow” button to
ddisplay a screen showing th
he date and time alarm occcurred. The daate
fformat is day//month/year; the
t time form
mat is 24 hours.
Log 1
16/03/20155 13:55
C
Clear Alarm Log:
L
From an
ny alarm log screen, press ENTER
E
and tthen
ppress “down arrow”
a
to cleaar all log entriies. A deletion confirmatioon
sscreen will bee displayed.
“Down arrow
w” to Clear
Log Enntries
T
The alarm log
g can only be cleared from the front pan
nel. There aree no
m
means to clearr the alarm lo
og entries rem
motely.
LOG
G
No Alaarms
P
PM990-8800-5
50, Issue 3
4-20
SSageon III Basee System
Connfiguration andd Operation
44.9 SAGEON
N BATTERY MONITOR SETUP
S
W
With the SBM
M option enab
bled, SBM parrameters musst be set beforre monitoringg can be perfoormed. From tthe
H
HOME screen
n, scroll throu
ugh the operattor display screens shown in Section 4.55.2 to the Auxxiliary, “Bat C
Config”
aand “SBM Baatteries” screeens and there declare the nu
umber of batttery cells per battery stringg (2-24) and thhe
nnumber of batttery strings (1-4) whose ceell voltages are to be moniitored by the SCU.
R
Refer to the Sa
ageon Batteryy Monitor Ma
anual (PM990
0-4209–00) fo
for detailed inf
nformation.
T
The quantity of
o SBM board
ds needed forr the above seelection is calcculated by thee SCU based on battery typpe and
cconfiguration.. The relation
nship between
n battery confi
figuration andd quantity of S
SBM boards iis shown in thhe table
bbelow.
BLE 4-4 SBM
M BOARDS NEEDED FOR VARIOU
US BATTER
RY CONFIG
GURATIONS
S
TAB
48V Battery
B
SBM Batt = 1
SB
BM Batt = 2
SBM B
Batt = 3
SBM Batt = 4
24, 2V
V Cells
12, 4V
V Cells
8, 6V Cells
4, 12V
V Cells
1 SBM Boaard
1 SBM Boaard
1 SBM Boaard
1 SBM Boaard
2 SBM
S
Boards
1 SBM Board
1 SBM Board
1 SBM Board
3 SBM
M Boards
2 SBM
M Boards
2 SBM
M Boards
1 SBM
M Board
4 SBM Boaards
2 SBM Boaards
2 SBM Boaards
1 SBM Boaard
44.9.1 Frequen
ncy of Measu
urement
T
The frequency
y of cell voltaage polling is programmable from 10 m
minutes to 8 hoours in 1-minuute steps. A ttypical
ppolling intervaal is 4 minutees, which yields 15 points for
f a 1-hour ddischarge. Forr a programm
med test dischaarge of
330 minutes, a polling interv
val of 2 minutes might be used.
u
This paarameter is noot accessible ffrom the operator
ppanel. A PC ru
unning SageV
View is needeed.
44.9.2 Battery Cell Measureements
W
When SBM iss active, indiv
vidual cell volltages can be monitored onn the operatorr panel by sellecting a batteery from
the BATT meenu and pressiing ENTER. The
T cell inforrmation will aappear on the screen and thhe next and previous
ccells can be seelected by preessing the “up
p arrow” and “down arrow
w” buttons.
S
Select battery: Battery 1 sccreen appears after pressing
g the BATT
bbutton. Press ENTER.
E
B
Battery cell paarameter: Batttery 1, Cell 01
0 values are displayed.
d
Ass
sshown here, th
he cell voltag
ge is 2.225V, which
w
is a dev
viation of +122%
ffrom the averaage cell voltaage in this batttery string.
B
Battery cell vo
oltage deviatiion: Battery 1,
1 Cellmm, cell voltage n.nnnnV
is deviating +//-pp% from th
he average ceell voltage in this
t battery sttring.
P
Press “up arro
ow” or “down
n arrow” to ch
hange the celll number.
Batteery 1
12A
A
Battery 1 Cell01
2.225V
V +12%
Battery 1 Cellmm
V ±pp%
n.nnnV
44.10 COMMIISSIONING THE CONTR
ROLLER
W
With all the batteries, load and AC cabliing wired, and checked forr correct polaarity, the systeem is commisssioned
bby the followiing steps:
• Ensurre no rectifierrs are installed
d in the Poweer plant and noo load is appllied.
• Plug in
i the Controlller – it shoulld power up off
o the batteryy. If not, it is possible that the battery poolarity is
reverssed.
• Set up
p the Controlller menu item
ms for:
P
PM990-8800-5
50, Issue 3
4-21
Configuration and Operation
o
o
o
o
o
o
o
o
o
Sageon III Base System
number of batteries and size (Ah),
number of rectifiers,
set the required float and equalize voltages,
set LVLD option to ON and set the LVLD Aux to 42.0V
set the Battery Switch to “Normally Open”
set the Cct Switch to “Normally Open”
set the Battery Transducer FS as size according to ordered transducers.
set the amount of battery temperature compensation voltage adjustment if used and after
confirming that the battery temperature is being measured
set the battery charging current limit to 10% of the Ah rating (i.e. if 150Ah battery is used, set the
limit to 15A) – this value can be adjusted later to meet your specific charging requirements.
Always refer to the manufacturers recommendations for charging batteries.
In many cases, these values are set up in the factory and will only require modification if the particular battery
being used requires a different set up. Refer back to section 3 to continue commissioning procedures.
4.11 OPERATION
System operation is controlled by the Controller system controller. As a result, operation information for the
system is directly related to the operation of the Controller as described in this section.
4.12 SUMMARY OF CONTROLLER FRONT PANEL CONTROLS
There are four Menus which can be viewed using the INC or DEC buttons:
a) The default or "Home" menu which contains general system information;
b) RECTIFIER menu - contains all the parameters relating to the switch-mode rectifiers (RECTIFIER);
c) Battery menu - contains all the parameters relating to the batteries;
d) Alarms log - which is a chronological record of the last 100 alarms.
Moving from one menu to another
If no button has been pressed for two minutes, the display will revert back to the Home screen. This shows the
output voltage and load current.
To move from any menu to any other menu, press the corresponding button. e.g. to move to the Battery Menu
from any other menu, momentarily press the BATT button.
To move to the Home menu from any other menu, press the button of the current menu. e.g. if in the RECTIFIER
menu, press RECTIFIER button to return to the Home menu.
Scrolling through the Menus:
To scroll through any menu from the first screen to the last, press the INC button;
To scroll to the last (bottom) screen first, then upwards through the menu to the first screen, press the DEC button.
Incrementing and decrementing programmable parameters
To change a programmable parameter press ENTER; the value will flash on and off. To increase the number,
press INC; to decrease the number press DEC. When the desired number is on the screen, press ENTER again.
To change parameters when the security function is activated
If an attempt is made to alter any parameter when the security function is activated, the display will show the
message "Enter Password".
To change a parameter, enter a valid password. Then proceed to change the parameter in the normal way.
When scrolling through the Alarms log
To observe the date and time of a given alarm, do not press any button for at least two seconds. The date and time
will display for two seconds and then the alarm name will be displayed for two seconds. The display will alternate
between the two screens in this manner until a button is pressed.
PM990-8800-50, Issue 3
4-22
SSageon III Basee System
Connfiguration andd Operation
44.13 NAVIGATING CON
NTROLLER FUNCTIONS
F
S
44.13.1 Base Menu
M
(System
m Level Functtions)
Home screen
s
- FL indicates float mode and FLC indicates float
f
mode with battery tem
mperature compensation
25.2A 54.3V
FL
Indicates tha
at the front panel is locked.. Press and hold ( ↑ ), ( ↓ ) and ENTER to unlock
Lock Panel
Press ENTER
(↑)
Ambient tem
mperature displayed in Deggrees Centigrade
DEC
Ambient Temp
28°C
INC
(↓)
"Not Availablle" shown if not sensor is cconnected
(If 1-ph AC Monittor not = Off)
1ph AC Volts
245V
Single phase
e AC voltage
Single phase
e AC current
1ph AC Current
52A
Single phase
e AC frequency
1p
ph AC Frequency
60Hz
(If 3-ph AC Monittor not = Off)
3ph AC1 Volts
245V
Phase AC vo
oltage
3ph AC2 Volts
243V
3ph AC3 Volts
246V
Phase AC cu
urrent
3ph
3 AC1 Current
28A
3ph
3 AC2 Current
29A
3ph
3 AC3 Current
32A
AC frequenc
cy
3p
ph AC Frequency
60.2Hz
ENTER
Volts
V
High Alarm
57.0V
Bus voltage above
e which alarm flagged
Modify Va
alue up/down
ENTER
R to accept
ENTER
Volts
V
Low Alarm
49.0V
Bus voltage below
w which alarm flagged
Modify Va
alue up/down
ENTER
R to accept
ENTER
Security
Off
Programmable va
alue change requires passw
word when security on
Modify Va
alue up/down
ENTER
R to accept
ENTER
Password
P
Setup
Press ENTER
Password program
mming submenu
Modify Va
alue up/down
ENTER
R to accept
Press ENTER to b
begin flashing display and LEDs
Test Indicators
Press ENTER
ENTER
System Info
Press ENTER
System informatio
on including controller softw
ware version, S/N and cab
binet S/N
INC/DEC to
oggles system
info
ENTER
System
UPS
Options for "Stand
dby" or "UPS" type system
m
Modify Va
alue up/down
ENTER
R to accept
ENTER
Number
N
of SMRs
1
Sets number of S
SMRs in the system
Modify Va
alue up/down
ENTER
R to accept
ENTER
Interface
MUIB
Modify Va
alue up/down
ENTER
R to accept
ENTER
Num
N
of Batteries
1
Modify Va
alue up/down
ENTER
R to accept
ENTER
FS
F Batt Current
20A
Modify Va
alue up/down
ENTER
R to accept
Selects the interfa
ace hardware to the system
m
Sets the number o
of batteries in the system
Sets full scale batt
ttery current
ENTER
Load Sensor
Off
(If Load Sensor not
n = Off)
FS
F Load Current
100A
P
PM990-8800-5
50, Issue 3
INC/DEC toggles state
ENTER
R to accept
ENTER
Modify Va
alue up/down
ENTER
R to accept
4-23
Sets full scale loa d current
Configuration and Operation
Sageon III Base System
(Base Menu continued)
Sets MiniCSU-3 access code address
ENTER
Access Code
0000000
Modify Value up/down
ENTER to accept
ENTER
Date Format
DD/MM/YYYY
Modify Value up/down
ENTER to accept
ENTER
Date 25/12/2012
Time 01:11:11
ENTER selects hours,
minutes, day, month or year
INC/DEC modifies value
ENTER
Alarm Report
Off
INC/DEC toggles state
ENTER to accept
ENTER
Daily Report
Off
(If Daily Rep not = Off)
INC/DEC toggles state
ENTER to accept
ENTER
Daily Rep Time
15:15
INC/DEC toggles state
ENTER to accept
ENTER
Modem
Off
(If Modem not = Off)
INC/DEC toggles state
ENTER to accept
ENTER
Country Code
61
Modify Value up/down
ENTER to accept
External modem initialisation string
ENTER
Cust Init String
None
Modify Value up/down
ENTER to accept
ENTER
Phone 1
0398887788
Modify Value up/down
ENTER to accept
ENTER
Phone 1 Cont
2323
Modify Value up/down
ENTER to accept
ENTER
Phone 2
0398887788
Modify Value up/down
ENTER to accept
ENTER
Phone 2 Cont
2323
Modify Value up/down
ENTER to accept
ENTER
Phone 3
0398887788
Modify Value up/down
ENTER to accept
ENTER
Phone 3 Cont
2323
Modify Value up/down
ENTER to accept
ENTER
Audio Alarm
Off
INC/DEC toggles state
ENTER to accept
Circuit breaker auxiliary contact circuit input configuration
ENTER
Cct Input
Not Used
INC/DEC toggles state
ENTER to accept
Battery circuit breaker auxiliary contact circuit input configuration
ENTER
Batt Switch Input
Not Used
INC/DEC toggles state
ENTER to accept
ENTER
LVDS Input
Not Used
ENTER
Auxiliary Units
Press ENTER
Battery low voltage disconnect switch auxiliary circuit input
configuration
INC/DEC toggles state
ENTER to accept
ENTER
1-ph AC Monitor
Off
INC/DEC toggles state
ENTER to accept
(If 1-ph AC Monitor not = Off)
ENTER
1ph AC Vhi Alarm
260V
Modify Value up/down
ENTER to accept
ENTER
1ph AC Vlo Alarm
200V
Modify Value up/down
ENTER to accept
ENTER
1ph AC fhi Alarm
63.0Hz
Modify Value up/down
ENTER to accept
ENTER
1ph AC flo Alarm
57.0Hz
Modify Value up/down
ENTER to accept
ENTER
1ph AC FS Curr.
100A
PM990-8800-50, Issue 3
4-24
Modify Value up/down
ENTER to accept
Sageon III Base System
Configuration and Operation
(Base Menu continued)
ENTER
3-ph AC Monitor
Off
INC/DEC toggles state
ENTER to accept
(If 3-ph AC Monitor not = Off)
ENTER
3ph AC Vhi Alarm
260V
Modify Value up/down
ENTER to accept
ENTER
3ph AC Vlo Alarm
200V
Modify Value up/down
ENTER to accept
ENTER
3ph AC fhi Alarm
63.0Hz
Modify Value up/down
ENTER to accept
ENTER
3ph AC flo Alarm
52.0Hz
Modify Value up/down
ENTER to accept
ENTER
3ph AC FS Curr.
100A
Modify Value up/down
ENTER to accept
ENTER
Battery Monitor
Off
INC/DEC toggles state
ENTER to accept
(If Battery Monitor not = Off)
ENTER
Selects battery cell type
ENTER
Modify Value up/down
ENTER to accept
Number of battery banks
Battery Config
24 cells
BCM Batteries
1
Modify Value up/down
ENTER to accept
ENTER
Cell Vhi Alarm
2.50V
Modify Value up/down
ENTER to accept
ENTER
Cell Vlo Alarm
1.80V
ENTER
Modify Value up/down
ENTER to accept
Differential cell threshold
ENTER
Modify Value up/down
ENTER to accept
Differential cell threshold
Cell +dVc Alarm
10%
Cell -dVc Alarm
10%
Modify Value up/down
ENTER to accept
ENTER
Site Monitor
Off
INC/DEC toggles state
ENTER to accept
(If Site Monitor not = Off)
ENTER
Status of output relay 1
ENTER
Modify Value up/down
ENTER to accept
Status of output relay 2
ENTER
Modify Value up/down
ENTER to accept
Status of output relay 3
ENTER
Modify Value up/down
ENTER to accept
Status of output relay 4
Output 1
Off
Output 2
Off
Output 3
Off
Output 4
Off
PM990-8800-50, Issue 3
4-25
Modify Value up/down
ENTER to accept
C
Configuration and
a Operation
Sageon III B
Base System
44.13.2 Rectifi
fier Menu (Reectifier Speciffic Functions))
Home Screen
25.2A 54.3V
5
FL
⇒
SMR Button
n
SMR softtware version
ENTER
SM
MR1
S/W 137901
SMR1
13.2A 58
8°C
(↑)
SMR Electronic Serial #
DEC
C
S/N
S
010205
50500012
ENTER
INC
C
(↓)
SM
MR2
:
SMR2
2
:
Additiona
al screens if more
SMRs are
e declared
S/N
S
:
Float Voltage - SMR Default
SMR Flo
oat
54.5V
V
*Cannot be adjusted
a
here
SMR Equa
alise
56.5V
V
*Cannot be adjusted
a
here
ault
Equalise Voltage - SMR Defa
arm flagged
SMR volttage above which ala
ENTER
SMR V high Alarm
57.0V
V
Modify Value up/down
ENTER to acccept
SMR volttage below which ala
arm flagged
ENTER
SMR V low Alarm
48.0V
V
Modify Value up/down
ENTER to acccept
SMR high
h voltage shutdown
ENTER
Modify Value up/down
ENTER to acccept
SMR HV
VSD
58.5V
V
SMR currrent limit
ENTER
SMR I Limit
30A
Modify Value up/down
ENTER to acccept
Resets an
ny latched SMR alarrm
R Fault
Reset SMR
Press ENT
TER
T
The RECTIFIIER Float and
d Equalize volltages are the default valuees set in the reectifier that w
will be used iff the
C
Controller faills to operate. They are a copy
c
of the raw
w values set iin the BATTE
ERY menu w
without batteryy
ttemperature compensation and system drop
d
adjustmeents.
44.13.3 Alarm
m Log
Home Sc
creen
25.2A 54.3V
FL
⇒
LOG Button
Most recentt logged Alarm/Eventt
ENTER
10/10/2
2005
17:32
2:56
LOG 1
AC Fail
Additional screens if more eventts logged
ENTER
(↑)
:
:
:
:
ENTER
DEC
C
LOG 100
0
Battery Sw Open
O
INC
(↓)
P
PM990-8800-5
50, Issue 3
3/1/20
005
02:05
5:14
DEC
DEC to Cle
ear
LOG Entrie
es
LOG
G
No En
ntries
4-26
100th most recent logged event
nts are erased
Older even
SSageon III Basee System
Connfiguration andd Operation
44.13.4 Battery
y Menu (Batttery Specific Functions)
F
Home Scre
een
25.2A 54.3V
FL
⇒
B
BATT
Button
B
Battery
string 1 curren
nt
Battery 1
g
12A Discharging
A
Additional
screens if more
m
batteries declare
ed
(↑)
:
:
DEC
Battery 4
g
10A Discharging
INC
(↓)
S
Shows
"Not Available" if no sensor connectted or "Sensor Fail" is faulty
Battery Temp
35°C
E
Estimated
remaining charge
c
1
Estimated Q Bat1
300Ah
A
Additional
screens if more
m
batteries declare
ed
:
:
4
Estimated Q Bat4
300Ah
Bus voltage below wh
hich alarm flagged
ENTER
m
Batt Disch Alarm
47.0V
Modify Value up/do
own
ENTER to accep
pt
Alarm threshold for po
oor battery
current sharing, show
ws if >1 battery
ENTER
Modify Value up/do
own
ENTER to accep
pt
Disch I Diff
20A
Battery temperature above
a
which alarm
flagged. Not active without
w
sensor.
ENTER
m
Batt Temp Alarm
50°C
Modify Value up/do
own
ENTER to accep
pt
Battery capacity (C10
0) in Ah
ENTER
Modify Value up/do
own
ENTER to accep
pt
Battery Rating
500Ah
Battery Temperature compensation.
0mV/C/°C
Variable from 0 to 6.0
ENTER
BTC Coeff.
3.2 mV/C/°C
Modify Value up/do
own
ENTER to accep
pt
O
(If BTC not = Off)
BTC Nominal
20°C
ENTER
Mid point temp for BT
TC curve (Comp.=0)
Modify Value up/do
own
ENTER to accep
pt
ENTER
own
Modify Value up/do
ENTER to accep
pt
Number of Cells
24
ENTER
(↑)
Modify Value up/do
own
ENTER to accep
pt
BILim Vb<Vdd
32A
DEC
ENTER
Modify Value up/do
own
ENTER to accep
pt
Vdd Level
43.5V
INC
(↓)
ENTER
Modify Value up/do
own
ENTER to accep
pt
BILim Vb<Vfl
40A
ENTER
Modify Value up/do
own
ENTER to accep
pt
System Float
54.0V
ENTER
System V Drop
0.8V
P
PM990-8800-5
50, Issue 3
Modify Value up/do
own
ENTER to accep
pt
4-27
Physical number of 2V cells in string - used
d for BTC
Charge current limit fo
or recovery of
deep discharged batte
eries
Battery voltage below
w which the battery
is considered to be de
eep discharged
Charge current limit fo
or battery voltage
between deep discharge & float
System Float voltage without BTC.
r
to this value
Sense point voltage regulated
Estimated max. resisttive drop between the
SMRs and the system
m voltage sense point.
Configuration and Operation
Sageon III Base System
(Battery Menu continued)
Enable/disable Equalization
charging
ENTER
Equalization
On
ENTER toggles state
Off / On
Charge current limit for battery voltage
ENTER
BILim Vb>Vfl
20A
between float & equalize
Modify Value up/down
ENTER to accept
System Equalize voltage without BTC.
ENTER
System Equalize
56.5V
Modify Value up/down
ENTER to accept
Sense point voltage regulated to this value
ENTER toggles state
Off / On
triggering of equalization charging
Enable/disable bus voltage discharge
ENTER
Volts Start Eq
On
ENTER
Volts Eq Trigger
46.0V
Modify Value up/down
ENTER to accept
Enable/disable battery capacity loss
ENTER
Q Start Eq
On
triggering of equalization charging
ENTER toggles state
Off / On
ENTER
Q Loss Trigger
25Ah
ENTER
EQ End Current
15A
Modify Value up/down
ENTER to accept
Modify Value up/down
ENTER to accept
ENTER toggles state
Start / Stop
Battery voltage below which the LVDS
ENTER
LVDS Trip
43.0V
Modify Value up/down
ENTER to accept
Modify Value up/down
ENTER to accept
[Auto, Open, or Closed]
ENTER toggles state
Off / On
alarm - set to off if no sensor used.
Enable/disable battery overtemperature
ENTER
Temp Sen Alarm
On
Periodic battery discharge test trigger
ENTER
BDT Period
14 Days
Modify Value up/down
ENTER to accept
Set to zero to disable
Modify Value up/down
ENTER to accept
discharge testing
Time of day to begin automatic
ENTER
BDT Time
21:35
Maximum duration of a discharge test
ENTER
BDT Duration
1h30min
opens when in Auto mode.
LVDS (where used) operation mode.
ENTER
LVDS Mode
Auto
Modify Value up/down
ENTER to accept
Discharge test current (controlled)
ENTER
BDT Current
50A
Modify Value up/down
ENTER to accept
Load must be > the value programmed
Modify Value up/down
ENTER to accept
terminates.
Battery voltage below which the BDT
ENTER
BDT End V
46.5V
Battery loss of capacity below which
ENTER
BDT End Q
150Ah
Set to zero to disable
Manual control of equalization
ENTER
Manual Start Eq
Press ENTER
INC
(↓ )
equalization charging terminates
Periodic equalization charging trigger
ENTER
DEC
Modify Value up/down
ENTER to accept
Battery charging current below which
Modify Value up/down
ENTER to accept
EQ Period
12 Weeks
(↑ )
Threshold below which Eq is triggered
Maximum duration of equalization
ENTER
EQ Duration
3 hours
Threshold below which Eq is triggered
Modify Value up/down
ENTER to accept
the BDT terminates.
Result of the Last discharge test
Last BDT
Passed
More detailed explanations of all the menu items are available in the Controller Operation PDF on the Manual
CD.
PM990-8800-50, Issue 3
4-28
SSageon III Basee System
Sageview
55.0 SAGEV
VIEW
S
SageView™ System
S
Moniitor software enables
e
configuring and m
monitoring of a Sageon III B
Base System from a
local or remotte personal co
omputer (PC). Figure 5-1 shows
s
the varrious access ooptions.
L
Local monitorring involves a PC connectted to the USB connector oon a System’s operator pannel.
Remote
PC with
SageView
Local PC
with
w
Sag
geView
Ethe
ernet
Nettwork
PC with
Sag
geView
Internet
CD00026a
R
Remote monittoring also co
onnects a Sageeon III Base System
S
to a P
PC, however, they can be sseparated by a few feet
oor by hundred
ds of miles. Your
Y
company
y’s Ethernet network or intrranet, the Inteernet, or a paiir of telephonne
m
modems can provide
p
the in
nterconnection
n. Refer to TG
G990.4262.100 for more dettails on SageView.
Remote
PC with
Modem
View
and SageV
Server with
Firewall
M
Modem
Intranet, Local Network; E
Ethernet
RS-232C
Power Plantt with Battery Strin
ng(s)
Operator Panel,
P
SageView Control
C
Unit (SCU), and
B
Interface Board
Measured
Variables
Local Outtputs to:
User's A
Alarm System
Data Lo
ogging
Status
To User
Loads
Distribution
Con
ntrol
Sign
nals
DC
D Bus
Rectifier 1
Rectifier 2
...
Rectifier n
Battery String(s))
Power Plant with
h Battery String(s))
FIGURE 5-1 NET
TWORK CO
ONNECTION
NS
55.1 CONFIGU
URATION
U
Use SageView
w to develop a completely new configurration and theen upload thiss configuratioon to a conneccted
S
Sageon III Baase System. Iff an operating
g configuration requires miinor parameteer value changges, downloadd the
cconfiguration from the Sysstem to the PC
C, edit as need
ded, and thenn uploaded to the same Sysstem or to anoother
cconnected Sysstem.
55.1.1 SageVieew benefits:
•
Saves tim
me since config
guration deveelopment and Sageon III B
Base System innstallation caan proceed
simultaneeously
•
Reduces configuration
c
errors since the
t configuraation can be deeveloped andd checked for accuracy at a PC
before beiing uploaded to the System
m
•
Includes on-line
o
securiity with accesss code and paassword proteection
•
Provides a permanent configuration
c
n record for co
omparison wiith operating ccost data and service recorrds
P
PM990-8800-5
50, Issue 3
5-1
Sageview
Sageon III Base System
5.2 MONITORING
SageView screens provide for efficient, effective monitoring of System operation. System output voltage and
current, alarms, battery status, and many other performance parameters are read on a single PC display.
SageView includes comprehensive Help. It provides the latest information about program installation and
operation, communication options, and other topics.
5.3 SECURITY
Security is a major consideration when deciding upon a communications strategy that involves sending
proprietary data over your company’s intranet, the Internet, or telephone lines. Before enabling local or remote
communications, carefully review your company’s electronic security policies. Contact your company’s network
administrator for details about network structure and security. The administrator can also furnish an IP (Internet
Protocol) address when Ethernet access is needed.
5.4 CABLE AND NETWORK CONNECTIONS
Figure 5-1 shows typical connections for local and remote access to Sageon III Base System data. Additional
information is provided in the SageView Help topic titled Connection Setup.
Local connection details are provided below. Guidelines for remote connections are also provided. Remote
connection specifics are beyond the scope of this manual since actual connections and required hardware are
determined by the systems operating within your System. Consult your company’s network administrator.
5.5 LOCAL CONNECTION, STANDARD
For a local connection, cable the serial port on the Sageon III Base System’s operator panel to the USB port on a
Windows-based PC. A customer supplied USB-A to USB-B cable is required.
5.6 REMOTE CONNECTION, ETHERNET, OPTION
When the Ethernet option is ordered, the Sageon III Base System includes an RJ-45 connector for the Ethernet
network cable. As shown in Figure 5-1, a remotely located Windows-based PC can be connected to your System’s
Ethernet network. With the addition of the necessary hardware (e.g. server with firewall), a remote PC can
connect to your System’s network over the Internet.
5.7 PC REQUIREMENTS
•
Microsoft® Windows® 98, ME, NT4, 2000, or XP
•
Pentium III or better microprocessor
•
128 KB or more RAM
•
10 MB unused hard disk space for program and database files
•
CD-ROM drive
•
USB port, with USB-A to USB-B cable.
5.8 INSTALLING SAGEVIEW
Before beginning the installation, review the PC requirements above to be sure the PC at hand meets the
minimum requirements. Also, read the ReadMe.txt file on the CD for the latest information about installing and
using SAGEVIEW.
PM990-8800-50, Issue 3
5-2
Sageon III Base System
Sageview
1. Insert the SAGEVIEW CD in your computer’s CD-ROM drive. The opening screen will appear. If it does not
appear, click Start and then click Run. In the Run dialog box type d:\setup.exe. Substitute your CD-ROM’s
drive letter for “d” as needed.
2. Windows’ InstallShield will start and the screen shown below will appear. Click Next to continue the
installation or click Cancel to exit the installation.
3. In the Choose Destination Location screen, click Next to accept the default location for installation of the
SageView program. Alternatively, type another path or browse to another location for installation of the
program and then click Install.
4. The final installation screen is the Setup Complete screen. Click Finish to complete the installation.
PM990-8800-50, Issue 3
5-3
Sageview
Sageon III Base System
Refer to the SageNET user manual for more information on setting up the Remote Communications Unit over
TCP/IP. This manual will describe network setting sand SageNET module configuration.
PM990-8800-50, Issue 3
5-4
SSageon III Basee System
M
Maintenance
66.0 MAINT
TENANCE
T
This chapter provides
p
perio
odic maintenaance procedurres and assem
mbly replacem
ment procedurres. If troubleshooting
is required, reefer to drawing SD-SAGEO
ON3.AXX for schematic rrepresentationns of Sageon IIII Base Systeem
ccircuits. A listt of spare and
d replacementt parts is locatted in Chapterr 9.
IIMPORTAN
NT: Regularly
y monitor the LEDs on the operator paneel, and Rectiffiers. Review
w the alarm log
rregularly to deetect minor prroblems before they becom
me significantt problems.
66.1 CIRCUIT
T BOARD HA
ANDLING
S
Semiconducto
ors such as IC
Cs (integrated circuits), diodes, and transsistors must bbe protected aagainst damagging
eelectrostatic discharges.
d
A properly grou
unded wrist sttrap must be w
worn whenevver a circuit bboard is handlled or
ttouched. A service kit with
h a wrist strap and static disssipative worrk mat is availlable from booth mail orderr and
local electroniic supply com
mpanies.
A
Always store circuit boardss in anti-staticc bags.
66.2 PERIODIIC MAINTEN
NANCE
P
Perform the fo
ollowing periodic maintenance procedu
ures at least tw
wice a year.
11. Thorough
hly review thee Alarm Log at
a the operato
or panel or at a local or rem
mote PC. Lookk for repetitivve alarms,
determinee their cause(ss), and take stteps to correct events that rresult in alarm
ms.
22. Check operator panel LEDs.
L
Refer to
t Chapter 4 Configuration
C
n and Operatiion for detailss.
33. Check all Rectifier LED
Ds. Refer to Section
S
4.3 fo
or details.
44. Check all electrical con
nnections. Ch
heck that all breakers
b
and ffuses are fullyy seated. Tighhten connectiions as
required. Seat breakerss and fuses as required. Look for signs oof overheatingg, arcing, andd accumulatioon of dust,
dirt, and other
o
contamiinants. Refer to
t Chapter 2 Installation
I
foor factory insttalled and cusstomer installled
connections.
WARNING
Electrical shock and arcin
ng hazard
us voltage can caause death or seriious injury.
Hazardou
me care when peerforming mainttenance on an opperating Sageon
Use extrem
III Base System.
S
Use insulaated tools. Remo
ove watch and jeewelry.
55. Verify thee Sageon III Base
B
System configuration
c
n and all param
meter values. Refer to Chaapter 4 Confiiguration
and Operaation for operrator panel an
nd PC screens.
66. Confirm that
t all alarm annunciators are functioniing. Refer to C
Chapter 4 Coonfiguration aand Operationn for
operator panel
p
and PC screens.
77. Verify LV
VBD parameter values. Refer to Chapter 4 Configuraation and Opeeration for operator panel aand PC
screens.
88. Confirm that
t all Rectiffiers are on-lin
ne and sharing current. Froom the operattor panel or a PC, check eaach
Rectifier for
f voltage an
nd current outtput. Refer to Chapter 4 Coonfiguration aand Operationn for operatorr panel
and PC sccreens.
P
PM990-8800-5
50, Issue 3
6-1
M
Maintenance
Sageon III B
Base System
99. If load req
quirements allow, remove Rectifier Sysstems one at a time. Use loow-pressure aair to clean Syystems.
Clean dusst and lint from
m Rectifier faans. Refer to Section
S
2.14 IInstalling andd Removing R
Rectifiers for
procedurees.
110. Verify com
mmunication
ns with remotee PCs, dial-up
p connectionss, and databasses as approprriate.
111. Test any spare
s
Rectifieers.
a) Insertt a spare devicce.
b) Test the
t device to ensure
e
correcct operation.
c) If the device is to remain
r
a sparee, remove it and
a repeat thee above steps until all sparees are tested. If spares
are to remain installed, for run-ttime equalizaation, repeat thhe above stepps until the sppare devices aare
installled.
66.3 TROUBL
LESHOOTIN
NG
T
Troubleshootiing is based on
o displayed alarm
a
messages and error ccodes that apppear in responnse to a deteccted
cchange in stattus of the Sageon III Base System,
S
batteeries, or envirronment; see T
Table 6-1.
TABLE
T
6-1 ALARM ME
ESSAGES A
AND ERROR
R CODES
Location
L
Display Methood
See C
Chapter or S
Section
Operator
O
Pan
nel
LED
D
Operator
O
Pan
nel or connectted
personal
p
com
mputer
Rectifier
R
fron
nt panel
Tex
xt message
LED
D
Chapterr 4 Configurattion and
Operatioon
Chapterr 4 Configurattion and
Operatioon
Section 6.3.1
IIt is possible for
f a configurration mistakee to cause an error or chan ge in status ddisplay. If thiss occurs after editing
tthe configurattion or upload
ding a new co
onfiguration from
fr
a PC to tthe Sageon IIII Base System
m, carefully ccheck the
cconfiguration’s programmaable parameteer values befo
ore changing a hardware asssembly.
66.3.1 Reading
g Rectifier Status Led Cod
des
T
There are 3 LE
EDs on a Recctifier’s front panel to indiccate operatingg status; see tthe following table.
BLE 6-2 RE
ECTIFIER L
LED CODES
TAB
Green 3
Yellow
w!
Red x
Meaningg
Usser Action
Off
Off
Off
No AC pow
wer to Rectifier..
Apply AC power to Rectiffier
Flashin
ng
Off
Off
AC input is
i too low or tooo high.
Primary ciircuit is faulty.
Troubleshooot AC input to
Rectifier; rreplace Rectifierr
On
Off
Off
Rectifier functioning
fu
norm
mally in Float
mode.
No action needed
On
Flashin
ng
Off
Alarm con
ndition.
Refer to Chapter 4
Operationss and Replacing a
Rectifier inn Chapter 6
Maintenannce
On
On
Off
Rectifier functioning
fu
norm
mally in Equalizee
mode.
No action needed
Off
Flashin
ng
On
Rectifier sh
hut down by rem
mote control.
Rectifier not
n inserted in hoolder properly.
Internal co
ontrol circuit fauult.
No action needed
Remove annd reseat
Replace R
Rectifier
Off
P
PM990-8800-5
50, Issue 3
Off
On
SCU micro
oprocessor fault .
6-2
Replace SC
CU
SSageon III Basee System
M
Maintenance
66.4 REPLAC
CING A RECT
TIFIER
IIn the event of Rectifier faiilure, replace the unit. There are no userr-serviceable parts in the R
Rectifier.
A rectifier is identified
i
by a label in the bezel recess and on the re ar of the rectiifier. Be certaain you are innstalling
tthe correct mo
odel Rectifierr. Only 48V/5
50Amp rectifiers are availaable with the S
Sageon III Syystem.
T
To replace a Rectifier,
R
refeer to Section 2.14
2 Installing
g and Removiing Rectifierss.
66.5 REPLAC
CING THE SA
AGEON III CONTROL
C
UN
NIT (SCU)
IIn the event of SCU failuree, replace the assembly. Th
here are no usser-serviceablle parts in thee SCU.
T
The Sageon IIII Base System
m SCU can be
b hot-swappeed. Be certainn a replacemeent SCU is onn hand before
bbeginning thiss procedure.
T
To remove thee Controller Assembly
A
11. Check thaat a known go
ood replacemeent Controllerr Assembly iss on-hand forr immediate innstallation.
22. Re-installl the new SCU
U.
FIGURE
E 6-1 REPLA
ACING THE
E SCU (SAG
GEON III CO
ONTROL UN
NIT)
66.5.1 Configu
uration Considerations
T
The System configuration is
i stored in no
on-volatile memory
m
on thee SCU Backpllane board. T
The SCU pluggs into the
S
SCU Backplane board so th
he SCU can be
b replaced without
w
affectiing the configguration.
IIt is recommended that if you
y have not previously
p
reccorded System
m configuratiion values andd the SCU is
ffunctioning, do
d so now beffore performin
ng the replaceement.
A
Alternatively, download th
he SCU config
guration to eitther a local P C plugged intto the operatoor panel USB
cconnector or a remotely connected PC. If
I the SCU is malfunctioniing and you bbelieve the configuration vvalues
P
PM990-8800-5
50, Issue 3
6-3
Maintenance
Sageon III Base System
may not be correct, save the file under a new filename to prevent overwriting earlier good data. (SageView
System Monitor software must be installed in the PC.) Refer to Sageview manual for more information.
If the SCU is not functioning, the replacement unit will power up with the configuration stored on the SCU
Backplane, which can then be edited from the operator panel or a PC.
6.6 REPLACING AN AC BACK PLANE BOARD
1. The system must be powered down to replace a rectifier back plane board.
IMPORTANT: Each rectifier position address must be unique; do not use an address number more than
once. Addresses must be in numerical order with the uppermost (in the System) Rectifier having address 1.
The address number increases by 1 with each Rectifier installed.
2. To install the Rectifiers, go to Section 2.14 Installing and Removing Rectifiers.
TABLE 6-3 RECTIFIER POSITION ADDRESSES 1 THROUGH 24
Table Notes:
TOP SHELF
BOTTOM SHELF
ADR↓
1
2
3
4
5
6
7
8
9
10
11
12
13
14
15
16
17
18
19
20
21
22
23
24
ADR = Rectifier position address
1
Off
Off
Off
Off
Off
Off
Off
Off
Off
Off
Off
Off
Off
Off
Off
Off
Off
Off
Off
Off
Off
Off
Off
Off
2
Off
Off
Off
Off
Off
Off
Off
Off
Off
Off
Off
Off
Off
Off
Off
Off
Off
Off
Off
Off
Off
Off
Off
Off
3
Off
Off
Off
Off
Off
Off
Off
Off
Off
Off
Off
Off
Off
Off
Off
Off
Off
Off
Off
Off
Off
Off
Off
Off
SW1 Switch Positions
4
5
6
Off
Off
Off
Off
Off
Off
Off
Off
Off
Off
Off
On
Off
Off
On
Off
Off
On
Off
Off
On
Off
On
Off
Off
On
Off
Off
On
Off
Off
On
Off
Off
On
On
Off
On
On
Off
On
On
Off
On
On
On
Off
Off
On
Off
Off
On
Off
Off
On
Off
Off
On
Off
On
On
Off
On
On
Off
On
On
On
Off
On
On
Off
7
Off
On
On
Off
Off
On
On
Off
Off
On
On
Off
Off
On
On
Off
Off
On
On
Off
Off
On
Off
Off
Non-Shaded addresses 1 through 12 are used for 50-600A systems
Shaded addresses 13 through 24 are used for 650-1200A systems
SW1
1
8
ON ADDRESS SWITCH DETAIL
ADDRESS 1 SHOWN
PM990-8800-50, Issue 3
6-4
8
On
Off
On
Off
On
Off
On
Off
On
Off
On
Off
On
Off
On
Off
On
Off
On
Off
On
On
Off
On
Sageon III Base System
Maintenance
Troubleshooting
Symptom
Likely Causes
Rectifiers do not power up – no LEDs lit
on front panel
AC power is not connected or internal
fuse blown or rectifier not properly
plugged in.
No output current from rectifiers and the
Green LED on each rectifier blinks
occasionally
AC power either <70VAC or >320VAC.
An internal relay will be heard open and
close periodically if the AC voltage is
excessive.
High ambient temperature.
Fan air intake/exhaust vents are blocked
or a fan is jammed with a foreign object
or excessive dust.
Over-temperature alarm or fan failure
alarm present
LVBD will not close
One or more batteries are reverse
polarity.
No battery is connected to the battery
distribution module.
Action
Re-insert rectifier(s) and make sure the
rear connections are good. Confirm that
AC power is available to the rectifier
backplanes. Replace the rectifier module
if the unit is suspected to have failed.
Check that the AC supply voltage and
connection arrangement are correct and
match the expected system supply
wiring.
Check the ambient temperature and
improve site cooling if possible.
Check and remove obstructions from the
air vents. Replace the module or remove
and replace the fan assemblies in the
module (requires only that the rectifier
lid be removed)
Check battery wiring polarity.
Connect a battery.
Check that the Controller is powered up
even when no rectifier is operational. If
not, service the fuses in the BDM.
Fuse link blown in the battery
distribution module (BDM).
Load or Battery circuit breaker alarm
does not set when the breaker is opened
or is incorrectly alarmed as battery
switch instead of load trip or visa-versa.
Battery or Ambient temperature sensor
reading is indicated as “Not Available”
Battery current indicated does not match
independent measurement.
Battery current indicates 0A when more
than 5A is flowing in the battery or is
inaccurate at low currents (<5A)
Controller setting for LVLD is “Off”.
Set LVLD to “On”.
Low Voltage Load Disconnect setting is
greater than the current bus voltage.
Power up the rectifiers and reduce the
load until the bus voltage increases to the
float voltage.
Check load and battery alrm/aux switch
connections to the BDM and that the
alarm links are correctly configured.
No battery or load alrm/aux switch is
connected to the circuit breaker
connection.
Alarm link in BDM is incorrectly
configured.
Sensor / cable faulty.
Sensor connector reversed.
No sensor installed.
Full-scale current of the DC hall effect
current transducer is incorrectly set and
will result in an error larger than +/- 5%
at more than 50% full-scale current.
Transducer is not calibrated
DC hall effect transducer or wiring is
faulty.
Current transducer sensitivity is too low
for 1A measurement.
Load current indicates 0A when known
to be >5A
Number of RECTIFIERs is incorrectly
set too low or the battery current FS is
set too high. The load current is
calculated from the sum of the
RECTIFIER currents minus the
measured battery currents
One unit is alarmed as HVSD (high
voltage shutdown) and is latched off.
The unit has developed a fault that
causes it to output a voltage above the
HVSD protection limit and has been
supplying load current while above this
PM990-8800-50, Issue 3
6-5
Turn cable connector around and
reconnect.
Replace faulty sensor assembly.
Change the setting of the “FS Batt Curr”
value in the Base Menu of Controller to
the correct full-scale value.
Calibrate transducer
Service the DC current transducer –
check the wiring is intact and still
connected properly, or replace the DC
CT is suspected to be faulty
Revise size of DC CT full-scale value
for the size of the load and battery
charging requirements.
Check that the number of RECTIFIERs
in the Controller Base menu matches the
actual number of rectifier modules
installed.
Check the Battery DC CT rated fullscale value is correctly set in the Base
menu.
Replacing the rectifier module is
recommended. However, a random
event may have triggered the HVSD and
to determine if the unit has a real fault,
Maintenance
Sageon III Base System
Symptom
Likely Causes
voltage limit.
A random event on the DC bus has
occurred that forced a unit into HVSD.
“RECTIFIER Urgent” alarm activated
All units are latched off as HVSD
A rectifier is indicating “RECTIFIER
Off” or “No Response” on the Controller
RECTIFIER display
One or more rectifiers has a current limit
or power limit alarm activated
One rectifier has an “UNCAL
RECTIFIER” alarm
“System Voltage Clamp” alarm
activated
PM990-8800-50, Issue 3
One or many RECTIFIERs are off due to
AC power failure, internal faults,
incorrect command signal from
Controller or all rectifiers are in current
limit
Absolute Overvoltage shutdown
protection activated. The system is
likely to have no load and without a
battery. An event on the DC bus has
caused the voltage to exceed 70V for
48V systems. The event could be caused
either by a faulty rectifier or other
equipment connected to the bus.
An AC failure to the rectifier is the most
likely cause. While the rectifier internal
power rails are still available, the unit
will communicate with “RECTIFIER
Off” if the AC has failed on its input.
Once the internal power dies, the unit
will no longer communicate and
Controller will indicate “No Response”.
Action
the HVSD latched alarm can be reset
using the “Reset Latched Alarm”
function in the Controller RECTIFIER
Menu. (If the system does not have any
batteries, cycling the AC power will
have the same effect). If the unit does
not recover by latching off again, it is
faulty.
Check the AC power and restore.
Replace faulty rectifier modules.
Check for DC bus overload faults.
Add a small amount of load (>2A per
rectifier) to the system and check for a
faulty rectifier.
Check for other faulty equipment
connected to the bus that could cause the
overvoltage transient.
Use the “Reset Latched Alarm” from the
Controller to reset the system.
Check the AC feed to the rectifier for a
tripped circuit breaker, blown fuse or
faulty connection.
“No Response” all the time and the
RECTIFIER is known to have AC power
indicates a communications wiring
problem.
Total load, including battery charging
current is equal to the output limits of the
rectifiers. (System overload)
One rectifier in current limit only
indicates a likely calibration problem
with the module. The Controller can
usually compensate for an out of
calibration unit in a system and will take
a few minutes to adjust the unit to
correctly share the load.
The Controller has not been able to make
the unit share the load with the other
units. Either the RECTIFIER is faulty
(excessive internal voltage drop) and
cannot be adjusted to share load, or it is
too far out of calibration.
Check the RECTIFIER communications
10-way ribbon cable for broken
connections and replace cable if
necessary.
Revise the load level on the system and
expand the number of rectifiers as
required to remove the overload
condition.
Controller cannot reach the desired
system voltage. This can be due to
possible excessive voltage drop along
the DC bus bars, inside one or more
rectifiers or “System V Drop” parameter
has been set too low.
If this alarm comes up during equalize,
the maximum output voltage from the
rectifier may not be high enough to
overcome the system drops to the sense
point and allow the system to regulate at
the desired high equalize voltage.
Increase “Sys V Drop” parameter.
Replace faulty rectifier (unlikely to
current share as well).
Check that the number of RECTIFIERs
in the system is correctly set (more
RECTIFIERs than declared can generate
this problem).
Revise the requirements for high
equalize voltage level.
6-6
Replace the rectifier module. Send the
unit for repair and re-calibration.
Sageon III Base System
Maintenance
Symptom
Likely Causes
Action
RECTIFIER “EEPROM Fail” alarm is
activated as indicated at the RECTIFIER
Menu for a particular RECTIFIER.
Corrupted data found on the EEPROM
inside the rectifier that is outside the
allowable data range. The rectifier
software has attempted to over-write and
has failed due to the memory cell being
damaged.
Note: excessive electrical noise can
corrupt the read data transfer, which can
lead to the same alarm being generated.
“EEPROM Fail” alarm for the
Controller is activated.
Corrupted data found on the backplane
EEPROM that is outside the allowable
data range. (similar to RECTIFIER
corruption above)
Corrupted data found on the EEPROM
inside the rectifier that is inside the
allowable data range but does not match
the value programmed.
Replace the faulty rectifier if the
memory cell is confirmed to have failed.
This can be done by, modifying each of
the RECTIFIER parameters on the
Controller and checking to see if the
alarm clears. (EEPROM corrects the
data).
Check for EMC problems and
remove/reduce the source of electrical
interference where possible.
Replace the faulty backplane if the
memory cell is confirmed to have failed.
“Range RECTIFIER” alarm for the
rectifier is activated.
Try adjusting the RECTIFIER
parameters to see if the EEPROM cells
can be updated. If not, replace the faulty
rectifier.
6.7 TO REMOVE A RECTIFIER MODULE
Lift the securing latch in the center divider adjacent to the module and pull the module out of the Power plant.
When removing modules, especially if the ambient temperature is high and the unit has been operating at
maximum load, avoid skin contact with the metal casing as it may be too hot to touch. Pull the unit halfway out
of the magazine and let cool for 2-3 minutes before handling.
6.8 TO INSERT A RECTIFIER MODULE
Insert the module into the slot. Push the module all the way in so the rear connector fully mates and the securing
latch spring clicks back down into place.
Latch
FIGURE 6-2 REMOVING RECTIFIER MODULE
PM990-8800-50, Issue 3
6-7
Sageon III Base System
Distribution Option Kit Installation
7.0 DISTRIBUTION OPTION KIT INSTALLATION
Distribution options included on the initial Power system order are factory installed. To field install a distribution
option, follow the appropriate section in this chapter.
While it is recommended that the Power system be powered down before installing a distribution option, an
option can be installed in a live Power system when proper safeguards are observed.
WARNING
Arcing hazard
Arcing can cause equipment damage, load interruptions, and personal injury.
Remove watch and jewelry. Use insulated tools and extreme caution when
working on a live Power system or on a battery string.
Insulate the free ends of any un-terminated cables.
There are 6 distribution groups organized in three Tiers with two Groups in each Tier: All are located in the
Power system’s distribution area, as shown in Figure 7-1. The type of distribution that can be installed in each
group is discussed below and listed in Table 7-1. Tier 2 & Tier 3 can be field installed. Figures 7-2 and 7-3 show
typical left and right side views of the distribution area.
DISTRIBUTION
GROUPS A & B
ON EACH TIER
LEFT SIDE
FIGURE 7-1 DISTRIBUTION LOCATION BY TIER AND GROUP
PM990-8800-50, Issue 3
7-1
Distribution Option Kit Installation
Sageon III Base System
Distribution guidelines
•
A Power system can have three tiers of distribution: Tiers 1, 2, and 3.
•
When adding distribution groups, tier 1 is factory installed (group A & B) with AM1 capability start at
tier 2 upwards.
•
AM1 type breaker distribution can be located in any group.
•
GJ1 type breaker distribution must be installed as the topmost group, above all other distribution types.
•
As distribution is added, additional return bus sections (up to 3 total) may be needed to provide
terminations (landings) for load returns. See Figure 7-3. Order the return bus sections separately as
needed.
TABLE 7-1 INSTALLABLE DISTRIBUTION TYPES BY TIER AND GROUP
Tier/Group,
Positions
Installable Distribution, See notes below
1/A, 1-10
AM1
-48V Plant
Y
GJ1
-48V Plant
N
1/B, 11-20
2/A, 21-30
2/B, 31-40
Y
Y
Y
N
Y²
Y²
3/A, 41-50
Y
Y²
3/B, 51-60
Y
Y²
Table Notes:
Y - Yes; indicated circuit breaker or fuse type can be installed in the group listed in the column at left.
N
- No; indicated circuit breaker or fuse type cannot be installed in the group listed in the column at left.
1. Refer to the Distribution Guidelines above for additional information.
2. The GJ1 type breaker Distribution Option is an assembly that can hold up to four GJ1 type breakers.
The GJ1 Option must be the topmost distribution. Other distribution types cannot be installed above GJ1
distribution.
PM990-8800-50, Issue 3
7-2
Sageon III Base System
Distribution Option Kit Installation
FIGURE 7-2 DISTRIBUTION AREA, LEFT SIDE
FIGURE 7-3 DISTRIBUTION AREA, RIGHT SIDE
PM990-8800-50, Issue 3
7-3
Distribution Option Kit Installation
Sageon III Base System
7.1 AM1 DISTRIBUTION, TIERS 2 AND 3, GROUPS A & B
This section describes installation of a kit for adding AM1 type breaker
distribution. Kit contents and part numbers are listed below. Installation of
circuit breakers and fuses is described in Chapter 8.
The figure at right shows many of the components included in the kit: the Ushaped bus bar, distribution assembly, assembly support bracket, and required
hardware. There are two kits. Kit PN 385.5881.00 is for installation in Group
A. Kit PN 385.5881.01 is for installation in Group B.
Distribution
Cabling
Tier 3
G roup A
Tier 3
G roup B
Tier 2
G rou p A
Tier 2
G rou p B
Tier 1
G rou p A
Tier 1
G roup B
Left Rear Corner of Rack
Left Front Corner of Rack
Figure 7-4 shows the orientation of the AM1 distribution assemblies. It also
shows routing of the supply cables upward through the open top of the rack
and the daisy-chained alarm wiring.
Fuse Alarm
(FA) Wire
CD00031a
Distribution
Assemblies
Bus Bars
FIGURE 7-4 ORIENTATION OF DISTRIBUTION ASSEMBLIES, -48V SYSTEMS
PM990-8800-50, Issue 3
7-4
SSageon III Basee System
Distributioon Option Kit IInstallation
7.1.1 Kit Contents
C
S
Some hardware listed below
w may be facctory-installed
d on another iitem in the kitt and disassem
mbly may be needed to
install the optiion kit.
Kit PN
Kit PN
N
on
3855.5881.00A,
385.5881.01A,
Descriptio
Quantity
Quantity
10-Positio
on Distributio
on Assembly
1
1
Bus Bar, U-Shaped
U
1
1
Bracket, Distribution
D
Assembly
A
Sup
pport
1
1
Screw, 10
0-32, Hex Heaad
2
0
Screw, 12
2-24 x 3/4
2
2
Bolt, Hex
x, 5/16-18 x 1
4
4
Washer, bevel,
b
5/16
6
6
Washer, Flat,
F
5/16
6
6
Nut, Hex,, 5/16-18
2
2
7.1.2 Instaalling the kit
W
While installin
ng the kit, reffer to Figure 7-5
7 and to a factory-install
fa
led group for location and orientation off items
included in th
he kit.
Item A
Item B
Distribution
n
Assemblyy
Disttribution Asse
embly
Support
S
Bracket
Rack Rail
With
Threaded
Holes
Group B
Group A
5/16 Flat Washerr, Bevel
Washerr, and Nut, Q
Qty 2 Each
Group B
Press
s-in Nut
In Unde
erside of
Bus Ba
ar, Qty 4
Group A
5/16 Bo
olt, Flat Wash
her, and
Bevel Washer,
W
Qty 4 Each
Item A - Scrrew, #10, Qtyy 2
Item B - Scrrew, 12 x 24 x 3/4, Qty 2
-48V or +
+24 Vdc
Bus Bar
FIGUR
RE 7-5 TYPIICAL INSTA
ALLATION OF AM1 DIISTRIBUTIO
ON
P
PM990-8800-5
50, Issue 3
7-5
Distribution Option Kit Installation
Sageon III Base System
1.
Open the kit. The packing list will identify the kit by part number and name.
2.
Open the distribution area door. Refer to Figure 7-1 and locate the Group where the additional
distribution is to be installed.
3.
From the kit, collect the U-shaped bus bar and four each: 5/16-18x¾” bolts, 5/16” bevel washers, and
5/16” flat washers.
4.
In the selected group, position the four unthreaded holes of the U-shaped bus bar from the kit onto the
factory installed U-shaped bus bar of the distribution option directly below the your selected group.
Orientation will be the same as the installed bus bar; see Figure 7-4. Using the hardware collected in
step 3 above, bolt the bus bar from the kit to the factory installed bus bar.
5.
From the kit, collect the distribution assembly support bracket, two 12-24x¾” screws.
6.
Orient the support bracket as shown in Figure 7-5, so the bracket legs with the two rectangular holes is
against the closest vertical rail of the rack. Use the two 12-24x¾” screws to fasten the bracket to the
rack rail.
7.
From the kit, collect the distribution assembly and two each: 10-32 hex-head screws, 5/16” flat washers,
5/16” bevel washers and 5/16x18 hex nuts.
8.
Referring to Figures 7-4 and 7-5 for assembly orientation, insert the studs of the distribution assembly
into the U-shaped bus bar and fasten with the flat washers, bevel washers and nuts. The 10 pairs of
output studs on the distribution assembly should be oriented towards the vertical rail of the rack.
9.
Fasten the support bracket to the distribution assembly using the two 10-32 hex-head screws.
10. Tighten all hardware. Refer to Table 2-2 for torque specifications.
11. Repeat the above steps for each AM1 distribution assembly kit to be installed.
12. From the kit(s), collect the Failure Alarm (FA) jumper wire(s).
13. Connect one end of each wire to the push-on terminal on the edge of a newly installed distribution
assembly. Connect the other end to a convenient push-on connector on an adjacent distribution
assembly in daisy chair fashion. Newly installed distribution assemblies must be connected (in daisy
chain fashion) to a previously installed distribution assembly.
See Figure 7-4.
14. Refer to Chapter 8 to install AM1 circuit breakers fuses.
7.2 GJ1 DISTRIBUTION, TIERS 2 AND 3, GROUPS A & B
This section describes installation of the GJ1breaker distribution option in Tiers 2 and 3, Groups A & B.
Installation of GJ1 circuit breakers is described in Chapter 8.
Figure 7-7 shows many of the components included in the kit. Figure 7-6 shows GJ1 distribution assemblies in
Groups A & B. It also shows the alarm wiring.
PM990-8800-50, Issue 3
7-6
SSageon III Basee System
Distributioon Option Kit IInstallation
T
Table 7-1 iden
ntifies the gro
oups in which
h a GJ1 distrib
bution assembbly can be insstalled. A GJ11 assembly m
must be the
ttopmost distriibution assem
mbly since other distribution
n types cannoot be installedd above a GJ11 assembly.
Distribu
ution Assemb
blies
Grp B
Tier 3, G
Tier 3, Grp
pA
Fuse Alarm
(FA)) Wire
Fuse Ala
arm
(FA) Wire
Tier 2
Group A
Tie
er 2
Gro up B
Tier 1
Group A
Tie
er 1
Gro up B
Bus Bars
Left Rear Corner of Rack
Left Front Corner of Rack
Distribution
Asse
emblies
FIGURE 7-6 DISTRIIBUTION AS
SSEMBLIES
S, GJ1
7.2.1 Kit Contents
C
Kit PN
385.5882.00,,
Quantity
Descriptio
on
Break
ker Mounting
g Bracket, U-S
Shaped
Break
ker Mounting
g Bar, 5/8" x 7-1/2"
7
Bus Bar
B Assembly
y, L-Shaped
Rack
k Screw, 12-24 x 3/4”
Bolt, Hex, 5/16-18
8 x 1”
Wash
her, bevel (Beevel), 5/16
Wash
her, Flat 5/16
Screw
w, Phillips Heead, 10-32 x 1/2”
Alarm
m Wire with Ring
R
Lug, Reed
Fuse Alarm Jumper Wire, Oran
nge
P
PM990-8800-5
50, Issue 3
7-7
1
2
1
2
4
4
4
4
1
1
D
Distribution Op
ption Kit Installlation
Sageon III B
Base System
7.2.2 Instaalling the Kit
1.
Opeen the kit. Thee packing list will identify the kit by parrt number andd name.
2.
Opeen the distribu
ution area doo
or. Refer to Fiigure 7-1 andd locate the Grroup where thhis distributioon will be
placced.
3.
From
m the kit, colllect the L-shaaped bus bar and
a four eachh: 5/16-18x1” bolts, 5/16” bbevel washers, 5/16”
flat washers and the red alarm
m wire with thee ring-terminnal lug.
4.
Posiition the L-sh
haped bus bar against the to
op of the U-shhaped distribuution bus in thhe factory insstalled
distrribution group
p and align th
he mounting holes;
h
see Figgures 7-6 and 7-7. The upw
ward pointing fingers
with
h the press-in nuts should be
b toward the inside of thee pant. Place tthe ring terminal of the redd alarm
wiree on one of th
he bolts. Loosely install thee hardware. D
Do not tightenn the hardwaree at this time..
5.
From
m the kit, colllect the painteed U-shaped breaker
b
mounnting bracket and two 12-224x3/4” screw
ws.
6.
Posiition the brack
ket against th
he nearest verttical rack raill, align the hooles in the braacket with thoose in the
rail and install the screws. Thee bottom edgee of the brackket extending into the pant should be
apprroximately 1.5" (3.8 cm) above
a
the horiizontal leg off the L-shapedd bus bar.
7.
Tigh
hten the U-shaped bracket mounting harrdware. See T
Table 2-2 for torque speciffications. Do nnot
tighten the L-shaaped bus bar hardware
h
at th
his time.
8.
From
m the kit, colllect two paintted 5/8”x7 1/2
2” breaker moounting bars, four 10-32 x 1/2” Phillipss head
screews.
9.
Refeer to Figure 7-7
7 and looselly mount the bars
b on the U
U-shaped breakker mountingg bracket.
10. From
m the kit, colllect the orang
ge fuse alarm wire and tem
mporarily drappe it over the U
U-shaped braacket.
Thiss wire and thee red alarm wire
w will be co
onnected whenn the GJ1 typpe breakers arre installed.
11. Rep
peat the abovee steps for eacch GJ1 distrib
bution group tto be installedd.
he GJ1 circuitt breakers.
12. Refeer to Chapter 8 to install th
P
PM990-8800-5
50, Issue 3
7-8
Sageon III Base System
Distribution Option Kit Installation
GJ1 Circuit Breaker, 4 Places
3/8 Nut and Flat Washer
Load Supply Cable with 3/8 Lug
and Output Terminal Hardware
Bracket Mounting Screw
12-24 x 3/4, 2 Places
Mounting Bracket, U-Shaped
3/8 x 1 Hex Bolt
Bevel Washer
Flat Washer
Breaker Mounting Bar, 2 Places
Bus Bar, L-Shaped
Breaker Input Terminal Hardware
FIGURE 7-7 GJ1 DISTRIBUTION KIT (W/ BREAKER KIT)
PM990-8800-50, Issue 3
7-9
SSageon III Basee System
C
Circuit Breaker and Fuse Kit IInstallation
88.0 CIRCUIT BREAK
KER AND FUSE KIT IN
NSTALLAT
TION
A
All AM1 typee breaker fusee kits included
d in the initiall Power systeem order are sshipped from the factory inn
sseparate, proteective packag
ging. This pacckaging is plaaced inside thee tower, at thee base the Power system.
G
GJ1 type breaaker kits inclu
uded in the iniitial Power sy
ystem order arre factory installed.
A
All Breaker (A
AM1 & GJ1) Kits can also
o be ordered separately
s
to aadd to existinng distributionn when emptyy
ppositions exist.
88.1 AM1 TYP
PE BREAKE
ER KITS
8.1.1 Kit Contents
C
Description
AM
M1 type breakeer, Bullet typee mount
Bus Bar, Output
Nut, Hex, 1/4-20
Wassher, Flat, 1/4
4
Quantity
1
1
2
2
8.1.2 Instaalling the Kit
1.
Rem
move an AM1 type breakerr kit from its protective
p
pacckaging. The package labeel will identify
fy the kit
by part
p number.
2.
Opeen the distribu
ution area doo
or. Refer to Fiigure 7-1 andd locate the Diistribution Tier and Distribbution
Group where thiss kit will be in
nstalled.
3.
Placce the Output Bus Bar overr the two threeaded studs off the Distributtion Assemblly; orient as inndicated
in Figures 8-1 an
nd 8-2.
4.
Placce load cable lug over Outp
put Bus Bar.
5.
Placce the two 1/4
4” flat washerrs over the loaad cable lug.
6.
Instaall the two 1/4-20 hex nutss over the flatt washers andd tighten. See Table 2-2 forr torque speciifications.
7.
Inseert the AM1 ty
ype breaker in
nto the Distrib
bution Assem
mbly as indicaated in Figuree 8-2. This com
mpletes
instaallation of thee AM1 type breaker
b
Kit; reepeat steps 1 – 7 for all AM
M1 type breakker Kits to bee installed.
P
PM990-8800-5
50, Issue 3
8-1
Circuit Breaker and Fuse Kit Installation
Sageon III Base System
Output Bus Bar
AM1
Circuit
Breaker
1/4-20 Nuts
FIGURE 8-1 AM1 TYPE BREAKER KIT COMPONENTS
U-shaped Bus Bar
Distribution Assembly
Support Bracket
Installed AM1 type
breaker Kit
Note mounted
operation.
Short Mounting
Surface
Long Mounting
Surface
(Output Terminal)
FIGURE 8-2 AM1 TYPE BREAKER (SHOWN) KIT INSTALLATION
PM990-8800-50, Issue 3
8-2
SSageon III Basee System
C
Circuit Breaker and Fuse Kit IInstallation
88.2 GJ1 TYPE BREAKER
R KITS
8.2.1 Kit Contents
C
Description
GJ1 type breakerr
Screew, Phillips Head,
H
10-32 x 1/2”
Wassher, Flat, 3/8
8
Wassher, Bevel, 3/8
3
Boltt, Hex Head, 3/8-16 x 1 1/4
4
Nut, Hex, 3/8-16
Alarrm wire adaptter (breaker kits
k 200A andd over only)
Quantity
1
2
3
2
2
1
1
8.2.2 Instaalling the Kit
1.
Opeen the distribu
ution area doo
or. Refer to Fiigure 7-1 andd locate the Diistribution Tier and Distribbution
Group where thiss kit will be in
nstalled.
Notee: GJ1 distrib
bution cannot be installed in
i any Group of Tier 1.
2.
Rem
move the two painted break
ker mounting bars from thee existing GJ1 Distributionn Option to alllow
acceess to mount the
t GJ1 type breaker
b
kit (S
See Figure 8-33).
Notee: It may be necessary
n
to remove
r
the 10
0-32 x 1/2" Phhillips head sccrews from anny GJ1 type bbreakers
alreaady installed in existing GJ1
G Distributio
on to facilitatee removal of the two paintted breaker m
mounting
barss.
3.
From
m the existing
g GJ1 Distribu
ution Option:: carefully rem
move the insuulated sleevinng from the orrange fuse
alarm
m wire and th
he red alarm wire
w for the breaker positioon you are insstalling.
4.
Rem
move a GJ1 ty
ype breaker kiit from its pacckaging. The package labeel will identifyy the kit by paart
num
mber.
5.
Con
nnect the red alarm
a
wire off the GJ1 Disttribution Optiion to the Com
mmon (C) pole and the oraange fuse
alarm
m wire of thee GJ1 Distribu
ution Option to
t the Normallly Closed (N
NO) pole on thhe rear of the GJ1 type
breaaker.
Notee: For GJ1 typ
pe breakers 200A
2
and over, the breakerr kit contains an alarm wiree adapter thatt must be
conn
nected betweeen the breakeer and the red alarm & orannge FA alarm
m wires of the GJ1 Distribuution
Optiion.
6.
Careefully place th
he GJ1 type breaker
b
from the
t kit over oone of the verttical tabs of thhe L-shaped bbus bar of
the GJ1
G Distributtion Option (ssee Figure 8-3
3).
7.
Colllect from the GJ1 type breaaker Kit, one each of the fo
following: 3/88-16 x 1 1/4" hhex head boltt, 3/8
beveel washer and
d 3/8 flat wash
her. Insert thrrough tab of th
the GJ1 type bbreaker and thhread into thee insert of
the vertical
v
tab off the L-shaped bus bar of the
t GJ1 Distriibution Optioon (see Figuree 8-4) and tighhten. See
Table 2-2 for torq
que specificattions.
8.
Rep
place the two painted
p
break
ker mounting bars of the G
GJ1 Distributioon Option usiing the 10-32 x 1/2"
screews removed in
i step 2.
9.
Colllect the two 10-32 x 1/2" from
f
the GJ1 type
t
breaker Kit and securre the new GJJ1 type breakeer to the
two painted break
ker mounting
g bars of the GJ1
G Distributiion Option repplaced in stepp 8.
P
PM990-8800-5
50, Issue 3
8-3
Circuit Breaker and Fuse Kit Installation
Sageon III Base System
10. Use the remaining 3/8” hardware from the GJ1 type breaker Kit to secure load cabling to the GJ1 type
breaker (see Figure 8-4).
GJ1 Circuit Breaker, 4 Places
3/8 Nut and Flat Washer
Load Supply Cable with 3/8 Lug
and Output Terminal Hardware
Bracket Mounting Screw
12-24 x 3/4, 2 Places
Mounting Bracket, U-Shaped
3/8 x 1 Hex Bolt
Bevel Washer
Flat Washer
Breaker Mounting Bar, 2 Places
Bus Bar, L-Shaped
Breaker Input Terminal Hardware
FIGURE 8-3 GJ1 TYPE BREAKER KIT COMPONENTS
Lower distribution option
removed for clarity
FIGURE 8-4 GJ1 TYPE BREAKER KIT INSTALLATION
PM990-8800-50, Issue 3
8-4
Sageon III Base System
Spare and Replacement Parts
9.0 SPARE AND REPLACEMENT PARTS
To minimize downtime should maintenance be required, a supply of spare circuit breakers and fuses, circuit
boards, rectifiers, and other recommended components should be immediately available. See the Recommended
Spare Parts List below.
Please refer to the UNIPOWER part number when placing orders. For assistance in ordering spare parts, call
UNIPOWER and ask to speak with Order Entry. The telephone number is found in Section 1.5 Product Support.
TABLE 9-1 LIST DRIVEN PCB’S
List A1
List A2
List B2
List B4
List C1
List D1
Contactor
Aux Relay PCB
Controller Backplane
PCB w/o C1
246.0840.10
ERT190.5691
ERT190.5691
ERT190.5770
ERT190.5770
Controller Backplane
PCB with C1
Circuit
Breaker 20A
Battery Ditribution
PCB
Battery
Concentrator
PCB
ERT190.5740X48P
ERT190.6011
SNMP
TCP/IP PCB
272.3701.20
272.3701.20
ERT190.5770T
103.4015.32
TABLE 9-2 MAJOR REPLACEMENT COMPONENTS
Controller
103.4130.48
48V Controller
Rectifiers
100.7675.4850
124.0073.00
Sageon Rectifier: 48V, 50A (208/240VAC, single phase)
Blank Rectifier Panel (Required to fill open rectifier positions)
Sageon Battery Monitor
385.5201.20
Include 30’ Ribbon Cable to SCU; Requires Battery Cell Wire Bundle and
Battery Adaptor Kit
Battery Cell Wire Bundle
350.7812.10
350.7812.25
350.7812.50
350.7812.100
Requires 385.5201.20
10’ Battery Cell Leads
25’ Battery Cell Leads
50’ Battery Cell Leads
100’ Battery Cell Leads
Battery Adaptor Kits
385.6151.03
385.6151.04
385.6151.05
385.6151.06
385.6151.07
Requires 350.7812.xx
For #10 Battery Hardware (Includes harness & flat washers)
For 1/4" and 6mm Battery Hardware (Includes harness & flat washers)
For 5/16” and 8mm Battery Hardware (Includes harness & flat washers)
For 3/8” and 10mm Battery Hardware (Includes harness & flat washers)
For 1/2" and 12mm Battery Hardware (Includes harness & flat washers)
Battery Current Transducers
385.5932.50
385.5932.100
385.5932.200
385.5932.600
385.5932.1000
385.5970.50
385.5970.100
385.5970.200
385.5970.600
385.5970.1000
385.5980.500
385.5980.1000
Requires SAGEON3.C01
Sageon Battery Current Transducer (50A) – with 30’ lead
Sageon Battery Current Transducer (100A) – with 30’ lead
Sageon Battery Current Transducer (200A) – with 30’ lead
Sageon Battery Current Transducer (600A) – with 30’ lead
Sageon Battery Current Transducer (1000A) – with 30’ lead
Sageon Battery Current Transducer (50A) – with 100’ lead
Sageon Battery Current Transducer (100A) – with 100’ lead
Sageon Battery Current Transducer (200A) – with 100’ lead
Sageon Battery Current Transducer (600A) – with 100’ lead
Sageon Battery Current Transducer (1000A) – with 100’ lead
Sageon Split-Core Current Transducer (500A) – with 30’ lead
Sageon Split-Core Current Transducer (1000A) – with 30’ lead
Battery Temperature Sensors
385.5941.03
385.5941.06
385.5941.15
Requires SAGEON3.C01 for more than One(1) Battery String
Temperature Sensor 10’ (3M)
Temperature Sensor 19’ (6M)
Temperature Sensor 50’ (15M)
MAJOR REPLACEMENT COMPONENTS CONTINUE…
PM990-8800-50, Issue 3
9-1
Spare and Replacement Parts
AM1 Series Breaker Kits
274.3830.01
274.3830.03
274.3830.05
274.3830.10
274.3830.15
274.3830.20
274.3830.25
274.3830.30
274.3830.40
274.3830.50
274.3830.60
274.3830.70
274.3830.80
274.3830.90
274.3830.100
274.3830.125
274.3830.150
274.3830.200
385.3830.00
Sageon III Base System
1 Ampere, AM1 Series Breaker, 1 Position
3 Ampere, AM1 Series Breaker, 1 Position
5 Ampere, AM1 Series Breaker, 1 Position
10 Ampere, AM1 Series Breaker, 1 Position
15 Ampere, AM1 Series Breaker, 1 Position
20 Ampere, AM1 Series Breaker, 1 Position
25 Ampere, AM1 Series Breaker, 1 Position
30 Ampere, AM1 Series Breaker, 1 Position
40 Ampere, AM1 Series Breaker, 1 Position
50 Ampere, AM1 Series Breaker, 1 Position
60 Ampere, AM1 Series Breaker, 1 Position
70 Ampere, AM1 Series Breaker, 1 Position
80 Ampere, AM1 Series Breaker, 1 Position
90 Ampere, AM1 Series Breaker, 1 Position
100 Ampere, AM1 Series Breaker, 1 Position
125 Ampere, AM1 Series Breaker, 2 Positions
150 Ampere, AM1 Series Breaker, 2 Positions
200 Ampere, AM1 Series Breaker, 2 Positions
Breaker Toggle Guard Kit
AM1 Breaker Adapter Bus Bars (adapt the breaker output to accept larger 2-hole lugs - 45° up angle –
utilizes two breaker spaces)
209.4743.01
2H Landing Bus Bar, 1” C-to-C 3/8”x16 Studs (Distribution Group A)
209.4743.02
2H Landing Bus Bar, 1” C-to-C 3/8”x16 Studs (Distribution Group B)
GJ1 Series Breakers
274.3833.100
274.3833.125
274.3833.150
274.3833.175
274.3833.200
274.3833.225
274.3833.250
274.3833.300
274.3833.350
274.3833.400
274.3833.600
Requires SAGEON3.E03, E04, E05
100 Ampere, GJ1 Series Breaker, 1 Position
125 Ampere, GJ1 Series Breaker, 1 Position
150 Ampere, GJ1 Series Breaker, 1 Position
175 Ampere, GJ1 Series Breaker, 1 Position
200 Ampere, GJ1 Series Breaker, 1 Position
225 Ampere, GJ1 Series Breaker, 1 Position
250 Ampere, GJ1 Series Breaker, 1 Position
300 Ampere, GJ1 Series Breaker, 2 Positions
350 Ampere, GJ1 Series Breaker, 2 Positions
400 Ampere, GJ1 Series Breaker, 2 Positions
600 Ampere, GJ1 Series Breaker, 3 Positions
GJ1 Breaker Adapter Bus Bars (adapt the breaker output to accept 2-hole lugs)
209.8104.00
For single position breakers (1 lug landing, 1” C-to-C, 3/8x16 studs)
209.5235.00
For two position breakers (1 lug landing, 1” C-to-C, 3/8x16 studs)
209.5240.00
For three position breakers (3 lug landings, 1” C-to-C, 3/8x16 studs)
209.5228.00
For four position breakers (4 lug landings, 1” C-to-C, 3/8x16 studs)
PM990-8800-50, Issue 3
9-2