1
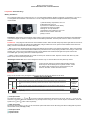
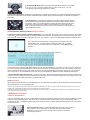
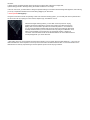
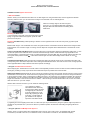
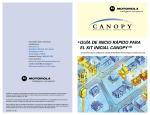
Modern Classic SLR Series
Contax TLA30 Flash Unit - Instruction Manual
Introduction: Every 35mm photographic system usually has a flash unit that shines in specification. The Olympus has a great flash in
Olympus T-32, Nikon has a Nikon SB-16A/B which is almost 20 years old, Canon has a Canon 300TL which incidentally, was the one and
only non-AF TTL flash unit Canon has ever produced for the FD-mount system, Pentax has also provide their users with an impressive Pentax
AF 280T etc. As you can observe, most of these non-AF flash units have a guide number at around 30; they were usually equipped with a
flexible flash heads and supported by a host of system accessories which makes them an all rounder for all sort of applications which includes
bounce, synchro-sunlight and even close up photography. Another prominent features for these ever popular flash models is their ability to
support TTL, Auto and Manual flash control which enables many positive possibilities such as multiple TTL-flash setup which previously can be
a very tedious process to setup and getting assuring results. Most of these evergreen flash models were originally being introduced during the
the mid of the eighties, they sailed through the turbulence of the AF revolution and remains in the product list of the respective camera
manufacturers even today.
Contax also has its own flash
that equally can excite many of
its loyal users, it is the TLA30
Auto Flash Unit.
Description of Parts
The TLA30, when used with the Contax RTS II Quartz and other Contaxes with direct TTL auto flash metering system, enables
automatic electronic flash photography by means of "direct TTL auto flash metering" using the camera's light sensor that
automatically controls the flash exposures in which the light through the lens is directly read from the film surface, this is often
called "TTL OTF" which stands for "Through the Lens, Off the Film" metering, a technique first pioneered by Olympus in their
Olympus OM2n camera in 1975. Because of the direct TTL auto flash metering system, you will find it easy to employ such
advanced techniques as bounce flash, diffuse flash, close-up flash, as well as multiple flash using multiple flash units and extension
systems. And being equipped with normal auto and manual flash functions, it can be used for electronic flash photography with
other cameras as well.
I have been struggling on a decision earlier whether to include a user's manual of this fascinating flash unit in the Contax RTS
website. I think it is essential and went to purchase a copy of this manual from an online auction, I hate to do all the stupid work of
scan, retouch and restoring closest to their originality. This is not an entirely easy task and very time consuming (the most boring
and unproductive work among all was the scanning process ..) but as this flash does has its uniqueness and features which makes
it an important system component in the CONTAX 35mm photographic system. This may well supplement many Contax
photographers, especially those who owns Contax camera models that support TTL flash photography - So, I hope you too can
also spend sometime familiarize yourself with the contents of this instruction manual so that you will be able to operate the device
properly and enjoy long years of trouble free use. Lastly, there is not such thing such as a perfect flash unit, if you were to ask me
what features has been omitted from its impressive specifications in this TLA30, I thought if it can incorporate a tiny secondary flash
as fill-in flash would be lovely. ..
Modern Classic SLR Series
Contax TLA30 Flash Unit - Instruction Manual
< Preparation before Shooting >
<Battery Installation>
The TLA30 Auto Flash Unit is powered by four 1.5 V AA-size penlight batteries, alkaline-manganese or manganese, or by four 1.2
V rechargeable Ni-Cd batteries of the same size. The use of high performance alkaline-manganese batteries is particularly
recommended.
1) Slide the battery compartment cover out
as illustrated and remove it.
2) Insert the four batteries into the battery
compartment according to polarity
markings "S" and "E)" inside the
compartment. Then replace the cover. The
flash unit will not function unless the
polarity is correct.
Test Flash To test the flash unit, first set the power switch to "ON" and then press the combination Flash-Ready Lamp/Test Button
control when it lights red. When not using the flash unit immediately afterwards, reset the power switch to "OFF" to conserve the
batteries.
Precautions: * Recycling time will slow down as the batteries weaken. When the flash-ready lamp fails to light within 30 seconds of
the previous flash, it means the batteries are inadequately charged. When this occurs, replace all four batteries at the same time.
Mixing of old and new batteries will shorten battery life.
** Battery performance will deteriorate temporarily when batteries are exposed to near subzero temperatures. When using the flash
unit in cold areas, it is recommended that the batteries be protected from the cold by keeping the flash unit in a bag or in some cold
weather gear, or that a set of fresh batteries be kept on hand. Batteries thus weakened will regain their power and become
serviceable again upon being returned to normal temperatures.
*** Battery contacts contaminated with oil or sweat can cause poor electrical contact. Wipe the contacts clean with a dry cloth
before use to ensure maximum performance.
<Mounting the Flash Unit> The TLA30 is designed to function only on cameras with a hot shoe (Direct X) contact.
Loosen the shoe locking ring and then slide the flash unit base
all the way into the accessory shoe for positive contact. * Make
sure that the flash unit base is firmly pushed all the way into
the shoe; otherwise, contact will not be ensured.
Functions:
Firmly secure the flash unit by turning the locking ring as far as it will go in the direction of the arrow.
CONTAX TLA 30 Flash Model
Flash Mode
TTL
Type of Flash Operations
Direct TTL flash (Using a Contax camera with direct TTL auto flash metering system.) Electronic flash
exposure is automatically controlled by camera's built-in sensor. Couples at all apertures of the lens in
use.
AUTO
Normal Auto Flash Couples at aperture indicated by green or red mark. Electronic flash exposure is
automatically controlled by sensor on front of flash unit.
F
MANUAL
1/4
Manual Flash Operation "F" denotes full output, -1/4" and '1/16- denote 1/4 and 1/16 of full output,
respectively.
1/16
GN (ASA/ISO
100, m)
30 - 4
(Continuously
variable)
30 - 4
(Continuously
variable)
30
15
7.5
(1) Film Speed Index
The white index marks " ", " " and " '' are used in setting the ASA/ISO film speed for the film in use. Use the " " index for TTL
auto flash, normal auto flash, and manual flash at (F) full output.*When using 1/4 and 1/16 of full output in manual flash, set the film
speed to the " " and " '' index marks respectively.
(2) Wide Panel Index
The orange colored marks " ", and " " are used as film speed index marks for the film being used when making flash exposures
with the Wide Panel (wideangle panel).
(3) Film Speed Scale
(4) Distance Scale
(5) Aperture Scale
(6) Exposure Computer Dial By setting the ASA/ISO film speed scale to
the speed of the film in use, it is possible to read out the following
exposure data: (a) In the TTL Auto mode, the flash range for the aperture
in effect-, (b) In the Normal Auto mode, the coverage aperture readings
and the flash ranges for the given apertures,- and (c) In the Manual Flash
mode, the correct aperture reading for the selected flash-to-subject
distance.
(7) Auto Flash Range Guide In the TTL Auto and Normal Auto modes,
the Auto Flash Range Guide shows the effective flash range for the
coverage aperture, Align the white band's extreme right (Thick white
band) with the coverage aperture reading on the Exposure Computer
Dial. The white band indicates the effective flash range for the given
aperture.
(8) Normal Auto Flash Mode Index Marks (Red and Green) The red
and green index marks indicate the coverage apertures to use in the
Normal Auto mode.
You can also Download a Copy of the PDF file (516k) for your future reference.
(9) Flash Mode Selector The selector is used to switch to any of the three modes, TTL Auto, Normal Auto and Manual flash. Be
sure to set the selector precisely on the click-stop position.
(10) Auto Check Lamp (For Normal Auto Flash Mode Only) In the Normal Auto flash mode, this lamp is used to indicate whether
subject was within effective flash range. After the exposure, it will signal a green after-flash for about three seconds if your subject
was within effective flash range; otherwise, the absence of such a signal indicates that the subject was not within the correct flash
range. The Auto Check Lamp is not designed to operate in the TTL Auto or the Manual flash modes.
(11) Flash-Ready Lamp/Test Button The Flash-Ready Lamp lights red when the flash unit is ready to flash. This control also
doubles as a test button for test flashing.
< Basic Electronic Flash Control with Contax TLA 30 >
TTL AUTO Flash Operation
When using the TLA30 with a Contax camera incorporating direct TTL auto flash metering system, merely set the camera to the
auto mode and the flash unit to the "TTL" mode. When the flash unit is ready to flash, the camera automatically switches over to the
camera's synch speed and two LEDs inside the viewfinder indicate that both the flash unit and camera are ready to flash.
(1) Set the Camera on the Auto Mode. The camera is set on
the auto mode by turning the shutter control dial to "A".
(2) Set the Flash Mode Selector to "TTL". Slide the flash mode selector to the "TTL" click-stop position.
(3) Set the Film Speed Scale. Rotate and set the Exposure Computer
Dial by aligning the white -,L" index mark with the correct ASA/ISO film
speed for the film in use. To rotate the dial, exert fingertip pressure
against the two little round-shaped projections placed opposite each other
on the dial, making sure to set the scale squarely on a click-stop.
(4) Check the LED Indicators Inside the Viewfinder. Turn the flash
unit's power switch to "ON", and then press the camera's exposure check
button to make a functional check of the LED display inside the viewfinder.
When the flash unit has recycled, the camera switches to its flash synch
speed (1/60 sec. for the RTS II Quartz) and a " " mark in the viewfinder
lights to indicate that the flash unit and camera are ready to flash. The
shutter speed display flashes the "60" mark at the same time.
Note: In the case of the Contax 137 MA/MD Quartz, make a functional check of the viewfinder LED display by lightly depressing the
shutter release button part way down.
(5) Set the Aperture. Rotate the aperture ring to the desired aperture setting.
Because of the direct TTL metering feature, you can freely select any aperture within
the full aperture range of the lens in use. The effective flash range varies with the
aperture setting in use.
For example, if you choose f/5.6 with ASA/ISO 100 film in the camera, you will need to align the extreme right of the white band on
the Auto Flash Range Guide with the "5.6 " mark on the Exposure Computer Dial. In so doing, you will obtain correct flash exposure
over an effective flash range between approximately 0.7 and 5 meters. Your subject will be correctly exposed within this flash
range.
(6) Make the Flash Exposure Focus and press the shutter
release. After the exposure, the " " flash data indicator inside the
viewfinder will flash for about a second and then extinguish itself
if your subject was within effective flash range. It the indicator fails
to light, open up the aperture setting or shorten the flashto-subject distance and re-shoot.
Note: The " " mark will flash even when your subject is shot closer than the effective flash range. However, in this case, your
subject will be overexposed.
a) In addition to flashing at the synch shutter speed, the "OVER" mark inside the
viewfinder will also flash as shown when shooting against the light or with daylight
synch flash. This indicates that the reading for the correct shutter speed is faster
than the synch shutter speed. If the exposure is made in such a situation without
any adjustment, the background will be overexposed showing a washed out effect.
To overcome this, close down the aperture ring until the "OVER" indication goes
away; then, shoot.
b) On completion of the auto flash exposure, the camera reverts to the non-flash auto exposure function until the flash unit has
recycled;
c) When checking the after-exposure flash function without film loaded in the camera, lay the flash test sheet supplied with the flash
unit over the film plane to ensure sufficient reflection surface.
<Auto Flash with the AE Lock>
When shooting subject against a dusky background or in a room of great depth, often your main subject is properly exposed but the
background comes out dark and flat In this instance you can obtain a more natural and better lighting balance between your subject
and background by employing direct TTL Auto flash with the AE Lock of the camera.
1) Set the lens aperture after making sure that the camera's shutter control dial has been set on "A" and the flash unit on "TTL".
2) Compose your photograph in the viewfinder,
focus and then set the camera's AE Lock. The
exposure is locked at the value appropriate for the
subject at the time the lock was set, and the
corresponding shutter speed flashes.
Note: In the case of the Contax 137 MA/MD Quartz and Contax 139 Quartz, the shutter speed is locked in.
3) When the LED mark "
" inside the viewfinder lights, take the picture.
a) The AE Lock can be set either before or after the flash unit has charged.
b) The same effect as when the AE Lock is used can be
obtained by leaving the flash unit on "TTL" and setting the
camera's shutter speed at 1/60 second or slower. However,
with the AE Lock, it is a much simpler task and produces
much more expressive results.
With AE Lock
Without AE Lock
Modern Classic SLR Series
Contax TLA30 Flash Unit - Instruction Manual
< Normal AUTO Flash Operation >
Along with TTL Auto flash in which exposures are controlled by the camera's independent sensor, the TLA30 also offers Normal
Auto flash over two aperture ranges, using its foreside sensor to control for correct exposure. When used with a Contax featuring
the direct TTL auto flash metering system or even with the Yashica FX-D Quartz, merely set the camera to the auto mode. Upon
recycling of the flash unit, the camera will automatically switch over to its flash synch speed and the viewfinder LED will indicate
flash-ready status. And, even when its shutter control dial is set at faster than the flash synch speed, the camera will automatically
switch to the flash synch speed as soon as the flash unit has completed its recycling.
1) Set the Camera on Auto Mode. The camera is set on the auto mode by turning the shutter control dial to "A".
2) Set the Film Speed Scale. Rotate
and set the Exposure Computer Dial
by aligning the white "A" index mark
with the correct ASA/ISO film speed.
3) Set the Aperture. Set the aperture ring to either of the two settings indicated by the red and green index marks for the Normal
Auto flash mode. For instance, when using an ASA/ISO 100 film speed, the correct coverage apertures will be f/8 and f/4. Check
the Auto Flash Range Guide for the correct flash range for the applicable aperture. When the extreme right (thick white band) of the
white band is aligned with the index mark for Normal Auto flash, the white band indicates the flash range for the flash unit. For
instance, you should keep your flash -to-subject distance between 0.7 and 4 meters approximately and between 1 and 9 meters
approximately for flash exposures at f/8 and f/4 aperture settings respectively as indicated by the green and red index marks.
4) Set the Flash Mode Selector. Slide and set the Flash Mode Selector to a Normal Auto
index bar corresponding to the color (red or green) of the index mark used to select the
correct coverage aperture.
5) Checking LED Display Inside Viewfinder. Turn the flash unit's power switch to "ON", and press the camera's exposure check
button to see if the LED display inside the viewfinder lights. The display here is the same as that seen in the TTL Auto mode).
6) Take Your Picture. Focus and press the shutter release. After the exposure,
the Auto Check lamp will light up green with an after-flash (about three seconds) if
your subject was within the effective flash range. To check for flash range before
making flash exposure, press the Test Button while holding the flash unit in
position identical to that during actual exposure.
Note: Since the camera's direct TTL metering function is operative even in the normal auto flash mode, you will sometimes see the
after-flash mark " " pulsate. Thus, be sure to check for correctness of the flash range by using the flash unit's Auto Check lamp.
< Normal Auto Flash with the AE Lock > Normal auto flash photography with the
camera's AE Lock is possible using the same operations employed in the TTL auto
flash mode.
< Using the TLA30 with Other SLR Cameras > Set the camera shutter speed to that recommended in the instruction manual for
the camera in use, Then, follow procedures outlined in steps 2 through 6. Since the viewfinder display will not be operative in this
case, use the test lamp on the flash unit to make your flash-ready check, and the auto check lamp to make your after-flash check.
< MANUAL FLASH OPERATION >
When you want to take flash photographs at certain fixed flash outputs depending on your photographic intentions or the prevailing
picture-taking situation, you have the option of using any one of three manual flash modes, the "F" mode for full output, and the
"1/4" and "1/16" modes for reduced outputs. When used with a Contax featuring the direct TTL auto flash metering system or the
Yashica FX-D Quartz or equivalent camera bodies, merely set the camera to the auto mode as in the case of normal auto flash
operation. As soon as the flash unit has completed its recycling, the camera will automatically switch to its flash synch speed and
the viewfinder LED will indicate flash-ready status. And, even if the camera is set at higher than its flash synch speed, it will be
automatically switched to its flash synch speed when the flash unit has completed recycling.
1) Set the Camera on Auto Mode. The camera is set on the auto mode by turning the shutter control dial to "A".
2) Set the Flash Mode Selector. Slide and set the Flash Mode Selector at a click stop
for "P, "1/4" or "1/16". The guide numbers are 30, 15 and 7.5 for the 'F", "1/4" and
"1/16" settings respectively, at ASA/ISO 100, meters.
3) Set the Film Speed Scale. Rotate and set the Exposure Computer Dial so that the correct ASA/ISO film speed aligns with the
index mark corresponding to the selected manual flash output. (When using the full manual output, set the dial at the white "A"
index mark.)
4) Set the Aperture. Focus and set the aperture ring to the coverage aperture read out
from the Exposure Computer Dial as applicable to the desired flash-to-subject distance.
For instance, when you have selected the "F" flash mode with ASA/ISO 100 film in the
camera, the correct aperture for a flash-to-subject distance of 5 meters will be f/5.6.
When not using the Exposure Computer Dial, you can compute the correct aperture by
using the following formula:
GN (Guide Number) divided by Subject Distance = f-number.
5) Take Picture After Checking Viewfinder LED Display. Turn on the flash unit's power switch. Press the exposure check button
to see if the " " mark inside the viewfinder will light, and then effect exposure. The display here will be identical to that seen in the
TTL auto mode. When the shutter control dial is set to "X", or to 1/60 sec. or slower, the LED display will flash the setting in effect.
Note: Since the camera's direct TTL metering function is operative even in the
manual flash mode, you will sometimes see the after flash mark " " pulsate.
However, since you are shooting at a fixed output level, you may disregard this
pulsation.
For guide numbers, use the following chart as a reference. (Bracketed GN for Wide Panel use.)
< Sequential Flash > With the Flash Mode Selector set at the low manual setting of "1/16" (GN 7.5, ASA 100, m), the TLA30 can
be used for synchronized sequential flash at a speed of three frames per second (using the RTW W-3) for a duration of about six
frames. The Normal Auto and TTL Auto modes can also be used for sequential flash provided the output is equal to or less than
GN 7.5, ASA 100, m. For sequential flash, be sure to use four fresh alkaline dry batteries to ensure satisfactory performance.
< Using TLA30 with Other SLR Cameras > Set the camera shutter speed to that recommended in the instruction manual for the
camera in use. Then, follow procedures outlined in steps 2 through 5. Since the viewfinder display will not be operative in this case,
use the test lamp on the flash unit to make your flash-ready check.
Usage Precautions:
When using a camera other than a Contax with direct TTL auto flash metering system, the TLA30 will operate in the Manual mode
with a Guide Number of 30, at ASA/ISO 100m.
* When not using the flash unit, always turn off the Power Switch to avoid battery drain. When not using the flash unit for long periods of time, remove all four
batteries. Also, periodically test the flash unit to keep the capacitor in top working condition.
** DO NOT leave the flash unit exposed to direct summer heat (uncovered on the beach, in a car parked in direct sunlight, etc.) for long periods of time. This
could result in damage to the flash system.
< Advanced Flash Techniques >
< Exposure Compensation >
In the TTL Auto flash mode, the TLA30 couples with the Exposure Compensation Dial system of the camera, permitting you to take
exposure compensated flash photos. Use the function to compensate flash exposure when you want to intentionally under- or
overexpose, or when you otherwise cannot obtain a correct exposure due to extreme lighting contrast between your main subject
and its background.
Increasing Exposure When you want to intentionally overexpose in such instances
where mirrors or white colored furniture with highly reflective, bright surfaces
dominate the scene you can compensate for correct exposure of subject by
increasing the exposure.
Decreasing Exposure When you want to intentionally underexpose in such
situations where your subject is shown against a background completely dominated
by dark-toned walls or furniture, you can compensate by decreasing exposure. # In
the Normal Auto or Manual flash modes, the Exposure Compensation Dial system
will not function for flash operation. In this instance, you can attain exposure
compensation by changing the lens aperture setting.
< Diffused Flash >
This technique applies to a method where the light is scattered to produce a softening effect by placing a sheet of tracing paper or a
thin, white handkerchief between the flash head and subject or directly over the flash head.
Diffused flash can be used effectively when you want a softer lighting effect with close-range portraits, or to reduce reflections when
there are metal or glass surfaces within the picture area. To obtain a more pleasing, soft lighting effect, it would be preferable to
place a sheet of tracing paper a short distance away from rather than directly over the flash head.
* With diffused flash, less intensive light will fall upon subject due to
scattering effect of the light. Thus, allow for underexposure by using a wider
aperture setting. ** With diffused flash in the Normal Auto mode, be sure
that the line of view from the flash unit's foreside sensor to subject is not
obstructed.
< Bounce Flash >
Bounce flash is the technique of aiming the flash head at the ceiling or walls instead of directly at the subject. The result is a softer,
more natural lighting as opposed to the harsh lighting of direct flash.
With the TLA30 in at-camera position, the
TLA30 flash head can be elevated vertically to
a maximum of 900 (click stops at 600, 750 and
900 provided), permitting you to take bounce
flash under varying conditions with the use of
these features.
And it even tilts 150 downward, making it very handy for parallax-free close-up photography. (When the flash head is tilted
downward, a red mark appears on the back of the flash head unit to warn you that the flash head is turned out of its normal
straight-ahead position, thus serving as a reminder to re-till the head upward when reverting to normal direct flash shots.) In the
TTL Auto mode, the light from the subject is metered through the taking lens to ensure you of correct exposure at all times. When
the TLA Extension Cord (sold separately) is connected, the flash unit may be used off-camera, permitting you to take flash pictures
in the TTL Auto mode at any desired flash position or angle.
* For optimum results it is necessary to
consider the reflectance ratio of the bounce
surface, the angle of bounce, and the
bounce-path distance, and choose your
f/number accordingly.
While the exposure will be considerably affected by the conditions involved, satisfactory results can be obtained by using an
aperture wider than for direct flash, using a white or gray colored reflection surface.
** In bounce flash, make sure that no direct light from the flash unit strikes the subject.
*** In the Normal Auto flash mode, the TLA30, set at-camera position, will enable you to take correctly exposed bounce flash shots
with the flash head positioned at any of the click stop positions because its foreside sensor is being aimed toward the subject. And
when using the TLA Extension Cord for off-camera flash, always be sure that the sensor is kept aimed at the subject.
< Synchro-Sunlight
Flash Photography >
When shooting outdoor pictures, photographing subject in bright sunlight or in backlit conditions, your main subject will come out
with shadow areas or be underexposed.
To overcome this situation, use supplementary
light from your flash unit to relieve the shadows
and beautifully capture the background at the
same time.
Daylight synch flash is effective under the following conditions:
a) When photographing subject against the light or a bright window.
b) When subject's face is darkened by shadows of a tree or when it is shaded because of sunlight being partially blocked by the
tree limbs.
c) When a highly contrasting shadow area is produced on subject's face under direct sunlight; and;
d) When taking portraits in weak light during the earliest and last hours of sunlight.
In the TTL Auto mode, you will be able to change the aperture setting in accordance with the background brightness, thus relieving
you of any complicated calculations even when taking daylight synch flash shots
< Close-up Flash Photography >
Using the TLA30 with a Contax incorporating a direct TTL auto flash metering system, you can easily take close-up flash shots in
the TTL Auto mode by coupling it to macro lenses, adapter rings, Auto Bellows unit, etc.
With the direct light metering feature, you can attain correct exposure for varying
apertures and image magnification. However, light cutoff by lens barrel and uneven
lighting often occur with close-ups taken from at-camera position. In such instances,
you can overcome lighting problems with at-camera close-ups by tilting the flash head
vertically downward 150 or you can achieve the same by using a TLA Extension Cord,
which is sold separately, and shooting from an appropriate position or angle from
off-camera. And even better results can be attained with the use of the Wide Panel that
comes packaged with your TLA30 flash unit.
* When taking close-ups, guard against overexposure that tends to occur at certain flash-to-subject distances. ** Since it is very
difficult to determine correct exposure for close-ups in the Normal Auto and Manual flash modes, it is recommended that such
determination be made by experimenting to find the optimum exposure under varying conditions.
Modern Classic SLR Series
Contax TLA30 Flash Unit - Instruction Manual
CONTAX TLA Flash System Accessories
< Wide Panel Flash >
With the TLA30 you can take flash shots with a 35 mm wide-angle lens. Using the Wide Panel, which is supplied as standard
accessory with the TLA30, you can extend the coverage to accommodate a 24 mm wide-angle lens.
When the coverage angle is not wide enough for
close-ups, you can eliminate flash light vignetting by
tilting the flash head downward and converting to the
Wide Panel.
Mounting the Wide Panel
(1) Insert the tab on right side of the panel and press it against
spring on right side of flash head. (2)Then, press the entire
panel to lock into place.
Removing the Wide Panel (1) While pressing in direction of arrow against the tab on left side of the panel, (2) pull the panel
toward you.
Effective flash range in TTL and Normal Auto modes, and guide numbers on the Manual mode are affected when using the Wide
Panel because of an increase in angle of coverage. Use the Exposure Computer Dial as directed below to ascertain the correct
exposure,
In the TTL and Normal Auto Modes Rotate and set the Exposure Computer Dial by aligning the Wide Panel index mark " " with
the ASA film speed of the loaded film Then consult the Auto Flash Range Guide to confirm the flash range applicable to the
coverage aperture. In the Normal Auto mode, by rotating the Exposure Computer Dial, align the coverage aperture with either the
red or green index positions marked " ", Then set the extreme right of the Auto Flash Range Guide to either one of the" "
positions.
In the Manual Flash Mode Rotate the Exposure Computer Dial, setting the ASA film speed in use to the Wide Panel index mark
corresponding to the same flash output value used in setting the Flash Mode Selector. Then read out the correct coverage aperture
for the applicable flash-to subject distance and set the aperture accordingly.
< Using the TLA Extension Cord 100S >
When employing the TLA Extension Cord 100S, which is sold separately, the flash unit can be used off camera at different positions
and angles, permitting a variety of special off-camera flash techniques not possible with at-camera flash.
Attaching the Extension Cord Insert the clip-on unit into the camera's accessory shoe and then plug the other end of the cord into
the Extension Cord Socket of the TLA30 and secure by tightening the locking ring. The flash unit can now be charged and flashed
in the off-camera position. And by combining the TLA Multi Connector S, TLA Extension Cord 10OSS and 30OSS, all of which are
sold separately, you can increase the movable working radius of the flash unit for enhanced application. However, the combined
length of the extension cords should not exceed 10 meters. * When shooting in the Normal Auto flash mode, be sure to maintain
flash unit's sensor on your main subject.
With the flash unit used off-camera, you can obtain the following effects.
1) For portraits, a pleasing
"three-dimensional" effect may
be produced by holding the flash
unit diagonally off to the side at
an angle pointing down on the
subject. By projecting the flash
in this way, you will be able to
give variation to the subject's
expression and shadow areas.
2) Vignetting and uneven lighting which often occur with close-ups may be eliminated by using the optimum angle and position of
the flash for the particular shot. 3) For bounce flash, ft is possible to position the flash unit while taking the lighting effects into
account.
< Using the optional TLA Multiple Flash System >
With the TLA30, you will be able to take multiple flash shots in the TTL Auto mode by using, TLA Multiple Flash System
Accessories (TL-A Multi Connector S, TLA Extension Cords, TLA Extension Connector S, TLA Attachment Adapter),
When using a Contax with direct TTL auto flash metering system, the light from the multiple flash units are metered and controlled
for correct exposure by the camera's sensor system after the light has passed through the lens. Multiple flash can be effectively
used in the following situations.
a) In cases where a single flash would produce dominant shadows, multiple flash can be used to provide supplementary lighting to
fill in or relieve the shadow area. 2) When a flash unit is placed directly to one side of subject to produce a three dimensional effect,
a supplementary flash can be employed to help lighten the shadow area that would otherwise be too dominant, thus enabling you
to attain a balanced lighting effect. c) For portraits in a room with expansive background depth, where the flash unit is incapable of
reaching the background, a single or multiple flash directed at the background will help lighten it.
While there are various other flash techniques available, in any instance, it will be necessary to take into account the best possible
position for effectively illuminating your subject.
While the position and angle of
flash units for multiple flash are
influenced by the prevailing
picture-taking situation or your
photographic intent, factors
basically essential to good
lighting effects are based on
considerations for lighting
balance in which you have made
clear distinctions between the
functions of main and secondary
sources of flash illumination.
The technique generally applied is one of using balanced lighting by varying the flash-to-subject distance of each flash unit.
Techniques available for using flash as supplementary lighting are bounce flash, diffused flash, reduced output flash in the manual
mode, etc.
* When taking multiple flash in the Auto flash modes, avoid using extension cords with a combined length exceeding 10 meters. Always be sure to check that the
Flash-Ready Lamps of all units are lit.
** When more than three flash units are hooked up for multiple flash, excessive flash exposure may occur.
*** Normal Auto flash mode is not suitable for multiple flash because of difficulty involved in determining the correct light factor.
TLA Flash System Accessories
TLA Extension Cord 100 This extension cord, measuring 1 meter overall, is used in taking off camera flash with the TLA20 and
TLA30. The shoe unit for accepting the flash unit base is provided with a tripod socket underneath.
TLA Extension Cord 100S The TLA
Extension Cord 100S, designed for
use with the TLA20 and TLA30, is
used in taking off-camera flash shots
and in connecting to the TLA Multi
Connector S for multiple flash shots.
TLA Extension Cords 100SS and 300SS The 100SS and 300SS are used in
making multiple flash shots by connecting to the TLA30, RTF 540 TLA Adapter, TLA
Multi Connector S, and Extension Connector S. The 100SS is a spiral cord type,
measuring 1 meter long-, the 300SS, a straight cord type, measuring 3 meters long.
TLA Multi Connector S This unit is specially
designed for use with TLA20 and TLA30 in
taking multiple flash shots, handling a maximum
of three flash units. Depending upon the
prevailing picture-taking situation or your
photographic intent, you can connect it to
Extension Cord 100S, 100SS and 300SS for
various multiple flash applications.
TLA Extension Connector S The TLA Extension Connector S, being a connector for linking the TLA20 with Extension Cord
100SS or 300SS, is mainly used for multiple flash applications. The shoe unit which accepts the flash unit base is provided with a
tripod socket underneath.
TLA Attachment Adapter This adapter is used when securing the TLA30 to a tripod when making multiple flash shots.
You can considered Download a Copy of the PDF file (1.9MB) of the entire
system chart for CONTAX flash group for your future reference (avoid if you can
unless you are looking for certain specific information critically - it will kill my line
if having multiple simultaneous downloads ....)
Technical Specifications:
Type: Clip-on auto flash unit with direct TTL control; normal auto flash featuring built-in sensor on flash unit.
Guide numbers (ASA/ISO 100, meters): On AUTO - GN 30 to 4 (continuously variable); on MANUAL - GN 30 at full output; and
GN 15 and 7.5 at reduced output.
Control Circuitry: Energy-saving series circuitry with automatic flash cut-off. Mounting: To camera hot shoe directly, or by
Extension Cord for off-camera.
Flash Modes: TTL Auto, Normal Auto (with two aperture ranges), and Manual (with three-way guide numbers).
Flash Control: TTL Auto flash - SPD flash metering system housed in camera measures flash directly at the film plane and cuts off
flash output for correct exposure (Only on Contax camera with direct TTL auto flash metering system); couples at all apertures with
lens 'in use. Normal Auto - SPD sensor housed in flash unit automatically cuts off flash output, coupled at two aperture ranges
(f/4.0 and f/8.0 at ASA/ISO 100, m).
Angle of Coverage: 60° horizontal; 45° vertical (coverage for a 35 mm wide-angle lens). Wide Panel: 76° horizontal; 58° vertical
(coverage for a 24 mm wide-angle lens).
Color Temperature: Equivalent to daylight.
Power Source: Four 1.5 V AA size penlight batteries (rechargeable Ni-Cd type of same size also usable).
Recycling Times: Using alkaline-manganese batteries approx. 9 seconds (at full output).
Number of Flashes: Using alkaline-manganese batteries - approx. 100 (at full output).
Flash Range-Check: TTL Auto mode - indicated by LED mark " " inside camera viewfinder; Normal Auto mode - indicated by Auto
Check lamp on flash unit.
Bounce Angle: Up to 90° vertical (with click stops at 60° 75°, and 90°), down to 15° vertical.
Effective ASA Coupling Range: ASA/ISO 25 - 880 Flash Test: By pressing Test Button which doubles as Flash-Ready Lamp.
Other Features: Provided with Power Switch and Extension Cord Socket.
Accessories: Accessory Wide Panel, case and test sheet supplied as standard accessories.
Size: 80 (W) x 120 (H) x 60 (D) mm. Weight: 290 grams without batteries.
* Recycling Times refer to the time required for subsequent lighting of Flash-Ready Lamp, firing the unit using fresh batteries. ** Number of Flashes refer to the number of times the Ready Flash Lamp will light within
30 seconds of previous flash when flash unit is fired successively at 30 second intervals. *** The above specifications and design are subject to change without notice.