1
RADREP Installation, Configuration & User Guide
© SecurityBoy Consulting
RADREP
RADIUS REPORTING AND BILLING TOOL
INSTALLATION, CONFIGURATION
& USER GUIDE
1
RADREP Installation, Configuration & User Guide
© SecurityBoy Consulting
Version 1.87
Copyright SecurityBoy Consulting, 2002-2005.
http://www.radiusreporting.com
All rights reserved. No part of this publication may be reprinted, reproduced, stored in a
retrieval system or transmitted, in any form or by any means, without the prior permission in
writing from the owners.
2
RADREP Installation, Configuration & User Guide
© SecurityBoy Consulting
3
RADREP Installation, Configuration & User Guide
© SecurityBoy Consulting
TABLE OF CONTENTS
1
INTRODUCTION ..................................................................................................... 7
1.1
RADREP Lite and RADREP Extended....................................................... 8
2
UNDERSTANDING HOW TO USE RADREP IN YOUR ENVIRONMENT ....... 9
2.1
Standalone Operation................................................................................... 9
2.1.1
Report Generation Options ............................................................ 9
2.1.2
‘users.csv’ - Input File Formats ..................................................... 9
2.2
ACE/Server Database Integration.............................................................. 11
2.2.1
ACE/Server RADIUS Log Format configuration ....................... 12
2.2.2
LDAP & User Extension Data Synchronization ......................... 12
2.2.3
Report Generation Options .......................................................... 13
2.2.4
Method 1 – Using a user’s associated SITE and GROUP ........... 13
2.2.5
Method 2 – Using user extension data fields ............................... 13
2.3
User Retrieval methods .............................................................................. 14
2.3.1
Method 1 - ACE/Server Database ............................................... 14
2.3.2
Method 2 - RADIUS Log file(s).................................................. 14
2.3.3
Method 3 – CSV File ( users.csv )............................................... 15
3
INSTALLATION, SETUP & CONFIGURATION ................................................ 16
3.1
Platforms Supported................................................................................... 16
3.2
Recommended Hardware ........................................................................... 16
3.3
RADIUS Log processing speed ................................................................. 16
3.4
Installation.................................................................................................. 16
3.5
Standalone Setup ........................................................................................ 17
3.6
ACE/Server Integr ation Setup ................................................................... 17
3.7
Configuration............................................................................................. 18
3.7.1
First Time Use ............................................................................. 18
3.7.2
RADIUS Accounting Log File Locations ................................... 21
3.7.3
Report Output Details .................................................................. 23
3.7.4
Historical Report Archiving ........................................................ 25
3.7.5
Billing Details .............................................................................. 28
3.7.6
How SITE/GROUP/USER-NAME/PROFILE Matching works. 32
3.7.7
Advanced Settings ....................................................................... 35
4
REPORT SELECTION & OUTPUT FORMATS ................................................... 40
4.1
Selecting Report Types .............................................................................. 40
4.2
Report Output Formats .............................................................................. 40
4.2.1
CSV Format ................................................................................. 40
4.2.2
HTML Format ............................................................................. 40
5
USAGE REPORTS – ATTRIBUTE/FIELD CONFIGURATION ......................... 41
5.1
Ascend Attribute Compatibility and Equivalence ..................................... 43
5.2
Custom/User Defined Attribute Configuration.......................................... 43
5.2.1
For Livingston Formatted RADIUS logs .................................... 43
5.2.2
For IAS Database Compatible RADIUS logs ............................. 43
5.2.3
For IAS Native/Standard RADIUS logs ...................................... 44
5.2.4
For Funk SBR, CISCO & other CSV formatted RADIUS logs .. 44
4
RADREP Installation, Configuration & User Guide
© SecurityBoy Consulting
6
HOW TO GENERATE REPORTS ......................................................................... 45
6.1
Report Generation Steps ............................................................................ 45
6.1.1
Configuration............................................................................... 45
6.1.2
Selection ...................................................................................... 45
6.1.3
Generation.................................................................................... 46
6.2
Report Output – File Naming Conventions ............................................... 53
6.2.1
CSV Output Files......................................................................... 53
6.2.2
HTML Output Files ..................................................................... 53
6.3
Report Gene ration Speed ........................................................................... 54
6.3.1
Report Generation Speed Limitations ......................................... 54
6.3.2
Benchmark Result for a 52MB RADIUS Log............................. 55
7
RADIUS ACCOUNTING LOG - FORMAT REQUIREMENTS .......................... 56
7.1
RADIUS accounting detail log - file formats & examples ........................ 56
7.1.1
Livingston Accounting Format .................................................... 56
7.1.2
Microsoft IAS - Database Compatible Format............................ 57
7.1.3
Microsoft IAS - Standard/Native Format .................................... 58
7.1.4
Funk Steel Belted RADIUS Format ............................................ 58
7.1.5
CISCO Secure & other CSV Formatted RADIUS Logs ............. 59
7.2
Required Accounting Log Attribute Fields................................................ 60
7.2.1
Minimal Attribute Requirements ................................................. 60
7.2.2
Attributes Required to generate all reports .................................. 60
7.2.3
Optional Attributes ...................................................................... 61
7.2.4
Custom Attributes ........................................................................ 61
7.3
Microsoft IAS/RAS Configuration & Recommendations ......................... 62
7.3.1
IAS STOP Record – Mandatory Attribute Fields ........................ 62
7.3.2
Processing IAS Access Accept/Deny Packets ............................. 63
7.3.3
IAS Server Configuration............................................................ 63
7.4
Novell RADIUS (BMAS) Log Format ...................................................... 67
7.5
Talon Computer Consulting RADIUS Compatibility (TCCRadius) ......... 68
7.5.1
TCCRadius Compatibility Details ............................................... 68
7.5.2
Sample TCCRadius STOP record ............................................... 68
8
AUTOMATING RADREP (AUTO RUN / BATCH MODE) ................................ 70
8.1
Before enabling 'Auto Run' mode .............................................................. 70
8.2
Enabling Auto Run Mode .......................................................................... 70
8.2.1
Option 1 : Run Mode Configuration Tool (autorun.exe)............. 70
8.2.2
Option 2 : Editing the RADREP.INI file ..................................... 73
8.3
Command Line Options ............................................................................. 74
8.4
Typical Auto Run Settings ......................................................................... 75
8.5
RADREP.INI Format................................................................................. 75
8.5.1
Sample RADREP.INI file contents: ............................................ 75
8.5.2
Hidden Configuration Options .................................................... 79
9
CONTACT AND SUPPORT DETAILS ................................................................. 81
10
APPENDIX A – IAS ATTRIBUTE TABLE – DATABASE FORMAT ............... 82
11
APPENDIX B – IAS ATTRIBUTE TABLE – STANDARD FORMAT ............... 86
5
RADREP Installation, Configuration & User Guide
12
© SecurityBoy Consulting
APPENDIX C – IAS VENDOR-SPECIFIC ATTRIBUTE TABLE ...................... 90
6
RADREP Installation, Configuration & User Guide
1
© SecurityBoy Consulting
INTRODUCTION
This user manual is provided to assist a person who will be installing and setting up the
RADius REPorting and billing tool (RADREP) to generate usage and/or billing reports from
RADIUS accounting log files. In many cases this person will be an IT administrator or
similar. Understanding how to configure and use RADREP in your respective environment
is essential in order to produce correctly generated reports.
RADREP is a general-purpose tool that can be used to generate end user usage and billing
reports from RADIUS accounting log files, often also referred to as detail files. RADIUS
accounting log formats which are supported include Livingston, Microsoft IAS, Funk Steel
Belted Radius, CISCO Secure ACS and other RADIUS servers which write their logs in CSV
(Comma Separated Values) format. The extended ability to group users into Office/Location
and Department/Business Unit allows those using RADREP for corporate charge-back and
usage reporting purposes to accurately allocate costs associated with providing a network
access or remote access service. Billing rates and charges can be allocated based on either a
users connect/usage time or on the amount of traffic (data volume) which they transfer during
the selected reporting period.
Most free and commercial RADIUS servers (including many of those which are bundled with
token based authentication systems ) do not give much attention to the reporting side of the
RADIUS protocol. The design of RADREP is such that it can be used as a stand-alone
RADIUS reporting engine with RADIUS servers that lack reporting abilities, or in an
integrated manner specifically with the RSA SecurID ACE/Server. The RADIUS server
which is bundled with the RSA ACE/Server v4.x, 5.x and 6.x does not include any reporting
mechanism for RADIUS accounting, so this tool can provide invaluable and meaningful
reports by extracting useful information from both the RADIUS accounting logs and/or the
ACE/Server database.
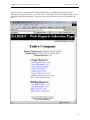
All users are presented in a selectable hierarchical representation which is categorised by
Site, Group, and User. Report selection criteria includes Site/Office, Group/Department and
User-Name/Login-ID details as well as the report start and end date range. To generate a
report for all Sites, Groups and Users, it is as simple as selecting the ‘Entire Company’ name
at the root level of the hierarchy. Configuration options allow the setting of any relevant
fixed and variable billing charges, TAX to be applied, file locations of the RADIUS log files,
the report output directory and numerous other options.
Report output formats include CSV (Comma Separated Values) files for easy importing into
Microsoft Excel (or other text editors/viewers) and web based (HTML) output for viewing
within a web browser. CSV report output gives you the ability to further manipulate the
report output data in Microsoft Excel, while the web based reports provide an easy navigable
way to view reports from a standard web browser. To see some sample report output please
refer to the ‘RADREP Sample Reports’ document or for the most up to date sample reports
view them online at http://www.radiusreporting.com.
7
RADREP Installation, Configuration & User Guide
1.1
© SecurityBoy Consulting
RADREP Lite and RADREP Extended
There are two versions of the RADREP product. A Lite version and an Extended version.
It should be noted that this manual covers all the functionality included in the RADREP
Extended product version. If you have purchased or are us ing a copy of RADREP Lite then
some of the functionality mentioned herein may not be available to you.
To cater for the diverse range of business sizes and reporting requirements, RADREP is
available in both a Lite version and an Extended version.
RADREP Lite is restricted to retrieving user information from RADIUS log files only and
not from any other external sources such as a customizable CSV file or the RSA ACE/Server
database. Due to this restriction the Lite version does not have the ability to group users by
Site/Location or Group/Department. Therefore, it can only generate reports for either an
individual user or the entire user base, but not for select communities of users. The Lite
version does have basic billing capabilities, allowing you to charge all users based on either
their ‘usage time’ or ‘data volume’ consumption, but not using a mixture of both. It does not
provide the ability to bill/charge different end users at different rates for their usage time or
data volume bandwidth consumption.
RADREP Extended has no functionality restrictions. With the Extended version you are
able to read in additional user information (from either a custom CSV file or the RSA
ACE/Server) which enables the grouping of users and therefore the ability to generate reports
for select communities of users. The Extended version provides up to 50 billing templates
and supports mixed mode billing. Mixed mode billing allows you to bill/charge some users
by ‘usage time’ and others by ‘data volume’ consumption, while also providing the flexibility
to charge different Sites, Groups and Users at different charge rates.
8
RADREP Installation, Configuration & User Guide
2
© SecurityBoy Consulting
UNDERSTANDING HOW TO USE RADREP IN YOUR ENVIRONMENT
RADREP can be run as a ‘Standalone’ reporting tool or integrated with the RSA
ACE/Server. The pros and cons of using either method are covered in this section.
2.1
Standalone Operation
This section describes how RADREP can be used in a stand-alone manner to process
RADIUS accounting logs.
2.1.1
Report Generation Options
When RADREP is run in a standalone manner, it can be used to process RADIUS accounting
detail files written by a RADIUS server that writes its output in Livingston, Microsoft IAS,
Funk Steel Belted RADIUS, CISCO Secure (ACS) or CSV log formats. In standalone
operation there are two ways in which you can retrieve user information that is displayed in a
selectable hierarchy for report generation. The first is by retrieving all user Login IDs from
the ‘RADIUS Log file(s)’. This is done by scanning through the nominated RADIUS
accounting logs and extracting the value of the ‘user- name’ attribute fields. This method of
user retrieval does not have the ability to group users by Site/Office or Group/Department. In
the selection hierarchy all users will appear as belonging to NO_SITE and NO_GROUP.
Reports will only show the user’s Login ID rather than their first and last name as well as any
relevant SITE and GROUP information.
The second way is to read in the user information from a ‘CSV file’. This file must be called
‘users.csv’, have comma separated fields representing each users Site, Group and first/last
names, and be located in the configured ‘Output Folder’. Note that the ‘users.csv’ file is
automatically produced by RADREP when the ‘Dump users to users.csv’ option is
selected/enabled and ‘RADIUS Log file(s)’ or ‘ACE/Server database’ is used as the user
retrieval method. There are two input formats that the ‘users.csv’ file can be in, and the first
line of this file tells RADREP the format that you want to use. See the ‘users.csv’ - Input
File Formats section for details on the format of this file.
2.1.2
‘users.csv’ - Input File Formats
The ‘users.csv’ file is created automatically when the ‘Dump user details to users.csv file’
is selected and the ‘ACE/Server database’ or ‘RADIUS log file(s)’ are used in the
‘Retrieve user list from:’ selection box. Alternatively you can create this file manually
yourself as long as you adhere to one of the formats described below.
You can use the ‘users.csv’ file as an input file by selecting ‘CSV file’ in the ‘Retrieve user
list from:’ selection box. Using a ‘users.csv’ file will give you the ability to associate more
meaningful information with a user’s Login ID. It allows you to group users by Site/Office,
Group/Department and display their first and last names in the reports rather than only their
Login IDs.
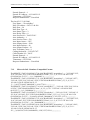
2.1.2.1
Format 1 – Extended User Details
Use the following comma separated file format to group users into sites/offices,
groups/departments and display their first and last names in reports: (the billing
PROFILE field is optional):
SITE GROUP FIRST & LAST NAME DEFAULT LOGIN / USER-NAME PROFILE
9
RADREP Installation, Configuration & User Guide
2.1.2.2
© SecurityBoy Consulting
Format 2 – User-Name Only
If you want to use a static list of Login IDs each time you generate reports then
you can do this by using the following file format:
RADIUS LOG - User-Name
Note: The first line of the ‘users.csv’ input file must have the above headings
separated by commas where applicable. Each line after the heading must have
the relevant field information. Examples of both formats are given below.
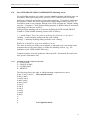
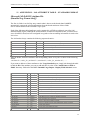
Example ‘users.csv’ file formats:
Extended User Details
SITE, GROUP, FIRST & LAST NAME, DEFAULT LOGIN, PROFILE
Melbourne,MelAccounts,David Johnson,djohnson,Gold
Melbourne,MelAdministration,Sharon Stone,sstone,Silver
Melbourne,MelSupport,Liz Hurley,lhurley,Bronze
Seattle,SeaAccounts,HuFlung Dung,hdung,Platinum
Seattle,SeaDispatch,Luke Logan,llogan,Basic
Seattle,SeaIT,Zvenya Stoistovic,zstoistovic,Gold
Seattle,SeaSales,Willy Walton,wwalton,Silver
User-Name Only
RADIUS LOG - User-Name
djohnson
sstone
lhurley
hdung
llogan
zstoistovic
wwalton
10
RADREP Installation, Configuration & User Guide
2.2
© SecurityBoy Consulting
ACE/Server Database Integration
RADREP can integrate with the ACE/Server database in order to extract specific user
information that is not otherwise available from RADIUS accounting logs. Information that
is obtained from the ACE/Server database in order to produce more descriptive and
meaningful reports includes:
• A user’s First and Last name
• The SITE to which the user has been assigned. (if any)
• The GROUP to which the user has been assigned. (if any)
• A optional pre-defined billing PROFILE which can be used to indicate the billing model
to use for a user.
*If a user belongs to multiple groups, only the first group returned is displayed in the reports.
As it is not always desirable or practical to use the ACE/Server’s SITE and GROUP
information to represent a user’s office/location and department/division, this information
can alternatively be read from two nominated ‘user extension data fields’. By adding the
ability to nominate two ‘user extension data fields’ to represent a users site/office and
group/department, it also means that this information can also be kept in sync with an LDAP
data store such as Microsoft Active Directory (ADS). Keeping nominated user extension
data fields in sync with an LDAP or ADS data store can be done using RSA provided
utilities. To configure ACE/Server Extension data fields in RADREP see the Advanced
Settings configuration section.
RADREP enables reporting to be performed on all users within the ACE/SERVER database
who have an assigned SecurID token. This means that it allows for billing of users who have
not necessarily had any accountable usage time within the report period, but are still required
to be charged a minimum fixed service fee.
11
RADREP Installation, Configuration & User Guide
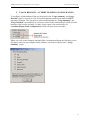
2.2.1
© SecurityBoy Consulting
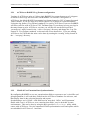
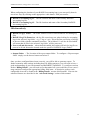
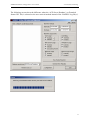
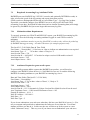
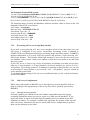
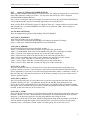
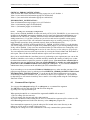
ACE/Server RADIUS Log Format configuration
Versions of ACE/Server prior to 5.0 have their RADIUS log output format set to Livingston
as default so these logs will work fine with RADREP. In version 5.0 and greater of
ACE/Server the default RADIUS accounting log format changed to CSV (Comma Separated
Values) format. If you are using ACE/Server version 5.0 or greater it is preferred that the
Livingston log format (‘Text Format [standard]’) be used by ACE/Server, however RADREP
will also work fine with ACE/Server CSV Formatted logs. If you choose to keep your logs in
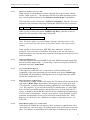
the same format as prior ACE/Server versions you will need to run the RSA provided
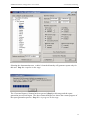
‘rwconfig.exe’ utility located in the ‘<drive>:\ace\prog’ directory and change the ‘Log File
Format’ to ‘Text Format (standard)’ as shown in the screen shot below. If you are running
ACE/Server for UNIX then the same can be done by running the ‘rtconfig’ utility located in
the ‘…\ace\prog’ directory.
2.2.2
LDAP & User Extension Data Synchronization
By configuring RADREP to use user extension data fields to represent a user’s site/office and
group/department, it will read these fields from the ACE/Server database for each user, and
then display them in the selection hierarchy and reports.
Synchronising a user’s LDAP / ADS fields used to store their ‘Office’ and ‘Department’
details with a user’s ACE/Server ‘user extension data fields’, may be desirable in some
environments. This can be done by using the RSA provided ‘sdaceldap’ utility, which
comes with ACE/Server 5.0 or the automated LDAP synchronization tools and options which
are embedded in ACE/Server 5.1 and later.
12
RADREP Installation, Configuration & User Guide
2.2.3
© SecurityBoy Consulting
Report Generation Options
To make reports more meaningful to view, user details within the ACE/Server database
should include SITE/office and GROUP/department information, and the user’s first and last
names. Currently RADREP supports two methods of associating a user with a SITE/office
and GROUP/department.
2.2.4
Method 1 – Using a user’s associated SITE and GROUP
If you are not using ACE/Server SITES and GROUPS already, you can use the standard
ACE/Server Administration Interface to create user GROUPS and SITES and assign each
user to at least one GROUP and SITE. If a user belongs to multiple GROUPS, RADREP
will only display the name of the first GROUP it finds the user associated with in its reports.
As GROUPS in ACE/Server are most often used for activating users on a specific
Client/Agent, it is not always practical to use this information to also represent the
SITE/Office and GROUP/Department that a user belongs to. For a more decisive way to
associate a user with a SITE/Office and GROUP/Department you can use ACE/Server’s user
extension data fields to represent this information instead.
2.2.5
Method 2 – Using user extension data fields
You can use ACE/Server ‘User Extension Data’ instead of each user’s SITE and GROUP
associations to define the user’s SITE/Office and GROUP/Department. RADREP will allow
you to configure the field names of two ‘User Extension Data’ fields that it will read. When
retrieving user informatio n from the ACE/Server database, RADREP will also retrieve these
two fields, displaying them in both the SITE/GROUP/USER selection hierarchy and the
reports that are generated.
Important Notes:
• If there are users in the ACE/Server database that are not associated with a SITE and/or
GROUP, RADREP will automatically display these users in the reports as belonging to a
site called NO_SITE and a group called NO_GROUP.
• For a user to be selectable or included in the reports they must have at least one RSA
SecurID token (or static password) assigned to them.
• Refer to the ACE/Server Administration manual (Admin.pdf) on the ACE/Server
CDROM media for further information on how to create SITES, GROUPS and/or ‘User
Extension Data’ fields.
13
RADREP Installation, Configuration & User Guide
2.3
© SecurityBoy Consulting
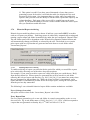
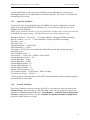
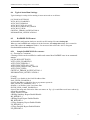
User Retrieval methods
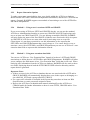
Currently there are three methods in which you can import/retrieve user details and display
them in the SITE/GROUP/USER hierarchical selection pane. To make your desired
selection you must select from one of the three available methods in the drop down box as
shown below. The default method is RADIUS Log file(s).
2.3.1
Method 1 - ACE/Server Database
Use this method if you want to retrieve all users (with an assigned token) from the
ACE/Server database and display each user according to the SITE and GROUP that they
belong to (if any). If a user belongs to multiple GROUPS in the ACE/Serve database, only
the first group that they are associated with is displayed. If more accurate grouping by
location/office and department is required, RADREP has the ability to read two user
extension data fields for each user in the ACE/Server database. The names of these two
extension data fields can be configured in RADREP’s ‘Advanced Settings’ configuration
section, simply by enabling the checkbox called ‘Use Extension Data Fields ’. If this
checkbox is selected, then for each user found in the ACE/Server database the values of these
extension data fields will be read, and then display in the selection hierarchy.
If this option is selected and some users do not have any extension data or don’t have the
correct field names, then they will be assigned to a SITE called ‘NO_SITE’ and a GROUP
called ‘NO_GROUP’.
2.3.2
Method 2 - RADIUS Log file(s)
Use this method if you want to just retrieve user login names from the RADIUS accounting
log files, and have each unique user name that is found displayed in the SITE/GROUP/USER
selection pane. When using this method you can only report on either ‘all users’ or a specific
selected user. You cannot group users by other information such as office location or
department. Reports will only contain a user’s Login ID and no other user specific
information. If you are using ‘RADREP – Lite’ then this will be the only option available.
14
RADREP Installation, Configuration & User Guide
2.3.3
© SecurityBoy Consulting
Method 3 – CSV File ( users.csv )
When you choose either of the first two methods and have the ‘Dump user details to
users.csv file’ configuration option enabled, each user found in the ACE/Server or RADIUS
accounting files will be written to a file called ‘users.csv’, located in the configured report
‘Output Folder’.
For ACE/Server (Method 1) this file will contain the following information and format:
SITE GROUP FIRST & LAST NAME DEFAULT LOGIN / USER-NAME PROFILE
For RADIUS (Method 2) this file will contain the following information and format:
RADIUS LOG - User-Name
Rather than retrieving a list of users (using method 1 or 2) each time you run RADREP, you
can simply choose to load the list of selectable and reportable users from the ‘users.csv’ file
by selecting ‘CSV file’ as the user list retrieval method. This will load the users and any
SITE or GROUP details from the ‘users.csv’ file which must exist and be located in the
configured ‘Output Folder’.
If you are using ACE/Server and do no t want to run RADREP on the Master/Primary
ACE/Server, but do want to use the additional information that is extracted from the
ACE/Server database in the reports, then this is an alternative way of running the reports on
another machine where you have copied the RADIUS accounting log files to and created or
copied a ‘users.csv’ file using the above ‘ACE/Server’ (extended user information) format.
To have the ‘users.csv’ file automatically created for you so that you don’t have to manually
create it, you will have to run RADREP on the Master/Primary ACE/Server at least once in
order to generate this file. To do this, you will need to make sure you select ‘ACE/Server
Database’ as the user list retrieval method and have the ‘Dump user details to users.csv
file’ selected in the configuration options.
If you are not using ACE/Server and are reporting on Login IDs (user- names) that are
extracted from RADIUS accounting logs (method 2), then by building your own ‘users.csv’
file (or adding further user information to the one which RADREP can generate for yo u) you
will be able to categorise your users into SITES and GROUPS as well as provide details such
as their first and last names. Grouping users will enable you to generate usage and billing
reports for select users or communities or users.
15
RADREP Installation, Configuration & User Guide
3
3.1
© SecurityBoy Consulting
INSTALLATION, SETUP & CONFIGURATION
Platforms Supported
It is recommended to run RADREP on a Windows 2000 Operating System as this seems to
give the best performance and compatibility. RADREP can also run on Windows
98/ME/NT4 /XP and Windows 2003 Server..
3.2
Recommended Hardware
RADREP will run on pretty much anything that is capable of running one of the above
supported Windows operating systems. For processing larger RADIUS accounting logs (in
excess of 200MB) it is recommended to use the following hardware or better.
PIII 500MHz or better
512MB RAM
*More RAM will increase the processing speed of large logs.
ATA100 HDD *Hard Disk Speed is very important. The faster the better.
* If you are generating reports for a period of time over which the accumulated log size is
large (eg. 500MB or more) you will need as much RAM in your machine as you can get your
hands on if you want reports to be generated in a reasonably quick time frame. If you are
prepared to wear the time cost for processing huge accumulated logs, then this is not really an
issue.
As a rule of thumb, if you see large amounts of Hard Disk activity during the report
generation process, then more RAM will help you.
3.3
RADIUS Log processing speed
Due to the nature of RADIUS accounting logs being large in size (anywhere in the range of
tens of Megabytes to Gigabytes), it is recommended that they reside on the same machine
(i.e. local hard disk) that you are running RADREP on, and not on a networked or mapped
drive. Using a network or mapped drive for the location of the log files will work, but
processing performance will be heavily impacted and is not recommended when processing
large accounting logs.
3.4
Installation
To install RADREP you should first download the latest installation package
‘RADREPsetup.exe’ from the RADREP website.
http://www.radiusreporting.com
After you have downloaded ‘RADREPsetup.exe’ simply double click on this installation
package and follow the prompts to install.
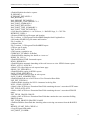
Upon completing a successful installation you will have a RADREP Icon created on your
desktop, and a RADREP folder under your windows Start | Programs menu from which you
can view online help, sample reports and amongst other things the license agreement. You
16
RADREP Installation, Configuration & User Guide
© SecurityBoy Consulting
should read the license agreement and make sure that you agree to and comply with the terms
and conditions set forth for using RADREP in your environment.
To start the RAREP simply double click on the RADREP desktop icon.
RADREP
3.5
Standalone Setup
You can use RADREP to generate reports from a different machine to that on which the
RADIUS server resides. To do this you will need to copy the RADIUS detail logs, which are
produced by your RADIUS server, to another machine where the RADREP software has
been installed, and configure RADREP accordingly so it knows the location of the detail
file(s). When using the RSA ACE/Server, if you choose to run RADREP on another
machine (i.e. Standalone), no additional user information such as First/Last name, Site/O ffice
location, or Group/Department will be obtained from the ACE/Server. The only way to get
this information and display it in the reports is by using the ‘CSV file’ user retrieval method
as described in the ‘Standalone Operation’ part of this manual.
3.6
ACE/Server Integration Setup
In order to use RADREP in an integrated fashion with the RSA ACE/Server database,
radrep.exe must be run from the same machine that the Primary/Master ACE/Server is
installed and running on. Before installing RADREP on the ACE/Server Primary you MUST
be logged in as a user with appropriate permissions to administer the ACE/Server database.
Usually this is the 'administrator' account but it could be some other user name depending on
how you have installed and setup ACE/Server. To test if you have adequate permissions you
can try and run the ACE/Server 'Host Mode' administration. If it runs then you have adequate
permissions otherwise you will have to login as another user that has the correct privileges.
To extract user information from ACE/Server, RADREP communicates with the ACE/Server
database via the RSA provided 'apidemon.exe' utility. The 'apidemon.exe' must reside in the
same directory as 'radrep.exe' for ACE/Server database communication to be successful.
The 'apidemon.exe' is usually located in the <drive>:\ace\utils\toolkit directory of your
ACE/Server Installation.
You must copy the 'apidemon.exe' from this directory into the same directory you installed
RADREP to which by default is usually <drive>:\program files\RADREP\. Make sure you
are logged into the ACE/Server Windows 2000 Machine with adequate permissions. If you
are not logged into Windows 2000 as a user that has adequate permissions to the ACE/Server
database, then when you run RADREP and attempt to 'Retrieve the user list' from the
'ACE/Server Database' you will either receive a database connection error message or get no
response at all.
In order to process ACE/Server's RADIUS logs you of course also need to configure the
location of these logs in RADREP.
17
RADREP Installation, Configuration & User Guide
3.7
© SecurityBoy Consulting
Configuration
The following sections detail how to configure RADREP and what to expect the first time it
is run.
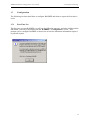
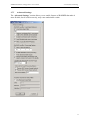
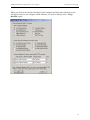
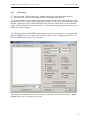
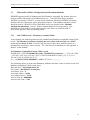
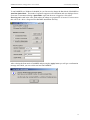
3.7.1
First Time Use
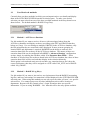
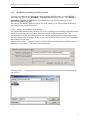
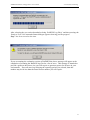
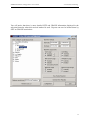
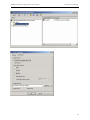
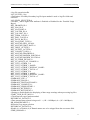
The first time you run RADREP you will see the following message, and after clicking on the
OK button, you will be presented with the ‘RADREP – Configuration’ screen. This
prompts you to configure RADREP so that it has at least the minimum information required
to generate reports.
.
18
RADREP Installation, Configuration & User Guide
© SecurityBoy Consulting
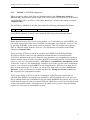
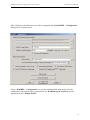
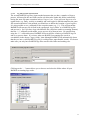
After clicking on the OK button you will be prompted with the RADREP – Configuration
dialogue box as shown below
On the ‘RADREP – Configuration’ screen, the minimum field items that need to be
configured so that reports can be generated are the ‘RADIUS log file locations ’ and an
appropriate report ‘Output Folder’.
19
RADREP Installation, Configuration & User Guide
© SecurityBoy Consulting
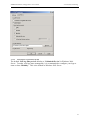
When configuring the location of your RADIUS accounting log(s) you can specify them in
one of two ways by clicking on the appropriate ‘radio button’ with your mouse:
• RADIUS Accounting log #1 - The file location and name of the Primary RADIUS
Accounting log file.
• RADIUS Accounting log #2 - The file location and name of the Secondary RADIUS
Accounting log file.
OR alternatively
• RADIUS Log(s) Folder – The folder location of one or more RADIUS Accounting log
files.
• RADIUS Log File Extens ion – the log file extension to use when looking for accounting
logs in the selected ‘log folder’. (e.g. *.log or *.act) This will allow processing of all logs
in the one folder with the nominated extension. The wildcard *.* can also be used which
will mean that all files in the selected ‘log folder’ will be processed.
• Process all sub-directories – when checked/enabled, this option will look for log files to
process in all sub-directories located under the specified ‘RADIUS Log(s) Folder’.
• Output Folde r - The Location of the report output folder. To configure a ‘Report output
folder’ simply use the browse button and select it.
Once you have configured these items correctly, you will be able to generate reports. To
further customise other settings including those for billing purposes, you will need to have a
good understanding of your environment and RADREP’s capabilities. To configure sections
such as ‘Billing Details’, you will need to first determine how you would like to cost a user’s
usage and then configure the appropriate billing field items. A descriptive guide to each
configurable item can be found in the ‘Billing Details’ section of this manual. Likewise the
advanced features are described in the ‘Advanced Settings’ section of this manua l.
20
RADREP Installation, Configuration & User Guide
3.7.2
© SecurityBoy Consulting
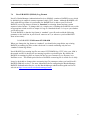
RADIUS Accounting Log File Locations
There are two methods for defining the input locations and file names of your RADIUS
accounting log files on the ‘RADREP – Configuration’ dialogue screen. The ‘RADIUS
Accounting Log File Locations’ section allows you to specify the locations of your
RADIUS accounting log files.
You can use the RADIO button to select one or the other log file input method as detailed
and shown in the screen shots below.
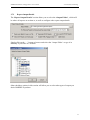
3.7.2.1
Primary & Secondary Log file locations
The first method assumes that you have one or two (primary and secondary) statically named
RADIUS accounting logs to process which may reside in different directories. The
assumption here is that accounting records are continuously appended/written to these logs
and their names will not change. If this is your case then this is the option to use for defining
the locations of your logs.
Simply click on the ‘…’ button to browse to the location and name of the log file or type it in
manually if you know it’s directory location and name.
Clicking on the ‘…’ button allows you to browse to the location of your accounting log file
and select it.
21
RADREP Installation, Configuration & User Guide
3.7.2.2
© SecurityBoy Consulting
Log File(s) Folder and Extension
The second RADIUS log file(s) input method assumes that you have a number of logs to
process, all located in the one folder (and/or sub-directories under this folder) and usually
having the same file name extension such as *.log or *.act. If you roll your logs over on a
regular basis (e.g. Daily, weekly or monthly) and each log has a different name but the same
file extension then this is the method you should use to define the location of your log files.
It is also possible to use a wildcard for the extension name (e.g. *.*). This will mean that
RADREP will treat any file it finds in the configured ‘log(s) folder’ as a RADIUS log file
and process it. So if you have logs with different file extensions (and/or accounting formats)
then the ‘*.*’ wildcard would enable you to process all of them at once. Be careful when
using the ‘*.*’ wildcard because RADREP will treat all files it finds as a RADIUS log file
and try to process them. If you have other non RADIUS accounting files (suc h as
executables) in the chosen ‘log(s) folder’, then although RADREP will automatically detect
that they are not a valid RADIUS log file, it could produce unpredictable results. It is best to
make sure you only have RADIUS logs files stored in this folder and nothing else.
Clicking on the ‘…’ button allows you to browse and select the folder where all your
RADIUS accounting logs reside.
22
RADREP Installation, Configuration & User Guide
3.7.3
© SecurityBoy Consulting
Report Output Details
The ‘Report Output Details’ section allows you to select the ‘Output Folder’, which will
be where all reports are written to, as well as configure other report output details.
Simply click on the ‘…’ button to browse and select the ‘Output Folder’ or type it in
manually if you know it’s location.
Other checkbox options in this section will allow you to select what types of output you
desire RADREP to produce.
23
RADREP Installation, Configuration & User Guide
3.7.3.1
© SecurityBoy Consulting
Dump user details to ‘users.csv’ file.
When selected it will produce a comma-separated file in the selected ‘Output
Folder’ called ‘users.csv’. The contents of the file will differ depending on the
user retrieval method selected in the ‘Retrieve user list from:’ selection box.
If the user list is retrieved from the ‘ACE/Server Database’, then the ‘users.csv’
output file will contain the following field format: (PROFILE field is optional)
SITE GROUP FIRST & LAST NAME DEFAULT LOGIN / USER-NAME PROFILE
If the user list is retrieved from the ‘RADIUS log file(s)’, then the ‘users.csv’
output file will contain the following field format:
RADIUS LOG - User-Name
Note: The above tables are just field name headings, subsequent lines in the
users.csv file would have the values of the named fields, each separated by a
comma.
If the user list is retrieved from a ‘CSV file’ then ‘users.csv’ will not be
produced. This is because it would have been used as the user list retrieval
method and hence have already been created by choosing one of the previous two
retrieval methods.
3.7.3.2
Generate HTML Reports
When this option is selected, RADREP will write HTML formatted output files
into the selected output folder. A ‘Home Page ’ for the web reports will also be
generated and called ‘home.html’
3.7.3.3
Auto Launch HTML Reports
If this option is enabled the user’s web browser will be launched at the
completion of the report generation process and the web reports ‘Home Page’
(home.html) will be displayed, allowing the user to navigate and select which
reports they would like to view.
3.7.3.4
Show CSV Reports on Home Page
If this option is enabled a link to each report in CSV format will be shown on the
web reports ‘Home Page’ (home.html), allowing the user to easily open each
CSV report for viewing in whatever desktop application is associated with the
‘.csv’ file extension. If you have Microsoft Excel installed then it is most likely
that it will be Excel which launches and enables you to view the selected CSV
report. It should be noted that Microsoft Excel has a limitation of displaying up
to 65536 rows of information. In some cases where a ‘Usage Detailed’ report is
generated for thousands of users, Excel will fail to load the entire file. If this
happens you will need to use a different text editor to open and view the ‘.csv’
report file.
3.7.3.5
Enable HTML paging every N table entries
If this option is enabled the web reports will be written in a paged format with a
‘Previous Page’ and ‘Next Page’ navigation option at the end of each web report
table. The number of rows displayed on each page is configured by the value of
24
RADREP Installation, Configuration & User Guide
© SecurityBoy Consulting
N. This option is useful if you have tens of thousands of users that you are
generating reports for because it will limit the table size displayed in the web
browser for each report. One important thing to realise when you enable this
option is that you will loose the ability to sort the entire report table output by the
column headings. Each page of the report will be sortable but not the entire
report. If you need the ability to sort on various columns within the entire report
then you should not enable this item.
3.7.4
Historical Report Archiving
Historical report archiving allows you to choose if and how you want RADREP to archive
each set of reports you produce. Archiving reports is achieved by automatically creating and
rotating a report output sub- folder located directly under the user configured ‘Output Folder’.
The sub- folder name will be dependent on the 'Historical log Rotation' method chosen and
will automatically change periodically as selected by the user. The default is to overwrite
prior reports with new reports that are generated and write them to a sub-folder called
'Overwritten_Reports'.
3.7.4.1
Enabling Historical Archiving
To enable archiving of reports you must decide the period for which you would like reports
to be archived by choosing one of the above drop down options.
For example, if your want to archive reports on a daily basis then you would choose ‘Daily’
from the drop down list. When reports are generated they will be stored in a sub- folder
reflecting the selected report end date day (e.g. 2003_Sun_Jul_13) no matter how many times
they are generated for that end date day. When the report end date is incremented, a new
report sub folder is automatically created for the next days report, leaving the last report run
from the previous day untouched.
The following 5 user selectable historical report folder rotation methods are available:
Never [Always Overwrite]
All reports will be written to the ‘Overwritten_Reports’ sub- folder.
Every Report Run
For every report generation cycle a new sub- folder is created corresponding to the current
date and time. Eg. A sub-folder name of ‘2003_Sun_Jul_13_13-34-56’ would correspond to
a report that was generated on Sunday July 13th 2003 at a time of 13:34:56.
25
RADREP Installation, Configuration & User Guide
© SecurityBoy Consulting
Daily
For each report generation cycle a new sub- folder is created corresponding to the selected
report end date. Eg. A sub- folder name of ‘2003_Sun_Jul_13’ would correspond to a report
that was generated with an end date of Sunday July 13th 2003.
Weekly
For each report generation cycle a new sub- folder is created corresponding to the week of the
year corresponding to the selected report end date. For example a sub- folder named
'2003_Week28' would correspond to a report that had an end date of Sunday July 13th 2003
which falls within Week 28 of the year 2003.
Monthly
For each report generation cycle a new sub- folder is created corresponding to the month of
the year selected in the report end date. Eg. A sub- folder name of ‘2003_Jul’ would
correspond to a report that was generated with an end date of the month of July year 2003.
Historical Reports Index Page (historical.html)
Each time a new set of reports are generated, a new Historical Reports Index page called
'historical.html' is built which contains a list of all previous report runs and allows you to
select and browse each and any of them. The 'historical.html' file will reside in the top level
directory you choose as your 'Report Output Folder'. When clicking on the ‘View Existing
Report(s) button, the historical.html file will be shown to allow you to select which
previously generated report you would like to view.
If you are hosting RADREP reports on a web server, you will need to make your web server
home page or URL link point to the 'historical.html' file if you want to be able to select from
all previous reports that have been generated.
Alternatively, if you will always be overwriting your reports then you can make your web
server home page or URL link point to the directory containing your overwritten reports
which should be as follows:
<drive>:\\<Output Folder>\Overwritten_Reports\home.html
3.7.4.2
Historical Reports when used with ‘Auto Run’ mode
When ‘Auto Run’ mode is enabled the report output sub-folder that is created will be named
depending on the user selected historical report folder rotation method and either the
‘AUTO_RUN_PERIOD’ setting located in RADREP.INI or the REPORT PERIOD in the
'Run mode configuration tool'.
The follows shows what behaviour to expect when using auto run mode:
Never [Always Overwrite]
All reports will be written to the ‘Overwritten_Reports’ sub- folder.
Every Report Run
For each report generation cycle a new sub- folder is created corresponding to the current
date and time. Eg. A sub-folder name of ‘2003_Sun_Jul_13_13-34-56’ would correspond to
a report that was generated on Sunday July 13th 2003 at a time of 13:34:56.
26
RADREP Installation, Configuration & User Guide
© SecurityBoy Consulting
Daily
Sub- folder corresponds to the automated report end date as determined by the
‘AUTO_RUN_PERIOD’ setting in RADREP.INI or the REPORT PERIOD in the 'Run mode
configuration tool'.
Weekly
Sub- folder corresponds to the automated report end date as determined by the
‘AUTO_RUN_PERIOD’ setting in RADREP.INI or the REPORT PERIOD in the 'Run mode
configuration tool'.
Monthly
Sub- folder corresponds to the automated report end date as determined by the
‘AUTO_RUN_PERIOD’ setting in RADREP.INI or the REPORT PERIOD in the 'Run mode
configuration tool'.
Generally speaking, if you enable ‘Auto Run’ mode you should make sur e that the historical
report folder rotation method matches the ‘AUTO_RUN_PERIOD’ in RADREP.INI or the
REPORT PERIOD in the 'Run mode configuration tool'.
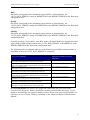
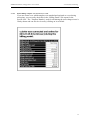
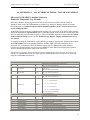
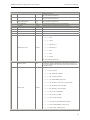
The following table recommends what to set the historical report folder rotation method to
depending on how the AUTO_RUN_PERIOD is configured.
AUTO_RUN_PERIOD
Value: 1 (Current Day).
Start of the current day to the end of the current day.
Value: 2 (Current Month).
Start of the current month to the end of the current day of month
Value: 3 (Current Year).
Start of the current year to the end of the current day.
Value: 4 (Previous Day).
Start of the previous day to the end of the previous day.
Value: 5 (Previous Month).
Start of the previous month to the end of the previous month.
Value: 6 (Last 7 Days)
Start date is seven days prior to the current date.
Value: 7 (Last 14 Days)
Start date is fourteen days prior to the current date.
Value: 8 (Last 21 Days)
Start date is twenty one days prior to the current date.
RECOMMENDED HISTORICAL
REPORT FOLDER ROTATION
METHOD
Daily or Every Report Run*
Monthly or Every Report Run*
Never [Always Overwrite]
Daily or Every Report Run*
Monthly or Every Report Run*
Never [Always Overwrite]
Never [Always Overwrite]
Never [Always Overwrite]
*Every Report Run will create a new output sub- folder each time you click on the
‘Generate New Report(s)’ button, potentially consuming considerable disk space. If you
intend to automatically run reports a number of times for the same start-end period then it is
advised to use one of Daily, Weekly or Monthly as the ‘Historical Report Folder Rotation
Method’.
27
RADREP Installation, Configuration & User Guide
3.7.5
© SecurityBoy Consulting
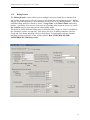
Billing Details
The ‘Billing Details’ section allows you to configure how you would like to allocate fixed
and variable based costs to each site, group or user during the selected report period. Billing
charges, costs and allowances can be allocated based on one of two Billing Models. The two
available billing models are based on a user’s Usage Time or the Data Volume which they
transfer. Optionally fixed service costs (such as a monthly subscription or service fee) and a
Per Connect charge can be allocated to either billing model.
The ability to define different billing rates for different Sites, Groups or Users is available in
the ‘Extended’ product version only. This allows for up to 50 billing templates with Site,
Group and User-Name matching criteria to be defined. For information on how template
matching criteria works refer to the section entitled ‘How SITE/GROUP/USERNAME/PROFILE Matching works’.
28
RADREP Installation, Configuration & User Guide
© SecurityBoy Consulting
The following cost items are available for configuration:
3.7.5.1
Billing Model
This is option is configurable on a per template basis and allows you to specify
the model on which you would like to charge/cost a particular site, group or users
usage of the service. Selecting ‘Usage Time’ will cause RADREP to calculate
the users costs/charges based on the amount of time the y were connected during
the billing period. Selecting ‘Data Volume’ will cause RADREP to calculate the
users costs/charges based on the amount of data they transfer during the billing
period. The default model is ‘Usage Time’.
3.7.5.2
Fixed Service Cost A [$] {E.g. Token}
This is optional and specifically used to represent any fixed cost entities
associated with providing a Remote Access Service during the selected report
period. In some cases this may be the monthly cost of providing the end user
with an optional component such as the cost of a SecurID token or Smart Card.
If you do not want to use this cost then make its value 0. Valid values are in
dollars and cents. E.g. 1.25 would be 1 dollar and 25 cents.
3.7.5.3
Fixed Service Cost B [$] {Min Service Fee}
This is specifically used to represent the minimum fixed service fee for the report
period (usually monthly) associated with providing a Remote Access Service. If
you do not want to use this cost then make its value 0. Valid values are in dollars
and cents. E.g. 1.25 would be 1 dollar and 25 cents.
3.7.5.4
Cost per Connect [$] {Session Fee}
This is the amount which is charged each time a user makes a connection.
Usually this applies if the user is on a pay as you go data plan.
If you do not want to use this cost then make its value 0. Valid values are in
dollars and cents. E.g. 1.25 would be 1 dollar and 25 cents.
3.7.5.5
Variable Cost [$] {Hourly Fee}
The variable cost is the hourly fee (actually calculated per second of usage),
which you want to charge the end user for being connected. Valid values are in
dollars and cents. E.g. 1.25 would be 1 dollar and 25 cents.
3.7.5.6
Time Covered by Min Service Fee {hrs.min}
This is the amount of time the user can use the service before the variable cost
also starts to apply. If the user does not use the service for more than this value
then they will only pay the ‘Minimum service Fee’ (Fixed Cost B) plus any other
configured costs. If the user exceeds the ‘time covered by the minimum service
fee’, then the ‘Variable Cost’ rate will apply for all time exceeding this value,
calculated on a per second basis. If you do not want to include any ‘free
connection time’ in the minimum service fee then make this value 0. Valid
values are in minutes and seconds.
Examples.
1.25 would equate to 1 Hour and 25 minutes.
12.59 would equate to 12 Hours and 59 minutes.
29
RADREP Installation, Configuration & User Guide
3.7.5.7
© SecurityBoy Consulting
Cost [$] per MB SENT and RECEIVED combined
This is the per megabyte charge rate at which you want to charge the user for the
amount of data which they have sent and received (combined) during the report
period. Users will be charged this rate calculated down to the number of bytes
they have transferred.
Valid values are in dollars and cents. E.g. 1.25 would be 1 dollar and 25 cents.
3.7.5.8
MB Covered by Min Service Fee. SENT and RECEIVED combined
This is the amount of data in megabytes that the user can send and receive before
the ‘Cost [$] per MB SENT and RECEIVED combined’ also starts to apply. If
the user does not transfer more data than the specified amount in this field, then
they will only pay the ‘Minimum service Fee’ (Fixed Cost B) plus any other
configured costs. If the user exceeds the megabyte value in this field, then the
configured cost/charge rate per megabyte will apply for all data exceeding this
value, calculated on a per bytes transferred basis. If you do not want to provide
the user with a data transfer volume allowance which is part of their minimum
service fee, then make this value 0.
Valid values are in Megabytes with up to two (3) decimal places.
Examples.
1.255 would equate to 1.255 Megabytes.
3.7.5.9
Cost [$] per MB SENT / RECEIVED (separate)
This is the per megabyte rate at which you want to charge the user for the amount
of data which they have sent and/or received during the report period. Users will
be charged this rate calculated down to the number of bytes they have transferred.
If you only want to charge the user for data which they received, then make the
SENT cost 0. If you only want to charge the user for data which they sent, then
make the RECEIVED cost 0.
Valid values are in dollars and cents. E.g. 1.25 would be 1 dollar and 25 cents.
3.7.5.10
MB Covered by Min Service Fee. SENT / RECEIVED (separate)
This is the amount of data in megabytes that the user can send/receive before the
‘Cost per MB SENT / RECEIVED’ also starts to apply. If the user does not
transfer more data than the specified amount in the SENT and RECEIVED fields,
then they will only pay the ‘Minimum service Fee’ (Fixed Cost B) plus any other
configured costs. If the user exceeds the ‘Megabytes covered by the minimum
service fee’ for the configured SENT or RECEIVED amounts, then the
configured cost/charge rate per megabyte for each of SENT and RECEIVED will
apply for all data exceeding the se values, calculated on a per bytes transferred
basis. If you do not want to provide the user with a data transfer volume
allowance which is part of their minimum service fee, then make these values 0.
Valid values are in Megabytes with up to two (3) decimal places.
Examples.
1.255 would equate to 1.255 Megabytes.
30
RADREP Installation, Configuration & User Guide
3.7.5.11
© SecurityBoy Consulting
Data Measurement
This feature allows you to decide if you want to measure data traffic volume
using the decimal system where 1 Kilobyte = 1000 Bytes, or the binary system
where 1 Kilobyte = 1024 Bytes. Most IT people will choose the binary
measurement system because this is really the system on which computers
calculate data storage volume; however others such as Internet Service Providers
usually will use the decimal system as it is obviously more beneficial for them.
The default measurement scheme is binary where 1KB = 1024 bytes.
3.7.5.12
TAX Rate [%]
This is the amount of TAX charged, usually dictated by local taxation rule. In
Australia for instance this would correspond to the GST (Goods and Services
Tax) amount and would be set at 10 percent. In other countries it may correspond
to a VAT (Value Added Tax). If you do not want to add a percentage of tax to the
end calculated costs then make its value 0. Valid values can include up to 3
decimal places. E.g. 10.255 would be 10.255 percent.
3.7.5.13
Currency Symbol
This configuration option allows you to set your local currency symbol for the
Billing reports. You can choose one from the drop down list or type in your own
symbol. By deleting any value from this field and leaving it blank the billing
reports will show no currency symbol.
31
RADREP Installation, Configuration & User Guide
3.7.6
© SecurityBoy Consulting
How SITE/GROUP/USER-NAME/PROFILE Matching works
For each billing template you enable, separate matching criteria and billing rates can
be defined. Whe n processing a user, the user’s SITE, GROUP and User-Name
details are compared against those of the billing templates. If a match is found then
the template’s values are used to appropriately assign charges/costs to the user. If
no match is made to any template then the user will be assigned the ‘Default’ billing
template – Template 0. If the Default billing template is disabled then all associated
costs/charges for the user will be 0.
Wildcard name matching can be used when defining the SITE NAME, GROUP
NAME or USER NAME matching criteria fields as follows:
* = match all/any. This is the same as disabling the field with it’s checkbox.
*ending = match anything ending with the word ‘ending’
starting* = matching anything starting with the word ‘starting’
Wildcards CANNOT be used in the middle of words.
The order in which you define your templates is important only if you define many
templates that use the same field(s) to define the matching criteria. (eg. All
templates use the USER NAME field only)
Template matches are made against the ‘Most Specific’ information first and to the
least specific information last.
3.7.6.1
Matching Order & Comparison Specifics
S = SITE NAME
G = GROUP NAME
U = USER NAME
P = PROFILE
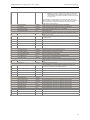
The following shows the order in which matching comparisons are done:
S and G and U and P
Most Specific match
S and G and U
G and U and P
S and U and P
S and G and P
G and U
S and U
S and G
U and P
G and P
S and P
U
G
S
P
Least Specific match
32
RADREP Installation, Configuration & User Guide
© SecurityBoy Consulting
Templates which are enabled and use the same fields to define matching information
are order specific. The first match found will become the users assigned billing
template.
Example1:
I have a number of users who are identified as belonging to an external company by
their User-Name (Login-ID). Each of these users has a username that ends in
@externalcompanyname. Eg. jdoe@externalcompanyname
If I wanted to bill these users at a specific rate all I would need to do is enable a
billing template and configure it with matching criteria for the ‘USER NAME:’ field
that contained ‘*@externalcompanyname’.
Example2:
I have an exception to the matching criteria defined in Example1. There is one user
from the external company that I do not want to bill. So I define another template,
defining the exact user name that I want to exclude from being billed (e.g.
md@externalcompanyname) in the USER NAME field and make sure the template
is located before the one created in Example1. Because both templates use only the
USER NAME field to define matching criteria the template order is important
because the first match found will be used as the users assigned template.
Another way to do this would be to have more specific matching criteria such as the
addition of the users SITE or GROUP name. This would then automatically get
precedence over just a user- name match because it is a more specific match. In this
case the order would not matter unless there was another template which also used
SITE or GROUP name plus the USER NAME as its matching criteria.
33
RADREP Installation, Configuration & User Guide
3.7.6.2
© SecurityBoy Consulting
Which Billing Template was used for user XYZ?
If you are unsure as to which template was matched and assigned to a user during
processing, you can easily check this in the ‘Billing Detail’ web report for the
specific user. The ‘Template Number’ used for calculating the users charges/costs is
clearly shown and can also be viewed by clicking on its web link.
34
RADREP Installation, Configuration & User Guide
3.7.7
© SecurityBoy Consulting
Advanced Settings
The ‘Advanced Settings’ section allows you to enable features of RADREP that make it
more flexible, but if used incorrectly, may cause undesirable results.
35
RADREP Installation, Configuration & User Guide
3.7.7.1
© SecurityBoy Consulting
RADIUS Log File - User-Name Retrieval
User-Name import filter
When you enable this option and specify a pattern of characters to filter username on, only users that match the pattern will be imported from the RADIUS
log files into the RADREP site/group/user hierarchy.
Example 1.
A Filter pattern of ‘*@*’ (no quotes) would only import users which have an ‘@’
sign in their user-name.
Example 2.
A Filter pattern of ‘sales*’ (no quo tes) would only import user-names which
started with the string ‘sales’.
3.7.7.2
RADIUS Log File - User-Name Retrieval
Retrieve and display ONLY user-names valid for the selected start-end period.
When this is selected only Login IDs that have activity within the configured start
and end dates will be shown for selection in the hierarchy. If this option is no t
selected then all Login IDs appearing in the RADIUS accounting Logs will be
shown in the selection hierarchy. This option only applies when the ‘Retrieve
user list from:’ selection box is set to ‘RADIUS log file(s)’.
3.7.7.3
RADIUS Log File - User-Name Retrieval
Enable User-Name CASE sensitivity
By default this option is not selected so user-names are treated as not being
CASE sensitive. This means for example that for reporting purposes RADREP
will treat the user-names ‘securityboy’, ‘SecurityBoy’ and ‘SECURITYBOY’ as
the same single user.
If this option is enabled then all user- names are treated in a CASE sensitive
manner. So if we use our previous example of user- names ‘securityboy’,
‘SecurityBoy’ and ‘SECURITYBOY, these would now be reported on as three
distinct/unique users.
3.7.7.4
RADIUS Log File - User-Name Retrieval
Strip DOMAIN prefix from User-Name
By enabling this option, any DOMAIN name that prefixes a user-name in the logs
will be removed. So a field in the logs which contains the user-name field of the
form ‘MYDOMAIN\securityboy’ would simply become ‘securityboy’. This
option is most useful when using RADREP with Microsoft IAS logs, although
some other lo g formats also record the user-name field with the full DOMAIN
prefix.
The Default is not to remove any DOMAIN name information from the username field in the logs.
36
RADREP Installation, Configuration & User Guide
3.7.7.5
© SecurityBoy Consulting
RADIUS Log File - User-Name Retrieval
Filter on specific NAS-IP-Address
This option is only available when the Filter on NAS-IP-Address option has
been enabled and configured under the RADIUS Log File – Processing Options
section. When enabled only users that have logged into the specified NAS-IPAddress will be shown in the SITE/GROUP/USER selection hierarchy.
For billing purposes where you want to bill everyone a fixed minimum service
fee regardless of whether they connected to the specific NAS, you will not want
to enable this option. When this option is disabled but the Filter on NAS-IPAddress option is enabled under the RADIUS Log File - Processing Options
area, all users will appear in the reports, but only those who logged into the
specified NAS server will have activity shown against their names in the reports.
This option is disabled by Default.
3.7.7.6
RADIUS Log File - Processing Options
Filter on NAS-IP-Address
By enabling this option you can generate NAS (RADIUS Client) specific reports.
When enabled, this option will allow you to specify the IP-Address of a NAS
server (RADIUS Client) which you want to filter out of the logs and generate
reports for. Reports are only generated for accounting data relating to the NAS
Server (RADIUS Client) IP address specified. All other accounting data is
ignored. When this option is disabled reports are generated for all NAS Servers
found in the log file(s). Default value is disabled.
3.7.7.7
RADIUS Log File - Processing Options
Enable INTERIM Record Processing.
By enabling this option RADREP will process INTERIM accounting data in your
log files and use this to calculate a user’s true data transfer and time usage for the
report period selected. INTERIM accounting data adds a great deal of overhead
to the size of a log file, but does give you the ability to generate reports for users
who stay logged into the same session for long periods of time (i.e. across
multiple report periods). In the case of most wireless accounting solutions, a
STOP record is never actually written to the accounting log file, so unless
INTERIM data is periodically logged and this option is enabled in RADREP, you
would not usually be able to generate reports for such use cases.
Default value is disabled.
3.7.7.8
RADIUS Log File - Processing Options
Warn about bad date ranges.
Selecting this option will mean that if there is no activity in the log file between
the report START and END dates selected, a Warning popup message will
appear informing you of this. The default for this option is off or not selected.
This is because if you process a directory containing many log files it could
become quite annoying having a popup warning message appearing for each log
that is processed and has accounting entries outside the selected report start-end
date range. If you want to be notified about each log that is outside the selected
start-end date range then enable this option.
37
RADREP Installation, Configuration & User Guide
3.7.7.9
© SecurityBoy Consulting
RADIUS Log File - Processing Options
For the Concurrency and Active User reports, process ALL users in the log file.
When enabled (the Default), the Concurrency and Active User reports will
process and show all users found in the log files and not just those selected for
usage report generation in the site/group/user hierarchy.
When this option is disabled (cleared) only those users selected in the
site/group/user hierarchy will be processed and shown in the Concurrency and
Active user reports.
If you want a report on Concurrency and Active users for a specific NAS/RAS
device then it will only reflect true concurrency if this setting is left at its default
and all users are processed for these reports.
If you want a report on Concurrency for just those users you have selected or
loaded into the site/group/user hierarchy then unselect (clear) this option.
3.7.7.10
Log File Processing Options
Log File ‘Date Format’ (IAS & CSV logs)
Microsoft IAS and CSV (Comma Separated Values) RADIUS log files do not
have a standard Date field format (unlike Livingston logs). So this option allows
you to set the format of the date field as seen in your IAS or CSV formatted log
file. The default Date field format is ‘Month/Day/Year’ in the format
MM/DD/YYYY.
3.7.7.11
Microsoft IAS Log File Processing Options
Process IAS ‘Access Accept’ packets
By default this option is disabled. If it is enabled and you process an IAS log
with Access Accept packets in it, then Access Accept data will appear in the ‘IAS
– Accept/Deny’ report.
3.7.7.12
Microsoft IAS Log File Processing Options
Process IAS ‘Access Deny’ packets
By default this option is enabled. If it is enabled and you process an IAS log with
Access Deny packets in it, Access Denied data will appear in the ‘IAS –
Accept/Deny’ report.
3.7.7.13
Microsoft IAS Log File Processing Options
IAS Service Name
By default the Microsoft IAS Service name is ‘IAS’ (uppercase). This name gets
written to the logs and is used by RADREP to automatically detect that the log is
an IAS log. If you change the IAS Service name from it’s default value, then
RADREP will not be able to detect the log type. An ‘Unknown Log Type’
message will be displayed when attempting to process these logs. So that
RADREP can correctly identify the logs as IAS logs, you will need to change this
value to match whatever value you have defined in your IAS server configuration
under the IAS Service name TAB.
3.7.7.14
ACE/Server Extension Data Fields
Use Extension Data Fields
When this checkbox is selected, RADREP will retrieve a user's Site/Office,
Group/Department and PROFILE information from the ACE/Server using the
named extension data fields in the SITE, GROUP and PROFILE edit boxes.
SITE: / GROUP: / PROFILE:
The default extension data field name for a user’s Site/Office has been set to
SITE, for Group/Department it has been set to GROUP and for their associated
38
RADREP Installation, Configuration & User Guide
© SecurityBoy Consulting
billing PROFILE (optional) it has been set to PROFILE-NAME. You should
make sure that these names match the user extension data field names that you
have defined for each user in your ACE/Server database. To function correctly
each user in the ACE/Server Database should have an extension data field that
represents the users Site/Office, another which represents the users
Group/Department and optionally a Profile name field that represents the user’s
remote access billing profile. If this feature is enabled and a user does not have
the configured extension data field names in the ACE/Server database, then they
will be assigned to a site called NO_SITE and a group called NO_GROUP.
When entering the names of the ACE/Server user extension data fields into the
RADREP SITE and GROUP fields, you should note that they are case sensitive
and must match exactly the field names that are in the ACE/Server.
39
RADREP Installation, Configuration & User Guide
4
4.1
© SecurityBoy Consulting
REPORT SELECTION & OUTPUT FORMATS
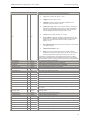
Selecting Report Types
To select which report types you want RADREP to generate it is a simple matter of
selecting or unselecting the appropriate check boxes as shown below:
At least one report must be enabled before the report generation process can start.
Note: The Microsoft IAS Accept/Deny report is enabled or disabled in the Advanced
Settings configuration area. This is because Microsoft IAS Access Accept/Deny
data is an extension to RADIUS accounting rather than part of the standard.
4.2
Report Output Formats
4.2.1
CSV Format
Each report type that is selected is automatically generated in CSV (Comma
Separated Values) format. CSV files can be directly opened by Microsoft Excel for
viewing and further manipulation. You cannot turn off the generation of CSV
formatted reports.
4.2.2
HTML Format
HTML (web) formatted report output is enabled by default but can be disabled in the
configuration dialogue screen by unselecting the ‘Generate HTML Reports’ check
box. Optionally the ‘Auto Launch HTML Reports’ checkbox can be selected if
you want to automatically launch your web browser and view the web based reports
when the report generation process has completed.
40
RADREP Installation, Configuration & User Guide
5
© SecurityBoy Consulting
USAGE REPORTS – ATTRIBUTE/FIELD CONFIGURATION
To configure which attributes/fields get displayed in the ‘Usage Summary’ and Usage
Detailed’ reports you need to click on the small buttons located on the main RADREP
application dialogue. The check boxes which enable/disable the ‘Usage Summary’ and
‘Usage Detailed’ reports MUST be selected in order for the attribute/display-field selection
buttons to also become available. If either Usage report is not selected then its
‘Attribute/Display Field Configuration’ button will also not be selectable.
When you click on the Summary Attribute/field Configuration Button the following screen
will appear and you can configure which attributes you want to display in the ‘Usage
Summary’ report.
41
RADREP Installation, Configuration & User Guide
© SecurityBoy Consulting
When you click on the Detailed Attribute/field Configuration Button the following screen
will appear and you can configure which attributes you want to display in the ‘Usage
Detailed’ report.
42
RADREP Installation, Configuration & User Guide
5.1
© SecurityBoy Consulting
Ascend Attribute Compatibility and Equivalence
For reporting purposes the following IETF and ASCEND attributes are seen to be equivalent.
By enabling the respective IETF attribute it will also mean you enable the equivalent
ASCEND attribute even though only one or the other will be in your accounting log file stop
records.
Framed-IP-Address (IETF) = Framed-Address (ASCEND)
NAS-IP-Address (IETF) = NAS-Identifier (ASCEND)
5.2
Custom/User Defined Attribute Configuration
The way to configure ‘Custom Attributes’ depends on the log type you are processing
which can be one of Livingston format, IAS Database compatible format, IAS
Native/Standard format, Funk Steel Belted Radius format, CISCO Secure (ACS) format or
CSV log format.
IMPORTANT NOTE: Any attribute you want to report on MUST be in your accounting
STOP records. If the attribute is not in an accounting STOP record then it will not be
processed by RADREP and hence will not be shown in the detailed usage report.
5.2.1
For Livingston Formatted RADIUS logs
Simply look at your log file(s) STOP records, identify the attribute name you want to show in
the detailed usage report and type it into one of the custom ‘Attrib Name or MS# or Field#’
fields in exactly the same case as it is seen. You can also enter the column heading ‘Display
Name’ that you want this attribute displayed as in the reports and optionally total the data if
it is numeric in nature by selecting the ‘Total’ checkbox.
5.2.2
For IAS Database Compatible RADIUS logs
Enter the field number of the IAS attribute you want to report on in the ‘Attrib Name or
MS# or Field#’ data entry field. You can work out the IAS field number by opening an
existing IAS database compatible log file (*.log) with a text editor, locate a STOP record (i.e.
field 32 has a value of 2), and count the number of fields (separated by commas) until you get
to the field you want to display.
Once you have the desired field number you can enter this number into the ‘Attrib Name or
MS# or Field#’ data entry field. You can also enter the column heading ‘Display Name ’
that you want this attribute displayed as in the reports and optionally total the data if it is
numeric in nature by selecting the ‘Total’ checkbox.
For a full list of IAS attributes see the appendix A of this manual.
43
RADREP Installation, Configuration & User Guide
5.2.3
© SecurityBoy Consulting
For IAS Native/Standard RADIUS logs
IAS Standard logs write their accounting data as consecutive RADIUS attribute/value pairs.
Microsoft, in their infinite wisdom, does not number RADIUS attributes according to the
IETF standard so you will need to lookup the ‘Microsoft Attribute ID Number’ that you
want to display and report on. See Microsoft ’s Windows 2000 Server documentation website
for full details on Microsoft RADIUS attribute ID numbering and vendor-specific attribute
ID numbering. You can also see appendix B and C of this manual for a list of ‘Microsoft
Attribute IDs’ that were current as of writing this manual.
Once you have the desired Microsoft attribute ID number you can enter this number into the
‘Attrib Name or MS# or Field#’ data entry field. You can also enter the column heading
‘Display Name ’ that you want this attribute displayed as in the reports and optionally total
the data if it is numeric in nature by selecting the ‘Total’ checkbox.
5.2.4
For Funk SBR, CISCO & other CSV formatted RADIUS logs
The first line of these logs (i.e. the header) has the attribute names (comma separated) and
field order of each subsequent accounting record that is written to the log file. You can work
out the attribute you want to display and its field number by opening an existing CSV
formatted Radius log file (eg. *.csv, *.act), looking at the header, and counting the number of
fields (separated by commas) until you get to the field/attribute-name you want to display.
Once you have the desired field number you can enter this number into the ‘Attrib Name or
MS# or Field#’ data entry field. You can also enter the column heading ‘Display Name ’
that you want this attribute displayed as in the reports and optionally total the data if it is
numeric in nature by selecting the ‘Total’ checkbox.
44
RADREP Installation, Configuration & User Guide
6
© SecurityBoy Consulting
HOW TO GENERATE REPORTS
The RADREP main application screen shows how easy it is to make a selection from the user
hierarchy and then generate RADIUS usage and billing reports.
The hierarchy of SITE/GROUP/USER is retrieved and constructed when the user presses the
‘Retrieve User List’ button. Upon user retrieval completion a hierarchy is displayed to the
end user so that they can make their user selection before generating reports. This makes it
simple to select and generate reports at 4 different levels:
Level 1: The ‘Entire Company’ (Tree Root)
Level 2: For a Selected SITE only
Level 3: For a select SITE and specific GROUP within that site.
Level 4: For a specific SITE, GROUP and USER.
Both the billing and usage reports have the option of being summary and/or detailed. Please
see the ‘RADREP Sample Reports’ document for details of what these reports look like.
6.1
Report Generation Steps
There are three steps to perform in order to generate reports: Configuration, Selection and
Generation.
6.1.1
Configuration
1. Configure the location and names of your RADIUS accounting log files under the
RADREP configuration screen.
2. Configure an ‘Output Folder’ where the reports will be written.
3. If desired, configure any other settings required for ACE/Server integration, and the
relevant billing rates and fees if billing reports are going to be generated.
6.1.2
Selection
4. Select the types of reports you want to produce. Billing and/or Usage (summary and/or
detailed)
5. Select the START DATE and END DATE for the report. Make sure that the RADIUS
accounting Logs actually have accounting records for this period otherwise you will not see
anything in the reports.
6. Select the ‘Retrieve User List from’ method. If you are running reports from the same
machine as the ACE/Server Primary, choose ‘ACE/Server Database’, otherwise choose
‘RADIUS Log file(s)’. If you have you own custom ‘users.csv’ file then select ‘CSV File’
and make sure your ‘users.csv’ file is located in the configured ‘Output Folder’.
7. Press the ‘Retrieve User List’ button to retrieve and display a list of SITES, GROUPS and
USERS.
8. From the displayed SITE/GROUP/USER hierarchy, select the level at which you would
like to run the reports. See levels 1 to 4 above.
45
RADREP Installation, Configuration & User Guide
6.1.3
© SecurityBoy Consulting
Generation
9. Now press the ‘Generate Report(s)’ button to begin the report generation process.
10. The status bar will show the progress of the report generation process.
11. Upon completion, you will have the selected reports written to the ‘Output Folder’ you
configured in CSV (Comma Separated Values) format. If you selected the ‘Generate HTML
Reports’ option and ‘Auto Launch HTML Reports’ then the ‘Home Page’ of the web/html
reports will be launched in your web browser. You can then navigate the web reports as you
would any other web page.
The following shows the RADREP main dialogue screen at start-up time. It is assumed that
steps 1, 2 and 3 have been completed at this time. Refer to the ‘Configuration Section’ on
how to complete these steps if you are unsure.
You will notice that there are no users to select, as they have not been retrieved yet. Steps
4,5 and 6 have been completed at this time.
46
RADREP Installation, Configuration & User Guide
© SecurityBoy Consulting
After selecting the user retrieval method as being ‘RADIUS Log file(s)’ and then pressing the
‘Retrieve User List’ button the Status dialogue appears showing you the progress.
Step 7 has been started at this time.
If you are running the evaluation version of RADREP the above message will appear at the
completion of scanning the RADIUS log files for a list of users. This message is intended to
provide a guide on the license size you will require to generate reports for all users in your
environment. If not all users log- in during the reporting period you selected, then this
number may be far less than the actual license number you will require.
47
RADREP Installation, Configuration & User Guide
© SecurityBoy Consulting
Selecting the demonstration user ‘cclarke’ from the hierarchy will generate reports only for
this user. Step 8 is complete at this stage.
The ‘Generate Report(s)’ button has been pressed (Step 9) at this stage and the report
generation process has begun. The above Status dialogue box shows the current progress of
the report generation process. Step 10 is in progress at this stage.
48
RADREP Installation, Configuration & User Guide
© SecurityBoy Consulting
Once the report generation process is finished you will see the above confirmation message.
This message also shows the location where the reports were written to. If you want to view
the CSV reports you will need to browse to this location and open them in Microsoft Excel.
49
RADREP Installation, Configuration & User Guide
© SecurityBoy Consulting
If web reports are selected and the auto launch option is enabled then you will see the
following web page when once you click on the ‘OK’ button to acknowledge that the report
generation process has finished. From here you can pick which reports you would like to
view.
50
RADREP Installation, Configuration & User Guide
© SecurityBoy Consulting
The following screens show the difference when the ‘ACE/Server Database’ (or Extended
format CSV file) is selected as the user retrieval method instead of the ‘RADIUS Log file(s)’.
51
RADREP Installation, Configuration & User Guide
© SecurityBoy Consulting
You will notice that there is more detailed SITE and GROUP information displayed in the
selection hierarchy when this retrieval method is used. Reports can now be broken down by
SITE or GROUP associations.
52
RADREP Installation, Configuration & User Guide
© SecurityBoy Consulting
6.2
Report Output – File Naming Conventions
6.2.1
CSV Output Files
The following table shows the naming convention used for reports generated in CSV format.
This is with the Windows regional settings set to English [Australian]. When the regional
settings are set to English [United States] the DAY and MONTH are in the reverse order.
E.g. BD-01-May-2001_to_08-Apr-2002.csv would become BD-May-01-2001_to_Apr-082002.csv
File Name
Purpose
BD-01-May -2001_to_08-Apr-2002.csv
BS-01-May -2001_to_08-Apr-2002.csv
UD-01-May -2001_to_08-Apr-2002.csv
US-01-May -2001_to_08-Apr-2002.csv
users.csv
Billing Detailed report.
Billing Summary report.
Usage Detailed report
Usage Summary report
Dump of each user’s user-name and grouping details.
6.2.2
HTML Output Files
The following table shows the naming conventions used for each of the files produced when
the ‘Generate HTML Reports’ option is selected.
File Name
home.html
historical.html
us-user-index.html
<user-name>-us.html
ud-user-index.html
<user-name>-ud.html
Usage-Summary-Totals.html
con-explain.html
active-users-<NAS-IP-Address>.html
active-explain.html
IAS-AA-AD-report.html
bs-user-index.html
<user-name>-bs.html
bd-user-index.html
<user-name>-bd.html
Billing-Summary-Totals.html
Billing-Cost-Rates.html
TermCauses.html
AscendDiscCauses.html
<Framed-IP-Address>.html
NAS-Usage-Summary.html
NAS-<IP-Address>-detail.html
concurrency-<NAS-IP-Address>.html
active-users-<NAS-IP-Address>.html
NAS-Port-Usage-Index.html
NAS-<IP-Address>-Port-Usage-Summary.html
NAS-<IP-Address>-port -<Port-Number>.html
NAS-Port-Type-Usage-Index.html
NAS-<IP-Address>-Port-Type-Usage-Summary.html
NAS-<IP-Address>-porttype-<Port -Type>.html
Purpose
Home page for the current reports.
The Historical Reports Selection page.
Index for the Usage Summary reports.
Usage Summary report for the named user.
Index for the Usage Detailed reports.
Usage Detailed report for the named user.
Usage Totals and Averages.
Explanation of concurrency results.
Shows active/logged in users for the stated NAS.
Explanation of active user results.
Microsoft IAS - Access Accept/Deny report.
Index for the Billing Summary reports.
Billing Summary report for the named user.
Index for the Billing Detailed reports.
Billing Detailed report for the named user.
Billing Totals report.
Billing Costs and Rates used.
IETF Terminate Cause explanations.
Ascend Disconnect Cause explanations.
Usage per relative <Framed-IP-Address>.
Usage Summary for all NAS Servers.
Detailed Usage for the stated NAS <IP-Address>.
Shows user concurrency and log stats for the stated NAS.
Shows active/logged in users for the stated NAS.
Index of NAS Servers with a Port Number usage report.
Usage Summary for the Port Numbers on the stated NAS.
Detailed Usage report for the stated NAS and port number.
Index of NAS Servers with a Port-Type usage report.
Usage Summary for the Port -Types on the stated NAS.
Detailed Usage for the stated NAS and Port-Type.
53
RADREP Installation, Configuration & User Guide
6.3
© SecurityBoy Consulting
Report Generation Speed
To give you some idea of the time it takes RADREP to process RADIUS Accounting Logs
and generate reports, the following benchmark information is provided as a guide.
Processing the RADIUS accounting logs is the task that takes the greatest time during the
report generation process. After processing the RADIUS accounting logs, the report
generation process itself (i.e. writing the reports to disk) is fairly negligible from a time point
of view. All efforts have been made to increase the performance and speed of processing the
RADIUS logs, and hence the overall time it takes to generate usage and billing reports.
Ultimately the time it takes to generate reports will vary depending on the following:
• Accumulated size of all RADIUS accounting logs to be processed.
• Number of users for which report will be generated.
• Processor speed of the machine running RADREP.
• RAM (memory) in the machine running RADREP.
• Hard Disk speed of the machine running RADREP.
6.3.1
Report Generation Speed Limitations
Currently RADREP uses as much RAM as it can get hold of during the log processing and
data collection phase. Once RAM is depleted it then uses Windows Virtual memory which
tends to slow down the report generation process significantly. Future versions of RADREP
will have improvements in this area to make log file processing speed less dependent on the
amount of RAM which a machine has installed. Customers who process extremely large
accumulated logs (> 1GB) will benefit the most from these future enhancements.
Until these enhancements are included if you want to generate reports quickly from large
accumulated logs it is recommended to either:
- Limit/reduce the report start-end date period.
- Limit/reduce the number of users for which reports are generated by generating
reports for one group or site at a time.
- Add as much RAM to the machine running RADREP as possible. This will greatly
improve performance.
- Use a machine with the fastest processor (CPU) you can acquire.
54
RADREP Installation, Configuration & User Guide
6.3.2
© SecurityBoy Consulting
Benchmark Result for a 52MB RADIUS Log
PC Hardware Details:
PIII 866MHz
256 MB RAM
ATA100 Hard Disk
RADIUS Accounting log details:
52MB Livingston RADIUS accounting log.
Entries starting on the 1st May 2001 and ending on 8th April 2002. (343 days)
1082 Users.
Task
Retrieve User List
Report Generation Time
Time Taken
35 seconds
46 seconds
Disk space used for generation of ALL reports and all report formats was 22 Megabytes with
3,260 files being written. 5 CSV output files and 3,255 HTML files. Approximately 120MB
of RAM was used during the report generation process.
55
RADREP Installation, Configuration & User Guide
7
7.1
© SecurityBoy Consulting
RADIUS ACCOUNTING LOG - FORMAT REQUIREMENTS
RADIUS accounting detail log - file formats & examples
RADREP will process and generate reports from RADIUS accounting logs that are written in
the Livingston, Microsoft IAS and CSV (Funk Steel Belted RADIUS & CISCO) Accounting
formats.
RADREP is verified to work with the following RADIUS Servers and Client Devices:
• Microsoft IAS RADIUS
• Livingston
• Funk Steel Belted Radius
• CISCO Secure (ACS)
• Novell BorderManager (BMAS) RADIUS Services
• SafeWord PremierAccess
• RSA ACE/Server
• ClearBox RADIUS Server
• Aradial RADIUS Server
• TCCRadius (Talon Computer Consulting Radius)
• Nortel
• 3Com
• Ascend Radius
• Lucent NavisRadius
• Shiva/Intel
• FreeRADIUS
• Cistron RADIUS
• Radiator
• .....plus many others
If you are unsure of what formats this means, then the following log file examples will show
what formats are required and supported.
7.1.1
Livingston Accounting Format
Many RADIUS servers can be configured to format their RADIUS accounting logs in
Livingston format, otherwise known as ‘standard’ format. Examples of two RADIUS servers
that can be configured in such a manner are Novell RADIUS (BMAS) and RSA ACE/Server.
Thu Oct 05 13:29:21 2000
User-Name = "SecurityBoy"
NAS-IP-Address = 203.13.140.209
NAS-Port = 24
NAS-Port-Type = 0
Acct-Status-Type = 1
Acct-Delay-Time = 0
Acct-Session-Id = "269517036"
Acct-Authentic = 1
Calling-Station-Id = "0393871747"
Called-Station-Id = "9012"
56
RADREP Installation, Configuration & User Guide
© SecurityBoy Consulting
Framed-Protocol = 1
Framed-IP-Address = 192.168.221.12
Timestamp = 970712961
Request-Authenticator = Unverified
Thu Oct 05 13:33:20 2000
User-Name = "SecurityBoy"
NAS-IP-Address = 203.13.140.209
NAS-Port = 24
NAS-Port-Type = 0
Acct-Status-Type = 2
Acct-Delay-Time = 0
Acct-Session-Id = "269517036"
Acct-Authentic = 1
Acct-Session- Time = 239
Acct-Input-Octets = 3207
Acct-Output-Octets = 2810
Acct-Input-Packets = 49
Acct-Output-Packets = 36
Acct-Terminate-Cause = 1
Calling-Station-Id = "0393871747"
Called-Station-Id = "9012"
Framed-Protocol = 1
Framed-IP-Address = 192.168.221.12
Timestamp = 970713200
Request-Authenticator = Unverified
7.1.2
Microsoft IAS - Database Compatible Format
"RASHOST1","IAS",02/18/2003,17:26:18,4,"RASHOST1 \securityboy",,,,,,,"192.168.3.254",
36,0,"192.168.3.254","CSICO3640 RADIUS Client",,,0,,1,2,,,0,"311 1 192.168.3.150
02/18/2003 06:23:35 1",,,,,1,0,,,"00000009",1,,,,,,,,,,,,,,,,,,,,,,,
"RASHOST1","IAS",02/18/2003,17:33:12,4,"RASHOST1 \securityboy",,,,,"192.168.3.207",,
"192.168.3.254",36,0,"192.168.3.254","CSICO3640 RADIUS Client",,,0,,1,2,,,0,"311 1
192.168.3.150 02/18/2003 06:23:35
1",,,,,2,0,15751,4695,"00000009",1,414,177,81,1,,,,,,,,,,,,,,,,,,,
"RASHOST1","IAS",02/18/2003,17:36:16,4,"securityboy",,,,,,,"192.168.3.254",36,0,"192.16
8.3.254","CSICO3640 RADIUS Client",,,0,,1,2,,,0,"311 1 192.168.3.150 02/18/2003
06:23:35 5",,,,,1,0,,,"0000000A",1,,,,,,,,,,,,,,,,,,,,,,,
"RASHOST1","IAS",02/18/2003,17:42:38,4,"securityboy",,,,,"192.168.3.210",,"192.168.3.2
54",36,0,"192.168.3.254","CSICO3640 RADIUS Client",,,0,,1,2,,,0,"311 1 192.168.3.150
02/18/2003 06:23:35 5",,,,,2,0,66031,893962,"0000000A",1,382,1271,1357,1,,,,,,,,,,,,,,,,,,,
"RASHOST1","IAS",02/18/2003,17:53:43,4,"RASHOST1 \securityboy",,,,,,,"192.168.3.254",
36,0,"192.168.3.254","CSICO3640 RADIUS Client",,,0,,1,2,,,0,"311 1 192.168.3.150
02/18/2003 06:23:35 29",,,,,1,0,,,"0000000B",1,,,,,,,,,,,,,,,,,,,,,,,
"RASHOST1","IAS",02/18/2003,18:14:28,4,"RASHOST1 \securityboy",,,,,"192.168.3.204",,
"192.168.3.254",36,0,"192.168.3.254","CSICO3640 RADIUS Client",,,0,,1,2,,,0,"311 1
192.168.3.150 02/18/2003 06:23:35
29",,,,,2,0,86324,75150,"0000000B",1,1245,1327,1236,1,,,,,,,,,,,,,,,,,,,
57
RADREP Installation, Configuration & User Guide
7.1.3
© SecurityBoy Consulting
Microsoft IAS - Standard/Native Format
192.168.3.254,RASHOST1\securityboy,02/20/2003,17:39:55,IAS,RASHOST1,5,36,61,0,40,
1,25,311 1 192.168.3.150 02/20/2003 06:35:49
1,45,1,6,2,44,0000000C,7,1,41,0,4108,192.168.3.254,4116,0,4128,CSICO3640 RADIUS
Client,4136,4,4142,0
192.168.3.254,RASHOST1\securityboy,02/20/2003,17:40:17,IAS,RASHOST1,5,36,61,0,40,
2,25,311 1 192.168.3.150 02/20/2003 06:35:49
1,45,1,6,2,44,0000000C,7,1,8,192.168.3.205,49,1,42,7732,43,364,47,48,48,10,46,23,41,0,41
08,192.168.3.254,4116,0,4128,CSICO3640 RADIUS Client,4136,4,4142,0
192.168.3.254,securityboy,02/20/2003,17:41:12,IAS,RASHOST1,5,36,61,0,40,1,25,311 1
192.168.3.150 02/20/2003 06:35:49
2,45,1,6,2,44,0000000D,7,1,41,0,4108,192.168.3.254,4116,0,4128,CSICO3640 RADIUS
Client,4136,4,4142,0
192.168.3.254,securityboy,02/20/2003,17:42:22,IAS,RASHOST1,5,36,61,0,40,2,25,311 1
192.168.3.150 02/20/2003 06:35:49
2,45,1,6,2,44,0000000D,7,1,8,192.168.3.206,49,1,42,8838,43,364,47,65,48,10,46,70,41,0,41
08,192.168.3.254,4116,0,4128,CSICO3640 RADIUS Client,4136,4,4142,0
7.1.4
Funk Steel Belted RADIUS Format
"Date","Time","RAS-Client","Record-Type","Full-Name","Auth-Type","User-Name","NASPort","Framed-IP-Address","Acct-Status-Type","Acct-Delay-Time","Acct-InputOctets","Acct-Output-Octets","Acct-Session-Id","Acct-Authentic","Acct-SessionTime","Acct-Input-Packets","Acct-Output-Packets","Acct-Termination-Cause","Acct-MultiSession-Id","Acct-Link-Count","Acc-Err-Message","Annex-Product-Name","Annex-SWVersion","Annex-System- Disc-Reason","Annex-Modem-Disc-Reason","Annex-DisconnectReason","Annex-Transmit-Speed","Annex-Receive-Speed","Ascend-Modem-PortNumber","Ascend-Modem-Slot-Number","Ascend-Modem-Shelf-Number","Ascend-XmitRate","Nautica-Acct-SessionId","Nautica-Acct-Direction","Nautica-AcctCauseProtocol","Nautica-Acct-CauseSource"
"02/26/2003","23:53:17","RAS-SERVER1","1","Unknown","Unknown","securityboy","545644","10.202.11.4","1","10",,,"0008536C"
,,,,,,,,,,,,,,,,,,,,,,,,
"02/27/2003","00:14:39","RAS-SERVER1","1","Unknown","Unknown","clarke","545650","10.202.11.3","1","4",,,"00085372",,,,,,,,,,,
,,,,,,,,,,,,,
"02/27/2003","00:15:53","RAS-SERVER1","2","Unknown","Unknown","clarke","545650","10.202.11.3","2","4","26518","56190","0
0085372",,"76",,,,,,,,,,,,,,,,,,,,,,
"02/27/2003","00:17:58","RAS-SERVER1","2","Unknown","Unknown","securityboy","545644","10.202.11.4","2","15","57098","122
361","0008536C",,"1481",,,,,,,,,,,,,,,,,,,,,,
58
RADREP Installation, Configuration & User Guide
7.1.5
© SecurityBoy Consulting
CISCO Secure & other CSV Formatted RADIUS Logs
CSV formatted log files should have the following attributes defined in the header of the log.
By logging at least these attributes you will have the ability to generate all the reports that
RADREP has to offer. Other optional attributes can also be logged and displayed in the user
usage reports as required.
Date,Time,User-Name,Acct-Status- Type,Acct-Session-Id,Acct-Session-Time,Acct-InputOctets,Acct-Output-Octets,Framed-IP-Address,NAS-Port,NAS-IP-Address, Acct-TerminateCause
Important Note:
1. Each attribute listed in the header line (first line of log) needs to conform to the IETF
standard for attribute naming. eg. FramedAddress should be Framed-IP-Address and
so forth.
2. The Date and Time field need to be two separate fields and not combined into one.
3. The Date field should conform to the following format: MM/DD/YYYY or different
arrangements of MM, DD, YYYY. The delimiter between MM, DD, YYYY can be
anything. The order of MM, DD, YYYY is configurable under the Advanced
Settings in area.
4. The Time field should be in 24 hour format (NOT AM/PM format) and in the form
of HH:MM:SS (Eg. 18:55:24). The delimiter between HH MM SS fields must be a
colon (:).
An example CSV log header and entires might look like the following:
Date,Time,User-Name,Group-Name,Calling-Station-Id,Acct-Status- Type,Acct-SessionId,Acct-Session-Time,Service-Type,Framed-Protocol,Acct-Input-Octets,Acct-OutputOctets,Acct-Input-Packets,Acct-Output-Packets,Framed-IP-Address,NAS-Port,NAS-IPAddress, Acct-Terminate-Cause
05/12/2003,00:00:46,securityboy,VPN,,Stop,41101C73,105,Framed,PPP,11688,79720,74,94,
10.0.14.137,1932,10.0.5.2,1
05/12/2003,00:04:04,cclarke,PPTP/MPPE,,Start,40E01C42,,Framed,PPP,,,,,10.0.14.17,1061,
10.0.5.1,
59
RADREP Installation, Configuration & User Guide
7.2
© SecurityBoy Consulting
Required Accounting Log Attribute Fields
RADREP processes RADIUS log **STOP** records (and optionally INTERIM records) in
order to boost the speed of the log parsing and report generation process.
STOP records are distinguished by having an 'Acct-Status- Type = 2 or Stop' line in them.
If possible, you should configure your RADIUS server to only log START and STOP
accounting event data. By default all other data (such as interim accounting data) will simply
be ignored by RADREP and just create larger than necessary log files.
7.2.1
Minimal Attribute Requirements
To correctly generate user USAGE and BILLING reports, your RADIUS accounting log file
**MUST** have the following accounting attributes logged in each STOP record as a
minimum.
NOTE: These attributes must be in your log files STOP records or they will not be picked up
by RADREP during processing. All values shown are for example purposes only.
Thu Oct 05 13:33:20 2000 (Date & Time Field)
User-Name = "SecurityBoy" **Can have no value to indicate no authentication was required
Acct-Status-Type = 2
**Can have values of 'Stop' or '2'
Acct-Session- Time = 239
Acct-Session-Id = “00384565” **Can also be unique-session- id OR multi- session-id
Acct-Input-Octets = 3207
Acct-Output-Octets = 2810
7.2.2
Attributes Required to generate all reports
To successfully generate all the reports that RADREP can produce, you will need to
configure your RADIUS client devices (i.e. NAS/RAS Servers etc) to send the following
RADIUS accounting attributes to your RADIUS accounting log server:
Date and Time fields (Thu Oct 05 13:33:20 2000)
User-Name = "SecurityBoy"
Acct-Status-Type = 2 **Can have values of 'Start', '1', 'Stop' or '2'.
Acct-Session- Time = 239
Acct-Input-Octets = 3207
Acct-Output-Octets = 2810
Acct-Session-Id = 123 **Alternatively Unique-Session-Id or Multi-Session-Id can be used.
Acct-Terminate-Cause = 1 OR Ascend-Disconnect-Cause = 185
Framed-IP-Address = 10.1.1.1
NAS-IP-Address = 192.168.1.1
NAS-Port = 23
NAS-Port-Type = 5
If you do not authenticate your end users when the y dial into your RAS/NAS server (i.e. You
use no username and password to authenticate the end users access) then the ‘User-Name’
attribute will have no data in it. In this case the user will show up in the reports as a user
called ‘Unknown User(s)’. This way even if you choose not to authenticate your end users
60
RADREP Installation, Configuration & User Guide
© SecurityBoy Consulting
you will still be able to generate usage and billing reports although they will not be as
meaningful as when you do authenticate the end user and their ‘user-name’ is recoded in the
accounting STOP records.
7.2.3
Optional Attributes
As part of the User Usage Detailed reports, RADREP can also be configured to read and
report on the following RADIUS accounting 'stop record attributes' plus up to two user
defined (Custom) attributes.
NOTE: These attributes must be in your log files STOP records or they will not be picked up
by RADREP during processing. All values shown are for example purposes only.
Framed-IP-Address = 192.168.4.1 (* 'Framed-Address' if using ASCEND accounting)
NAS-IP-Address = 10.3.8.1 (* 'NAS-Identifier' if using ASCEND accounting)
NAS-Port = 6911
NAS-Port-Type = 1
Calling-Station-Id = "0396972558"
Called-Station-Id = "18389"
Timestamp = 970713200 **If available this field will boost the log parsing and report
generation speed
Acct-Terminate-Cause = 1
Connect-Info = "33600 V34+/LAPM (31200/33600)"
Ascend-Disconnect-Cause = 185
Ascend-Data-Rate = 26400
Ascend-Xmit-Rate = 24000
Ascend-Billing-Number "L2"
Ascend-Modem-PortNo = 5
Ascend-Modem-SlotNo = "6"
Ascend-Connect-Progress = 60
LE-Terminate-Detail = "User Request - PPP Term Req"
LE-Advice-of-Charge = "69A30"
* These are the Ascend equivalents of the IETF standard attributes and for reporting purposes
are considered to be the same.
7.2.4
Custom Attributes
If you have attributes in your accounting log STOP records that you want to include in the
‘Detailed Usage’ report but they are not listed above, then you can define these (up to two)
attributes by manually adding them in the ‘Usage Reports – Attribute/Field Configuration
Selection’ configuration screen. See the ‘Custom/User Defined Attribute Configuration‘
section for details on how to do this.
61
RADREP Installation, Configuration & User Guide
7.3
© SecurityBoy Consulting
Microsoft IAS/RAS Configuration & Recommendations
RADREP supports both IAS Standard and IAS Database compatible log formats, these are
used by both the Microsoft IAS and RRAS Services.. Your IAS /RAS log(s) must have
RADIUS accounting **STOP** records which contain the minimum RADIUS accounting
attributes that are required for report generation purposes. The minimum attributes which
should be sent by a RADIUS Client (NAS/RAS server) are detailed in the ‘Minimal
Attribute Requirements’ section. If these minimal attributes are being sent by your
RADIUS client (NAS/RAS server) and logged by IAS, then you should be able to
successfully generate usage and billing reports.
7.3.1
IAS STOP Record – Mandatory Attribute Fields
As an example, the following shows an IAS-Standard and Database-compatible format STOP
record. The Mandatory attributes including the value which indicates that it is a STOP
record (2) are shown in bold. Your IAS log files need to have these attribute entries as a
minimum for reporting to work correctly. For a full list of IAS attributes see the appendix A,
B and C of this manual.
IAS Database Compatible Format STOP record
"RASHOST1","IAS",02/18/2003,18:14:28,4,"RASHOST1\securityboy",,,,,"192.168.3.204"
,,"192.168.3.254",36,0,"192.168.3.254","CSICO3640 RADIUS Client",,,0,,1,2,,,0,"311 1
192.168.3.150 02/18/2003 06:23:35
29",,,,,2,0,86324,75150,"0000000B",1,1245,1327,1236,1,,,,,,,,,,,,,,,,,,,
The following shows (in order) the Mandatory attributes and their values as shown in the IAS
Database Compatible STOP record above:
Date and Time = 02/18/2003,18:14:28
User-Name = RASHOST1 \securityboy
Acct-Status-Type = 2
Acct-Input-Octets = 86324
Acct-Output-Octets = 75150
Acct-Session-Id = 0000000B
Acct-Session- Time = 1245
62
RADREP Installation, Configuration & User Guide
© SecurityBoy Consulting
IAS Standard Format STOP record
192.168.3.254,securityboy,02/20/2003,17:42:22,IAS,RASHOST1,5,36,61,0,40,2,25,311 1
192.168.3.150 02/20/2003 06:35:49
2,45,1,6,2,44,0000000D,7,1,8,192.168.3.206,49,1,42,8838,43,364,47,65,48,10,46,70,41,0,41
08,192.168.3.254,4116,0,4128,CSICO3640 RADIUS Client,4136,4,4142,0
The following shows (in order) the Mandatory attributes and their values as shown in the IAS
Standard Format STOP record above:
User-Name = securityboy
Date and Time = 02/20/2003,17:42:22
Acct-Status-Type (40) = 2
Acct-Session-Id (44) = 0000000D
Acct-Input-Octets (42) = 8838
Acct-Output-Octets (43) = 364
Acct-Session- Time (46) = 70
7.3.2
Processing IAS Access Accept/Deny Packets
If you need a report showing ALL user access attempts (good or bad) then make sure your
IAS Server is configured to log Access Accept/Deny accounting events, in addition to
START/STOP accounting data required for generating usage and billing reports. RADREP’s
default configuration is to process IAS Deny packets and generate a report showing ALL
failed login attempts. This includes failed login attempts by users who do not exist in your
user database, such as when a hacker tries random or well know user-names to try and break
into your system.
If your IAS server is setup to log Access Accept/Deny accounting event data and you have
either the ‘Usage Summary’ or ‘Usage Detailed’ web reports selected, you will see an ‘IAS Accept/Deny’ report being produced. In addition to reporting on Deny Packets you can turn
on processing of Accept packets if you want the ‘IAS – Accept/Deny’ report to contain all
access attempts good or bad.
To configure the processing of IAS Access Accept/Deny Packets see the ‘Advanced Settings’
section of RADREP.
7.3.3
IAS Server Configuration
When using a Microsoft IAS RADIUS server the following sections should be used as a
guide to configure IAS appropriately so that its log files can be optimally processed by
RADREP.
7.3.3.1
Choosing an IAS Log Format
Generally speaking you should use the IAS database compatible format for logging
accounting information unless you need to report on Vendor-specific attributes. If you
require the ability to report on Vendor-Specific attributes then yo u should use the IASStandard Log format. To configure a suitable IAS log format, the location of the logs and
other IAS service information you need to run the IAS Service configuration program as
shown in the following screen shots.
63
RADREP Installation, Configuration & User Guide
© SecurityBoy Consulting
64
RADREP Installation, Configuration & User Guide
7.3.3.2
© SecurityBoy Consulting
Selecting the Log Rotation Period
The default ‘New log time period’ defaults to ‘Unlimited file size’ in Windows 2000
Server. To make your logs more manageable, it is recommended to configure your logs to
rotate at least ‘Monthly’. This is the default in Windows 2003 Server.
65
RADREP Installation, Configuration & User Guide
7.3.3.3
© SecurityBoy Consulting
Selecting IAS Accounting Event Types
As a minimum and unless you require other accounting data, you only need to log RADIUS
START and STOP accounting records in your IAS log files. By default any other non
START/STOP record data (such as interim accounting data) that is logged will simply be
ignored by RADREP when processing the log(s). To log START and STOP accounting data
(and optionally Access Accept/Deny requests) make sure that your IAS log configuration
looks like the below screenshot. INTERIM accounting data may be optionally enabled by
clicking the Log period status checkbox on the IAS Server. To process INTERIM
accounting data in RADREP you will need to enable it under the Advanced Settings
Configuration screen.
7.3.3.4
IAS Service Name
By default the IAS Service name description is set to IAS. For the RRAS Service it is set to
RAS. If the IAS Service name is changed from it’s default description of IAS to something
else, you will also need to change it under the Advanced Settings configuration screen of
RADREP. RADREP will not recognise the log format if the name here does not match what
is defined in RADREP. The below screenshot shows a default service description of IAS.
66
RADREP Installation, Configuration & User Guide
7.4
© SecurityBoy Consulting
Novell RADIUS (BMAS) Log Format
Novell’s BorderManager Authentication Services (BMAS) contains a RADIUS server which
by default logs its output in comma separated value (CSV) format. Although RADREP will
work with this log format it is preferable (for RADREP ) to be able to process Novell
RADIUS server logs that are written in ‘Standard’ accounting format and not comma
separated value format. To change this it is a simple case of loading the RADIUS server with
an appropriate switch to tell it to output it’s logs in ‘Standard format. It is up to you whether
you do this or not.
To load RADIUS so that the log format is ‘standard’ you will need to add the following
parameter to the load line in your Novell ‘autoexec.ncf’ (or wherever you load RADIUS
from at boot time):
LOAD RADIUS FileFormat=STANDARD
When you change the log format to ‘standard’ you should also purge/delete any existing
RADIUS accounting log files so that a fresh one is created containing only the new
‘standard’ format log entires.
Novell RADIUS accounting log files are named YYYYMMDD.log. YYYY is the year, MM is
the month, and DD is the day the accounting log rollover period begins. By default, the
RADIUS accounting log files are located in the SYS:\ETC\RADIUS\ACCT directory on a
NetWare server. The default period before a RADIUS account ing file is rolled over is daily.
It may be desirable to change other accounting log file parameters when you load Novell’s
RADIUS (BMAS) services. For more information about configuring the BorderManager
RADIUS Authentication Service, see the BorderMana ger administration guide on Novell
web site at http://www.novell.com/bordermanager/bmas
67
RADREP Installation, Configuration & User Guide
7.5
© SecurityBoy Consulting
Talon Computer Consulting RADIUS Compatibility (TCCRadius)
TCCRadius writes RADIUS accounting logs that are very close to the Livingston format
standard. There are a couple of small deviations from the standard
TCCRadius writes Livingston formatted log files but uses a non conformant date line and
user-name (username) attribute. These deviations from the Livingston standard make
TCCRadius logs incompatible with RADREP unless you explicitly tell RADREP that you are
going to be processing TCCRadius log files.
You can configure RADREP to process TCCRadius logs by using a text editor and manually
adding two configuration entries to your 'radrep.ini' configuration file RADREP will process
TCCRadius accounting log files.
7.5.1
TCCRadius Compatibility Details
To enable TCCRadius accounting log file compatibility:
1. Run the RADREP application at least once and configure the location of your log files.
2. Exit the RADREP application.
3. Using Windows Explorer browse to the RADREP installation folder (usually c:\program
files\RADREP \) where the 'radrep.exe' application is located. If you have performed step 1
you will now see a 'radrep.ini' configuration file.
4. Open the 'radrep.ini' configuration file with any text editor (Windows Notepad will do just
fine) and add the following two lines to the [Hidden Settings] section which is located at
the very end of the file:
[Hidden Settings] <----- This line will already exist. You need to add the next two lines.
TCCRADIUS=1
PRIMARY_KEY_ATTRIB=USERNAME
5. After making the above changes save the 'radrep.ini' configuration file and then run the
RADREP application again to begin processing your TCCRadius log files.
7.5.2
Sample TCCRadius STOP record
The following is a typical TCCRadius stop record showing the non-conformant date line and
'USERNAME attribute.
The standards say that the date line should be 'Wed April 01 00:04:11 2004' and the
'USERNAME' should be called 'USER-NAME')
04/01/2004 00:04:11 202.141.54.71 711 STOP [email protected]
EVENT- TIMESTAMP=1080806589
ACCT-SESSION-ID=296900920
ACCT-SESSION-TIME=891
ACCT-INPUT-PACKETS=1493
ACCT-OUTPUT-PACKETS=1878
68
RADREP Installation, Configuration & User Guide
© SecurityBoy Consulting
FRAMED-PROTOCOL=PPP
FRAMED-IP-ADDRESS=202.141.54.71
NAS-PORT-TYPE=ASYNC
NAS-IP-ADDRESS=203.161.51.254
ACCT-STATUS-TYPE=STOP
CALLED-STATION-ID=98717834
ACCT-INPUT-OCTETS=131082
ACCT-OUTPUT-OCTETS=678107
CALLING-STATION-ID=987174631
[email protected]
NAS-IDENTIFIER=nas91.mycompany.com
Note: To process other types of RADIUS server logs you will need to undo these changes as
they enable processing features specific only to TCCRadius server logs that write their logs
in Livingston format but use a non-conformant date line and user-name (username)
accounting attribute.
69
RADREP Installation, Configuration & User Guide
8
© SecurityBoy Consulting
AUTOMATING RADREP (AUTO RUN / BATCH MODE)
RADREP can be configured to run in what is known as 'Auto Run' mode. This mode of operation is
well suited to those who want to setup RADREP on a machine running a web server such as
Microsoft IIS and have usage and/or billing reports automatically generated or updated periodically.
Enabling this mode of operation will fully automate RADREP so that it can be run via a batch file or
via the Windows Scheduler without any user interaction.
When you enable 'Auto Run' mode and then start RADREP (radrep.exe), it will run in a
minimized/hidden state, retrieve the user list, generate reports and then exit automatically. The
configuration settings used in 'Auto Run' mode will be the same as those you configured when
running RADREP in it's Standard GUI interface mode with the exception of the report period (start
and end date selection), message popup behaviour and optionally the site, group or user to generate
reports for.
There are two options for enabling and configuring 'Auto Run' mode.
Option 1 : Use the 'Run Mode Configuration Tool'
Option 2 : Manually edit the radrep.ini settings file as detailed below.
For most users using the 'Run Mode Configuration Tool' will provide the easiest way to enable 'Auto
Run' mode. In some cases where you need to change other RADREP settings it may be necessary to
manually edit the radrep.ini file. Only experienced users and administrators should do this as
undesirable results may occur if it is modified incorrectly.
8.1
Before enabling 'Auto Run' mode
Before you enable 'auto run' mode you should follow these steps:
1. Ensure that the date and time are correct on the machine RADREP will be running on.
2. Run RADREP normally by clicking on the start menu or desktop icon. Configure the log file(s) to
be processed and any other relevant settings. Note you need to run RADREP using the same
Windows username you used when you installed it; otherwise it is possible that if you log in as a
different user you will not have the appropriate permissions to run RADREP or access the
'radrep.ini' settings file.
3. Make a test run by going through the normal steps for manually generating reports. E.g. Select the
start-end dates, Retrie ve the user list, Generate reports.
4. Once you have an error free run (i.e. all your configuration information is correct) you can enable
the 'auto run' feature and set the desired 'report period' by using either the 'Run Mode
Configuration Tool' or by manually editing the 'radrep.ini' settings file.
8.2
Enabling Auto Run Mode
8.2.1
Option 1 : Run Mode Configuration Tool (autorun.exe)
This tool is located under the RADREP Start menu program folder (i.e. Start | Programs | RADREP |
Run Mode Configuration). You can use this tool to enable and switch between Standard GUI
Mode, Auto Run test Mode and Auto Run Quiet Mode .
To use this tool it must be located in the same directory as the radrep.ini settings file that is created
the first time you configure RADREP. When switching to Auto Run mode a number of other 'Auto
Run Options' will become available for configuration including the 'Report Period' and optionally the
Site, Group and User name that you want to generate reports for. If no specific Site, Group or User is
specified, reports will be generated for all Sites, Groups and Users. If you want to generate a report
for just a specific user then you must also make sure that you specify the Site and Group they belong
70
RADREP Installation, Configuration & User Guide
© SecurityBoy Consulting
to first otherwise the user name will just be ignored. Likewise if you want to generate reports for a
specific Group of users you must specify the Site to which the Group belongs to.
To run RADREP in Standard GUI Mode simply click on the radio button and Apply the change.
The next time RADREP is run it will run in interactive GUI mode.
To test your Auto-Run settings before fully automating your report generation task with the Windows
Scheduler you can select the Auto Run Test Mode radio button and Apply the change. The next
time you run RADREP it will run minimized on the task bar, import the user list, generate reports and
then exit. If any errors are encountered an error pop-up box will be displayed. If there are problems
with the report run you can switch back to Standard GUI mode in order to re-configure RADREP and
correct the problem. Once you have an error free run in Auto Run Test Mode you can switch to
Auto Run Quiet Mode and fully automate the task by creating a Windows Scheduler job.
71
RADREP Installation, Configuration & User Guide
© SecurityBoy Consulting
To run RADREP as a Windows Scheduled job you first need to change the Run Mode of RADREP to
Auto Run Quiet Mode . This mode of operation suppresses all information and error dialogue boxes.
If an error is encountered during a Quiet Mode report run the error is logged to a file called
ErrorLog.txt located in the same folder where the radrep.exe program file is located. For most users
this will be the <drive>:\Program Files\RADREP installation directory.
After selecting the Run mode of RADREP and pressing the Apply button you will get a confirmation
message after which you can exit this tool and run RADREP.
72
RADREP Installation, Configuration & User Guide
8.2.2
© SecurityBoy Consulting
Option 2 : Editing the RADREP.INI file
When you run RADREP and configure it for the first time, the 'radrep.ini' settings file is created in the
same folder where the 'radrep.exe' resides. For most users this will be the <drive>:\Program
Files\RADREP installation directory.
Once you have located the 'radrep.ini' settings file you need to locate the [AUTO-RUN-SETTINGS]
section and then modify and save its settings appropriately as described below.
In the [AUTO-RUN-SETTINGS] section of ‘radrep.ini’ there are 7 settings which are used to enable
and customize how you want RADREP to run when it is in 'Auto Run' mode. These settings are
described below:
[AUTO-RUN-SETTINGS]
Auto run configuration options section heading. DO NOT MODIFY
AUTO_RUN_ENABLED=
Turns auto run feature 'on' or 'off'. Default: 0
Value: 0 (auto run is disabled/off and RADREP will function in normal GUI mode)
Value: 1 (auto run is enabled/on and RADREP will run minimized)
AUTO_RUN_PERIOD=
Sets the predefined report period as described. Default: 3
Value: 1 (Current Day. Start of the current day to the end of the current day.)
Value: 2 (Current Month. Start of the current month to the end of the current day of month)
Value: 3 (Current Year. Start of the current year to the end of the current day.)
Value: 4 (Previous Day. Start of the previous day to the end of the previous day.)
Value: 5 (Previous Month. Start of the previous month to the end of the previous month.)
Value: 6 (Last 7 Days. Start date is seven days prior to the current date.)
Value: 7 (Last 14 Days. Start date is fourteen days prior to the current date.)
Value: 8 (Last 21 Days. Start date is twenty one days prior to the current date.)
AUTO_RUN_SITE=
Here you can type the name of a site that exists in your the site/group/user hierarchy when your
perform a 'Retrieve user list'. If the site name is not found or left at its default of blank then reports
will be generated for a previous level of the site/group/user hierarchy where a valid name is found. In
this case if the site is not found it would revert to the 'Entire Company' (root of tree) for the level at
which to generate reports.
AUTO_RUN_GROUP=
Here you can type the name of a group that exists in your the site/group/user hierarchy when your
perform a 'Retrieve user list'. You must also specify the site that this group belongs to in the
AUTO_RUN_SITE configuration field. If the group name is not found or left at its default of blank
then reports will be generated for a previous level of the site/group/user hierarchy where a valid name
is found. In this case at the site or root of tree level.
AUTO_RUN_USER=
Here you can type the user-name of a user that exists in your the site/group/user hierarchy when your
perform a 'Retrieve user list'. Remember this is the RADIUS user-name and not the user's first and
last name. You must also specify the site and group that this user belongs to in the
AUTO_RUN_SITE and AUTO_RUN_GROUP configuration fields. If the user-name is not found or
left at its default of blank then reports will be generated for a previous level of the site/group/user
hierarchy where a valid name is found. In this case at the group, site or root of tree level.
73
RADREP Installation, Configuration & User Guide
© SecurityBoy Consulting
CRITICAL_ERROR_NOTIFICATION=
Turns all error and critical information message popups 'on' or 'off'. Default: 1
Value: 0 (error and critical information popups are disabled/off)
Value: 1 (error and critical information popups are enabled/on)
INFORMATION_NOTIFICATION=
Turns all information message popups 'on' or 'off'. Default: 1
Value: 0 (information popups are disabled/off)
Value: 1 (information popups are enabled/on)
8.2.2.1
Testing your AUTO RUN configuration
Once you have enabled RADREP for 'auto run' mode (AUTO_RUN_ENABLED=1) you can test it by
clicking on the RADREP start menu or desktop icon. For 'auto run' testing and troubleshooting you
should leave the CRITICAL_ERROR_NOTIFICATION and INFORMATION_NOTIFICATION
settings turned on (1). If you have left them on you will see and need to respond to various popup
messages in your test run. This will confirm the automation steps are working correctly. If you are
happy that the reports have been generated correctly, then you should turn off (0)
INFORMATION_NOTIFICATION and CRITICAL_ERROR_NOTIFICATION. If you do this then
you will no longer see or need to respond to any information popups or error message dialogue boxes
as they will be disabled. If any errors are encountered when you turn off these two settings they will
be written to a file called ErrorLog.txt located in the same directory as the radrep.exe program file .
You can confirm the last successful report run date by viewing the 'historical.html' and 'home.html' of
each report. This will show the last date and time reports were successfully generated.
Once you are satisfied that the 'Auto Run' process is performing to your requirements you can use the
Windows Scheduler service/utility to schedule and fully automate the running of 'radrep.exe' so that
no manual intervention is required to generate or update reports. You must run the scheduled job as
the same user you were logged in as when you installed RADREP or another user with appropriate
permissions to the RADREP installation and settings file 'radrep.ini'. If you installed RADREP as
administrator then you must run the scheduled job as the administrator user.
If you run radrep.exe as an automated Windows Scheduler process, make sure that you turn off all
popup message dialogue boxes by making sure that CRITICAL_ERROR_NOTIFICATION=0 and
INFORMATION_NOTIFICATION=0. If you do not do this and an information or error popup
occurs during a Windows Scheduler job, you will not be able to see or respond to it. The result will
be that radrep.exe will remain in memory forever until it is forcefully ended using the Task Manager
'End Task' feature
8.3
Command Line Options
You can pass the radrep.ini settings file to radrep.exe as a command line argument.
You MUST specify the full path of the .ini file when doing this.
Eg. radrep.exe c:\myreports\radrep.ini
When passing the ini file as a command line argument RADREP will not start if:
1. The ini settings file does not exist.
2. The ini settings file does not end with a .ini extension
Any errors encountered when reading the ini file as a command line argument will be written to a file
called ErrorLog.txt located in the same directory as the radrep.exe program file.
If no command line argument is given the radrep.ini file located in the same directory as the
radrep.exe will be used or created if it does not exist.
Passing the ini settings file on the command line is the only command line option available.
74
RADREP Installation, Configuration & User Guide
8.4
© SecurityBoy Consulting
Typical Auto Run Settings
Typical settings in radrep.ini for running in 'auto run' mode are as follows:
[AUTO-RUN-SETTINGS]
AUTO_RUN_ENABLED=1
AUTO_RUN_PERIOD=2
AUTO_RUN_SITE=NO_SITE
AUTO_RUN_GROUP=NO_GROUP
AUTO_RUN_USER=
CRITICAL_ERROR_NOTIFICATION=0
INFORMATION_NOTIFICATION=0
8.5
RADREP.INI Format
All RADREP configuration details are stored in an INI settings file named radrep.ini
When you run RADREP and configure it for the first time, the radrep.ini settings file is created in
same folder where the radrep.exe resides. For most users this will be the <drive>:\Program
Files\RADREP installation directory.
8.5.1
Sample RADREP.INI file contents:
(# = Descriptive Comment)
# Settings which can be modified to enable and control how RADREP runs in an automated
manner.
[AUTO-RUN-SETTINGS]
AUTO_RUN_ENABLED=0
AUTO_RUN_PERIOD=3
AUTO_RUN_SITE=NO_SITE
AUTO_RUN_GROUP=NO_GROUP
AUTO_RUN_USER=
CRITICAL_ERROR_NOTIFICATION=1
INFORMATION_NOTIFICATION=1
[Config]
#Enable (1) or disable (0) the NAS IP Address filter
NAS_FILTER_ENABLED=0
#Specify the address of the NAS Server to generate reports for.
NAS_FILTER_IP_ADDRESS=10.1.1.1
#Enable (1) or disable (0) the User-Name filter
FILTER_USER_NAME_ENABLED=0
#Specify the string and wild card to filter user names on. Eg. *@* would filter out all users with an @
sign in their username
USER_NAME_FILTER=
# Billing Summary Report Enable/Disable
BS_REPORT=1
# Billing Detail Report Enable/Disable
BD_REPORT=1
# Usage Summary Report Enable/Disable
US_REPORT=1
# Usage Detailed Report Enable/Disable
UD_REPORT=1
75
RADREP Installation, Configuration & User Guide
© SecurityBoy Consulting
# Enable/Disable the relative reports.
IP_REPORT=1
IP_REPORT_DETAILED=1
NAS_REPORT=1
NAS_REPORT_DETAILED=1
NAS_REPORT_CONCURRENCY=1
NAS_PORT_SUMMARY=1
NAS_PORT_DETAILED=1
NAS_PORT_TYPE_SUMMARY=1
NAS_PORT_TYPE_DETAILED=1
# User Retrieval Method, 0 = ACE/Server, 1 = RADIUS logs, 2 = CSV File
RETRIEVE_USER=1
# Primary RADIUS log file name and location
File_Location_1=F:\Program Files\RADREP\Samples\detail- log\detail.txt
# Secondary RADIUS log file name and location
File_Location_2=
# Output Folder
File_Location_3=F:\Program Files\RADREP\report
# The tax rate to apply
TAX_RATE=10.00
# The currency symbol to use
CURRENCY_SYMBOL=$ (Dollar)
# Enable/Disable dumping user details to ‘users.csv’
DUMP_TO_CSV=0
# Enable/Disable HTML formatted reports
HTML_REPORTS=1
# Enable/Disable automatic launching of the web browser to view HTML format reports
HTML_AUTO_LAUNCH=1
# Show CSV report links on web reports home page
SHOW_CSV_REPORTS=1
# Enable/Disable paging in HTML reports
PAGE_HTML_REPORTS=0
# Number of table rows per page in web reports
PAGE_TABLE_NUMBER=2000
# Enable/Disable the use of ACE/Server User Extension Data fields
USE_EXT_FIELDS=0
# Enable/disable checking for NULL characters in the log files
NULL_CHAR_CHECK=0
# Name of the ACE/Server Extension Data Field containing the user’s associated SITE name.
EXT_FIELD_SITE=SITE
# Name of the ACE/Server Extension Data Field containing the user’s associated GROUP
name.
EXT_FIELD_GROUP=GROUP
# Name of the ACE/Server Extension Data Field that contains the users associated billing
PROFILE name.
EXT_FIELD_PROFILE=PROFILE-NAME
# Enables/Disables Start-End date checking when retrieving user-names from the RADIUS
logs.
RADIUS_START_END_CHECK=0
# Log file input folder name.
LOG_INPUT_FOLDER=
76
RADREP Installation, Configuration & User Guide
© SecurityBoy Consulting
# log file extension/suffix
LOG_SUFFIX=*.log
# Determines if Primary/Secondary log file input method is used or log file folder and
extension.
LOG_FILES_SELECTED=0
# All DET_ entries signal if the attribute is Enabled or Disabled for the ‘Detailed Usage
Report’
DET_FRAMED_IP=1
DET_NAS_IP=0
DET_NAS_PORT=0
DET_CALLED_ID=0
DET_CALLING_ID=1
DET_TERM_CAUSE=1
DET_DISC_CAUSE=0
DET_DATA_RATE=0
DET_NAS_PORT_TYPE=0
DET_ASCEND_BILL_NUM=0
DET_ASCEND_XMIT_RATE=0
DET_INPUT_OCTETS=1
DET_OUTPUT_OCTETS=1
DET_CONNECT_INFO=1
DET_ASCEND_PROGRESS=0
DET_ASCEND_MODEM_PORTNO=0
DET_ASCEND_MODEM_SLOTNO=0
DET_LE_TERM_DETAIL=0
DET_LE_ADVICE_OF_CHARGE=0
DET_CUST_ATTRIB_1=0
DET_CUST_ATTRIB_1_NAME=
DET_CUST_ ATTRIB_1_DISPLAY_NAME=
DET_CUST_ATTRIB_1_TOTAL=0
DET_CUST_ATTRIB_2=0
DET_CUST_ATTRIB_2_NAME=
DET_CUST_ATTRIB_2_DISPLAY_NAME=
DET_CUST_ATTRIB_2_TOTAL=0
SUMMARY_SITE=1
SUMMARY_GROUP=1
SUMMARY_FIRSTLASTNAME=1
SUMMARY_CONNECTS=1
SUMMARY_SESSIONTIME=1
SUMMARY_BYTESREC=1
SUMMARY_BYTESSENT=1
# Setting to enable/disable the displaying of date range warnings when processing log files.
START_END_DATE_MSG=0
# The historical report rotation method.
HISTORICAL_ROTATE=3
# Data measurement scheme being used. 1 = (1K = 1024Bytes) 0 = (1K =1000Bytes)
KB_MEASUREMENT=1
#Historical Log output selection.
HISTORICAL_ROTATE=0
#Enable (1) or Disable (0) if Domain names are to be stripped from the user- name field.
STRIP_DOMAIN=1
77
RADREP Installation, Configuration & User Guide
© SecurityBoy Consulting
#Specify the IAS Service name. (default: IAS)
IAS_SERVICE_NAME=IAS
#Concurrency & Active User Reports process all users found in the logs (1) or only those
selected in the site/group/user hierarchy (0)
CONCURRENCY_ALL_USERS=1
[BillingTemplate0-50]
#Indicates if the template is enabled (1) or disabled (0)
TEMPLATE_ENABLED=1
#Matching Criteria for Site name is enabled (1) or disabled (0)
SITE_CHECK=0
#Site name to use for matching criteria
SITE_NAME=
#Matching Criteria for Group name is enabled (1) or disabled (0)
GROUP_CHECK=0
#Group name to use for matching criteria
GROUP_NAME=
#Matching Criteria for Group name is enabled (1) or disabled (0)
USER_CHECK=0
#User name to use for matching criteria
USER_NAME=
#Include (1) or exclude (0) if match is made.
INCLUDE=1
# Fixed Service Cost A
FIXED_A_FEE=1.00
# Fixed Service Cost B
FIXED_B_FEE=1.00
# Variable Cost (Usage Time)
USAGE_FEE=1.00
# Time covered by minimum service fee (Fixed cost B)
EXCESS_TIME=0.00
# Cost for each Megabyte sent
COST_MB_SENT=0.01
# Cost for each Megabyte received
COST_MB_RECEIVED=0.01
# Sent Megabyte covered by the minimum service fee
MB_SENT_COV=0
# Received Megabyte covered by the minimum service fee
MB_REC_COV=0
# Combined Sent & Received Megabytes covered by the minimum service fee
MB_SENT_REC_COMB=0
# The Billing Model being used for this template. 1 = Usage Time, 0 = Data Volume
BILL_MODEL=0
#Cost per connection made
COST_PER_CONNECT=0.22
#Combined MB send and received allowance
MB_SENT_REC_COV=0.25
#Combined sent and received cost
COST_MB_SENT_RECEIVED=20.50
#Data volume is measured on sent and received combined (1) or separate (0)
VOL_COMBINED=1
78
RADREP Installation, Configuration & User Guide
© SecurityBoy Consulting
8.5.2
Hidden Configuration Options
In order to further tailor RADREP and customize its behaviour a number of hidden
configuration options are available by manually editing the ‘radrep.ini’ configuratio n file.
All hidden configuration settings are stored in the [Hidden Settings] section of the radrep.ini
file. The following shows what options are available and how to configure them:
• Combine the group and profile names when reading them from the users.csv file.
#(1 = group and profile are combined, 0 = not combined [default].)
COMB_GROUP_PROFILE=0
• Convert the Site, Group and Profile fields in the users.csv file to lower case as they
are read in. This was added to make it possible to eliminate duplicates that were due
to CASE differences in the users.csv file.
#(1 = convert the site, group and profile fields to lower case, 0 = leave the fields as
they are [default].)
SITE_GROUP_PROFILE_LOWER=0
•
Enable/disable the reading of the 'Group-Name' attribute in CISCO ACS CSV logs so
that auto grouping of users can occur when reading a log containing this attribute.
#(1=Read 'Group-Name' attribute for auto-grouping purposes, 0 = Do not read the
‘Group-Name’ attribute [default].)
USE_GROUP_NAME_ATTRIBUTE=0
Important Note: RADREP only produces 'Site and Group' based reports when using the
users.csv (CSV File) or the 'ACE/Server Database' to read in user grouping information.
So even though RADREP will read in the group-name information from your RADIUS
CSV log files you still need to write/dump this information to the 'users.csv' file
(manipulate it if necessary) and then read/reload it into RADREP in order to generate
Group based reports.
The process would be as follows:
1. Run and configure RADREP at least once to create the radrep.ini file located in the
same directory as radrep.exe.
2. Edit the 'radrep.ini' file and make the USE_GROUP_NAME_ATTRIBUTE=1. (the
default will be =0)
3. Start/Run RADREP again.
4. Click on the 'Configuration' Button and check/select the option that says "Dump user
details to 'users.csv' file."
5. Select the 'Retrieve user list from:' method to be 'RADIUS Log file(s)'.
6. Press the 'Retrieve user list' button.
7. After RADREP has retrieved all the 'User-Name' fields and associated 'Group-Name'
fields from the RADIUS logs it will write this information out to the 'users.csv' file,
located in the 'Report Output Folder'.
8. You can now edit the 'users.csv' file that has been created and amend any necessary
user or Grouping information.
9. Now change the 'Retrieve user list from:' method to be 'CSV File'.
10. Press the 'Retrieve user list' button again to read the 'User-Name' and grouping
information from the 'users.csv' file.
11. After reading in this information from the 'users.csv' file yo u can now generate group
based reports.
12. To generate group based reports set the 'Report Start/End Dates', select the reports
79
RADREP Installation, Configuration & User Guide
© SecurityBoy Consulting
you want and then press the 'Generate New Report(s)' button.
Another way to generate Group based reports from CISCO ACS CSV lo gs is to enable
the USE_GROUP_NAME_ATTRIBUTE=1 setting and select one Group at a time from
the SITE/GROUP/USER hierarchy and generate reports. The only drawback in doing it
this way is that report output will be only for the Group you select so you will ha ve to
generate reports one group at a time.
•
Change the reporting primary key. Usually the 'user-name' is used as the primary key.
By changing the following radrep.ini file configuration parameters it is possible to
change the attribute which is used to represent the "User-Name" field. This was done
for some users who wanted to report on H323 attribute fields (in particular the h323remote-address) as the primary key. The following settings apply to making this
change but will depend on which log file type you use as to which ones you need to
change.
PRIMARY_KEY_ATTRIB= (Default: User-Name. Change to any unique attribute
name seen in a user's accounting STOP record.)
IASSTD_PRIMARY_KEY_ATTRIB= (Default: 0 which reads field 2 of an IAS
Standard log as the 'User-Name'. Examples values are 4129 or another unique field in
a user's accounting STOP record..
IASDB_PRIMARY_KEY_ATTRIB= (Default: 6 which is the Field number of the
IAS Database compatible log that contains the 'User-Name' attribute. To change the
'User-Name' field number enter the field number of a unique field in the IAS
Database compatible log that you want to use instead of the default.)
CSV_PRIMARY_KEY_ATTRIB= (Default: 0 which means to detect the field
number in the CSV log header that contains the 'User-Name' attribute.
80
RADREP Installation, Configuration & User Guide
9
© SecurityBoy Consulting
CONTACT AND SUPPORT DETAILS
If you have any questions, want to report a bug you have found in RADREP (not many we
hope), or a request for features you would like to see in RADREP, please email us with the
details at the following email address:
mailto:[email protected]
Check the RADREP website for the latest version and FAQ on RADREP.
Website: http://www.radiusreporting.com
81
RADREP Installation, Configuration & User Guide
© SecurityBoy Consulting
10 APPENDIX A – IAS ATTRIBUTE TABLE – DATABASE FORMAT
Microsoft IAS RADIUS Attribute Sequence
(Database Compatible Log Format)
Microsoft's database-import log format for IAS log files became available with the launch of
Windows 2000. Unlike the IAS-Standard log format, logs written in database-import log format
present the data in a standard sequence that is identical regardless of the network access server
(NAS) sending the data.
As the data is always written in a standard field sequence, all you need to do in order to add a custom
field to the RADREP 'Usage Detailed' report is count through the fields (which are comma separated)
until you reach the field you want to report on. This field number can then be entered into the 'Attrib
Name or MS# or Field#' edit box on the 'Detailed Usage Report - Display Field Selection' screen
in RADREP.
To simplify locating the field number of the attribute you want to report on, the following table shows
the 'Field Number' and corresponding RADIUS attribute. Each of the listed attributes can be
contained in a record that is part of the database-import log file, although the actual attributes
recorded will depend on how your NAS server (RADIUS client) has been configured in regards to
what accounting information it sends to the IAS server.
IAS database compatible format logs do not support reporting on Vendor-Specific Attributes, so if
you have a requirement to report on vendor-specific RADIUS attributes you will have to stick with
using the IAS-Standard log format.
Field #
Attribute
Data type
Represents
1
ComputerName
Text
Name of the server where the packet was received.
(This is an IAS-internal attribute.)
2
ServiceName
Text
Name of the service that generated the record, IAS or Windows 2000
remote access.
(This is an IAS-internal attribute.)
3
Record-Date
Time
Date at the IAS or remote access server.
(This is an IAS-internal attribute.)
4
Record-Time
Time
Time at the IAS or remote access server.
(This is an IAS-internal attribute.)
Type of packet. Can be:
5
Packet -Type
•
1 = Accept-Request
•
2 = Access-Accept
•
3 = Access-Reject
•
4 = Accounting-Request
Number
(This is an IAS-internal attribute.)
6
User-Name
Text
User's claimed identity.
7
Fully-Qualified-User-Name
Text
User name in canonical format.
(This is an IAS-internal attribute.)
8
Called-Station-Id
Text
Phone number dialled by user.
9
Calling-Station-Id
Text
Phone number from which call originated.
10
Callback-Number
Text
Callback phone number.
11
Framed-IP-Address
Text
Framed address to be configured for user.
12
NAS-Identifier
Text
Text identifying the NAS originating the request.
13
NAS-IP -Address
Text
The IP address of the NAS originating the request.
82
RADREP Installation, Configuration & User Guide
© SecurityBoy Consulting
14
NAS-Port
Number
Physical port number of the NAS originating the request.
15
Client-Vendor
Number
Manufacturer of NAS.
(This is an IAS-internal attribute.)
16
Client-IP -Address
Text
The IP address of RADIUS client.
(This is an IAS-internal attribute.)
17
Client-Friendly-Name
Text
Friendly name for the RADIUS client.
(This is an IAS-internal attribute.)
18
Event-Timestamp
Time
The date and time that this event occurred on the NAS.
19
Port-Limit
Number
Maximum number of ports that NAS provides to the user.
20
NAS-Port-Type
Number
Type of physical port used by the NAS originating the request.
21
Connect-Info
Text
Indicates the nature of user's connection.
22
Framed-Protocol
Number
The protocol to be used.
23
Service-Type
Number
Type of service user has requested.
Authentication scheme use to verify user. Can be:
24
Authentication-Type
Number
•
1 = PAP
•
2 = CHAP
•
3 = MS-CHAP v1
•
4 = MS-CHAP v2
•
5 = EAP
•
7 = None
•
8 =Custom
(This is an IAS-internal attribute.)
25
NP-Policy-Name
Text
Friendly name of the remote access policy that granted or denied access.
This attribute is logged in authentication accept and reject requests. If a
user is rejected because none of the remote access policies matched, then
this attribute is blank.
Reason for rejecting a user. Can be:
26
Reason-Code
Number
•
0 = IAS_SUCCESS
•
1 = IAS_INTERNAL_ERROR
•
2 = IAS_ACCESS_DENIED
•
3 = IAS_MALFORMED_REQUEST
•
4 = IAS_GLOBAL_CATALOG_UNAVAILABLE
•
5 = IAS_DOMAIN_UNAVAILABLE
•
6 = IAS_SERVER_UNAVAILABLE
•
7 = IAS_NO_SUCH_DOMAIN
•
8 = IAS_NO_SUCH_USER
•
16 = IAS_AUTH_FAILURE
•
17 = IAS_CHANGE_PASSWORD_FAILURE
•
18 = IAS_UNSUPPORTED_AUTH_TYPE
•
32 = IAS_LOCAL_USERS_ONLY
83
RADREP Installation, Configuration & User Guide
© SecurityBoy Consulting
•
33 = IAS_PASSWORD_MUST_CHANGE
•
34 = IAS_ACCOUNT_DISABLED
•
35 = IAS_ACCOUNT_EXPIRED
•
36 = IAS_ACCOUNT_LOCKED_OUT
•
37 = IAS_INVALID_LOGON_HOURS
•
38 = IAS_ACCOUNT_RESTRICTION
•
48 = IAS_NO_POLICY_MATCH
•
64 = IAS_DIALIN_LOCKED_OUT
•
65 = IAS_DIALIN_DISABLED
•
66 = IAS_INVALID_AUTH_TYPE
•
67 = IAS_INVALID_CALLING_STATION
•
68 = IAS_INVALID_DIALIN_HOURS
•
69 = IAS_INVALID_CALLED_STATION
•
70 = IAS_INVALID_PORT_TYPE
•
71 = IAS_INVALID_RESTRICTION
•
80 = IAS_NO_RECORD
•
96 = IAS_SESSION_TIMEOUT
•
97 = IAS_UNEXPECTED_REQUEST
(This is an IAS-internal attribute.)
Attribute sent to client in an access-accept packet. The format is:
•
Type Always contains the value 25. 1 octet.
•
Length Always 20 or more. 1 octet.
•
•
27
Class
Text
•
•
•
•
Checksum Contains an Adler-32 checksum computed over the
remainder of the Class attribute. 4 octets.
Vendor-Id The high-order octet is 0 and the low-order 3 octets
are the SMI Network Management Private Enterprise Code of
the Vendor in network byte order, as defined in the IETF RFC
1007 "Vendor SMI Network Management Private Enterprise
Codes". 4 octets.
Version Always contains the value of 1. 2 octets.
Server-Address This field contains the IP address of the
RADIUS server that issued the Access-Challenge. For
multihomed servers,this will be the address of the network
interface that received the original Access-Request. 2 octets.
Service -Reboot-Time Specifies the time at which the first
serial number was returned. 8 octets.
Unique-Serial-Number 8 octets.
84
RADREP Installation, Configuration & User Guide
© SecurityBoy Consulting
•
String Can be used to classify the accounting records so that
this information can be used for further analysis. In IAS, the
Class attribute from the profile should be copied into this String.
0 or more octets.
The combination of Serial-Number, Service-Reboot-Time, and ServerAddress should be a unique identification for each authentication that the
server accepted. This combination is used for correlating accounting
records with the authentications.
28
Session-Timeout
Number
Length of time (in seconds) before session is terminated.
29
Idle-Timeout
Number
Length of idle time (in seconds) before session is terminated.
30
Termination-Action
Number
Action NAS should take when service is completed.
31
EAP -Friendly-Name
Text
EAP friendly name.
32
Acct -Status-Type
Number
Specifies whether accounting packet starts or stops a bridging, routing, or
terminal server session.
33
Acct -Delay-Time
Number
Length of time (in seconds) for which the NAS has been sending the same
accounting packet.
34
Acct -Input -Octets
Number
Number of octets received during the session.
35
Acct -Output -Octets
Number
Number of octets sent during the session.
36
Acct -Session-Id
Text
Unique numeric string identifying the server session.
37
Acct -Authentic
Number
Specifies which server authenticated an incoming call.
38
Acct -Session-Time
Number
Length of time (in seconds) for which the session has been logged in.
39
Acct -Input -Packets
Number
Number of packets received during the session.
40
Acct -Output -Packets
Number
Number of packets sent during the session.
41
Acct -Terminate-Cause
Number
Reason a connection was terminated.
42
Acct -Multi-Ssn-Id
Text
Unique numeric string identifying the multilink session.
43
Acct -Link-Count
Number
Number of links in a multilink session.
44
Acct -Interim -Interval
Number
Length of interval (in seconds) between each interim update the NAS
sends.
45
Tunnel-Type
Number
Tunneling protocols to be used.
46
Tunnel-Medium-Type
Number
Transport medium to use when creating a tunnel for protocols (such
as L2TP) that can operate over multiple transports.
47
Tunnel-Client-Endpt
Text
The IP address of the initiator end of the tunnel.
48
Tunnel-Server-Endpt
Text
The IP address of the server end of the tunnel.
49
Acct -Tunnel-Conn
Text
50
Tunnel-Pvt-Group-ID
Text
Group ID for a particular tunneled session.
51
Tunnel-Assignment-ID
Text
Tunnel to which a session is to be assigned.
52
Tunnel-Preference
Number
53
MS-Acct -Auth-Type
Number
Routing and Remote Access service attribute. See RFC 2548.
54
MS-Acct -EAP-Type
Number
Routing and Remote Access service attribute. See RFC 2548.
55
MS-RAS-Version
Text
Routing and Remote Access service attribute. See RFC 2548.
56
MS-RAS-Vendor
Number
Routing and Remote Access service attribute. See RFC 2548.
57
MS-CHAP -Error
Text
Routing and Remote Access service attribute. See RFC 2548.
58
MS-CHAP -Domain
Text
Routing and Remote Access service attribute. See RFC 2548.
59
MS-MPPE-Encryption-Types
Number
Routing and Remote Access service attribute. See RFC 2548.
60
MS-MPPE-Encryption-Policy
Number
Routing and Remote Access service attribute. See RFC 2548.
85
RADREP Installation, Configuration & User Guide
© SecurityBoy Consulting
11 APPENDIX B – IAS ATTRIBUTE TABLE – STANDARD FORMAT
Microsoft IAS RADIUS Attribute IDs
(Standard Log Format Only)
The first six fields in an IAS log entry contain what is known as the header data. RADREP
automatically extracts the relevant information from the header and none of these fields
can be custom defined in the 'Detailed Usage' report.
Each of the following tabled attributes can be contained in a STOP record that is part of the IAS
Standard format log file, although the actual attributes recorded will depend on how your RAS/NAS
server (RADIUS client) has been configured in regards to what accounting inf ormation it sends to the
IAS server.
The IAS header always contains the following sequenced entries:
Attribute
ID
Data type
Represents
NAS-IP -Address
IAS Header1
Text
The IP address of the NAS sending the request
User-Name
IAS Header2
Text
The user name requesting access.
Record-Date
IAS Header3
Time
The date that the log is written
Record-Time
IAS Header4
Time
The time that the log is written
Service-Name
IAS Header5
Text
The name of the service running on the RADIUS server
Computer-Name
IAS Header6
Text
The name of the RADIUS server
After the header, RADIUS attributes and corresponding values are in pairs as shown in the following
format:
<attribute#1>,<value_for_attribute#1>,<attribute#2>,<value_for_attribute #2>, .......
If you want to add one of these attributes to the 'Usage Detailed' report, simply look through the table
to find the ID of the attribute you want to add and enter its value in the 'Attrib Name or MS# or
Field# ' data entry field on the RADREP 'Detailed Usage Report - Display Field Selection' screen.
Attribute
ID
Data type
Represents
User-Name
1
Text
User's claimed identity.
NAS-IP -Address
4
Text
The IP address of the NAS originating the request.
NAS-Port
5
Number
Physical port number of the NAS originating the request.
Service-Type
6
Number
Type of service user has requested.
Framed-Protocol
7
Number
The protocol to be used.
Framed-IP-Address
8
Text
Framed address to be configured for user.
Framed-IP-Netmask
9
Text
IP netmask to be configured for user.
Framed-Routing
10
Number
Routing method to be used by user.
Filter-Id
11
Text
Name of filter list for user requesting authentication.
Framed-MTU
12
Number
Maximum transmission unit to be configured for user.
Framed-Compression
13
Number
Compression protocol to be used.
Login-IP-Host
14
Number
The IP address of host to which user should be connected.
Login -Service
15
Number
Service connecting user to login host.
Login -TCP-Port
16
Number
TCP port to which user should be connected.
Reply -Message
18
Text
Message to be displayed to user when authentication request is accepted.
Callback-Number
19
Text
Call-back phone number.
Callback-Id
20
Text
Name of a place to be called by the NAS.
Framed-Route
22
Text
Name of a place to be called by the NAS.
86
RADREP Installation, Configuration & User Guide
Framed-IPX-Network
23
Number
© SecurityBoy Consulting
IPX network number to be configured on the NAS for user.
Attribute sent to client in an access-accept packet. The format is:
•
Type Always contains the value 25. 1 octet.
•
Length Always 20 or more. 1 octet.
•
•
•
Class
25
Text
•
•
•
•
Checksum Contains an Adler-32 checksum computed over the
remainder of the Class attribute. 4 octets.
Vendor-Id The high-order octet is 0 and the low-order 3 octets are the
SMI Network Management Private Enterprise Code of the Vendor in
network byte order, as defined in the IETF RFC 1007 "Vendor SMI
Network Management Private Enterprise Codes". 4 octets.
Version Always contains the value of 1. 2 octets.
Server-Address Contains the IP address of the RADIUS server that
issued the Access-Challenge. For multi-homed servers, this will be the
address of the network interface that received the original AccessRequest. 2 octets.
Service -Reboot-Time Specifies the time at which the first serial number
was returned. 8 octets.
Unique-Serial-Number 8 octets.
String Can be used to classify the accounting records so that this
information can be used for further analysis. In IAS, the Class attribute
from the profile should be copied into this String. 0 or more octets.
The combination of Serial-Number, Service-Reboot-Time, and Server-Address
should be a unique identification for each authentication that the server accepted.
This combination is used for correlating accounting records with the authentications.
Vendor-Specific
26
Text
Used to support proprietary NAS features
Session-Timeout
27
Number
Length of time (in seconds) before session is terminated.
Idle-Timeout
28
Number
Length of idle time (in seconds) before session is terminated.
Termination-Action
29
Number
Action NAS should take when service is completed.
Called-Station-Id
30
Text
Phone number dialled by user.
Calling-Station-Id
31
Text
Phone number from which call originated.
NAS-Identifier
32
Text
String identifying the NAS originating the request.
Login -LAT-Service
34
Text
Host with which user is to be connected by LAT.
Login -LAT-Node
35
Text
Node with which user is to be connected by LAT.
Login -LAT-Group
36
Text
LAT group codes for which user is authorized.
Framed-AppleTalk-Link
37
Number
AppleTalk network number for the serial link to user (only when user is router).
Framed-AppleTalk-Network
38
Number
AppleTalk network number the NAS must probe to allocate user's AppleTalk node.
Framed-AppleTalk-Zone
39
Text
AppleTalk default zone for user.
Acct -Status-Type
40
Number
Specifies whether accounting packet starts or stops a bridging, routing, or terminal
server session.
Acct -Delay-Time
41
Number
Length of time (in seconds) for which the NAS has been sending the same
accounting packet.
Acct -Input -Octets
42
Number
Number of octets received during the session.
Acct -Output -Octets
43
Number
Number of octets sent during the session.
Acct -Session-Id
44
Text
Unique numeric string identifying the server session.
Acct -Authentic
45
Number
Specifies which server authenticated an incoming call.
Acct -Session-Time
46
Number
Length of time (in seconds) for which the session has been logged in.
Acct -Input -Packets
47
Number
Number of packets received during the session.
Acct -Output -Packets
48
Number
Number of packets sent during the session.
Acct -Terminate-Cause
49
Number
Reason a connection was terminated.
Acct -Multi-Ssn-Id
50
Text
Unique numeric string identifying the multilink session.
87
RADREP Installation, Configuration & User Guide
© SecurityBoy Consulting
Acct -Link-Count
51
Number
Number of links in a multilink session.
Event-Timestamp
55
Time
The date and time that this event occurred on the NAS.
NAS-Port-Type
61
Number
Type of physical port used by the NAS originating the request.
Port-Limit
62
Number
Maximum number of ports that NAS provides to the user.
Login -LAT-Port
63
Number
Maximum number of ports that NAS provides to the user.
Tunnel-Type
64
Number
Tunnelling protocols to be used.
Tunnel-Medium-Type
65
Number
Transport medium to use when creating a tunnel for protocols (such as L2TP) that
can operate over multiple transports.
Tunnel-Client-Endpt
66
Text
The IP address of the initiator end of the tunnel.
Tunnel-Server-Endpt
67
Text
The IP address of the server end of the tunnel.
Acct -Tunnel-Conn
68
Text
Password-Retry
75
Number
Number of times user can try to be authenticated before NAS terminates connection.
Prompt
76
Number
Specifies to the NAS whether or not it should echo user's response as it is entered.
Connect-Info
77
Text
Indicates the nature of user's connection.
Configuration-Token
78
Text
Indicate a type of user profile to be used (sent from a RADIUS proxy server to a
RADIUS proxy client in an access-accept packet.
Tunnel-Pvt-Group-ID
81
Text
Group ID for a particular tunnelled session.
Tunnel-Assignment-ID
82
Text
Tunnel to which a session is to be assigned.
Tunnel-Preference
83
Number
Acct -Interim -Interval
85
Number
Length of interval (in seconds) between each interim update the NAS sends.
Ascend
107
to
255
Text
See the Vendor-Specific attribute table for these attributes.
Saved-RADIUS-Framed-Route 4100 Text
Routing information to be configured on the NAS for user (for IAS internal use
only).
Client-IP -Address
4108 Text
The IP address of RADIUS client.
NAS-Manufacturer
4116 Number
Manufacturer of NAS.
MS-CHAP -Error
4121 Number
Error data describing an MS-CHAP transaction.
Authentication-Type
4127 Number
Authentication scheme use to verify user.
Client-Friendly-Name
4128 Text
Friendly name for the RADIUS client.
SAM-Account-Name
4129 Text
User account name in Security Accounts Manager (SAM ).
Fully-Qualified-User-Name
4130 Text
User name in canonical format.
EAP -Friendly-Name
4132 Text
Extensible Authentication Protocol (EAP) friendly name.
Type of packet. Can be:
Packet -Type
4136 Number
•
1=Accept-Request
•
2=Access-Accept
•
3=Access-Reject
•
4=Accounting-Request
Reason for rejecting a user. Can be:
Reason-Code
4142 Number
•
00 = IAS_SUCCESS
•
01 = IAS_INTERNAL_ERROR
•
02 = IAS_ACCESS_DENIED
•
03 = IAS_MALFORMED_REQUEST
•
04 = IAS_GLOBAL_CATALOG_UNAVAILABLE
•
05 = IAS_DOMAIN_UNAVAILABLE
88
RADREP Installation, Configuration & User Guide
NP-Policy-Name
4149 Text
© SecurityBoy Consulting
•
06 = IAS_SERVER_UNAVAILABLE
•
07 = IAS_NO_SUCH_DOMAIN
•
08 = IAS_NO_SUCH_USER
•
16 = IAS_AUTH_FAILURE
•
17 = IAS_CHANGE_PASSWORD_FAILURE
•
18 = IAS_UNSUPPORTED_AUTH_TYPE
•
32 = IAS_LOCAL_USERS_ONLY
•
33 = IAS_PASSWORD_MUST_CHANGE
•
34 = IAS_ACCOUNT_DISABLED
•
35 = IAS_ACCOUNT_EXPIRED
•
36 = IAS_ACCOUNT_LOCKED_OUT
•
37 = IAS_INVALID_LOGON_HOURS
•
38 = IAS_ACCOUNT_RESTRICTION
•
48 = IAS_NO_POLICY_MATCH
•
64 = IAS_DIALIN_LOCKED_OUT
•
65 = IAS_DIALIN_DISABLED
•
66 = IAS_INVALID_AUTH_TYPE
•
67 = IAS_INVALID_CALLING_STATION
•
68 = IAS_INVALID_DIALIN_HOURS
•
69 = IAS_INVALID_CALLED_STATION
•
70 = IAS_INVALID_PORT_TYPE
•
71 = IAS_INVALID_RESTRICTION
•
80 = IAS_NO_RECORD
•
96 = IAS_SESSION_TIMEOUT
•
97 = IAS_UNEXPECTED_REQUEST
Friendly name of remote access policy.
89
RADREP Installation, Configuration & User Guide
© SecurityBoy Consulting
12 APPENDIX C – IAS VENDOR-SPECIFIC ATTRIBUTE TABLE
Vendor-Specific Microsoft IAS RADIUS Attribute IDs
(Standard Log Format Only)
ID
Attribute name
Vendor
Data
type
107
Ascend-Calling-Subaddress
Ascend
Text
108
Ascend-Callback-Delay
Ascend
Number
109
Ascend-Endpoint-Disc
Ascend
Text
110
Ascend-Remote-FW
Ascend
Text
111
Ascend-Multicast-G-Leave-Delay
Ascend
Number
112
Ascend-CBCP-Enable
Ascend
Number
113
Ascend-CBCP-Mode
Ascend
Number
114
Ascend-CBCP-Delay
Ascend
Number
115
Ascend-CBCP-Trunk-Group
Ascend
Number
116
Ascend-Appletalk-Route
Ascend
Text
117
Ascend-Appletalk-Peer-Mode
Ascend
Number
118
Ascend-Route-Appletalk
Ascend
Number
119
Ascend-FCP-Parameter
Ascend
Text
120
Ascend-Modem-Port -No
Ascend
Number
121
Ascend-Modem-Slot-No
Ascend
Number
122
Ascend-Modem-Shelf-No
Ascend
Number
123
Ascend-CallAttempt-Limit
Ascend
Number
124
Ascend-CallBlock-Duration
Ascend
Number
125
Ascend-Maximum-Call-Duration
Ascend
Number
126
Ascend-Route-Preference
Ascend
Number
127
Ascend-Tunneling-Protocol
Ascend
Number
128
Ascend-Shared-Profile-Enable
Ascend
Number
129
Ascend-Primary-Home-Agent
Ascend
Text
130
Ascend-Secondary-Home-Agent
Ascend
Text
131
Ascend-Dialout-Allowed
Ascend
Number
132
Ascend-Client-Gateway
Ascend
Number
133
Ascend-BACP-Enable
Ascend
Number
134
Ascend-DHCP -Maximum-Leases
Ascend
Number
135
Ascend-Client-Prim ary-DNS
Ascend
String
136
Ascend-Client-Secondary-DNS
Ascend
String
137
Ascend-Client-Assign-DNS
Ascend
Number
138
Ascend-User-Acct -Type
Ascend
Number
139
Ascend-User-Acct -Host
Ascend
Number
140
Ascend-User-Acct -Port
Ascend
Number
141
Ascend-User-Acct-Key
Ascend
Text
142
Ascend-User-Acct -Base
Ascend
Number
143
Ascend-User-Acct -Time
Ascend
Number
144
Ascend-Assign-IP -Client
Ascend
Number
145
Ascend-Assign-IP -Server
Ascend
Number
146
Ascend-Assign-IP -Global-Pool
Ascend
Text
147
Ascend-DHCP -Reply
Ascend
Number
148
Ascend-DHCP -Pool-Number
Ascend
Number
149
Ascend-Expect -Callback
Ascend
Number
90
RADREP Installation, Configuration & User Guide
© SecurityBoy Consulting
150
Ascend-Event-Type
Ascend
Number
151
Ascend-Session-Svr-Key
Ascend
Text
152
Ascend-Multicast-Rate-Limit
Ascend
Number
153
Ascend-IF-Netmask
Ascend
Number
154
Ascend-Remote-Addr
Ascend
Number
155
Ascend-Multicast-Client
Ascend
Number
156
Ascend-FR-Circuit-Name
Ascend
Text
157
Ascend-FR-Link-Up
Ascend
Number
158
Ascend-FR-Nailed-Grp
Ascend
Number
159
Ascend-FR-Type
Ascend
Number
160
Ascend-FR-Link-Mgt
Ascend
Number
161
Ascend-FR-N391
Ascend
Number
162
Ascend-FR-DCE-N392
Ascend
Number
163
Ascend-FR-DTE-N392
Ascend
Number
164
Ascend-FR-DCE-N393
Ascend
Number
165
Ascend-FR-DTE-N393
Ascend
Number
166
Ascend-FR-T391
Ascend
Number
167
Ascend-FR-T392
Ascend
Number
168
Ascend-Bridge-Address
Ascend
Text
169
Ascend-TS-Idle-Limit
Ascend
Number
170
Ascend-TS-Idle-Mode
Ascend
Number
171
Ascend-DBA-Monitor
Ascend
Number
172
Ascend-Base-Channel-Count
Ascend
Number
173
Ascend-Minimum -Channels
Ascend
Number
174
Ascend-IPX-Route
Ascend
Text
175
Ascend-FT1-Caller
Ascend
Number
176
Ascend-Backup
Ascend
Text
177
Ascend-Call-Type
Ascend
Number
178
Ascend-Group
Ascend
Text
179
Ascend-FR-DLCI
Ascend
Number
180
Ascend-FR-Profile-Name
Ascend
Text
181
Ascend-Ara-PW
Ascend
Text
182
Ascend-IPX-Node-Addr
Ascend
Text
183
Ascend-Home-Agent-IP -Addr
Ascend
Text
184
Ascend-Home-Agent-Password
Ascend
Text
185
Ascend-Home-Network-Name
Ascend
Text
186
Ascend-Home-Agent-UDP-Port
Ascend
Number
187
Ascend-Multilink-ID
Ascend
Number
188
Ascend-Num-In-Multilink
Ascend
Number
189
Ascend-First -Dest
Ascend
Number
190
Ascend-Pre-Input-Octets
Ascend
Number
191
Ascend-Pre-Output -Octets
Ascend
Number
192
Ascend-Pre-Input-Packets
Ascend
Number
193
Ascend-Pre-Output -Packet s
Ascend
Number
194
Ascend-Maximum-Time
Ascend
Number
195
Ascend-Disconnect-Cause
Ascend
Number
196
Ascend-Connect -Progress
Ascend
Number
197
Ascend-Data-Rate
Ascend
Number
198
Ascend-Pre-Session-Time
Ascend
Number
199
Ascend-Token-Idle
Ascend
Number
200
Ascend-Token-Immediate
Ascend
Number
91
RADREP Installation, Configuration & User Guide
© SecurityBoy Consulting
201
Ascend-Require-Auth
Ascend
Number
202
Ascend-Number-Sessions
Ascend
Text
203
Ascend-Authen-Alias
Ascend
Text
204
Ascend-Token-Expiry
Ascend
Number
205
Ascend-Menu-Selector
Ascend
Text
206
Ascend-Menu-Item
Ascend
Text
207
Ascend-PW-Warntime
Ascend
Number
208
Ascend-PW-Lifetime
Ascend
Number
209
Ascend-IP -Direct
Ascend
Text
210
Ascend-PPP-VJ-Slot-Comp
Ascend
Number
211
Ascend-PPP-VJ-1172
Ascend
Number
212
Ascend-PPP-Async-Map
Ascend
Number
213
Ascend-Third-Prompt
Ascend
Text
214
Ascend-Send-Secret
Ascend
Text
215
Ascend-Receive-Secret
Ascend
Text
216
Ascend-IPX-PeerMode
Ascend
Number
217
Ascend-IP -Pool-Definition
Ascend
Text
218
Ascend-Assign-IP -Pool
Ascend
Number
219
Ascend-FR-Direct
Ascend
Number
220
Ascend-FR-Direct-Profile
Ascend
Text
221
Ascend-FR-Direct-DLCI
Ascend
Number
222
Ascend-Handle-IPX
Ascend
Number
223
Ascend-Netware-Timeout
Ascend
Number
224
Ascend-IPX-Alias
Ascend
Number
225
Ascend-Metric
Ascend
Number
226
Ascend-PRI -Number-Type
Ascend
Number
227
Ascend-Dial-Number
Ascend
Text
228
Ascend-Route-IP
Ascend
Number
229
Ascend-Route-IPX
Ascend
Number
230
Ascend-Bridge
Ascend
Number
231
Ascend-Send-Auth
Ascend
Number
232
Ascend-Send-Passwd
Ascend
Text
233
Ascend-Link-Compression
Ascend
Number
234
Ascend-Target -Util
Ascend
Number
235
Ascend-Maximum-Channels
Ascend
Number
236
Ascend-Inc-Channel-Count
Ascend
Number
237
Ascend-Dec-Channel-Count
Ascend
Number
238
Ascend-Seconds-Of-History
Ascend
Number
239
Ascend-History-Weigh-Type
Ascend
Number
240
Ascend-Add-Seconds
Ascend
Number
241
Ascend-Remove-Seconds
Ascend
Number
242
Ascend-Data-Filter
Ascend
String
243
Ascend-Call-Filter
Ascend
String
244
Ascend-Idle-Limit
Ascend
Number
245
Ascend-Preempt-Limit
Ascend
Number
246
Ascend-Callback
Ascend
Number
247
Ascend-Data-Svc
Ascend
Number
248
Ascend-Force56
Ascend
Number
249
Ascend-Billing-Number
Ascend
Text
250
Ascend-Call-By-Call
Ascend
Number
251
Ascend-Transit-Number
Ascend
Text
92
RADREP Installation, Configuration & User Guide
© SecurityBoy Consulting
252
Ascend-Host-Info
Ascend
Text
253
Ascend-PPP-Address
Ascend
Number
254
Ascend-MPP-Idle-Percent
Ascend
Number
255
Ascend-Xmit-Rate
Ascend
Number
4120
MS-CHAP -Domain
Microsoft
String
4121
MS-CHAP -Error
Microsoft
String
4134
MS-Acct -Auth-Type
Microsoft
Number
4135
MS-Acct -EAP-Type
Microsoft
Number
4143
MS-Filter
Microsoft
String
4147
MS-RAS-Vendor
Microsoft
Number
4148
MS-RAS-Version
Microsoft
String
4150
MS-Primary-DNS-Server
Microsoft
String
4151
MS-Secondary-DNS-Server
Microsoft
String
4152
MS-Primary-NBNS-Server
Microsoft
String
4153
MS-Secondary-NBNS-Server
Microsoft
String
5000
Cisco-AV-Pair
Cisco
Text
11000 USR-Last-Number-Dialed-Out
US Robotics Text
11001 USR-Last-Number-Dialed-In-DNIS
US Robotics Text
11002 USR-Last-Callers-Number-ANI
US Robotics Text
11003 USR-Channel
US Robotics Number
11004 USR-Event-Id
US Robotics Number
11005 USR-Event-Date-Time
US Robotics Number
11006 USR-Call-Start-Date-Time
US Robotics Number
11007 USR-Call-End-Date-Time
US Robotics Number
11008 USR-Default -DTE-Data-Rate
US Robotics Number
11009 USR-Initial-Rx-Link-Data-Rate
US Robotics Number
11010 USR-Final-Rx-Link-Data-Rate
US Robotics Number
11011 USR-Initial-Tx-Link-Data-Rate
US Robotics Number
11012 USR-Final-Tx-Link-Data-Rate
US Robotics Number
11013 USR-Chassis-Temperature
US Robotics Number
11014 USR-Chassis-Temp-Threshold
US Robotics Number
11015 USR-Actual-Voltage
US Robotics Number
11016 USR-Expected-Voltage
US Robotics Number
11017 USR-Power-Supply -Number
US Robotics Number
11018 USR-Card-Type
US Robotics Number
11019 USR-Chassis-Slot
US Robotics Number
11020 USR-Sync-Async-Mode
US Robotics Number
11021 USR-Originate-Answer-Mode
US Robotics Number
11022 USR-Modulation-Type
US Robotics Number
11023 USR-Initial-Modulation-Type
US Robotics Number
11024 USR-Connect-Term-Reason
US Robotics Number
11025 USR-Failure-to-Connect-Reason
US Robotics Number
11026 USR-Equalization-Type
US Robotics Number
11027 USR-Fallback-Enabled
US Robotics Number
11028 USR-Connect-Time-Limit
US Robotics Number
11029 USR-Number-of-Rings-Limit
US Robotics Number
11030 USR-DTE-Data-Idle-Timout
US Robotics Number
11031 USR-Characters-Sent
US Robotics Number
11032 USR-Characters-Received
US Robotics Number
11033 USR-Blocks-Sent
US Robotics Number
11034 USR-Blocks-Received
US Robotics Number
93
RADREP Installation, Configuration & User Guide
© SecurityBoy Consulting
11035 USR-Blocks-Resent
US Robotics Number
11036 USR-Retrains-Requested
US Robotics Number
11037 USR-Retrains-Granted
US Robotics Number
11038 USR-Line-Reversals
US Robotics Number
11039 USR-Number-Of-Characters-Lost
US Robotics Number
11040 USR-Number-of-Blers
US Robotics Number
11041 USR-Number-of-Link-Timeouts
US Robotics Number
11042 USR-Number-of-Fallbacks
US Robotics Number
11043 USR-Number-of-Upshifts
US Robotics Number
11044 USR-Number-of-Link-NAKs
US Robotics Number
11045 USR-DTR-False-Timeout
US Robotics Number
11046 USR-Fallback-Limit
US Robotics Number
11047 USR-Block-Error-Count-Limit
US Robotics Number
11048 USR-DTR-True-Timeout
US Robotics Number
11049 USR-Security-Login-Limit
US Robotics Number
11050 USR-Security-Resp-Limit
US Robotics Number
11051 USR-DTE-Ring-No-Answer-Limit
US Robotics Number
11052 USR-Back-Channel-Data-Rate
US Robotics Number
11053 USR-Simplified-MNP -Levels
US Robotics Number
11054 USR-Simplified-V42bis-Usage
US Robotics Number
11055 USR-Mbi-Ct-PRI-Card-Slot
US Robotics Number
11056 USR-Mbi-Ct-TDM-Time-Slot
US Robotics Number
11057 USR-Mbi-Ct-PRI-Card-Span-Line
US Robotics Number
11058 USR-Mbi-Ct-BChannel-Used
US Robotics Number
11059 USR-Physical-State
US Robotics Number
11060 USR-Packet-Bus-Session
US Robotics Number
11061 USR-Server-Time
US Robotics Number
11062 USR-Channel-Connected-To
US Robotics Number
11063 USR-Slot-Connected-To
US Robotics Number
11064 USR-Device-Connected-To
US Robotics Number
11065 USR-NFAS-ID
US Robotics Number
11066 USR-Q931-Call-Reference-Value
US Robotics Number
11067 USR-Call-Event-Code
US Robotics Number
11068 USR-DS0
US Robotics Number
11069 USR-DS0s
US Robotics Text
11070 USR-Gateway-IP -Address
US Robotics String
11071 USR-Call-Arrival-in-GMT
US Robotics
11072 USR-Call-Connect -in-GMT
US Robotics Number
11073 USR-Call-Terminate-in-GMT
US Robotics Number
11074 USR-IDS0 -Call-Type
US Robotics Number
11075 USR-Call-Reference-Number
US Robotics Number
11076 USR-CDMA-Call-Reference-Number
US Robotics
11077 USR-Mobile-IP -Address
US Robotics String
11078 USR-IWF-IP-Address
US Robotics String
11079 USR-Called-Party-Number
US Robotics Text
11080 USR-Calling-Party-Number
US Robotics Text
11081 USR-Call-Type
US Robotics Number
11082 USR-ESN
US Robotics Text
11083 USR-IWF-Call-Identifier
US Robotics Number
11084 USR-IMSI
US Robotics Text
11085 USR-Service-Option
US Robotics Number
Number
Number
94
RADREP Installation, Configuration & User Guide
11086 USR-Disconnect -Cause-Indicator
US Robotics Number
11087 USR-Mobile-NumBytes-Txed
US Robotics Number
11088 USR-Mobile-NumBytes-Rxed
US Robotics Number
11089 USR-Num-Fax-Pages-Processed
US Robotics Number
11090 USR-Compression-Type
US Robotics Number
11091 USR-Call-Error-Code
US Robotics Number
11092 USR-Modem-Setup -Time
US Robotics Number
11093 USR-Call-Connecting-Time
US Robotics Number
11094 USR-Connect-Time
US Robotics Number
11095 USR-RMMIE-Manufacutere-ID
US Robotics Number
11096 USR-RMMIE-Product -Code
US Robotics Text
11097 USR-RMMIE-Serial-Number
US Robotics Text
11098 USR-RMMIE-Firmware-Version
US Robotics Text
11099 USR-RMMIE-Firmware-Build-Date
US Robotics Text
11100 USR-RMMIE-Status
US Robotics Number
11101 USR-RMMIE-Num-Of-Updates
US Robotics Number
11102 USR-RMMIE-x2-Status
US Robotics Number
11103 USR-RMMIE-Planned-Disconnect
US Robotics Number
11104 USR-RMMIE-Last -Update-Time
US Robotics Number
11105 USR-RMMIE-Last -Update-Event
US Robotics Number
11106 USR-RMMIE-Rcv-Tot-PwrLvl
US Robotics Number
11107 USR-RMMIE-Rcv-PwrLvl-3300Hz
US Robotics Number
11108 USR-RMMIE-Rcv-PwrLvl-3750Hz
US Robotics Number
11109 USR-RMMIE-PwrLvl-NearEcho-Canc
US Robotics Number
11110 USR-RMMIE-PwrLvl-FarEcho-Canc
US Robotics Number
11111 USR-RMMIE-PwrLvl-Noise-Lvl
US Robotics Number
11112 USR-RMMIE-PwrLvl-Xmit-Lvl
US Robotics Number
11113 USR-PW-IFilter-IP
US Robotics Text
11114 USR-PW-IFilter-IPX
US Robotics Text
11115 USR-PW-IFilter-SAP
US Robotics Text
11116 USR-PW-OFilter-IP
US Robotics Text
11117 USR-PW-OFilter-IPX
US Robotics Text
11118 USR-PW-OFilter-SAP
US Robotics Text
11119 USR-PW-VPN-ID
US Robotics Number
11120 USR-PW-VPN-Name
US Robotics Text
11121 USR-PW-VPN-Neighbor
US Robotics String
11122 USR-PW-Framed-Routing-V2
US Robotics Number
11123 USR-PW-VPN-Gateway
US Robotics Text
11124 USR-PW-Tunnel-Authentication
US Robotics Text
11125 USR-PW-Index
US Robotics Number
11126 USR-PW-Cutoff
US Robotics Text
11127 USR-PW-Packet
US Robotics Text
11128 USR-Primary-DNS-Server
US Robotics String
11129 USR-Secondary-DNS-Server
US Robotics String
11130 USR-Primary-NBNS-Server
US Robotics String
11131 USR-Secondary-NBNS-Server
US Robotics String
11132 USR-Syslog-Tap
US Robotics Number
11133 USR-Log-Filter-Packet
US Robotics Number
11134 USR-Chassis-Call-Slot
US Robotics Number
11135 USR-Chassis-Call-Span
US Robotics Number
11136 USR-Chassis-Call-Channel
US Robotics Number
© SecurityBoy Consulting
95
RADREP Installation, Configuration & User Guide
11137 USR-Keypress-Timeout
US Robotics Number
11138 USR-Unauthenticated-Time
US Robotics Number
11139 USR-VPN-Encryptor
US Robotics Text
11140 USR-VPN-GW-Location-Id
US Robotics Text
11141 USR-Re-Chap-Timeout
US Robotics Number
11142 USR-CCP-Algorithm
US Robotics Number
11143 USR-ACCM-Type
US Robotics Number
11144 USR-Connect-Speed
US Robotics Number
11145 USR-Framed-IP -Address-Pool-Name
US Robotics Text
11146 USR-MP-EDO
US Robotics String
11147 USR-Local-Framed-IP-Addr
US Robotics String
11148 USR-Framed-IPX-Route
US Robotics String
11149 USR-MPIP -Tunnel-Originator
US Robotics String
11150 USR-Bearer-Capabilities
US Robotics Number
11151 USR-Speed-Of-Connection
US Robotics Number
11152 USR-Max-Channels
US Robotics Number
11153 USR-Channel-Expansion
US Robotics Number
11154 USR-Channel-Decrement
US Robotics Number
11155 USR-Expansion-Algorithm
US Robotics Number
11156 USR-Compression-Algorithm
US Robotics Number
11157 USR-Receive-Acc-Map
US Robotics Number
11158 USR-Transmit-Acc-Map
US Robotics Number
11159 USR-Compression-Reset-Mode
US Robotics Number
11160 USR-Min-Compression-Size
US Robotics Number
11161 USR-IP
US Robotics Number
11162 USR-IPX
US Robotics Number
11163 USR-Filter-Zones
US Robotics Number
11164 USR-Appletalk
US Robotics Number
11165 USR-Bridging
US Robotics Number
11166 USR-Spoofing
US Robotics Number
11167 USR-Host -Type
US Robotics Number
11168 USR-Send-Name
US Robotics Text
11169 USR-Send-Password
US Robotics Text
11170 USR-Start -Time
US Robotics Number
11171 USR-End-Time
US Robotics Number
11172 USR-Send-Script1
US Robotics Text
11173 USR-Reply-Script1
US Robotics Text
11174 USR-Send-Script2
US Robotics Text
11175 USR-Reply-Script2
US Robotics Text
11176 USR-Send-Script3
US Robotics Text
11177 USR-Reply-Script3
US Robotics Text
11178 USR-Send-Script4
US Robotics Text
11179 USR-Reply-Script4
US Robotics Text
11180 USR-Send-Script5
US Robotics Text
11181 USR-Reply-Script5
US Robotics Text
11182 USR-Send-Script6
US Robotics Text
11183 USR-Reply-Script6
US Robotics Text
11184 USR-Terminal-Type
US Robotics Text
11185 USR-Appletalk -Network-Range
US Robotics Number
11186 USR-Local-IP-Address
US Robotics Text
11187 USR-Routing-Protocol
US Robotics Number
© SecurityBoy Consulting
96
RADREP Installation, Configuration & User Guide
11188 USR-Modem-Group
US Robotics Text
11189 USR-IPX-Routing
US Robotics Number
11190 USR-IPX-WAN
US Robotics Number
11191 USR-IP-RIP -Policies
US Robotics Number
11192 USR-IP-RIP -Simple-Auth-Password
US Robotics Text
11193 USR-IP-RIP -Input -Filter
US Robotics Text
11194 USR-IP-Call-Input -Filter
US Robotics Text
11195 USR-IPX-RIP-Input-Filter
US Robotics Text
11196 USR-MP-MRRU
US Robotics Number
11197 USR-IPX-Call-Input-Filter
US Robotics Text
11198 USR-AT-Input-Filter
US Robotics Text
11199 USR-AT-RTMP -Input -Filter
US Robotics Text
11200 USR-AT-Zip-Input -Filter
US Robotics Text
11201 USR-AT-Call-Input -Filter
US Robotics Text
11202 USR-ET -Bridge-Input -Filter
US Robotics Text
11203 USR-IP-RIP -Output -Filter
US Robotics Text
11204 USR-IP-Call-Output -Filter
US Robotics Text
11205 USR-IPX-RIP-Output-Filter
US Robotics Text
11206 USR-IPX-Call-Output -Filter
US Robotics Text
11207 USR-AT-Output-Filter
US Robotics Text
11208 USR-AT-RTMP -Output -Filter
US Robotics Text
11209 USR-AT-Zip-Output -Filter
US Robotics Text
11210 USR-AT-Call-Output -Filter
US Robotics Text
11211 USR-ET -Bridge-Output -Filter
US Robotics Text
11212 USR-ET -Bridge-Call-Output -Filter
US Robotics Text
11213 USR-IP-Default -Route-Option
US Robotics Number
11214 USR-MP-EDO-HIPER
US Robotics String
11215 USR-Modem-Training-Time
US Robotics Number
11216 USR-Interface-Index
US Robotics Number
11217 USR-Tunnel-Security
US Robotics Number
11218 USR-Port -Tap
US Robotics Number
11219 USR-Port -Tap-Format
US Robotics Number
11220 USR-Port -Tap-Output
US Robotics Number
11221 USR-Port -Tap-Facility
US Robotics Number
11222 USR-Port -Tap-Priority
US Robotics Number
11223 USR-Port -Tap-Address
US Robotics String
11224 USR-MobileIP-Home-Agent-Address
US Robotics String
11225 USR-Tunneled-MLPP
US Robotics Number
11226 USR-Multicast-Proxy
US Robotics Number
11227 USR-Multicast-Receive
US Robotics Number
11228 USR-Multicast-Forwarding
US Robotics Number
11229 USR-IGMP-Query-Interval
US Robotics Number
11230 USR-IGMP-Maximum-Response-Tim e
US Robotics Number
11231 USR-IGMP-Robustness
US Robotics Number
11232 USR-IGMP-Version
US Robotics Number
11233 USR-IGMP-Routing
US Robotics Number
11234 USR-VTS-Session-Key
US Robotics Text
11235 USR-Orig-NAS-Type
US Robotics Text
11236 USR-Call-Arrival-Time
US Robotics Number
11237 USR-Call-End-Time
US Robotics Number
11238 USR-Rad-Multicast -Routing-Ttl
US Robotics Number
© SecurityBoy Consulting
97
RADREP Installation, Configuration & User Guide
11239 USR-Rad-Multicast -Routing-Rate-Limit
US Robotics Number
11240 USR-Rad-Multicast -Routing-Protocol
US Robotics Number
11241 USR-Rad-Multicast -Routing-Boundary
US Robotics Text
11242 USR-Rad-Dvmrp-Metric
US Robotics Number
11243 USR-Chat -Script-Name
US Robotics Text
11244 USR-Chat -Script-Rules
US Robotics Text
11245 USR-Rad-Location-Type
US Robotics Number
11246 USR-T unnel-Switch-Endpoint
US Robotics Text
11247 USR-OSPF-Addressless-Index
US Robotics Number
11248 USR-Callback-Type
US Robotics Number
11249 USR-Tunnel-Auth-Hostname
US Robotics Text
11250 USR-Acct -Reason-Code
US Robotics Number
11251 USR-DNIS-ReAuthentication
US Robotics Number
11252 USR-PPP-Source-IP -Filter
US Robotics Text
11253 USR-Auth-Mode
US Robotics Number
11254 USR-NAS-Type
US Robotics Number
11255 USR-Request-Type
US Robotics Number
© SecurityBoy Consulting
98