1
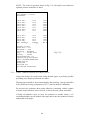
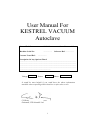
User Manual For
KESTREL VACUUM
Autoclave
Manual Ref. No:
UM0012
Machine Serial No:
...................
Pressure Vessel Ref:
Issue No:
005
Software Ref: ...................
...................
Description Of Any Options Fitted:
............................................................................................................................
............................................................................................................................
............................................................................................................................
............................................................................................................................
....................................................................
Voltage:
Power:
Phase:
It would be most helpful if you could have the above information
available when requesting technical advice or after sales service.
C H Perry
Chairman, LTE Scientific Ltd
1
2
Confidentiality
All rights reserved. No part of this publication may be reproduced, stored in a
retrieval system, or transmitted in any form or by any means, mechanical,
photocopying, recording, or otherwise, without the prior written permission of LTE
Scientific Limited. No patent liability is assumed with respect to the use of the
information contained herein. While every precaution has been taken in the
preparation of this manual, LTE Scientific Limited assumes no responsibility for
errors or omissions. Neither is any liability assumed for damages resulting from the
use of the information contained herein.
3
4
CONTENTS
Page
1. SAFETY .................................................................................................................. 7
2. OVERVIEW ............................................................................................................. 9
2.1 OPERATING ENVIRONMENT ............................................................................. 9
3. INSTALLATION INSTRUCTIONS ................................................................... 11
3.1
3.2
3.3
3.4
3.5
3.6
3.7
INSTALLATION AND LEVELLING .................................................................. 11
ELECTRICAL CONNECTIONS .......................................................................... 11
PIPE CONNECTIONS .......................................................................................... 12
DRAINS ................................................................................................................. 13
WATER INLET ..................................................................................................... 13
STEAM GENERATOR BOILER DRAIN ............................................................ 13
STEAM SUPPLY (S VERSION AUTOCLAVES ONLY) .................................. 14
4. HELP WHEN USING THE KEYBOARD AND DISPLAY ............................. 15
4.1 KEYPAD ............................................................................................................... 15
4.2 DISPLAY AND REQUIRED ENTRIES ............................................................... 15
4.3 CANCEL (C) AND ENTER KEYS ...................................................................... 15
4.4 ALLOWABLE USE OF THE KEYPAD .............................................................. 15
4.4.1 THERMAL LOCK OVERRIDE key.................................................................. 15
4.4.2 RESET key.......................................................................................................... 16
5. OPERATING THE AUTOCLAVE ..................................................................... 17
5.0 GETTING STARTED QUICKLY
(a guide for those who do not initially want to read the manual)..................................................... 17
5.0.1 Some useful tips ................................................................................................ 17
5.0.2 Power fail during a cycle operation ................................................................... 18
5.1 SUPERVISORS MODE ........................................................................................ 18
5.1.1 Changing date and time settings ........................................................................ 19
5.1.2 Introduction to the cycle parameters ................................................................... 20
5.1.2.1 Changing the cycle parameters ....................................................................... 23
5.1.3 Locking out cycles .............................................................................................. 29
5.1.4 Print out of cycle parameters .............................................................................. 29
5.1.5. Print out of individual cycle parameters ............................................................. 29
5.1.6 Print out of engineering parameters ..................................................................... 30
5.1.7 Changing the printed value of the cycle count ..................................................... 30
5.2 OPERATORS MODE ........................................................................................... 31
5.2.1 .Introduction ......................................................................................................... 31
5.2.2 Using the Autoclave ............................................................................................ 32
5.2.2.1 Autoclave door types ....................................................................................... 32
5.2.3 Using the delayed start cycle ............................................................................... 37
5.2.4 Additional messages ........................................................................................... 38
5
5.3 THE PRINTER ...................................................................................................... 38
5.3.1 Introduction ........................................................................................................ 38
5.3.2 Example of a typical printout .............................................................................. 39
5.3.3 Long term storage of printouts ............................................................................ 40
5.4 FAILURE MESSAGES ......................................................................................... 41
5.4.1 Introduction
.................................................................................................. 41
5.4.2 Door lock failure ............................................................................................... 41
5.4.3 Calendar fault, reset date and time ...................................................................... 41
5.4.4 Steam generator boiler water level low (option) ................................................. 42
5.4.5 Low load temperature during sterilising ............................................................. 42
5.4.6 High load temperature during sterilising ............................................................ 42
5.4.7 Printer failure ...................................................................................................... 43
5.4.8 Vessel door opening during a cycle .................................................................... 43
5.4.9 Temperature sensor failure.................................................................................. 43
5.4.10 Cycle parameters overwritten ........................................................................... 43
5.4.11 Operation of over-temperature lamp (optional) ................................................ 43
5.4.12 EEPROM fault .................................................................................................. 43
6. MAINTENANCE PROCEDURES ...................................................................... 45
6.1
6.2
6.3
6.4
6.5
6.6
6.7
6.8
6.9
ACCESS TO THE INTERIOR .............................................................................. 45
DOOR CLAMPING BOLT LUBRICATION ....................................................... 45
DESCALING OF STEAM GENERATOR (E VERSIONS ONLY)..................... 45
PUMPS .................................................................................................................. 46
FILTERS ................................................................................................................ 46
SPILLAGE OF AGAR .......................................................................................... 46
HEATER REPLACEMENT
........................................................................... 46
PRINTER ROLL REPLACEMENT...................................................................... 47
BATTERY REPLACEMENT ON PROCESSOR PCB ........................................ 48
7. SPARES AND ACCESSORIES............................................................................ 48
6
1.
SAFETY
The main hazard when using the autoclave are the risk of touching a hot
surfaces, particularly when the door is opened, or from residual vessel steam
when opening the door at the end of a cycle.
Always wear an overall or laboratory coat that will protect the arms when
loading or unloading. When the autoclave is being unloaded, suitable hand
protection should be used, remembering that the load could be at a temperature
of around 100°C if the Thermal Lock Override key has been used. Under this
condition there will be residual steam in the vessel, hence use great caution.
Take care when moving the autoclave as it is very heavy and could cause
serious injury if not handled in the correct way.
It is vital that the power cable earth (ground), be connected to a suitable
protective earth supply.
If this equipment is used in a manner not specified by the manufacturer, the
protection provided by the equipment may be impaired.
NB:
IN THE EVENT OF STEAM ESCAPING FROM THE
AUTOCLAVE IN SUCH A WAY THAT IT COULD BECOME A
DANGER TO THE OPERATOR, SWITCH THE MACHINE
OFF AT THE MAINS ISOLATOR AND CALL LTE AT THE
SERVICE CENTRE – ON 01457 87 6221 EXTENSION 144 OR
151 AS SOON AS POSSIBLE.
7
8
2.
OVERVIEW
This autoclave is one of a range having different vessel types and sizes, and a
number of options such as external or internal steam sources, and drain
condensate units. Additionally special vessel sizes are available.
Regardless of which model of autoclave you have, the control system that you
will be using to operate it with is the same.
In operation, the autoclave offers ease of use together with reliability. You
will be able to use the control system via the membrane keypad and liquid
crystal display (LCD). Questions are displayed on the LCD which asks you to
reply with either a YES/NO or a numeric answer, thus leading you through the
programming and operational procedures.
There are two distinct levels of operation within the system – Operator, and
Supervisor modes. The Supervisor level allows, by use of a security access
code, entry to the variables within each of the eight programs, which may be
changed as required. Additionally, the supervisor may ‘lock out’ any of the
available programs to restrict usage by the operator. This removes the chance
of an operator allowing a particular load to be processed using the wrong
sterilising parameters, and is particularly useful when a number of identical
loads are being sterilised.
Air purging may be carried out using either pulsed vacuum and steam with
selectable number of pulses or by direct steam purging. Numerous options are
available for precooling, drying and final cooling.
Recording of cycle operation is done using a printer to document cycle
parameter details, temperature and time, together with operational elements
such as batch numbers and operator identity. In addition the system acts as a
‘watchdog’ throughout the sterilising period checking that the sterilising
parameters of temperature and time are adhered to. Any variation from these
sterilising conditions will be printed out and the attention of the operator
drawn to the reasons for failure.
As well as the information given on the liquid crystal display there are a
number of indicating LED's (light emitting diodes) that show the cycle stages,
door closed and locked states, and cycle failed indication.
2.1
Operating Environment
•
•
•
•
10 – 40°C
Maximum relative humidity 70%
For indoor use only
Operation at altitudes below 2500m only is permitted
9
10
3.
INSTALLATION INSTRUCTIONS
3.1
INSTALLATION AND LEVELLING
Before installation, please ensure that the mains isolator switch will not be
obscured by the autoclave and that it is easily accessible in case of a need to
shut the machine down in an emergency or for any other reason.
Warning: Do not try to move the autoclave without the proper resources.
The machine is very heavy and special care MUST be taken when attempting
to move it. NEVER try to move the Autoclave when the door is open.
Accessibility of the chosen site and maximum floor loadings should be
carefully considered. Siting near an outside wall may help the provision of
ventilation and drainage. Services should be within 2 mtrs. of the Autoclave.
You may wish to check BS2646 Part 2 for advice. Position the autoclave on a
level floor taking care to leave sufficient space at the back of the machine to
allow access for installation of the pipework and electrical connections. Also
allow space at the sides of the machine for the machine covers to be removed,
and service personnel to gain access to the internal components.
The site MUST provide sufficient ventilation for cooling and steam loss both
during operation and when the door is opened on completion of a cycle.
Excessive heat and condensation in a poorly ventilated area will effect the safe
and reliable running of the Autoclave.
Use a spirit level to adjust the unit. The autoclave should be set up to give a
fall from front to rear. This will stop any residual water remaining in the
vessel at the end of a cycle from leaking onto the floor.
Levelling is achieved by adjustment of the jacking bolts. Start by adjusting the
level in a front to rear direction to give a slight fall to the rear. Next use the
jacking bolts to level the unit in the left to right direction.
On machines with bolted doors fit the stainless steel interlock spigot to the end
of the door securing bolt which has the red handle a spanner is provided for
this purpose, but please note that this has a left hand thread. The spigot is
supplied loose with the other machine accessories. This allows the door to be
opened without power being applied to the machine, and eases the installation.
On machines fitted with a single action door the door lock is retained in the
unlocked position by a transit retaining piece. This must be removed before
the Autoclave is switched on. Instructions are supplied on a tie on label fitted
to the door handle.
3.2
ELECTRICAL CONNECTIONS
The power supply to which the autoclave is connected MUST have a
protective earth which is known to be in good working condition and of the
correct current carrying capacity.
11
The power supply to the machine varies depending on the model and type. On
autoclaves containing an integral steam generator a three phase AC supply plus
neutral and earth is required, a direct steam machine again requires a three
phase supply plus neutral and earth although the power consumption is much
less ( see table 1 ).
From table 1 below select the value of supply current for the machine that you
have, and arrange for a suitable protected supply to be installed.
The three phase AC voltage is 400/415 VAC Phase to Phase and the single
phase voltage is 220/240 VAC Phase to Neutral. In all cases a high quality
Earth connection of suitable cable size must be provided, together with a
Neutral. The autoclave MUST be fed from a switched fused supply, and
located as near to the equipment as possible.
Table 1 shows the actual power consumption of the Autoclave and a switched
fused supply must be provided to accommodate this.
Table 1
MODEL
Kestrel 200L
Kestrel 200L
Kestrel 315L
Kestrel 315L
Steam
Source
POWER SUPPLY
No. of Phases
KW
E
S
E
S
30
1.5
45
1.5
3
3
3
3
WARNING
Always confirm the supply requirements shown on the machine serial plate, as
special versions are sometimes supplied, and may have different power
requirements from the above list.
Check for correct rotation of the vacuum pump, which should rotate clockwise
when viewing at the fan end. If the direction is incorrect, reverse wires
numbered 60 and 61 on contactor C2.
12
3.3
PIPE CONNECTIONS
Pipework requiring connections to customers, supplies are labelled at the
factory.
These will be:
(a)
Steam inlet ( 15mm tube – S versions only)
(b)
Condensate drain (22mm tube – condensate option machines)
(c)
Water dump/drain (22mm tube)
(d)
Water inlet (15mm tube)
(e)
Vacuum outlet drain (22mm Tube )
IMPORTANT NOTE
DO NOT USE either deminarilised or deionised water supplies to the steam
generator on E versions of Vacuum Kestrel autoclaves, as this will prevent the
generator level sensors from operating correctly.
NOTE
On E version autoclaves fitted with a steam generator you MUST remove the
masking tape fitted to the steam generator overtemperature cut out for
protection during shipping.
3.4
DRAINS
These pipes should be connected to a suitable waste, and must have a
continuous fall to the waste. It is vital that they discharge into free air and do
not have their ends submerged in standing water. To avoid the possibility of
overflow the drain service pipe must have a minimum diameter of 75mm.
In addition the three drains must run independently to waste. Under no
circumstances must they be teed together, or into any other common pipe
leading to waste.
3.5
WATER INLET
A mains pressure water supply with a minimum of 2 bar pressure should be
connected to the water inlet. A supply of softened water will reduce the need
for descaling of the steam generator boiler on E version Autoclaves. Hard or
contaminated water may lead to problems with operation of the vacuum pump.
When commissioning always make sure the vacuum pump is correctly primed.
3.6
STEAM GENERATOR BOILER DRAIN
The integral steam generator on E version Autoclaves has a drain pipe fitted to
the base. This is used at service time to drain the generator prior to inspection
and descaling. The drain pipe will be found packed inside the main vessel and
should be fitted to the connection on the generator. Check that the stop tap on
the generator drain is closed.
13
3.7
STEAM SUPPLY ( S VERSION AUTOCLAVES ONLY )
A supply of dry steam should be provided with pressure in the range 3.5 to 5.5
bar. The supply should terminate in a 15 mm manually operated isolation
valve with a compression fitting. The required steam consumption will be:
STEAM CONSUMPTION
MACHINE
HEATING PHASE
CONTROL PHASE
200ltr
27Kg/hour
5Kg/hour
315ltr
36Kg/hour
7Kg/hour
14
4.
HELP WHEN USING THE KEYBOARD AND DISPLAY
4.1
The control system uses a membrane keypad to enter information. When a key
is pressed there will be a short audible bleep to confirm that the key entry has
been recognised.
4.2
When an input from the keyboard is required the display will indicate this. A
statement followed by a question mark shows that the required reply will either
be YES or NO to a question shown on the display. If there is no question
mark after the statement, a numerical input is expected. Some displays are for
your information only and require no keying in of information.
If a numerical entry is called for, it may be inputted using whole numbers or
decimal format, for example a temperature of 134.5°C may be entered, using
the decimal point on the keyboard. If you are using whole numbers just enter
134. When the existing numerical value for the parameter under inspection is
displayed, together with a request for a new value, the existing value may be
used by pressing ENTER. Hence no numerical entry is required.
4.3
Any numerical entry may be cancelled by pressing the C key. All numerical
entries must be followed by the ENTER key being pressed. Until ENTER is
pressed, information that has been keyed into the unit, will not be accepted.
4.4
Except for the use of two particular keys, the system will only accept entries
from the keyboard when the display is prompting the user for information.
The two keys that may be used without prompt from the display are RESET
and THERMAL LOCK OVERRIDE.
4.4.1 THERMAL LOCK OVERRIDE may be used to gain early access to the
vessel during the cooling part of the cycle. Completion of a cycle will occur
when the load and load simulator temperatures reach the value that has been
programmed in by the supervisor during cycle parameter setting (see fig
5.1.20).
15
However early access to the vessel may be gained during cooling by pressing
and holding the THERMAL LOCK OVERRIDE key for about 1 second.
Operation of this key is strictly controlled by the system, and is only active
when the vessel pressure has reached zero. In addition the Supervisors access
code must be inputted after thermal lock override key operation. This key
cannot be used after a reset or a fault condition stops a cycle.
4.4.2 RESET may be pressed at anytime during a cycle. It will terminate operation
of the cycle, leaving the machine in a safe, shutdown condition. The way to
recover is to follow the display prompts and restart, by using the supervisors
access code. Restarts may only be made by the supervisor using the access
code. The printer will record the fact that RESET has been operated.
16
5.
OPERATING THE AUTOCLAVE
Prior to starting this unit you must have read sections 4 and 5 which give an
overall description of the machine operation, and also help when using the
keyboard and display unit. The first part of this section deals with
programming the various parameters in the Supervisors mode. Parameter
details will be found in the user documents accompanying the machine.
5.0
GETTING STARTED QUICKLY
A guide for those who do not initially wish to read the manual.
Providing you do not wish to change any of the cycles shown on the parameter
printout which is found in the machine documentation, you can use this section
to get started quickly, however you must read the section referring to safe
operation of this machine. Also if this is the first time the machine has been
used see 5.4.4 .
Switch on the power and close the door. The panel indicators should show
DOOR CLOSED and DOOR UNLOCKED, and the display will be requesting
a cycle number be pressed. Press CYCLE 1 button and the display will
indicate cycle 1 parameters together with a request to proceed. If you want to
run this cycle press YES if not press NO and select another cycle. Follow the
displayed instructions and press CYCLE START. You will be asked to input
a number which represents the batch number of the load to be sterilised. Input
a number followed by ENTER. Next a number followed by ENTER to
represent your identity should be entered.
The cycle will now start, and you should watch the proceedings to familiarise
yourself with the machine operation. While the cycle is running take the
opportunity to read the remaining sections of this manual to allow a greater
understanding of the safe operation of the equipment.
5.0.1 SOME USEFUL TIPS
(a)
Always safely store the machine parameters printout.
(b)
If you make any changes to the cycle parameters in Supervisors mode,
always keep a copy using the print out of cycle parameters routine fig
5.1.36/7.
(c)
To allow quick entry to Supervisors mode, always keep at least one
cycle locked out (see 5.1.3). Should you wish to change any
parameters you can then select this locked out cycle in Operators mode
and gain entry to Supervisors mode using your access code.
(d)
If the machine suffers a failure of any kind it is vital to keep as much
information as possible about the failure. Always keep the printout
from the failed cycle and write down what message the display is
showing, whether the display is static or flashing and if temperatures
are displayed, whether they are changing or static readings. Also keep
a note of the state of the LED's on the mimic display. This will be very
useful when servicing or repairing the machine.
17
(e)
If you are reporting a problem to the LTE Service Department, make a
note of the number shown in the header message fig 5.2.1. This is the
software issue reference for your machine.
(f)
Don't try to ‘beat’ the keyboard. When you become familiar with the
system and know what the next displayed instruction will be, it's easy
to try to key in the answer before the display has asked you the
question! The control system will not take information from the
keyboard until the message appears on the display. Also you should try
to follow the display rather than rely on what you believe will be the
next question, as you can easily key in the wrong information.
Checking the display before entering information only adds about 1
second to the task, and virtually eliminates mistakes.
5.0.2 Power fail during a cycle operation
If for any reason the power supply is lost to any computer based product, the
product would normally terminate the program on which it was working once
power is restored. In order to minimise any disruption, the Autoclave will
carry on operation when power is restored. Depending on how long the power
was off, the control system will check on current temperatures and at what
point the cycle had reached when power was removed, and continue in a safe
manner.
NOTE: If the autoclave was performing purge, sterilising or drying timing
when power was cut, these timing elements will be restarted from the
beginning.
5.1
SUPERVISORS MODE
Supervisors mode gives access to the following procedures:
•
Change date and time settings
•
Change cycle parameters
•
Change cycles locked out
•
Print all cycle parameters
•
Print individual cycle parameters
•
Print Engineering parameters
•
Change cycle count
You can enter the Supervisors mode by two different routes, either in
Operators mode (see fig 5.2.4) or when the autoclave is first powered up.
When the display shows:
18
fig 5.1.0
LTE SCIENTIFIC VACUUM AUTOCLAVE ********
Press YES You will be prompted to enter the Supervisors mode. After the key
press the display will be:
fig 5.1.1
LTE SCIENTIFIC VACUUM AUTOCLAVE ********
ENTER SUPERVISOR’S MODE ?
Keying a YES will prompt you to enter the Supervisors access code as
follows:
fig 5.1.2
ENTER SUPERVISOR’S CODE NUMBER
_
Once you have entered your access code the first procedure will be displayed.
The Supervisors access code will be found on a separate sheet at the front of
this manual.
5.1.1
CHANGING THE DATE AND TIME SETTINGS
The first procedure allows the real time clock within the control system to be
initialised. Under normal circumstances this should not be necessary, as the
date and time are remembered by the control system, even when the power is
switched off, due to the presence of a battery. However if the control system
has been switched off for a long period, the correct time and date may be lost.
If this happens you will have to reinitialise the date and time settings. The
following display will appear after the Supervisors access code has been
entered.
fig 5.1.3
CHANGE DATE AND TIME SETTINGS ?
Answering by pressing the NO key will lead you to the next procedure 5.1.2.1
(change cycle parameters). Replying with a YES will provide the following
display. The date shown is an example.
fig 5.1.4
7-8-1998 CORRECT ?
If this is the correct date reply with YES and you will be prompted to check
the time as shown in the example below.
19
Fig 5.1.5
fig
5.1.5
12:31
CORRECT ?
Again if the time is correct respond with a YES and the next procedure 5.1.2
will be shown. If either the date or time are incorrect the response to either of
the last two displays will be NO. In this case you will be prompted to enter the
correct date or time. The example shown is for time, but the same format is
used for entry of the date.
Display will be
fig 5.1.6
HOUR = 0
NEW VALUE =
Key in the correct hour of the day and press ENTER. The next display will
be:
fig 5.1.7
MINUTES = 0
NEW VALUE =
This completes the initialisation of the time but the next display allows you to
re-check your entry. This will be:
fig 5.1.8
12:15 CORRECT ?
If the time is correct reply with the YES key and the display will move on to
the next procedure 5.1.2. Answering NO to the above will take you back to
the start of Change Date or Time (5.1.1).
5.1.2 INTRODUCTION TO THE CYCLE PARAMETERS.
In order to give you the ultimate in flexibility when using your autoclave, each
of the eight cycles can have a number of parameters which can be individually
set by yourself. The following are a list of these parameters and what they are
used for. The same set of parameters are available within each of the eight
cycles.
If you supplied details when you purchased your autoclave, it will have been
delivered with your own cycles entered into memory, together with a list
showing cycle parameter details and cycle numbers. In this case you can skip
the section on programming and move on to fig 5.2.2. If in future you wish to
change any of the parameters within any of the cycles, then follow this section.
20
Cycle parameters within each program are as follows.
(a)
STERILIZING TEMPERATURE. This is the drain temperature which
is also used as the control temperature during this phase of the cycle.
The available range of temperatures is 100 C to 140°C.
(b)
PURGE METHOD. There are two available methods for purging either
Vacuum or Steam purge.
(c)
VACUUM PURGE. If vacuum purge is selected the number of purge
pulses may be set. The range of available pulses is 1 to 20 .
OPTION. If the optional pressure transducer has been fitted you will
be able to set the purge pulse depth. This consists of two values for
purge pulse low and purge pulse high. The displayed values are
absolute quantities.
(d)
STEAM PURGE. During the air removal stage free steaming
(purging) is undertaken for a fixed time. This parameter is the required
purge time, and values from 1 to 30 minutes can be set. NOTE. Due to
the high pressure steam generator fitted to this machine, purge times
tend to be closer to those required by a direct steam machine rather
than an internal steam generator.
(e)
HOLDING TIME. The period of time for which the sterilising
temperature is maintained. The holding time will start when both drain
and load temperatures are equal to or greater than the sterilising
temperature. The maximum available holding time is factory set
according to the type of machine.
(f)
SAFE LOAD TEMPERATURE. This parameter allows a choice of
cycle finishing temperatures. It is sensed from the load simulator. This
parameter has an available range of 50 to 90°C.
(g)
LOAD FAIL TEMPERATURE. The user may program in the
minimum temperature at which, during the holding time, a faulty cycle
is declared, should the load temperature fall below this value. The
default value is sterilising temperature minus 2 C. The range is from
the sterilising temperature to ten degrees below the sterilising
temperature.
(h)
START RECORDING TEMPERATURE. The printer will start to
record the drain and vessel temperatures at the set level. The default
value will be sterilising temperature minus 2°C, but any value from
20°C to set point minus 2°C may be set.
(i)
START/STOP RECORDING TEMPERATURE. If your autoclave is
fitted with the optional extra of a temperature chart recorder, the chart
will start and stop at the same values of temperature as are programmed
into the start and stop printing temperature parameters. If this option is
fitted continuous recording will be made on the chart recorder, and
21
hence it is best to set the printing interval (see k) to a high value, thus
restricting the amount of print paper used.
(j)
STOP RECORDING TEMPERATURE. The unit will stop printing
temperature values (and stop the chart drive on any optional
temperature recorder if fitted) at the level entered here. The available
range is from 20 C to the sterilising temperature.
(k)
PRINTING INTERVAL. The unit will, during the start and stop
recording period, print at the interval entered. Any value from 1 to 60
minutes may be used.
COOLING METHOD. There are numerous choices of cooling
method, to allow maximum flexibility for any type of load. The
cooling is split into three separate stages and different options are
available within each stage. The first stage is Precooling which
operates from the end of the holding period until zero vessel pressure is
reached. The second stage, which may be selected if required, is
Drying. The last of the three stages is Final Cooling which starts either
at the end of the Drying period, or directly after zero vessel pressure if
no Drying is selected, and continues until the programmed value of safe
load temperature is reached.
(n)
(m)
PRECOOLING. On completion of the holding period the following
precooling options are available:
(m1)
FORCED RAPID. The cooling pump will circulate cooling water
through the cooling coil or optional jacket. The vessel will remain
sealed there will be no exhausting of the vessel steam pressure. If this
precool option is selected no drying stage will be offered, the next
available stage will be final cooling .
(m2)
VACUUM. The vacuum pump will run and the vessel will rapidly
exhaust its pressure to drain.
(m3)
VACUUM + HEAT. This will be as in (m2) above but additionally
the vessel external heaters, or optional jacket, will be used to retain the
vessel temperature in anticipation of drying being selected in the next
stage.
(m4)
SLOW BLEED. The vessel will cool by natural convection only. No
accelerated cooling will be used.
(m5)
BALLAST AIR (OPTIONAL). This optional cooling method allows
compressed air to enter the vessel expelling the steam pressure.
Following this process forced rapid cooling will commence and this
will continue until safe load temperature is reached.
DRYING. If any of options m2, m3, or m4 have been selected the following
three alternatives will be available :
(n1)
VACUUM DRYING. The vacuum pump will run until 200 mbar
absolute pressure is achieved at which point the drying timer will start.
22
On completion of the drying period the vacuum pump will switch off
and final cooling will begin. If vacuum drying is selected final cooling
will be set automatically to slow bleed and section (o) final cooling
will not be offered.
(n2)
VACUUM + HEAT DRYING This will be as in (n1) above but
additionally the vessel external heaters, or jacket option, will be used to
assist with the drying.
If vacuum + heat drying is selected final cooling will be set automatically to
slow bleed and section (o) final cooling will not be offered.
(o)
(n3)
PULSED VACUUM DRYING. Operation will be as for (n1) but
additionally after 100 seconds filtered air will be allowed to enter the
vessel for a period of 20 seconds. This will be repeated throughout the
drying period using the same 100 second plus 20 second interval.
(n4)
NONE. If this option is selected no drying will take place and the
system will jump directly to final cooling.
FINAL COOLING
(o1)
SLOW BLEED. Using this option cooling will be by natural
convection only. The vessel will vent through a microbiological filter
until the programmed value of safe load temperature has been reached.
(o2)
FORCED. Using this method the pump will circulate cooling water
through the cooling coil or optional jacket, and the vessel will vent
through a microbiological filter until the programmed value of safe
load temperature has been reached.
(o3)
VACUUM ASSISTED. The vacuum pump will run together with the
cooling pump circulating water through the coil or optional jacket.
This will stop when the programmed value of safe load temperature
has been reached.
(o4)
VACUUM / NATURAL. The vacuum pump only will run to cool the
vessel to the programmed value of safe load temperature.
(p)
CYCLE TITLE. This allows a name to be allocated to a cycle. This
name will be displayed and printed out during operation of the cycle in
question. Any of the following names may be allocated:
(1)
(2)
(3)
(4)
(5)
(6)
(7)
(8)
5.1.2.1
Plastic make safe
Make safe fluids
Media 1
Media 2
Media 3
Media 4
Glassware
Free steaming
(9)
(10)
(11)
(12)
(13)
(14)
(15)
(16)
Unwrapped Instruments
Discard
Special 1
Special 2
Special 3
Special 4
Special 5
No name
CHANGING THE CYCLE PARAMETERS
23
The first display in this procedure will be:
fig 5.1.9
CHANGE CYCLE PARAMETERS ?
NEW VALUE =
Replying NO will move you to the next procedure 5.1.3 cycle lockout, and a
YES will give the following display.
fig 5.1.10
CYCLE NUMBER TO CHANGE
Enter the cycle number that you wish to change. In the following example
cycle 1 is used. If you wish to change any other cycle parameters the C1
(representing cycle 1) shown in this example will change to reflect this.
fig 5.1.11
C1 STERILIZING TEMPERATURE = *** C
NEW VALUE =
Input the new temperature or press ENTER to retain old value
fig 5.1.12
C1 PURGE METHOD VACUUM PURGE
CHANGE ?
The above screen will show either vacuum or steam purge depending on the
last method selected. If you wish to change the type of purge used answer
YES to the above and the following display will appear. Pressing the NO key
will lead to fig 5.1.14
fig 5.1.13
CYCLE NUMBER 1
VACUUM PURGE ?
Keying YES will accept vacuum purge for cycle 1 and fig 5.1.14 will be
shown, NO will change the display to fig 5.1.17
fig 5.1.14
C1 PURGE PULSES = **
NEW VALUE =
The number of purge pulses that are required may now be entered up to a
maximum of 20 pulses.
NOTE : The next display will depend on whether your machine is fitted with
the optional pressure transducer allowing the pulse depth to be set by the
24
Supervisor. If the option is fitted fig 5.1.15 will be given, if it is not fitted fig
5.1.19 will be shown.
fig 5.1.15
C1 PURGE PULSE LOW = 300mbA
NEW VALUE =
You can now adjust the low level of the purge pulse by keying in the required
value. The low level pulse represents the lowest vacuum level that the pulse
will achieve. When this value has been entered the following display will be
given:
fig 5.1.16
C1 PURGE PULSE HIGH = 700mbA
NEW VALUE =
Now key in the value of the high level purge pulse. The high level pulse
represents the highest vacuum level that the pulse will achieve. On completion
fig 5.1.19 will be seen.
fig 5.1.17
CYCLE NUMBER 1
STEAM PURGE ?
Again answer YES to accept steam purge, or NO to return to fig 5.1.13.
If the steam purge method is accepted the following display will prompt for the
purge time period to be given. Bear in mind that when a cycle is operated with
steam purge the timer will not start until the temperature of the Drain sensor
reaches 80 C.
fig 5.1.18
C1 PURGE TIME = *.* MINS
NEW VALUE =
To accept the displayed value press ENTER, or input a new value and press
ENTER. The next display will be :
fig 5.1.19
C1 HOLDING TIME = ** MINUTES
NEW
= or press ENTER to retain old value
Input
theVALUE
new time
Enter the sterilising time period that you require or press ENTER to accept the
previous value.
fig 5.1.20
SAFE LOAD TEMPERATURE = *** C
NEW VALUE =
25
Input the new temperature at which the door may be opened at the end of a
cycle, or press ENTER to retain the old value.
fig 5.1.21
C1 LOAD FAIL TEMPERATURE = *** C
NEWthe
VALUE
=
Input
new temperature
or press ENTER to retain old value
You may enter the temperature at which you wish a failed cycle to be declared
if the temperature falls below this value during the holding time period.
fig 5.1.22
C1 START RECORDING TEMPERATURE = *** C
NEW VALUE =
The printer will start to print at this temperature. Input the new value or press
ENTER to retain the old value.
fig 5.1.23
C1 STOP RECORDING TEMPERATURE = *** C
NEW VALUE =
Input the new temperature or press ENTER to retain old value
fig 5.1.24
C1 PRINTING INTERVAL = ** MINUTES
NEW VALUE =
A print will occur at this programmed interval . Input the new time or press
ENTER to retain old value
fig 5.1.25
C1 PRECOOL FORCED RAPID
CHANGE ?
There are four Precool options available and the last option that was selected
will appear in the display shown above. The options are: FORCED RAPID,
VACUUM, VACUUM + HEAT, SLOW BLEED, and supplied only as an
option, BALLAST AIR. These options are described in 5.1.2 section (m).
The precool stage starts on completion of the holding period and stops when
zero pressure is achieved .In the above display, if you don’t wish to change
from the FORCED RAPID precool option press NO. If you do wish to change
the Precool to one of the other options press YES. You will now be able to
scroll through all the Precool options by pressing NO until you come to the
option you want to use. When the required Precool option is displayed press
YES. If the option you selected is FORCED RAPID the next display will be
fig 5.1.30 the final cooling stage. For any other precool option the next display
will be fig 5.1.29.
26
fig 5.1.26
C1 DRYING VACUUM + HEAT
CHANGE ?
This is the drying stage and four different options are available, vacuum, vacuum +
heat, pulsed vacuum or none. The final option, none, means that the drying stage will
not be used and the system will jump from the precool stage to the final cooling stage
shown in fig 5.1.29.
If Vacuum Drying is selected the vacuum pump will start to run following the precool
stage . The Precool stage will be complete once zero vessel pressure is reached .
If Vacuum + Heat is selected both the vacuum pump and the external vessel heaters
(or optional jacket) will run following completion of the Precool stage . The drying
stage will be terminated when the programmed value of drying time is complete.
Pulsed vacuum drying is similar to vacuum drying but additionally filtered air will be
allowed to enter the vessel for 20 seconds every 100 seconds.
In the example shown in fig 5.1.26 if you wish to change to another option then reply
YES to the “ CHANGE ? ” question and fig 5.1.27 will be shown . If you don’t wish
to change the VACUUM + HEAT option then answer NO to the “CHANGE?”
question and fig 5.1.31 will be given .
fig 5.1.27
CYCLE NUMBER 1 DRYING METHOD
VACUUM + HEAT ?
Pressing NO in reply to the above question in fig 5.1.27 will allow you to step through
the four drying options and select one by pressing the YES button. If one of the three
drying options is selected fig 5.1.28 will then be shown. If no drying is selected fig
5.1.29 will be displayed.
fig 5.1.28
C1 DRYING TIME = * MINS
NEW VALUE =
This is the length of time the vacuum pump or vacuum pump + heaters will run for
during the drying period. The drying period timer will not start until the vessel
pressure has reduced to 200 mbar absolute. Enter the new value for the drying period.
Having selected drying, the final cooling stage will be automatically set to SLOW
BLEED and the final cooling stage will not be offered. The next display will be fig
5.1.30.
If no drying has been selected, or FORCED RAPID was requested in the precool
stage, the final cooling stage will be offered and the following display will be shown.
FIG 5.1.29
C1 FINAL COOLING FORCED
CHANGE ?
There are four options available within the final cooling stage: FORCED; VACUUM
ASSISTED; VACUUM NATURAL; SLOW BLEED. All the final cooling options
continue until the programmed value of safe load temperature is achieved.
27
The FORCED cooling option will allow water to flow through the cooling coil or the
optional jacket.
VACUUM ASSISTED final cooling will allow water to flow through the cooling coil
or the optional jacket and in addition the vacuum pump will run.
VACUUM NATURAL final cooling allows the vacuum pump alone to operate.
SLOW BLEED final cooling uses only the natural convection of the machine to
achieve the programmed safe load temperature.
For fig 5.1.29 if you wish to use the FINAL COOLING option that has been
previously programmed reply NO to the “CHANGE ?” question. This will move the
display to fig 5.1.31.
Answering YES will allow a final cooling option to be selected. The display will
change to :
fig 5.1.30
CYCLE NUMBER 1 FINAL COOLING METHOD
FORCED ?
By replying NO to the FORCED final cooling question shown in fig 5.1.30, all the
other options will be displayed in turn. When the required option is shown press
YES. The next display will be:
fig 5.1.31
C1 CYCLE TITLE: PLASTIC MAKE SAFE
CHANGE ?
At this point you may allocate a cycle title that will be printed out as part of the header
message when you run a cycle. Please note that this will only change the printed title
and will in no way affect any parameters previously selected. If you wish to change
the title allocated to cycle 1 press YES.
The six cycle names available will be displayed in turn. To select a cycle title press
YES when the required title is displayed or NO when a title is shown that you do not
wish to select. The available titles are: PLASTIC MAKE SAFE, MAKE SAFE
FLUIDS,
MEDIA,
GLASSWARE,
FREE
STEAMING,
UNWRAPPED
INSTRUMENTS, DISCARD, NO NAME. Following selection the next screen will be
displayed.
fig 5.1.32
CHANGE PCHANGE PARAMETERS OF ANOTHER CYCLE ?
If you wish to change parameters on any of the other cycles press YES, and the
selection process will be repeated from fig 5.1.10. Replying NO will display the
following screen which is the entry point to the next procedure.
28
5.1.3 LOCKING OUT CYCLES
fig 5.1.33
CHANGE CYCLES LOCKED OUT ?
This facility allows the Supervisor to restrict the access of the autoclave operator to
any of the eight available cycles.
NOTE. It is worthwhile locking out at least one of your cycles usually Cycle 8, as
calling up a locked out cycle will allow entry to Supervisors mode directly from
operators mode (see fig 5.2.4).
Keying in NO will move you on to the next procedure 5.1.4. YES will give the following
display:
fig 5.1.34
ENTER NO’S OF CYCLES TO BE LOCKED OUT
FOLLOWED BY ENTER KEY
If for example you wish to restrict use of all but program 2, then you would key in
1345678 plus ENTER. The display will now give:
fig 5.1.35
CYCLES LOCKED ARE 1345678
ALL CORRECT ?
The procedure is asking for confirmation. If you answer NO you will be returned to
the start at 5.1.34. Answering YES will lock out the indicated cycles and lead on to
the next procedure.
5.1.4
PRINT OUT OF ALL CYCLE PARAMETERS
fig 5.1.36
PRINT ALL CYCLE PARAMETERS ?
The display will ask if you wish the cycle parameters to be printed out. Keying YES
will allow all information to be printed. The printing time will be about three and a
half minutes. NO will lead to fig 5.1.37.
5.1.5 PRINT OUT OF INDIVIDUAL CYCLE PARAMETERS .
fig 5.1.37
PRINT INDIVIDUAL CYCLE PARAMETERS ?
29
If you do not wish to print out all the cycle parameters as in fig 5.1.36, you may elect
to select any single cycle/s to be printed, by answering YES to the above display,
when the message shown in fig 5.1.38 will be given. If you do not wish to print
individual cycle parameters reply NO to fig 5.1.37.
fig 5.1.38
PRINT PARAMETERS OF CYCLE No
NEW VALUE =
Enter a cycle number and its parameters will be printed out. The next message will
be:
fig 5.1.39
MORE ?
If you wish to return to fig 5.1.38 and print parameters of another cycle press YES, to
go to the next display, fig 5.1.40 , press NO.
5.1.6 PRINT OUT OF ENGINEERING PARAMETERS
fig 5.1.40
PRINT ENGINEERING PARAMETERS ?
This procedure will print out temperature sensor calibration offsets, machine factor,
control hysterisis and maximum holding time. Pressing YES will generate the
printed information, NO will move you to the next procedure, fig 5.1.41.
5.1.7 CHANGING THE PRINTED VALUE OF THE CYCLE COUNT
fig 5.1.41
CHANGE CYCLE COUNT ?
This procedure shown in fig 5.1.41 allows you to initialise the value of the printed
cycle count number shown at the start of the cycle. This will only require attention if
the printed number and the number shown on the electromechanical cycle counter do
not coincide. If you don’t wish to initialise this procedure press NO and fig 5.1.43
will be seen. Inputting a YES will give:
fig 5.1.42
CYCLE COUNTER = ***
NEW VALUE =
Enter the number on the electromechanical counter +1 and the system will step on to
fig 5.1.43.
30
fig 5.1.43
ENTER ENGINEERS MODE?
This is a restricted access area for engineering tests and changes. Answer NO.
That concludes the Supervisors mode programming section. Once the cycle
parameters are entered this will complete the major part of the programming that will
be required. Provided you have covered all of the cycles that you will want to run,
there should be no need to refer to the program parameter section again.
The item that may need attention in day to day operations is likely to be the cycle
lockout procedure 5.1.3.
5.2
OPERATORS MODE
5.2.1
INTRODUCTION
Operating this autoclave is very straightforward with all the required actions being
passed to the operator via prompts on the liquid crystal display screen. No security
access code is required in Operators mode.
The Vacuum Autoclave uses a high pressure steam generator which remains primed at
pressure during suitable periods of the cycle operation. This means that cycles will be
completed very quickly.
For safety and power saving reasons the steam generator will NOT be operational
during the following periods:
(a)
From the completion of the sterilising holding period until the Autoclave door
is opened.
(b)
From entry into Supervisors mode until return from Supervisors mode .
(c)
If while waiting for the entry of a cycle number at fig 5.2.2 no key has been
pressed for 30 minutes .
The state of the steam generator may be seen by checking the steam generator pressure
gauge. When fully charged a pressure of approximately 3.5 Bar G will be displayed.
The generator must be fully charged at the start of a cycle, if a cycle is started before
the generator is ready, the message shown in fig 5.2.1.1 will be given and the cycle
will automatically start when pressure is achieved.
FIG 5.2.1.1
WAITING FOR GENERATOR PRESSURE
The following description assumes that the cycle parameters have been correctly
programmed in Supervisors mode, and the autoclave has been properly installed.
31
5.2.2 USING THE AUTOCLAVE
Switch the power on and check that the display is illuminated and contains the
following message (Fig 5.2.1). Check that the door unlocked LED on the membrane
control panel is illuminated.
5.2.2.1 AUTOCLAVE DOOR TYPES
Two types of door are available on Kestrel Vacuum Autoclaves, bolted or single
action.
WARNING . NEVER TRY TO OPEN THE DOOR UNLESS THE MACHINE IS
SWITCHED ON AND THE DOOR UNLOCKED INDICATOR IS
ILLUMINATED OR THE DOOR LOCK MECHANISM WILL BE DAMAGED.
BOLTED DOOR.
To open a bolted door, unscrew in an anticlockwise direction, the three black handles
first and the red door handle last. The red handle door bolt is a safety device to
protect the operator, and allows the door sealing to be broken by a tiny but controlled
amount.
To close a bolted door reverse the sequence turning each handle clockwise, the red
bolt first followed by the three black bolts. Double check the tightness of all the bolts
before proceeding.
SINGLE ACTION DOOR
To open a single action door rotate the handle clockwise to the stop position. A red
handle will be revealed in the top left hand corner of the door. This is a secondary
safety device. Move the red handle to the left to unlatch the secondary safety lever
and open the door.
To close the door move into position and rotate the door handle anticlockwise until it
reaches the stop position.
VESSEL TEMPERATURE SENSORS
There are two temperature sensors in the chamber. Check that the sensor with the
yellow identifying sleeve has been placed in the optional load simulator box.
The second sensor may be placed in the load if required. The holding timer will not
start until the load sensor has reached the sterilising temperature. Please bear this in
mind when selecting a suitable position for the load sensor to suit the type of load
being sterilised.
It is very important to make sure that the correct cycle has been selected for the load
that is to be sterilised. For example using the wrong cycle parameters may lead to a
non sterile load or, in the case of bottled fluids explosion of the container/s should the
wrong cooling method be selected. If in doubt check with the Supervisor.
32
When power to the Autoclave is first applied the control system performs a
memory check to see if there is any corruption of the parameter data. This will
take about five seconds and the following message will be shown:
fig 5.2.0
CHECKING MEMORY WAIT
When the memory check is completed satisfactorily fig 5.2.1 will be given.
Should the check indicate a problem the message given in 5.4.10 will be seen.
fig 5.2.1
LTE SCIENTIFIC VACUUM AUTOCLAVE ******
The numbers at the end of the above message represent the software issue
number of your machine.
If you wish to enter Supervisors mode press YES twice.
Supervisors mode operation go to fig 5.1.1.
For help with
After a short period the display will change to:
fig 5.2.2
ENTER CYCLE NUMBER =
Check that the DOOR UNLOCKED indicator is illuminated. If it is, open the
door, load the vessel close and secure the door.
At this point enter the cycle number that you wish to run. In the following
example CYCLE 1 key has been selected and the cycle has been programmed
for vacuum purge pulsing.
fig 5.2.3
CYC 1 . VAC. PULSES 5
121 C FOR 15 MINS
CONTINUE ?
This now allows you to check the major parameters of the cycle that you have
selected (cycle 1 in this example) and confirm that this is the cycle that you
wish to run. If you do not wish to run this cycle enter NO and you will be
returned to the previous display (FIG 5.2.2).
The other possible option at this stage is that the operator may select a cycle
that has been locked out in the Supervisors mode (see 5.1.3). Should this
occur the following message will appear:
33
fig 5.2.4
CYCLE 2 IS LOCKED OUT FROM USE.
ENTER SUPERVISORS MODE?
If you want to go into the Supervisors mode and change the locked out cycles
then answer YES. Entering NO will return you to the display fig 5.2.2.
If you wish to run cycle 1 as shown in fig 5.2.3 enter YES. The result will
depend on whether the door has been closed or not. If the door is open the
message will be:
fig 5.2.5
CLOSE DOOR !!
Or if the door is closed:
fig 5.2.6
PRESS CYCLE START
After pressing CYCLE START the following message will be shown:
fig 5.2.7
BATCH NO = 242
NEW VALUE =
The display is prompting you to enter the batch reference number of the load
that you are about to sterilise. This will give traceability of the load to the
cycle parameters used. This information will be on the printed output see fig
5.3.2.
Key in the batch number reference followed by ENTER. The next display
will be:
fig 5.2.8
OPERATOR IDENT NO =
NEW VALUE =
Key in your operator identity number followed by ENTER. The cycle will
now begin but the message that is displayed will depend on which type of
purging, either vacuum or steam, has been programmed in Supervisors mode.
For steam purge the display will be as in fig 5.2.9, for vacuum purge fig 5.2.11
will be given.
fig 5.2.9
HEATING
DRAIN 71.3 C
LOAD 75.7 C
34
In addition the LED indicators, will also display cycle information. ‘Cycle in
progress’ will remain on from the beginning of the cycle until the safe load
temperature has been achieved. ‘Air removal’ will operate throughout the
duration of the purging part of the cycle. ‘Sterilising’ will illuminate from the
moment that both drain and load temperature sensors reach the sterilising
temperature, until the completion of the holding period set at 5.1.13. ‘Cycle
complete’ will illuminate when the safe load temperature is achieved at the end
of the cooling period.
The above display will continue to show the temperature increasing until the
drain temperature channel reaches 80°C, at which time the purge timing
section of the cycle will begin.
The display will then be:
fig 5.2.10
PURGING IN PROGRESS 05:23
DRAIN 83.7 C
LOAD 89.9 C
Both temperatures are shown and the count down of time represents that
remaining in the purge section of the cycle. When the count down reaches
zero, the purge will be complete and the vessel will heat up to it's sterilising
temperature showing the display in fig 5.2.13
If vacuum purging has been selected instead of the screen for steam purge fig
5.2.9, the following display will be shown:
fig 5.2.11
PURGING PULSE 1 PUMPING
DRAIN 35.5 C
LOAD 43.6 C
The first of the programmed pulses is now operating and the vacuum pump is
pulling the chamber pressure down to 200 mbA ( or the programmed value of
pulse depth if the pressure transducer option has been specified ). When the
chamber reaches this pressure the display will change to:
fig 5.2.12
PURGING PULSE 1 HEATING
DRAIN 35.5 C
LOAD 43.6 C
At this point the vacuum pump will switch off and steam will be injected into
the vessel. This will continue until a pressure of 800mbA ( or the programmed
value of pulse depth if the pressure transducer option has been specified ) is
reached. At this point the display will return to fig 5.2.12 but the displayed
value of pulse number will have been increased by 1. This will continue until
the programmed number of pulses ( fig 5.1.14 in Supervisors mode has been
completed ) and fig 5.2.13 will be shown.
fig 5.2.13
35
HEATING TO STERILIZING TEMPERATURE
DRAIN 117.5 C
LOAD 114.1 C
The above display will show the temperature increasing as it approaches the
sterilising temperature. When both displayed temperatures are greater than the
sterilising temperature, the holding period will start and the temperature will
be controlled. The display will be:
fig 5.2.14
HOLDING TIME REMAINING 10:38
DRAIN 121.3 C
LOAD 122.7 C
This will continue until the holding time is complete and cooling has started.
Notice that the drain temperature has been replaced by the Simulated Load
temperature, these being the temperatures of interest during the cooling
process.
The display will be:
fig 5.2.15
COOLING TO ZERO VESSEL PRESSURE
SIMULATED LOAD 111.9 C
LOAD 109.6 C
At zero vessel pressure the next display will depend on which of the cooling
options has been selected. If drying has been chosen (see 5.1.2 n ) the display
will be fig 5.2.16. If drying has not been included in the cooling process then
final cooling will begin with fig 5.2.18
FIG 5.2.16
DRYING EVACUATING TO 200 MBAR
SIMULATED LOAD 111.9 C
LOAD 109.6 C
This message will remain in place until the chamber pressure has reached
200mbarA when fig 5.2.17 will be shown .
fig 5.2.17
DRYING **:**
SIMULATED LOAD 105.9 C
LOAD 102.6 C
A countdown of the programmed drying time ( see fig 5.1.28 ) will be
displayed in the top left hand corner of the screen, and when the drying period
is complete the final cooling stage begins. Fig 5.2.18 will be given .
fig 5.2.18
COOLING TO SAFE LOAD TEMPERATURE
SIMULATED LOAD 101.2 C
LOAD 100.3 C
36
When both load and simulated load temperatures have cooled to less than the
value set for the safe load temperature (see fig 5.1.20 ), the display will change
to:
fig 5.2.19
CYCLE IS COMPLETE. OPEN DOOR
SIMULATED LOAD 80.0 C LOAD 78.6 C
When the door has been opened, the display will return to that shown in fig
5.2.2 and the autoclave will be ready to start the next cycle.
5.2.3 USING THE DELAYED START CYCLE
The delayed start cycle is CYCLE 7. When using this cycle the machine can
be prepared for use and then a date and time entered at which the autoclave
will start the cycle. This allows you to have a load autoclaved and ready for
use at the start of the next working day.
After selecting Cycle 7, follow the method from Fig 5.2.2 up to Fig 5.2.8. In
the following example the autoclave will be set to start on May 22 at 0730.
The next display will be:
Fig 5.2.3.1
START MONTH
NEW VALUE =
Enter the month number e.g. for May enter 5. The next display will request the
day of the month:
Fig 5.2.3.2
START DAY
NEW VALUE =
Enter 22 and the starting hour will be requested :
Fig 5.2.3.3
HOUR = 0
NEW VALUE =
Enter 7 and the starting minutes will be requested:
Fig 5.2.3.4
MINUTE = 0
NEW VALUE =
Enter 30. You will now be asked to check your entries and confirm
that they are correct.
FIG 5.2.3.5
37
MONTH =5 DAY =23 TIME = 0730
CORRECT?
If you answer NO you will be returned to Fig 5.2.3.1 to start again.
Replying YES will start the cycle but note that the door lock will not
operate until the starting time has arrived, hence you can still open the
door and place extra items in the vessel if required. The display will
show:
Fig 5.2.3.6
DELAYED START IN OPERATION
MAY 22 0730
NOTE: If power to the autoclave is lost prior to the delayed start
operating time, the cycle will not begin.
5.2.4
ADDITIONAL MESSAGES
For E version autoclaves with an internal steam generator there will be two
additional messages that are displayed when the generator is filling with water.
The normal message will be:Fig 5.2.4.1
FILLING STEAM GENERATOR
Indicating that the high level water detector is operating correctly.
Should the message be:
Fig 5.2.4.2
PRIMING STEAM GENERATOR
This indicates that the generator is filling using the low level water detector.
This is abnormal condition and should be investigated.
5.3
THE PRINTER
5.3.1 INTRODUCTION
The printer provides a permanent record of cycle operation and sterilising
conditions. In order to provide traceability of Autoclaved loads the user keys
in such information as operator identity and load batch number, and this will
be printed out together with the holding times and sterilising temperatures
throughout the period of the cycle. This generates evidence of correct
sterilisation and correlates this to an identified load.
38
Throughout the period of the sterilising section of the cycle, the control system
will check that the correct minimum temperature and time for sterilising has
been maintained. Details of temperature and time are printed, together with
details of any incorrect conditions occurring. At cycle completion the print-out
also requests a signature to verify inspection of the results.
5.3.2
EXAMPLE OF A TYPICAL PRINT OUT
As you will see from the example, Fig 5.3.2, the major cycle parameters are
printed together with the batch and operator references. In this example the
printing start temperature was set to 100°C, hence this will be the range of the
print-out.
NOTE: The print out shows a value for pressure. This will only be seen when
the optional pressure transducer is fitted.
The dotted lines show the beginning and end of the sterilising interval. Note
that the print-out is read from the bottom of the page to the top. BE VERY
CAREFUL WHEN TEARING OFF THE PRINTED PAPER EXITING
FROM THE MACHINE. NEVER PULL THE PAPER FROM THE SLOT. IF
YOU WANT TO ADVANCE THE PRINT OUT USE THE PAPER FEED
BUTTON. ALWAYS TEAR THE PRINT OUT OFF AGAINST THE TEAR
OFF STRIP.
NEVER PULL THE PAPER BACKWARDS FROM THE PRINTER ROLL
AS THIS WILL CAUSE PERMANENT DAMAGE.
39
NOTE : The value for pressure shown in fig 5.3.2 will only be seen when the
optional pressure transducer is fitted .
SIGNATURE …………………….
Cycle completed ------15:59:10
CYCLE PASS
.................................
15:48:53 118.3
119.0
15:47:53 120.5
121.4
15:46:53 121.0
121.6
14:45:53 120.6
121.3
15:44:53 120.4
121.1
15:43:53 120.8
121.3
15:42:53 121.0
121.1
.................................
1.944
2.009
2.043
2.038
2.032
2.069
2.063
15:41:53 119.3
15:40:53 114.1
15:39:53 108.7
15:38:53 100.1
TIME DRAIN C
2.018
1.748
1.463
1.012
Bar A
119.8
115.6
110.2
102.5
LOAD C
Cycle Start ---15:08:33
Operator ident -------112
Batch number--------5461
Final cooling........Slow Bleed
Drying..................Vacuum + Heat
Precooling............Vacuum
Load Fail Temperature—119
Temperature 121.0 c For 5 Minutes
Cycle no. 1 PLASTIC MAKE SAFE
Counted cycles 363
6-January-1999
Sterilise ident. 3151
LTE VACUUM AUTOCLAVE
Fig. 5.3.2.
5.3.3 LONG TERM STORAGE OF PRINT-OUTS
Long term storage of records made using thermal paper is perfectly possible
providing some simple precautions are taken.
Thermal paper should be stored immediately after printing. Storage should be
in the dark at an average temperature of 25°C and less than 65% humidity.
Do not stick the printouts down using adhesives containing volatile organic
solvents such as alcohol, ester or ketone, as this will cause colour formation.
If using self adhesive tapes to ‘tack’ the printouts to another surface, it is
recommended that you use double-sided tape and secure the printouts from the
underneath of the paper.
40
5.4
FAILURE MESSAGES
5.4.1 INTRODUCTION
Throughout the period of operation, the control system checks many
parameters within the machine to ensure satisfactory operation. Failure of any
particular parameter will result in a message display and, in some cases a print
out of information regarding the fault. Should a fault occur it is vital that you
carefully note down what messages are displayed and retain the print out from
the faulty cycle. Also observe and record which of the warning LED's are
illuminated. This information will be invaluable should any service work be
required.
5.4.2 DOOR LOCK FAILURE
The autoclave door is locked by an electrically operated door bolt, and its
position is monitored to ensure correct operation. When a cycle is first started
the door bolt should drop into the locked position, and a failure to achieve this
will give the following message:
BOLT JAMMED UN UNLOCKED POSITION
Fig 5.4.1
This message will also be printed out.
On completion of the cycle the door will be unlocked. Should the door bolt
remain in the locked position the message will be:
BOLT JAMMED IN LOCKED POSITION
Fig 5.4.2
Again this message will be printed out.
5.4.3 CALENDAR FAULT RESET DATE AND TIME
This fault message will be printed out if the date and time values stored within
the system real time clock have been lost.
The display will show:
CALENDAR FAULT RESET DATE AND TIME
ENTER SUPERVISOR MODE?
Fig 5.4.3
And the date and time may be initialised via Supervisors mode section 5.1.1 to
correct the problem. Answering yes to the above request will cause the system
to jump directly to fig. 5.1.3 to allow the date and time to be adjusted.
Following adjustment the system will exit from supervisors mode with only
the date and time procedure being offered.
41
5.4.4 STEAM GENERATOR BOILER WATER LEVEL (E VERSIONS ONLY)
Failure of the boiler to properly fill with water will cause the following
message to be displayed:
WATER LEVEL LOW IN BOILER (HSW)
CAUTION VESSEL AT PRESSURE
Fig 5.4.4
The message will vary depending on if there is pressure in the vessel. When
vessel pressure is zero, the above message will change to:
WATER LEVEL LOW IN BOILER (HSW)
WAITING FOR SAFE LOAD TEMP.
Fig 5.4.5
In both of the above cases the lower line of the display will alternately be
showing either the above messages, or the Simulated Load and Load
Temperature displays.
In all cases the message
WATER LEVEL LOW IN BOILER
will be printed. As an aid to service and repair the message will also indicate
which one of the two boiler level sensors has caused the problem. HSW refers
to the high level float switch and LSW the low level float switch. This will be
printed after the top line message.
NOTE: On a new machine with no water in the steam generator boiler a
HSW fault will usually be declared. This will happen only once when the
boiler is dry and requires at least two full periods. To clear the fault
simply key in the supervisors access code when requested and restart the
cycle.
5.4.5 LOW LOAD TEMPERATURE DURING STERILIZING
For this condition the temperature of the load during sterilisation must have
fallen below the value set in the Supervisors mode fig. 5.1.21 for 5 consecutive
seconds or more. The length of time that the temperature has been below the
required value will be printed.
Failures due to low load temperature during sterilising should be investigated,
even if only a short period of time is involved.
5.4.6 HIGH LOAD TEMPERATURE DURING STERILIZING
This condition indicates that the load temperature has exceeded the Sterilising
temperature by 5°C or more, and will cause a failed cycle. The print out will
show:
42
OVER TEMPERATURE FAILURE, SET POINT +5 C EXCEEDED
The control system will enter cooling mode. When safe load temperature is
achieved, the Supervisors access code is requested to acknowledge the fault.
5.4.7 PRINTER FAILURE
Should a failure of the printer take place the display will indicate this. The
most likely cause is a paper jam within the print mechanism.
5.4.8 VESSEL DOOR OPENING DURING A CYCLE
If the control system detects that the door opening mechanism is released, while a
cycle is in progress, the cycle will be terminated and display and printer will record
the event. The printed record will show:
ERROR DOOR OPENED
5.4.9 TEMPERATURE SENSOR FAILURE
Should one of the three temperature detectors fail this will be recorded and the
cycle terminated. Inspection of the printer will show which sensor is faulty. A
typical message will be:
DRAIN SENSOR
OPEN CIRCUIT
SENSOR FAILURE
OR
DRAIN SENSOR
SHORT CIRCUIT
SENSOR FAILURE
As you can see, the print-out will also indicate the nature of the fault.
5.4.10 CYCLE PARAMETERS OVERWRITTEN
Any major corruption of the cycle parameter values will be detected, and
the above message printed. Should this fault occur, you must check the
cycle parameter values and re-input where required. Check the parameters
printed out at fig 5.1.36 for the current values.
5.4.11 OPERATION OF STEAM GENERATOR OVERTEMPERATURE LAMP
This overtemperature lamp is only found on E version machines with an
internal steam generator. Direct steam machines do not have this warning
lamp. Should this operate, power will be removed from the heaters by the
operation of a manually resetable overtemperature cut out.
5.4.12 EEPROM FAULT
This display will be given if a fault is detected during the update of default
values and would indicate a circuit board problem. The machine could still be
used in the short term, but the problem should be corrected as soon as possible.
43
44
6.
MAINTENANCE PROCEDURES
NOTE. FOR ARRANGEMENT DRAWINGS OF THE 200L AND 315L
VACUUM AUTOCLAVES TOGETHER WITH THE STEAM
OPTIONAL STEAM GENERATOR SEE THE FINAL PAGES OF THIS
MANUAL
The vessel interior should be kept clean and free of debris. The door seal
should be cleaned using a damp cloth.
Before attempting servicing of the machine, isolate the autoclave from the
power supply.
SAFETY WARNING Always check for zero pressure in the vessel and
steam generator before commencing work on E version autoclaves.
Only suitably skilled engineers should carry out maintenance or repair
work on this machine.
6.1
ACCESS TO THE INTERIOR
6.1.1 Access to the steam generator boiler (e versions only) is by removal of the
lower front panel. The remainder of the pipework and solenoids can be
accessed by removing the two lower side panels.
6.1.2 Entry for temperature sensors for thermometric testing can be made through
the 3/4 inch bsp hole on the rear wall of the autoclave.
6.1.3 Access to the electronic control enclosure can be made by removing the four
screws that hold the cover in place, and removing the cover.
6.2
DOOR CLAMPING BOLTS (BOLTED DOOR VERSIONS ONLY)
6.2.1 The threads of the door clamping bolts should be lubricated occasionally with
high Melting point grease.
6.3
DESCALING OF STEAM GENERATOR
6.3.1 Remove the lower front panel.
6.3.2 Ensure the power supply is isolated. Check that there is no pressure in the
generator, and the boiler case is at a safe temperature to be worked on.
6.3.3 A 3/8 inch BSP filler plug is located at the front of the steam generator above
the heaters. The generator should be filled with descalant and left to act for the
period prescribed by the manufacturer.
6.3.4 Descalant instructions should be carefully followed. a typical descalant is
‘scale clean’ (dry inhibited acid descaler) obtainable from Deerborn chemicals,
Widnes, Lancs) . After cleaning, the system should be drained and flushed
with an alkaline solution and then flushed with fresh water prior to use.
45
6.4
PUMPS
Two water pumps may be fitted, one for the cooling system and one for the
water feed to the steam generator depending on which machine model you
have. A third pump may be fitted should an optional drain condensate be
fitted.
If the brushes are to be replaced on the centrifugal pump, take care not to put
any grease on the commutator. Also the pump gland must never be oiled or
greased.
6.4.1 VACUUM PUMP
For information on this unit see the operation and service manual in the
accompanying documentation. To avoid seizure of the vacuum pump do not
leave the unit for periods longer than two weeks without running a vacuum
cycle.
6.5
FILTERS
6.5.1 There are two steel mesh filters fitted in the outlet drain pipes. These filters
must be kept clean and free from debris.
6.6
ACCIDENTAL SPILLAGE OF AGAR
It is recommended that the discharge pipework be purged at weekly intervals
or after a known spillage. This can be done by selecting steam purge and using
an extended purge time period. Operation of this cycle will purge the
discharge pipework. Alternatively the manual exhaust steam bleed valve can
be operated.
6.7
REPLACEMENT OF HEATERS
6.7.1 Ensure the power supply is off, there is no pressure in the steam generator, and
the steam generator is cool enough to touch.
6.7.2 Remove the lower front panel.
6.7.3 Establish which of the heaters is faulty. Disconnect the wires from the heaters
noting their wire references and position.
6.7.4 Remove the screws around the periphery of the generator end plate, and
withdraw the plate complete with heaters. If required there are two holes for
jacking the end plate away from the body using two 12mm screws.
6.7.5 The faulty heater may be removed by unscrewing the heater terminal nuts.
6.7.6 Fit the new heater using new washers.
6.7.7 Fit a new gasket, replace the generator end plate, and secure. Reconnect the
wires in the correct position.
46
6.8
REPLACING THE PRINTER ROLL
6.8.1 Isolate the power from the autoclave. The printer roll is located behind the
small panel on the right hand side of the control box. Remove the retaining
screw and lift out the panel. The print roll tube sits on the print roll spindle.
Discard the print roll tube but not the spindle.
Prior to installing a new roll of paper check the diameter of the paper roll.
This must be a maximum of 48mm. If you try to fit a larger diameter roll than
this it will cause the printer to jam and may permanently damage the unit.
The printer used is a thermal type and the print paper roll is heat sensitive on
one side only, hence if the print roll is installed incorrectly the unit will not
work.
Remove the label from the paper roll and cut a tongue about 100mm long
terminating in a sharp point.
Slacken the knurled fixing screw at the rear of the paper exit slot. Slide the
clip to one side and remove the paper exit slot from the case. Feed the paper
through the entry slot at the base of the printer assembly ( see fig. 6.9.1.1) and
gently pull the paper tongue clear of the case. DO NOT USE THE PAPER
ADVANCE BUTTON TO DO THIS. Feed the paper through the paper exit
slot and refit it into the case. Position the clip and tighten the knurled fixing
screw. Double check that the tongue cut in the paper is clear of the paper exit
slot as shown in fig. 6.9.1.1. If the tongue is not clear a jam will result.
Fit the paper roll spindle inside the new roll, and install in the carrier as shown
in the diagram.
The top side of the paper roll is the ‘thermal side’ and it is important that this
is fed into the printer exactly as shown in the diagram.
New roll has thermal
coating on the outside
Fig. 6.9.1.1
Thermal coating should
be on the underside
47
6.9
BATTERY REPLACEMENT
If after a long period of service the system gives calendar fault error every time
it is switched on, this indicates that the battery on the processor PCB that
supports the calendar clock when the power is off, has failed. The processor
PCB must be removed, the battery unsoldered, and a new item fitted.
7.
SPARE PARTS
The following spare parts are available.
Printer paper roll (Pack of 5) 900/0450/10
Door Gasket
VACUUM KESTREL 200L
VACUUM KESTREL 315L
FOR PART NUMBERS PLEASE RING SERVICE DEPT.
48
DECLARATION
OF
CONFORMITY
PRODUCT
..................................................
CATALOGUE NUMBER ...................................................
SERIAL NUMBER
...................................................
“We declare that the above CE marked product conforms with the
following EU Directives.”
EMC Directive - 89/336/EEC as amended by Directive 92/31/EEC.
Low Voltage Directive - 73/23/EEC
C H Perry, Chairman
LTE Scientific Ltd, Greenfield Lane, Greenfield, Oldham. OL3 7EN
49