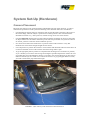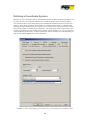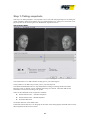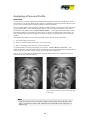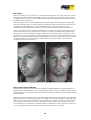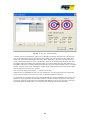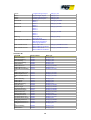
1
Smart Eye Pro 5.0 User manual SMART EYE PRO User manual REVISION 249 08-07-02 Smart Eye AB Första Långgatan 28B • 413 27 Gothenburg • Sweden Phone +46 31 60 61 60 • Fax +46 31 701 05 15 Support mail address: [email protected] Table of Contents SMART EYE PRO.................................................................................................................................5 Licensing..............................................................................................................................................................5 Corneal reflection and Estimated Gaze...............................................................................................................5 Pupil detection or Iris Detection.........................................................................................................................6 Getting started.....................................................................................................................................................7 System Overview.................................................................................................................................................8 Hardware...................................................................................................................................................................................................8 Smart Eye Pro Software............................................................................................................................................................................8 SYSTEM SET-UP (HARDWARE)..........................................................................................................9 Camera Placement...............................................................................................................................................9 Camera placement for screen measurement..........................................................................................................................................10 IR Illumination....................................................................................................................................................10 Positioning of the IR Flashes..................................................................................................................................................................11 Power saving mode ................................................................................................................................................................................11 Aperture and Focus Settings.............................................................................................................................11 Camera orientation..................................................................................................................................................................................11 Adjusting the camera brightness (aperture)............................................................................................................................................11 Adjusting the camera focus.....................................................................................................................................................................12 Sound feedback......................................................................................................................................................................................12 SYSTEM SET-UP (SOFTWARE).........................................................................................................13 System Configuration .......................................................................................................................................14 The Camera Configuration Tab ..............................................................................................................................................................14 The Flash Positions Tab ........................................................................................................................................................................15 Camera Calibration............................................................................................................................................16 Verify Camera Calibration.................................................................................................................................17 Defining a Coordinate System...........................................................................................................................19 Defining Coordinate System Automatically.............................................................................................................................................20 Defining Coordinate System Manually....................................................................................................................................................21 Use Camera 1 as Coordinate System Origin .........................................................................................................................................22 Defining reference rotations for heading, pitch and roll...................................................................................22 Defining the reference rotation................................................................................................................................................................23 PERSONAL PROFILE.........................................................................................................................25 Components of a Personal Profile.....................................................................................................................25 Creating a Personal Profile................................................................................................................................26 Step 1: Taking snapshots..................................................................................................................................27 The Snapshot Dialog...............................................................................................................................................................................27 Automatic Feature Detection...................................................................................................................................................................28 Modes......................................................................................................................................................................................................28 Eye Center Snapshots............................................................................................................................................................................28 Step 2: Selecting Poses.....................................................................................................................................29 Removing poses.....................................................................................................................................................................................29 Marking eye center poses.......................................................................................................................................................................29 Step 3: Mark facial features..............................................................................................................................30 Correcting or modifying automatic feature detection..............................................................................................................................31 The Auto Correct button..........................................................................................................................................................................31 Marking the eye centers..........................................................................................................................................................................31 Placing the markers................................................................................................................................................................................31 Sub pixel marking....................................................................................................................................................................................31 Marking Tracking Pictures.......................................................................................................................................................................32 Marking Eye Center Calibration Pictures................................................................................................................................................33 Extra Feature Points...............................................................................................................................................................................33 Eye Lid Ranges.......................................................................................................................................................................................33 Iris and Eye Radius.................................................................................................................................................................................34 Eye to use...............................................................................................................................................................................................35 Appending Poses to a Personal Profile.............................................................................................................35 Removing Poses.................................................................................................................................................35 Requirements on a Profile.................................................................................................................................35 Using / Changing an Existing Profile.................................................................................................................35 Analyzing a Personal Profile..............................................................................................................................37 Head model.............................................................................................................................................................................................37 Eye Centers.............................................................................................................................................................................................38 Errors in the camera calibration..............................................................................................................................................................38 Profile Statistics.......................................................................................................................................................................................39 The Pose Rotations Box.........................................................................................................................................................................39 The Head model Information Box...........................................................................................................................................................39 Placing markers automatically..........................................................................................................................40 Make the cursor jump to the current feature....................................................................................................40 Gaze Calibration.................................................................................................................................................40 RUNNING THE SYSTEM...................................................................................................................42 Playback Control ...............................................................................................................................................42 The Action Menu................................................................................................................................................43 Start/Stop Tracking.................................................................................................................................................................................43 Creating a Recording..............................................................................................................................................................................43 Logging....................................................................................................................................................................................................43 The Views...........................................................................................................................................................44 The Image Source View..........................................................................................................................................................................44 The Values View.....................................................................................................................................................................................44 The Graph View.......................................................................................................................................................................................44 The 2D World View.................................................................................................................................................................................45 The 3D World View ................................................................................................................................................................................45 The Zone View .......................................................................................................................................................................................46 The Screen View ....................................................................................................................................................................................46 The System Setup Menu....................................................................................................................................46 Selecting Image Source..........................................................................................................................................................................46 Calibrate Cameras and Verify Camera Calibration.................................................................................................................................46 System Configuration..............................................................................................................................................................................46 World Model............................................................................................................................................................................................46 The Profile Menu................................................................................................................................................47 The Options Menu and the Settings Dialog.......................................................................................................47 The Tracking Tab....................................................................................................................................................................................47 Chessboard.............................................................................................................................................................................................48 IR Flash Time Out...................................................................................................................................................................................48 Communication.......................................................................................................................................................................................48 Can Output Settings................................................................................................................................................................................50 ................................................................................................................................................................................................................50 CANCaseXL Configuration Utility............................................................................................................................................................51 Text Log Settings....................................................................................................................................................................................51 Time Synchronization..............................................................................................................................................................................52 World Coordinate System.......................................................................................................................................................................52 Gaze Filter ..............................................................................................................................................................................................52 The Toolbar........................................................................................................................................................52 Keyboard Shortcuts...........................................................................................................................................54 Main Application......................................................................................................................................................................................54 2D world model view...............................................................................................................................................................................54 3D world model view...............................................................................................................................................................................54 Zone view...............................................................................................................................................................................................55 Graph view..............................................................................................................................................................................................55 Profile dialog............................................................................................................................................................................................55 Playback Control ....................................................................................................................................................................................56 USING A WORLD MODEL .................................................................................................................57 World Model Syntax...........................................................................................................................................57 LocalCS ..................................................................................................................................................................................................57 Plane ......................................................................................................................................................................................................57 Screen ....................................................................................................................................................................................................58 Calibration Point......................................................................................................................................................................................59 Sphere.....................................................................................................................................................................................................59 Box..........................................................................................................................................................................................................59 Viewing the World...................................................................................................................................................................................60 Reload the World Model..........................................................................................................................................................................60 ..............................................................................................................................................................................................................60 THE REMOTE CONTROL INTERFACE...............................................................................................61 Documentation........................................................................................................................................................................................61 Methods...................................................................................................................................................................................................61 Examples.................................................................................................................................................................................................61 FAQ / TROUBLESHOOTING...............................................................................................................62 General...............................................................................................................................................................62 Frame Loss.........................................................................................................................................................62 Logging / Communication..................................................................................................................................62 Camera Calibration............................................................................................................................................62 World Model / WCS ............................................................................................................................................63 Profile Generation..............................................................................................................................................63 Cameras.............................................................................................................................................................63 IR-flashes...........................................................................................................................................................63 SYSTEM SPECIFICATION.................................................................................................................64 Hardware............................................................................................................................................................64 Frame grabber.........................................................................................................................................................................................64 Cameras and Frame Rate.......................................................................................................................................................................64 IR Safety..................................................................................................................................................................................................64 External Processor..................................................................................................................................................................................64 Chessboard.............................................................................................................................................................................................64 Data Output Specification.................................................................................................................................65 Pupilometry........................................................................................................................................................70 Pupil filter.................................................................................................................................................................................................70 Quality ...............................................................................................................................................................70 Head Position Quality..............................................................................................................................................................................70 Gaze Direction Quality............................................................................................................................................................................70 Diagnosis............................................................................................................................................................72 Time Synchronization Specification (Optional module)....................................................................................72 Writing the dll..........................................................................................................................................................................................73 Logging Specifications......................................................................................................................................73 Communication Specifications..........................................................................................................................73 TCP/IP socket.........................................................................................................................................................................................73 UDP/IP socket.........................................................................................................................................................................................73 Packet Specification (TCP/IP, UDP/IP)...................................................................................................................................................74 Smart Eye Serial Format (RS232)..........................................................................................................................................................78 CAN Output Specification..................................................................................................................................79 Contact Information...........................................................................................................................................81 Smart Eye Pro The Smart Eye Pro system is a head and gaze tracking system well suited for the demanding environment of a vehicle cockpit and has the flexibility to cope with most research projects. The system measures the subject’s head pose and gaze direction in full 3D. You can also receive eye lid opening values and pupil dilation measurements depending on your needs. The system can be used with up to six cameras with different lenses, allowing for a very large field of view. Licensing Normally the license agreement allows you to install the software on one computer. Unless the system comes pre-installed on your computer you need to create a small file, identifying your computer, and email this to [email protected]. In return you will get a license file valid for your computer. The license file also handles the unlocking of optional modules such as pupilometry or the remote control interface. The license information generation utility is always installed with smart eye pro and you can find it in the start menu under Smart Eye Pro 5.0. To make a license information file, simply start the program SmartEyeKeyGen and press OK and you will be prompted to name and save the file to an appropriate location. Corneal reflection and Estimated Gaze As of Smart Eye Pro 4.0 we use the reflections of the IR flashes on the cornea (also referred to as “glints”) to find the center of the eyes, rather than our old model where we estimated the eye center using the head model. This allows for a more accurate gaze direction, and one that is less sensitive to errors in the head pose estimation. These errors can still be induced by large head movements or distorted facial expressions, but will no longer significantly impair the gaze direction. Since we now use corneal reflection, the system is very sensitive to incorrectly positioned flashes so you need to make sure that the flashes are defined correctly in the flash dialog. To find the glints, the system also needs a clear, high resolution view of the iris, so depending on your set up you might need to change lenses or move the cameras. The third difference from the old gaze is that to build a gaze vector, each eye needs to be visible in two or more cameras. Since these restrictions mean that you cannot use corneal reflection with all camera setups and all head rotations, we always provide the old gaze vector as well. This is now referred to as Estimated Gaze. If you have a system set up where you have problems with the Corneal Reflection, you can turn the feature off in the settings menu. In this case, the old gaze direction will be found in the GazeDirection value. This allows for full backwards compatibility with any client software you have. If corneal reflection is turned off, Estimated Gaze and Gaze will be the same value. All intersections calculated by the system will be calculated using the GazeDirection value, meaning that no intersections are available for the estimated gaze direction except if you turn corneal reflection off. Note Corneal reflection gives a higher accuracy and a more robust gaze vector, but it needs a high quality image, and at least two cameras needs to see the eye at the same time. It is essential that the IR flashes are correctly measured and that their position is set in the program. 5 Pupil detection or Iris Detection The system is capable of using either the position of the iris, or the position of the pupil to calculate gaze direction. The key differences is that the pupil position is more accurate, but, much similar to corneal reflection vs head model based tracking, it might not be feasible to find the pupil in all setups. If possible, we recommend that you use both pupil detection and corneal reflection as that will provide a much higher accuracy. Moreover the use of pupil detection rather than iris detection will make the system much more robust to individuals with high melanin content in the iris, which in IR, unfortunately makes the contrast between the iris and the sclera very low. The good news is of course, that the pupil will have a very large contrast in these cases. In order to run pupil detection, you need to ensure a well focused, sufficiently high contrast image, much like in the corneal reflection case. Furthermore: The system assumes a dark pupil, rather than a bright pupil so you need to mount the IR-flashes at least 10 cm away from the camera. The easiest way to ensure this is to use IR-flash mounts that are at least 10 cm long. Note The pupil gives a much more accurate gaze direction than the iris, but it is a bit more demanding when it comes to image quality, and it also needs a flash placements that minimizes the risk for bright pupil. 6 Getting started To start measuring gaze, head pose or eye closure you need to perform the following tasks, all of which will be described in detail below. 1) Assemble the system. Place the cameras in such a way that they won't be moved during tracking, and make sure all cables are connected. 2) Perform a calibration of the cameras. This is an automatic process where you move a chessboard in front of the cameras to calculate their relative position. 3) If you want to relate the measurements to the real world you need to create a World Coordinate System (WCS). This can either be done automatically by placing a chessboard where you want the coordinate system to be or manually by marking known real world points in each camera image. 4) The next step is to create a personal profile for your test subject. A personal profile is a collection of snapshots with marked facial feature points. The profile is used to detect and track the face and eyes. 5) The next step is to calibrate the gaze so the the gaze vector is aligned to the optical axis instead of the visual axis. This is done by gazing at a number of known points. You can then start the tracking by pressing 'F2' or selecting “Start Tracking” in the “Action” menu. If you want to verify that the system operates correctly you can turn on “Values” in the “View” menu. If you want to send the data to one or more client application use the “Communication” tab in the settings property page. Possible communication choices are TCP and UDP. 7 System Overview The system consists of both hardware and software. The hardware components are mainly industry standard high volume components. Hardware The Smart Eye system standard hardware consists of: • Standard desktop PC • PCI mounted frame grabber with adapter to the external processor • Two or more cameras with stand and cables • Two or more IR lights with cables • 1-2 external processors with required cables and adapter • Chessboard for camera calibration Optionally, it is possible to equip the Smart Eye system with up to five cameras and more than two IR lights. Smart Eye Pro Software The Smart Eye Pro application is used for tracking and measurements as well as controlling the system configuration. FIGURE 1. Smart Eye Pro with 4 installed cameras. 8 System Set-Up (Hardware) Camera Placement Physically the cameras can be positioned totally independent from each other. However, in order to maximize the performance of the system the following issues should be taken into consideration: • It is advantageous if each camera is oriented in such way that the subject’s head is at the center of the camera image, while the subject is positioned in a neutral position. This will maximize the allowable movement in x, y and z positions, without moving out of view of the cameras. • It is very important that the positions of the cameras and their orientation in respect to each other are kept constant once the camera calibration process has been performed. Every time the cameras are moved, you have to redo the camera calibration process. • In a vehicle environment one should strive to position and orient the cameras in a way that minimizes the risk of direct sunlight straight into the camera. • It is of importance to position the cameras in such a manner that the hands and arms of the driver do not obscure the field of view of the cameras when the steering wheel is spun. • To get as high quality data as possible it is important that the images are as zoomed in as possible, so you should try to use lenses with as large focal length as possible and place the cameras as close as possible that your wanted head box allows. To be able to use corneal reflection you also need to make sure that the eyes are visible in two cameras at all times. To get good pupil detection values, you need to ensure dark pupil rather than bright. FIGURE 2. A four camera system mounted in an instrumented car. 9 Camera placement for screen measurement FIGURE 3. A two camera system, mounted for screen measurement In a (2 camera) screen measurement situation, the best setup for high accuracy is to place the cameras symmetrically about 20-30 cm apart and 5-10 cm below the screen. To get the best accuracy, use 12 mm lenses and our special pupil flash mounts. Make sure that pupil detection and corneal reflection is turned on. By using the middle of the cameras as origin for your WCS it will also be very easy to build the world model. If you mount the cameras and screen on a screen stand it easy to adjust screen and cameras to accommodate subjects of different height. Both screen stands and screen mounts are available for purchase from Smart Eye. IR Illumination The system uses IR-diodes to illuminate the face of the subject and to minimize the effect of varying lighting conditions. The IR lights are by default placed together with the cameras (one per camera). This is not an absolute requirement and for test purposes the IR lights can be repositioned freely. If you want to use the pupil positions, rather than the iris position to calculate gaze, or if you are interested in the pupil dilation measure, the IR flashes need to be positioned at least 10 centimeters from the optical axis to ensure dark pupil rather than bright pupil. See the pupilometry section for more details. While positioning the IR lights one should strive to minimize the effect of shadows (as seen from the cameras) created by each IR light and also strive to create as even facial illumination as possible. The easiest way of doing this is to position the lights directly on the “outside” of the cameras as shown in Figure 2. To minimize the reflexes when wearing eyeglasses, it is often advantageous to position the IR lights (preferably along with the cameras) a good deal below the dominating gaze direction 10 Note Do not reposition the IR lights unless there is a good reason for it, since this will affect the performance of the system. The personal profile is especially sensitive to changes in the IR illumination. Make sure you update information about flash positions in the software. See below. Positioning of the IR Flashes You can move the flashes from their original positions if you wish, the system needs this information however, to prevent reflexes from corrupting the iris detection. After you reposition the flashes, go to the Flash Positions tab in the “System Setup→System Configuration” menu and enter their new positions. See the section “System Setup” for additional information on this topic. Power saving mode To prevent the flashes from burning out prematurely they can automatically be turned off. To adjust the time, go to the IR Flash Time Out tab in the “Options→Settings” menu and enter the new time, or to turn off this feature. When the flashes is turned off a system message will appear and the flashes will be kept dark until you press “Resume” in the message dialog. FIGURE 4. The Power Saving Flash dialog. Aperture and Focus Settings Before starting the software set-up procedure, it is of importance to check the aperture and focus settings on the cameras. Start the application and open the aperture and focus dialog (System Setup>Cameras->Aperture and Focus dialog. Camera orientation The first step is to orient the cameras such, that the subject's face is positioned in the center of each image. This can be checked by opening the focus dialog. The face should fill the center box in the focus dialog. Adjusting the camera brightness (aperture) For adjusting the brightness, the subject should look towards the camera to be adjusted, such that his face is seen in the center box of the window. On the top of this box, the gray value histogram is shown. The optimal gray value histogram includes the full spectrum from low to high gray values, see Figure 5 (left). Note that the background is not completely black and thus the histogram usually starts with gray values around 30. If the image is too bright, there are many saturated pixels (gray value 255), see Figure 5 (mid). Compare with the optimal case, where there are only few saturated pixels, caused by reflexions on the glasses, on the nose tip, or on glints on the iris. Figure 5 (right) shows an example where the image is too dark. There are no pixels with high gray-values and thus the contrast is lower compared to the optimal setting. The optimal setting is also indicated by the red bar on the left side of the box. The optimal setting is reached when the length of this bar is in a (local) optimum. Clicking on the Reset button, resets the current maximum value. 11 FIGURE 5. Aperture settings: The image to the left has a near optimal setting, while the middle image is too bright and the right image too dark. Note the peak at the histogram in the middle image, indicating that there are too many saturated pixels. Adjusting the camera focus When adjusting the focus, the subject should look towards the camera to be adjusted, such that his face is seen in the center box of the window. Alternatively, a sheet of paper with text can be placed in this position. In the same way as with the aperture, the blue bar on the right side of the window indicates the quality of the focus setting. Again, since the measurement depends on the image content, the optimal setting might corresponds to a local maximum of the length of the bar and not necessarily to a global maximum. Clicking on the Reset button, resets the current maximum value. Sound feedback Both, the aperture and the focus setting is supported by sound feedback, which is especially useful, if the images are not seen when adjusting the cameras. The aperture is coded by a sound with low frequency and the focus by a sound with high frequency, which can by activated or deactivated separately by the corresponding check box. The volume of the sound codes the difference of the current setting from the maximum measured since the last reset. Thus, the optimal setting is reached when the sound is as quiet as possible. Since the optimum value might not reach the current maximum, the sound might not disappear completely. The current maximum can be reset by clicking the Reset button. Since the aperture has influence on the focus, it is recommended to first adjust the aperture (deactivate sound feedback for focus) and after that adjust the focus. 12 System Set-Up (Software) The system needs to be set up before the measuring can start. All setup is done in the ”System Setup” menu. Usually you only have to do this once. However if you move your cameras, want your values in a new coordinate system or want to select another world model you have to set up the system again for the new environment. If you experience a sudden lapse of quality of your measurement your cameras might have been moved. It is then advisable to control the camera calibration by use of the “Verify Camera Calibration” dialog. If you have the cameras mounted in a place where the risk of someone accidentally touching them is high, it's advisable to always do a camera calibration before each test subject. 13 System Configuration “System Setup→System Configuration” opens the dialog where you set up your system configuration. Unless you change cameras, lenses or reposition your flashes you usually won't have to change anything here. This information is needed to compensate for lens distortion and for reflexes on the iris by the flashes. Performance can be seriously impaired if this is not entered correctly. The Camera Configuration Tab Here you simply select the camera and lens that corresponds to your setup, and press enter when done. Unless you have other values presented to you by Smart Eye the default values for your particular camera and lens combination are what you should use. FIGURE 6. The Camera Configuration Tab 14 The Flash Positions Tab In the flash positions tab you enter the position for each flash. You can specify it in the coordinate system for each camera or in the WCS. The coordinate system for each camera have the positive Y direction upwards, the positive z direction straight out of the camera and the positive x direction to the left. After adding a new flash or moving an existing one you can check their new position in the 3D world view. The flashes are denoted by a yellow dot, and the cameras are denoted by a coordinate system with Red Blue and Green axes. The colored bars symbolize the x-, y- and z-axes respectively on the camera coordinate system. FIGURE 7. The Flash Positions Tab 15 Camera Calibration Note Before calibrating the cameras, make sure that you have selected the correct lenses and the correct chessboard size in Options->Settings. If you select the wrong size, all measured values will be incorrect and tracking might not work at all! Once the cameras have been fixed in the desired positions the camera calibration process should be performed. During this simple procedure, the application automatically detects the current positions and orientation of the cameras. To calibrate the cameras perform the steps below: 1. Choose “System Setup→Cameras→Calibrate Cameras…”. This will bring up the camera calibration dialog, showing the live images of the currently connected cameras. 2. Hold the chessboard in front of the cameras to perform calibration. The system requires the whole chessboard to be visible in at least two cameras simultaneously to accept a certain chessboard position. Showing the red, green and blue bars on the chessboard indicates an accepted chessboard position. This is indicated individually for the cameras. The colored bars symbolize the x-, y- and z-axes respectively on the chessboard coordinate system. If possible, try to make the chessboard visible in all cameras. 3. Move the chessboard around until all progress bars are filled and the OK button becomes active. If the chessboard is clearly visible, and you see the yellow dots notifying a detected chessboard. But the application displays the text “Could not Estimate Pose”, a probable cause for this is that you have incorrect intrinsic lens parameters, check the settings in System Setup->System Configuration. FIGURE 8. The camera calibration dialog. The figure shows a three-camera Smart Eye Pro system. Note Each time the camera positions have been changed, a new camera calibration must be performed. The chessboard has to be entirely visible in a camera for it to be detected. 16 Verify Camera Calibration After calibrating the cameras you should verify that they are correctly calibrated. This is done by selecting “System Setup→Cameras→Verify Camera Calibration…” or by pressing 'F3'. The operation is fairly quick and you should do this often to check if the cameras have been moved. This is very important to keep system performance on a high level. Hint Make it a rule to always verify your camera calibration prior to any session with the system. To verify the calibration you need a chessboard just like in the calibration step. In the dialog you will note a small check box under each camera image. Here you select which camera or which cameras you want as “ground truth”. The pose of the chessboard in the checked cameras are then projected into the other images using the current camera calibration. The difference between the tracked board and the projected one is then shown as a red error vector (scaled by a factor of ten). The average difference is also displayed in each image. Ideally this should be below 0.5 (but since the value is in pixels it depends on the type of lens and how far away the chessboard is) . If you get a large value and see long error vectors you have perform the calibration step again. Hint To get as much information as possible from the verification dialog., check each camera against the other(s). Do this by checking and unchecking the check boxes below each picture. FIGURE 9. The verify camera calibration dialog. Here the error vectors are small, and the accuracy in the second camera is at 0.299 pixels, which is an acceptable value. 17 FIGURE 10. The verify camera calibration dialog. Here the error vectors in the right camera are large. It is apparent that the cameras have been moved. In this case the right camera was moved downwards. 18 Defining a Coordinate System Definition of your coordinate system is by default done by the automatic chessboard procedure. You can however select your preferred method in the “Coordinate System” tab in the options dialog. You will not be able to start tracking until you have defined the Coordinate System you want your values in. This is done by selecting System Setup->Coordinate System Define...' in the menu and following the steps outlined below. If you prefer to use a camera as the origin and rotation you don't have to do any further Coordinate System definition. The disadvantage of this is that camera one is normally not aligned with your desired world coordinate system and there is no way to reconstruct a world coordinate system exactly, if camera one has been moved. Therefore we recommend that you either use the Manual definition or use the chessboard. FIGURE 11. In the options dialog. you can select how you want to define your coordinate system. 19 Defining Coordinate System Automatically If you have a two camera screen measurement system, you can check the check box at the top of the property page. This means that your origin will be placed between camera 1 and 2 and that the rotation of the WCS will be determined by a line between camera 1 and 2 and the y-rotation of the chessboard. This means that you will get an easy origin to measure the screen from, and if you make sure you hold the chessboard vertically it will be very easy to build your world model. If the cameras are fixed to the screen, you can even move the screen around without having to make a new definition. With the box unchecked you can choose any combination of the following origins and rotations. Origin Center of Chessboard Position of one Camera Midpoint between two cameras. Rotation Rotation of chessboard Rotation of one Camera Line between two Cameras (x-axis) and the rotation of the chessboard (y-axis). Description The middle of where you hold the chessboard in the define WCS dialog. The position of a certain camera, you have to specify which one. The midpoint between two different cameras, if two cameras are symmetrically placed, it will be very easy to measure an object that are between them. Description The rotation of the chessboard when you hold it in the define WCS dialog. This is most useful if you can fix the chessboard at the same position each time. The rotation of a certain camera, not recommended you might want to realign the camera without remeasuring your world model The coordinate system will be built using a line between two Cameras (x-axis) and the rotation of the chessboard (y-axis). If you hold the chessboard vertically or with the y-axis aligned exactly in the same way as you want your WCS rotated and the cameras are symmetrically placed and fixed in relation to your objects it will be easy to measure them. The orientation of the chessboard coordinate system is as follows: Axis X Y Z Orientation Parallel to chessboard with positive X to your left. Parallel to chessboard with positive Y upwards. Orthogonal to chessboard with positive Z towards the cameras. Color Red Green Blue Table 1. Orientation of chessboard coordinate system. Follow these steps to define coordinate system automatically: 1) Make sure your selected definition method is automatic. 2) Select “System Setup→Coordinate System Definition... or press the define button in the toolbar. 3) Choose which cameras you want to use by checking the respective box. 4) Hold the chessboard steady in the position where you wish to define the origin of the coordinate system. Be sure to hold the chessboard in the “landscape”-position and not the “portrait”-position. 5) When the system has calculated the pose of the chessboard, the OK button will become active. Press the OK button to define the coordinate system. The main advantage of this method is that it's very quick, you simply hold a chessboard in front of the camera and when you press 'OK' the origin of the chessboard will be the center of the chessboard. The 20 disadvantage is that it is normally difficult to reproduce an identical chessboard position if you need to redo the coordinate system definition. When using chessboard rotation and origin for your WCS it is recommended that the chessboard is placed on a fixture to ensure that the Coordinate System is placed on the same position each time you need to redefine it. If your objects are placed close to the cameras (such as a screen between them), it is easier to use the midpoint between the cameras and only use the chessboard to define the y-axis of the coordinate system. FIGURE 12. Automatic Coordinate System Detection. Picture shows a 2-camera system. Note If you want to use the rotation and origin of the chessboard method as your main method for defining the world coordinate system, we recommend that you mount the chessboard on a fixture to make it easy to place the chessboard in the same position every time you need to redefine the coordinate system. It is necessary to re-define the coordinate system each time the cameras have been moved. Defining Coordinate System Manually Selecting “System Setup→Coordinate System Define…” when your selected method is manual pens a dialog where you can add landmarks in the landmark list and enter their coordinates in the real world (the coordinates are always in meters). If you want to inspect or change a defined landmark simply double-click on the landmark of interest in the landmark list. When landmarks are defined in the landmark list; select the desired landmark, position the cursor over the corresponding point (if visible) in the camera image and left-click in the correct position to connect that pixel to the landmark coordinates. Right click to delete the connection. Note When you add a new real world reference point the coordinates should always be in meters. 21 FIGURE 13. Define Coordinate System. Picture shows a 2-camera system. This picture shows that landmark “p6” is badly marked since the back projected point (in cyan) is quite far away from the marked point (in green). You will need to mark at least four landmarks in each camera. These landmarks need not be the same in different cameras. You can check if the coordinate system is correctly calculated by checking the “Show Back projection” check box. The landmarks are then recalculated into the camera images and shown in cyan. If everything is correct they should be in roughly the same place as the ones you marked. To make marking easier you can check the “Show Magnifying Glass” - button that will magnify an area around the hair-cross. Check “Noise Reduction” to make it easier to identify far away landmarks in the picture. Note Use well defined points for the landmark, e.g. mark points on the wall behind the system. If the points are hard to see in the picture, you can put a drawing pin (with a metallic surface) on the landmarks to improve visibility. Use Camera 1 as Coordinate System Origin By selecting “Camera 1” in the Coordinate System tab in the options dialog, the world coordinate system will be defined by the position of camera 1 and its orientation with the x- and y-axis in the CCD image sensor plane, the x-axis pointing to the right being parallel to the horizontal rows of pixels, the yaxis pointing up and being parallel to the vertical pixel columns and finally the z-axis starting at the center of the CCD image sensor and pointing towards the object. Defining reference rotations for heading, pitch and roll Head rotation and gaze direction may be put out from the system in the form heading, pitch and roll, also know as Euler angles. One may think of the heading as the left/right-rotation of the head, the pitch as the up/down-rotation of the head and the roll as the tilt rotation of the head. Analogue for the gaze 22 vector, but roll is not applicable as the gaze direction is a vector and not a rotation. (The Smart Eye system can not measure the torsion of the eyes.) Any rotation may be described using Euler angles, but it is crucial that the heading, pitch and roll rotations are applied in correct order. In order for the Euler angles to be useful one need to define a reference rotation that defines the rotation for which all Euler angles are zero. The rotation matrix of the head pose has three base vectors. The base vectors originates at the head center, which is located at the midpoint between the ears of the subject. The x-vector of the head rotation matrix is the vector pointing out of the left ear of the subject, the y-vector is the vector pointing 'straight' up from the head center and finally the z-vector is the vector pointing forward out of the nose of the subject. You can see the vectors as green coordinate axes drawn on the subject's head when the system is in tracking mode. The reference rotation for the Euler angles are defined by specifying two vectors; reference forward direction and reference up direction. When the z-vector of the head rotation is parallel to the reference forward direction and the y-vector of the head rotation is parallel to the reference up direction, the heading, pitch and roll angles are all zero. Out of the two reference vectors one can also create the reference left ear direction. As mentioned, any rotation may be described using Euler angles. To create a rotation out of Euler angles, do the following. 0. Start at the reference orientation 1. Rotate -heading about reference up direction. We have defined that a positive heading will turn the head to the right, therefore the minus. 2. Rotate -pitch about the new reference left ear direction, as rotated in step 1. We defined that a positive pitch will turn the head upwards, therefore the minus. 3. Rotate +roll about the the new reference forward direction, as rotated by step 1 and 2. Positive roll will give tilt to the right, therefore no minus. Defining the reference rotation The reference forward and up directions are defined under the tab Heading, Pitch and Roll. By default the reference forward direction is set to z-axis and the reference up direction is set to the y-axis of the world coordinate system. Therefore, if your world coordinate system is aligned quite well with the typical zero rotation (neutral pose) of the subjects head, you will not need to alter the reference directions. FIGURE 14. The Heading, pitch and roll property page 23 Note Make sure that the reference forward and up directions are never parallel. In that case heading, pitch and roll can not be calculated and the system will set all to 0.0. 24 Personal Profile A personal profile is made up of a group of pictures with a number of facial features marked in each picture. These marked pictures are used to build a model of the head and eyes and the marked features are also used as templates when performing feature tracking. This text covers the general steps in creating a personal profile. Normally the profile creation process needs to be customized slightly to suit the specific requirements of a certain study/system set-up. In order to make the profile creating as simple and robust as possible there is also a separate guide for creating the personal profile. The guide can be used as it is or can be customized to be used as a guideline in a specific project. Components of a Personal Profile A profile is virtual model of the subject's head. The profile contains information about 3D location of all facial features such as eyebrows, ears, eye centers and mouth. This part of the profile is called the head model. It also contains small snapshots/templates of each facial feature taken from different angles and with different cameras. The templates are then used in the tracking to locate the facial features in the stream of pictures from the cameras. Based on the location of features in the pictures and the 3D model of the head, the system calculates the head pose of the subject. In order to create the profile a number of snapshots of the subject is taken and the facial features are marked in all the snapshots from the different cameras. This process will be more and more automatic over time. An important component of the profile is the location of the eye centers. This location is highly individual and needs to be determined for each subject. Determining the eye centers is done using and marking separate snapshots, but is performed in parallel to creating the profile for pose tracking. The profile thus consists of marked pictures that serve one of two purposes. • Eye center calibration: these pictures are used to calculate the left and right eye centers of the subject. The marked features will not be used when tracking, but only for computing the head model and the head pose in each snapshot. In addition to marking the facial features, the center of the irises should also be marked for these snapshots. A correct eye center is crucial for the accuracy of the system as it is used together with the tracked irises to calculate the gaze vector. • Feature tracking: normally a set of pictures (snapshots) evenly spread along the dominating head rotation direction, e.g. head and gaze pointing straight forward with respect to the cameras, 20 and 40 degrees respectively horizontally to the left, then 20 and 40 degrees horizontally right. It is not recommended to have differences in rotations larger than 20 degrees. Head orientations of special interest can also be added, e.g. head and gaze pointing to the rear view mirrors and/or to the radio/speedometer/climate control unit in a car. The feature points marked in tracking snapshots will be used for tracking, therefore it is of great importance how the feature looks, when making the decision about marking it or not. More details on this will follow. Note • • A profile pose consists of the pictures for each camera taken at the same point in time. On a three camera system, each pose will be a set of three corresponding images. Each profile pose also corresponds to a specific head pose of the subject, which explains the term pose. The head model is a three dimensional model of the head of the subject. All marked features in the profile will be part of the head model. By detecting the positions of some of the features in the head model while tracking, the system may calculate the pose of the head and thus the positions of all other features in the head model. 25 • To calculate the head pose from a profile pose a couple of features needs to be marked in the corresponding pictures. The system decides when a head pose can be calculated for a specific profile pose. Poses not used are marked in the image list. Creating a Personal Profile To create a new profile, choose “Profile→Create New...”. Then a “Profile Wizard” dialog appears where you follow three steps: 1) Take snapshots, this can be done in a couple of different ways. 2) Check the snapshots that were taken, remove snapshot and mark eye center snapshots 3) Check and mark the facial features in the selected poses. 26 Step 1: Taking snapshots This step is for taking snapshots. It is important to use a clear and well prepared process for taking the profile snapshots, otherwise the subject may get confused and nervous. It may prove convenient to use physical points in the world to gaze at for the different snapshot directions. The Snapshot Dialog FIGURE 15.The Snapshot Dialog The Camera button or 'S' adds a feature tracking pose to your selected poses The Eye button or 'E' adds an Eye Center pose to your selected poses The Add from Bookmarks button is only enabled when running a recording and the No Feature Detection option is marked. It is not available when using live cameras. The button adds all the bookmarks in current the recording to the profile. There are three different modes of operation available: ● Feature Detection On – Automatic Snapshots ● Feature Detection On – Manual Snapshots ● No Feature Detection No Feature Detection is the default value. If automatic feature detection is on the graph in the center of the dialog displays the head rotation of the taken snapshots and the current rotation. 27 Automatic Feature Detection Automatic feature detection is new for this version of Smart Eye Pro. Markers for facial feature points can be positioned automatically when creating a new profile. At the moment it is only designed to work for two cameras but in certain situations it might work with more than two cameras. The automatic initialization uses elastic face models to find corresponding facial features in both images. In the beginning, the user should look straight ahead, until the models in both images are fitted correctly to the face. The corresponding 3D face model and the head pose are computed continuously. The 2D face models are painted into the image with green dots, while the back projection of the 3D model is painted with white dots. With the 2D face models tracking the face, the user can rotate his head slowly to both sides, while snapshots are taken continuously if all 2D models agree in their marker positions. If the tracking fails, the user should look straight ahead, until the models reinitialize. There are several restrictions that have to be kept for the automatic profile initialization to be successful. Camera setup The current version of the automatic initialization supports two cameras positioned with a distance between them of about 20 to 50 cm. The cameras should be placed below the area of interest, for example below the screen for a screen measurement set up. Visibility The face from eyebrow to chin as well as the ears have to be completely visible in both images for the models to be able to converge. If the subject has long hair covering the ears, it should be removed. Head movements During automatic initialization, the subject should not move his head abruptly as this could cause the 2D face models to lose tracking. When varying the head pose, this should be done with rather slow and smooth movements. Facial expressions The flexible face model can handle facial expressions to some extent, but during automatic profile initialization, facial expressions should be avoided. Modes The mode Feature Detection On – Automatic Snapshots takes snapshots continuously while the subject moves the head. New snapshots are only added if the distance to previously taken snapshots is greater than a certain threshold. This mode doesn't take any Eye center snapshots so these should either be taken manually by pressing the Eye center button or by marking a snapshot in the next step. Feature Detection On – Manual Snapshots also uses the automatic feature detection but taking snapshots is left to the user. Normal snapshots can only be taken when the dot indicating head rotation is green, Eye center snapshots can be taken at any time. Selecting No Feature Detection turns of the automatic feature detection. This means that all snapshots taken needs to be marked manually in step 3. Eye Center Snapshots Take snapshots for the eye center calibration, by pressing the Eye button. This is of great importance, please make sure that you understand the discussion below, otherwise contact Smart Eye. It is of importance that the gaze direction/eye rotation relative to the head differs significantly for each eye center calibration snapshot. This will make the calculation of the eye centers more accurate. The best way of taking eye center calibration snapshots is to have a fix head pose for all the snapshots and directing the gaze into the different cameras. This will give acceptable accuracy as long as the difference in gaze direction relative to the head differs significantly between the snapshots. A common mistake is to direct the head to one camera and also gaze into the same camera. Do not do this, two snapshots like that will produce a very inaccurate eye center. Hint By using the camera or eye buttons, you can mark a snapshot as an Eye Center pose directly from the Snapshot Dialog. 28 Step 2: Selecting Poses Any snapshots you added in the previous step will be in the list of profile poses. If you have used the automatic feature detection you should make sure that the feature points are marked at the correct positions. In case of incorrect positions you can either remove the pose or proceed to the next step and correct the positions. FIGURE 16.The first Auto pose Removing poses If you for some reason do not want to keep a pose you can select the pose in the list and press remove pose. Marking eye center poses If the pose is an eye center snapshot but the normal snapshot button was used you can use the check box to mark it. When all the relevant poses are selected and properly marked you go to the next step of the wizard by pressing “Next”. 29 Step 3: Mark facial features This dialog is used for marking features in the previously selected pictures. All features you can mark are in the list labeled “Feature points” to the left in the dialog. You select the feature you want to mark by clicking on it in the list or by pressing the “down” or “up” arrows. You browse through the pictures by using the “left” or “right” arrow keys or by clicking t the thumbnails below the current picture. If you press “control” when using the arrow keys you will automatically jump to the same pose in another camera. The buttons to the left and right of the pose name also takes you to the previous or next pose A marker is placed on a feature point in a picture by moving the mouse over it and clicking the left mouse button. A right click removes the selected marker. There’s also a window around the cursor that provides a zoomed contrast enhanced image. You can turn this feature on or off by pressing 'ctrl-m' or by selecting “View->Magnifying Glass” in the menu. The magnifying factor can be changed by using the ´+´ or ´-´keys. FIGURE 17. The Place Markers Dialog,. Note Camera images are mirrored, so a point on the left side of the head such as “left mouth corner” will be displayed to the left in the image. Think of it as “left is always left” 30 The placing of markers in a picture is done a bit differently depending on if the picture is to be used for tracking or for an eye center calibration. The tracking pictures are those you took of your face moving or you gazing directly at an object of interest while the eye center pictures are of you gazing directly into a camera. Correcting or modifying automatic feature detection When using the automatic feature detection the left and right ears are not marked. To get the best tracking performance you should make sure to mark them manually. In some cases the automatic feature detection get the eye corners a bit off, you should make sure that all eye corners are at the correct position. The Auto Correct button The Auto Correct button uses the calculated head model and moves user marked features closer to the calculated position to reduce errors. This should only be used when all the features in the Top Errors list is at least orange. Pressing the button when having red members in the Top Errors list can produce larger errors. The auto correct button only corrects the top ten errors in the list. Marking the eye centers It is a little misleading to call this procedure eye center marking as it actually is the iris center that should be marked. The idea is however that the eye center will be right behind the iris center if the subject is gazing straight into the camera. Indirectly it it thus the eye center that is marked. It is common that users misinterpret the marking of eye centers, so please read following sentences carefully. The eye centers, i.e the iris centers, should be marked, only in the snapshot from the camera, which the subject is gazing directly into and not in the corresponding snapshots from the other cameras. All snapshots in the profile pose will be marked with the text eye center, but this is only to indicate that the profile pose will be used only for determining eye center. All other features should be marked however. If you have taken 2 snapshots (profile poses) for eye centers you should in total have marked 2 left eye centers and 2 right eye centers. This is regardless of number of cameras. There will be 2 * number of cameras pictures that are marked with the text eye center in the picture list. All these images should be treated as eye center calibration pictures as they are all parts of eye center calibration profile poses. Note You can only mark eye centers in the pose you have previously marked as eye centers (The text Eye Center will appear next to the pose and camera information in the upper left corner of the image) . If you have omitted to do this, you can go back one step in the process by pressing “<Previous” and check the check box in the list of poses. Placing the markers A fast and relatively fool-proof method for marking the feature points is to click the same feature and browse the images for all cameras and poses. You can use the left hand to navigate among the images (left-right key) and the features (up-down key) and use the mouse to click. The left mouse button adds a feature point, the right one removes a feature point. For example, start by clicking the left eye brow (if that feature is prominent for the subject in question) while browsing through all images with the right arrow. When you have reached the end of the image buffer, switch feature to the right eye brow and traverse the image buffer in the reverse direction with the right arrow. You will probably find that marking the features in this ”forward-backwards” fashion is a swift and efficient. Please note that all features should not be marked in all images; some images are reserved for the the eye centers (see below). Sub pixel marking Sub pixel marking mode can be entered by pressing and holding the left mouse button, or the shift key. In this mode the magnifying glass freezes around the current mouse position, which allows you to mark between pixels. Releasing the left mouse button inside the magnifying glass will mark the selected feature in the position of the cursor. 31 The magnifying glass will appear every time you press the left mouse button, no matter if you have turned it on or off, so if you don't need it for the time being, you can set the magnifying factor to 1 by using '+' or '-' or by using the wheel on your mouse while pressing the left button. FIGURE 18. Sub pixel marking simplifies the marking of eye centers significantly. Marking Tracking Pictures When marking the feature tracking points you need to keep in mind that some facial features are less suitable than others. Due to the plasticity of the face, some features tend to move around more than others, which can lead to errors in the estimation of the head- and consequently eye models. Depending on your measuring situation you need to consider which features to omit. The nostrils and the ears are always good features to mark. You also need at least one or two additional feature pairs. You can add up to 20 extra tracking points. These can be placed on any part of the face, or on anything that moves with the face such as glasses or markers, these, or some of the standard features can be used. When should I omit a certain feature in a particular snapshot? • If the feature is poorly visible or if the template box contains background, simply skip the point. • Emphasis should be on contrast and visibility when marking feature points in order to ensure good tracking. • Regarding the inner eye corner (for both eyes): these should not be marked if the point is occluded or nearly occluded by the nose. No part of the silhouette of the nose should be in the inner rectangle. When should I omit a feature altogether for a certain test person? • The eyebrows should only be marked if they are highly visible with a contrast. If the experiment requires high accuracy measurements in the vertical direction, the eye brows should not be marked. • In order to achieve better accuracy in vertical direction, it is also good practice to skip both inner and outer eye corners. • If the experiment requires that the subject be talking, if possible the mouth corners should not be marked. General Remarks: • The ear is a good feature if visible in the poses and cameras used in the experiment. • Always try to mark a feature in the same physical 3D position for all cameras and poses. This can sometimes be tricky in cases where the feature appears in an extreme angle. 32 Hint The square around the pointer shows the size of the template used in the tracking, while the size of the magnifying glass corresponds to the search region. If there is parts of background in the square you should not mark that particular feature. Marking Eye Center Calibration Pictures It is important to understand that no tracking templates are taken from the snapshots that are marked with eye centers. Only the position is of relevance in calculating the head pose. Consequently, here you should mark all visible features, regardless if the are poorly visible or not or if they contain a part of background. Some features, such as eye corners and eye centers are essential. Note • You should mark all visible features when marking the eye center calibration pictures. • Make sure you mark eye corners carefully, even if you have chosen to not mark them in the tracking snapshots. The positions of the eye corners are important in detecting eyelids and irises. • Mark ears if possible, even if you have chosen to not mark them in the tracking snapshots. The positions of the ears are used for determining the center of the head. When all feature points have been marked in all the pictures (except the ones that should be left empty) you finish the procedure by pressing the OK button. Finally you will be prompted to save the profile. You can do this later if you wish but saving the profile it as soon as it is completed is recommended. Extra Feature Points You can add up to 20 extra tracking points. these can be placed on any part of the face, or on anything that moves with the face such as glasses or markers. Just make sure that you place each point on the same position in each picture. If you use additional feature points you can cut down on some of the insecure features that tend to move around a lot. Features such as eye corners, mouth corners and eyebrows are prone to move as the user speaks, moves his eyelids or even moves his eye, and this makes them unsuitable for use in feature tracking. Just make sure that you mark the necessary features in the eye center calibration snapshots. In the eye center pictures you should always mark eye corners. But it can often be a good idea to omit them in the feature tracking images if you have enough extra features. Note Even if you choose to omit eye corners or ears in your feature tracking snapshots, you should mark them in your eye calibration snapshots as they are needed for detecting eyelids and irises. Eye Lid Ranges In order to prevent false answers from the iris detection or the eyelid detection you should calibrate the maximum opening of the eyelids. In this simple procedure you simply set the upper and lower limits of the eyelid opening. The system will only look for an iris in that region so it's important that they aren't too small. Select ”Eye Parameters->Adjust Individual Eye Settings” and use the sliders to pick the limits. You will notice two half ellipses around the eye for the upper and lower limit. You should make sure they fit good around the eyes, with a little extra room for extreme poses or a very open eye. The eyelid boundary is global for a specific profile, i.e. the same boundary is used in all poses. You can navigate around the poses with the left and right arrows as usual to make sure the limits work well for 33 all poses. Press OK when you are done. The ranges are part of the profile and will be saved and loaded together with the rest of your profile. FIGURE 19. The adjust eye parameters dialog. Iris and Eye Radius The second use for this dialog is to change the radius for the iris and the eye. This can for example be of use if a user has glasses that make the iris smaller than expected. Be careful with this feature however, a faulty eye or iris radius will both make the iris detection less reliable and make the eye vector point in the wrong direction. Hint A head model has to be created before you can see the eyelid ellipses. 34 When all feature points have been marked in all the pictures (except the ones that should be left empty) you finish the procedure by pressing the Done button. Finally you will be prompted to save the profile. You can do this later if you wish but saving the profile it as soon as it is completed is recommended. Eye to use If one eye is occluded or the user has a severe squint, you can select which eye you want to use for all calculations here. The choice here reflects all calculations such as gaze origin, gaze direction, eye lid opening and pupil dilation. This choice is valid for this particular profile only. Appending Poses to a Personal Profile You can add images to a previously created profile. This can for example be useful if you want to perform an eye center calibration or if you note that you need more poses during tracking. Press “<Previous” until the step 1:recording is reached. Removing Poses To remove one or more poses press “<Previous” to go back to step 2: Selecting poses. In this step you can remove poses. Requirements on a Profile In order for the tracking to work a number of requirements for the personal profile has to be met. The system automatically controls your profile while you are placing markers and you will note the text “Can't build” in the Pose Rotations box to the left of the dialog (more on that in the “Analyze Your Personal Profile” section below. Currently the profile has to meet the following requirements: • Each marked feature point has to have at least 2 occurrences. • Each pose needs at least 4 marked features (although empty poses are allowed). • The poses have to be fully connected. A connection between two poses exists if they have at least 3 features in common. • The features "eye corners", "nostrils" and "mouth-corners" always has to be marked. • There has to be at least one non-empty pose without any marked eye-centers. Note Although the requirements above will satisfy the formal conditions of the system, they will not ensure good tracking. In order to achieve good tracking the above procedure for recording and creating a profile should be followed and result in, typically, 5 different, well spread (but less than 20 degrees apart), profile images along the dominant head rotation, with marked features. For an accurate gaze measurement it is strongly recommended that an “Eye Center Calibration Profile” (according to the above procedures) is made for each camera. Using / Changing an Existing Profile If an existing profile is to be used, choose “Profile→Open…” and open a profile of choice. Note A profile file consists of two separate files with the endings .sep and .seb respectively. Both files have to reside in the same folder on the file system. If a profile is moved, both files must be moved to the same location. 35 Your last four opened or saved profiles can be found in the “Profile→Recent Profiles” sub menu. You can also edit a previously created or loaded profile by selecting “Profile→Edit Current...”. 36 Analyzing a Personal Profile Head model As soon as there is enough information to build a head model the system starts calculating it. You'll note that the text in the Pose Rotations box changes to “Building” and shortly instead of the text you'll see a pie chart representing the estimated rotations of the current model. Once your head model is built you'll have a number of different ways to analyze the profile and correct any possible mistakes you've made during the marking. The most obvious method is to turn on the presentation of the head model in “View->Head model”. This displays the head model as small plus-shaped markers for each feature in each picture. By simply comparing these to the markers you have placed and the position of the features in the face you get get a general idea of how correct the model is. If the head model differs a lot from the actual head position there are three possibilities: 1) You need to mark more features. 2) The ones you have already marked are incorrectly placed. 3) There is something wrong with your camera calibration. To check if markers are incorrectly placed you can select “View->Error Vectors”-. The difference between a marked feature and the same feature in the head model will then be displayed as a vector in the current picture. Longer vectors of course represents a large error. Even if you have poses that are marked by the automatic feature detection it is imperative that you check them for any misplaced features. FIGURE 20. A decent head model. FIGURE 21. The left eyebrow is incorrectly placed which makes the whole head model shift to the right. Note If you have moved or removed a marker or added or removed poses the system takes a short while to regenerate the head model. Meanwhile the head model will be displayed in a different color. 37 Eye Centers There are basically two types of errors one can make when marking the eye centers, the first one is that the marker isn't placed exactly in the middle of the iris, a convenient way of making sure the marker is in a good position is to place it on the middle of an IR reflection (assuming there is an IR-flash close to the camera you are gazing into.) The second type of error is when the difference between the angle of the facial direction and the gaze direction isn't large enough. A common mistake is to turn the head into the same camera as the one you are gazing into when taking the eye center calibration snapshots. This will provide very little information about the depth of the eye center, especially if all snapshots are taken in the same way. This can easily be seen if you turn Show Head model on. The green arcs denoting the allowed eye lid positions will often look very weird if the eye center is not correctly calculated. In the pictures below the left picture is correct (the head is turned in another direction than the one you are gazing at). And the green arcs fit nicely around the eyes. The right picture however, has no depth information since the head is not turned. And thus the system has calculated the eye center far closer to the irises than it really is. This will make the arcs become bloated. If they had been very small instead, it means that the calculated eye center is too far away. FIGURE 22. A correctly marked eye center. FIGURE 23. This eye center is not correct! Errors in the camera calibration If you experience strange errors that can not be explained by a misplaced feature, it is possible that there is a problem with the camera calibration. This is especially likely if all error vectors in a particular camera points in the same direction. To prevent these pesky errors, make sure you always calibrate your cameras before making a personal profile. The system can detect possible errors in the camera calibration. If a feature is marked on a position that differs significantly from the expected position according to the camera calibration, it will be added as a dark red error in the error list (see below). If you click this error in the list you will see a red text in the camera image, describing the error and it's distribution over the cameras. You will also see the total error distribution over all cameras. If a certain camera is responsible for a large proportion of the errors it is very likely that you need to calibrate the cameras again and make a new profile. 38 Profile Statistics A helpful tool in analyzing and improving your personal profile and the head model is the profile statistics section to the left of the profile dialog. The information below will appear only if a head model has been built successfully. The dark red errors however, will appear even if you don't have a head model yet. The Pose Rotations Box In the first box you'll find the rotation of the poses around the y-axis. Each pose is represented by a line with the neutral (the most forward facing) pose pointing upwards. This is useful if you want to make sure your poses are at a reasonably even spread. If two poses are more than 20 degrees apart the area between them will be yellow. And if they're at 25 degrees or more apart in the area will be red. For optimal performance in rotations around the y-axis you should aim for all green areas as in the picture below. The Head model Information Box Here you'll find the errors in pixels between your generated head model and the features you marked. From left to right the errors are: The entire head model, The current pose, the current picture and the selected feature. Below you'll find a list of the features that differ the most from your generated model. The numbers between the brackets represents camera and pose. The poses are sorted by error size, and also color coded, where a red feature is over 5 pixels, an orange feature between 3 and 5 and a green one lower than 3. Ideally all features should be green. By clicking on a feature point you'll automatically skip to that feature in the correct camera and pose. Using the list you can quickly verify that a feature is correctly marked and mark it again if necessary. FIGURE 24. The profile statistics box, the little black dot represents the pose you have are currently marking. 39 Placing markers automatically When your head model starts to build you might notice that when there is enough information, the projected head model (the plus shaped markers) are already placed in the correct positions without the need to mark them by hand. If you wish you might just add a point there by turning “View>Suggest Point” on and then press “Space” to add a marker in the suggested position. You'll note that an automatically placed marker looks a bit different (there's a circle around the cross), this is simply to avoid confusion since these markers are not used in the head model generation. Using this feature you can speed up the process of placing markers, but there is also a risk that features are misplaced if not very careful. Make the cursor jump to the current feature If you turn “View->Suggest Point” off, you can instead use the space bar to make the cursor jump to the feature you have currently selected. This can speed up the placing of markers significantly, once you have a working head model. Gaze Calibration You calibrate the gaze by selecting ”Profile→Gaze Point Calibration”. In the dialog you can select which predefined object to look at. The purpose of the gaze calibration is to determine the difference between the visual and the optical axis of the eye. Before you can start calibrating you need to add a number of calibration points. The points should be easy to distinguish and evenly spread over your area of interest. If you are not using calibration points on a screen or a plane, you need to know the 3D position of each point in the defined coordinate system. Simply add any points as calibration objects in your world model (see “Using a World Model”). If your area of interest is a screen, you only have to define how many calibration points you want. The system will automatically create calibration points for you on each screen. To display them on another screen than the one smart eye pro runs on, you need a client that listens for the CalibrationGazeIntersection value. Load your world with the points and then select ”Profile→Gaze Point Calibration”. A dialog will appear where you maneuver between the objects by using the “up” and “down” keys and train for a specific object by looking at it and tapping “space”. The system will train until you tap space again or until the progress bar is filled (after 1 second). Pressing “clear” or the delete button will clear the selected sample. 40 FIGURE 25. The gaze calibration dialog A sample will only be added if the quality of it is deemed good enough, but make sure you don't look away or blink during the training because that will probably ruin your calibration. The red dot shows where your current uncalibrated gaze intersects a plane, orthogonal to the current world point and a vector pointing towards the eye center. The blue dots show all saved samples and the green dots show the samples when the calibration algorithm has been run on them. Ideally the green dots should be in the middle of the target. Carefully check that the blue dots are close together without outliers. If outliers do exist, clear the current point and add new samples again. It doesn't matter if the blue dots are offset from the target as long as the noise is small. One circle in the target corresponds to +- 2 degrees of accuracy. When the eyes are calibrated you can save your calibration in your personal profile. We suggest that you give it a new name so you can use your old uncalibrated profile for reference. For each point you can check the accuracy and standard deviation of the calibration, the accuracy will depend on various parameters such as distance from the cameras, distance and position of the object you look at and focal length of the lenses and individual differences. If any one point has a value that significantly differs from the others, you should remove that point and redo the calibration. 41 Running the System Playback Control The playback control appears only when you are using a Smart Eye recording as your image source. You can use it for navigating in a recording, and by using the bookmark frame feature, you can mark a frame that you want to use for profile creation. The slider consists of three markers, one is the start marker which sets the position where playback starts. This positions frame number can be read in the first of the three text boxes on the left side. There's also a stop marker which indicates the positions where playback stops or loops, the frame number for the stop marker is displayed in the rightmost text box. Then there's the marker for the current position, this can be moved to change the current playback position. The current frame number is shown in the text box in the middle on the left side of the tool bar. Bookmarks are displayed as a red line on the slider. Bookmarks can be used to create profiles, see Profile Creation. A brief description of buttons from left to right (Keyboard short cuts): ● ● ● ● ● ● ● ● ● ● ● ● ● ● Back - Returns the recording to the first frame or the frame marked with the green start marker. Step back - Moves the recording one frame back(H). Play backwards - Plays the recording backwards. Pause - Pauses the playback. Press again to resume(I). Play - Normal playback. Step forward - Moves the recording one frame forward(K). Repeat - Toggles if playback will loop when reaching the start/end of the recording or the start/stop markers. Jump to previous Bookmark - Jumps to previous bookmark if available(CTRL+H). Toggle Bookmark - Set or remove a bookmark(CTRL+J). Jump to next Bookmark - Jumps to next bookmark if available(CTRL+K). Save Bookmark - Saves the Bookmarks and the starts & stop markers to the recording. Speed - Up increases playback speed, down decreases/reverses playback speed. It is not possible to get slow motion playback(U & J). Higher speeds than 1x or lower than -1x means that frames are skipped. Zoom in - Expands the region between the green start marker and the red stop marker to occupy the total length of the slider. Zoom out - Resets the range of the slider to fit the entire recording. Note Playing backwards or skipping frames when tracking may result in loss of tracking and strange tracking behavior. Proper tracking output is only guaranteed with forward playback at normal speed. 42 The Action Menu The “Action” menu contains three choices. The first is “Start/Stop Tracking” which turns the tracking on and off. You need a personal profile and a calibrated Image Source to turn the Tracking on. The second choice is “Record...” which is used to capture camera image to a file. You can then select this file as your image source and use it for tracking or creating a profile. The last choice concerns the logging of tracking data to file. Start/Stop Tracking Selecting “Action→Start Tracking” turns the tracking mode on and “Action→Stop Tracking” turns it off. When the tracking mode is off, the system only shows the live images from the selected image source. Creating a Recording To create a recording, first make sure that the application is not in tracking mode, and then choose “Action→Record...”. The system will prompt you for a filename, when you have selected the file the recording dialog appears. You can select the size of your recording to fit a CD, DVD or make it arbitrarily long. Since this function writes to the hard disk at a very high data rate, it is recommended that the disk is defragmented and has plenty of free space left in order to avoid recording drop-outs. Note A Smart Eye recording consists of two separate files with the endings .sma and .smb respectively. Both files have to reside in the same folder on the file system. If a recording is moved, both files must be moved to the same location. Logging Smart Eye Pro has a logging function, which logs output from the system to a file. To start the log, first make sure that the system is in tracking mode. Then choose a destination file by selecting “Options→Log→Select Log file...”. When ready to start logging, select “Options→Log→Log”. To stop the logging; unselect “Options→Log→Log”. Instead of using the menu options, you may use the two buttons on the tool bar with the same functionality. Also see “Logging Specifications” for a description of the log file format. 43 The Views Each view has it's own pop-up menu that is displayed with a right-click of the mouse. Each of the six views will be described in detail below. The Image Source View In the Image Source view the camera or recorded images are displayed, along with gaze vectors, tracking points and other information. If your cameras are not connected, calibrated or if your coordinate system is not defined a text will appear over the Images. Right-clicking on the Image Source View window will make a menu appear Under this menu you can select which type of information you want displayed in the Smart Eye Pro application window. • View->Gaze – In this sub menu you can select whether you want to displayed the gaze vectors and if you want an individual vector for each eye or a consensus vector. • View->Eyelids – If you are measuring eye closure you can see the tracked eyelids as blue curves around the eye. • View->Eye Clips – Will display a picture of each eye and a circle around it where the system thinks the iris is positioned. • View->Head Orientation – This displays the head coordinate system in each camera. • Zoom – Here you can select if and how you want the images zoomed. The old gaze will always be drawn in pink in the image view, while the gaze vector calculated with corneal reflection is drawn in red. This means that with corneal reflection off, you will only get a pink gaze vector. Double clicking on an image in the image view, pops the focus and aperture dialog. The Values View This view displays the tracked values, such as head coordinates, gaze vector and eye lid opening. All values are in your defined coordinate system. Right clicking on this view opens a menu where you can either change the font of the view or select which values to show. You can display any of the values in the Data Output Specification below. The Graph View The graph view displays a graph for the selected category, by enlarging the width of the graph view you can examine values for a larger time window. Right-clicking on the view makes a menu appear, where you can choose the value you want the graph view to show. Change settings such as which color the graph should have or set the scale. Selecting auto set or pressing space bar will set the scale between the highest and the lowest value since the last auto set. You can also increment or decrement the scale by using a scroll mouse or the '+'or '-' keys. Using the up and down arrow keys you can offset the graph up or down. If a frame is lost, the graph view will simply skip a step, so if your graphs look very jagged you might want to check your settings. FIGURE 26. A Graph View showing eye lid opening state for the last 6 seconds If you select color coded graphs, and the value you are looking at has a corresponding quality value, the color of the graph will depend on the quality of the value that is displayed, for example for a head 44 position graph the color will change with the head position quality value. A red graph corresponds to a low quality, while a green graph means that the quality is high. The 2D World View The 2D world view displays your world model in 2D if you have built and loaded one. If no world is loaded or if you don't have the world module you can still see the camera and IR-flash positions relative to each other. A camera is displayed as a coordinate system with the z-axis point straight out from the middle of the CCD, while a flash bank is displayed as a yellow dot. Right button opens a menu where you can select what you want to display and how. You turn on and off the drawing of labels as well as different objects. You can also choose between X-Y, X-Z or Y-Z perspective which gives you the option to look at your world from different angles. FIGURE 27. A The same world shown in a 2D world view for each perspective. You can rotate your world using the left mouse button and translate it by holding down left-ctrl and using the mouse button to drag the world to your preferred position. When you start tracking your head, eye center and a gaze vector will appear, when the gaze vector intersects a world object the object will be highlighted in red and a blue dot will indicate the intersected point. The 3D World View The 3D world view as indicated by it's name shows the world in 3D, as in 2D views it shows only the camera and flash positions unless you have a world loaded. FIGURE 28. A The same world as in figure 16 shown in a 3D world view. You rotate the world by pressing the left mouse button and moving the mouse in the direction you want to rotate. Translation is done in the same way, only you also press left control before pressing the mouse button. 45 When tracking is started your head, eye center and a gaze vector will appear, when the gaze vector intersects a world object the object will be highlighted in red and a blue dot will indicate the intersected point. The Zone View The zone view displays a zone plane, in the right menu you can choose between each available zone plane. As in the other views a zone that is intersected by the gaze vector will be highlighted in red and the point of intersection will be denoted by a blue circle. FIGURE 29. The first zone plane in the world displayed in the zone view. The Screen View The screen view draws the intersected dot on the actual screen, no matter where the window is positioned. It can be used to verify the gaze intersection if you run Smart Eye Pro on the same screen as the one you are looking at. The System Setup Menu The ”System Setup” menu is used to set up the system so it can start operating. Here you select your preferred image source, calibrate your cameras if applicable and define the coordinate system you want the tracking data to appear in. The world model is also selected here. If you don't move your system and want to track under the same conditions you should only have to performs these operations once. Selecting Image Source The system can use either the cameras or a recording as image source. The default image source is the cameras. To change image source, the application must be in the non-tracking mode (toggle with “Action→Tracking Stop”). Then select either “System Setup→Image Source→Recording…” or “System Setup→Image Source→Cameras”. Selecting File brings up a file dialog for selection of recording to use as image source. Calibrate Cameras and Verify Camera Calibration The camera menu also contains the choices for camera calibration and the verification dialog. These are all described in detail in the 'Camera Calibration' and 'Verify Cameras Calibration' sections respectively. System Configuration Contains the controls to select the type of lense and camera model you are using, as well as the positions of the IR flashes in the world. World Model In the ”System Setup→Open World Model..” menu you select the world model you want to use. You can also reload the currently loaded model and open it for editing if you have associated a text editor to the world model files. 46 The Profile Menu The ”Profile” menu is used for creating, editing, loading and saving a personal profile. This profile is unique for each person and if the cameras are moved or the lighting conditions changed you need to create a new profile. See the section about “Personal Profile” for more details. This menu also contains the ”Gaze Calibration” dialog. The Options Menu and the Settings Dialog The options menu only contains one choice which to open the settings dialog. The dialog contains choices like communication, logging and whether you want the system to track only head movements, or if you want gaze or eye closure detection. It also contains the dialog for selecting a dll to amend a user defined time stamp to the Smart Eye data output (Time Synchronization Module only).. FIGURE 30. The Settings dialog The Tracking Tab Under the “Tracking” tab you can select between corneal reflection or head model based gaze origin, and between pupil and iris based gaze direction. You will receive the highest accuracy if you use both corneal reflection and pupil detection. 47 Chessboard Here you can change the size of the chessboard, this is important to do when you change lenses as a bigger chessboard might not fit with for example a 12 mm lens. If you select the small chessboard, and use the larger one to calibrate or vice versa, all measured values will be incorrect! A good practice, if you plan on using the same chessboard each time is to place a bit of tape over the chessboard you are not using, which will prevent you from using it by mistake. It will also help you in the unusual but potentially fatal case when both sides of the chessboard is visible in different cameras, but at the same time. IR Flash Time Out Here you can set or turn off the IR time out for the flashes. This is simply a power saving feature to make the flashes last longer. The flashes wont be turned off if you are in tracking mode. Communication The system is able to communicate with external systems in two different formats each with it's own tab in the settings dialog: The UDP Settings and the TCP Settings tabs work analogously with the only difference being that you have to define a destination host for the UDP connection. FIGURE 31. The UDP settings property page You can add as many connections as you wish. To add a connection just go to the corresponding tab, and press the “Add New” button. A small dialog will appear where you specify host and port, and the desired format. You can select between 3 different formats (two are older and for compatibility reasons only). We recommend the more flexible Custom format. You can disable a connection temporarily by unchecking the check box for that row. 48 FIGURE 32. The UDP destination host dialog If you select the custom format you will also be required to specify which type of information you want. Simply check the check box by the name of the value you want to send. See the “Data Output Specification” section for more details about which values are available. FIGURE 33. The Custom Output Specification dialog. The specific format for the communication protocol is specified in the “Communication Specifications” section. Free example code for a client receiving packets is available upon request from Smart Eye. Contact Smart Eye for more information. 49 Can Output Settings In the CAN log page you can turn can output on and off and select the base id for your can messages. See CAN Output Specification for details on the different packets. A check in the use-column means that the packet will be sent if CAN Output is enabled. FIGURE 34. The CAN Output page: CAN Output is enabled, with base id 1024 (0x400), the selected packets are CAN_SYNCH, and CAN_GAZEORIGIN and CAN_GAZEDIRECTION. 50 CANCaseXL Configuration Utility The first time you turn CAN Output on and start the application the Vector Hardware Configuration utility will start. In order for Smart Eye Pro to start sending CAN data you have to add an application named “SmartEyePro” using Edit->Add Application in the Vector Hardware Config. Assign the Channel on the CAN bus you want to use. (For more information on this, see the CANCaseXL documentation). If you want to change the channel for Smart Eye Pro later on, you can access the utility from the Control Panel. FIGURE 35. Adding SmartEyePro as an application with the CANCaseXL Vector Hardware configuration utility. Text Log Settings The text log settings is similar to the UDP and TCP settings pages. You simply select your desired format, and if you prefer the custom format, you will have to specify the data you want. Your log files will be in the format specified here. 51 FIGURE 36. The Text Log Specification dialog. Note Changing the specification of your custom text log packet will not affect your custom packets set for the UDP or TCP communication. All custom packets can be contain different data if desired. Time Synchronization The optional time synchronization module enables Smart Eye Pro to read absolute time stamps from a user defined source. The “User Time stamp” tab configures this time stamp source. World Coordinate System Here you can pick between a coordinate system defined by manually marking known 3D positions, using a chessboard or by the position or rotation of the cameras. Gaze Filter Here you specify at which angle an eye movement will be classed as a saccade (saccades will be removed from the filter) and how long the fixation filter should be in seconds. The filter will not affect the 'raw' head and gaze tracking values in the log or communication packets. instead it is used for the processed data, such as which zone you are looking at and where in that zone. You can also turn on the filter in the image view and the world model views. In those cases it only affects the visualized eye vector. The Toolbar The toolbar contains the most common functions, namely: Start/Stop Tracking, Use Cameras, Open Recording, Create Recording, Create New Profile, Edit Profile, Open Profile, Adjust Focus/Aperture, Calibrate Cameras, Verify Camera Calibration, Define Coordinate System, Select Log file and Start/Stop Logging. 52 FIGURE 37. The toolbar 53 Keyboard Shortcuts Main Application You can use the following keyboard shortcuts to speed up your work in the main application window. Shortcut Alt + F4 F2 F3 F4 Menu Choice Exit Start/Stop Tracking Calibrate Cameras Verify Camera Calibration F5 F6 Ctrl + R Reload World Model Start/Stop Logging Create Recording Alt + F7 Alt + C Alt + R Options -> Settings Image Source -> Cameras Image Source -> Recording Shift + [0..7] Image Source -> Recent Ctrl + D Define your Coordinate System. Ctrl + W Ctrl + O Load World model Open Profile Ctrl + S Ctrl + N Save Profile Create New Profile Ctrl + E Edit Profile Ctrl + G Shift + I Shift + V Shift + G Shift + W Shift + D Shift + Z Gaze Calibration New Image Source View New values view New graph view New 2D world view New 3D world view New zone view Description Exits the application. Starts or Stops the tracking. Detects and saves the position of the cameras. Verifies that the camera calibration was successful. Reload the current world model. Start or stop the file logging. Streams the image source to a file on your hard drive. Opens the settings dialog Makes cameras your image source Makes the recording of your choice your image source Makes one of your eight recently used recordings your image source. Opens a dialog where you can set the origin of your coordinate system. If you have selected 'Camera 1 ' as your preferred coordinate systems this choice is not possible. Load a world model. Open a previously created profile. Save a profile to disk. Create a new profile using the profile creation wizard. Edit your current profile, add or remove poses and markers. Calibrate the gaze Opens an image source view Opens a values view Opens a graph view Opens a 2D world view Opens a 3D world view Opens a zone view 2D world model view Shortcut 1 2 3 + Ctrl Description Perspective X-Y Perspective Y-Z Perspective Z-X Zoom in Zoom out Enables translation by click and move instead of rotation 3D world model view These shortcuts are only used for the world model orientation views. Use the num pad keys to navigate around the 3D view (the lower right of the four views). And the '+' and '-' keys to zoom all views in or out. 54 Shortcut Num Pad 8 Num Pad 2 Num Pad 4 Num Pad 6 Num Pad 7 Num Pad 3 Num Pad 9 Num Pad 1 + Ctrl Description Rotate up Rotate down Rotate left Rotate right Rotate left/up Rotate right/down Rotate right/up Rotate left/down Zoom in Zoom out Enables translation by click and move instead of rotation Zone view Shortcut 1..N Description Toggle between zone planes Graph view Shortcut Up Down + - Description Move the scale upwards Move the scale downwards Scale out Scale in Profile dialog These shortcuts only work in the edit profile dialog. Shortcut Left Right Ctrl + Left Menu Choice Ctrl + Right Up Down Ctrl + M View -> Magnifying Glass + Ctrl + E View -> Error Vectors Ctrl + H View -> Head model Ctrl + P View -> Suggest Point Hold Shift / Hold Left Button - 55 Description Browse pictures left Browse pictures right Jump to the previous picture in the same pose Jump to the next picture in the same pose Move to the previous landmark Move to the next landmark Displays a magnifying glass around the cursor to simplify the placing of markers. Increment the magnifying factor by 1 Decrement the magnifying factor by 1 Shows or Hides error vectors between the head model and the manually placed landmark. Displays the head model as plus shaped markers for each marked feature. Turns the ability to automatically place a marker on the corresponding head model position. on or off. Enter Sub pixel Marking Mode Space bar Automatically place a marker on the corresponding head model position. Ctrl + A Ctrl + R Ctrl + X Poses -> Add New Poses -> Remove Markers -> Remove Ctrl + L Eyelids -> Set Eyelid Ranges If suggest point is off, you will automatically jump to the position of the selected feature. Add new poses to the profile. Remove poses from the profile. Remove all markers from the current pose. Set the upper and lower limit of the eyelids. Playback Control These shortcuts can only be used when viewing a recording Shortcut H I K Ctrl + H Ctrl + J Ctrl + K U J Description Moves the recording one frame back Pauses the playback. Press again to resume Moves the recording one frame forward Jumps to previous bookmark if available Set or remove a bookmark Jumps to next bookmark if available Increase playback speed Decrease playback speed 56 Using a World Model In order to find out which real world objects the user's gaze intersects a world model has to be defined. The easiest way to do this is to use one of the examples in the Sample Worlds folder in your Smart Eye Pro installation directory. To build the the world model you need to create a text file with the ending .sew. You may use any text editing software to create and edit you world files. We recommend that you use the free software “Notepad++”, which can be downloaded from http://sourceforge.net/projects/notepad-plus/ in the Sample Worlds folder you will find an xml document called userdefine.xml if you place this in your notepad++ directory (either in application data or the actual program directory depending on how you configured notepad++, notepad++ will parse the world model syntax and highlight the allowed keywords which greatly simplifies editing. A world model can be loaded by selecting ”System Setup→Open World Model...”. Note All distances in the world model and elsewhere are in meters except when something else is specified. World Model Syntax When placing a 3D object (LocalCS, Plane, Screen, Box, Sphere or Calibration Point) it should be defined in world coordinates, unless you place it inside the brackets of a LocalCS. In that case the position of the object should be measured from the origin of the LocalCS and with respect to the orientation of your local coordinate system. Coordinate Systems can be nested, and you should always use the coordinate system that contains your current object. 2D objects (Rectangular or Circular Zones or 2D Calibration points) can only be placed inside a Plane or a Screen. In this case they should be defined in object coordinates, which for a Plane will be in meters from the lower left corner of the plane, with positive x to the right and positive y upwards, and for a Screen will be in pixels from the upper left corner of the screen with positive x right and positive y downwards. World models can contain any of the following objects: LocalCS A right handed local coordinate system used to move and rotate a group of objects. You can place a LocalCS in the world coordinate system, or inside another LocalCS. A LocalCS is defined by an origin and x and y-axises in it's parent coordinate system, which can be either the World Coordinate system or another Local Coordinate System. All coordinate systems in Smart Eye Pro are right hand systems. LocalCS : { name = "localCS" origin = 0.1, 0.1, 0 xAxis = 1, 0, 0 yAxis = 0, 0.8, 0.2 } Plane A 2D plane that can contain rectangular or circular zones. The plane can be rotated by defining the x and y-axis' or by placing in in a local cs. If the gaze vector intersects a plane, both world coordinates and object (2D) coordinates will be provided. The name of the plane, and any intersected zones will also be provided in the intersection object. The plane can also contain 2D calibration points for gaze calibration. 57 A plane is defined by a a point (in your parent coordinate system), a size and optionally two vectors that defines the orientation of the plane. If you want to use a coordinate system for each plane instead and rotate the planes that way, that is perfectly fine. The zone planes in turn can contain either circular or rectangular zones. Those are defined by a point (in the coordinate system of the plane) and a width and a height. The plane below contains a rectangular zone, a circular zone and four calibration points. Plane : { name = "MyPlane" lowerMiddle = 0.0, -0.05, -0.3 xAxis = 1, 0, 0 // optional, if undefined it will be 1, 0 ,0 yAxis = 0, 0.5, 0.2 // optional, if undefined it will be 0, 1, 0 size = 1, 0.5 RectangularZone : { name = "rectangular zone" lowerLeft = 0.1, 0.15 width = 0.25 height = 0.1 } CircularZone : { name = "circular zone" center = 0.75, 0.25 radius = 0.1 } } CalibrationPoint2D : { name = "c1" center = 0.25, 0.15 } CalibrationPoint2D : { name = "c2" center = 0.75, 0.15 } CalibrationPoint2D : { name = "c3" center = 0.25, 0.35 } CalibrationPoint2D : { name = "c4" center = 0.75, 0.35 } Screen Similar to the plane, but object coordinates will be in pixels instead of meters. It can also contain rectangular and circular zones, and automatically or manually defined 2D calibration points. The name of the screen and the name of any intersected zones will be provided in the intersection object. A screen is defined by a a point, a size (in your current coordinate system) and a resolution and optionally two vectors that defines the orientation of the plane. You can also make the system place a number of calibration points for you, which is recommended, you should use 4 points for best results.. You do this by defining the keyword calibrationPoints = 4. The screen in turn can contain either circular or rectangular zones. Those are defined by a point (in the coordinate system of the screen which means the are in pixels) and a width and a height. Screen : { name = "MyScreen" lowerMiddle = 0.0, -0.015, 0.02 xAxis = 1, 0, 0 // optional yAxis = 0, .25, 0.04 // optional size = 0.34, 0.271 resolution = 1280, 1024 calibrationPoints = 4 CalibrationPoint2D : { name = "c1" center = 145, 120 } 58 CalibrationPoint2D : { name = "c2" center = 500, 200 } CalibrationPoint2D : { name = "c3" center = 600, 500 } RectangularZone : { name = "rectangular zone" lowerLeft = 20, 20 width = 250 height = 200 } } CircularZone : { name = "circular zone" center = 600, 400 radius = 100 } Calibration Point Can either be a 2D point, in which case it needs to be placed in a Screen or Plane, or a 3D point in which case can be placed in the world coordinate system or inside a local coordinate system. A calibration point is only used in the gaze calibration phase and can never be intersected by the gaze vector. A 2D point in a screen: CalibrationPoint2D : { name = "c1" center = 145, 120 } A 3D point CalibrationPoint : { name = "CP_1" center = 0,0,0.4 } Sphere A sphere of a certain radius which can be intersected by a gaze, intersections provide the name of the sphere and the position of the intersection in world coordinates. Sphere : name = center radius } { "a sphere" = 0,0.15,0.3 = 0.1 Box A 3D box, intersections provide the name of the box and the position of the intersection in world coordinates. Box : { name = "MyBox" 0,0,0 .1,0,0 .1,.1,0 0,.1,0 0,0,.1 .1,0,.1 .1,.1,.1 0,.1,.1 } 59 Note When you define your world, all objects should be in the coordinate system you plan to use. The coordinate system should be manually or automatically defined since it's very difficult to relate the world to a movable object such as a camera. Viewing the World When you have a world model loaded you can display it in two ways. The first way is by the world views where you see the objects in your world and the subject's head and gaze in 2 or 3 Dimensions. Use the world views to control that your world is correctly built, since you can see both the cameras and the origin of your coordinate system in the views you can quickly check that your positioning is correct. In the 2D view you can quickly look at your world from the side top or front by pressing the keys 1-3 or by using the right mouse button menu. The other type of display is the zone view. It displays each zone plane and the defined zones in it. The spot where the gaze intersects the zones will be marked by a blue dot. Both those views are described above in the section 'Running the System'. Reload the World Model By pressing F5 or by selecting “System Setup→Reload World Model” You can quickly reload the world model if you have done any changes. This is mainly useful when defining the world. 60 The Remote Control Interface The optional module remote control interface allows you to control Smart Eye Pro from an external application. You do this by issuing procedure calls in XML-RPC (for full documentation refer to http:// www.xmlrpc.com/), this means that your application can communicate with Smart Eye Pro no matter what your programming language of choice is. To connect to the XML-RPC server, use port 8000 on the machine that Smart Eye Pro is running on. Documentation To get the documentation on line, simply go to port 8000 on the host machine. i.e. http://localhost:8000/ for a server that is on the computer you are currently using. If you are connecting to a remote host, make sure that your firewall won't block the connection. Methods These are the methods currently available in the remote interface of Smart Eye Pro. All functions return 0 if successful, otherwise an error code. Method LoadProfile(fileName) setLogFile(fileName) startLog(start=True) startTracking(start=True) stopLog() stopTracking() system.listMethods() system.methodHelp(method_n ame) Description Loads profile using the provided filename Sets filename of the log Starts or stops the log Starts or stops tracking Stops the log Stops the tracking Returns a list of the methods supported by the server Returns a string containing documentation for the specified method. Examples Error Code(s) 1 - no profile with the provided name was found 1 – no filename of log specified 1 – no profile You can find sample c++ and python code for the remote control interface in the Smart Eye Pro API. 61 FAQ / Troubleshooting General Q: The images from one or more of the cameras are all black. A: Make sure that both the cameras and the flash cables are plugged in. Check the aperture settings for each camera as well. Q: The first time I used the Smart Eye system the values looked fine, now I've noted a lapse in quality of the performance of the system. A: Most likely one of your cameras has been moved, this can be due to an instable fixture or in some cases due to large differences in temperature that might affect the position of the cameras. Verify this by running the camera verification dialog, and if the error vectors are large, re-run the camera calibration. Frame Loss Q: How do I avoid frame loss (You notice that the frame rate in the values field isn't exactly 30 or 60 fps) A: Shut down unnecessary image source views, cut down on the number of open graph views and make sure that eye clips aren't drawn in image source views. Generally the more views and more information you show on the screen the more risk you run of experiencing lost frames. You can check the frame loss by looking at the frame rate field or by pressing and holding left shift. If frames are lost you will see the % of lost frames in the lower right corner of the application window. Logging / Communication Q: How do I convert the rodrigues vector in the log file or the Smart Eye Packet to a more user friendly format? A: In the program folder you'll note a folder named 'Examples', look for the method rodriguesToMatrix in the Matrix.cpp file. Using this you can easily convert a rodrigues vector to an ordinary rotation matrix. Q: How do I use the eye vector to calculate which real world object a user is looking at? A: You can either use our world model module, or write your own code. There is an example of how to calculate the intersection between a vector and a plane in the 'Examples' folder. Camera Calibration Q: I can never seem to get good values when i verify my camera calibration A: Make sure you have set the correct size of the chessboard and make sure you wiggle the chessboard around. To make a reliable calibration the system needs to see the chessboard in different angles in each camera. 62 World Model / WCS Q: The back projected values in the manual WCS dialog are very far from the points I've marked by hand. I've made sure all points are correctly defined. A: Note that all values should be in meters, if you still get a strange result, try to move some points slightly or add a new one. Profile Generation Q: The back projected points in the head model in the profile dialog are very far from the points I've marked by hand. I've made sure all points are correctly defined. A: Move some points slightly or add a new one. Cameras Q: What are the default dip switch and gain settings for the Sony XC-HR50 camera? A: See the hardware manual. IR-flashes Q: How can i check if the IR-flashes works properly. A: Turn down the aperture setting and use a CD-case as a mirror to inspect intensity and evenness. 63 System Specification Hardware Frame grabber The system uses one Matrox Meteor II / Multi Channel frame grabber to acquire images from up to three cameras. Cameras and Frame Rate The cameras are normally identical and of the model SONY XC HR50. These cameras are normally run at 30 or 60 fps with a resolution of 640*480 pixels but has the capability of frame rates up to 240 fps with reduced resolution. (Older Smart Eye systems use SONY XC55 or XC55BB). The cameras are monochrome and are sensitive in the visible and near IR-range. IR-filters are attached in front of the lenses of the cameras. The IR-filters stop visible light and thus makes the system more tolerant to varying light conditions. IR Safety IR lighting is used to illuminate the drivers face with IR light. The Smart Eye equipment complies to the appropriate international standard; IEC 62471 "Photo-biological safety of lamps and lamp systems. This standard contains the calculation rules for Maximum Permissible Exposure (MPE), that Smart Eye complies with. Under normal operating conditions the Smart Eye system has an approximately 300-fold safety margin relative to the MPE. Even under worst case evaluation the safety margin is comfortable. External Processor The processor is used to control the IR-lights and the camera synchronization. The processor PC-card also serves as a splitter adapter/connector between the cameras and the frame grabber. Chessboard The chessboard is used for automatic detection of camera positions. The chessboard should consist of 5*7 full squares plus a fringe of truncated squares. The sides of the squares should be exactly 30 mm. 64 Data Output Specification From version 3.0 quite a large number of data items can be produced by the Smart Eye Pro system. It is also possible for the user to select which of the data items that should be included in the output from the system, both for text logs and for TCP/UDP data packets. Version 3.0 is backward compatible and you may want to use an older communication format with your old client. However, for building new clients we strongly recommend to base the communication on the new generic format. See the “Communication Specification” below for details. The available data items in the generic format are specified in the header file SEOutputDataIds.h included in the sample network client. Please refer to this file for data types and ids of the specified data items. The available data items are listed in the following table. 65 Data item Unit Frame number - Required Module Description A sequential frame number, set by the image capture subsystem. The frame number starts counting from 0 at application start and increments by +1 for each successfully captured image. This means that the frame number of two consecutive frames will always differ by 1 even if the image capture subsystem should happen to drop one or more frames in between. If the frame numbers in the data output should increment by more than +1 from one data record to the next, then it is either an indication of frame loss in the image processing subsystem, probably due to CPU overload – or, in the case of UDP communication, loss of network data packets. Timestamp 10-7 s Estimated delay 10-7 s Time synch User time stamp Time synch Frame rate User defined fps Head position m Head position quality Head rotation rodrigues Head nose direction Head up direction Head left ear direction rad N.B: The frame number should primarily be seen as a simple and unique data record identifier and can not be used to detect frame loss. The only reliable way to determine frame loss is to check the time stamp difference between two consecutive data records. A high-resolution time stamp, measured at the midpoint of image exposure and starting to count from 0 when the application is started. Since this time stamp is based on the PC hardware highresolution clock, it should only be used to measure time differences over relatively short periods of time. The estimated delay from the real-world event (midpoint of image exposure) to the network socket send() system call. 64 bits of user defined information, usually an absolute-time time stamp and/or annotation data. The current frame rate of the system in frames. Should ideally be 30 or 60 frames per second depending on system frame rate. The head position in 3D given in the defined world coordinate system. 0..1 (0 = no cameras are tracking, 0.5 = 1 camera, 1 = 2+ cameras); A value less than 1 means “not reliable”. The head rotation in 3D given on Rodrigues1 format in the defined world coordinate system. Unit vector defining the 'nose' direction. Identical to the z-axis of the head rotation matrix. Unit vector defining the 'up' direction. Identical to the y-axis of the head rotation matrix Unit vector defining the 'left ear' direction. Identical to the x-axis of the head rotation matrix 1 Rodrigues format is a convenient way of describing rotation: The length of the vector defines the rotation angle about the axis defined by the vector it self. Be careful not to interpret the components of the rodrigues vector as true rotations about the axes in the corresponding coordinate system. This can only be done if all components are close to zero, otherwise not. You can easily convert this vector to a rotation matrix and example code that does this is shipped with your system. 66 Head heading rad Head pitch rad Head roll rad The left/right-rotation of the head. Also known as 'no'-rotation. Refer to discussion about Euler angles above for more information. The up/down-rotation of the head. Also known as 'yes'-rotation. Refer to discussion about Euler angles above for more information. The tilt-rotation of the head. Also known as 'maybe'-rotation. Refer to discussion about Euler angles above for more information. Head rotation quality Eye position 0..1 The same number as the head position quality. m The virtual eye position (origin of gaze vector) in 3D given in the defined world coordinate system. Calculated as average position of the physical eyes. A unit vector originating in the virtual eye position describing the direction of the gaze. Calculated as the average of the two gaze vectors originating at the physical eyes. If vergence is of interest, the eyes should be handled separately instead. 0..1 Depends on the quality of the iris detection. Calculated as the average of the quality of the both physical eyes. See also discussion below. The position of the center of the left eye ball in 3D given in the defined world coordinate system. The center of the iris of the left eye, where the gaze vector originates. A unit vector originating in the left gaze origin, describing the direction of the gaze of the left eye. 0..1 Depends on the quality of the iris detection of left eye. (see discussion below) The position of the center of the right eye ball in 3D given in the defined world coordinate system. The center of the iris of the right eye, where the gaze vector originates. A unit vector originating in the left gaze origin, describing the direction of the gaze of the right eye. 0..1 Depends on the quality of the iris detection of right eye. (see discussion below) The left/right angle of the gaze vector. See discussion on Euler angles above. Gaze direction* Gaze direction quality Left eye position m Left gaze origin m Left gaze direction* Left gaze direction quality Right eye position m Right gaze origin m Right gaze direction* Right gaze direction quality Gaze heading* rad Gaze pitch* rad Eyelid opening m The up/down angle of the gaze vector. See discussion on Euler angles above. Eye closure The average distance between the eyelids of both eyes. * There are two version of these data items, unfiltered and filtered. The filtered data items have the same name but are preceded with Filtered. †There are two versions of this item, bot regular and estimated. The estimated data items have the same name but are preceded with Estimated. The estimated values are not as accurate as the regular ones but on the other hand you get a value even if there are no Glints visible on the iris (for example when they are occluded by an eyelid). When you have turned corneal reflection off, the estimated and regular values will be the same value. 67 Eyelid opening quality Left eyelid opening Left eyelid opening quality Right eyelid opening Right eyelid opening quality Closest world intersection Eye closure m Eye closure Eye closure m Eye closure Eye closure World Filtered closest world intersection World World intersections World Filtered world intersections Calibration Intersection Keyboard State ASCII Keyboard State Left Diagnosis Right Diagnosis Left Eye Glints Found World Normally in the range 0..1, some subjects may have values larger than 1.0. The value depends on how distinct the eyelids can be detected. The range is individual and can not be compared between subjects. Calculates as the average quality of the both physical eyes. The distance between the eyelids of the left eye. Quality of left eyelid detection. See also comment above on Eyelid opening quality The distance between the eyelids of the right eye. Quality of left eyelid detection. See also comment above on Eyelid opening quality The closest intersection with any of the world objects. The intersection information contains name of object, intersection point in world coordinates and intersection point in object coordinates. E.g. position in zone-coordinates. Each sub packet of this type starts with an integer indicating the number of world intersections contained in the sub packet. If there are no gaze intersections with world objects for the current frame this integer will be 0, otherwise 1. Same as Closest world intersection, but the intersections are calculated based on the filtered gaze direction. Analogue to closest, but contains the whole list of intersected world objects. E.g., if the right window of a car is intersected it may be interesting to also find out if the right rear mirror is intersected. As with closest intersections, each sub packet of this type starts with an integer indicating the number of world intersections contained in the sub packet. The difference is that in this case there may be any number of intersections. Same as World intersection, but the intersections are calculated based on the filtered gaze direction. Only used to send the selected calibration object to clients. Useful if you want to display a calibration point on a screen when performing the gaze calibration. The keys that are currently pressed (A-Z, 0-9), useful for marking events in log files. Please note that due to limitations in a normal PCkeyboard, pressing more than two keys at a time gives undefined output. The ascii code of the first pressed key, as an integer. Gives a diagnosis via a value below zero if a gaze vector cannot be calculated for the left eye. Gives a diagnosis via a value below zero if a gaze vector cannot be calculated for the right eye. How many glints that are found on the iris of the left eye 68 Left Eye Glints Found Pupil diameter* How many glints that are found on the iris of the right eye m Pupil diameter quality* Left pupil diameter* m Left pupil diameter quality* Right pupil diameter* Right pupil diameter quality* m Pupilometry The consensus diameter of the pupils of both eyes. See section on pupilometry for more details. Pupilometry The value is normalized and will be in the range of [0.0, 1.0]. Pupilometry The diameter of the left eye pupil. Pupilometry The value is normalized and will be in the range of [0.0, 1.0]. Pupilometry The diameter of the right eye pupil. Pupilometry The value is normalized and will be in the range of [0.0, 1.0]. 69 Pupilometry The pupilometry module enables measurement of pupil diameters. Pupil diameters are measured at full frame rate. Pupilometry is an optional module of Smart Eye Pro. For pupilometry the IR-flashes should be placed in a way such that dark pupils can be guaranteed. This is done by placing the IR-flashes at least 10 cm from the optical axis of the cameras. Normally the flashes are placed only a few centimeters on either side of the cameras. Ideally the flashes should be placed underneath the cameras or 'outside' the cameras if applicable. Avoid placing the flashes on the upper side of the cameras as this may cause undesired reflections in glasses. The pupil diameter is measured by matching the image of the dark pupil with all feasible pupil diameters. This results in a probability function which has its maximum at the best matching diameter. A probability function is created for each separate eye clip from the cameras. To form the resulting probability function for one physical eye, the probabilities from all corresponding eye clips are added together on the maximum of the resulting function. To determine the consensus pupil diameter for both eyes, the probability functions from the physical eyes are added together and the maximum of the resulting function defines the diameter. The quality measure provided with each diameter sample is actually the value of the probability function at the determined diameter. Quality measures are normalized for each individual and will be a value in the range [0.0, 1.0]. The set of pupil diameters matched with the image to form the probability function range from 2.5 mm up to 8 mm with a step of 0.5 mm. This results in a diameter resolution of 0.5 mm. As described below, a temporal filter is then used to increase the resolution. Pupil filter The diameter of the pupil does not change very rapidly. Temporal filtering may therefore be used successfully to increase the resolution and to reduce the amount of noise. The pupil filter is a quality weighted average filter. That is, each sample is weighted with its quality and the average of all weighted samples is calculated. Samples that differ from the average by more than two standard deviations will be considered to be outliers and will be removed. Samples within the filter length time are used to produce the filtered value. To reduce delay in output from the system, only samples calculated before the current time will be used to form the current filtered value. That is, the filtered value at a given time will only be based on history. One can say that the filtered value lags from the unfiltered values with about half the filter length. The default filter length of the pupil filter is 300 ms. This implies that filtered values produced for one frame corresponds to a frame 150 ms earlier in the output data stream. The filter length may be adjusted in the Options->Settings->Pupilometry tab. Quality Quality figures are always given as a value ranging from 0.0 to 1.0. Head Position Quality The head position quality can take 3 values, a value of 1.0 denotes that the head is found and tracked in at least 2 cameras, while the value 0.5 means that only one camera is tracking. The value 0.0 means that no face is found at all. Generally you should only trust a quality value of 1.0. Gaze Direction Quality The gaze direction quality reflects the strength of the edge between iris and sclera. This value highly depends on the eye color, illumination and other factors. Therefore the range of this value is very individual. In order to be able to use some generic threshold over a number of different individuals an attempt is made to normalize this value to the range [0.0, 1.0]. The normalized value 0.0 corresponds to 70 the 1st percentile of all collected quality values of the current tracking session while 1.0 corresponds to the 99th percentile respectively. It takes some samples with good and bad quality measurements before the normalization has built up enough statistics to be effective. Therefore the quality value of the first few seconds of a tracking session may not be comparable to the succeeding quality values. What complicates this further is the fact that normalization is done individually for each camera. This means that the quality levels from the different cameras may differ slightly, especially in the beginning of a tracking session. The quality value that the system puts out is the one of the camera that is expected to have the best view of the eye. There is no averaging between the cameras. So, when the system thinks another camera has a better view of the eye, that camera’s quality value is the output. Consequently, if the cameras have different normalized quality levels, there might be different quality levels put out of the system. Normally, this effect is only significant at the very beginning of a tracking session. However, if the system is configured is such way that one of the cameras is used very little, there might be a risk that this camera will provide quality levels in a different range than the other cameras. A workaround for this problem is to start each tracking session by looking into each camera once and blink the eyes. This will fill up the normalization buffer with enough statistics. 71 Diagnosis We provide a diagnosis value each time there isn't enough information to calculate a gaze vector, or if the quality of the information is too low to give a correct result. You get a diagnosis value for each eye. Ideally these values should be 0. All values below 0 indicate that a gaze vector couldn't be calculated and if they appear often you should examine your system set up. Value Description Cause Resolution 0 Gaze Calculated Successfully. -1 Less than two detected irises/pupils. Less than two irises or pupils are found in the cameras for this eye. Make sure at least two irises can be seen with the current camera position. -2 Iris/pupil triangulation failed. Two or more irises/pupils are detected at different positions. Check the camera calibration. -3 Eyelid opening too small to accept iris detection The iris or pupil is Check your eyelid occluded by the eyelids. ranges. Or personal profile. -4 No glints found No reflection of the IR- Check your flashes and flashes found on the flash settings. Make Iris. sure the lenses are not out of focus. -5 Cannot calculate gaze The gaze direction calculation failed for another reason. -6 Iris/Pupil detection quality too low The quality of the If the iris quality is detected irises or pupils constantly too low for a is too low. subject, try to run the pupil detection instead. Contact Smart Eye if this error persists. Time Synchronization Specification (Optional module) The Time Synchronization Module has three main features: It enables the user to provide a user defined 64 bits value as a timestamp to each frame by writing a very simple .dll, which is called from the Smart Eye system at capture of each frame. The user timestamp is passed on to all logs and makes it then very easy to synchronize data from the Smart Eye system with data from another system utilizing the same timestamps. Instructions on writing the dll follow below. The time synchronization module also provides information about latency for each frame, which is the time from the image capture to the time the log data leaves the application either on file, TCP, UDP or rs232. This is important in real time applications. Note that this value can and will differ by several 100 microseconds for different data streams, since we wont be sending them at the exact same time. If the user does not desire to use a user defined time stamp the module will by default provide the realtime timestamp of the frame capture based on the real time clock of the PC. The real-time timestamp is issued using the Win32 function GetSystemTimeAsFileTime(). 72 Writing the dll For this section it is a good idea to refer to the sample code in the folder TimeService of the Smart Eye Pro installation, which normally resides in C.\Program files\Smart Eye\Smart Eye Pro x.x\ Compiling the TimeService project results in the default TimeService.dll, which provides the real time clock of the PC. The dll has four functions that may be modified by the user. The most important is obviously the getCurrentTime function, which should return a 64-bit value representing the user time stamp. If necessary, startup and close down code can be added into the startTimeService and stopTimeService functions respectively. The timeToString should be able to convert the user time stamp to a readable value that may be presented in user interface. The getCurrentTime function of the dll is called upon capture of a video frame from the cameras. The capture is halted while the waiting for response, thus the getCurrentTime function must return very fast and must be non-blocking. Ideally only calls to window system dlls should be performed and obviously no locks or any other pieces of code that may halt the execution can be utilized. Also, the getCurrentTime function should ideally be reentrant, meaning that more than one thread can run the function simultaneously without hazards. By default the system expects that the function is reentrant, but this may be configured in the Options->Settings->Current Timestamp DLL tab. The sample code also contains a project called “TimeServiceTest”, which is an application for testing the TimeService.dll outside Smart Eye Pro. The usage of TimServiceTest.exe is: C:\TimeService\TestDebug\TimeServiceTest.exe <DLLFileName> <offset> - DLLFileName is the full path to the dll - offset is an optional time to add to the current time, set this to 0 At run time Smart Eye Pro will set offset to the time elapsed from midpoint of camera exposure to time of call to getCurrentTime of TimeService.dll. Logging Specifications The log file is a tab-separated text file, which contains the data items specified in the format specification dialog. You can select between a custom format where you pick what you want to log from a list, or two predefined formats for backward compatibility. Communication Specifications TCP/IP socket The system provides a socket server of type TCP on port 5002 (default). The data is sent in packets. A packet consists of a header and the actual output of the system. For a more detailed description of the network packet, please see heading “Packet Specification (TCP/IP, UDP/IP)” below. Note Data is sent with network order (high order byte first). UDP/IP socket The system can send data packets in UDP format. This option is default off. See heading “Communication” above for enabling instructions. A packet consists of a header and the actual output of the system. For an exact definition of the UDP packet, see heading “Packet Specification (TCP/IP, UDP/IP)” below. Note Data is sent with network order (high order byte first). 73 Packet Specification (TCP/IP, UDP/IP) The basic structure of the data packet produced by the different versions of Smart Eye Pro are the same. The data packet always starts with the packet header. The packet header declares the type of the packet and the size of the data included in the packet. Schematically a data packet from Smart Eye Pro looks like this: Packet header Sync Id SEu32, 4 bytes Packet type SEu16, 2 bytes Packet length SEu16, 2 bytes Data Contents dependent on packet type . . . . FIGURE 38. The basic packet structure of data packets from Smart Eye Pro Up to version 3.0 the data part in the packet had a fixed length for all packets of the same type. Please refer to the header file SmartEyePacket.h included in the sample network client included in your Smart Eye Pro installation for the exact definitions of the data packets up to version 3.0. Packet types for these packets are 2 or 3. The output format of Smart Eye Pro 3.0 is quite different from the formats of earlier versions. The format is not fixed as before, but is composed by a number of tagged sub packets. Please see packet structure below for an illustration of packet structure. As before the packet begins with a packet header. The header definition is the same as before, but the packet type is 4 for the generic packet. After the header a number of sub packets will follow. The size declared in the packet header indirectly defines how many sub packets there are. That is, the size defines the size in bytes and not the actual number of sub packets. The number of sub packets may differ between two consecutive data packets. Client is responsible for interpreting the data packets correctly. Each sub packet begins with a sub packet header. The sub packet header contains two pieces of information: id and size(length). The id indicates what data the sub packet contains, for instance. SELeftGazeDirection or SEHeadPosition. Please note that the actual data type (double, int e.t.c.) is not indicated in the packet. The client is expected to look up data type out of the data id. The sample network client illustrates how this may be done. Sample network client The sample client you will find at the same location as the Smart Eye Pro installation. E.g. C:\Program\ SmartEye\Smart Eye Pro 3.0\SampleNetworkClient. The files in this folder are portable and may be used under Linux. The folder SocketListener contains the project and workspace files for a Visual C++ project. Just open the project file in Visual C++ and build the executable to test the client. There are two important header files that are needed when creating a network client: The file SEDataTypes.h contains definitions of the data types that are custom to the Smart Eye System. The file SEOutputDataIds.h contains definitions of the different data items that the Smart Eye System may produce. E.g. SEGazeDirection, SETimestamp and SEHeadPosition. The file also contains a 74 lookup table for looking up data type and literal name based on data id. The sample network client illustrates how this is done. The vast part of the code resides in the file SocketListener.cpp in the folder SocketListener. If you are building a client for the generic packet you will only have to consider the cases that handles packet type 4. We strongly recommend all customers to use the generic packet format as this will make the client more tolerant to future format modifications. Please note that data is sent in network byte order. That is, on a Intel based system you will need to reverse the byte order in order to interpret the data correctly. The sample client also illustrates this. Packet header Sync Id SEu32, 4 bytes Packet type SEu16, 2 bytes Packet length SEu16, 2 bytes Subpacket 1 Subpacket header Id SEu16, 2 bytes Length SEu16, 2 bytes Subpacket data Data . . . . . Subpacket N . . Subpacket header Id SEu16, 2 bytes Length SEu16, 2 bytes Subpacket data Data . . FIGURE 39. The packet structure of new generic format introduced in Smart Eye Pro 3.0 Data types Data Type SEu8 SEu16 Consists of Unsigned integer 1 byte Unsigned integer 2 bytes 75 Type Alias SEType_u8 SEType_u16 SEu32 SEs32 SEu64 SEf64 SEPoint2D SEVect2D SEPoint3D SEVect3D SEString SEWorldIntersectionStruct SEWorldIntersection SEWorldIntersections Unsigned integer 4 bytes Signed integer 4 bytes Unsigned integer 8 bytes Floating point 8 bytes SEf64 x SEf64 y SEf64 x SEf64 y SEf64 x SEf64 y SEf64 z SEf64 x SEf64 y SEf64 z SEu16 size SEu8 ptr[1024] SEPoint3D worldPoint SEPoint3D objectPoint SEString objectName SEu16 size = 0..1 SEWorldIntersectionStruct SEu16 size = 0..N SEWorldIntersectionStruct SEType_u32 SEType_s32 SEType_u64 SEType_f64 SEType_Point2D SEType_Vect2D SEType_Point3D SEType_Vect3D SEType_String SEType_WorldIntersection SEType_WorldIntersections SubPacket Ids Enum ID SEFrameNumber SEEstimatedDelay SETimeStamp SEUserTimeStamp SEFrameRate SEHeadPosition SEHeadPositionQ SEHeadRotationRodrig ues SEHeadNoseDirection SEHeadUpDirection SEHeadLeftEarDirecti on SEHeadHeading SEHeadPitch SEHeadRoll SEHeadRotationQ SEEyePosition SEGazeOrigin SELeftGazeOrigin SERightGazeOrigin SEGazeDirection SEGazeDirectionQ SELeftEyePosition SELeftGazeDirection SELeftGazeDirectionQ SERightEyePosition SERightGazeDirection SERightGazeDirection Q SEGazeHeading SEGazePitch Enum number 0x0001 0x0002 0x0003 0x0004 0x0005 0x0010 0x0011 0x0012 Data type SEType_u32 SEType_u32 SEType_u64 SEType_u64 SEType_f64 SEType_Point3D SEType_f64 SEType_Vect3D 0x0013 0x0014 0x0015 SEType_Vect3D SEType_Vect3D SEType_Vect3D 0x0016 0x0017 0x0018 0x0019 0x0020 0x001a 0x001b 0x001c 0x0021 0x0022 0x0023 0x0024 0x0025 0x0026 0x0027 0x0028 SEType_f64 SEType_f64 SEType_f64 SEType_f64 SEType_Point3D SEType_Point3D SEType_Point3D SEType_Point3D SEType_Vect3D SEType_f64 SEType_Point3D SEType_Vect3D SEType_f64 SEType_Point3D SEType_Vect3D SEType_f64 0x0029 0x002a SEType_f64 SEType_f64 76 SEFilteredGazeDirecti on SEFilteredGazeDirecti onQ SEFilteredLeftGazeDir ection SEFilteredLeftGazeDir ectionQ SEFilteredRightGazeDi rection SEFilteredRightGazeDi rectionQ SEFilteredGazeHeadin g SEFilteredGazePitch SESaccade SEFixation SEEyelidOpening SEEyelidOpeningQ SELeftEyelidOpening SELeftEyelidOpeningQ SERightEyelidOpening SERightEyelidOpening Q SEClosestWorldInterse ction SEFilteredClosestWorl dIntersection SEAllWorldIntersectio ns SEFilteredAllWorldInt ersections SEEstimatedGazeOrigi n SEEstimatedLeftGaze Origin SEEstimatedRightGaze Origin SEEstimatedEyePositio n SEEstimatedGazeDirec tion SEEstimatedGazeDirec tionQ SEEstimatedGazeHead ing SEEstimatedGazePitch SEEstimatedLeftEyePo sition SEEstimatedLeftGaze Direction SEEstimatedLeftGaze DirectionQ SEEstimatedLeftGaze Heading SEEstimatedLeftGazeP itch SEEstimatedRightEyeP osition 0x0030 SEType_Vect3D 0x0031 SEType_f64 0x0032 SEType_Vect3D 0x0033 SEType_f64 0x0034 SEType_Vect3D 0x0035 SEType_f64 0x0036 SEType_f64 0x0037 0x0038 0x0039 0x0050 0x0051 0x0052 0x0053 0x0054 0x0055 SEType_f64 SEType_f64 SEType_f64 SEType_f64 SEType_f64 SEType_f64 SEType_f64 SEType_f64 SEType_f64 0x0040 SEType_WorldIntersection 0x0041 SEType_WorldIntersection 0x0042 SEType_WorldIntersections 0x0043 SEType_WorldIntersections 0x007a SEType_Point3D 0x007b SEType_Point3D 0x007c SEType_Point3D 0x0080 SEType_Point3D 0x0081 SEType_Vect3D 0x0082 SEType_f64 0x0083 SEType_f64 0x0084 0x0085 SEType_f64 SEType_Point3D 0x0086 SEType_Vect3D 0x0087 SEType_f64 0x0088 SEType_f64 0x0089 SEType_f64 0x008a SEType_Point3D 77 SEEstimatedRightGaze Direction SEEstimatedRightGaze DirectionQ SEEstimatedRightGaze Heading SEEstimatedRightGaze Pitch SEKeyboardState SELeftDiagnosis SERightDiagnosis SELeftGlintsFound SERightGlintsFound SECalibrationGazeInte rsection 0x008b SEType_Vect3D 0x008c SEType_f64 0x008d SEType_f64 0x008e SEType_f64 0x0056 0x00a0 0x00a1 0x00a2 0x00a3 0x00b0 SEType_String SEType_f64 SEType_f64 SEType_u32 SEType_u32 SEType_WorldIntersection Smart Eye Serial Format (RS232) Up to version 3.0 RS232 was a standard communication interface of Smart Eye Pro. Due to its limited bandwidth the serial interface is normally not the best choice for communicating data at 60 Hz. 78 CAN Output Specification The Smart Eye Can Output interface uses 10 predefined packets containing the much of the same information as in the data output specification. All packets have a numerical id (nID in the table below) that is added to a user defined message base for use on the CAN bus. The default message base is 0x400. You will find the message definitions in SECANMsgTypes.h in the Smart Eye API, where you can also find a sample CANCaseXL-client. The packet data is normally 8 bytes long, except for the SE_CAN_EYECLOSURE and SE_CAN_PUPILDIAMETER packets which are 4 bytes each. To save bandwidth all values (except frame number and user time stamp) are multiplied by 10 000 before they are sent, which means that metric values will be in 1/10 mm, time measurement in 1/10 ms, and angular values in 1/10 000 radians. Quality values are between 1 and 10000. Most values will be in the form of 16 bit integers, except for frame number which has to be 32 bit integer and the user defined time stamp which still is a 64 bit integer. On the CAN bus, little endian is used, i.e the least significant byte is always sent first for multiple byte values. Note Output Data is always sent as little endian on the CAN bus Packet ID nID Data Byte Type Id SE_CAN_SYNCH 1 [0..3] u32 Framenumber [4..5] u16 Timestamp [6..7] u16 EstimatedDelay Unit Description 1/10ms 1/10ms You can use the frame number to uniquely identify a frame. The time stamp will wrap around at 6.5536 s and the estimated delay will saturate at 6.5535s Used to synchronize Smart Eye Pro with external events. The head position, scaled down to 1/10 mm. SE_CAN_USERTIME STAMP 2 [0..7] u64 UserTimeStamp User Defined SE_CAN_HEADPOSI TION 3 SE_CAN_HEADROT ATION 4 SE_CAN_GAZEORIG IN 5 [0..1] s16 HeadPosition.x [2..3] s16 HeadPosition.y [4..5] s16 HeadPosition.z [6..7] u16 HeadPositionQ [0..1] s16 HeadRotation.x [2..3] s16 HeadRotation.y [4..5] s16 HeadRotation.z [6..7] u16 HeadRotation Q [0..1] s16 GazeOrigin.x [2..3] s16 GazeOrigin.y [4..5] s16 GazeOrigin.z [6..7] u16 GazeOriginQ 1/10 mm 1/10 mm 1/10 mm 0-10000 1/10 mm 1/10 mm 1/10 mm 0-10000 1/10 mm 1/10 mm 1/10 mm 0-10000 79 The head position in rodrigues format, scaled down to 1/10000 radians. The origin of the gaze vector, scaled down to 1/10 mm. SE_CAN_GAZEDIRE CTION 6 [0..1] s16 GazeDirection.x [2..3] s16 GazeDirection.y [4..5] s16 GazeDirection.z [6..7] u16 GazeDirectionQ [0..1] s16 EyeLidOpening [2..3] u16 EyeLidOpeningQ +-10000 +-10000 +-10000 0-10000 1/10 mm 0-10000 SE_CAN_EYECLOS URE 7 SE_CAN_BOTHEYE CLOSURES 8 [0..1] s16 LeftEyeLidOpening [2..3] u16 LeftEyeLidOpeningQ [4..5] s16 RightLidOpening [6..7] u16 RightLidOpeningQ 1/10 mm 0-10000 1/10 mm 0-10000 SE_CAN_PUPILDIA METER 9 [0..1] s16 Pupildiameter [2..3] u16 PupildiameterQ 1/10 mm 0-10000 SE_CAN_BOTHPUPI LDIAMETERS 10 [0..1] s16 LeftPupildiameter [2..3] u16 LeftPupildiameterQ [4..5] s16 RightPupildiameter [6..7] u16 RightPupildiameterQ 1/10 mm 0-10000 1/10 mm 0-10000 80 The unit vector gaze direction, but between -10000 and 10000 The average eye lid opening value. Unit is 1/10 mm. Both the left and right eye lid opening values with quality values. Unit is 1/10 mm. The diameter of the pupil in 1/10 mm scale. The diameter of the pupil in 1/10 mm scale for both the left and the right eye. Contact Information Smart Eye AB Första Långgatan 28 B SE - 413 27 Göteborg Sweden Tel +46 31 60 61 60 Fax +46 31 701 05 15 [email protected] www.smarteye.se 81