1
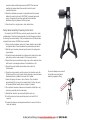
WARRANTY
Martel Electronics Corporation warrants the MECP500 pneumatic pump
against defects in materials and workmanship for a period of twelve (12)
months after date of sale. An invoice may be required as proof of purchase
for warranty claims. Damage due to contamination or other misuse is not
covered under this warranty.
If any product is to be returned, a “Return Material Authorization”
number may be obtained by calling our Customer Service Department toll
free at 1-800-821-0023 in the US or Canada or
+1-603-434-8179 outside the US. Access our RMA Form by using
www.martelcorp.com, under Customer Service.
MECP500
Pneumatic Hand Pump
Operating Instructions
The MECP500 Pneumatic Hand Pump is a compact, lightweight,
portable, hand-operated pressure and vacuum pump. When a digital
calibrator is added the unit can be used to calibrate or check pressure
measuring devices in the field. No external power or high pressure bottles
are required. The MECP500 is completely assembled and ready to connect
to the pressure device to be calibrated. Calibration is quick and simple
since the pump is taken directly to the pressure device. This pneumatic
pump provides a source of air pressure, 0-500 psig (600 psi max.), or
vacuum, 0-28" Hg.
1. Isolate the device to be calibrated. CAUTION: Do not connect to
high pressure sources. Safe operating procedures must be
exercised to avoid personal injury and damage to the calibration
system.
2. Connect the pump and calibrator to the pressure device to be
calibrated. Make sure the connection is pressure tight and be certain
to use Teflon tape to prevent leakage.
3. Turn the knurled knob on the needle valve clockwise to close.
NOTE: Hand tighten only to prevent damage to the valve seat.
www.martelcorp.com
e-mail: [email protected]
Tel: (603) 434-1433 800-821-0023
Fax: (603) 434-1653
Martel Electronics
3 Corporate Park Dr.
Derry, NH 03038
Rev D 10/09 P/N 0280257
4. Using a small screwdriver, set the shuttle valve to "pressure or
vacuum". Note that "P" and "V" are stamped on the sides of the pump
body.
5. Squeeze the handles until the desired or approximate pressure is
obtained. Additional force is required as the pressure is increased.
6. The pressure can be decreased with the needle valve.
7. The pressure can be "fine tuned" with the vernier knob. To increase
pressure, turn the vernier knob clockwise. Turning the vernier knob
counterclockwise will decrease pressure. NOTE: The vacuum
reading increases when the vernier knob is turned
counterclockwise.
8. When the calibration procedure is completed, bleed the pressure
before disconnecting the unit. CAUTION: To prevent personal
injury, the pressure must be reduced to zero before
disconnecting any element of the system.
9. Store the unit in a carrying case or other safe location.
Pump Valve Assembly Cleaning Instructions
Occasionally, the MECP500 may not work properly due to dirt or other
contamination of the internal valve assembly. Use the following procedure
for cleaning the valve assembly. If this procedure does not fix the problem,
a repair kit (part number 1010043) may be ordered.
1. Using a small screwdriver, remove the 2 valve retention caps located
on opposite sides of the pump below the pressure/vacuum switch.
2. After the caps have been removed, gently remove the spring and oring assembly.
3. Set aside the valve assemblies in a safe area and clean out the valve
body using a cotton swab soaked in IPA (isopropyl alcohol).
4. Repeat the process several times using a new cotton swab each time
until there is no remaining evidence of contamination or dirt.
5. Operate the pump handles several times and recheck for
contamination.
6. Clean the o-ring assembly and the o-ring on the retention caps with
IPA and inspect the o-rings closely for any damage or excessive wear.
Replacements are included in the repair kit, if needed.
7. Inspect the springs for wear or loss of tension. They should be
approximately 8.6 mm long in the relaxed state. If shorter, they may
not provide sufficient sealing tension. Replace if needed.
8. Once all parts have been cleaned and inspected, reinstall the o-ring
and spring assembly into the valve body.
9. Reinstall the retention caps and gently tighten each cap.
10. Seal the output port and operate the pump to at least 50% of
capacity.
11. Release the pressure and repeat several times to ensure that the orings seat properly.
To prevent damage use a wrench
to hold the pump body when
attaching a gauge or fitting