1
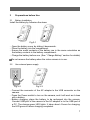
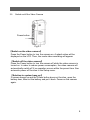
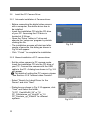
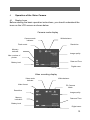
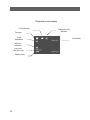
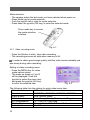
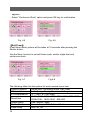
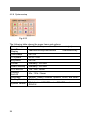
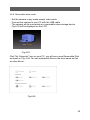
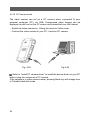
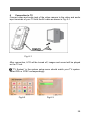
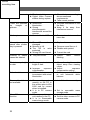
Table of Contents 1 Features and Specifications ........................................ 2 1.1 1.2 2 Functions ....................................................................................... 2 Technical Specifications ................................................................ 3 Appearance and Accessories...................................... 4 2.1 2.2 3 Appearance ................................................................................... 4 Accessories ................................................................................... 6 Preparations before Use ............................................. 7 3.1 Battery Installation ......................................................................... 7 3.2 Use external power supply ............................................................ 7 3.3 Install SD Card .............................................................................. 8 3.4 Install hand strap ........................................................................... 8 3.5 Switch on/off the Video Camera .................................................... 9 3.6 Install the PC Camera Driver ....................................................... 10 3.6.1 Automatic installation of Camera drivers .............................. 10 3.6.2 Manual installation of PC camera driver .............................. 10 3.6.3 Install the removable driver .................................................. 11 4 Operation of the Video Camera ................................ 13 4.1 Display Icons ............................................................................... 13 4.2 Modes of operations .................................................................... 15 4.2.1 Video recording mode .......................................................... 16 4.2.2 Camera mode ...................................................................... 17 4.2.3 MP4 playback mode ............................................................. 19 4.2.4 Playback mode ..................................................................... 20 4.2.5 Photo playback ..................................................................... 20 4.2.6 MP3 Playback Mode ............................................................ 22 4.2.7 Audio recording .................................................................... 23 4.2.8 System setup ....................................................................... 24 4.2.9 Removable drive mode ........................................................ 25 4.2.10 PC Camera mode ............................................................. 26 5 File Management ...................................................... 27 5.1 5.2 6 7 Delete Files ................................................................................. 27 File Protection ............................................................................. 28 Connection to TV....................................................... 29 Additional Information ............................................... 30 7.1 7.2 7.3 7.4 Keep the video Camera clean ..................................................... 30 Precautions for Use of Video Camera ......................................... 30 Precautions for Use of Power Supply .......................................... 30 Troubleshooting ........................................................................... 31 1 1 Features and Specifications 1.1 Functions It digital video camera is designed with highly integrated digital video processor and sophisticated processing algorithm. With advanced CMOS image sensor and high-resolution TFT LCD display, it has many functions and very high cost performance. It is small, fashionable and low power consumption. Accessories and optional parts are bundled. Features: MPEG4, HD video recording, 30 frames of images per second, with synchronized sound recording Still picture photographing, with 5 mega pixels image size. Still pictures and video clip playback Digital sound recording, voice annotation to the photos or continuous sound recording PC camera for internet communication. MP4 files playback MP3 play Audio and video outputs to TV and headphones, Portable USB mass storage. 2.4” TFT LCD display. 270 degrees rotational display. 2 1.2 Technical Specifications Image sensor Image size Interpolated image size Image quality Color Depth Display Lens Zoom Shooting distance Shutter speed Exposure Exposure compensation White balance Shooting interval Continuous shooting Playback delay Timer Built-in Flash Recharge time of Flash Effective range of flash On-board memory Removable memory File format PC camera Video recording Music player Video play Voice function ISO sensitivity Operating system Menu language External interface Power supply Dimensions Weight 5.17 mega pixels CMOS 2560x1920,2048×1536,1600×1200,800×600 4640×3480,4000×3000,3264x2448, Fine/ Normal/ Basic 24-bit true colors (RGB) 2.4” TFT LCD F2.8, fixed focus Digital zoom, 4X at image capture, 16X at playback 1m ~ infinity 1/2-1/1000 second Automatic -2 to +2EV value, at 1/2EV step. Auto, Sunny, Cloudy, fluorescent, tungsten <3 sec 4 photos <3 sec 10 sec delay Auto/ On/ off <8 sec (when full-recharged battery is used at normal temperature) 1-2 m 32MB flash memory SD / MMC card JPEG+Exif2.2 30 fps @ CIF image MPEG-4, HD(1280X720), D1(720X480), QVGA or VGA @ 30fps MP3 play MP4 play Voice recording and playback Auto Windows 98/Me/2000/XP/Vista, above Mac OS 8.0 English, French, German, Spanish, Dutch, and Italian USB2.0 High Speed, AV output Rechargeable Lithium Ion battery 102x57x23mm 105 grams (excluding battery) 3 2 Appearance and Accessories 2.1 Appearance 7 9 1.Joystick and OK button 2.Shutter 3.Mode 4.Menu 5.Power 6.Strap holder 7.Microphone 8.Speaker 9.Power/ Battery charge LED 1 2 3 4 5 8 6 Fig. 2-1 11 10.Flashlight 11.Lens 12.Audio output jack 13.Video output jack 14.USB connector 15.SD Card slot 16. Battery door 10 12 13 14 15 16 Fig. 2-2 4 Shutter: In capture mode, take a photo or start/stop capturing a movie. In playback mode, voice recording and playback. In MP4 mode, play/stop a movie file. Microphone: Convert sound wave to electrical signal for voice recording. Flashlight: Illumination objects in dark environment for photo taking. See flash mode setting for operations. Lens: Allow the CMOS sensor picking up image of the object. USB connector: When connected to the power adapter, the video camera operates with external power supply and the battery is charging. When connected to the computer, the video camera battery is charging and the camera operates in mass storage or PC camera mode. Audio output interface: Connect to audio input of TV set with the audio cable. Connect to earphones for audio or MP3 playback. Video output interface: Connect to video input of TV set with the video cable. The camera can display pictures or play videos on TV. Speaker: Play operation prompt sounds, or voice playback Power/ Battery charging LED: Turn off when the video camera is switched off. Red LED turns on when the video camera is switched on. Red LED flashes while the flash is recharging. Green LED turns on when the camera is charging. When the camera is power on and charging at the same time, the LED turns orange. Mode key: Enter mode selection. Joystick: It is multi-functional. It is used in menu selection, digital zoom, panning, file lock/unlock, and volume control. Use your thumb to push it up, down, left or right. Ok button: Press down the joystick to go to the submenu or selection confirmation. Strap holder: Use for fixing the strap. Battery door: 5 Slide the battery door downwards to open the compartment for battery replacement. SD Card slot: Remove the SD card slot cover. Insert a card. Push the card for ejection. Menu button: Enter/ Exit the menu. Power button: Switch on/off the video camera LCD: Liquid crystal display which displays video images, still pictures, status icons, menu and list of music or video files. 2.2 Accessories Strap USB cable Video camera pouch Driver disc Earphone lithium battery warranty card 6 TV cable User’s Manual AC adapter 3 Preparations before Use 3.1 Battery Installation Install the battery by following the steps: Fig.3-1 Open the battery cover by sliding it downwards. Place the battery into the compartment. Ensure the metal contacts of the battery are in the same orientation as the battery contacts in the battery compartment. Charge the battery before use. (See “ Charge Battery” section for details) Do not remove the battery when the video camera is in use. 3.2 Use external power supply Fig.3-2 Fig.3-3 Connect the connector of the AC adapter to the USB connector on the camera. Press the Power switch to turn on the camera, and it will work as it does with a battery. Battery charging: place the battery to be recharged into the camera. Connect USB port of the camera to the AC adapter or to the USB port of a PC. The charge green LED lights. It takes about 4 hours for charging, the LED goes out when charging completed. 7 3.3 Install SD Card Open the rubber cover Insert SD card as shown into the SD card slot To remove the SD card, press it with a finger and the card will be ejected. Fig.3-4 3.4 Install hand strap Fig.3-5 Fig.3-6 Run the ring at one end of the strap around the strap fixing pin as shown in Fig. 3-5 Run the strap through the ring, and then tighten it by pulling as shown in Fig. 3-6. 8 3.5 Switch on/off the Video Camera Power button Fig.3-7 【Switch on the video camera】 Press the Power button to turn the camera on. A splash video will be displayed on the LCD. Then, the mode video recording will appear. 【Switch off the video camera】 Press the Power button to turn the camera off while the video camera is turned on. In order to reduce power consumption, the video camera will automatically switch off if no operation occurs within the preset time. See automatic power-off function in the Setup menu. 【Solution to system hang up】 If camera hangs up and the Power button does not function, open the battery door, take out the battery and put it back. Power on the camera again. 9 3.6 Install the PC Camera Driver 3.6.1 Automatic installation of Camera drivers Before connecting the digital video camera with a computer, the device driver has to be installed. Insert the installation CD into the CD drive of your PC. Assuming the CD drive is located at X:\Driver, Open the ‘Driver’ folder in F drive and execute the ‘setup.exe’ program by double clicking the file. The installation process will start and after couple of seconds, the dialog as shown in Fig.3-8 will appear. Click“Finish”to complete the installation. Fig. 3-8 3.6.2 Manual installation of PC camera driver Set the video camera to PC camera mode. Insert the installation CD into the CD drive of your PC. Connect the camera with the USB cable to the PC. A dialog box shown in Fig. 3-9 will appear. For details of setting the PC camera, please see Section 4.2.9 “Internet video Camera”. Select “Search for Latest Driver for the Device” and click “Next”. Dialog box as shown in Fig.3-10 appears, click “View” and Select the folder, “X:\PC_Cam\Win98_2K” or “X:\ PC_Cam\winme_xp_Vista32” or “X:\ PC_Cam\win_xp_Vista64” for different systems. 10 Fig. 3-9 Fig.3-10 Click “Next”. After a window as shown in Fig. 3-11 appears, click “Finish” to complete the installation. Fig. 3-11 3.6.3 Install the removable driver WIN2000/XP have built in removable drive driver, no driver installation is required. Installation of removable drive driver for Win98 operating system Set the camera to still picture or playback mode, and connect it with the USB cable to the PC. A dialog box as shown in Fig. 3-12 will appear. Click“Next”, an dialog box shown in Fig. 3-13 will appear. Fig. 3-12 Select “Search for Latest Driver for the Device” and click “Next”. Fig.3-13 Dialog box as shown in Fig.3-14 appears, click “View” to view CD disk and locate the folder at “X: \ Mass” (Assuming CD drive is located at X:). Fig. 3-14 11 Click “Next” accordingly Fig. 3-15 When installation finishes, the dialog box as shown in Fig. 3-16 appears. Fig. 3-16 12 4 Operation of the Video Camera 4.1 Display Icons Before reading the basic operation instructions, you should understand the icons on the LCD screen as shown below. Camera mode display Camera mode indicator White balance Flash mode Resolution Memory indicator Image quality Max. number of photos Date and Time Battery level Digital zoom Video recording display Video mode indicator Video format White balance PC Camera Mode Resolution Image quality Memory indication Date and Time Battery level Digital zoom 13 Playback mode display File protection File type Voice annotation Memory indication File count / total file count Battery level 14 Playback mode indicator Resolution 4.2 Modes of operations The video camera operates in seven modes as shown below: 1. Camera 2. Video recording 3. Playback 4. System setup 5. Audio recording 6. MP3 playback 7. MP4 playback Camera Video Playback Setup Audio MP3 MP4 15 Mode selection: The camera enters the last mode you have selected when power on. Press Mode key for mode selection. Push the joystick left or right for mode selection. Press down the joystick (OK key) to enter the selected mode. Press mode key to access the mode selection interface 4.2.1 Video recording mode Fig. 4-1 Press the Shutter to start / stop video recording. The recording process will stop when memory is full. In order to obtain good image quality, hold the video camera steadily and pan slowly during video recording. Setting of video recording menu: Press the MENU key for video mode options setup. The menu as shown in Fig.4-2 will be displayed. Push the joystick to select the menu item and press the joystick (OK key) to enter the selected item. Fig. 4-2 The following table lists the options for each video menu item: Video format ASF,AVI,WMV Resolution 1280X720,720X480,640X480,320X240 Video quality Fine, Normal, Basic White balance Auto, Sunny, Cloudy, Fluorescent, Tungsten EV compensation -2 ~ +2EV, at 1/2EV step Photo effect Normal, Sepia, B/W, Soft and Vivid Anti-vibration On/ Off 16 4.2.2 Camera mode 【Taking single photo】 Aim the camera to your object and press the shutter to take a picture. Image can be zoomed digitally by pressing or key (pushing the joystick up/down) The camera is set to Single Shot whenever the Camera mode is activated. If the camera has been switched to Continuous shots or self timer modes, Single Shot can be selected by the menu function as described below Press MENU key, and menu screen appears, Select “ ” option as shown in Fig. 4-3. Press OK key for confirmation, the option screen as shown in Fig. 4-4 appears. Select “Single Shot”, press OK key for confirmation. Fig. 4-3 Fig. 4-4 【Continuous shots of multiple photos】 In continuous shots mode, the camera will take 4 photos continuously by pressing the shutter button. The video camera should be kept still when multiple photos are shot continuously, Use the Menu function to set continuous shots mode. Press MENU key, and menu screen appears, Select “ ” option as shown in Fig. 4-5. Press OK key for confirmation, the option screen as shown in Fig. 4-6 17 appears. Select “Continuous Shots” option and press OK key for confirmation Fig. 4-5 Fig. 4-6 【Self-Timer】 In self-timer mode, picture will be taken at 10 seconds after pressing the Shutter button. Use the Menu function to set self-timer mode, similar single shot and continuous shots. Fig. 4-7 Fig.4-8 The following table lists the options for each camera menu item. Capture Options Single shot, Continuous shots, Self-Timer White balance Auto, Sunny, Cloudy, Fluorescent, Tungsten EV compensation -2 ~ +2EV, at 1/2EV step 4640×3480,4000×3000,3264x2448,2560x1920, Resolution 2048×1536,1600×1200,800×600 Image quality Fine, Normal, Basic Photo effect Normal, Sepia, B/W, Soft and Vivid Flash mode Auto, off, On 18 4.2.3 MP4 playback mode A movie play list will be displayed when this mode is activated. Fig. 4-9 Fig. 4-10 Fig. 4-11 Use the joystick and shutter button to control the movie playback. The following table shows the key functions: MP4 playback Play list FR (fast reverse) the movie; return to the play list when the movie is stop FF (fast forward) Increase audio volume Select previous file Reduce audio volume Select next file MENU Enter and exit the delete menu OK Play the selected movie Shutter Start/Stopping playing a movie 【Download MP4 files】 If an empty list is displayed after the video camera is switched over to MP4 mode, MP4 file should be downloaded first. The process is as follows: Connect the video camera to a PC in Mass Storage mode. Open the removable storage device and create a folder named “MPEG” under the root directory. If this folder already exists, this step can be skipped. Convert the movie stored in the computer to AVI format and then copy it to “MPEG” folder. 19 4.2.4 Playback mode When the playback mode is activated, the last picture, video, or voice file is displayed. The Icon on the top left corner of the display shows the file type. 4.2.5 Photo playback Use Use key to view previous photo; use key to view next photo. keys to zoom in/out the current photo. 【Display thumbnails】 Display thumbnails of photos with the following procedures. with the Press MENU key and the menu screen appear. Select joystick and press OK key for confirmation. or key: 2x2, 3x3, 4x4, and press Select “DISPLAY FORMAT” with OK key for confirmation. If 3x3 is selected, the display is as shown in Fig. 4-14. Use the joystick to select a photo or scroll the thumbnail pages. Press OK key to display the selected photo. Fig.4-12 4.2.5.1 Fig.4-13 Video Playback represents a video file. The picture marked with Press Shutter key to start to playback the video file. Pause the playback, press Shutter key once again. or . Adjust audio volume by pushing the joystick 20 Fig.4-14 4.2.5.2 Voice file Playback The display with ‘ message on the top left corner represents a voice file. Fig.4-15 Press Shutter key to start/stop voice playback. or Adjust audio volume by pushing the joystick 4.2.5.3 . Voice annotation to a photo 【Record a voice annotation】 Select the picture to which voice annotation will be attached. The message “Voice recording” as shown in Fig. 4-16 appears on the screen during voice recording,. To stop the voice annotation, press Shutter key once again. 【Play the voice annotation】 icon on left upper corner A picture file an of the display as shown in Fig. 4-17 indicates this photo includes a voice annotation. Press Shutter key to playback voice annotation. To pause, press Shutter key once again. Voice annotation play can be repeated. Fig. 4-16 Fig. 4-17 【Delete voice annotations】 Please see “Delete Files”. 21 4.2.6 MP3 Playback Mode MP3 play list as shown in Fig.4-18 is displayed when MP3 playback mode is activated. Fig 4-18 shows the screen during playback. Fig.4-18 Fig.4-19 Fig.4-20 Key Operations: : Select a MP3 file in play list. Adjust the volume level during playback. : Switch play modes in the following sequence: , repeat single track , repeat Play sequentially , random play playing in sequence : Pause and continue the playing during playback. Return to play list when playing is stop. OK: Start and stop playing. MENU: Go to MP3 file deletion menu while no MP3 file is playing. Download MP3 files If an empty list is displayed after the video camera is switched over to MP3 mode, MP3 file should be downloaded first. The process is as follows: 1. Set the video camera to Portable Hard disk mode and connect it with a computer. 2. Open the portable hard disk and create a folder named “MP3” under the root directory. If this folder already exists, this step can be skipped over. 3. Copy the MP3 songs stored in the computer to this MP3 folder. 22 4.2.7 Audio recording Filename Recording time Fig.4-21 Press Shutter key to start recording; press again to stop recording. Recorded voice file is in WAV format, and recording duration depends on storage capacity. 23 4.2.8 System setup Fig.4-22 The following table shows the menu items and options: Date settings Year/Month/Day Hour/Minute am(pm) Date/Time Year/Month/Day/Hour/Minute Year/Month/Day Display Time stamp On / Off TV system NTSC / PAL Key tones On /Off Format Internally / SD card Select Memory Internally / SD card LCD Self-Off 15s / 30s / Never Camera 60s / 120s / Never Self-Off Language English, French, German, Spanish, Dutch, and Italian Factory Reset Reset / Cancel Model / HW VER / FW VER / System Version ZCHFIX 24 4.2.9 Removable drive mode Set the camera in any mode except video mode. Connect the camera to your PC with the USB cable. The camera will be connected as a removable mass storage device. Fig.4-23 will be displayed on the LCD. Fig.4-23 Click “My Computer” icon on your PC, you will see a new Removable Disk as shown in Fig. 4-24. You can manipulate files on the drive same as that on other drives. Fig.4-24 25 4.2.10 PC Camera mode The video camera can act as a PC camera when connected to your personal computer (PC) via USB. Compressed video images can be displayed at real time on the PC screen and transmitted over the Internet. Switch the video camera on. Chang the mode to Video mode. Connect the video camera to your PC; it acts as PC camera. Fig. 4-25 Fig.4-26 Refer to “Install PC camera driver” to install the device driver on your PC before using the camera as a PC camera. If the camera is in video camera mode, pressing Mode key will change over to Portable Hard disk mode. 26 5 File Management Select playback mode and press MENU button to go to the Playback menu for file management functions. 5.1 Delete Files Select “Delete Current”, “Delete All” or “Delete Voice”, and press OK key to execute corresponding operation. 【Delete Current】: Delete currently selected photo, video or voice file. Select “Yes” to confirm to delete; Select “No” to do nothing. Fig.5-1 Fig.5-2 【Delete All】: Delete all the unprotected photo, video and voice files on the camera. 【Delete Voice】: Delete the voice annotation of the current photo. 【Format】: Format the memory system; all information and data stored in the memory will be deleted. In some cases, new cards or cards used in other system may need formatting before using. 27 5.2 File Protection File protection means protecting specified photos or images from being deleted or voice annotations being added to or deleted. Fig.5-3 Fig.5-4 Enter the Playback menu and select , then press OK key for confirmation. Select LOCK or UNLOCK item, and then press OK key for confirmation. 【Lock】 : Enable protection function. When locked icon will appear photo is displayed, a on the left upper corner of the photo, as shown in Fig.5-5. 【Unlock】: Used to disable the protection function. An unprotected photo will not have the icon displayed on the left upper corner of the photo. 28 Fig.5-5 6 Connection to TV Connect video and audio jack of the video camera to the video and audio input terminals of your TV with the AV cable as shown in Fig. 6-1. Fig. 6-1 After connection, LCD will be turned off, images and sound will be played on the TV set. “TV System” in the system setup menu should match your TV system. Select PAL or NTSC correspondingly. Fig.6-2 Fig.6-3 29 7 Additional Information 7.1 Keep the video Camera clean Always keep the video camera clean, especially the lens and LCD. Do not touch the lens or you will leave fingerprint on it. Follow the instructions to clean the camera: Camera body: Clean the camera body with a piece of soft cloth moistened with water, then wipe the body with a dry cloth. No chemical detergent can be used in order to avoid any damage to the finish or casing. LCD: Refer to video camera body cleaning procedures. Take care not to put much pressure on the LCD. Lens: Wipe the lens with soft cloth to remove fingerprints, dust, etc. 7.2 Precautions for Use of Video Camera Do not shoot towards strong light for a long time. Do not use or store the video camera in a place of high humidity, high temperature or high dust content. Keep the video camera far away from strong electromagnetic fields. Avoid strong impact and vibrations. Remove the battery from the video camera if it is not in use for a long period. Never use any batteries or AC adapters that are not compatible with the video camera. Do not try to open the video camera enclosure. The camera must be serviced by qualified persons only. Keep the video camera clean. 7.3 Precautions for Use of Power Supply When carrying or using the batteries, avoid short circuit of the two polarities of the battery. Do not dismantle the batteries or AC adapter. Never throw batteries into fire or chemical solvent. Only rechargeable lithium battery or AC adapter supplied with the video camera can be used for the camera Recharge lithium batteries strictly according to the provided instructions. Battery heating is normal during recharging process, but if it is 30 overheated, recharging must be stopped. If the video camera is not in use for a long period, the battery should be removed. If AC adapter is overheated during its use, it should not be used any longer. Avoid shock or impact on the battery or AC adapter Avoid unexpected accidents, the battery and AC adapter should be placed out of children’s reach, Aged batteries should be recycled according to related regulations of the State to protect environment. 7.4 Troubleshooting Symptoms No response when power button is pressed. The video camera suddenly stops during operation after operating for some time. The video camera suddenly stops during operation after having not operated for some time. The battery is used up very soon Possible Causes z The battery has low voltage. z The AC adapter does not supply the voltage normally. z The battery has low voltage. z No battery is inside the video camera or AC adapter is powered off. z It has been in standby state for a long period and automatically switches off. Solutions z Replace it with a new one. z It is not fully recharged z Correctly recharge battery to full capacity z Replace it z It is aged. The video camera gives an error message after SD card is inserted. Flash does not work. z The card formatted z Bad contact is not z The battery has low voltage z It is set to flash off mode. z Check if AC adapter and supply socket are normal. z Replace or recharge the battery z Check if AC adapter works normally. z Restart the video camera. z Disable automatic switchoff. the z Format it z Clean card contact and reinsert it. z Correctly recharge battery to full capacity z Change Flash mode the 31 Sound recording time not z The lens is dirty z Digital Video Camera shakes during capture There are speckles on images or pictures. z Insufficient illumination. z Strong electromagnetic interference around the camera. z Sound effect is OFF. Pictures clear. are No beep tones. z Clean the lens according to above-mentioned requirements. z Take correct posture. z Increase illumination or use the flash. z Keep it far away from interference source. z Turn on touch tone on the menu bar z The SD card is damaged. z Memory is full. z The SD is write protected. z Wrong SD card format. z They are locked. z Replace it. Photo is very bright or dark z Viewing center is too bright or dark. Color deviation. z Improper exposure compensation. z White balance is inconsistent with actual illumination. z Move the bright or dark object away from viewing center. z Adjust exposure compensation setting z Select proper white balance or use automatic white balance. No pictures are saved after shutter key is pressed. Pictures or videos cannot be deleted. Removable disk is not available No PC function 32 camera z The operating system running on the PC is the version prior to Win 2000 and no correct driver is installed. z It is in PC camera mode. z PC camera driver is not installed in the PC. z It is in Removable mass storage mode. z Remove some files on it. z Disable write protect z Format the card. z Unlock them deleting. before z Install the driver correctly. z Set to removable mass storage mode. z Install the driver correctly. z Set the video camera to PC camera mode.


![[ENG] CE60-3 GSM Software ComCE v4-2](http://vs1.manualzilla.com/store/data/005829621_1-1503a18c5b086c34f94e34b38a52b968-150x150.png)