1
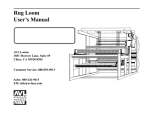
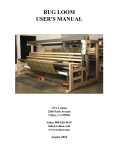
WORKSHOP DOBBY LOOM
User's Manual
AVL Looms
3851 Morrow Lane, Suite 9
Chico, CA 95928-8305 U.S.A.
530 893-4915
530 893-1372 (fax #)
[email protected] (e-mail)
www.avlusa.com
Copyright © 2001
All Rights Reserved Worldwide
WORKSHOP DOBBY LOOM
Table of Contents
Assembly
1
I. Parts
II. Tools You Will Need
III. Set Up
1
1
2
A. The X-Frame
B. Interchangeable Design Unit (IDU)
Hanging the Harnesses
C. Beater
D. Treadles
E. Beams
F. Apron
G. AVL Compu-Dobby III
H. Connecting your Compu-Dobby III to your Computer
2
4
4
5
6
7
8
9
9
IV. Drivers
9
Using the Workshop Dobby Loom
9
Traveling with your WDL
10
I. With a Warp On
II. Without a Warp
10
12
Page 1
WORKSHOP DOBBY LOOM
Please watch the enclosed Workshop Dobby Loom
Assembly and Use videos before you begin assembly.
Assembly:
I. Parts:
(1) Interchangeable Design Unit (IDU): harness pulley support, harnesses, and dobby
(1) Bag of Hardware
(2) Leg Sets with Attached Beater Legs; right and left sets
(2) Center Brace
(1) Cross Brace
(1) Reed Assembly
(2) Treadles with (1) Treadle Rod
(1) Cloth Beam with Ratchet
(1) Warp Beam with Brake Drum
(1) Tension Tie-Up Assembly
(1) Beam Handle
(1) Apron
(1) Compu-Dobby III with RS-232 Cable
II. Tools You Will Need:
Allen Wrench
Hammer (optional)
Page 1
WORKSHOP DOBBY LOOM
III. Set Up:
A. The X-Frame
Page 2
1.)
Left Side: Take the left set of legs (A and B) and fit them
together. The side of the legs with the white plastic bracket is
the inside. Take a bolt and slide it from the outside through
the center hole at the crossing of the legs. Slide one of the
Center Brace blocks onto the bolt. Then put a washer and a
wing nut onto the bolt and tighten. Repeat this process for
the remaining four holes and bolts that secure the Center
Brace to the legs.
2.)
Right Side: Repeat Step #1 for the right set of legs (C and D).
WORKSHOP DOBBY LOOM
3.)
Cross Brace: The Cross Brace goes between the bottom back
part of the sides. The Beater Legs that are already installed
go to the front of the loom The Center Braces go toward the
inside of the loom. Hold the Cross Brace against the inside
right side where the hole is drilled. Insert a black thumb screw
(long) from the outside of the leg and tighten in through the
leg and into the Cross Brace. Repeat this for the left side and
other end of brace.
Page 3
WORKSHOP DOBBY LOOM
B. Interchangeable
Design Unit (IDU)
The IDU is easy to position. Simply lift it in between the frame sides
and set it down onto the Center Braces. There are four bolts with
washers and wing nuts that secure the IDU to the frame sides. Insert
the bolt from the lower inside of the IDU out through the frame side.
Put a washer and wing nut over the bolt and tighten in so that the
square part of the bolt head sinks into the hole.
NOTE: A light tap with a hammer on the end of the bolt will help seat
the bolt.
Repeat this process for the remaining three bolts.
Hanging the Harnesses
in the IDU
Make sure that the harness cables are fed through the proper pulleys.
Cable ends should be hanging freely over the pulleys and down inside
the IDU box.
Find the bag of springs, the heddles, and the harness sticks.
Lay one stick so flat that the eye screws are to the top. Lay a second
harness stick flat so that the eye screws are going down. Slide the
top harness stick through the loop at one end of the 25 heddles, then
slide the bottom harness stick through the opposite loop of the 25
heddles.
Holding the top stick of the harness, lift the harness with the heddles
over to the IDU box. Hook the first left harness cable to the eye hook
on the left side of the harness stick and the first right harness cable
to the right eye hook. Let the harness hang in the IDU box.
Now, take one of the springs and attach the eye hook on the bottom
harness stick. Attach a second spring to the other eye hook on the
bottom harness stick. Hook each of the springs to the first eye hooks
directly below each spring on the bottom of the IDU box.
Repeat this process for each of the harnesses, working your way from
the front to the back of the IDU box.
Page 4
WORKSHOP DOBBY LOOM
C. Beater
1.)
The beater legs have already been attached to the frame legs
for you.
Page 5
WORKSHOP DOBBY LOOM
2.)
D. Treadles
Page 6
Place the Reed Assembly in-between the top of the beater legs.
Notice there are two openings on each of the metal side
brackets of the Reed Assembly. Line the bottom opening up
against the beater legs so that the holes on the beater legs
can be seen.
a.)
Right Leg: Slide a 1 1/2" bolt from the inside of the
metal bracket on the Reed Assembly through the top
hole of the beater leg. Then slide a washer and wing nut
onto the bolt and tighten. Slide another 1 1/2" bolt
from the inside of the metal bracket on the Reed
Assembly through the bottom hole of the beater leg.
b.)
Left Leg: Repeat step #2a for the left side.
1.)
The metal treadle rod has two stop collars already attached.
Slide one treadle onto one end of the rod and the other onto
the other end. Slide a stop collar onto each end of the rod and
position them next to the treadles. Tighten the stop collar
into place using an Allen Wrench.
2.)
From the front, place the treadles under the loom. The long
treadle goes on the left, the short treadle on the right. Slide
the left end of the rod into the hole on the lower front left
frame leg; slide the right end of the rod into the hole on the
lower front right frame leg. Then slide a stop collar onto each
end of the rod and tighten.
WORKSHOP DOBBY LOOM
E. Beams
3.)
Unclip the cables from under the IDU. Clip the left hanging
cable from IDU to the left treadle cable and the right hanging
cable from IDU to the right treadle cable. These cables connect the treadles to the dobby arm. Treadle movement signals
the Compu-Dobby III to move to the next pick.
1.)
The Cloth Beam with Ratchet goes to the front of the loom.
Slide the right beam end with the plastic ratchet into the hole
on the front frame leg and then slide the other end of the
beam into the white plastic bracket on the other leg. Insert
the retainer pin.
2.)
The Warp Beam goes to the back of the loom. Slide the beam
end with the brake drum into the hole on the back frame leg
and then slide the other end of the beam into the white plastic
bracket on the other leg. Insert the retainer pin. Turn the
beam so that the Velcro is on top. Attach the apron to the
Velcro so that the apron hangs to the inside of the loom. Roll
the apron onto the beam by rotating the beam toward the
back of the loom.
3.)
Screw the eyebolt on the tie-up into the hole on the inside of
the lower back leg (on the side with the warp beam break
drum). Extending from the spring is a long cord with a clip on
its end. Bring the cord to the top of the brake drum and
around the drum once. Clip the clip end of the cord to the
eyebolt that you screwed in on the frame leg.
Page 7
WORKSHOP DOBBY LOOM
4.)
F. Apron
Page 8
The Beam Handle will be used on both the Cloth Beam and the
Warp Beam. Simply slide it over either beam axle end that
extends outside the frame. The handle position is adjustable
by disengaging the handle’s secure pin from the beam axle and
turning the handle so that the pin aligns with a different hole
on the axle.
Hang the apron, loops down and velcro towards the back, between the
back frame legs. Velcro the apron to the warp beam. Wind the warp
beam toward the back of the loom so that the apron rolls onto the
warp beam. Insert the apron rod through the apron loops.
WORKSHOP DOBBY LOOM
G. AVL Compu-Dobby III
The Compu-Dobby III box slides onto the right outside of the IDU.
There are two holes on each side of the box that will line up with the
two holes on either side of the IDU. Insert the black thumbscrews into
the holes to secure the Compu-Dobby III to the IDU. The wood piece
that travels with the Compu-Dobby III will be screwed onto the top of
the cable over the harness cables.
H. Connecting your
Compu-Dobby III to your
Computer
1.)
The Compu-Dobby III has a black cord attached to the box. It
is best to plug this into a surge protector, but you can plug it
directly into the wall.
2.)
The RS-232 cable is plugged into the front of the CompuDobby III box and the other end is plugged into your computer.
IV. Drivers
AVL’s WeavePoint and WeaveMaker Mi software.
Using the Workshop
Dobby Loom:
When you warp your loom front to back, turn the crossbeam so that
you can rest your legs more comfortable inside the loom.
The WDL has a reverse dobby, which means that the weaving software
will tell the computer to lift the harnesses that are not selected.
What this means for you is that if you are designing an unbalanced
weave, we recommend that you reverse the lift plan.
Page 9
WORKSHOP DOBBY LOOM
Traveling with your WDL:
I. With a Warp On
Page 10
A.)
Remove the bolts securing the Reed Assembly to the Beater
Legs. You may need to slide the reed to the right or left to
remove the bolts. Holding the Reed Assembly, hang it from the
open screweyes inside the IDU. Make sure the Reed Assembly
is hanging vertically.
B.)
Remove the handle from the Cloth Beam. Disengage the
ratchet. Remove the Cloth Beam and place it on top of the
IDU in the first beam rest.
WORKSHOP DOBBY LOOM
C.)
Unhook the Tension Tie-Up from the screweye on the back right
leg. Remove the Warp Beam and place it on top of the IDU in
the second beam rest.
D.)
To hold the beams in place, place the Travel Straps so that its
handle rests between the two beams. This will put the Travel
Straps in a position so that each side of the straps can be
wrapped down and under the Harness Pulley Support. Secure
each of the straps in their corresponding buckles.
E.)
(continue with next instructions)
Page 11
WORKSHOP DOBBY LOOM
II. Without a Warp
A.)
Remove the Compu-Dobby III. Set it aside.
B.)
Unscrew and remove the bolts that hold the IDU to the WDL
frame. Lift the IDU out from the WDL frame and set it on the
floor. It is now ready to roll.
C.)
The WDL’s X-Frame can be completely disassembled and repacked into the box it was shipped in.
NOTE: If you plan on traveling extensively with your WDL, please
contact AVL for information on custom travel cases.
Page 12