1
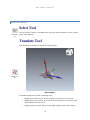
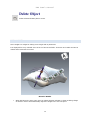
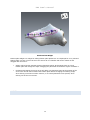
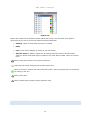
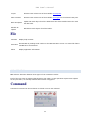
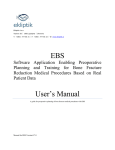
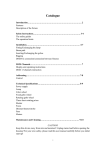
EKLIPTIK
EBS User’s Manual
A guide for preoperative planning of bone fracture medical procedures with EBS
Manual for EBS Version 0.5.0
EBS User’s Manual
CONTENTS
User Manual ..................................................................................................................................................................3
Terminology ...................................................................................................................................................................4
User Interface ................................................................................................................................................................5
Toolbar ......................................................................................................................................................................5
View Toolbox.........................................................................................................................................................6
Segmentation Toolbox ..........................................................................................................................................7
Labels Toolbox ......................................................................................................................................................8
Reduction Toolbox ..............................................................................................................................................10
Screw Widget ..........................................................................................................................................................13
Fixation Plate Widget ..............................................................................................................................................14
Objects ....................................................................................................................................................................15
Selection Properties ................................................................................................................................................16
View Area ................................................................................................................................................................17
View Types ..............................................................................................................................................................18
Main Menu ..............................................................................................................................................................20
User Interaction.......................................................................................................................................................22
Options Dialog .........................................................................................................................................................24
Tasks ............................................................................................................................................................................25
Segmentation ..........................................................................................................................................................25
Importing Examination .......................................................................................................................................25
Filtering Dataset ..................................................................................................................................................25
Region Of Interest (ROI) ......................................................................................................................................26
Segmentation ......................................................................................................................................................26
Further Processing ..............................................................................................................................................26
Reduction ................................................................................................................................................................26
Analysis ....................................................................................................................................................................26
2
EBS User’s Manual
USER MANUAL
Welcome to the EBS user's manual. EBS is a software application for preoperative planning of bone
fracture medical procedures based on a real patient data.
This manual is a guide through the concepts and building blocks of the application. It also serves as a
reference for a standard application procedures.
EBS operates on a real patient data. CT examination in form of DICOM files is accepted as an input.
3D mesh models are build from the examination in segmentation process. While the segmentation is
largely automated it still requires some user input. The 3D mesh models of bone fragments can be
viewed in any arbitrary 3D projection as well as manipulated as to simulate reduction. Fixation plates
and screws can be inserted into the model.
Get acquainted with Terminology, User Interface and start using EBS.
3
EBS User’s Manual
TERMINOLOGY
Dataset Medical examination comprising of a stack of slices.
Label
Set of voxels in dataset. Labels are used to represent elements of interest e.g. bone
fragment. Label shape can be visualized in 3D.
Slice
Two dimensional image containing crossection trough the body.
Voxel
A single pixel, cell in the slice grid.
4
EBS User’s Manual
USER INTERFACE
EBS main window comprises of a toolbar on the left hand side, a document view area on the right
hand side and the main menu at the top of the window.
Document viewing and editing is done by executing commands, using the tools and manipulating
widgets. User Interaction describes the distinction between those in detail.
Global options can be set using Options Dialog.
TOOLBAR
Toolbar on the left hand side
The toolbar contains tools and commands for viewing and editing of the document. The top part of the
toolbox contains tools and commands for view manipulation - View Toolbox including a panel with
properties for the currently active view. Below the panel is a task selector which shows additional tools
and commands based on task selected:
•
•
Segmentation :
o
Segmentation Toolbox
o
Labels Toolbox
Reduction :
o
Reduction Toolbox
5
EBS User’s Manual
•
Analysis .
At any time Object List or Selection attributes might be displaying as well.
VIEW TOOLBOX
Slice Tool
Shortcut:
Z
Click and/or drag mouse in a view to change the slice position. In slice and 3D view
mouse click or drag will display slice at the position pointed by mouse.
This tool can be also temporarily activated by clicking on the middle mouse button.
View Pan Tool
Shortcut:
X
Click and drag to pan the view.
This tool can be temporarily activated by holding Alt + middle mouse button.
View Zoom Tool
Shortcut:
C
Click and drag to zoom the view.
This tool can be temporarily activated by holding Alt + left and middle mouse button.
View Rotate Tool
Click and drag to rotate the 3D view. In dataset view this tool changes view projection.
Shortcut:
V
Viewpoint widget
Viewpoint widget can also be used to to change the viewpoint: click on surface to rotate
the viewpoint to one of the predefined view orientations or drag to rotate freely.
This tool can be temporarily activated by holding Alt + left mouse button.
6
EBS User’s Manual
View Reset
Click to reset the selected view to default.
SEGMENTATION TOOLBOX
Region Of Interest Tool
Define region of interest (ROI) - a volume which is used in further processing. ROI can be
defined by manually by entering coordinates in tool panel or by dragging a mouse in dataset
view. Drawing region in dataset view will modify only two dimensions of ROI, dimensions
which are displayed in the view with the third one - depth - left unmodified. To draw all
three dimensions bounding box has to be drawn in two dataset views displaying different
orientation. Region is indicated by red rectangle.
Filter
Filter the dataset with low-pass filter. Dialog box offering filters is shown. There are 3
distinct smoothing filters available:
•
Recursive Gaussian - this filter is using ITK RecursiveGaussianImageFilter filter to
process the dataset.
•
Gradient Anisotropic Diffusion - this filter is using ITK
GradientAnisotropicDiffusionImageFilter to process the dataset.
•
Curvature Anisotropic Diffusion - this filter is using ITK
CurvatureAnisotropicDiffusionImageFilter to process the dataset.
Segmentation Tool
Segmentation tool creates initial label from the dataset based on voxel values. The tool sets
a threshold value for the threshold filter. The threshold edge is drawn on the slice.
Segmentation will be executed with a click on Apply button in the tool panel. Based on
selected options some of the following filters might be executed on the label as a post
processing step:
•
Opening - ITK BinaryMorphologicalOpeningImageFilter
7
EBS User’s Manual
•
Opening by reconstruction - ITK OpeningByReconstructionImageFilter
•
Hole filling - ITK VotingBinaryIterativeHoleFillingImageFilter followed by
GrayscaleFillholeImageFilter It is recomended to Select at least one opening filter as
this will remove small isolated fragments which are usually artifacts of thresholding.
Clear all existing labels will remove labels that are already there before the filter
is run.
Segmentation Wizard
Wizard opens a new tool panel and guides a user trough steps of segmentation process as
described in Segmentation task.
LABELS TOOLBOX
Labels are parts of whole volume which are of interest.
For the most part labels can be interpreted as bone fragments. EBS offers tools to create and
manipulate labels. Initial label is usually created with Segmentation Tool.
Select Tool
Click on label in Dataset or 3D view to select it. Hold Shift while clicking to add to selection
or Ctrl to remove object from selection. This tool can be used to select other types of
Shortcut: objects as well. An alternative way to select objects is by clicking in the items in Objects
Q
box in the toolbox.
New Label
Create new, empty label.
Merge Labels
Merge selected labels into a new label.
8
EBS User’s Manual
Delete Label
Delete selected labels.
Paint Tool
Manually paint selected label. Painting is done in Dataset view. The tool shows options box
with following settings:
•
Paint over defines which objects to paint over.
•
Clear label when set painting will clear the label.
•
Size defines size of paintbrush in voxels.
•
3D when selected the painting is done in multiple slices at once.
•
Isotropic takes voxel physical size in each direction into account when size is
defined.
•
Round or Square defines a brush shape.
Fill Hole Tool
Click on hole to fill it. The tool works only on a single slice. The tool will not perform when
hole is not closed.
Separate
Move spatially un-connected volumes in selected label into separate labels.
Split Tool
Split label into multiple labels based on seed points. Based on dataset labels grow from
seed points. The seed points can be defined in dataset or 3D view. When seed point is
clicked in 3D view it may move away from clicked point. This is to assure the optimal
placement. Verify that seed point is still inside object to be separated. Split Tool uses ROI.
Cut Tool
Cut label by drawing a cutting plane. One or more cutting planes can be defined by clicking
on the 3D view. Object separated will lay in one of the partitions of the cutting planes.
9
EBS User’s Manual
REDUCTION TOOLBOX
Select Tool
Shortcut:
Q
Click on object to select it. Hold Shift while clicking to add to selection or Ctrl to remove
object from selection.
Translate Tool
Click and drag on handles to translate a selected object.
Shortcut:
W
Move Widget
Translation widget can be used in following ways:
•
Dragging one of the arrows will move object in the direction of the arrow.
•
Dragging cube in the center will move the selected object to the surface of the
object below the mouse cursor.
•
Dragging near the center will move the object parallel to the screen surface.
10
EBS User’s Manual
Pivot Tool
Click and drag on handles to change center of rotation.
Shortcut:
E
Pivot Widget
Pivot widget can be used in following ways:
•
Dragging one of the lines will move object in the direction of the line.
•
Dragging cube in the center will move the pivot to the surface of the object below
the mouse cursor.
•
Dragging near the center will move the pivot parallel to the screen surface.
Rotate Tool
Shortcut:
R
Click and drag the handles to rotate selected object.
11
EBS User’s Manual
Rotation Widget
Rotate widget can be used in following ways:
•
Dragging one of the circles will rotate object in the axis of that circle.
•
Dragging the outermost circle will rotate the object in the axis perpendicular to
the screen.
•
Dragging near the center of the widget will rotate object freely.
Reset
Reset Transformation.
Add Screw Tool
Click on scene to add a new screw. Once screw is created Screw Widget can be used to
edit its placement.
Add Fixation Plate Tool
Click on scene to add a new fixation plate. Once fixation plate is created Fixation Plate
Widget can be used to edit its placement.
12
EBS User’s Manual
Delete Object
Delete selected fixation plate or screw.
SCREW WIDGET
Screw widget is a widget for editing screw length and its placement.
It is displayed for every selected screw in form of arrows and balls. Those act as a handle and can be
clicked and moved with the mouse:
Direction Handle
•
When ball above the entry point arrow is clicked direction indicator is shown enabling change
of direction. Screw will automatically adjust the length to the new exit point.
13
EBS User’s Manual
Screw widget
•
When screw exit point arrow is dragged screw exit point is changed.
•
When screw entry point arrow is dragged entry position is changed and either:
•
o
direction is changed so that exit point remains the same (when exit point has been
previously manipulated)
o
direction is perpendicular to the normal at new entry point (when screw direction has
been previously manipulated)
Holes in all fixation plates elements contain placement handle. When clicked screw will be
placed in fixation plate hole.
FIXATION PLATE WIDGET
14
EBS User’s Manual
Fixation Plate Widget
Fixation plate widget is a widget for editing fixation plate placement. It is displayed for every selected
fixation plate in a form of set of arrows. The arrows act as a handles and can be clicked on and
dragged with the mouse:
•
Indigo colored arrows annotate existing placement points. By dragging them on a bone
fixation plate will change the shape. Dragging the placement arrow off the object will delete it.
•
Clicking and dragging the green arrow will add a new placement point at the position of the
arrow. This can be used to extend the fixation plate without changing the existing shape,
when clicking on arrows on either extreme, or to control placement more precise, when
clicking one of the inner arrows.
OBJECTS
15
EBS User’s Manual
Objects list
Objects box contains list of all labels, fixation plates and screws in the document. Each object is
represented by one row in the list and contains following information:
•
Visibility. Object is visible when check box is checked.
•
Name
•
Color. Color can be changed by clicking on the color button.
•
3D mesh status for labels or object icon for fixation plates and screws. 3D mesh status
shows the status of 3D mesh object in relation to the voxel data of a label. There are 4 status
icons:
Mesh is build and it reflects current state of the label.
Label does not contain enough voxels to build mesh from it.
Mesh is not build or contains old state of the label. Build is required. Buld process can be started
by clicking on the icon.
Mesh is being built.
Mesh is already build, building collision detection mesh.
SELECTION PROPERTIES
16
EBS User’s Manual
Properties for selected Screw
Selection contains properties of selected object or objects. Some of the properties can be modified by
typing in new value.
VIEW AREA
View area contains panes with views onto the document. Based on selected layout there is one or up
to four panes displayed at the same time. View layout can be modified by selecting desired item from
the View|Layout menu. Press spacebar in one of the panes to toggle between single pane layout and
multiple view layout.
Single Pane Layout
17
EBS User’s Manual
Four Panes Split Bottom
Four Panes
VIEW TYPES
View displays visualization of document.
Based on view type visualization focus on different aspects of the data. View type of selected pane can
18
EBS User’s Manual
be modifed by clicking on one of the options in Views|Pane Contents. Alternativelly view type icon can
be clicked inside any view. The view type icons are located on the top left hand side corner of every
view.
View type icons
Dataset View
Dataset view displays an orthogonal cross-section trough the dataset. Three orientations are possible.
This view type can be used for Segmentation.
3D View
3D view displays segmented objects as 3D meshes. This is primary view for Reduction.
X-Ray View
19
EBS User’s Manual
X-Ray view displays X-Ray simulation based on 3D mesh objects. X Ray simulation does not give
physically accurate image as it is based on following assumptions:
•
All objects are of homogeneous material. Attenuation depends only on thickness.
•
Visualization is based on 3D mesh objects. It does not include data that is present in the
original dataset, but has not been captured by segmentation. Cracks than have not been
captured in the process of segmentation will not be visible.
Cutaway View
Cutaway view display section trough the 3D model following the screw axis.
A screw has to be selected for this view to work.
CAD View
CAD view shows fixation plate from different sides in orthographic projection. This view can be used as
a reference for bending the plate.
A fixation plate has to be selected for this view to work.
Lock Display Scale to 1:1
By selecting this option fixation plate is displayed on screen in real size.
Operating system does not provide accurate information on display device physical size. To get scaling
to work correctly display has to be calibrated. Calibration is done in options:
Edit|Options|Display|Calibration by entering pixel vertical and horizontal size. In case this information
is not available physical display device width or resolution can be specified to calculate the pixels size.
MAIN MENU
20
EBS User’s Manual
File
New
Create a new document. Dialog will be displayed to select dataset files location.
Open
Load existing EBS document. EBS documents have .ebs extension.
Save
Save document under existing name.
Save
Save document under a different name.
Export
Export 3D mesh objects into COLLADA file. All visible screws, fixation plates and
labels with 3D mesh representation are exported. The unit of exported scene is
millimeter.
DICOM Files|Show
Info
Show status of dataset file with source location of dataset files.
DICOM Files|Set
Dataset Path
Set location of the dataset files. Available only in cases when the dataset path
specified in document is invalid.
DICOM Files|Copy
Dataset Files
Copy dataset files referenced in the document to arbitrary folder.
DICOM Files|Move
Dataset Files
Move dataset files referenced in the document to arbitrary folder.
Show Metadata
Display DICOM metadata defined in currently loaded dataset. DICOM metadata
contain information about the patient and examination details.
Exit
Exit the application.
File
Undo
Undo command.
Redo
Redo undone command.
Clear Undo
Buffer
This command will release memory used by undo steps. It will also revert filtered
dataset to initial state. This command can not be undone.
Due to large size of data EBS might sometime not be able to perform operation for the
lack of memory. To release unused memory use Clear Undo Buffer and try to execute
operation again.
Options
Display options dialog.
File
21
EBS User’s Manual
Layout
Submenu item selects one of the available view layouts.
Pane Contents
Submenu item selects one of the available view types for the selected view pane.
Build 3D objects
Update 3D mesh object for all the labels that have been modified since the mesh
was last build.
Rebuild 3D
objects
Rebuild 3D mesh objects for all the labels.
File
Contents
Display help contents.
Activation
Activate EBS by sending serial number to the EBS activation service. To access full feature
set EBS has to be activated.
About
Display application information.
USER INTERACTION
EBS makes a distinction between three types of user interaction modes.
In all of the tree cases is expected that objects to act uppon, in case operation expects some objects
as an input that is, are already selected before action is triggered.
Command
Command is executed as soon as button is clicked or menu item selected.
22
EBS User’s Manual
Command button for view-point reset.
Tool
Tool is state of the input and operations are executed only when mouse is clicked or dragged in one of
the views. Each tool supports only certain view types. Tool buttons are denoted by triangle icon in
bottom right hand corner. Only one tool can be active at any time.
Tool button for view panning; note the triangle.
Widget
Widget is a visual element that is drawn inside view and can be manipulated by clicking or dragging on
its handle. As a general rule when both tool is active and widget is present widget has a priority i.e.
when mouse is clicked on the widget handle widget will accept the action.
Translate object and viewpoint orientation widgets inside 3D view.
23
EBS User’s Manual
OPTIONS DIALOG
Use options dialog to set application preferences.
24
EBS User’s Manual
TASKS
EBS workflow comprises of following steps:
•
Importing examination and creation of 3D mesh model: Segmentation
•
Reduction and fixation using 3D mesh model: Reduction
•
Analysis of the model: Analysis
SEGMENTATION
Segmentation is a process of building 3D mesh model from examination in form of volumetric image stack of image slices. Steps of segmentation are outlined below.
IMPORTING EXAMINATION
A first step is to import examination data stored in DICOM format. Examination is loaded by selecting
File|New... menu and pointing to folder with examination. With option "Include Sub-Folders" all subfolders of selected folder will be scanned for images. In case there is more than one dataset found in
specified folder selection dialog box will appear prompting to select one of the available datasets.
Once dataset is loaded it can be viewed in dataset views.
DICOM metadata such as more detailed patient info and scanning parameters are available trough the
menu File|Show Metadata....
Menu File|DICOM Files|Show Info... displays short info about the state of dataset and where the
images were loaded from. This might be useful moving .ebs documents to a different location.
Location of DICOM files is stored in .ebs document as a relative path reference. When document is
saved to different device or media user must take care that DICOM files which document references
are moved too. To modify the path to DICOM files File|DICOM Files|Set Dataset Path... can be used.
There are two utility commands to copy or move referenced DICOM files to user specified folder under
FIle|DICOM Files.
FILTERING DATASET
Based on scanning protocol used, data might contain too much noise to proceed with segmentation.
By filtering dataset high frequency noise is removed. More the data is smoothed, easier will it will be
to process further, but possibly important details might be lost.
Filter dialog is shown by clicking the Filter Dataset button. There are three smoothing filters available:
•
Recursive Gaussian
25
EBS User’s Manual
•
Gradient Anisotropic Diffusion
•
Curvature Anisotropic Diffusion
Please consult ITK documentation about filter details.
REGION OF INTEREST (ROI)
Processing time increases with dataset size. In case only part of dataset contains structures of interest
it is possible to ignore irrelevant parts by defining sub region of the dataset where on which filtering is
performed - ROI. ROI is used in Segmentation and some other filters.
SEGMENTATION
Segmentation tags parts of dataset image which contain tissue of interest. Bone extraction is done
with value thresholding followed by optional post processing. Segmentation tool is activated with
Segment Tool button.
With segmentation parts of dataset are selected which contain image. Simple thresholding is used to
define areas. There are also three options for object post processing.
FURTHER PROCESSING
Before reconstruction can start bone fragments have to be separated so they can be manipulated
independently. Full set of functions available for that purpose is in Segmentation Toolbox.
REDUCTION
Reduction is done by moving the bone fragments and adding implants in form of fixation plates and
screws.
The tools for reduction are available in Reduction Toolbox .
ANALYSIS
Analysis is not available yet.
26