1
the possibilities
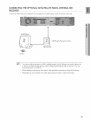
Thank you for purchasing this Samsung proou st
To rece ve more comulete serwce,
olease register your product at
www.samsung.com/globaliregister
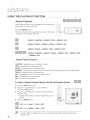
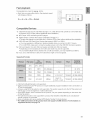
Multi-Disc Playback & FM Tuner
The HT-Z510/HT-TZ512 combines the convenience of multPdiec playback capability, including DVD-AU%O, DVDVIDEO, CD, MP3-CD, WMA-CD, %vX,CD-R/RW, and DVD±R/RW,with a sophisticated FM tuner, all in a single player.
DVD-Audio compatible
Experiencethe super high-qualityaudiopellormanceof DVD-Audio.Theon-board 24-bit/192kHzDAC enablesthis playerto
deliverexceptionalsound quality interms of dynamicrange,Iowqevelresolutionand high-frequencydetail.
USB Host support
You can enjoy media files such as pictures, movies and music saved on an MP3 pbyer, digital camera or USB
memory stick by connecting the storage device to the USB port of the Home Theater.
Dolby Pro Logic II
Doby Pro Logic IIis a form of multPchannelaudio signaldecoding technology that improves upon existing Ddby Pro
Logic.
DTS (Digital Theater Systems)
DTS is an audio compression format developed by Digital Theater Systems Inc. It delivers fulPfrequency 5.1 channel
sound.
TV Screen Saver Function
If the main unit remains in Stop mode for 3 minutes, the Samsung logo appears on the TV screen.
The HT-Z510/HT-TZ512 will automatically switch to the Power Saving mode after 20 minutes inthe Screen Saver
mode.
Power Saving Function
The HT-Z510/HT-TZ512will automaticallyshut off after 20 minutesin Stop mode.
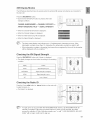
Customized TV Screen Display
The HT-Z510/HT-TZ512 allows you to select your favorite image during JPEG or DVD playback and set it as your
background wallpaper.
Anynet+ (HDMI-CEC) Function
Anynet+ is a function that can be used to operate the main unit using a SamsungTV remote control, by connecting the
HomeTheater to a SAMSUNGTVusing an HDMI Cable. (Thisis only availablewith SAMSUNGTV's that support
Anynet+.)
iPod support
Youcan enjoy music filesby your connecting iPod to the home theater with the supplied iPod dock.
Wireless receiver amplifier
Samsung's rear- channelwireless module does awaywith cables running betweenyour DVD receiverand
rear- channel speakers,instead, the rearspeakers connect to a compact wireless modub that communicateswith your
DVD receiver.
Optional XM radio
Youcan connect an optional XM Radio Recieverand Antenna for playback through this Home theater.
AV SYNC Function
Video may lag behind the audio if the unit is connected to a digital TV.
To compensatefor this,you can adjustthe audio delay time to sync up with the video.
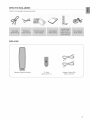
WHAT'S
INCLUDED
Check for the supplied accessories below.
SWA-4000
Wireless Receiver Module
TX Card
(AH81-04177J)
Speaker Cable (2EA)
(AH81-02137A)
3
J
SAFETY WARNINGS
TOREDUCE
THERISKOFELECTRIC
SHOCK,
DONOTREMOVE
THECOVER(OR
BACK)NOUSERSERVICBABLE
PARTS
AREINSIDE
REFER
SERVICING
TOQUALIFIED
SERVICE
PERSONNEL,
RISK
OFELECTRIC
SHOCK
DONOTOPEN
The lighting flash and Arrowhead within
Tdangle Is a warning sign alerting you of
dangerous voltage inside the product
CAUTION: TO REDUCE THE RISK OF
ELECTRIC SHOCK, DO NOT REMOVE
COVER (OR BACK) NO USER SERVICEABLE
PARTS INSIDE. REFER SERVICING TO
QULAIFIED SERVICE PERSONNEL.
The explanation point wkhin the triangle is a
warning sign alerting you of important
instructions accompanying the product.
CLASS 1 LASER PRODUCT
KLASSE 1 LASER PRODUKT
LUOKAN 1 LASER LAITE
KLASS 1 LASER APPARAT
CLASS 1 LASER PRODUCT
PRODUCTO LASER CLASE 1
1
This Compact Disc player is classified as a CLASS 1 LASER product.
Use of controls, adjustments or pedormance of procedures other than
those specified herein may result in hazardous radiation exposure.
CAUTION : INVISIBLE
LASER
RADIATION
WHENOPEN
ANDINTERLOCKS
DEFEATED,
AVOID
EXPOSURE
TOBEAM.
WARNING
. To reduce the risk ot fire or electric shock, do not expose this appliance to rain or moisture.
To prevent injury, this apparatus must be securely attached to the floor/wall in accordance with the installation instructions.
. If this power supply is used at 240V ac, a sukable plug adapter should be used.
CAUTION
. Apparatus shall not be expeeed to dripping or splashing and no objects filled with liquids, such as vases, shall be placed on the apparatus.
. The Mains plug is used as a disconnect device and shall stay readily operable at any time.
This product ,satisfiesFCC regulations when shielded cables and connectors are used to connect the unit to other equipment. To prevent
electromagnetic interference with electric appliances, such as radios and televisions, use shielded cables and connectors for connections.
FCC NOTE (for U.S.A):
This equipment has been tested and tound to comply wkh the limits for a Class B digital device, pursuant to Part 15 ot the FCC Rules. These limits
are deeigned to provide reasonable protection against harmful interterence in a residential installation.
This equipment generates, uses and can radiate radio frequency energy and, if not installed and ueed in accordance with the instructions, may cause
harmful interterence to radio communications. However, there is no guarantee that interference will not occur in a particular installation.
If this equipment does cauee harmtul interference to radio or television reception, which can be determined by turning the equipment off and on, the
user is encouraged to try to correct the ir_terference by one or more d the tollowing measures:
. Reorient or relocate the receiving antenna.
Increase the separation between the equipment and receiver.
Connect the equipment into an outlet on a circuk different trom that to which the receiver is connected.
. Consult the dealer or an experienced radio/TV technician for help.
Caution : FCC regulations state that any unauthorized changes or modifications to this equipment may void the user's authorky to operate it.
important Safety instructions
Read these operating instructiees carefully before using the unit. Follow all the safety instructions listed below. Keep these operating ieetructions
handy for future reference.
1) Read theee instructions.
2) Keep these Instructions.
3) Heed all warnings.
4) Follow all instructions.
5) Do not uee this apparatus near water.
6) Clean only with dry cloth.
7) Do not block any ventilation openings. Install in accordance with the
manufacturer's instructions.
8) Do not install near any heat ,sources such as radiators, heat
registers, stoves, or other apparatus (including amplifiers) that
produce heat.
9) Do not defeat the safety purpoee of the polarized or grounding type
plug. A polarized plug has tv_,oblades with one wider than the other.
A grounding type plug has two blades and a third grounding prong.
The wide blade or the third prong are provided for your safety, if the
provided plug does not fit into your outlet, consult an electrician for
replacement of the obsolete outlet.
4
10) Protect the power cord from being walked ee or pinched
particularly at plugs, convenience receptacles, and the poir_twhere
they exit from the apparatus.
11) Only use attachment/accessories
specified by the manufacturer.
12) Use only with the cart, stand, tripod,
bracket, or table specified by the
manutacturer, or sold with the apparatus.
When a cart is used, use caution when
moving the cart/apparatus combination
to avoid injury from tip over.
13) Unplug this apparatus during lightning storms or when unused tor
long periods d time.
14) Refer all servicing to qualified service personnel Servicing is
required when the apparatus has been damaged in any way, such
as power supply cord or plug is damaged, liquid has been spilled
or objects have tallen into the apparatus, the apparatus has been
exposed to rain or moisture, does not operate normally, or has
been dropped.
PRECAUTIONS
{
Ensure that the AC power supply in your house complies with the identification sticker located on the back of your player. Install your
player horizontally, on a suitable base (furniture), with enough space around it for ventilation (3~4 inches). Make sure the ventilation
slots are not covered. Do not stack anything on top of the player. Do not place the player on amplifiers
may become hot. Before moving the player, ensure the disc tray is empty. This pJayer is designed for
the DVD player to the stand-by mode does not disconnect the electrical supply. In order to disconnect
power supply, remove the main plug from the wall outlet, especially when left unused for a long pedod
During thunderstorms, disconnect the AC main plug from the
wall outlet. Voltage peaks due to lightning could damage the unit.
or other equipment which
continuous use Switching off
the player completely from the
of time.
Do not expose the unit to direct sunlight or other heat sources.
This could lead to overheating and malfunction of the unit.
B_
Protect the player from moisture (i.e. vases), and excess heat
(e.g.fireplace) or equipment creating strong magnetb or electric fields
(ks.speakers...). Disconnect the power cable from the AC supply if the
player malfunctions. Your player is not intended for industrial use. Use of
this product is for personal use only.
The batteries used wrth this product contain chemicals that are harmful
to the environment.
Do not dispose d batteries in the general household trash.
Condensation may occur if your player or disc has been stored in
cold temperatures. If transporting the player during the winter,
war approximately 2 hours until the unit has reached room temperature
before using.
This product is covered by one or more of the following
5,060,220
6,389,570
6,631,110
6,744,713
6,810,201
5,457,669
6,408,408
6,658,588
6,744,972
6,862,256
5,561,649
6,466,532
6,674,697
6,765,853
6,868,054
5,705,762
6,473,736
6,674,957
6,765,853
6,894,963
5,987,417
6,477,501
6,687,455
6,771,890
6,937,552
U.S. patents:
6,043,912
6,480,829
6,697,307
6,771,891
6,222,983
6,556,520
6,707,985
6,775,465
6,272,096
6,556,521
6,721,243
6,778,755
6,377,524
6,556,522
6,721,493
6,788,629
6,377,531
6,578,163
6,728,474
6,788,630
6,385,587
6,594,208
6,741,535
6,795,637
This product is covered by the following U.S. patents:
US4,930,188
US4,930,160
5
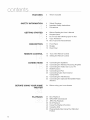
FEATURES
SAFETY
iNFORMATiON
GETTING
STARTED
DESCRIPTION
REMOTE
CONTROL
CONNECTIONS
ii
2
What's included
4
4
5
Safety Warnings
Important Safety Instructions
Precautions
8
9
Before Reading the User's Manual
Playable Discs
9
9
10
Do not use the following types of disc!
Copy Protection
Disc Type and Characteristics
11
Front Panel
12
13
Display
Rear Panel
14
Tour of the Remote Control
16
Setting the Remote Control
18
Connecting the Speakers
23
25
27
Connecting the Wireless Receiving Amplifier
Connecting the Video Out to your TV
HDMI Function
28
30
Connecting an iPod
Connecting Audio from External
Components
Connecting the FM Antenna
32
BEFORE
USING YOUR HOME
THEATER
33
Connecting the Optional XM Satellite Radio
Antenna
34
Before using your home theater
35
36
37
38
40
Disc Playback
MP3/WMA-CD playback
JPEG File Playback
DivX Playback
Using The Playback Function
49
50
Using theiPod
Playing Media Files Using The USB Host
Feature
i
PLAYBACK
SYSTEM
SETUP
RADIO
....... ....
CONVENIENT
FUNCTION
TROUBLESHOOTING
USB HOST FEATURE
SUPPORTED
PRODUCTS
52
53
54
54
55
Setting
Setting
Setting
Setting
Setting
the Language
TV Screen Type
Parental Controls (Rating Level)
the Password
The Wallpaper
55
To Select one of the 3 Wallpaper Settings
you've made
56
56
57
58
58
DVD Playback Mode
Setting the Speaker Mode
Setting the Delay Time
Setting the Test Tone
Setting the Audio
59
60
60
61
61
Setting the DRC (Dynamic Range
Compression)
Setting the AV SYNC
Setting the HDMI Audio
Sound field (DSP)/EQ Function
Dolby Pro Logic II Mode
62
62
Dolby Pro Logic II Effect
P.BASS
63
ASC (Auto Sound Calibration)
65
65
66
Listening To Radio
Presetting Stations
XM satellite radio
69
Sleep Timer Function
69
69
Adjusting Display Brightness
Mute Function
70
Troubleshooting
72
Digital Camera
72
72
USB Flash Disc
MP3 Player
73
74
76
Cautions on Handling and Storing Discs
Specifications
Warranty
Setup
J
APPENDIX
aett na started
BEFORE
READING
THE
USER'S
MANUAL
Make sure to check the following terms before reading the user manual.
Icons that will be used in manual
_
DvD
This involves a function available with DVD or DVD-R/DVD-RW discs that
have been recorded and finalized in Video Mode.
CD
This involves a function available with a data CD (CD-R or CD-RW).
MP3
This involves a function available with CD-R/-RW discs.
This involves a function available with CD-R/-RW discs.
DivX
Caution
This involves a function available with MPEG4 discs.
(DVD_+R/RW,CD-R or CD-RW)
This involves a case where a function does not operate or settings may be
cancelled.
This involvestips or instructions on the page that help each function
operate.
', In this manual, the instructions marked with "DVD ( _
)" are applicable to DVDVIDEO, DVD-AUDIO and DVD-R/-RW discs that hav6**_J15_en
recorded in Video Mode
and then finalized. Where a particular DVD type is mentioned, it is indicated
separately.
_ If a DVD-R/-RW disc has not been recorded properly in DVD Video format, it will not be
playable.
About
the use of this user's
manual
1) Be sure to be familiar with Safety Instructions before using this product. (See pages 4_5)
2) Ifaproblem occurs, check the Troubbshooting. (See pages 70-_71)
Copyright
©2008 Samsung Electronics Co.,Ltd.
All rights reserved; No part or whole of this user's manual may be reproduced or copied without the
prior written permission of Samsung Electronics Co.,Ltd.
DVD (Digital Versatile Disc) offersfantasticaudio and video,thanksto DolbyDigital
surroundsound and MPEG-2videocompressiontechnology.Now you can enjoy these
realisticeffectsin the home,as if you were ina movietheater or concerthall.
o
AUDIO/VIDEO
DVDplayersand the discsare coded by region.Theseregionalcodes mustmatch in order for the
disc to play. If the codesdo not match, the disc will not play.
The RegionNumberfor this playeris givenon the rearpanelof the player.
(YourDVDplayerwill only playDVDsthat are labeledwith identicalregioncodes.)
PLAYABLE
DISCS
Approx.240rain.(single-sided)
5 inches
Approx.480 rain.(doubGsided)
DVD-AUDIO
DVGVIDEO
o
AUDIO
+ VIDEO
AU_IOJWD_O
Approx.80 rain.(single-sided)
3 1/2 inches
Approx.160 rain.(doubGsided)
AUDI0CD
5 inches
74 min.
3 1/2 inches
20 min.
AUDIO
D_GITALAUDIO
5 inches
DivX
AUDIO
+ VIDEO
3 1/2 inches
DO NOT USE THE
FOLLOWING
TYPES
OF DISC!
,, LD, CD-G, CD-I, CD-ROM, DVD-ROM and DVD-RAM discs cannot be played on this player.
Ifsuch discs are played, a <WRONG DISC FORMAT> message appears on the TV screen.
,, DVD discs purchased abroad may not play on this player.
Ifsuch discs are played, a <CAN'T PLAYTHIS DISC PLEASE, CHECK REGIONCODE> message appears on the
TV screen.
COPY
PROTECTION
,, Many DVD discs are encoded with copy protection. Because of this, you should only connect your DVD player
directly to your TV, not to a VCR. Connecting to a VCR results in a distorted picture from copy-protected DVD
discs.
,, This product incorporates copyright protection technology that is protected by methods claims of certain U.S.
patents and other intellectual property rights owned by Macrovision Corporation and other rights owners.
Use of this copyright protection technology must be authorized by Macrovision Corporation, and is intended
for home and other limited viewing uses only unless otherwise authorized by Macrovision Corporation.
Reverse engineering or disassembly is prohibited.
cj tt ncj , t rt d
DISC
TYPE AND
CHARACTERISTICS
This product does not support Secure (DRM) Media files.
+ CD-R Discs
Some CD-R discs may not be playable depending on the disc recording device (CD-Recorder or PC) and the
condition of the disc.
Use a 650MB/74 minute CD-R disc.
Do not use CD-R discs over 700MB/80 minutes as they may not be played back.
Some CD-RW (Rewritable) media, may not be playable.
,, Only CD-Rs that are properly "closed" can be fully played. Ifthe session is closed but the disc is left open, you
may not be able to fully play the disc.
+ CD-R MP3 Discs
Only CD-R discs with MP3 files h ISO 9660 or Joliet format can be played.
MP3 file names should be 8 characters or less in length and contain no blank spaces or spedal characters
(./= +),
Use discs recorded with a compression/decompression data rate greater than 128Kbps.
Only files with the "rap3" and extensions can be played.
,, Only a consecutively written multisession disc can be played. If there is a blank segment in the Multisession
disc, the disc can be played only up to the blank segment.
,, if the disc is not closed, it will take longer to begin playback and not all of the recorded files may be played.
For files encoded in Variable Bit Rate (VBR)format, i.e. fliesencoded in both low bit rate and high bit rate
(e.g., 32Kbps - 320Kbps), the sound may skip during playback.
A maximum of 500 tracks can be played per CD.
A maximum of 300 folders can be played per CD.
+ CD-R JPEG Discs
Only files with the "jpg" extensions can be played.
,, If the disc is not closed, it will take longer to start playing and not all of the recorded flies may be played.
,, Only CD-R discs with JPEG files in ISO 9660 or Joliet format can be played.
,, JPEG file names should be 8 characters or less in length and contain no blank spaces or special characters
(./= +),
,, Only a consecutively written multisession disc can be played. If there is a blank segment in the multisession
disc, the disc can be played only up to the blank segment.
,, A maximum of 9,999 images can be stored on a single CD.
,, When playing a KodaWFuji Picture CD, only the JPEG flies in the picture folder can be played.
Picture discs other than KodaWFuji Picture CDs may take longer to start playing or may not play at all.
+ DVD+_R/RW, CD-R/RW
DivX Discs
,, Since this product only provides encoding formats authorized by DivX Networks, Inc., a DivX file created by the
user might not play.
Software updates for incompatible formats are not supported.
(Example : OPEL, GMC, resolution higher than 800 x 600 pixels, etc.)
,, Sections with a high frame rate might not be played while playing a DivX file.
For more information about the formats authorized by DivX Networks, Inc., please visit "www.divxnetworks.
net".
10
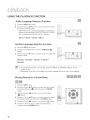
FRONT PANEL
il!
i
14
B_SCTBAY
POWER(@)BUTTON
TUNINGUP& SKIP())_)
BUTTON
FUNOTION
BUTTON
7
OPEN/CLOSE
BUTTON
_
3
L /
TUNINGDOWN& SKIP(K{)
BUTTON
-8"
VOLUMECONTROL
_tR_ AUXIN 1!ASC(AutoSound
Calibration)INJACK
i_4_
STOP(rl) BuTTON
J_)
DIRECTPLAYI~5 BUTTONS
L1_ USB PORT
I0
DISCCHANGEBUTTON
i5 PLAY>PAUSE(>li)BUTTON
PHONESJACK
11
DISPLAY
_/
FUNCTION
DISPLAY
7i
USBINDICATOR
J3/
RADIO
FREQUENCY
INDICATOR
I_l REP_TiNDiCATOR
8i UTS
D,SC_NU,CATOR
141 DOLBY
DIGITAL
INDICATOR
/3i NDMliNDiCATOR
]i
REPEAT
INDICArOR
"151 PROLOGICiNDiCATOR
I_ilDiSc_ND'OATOR_oiDS_,ND,CATOR161
lSi
D_D INDICATOR
31'
ASC(Auto
SoundCalibration)
..........INDICATOR
(S]
CD INDICATOR
]21
_2
SYSTEMSTATUS
DISPLAY
LPCMiNDICATOR
REAR
PANEL
!0
!tl
L!. XMAntennaJack
ConnectanXMAntennato theXMAntenna,Jackonthe rearofthisunit.
'_2
_d
TXCARDCONNECTION
_ IRELEss:
(w
!
TheTXcardenabbscommunbation
betweenthe mainunitandthe
wirelessreceiveramplifier.
14_
V DEOOUTPUT
JACK
ConnecttheTV'sVideoInputjack(VIDEO
IN)to theVIDEOOUTjack.
AUXIN2 JACKS
Connectto the2CHanalogoutputofan externaldevice(suchasaVCR)
L_61 COMPONENT
VIDEOOUTPUT
JACKS
Connecta TVwithComponent
videoinputsto thesejacks.
L7
Externa!Digita!optica!!nputJack
Usethisto connectexternalequipment
capabbof digitaloutput.
f8
L
FM75fl COAXIAL
JACK
Connectthe FMantenna.
iq ,nM
L_
"'-'"" """ ""'"
Ueethe,DM,
eab,e,
eonnectth,e,DM,
outputterm,na,
tothe,DM,,nput
{10}
COOLING
FAN
Thefan alwaysrevolves
whenthepowerison.Ensureaminimumof
4 inchesofdearspaceonallsidesofthefanwheninstalling
theproduct.
1111 SPEAKER OUTPUT
CONNECTORS
.................
terminalonyourTVforthebestqualitypicture.
Connectthe front,center speakersand subwoofer.
Tilerearspeakers
mustbeconnectedtotheWirelessReceiver.
13
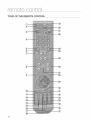
TOUR OF THE REMOTE CONTROL
--i37i
14
11_
DVDRECEIVER
button
{20} PORT button
i_TV button
{4}
{2:i}
POWER
button
{22} (,,=} OPEN/CLOSE button
Number (0-9)buttons
I231 CANCEL button
{5} REMAIN
button
{_
DISC SKIP, TVNIDEO button
!24i PAUSE button
PLAY button
STEP button
{t} Tuning
Preset/CD
Skip
buttons
VOLUME button
125/ _ STOP button
(_ (_) SEARCH buttons
I26i
TUNING/CH button
{_} MENU
button
127i MUTE button
1_
/28/ RETURN button
AUDIO button
i111 [][]PL II MODE button
I29/ Cursor/ENTER button
{30}
{i2_TUNER
MEMORY,
SDtStandard
Definition)/HD(High
Definition) button
/31/
ZOOM
button
SUBTITLE button
EXIT button
132} INFO button
P.BASS button
/15_ SLEEP button
/331 SOUND EDIT button
{i6}
134i
ASC button
{@
DSP/EQ button
SLOW, MO/ST button
/:1_
136i LOGO button
[]3PL II EFFECT button
{37} DIMMER button
DVD button
[19}
_
(_
Insert
REPEAT button
TUNER button
AUX button
Remote
Batteries
_:RemoVe
theb_tte,X 2: ,,,Sert
_Q_.sv_
cover in the direction
of the arrow.
Follow these precautions
_
_
'_
_
attention
(+and-).
batte,os,
payings: RepJace
theb_tt_ry
to the correct
Polarities
to avoid leaking or cracking
cover.
cells:
Place batteries in the remote control so they match the polarity : (+) to (+) and (-) to (-).
Use the correct type of batteries. Batteries that look similar may differ in voltage.
Always replace both batteries at the same time.
Do not expose the batteries to heat or a flame.
15
SETTING
THE
REMOTE
CONTROL
You can control certain functions of your TV with this remote control.
When operating
a TV with the remote
control
1. Press the TV button to set the remote to TV mode.
2. Press the POWER button to turn on the TV.
............
3. While holding down the POWER button, enter the code
corresponding to your brand of TV.
If there is more than one code listed for your TV inthe
table, enter one at a time to determine which code works.
Example : For a Samsung TV
While holdingdown the POWER button, use the number
buttons to enter00, 15, 16, 17 or 40.
...........
1
@o:,,, i iiiii!!
I¸¸
@@@
@@@
@@@
@
4. If the TV turns off, the setting is complete.
You can use the TV POWER, VOLUME, CHANNEL, and
Numeric buttons (0-9).
@ '_The remote control may not work on some brands of TVs. Also, some operations
may not
be possible depending on your brand of W.
If you do not set the remote control with the code for your brand of TV, the remote control
will work on a Samsung TV by default.
Operation
Range of the Remote
Control
The remote control can be used up to approximately
23 feet (7 meters) ina straight line.
It can also be operated at a horizontal angle of up to 300 from the
remote control sensor.
16
TV Brand Code List
1
Admiral (M.Wards)
56, 57, 58
44
MTC
18
2
A Mark
01, 15
45
NEC
18, 19, 20, 40, 59, 60
3
Anam
01,02, 03, 04, 05, 06, 07, 08, 09, 10, 11,
46
Nikei
03
12, 13, 14
47
Onking
03
01, 18, 40, 48
48
Onwa
03
57, 58, 81
49
Panasonic
06, 07, 08, 09, 54, 66, 67, 73, 74
4
5
AOC
Bell& Howell
(MWards)
6
Brocsonic
59, 60
50
Penney
18
7
Candle
18
51
Phiico
03, 15, 17, 18, 48, 54, 59, 62, 69, 90
8
Cetronic
03
52
Philips
15, 17, 18, 40, 48, 54, 62, 72
9
Citizen
03, 18, 25
53
Pioneer
63, 66, 80, 91
10
Cinema
97
54
Portland
15,18, 59
11
Classic
03
55
Proton
40
12
Concerto
18
56
Quasar
06, 66, 67
13
Contec
46
57
RadioShack
17, 48, 56, 60, 61,75
14
Coronado
15
58
RCA/Proscan
18, 59, 67, 76, 77, 78, 92, 93, 94
15
Craig
03, 05, 61, 82, 83, 84
59
Realistic
03, 19
16
Croslex
62
60
Sampo
40
17
Crown
03
61
Samsung
00, 15, 16, 17, 40, 43, 46, 47, 48, 49,
18
Curtis Mates
59, 61,63
19
CXC
03
62
Sanyo
19, 61, 65
20
Daewoo
02,03,04 15 16 17,18,19,20 21 22 23,24,
63
Scott
03, 40, 60, 61
25,26,27,28,29303234,35,36,48,59,90
64
Sears
15,18,19
21
Daytron
40
65
Sharp
15, 57, 64
22
Dynasty
03
66
Signature2000 (M.Wards
57, 58
23
Emerson
03, 15, 40, 46, 59, 61,64, 82, 83, 84, 85
67
Sony
50, 51,52, 53, 55
24
Fisher
19, 65
68
Soundesign
03, 40
25
Funai
03
69
Spectricon
01
26
Futuretech
03
70
SSS
18
27
General Electric(GE)
06, 40, 56, 59, 66, 67, 68
71
Sylvania
18, 40, 48, 54, 59, 60, 62
28
Hall Mark
40
72
Symphonic
61,95, 96
29
Hitachi
15, 18, 50, 59, 69
73
Tatung
06
30
Inkel
45
74
Techwood
18
31
JC Penny
56, 59, 67, 86
75
Teknika
03, 15, 18, 25
32
JW}
70
76
TMK
18, 40
33
KTV
59, 61, 87, 88
77
Toshiba
19, 57, 63, 71
59, 60, 98
34
KEC
03, 15, 40
78
Vidtech
18
35
KMC
15
79
Videch
59, 60, 69
36
LG (Goldstar)
01, 15, 16, 17, 37, 38, 39, 40, 41, 42, 43, 44
80
Wards
15, 17, 18, 40, 48, 54, 60, 64
37
Luxman
18
81
Yamaha
18
38
LXI (Sears)
19, 54, 56, 59, 60, 62, 63, 65, 71
82
York
40
39
Magnavox
15, 17, 18, 48, 54, 59, 60, 62, 72, 89
83
Yupiteru
03
40
Marantz
40, 54
84
Zenith
58, 79
41
Matsui
54
85
Zonda
01
42
MGA
18, 40
86
Dongyang
03, 54
43
Mitsubishi/MGA
18, 40, 59, 60, 75
17
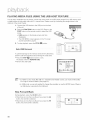
This section involves various methods of connecting the Digital Home Theater to other external components.
Before moving or installing the product, be sure to turn off the power and disconnect the power cord.
CONNECTING
THE SPEAKERS
@
®®
2.5 to 3 times the size of the TV screen
Position of the DVD Player
Placeit ona standorcabinetshelf,or undertheTVstand.
Selecting the Listening Position
The listening position should be located about 2.5 to 3 times the distance of the TV's screen sizeaway from the TV.
Example : For 32" qVs b2.4m (6-8feet)
For 55" TVs 3.54m (1ld 3feet)
Front Speakers_
Q
Placethese speakers infront of your listening position, facing inwards (about 45°) toward you.
Placethe speakers so that their tweeters will be at the same height as your ear.
Alignthe front face of the front speakers with the front face of the center speaker or place them slightlyin front
of the center speakers.
Center Speaker
Q
It is best to install it at the same height as the front speakers.You can also install it directly over or under the TV.
Rear Speakers _I_
Place these speakers behind your btening position. If there isn't enough room, place these speakers so they face each
other. Place them about 60 to 90cm (2 to 3feet) above your ear, facing slightly downward.
* Unlike the front and center speakers, the rear speakers are used to handle mainly sound effects and sound will not
come from them all the time.
-k Sound will be heard from the rear speakers in DVD 5.1-CH or Dolby Pro Logic II mode only.
Subwoofer
t_
The position of the subwoofer is not so critbal. Placeit anywhere you like.
18
Front / Rear & Center Speakers Cradle Stand and Wall Mount Installation
HT-Z510
@
CENTER
AH81-O3469A
(L)
(R)
CENTER
_H81-0385%
REAR
h (AH81-03845G
R(AH81-03845k
r_
_
FRONT/REAR
AH81-03465A
FRONT
L (AH81-03845E)
R (AH81-03845L)
CENTER
(AH81-03845F)
FRONT/REAR
_,H81-0385%
SUBWOOFER " CRADLESTAND/-_ '_ HOLE COVER _j
WALLMOUNT
(AH81-03845D)
Installing the Cradle Stand
<Fronb'Rear>
1. Insert the stand so that it fits into the hole
as described in the figure.
<Center>
1
2. Turn the stand clockwise to lock it.
(Turning it counter-clockwise will loosen
from the hole.)
3. This is the completion of the stand
installation.
19
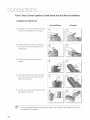
Front / Rear & Center Speakers Cradle Stand and Wall Mount Installation
Installing the Wall Mount
<Front/Rear>
<Center>
1. Insert the wall mount so that it fi ts into the
rear hole of the speaker as inthe figure.
2. Turn the wall mount counter clockwise to
fix it. (This is the reverse direction to the
cradle stand.)
3. Put the hole cover on the hole of the
speaker.
3
4. Use a coin turn the hole cover clock wise
to fix it. Curning it count-clock wise will
loosen from the hole.)
5. Use the wall mount hole (bracket) to install
the speaker on the wall.
(_
To avoid accident fall and consequent damage to the customer and speaker, make sure
the speaker is hung safely.
2O
Speaker Components
HT-TZ512
(L) (R)
f
f
II i i iiiiiiiiiiiiiiiiiiiiiiiiiiiiii!
! i!i!!!!
SCREW
(Small):
6EA
@
(L)(R)
CENTER
(AH81-0346%
L (AM81-04171
G) _(AM81-0385%)
m(AM81-03848J)_
REAR
_
CENTER
CENTER
(AH81-03944A)
(AH81-04171F)
_,_,
SCREW
(Large):
4EA
(AH81-03943A)
FRONT/REAR
AH81-0385%)
FRONT/REAR (AH81-03465A)
FRONT
STAND/
, SUBWOOFER
__HOLECOVER. , CRADLE
L (AH81-04171E)
STAND
R (AM81-03848H)(AH81-03846N)
WALLMOUNT (AH81-04171D)
STAND BASE
(AH81-03846P)
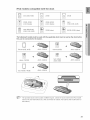
How to Install the Speaker on the stand (HT;TZ512 only)
t. Turn the STAND upside-down and connect
it to the STAND BASE.
2. Insert three small SCREWS into three holes
marked with arrows using a screwdriver as
shown in the illustration.
3. Insert a large SCREW into the hole on the
rearof the Speaker STAND.
4. Connect the assembled stand to the
SPEAKER.
5. Insert another large SCREW into the hole
on the rear of the speaker using a
screwdriver as shown in the illustration.
6. This is the successfully assembled speaker.
Make sure that the speaker is installed on a
flat and stable area. Otherwise it may be
easily knocked over.
;i_:i!
!_i_!i!_!!!!i:_!i;!!_!i!_3!!!_!!i!:_!i
¸ii!:_!:!:_!!;!!!!!_;!!i!_!!_!!!!_;
How to Install the Speaker
t.
on the Stand Base (HT-TZ512 only)
Connect the SPEAKER with the
STAND BASE.
2. Insert the SCREW into the hole on the rear
of the speaker using a screwdriver as shown
inthe illustration.
3. This is the SPEAKER successfully
assembled with the Stand Base.
J
STAND
ii_ii
!i¸
i¸_i!ii¸!!;i ¸I¸¸_i̧!!;
i ¸I¸¸_i̧!!;
i ¸I¸¸_i̧!!;
i ¸I¸¸_i
¸!!;i ¸I¸¸_i
¸!!;i ¸I¸¸_i̧!!;
i ¸I¸¸_i̧!!
21
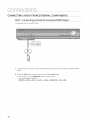
Connecting the Front, Center and Subwoofer Speakers
1. Press down the terminal tab on the back of the speaker.
2. Insert the black wire intothe black terminal (-) and the red wire into
the red (+) terminal, and then releasethe tab.
3. Connect the connecting plugs to the back of the Home Theater.
,, Make sure the colors of the speaker terminals match the colors of
the connecting plugs.
HT=Z510
HT=TZ512
Center Speaker
Front
Speaker (R)
Center Speaker
I
Front
Speaker (R)
Speaker
Front
Speaker (L)
Subwoofer
Stand
Subwoofer
Front Speaker (L)
* To connect the rear speakers, refer to page 23.
Do not let children play with or near the speakers. They could get hurt if a speaker falls.
', When connecting the speaker wires to the speakers, make sure that the polarity (+/-) iscorrect.
', Keep the subwoofer speaker out of reach of children so as to prevent children from
inserting their hands or alien substances into the duct (hole) of the subwoofer speaker.
,_ Do not hang the subwoofer on a wall through the duct (hole).
(_
If you place a speaker near your TV set, screen color may be distorted because of the
magnetic field generated by the speaker. If this occurs, place the speaker away from your
TV set.
22
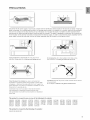
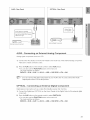
CONNECTING THE REAR SPEAKERS TO THE WIRELESS RECEIVING AMPLIFIER
Wireless
Receiving
Module (SWA-4000)
HT-Z510
Center Speaker
Front Speaker (R)
Fro_t Speaker (L)
Rear Speaker (L)
....
Rear Speaker (R)
Subwoofer
!iJJiiJi/i/ii!i'iiii_
WIRELESS RECEIVER MODULE
HT-TZ512
Center Speaker
Front Speaker (R)
Rear Speaker (L)
n
e
Rear Speaker (R)
Front Speaker (L)
Subwoofer
WIRELESS RECEIVER MODULE
23
CONNECTING
THE WIRELESS
RECEIVING
AMPLIFIER
1oConnect the front, center and Subwoofer speakers to the
DVD Player, refering to page 21.
2. With the DVD Playerturned off, insert the TX card into the
TX Card Connection(WIRELESS) on the back of the main unit.
,, Hold the TX card so that the slanted side faces to the left
and insert the card into the port.
,, The TX card enables communication between the main
unit and the wireless receiver.
3. Connect the left and right rearspeakers to the wireless
receiving module.
Slanted side face left
TX card
4. Plug the power cord of the wireless receivingmodule
in the wall outlet and switch the power switch ON.
@
@
@
_
_
_
'_
_
_
24
'_
Place the wireless receiver module at the rear of the listening position. If the wireless
receiver module is too close to the main unit, some sound interruption may be heard due
to interference.
If you use a device such as a microwave oven, wireless LAN Card, Bhetooth equipment,
or any other device that uses the same frequency (5.8GHz) near the system, some sound
interruption may be heard due to interference.
The transmission distance from the main unit to the wireless receiving module is about 33
feet (10m), but may vary depending on your operating environment. If a steel-concrete wall
or metallic wall is between the main unit and the wireless receiver module, the system may
not operate at all, because the radio wave cannot penetrate metal.
This product(HT-Z510/HT-TZ512) is also compatible with the wireless receiver module
SWA-3000.
If the main unit doesn't make wireless connection, the system needs ID Setting between
main unit and wireless receiver module. With the main unit turned off, press remote
control's number button "0"->"1 "->"3"->"5" and unit turned on. With the wireless receiver
module turned on, press "ID SET" button on the back of the unit for 5 seconds.
Do not insert any other card except the TX card dedicated to the product.
If a different TX card is used, the product may be damaged or the card may not be
removed easily.
Do not insert the TX card upside down or in the reverse direction.
Insert the TX card when the DVD Player is turned off. Inserting the card when it is turned
on may cause a problem.
If the TX Card is inserted and wireless receiving module setting is complete, sound is not
output from the Rear Speaker connectors on the main unit.
The wireless receiving antenna is built into the wireless receiver module. Keep the unit
away from water and moisture.
For optimal listening performance, make sure that the area around the wireless receiver
module location is clear of any obstructions.
If no sound is heard from the wireless rear speakers, switch the mode to DVD 5.1
channel or Dolby ProLogic II.
In 2-CH mode, no sound will be heard from the wireless rear speakers.
CONNECTING
THE VIDEO
OUT TO YOUR
TV
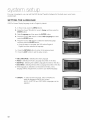
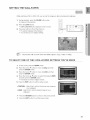
Choose one of the three methods for connecting to a TV.
METHOD3
(supplied)
METHOD
1 : HDMI
Connect the HDMI cable from the HDMI OUT jack on the back of the DVD Home Theater to the HDMI
IN jack on your TV.
METHOD
2 : Component
Video
If your television is equipped with Component Video inputs, connect a component video cabb(not
supplied) from the Component Video Output (Pr, Pb and Y) Connectors on the back of the main unit to
the Component Video Input Connectors on your TV.
METHOD
3 : Composite
Video
Connect the supplied video cable from the VIDEO OUT jack on the back of the main unit to the VIDEO
IN jack on your TV.
Resolutionsavailablefor the HDMI output are 480p, 720p, 1080i/1080p.
This product operates in Interlacescan mode (480i)for Component Output.
@
After making the video connection, set the Video input source on your TV to match the
corresponding Video output (HDMI, Component or Composite) on your Home theater.
Seeyour TVowner's manualfor more information on hew to select the TV's Video Input source.
If you use an HDMIcable to connect a Samsung TVto the main unit, you can operate the Home
Theater using the TV's remote control. _his is only availablewith SAMSUNGTVs that support
Anynet+(HDMFCEC).)
Please check the 4;;y_ logo (If your TV has an _4_
function.)
logo, then it supports Anynet+
25
HDMI Auto Detection
Function
The player's video output will automatically
change to HDMI mode when connecting
while power is on. For possible HDMI resolutions,
an HDMI cable
see page 27.
• HDMI (Nigh Definition Multimedia Interface)
HDMIis an interfacethat enablesthe digital transmissionof video and audio datawith just a single connector.
Using HDMI, the DVD Home Theater transmits a digital video and audio signal and displays a vivid picture on a TV
having an HDMI input jack.
• HDMI connection description
HDMI connector - Supports video and digital audio data.
- HDMI outputs only a pure digital signal to the TV.
- If your TV does not support HDCP (High-bandwidth Digital Content Protection), random noise appears on the
screen.
• Why does Samsung use HDMI?
Analog TVs require an analog video/audio signal. However, when playing a DVD, the data transmitted to a TV is
digital. Therefore either a digital-to-analog converter (inthe DVD Home Theate0 or an analog-to-digital converter (in
the TV) is required. During this conversion, the picture quality is degraded due to noise and signal loss. HDMI
technology is superior because it requires no D/A conversion and is a pure digital signal from the player to your TV.
• What is the HDCP?
HDCP (High-band width Digital Content Protection) is a system for protecting DVD content outputted via HDMI
from being copied. It provides a secure digital link between a video source (PC, DVD. etc) and a display device
(TV, projector, eto). Content is encrypted at the source device to prevent unauthorized copies from being made.
• What is Anynet+?
Anynet+ is a convenient function that offers linked operation of this unit through Samsung TVs with the Anynet+
feature.
- If your Samsung TV has an _;4_,_* logo, then it supports the Anynet+ function.
- If you turn on
automatically
- If you turn on
and switch to
26
the player and insert a disc, the player will start playing the disc, and the TV will turn on
and switch to HDMI mode.
the player and press the Play button with a disc already inserted, the TV will immediately turn on
HDMI mode.
HDMI FUNCTION
Resolution Selection
This function allowsthe user to select the screen resolutionfor
HDMIoutput.
In Stop mode, press and hold the SD/HD (Standard
Definition/High Definition) button on the remote control.
Resolutions available for the HDMI output are 480p, 720p,
1080i/1080p.
SD(Standard Definition) resolution is 480p and HD
(High Definition) resolution is 720p, 1080i/1080p.
@
If the TV does not support the configured
resolution, you will not be able to see the picture
properly.
When an HDMI cable is connected, composite and
component video signals are not output.
See your TV owner's manual for more information on
how to select the TV's Video Input source.
Why use HDMI (High Definition
Multimedia Interface)?
This device transmits a DVD video
signal digitally without the process
of converting to analog. You will get
sharper digital pictures when using
an HDMI connection.
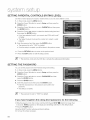
Using Anynet+(HDMl-CEC)
Anynet+ is a function that enables you to control other Samsung Deviceswith yourSamsung TV's remote
control,Anynet + can be used by connecting this Home Theaterto a SAMSUNGTV using an HDMICable.
This is only availablewith SAMSUNGTVsthat support Anynet+.
t.
Connect the main unit of the Home Theater to a Samsung
TV with an HDMI cable. (See page 25)
2. Set the Anynet+ function on your TV.
(Seethe TV instruction manual for more information.)
You can operate the Home Theater by using the TV
remote control. (AvailableTV buttons: (_, _, _, (_,
A,'V and _1,_,buttons,(o}- (_button
With Anynet+
You can operate this unit, power
on your TV, or watch a movie by
pressing the Play button on your
Samsung TV's remote control.
If you select the TV
Set the Anynet+(HDMI-CEC)to On by pressingthe Anynet+
button on your TVremote control.
Receiver: On :Youcanlistento audiothroughthe HomeTheater.
Receiver: Off : Youcan listento audiothroughthe TV.
If you select the THEATER
SelectTHEATERto connect andset the optionof eachitem below.
ViewTV :Ifanynet+(HDMI
CEC)issetto onandyouselectVbwW, the
hometheaterwillautomatically
switchto digitalinmode.
Theater Menu :you canaccessandcontrolthe Hometheatermenu.
Theater Operation :The HomeTheater disc playback
informationwill be displayed. You can
control the Discoperation of the
Home Theatersuch as title, chapter
and subtitlechange.
Receiver: On :Youcanlistento audiothroughthe HomeTheater.
Receiver: Off : Youcan listento audiothroughthe TV.
_ In case that you chose 'View TV', if you want to listen to TV sound through Digital In, you
have to connect the optical cable between the TV and the Home Theater.
27
CONNECTING
AN iPod
You can listen to the audio from an iPod through the main unit. For iPodoperation with this Home Theater, see
pages 29 and 49.
1. Connect the iPod dock connector to the lPod jack on the DVD home theater.
2. Press the PORT button on the remote control to select iPod input.
,, You can also use the FUNCTION button on the main unit.
The mode switches as follows :
DVD/CD --, D.IN --, AUX 1 --, AUX 2 --, USB --, OSD iPOD --, FM ...*XM.
'_ As the cable ports are close together, be sure to remove the wireless adaptor before
disconnecting the ipod docking cable.
_ Depending on the type of iPod. You may need to insert one of the dock slots into the dock
before you station your iPod (see next page).
_ Adjust the volume to a moderate level before you connect your iPod and DVD home
theater.
_ When the unit is powered on and you connect an iPod, the unit will charge your iPod's
battery.
'_ Make sure to connect the dock connector so that the
label "SAMSUNG" faces upward.
28
iPod models
compatible
with the dock
mini (4GB, 6GB)
[]
20GB, 30GB
20GB
[]
(color display)
_J
nano
(2GB,(aluminum)
4GB, 8GB)
40GB
40GB, 60GB
[_
(color display)
[]
30GB (video)
nano
(1GB, 2GB, 4GB)
[]
60GB, 80GB (video)
The following 5 models must be used with the applicable dock insert as well as the dock before
they can be connected to the system.
iPhone (4GB, 8GB)
AH81-04244A
classic (80GB)
AH81-04241A
AH81-04242A
nano (video)
(4GB, 8GB)
AH81-04243A
[]
©
classic (160GB)
3
touch (SGB, 16GB)
AH81-04245A
_ The provided dock insert includes 5 different types. Check the dock insert for the iPod model
name on its rear side before use. (The dock insert for Classic 160 GB has the model name on
the bottom.)
29
CONNECTING
AUDIO
FROM
AUX1 : Connecting
EXTERNAL
an External
COMPONENTS
Component/MP3
player
Components such as an MP3 Player
j_
Cable '1
1. Connect AUX IN 1 (Audio) on the Home Theater to the Audio Out of the external component/MP3
pbyer.
2. Press the AUX button on the remote control to select AUX1 input.
• You can also use the FUNCTION button on the main unit.
The mode switches as follows :
DVD/CD -* D.IN -* AUX 1 -* AUX 2 -* USB -* OSD iPOD -* FM -* XM.
50
AUX2 : Rear Panel
OPTICAL : Rear Panel
Optical Cable
(not suppJied)
oooj
External Digital Component
External Analog Component
AUX2 : Connecting
an External
Analog
Component
Analog signal components such as a VCR.
t. Connect AUX IN 2 (Audio)on the Home Theater to the Audio Out of the external analog component.
,, Be sure to match connector colors.
2. Press the AUX button on the remote control to select AUX 2 input.
You can also use the FUNCTION button on the main unit.
The mode switches as follows :
DVD/CD -, D.IN -, AUX 1 -, AUX 2 -, USB -, OSD !POD -, FM .-, XM.
(_
_ You can connect the Video Output jack of your VCR to the TV, and connect the Audio
Output jacks of the VCR to this product.
OPTICAL
: Connecting
an External
Digital
Component
Digital signal components such as a Cable Box/Satellite receiver (Set-Top Box).
t. Connect the Digital Input (OPTICAL)on the Home Theater to the DigitalOutput of the external digital
component.
2. Press the AUX button on the remote control to select DIGITAL IN.
You can also use the FUNCTION button on the main unit.
The mode switches as follows :
DVD/CD -_ D.IN -_ AUX 1 -_ AUX 2 -_ USB -_ OSD !POD -_ FM -' XM.
31
CONNECTING
THE FM ANTENNA
1. Connect the FM antenna supplied to the FM 750 COAXIAL Jack.
2. Slowly move the antenna wire around until you find a location where reception is good, then fasten it
to a wall or other rigid surface.
FM Antenna
(supplied)
[_
This unit does not receive AM broadcasts.
Cooling
Fan
The cooling fan supplies cool air to the unit to prevent overheating.
Please observe the following cautions for your safety.
• Make sure the unit is well-ventilated. If the unit has poor ventilation, the temperature inside the unit may rise
and may damage it.
• Do not obstruct the cooling fan or ventilation holes. (If the cooling fan or ventilation holes are covered with a
newspaper or cloth, heat may build up inside the unit and fire may result.)
32
CONNECTING
RECEIVER
THE OPTIONAL XM SATELLITE RADIO ANTENNA AND
Connect an XM Antenna and Receiver (not supplied) to the XM Antenna Jack on the rear of this unit.
ANTENNA
XM Ready Receiver Only
RECEIVER
South
To ensure optimal reception of XM's satellite signal, the XM Antenna should be placed at
or near a southerly facing window with nothing obstructing its path to the sky. You can
mount it indoors or outdoors.
_ When making connections, also refer to the operation instructions of the XM Antenna.
_ Depending on your location, the radio signal may be weak or cannot be tuned.
The DVD Home Theater's remote can be used to control Samsung TVs.
1,
Plug the main unit's power cord into the AC power supply.
2. Press the DVD RECEIVER button to operate the DVD Home
Theater.
3. Press the FUNCTION button on the main unit or DVD button
on the remote to enable DVD/CD playback.
4. Press the TV button to set the remote to TV mode.
5. Press the POWER button to turn on your Samsung TV
with this remote.
6. Press the TV/VlDEO button to select VIDEO mode
on your TV.
34
Payback
DISC
PLAYBACK
t.
Press the OPEN/CLOSE (_)
button to open the disc tray.
2. Load a disc.
,, Place a disc gently into the tray with the disc's label
facing up.
S. Press the DISC SKIP button.
,, Rotate the carousel tray so you can load the third,
fourth, and fifth discs.
4. Close the compartment by pressing the OPEN/CLOSE ('J_)
button again.
,, Playback starts automatically.
To stop playback, press the STOP (®) button during playback.
• If pressed once, PRESS PLAY is displayed and the stop position will be stored in memory.
If the PLAY (®) button or ENTER button is pressed, playback resumes from the stop position.
(This function works only with DVDs.)
• If pressed twice, STOP is displayed, and if the PLAY (®) button is pressed, playback starts from the
beginning.
To temporarily pause playback, press the PAUSE((.}) button during playback.
• To resumeplayback,pressthe PLAY (Q) button.
_ Depending on the content of tile disc, tile initial screen may appear different.
Pirated discs will not run in tills player because it violates the CSS (Content Scrambling System :
a copy protection system) recommendations.
Selecting
a Disc in the Disc changer
To select a specific disc, press the corresponding the DIRECT
PLAY (1,2, 3, 4, 5) buttons on the front panel or the DISC SKIP
button on the remote control, until the required disc indicator
flashes.
,, If the disc selected is not loaded, the next disc is played
automatically.
35
4
MP3/WMA-CD
PLAYBACK
Data CDs (CD-R, CD-RW)encoded in MP3/WMA format can be played.
1. Place the MP3/WMA disc on the disc tray.
• The MP3/WMA menu screen will appear and
playback will start.
• The appearance of the menu depends on the
MP3/WMA disc.
• WMA-DRM files cannot be played.
2. In Stop mode, use the Cursor A,T,4,_,
button
to select the album, and then press the ENTER button.
• Use the Cursor A,T
button to select the track.
3. To change the album, use the Cursor ,&,'V,_I,_
button to select another album in Stop mode, and then
press the ENTER button.
4. Press the STOP (r"l) button to stop playback.
[_
Depending on the recording mode, some MP3/WMA-CDs may not play.
Table of contents of a MP3-CD varies depending on the MP3ANMA track format recorded
on the disc.
To play a file icon in the screen,
,, Press the Cursor A,V,4,_.
top part of the menu.
button when it is in Stop mode and select a desired icon from the
[_
36
Music File Icon :To play music files only, select the _
Icon.
Image File Icon : To view image files only, select the _
Icon.
Movie File Icon : To view movie files only, select the _
Icon.
All File Icon : To view all files select the _
Icon.
JPEG
FiLE
PLAYBACK
Imagescaptured with a digital camera or camcorder, or JPEG fileson a PC can be stored on a CD and then played back
with this HomeTheater.
Slide Mode
Place the JPEG disc on the disc tray.
,, Playback starts automatically. Each image is displayed
for 5 seconds and then the next image is displayed.
Press the 144,_1 button to skip to the next slide.
Eachtime the buttonis pressed,the slidemovesbackwardor forward.
Rotate/Flip
Function
Press the Cursor A,V,4,11_ button during playback.
_.button:
_1button: Rotate 90°
Counterclockwise
Flip Vertically
_ button: Rotate 90°
Clockwise
Original Image
V button: Flip Horizontally
[_
The maximum resolutions supported by this product are 5120 x 3480 (or 19.0 MPixel) for
standard JPEG files and 2048 x 1536 (or 3.0 MPixel) for progressive image files.
'_ If a JPEG file is played when the HDMI output
resolution is 720p/1080i/1080p, the mode is automatically converted to 480p mode.
37
4
DIVX PLAYBACK
The functions on this page apply to DivXdisc playback.
Skip Forward/Back
During playback, press the I_.,i,_l button.
,, Goes to the next filewheneveryou press the ),)4 button,
,, Goes to the previousfilewheneveryou press the
I_
button,over
if there
are over
files inthe disc.
if thereare
2 filesin
the2disc.
_
Fast Playback
During playback, press the _, _,_ button.
To play back the disc at a faster speed, press the 4,_ or
button during playback.
,, Eachtime you press either button, the playback speed
will change as follows:
2x -.-,4x -.-,8x -.-,32x -.-, Normal.
5 Minute
Skip function
During playback, press the Cursor 4,_" button.
,, Playback skips 5 minutes forward whenever you press
the Cursor _ button.
,, Playback skips 5 minutes back whenever you press the
Cursor 4 button.
Audio
Display
Press the AUDIO button.
,, Ifthere are multiple audio languages on a disc, you can
toggle between them.
,, Eachtime you press the button, your selection will toggle
between AUDIO (l/N, 2/N ...) and _r}.
(_
_ ![[i/is displayed when there is one supported language in the disc.
Subtitle
Display
Press the SUBTITLE button.
,, Eachtime you press the button, your selection will toggle
between SUBTITLE (l/N, 2/N ...) and SUBTITLE OFF.
,, if the disc has only one subtitle file, it will be played
automatically.
,, See number 2 (Caption Function) on the next page for
more details concerning Subtitle usage with DivX discs.
_
'"
@
@
DIVX PLAYBACK
if the Disc has more than One Subtitle
File
If the disc has more than one subtitle file, the default
subtitle may not match the movie and you will have
to select your subtitle language as follows:
t.
In Stop mode, press the Cursor A,'V button, select the
desired subtitle (_) from the TV screen, and then
press the ENTER button.
2. When you select the desired DivX file from the TV
screen, the movie will be played normally.
DivX(Digital
internet
video
eXpress)
DivX is a video file format developed by Microsoft and is based on MPEG4 compression technology to
provide audio and video data over the Internet in reaFtime.
iiiiiiiiiiiiiiiii
MPEG4 is used for video encoding and MP3 for audio encoding so that the users can watch a movie at
near DVD-quality video and audio.
iiiiiiiiiiiiiiiii
t. Supported Formats
This product only supports the following media formats.If both video and audio formats are not
supported, you may experience problems such as broken images or no sound.
Supported Video Formats
Av
Supported Versions
DivX3.11-DivX5.1, XvD
V1/V2/V3/V7
Supported Audio Formats
Bit Rate
Sampling Frequency
80-384kbps
56-128kbps
44.1 khz
128-384kbps
1.5Mbps
44.1/48khz
44.1 khz
DivXfiles, includingaudio and video files, created inthe DTS format can only support up to 6Mbps.
Aspect Ratio : Although the default DivX resolution is 640x480 pixels (4:3), this product supports
up to 800x600 pixels (16:9). TV screen resolutions higher than 800 will not be supported.
When you play a disc whose sampling frequency is higher than 48khz or 320kbps, you may
experience shaking on the screen during playback.
2o
Caption Function
You must have some experience with video extraction and editing in order to use this feature
properly.
,, To use the caption function, save the caption file (*.smi) in the same file name as that of the DivX
media file (*.avi)within the same folder.
Example. Root
SamsungO07CDl.avi
SamsungO07CD1 .smi
Up to 60 alphanumeric characters or 30 East Asian characters (2 byte characters such as Korean
and Chinese) for the file name.
39
4
USING THE PLAYBACK
FUNCTION
You can view disc playback information on the TV screen.
Pressthe INFO button.
Depending on the disc, the disc information
display may appear different.
_ Depending on the disc, you can also select
DTS, DOLBY DIGITAL, or PRO LOGIC.
@ appears on the TV screen!
Ifthis symbol appears on the TV screen when pressing
a button, that operation is not possible with the disc
currently being played.
Screen Display
STEREO (L/R)
dbpby
DVDdispBy
TITLEdisplay
@
displayELAPSEDTIME
_
DVD-AUDIO _,&
display
_Av
CHAPTER
display
_,_
REPEAT
[][qFG-O-E_]DOLBY DIGITAL
PLAYBACK
display DgGgTAL dbpby
CDdisplay
TRACK(FILE)
display
@
GROUPdisplay
Checking
the Remaining
AUDIO
displayLANGUAGE _
_
hm
ANGLE display
SUBTITLE
display
Time
Pressthe REMAIN button.
For checking the total and remaining time of a title or
chapter being pbyed.
Each time the Remain button is pressed
N
TITLE ELAPSED -_ TITLE REMAIN -_ CHAPTER ELAPSED -* CHAPTER REMAIN
N,
GROUP ELAPSED -* GROUP REMAIN -_ TRACK ELAPSED -_ TRACK REMAIN
TRACK ELAPSED -* TRACK REMAIN -* TOTAL ELAPSED -* TOTAL REMAIN
TRACK REMAIN -* TRACK ELAPSED
4O
Fast Playback
Press the 4,q,_._ button.
Each time the button is pressed during playback, the
playback speed changes as follows:
_-,_
2X_
"_ 4X-* _
8X_
4_ 32X_
_ PLAY
_ 2x--,_ 4x-, _ 8x--,_ 32x-, _ PLAY
(_
During fast playback of a CD or MP3-CD, sound is heard only at 2x speed, and not at 4x,
8x, and 32x speeds.
Slow Playback
Press the SLOW button.
Each time the button is pressed during playback, the playback speed changes as follows:
I)-1/2 -*1_1/4 -*1_1/8 _411/2 _411/4 -,411/8 -,
PLAY
1_1/2 -_1_1/4 -.1_1/8 -_ _ PLAY
[_
No sound is heard during slow playback.
_ Reverse slow playback does not work with CD.
Skipping
Scenes/Songs
Press the I._4,_1 button.
previous or next chapter, track or directory (file)will be
played.
• You cannot skip chapters consecutively ..........
• Each time the button is pressed during playback, the
!:i_
.....
ii
_
41
iiiiiiiiiiiiiiiii
4
USING THE PLAYBACK
FUNCTION
Repeat playback allows you to repeatedly play a chapter, title,
track (song), or directory (MP3 file).
Pressthe REPEAT button.
Eachtime the button is pressed during playback, the repeat
playback mode changes as follows:
REPEAT: CHAPTER -'* REPEAT : TITLE _ REPEAT : OFF
REPEAT :TRACK _ REPEAT : GROUP -' REPEAT : OFF
REPEAT : TRACK -'* REPEAT: DISC _ REPEAT : OFF
REPEAT : RANDOM _ REPEAT :TRACK-'*
REPEAT: DIR _ REPEAT : DISC
-'* REPEAT : OFF
Repeat Playback
Options
CHAPTER : Repeatedly plays the selected chapter.
TITLE : Repeatedly plays the selected title.
GROUP : Repeatedly plays the selected group.
RANDOM : Plays tracks in random order. (A track that has already been played may be played again.)
TRACK : Repeatedly plays the selected track.
DIR : Repeatedly plays all tracks in the selected folder.
DISC : Repeatedly plays the entire disc.
OFF : Cancels Repeat Playback.
To Select a Repeat Playback Mode in the Disc Information Screen
1.
Pressthe INFO button twice.
2. Press the Cursor _ button to move to REPEAT
PLAYBACK ((_;))display.
3. Press the Cursor V button to select the desired Repeat
Playback mode.
,, To select another album and track, repeat Steps 2 and
3 above.
4. Press the ENTER button.
OFF _ A-. _ CHAP -* TITLE -* OFF
OFF -' A- -' TRACK -' DISC -' OFF
[_
_ For DivX, MP3 and JPEG discs, you cannot select Repeat Play from the information
display screen.
42
A-B Repeat
Playback
You can repeatedly play back a designated section of a DVD.
t. Press the INFO button twice.
2. Press the Cursor I_ button to move to REPEAT PLAYBACK
((_) display.
3. Press the Cursor A,V
the ENTER button.
button to select A- and then press
,, When the ENTER button b pressed, the selected
position will be stored in memory.
4. Press the ENTER button at the end of the desired segment.
,, The specified segment will be played repeatedly.
A TO B REPEAT ON
To return to normal playback, press the Cursor A,T
button to select _? OFF.
The A-B Repeat function does not operate with DivX, MP3 or JPEG discs.
Step Function
Press the STEP button.
The picture moves forward one frame each time the button is
pressed during playback.
{_
:* @ : :)
<_i) 'i]] iii
ii
II!!iiiii
'= No sound is heard during step motion playback.
43
4
USING THE PLAYBACK
FUNCTION
This function allows you to view the same scene in different
angles.
1. Press the INFO button.
2. Press the Cursor I_ button to move to ANGLE ( _
display.
)
3. Press the Cursor A,T button or numeric buttons to select
the desired angle.
,, Each time the button is pressed, the angle changes as
follows:
1/3 -'* _
(_
2/3 ""* _
3/3 -'* _
1/3
The Angle function works only with discs on which multiple angles have been recorded.
Zoom
(Screen
Enlarge)
Function
This function allows you to enlarge a particular area of the
displayed image.
1. Press the ZOOM button.
2. Press the Cursor A,V,4,1_
you want to enlarge.
button to move to the area
3. Press the ENTER button.
,, Each time the button is pressed, the zoom levelchanges
as follows:
ZOOM X 1.5 _ZOOM X 2 ""*ZOOM X 3
_ZOOM OFF
44
! :!i:!!!:
__!!!_!!!_
¸__iii!i!!!ii!!
¸__)i
Bonus
Group
Some DVD-Audio discs have an extra 'bonus' group that
requires a 4-digit key number to access. See the disc
packaging for details and the key number.
8ONUS
GROUP
When you play a DVD-Audio disc that has a bonus group, the
key number input screen appears automatically.
[_
If you eject the disc, switch the power off, or unplug the player, you will need to re-enter
the key number.
Navigating
Pages
During playback, press the V,A button on the remote control.
You can select the desired image from a DVD-Audio disc
containing still images.
With some discs, you may not be able to select images.
45
4
USING THE PLAYBACK
Audio
FUNCTION
Language
Selection
Function
1. Press the INFO button twice.
2. Press the Cursor AT button or numeric buttons to select
the desired audio language.
,, Depending on the number of languages on a DVD disc, a
different audio language (ENGLISH, SPANISH, FRENCH,
etc.) is selected each time the button is pressed.
......................
EN 1/3 _ SP 2/3 _ FR 3/3 _ EN 1/3
Subtitle
Language
Selection
Function
1. Press the INFO button twice.
2. Press the Cursor 1_ button to move to SUBTITLE (_])
display.
3. Press the Cursor V button or numeric buttons to select the
desired subtitle.
EN 01/03 -" SP 02/03 _ FR 03/03 _ OFF/03
EN 01/03
_ To operate this function, you can also press the AUDIO or SUBTITLE buttons on the
remote control.
_ Depending on the disc, the Subtitle and Audio Language functions may not be available,
Moving
Directly
to a Scene/Song
1. Press the INFO button.
2. Press the Cursor A,T button or numeric buttons to select
the desired titb/track (_) and then press the ENTER
button.
3. Press the Cursor _1,_ button to move to the Chapter
(@) display.
4. Press the Cursor A,V button or numeric buttons to select
the desired chapter and then press the ENTER button.
5. Press the Cursor _1,1_button to move to time (C)) display.
6. Press the numeric buttons to select the desired time
and then press the ENTER button.
46
,,.................................
Moving
Directly
to a Scene/Song
Press the numeric buttons.
,, The selected file will be played.
When playing an MP3 or JPEG disc, you cannot use the
Cursor A,_' button to move to a folder.
To move a folder, press the STOP (r"l) and then press the
Cursor A,T button.
[_
_ You can press the I.q_,_-I button on the remote control to move directly to the desired title,
chapter, or track.
_ Depending on the disc, you may not be able to move to the selected title or time.
Using the Disc Menu
You can use the menus for the audio language, subtitle language, profile, etc.
DVD menu contents differ from disc to disc.
t.
In Stop mode, press the MENU button.
2. Press the Cursor A,_" button or numeric buttons
to move to Disc Menu and then press the
ENTER button.
When you select Disc Menu and it is not supported by
the disc, the "This menu is not
supported" message appears on the screen.
3. Press the Cursor A,T,_I,I_
item.
button to select the desired
4. Press the ENTER button.
_-- Press the EXIT button to exit the setup screen.
[_
'_ The disc menu display may be different depending on the disc.
47
4
USING THE PLAYBACK
FUNCTION
For DVDs containing multiple titles, you can view the title of
each movie. Depending on the disc, the availability of this
feature may vary.
1. In Stop mode, press the MENU button.
2. Press the Cursor A,V
button to move to Title Menu.
8. Press the ENTER button.
The title menu appears.
[
,:::::
MENU
Press the EXIT button to exit the setup screen.
[_
48
'_ The Title menu display may be different depending on the disc.
.........
} : : ::
#
1
: : ); ........................
USING THE iPod
You carl enjoy playback of your iPod using the supplied rernote control.
t.
Place the iPod in the Dock.
• Your iPod is automatically turned on.
2. Connect the dock connector for iPod to the iPod jack on the DVD
home theater.
So Press the PORT button on the remote control to select iPod mode.
,, Each time the button is pressed, your selection will toggle between
iPod mode and USB mode.
4. Use A,_r4,_. and ENTER button on the remote control to display
the list of menu.
5. You can use the remote control or main unit to control simple
playback functions such as PLAY, PAUSE, STOP, NEXT/PREV,
and FF/REW, and REPEAT.
> Press the RETURN button to return to the previous menu,
Listening
by Category
OK to disconnect,
t.
Pressthe _,,T buttons on the remote control to select music and
pressthe ENTER button.
,, The Music categoriesappear.
2. Pressthe A,T buttons desiredcategory and press the ENTER button.
The music fliesappear.
3. Pressthe A,T buttons to select the file to play and press the ENTER
button
,, The music will start with a new screen which shows the song title,
time, artist, and progress bar.
[_
_ Not all iPods are compatiblewith this unit.
_ This product may not work properly,dependingon the software
versionof iPod. Pleasedownloadand installthe latestsoftware
version.
_ This product does net support playingphotos and moviesfrom
your iPod.
Music categories
File information including the artist name, album name, music title and genre will be displayed according
to the ID3 Tag information on the appropriate music file.
Now Playing : Plays a recently played file or moves to the playback screen of the current file.
Artists : To play by artist.
Songs : To play in numeric or alphabetical order
Playlists :To play by Playlist.
Albums : To play by album.
Genres : To play by genre.
Composer : To play by composer.
(_
_ What is an ID3 Tag?
This is what is attached to an MP3 to carry information relevant to the file such as
the title, artist, album, year, genre and a comment fi eld.
49
4
PLAYING
MEDIA FILES USING THE USB HOST FEATURE
You can enjoy media filessuch as pictures,movies and music savedon an MP3 player (exceptiPod), USB memory stick
or digital camera in high quality video with 5.1 channel HomeTheater sound by connecting the storage device to the
USB port of the Home Theater.
t. Connect the USB device to the USB port on the front
of the unit.
2. Press the FUNCTION button on the DVD Player or the
PORT button on the remote control to select the USB
mode.
,, USB appears on the display screen and then
disappears.
,, The USB MENU screen appears on the TV screen
and the saved file is played.
3. To stop playback, press the STOP (D) button.
Safe USB Removal
To prevent damage to the memory stored in the USB device,
perform safe removal before disconnecting the USB cable.
,, Press the STOP (1"!) button twice in a row.
The display will show REMOVE USB.
,, Remove the USB cable.
[_
'_ To listen to your music files with 5.1 channel home theater sound, you must set the Dolby
Pro Logic II mode to Matrix. (See page 61)
_ In USB mode, you are not enabled to change the resolution or use the SETUP menu if there is
no USB device connected to the USB port.
Skip Forward/Back
During playback, press the I_,_,_1 button.
,, When there is more than one file and you press the _,_1
button, the next file is selected.
,, When there is more than one file and you press the I._
button, the previous file is selected.
5O
Fast playback
During playback, press the _ ,_._ button.
• Each time you press either button, the playback speed
will change as follows:
2x -_ 4x -_ 8x -_ 32x -_ Normal:
Compatible
t.
2.
3.
4.
5.
6.
Devices
USB devices that support USB Mass Storage v1.0. (USB devices that operate as a removable disc
inWindows (2000 or later)without additional driver installation.)
MP3 Player: HDD and flash type MP3 players.
Digitalcamera: Cameras that support USB Mass Storage v1.0.
• Camerasthat operateas a removabledisc inWindows(2000or later)withoutadditionaldriverinstallation.
USB HDD and USB Flash Drive: Devices that support USB2.0 or USB1.1.
• You may experience a difference in playback quality when you connect a USBI.1 device.
• For a USB HDD, makesure to connect an auxiliarypower cord to the USB HDDfor proper operation.
USB card Reader: One slot USB card reader and Multi slot USB card reader.
,, Depending on the manufacturer, the USB card reader may not be supported.
,, If you install multiple memory devices into a multi card reader, you may experience problems.
If you use a USB extension cable, the USB device might not be recognized.
Supported Formats
JPG
JPG .JPEG
-
-
640x480
-
MP3
.MP3
80-384kbps
-
-
44.1kHz
WMA
.WMA
56-128kbps
V8
-
44.1kHz
WMV
.WMV
4Mbps
VI,V2,V3,V7
720x480
44.1KHz48KHz
720x480
44.1KHz48KHz
DivXS.11
DivX
.AVI,.ASF
........................................................
4Mbps
DivX5.1, XviD
CBI (Control/BuIWInterrupt)is not supported.
• Digital Cameras that use PTP protocol or require additional program installation when connected to a
PC are not supported.
A device using NTFS file system is not supported. (The system supports only the FAT file system and
will not play a movie in largerthan 1 GB in USB mode.)
,, Some MP3 players, when connected to this product, may not operate depending on the sector size
of their file system.
• The USB host function is not supported if a product that transfers media flies by its manufacturerspecific program is connected.
• Does not operate with Janus enabled MTP (Media Transfer Protocol) devices.
,, The USB host function of this product does not support all USB devices. For information on
supported devices, see page 72.
51
iiiiiiiiiiiiiiiii
,sy,stem,SetLAp
For your convenience, you can set this DVD Home Theater's features for the best use in your home
environment.
SETTING THE LANGUAGE
OSD(On-Screen Display) language is set to Englishby default.
1. in Stop mode, press the MENU button.
2. Press the Cursor T button to move to Setup and then press the
ENTER button.
3. Select Language and then press the ENTER button.
4. Press the Cursor A,T button to select OSD Language and then
press the ENTER button.
5. Press the Cursor A,_' button to select the desired language
and then press the ENTER button.
Once the setup is complete, the OSD will be English if
English has been selected as language.
:_- Pressthe RETURN button to return to the previous level.
:_- Pressthe EXIT button to exit the setup screen.
OSD LANGUAGE : Selecting the OSD Language
AUDIO : Selecting the Audio Language (recorded on the disc)
SUBTITLE : Selecting the Subtitle Language (recorded on the disc)
DiSC MENU : Seleding the Disc Menu Language(recordedon the disc)
If the languageyou selected is not recorded on the disc, menu
languagewill not changeeven if you set it to your desired language.
OTHERS : To select another language, select OTHERS and
enter the language code of your country.
AUDIO, SUBTITLE and DISC MENU languages can be
selected.
52
SETTING
TV SCREEN
TYPE
Depending on your TV type (Widescreen or conventional 4:3), you can select the TV's aspect ratio.
t.
In Stop mode, press the MENU button.
2. Press the Cursor T button to move to Setup and then press the
ENTER button.
3. Press the Cursor T button to move to TV DISPLAY and then
press the ENTER button.
4. Press the Cursor A, T button to select the desired item
and then press the ENTER button.
Once the setup is complete, you will be taken to the
previous screen.
Press the RETURN button to return to the previous level.
>-- Press the EXIT button to exit the setup screen.
Adjusting
the TV Aspect
Ratio (Screen Size)
The horizontal to vertical screen size ratio of conventional TVs is 4:3, while that of widescreen and high
definition TVs is 16:9. This ratio is called the aspect ratio. When playing DVDs recorded in different
screen sizes, you should adjust the aspect ratio to fit your TV or monitor.
For a standard TV, select either 4:3PS or 4:3LB option according to personal preference.
Select WlDE/HDTV if you have a widescreen TV.
4:3PS (4:3 Pan&Scan)
Select this to play a 16:9 picture in the pan & scan mode on a conventional
TV.
,, You can see the central portion of the screen only (with the sides of the
16:9 picture cut oft).
4:3LB (4:3 Letterbox)
Select this to play a 16:9 picture in the letter box mode on a conventional
TV.
,, Black bars will appear at the top and bottom of the screen.
WIDE/HDTV
Select this to view a 16:9 picture in the full-screen mode on your
widescreen TV.
You can enjoy the widescreen aspect.
(_
'_ If a DVD is in the 4:3 ratio, you cannot view it in widescreen.
_ Since DVD discs are recorded in various image formats, they will look different depending
on the software, the type of TV, and the TV aspect ratio setting.
'_ When using HDMI, the screen is automatically converted to Wide mode.
iiiiiiiiiiiiiiiii
, y, tem , etLAp
SETTING
PARENTAL
CONTROLS
(RATING
LEVEL)
Use this to restrict playback of adult or violent DVDs you do not want children to view.
1. In Stop mode, press the MENU button.
2. Press the Cursor T button to move to Setup and then press the
ENTER button.
8. Press the Cursor T button to move to PARENTAL and then press
the ENTER button.
4. Press the Cursor A,T button to select the desired rating leveland
then press the ENTER button.
If you have selected Level 6, you cannot view DVDs with Level 7
or higher.
,, The higher the level, the closer the content is to violent or adult
material.
5. Enter the password and then press the ENTER button.
The password is set to "7890" by default.
,, Once the setup is complete, you will be taken to the previousscreen.
>_- Pressthe RETURN button to return to the previous level.
Press the EXiT button to exit the setup screen.
(_
_ This function works only if a DVD disc contains the rating level information.
SETTING THE PASSWORD
You can set the password for the Parental (rating level) setting.
1. In Stop mode, press the MENU button.
2. Press the Cursor T button to move to Setup and then press the
ENTER button.
3. Press the Cursor T button to move to PASSWORD and then
press the ENTER button.
4. Press the ENTER button.
5. Enter the password and then press the ENTER button.
Enter the old password,a new password, and confirm new
password.
,, The setting is complete.
[_
'_ The password is set to "7890" by default.
If you have forgotten
the rating
level password,
do the following
While the player is in No Disc mode, hold the DVD PlayersSTOP (1"1)button for longer than
5 seconds. INITIAL appears on the display and all settings will return to the default values.
,, Press the POWER button.
Using the RESETfunction will erase all stored settings.
Do not use this unless necessary.
54
SETTING
THE WALLPAPER
While watching a DVD or JPEG CD, you can set the image you like as background wallpaper.
t.
During playback, press the PAUSE button when
an image you like appears.
2. Press the LOGO button.
• coPY LOGODATAwill bedisplayedonthe TVscreen.
3. The power will turn off and then back on.
• Theselectedwallpaperwill be displayed.
• Youcanselectup to 3 wallpapersettings.
This function will not work when the HDMI output is 720p, 1080i or 1080p.
TO SELECT
t.
ONE OF THE 3 WALLPAPER
SETTINGS
YOU'VE
MADE
In Stop mode, press the MENU button.
2. Press the Cursor T button to move to Setup and then
press the ENTER button.
3. Press the Cursor 'v button to move to LOGO and then
press the ENTER button.
4. Press the Cursor A,T button to select the desired USER,
and then press the ENTER button.
• Thisselectsoneof the 3 wallpaperscreens.
5. Press the EXIT button to exit the setup screen.
,, ORIGINAL : Select this to set the Samsung Logo image as
your wallpaper.
,, USER : Select this to set the desired image as your
wallpaper.
Press the RETURN button to return to the previous level.
Press the EXIT button to exit the setup screen.
55
DVD PLAYBACK
MODE
Some DVD-Audio discs contain DVD-Video as well as DVD-Audio.
To play back the DVD-Video portion of the DVD-Audio disc, set the unit
to DVD-Video mode.
1. Press the MENU button while the disc tray is open.
2. Press the Cursor T button to move to Setup and then press the
ENTER button.
3. Press the Cursor T button to move to DVD TYPE and then press
the ENTER button.
4. Press the Cursor A,T button to move to DVD VIDEO and then
press the ENTER button.
• Setsteps1 ~ 4againif youwantto switchto DVDAUDIOPlaymode.
,, DVD VIDEO : Set to play the DVD video contents contained on
a DVD audio disc.
,, DVD AUDIO : Set to play the default DVD audio.
(_
_ DVD Play mode is set to DVD Audio as factory default setting.
_ Powering off the main unit will automatically switch to the DVD Audio mode.
DvIX (R) Registration
Please use the Registration code to register this player with the DivX (R) video on demand format.
To learn more, go to vcc_v.divx.com/vod.
SETTING THE SPEAKER
MODE
Signal outputs and frequency responses from the speakers will automatically be adjusted according to
your speaker configuration and whether certain speakers are used or not.
1. In Stop mode, press the MENU button.
2. Press the Cursor T button to move to Audio and then press the
ENTER button.
3. In the SPEAKER SETUP, press the ENTER button again.
4. Press the Cursor A,V,._,I_ button to move to the desired speaker
and then press the ENTER button.
• ForC, SL,andSR,eachtimethe buttonispressed,the modeswitches
alternatelyasfollows:SMALL-* NONE.
• ForL andR,the modeis setto SMALL.
,, SMALL : Select this when using the speakers.
,, NONE : Select this when no speaker is connected.
>_- Pressthe RETURN button to return to the previous level.
>_- Pressthe EXIT button to exit the setup screen.
(_
56
Depending on PROLOGIC and STEREOsettings, the speakermode may vary (seepage 61).
SETTING
THE DELAY TIME
If the speakers cannot be placed at equal distances from the listening position, you can adjust the delay
time of the audio signals from the center and rear speakers.
t.
2.
3o
4.
In Stop mode, press the MENU button.
Press the Cursor T button to move to Audio and then press the ENTER button.
Press the Cursor T button to move to DELAY TIME and then press the ENTER button.
Pressthe Cursor A,'V,41,_ button to move to the desiredspeakerand then pressthe ENTER button.
5. Press the Cursor _,I_ to set the Delay time.
,, Youcan set the delaytime forC between00 and05mSECand forSL andSR between00 and 15mSEO.
>_- Press the RETURN button to return to the previous level.
>
Press the EXIT button to exit the setup screen.
Setting up the Speaker
Delay Time
When 5.1CH Surround Sound is played, you can enjoy the best sound if the distance between you and each
speaker is the same.
Since the sounds arrive at the listening position at different times depending on the placement of speakers, you can
adjust this difference by adding a delay effect to the sound of the Center and Rear Speakers.
Setting CENTER SPEAKER
SealCENTER SPEAKER
Ifthe distance of Dc is equal to or longer than the
distance of Df in the figure, set the mode as Oms.
Otherwise, change the setting according to the table.
0.00inch
0 ms
1feet,
2 feet,
3 feet,
4 feet,
5 feet,
1.39inches 2.77inches 5.73inches 7.12inches 9.29inches
1 ms
2 ms
3 ms
4 ms
5 ms
Setting REAR SPEAKER
Ifthe distance of Dc is equal to or longer than the distance of Df
in the figure, set the mode as Oms.
Otherwise, change the setting according to the table.
3feet,
0.00inch
0ms
6feet,
10leer,
13leer,
Dr:The distance from FRONT SPEAKEF
]c: The c stance from CENTERSPEAKER
Dr: The distance from REAR SPEAKER
17feet,
5.73inches 117inches 480inches 1054inches 427inche6
3n/s
6n/s
9ms
12ms
15ms
With 13[]PL II (Dolby Pro Logic II),the delay time may be different for each mode.
'_ With AC-3 and DTS, the delay time can be set between O0 and 15mSEC.
_ The Center channel is only adjustable on 5.1 channel discs.
57
iiiiiiiiiiiiiiiii
iiiiiiiiiiiiiiiii
,system ,SetLAp
SETTING
THE TEST TONE
Use the Test Tone feature to check the speaker connections.
1. In Stop mode, press the MENU button.
2. Press the Cursor T button to move to Audio and then press the
ENTER button.
3. Press the Cursor 'v button to move to TEST TONE and then press
the ENTER button.
,, The test tone will be sent to L ...*C ...*R ...*SR _ SL _ SW in
order.
If the ENTER button is pressed again at this time, the test tone
will stop.
>_ Pressthe RETURN button to return to the previous level.
Pressthe EXIT button to exit the setup screen.
SETTING
THE AUDIO
You can adjust the balance and level for each speaker.
1. In Stop mode, press the MENU button.
2, Press the Cursor T button to move to Audio and then press the
ENTER button.
3, Press the
press the
4, Press the
Press the
Cursor T button to move to SOUND EDIT and then
ENTER button.
Cursor A,T button to select and adjust the desired item.
Cursor ,_,_ button to adjust the settings.
>_ Pressthe RETURN button to return to the previous level.
Pressthe EXIT button to exit the setup screen.
58
SETTING
THE AUDIO
Manually Adjusting the speaker volume and Balance With the SOUND EDIT Buttonl
Press the SOUND EDIT button and then press the Cursor
_,_ button.
Adjusting Front/Rear Speaker Balance
_ You can select between 00, -06, and OFF.
_ The volume decreases as you move closer to -6.
Adjusting Center/Rear/Subwoofer
Speaker Level
_ The volume level can be adjusted in steps from +6dB to -6dB.
_ The sound gets louder as you move closer to +6dB and quieter as you get closer to -6dB.
SETTING
THE DRC (DYNAMIC
RANGE
COMPRESSION)
This feature balances the range between the loudest and quietest sounds. You can use this function to enjoy Dolby
Digitalsound when watching movies at low volume at night.
t.
In Stop mode, press the MENU button.
2. Press the Cursor T button to move to Audio and then press the
ENTER button.
3. Press the Cursor T button to move to DRC and then press the
ENTER button.
4. Press the Cursor A,T to adjust the DRC.
When the Cursor A button is pressed, the effect is greater, and
when the Cursor T button is pressed, the effect is smaller.
Press the RETURN button to return to the previous level.
_- Press the EXIT button to exit the setup screen.
59
,sy,st m , tLAp
SETTING THE AV SYNC
Video may look slower than the audio if it is connected to a digital TV. If this occurs, adjust the audio delay time to
match the video.
1. In Stop mode, press the MENU button.
2. Press the Cursor T button to move to Audio and then press the
ENTER button.
3. Press the Cursor T button to move to AV-SYNC and then press
the ENTER button.
4. Press the Cursor A,T button to select the AV-SYNC Delay Time
and then press the ENTER button.
,, You can set the audio delay time between 0 ms and 300 ms. Set
it to the optimal status.
Pressthe RETURN button to return to the previous level.
Pressthe EXIT button to exit the setup screen.
SETTING
THE
HDMI
AUDIO
The audio signals transmitted over the HDMI Cable can be toggled ON/OFF.
1. In Stop mode, press the MENU button.
2. Press the Cursor T button to move to Audio and then press the
ENTER button.
3. Press the Cursor T button to move to HDMI AUDIO and then
press the ENTER button.
4. Press the Cursor i,,T button to select ON or OFF and then press
the ENTER button.
, ON : Both video and audio signals are transmitted over the HDMI
connection cable, and audio is output through your
TV speakers only.
• OFF : Video is transmitted over the HDMI connection cable only,
and audio is output through the home theater speakers only.
>_ Press the RETURN button to return to the previous level.
>_ Press the EXIT button to exit the setup screen.
1_
+_The default setting of this function is HDMI AUDIO OFF.
_ HDMI AUDIO is automatically down-mixed to 2ch for TV speakers.
6O
SOUND
FIELD
(DSP)/EQ
FUNCTION
DSP(DigitalSignalProcessor): DSP modes have been designedto simulatedifferent acoustic environments.
EQ : Youcan select ROCK,POP, or CLASSICto optimize the sound for the genreof music you are playing
Press the DSP/EQ button.
,, DSP appears on the display panel.
Each time the button is pressed, the selection changes as follows:
POPS .-, JAZZ -, ROCK -, STUDIO -* CLUB .-, HALL -, MOVIE .-, CHURCH -, PASS --, POPS
,, POP, JAZZ, ROCK : Depending on the genre of music, you can select POP, JAZZ, and ROCK.
,, STUDIO : Provides a sense of presence as if in a studio.
,, CLUB : Simulates the sound of a dance club with a throbbing
bass beat.
,, HALL : Provides a clear vocal as if listening in a concert hall.
,, MOVIE : Provides the feeling of a movie theater.
,, CHURCH : Gives the feel of being in a grand church.
,, PASS : Select this for normal listening.
[_
DOLBY
The DSP/EQ function is only available in STEREO mode.
Press the II] PL II mode button to show STEREO on the display.
_ This feature works with CDs, MP3-CDs, 2 channel DVD-Audio, DivX and Dolby Digital discs.
_ When playing a DVD disc encoded with two or more channels, multi-channel mode will be
selected automatically and DSP/EQ function does not work.
PRO LOGIC
II MODE
Youcan select the desiredDolby Pro Logic IIaudio mode.
Press the FJDPL II MODE button.
,, Eachtime the button is pressed,the mode changesas follows.
MUSIC .--*CINEMA -, PRO LOGIC _ MATRIX --.-,
STEREO -* MUSIC
PRO LOGIC II
,, MUSIC : When listening to music, you can experience
sound effects as if you are listening to the actual
performance.
,, CINEMA :Adds realism to the movie soundtrack.
,, PRO LOGIC : You will experience a realistic multi-channel effect, as if using five speakers, while using
just the front left and right speakers.
,, MATRIX : You will hear 5.1 channel surround sound.
STEREO : Select this to listen to sound from the front left and right speakers and the subwoofer only.
[_'_
When selecting Pro Logic II mode, connect your external device to the AUDIO INPUT jacks
(L and R) on the player. If you connect to only one of the inputs (L or R), you cannot listen
to surround sound.
61
DOLBY
PRO LOGIC
II EFFECT
This function works only in Dolby Pro Logic MUSIC mode.
1. Press the [][]PL II MODE button to select MUSIC mode.
2. Press the [_PL
II EFFECT button.
,, Each time the button is pressed, the mode changes as
follows.
3. Press the _l,i_ buttons to select the desired effect setting.
PANORAMA : You can select either 0 or 1.
C- WIDTH : You can select between 0 and 7.
,, DIMENS : You can select between 0 and 6.
P.BASS
P.BASS function boosts the bass for a more powerful
sound.
1. Press the P.BASS button to select P.BASS mode.
2. Press the P.Bass button again to turn off the P.Bass
mode.
[_
62
'_ The P.BASS function is only available with 2 channel LPCM sources such as mp3,Divx,cd
and wma. Press P.BASS button and "POWER BASS ON" will be displayed on the screen.
'_ The P.bass does not work with DSP/EQ or DOLBY PRO LOGIC II modes.
If you press P.BASS in the DSP/EQ mode, the DSP/EQ mode is automatically shut off and
the P. BASS function comes on.
ASC (Auto Sound Calibration)
SETUP
By setting the ASC function just once when you relocate or install the unit, you can have the unit
automatically recognize the distance between speakers, levels between channels, and frequency
characteristics to create a 5.1 -channel sound field optimized for your environment.
ASC
: FRONT SPEAKER
(L)
: FRONT SPEAKER (R)
[_
SL: REARSPEAKER
(L)
SR: REAR SPEAKER (m_
: CENTER SPEAKER
/
: SUBWOOFER
J
_ ASC SETUP can be made when there is no disc in the unit, or it is in Stop mode with a
DVD/CD inserted.
_ Because the volume level of the tone is fixed during the ASC setup, you cannot adjust the
volume using the volume control buttons.
_ If the auto sound microphone is disconnected during the ASC setup, the setup will be
cancelled.
_ When ASC function is activated, the DSP/EQ, DOLBY PRO LOGIC II,and P. BASS sound
effects will not work.
To Verify the ASC
Briefly press ASC button.
,, Distance and level values specified for each channel will appear in the display.
ASC (Auto Sound Calibration) SETUP
1. Plug the ASC microphone into the ASC input jack.
2. Place the ASC microphone at the listening position.
3. PressASC button.
,, To create the optimal 5.1 channel sound field, the
selections are in the following sequence:
L-, C-_ R -, SR -, SL-* SW
4. When the message "REMOVEMIC" appears in the display,
unplug the ASC microphone.
[_
'_ Setting the ASC function takes about 3 minutes.
To cancel
button.
the ASC (Auto Sound
Calibration)
setup,
press ASC
The tone output stops, "CANCEL ASC" appears in the display followed by "REMOVE MIC", and the
setup is cancelled.
To listen in the ASC (Auto Sound
ASC button.
Calibration)
mode,
briefly
press
The selection alternates between ASC ON and ASC OFF inthe display.
Ifyou select "ASC ON", you will hear sound in the ASC mode.
Ifyou select "ASC OFF", you will hear sound in the mode set in the audio setting of the setup screen.
64
LiSTENiNG
TO RADIO
Remote Control
t.
Press the TUNER button to select the FM band.
2. Tune in to the desired station.
Automatic Tuning 1 : When the 144,_1 button is
pressed, a preset broadcast station is selected.
Automatic Tuning 2 : Press and hold the A,V
button to automatically search for active
broadcasting stations.
Manual Tuning : Briefly press the A,V button to
increase or decrease the frequency incrementally.
Main Unit
t.
Press the FUNCTION button to select the FM band.
2. Selecta broadcast station.
Automatic Tuning 1 : Press the STOP (rl) button to select PRESET and then press the 144,_1
button to select the preset station.
Automatic Tuning 2 : Press the STOP (Jr'l) button to select MANUAL and then press and hold
the I_,_1 button to automatically search the band.
Manual Tuning : Press the STOP (rl) button to select MANUAL and then briefly press
the _ _,_l button to tune in to a lower or higher frequency.
Pressthe MO/ST button to listenin Mono/Stereo.
* Eachtime the buttonis pressed,the soundswitchesbetweenSTEREOand MONO.
* Ina poor receptionarea,selectMONOfor a clear,interference-freebroadcast.
PRESETTING
STATIONS
Example : PresettingFM 89.10 in the memory
t.
Press the TUNER button to select the FM band.
2. Pressthe A, V button to select 89.10.
3. Pressthe TUNER MEMORY button.
4. Pressthe I_,_l
button to select presetnumber.
You can select between 1 and 15 presets.
5. Press the TUNER MEMORY button again.
6. To preset another station, repeat steps 2 to 5.
To tune in to a preset station, press the I_,_1
button on the remote control to select a channel.
65
o
XM SATELLITE
Before
RADIO
Using XM Satellite
Radio
What is XM satellite Radio?
XM SatelliteRadio is the satellite radio servicewith millionsof listenersacross the U.S., broadcastinglive daily.
XM's channellineup includesmerethan 160 digital channelsof choice from coast to coast: 68 commercialfree music channels,featuring hip hop to opera,classicalto country, bluegrassto blues; 33 channelsof
premier sports, talk, comedy, children's and entertainmentprogramming;and more than 20 channels of the
traffic and weather informationfor major metropolitan areas nationwide.
[_
The XM Satellite Radio service is only available in the 48 contiguous United States (not
available in Alaska and Hawaii).
_ The XM Antenna and monthly subscription are sold separately. For details, see the XM
Satellite Radio website at "http://www.xmradio.com"
_ To ensure optimal reception of XM's satellite signal, the XM Antenna should be placed at
or near a southerly facing window with nothing obstructing its path to the sky. You can
mount it indoors or outdoors.
Listening
to XM Satellite
Radio
1. Press the FUNCTION button and select the XM band.
• Each time the FUNCTION button is pressed, the band
switches between <FM> -_ <XM>
2. Press the Cursor ,,_,1_.button to select the channel, press
the Cursor A,'V button to select the category.
........ ..............
U
/
/
• You can select the channel directly by pressing the
number buttons(1 to 255).
[_
If "CHECK ANTENNA" appears in the display, the XM Antenna may not be connected to
the XM Antenna Jack on the rear of this unit properly.
When the selected channel is not available, "OH---" is displayed.
_ See page 33 for XM Radio Receiver/Antenna connection to this Home Theater.
66
XM Display
Modes
The XM featuresdescribed here onlyoperate when the optional XM receiverand antennaare connected to
the mainunit.
Pressthe XM DISPLAY button.
,, Eachtime the XM DISPLAYbutton is pressed,the mode
changesas follows:
CHANNEL NAME/NUMBER "-* CHANNEL CATEGORY "-*
ARTIST NAME/SONG TITLE -" SIGNAL STRENGTH
,, When the ChannelName/Number is displayed :
,, When the ChannelCategory is displayed :
,, When the Artist Name/SongTitle is displayed :
,, When the SignalStrength is displayed :
(_
'_ The front panel display can indicate up to 10 alphanumeric characters at once. If the
information contains more than 10 characters, the information scrolls from right to left.
'_ If the information contains a character that cannot be recognized by the unit, the character
will be displayed with an underbar .....
Checking
the XM Signal
Strength
Pressthe XM DISPLAY button until<Signal> is displayed.
,, The displaychanges as shown below according to the receiving
condition.
Display
Condition
GOOD
Signalstrengthisgood
MARGINAL
Signal strength is marginal
WEAK
Signal strength is poor
NO
Loss of signal
Checking
the Radio ID
Pressthe Cursor 41,_.button (or 144,_,_1button on the main unit)
to selectchannel <o>.
,, The Radio ID is displayed.
(_
_ To sign up for an account with the XM Satellite Radio service, an XM Satellite Radio ID
number is required. Follow the procedure above to check your ID number, and then
access the website at http//activate.xmradio.com"
or call "1-800-XM-RADIO(1-800-9672346)" with a major credit card to sign up.
67
XM SATELLITE
RADIO
XM Display
Modes
The XM featuresdescribed here only operate when the optional XM receiverand antenna connected to the
main unit.
Press the XM SEARCH button.
,, Eachtime the XM SEARCHbutton is pressed,the mode
changes asfollows:
CHANNEL SEARCH "_ CATEGORY SEARCH "-'
PRESET SEARCH
,, Channel Search Mode :
Pressthe TUNING/CH(or A, V button on the mainunit) to
moveto the desiredchannel.
,, Category Search Mode :
Pressthe TUNING/CH(or A, V button on the mainunit) to select the channel within the selectedcategory.
,, Preset Search Mode :
Pressthe TUNING/CH(or A, V button on the mainunit) to select the channel within the memorized
channels.
Presetting
XM Satellite
Radio
1. Press the FUNCTION button and select the XM band.
,, Each time the FUNCTION button is pressed, the band
switches between <FM> ...*<XM>
@
@
2. Search the XM Satellite Radio channel you want to set as a
preset channel.
3. Press the FM/XM MEMORY button.
,, <PRGM> flashes in the display.
4. Press the I_,_,q_l button to select preset number.
,, You can select between 1 and 15 presets.
5. Press the FM/XM MEMORY button again.
,, Press the FM/XM MEMORY button before <PRGM> disappears from the display.
,, <PRGM> disappears from the display and the channel is stored in memory.
6. To preset another channel, repeat steps 2 to 5.
'_ Up to 15 channels can be saved in memory. If you save more than 15 channels, the oldest
channel previously saved is removed and a new channel is stored in its place.
To tune in to a preset channel, press the TUNING/CH button (or I._,_,q_lbutton on the main
unit )until the channel is selected.
68
SLEEP TIMER FUNCTION
You can set the time that the Home Theater will shut itself off.
Press the SLEEP button.
• SLEEP will be displayed. Each time the button is pressed, the
preset time changes as follows :
10 _ 20 _ 30 "-, 60 -, 90 _ 120 -, 150 _ OFF.
To confirm the sleep timer setting, press the SLEEP button.
• The remaining time betore the Home Theater will shut itself off is
displayed.
• Pressing the button again changes the sleep time from what you
have set earlier.
To cancel the sleep timer, press the SLEEP button until OFF appears on the display.
ADJUSTING
DISPLAY
BRIGHTNESS
You can adjust the brightness of the display on the main unit so it won't
interfere with your movie viewing.
Press the DIMMER
button.
• Each time the button is pressed, the brightness of front display will
be adjusted.
MUTE FUNCTION
This is useful when answering a doorbell or telephone call.
Press the MUTE button.
• MUTE appears in the display.
• To restore the sound, press the MUTE button again.
69
troLAbeshootnG
Referto the chart belowwhenthis unit doesnotfunctionproperly.Ifthe problemyouare experiencingis not listed
belowor if the instructionbelowdoesnot help,turn off the unit,disconnectthe powercord, and contactthe nearest
authorizeddealeror SamsungElectronicsServiceCenter.
Disc tray does not open.
• Is the power cord plugged securely into the outlet?
Turn off the power and then turn it back on.
'Please connect your ipod'
appears on the screen,
Remove the iPod from the docking cradle and reinsert again.
Playback does not start
immediately when the
Play/Pause button is pressed,
Are you using a deformed disc or a disc with scratches on
the surface?
Sound is not produced.
If the battery levelof your iPod is totally drained, you
have to charge it again before use.
* Wipe the disc clean.
No sound is heard during fast playback, slow playback, and
step motion playback.
Are the speakers connected properly? Is the speaker setup
correctly customized?
Is the disc severely damaged?
Sound can be heard only from a
few speakers and not all six.
* When listening to a CD or radio, sound is output to the front
speakers (L/R) only. Select "PRO LOGIC I1"by pressing
I][qPL II (Dolby Pro Logic II)on the remote control to use all
six speakers.
* Make sure that the DVD disc is 5.1-CH compatible.
* If you set C, SL, and SR to NONE in the speaker mode in the
audio setup of the setup screen, no sound is heard from the
center speaker and the front left and right speakers. Set C,
SL, and SR to SMALL.
Dolby Digital 5,1 CH Surround
Sound is not produced,
* Is there "Dolby Digital 5.1 CH" mark on the disc? Dolby
Digital 5.1 CH Surround Sound is produced only if the disc is
recorded with 5.1 channel sound.
Is the audio language correctly set to DOLBY DIGITAL
5.1-CH in the information display?
The remote control does not
work.
Is the remote control being operated within its operation
range of angle and distance?
Are the batteries exhausted?
Have you selected the mode(TV/DVD)functions of the
remote control (TVor DVD) correctly?
70
• Discisrotatingbutno
pictureisproduced,
- Picturequalityispoorand
pictureisshaking.
• Is the TV power on?
Audiolanguage
andsubtitlesdo
notwork.
• Audio language and subtitles will not work if the disc does
not contain them.
Menuscreendoesnotappear
evenwhenthemenufunctionis
selected.
• Are you using a disc that does not contain menus?
Aspectratiocannotbechanged.
• You can play 16:9 DVDs in 16:9 WIDE mode, 4:3 LEWER
BOX mode, or 4:3 PAN SCAN mode, but 4:3 DVDs can be
seen in 4:3 ratio only. Refer to the DVD disc jacket and then
select the appropriate function.
• Themainunitis notworking.
(Example:
Thepowergoesout
orstrangenoiseis heard.)
• TheDVDplayerisnotworking
normally.
• Turn off the power and hold the STOP (D) button on the
main unit for longer than 5 seconds (resetfunction).
Thepassword
forratinglevelhas
beenforgotten,
• While "NO DISC" message appears on the display of main
unit, hold the main unit's STOP (rl) button for longer than 5
seconds. "INITIAL" appears on the display and all settings will
return to the default values.
• Are the video cables connected properly?
• Is the disc dirty or damaged?
• A poorly manufactured disc may not be playable.
Using the RESET function will erase all stored settings.
Do not use this unless necessary.
• Press the POWER button.
Using the RESET function will erase all stored settings.
Do not use this unless necessary.
Can'treceiveradiobroadcast.
• Is the antenna connected
properly?
• If the antenna's input signal is weak, install an external FM
antenna in an area with good reception.
'CHECK ANTENNA' is displayed.
• XM Antenna Jack and the XM Antenna is not properly connected.
Check the connections.
'ON SIGNAL' is displayed.
• Reposition your XM Antenna.
'OFF AIR' is displayed.
The selected channel is not currently broadcasting.
Receiving only XM channel 0 and
channel 1.
XM Antenna is not activated.
Access the website at 'http://activate.xmradio.com" with a credit
card to sign up.
71
DIGITAL
CAMERA
Finepix-A340
Finepix-F810
Finepix-F610
Finepix-f450
Finepix$7000
FinepixA310
KD-310Z
FinecamSL300R
FinecamSL400R
FinecamS5R
FinecamXt
Dimage-Z1
DimageZ1
DimageX21
Coolpix4200
Coolpix4300
Coolpix2200
Coolpix3500
Coolpix3700
Coolpix4100
Coolpix5200
Stylus410 digital
300-digital
300-digital
Fuji
Fuji
Fuji
Fuji
Fuji
Fuji
Konica
Kyocera
Kyocera
Kyocera
Kyocera
Minolta
Minolta
Minolta
Nikon
Nikon
Nikon
Nikon
Nikon
Nikon
Nikon
Olympus
Olympus
Olympus
DigitalCamera
DigitalCamera
DigitalCamera
DigitalCamera
DigitalCamera
DigitalCamera
DigitalCamera
DigitalCamera
DigitalCamera
DigitalCamera
DigitalCamera
DigitalCamera
DigitalCamera
DigitalCamera
DigitalCamera
DigitalCamera
DigitalCamera
DigitalCamera
DigitalCamera
DigitalCamera
DigitalCamera
DigitalCamera
DigitalCamera
DigitalCamera
U300
X-350
C-760
C-5060
Xl
U-mini
Lumix-FZ20
DMC-FXTGD
LumixLC33
LUMIXDMC-F1
Optic-S40
Optic-S50
Optic 33LF
Optic MX
Digimax-420
Digimax-400
Sofa PDR-T30
Coolpix5900
Coolpix$1
Coolpix7600
DMC-FX7
DimageXt
AZ-1
Olympus
Olympus
Olympus
Olympus
Olympus
Olympus
Panasonic
Panasonic
Panasonic
Panasonic
Pentax
Pentax
Pentax
Pentax
Samsung
Samsung
Toshiba
Nikon
Nikon
Nikon
Panasonic
Minolta
Olympus
DigitalCamera
DigitalCamera
DigitalCamera
DigitalCamera
DigitalCamera
DigitalCamera
DigitalCamera
DigitalCamera
DigitalCamera
DigitalCamera
DigitalCamera
DigitalCamera
DigitalCamera
DigitalCamera
DigitalCamera
DigitalCamera
DigitalCamera
DigitalCamera
DigitalCamera
DigitalCamera
DigitalCamera
DigitalCamera
DigitalCamera
USB FLASH DISC
CruzerMicro
CruzerMini
CruzerMini
SONYMicroVault
FLEXDRIVE
Sandisk
Sandisk
Sandisk
Sony
Serotech
AnyDrive
A.L tech
USB2.0USBFlash
Dave128M XTICK
USB 2.0 128M
Micro Mini
USB 2.0 256M
iFlash
USB2.0 64MB
LG
USB2.0 32MB
RiDATA
LG
Iomega
Imation
XTICK(M)
EZDrive
USB 2.0 128M
USB 2.0 128M
USB2.0 64M
USB2.0 64M
USB2.0 64M
USB2.0 128MB
MP3 PLAYER
CreativeMuVoNX128M
IriverH320
YH-920
YP-T7
YP-MT6
YP-T6
YP-T9
YP-ST5
YP-T5
YP-K5
72
Creative 128 MB MP3 Player
Iriver
20G HDDMP3 Player
Samsung 20G HDDMP3 Player
Samsung
MP3 Player
Samsung
MP3 Player
Samsung
MP3 Player
Samsung
MP3 Player
Samsung
MP3 Player
Samsung
MP3 Player
YP-K3
YP-U3
YP-Z5F
iAUDIOU2
iAUDIOG3
iAudioM3
SI-M500L
H10
YP-T10
Samsung
Samsung
Samsung
Cowon
Cowon
Cowon
Sharp
Iriver
Samsung
MP3 Player
MP3 Player
MP3 Player
MP3 Player
HDDMP3 Player
256MBMP3 Player
MP3 Player
MP3 Player
Samsung
YP-P2
Samsung
MP3 Player
MP3 Player
CAUTIONS
ON HANDLING
AND STORING
DISCS
Small scratches on the disc may reduce sound and picture quality or cause skipping.
Be especially careful not to scratch discs when handling them.
Handfing
discs
Do not touch the playback side of the disc.
Hold the disc by the edges so that fingerprints will not get on the surface,
Do not stick paper or tape on the disc.
Disc Storage
_,
i i: :
,,
]
uorlotKeeplnelrec[stJnllgn[
\\
[_
KeePinaCo01
....
yen[ a[ee area
KeePin a cleanProtectionjacketl
,,
Sterevet[ice y.
II
_ Do not allow the discs to become contaminated with dirt.
Do not load cracked or scratched discs.
Handfing
and Storing
Discs
When you get fingerprints or dirt on the disc, clean it with a mild detergent diluted inwater and wipe with
a soft cloth.
,, When cleaning, wipe gently from the inside to the outside of the disc
[_
_ Condensation may form if warm air comes into contact with cold parts inside the player.
When condensation forms inside the player, the player may not operate correctly. If this
occurs, remove the disc and let the player stand for 1 or 2 hours with the power on.
73
SPECIFICATIONS
PowerRequirements
AC120V,60Hz
PowerConsumption
Weight
90 W
11.5Ibs
Dimensions
16.9_t,/)x 17.3(H)x 2.9 (D)inches
Operating
Temperature
Range
+41°F to +95°F
Operating
Humidity
Range
10 % to 75 %
ReadingSpeed:3.49 - 4.06m/sec.
D\/D(Digital\/ersatileDisc)
iiiiiiiiiiiiiiiiiiiiiiiiiiiiiiiii l l l!l l i l l l l l
CD:5 inches(COMPACT
DISC)
CD: 3v2 inches(COMPACT
DISC)
Composite
Video
Approx.PlayTime,SingleSided,SingleLayerDisc): 135rain.
i! iii ii ii ii ii ii ii ii ii ii ii ii ii ii ii ii ii i! ii i i i
ReadingSpeed:4.8 - 5.6 m/see.
MaximumPlayTime: 74 rain.
ReadingSpeed:4.8 - 5.6 m/sec.
MaximumPlayTime: 20 rain.
480i
Cornponent
Video
1 channel
:1.0Vp-p(75(] load)
480i
Y: 1.0Vp-p(75load)
Pr:0.70Vp-p(750 load)
HDMI
Pb: 0.70Vp-p(750 load)
1080p,1080i,720p,480p
Frontspeaker
output
170Wx 2(30)
Center
speaker
output
180W(30)
l_earspeaker
output(SWA-4000)
Subwoofer
s
170Wx 2(30)
170Wx 2(30)
Frequency
range
S/NRatio
20Hz-2OKHz
70dB
Channel
separation
60dB
Inputsensitivity
(AUX)4OOmV
SWA-4000
Power Requirements
AC120V- 60Hz
Power Consumption
40 W
Weight
2.9 Ibs
Dimensions (W x H x D)
3.0 x 10.1 x 6.9 inches
Operating Temperature Range
+5°C - +35°C
Operating Humidity Range
Output
10% - 75%
170W x 2
Frequency range
20Hz-2OKHz
S/N Ratio
75dB
- If this power supply is used at 240V ac, a suitable plug adapter should be used.
74
HT-Z510
5.1 ch speaker system
Center
Subwoofer
Speakersystem
Front/Rear
Impedance
30
30
30
Frequencyrange
140Hz-2OKHz
140Hz-_20KHz
45Hz-q 60Hz
Output sound pressure level
86dB/W/M
86dB/W/M
86dB/W/M
Ratedinput
170W
180W
340W
360W
680W
Maximum input
Dimensions (WX H xD)
Weights
340W
Front/Rear : 3.5 x 9.0 x 3.6 inches
Center : 11.8 x 4.0 x 3.6 inches
Subwoofer : 7.9 x 15.7 x 16.5 inches
Front: 1.9Ibs,Center: 3.1 Ibs
Rear: 1.11bs, Subwoofer: 19.0Ibs
HT-TZ512
Speakers/s[em
Front/Rear
5.1 ch speaker system
Center
Subwoofer
muedance
30
30
30
Frequency
range
Outputsoundoressure_eve_
140Hz-2OKHz
86dB/W/M
140Hz-20KHz
45Hz-160Hz
86dB/W/M
86dB/W/M
Rated qou[
170W
180W
340W
Maximumqout
340W
360W
680W
Dimensions tW x H x D1
WeighB
Front : 3.5 x 47.2 x 3.6 inches
Rear : 3.5 x 9.0 x 3.6 inches
Center : 11.8 x 4.0 x 3.6 inches
Subwoofer : 7.9 x 15.7 x 16.5 inches
Front : 7.7 Ibs, Center :3.1 Ibs
Rear : 1.1 Ibs, Subwoofer : 19.0 Ibs
*: Nominal specification
- Samsung Electronics Co., Itd reserves the right to change the specifications without notice.
- Weight and dimensions are approximate.
75
WARRANTY
This SAMSUNG brand product, as supplied and distributed by Samsung Electronics America, Inc. (SAMSUNG)and delivered new,
in the originalcarton to the original consumer purchaser, is warranted by SAMSUNG against manufacturing defects in materials and
workmanship for a limited warranty period of:
One (1) Year Parts and Labor*
(*90 Days Parts and Labor for Commercial
Use)
This limited warranty begins on the original date of purchase, and is valid only on products purchased and used in the United States.
To receive warranty service, the purchaser must contact SAMSUNG for problem determination and service procedures. Warranty
service can only be performed by a SAMSUNG authorized service center. The original dated bill of sale must be presented upon
request as proof of purchase to SAMSUNG or SAMSUNG's authorized service center. Transportation of the product to and from
the service center is the responsibility of the purchaser.
SAMSUNG will repair or replace this product, at our option and at no charge as stipulated herein, with new or reconditioned parts
or products if found to be defective during the limited warranty period specified above. All replaced parts and products become
the property of SAMSUNG and must be returned to SAMSUNG. Replacement parts and products assume the remaining original
warranty, or ninety (90)days, whichever is longer.
SAMSUNG'sobligationswith respectto softwareproductsdistributed by SAMSUNGunderthe SAMSUNGbrand nameare set forth in the
applicableenduser licenseagreement.Non-SAMSUNGhardwareand sefb/vareproducts,if provided,are on an "AS IS" basis.
NomSAMSUNGmanufacturers,suppliers,publishers,andservice providersmay providetheirown warranties.
This limited warranty covers manufacturing defects in materials and workmanship encountered in normal, and except to the extent
otherwise expressly provided for in this statement, noncommercial use of this product, and shall not apply to the following, including,
but not limited to: damage which occurs in shipment; delivery and installation; applications and uses for which this product was not
intended; altered product or serial numbers; cosmetic damage or exterior finish; accidents, abuse, neglect, fire, water, lightning or
other acts of nature; use of products, equipment, systems, utilities, services, parts, supplies, accessories, applications, installations,
repairs, external wiring or connectors not supplied and authorized by SAMSUNG, or which damage this product or result in service
problems; incorrect electrical line voltage, fluctuations and surges; customer adjustments and failure to follow operating instructions,
cleaning, maintenance and environmental instructions that are covered and prescribed in the instruction book; product removal
or reinstallation; reception problems and distortion related to noise, echo, interference or other signal transmission and delivery
problems. SAMSUNG does not warrant uninterrupted or error-free operation of the product.
THERE ARE NO EXPRESSWARRANTIESOTHERTHAN THOSE LISTEDAND DESCRIBEDABOVE, AND NO WARRANTIES
WHETHER EXPRESSOR IMPLIED, INCLUDING,BUT NOT LIMITEDTO, ANY IMPLIED WARRANTIESOF MERCHANTABILITY
OR FITNESSFOR A PARTICULARPURPOSE, SHALL APPLY AFTER THE EXPRESSWARRANTY PERIODSSTATEDABOVE,
AND NO OTHER EXPRESSWARRANTY OR GUARANTY GIVEN BY ANY PERSON,FIRM OR CORPORATIONWITH RESPECTTO
THIS PRODUCT SHALL BE BINDING ON SAMSUNG. SAMSUNG SHALL NOT BE LIABLE FOR LOSS OF REVENUEOR PROFITS,
FAILURETO REALIZE SAVINGS OR OTHER BENEFITS, OR ANY OTHER SPECIAL, INCIDENTALOR CONSEQUENTIALDAMAGES
CAUSED BY THE USE, MISUSE OR INABILITYTO USETHIS PRODUCT, REGARDLESSOF THE LEGAL THEORY ON WHICH
THE CLAIM IS BASED, AND EVEN IF SAMSUNG HAS BEEN ADVISED OF THE POSSIBILITYOF SUCH DAMAGES. NOR SHALL
RECOVERYOF ANY KIND AGAINST SAMSUNG BE GREATER IN AMOUNT THAN THE PURCHASE PRICEOF THE PRODUCT
SOLD BY SAMSUNG AND CAUSING THE ALLEGED DAMAGE. WITHOUT LIMITINGTHE FOREGOING,PURCHASER ASSUMES
ALL RISK AND LIABILITYFOR LOSS, DAMAGEOR INJURY TO PURCHASER AND PURCHASER'S PROPERTYAND TO OTHERS
AND THEIR PROPERTYARISING OUT OF THE USE, MISUSE OR INABILITYTO USE THIS PRODUCT SOLD BY SAMSUNG NOT
CAUSED DIRECTLYBY THE NEGLIGENCE OF SAMSUNG. THIS LIMITEDWARRANTY SHALL NOT EXTENDTO ANYONE OTHER
THAN THE ORIGINAL PURCHASEROF THIS PRODUCT, IS NONTRANSFERABLEAND STATES YOUR EXCLUSIVEREMEDY.
Some states do not allow limitations on how long an implied warranty lasts, or the exclusion or limitation of incidental or consequential
damages, so the above limitations or exclusions may not apply to you. This warranty gives you specific legal rights, and you may also
have other rights which vary from state to state.
To obtain warranty hardware service, please contact SAMSUNG at:
Samsung Electronics America, Inc.
105 Challenger Road Ridgefleld Park, NJ 07660-0511
1-800-SAMSUNG (726-7864) and www.samsung.com/us
76
Contact
SAMSUNG
WORLD
WIDE
Ifyouhave
anyquestions
orcomments
relating
toSamsung
products,
please
contact
theSAMSUNG
customer
carecenter.
North
Latin
America
America
CANADA
1 800 SAMSUNG{726
MEXICO
01 800 SAMSUNG(726
U.S.A
1 800 SAMSUNG{726
ARGENTINE
0800 833 3733
wvwv.s_msu
BRAZIL
0800 124 421 . 4004 0000
wvwv.samsuf_g.com
CHILE
8(30 SAMSUNG(726
wvwv.s_msu
NICARAGUA
00 1800 5077267
HONDURAS
8(30 7919267
COSTA RICA
0 800 507 7267
wwTv.samsu_g.com/latir_
ECUADOR
1 800 10 7267
w_wv.samsu f_g.oo_r_/latir_
EL SALVADOR
800 6225
GUATEMALA
1 800 299 0013
w_wv.samsu f_g.oo_r_/latir_
www.samsui/g.com/latirl
JAMAICA
1 800 234 7267
w_wv.samsu f_g.oo_r_/latir_
PANAMA
800 7267
w_wv.samsu f_g.oo_r_/latir_
PUERTO RICO
1 800 682 3180
w_wv.samsu f_g.oo_r_/latir_
REP. DOMINICA
1 800 751 2676
TRINIDAD & TOBAGO
1 800 SAMSUNG{726
VENEZUELA
0 800 100 5308
vcvwv.samsu f_g.com/latir;
COLOMBIA
01 8000112112
vcvwv.samsu f_g.com.co
BELGIUM
0032 (0)2 201 24 18
844 000 844
vcvwv.samsu f_g.com/be
CZECH REPUBLIC
70 70 19 70
FINLAND
030 6227 515
Europe
C IS
Asia
Pacific
Middle East
Africa
wwzv.sarnsu[_g.com/ca
7864)
wvwv.samsuf_g.ooln
7864)
wvwv.samsuf_g.com
7864)
f_g.com/ar
f_g.com/cI
vcvwv.samsu f_g.com/latir;
7864)
Distributor pro 0eskou repubIiku:
Samsung Zrt., _eska organiza_ni
Vysko_ilova 4 14000 Praha 4
DENMARK
FRANCE
7864)
wvwv.s8msu f_g.oom/]atirl
slo2ka
wvwv.samsui/g.corWcz
wvwv.samsui/g.corWdk
wwvv.samsui/g.com/ti
3260 SAMSUNG
(€ 0,15/M in),
wwvv.samsui/g.com
08 25 08 65 65 ((_ 0,15/Min)
GERMANY
01805
SAMSUNG(726
7864) (€ 0,14iMin)
HUNGARY
06 80 SAMSUNG{726
wwvv.samsung.com
7864)
ITALIA
800 SAMSUNG(726
wwvv.samsung.com
LUXEMBURG
0035 (0)2 261 03 710
NETHERLANDS
0900 SAMSUNG(726
NORWAY
815 56 480
POLAND
0 801 801 881 , 022 607 93 38
wwvv.samsung.com/pl
PORTUGAL
80820
wwvv.samsung.com/pt
SLOVAKIA
0800 SAMSUNG(726
SPAIN
902 10 11 30
SWEDEN
0771 400 200
U.K
EIRE
0845 SAMSUNG
0818 717 100
AUSTRIA
0800 SAMSUNG(726
7864)
wwvv.samsung.corWat
SWITZERLAND
0800 SAMSUNG(726
7864)
wwvv.samsung.corWch
RUSSIA
8 800 555 55 55
wwvv.samsung.com
KAZAHSTAN
8 10 800 500 55 500
wwvv.samsung.kz
UZBEKISTAN
KYRGYZSTAN
8 10 800 500 55 500
wwvv.samsung.uz
TADJIKISTAN
8 10 800 500 55 500
UKRAINE
8 800 502 0000
wwvv.samsung.com
LITHUANIA
8 800 77777
wwvv.samsung.lt
LATVIA
800 7267
wwvv.samsung.com/Iv
ESTONIA
800 7267
wwvv.samsung.ee
AUSTRALIA
1300 362 603
NEW ZEALAND
0800SAMSUNG(726
CHINA
8(30 810 5858 , 010 6475 1880
wwvv.samsung.com
HONG KONG
3698 4698
wwvv.samsung.corWhk
INDIA
3030 8282.
INDONESIA
0800 112 8888
wwvv.samsung.com
JAPAN
0120 827 527
wwvv.samsung.com/jp
MALAYSIA
1800 88 9999
PHILIPPINES
1800 10 SAMSUNG(726
SINGAPORE
wwvv.samsung.com
THAILAND
1800 SAMSUNG(726 7864)
1800 29 8232.02
689 8232
TAIWAN
0800 829 999
wwvv.samsung.com/t_zv
VIETNAM
1 800 588 889
wwvv.samsung.com
TURKEY
444 77 11
SOUTH AFRICA
0860 SAMSUNG(726
U.A.E
800 SAMSUNG
7864)
wwvv.samsung.com
www.samsung.com/be
7864){€
0,10/Min)
wwvv.samsung.corWnl
wwvv.samsung.com/ilo
SAMSUNG{726
7864)
7864)
wwvv.samsung.com/sk
wwvv.samsung.com
wwvv.samsung.corWse
(7267864)
wwTv.samsung.com
wwvv.samsung.corWie
00 800 500 55 500
wwvv.samsung.com
7864)
1800 110011
wwvv.samsung.corWilz
wwvv.samsung.com
wwvv.samsung.com/my
7864)
wwvv.samsung.com/ph
wwvv.samsung.com
wwvv.samsung.com
&
7864 )
(726 7864), 8000 4726
wwvv.samsung.com
www.samsung.oom
QUESTIONS
OR COMMENTS?
COUNTRY
IN THE US
CaLL
1 800 SAMSUNG
(7267864)
'OR VISIT
USONUNE
AT
www.samsung.com/us
WRITE
Samsung Electronics America, Inc.
105 Challenger Road Ridgefield Park,
NJ 07660 0511
Code No. AH68-02048C
(0.0)