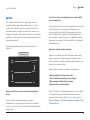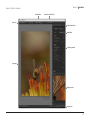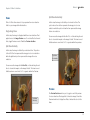
1
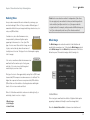
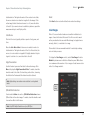
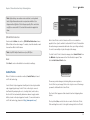
Nik Software
Dfine 2.0
®
User Guide
© Josh Haftel
Chapter 1
Introduction
Introduction to Dfine 2.0 and the User’s Manual
Dfine 2.0 User Guide
Chapter 1 : Introduction
The result? Dfine 2.0 is a powerful, yet easy-to-use tool that anyone
can use to perform high quality noise reduction without needing to
understand the complex underlying theory.
Because Dfine 2.0 is a plug-in for Adobe Photoshop and other
compatible applications, you must have Photoshop or a compatible
application installed on your computer.
Introduction
Welcome to Dfine 2.0, the most powerful tool for reducing noise in
your digital photographic images.
All digital cameras inherently create unwanted imperfections known
as “noise.” The amount of noise in an image typically depends on
the quality and type of imaging sensor with which it was created.
High ISO speeds and low light can also add noise.
New Dfine 2.0 gives you unprecedented control over exactly how
much and where to apply noise reduction. This makes it ultra-easy
to eliminate noise in your images while maintaining detail and
sharpness, thus improving the quality of every digital photo you
take. Dfine 2.0 is designed to prevent the loss of detail other noise
reduction tools often introduce.
Dfine 2.0 introduces a brand new, re-sizable user interface that
includes Nik Software’s award-winning U Point™ technology for the
ultimate in selective control. Busy photographers will appreciate
the workflow improvements offered by the new interface, as well
as improvements such as automatic camera profiles and batch
processing.
New Feature Highlights
• New interface
• Navigator Loupe
• Resizable
• New, more professional look and feel
• Greatly improved noise reduction engine
• Higher quality noise reduction
• Better retention of fine details
• Profile creation
• Profiles can be created automatically or manually
• Profiles can be shared
• Improved batch processing. Interface can be set to auto-profile or
auto-load profiles based on image EXIF data (needs a profile to be
created first for each camera/ISO combination)
• Improved Selective Tool interaction. Selective Tool can be called
from within the Interface, users do not have to access the filter from
the Selective Tool in order to selectively apply the filter
Chapter 1 : Introduction
Dfine 2.0 User Guide
• Improved Color Ranges tool (formerly the Camera Profile
Controller). Can add or remove color ranges, minimum is 2 ranges
• U Point-based noise reduction. Add Control Points to selectively
reduce noise
What’s in the Manual
In addition to providing installation instructions, the manual shows
you how to measure noise in your images, introduces new methods
for selectively applying noise reduction, and suggests workflow
methods that can dramatically improve your productivity. The
manual also points out differences between Dfine 2.0 and Dfine 1.0.
The typographical conventions used in this manual are:
• Dfine 2.0 processes and user interface components appear in
Initial Caps, with first instances in Bold Caps. (In context-appropriate
cases, later instances also appear in Bold Caps.)
• Specific control inputs appear in Bold Italic. Control inputs can be
menu items, buttons, or sliders. Where first instances coincide with
specific control inputs, the term appears in Bold Italic.
© Laurie Shupp
Chapter 2
What’s New in 2.0
New Features and Functionality in Dfine 2.0
Dfine 2.0 User Guide
Chapter 2 : What’s New in 2.0
What’s New in 2.0
Dfine 2.0 offers many enhancements and improvements on Dfine
1.0, in four general categories:
• Interface
• Noise Reduction Engine
• Noise Reduction Process
• Selective Tool Interaction
The new interface is a professional photographic tool. It is fully
resizable, color-neutral with a medium-gray background and a strong
focus on efficient workflow. Dfine 2.0 groups major controls close
together for greater efficiency, allowing you to achieve excellent
results in less time. (Please see Chapter 5: Dfine 2.0 Interface.)
Noise Reduction Engine
Interface
Dfine 1.0 users will notice version 2.0’s extensively reworked
interface, the result of extensive research into professional
photographers’ expectations regarding the look and feel of image
editing software. Feedback from Nik Software users has been taken
into account as well.
Dfine 2.0 features a completely new noise reduction engine. This
gives photographers an incredibly powerful and precise tool for
reducing unwanted artifacts while maintaining high levels of
detail and at the same time simplifying processes and keeping the
learning curve minimal.
Dfine 2.0
Noise Reduction
Engine
Dfine 2.0
User Interface
To ensure a simple and straightforward workflow, an automatic
profiling system was also developed. This system makes noise
reduction as easy as possible while working on the broadest
possible range of images. The system is designed to provide optimal
profiling results with no input required for most images. The system
lets you profile an image with one click and then apply the highest
quality noise reduction with only a few more simple steps.
Dfine 2.0 User Guide
Chapter 2 : What’s New in 2.0
Noise Reduction Process
Dfine 2.0 uses three distinct noise reduction methods. The first,
Whole Image, lets you apply noise reduction globally to an entire
image.
The second method, Color Ranges, improves upon Dfine 1.0’s
Camera Profiles. The Color Ranges tool enables you to select the
number of color ranges against which to control noise reduction. A
minimum of two color ranges must be selected for each image.
The third method, Control Points, is based on Nik Software’s
patented U Point technology. U Point-powered Control Points provide
photographers with the ability to selectively enhance their images,
without the use of complex selections or masks. With Dfine 2.0’s
U Point technology, you can quickly, easily, and selectively reduce
noise in images by simply placing Control Points on different objects
within your image, identifying and controlling noise on those
objects. (Please see Chapter 7: Noise Reduction Step 2: Reducing
Noise.)
Dfine 2.0
Selective Tool
To increase flexibility, Dfine 2.0 gives you the choice of selectively
applying the filter in the Filter Interface, letting you launch the Dfine
2.0 interface either from within the Selective Tool or from the Filters
menu. (Please see Filter Controls, Chapter 5: Dfine 2.0 Interface.)
Selective Tool Interaction
Originally, the Selective Tool was used to determine when to apply
Dfine’s noise reduction selectively to an image. As Dfine’s popularity
increased, photographers discovered that the Selective Tool offered
a convenient way to access the filter without using the Filters menu.
Dfine 1.0 doesn’t allow the Selective Tool to be launched while Dfine
is running. Thus, if you discover you need the Selective Tool during
a Dfine 1.0 session, you must close the session, start the Selective
Tool, and then restart Dfine.
© Tony Corbell
Chapter 3
Installation
Installing and Accessing Dfine 2.0
Dfine 2.0 User Guide
Chapter 3 : Installation
Installation
Dfine 2.0 is a plug-in for Adobe Photoshop and other compatible
applications. The installer provided for Dfine 2.0 searches for an
installation of Adobe Photoshop or Adobe Photoshop Elements.
The installer attempts to locate the most recent installation of
Adobe Photoshop or Adobe Photoshop Elements, and if successful,
displays the recommended folder.
Installing Dfine 2.0 and the Selective Tool
Before you install Dfine 2.0, please close all applications including
Adobe Photoshop or other image editing application that will serve
as Dfine 2.0’s host. Please do not open any other applications
during the installation process.
To begin installation:
Dfine 2.0
Setup
Double-click on the installation file provided either on your Dfine 2.0
CD or from the download process from the Nik Software web page. A
window appears displaying the Dfine 2.0 Setup Wizard.
Double-click
the Installer
The installer will walk you through the various steps necessary in
order to install Dfine 2.0 into your image editing application of
choice.
After you read the Read Me and accept the End User License
Agreement, the Dfine 2.0 installer will prompt you for the plug-in
location for your image editing application of choice.
If the installer is unable to locate Adobe Photoshop or Adobe
Photoshop Elements, or if you are using a different image editing
application, you must specify the appropriate installation path.
For Adobe Photoshop or Adobe Photoshop Elements, this location is
the Plug-Ins folder located under the application’s main folder. For
example:
Adobe Photoshop
Windows – C:\Program Files\Adobe\Adobe Photoshop CS3\Plug-Ins
Macintosh – Macintosh HD : Applications : Adobe Photoshop CS3 :
Plug-Ins
Dfine 2.0 User Guide
Chapter 3 : Installation
Adobe Photoshop Elements
Accessing Dfine 2.0 and the Selective Tool
Windows – C:\Program Files\Adobe\Adobe Photoshop Elements
5.0\Plug-Ins
After completing the installation, launch your image editing
application. In Adobe Photoshop and Adobe Photoshop Elements,
Dfine 2.0 is accessed via the Filter menu.
Macintosh – Macintosh HD : Application : Adobe Photoshop
Elements 4.0 : Plug-Ins
Click Browse… to open the Browse for Folder window, then navigate
to the appropriate folder.
Note: For guidance on the location of Plug-Ins in applications other
than Adobe Photoshop or Adobe Photoshop Elements, please refer
to your application’s user manual.
To begin using Dfine 2.0:
1. Open an image that requires noise reduction.
2. Click the Filter menu.
3. Roll over the Dfine 2.0 item. A popup menu appears.
4. Select Dfine 2.0 from the Dfine 2.0 popup menu.
After selecting the appropriate folder location, click Install. When
the installation is complete, the installer’s final page appears.
If you want the Selective Tool to open each time Photoshop or
Photoshop Elements launches, leave the Open Dfine 2.0 Selective
automatically box checked. The Selective Tool enables you to
selectively apply Dfine 2.0 by automating Photoshop or Photoshop
Element’s layers systems. (Please see Chapter 8: Selective Tool.)
Uncheck this box to prevent the Selective Tool from opening each
time Photoshop or Photoshop Elements launches. You can change
this option within the Selective Tool settings interface. (Please see
Chapter 10: Selective Tool Settings.)
Note: The Selective Tool is available only with Adobe Photoshop
and Adobe Photoshop Elements as Dfine 2.0’s host.
Click Finish to complete the installation process.
The Dfine 2.0 interface appears displaying the image specified in
step 1 above. (Please see Chapter 5: Dfine 2.0 Interface or Chapter
6: Noise Reduction Step 1: Measuring Noise.)
10
Dfine 2.0 User Guide
Chapter 3 : Installation
The Selective Tool can be accessed by navigating to one of the
locations listed below:
Adobe Photoshop Elements
File > Automation Tools
Adobe Photoshop
File > Automate
11
© Tony Sweet
Chapter 4
Workflow
Workflow and Tips for Optimal Noise Reduction
Dfine 2.0 User Guide
Chapter 4 : Workflow
Workflow
Noise reduction’s effectiveness varies depending on where it
is applied within the image editing workflow. Noise is a subtle
variation of recorded light values from one pixel to the next. The
more enhancements you apply to an image before reducing noise,
the greater the variation. As this variation increases, noise reduction
applications become less able to reduce unwanted artifacts without
degrading image detail.
The following guidelines will help you achieve optimal noise
reduction:
Workflow Diagram
Image
Capture
Convert from RAW
Edit
Dfine 2.0
(if necessary)
Sharpen
Print
Workflow Diagram
Apply noise reduction as early as possible in the image editing
process.
The more contrast, sharpening, brightening, saturation
enhancements, or image resizing you perform before using Dfine
2.0, the less noise you will be able to remove without degrading the
image’s detail.
Turn off noise reduction and sharpening on your camera or RAW
conversion application.
Turning off these functions ensures that image details are preserved
and enables Dfine 2.0 to provide precise and powerful noise
reduction. Additionally, turning off sharpening functions in your
camera or RAW conversion application prevents amplification of
noise structures in images. If you choose to apply RAW or capture
sharpening to your image, do so after using Dfine 2.0, ideally with
Nik Sharpener Pro 2.0.
Apply noise reduction only when necessary.
Because noise reduction alters detail structures, however subtly,
apply noise reduction only when necessary. All images contain
some noise, but noise reduction should be applied only when noise
detracts from an image’s subject.
Typical situations in which noise reduction is indicated are:
• When using high ISO settings on your camera
• After accidentally underexposing a series of images
• When opening up shadow details in an image
• Whenever noise is visible in an image
Dfine 2.0’s workflow is straightforward: measure noise, then reduce
it. The interface walks you through and automates the process
of measuring noise and provides the tools you need to reduce it.
(Please see Chapter 6: Step 1: Measuring Noise and Chapter 7: Step
2: Reducing Noise.)
12
© Don Gale
Chapter 5
Dfine 2.0 Interface
Overview of the New Dfine 2.0 Interface
Dfine 2.0 User Guide
Chapter 5 : Dfine 2.0 Interface
Preview Modes
Select, Zoom, and Pan Tools
View Tools
Noise Reduction Area
Method Area
Color Range Controls
Image Area
Navigator/Loupe
Resize Corner
14
Dfine 2.0 User Guide
Chapter 5 : Dfine 2.0 Interface
Views
Split View Horizontally
Dfine 2.0 offers three views to let you preview the noise reduction
effect on your image within the interface.
In this view, the image is divided by a horizontal red line. The
portion above the red line represents the image prior to noise
reduction while the portion below the line represents the image
after noise reduction.
Single Image View
In this view, the image is displayed with the noise reduction effect
applied across the Image Preview area. To see the effect before and
after, toggle Preview on and off with the Preview checkbox.
You can move the image with the Pan Tool or click and drag the red
line to observe the impact on the image’s detail. This view is most
effective when zoomed in at 100% or greater within the preview.
Split View Vertically
In this view, the image is divided by a vertical red line. The portion
to the left of the line represents the image prior to noise reduction
while the right-hand portion represents the image after noise
reduction.
Split View
Horizontally
You can move the image with the Pan Tool or click and drag the red
line to observe the impact on the image’s detail. This view is most
effective when zoomed in at 100% or greater within the Preview.
Preview
Split View
Vertically
The Preview Function enables you to toggle on and off a preview
of noise reduction effects applied to the active image. Check the
Preview checkbox to display the effects. Uncheck the box to hide
them.
15
Dfine 2.0 User Guide
Chapter 5 : Dfine 2.0 Interface
Preview Modes
The Preview Modes enable you observe the effects of noise
reduction on individual elements of the image. You can display
individual color channels or examine the masks created by different
noise reduction methods. The Preview Modes are useful in judging
the correct amount of noise reduction to apply.
RGB
RGB is the default view. It displays the image in color.
Red, Green, and Blue channels
Choose from Red, Green, or Blue to display a black and white
representation of the image’s detail from the selected color channel.
Luminance and Chrominance
Select Luminance or Chrominance modes to display black and white
representations of, respectively, the image’s brightness components
or color components and to observe the effects of noise reduction
on them.
Contrast and Color Noise Masks
Contrast Noise Mask and Color Noise Mask display the masks
created automatically by either the Color Ranges noise reduction
method or the Control Points noise reduction method. Separate
masks are created for both contrast and color noise reduction,
letting you observe the effects on different areas and objects
throughout your image. You can interact with and adjust the controls
within either the Color Ranges or Control Points methods while in
either mask mode.
White areas receive the maximum amount of the selected type of
noise reduction, while black areas receive none. Gray areas receive
an intermediate amount.
Select Tool
The Select Tool lets you select and interact with either Measurement
Rectangles that you add to your image during the measuring process
or Control Points that are added during the noise reduction process.
shortcuts
Press the A key to switch to this tool
Press Ctrl (Windows) / Command (Macintosh) to temporarily switch
to this tool
Zoom Tool
The Zoom Tool lets you zoom in and out of your image. After
selecting this tool, click on the area of the image within the interface
that you want to zoom in to. If you would like to zoom out, press
and hold the Alt (Windows) or Option (Macintosh) and click on the
image.
Dfine 2.0 offers three zoom states:
• Zoom to Fit
• 100%
• 300%
16
Dfine 2.0 User Guide
Chapter 5 : Dfine 2.0 Interface
Zoom to Fit ensures that the entire image fits within the Preview
and automatically adjusts the zoom factor as you change the size of
the interface. The 100% view shows the actual pixel details, and is
the recommended viewing method when reviewing noise and image
detail. The 300% view allows you to zoom even further into your
image and view fine pixel detail.
ZOOM Shortcuts
Background Color Selector
The Background Color Selector tool lets you change the color of the
background surrounding the image. The three choices are Light Gray,
Medium Gray, and Dark Gray.
Image Area
Press the Z key to switch to this tool
The Image Area displays the active image and related information
beneath the image.
Ctrl (Windows) / Command (Macintosh) + Command to temporarily
switch to this tool
Image Preview
Ctrl (Windows) / Command (Macintosh) + ‘+’ to zoom in one level
Ctrl (Windows) / Command (Macintosh) + ‘-’ to zoom out one level
Ctrl (Windows) / Command (Macintosh) + 0 to zoom to Zoom to Fit
Ctrl (Windows) / Command (Macintosh) + Alt (Windows) / Option
(Macintosh) + 0 to zoom to 100%
The Image Preview displays the image you are currently working on,
with the Preview as set within the interface as well as the selected
Mode. This area has three zoom states: Zoom to Fit, 100%, and
300%, controlled with the Zoom Tool or with keyboard shortcuts.
Please refer to the Zoom Tool section earlier in this chapter for
additional information.
Image Info
Pan Tool
The Pan Tool lets you reposition your image while zoomed into the
100% or 300% views. When interacting with the Loupe tool, the
cursor always becomes a Pan Tool to let you reposition the content
of the Loupe tool.
pan shortcuts
Press the H key to switch to this tool
Press the Spacebar key to temporarily switch to this tool
The Image Info Area, typically only visible in the Zoom to Fit view,
displays the name of the image, and, if EXIF data is available, the
resolution, ISO, and the camera make and model used to capture
the image. This information is used in creating profiles and when
loading profiles based on EXIF data.
Noise Reduction Tools
Dfine 2.0 uses a two-step noise reduction process: Measure and
Reduce. The measuring step lets Dfine identify the characteristics
17
Dfine 2.0 User Guide
Chapter 5 : Dfine 2.0 Interface
of noise present in either the current image or related to a specific
camera and ISO combination. The reduction step lets you decide
how much noise reduction to apply and where. (Please see Chapter
6: Noise Reduction Step 1: Measuring Noise or Chapter 7: Noise
Reduction Step 2: Reducing Noise.)
Navigator Loupe
The Navigator Loupe is one of Dfine 2.0’s new interface features.
This tool ensures that the appropriate information is displayed
depending on the state of the Image Preview. In the Zoom to Fit
view, the Loupe mode displays details under the mouse cursor at
100%, and image detail information before and after noise reduction
is applied. When zoomed to 100% or 300%, the Navigator mode is
displayed, giving you a bird’s eye view of where you are currently in
the image. The view switches automatically between Navigator and
Loupe for efficient workflow.
Loupe Mode
With the Image Preview in the Zoom to Fit view, the Navigator
switches to Loupe mode. A vertical red line bisects the image, the
right-hand section displaying the image pre-noise reduction and the
left-hand side, the image post-noise reduction.
This ensures that you can always see the image detail at 100% while
reviewing the noise reduction effect where you position your mouse
in the Preview.
To lock in place the area displayed in the Loupe, click on the
pushpin icon at the Loupe’s lower left corner, then click on the area
of the image you want to stay within the Loupe. To unlock the area,
click on the pushpin icon again. Alternately, right-click (Windows) or
Control-click (Macintosh) to toggle the lock in place function.
To pan within the Loupe display, click and drag the image. You can
also click and drag the red line to adjust the relative size of the
before and after sections in the Loupe.
Navigator Mode
When you leave the Zoom to Fit mode for 100% or 300%, the
Navigator Loupe switches to the Navigator mode. While in the
Navigator mode, a red rectangle in the Navigator indicates the area
of the image currently displayed in the Preview. Click on the area
of the image in the Navigator that you would like to display in the
Preview.
Navigator
Mode
Loupe
Mode
18
Dfine 2.0 User Guide
Chapter 5 : Dfine 2.0 Interface
Filter Controls
Shortcut
Use the Filter Controls to apply or discard Dfine 2.0’s noise
reduction effect.
Enter (Windows) / Return (Macintosh) key
The Brush and OK buttons process and apply the specified noise
reduction effect to the active image. The Cancel button discards
any settings specified in the current session, closes Dfine 2.0, and
returns you to Photoshop without changing the image.
Brush
Click Brush to apply noise reduction to a separate layer and then
selectively paint the noise reduction in, using the Selective Tool to
automatically create and modify a layer mask. (Please see Chapter 8:
Selective Tool.)
Cancel
Click Cancel to prevent noise reduction from being applied to your
image, close the current Dfine 2.0 session, and return to Photoshop.
Shortcut
Esc key
OK
Click OK to apply noise reduction to your image, close the current
Dfine 2.0 session, and return to Photoshop. Dfine 2.0 also provides
you with an option to apply the filter to a separate layer or to apply
to the current layer, providing you with the ability to quickly apply
the filter’s effect to a separate layer. (Please see Chapter 9: Filter
Interface Settings.)
19
© Janice Wendt
Chapter 6
Noise Reduction
Step 1: Measuring Noise
Starting the Noise Reduction Process
Dfine 2.0 User Guide
Chapter 6: Noise Reduction Step 1: Measuring Noise
Measuring Noise
The first step in reducing noise with Dfine 2.0 is to measure
the noise present in the active image. Dfine 2.0 determines the
characteristics of noise based on the details in the current image or
from a saved profile. Dfine 2.0 measures noise in one of three ways:
Automatic measurement, Manual measurement, or by loading a
profile.
Rectangles on the areas it believes will benefit most from noise
reduction. At this point you can move on to the Noise Reduction
step, or you can modify the profile.
To modify the profile, either click and adjust one or more of the
automatically generated Measurement Rectangles, or select the
Manual mode and add additional Measurement Rectangles.
After modifying one of the automatically generated Measurement
Rectangles, click Measure Noise again to generate a new profile.
Click Save to save the profile.
Automatic (recommended)
The Automatic method identifies only those areas that contain
unwanted noise details—not photographic detail. The Automatic
method works on a wide variety of images, providing optimal noise
profiling with little to no interaction needed.
Click Reset at any time to remove all Measurement Rectangles and
start the measurement process over.
Manual
The Manual method lets you manually specify areas within which to
measure noise characteristics. As with the Automatic method, you
can save manually generated measurements in a profile.
Automatic
Method
Click Measure Noise to have Dfine 2.0 automatically measure the
active image and create a profile for it. If you want to save the
profile, click Save.
Manual
Method
When the measurement is complete, Dfine 2.0 places Measurement
21
Dfine 2.0 User Guide
Chapter 6: Noise Reduction Step 1: Measuring Noise
Select Manual from the dropdown menu in the Noise Reduction
Panel, then click on the Add Measurement Rectangle button
and then, in the Preview, click and drag to apply a Measurement
Rectangle to the area of the image to be measured.
Apply Measurement Rectangles only to smooth, detail-free areas of
the image, for example:
• Uniformly clear or overcast sky
• Featureless walls
• Other smooth, detail-free surfaces
Do not place a Measurement Rectangle over areas with hard edges,
walls with structure, grass or foliage, or areas that are very light
(nearly white) or very dark (nearly black).
After placing a Measurement Rectangle on the image, click on the
Measure button to create a profile.
You can add multiple Rectangles to refine the noise reduction
process. Add additional Rectangles only to areas of different color or
tone. For example, if you apply two rectangles to objects with similar
brightness and color values, the result will not be refined. In most
cases the Automatic measuring method yields optimal results, so it
is recommended that you start with it.
Click on Reset at any time to remove all Measurement Rectangles
and start over.
Load
Alternatively to creating a profile with the Manual or Automatic
modes, you can load an existing one. This lets you skip the step of
measuring the active image, or you can apply proven noise reduction
results to images that do not lend themselves to being profiled.
Those images that typically cannot be profiled contain photographic
detail throughout the entire image, with no smooth or detail less
areas upon which to place a Measurement Rectangle to create a
profile.
Profiles are specific to camera and ISO combinations; in other
words, you should apply a profile only to images created with the
same camera/ISO as the image that was used to create the profile.
If you are working on an image that cannot be profiled and have no
profile for its camera/ISO combination, please see the If Your Image
Cannot be Profiled section later in this chapter.
Clicking on the Load button will display a dropdown menu
containing the last six profiles you either saved or loaded. Click on
the Browse button at the bottom of the Load dropdown menu to
navigate and select a profile that you’ve saved on your computer.
Load Button
You can configure Dfine 2.0 to automatically load a profile based
on an image’s EXIF data. (Please see Chapter 9: Filter Interface
Settings.)
23
Dfine 2.0 User Guide
Chapter 6: Noise Reduction Step 1: Measuring Noise
Save
After you have created a profile using either the Manual or
Automatic methods, you can save your profile for later use or to
share with other Dfine 2.0 users.
Click on Save to display the Save Profile… dialog. Dfine 2.0 suggests
a name for the profile based on the active image’s camera and ISO
settings and the current date, though you can edit the name. When
you are satisfied with the profile name, click OK.
By default, profiles are saved in the Profiles folder under the Dfine
2.0 folder, thus you can access them to, for example, back them up
to a storage device or share them with other Dfine 2.0 users, who
can load them once they are saved to their computer.
Photography
of blank paper
for custom
profiling
If Your Image Cannot be Profiled
possible in an area large enough to add a Measurement Rectangle.
Occasionally you may have an image that cannot be profiled.
Typically, this occurs if the image has such a high level of detail
that there is no detail-free area on which to place a Measurement
Rectangle.
After you have shot the image of the blank paper, open that image
in your host application without making any adjustments (contrast,
sharpening, noise reduction, etc.) to the image.
In such situations, you can create a profile based on another image
and then load that profile into Dfine 2.0. Do this by taking a picture
of a blank piece of paper with the camera at the ISO setting of the
image in question.
When photographing the blank sheet, underexpose it slightly to
ensure that the paper comes out close to middle gray. The absolute
tonal value of the paper is not important, as long as it is not too
close to pure white or pure black. Provide as even lighting as
Launch Dfine 2.0, and then use the Automatic measuring method
to create a profile. Click Save to create a profile then click Cancel to
close the Dfine 2.0 interface.
Next, open the original image—the one that couldn’t be profiled—
launch Dfine 2.0, then click Load, and select the profile you just
created.
Because the noise structures are based on the characteristics of the
correct camera and ISO combination, you can now apply optimal
noise reduction to the image.
24
© Janice Wendt
Chapter 7
Noise Reduction
Step 2: Reducing Noise
Completing the Noise Reduction Process
Dfine 2.0 User Guide
Chapter 7: Noise Reduction Step 2: Reducing Noise
Reducing Noise
Once you have measured the noise inherent in your image, you
can start reducing it. Dfine 2.0 lets you reduce different types of
unwanted artifacts from your images including contrast noise, color
noise, and JPEG artifacts.
Contrast noise, also called luminance noise,
Contrast Noise
is represented by darker and lighter specks
appearing in the same color of an object. This
type of noise is most often visible in large, smooth
objects, such as the sky, where the variance of
tonality is most obvious. This type of noise often imparts a grainy
look to images.
Color noise, sometimes called chrominance noise,
manifests itself as random spots of red, green,
and blue. Color noise is most visible against
neutral objects, such as clouds.
Whole Image
The Whole Image noise reduction method is the default mode
applied after measuring noise. To display the Whole Image controls
select Whole Image from the Method dropdown menu in the Noise
Reduction panel. This method employs the following tools:
Color Noise
This type of noise is often aggravated by saving files in JPEG format
because the JPEG compression scheme causes color artifacts. The
higher the compression the more conspicuous the JPEG artifacts.
JPEG artifacts are often visible as blocking structures with higher
levels of color noise around each block.
Dfine 2.0 offers three methods to reduce noise either globally, or
selectively, based on colors or objects:
• Whole Image
• Color Ranges
• Control Points
Note: Each noise reduction method is independent of the others.
You can apply only one method at a time, and switching methods
in the middle of workflow results in loss of changes under the
original method. For example, settings made with Whole Image are
lost if you subsequently select one of the other two methods.
Whole
Image
Contrast Noise
This noise type is manifested in artifacts of light and dark specks
appearing in what would ideally be a uniform image detail.
Move the Contrast Noise slider to balance noise reduction and
26
Dfine 2.0 User Guide
Chapter 7: Noise Reduction Step 2: Reducing Noise
detail retention. The higher the value of the contrast noise slider,
the more contrast noise reduction is applied to the image. If the
active image’s detail structures become too soft, move the slider
to the left. If you cannot arrive at a satisfactory balance, repeat the
measurement step to modify the profile.
Reset
Color Noise
Dfine 2.0’s second method reduces noise within individual color
ranges. It uses the Contrast Noise and Color Noise controls much
as they are described above under Whole Image, but applied more
narrowly, that is, to a selected color range.
This kind of noise is typically visible as specks of red, green, and
blue.
Move the Color Noise slider to balance noise reduction and color
detail retention. The higher the value of the Color Noise slider, the
more color noise reduction is applied. If brightly saturated objects
begin to lose their color, move the slider to the left.
Edge Preservation
Use this feature to preserve fine detail in the active image. Click
More to display the Edge Preservation Slider. To enable, check the
checkbox next to the slider. Click and drag on the slider, observing
the effect in the Preview until the desired result is attained.
Click Reset button restore the default noise reduction settings.
Color Ranges
This method is the recommended method for selectively reducing
noise in batch processes.
To display the Color Ranges controls, select Color Ranges from the
Method dropdown menu in the Noise Reduction panel. While there
is no maximum to the number of color ranges, at least two are active
in the Color Ranges method.
Note: High settings can reduce noise reduction to sub-optimal
levels.
JPEG Artifact Reduction
Color
Range
Found under the More sub-section, JPEG Artifact Reduction reduces
JPEG artifacts in the active image. To enable, check the checkbox and
observe the effect in the Preview.
Note: Use JPEG Artifact Reduction only on JPEG files.
27
Dfine 2.0 User Guide
Chapter 7: Noise Reduction Step 2: Reducing Noise
After configuring some color ranges and applying different amounts
of noise reduction to each, you can look at the Color Noise or
Contrast Noise Mask Preview Modes to see how noise reduction is
affecting the image. (Please see Contrast and Color Noise Masks
section of Chapter 5: Dfine 2.0 Interface.)
Color Patch
The Color Patch to the upper left of each set of range controls
displays the color specified for noise reduction for the
corresponding Color Range. Roll the mouse over the patch to display
the RGB color values for the selected color.
Click on the Color Patch to call up the Color Picker from your image
editing application to specify the range’s color.
Eyedropper
The Eyedropper, as an alternative to the Color Picker described
above, lets you select a color from the active image. Click the
Eyedropper button, then click the eyedropper mouse pointer on the
desired color in the active image. Verify that the corresponding Color
Patch now reflects the selected color. Now you can manipulate the
Contrast Noise and Color Noise sliders and observe their effects on
the selected color in the active image.
Contrast Noise
This kind of noise type appears as artifacts of light and dark specks
in what would ideally be a uniform image detail.
Move the Contrast Noise Slider to balance noise reduction and
detail retention. The higher the value of the Contrast Noise slider,
the more contrast noise reduction is applied to the image. If the
active image’s detail structures become too soft, move the slider
to the left. If you cannot arrive at a satisfactory balance, repeat the
measurement step to modify the profile.
Color Noise
This kind of noise is usually visible as specks of red, green, and
blue.
Move the Color Noise slider to balance noise reduction and color
detail retention. The higher the value of the Color Noise slider, the
more color noise reduction is applied. If brightly saturated objects
begin to lose their color, move the slider to the left.
Add Color Range
This is the button marked with a Plus Sign below the Color Range
controls. Click on it to add another color range.
Delete Color Range
Each set of Color Range controls has a Delete Color Range button
to the right of the Eyedropper button. Click on this button to delete
the corresponding Color Range. The Delete Color Range buttons
disappear when two Color Ranges remain. When you click on the Add
Color Range button, the Delete Color Range buttons appear again for
all Color Ranges.
Edge Preservation
Use this feature to preserve fine detail in the active image. Click
More to display the Edge Preservation Slider. To enable, check the
checkbox next to the slider. Click and drag on the slider, observing
the effect in the Preview until the desired result is attained.
28
Dfine 2.0 User Guide
Chapter 7: Noise Reduction Step 2: Reducing Noise
Note: High settings can reduce noise reduction to sub-optimal
levels. Edge Preservation used in conjunction with the Color
Ranges method affects all Color Ranges equally. This control has
no effect on areas with 0% Contrast Noise reduction applied to
them.
Control
Points
JPEG Artifact Reduction
Found under the More sub-section, JPEG Artifact Reduction reduces
JPEG artifacts in the active image. To enable, check the checkbox and
observe the effect in the Preview.
Note: Use JPEG Artifact Reduction only on JPEG files.
Reset
Each Control Point controls Contrast and Color noise reduction
applied to the object to which it is attached. All Control Points within
the active image communicate with each other, providing continuity
of control over multiple objects throughout the image.
To add a Control Point to the active image, select Control Points from
the Methods dropdown menu in the Noise Reduction panel. Then
click the Add Control Point button.
Click Reset to restore the default noise reduction settings.
Control Points
Dfine 2.0’s third noise reduction method, Control Points, is based
on U Point technology.
Control Points let photographers identify and isolate objects within
a photograph by placing a Control Point on the object or area to
be affected. By analyzing the color, tonality, detail, and location,
the Control Point automatically determines where to apply certain
affects, based on the photographer’s needs. (For more information
on U Point technology, please visit http://www.upoint.com/)
Add Control Point
The mouse pointer changes, indicating that you can now place a
Control Point on your image. Click on the object or area of the image
you want to affect with the Control Point.
The Control Point appears at the selected location displaying three
sliders.
The top slider, Size, controls the size or reach of the Control Point.
Click and drag this control to the right to enlarge the Control Point’s
29
Dfine 2.0 User Guide
Chapter 7: Noise Reduction Step 2: Reducing Noise
reach, or to the left to reduce its reach, as indicated by an expanding
or contracting circle.
The middle slider, Contrast Noise, controls the amount of contrast
noise reduction applied to the object affected by the Control Point.
The bottom slider, Color Noise, controls the amount of color noise
reduction applied to the object affected by the Control Point.
To remove a Control Point, click the Select tool, then click on the
Control Point to be removed, then finally click on the Remove Control
Point button or press the Delete key on your keyboard.
Remove
Control Point
To adjust or delete multiple Control Points or adjust their controls
in parallel, first select the desired Control Points by one of the
following methods:
• Click the Select Tool, then left-click, hold and draw a bounding box
containing the desired Control Points, or
• Hold the Shift key down and click on the Control Points to be
selected.
With multiple Control Points selected, you can delete all or modify
the contrast noise or color noise sliders of all Control Points at the
same time by adjusting those of only one.
After configuring some Color Ranges and applying different amounts
of noise reduction to each range, you can look at the Color Noise
or Contrast Noise Mask Preview Modes to see how noise reduction
is affecting the image. (Please see Contrast and Color Noise Masks
section of Chapter 5: Dfine 2.0 Interface.)
Edge Preservation
Use this feature to preserve fine detail in the active image. Click
More to display the Edge Preservation slider. To enable, check the
checkbox next to the slider. Click and drag on the slider, observing
the effect in the Preview until the desired result is attained.
Note: High settings can reduce noise reduction to sub-optimal
levels. Edge Preservation used in conjunction with the Color
Ranges method affects all Color Ranges equally. This control has
no effect on areas with 0% Contrast Noise reduction applied to
them.
JPEG Artifact Reduction
Found under the More sub-section, JPEG Artifact Reduction reduces
JPEG artifacts in the active image. To enable, check the checkbox and
observe the effect in the Preview.
Note: Use JPEG Artifact Reduction only on JPEG files.
Reset
Click on the Reset button to delete all Control Points on the image.
30
© Tony Sweet
Chapter 8
Selective Tool
Using the Selective Tool to Apply Noise Reduction
Dfine 2.0 User Guide
Chapter 8: Selective Tool
Selective Tool
The Selective Tool automates the creation of layers and layer masks
within Adobe Photoshop and Adobe Photoshop Elements, allowing
you to apply Dfine 2.0 or any of seven detail-specific Noise Brushes.
The Selective Tool can be used with pressure sensitive tablets such
as a Wacom® Pen Tablet to selectively apply noise reduction with
pressure sensitivity.
Note: The Selective Tool and the Additional Noise Brushes are only
available within Photoshop and Photoshop Elements serving as
Dfine 2.0’s host.
Note: The Selective Tool cannot be used when creating a
Photoshop Action. In order to create a Photoshop Action, please
select Dfine 2.0 from the Filters menu.
Interaction with Dfine 2.0
You can click on Dfine 2.0 in the Selective Tool window’s upper left
hand corner to launch Dfine 2.0.
If you click Dfine 2.0’s Brush button, regardless of whether you
launched Dfine 2.0 from the Selective Tool or from Photoshop or
Photoshop Elements’ Filters menu, the Selective Tool appears, the
filter will be applied to a copy of the image on a separate layer, the
new layer will be named Dfine 2.0, and you will be able to selectively
apply the Dfine 2.0 noise reduction effect using the Paint, Erase,
Fill, and Clear buttons described later in this chapter.
Noise Brushes
Dfine 2.0 offers seven Noise Brushes, each designed for a specific
detail structure. These Brushes do not have an interface as they
were designed to be applied selectively and provide the optimal
amount of noise reduction for each of those different detail types.
Noise Brushes are useful for images that require noise reduction
only in a small area. They can be quickly loaded and then selectively
applied to your image, without the need to load and modify the
settings within the Dfine 2.0 interface.
Additional
Noise
Brushes
The Noise Brushes are:
• Background – Reduces noise in the active image’s background.
• Hot Pixels – Use to minimize unwanted pixels visible as bright
dots, typically most troublesome in night shots and images with
dark backgrounds.
• Fine Structures – Reduces dominant color noise while reducing
contrast noise, effectively balancing detail and noise in image
components such as hair and fine image structures that can be
adversely affected by noise reduction.
32
Dfine 2.0 User Guide
Chapter 8: Selective Tool
• Skin – Reduces both contrast and color noise while preserving fine
detail structures.
• Sky – Reduces color noise and smoothes artifacts that often
appear very strongly in the sky of an image.
• Shadows – Reduces chrominance noise in shadows and low light
areas, while preserving the potential for detail and structures.
• Strong Noise – Reduces strong noise while preserving as much
image structure as possible. This brush is appropriate for images
with high levels of contrast noise and for high ISO images where
noise dominates. The Strong Noise brush offers an alternative to
selective blurring, where traditional blurring methods often lead to
unnatural structures and color shifts.
Using Noise Brushes
In the Selective Tool interface, click on the Brush name (e.g.,
“Background,” “Hot Pixels,” etc.) that best describes the area
to which you want to apply noise reduction. The Selective Tool
processes the image and then lets you apply the specified effect
using the Paint, Erase, Fill, and Clear buttons described below. You
can control the amount of each of the Noise Brushes’ effects by
altering the brush’s opacity or the opacity of the layer created by
that Noise Brush.
Selection Tools
The Selective Tool provides four tools with which you can apply
noise reduction specified either with Dfine 2.0 or with one of the
Noise Brushes.
Paint
Click the Paint button to selectively paint the current noise reduction
effect into your image. Ensure that your Paint Brush mode is set to
Normal and that opacity is set greater than 100%. You can control
the amount of the effect that is added to your image by varying the
opacity of the brush.
Erase
Click the Erase button to selectively remove the current noise
reduction effect from your image. Ensure that the mode of your Paint
Brush is set to Normal and that opacity is set greater than 100%.
You can control the amount of the effect that is added to your image
by varying the opacity of the brush.
Fill
Click the Fill button to apply the noise reduction effect to the entire
image. This tool is especially useful if you want to apply the noise
reduction to all but a small area. Click Fill then use Erase to remove
the effect from the area to remain unaffected.
Clear
Click the Clear button to remove the noise reduction effect from the
entire image. This is helpful if you made some mistakes with the
Paint tool and would like to start over.
Apply / Discard
Click on Apply to apply the current noise reduction effect to the
image. Click on Discard to prevent the effect from being applied.
33
© Michael Gilbert
Chapter 9
Filter Interface Settings
Controlling the Default Behavior of the Filter Interface
Dfine 2.0 User Guide
Chapter 9: Filter Interface Settings
Filter Interface Settings
Zoom to Fit
Click on Settings in the Dfine 2.0 Filter Interface to configure default
look and functionality, and to determine how Dfine 2.0 interacts
with your images.
Ensures that the entire image is visible within the filter interface.
Use Last Setting
Opens images in the zoom state used in the previous Dfine 2.0
session.
Default Preview
Default Preview lets you specify how images are displayed after
opening Dfine 2.0.
Single Image View
Filter
Settings
Sets the default Preview mode to the Single Image View.
Split Vertically
Splits the image vertically, with the before image on the left and the
after image on the right.
Split Horizontally
Splits the image horizontally, with the before image above and the
after image below.
Default Zoom
Use Last Setting
Default Zoom lets you specify the zoom setting to be applied when
the interface is launched.
Opens the image with the last Preview state used in the previous
Dfine 2.0 session.
100%
Opens images at 100% zoom.
35
Dfine 2.0 User Guide
Chapter 9: Filter Interface Settings
Default Appearance
Load Based on EXIF Data
Default Appearance sets the brightness of the area surrounding the
image in the Preview.
This option searches the Default Profiles Path for saved profiles with
the same camera and ISO combination as the active image. If Dfine
2.0 cannot find a matching profile, or if the current image does not
contain EXIF information, it will apply an Auto Profile.
• Light Gray
• Medium Gray
• Dark Gray
Auto Profile Load Behavior
The Auto Profile Load Behavior setting lets you specify how Dfine
2.0 applies profiles to images. This setting enables you to save time
by setting it according to how you interact with Dfine 2.0.
Enabling one of the automatic methods lets Dfine 2.0 automatically
apply the appropriate noise reduction profile to each image of a
batch process.
Do Nothing
When Do Nothing is selected, Dfine 2.0 does not measure image
noise and requires that you select either the Automatic or Manual
method of noise measurement.
Auto Profile Image
The Auto Profile Image option sets Dfine 2.0 to automatically profile
every image that is opened, thus saving time.
Use Last Profile
With this option enabled, Dfine 2.0 applies the same noise
reduction effect that was applied to the last image processed.
Default Profiles Path
Click on the Browse button to specify the folder in which Dfine 2.0
saves profiles. (This is also the folder that Dfine 2.0 searches when
Load Based on EXIF Data is enabled.)
After Clicking OK
This option lets you specify how Dfine 2.0 filters are applied to
images.
Note: This option is valid only within Photoshop or Photoshop
Elements serving as Dfine 2.0’s host.
Apply the Filtered Effect to the Current Layer
This option applies Dfine 2.0 to the layer that was active when Dfine
2.0 was launched.
Apply the Filtered Effect to a Separate Layer
Choose this option to always apply Dfine 2.0 to a separate layer. Use
of this option and saving the final image in a layered format ensures
the preservation of original image details. Enabling this option
increases file size and may increase image processing times.
36
Chapter 9: Filter Interface Settings
Dfine 2.0 User Guide
Note: When using Dfine 2.0 in a batch process or Actions, the filter
effect will not be applied to a separate layer. To apply Dfine 2.0 to a
separate layer, while recording the action, duplicate the layer prior
to applying Dfine 2.0. This will ensure that the batch process will
include a new filtered layer for each image.
Reset
Click Reset to restore Dfine 2.0 filter settings to their default values.
37
© Tony Sweet
Chapter 10
Selective Tool Settings
Controlling the Default Behavior of the Selective Tool
Chapter 10: Selective Tool Settings
Dfine 2.0 User Guide
Selective Tool Settings
Merge the Filtered Effect to the Current Layer
Click on the Settings button at the bottom of the Selective Tool
interface to specify how the Selective Tool interacts with Photoshop
or Photoshop Elements and active images.
This option merges the filtered image with your original image into
one layer. Enabling this option helps keep file sizes to a minimum.
Apply the Filtered Effect to a Separate Layer
The Keep as Layer option ensures that the filtered effect is limited
to a separate layer. By enabling this setting and saving the active
image in a layered file, you will preserve original image information
and will be able to remove noise reduction effects at any time.
Please keep in mind, however, that enabling this option may
increase file sizes.
Selective
Tool Settings
When Photoshop Launches
This option lets you specify whether the Selective Tool opens when
launching Photoshop or Photoshop Elements. Choose between:
• Automatically open the Selective Tool
• Do not open the Selective Tool
After Clicking Apply
This option lets you specify whether the Selective Tool maintains
Dfine 2.0 filter or Noise Brush effects as a separate layer or merges
layers when you click Apply.
39
© Vincent Versace
Chapter 11
Contact and Support
Getting Additional Support
Dfine 2.0 User Guide
Chapter 11: Contact and Support
United States
© 2007 Nik Software, Inc.
In the U.S.A., contact Nik Software at 1-888-284-4085
or +1-619-725-3150 if calling outside of the U.S.A.
Protected by one or more US Pats. 6,728,421; 6,865,300;
7,031,547; and other patents pending.
Monday – Friday from 8:30 AM – 5:00 PM (PST) or via email at
[email protected].
Nik Software, Inc.
7588 Metropolitan Drive
San Diego, CA 92108, USA
Phone (619) 725-3150
Fax (619) 725-3151
[email protected]
U Point is a trademark of Nik Software, Inc. Dfine is a registered
trademark of Nik Software, Inc. and Macintosh and Mac OS are
trademarks of Apple Computer, Inc. Microsoft and Windows are
registered trademarks of Microsoft Corporation. Pentium and Celeron
are trademarks of Intel Corporation. Adobe and Photoshop are
registered trademarks of Adobe Systems Inc. All other trade names
mentioned in this manual are trademarks or registered trademarks
of their respective holders.
www.niksoftware.com
Germany
In Europe, contact Nik Software, GmbH at +49-40-47-11-35-0
Monday - Friday from 9:00 AM - 5:00 PM (CET) or via email at
[email protected].
Nik Software, GmbH
Hammerbrookstraße 93
D-20097 Hamburg, Germany
Phone +49-40-47-11-35-0
Fax +49-40-47-11-35-35
[email protected]
www.niksoftware.com
41