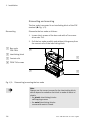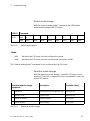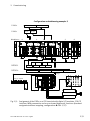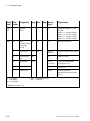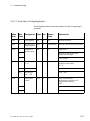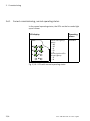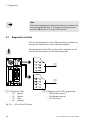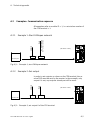
1
Terminal CPX Bus node CPX-FB14 Description CANopen network protocol 526410 en 1411d [8041138] Contents and general instructions Original . . . . . . . . . . . . . . . . . . . . . . . . . . . . . . . . . . . . . . . de Edition . . . . . . . . . . . . . . . . . . . . . . . . . . . . . . . . . . en 1411d Designation . . . . . . . . . . . . . . . . . . . . . . . . . . . P.BE-FB14-EN Order no. . . . . . . . . . . . . . . . . . . . . . . . . . . . . . . . . . . 526410 © (Festo AG & Co. KG, Postfach, 73726 Esslingen, Germany, 2013) Internet: http://www.festo.com E-Mail: [email protected] Reproduction, distribution or sale of this document or com munication of its contents to others without express author ization is prohibited. Offenders will be liable for damages. All rights reserved in the event that a patent, utility model or design patent is registered. Festo P.BE-FB14-EN en 1411d English I Contents and general instructions CANopen®, TORX®, CiA® are registered trademarks of the respective trademark owners in certain countries. II Festo P.BE-FB14-EN en 1411d English Contents and general instructions Table of contents Intended use . . . . . . . . . . . . . . . . . . . . . . . . . . . . . . . . . . . . . . . . . . . . . . . . . . . . . . . . . . Target group . . . . . . . . . . . . . . . . . . . . . . . . . . . . . . . . . . . . . . . . . . . . . . . . . . . . . . . . . . Service . . . . . . . . . . . . . . . . . . . . . . . . . . . . . . . . . . . . . . . . . . . . . . . . . . . . . . . . . . . . . . . Instructions regarding this description . . . . . . . . . . . . . . . . . . . . . . . . . . . . . . . . . . . . . Important user information . . . . . . . . . . . . . . . . . . . . . . . . . . . . . . . . . . . . . . . . . . . . . . VI VII VII VIII IX 1. Installation . . . . . . . . . . . . . . . . . . . . . . . . . . . . . . . . . . . . . . . . . . . . . . . . . . . 1-1 1.1 1.2 1.5 General instructions on installation . . . . . . . . . . . . . . . . . . . . . . . . . . . . . . . . Settings of the DIL switches on the bus node . . . . . . . . . . . . . . . . . . . . . . . . . 1.2.1 Removing and mounting the cover for the DIL switches . . . . . . . . . 1.2.2 Settingthe DIL switches . . . . . . . . . . . . . . . . . . . . . . . . . . . . . . . . . . . Connecting the fieldbus . . . . . . . . . . . . . . . . . . . . . . . . . . . . . . . . . . . . . . . . . . 1.3.1 Fieldbus cable . . . . . . . . . . . . . . . . . . . . . . . . . . . . . . . . . . . . . . . . . . 1.3.2 Fieldbus baud rate and fieldbus length . . . . . . . . . . . . . . . . . . . . . . 1.3.3 Information on connecting the fieldbus . . . . . . . . . . . . . . . . . . . . . . 1.3.4 Fieldbus interface . . . . . . . . . . . . . . . . . . . . . . . . . . . . . . . . . . . . . . . 1.3.5 Connecting with the fieldbus plug from Festo . . . . . . . . . . . . . . . . . 1.3.6 Further connection possibilities for the fieldbus with adapters . . . Bus terminal with terminating resistors . . . . . . . . . . . . . . . . . . . . . . . . . . . . . 1.4.1 Install a terminating resistor using the adapters . . . . . . . . . . . . . . . Power supply . . . . . . . . . . . . . . . . . . . . . . . . . . . . . . . . . . . . . . . . . . . . . . . . . . 1-3 1-8 1-8 1-9 1-23 1-23 1-24 1-25 1-27 1-28 1-30 1-33 1-33 1-34 2. Commissioning . . . . . . . . . . . . . . . . . . . . . . . . . . . . . . . . . . . . . . . . . . . . . . . . 2-1 2.1 Commissioning on a CANopen master . . . . . . . . . . . . . . . . . . . . . . . . . . . . . . 2-4 2.1.1 General information on CANopen . . . . . . . . . . . . . . . . . . . . . . . . . . . 2-5 Configuration . . . . . . . . . . . . . . . . . . . . . . . . . . . . . . . . . . . . . . . . . . . . . . . . . . 2-6 2.2.1 Layer setting service (LSS) . . . . . . . . . . . . . . . . . . . . . . . . . . . . . . . . 2-6 2.2.2 LSS commands . . . . . . . . . . . . . . . . . . . . . . . . . . . . . . . . . . . . . . . . . 2-6 2.2.3 Configuration of the LSS slave . . . . . . . . . . . . . . . . . . . . . . . . . . . . . 2-24 2.2.4 Addressing the CPX terminal . . . . . . . . . . . . . . . . . . . . . . . . . . . . . . 2-26 2.2.5 Configuration examples . . . . . . . . . . . . . . . . . . . . . . . . . . . . . . . . . . 2-29 1.3 1.4 2.2 Festo P.BE-FB14-EN en 1411d English III Contents and general instructions 2.3 Overviews . . . . . . . . . . . . . . . . . . . . . . . . . . . . . . . . . . . . . . . . . . . . . . . . . . . . . 2.3.1 Brief overview of the scope of functions . . . . . . . . . . . . . . . . . . . . . 2.3.2 Overview Object directory . . . . . . . . . . . . . . . . . . . . . . . . . . . . . . . . 2.3.3 Behaviour of the CPX terminal when it is switched on . . . . . . . . . . 2.3.4 Default identifier distribution . . . . . . . . . . . . . . . . . . . . . . . . . . . . . . Object directories . . . . . . . . . . . . . . . . . . . . . . . . . . . . . . . . . . . . . . . . . . . . . . . 2.4.1 Communication profile . . . . . . . . . . . . . . . . . . . . . . . . . . . . . . . . . . . 2.4.2 Overview of the PDO structure . . . . . . . . . . . . . . . . . . . . . . . . . . . . . 2.4.3 Digital inputs (Transmit PDO 1) . . . . . . . . . . . . . . . . . . . . . . . . . . . . 2.4.4 Digital outputs (Receive PDO 1) . . . . . . . . . . . . . . . . . . . . . . . . . . . . 2.4.5 Analogue inputs channel 0 … 3 (Transmit PDO 2) . . . . . . . . . . . . . . 2.4.6 Analogue outputs channel 0 … 3 (Receive PDO 2) . . . . . . . . . . . . . 2.4.7 Analogue inputs channel 4 … 15 (Transmit PDO 3) . . . . . . . . . . . . . 2.4.8 Analogue outputs channel 4 … 15 (Receive PDO 3) . . . . . . . . . . . . 2.4.9 Technology modules, status bits, I/O diagnostic interface (PDO 4) 2.4.10 Manufacturer specific profile . . . . . . . . . . . . . . . . . . . . . . . . . . . . . . 2.4.11 Overview of mappingobjects . . . . . . . . . . . . . . . . . . . . . . . . . . . . . . 2.4.12 Forcing . . . . . . . . . . . . . . . . . . . . . . . . . . . . . . . . . . . . . . . . . . . . . . . . 2.4.13 Function assignment and virtual modules . . . . . . . . . . . . . . . . . . . . Parameterisation . . . . . . . . . . . . . . . . . . . . . . . . . . . . . . . . . . . . . . . . . . . . . . . 2.5.1 Parameterisation during switch-on . . . . . . . . . . . . . . . . . . . . . . . . . 2.5.2 Parameterisation with the handheld . . . . . . . . . . . . . . . . . . . . . . . . 2.5.3 Application example for parameterisation . . . . . . . . . . . . . . . . . . . . Commissioning the CPX terminal in the system . . . . . . . . . . . . . . . . . . . . . . . 2.6.1 Correct commissioning, normal operating status . . . . . . . . . . . . . . 2-35 2-35 2-36 2-37 2-39 2-41 2-41 2-46 2-47 2-50 2-55 2-60 2-62 2-65 2-68 2-72 2-79 2-81 2-85 2-91 2-91 2-92 2-92 2-93 2-94 3. Diagnostics . . . . . . . . . . . . . . . . . . . . . . . . . . . . . . . . . . . . . . . . . . . . . . . . . . . 3-1 3.1 3.2 Summary of diagnostics options . . . . . . . . . . . . . . . . . . . . . . . . . . . . . . . . . . . 3-3 Diagnostics via LEDs . . . . . . . . . . . . . . . . . . . . . . . . . . . . . . . . . . . . . . . . . . . . 3-4 3.2.1 Normal operating status . . . . . . . . . . . . . . . . . . . . . . . . . . . . . . . . . . 3-5 3.2.2 Displays of the CPX-specific LEDs PS, PL, SF, M . . . . . . . . . . . . . . . . 3-6 3.2.3 Displays of the CANopen-specific LEDs MS, NS, IO . . . . . . . . . . . . . 3-9 Diagnostics via status bits . . . . . . . . . . . . . . . . . . . . . . . . . . . . . . . . . . . . . . . . 3-12 Diagnostics via the I/O diagnostic interface . . . . . . . . . . . . . . . . . . . . . . . . . . 3-13 2.4 2.5 2.6 3.3 3.4 IV Festo P.BE-FB14-EN en 1411d English Contents and general instructions 3.5 Diagnostics via CANopen . . . . . . . . . . . . . . . . . . . . . . . . . . . . . . . . . . . . . . . . . 3-14 3.5.1 The emergency message . . . . . . . . . . . . . . . . . . . . . . . . . . . . . . . . . . 3-15 3.5.2 CPX error numbers . . . . . . . . . . . . . . . . . . . . . . . . . . . . . . . . . . . . . . 3-20 A. Technical appendix . . . . . . . . . . . . . . . . . . . . . . . . . . . . . . . . . . . . . . . . . . . . . A-1 A.1 A.2 Technical data, bus node CPX-FB14 . . . . . . . . . . . . . . . . . . . . . . . . . . . . . . . . Examples: Communication sequence . . . . . . . . . . . . . . . . . . . . . . . . . . . . . . . A.2.1 Example 1: Start CANopen network . . . . . . . . . . . . . . . . . . . . . . . . . A.2.2 Example 2: Set output . . . . . . . . . . . . . . . . . . . . . . . . . . . . . . . . . . . . A.2.3 Example 3, Start “node guard” monitoring . . . . . . . . . . . . . . . . . . . A.2.4 Example 4: load objects . . . . . . . . . . . . . . . . . . . . . . . . . . . . . . . . . . A.2.5 Example 5: write objects . . . . . . . . . . . . . . . . . . . . . . . . . . . . . . . . . . A-3 A-5 A-5 A-5 A-6 A-7 A-8 B. Index . . . . . . . . . . . . . . . . . . . . . . . . . . . . . . . . . . . . . . . . . . . . . . . . . . . . . . . . . B-1 Festo P.BE-FB14-EN en 1411d English V Contents and general instructions Intended use The bus node CPX-FB14 described in this description has been designed exclusively for use as a participant on the CANopen fieldbus. The CPX terminal must only be used as follows: – As intended in industrial environments; outside of industrial environments, e.g. in commercial and mixed-residential areas, actions to suppress interference may have to be taken – in original status without unauthorised modifications; only the conversions or modifications described in the documentation supplied with the product are permitted. – in excellent technical condition. The limit values specified for pressures, temperatures, elec trical data, torques etc. must be observed. Comply with the legal rules and regulations and standards, rules of the testing organisations and insurance companies and national specifications applicable for the location. Warning Use only PELV circuits for the electrical power supply in accordance with IEC/EN 60204-1 (Protective Extra-Low Voltage, PELV). Observe also the general requirements for PELV circuits in accordance with IEC/EN 60204-1. Use only voltage sources that ensure a reliable electric separation of operating voltage in accordance with IEC/EN 60204-1. Always connect both circuits for operating and load voltage supply. VI Festo P.BE-FB14-EN en 1411d English Contents and general instructions Through the use of PELV circuits, protection against electric shock (protection against direct and indirect contact) is en sured in accordance with IEC/EN 60204-1. Target group This description is intended exclusively for technicians trained in control and automation technology who have experience in installing, commissioning, programming and diagnosing participants on the CANopen fieldbus. Service Please consult your local Festo repair service if you have any technical problems. Festo P.BE-FB14-EN en 1411d English VII Contents and general instructions Instructions regarding this description This description contains specific information on installing, configuring, parameterising, commissioning, programming and diagnosing with the CPX bus node for CANopen. This description refers to the following versions: Versions 1) Supports Rev 26 (5 Jun. 13) – Layer setting service (è section 2.2.1) Rev 24 (19 Nov. 08) Rev 20 (10 Oct. 07) – Virtual modules via the function assignment object (è section 2.4.13) Rev 14 (12 Jul. 05) – CPX-FEC – CPX-CP interface EDS file from 23 Apr. 13 1) Software status (SW) or revision no. (Rev) è type plate Tab. 0/1: Revisions of the CPX-FB14 until June 2013 An overview of the structure of the CPX terminal user docu mentation is contained in the CPX system description. General basic information about the mode of operation, mounting, installation and commissioning of CPX terminals can be found in the CPX system description. Information about additional CPX modules can be found in the description for the respective module. VIII Festo P.BE-FB14-EN en 1411d English Contents and general instructions Important user information Danger categories This description includes instructions on the possible dangers which can occur if the product is used incorrectly. These instructions are marked with a signal word (Warning, Caution, etc.), printed on a shaded background and marked additionally with a pictogram. A distinction is made between the following danger warnings: Warning ... means that failure to observe this instruction may result in serious personal injury or material damage. Caution ... means that failure to observe this instruction may result in personal injury or material damage. Note ... means that failure to observe this instruction may result in material damage. In addition, the following pictogram marks passages in the text which describe activities with electrostatically sensitive devices: Electrostatically sensitive devices: Incorrect handling may cause damage to devices. Festo P.BE-FB14-EN en 1411d English IX Contents and general instructions Marking of special information The following pictograms mark passages in the text which contain special information. Pictograms Information: Recommendations, tips and references to other information sources. Accessories: Specifications on necessary or useful accessories for the Festo product. Environment: Information on the environmentally friendly use of Festo products. Text designations Bullets denote activities that may be carried out in any desired order. 1. Numerals denote activities that must be carried out in the sequence specified. – X Arrowheads indicate general lists. Festo P.BE-FB14-EN en 1411d English Contents and general instructions The following product-specific terms and abbreviations are used in this description: Term/abbreviation Significance AO, AI Analogue output, analogue input Bus nodes Connects the CPX terminal to the fieldbus or network; it transmits control signals to the connected CPX and pneumatic modules and monitors their functional capability CEC CODESYS controller, e.g. CPX−CEC/CPX−CEC..., applicable for configuration, commissioning and programming of CPX terminals COB-ID Communication object identifier; for every communication object, there is a unique COB-ID in the network CODESYS Controller Development System CPX terminal Modular terminal, available in different variants: – CPX…: Standard design with plastic linking – CPX-M: Standard design with metal linking – CPX-L: Standard design for control cabinet installation – CPX-P: Variant P, optimised for use in process automation DIL switches Miniature switches; dual-in-line switches usually consist of several switch elements which can be used to implement settings F0h Hexadecimal numbers are marked by a low-set “h” FEC Front End Controller, e.g. CPX-FEC, can be used as: – stand-alone system controller (PLC, stand alone operating mode) – system controller (PLC, remote controller operating mode) – fieldbus slave (remote I/O operating mode) Function module Collective term for modules with additional functions, e.g. CP-interface, front end controller (CPX-FEC) and CODESYS controller (CPX-CEC); function modules are also known as technology modules Handheld control unit (MMI) Handheld terminal (handheld, CPX-MMI) for CPX modules for commissioning and service purposes (man-machine interface, MMI) I/O diagnostic interface The I/O diagnostic interface is a bus-independent diagnostic interface at I/O level that permits access to internal data of the CPX terminal I/O modules Collective term for the CPX modules which provide digital inputs and outputs Festo P.BE-FB14-EN en 1411d English XI Contents and general instructions Term/abbreviation Significance I/Os Digital inputs and outputs IPC Industrial PC IW / OW Input/output word O, I Digital output, digital input PLC Programmable logic controller, also designated fieldbus master, system controller or higher-order controller (è also PLC) PLC Programmable Logic Controller (German: Speicherprogrammierbare Steuerung (SPS)) Pneumatics interface Interface between CPX modules and pneumatics modules SCO SCS, SCO, SCV Short circuit/overload Short circuit/overload sensor supply, outputs, valves Status bits Internal inputs which supply coded common diagnostic messages Technology module è Function module Tab. 0/2: XII Product-specific terms and abbreviations Festo P.BE-FB14-EN en 1411d English Installation Chapter 1 Installation Festo P.BE-FB14-EN en 1411d English 1-1 1. Installation Table of contents 1. Installation . . . . . . . . . . . . . . . . . . . . . . . . . . . . . . . . . . . . . . . . . . . . . . . . . . . 1-1 1.1 1.2 General instructions on installation . . . . . . . . . . . . . . . . . . . . . . . . . . . . . . . . Settings of the DIL switches on the bus node . . . . . . . . . . . . . . . . . . . . . . . . . 1.2.1 Removing and mounting the cover for the DIL switches . . . . . . . . . 1.2.2 Settingthe DIL switches . . . . . . . . . . . . . . . . . . . . . . . . . . . . . . . . . . . Connecting the fieldbus . . . . . . . . . . . . . . . . . . . . . . . . . . . . . . . . . . . . . . . . . . 1.3.1 Fieldbus cable . . . . . . . . . . . . . . . . . . . . . . . . . . . . . . . . . . . . . . . . . . 1.3.2 Fieldbus baud rate and fieldbus length . . . . . . . . . . . . . . . . . . . . . . 1.3.3 Information on connecting the fieldbus . . . . . . . . . . . . . . . . . . . . . . 1.3.4 Fieldbus interface . . . . . . . . . . . . . . . . . . . . . . . . . . . . . . . . . . . . . . . 1.3.5 Connecting with the fieldbus plug from Festo . . . . . . . . . . . . . . . . . 1.3.6 Further connection possibilities for the fieldbus with adapters . . . Bus terminal with terminating resistors . . . . . . . . . . . . . . . . . . . . . . . . . . . . . 1.4.1 Install a terminating resistor using the adapters . . . . . . . . . . . . . . . Power supply . . . . . . . . . . . . . . . . . . . . . . . . . . . . . . . . . . . . . . . . . . . . . . . . . . 1-3 1-8 1-8 1-9 1-23 1-23 1-24 1-25 1-27 1-28 1-30 1-33 1-33 1-34 1.3 1.4 1.5 1-2 Festo P.BE-FB14-EN en 1411d English 1. Installation 1.1 General instructions on installation Warning Danger of injury through uncontrolled movements of con nected equipment. Make sure that electrical and pneumatic equipment are in a de-energised and pressureless status. Before working on the pneumatics: Switch off the compressed air supply Vent the valve terminal Before working on the electrical components, e.g. before installation or maintenance work: Switch off the power supply In this way, you can avoid: uncontrolled movements of loose tubing accidental and uncontrolled movements of the connec ted actuators undefined switching states of the electronics Note The CPX bus node contains electrostatically sensitive devices. Do not touch any electrical or electronic components. Observe the handling specifications for electrostatically sensitive devices. They will help you avoid damage to the electronics. Festo P.BE-FB14-EN en 1411d English 1-3 1. Installation Information about mounting of the CPX terminal can be found in the CPX system description (P.BE-CPX-SYS-...). 1-4 Festo P.BE-FB14-EN en 1411d English 1. Installation Electrical connection and display components The following connection and display components are found on the CPX bus node for CANopen: 4 ms PS NS PM IO SF 1 M 2 3 1 Bus-status-specific and CPX-specific 4 Service interface for handheld LEDs 2 Fieldbus connection (9-pin sub-D plug) 3 Transparent cover for the DIL switches Fig. 1/1: Connection and display components on the CPX bus node Note Use protective caps to seal unused connections. This is how you achieve protection class IP65/IP67. Festo P.BE-FB14-EN en 1411d English 1-5 1. Installation Dismantling and mounting The bus node is mounted in an interlinking block of the CPX terminal (è Fig. 1/2). Dismantling Dismantle the bus node as follows: 1. Loosen the 4 screws of the bus node with a Torx screw driver size T10. 2. Pull the bus node carefully and without tilting away from the contact rails of the interlinking block. 1 Bus node CPX-FB14 4 2 Interlinking block 1 3 Contact rails 4 TORX T10 screws 3 Fig. 1/2: 2 Dismantling/mounting the bus node Note Always use the correct screws for the interlocking block, which depend on whether the block is made of metal or plastic: for plastic interlinking blocks: self-tapping screws for metal interlinking blocks: screws with metric thread. 1-6 Festo P.BE-FB14-EN en 1411d English 1. Installation Both types of screws are enclosed respectively when the bus node is ordered as a single part. Mounting Mount the bus node as follows: 1. Check seal and seal surfaces. 2. Place the bus node in the interlinking block. Make sure that the corresponding grooves with the contacting ter minals on the bottom of the bus node are above the con tact rails. 3. Then push the bus node carefully and without tilting into the interlinking block up to the stop. 4. Only tighten the screws by hand. Place the screws so that the self-cutting threads can be used. 5. Tighten the screws with a TORX screwdriver size T10 with 0.9 ... 1.1 Nm torque. Festo P.BE-FB14-EN en 1411d English 1-7 1. Installation 1.2 Settings of the DIL switches on the bus node In order to set the CPX bus node, you must first remove the cover for the DIL switches. Note The CPX bus node contains electrostatically sensitive devices. Do not touch any electrical or electronic components. Observe the handling specifications for electrostatically sensitive devices. They will help you avoid damage to the electronics. 1.2.1 Removing and mounting the cover for the DIL switches You need a screwdriver in order to remove or attach the cover. Note Observe the following instructions when removing or at taching the cover: Disconnect the power supply before removing the cover. Make sure that the seal is seated correctly when attach ing the cover! Tighten the two mounting screws with a max. torque of 0.4 Nm. 1-8 Festo P.BE-FB14-EN en 1411d English 1. Installation 1.2.2 Settingthe DIL switches When the cover over the DIL switches is removed, you will see 5 DIL switches in the bus node (è Fig. 1/3). You can set the following parameters with the DIL switches: – Operating mode – Error mode – Station number/layer setting service – Baud rate – CPX diagnostics mode Procedure: 1. Switch off the power supply. 2. Remove the cover over the DIL switches (section 1.2.1). 3. Set the desired operating mode (DIL switch 1, factory setting: remote I/O). 4. Set the error mode (DIL switch 2). 5. Assign to the CPX terminal a station number that is not yet allocated: Set the desired station number or activate layer setting services (8-off DIL switch 3, switch elements 1…7). 6. Set the baud rate (DIL switch 4) if you have not activated layer setting services. 7. For remote I/O operating mode: Set the CPX diagnostic mode (DIL switch 5). For remote controller operating mode: Set the required number of logical I/Os of the CPX-FB14 (DIL switch 5). 8. Mount the cover (section 1.2.1). Festo P.BE-FB14-EN en 1411d English 1-9 1. Installation ON 1 ON 2 1 7 8 3 2 station number 4 DIL switch 4: baud rate 1 3 DIL switch 3: ON 2 3 undervoltage error message mode 2 6 2 DIL switch 2: 1 5 operating mode 4 1 DIL switch 1: 4 ON 1 ON 2 1 2 5 5 DIL switch 5: CPX diagnostics mode or number of log. I/Os with “remote controller” Fig. 1/3: 1-10 DIL switch in the bus node (additional information on 1…5 in the following) Festo P.BE-FB14-EN en 1411d English 1. Installation Setting the operating mode with DIL switch1 You can set the operating mode of the bus node with switch element 1 of DIL switch 1: Operating mode Setting DIL switch 1 Remote I/O operating mode All functions of the CPX terminal are controlled directly by the CANopen Master. An FEC or CEC that may be integrated into the CPX terminal works as a passive function module without controller. DIL 1.1: OFF DIL 1.2: OFF (factory setting) Remote controller operating mode An FEC or CEC integrated into the CPX terminal takes over I/O control. This operating mode is only useful if an FEC or CEC is integrated into the CPX terminal. DIL 1.1: ON DIL 1.2: OFF Tab. 1/1: DIL switch 1: (operating mode) Festo P.BE-FB14-EN en 1411d English 1-11 1. Installation Setting the error mode with DIL switch 2 You set the error mode with switch element 1 of the dual DIL switch 2: Error mode Setting DIL switch 2 Reporting undervoltage error 2.1: OFF (factory setting) Filtering undervoltage error Errors during monitoring of the operating and load voltage supplies will be ignored 2.1: ON Reserved 2.2: Always OFF Tab. 1/2: DIL switch 2 (“Undervoltage” error message) With the setting “Filter undervoltage error”, voltage errors which occur will not be reported as errors. In this way, you can, for example, suppress unnecessary error messages during the commissioning phase. The setting of the DIL switch has precedence especially over the parameterisation of defined settings. No emergency mes sage is transmitted with error filtering. 1-12 Festo P.BE-FB14-EN en 1411d English 1. Installation Setting of the station number with DIL switch 3 You can set the station number of the CPX terminal binary coded with the 8-off DIL switch 3: 5 6 4 3 2 1 1 tion number (switch elements 1...7) 7 8 1 Setting the sta Fig. 1/4: DIL switch 3: (station number) The following station numbers are permissible: Protocol Address designation Permissible station numbers CANopen Station number 1; ...; 127 Tab. 1/3: Permissible station numbers Recommendation: Assign the station numbers in ascending order. Assign the station numbers in accordance with the machine structure of your system. Festo P.BE-FB14-EN en 1411d English 1-13 1. Installation 7 7 6 6 2 1 20 + 22 = 1+4= 5 3 4 5 5 4 3 2 1 Tab. 1/4: Example: Station number set: 38 8 8 Example: Station number set: 05 21 + 22 + 25 = 2 + 4 + 32 = 38 Examples of set station numbers (binary coded) On the following pages you will find an overview of the station number settings. 1-14 Festo P.BE-FB14-EN en 1411d English 1. Installation Station no. 1 0 Activation of LSS (from software version V1.26) 1 2 ON OFF OFF OFF OFF OFF OFF OFF OFF OFF OFF OFF OFF OFF OFF OFF OFF OFF OFF OFF OFF OFF OFF OFF OFF OFF OFF OFF OFF OFF OFF OFF OFF OFF OFF OFF OFF OFF OFF OFF OFF OFF OFF OFF OFF OFF OFF OFF OFF OFF OFF OFF OFF OFF OFF OFF OFF OFF OFF OFF ON ON ON ON 13 ON ON ON ON Tab. 1/5: ON ON OFF OFF OFF OFF OFF ON ON ON ON OFF OFF OFF OFF OFF OFF OFF OFF OFF OFF OFF OFF OFF OFF OFF OFF OFF OFF OFF OFF OFF OFF OFF OFF OFF OFF OFF OFF OFF OFF OFF ON OFF ON ON ON ON OFF ON ON OFF ON ON OFF ON ON ON ON OFF OFF OFF OFF ON ON ON OFF ON ON ON ON ON OFF ON ON ON OFF ON OFF ON ON OFF ON ON ON ON OFF ON ON ON ON OFF 31 OFF 8 ON ON 30 ON 7 ON ON OFF 29 ON OFF 15 OFF 6 ON 28 ON OFF 14 OFF 5 OFF 27 ON OFF ON OFF 26 ON OFF OFF OFF OFF 25 ON OFF 12 OFF 24 ON OFF OFF OFF 23 ON 10 4 22 ON 8 OFF 3 OFF 21 ON OFF ON 2 20 ON ON 1 OFF 19 OFF ON Station no. 18 OFF ON 6 8 16 ON OFF 11 7 ON 4 9 6 17 OFF 7 5 ON 2 5 4 ON OFF 3 3 ON ON ON ON ON Setting of the station numbers 1 … 31: position of the DIL switch Festo P.BE-FB14-EN en 1411d English 1-15 1. Installation Station no. 1 2 3 4 5 OFF OFF OFF OFF OFF OFF OFF OFF OFF OFF OFF OFF OFF OFF OFF OFF OFF OFF OFF OFF OFF OFF OFF ON OFF ON OFF 37 OFF ON ON 38 ON ON OFF 41 OFF OFF OFF OFF ON ON 42 OFF 43 ON ON ON 44 OFF 45 ON ON ON 46 ON 47 ON ON Tab. 1/6: 1-16 OFF ON OFF ON OFF ON ON OFF ON ON OFF ON OFF ON ON OFF ON ON OFF ON ON OFF OFF OFF OFF ON ON ON OFF ON ON OFF ON ON ON ON OFF ON ON ON OFF ON OFF ON ON 60 OFF 61 ON ON OFF ON ON ON OFF ON OFF OFF ON ON ON ON OFF ON 62 OFF OFF ON ON ON ON OFF 63 ON 8 ON OFF OFF ON OFF ON 7 OFF OFF ON OFF 59 ON ON ON OFF OFF ON ON ON ON ON ON ON ON 58 OFF OFF ON OFF ON OFF 57 ON ON OFF ON OFF OFF OFF OFF 6 ON 56 ON ON OFF 5 OFF OFF OFF OFF OFF OFF 55 ON ON OFF OFF OFF OFF OFF ON 54 ON ON OFF OFF OFF OFF OFF OFF OFF 53 ON ON OFF OFF OFF OFF OFF 52 OFF OFF ON 4 OFF 51 ON ON 40 3 OFF ON ON 2 50 OFF ON ON OFF 39 49 ON ON OFF 1 OFF ON ON 36 Station no. 48 ON ON 8 OFF ON ON 34 35 7 ON 32 33 6 OFF ON ON ON ON ON OFF OFF Setting of the station numbers 32 … 63: position of the DIL switch Festo P.BE-FB14-EN en 1411d English 1. Installation Station no. 1 2 3 4 5 6 OFF OFF OFF OFF OFF OFF OFF OFF OFF OFF OFF OFF OFF OFF OFF OFF OFF OFF OFF OFF OFF OFF OFF OFF OFF OFF OFF OFF OFF OFF OFF OFF OFF OFF OFF OFF OFF OFF OFF OFF OFF OFF OFF OFF OFF OFF OFF ON 64 65 ON ON ON 66 OFF 67 ON ON ON OFF OFF ON ON 70 ON ON OFF 73 OFF OFF OFF OFF ON ON 74 OFF 75 ON ON ON 76 OFF 77 ON ON 78 ON 79 Tab. 1/7: ON ON ON OFF 81 OFF OFF OFF OFF OFF OFF OFF ON ON 85 OFF ON 87 ON ON ON ON 89 OFF OFF ON 91 ON ON 93 ON ON ON ON ON ON 95 ON ON ON ON OFF ON ON ON OFF ON ON OFF OFF ON ON 94 ON OFF OFF ON ON OFF ON ON 92 ON ON OFF ON ON OFF OFF ON ON 90 ON OFF ON ON OFF ON OFF ON ON OFF ON OFF OFF 88 ON OFF OFF ON ON OFF OFF ON ON 86 ON OFF ON ON 84 8 ON ON ON 7 OFF ON ON 82 83 6 ON OFF ON ON OFF OFF ON ON OFF OFF 5 OFF ON ON OFF OFF 80 OFF ON ON OFF ON ON ON OFF 4 OFF ON ON OFF 3 OFF ON ON 2 OFF ON ON 72 1 OFF ON ON Station no. OFF ON ON OFF 71 ON ON OFF 8 OFF ON ON 68 69 7 ON OFF ON ON ON ON ON OFF Setting of the station numbers 64 … 95: position of the DIL switch Festo P.BE-FB14-EN en 1411d English 1-17 1. Installation Station no. 1 2 3 4 5 OFF OFF OFF OFF OFF OFF OFF OFF OFF OFF OFF OFF OFF OFF OFF OFF OFF OFF OFF OFF OFF OFF OFF 96 97 ON OFF 99 ON 101 OFF ON ON ON ON OFF 105 OFF OFF OFF OFF ON OFF 107 ON ON OFF 109 ON ON ON OFF OFF ON ON ON ON OFF OFF OFF ON ON ON OFF OFF ON ON ON OFF OFF ON ON ON ON ON ON ON ON ON ON ON ON ON ON ON ON ON ON ON ON ON ON ON ON ON ON ON ON ON ON ON ON ON ON ON ON ON ON ON ON ON ON ON ON ON ON ON ON ON ON ON ON ON ON ON ON ON ON ON 116 117 ON OFF ON ON 119 ON ON OFF ON ON ON 121 ON OFF OFF OFF OFF ON ON 122 ON 123 ON OFF ON ON 124 ON 125 OFF ON OFF ON ON ON 120 OFF ON ON OFF OFF ON ON 8 OFF ON ON 118 ON 126 OFF ON OFF OFF ON 7 OFF ON ON OFF 111 ON 115 OFF ON 6 OFF OFF 110 ON OFF OFF ON OFF OFF ON ON 5 OFF ON ON OFF 108 4 OFF OFF ON 3 114 OFF ON ON 106 113 2 OFF ON ON 104 112 1 OFF ON ON ON Station no. OFF ON ON OFF ON 8 OFF ON ON OFF 103 ON ON ON 102 ON ON ON 100 OFF 7 ON ON 98 6 OFF ON ON 127 ON OFF Tab. 1/8: 1-18 Setting of the station numbers 96 … 127: position of the DIL switch Festo P.BE-FB14-EN en 1411d English 1. Installation Activation of the layer setting service (LSS) with DIL switch 3 The bus node CPX-FB14 supports layer setting service (LSS) in accordance with CiA DSP-305. With the help of the layer setting service (LSS), the LSS mas ter can change the baud rate and node number of an LSS slave via the CANopen bus. You activate LSS with the 8-off DIL switch 3. To do this, set the switch elements 1 … 7 of the DIL switch 3 to OFF (station number = 0). 7 8 1 Activate LSS Fig. 1/5: 2 1 1 3 4 5 6 (switch elements 1…7) DIL switch 3 (station number) Resetting parameters with DIL switch 3 The bus node can be reset to factory setting with switch ele ment 8 of the DIL switch 3. The power supply of the CPX terminal is switched off. 1. Set the switch element 8 of the DIL switch 3 to ON. 2. Switch on the power supply for the CPX terminal (Power on). The bus node is reset to factory settings during boot-up. 3. Set the switch element 8 of the DIL switch 3 back to OFF. Festo P.BE-FB14-EN en 1411d English 1-19 1. Installation Setting the baud rate with DIL switch 4 You can set the baud rate with the dual DIL switch 4: Baud rate Setting DIL switch 4 125 kB 4.1: OFF 4.2: OFF (factory setting) 250 kB 4.1: ON 4.2: OFF 500 kB 4.1: OFF 4.2: ON 1000 kB 4.1: ON 4.2: ON Tab. 1/9: DIL switch 4 (baud rate) The following table shows the settings of the DIL switch. 1-20 Festo P.BE-FB14-EN en 1411d English 1. Installation Setting the diagnostics mode or the number of logical I/Os (data field size) with DIL switch 5 The function of DIL switch 5 is dependent on the set operat ing mode of the CPX terminal (è Tab. 1/1): – Remote I/O operating mode: setting the CPX diagnostic mode. The status bits occupy 8 bits and the I/O diagnostic inter face 16 bits in PDO 4 (bit 0 … 7 or 0 … 15, è Fig. 2/1). – Remote controller operating mode: 64 I/Os are provided for communication of the bus node with the FEC/CEC in PDO 1 (è Fig. 2/2). Remote I/O operating mode Remote controller operating mode Diagnostics mode Number of I/O bytes (data field size) I/O diagnostics interface and status bits are switched off (+ 0 I/O bits) Reserved for future extensions Setting DIL switch 5 3.1: OFF 3.2: OFF (factory setting) The status bits are switched on 1) (+ 8 (16) I bits) 3.1: OFF 3.2: ON I/O diagnostics interface is switched on 1) (+ 16 I/O bits) 3.1: ON 3.2: OFF Reserved for future extensions 1) 8 bytes I/8 bytes O for communication of the bus node with the CPX-FEC or CPX-CEC 3.1: ON 3.2: ON The diagnostics mode (status bits or I/O diagnostics interface) occupies 2 bytes or 4 bytes of address space (16 I-bits or 16 I/O-bits; 8 I-bits remain unused in the status bits mode) Tab. 1/10: DIL switch 5 (diagnostics mode or number of I/O bytes with remote controller) Festo P.BE-FB14-EN en 1411d English 1-21 1. Installation Note (1) An activated diagnostics mode reduces the available address space in the PDO 4 Use of the diagnostics mode (status bits or I/O diagnostic interface) occupies 16 I or 16 I/O bits in the PDO 4. In combination with technology modules, it thus reduces the number of I/O bits which are available for module commu nication. In this way, the number of addressable modules is reduced in favour of additional status or diagnostic in formation. Take account of this fact for the planning of your CPX ter minal. (2) Subsequent activation of the diagnostics mode requires reconfiguration The CPX-internal I/O image can be displaced during subsequent activation of the diagnostics mode (status bits or I/O diagnostics interface). Restart the CPX terminal with Power OFF/ON. 1-22 Festo P.BE-FB14-EN en 1411d English 1. Installation 1.3 1.3.1 Connecting the fieldbus Fieldbus cable Note Faulty installation and high transmission rates may cause data transmission errors as a result of signal reflections and attenuations. Causes of the transmission errors can be: missing or incorrect terminating resistor incorrect screened connection branches transmission over long distances inappropriate cables. Observe the cable specifications! Refer to the manual for your control system for information on the type of cable to be used. Use a twisted, screened 4-wire cable as fieldbus line. The CANopen bus interface of the CPX terminal is supplied with power via the fieldbus line. If the Festo fieldbus plug is used, a cable diameter of 5...8 mm or 7...10 mm is permissible. Note If the CPX terminal is mounted movably into a machine, the fieldbus cable on the movable part must be provided with strain relief. Also observe the corresponding regulations in EN60204 Part 1. Festo P.BE-FB14-EN en 1411d English 1-23 1. Installation 1.3.2 Fieldbus baud rate and fieldbus length The maximum permissible fieldbus length and length of the branch lines depends on the baud rate used. Detailed spe cifications can be found in the manuals for the your control system or bus interface. Note Refer to the manuals for your control system or bus interface in order to ascertain which T-adapter and maximum branch line length are permitted for your controller. Also take into account the sum of the branch line lengths when calculating the maximum permitted length of the fieldbus cable. 1-24 Festo P.BE-FB14-EN en 1411d English 1. Installation 1.3.3 Information on connecting the fieldbus Bus power supply Avoid long distances between the bus interface supply and the CPX terminal. Caution Make sure the polarity is correct when you connect the fieldbus interface and the power supply for the bus interface/internal logic. Protect the voltage supply to the bus interface extern ally, corresponding to the number of stations on the bus. Connect the screening. Note Power supply is needed over the fieldbus line (pin 3 and pin 9 on the Sub-D plug). Bus stations have different tolerances regarding interface supply, dependent on the manufacturer. Observe this when designing the bus length and placing the power sup ply unit. The following tolerance in the bus interface power supply (pin 3/pin 9 on the sub-D plug) applies to the CPX terminal: Umax = 30.0 V Umin = 11.0 V Recommendation: Place the power supply unit approximately at the centre of the bus. Festo P.BE-FB14-EN en 1411d English 1-25 1. Installation With the Festo fieldbus plug, you can implement a T-adapter (è Fig. 1/6). 1 2 3 6 ÓÓ ÓÓ 5 4 1 Fieldbus 4 Branch line 2 Voltage supply 5 T-adapter (T-tap) 3 Screening 6 Fieldbus plug with T-adapter function Fig. 1/6: 1-26 Structure of the bus interface and example of connection Festo P.BE-FB14-EN en 1411d English 1. Installation 1.3.4 Fieldbus interface There is 9-pin sub-D plug on the bus node for connecting the CPX terminal to the fieldbus. This connection is used for the incoming and continuing fieldbus line. You can connect the CPX terminal with the fieldbus plug from Festo type FBS-SUB-9-BU-2x5POL-B. Note Note that only the Festo fieldbus plug guarantees compli ance with protection class IP65. Before using fieldbus plugs from other manufacturers: Replace the two flat screws with bolts (type UNC4-40/M3x6). Plug on the CPX terminal 6 1 5 9 Tab. 1/11: Pin Internal contacting 1 2 3 4 5 6 7 8 9 Housing (plug) CANopen Designation n.c. CAN_L CAN_GND n.c. CAN_SHLD GND CAN_H n.c. CAN_V+ not connected CAN bus low Power supply to bus (0 V) not connected Connection to functional earth (screening) Optional GND CAN bus high not connected Power supply to bus (24 V) FE Pin assignment of the fieldbus interface of the CPX bus node Festo P.BE-FB14-EN en 1411d English 1-27 1. Installation 1.3.5 Connecting with the fieldbus plug from Festo Note Use protective caps or blanking plugs to seal unused connections. You will then achieve protection class IP65. Observe the assembly instructions for the fieldbus plug. Tighten the two fastening screws at first by hand and then with max. 0.4 Nm! With the fieldbus plug from Festo (FBS-SUB-9-BU-2x5POL-B), you can connect the CPX terminal easily to the fieldbus. You can disconnect the plug from the node without interrupting the bus line (T-TAP function). Note The clamp strap in the Festo fieldbus plug is connected only capacitively internally with the metal housing of the sub-D socket. This prevents equalizing currents from flow ing via the screening of the fieldbus cable (Fig. 1/7). 1-28 Clamp the screening of the fieldbus cable under the clamp strap in the fieldbus plug. Festo P.BE-FB14-EN en 1411d English 1. Installation 1 Folding cover with inspection window 1 3 2 Bus IN 2 Clamp strap for Bus OUT screened connection 3 Protective cap if connection is not used continuing (OUT) SLD L H GND V+ SLD L H GND V+ 4 Fieldbus 5 Fieldbus incoming (IN) 6 Only capacitively connected 6 Fig. 1/7: 5 4 Fieldbus plug from Festo, type FBS-SUB-9-BU-2x5POL-B Festo P.BE-FB14-EN en 1411d English 1-29 1. Installation 1.3.6 Further connection possibilities for the fieldbus with adapters Caution When connecting the fieldbus interface and the power supply for the bus interface, pay attention to the polarity. Connect the screening. There are further connection options for the CPX terminal with adapters which can be ordered separately from Festo: 1-30 – M12 adapter 5-pin (protection class IP 65) type FBA-2-M12-5POL – Screw terminal adapter 5-pin (protection class IP20) type FBA-1-SL-5POL Festo P.BE-FB14-EN en 1411d English 1. Installation M12 adapter (IP65) With this adapter the bus is connected via a 5-pin M12 socket with PG9 fitting. Use the second connection socket for continuation of the fieldbus. Note Use protective caps to seal unused connections. You will then achieve protection class IP65. Order this connection from Festo (FBA-2-M12-5POL). M12 adapter Pin no. 2 2 3 1 1 3 5 4 5 1. Screening 2. 24 V DC bus (max. 4 A) 3. 0 V bus 4. CAN_H 5. CAN_L 4 Bus OUT Bus IN Protective cap or plug with bus termination resistor if connection is not used. Fig. 1/8: Pin assignment of the fieldbus interface (adapter for 5-pin M12 connection) With the two M12 connections, you can implement a T-adapter (è Fig. 1/6). Festo P.BE-FB14-EN en 1411d English 1-31 1. Installation Screw terminal adapter (IP20) With this adapter the bus is connected to a 2x5-pin terminal strip. Use the second row of connections for the continuing fieldbus. The maximum permissible current at the clamps is 4 A. Use cables with a minimum cross-section of 0.34 mm2. Order this connection from Festo (FBA-1-SL-5POL) together with the terminal strip type FBSD-KL-2x5POL. Screw terminal adapter 1 2 3 4 5 Pin no. 1. 0 V bus 2. CAN_L 3. Screening 4. CAN_H 5. 24 V DC bus (max. 4 A) 2x5-pin terminal strip Fig. 1/9: Pin assignment of the fieldbus interface (5-pin screw terminal adapter) If you connect the fieldbus via the terminal strip FBSD-KL-2x5POL from Festo, you can implement a T-adapter function. 1-32 Festo P.BE-FB14-EN en 1411d English 1. Installation 1.4 Bus terminal with terminating resistors Note Always use a terminating resistor at both ends of the fieldbus. This also applies if the CPX terminal is at the end of the fieldbus. If you are using T-adapters, install the terminating resistor at the unused output of the T-adapter. Recommendation: Mount a terminating resistor for the bus terminal in the Festo fieldbus plug (120 Ω, 0,25 W, è Fig. 1/10). 1 Protective cap 1 2 2 Resistor for bus termination (120 Ω, 0.25 W) SLD L H GND V+ SLD L H GND V+ SLD L H GND V+ Fig. 1/10: Terminating resistor in the fieldbus plug from Festo 1.4.1 Install a terminating resistor using the adapters If the CPX terminal to be connected is at the end of the field bus, a terminating resistor (120 Ω, 0.25 W) must be installed in the fieldbus socket. Festo P.BE-FB14-EN en 1411d English Connect the terminating resistor between the cores for CAN_H and CAN_L. 1-33 1. Installation 1.5 Power supply Warning Only use PELV circuits in accordance with IEC/EN 60204-1 (protective extra-low voltage, PELV) for the electrical power supply. Consider also the general requirements for PELV circuits in accordance with IEC/EN 60204-1. Only use voltage sources which ensure reliable electrical isolation of the operating voltage in accordance with IEC/EN 60204-1. Through the use of PELV circuits, protection from electric shock (protection from direct and indirect contact) in accord ance with IEC/DINEN60204-1 is ensured (Electrical equip ment of machines. General requirements). The current consumption of a CPX terminal depends on the number and type of integrated modules and components. Read in the CPX system description the information on power supply as well as on the earthing measures to be carried out. System power supply, additional power supply and valve power supply The CPX terminal is supplied with operating and load power via the interlinking block with system, additional and valve supply. The pin allocation of the CPX interlinking blocks can be found in the CPX system description and the package insert for the CPX interlinking block. 1-34 Festo P.BE-FB14-EN en 1411d English Commissioning Chapter 2 Commissioning Festo P.BE-FB14-EN en 1411d English 2-1 2. Commissioning Table of contents 2. Commissioning . . . . . . . . . . . . . . . . . . . . . . . . . . . . . . . . . . . . . . . . . . . . . . . . 2-1 2.1 Commissioning on a CANopen master . . . . . . . . . . . . . . . . . . . . . . . . . . . . . . 2.1.1 General information on CANopen . . . . . . . . . . . . . . . . . . . . . . . . . . . Configuration . . . . . . . . . . . . . . . . . . . . . . . . . . . . . . . . . . . . . . . . . . . . . . . . . . 2.2.1 Layer setting service (LSS) . . . . . . . . . . . . . . . . . . . . . . . . . . . . . . . . 2.2.2 LSS commands . . . . . . . . . . . . . . . . . . . . . . . . . . . . . . . . . . . . . . . . . 2.2.3 Configuration of the LSS slave . . . . . . . . . . . . . . . . . . . . . . . . . . . . . 2.2.4 Addressing the CPX terminal . . . . . . . . . . . . . . . . . . . . . . . . . . . . . . 2.2.5 Configuration examples . . . . . . . . . . . . . . . . . . . . . . . . . . . . . . . . . . Overviews . . . . . . . . . . . . . . . . . . . . . . . . . . . . . . . . . . . . . . . . . . . . . . . . . . . . . 2.3.1 Brief overview of the scope of functions . . . . . . . . . . . . . . . . . . . . . 2.3.2 Overview Object directory . . . . . . . . . . . . . . . . . . . . . . . . . . . . . . . . 2.3.3 Behaviour of the CPX terminal when it is switched on . . . . . . . . . . 2.3.4 Default identifier distribution . . . . . . . . . . . . . . . . . . . . . . . . . . . . . . Object directories . . . . . . . . . . . . . . . . . . . . . . . . . . . . . . . . . . . . . . . . . . . . . . . 2.4.1 Communication profile . . . . . . . . . . . . . . . . . . . . . . . . . . . . . . . . . . . 2.4.2 Overview of the PDO structure . . . . . . . . . . . . . . . . . . . . . . . . . . . . . 2.4.3 Digital inputs (Transmit PDO 1) . . . . . . . . . . . . . . . . . . . . . . . . . . . . 2.4.4 Digital outputs (Receive PDO 1) . . . . . . . . . . . . . . . . . . . . . . . . . . . . 2.4.5 Analogue inputs channel 0 … 3 (Transmit PDO 2) . . . . . . . . . . . . . . 2.4.6 Analogue outputs channel 0 … 3 (Receive PDO 2) . . . . . . . . . . . . . 2.4.7 Analogue inputs channel 4 … 15 (Transmit PDO 3) . . . . . . . . . . . . . 2.4.8 Analogue outputs channel 4 … 15 (Receive PDO 3) . . . . . . . . . . . . 2.4.9 Technology modules, status bits, I/O diagnostic interface (PDO 4) 2.4.10 Manufacturer specific profile . . . . . . . . . . . . . . . . . . . . . . . . . . . . . . 2.4.11 Overview of mappingobjects . . . . . . . . . . . . . . . . . . . . . . . . . . . . . . 2.4.12 Forcing . . . . . . . . . . . . . . . . . . . . . . . . . . . . . . . . . . . . . . . . . . . . . . . . 2.4.13 Function assignment and virtual modules . . . . . . . . . . . . . . . . . . . . 2-4 2-5 2-6 2-6 2-6 2-24 2-26 2-29 2-35 2-35 2-36 2-37 2-39 2-41 2-41 2-46 2-47 2-50 2-55 2-60 2-62 2-65 2-68 2-72 2-79 2-81 2-85 2.2 2.3 2.4 2-2 Festo P.BE-FB14-EN en 1411d English 2. Commissioning 2.5 2.6 Parameterisation . . . . . . . . . . . . . . . . . . . . . . . . . . . . . . . . . . . . . . . . . . . . . . . 2.5.1 Parameterisation during switch-on . . . . . . . . . . . . . . . . . . . . . . . . . 2.5.2 Parameterisation with the handheld . . . . . . . . . . . . . . . . . . . . . . . . 2.5.3 Application example for parameterisation . . . . . . . . . . . . . . . . . . . . Commissioning the CPX terminal in the system . . . . . . . . . . . . . . . . . . . . . . . 2.6.1 Correct commissioning, normal operating status . . . . . . . . . . . . . . Festo P.BE-FB14-EN en 1411d English 2-91 2-91 2-92 2-92 2-93 2-94 2-3 2. Commissioning 2.1 Commissioning on a CANopen master This section describes the configuration and addressing of a CPX terminal on a CANopen interface or CANopen master. The following specifications have been taken into account: CANopen specifications CiA 201, V1.1.0 CiA 207 CAN application layer CAL CiA 301, V4.2.0 The specification CiA 301 relies on the CAL-based communication profile CiA 305 DSP V2.2 The Draft Standard Proposal describes the layer setting service (LSS) CiA 401, V3.0.0 The specification CiA 401 defines the device profiles for input and output modules within CANopen Tab. 2/1: CANopen specifications taken into account with the CPX terminal In order to understand this chapter, you should be familiar with CANopen and the specifications CiA 301, CIA DSP 305 and CiA 401. 2-4 Festo P.BE-FB14-EN en 1411d English 2. Commissioning 2.1.1 General information on CANopen CANopen devices have an object directory which makes all important participant parameters accessible in a standard ized manner. A CANopen system is configured mainly by access to the object directory of the individual participants. The access mechanism is provided by Service Data Objects (SDOs). There are two different communication mechanisms in a CANopen system. Process Data Objects (PDOs) provide fast transfer of process data and are transmitted by simple CAN messages with no protocol overhead. Process Data Objects may be transmitted based on event control, synchronised to a system clock, or on request. The Service Data Objects (SDO) form a point-to-point connection and permit access to every entry in the object directory of a node. Festo P.BE-FB14-EN en 1411d English 2-5 2. Commissioning 2.2 2.2.1 Configuration Layer setting service (LSS) With the help of the layer setting service (LSS), an LSS master can change the baud rate and station number (node number) of an LSS slave via the CAN bus. Communication between the LSS master and LSS slave takes place via the LSS protocol. The LSS slave is identified through its LSS address. An LSS address, according to CiA DSP-305, consists of: – Vendor ID – Product code – Revision number – Serial number To activate the layer setting service at the bus node CPXFB38, the switch elements 1 … 7 of the DIL switch 3 must be set to OFF (è Fig. 1/5). LSS can only be used if the LSS slave is in the status “stopped” or “pre-operational”. 2.2.2 LSS commands The LSS commands are sent from the LSS master with COBID 0x7E5 (communication object identifier). The LSS slave answers with COB-ID 0x7E4. To make the bus node CPX-FB14 configurable via LSS, it must be placed in the LSS configuration mode. There are two differ ent possibilities for this: 2-6 – Global mode change – Selective mode change Festo P.BE-FB14-EN en 1411d English 2. Commissioning Global mode change With the “switch mode global” command, the LSS master switches the mode of the LSS slave. COB-ID Command 0x7E5 Byte 0 1 2 3 4 5 6 7 Data 0x04 Mode 0x00 0x00 0x00 0x00 0x00 0x00 Tab. 2/2: Switch mode global Mode: – 0x01 Switches the LSS slave into the configuration mode – 0x00 Switches the LSS slave into the normal mode (operation mode) The “switch mode global” command is not confirmed by the LSS slave. Selective mode change With the selective mode change, a specific LSS slave can be selected. To do this, a sequence of four commands is sent out by the LSS master. Selective module change commands Description Contents (hex.) 1. Vendor ID Manufacturer ID (assigned by CiA) 00 00 00 1D 2. Product code Product code 00 00 00 CD 3. Revision number Software version xx xx xx xx 4. Serial number Serial number xx xx xx xx Tab. 2/3: Selective mode change Festo P.BE-FB14-EN en 1411d English 2-7 2. Commissioning 1) Selective mode change – vendor ID With the “switch mode selective – vendor ID” command, only the mode of the LSS slave with the specified vendor ID is changed. COB-ID Command 0x7E5 Byte 0 1 2 3 4 5 6 7 Data 0x40 VendorID 0x00 0x00 0x00 0x00 0x00 0x00 Tab. 2/4: Switch mode selective – vendor ID The “switch mode selective – vendor ID” command is not confirmed by the LSS slave. 2) Selective mode change – product code With the “switch mode selective – product code” command, only the mode of the LSS slave with the specified product code is changed. COB-ID Command 0x7E5 Byte 0 1 2 3 4 5 6 7 Data 0x41 ProdCode 0x00 0x00 0x00 0x00 0x00 0x00 Tab. 2/5: Switch mode selective – product code The “switch mode selective – product code” command is not confirmed by the LSS slave. 2-8 Festo P.BE-FB14-EN en 1411d English 2. Commissioning 3) Selective mode change – revision number With the “switch mode selective – revision number” com mand, only the mode of the LSS slave with the specified revi sion number is changed. COB-ID Command 0x7E5 Byte 0 1 2 3 4 5 6 7 Data 0x42 Revision 0x00 0x00 0x00 0x00 0x00 0x00 Tab. 2/6: Switch mode selective – revision number The “switch mode selective – revision number” command is not confirmed by the LSS slave. 4) Selective mode change – serial number With the “switch mode selective – serial number” command, only the mode of the LSS slave with the specified serial num ber is changed. COB-ID Command 0x7E5 Byte 0 1 2 3 4 5 6 7 Data 0x43 Serial 0x00 0x00 0x00 0x00 0x00 0x00 Tab. 2/7: Switch mode selective – serial number After the fourth command is sent, the addressed LSS slave answers (vendor ID, product code, revision number and serial number must agree with the internal data of the LSS slave). Festo P.BE-FB14-EN en 1411d English 2-9 2. Commissioning COB-ID Acknowledge 0x7E4 Byte 0 1 2 3 4 5 6 7 Data 0x44 Mode 0x00 0x00 0x00 0x00 0x00 0x00 Tab. 2/8: Answer to switch mode selective – serial number Mode: – 0x01 Configuration mode – 0x00 Normal mode (operation mode) 2-10 Festo P.BE-FB14-EN en 1411d English 2. Commissioning Configure node number With the “configure node ID” command, a new node number is assigned to the LSS slave. COB-ID Command 0x7E5 Byte 0 1 2 3 4 5 6 7 Data 0x11 Node ID 0x00 0x00 0x00 0x00 0x00 0x00 Tab. 2/9: Configure node ID Node ID: – Node ID of the LSS slave (possible values 1 … 127) COB-ID Acknowledge 0x7E4 Byte 0 1 2 3 4 5 6 7 Data 0x11 Error code Error ex tension 0x00 0x00 0x00 0x00 0x00 Tab. 2/10: Answer to configure node ID Error code: – 0 Successful assignment of the node ID – 1 Impermissible node ID – 0xFF Not all switch elements 1 … 7 of the DIP switch 3 are at OFF. The bus node is not in the LSS mode. Error extension: – Reserved Festo P.BE-FB14-EN en 1411d English 2-11 2. Commissioning Configure bit timing parameters With the “configure bit timing parameters” command, a new baud rate is assigned to the LSS slave. COB-ID Command 0x7E5 Byte 0 1 2 3 4 5 6 7 Data 0x13 Bit timing table Table entry 0x00 0x00 0x00 0x00 0x00 Tab. 2/11: Configure bit timing parameters Bit timing table: – Is always 0. Table entry: – 0 1000 kBaud – 2 500 kBaud – 3 250 kBaud – 4 125 kBaud 2-12 Festo P.BE-FB14-EN en 1411d English 2. Commissioning COB-ID Acknowledge 0x7E4 Byte 0 1 2 3 4 5 6 7 Data 0x13 Error code Error extension 0x00 0x00 0x00 0x00 0x00 Tab. 2/12: Answer to configure bit timing parameters Error code: – 0 Successful assignment of the baud rate – 1 Impermissible baud rate (baud rate is not supported) – 0xFF Not all switch elements 1 … 7 of the DIP switch 3 are at OFF. The bus node is not in the LSS mode. Error extension: – Reserved Festo P.BE-FB14-EN en 1411d English 2-13 2. Commissioning Activate bit timing With the “activate bit timing” command, the new baud rate is activated after a time delay. This command can only be used in the configuration mode. COB-ID Command 0x7E5 Byte 0 1 2 3 4 5 6 7 Data 0x15 Delay 0x00 0x00 0x00 0x00 0x00 0x00 Tab. 2/13: Activate bit timing Delay: – Time delay in ms The command is not confirmed by the LSS slave. 2-14 Festo P.BE-FB14-EN en 1411d English 2. Commissioning Save the configuration With the “store configuration” command, the new node ID and the new baud rate are stored. This command is only possible in the configuration mode. COB-ID Command 0x7E5 Byte 0 1 2 3 4 5 6 7 Data 0x17 0x00 0x00 0x00 0x00 0x00 0x00 0x00 Tab. 2/14: Store configuration COB-ID Acknowledge 0x7E4 Byte 0 1 2 3 4 5 6 7 Data 0x17 Error code Error ex tension 0x00 0x00 0x00 0x00 0x00 Tab. 2/15: Answer to store configuration Error code: – 0 Successful saving of the settings – 1 Saving is not supported by the LSS slave. – 2 No access to the storage medium. – 0xFF Not all switch elements 1 … 7 of the DIP switch 3 are at OFF. The bus node is not in the LSS mode. Error extension: – Reserved Festo P.BE-FB14-EN en 1411d English 2-15 2. Commissioning Query manufacturer ID With the “inquire vendor ID” command, the manufacturer ID of the LSS slave is queried. COB-ID Command 0x7E5 Byte 0 1 2 3 4 5 6 7 Data 0x5A 0x00 0x00 0x00 0x00 0x00 0x00 0x00 Tab. 2/16: Inquire vendor ID COB-ID Acknowledge 0x7E4 Byte 0 1 Data 0x5A Low word Low word High word High word Low byte High byte Low byte High byte Tab. 2/17: 2-16 2 3 4 5 6 7 0x00 0x00 0x00 Answer to inquire vendor ID Festo P.BE-FB14-EN en 1411d English 2. Commissioning Query product code With the “inquire product code” command, the product code of the LSS slave is queried. COB-ID Command 0x7E5 Byte 0 1 2 3 4 5 6 7 Data 0x5B 0x00 0x00 0x00 0x00 0x00 0x00 0x00 6 7 0x00 0x00 Tab. 2/18: Inquire product code COB-ID Acknowledge 0x7E4 Byte 0 1 Data 0x5B Low word Low word High word High word 0x00 Low byte High byte Low byte High byte Tab. 2/19: 2 3 4 5 Answer to inquire product code Festo P.BE-FB14-EN en 1411d English 2-17 2. Commissioning Query revision number With the “inquire revision number” command, the revision number of the LSS slave is queried. COB-ID Command 0x7E5 Byte 0 1 2 3 4 5 6 7 Data 0x5C 0x00 0x00 0x00 0x00 0x00 0x00 0x00 6 7 0x00 0x00 Tab. 2/20: Inquire revision number COB-ID Acknowledge 0x7E4 Byte 0 1 Data 0x5C Low word Low word High word High word 0x00 Low byte High byte Low byte High byte Tab. 2/21: 2-18 2 3 4 5 Answer to inquire revision number Festo P.BE-FB14-EN en 1411d English 2. Commissioning Query serial number With the “inquire serial number” command, the serial number of the LSS slave is queried. COB-ID Command 0x7E5 Byte 0 1 2 3 4 5 6 7 Data 0x5D 0x00 0x00 0x00 0x00 0x00 0x00 0x00 6 7 0x00 0x00 Tab. 2/22: Inquire serial number COB-ID Acknowledge 0x7E4 Byte 0 1 Data 0x5D Low word Low word High word High word 0x00 Low byte High byte Low byte High byte Tab. 2/23: 2 3 4 5 Answer to inquire serial number Festo P.BE-FB14-EN en 1411d English 2-19 2. Commissioning Query node number With the “inquire node ID” command, the currently set node number of the LSS slave is queried. COB-ID Command 0x7E5 Byte 0 1 2 3 4 5 6 7 Data 0x5E 0x00 0x00 0x00 0x00 0x00 0x00 0x00 Tab. 2/24: Inquire node ID COB-ID Acknowledge 0x7E4 Byte 0 1 2 3 4 5 6 7 Data 0x5E Node ID 0x00 0x00 0x00 0x00 0x00 0x00 Tab. 2/25: 2-20 Answer to inquire node ID Festo P.BE-FB14-EN en 1411d English 2. Commissioning Identify manufacturer’s code With the “identify vendor ID” command, the manufacturer ID of the LSS slave is identified. COB-ID Command 0x7E5 Byte 0 1 Data 0x46 Low word Low word High word High word 0x00 Low byte High byte Low byte High byte Tab. 2/26: 2 3 4 5 6 7 0x00 0x00 Identify vendor ID The command is not confirmed by the LSS slave. Identify product code With the “identify product code” command, the product code of the LSS slave is identified. COB-ID Command 0x7E5 Byte 0 1 Data 0x47 Low word Low word High word High word 0x00 Low byte High byte Low byte High byte Tab. 2/27: 2 3 4 5 6 7 0x00 0x00 Identify product code The command is not confirmed by the LSS slave. Festo P.BE-FB14-EN en 1411d English 2-21 2. Commissioning Identify revision number (low) With the “identify revision number low” command, the lower limit of the LSS slave’s revision number is identified. COB-ID Command 0x7E5 Byte 0 1 Data 0x48 Low word Low word High word High word 0x00 Low byte High byte Low byte High byte Tab. 2/28: 2 3 4 5 6 7 0x00 0x00 Identify revision number low The command is not confirmed by the LSS slave. Identify revision number (high) With the “identify revision number high” command, the upper limit of the LSS slave’s revision number is identified. COB-ID Command 0x7E5 Byte 0 1 Data 0x49 Low word Low word High word High word 0x00 Low byte High byte Low byte High byte Tab. 2/29: 2 3 4 5 6 7 0x00 0x00 Identify revision number high The command is not confirmed by the LSS slave. 2-22 Festo P.BE-FB14-EN en 1411d English 2. Commissioning Identify serial number (low) With the “identify serial number low” command, the lower limit of the LSS slave’s revision number is identified. COB-ID Command 0x7E5 Byte 0 1 Data 0x4A Low word Low word High word High word 0x00 Low byte High byte Low byte High byte Tab. 2/30: 2 3 4 5 6 7 0x00 0x00 Identify serial number low The command is not confirmed by the LSS slave. Identify serial number (high) With the “identify serial number high” command, the upper limit of the LSS slave’s revision number is identified. COB-ID Command 0x7E5 Byte 0 1 Data 0x4B Low word Low word High word High word 0x00 Low byte High byte Low byte High byte Tab. 2/31: 2 3 4 5 6 7 0x00 0x00 Identify serial number high COB-ID Acknowledge 0x7E4 Byte 0 1 2 3 4 5 6 7 Data 0x4F 0x00 0x00 0x00 0x00 0x00 0x00 0x00 Tab. 2/32: Answer to Identify serial number high Festo P.BE-FB14-EN en 1411d English 2-23 2. Commissioning Identify non-configured slave With the “identify non-configured slave” command, a nonconfigured LSS slave is identified. COB-ID Command 0x7E5 Byte 0 1 2 3 4 5 6 7 Data 0x4C 0x00 0x00 0x00 0x00 0x00 0x00 0x00 Tab. 2/33: Identify non-configured slave COB-ID Acknowledge 0x7E4 Byte 0 1 2 3 4 5 6 7 Data 0x50 0x00 0x00 0x00 0x00 0x00 0x00 0x00 Tab. 2/34: 2.2.3 Answer to identify non-configured slave Configuration of the LSS slave LSS can only be used if the LSS slave is in the status “stopped” or “pre-operational”. Case 1: Individual LSS slave connected to the master 1. Transfer the LSS slave into the configuration mode: Switch mode global (mode = 0x01) è Tab. 2/2 2. Query node number: Inquire node ID è Tab. 2/25 3. Configure new node number: 2-24 Configure node ID è Tab. 2/9 Festo P.BE-FB14-EN en 1411d English 2. Commissioning 4. Configure new baud rate: Configure bit timing parameters è Tab. 2/11 5. Save the configuration: Store configuration è Tab. 2/14 6. Transfer the LSS slave into the normal mode: Switch mode global (mode = 0x00) è Tab. 2/2 Case 2: Several LSS slaves connected to the master 1. Transfer the LSS slave into the configuration mode: Selective mode change – vendor ID è Tab. 2/4 (Festo = 0x1D) Selective mode change – product code è Tab. 2/5 (CPX-FB14 = 0xCD) Selective mode change – revision number è Tab. 2/6 Selective mode change – serial number è Tab. 2/7 2. Query node number: Inquire node ID è Tab. 2/24 3. Configure new node number Configure node ID è Tab. 2/9 4. Configure new baud rate Configure bit timing parameters è Tab. 2/11 5. Save the configuration Festo P.BE-FB14-EN en 1411d English Store configuration è Tab. 2/14 2-25 2. Commissioning 6. Transfer the LSS slave into the normal mode 2.2.4 Switch mode global (mode = 0x00) è Tab. 2/2 Addressing the CPX terminal Before configuring, ascertain the exact number of available inputs/outputs. Dependent on what you have ordered, a CPX terminal comprises a different number of I/Os. The I/Os will be assigned automatically within the CPX terminal (standard setting). The following applies to inputs and outputs: – The address assignment of the inputs is independent of the outputs. – The counting mode is independent of the position of the bus node. The bus node counts as a module with 0 or 8 inputs or 16 inputs and outputs, depending on the setting of DIL switch 5 (è section 1.2.2). – Counting is from left to right, in ascending order without gaps. Note Observe that a CPX terminal provides status bits or an I/O diagnostic interface, dependent on the setting. The status bits must be treated like inputs and occupy 8 bits in the Transmit PDO 4 (standard setting). The 16 bits of the I/O diagnostic interface must be treated like inputs and outputs. They each occupy 16 bits in the Transmit and Receive PDO 4 (standard set ting). 2-26 Festo P.BE-FB14-EN en 1411d English 2. Commissioning The following figure shows the standard distribution of I/Os on the PDOs in the remote I/O operating mode. If you use more than 8 I/O bytes, you must map these into the PDOs by “mapping”. In this case, the use of analogue channels will be limited. The same applies in the reverse case if more than 8 analogue channels are mapped into the PDOs by mapping. Transmit PDO 1 I0…I7 I8…I15 I16…I23 I24…I31 I32…I39 I40…I47 I48…I55 Receive PDO 1 O0…O7 O8…O15 O16…O23 O24…O31 O32…O39 O40…O47 O48…O55 O56…O63 Transmit PDO 2 AI0 AI1 AI2 AI3 Receive PDO 2 AO0 AO1 AO2 AO3 Transmit PDO 3 AI4 AI5 AI6 AI7 Receive PDO 3 AO4 AO5 AO6 AO7 Transmit PDO 4 IW0 / diagnostics 1) IW1 IW2 IW3 Receive PDO 4 OW0 / I/O diag. 2) OW2 OW3 OW1 I56…I63 1) Dependent on the configuration: With status bits: I0 - I7, with I/O diagnostic interface: I0 … I15 The input words of the technology modules shift correspondingly. 2) Dependent on the configuration: With activated I/O diagnostic interface: O0 … O15 (è section 1.2.2) The output words of the technology modules shift correspondingly. Fig. 2/1: Overview of PDO 1 … 4 and position of the status bits and I/O diagnostic inter face Note For the receive PDO 1 ... 4: The necessary telegram length depends on the CPX expansion and is 1 ... 8 byte. If the telegram received is shorter than the necessary telegram length, an error message will be output. If the telegram received is longer, the part corresponding to the necessary length will be processed. Festo P.BE-FB14-EN en 1411d English 2-27 2. Commissioning Remote controller operating mode In the remote controller operating mode (DIL switch 1) only the PDOs 1 are assigned. They contain 64 logical I/Os for data exchange with the remote controller. Transmit PDO 1 I0…I7 Receive PDO 1 O0…O7 O8…O15 O16…O23 O24…O31 O32…O39 O40…O47 O48…O55 O56…O63 I16…I23 I24…I31 Transmit PDO 2 … 4 Unused Receive PDO 2 … 4 Unused Fig. 2/2: 2-28 I8…I15 I32…I39 I40…I47 I48…I55 I56…I63 64 logical I/Os in the PDO 1 in the remote controller operating mode Festo P.BE-FB14-EN en 1411d English 2. Commissioning 2.2.5 Configuration examples Configuration and addressing example 1 T-PDO 4 (I/O diagnostics interface) IW0 T-PDO 1 I0…I7 I8…I15 1 Module no.:0 8DI O0…O7 I16…I23 2 8DI 3 8DO 4 4DO 8DI 5 6 8O 8O 8DO O8…O15 O16…O23 O24…O31 O32…O39 R-PDO 1 R-PDO 4 Fig. 2/3: OW0 (I/O diagnostics interface) Assignment of the PDOs on a CPX terminal with digital I/O modules, MPA pneumatics and activated I/O diagnostic interface (standard assignment without mapping, configuration è Tab. 2/35) Festo P.BE-FB14-EN en 1411d English 2-29 2. Commissioning Mo dule no. Module Input address Output address 0 CANopen bus node CPX-FB14 With activated I/O diagnostic interface T-PDO 4: IW0 Obj. 6100.1 R-PDO 4: OW0 Obj. 6300.1 1 Digital 8-off input module CPX-8DE T-PDO 1: I0 … I7 Obj. 6000.1 – 2 Digital multi I/O module CPX-8DE-8DA T-PDO 1: I8 … I15 Obj. 6000.2 R-PDO 1: O0 … O7 Obj. 6200.1 3 Digital 4-off output module CPX-4DA – R-PDO 1: O8 … O11 Obj. 6200.2 4 Digital multi I/O module CPX-8DE-8DA T-PDO 1: I16 … I23 Obj. 6000.3 R-PDO 1: O12 … O19 Obj. 6200.2 Obj. 6200.3 – MPA port pattern Passive module – – 5 MPA pneumatic module (8DO) MPA1S: VMPA1-FB-EMS-8 MPA pneumatic modules without separ ate power supply circuits – R-PDO 1: O20 … O27 Obj. 6200.3 Obj. 6200.4 6 MPA pneumatic module (8DO) MPA1S: VMPA1-FB-EMS-8 MPA pneumatic modules without separ ate power supply circuits – R-PDO 1: O28 … O35 Obj. 6200.4 Obj. 6200.5 Tab. 2/35: Configuration for example terminal 1 from Fig. 2/3 How you can prepare a changed configuration for this ex ample with function assignment and virtual modules can be found in section 2.4.13. 2-30 Festo P.BE-FB14-EN en 1411d English 2. Commissioning Configuration and addressing example 2 AI0 T-PDO 2 T-PDO 1 Module no.: AI1 I0…I7 1 I8…I15 2 I16…I23 3 4 5 6 7 8O 8DI R-PDO 1 R-PDO 2 8DI 4DO 8DI 8DO 2AI 2AO O0…O7 O8…O15 O16…O23 AO0 AO1 Fig. 2/4: Assignment of the PDOs on a CPX terminal with digital and analogue I/O modules, VTSA pneumatics (DIL switch setting 8O) and not-activated diagnostic functions (standard assignment without mapping, configuration è Tab. 2/36) Festo P.BE-FB14-EN en 1411d English 2-31 2. Commissioning Mo dule no. Module 0 Bus nodes – CPX-FB14 Without activation of diagnostic functions – 1 Digital 8-off input module CPX-8DE T-PDO 1: I0 … I7 Obj. 6000.1 – 2 Digital 8-off input module CPX-8DE T-PDO 1: I8 … I15 Obj. 6000.2 – 3 Digital 4-off output module CPX-4DA – R-PDO 1: O0 … O3 Obj. 6200.1 4 Digital multi I/O module CPX-8DE-8DA T-PDO 1: I16 … I23 Obj. 6000.3 R-PDO 1: O4 … O11 Obj. 6200.1 Obj. 6200.2 5 Analogue 2-off input module CPX-2AE-U-I T-PDO 2: AI0 … AI1 Obj. 6401.1 Obj. 6401.2 – 6 Analogue 2-off output module CPX-2AA – R-PDO 2: AO0 … AO1 Obj. 6411.1 Obj. 6411.2 7 VTSA pneumatic interface ISO plug-in (type 44) DIL switch in the interface set to 1 ... 8 solenoid coils (8DO) Tab. 2/36: 2-32 Input address – Output address R-PDO 1: O12 … O19 Obj. 6200.2 Obj. 6200.3 Configuration for example terminal 2 in Fig. 2/4 Festo P.BE-FB14-EN en 1411d English 2. Commissioning Configuration and addressing example 3 IW0 T-PDO 4 T-PDO 1 IW1 I0…I7 Module no.: 0 I8…I15 1 2 8DI 3 4DO R-PDO 1 O0…O7 R-PDO 4 OW0 4 8DI 5 6 8O 8O 8DO O8…O15 O16…O23 O24…O31 OW1 OW2 OW3 String 1 String 4, outputs String 1 Fig. 2/5: Assignment of the PDOs on a CPX terminal with digital I/O modules, CPX-CP interface, MPA pneumatics and non-activated diagnostic functions (standard assignment without mapping, configuration è Tab. 2/37) Festo P.BE-FB14-EN en 1411d English 2-33 2. Commissioning Mo dule no. Module Input address Output address 0 Bus nodes – CPX-FB14 Without activation of diagnostic functions – 1 Digital 8-off input module CPX-8DE T-PDO 1: I0 … I7 Obj. 6000.1 – 2 Digital 4-off output module CPX-4DA – R-PDO 1: O0 … O3 Obj. 6200.1 3 CPX-CP interface CPX-CP On string 1, 4 I bytes are assigned (32I) On string 1 … 4, 16 O bytes are assigned (128O) T-PDO 4: IW0 … IW1 Obj. 6100.1 Obj. 6100.2 R-PDO 4: OW0 … OW3 Obj. 6300.1 Obj. 6300.2 Obj. 6300.3 Obj. 6300.4 Manual mapping for OW4 ... OW7 1) 4 Digital multi I/O module CPX-8DE-8DA T-PDO 1: I8 … I15 Obj. 6000.2 R-PDO 1: O4 … O11 Obj. 6200.1 Obj. 6200.2 – MPA port pattern Passive module – – 5 MPA pneumatic module (8DO) MPA1S: VMPA1-FB-EMS-8 MPA pneumatic module – R-PDO 1: O12 … O19 Obj. 6200.2 Obj. 6200.3 6 MPA pneumatic module (8DO) MPA1S: VMPA1-FB-EMS-8 MPA pneumatic module – R-PDO 1: O20 … O27 Obj. 6200.3 Obj. 6200.4 1) Manual mapping: The CPX-CP interface occupies in the configuration 16 byte outputs (128O). Since the PDO 4 can only address the first 8 bytes (64O), manual mapping is required for configuration of this CPX terminal. As a result, the remaining output bytes can be made available over other PDOs. (OW4 ... OW7 are not depicted in Fig. 2/5). Tab. 2/37: 2-34 Configuration for example terminal 3 in Fig. 2/5 Festo P.BE-FB14-EN en 1411d English 2. Commissioning 2.3 2.3.1 Overviews Brief overview of the scope of functions Festo P.BE-FB14-EN en 1411d English – Module states and boot-up as per Communication Profile CiA 301 – 1 Service Data Object for read and write access to the object directory: Send and Receive SDO – 4 process data objects for access to digital and analogue inputs: Transmit PDO 1...4 – 4 process data objects for access to digital and analogue outputs: Receive-PDO 1…4 – Emergency telegram for fault message to the master – Node guarding and heart beat – Default setting of all identifiers as per CiA 301 and the station number (predefined connection set) – Variable mapping – Function assignment and virtual modules – Layer setting service (LSS) 2-35 2. Commissioning 2.3.2 Overview Object directory Index (hex) Objects è Section 1000…1200 Communication part of the object directories 2.4.1 1400…1403 Communication parameters for Receive PDO 1...4 2.4.4 1800…1803 Communication parameters for Transmit PDO 1...4 2.4.3 1600…1603 Mapping parameters for Receive PDO 1…4 2.4.4 1A00…1A03 Mapping parameters for Transmit PDO 1...4 2.4.3 Manufacturer specific (2000…5FFF): 2000…2110 System and module data 2200…2210 System and module diagnostic data 2300…2310 Diagnostic memory data 2400…2421 System and module parameters 4000 … 4801 Function assignment module (virtual modules) 2.4.13 5000…5FFF Force tables 2.4.12 6000, 6100 Input array 2.4.3 6200, 6300 Output array 2.4.4 6206/6306 Fault mode array for the outputs 6207/6307 Error state array for the outputs 64xx Analogue inputs and outputs Tab. 2/38: 2-36 2.4.10 2.4.5 Implemented objects of the CPX terminal Festo P.BE-FB14-EN en 1411d English 2. Commissioning 2.3.3 Behaviour of the CPX terminal when it is switched on Power on Application initialization 5 0 0 4 Communication initialization 0 0 Pre-operational 1 2 3 2 Stopped 3 1 Operational Fig. 2/6: Status transitions of the CPX terminal (description è Tab. 2/39 on the next page) Festo P.BE-FB14-EN en 1411d English 2-37 2. Commissioning Description of the status transitions Status transition Designation Command specifier (cs) Function 0 0 – – Automatic boot-up after power on The saved parameters 2000 … 5FFF are only loaded after power on is loaded 1) 1 Start_Remote_ Node_Indication 01h Starts the CPX terminal in operational mode: – SDO transmission valid – PDO transmission (outputs active) – Node guarding / heart beat valid (Node guard response: toggle + 05h) 2 Enter_Pre_ Operation_State_ Indication 80h CPX terminal in pre-operational mode: – SDO transmission valid – PDO transmission invalid (outputs assume error status 2)) – Node guarding / heart beat valid (Node guard response: toggle + 7Fh) 3 Stop_Node_ Indication 02h CPX terminal in stopped mode: – SDO transmission invalid – PDO transmission invalid (outputs assume error status 2)) – Node guarding / heart beat valid (Node guard response: toggle + 04h) 4 Reset_ Communication_ Indication 82h Resetting the communication functions: – Outputs are reset – Communication parameters are reset (objects 1000…1FFF) 5 Reset_Node_ Indication 81h Module reset including application: – Outputs are reset – Maskings of the outputs are reset to default – Communication parameters are reset (objects 1000…1FFF) – Stored parameters (2000…5FFF) are not reloaded. 1) 2) The objects 6000 … are always loaded with the default settings after power-on Only after the transition from operational mode to stopped or pre-operational mode Tab. 2/39: 2-38 Status transitions Festo P.BE-FB14-EN en 1411d English 2. Commissioning 2.3.4 Default identifier distribution The following table shows the identifier distribution: Broadcast objects Object name Object designation Range of values of the COB identifier on the CPX terminal SYNC – 080h 128d Tab. 2/40: Broadcast objects Festo P.BE-FB14-EN en 1411d English 2-39 2. Commissioning Peer-to-Peer objects Object Object designation Range of values of the COB identifier EMERGENCY For procedures with high priority, e.g. undervoltage 081h 0FFh 129d … 255d Transmit PDO 1 PDO1 (tx) 181h 385d 1FFh … 511d Receive PDO 1 PDO1 (rx) 201h 513d 27Fh … 639d Transmit PDO 2 PDO2 (tx) 281h 641d 2FFh … 767d Receive PDO 2 PDO2 (rx) 301h 769d 37Fh … 895d Transmit PDO 3 PDO3 (tx) 381h 897d 3FFh … 1023d Receive PDO 3 PDO3 (rx) 401h 47Fh 1025d … 1151d Transmit PDO 4 PDO4 (tx) 481h 4FFh 1153d … 1279d Receive PDO 4 PDO4 (rx) 501h 57Fh 1281d … 1407d Transmit SDO SDO1 (tx) 581h 5FFh 1409d … 1535d Receive SDO SDO1 (rx) 601h 67Fh 1537d … 1663d Node guarding / heart beat Guarding 701h 77Fh 1793d … 1919d Tab. 2/41: 2-40 Peer-to-Peer objects of the CPX-FB14 Festo P.BE-FB14-EN en 1411d English 2. Commissioning 2.4 2.4.1 Object directories Communication profile The following tables show the objects of the communication part (values and examples: module ID = 1). In the following: U = unsigned ro = read only rw = read/write Map. = mapping possible Attr. = attribute Note For mapping, the rules in accordance with CiA 301 apply: Mapping entries are only possible if the number of para meters has previously been set to zero. (Example: index 1O00, subindex 3 … 8: Set subindex 0 to “0”). After entering the mapping values, set the number of para meters to the corresponding value again. Index (hex) Sub Designa index tion Type Attr. Map. Values (hex) Explanation 1000 0 U32 00 0F 91 01 From software version V1.10: OF = maximum expansion of the CPX terminal 00 0x 91 01 Prior to software version V1.10: 91 01 = device profile x = dependent on expansion of the CPX terminal: Bit 16: digital inputs Bit 17: digital outputs Bit 18: analogue inputs Bit 19: analogue outputs Example: 00 03 91 01 CPX terminal with digital inputs and outputs Device type Festo P.BE-FB14-EN en 1411d English ro – 2-41 2. Commissioning Index (hex) Sub Designa index tion Type Attr. Map. Values (hex) Explanation 1001 0 U8 Yes 00 No error xx Generic/manufacturer error (è section 3.5.1) Error re gister ro 1002 0 Manufac turer status register U32 ro Yes 00 00 00 00 Module number and error number (è section 3.5.1) 1003 0 Pre-defined error field U8 rw – 00 … 0A Number of the current error (Write 00 deletes all errors) (è section 3.5.1) 1 Standard error field U32 ro xx xx xx xx Most recent error (n) – Byte 0 … 1 = error code (è section 3.5.1) – Byte 2 = byte 0 of In dex 1002 – Byte 3 = byte 1 of In dex 1002 2 xx xx xx xx Error (n+1) 3 xx xx xx xx Error (n+2) ... ... ... Ah xx xx xx xx Oldest error n+9 1005 0 COB-ID SYNC message U32 rw – 80 Default SYNC message COB-ID 80h 1008 0 Manufac turer device name Str. ro – “FB14” Node designation 1009 0 Manufac Str. turer hard ware version ro – “0810” (ex ample) Current hardware status 100A 0 Manufac turer soft ware ver sion ro – “V2.0” (ex ample) Current software version 2-42 Str. Festo P.BE-FB14-EN en 1411d English 2. Commissioning Index (hex) Sub Designa index tion Type Attr. Map. Values (hex) Explanation 100C 0 Guard time U16 rw – 00 00 Timeout monitoring [ms] 100D 0 Life time factor U8 rw – 00 Timeout monitoring (Guard time x life time factor = complete node guard time) 1014 0 COB-ID emergency object U32 rw – 80 + node ID Default emergency object COB-ID 80h + node ID 1015 0 Inhibit time emergency message U16 rw – 00 00 Transmit blocking time emergency message [100 μs] 1016 0 Consumer heart beat time U8 ro – 6 Number of entries 1 C.-H. Time 1 U32 rw 00 00 00 00 Heart beat ID und heart beat time [ms] 2 C.-H. Time 2 00 00 00 00 ... ... ... 6 C.-H. Time 6 00 00 00 00 0 Producer heart beat time 1017 Festo P.BE-FB14-EN en 1411d English U16 rw – 00 00 Heart beat time [ms] COB-ID = node guard ID Status (pre-operational, operational, stopped) 2-43 2. Commissioning Index (hex) Sub Designa index tion Type Attr. Map. Values (hex) Explanation 1018 0 Identity ob ject U8 – 4 Number of entries 1 Vendor ID U32 00 00 00 1D Vendor ID (from CiA) 2 Product code 00 00 00 CD Product code 3 Revision number xx xx.xx xx Version (like object 100A) 4 Serial num ber xx xx xx xx Serial number (individual for each module) 0 Module list U8 1… Number of connected CPX modules 1 Module 0 U16 Module code module 0 1) 2 Module 1 è CPX sys tem descrip tion 3 Module 2 Module code module 2 1) ... ... ... 1027 1) ro ro – Module code module 1 1) Sequence as in CPX terminal from left to right. 2-44 Festo P.BE-FB14-EN en 1411d English 2. Commissioning Index (hex) Sub Designa index tion Type Attr. Map. Values (hex) Explanation 1029 0 Error behaviour, number of error classes U8 – 3 Number of error classes 1 Communic ation error 00 With communication error (timeout/heart beat) 0 = Pre-operational 1 = No state change 2 = Stopped Error codes: 8130, 8140 From V1.10: 8100, 8130, 8140 2 Output error 01 With short circuit/overload at output module 0 = Pre-operational 1 = No state change 2 = Stopped Error codes: 23xx, 33xx 3 Input error 01 With short circuit/overload at input module or failure of sensor supply 0 = Pre-operational 1 = No state change 2 = Stopped Error codes: 21xx, 31xx 0 Server SDO parameter U8 2 Number of entries 1 COB_ID Cli ent } Serv er (rx) U32 600 + node ID Default COB-ID + node ID 2 COB_ID server } client (tx) 580 + node ID Default COB-ID + node ID 1200 U = unsigned ro = read only rw = read/write Tab. 2/42: ro rw ro – Map. = Mapping possible Attr. = attribute Objects of the communication part Festo P.BE-FB14-EN en 1411d English 2-45 2. Commissioning 2.4.2 Overview of the PDO structure Default mapping PDO 1 Digital inputs/outputs (transmit/receive) PDO 2 Analogue inputs/outputs channels 0 ... 3 (transmit/receive) PDO 3 Analogue inputs/outputs channels 4 ... 7 (transmit/receive) PDO 4 Technology modules, status bits, I/O diagnostic interface Tab. 2/43: PDO structure If required, the default PDO structure can be changed via SDO (è “PDO Communication Mapping Parameter” in the following sections, Index1O00h…1A03h, 1600h…1603h) 2-46 Festo P.BE-FB14-EN en 1411d English 2. Commissioning 2.4.3 Digital inputs (Transmit PDO 1) Index (hex) Sub Designa index tion Type Attr. Map. Values (hex) Explanation 181 … 1FF – Transmit PDO 1 – – – xx xx Telegram length 1 ... 8 bytes Byte 0: I0 … I7 Byte 1: I8 … I15 ... Byte 7: I56 … I63 1800 0 PDO com munication parameter record U8 ro – 05 Number of entries 1 PDO COB-ID U32 180 + node ID Default COB-ID of the inputs 2 Transmis sion type U8 FF Default: acyclic 1) 3 Inhibit time U16 00 00 Transmit blocking time inputs [100 μs] 4 – – Not used 5 Event timer 00 00 Time-controlled transmission of the inputs [ms] U = unsigned ro = read only rw = read/write Festo P.BE-FB14-EN en 1411d English rw Map. = Mapping possible Attr. = attribute 2-47 2. Commissioning Index (hex) Sub Designa index tion Type Attr. Map. Values (hex) Explanation 1A00 0 U8 – 0…8 Number of entries 60 00 01 08 Pointer at index I0 … I7 60 00 02 08 ... Index I8 … I15 3 60 00 03 08 ... Index I16 … I23 4 60 00 04 08 ... Index I24 … I31 5 60 00 05 08 ... Index I32 … I39 6 60 00 06 08 ... Index I40 … I47 7 60 00 07 08 ... Index I48 … I55 8 60 00 08 08 ... Index I56 … I63 – 0 … 40 Number of 8-input groups Yes xx Status of inputs 0 ... 7 2 xx ... Inputs 8 ... 15 3 xx ... Inputs 16 ... 23 4 xx ... Inputs 24 ... 31 5 xx ... Inputs 32 ... 39 6 xx ... Inputs 40 ... 47 7 xx ... Inputs 48 ... 55 8 xx ... Inputs 56 ... 63 9 xx ... Inputs 64 ... 71 Ah xx ... Inputs 72 ... 79 Bh xx ... Inputs 80 ... 87 Ch xx ... Inputs 88 ... 95 1 2 6000 0 1 U = unsigned ro = read only rw = read/write 2-48 PDO com munication mapping parameter Read input 8-bit rw U32 U8 ro Map. = Mapping possible Attr. = attribute Festo P.BE-FB14-EN en 1411d English 2. Commissioning Index (hex) Sub Designa index tion Type Attr. Map. Values (hex) Explanation 6000 Dh U8 Yes xx ... Inputs 96 ... 103 Eh xx ... Inputs 104 ... 111 Fh xx ... Inputs 112 ... 119 10h xx ... Inputs 120 ... 127 … … … 3D xx ... Inputs 480 ... 487 3E xx ... Inputs 488 ... 495 3F xx ... Inputs 496 … 503 40h xx ... Inputs 504 … 511 Read input 8-bit U = unsigned ro = read only rw = read/write 1) ro Map. = Mapping possible Attr. = attribute During the transition from pre-operational to operational, the current SDO values will be “frozen” (e.g. analogue inputs). These values will be transmitted with each remote transmission request (RTR), independent of further settings (e.g. interrupt enable for analogue inputs). Tab. 2/44: Digital inputs Festo P.BE-FB14-EN en 1411d English 2-49 2. Commissioning 2.4.4 Digital outputs (Receive PDO 1) Index (hex) Sub Designa index tion Type Attr. Map. Values (hex) Explanation 201 … 27F – Receive PDO 1 – – – xx xx xx xx Telegram length 1 ... 8 bytes1) Byte 0: O0 … O7 Byte 1: O8 … O15 ... Byte 7: O56 … O63 1400 0 PDO com munication parameter record U8 ro – 02 Number of entries 1 PDO COB-ID U32 200 + node ID Default COB-ID of the outputs 2 Transmis sion type U8 FF Default: acyclic 0 PDO com munication mapping parameter U8 0…8 Number of entries 62 00 01 08 Pointer at index O0 … O7 62 00 02 08 ... Index O8 … O15 3 62 00 03 08 ... Index O16 … O23 4 62 00 04 08 ... Index O24 … O31 5 62 00 05 08 ... Index O32 … O39 6 62 00 06 08 ... Index O40 … O47 7 62 00 07 08 ... Index O48 … O55 8 62 00 08 08 ... Index O56 … O63 1600 1 2 U = unsigned ro = read only rw = read/write 1) U32 rw rw – Map. = Mapping possible Attr. = attribute è Note in section 2.2.4 2-50 Festo P.BE-FB14-EN en 1411d English 2. Commissioning Index (hex) Sub Designa index tion Type Attr. Map. Values (hex) Explanation 6200 0 U8 ro – 0 … 10 Number of 8-output groups rw Yes xx Status of outputs 0 ... 7 2 xx … Outputs 8 … 15 3 xx … Outputs 16 … 23 4 xx … Outputs 24 … 31 5 xx … Outputs 32 … 39 6 xx … Outputs 40 … 47 7 xx ... Outputs 48 … 55 8 xx ... Outputs 56 … 63 9 xx ... Outputs 64 … 71 Ah xx ... Outputs 72 … 79 Bh xx ... Outputs 80 … 87 Ch xx ... Outputs 88 … 95 Dh xx ... Outputs 96 - 103 Eh xx ... Outputs 104 … 111 Fh xx ... Outputs 112 … 119 10h xx ... Outputs 120 … 127 … … … 3D xx ... Outputs 480 … 487 3E xx ... Outputs 488 … 495 3F xx ... Outputs 496 … 503 40h xx ... Outputs 504 … 511 Write output 8 bit 1 Festo P.BE-FB14-EN en 1411d English 2-51 2. Commissioning Index (hex) Sub Designa index tion Type Attr. Map. Values (hex) Explanation 6206 0 U8 – 0 … 40 Number of 8-output groups FF Fault mode outputs 0 - 7 2 FF ... Outputs 8 … 15 3 FF ... Outputs 16 … 23 4 FF ... Outputs 24 … 31 5 FF ... Outputs 32 … 39 6 FF ... Outputs 40 … 47 7 FF ... Outputs 48 … 55 8 FF ... Outputs 56 … 63 9 FF ... Outputs 64 … 71 Ah FF ... Outputs 72 … 79 Bh FF ... Outputs 80 … 87 Ch FF ... Outputs 88 … 95 Dh FF ... Outputs 96 … 103 Eh FF ... Outputs 104 … 111 Fh FF ... Outputs 112 … 119 10h FF ... Outputs 120 … 127 … … … 3D FF ... Outputs 480 … 487 3E FF ... Outputs 488 … 495 3F FF ... Outputs 496 … 503 40 FF ... Outputs 504 … 511 1 2-52 Fault mode output 8 bit ro rw Festo P.BE-FB14-EN en 1411d English 2. Commissioning Index (hex) Sub Designa index tion Type Attr. Map. Values (hex) Explanation 6207 0 U8 – 0 … 40 Number of 8-output groups 00 Error state outputs 0 ... 7 2 00 ... Outputs 8 … 15 3 00 ... Outputs 16 … 23 4 00 ... Outputs 24 … 31 5 00 ... Outputs 32 … 39 6 00 ... Outputs 40 … 48 7 00 ... Outputs 48 … 55 8 00 ... Outputs 56 … 63 9 00 ... Outputs 64 … 71 Ah 00 ... Outputs 72 … 79 Bh 00 ... Outputs 80 … 87 Ch 00 ... Outputs 88 … 95 Dh 00 ... Outputs 96 … 103 Eh 00 ... Outputs 104 … 111 … … … 3D 00 ... Outputs 480 … 488 3E 00 ... Outputs 489 … 495 3F 00 ... Outputs 496 … 503 40h 00 ... Outputs 504 … 511 Error state output 8-bit 1 rw U = unsigned ro = read only rw = read/write Tab. 2/45: ro Map. = Mapping possible Attr. = attribute Digital outputs Festo P.BE-FB14-EN en 1411d English 2-53 2. Commissioning The statuses of the valves and outputs of the CPX valve ter minal can be defined in case of error. Note With Index 6206 you can define the outputs which are to assume a defined status in the event of a fault. With Index 6207 you can define the status which the fixed outputs are to assume in the event of a fault. The settings do not become active until the CPX valve terminal is put into the operational mode. After each switching on or after each reset (hardware initialization), the default values will automatically be accepted and any maskings will be overwritten. The following applies: Index (hex) Definition 6206 Subindex 1 … 10h Bit 0 … 7 0 = status of the output is retained 6207 Subindex 1 … 10h Bit 0 … 7 0 = output is reset Tab. 2/46: 2-54 1 = output assumes the status defined in Index 6207 1 = output is set Statuses of the valves and outputs in case of error Festo P.BE-FB14-EN en 1411d English 2. Commissioning 2.4.5 Analogue inputs channel 0 … 3 (Transmit PDO 2) CANopen represents the 16-bit analogue values with the following objects left justified in a 32-bit value: – 6422, 6424, 6425, 6426, 6444, 5444, 5434 Values of an analogue input are loaded into the PDO only if the following requirements are fulfilled: – Globale Interrupt Enable must be set to Enable (Index 6423). – With the Interrupt Trigger (Index 6421), you can define how the analogue value in the following step is to be checked (minimum/maximum value, value modification, Index 6424, 6425, 6426). The channel number of the interrupt-triggering analogue input is entered in Object 6422. The PDO is then transmitted according to the transmission code in Object 1801 (FFh, FDh, FCh or 0 ... F0h). Festo P.BE-FB14-EN en 1411d English 2-55 2. Commissioning Index (hex) Sub Designation index Type Attr. Map. Values (hex) Explanation 281 … 2FF – Transmit PDO 2 – 1801 0 – – xx Telegram length 2, 4, 6 or 8 bytes Byte 0, 1: channel 0 (AI0) Byte 2, 3: channel 1 (AI1) Byte 4, 5: channel 3 (AI2) Byte 6, 7: channel 4 (AI3) PDO U8 communication parameter record ro – 05 Number of entries 1 PDO COB-ID U32 rw 280h + node ID Default COB-ID of the inputs 2 Transmission type U8 FF Default: acyclic 1) 3 Inhibit time U16 01 4F (= 50 ms) Transmit blocking time inputs [100 μs] 4 – – Not used 5 Event timer 00 00 Time-controlled transmission of the inputs [ms] U = unsigned ro = read only rw = read/write 1) Map. = Mapping possible Attr. = attribute è Note on page 2-49 2-56 Festo P.BE-FB14-EN en 1411d English 2. Commissioning Index (hex) Sub Designation index 1A01 0 Number of entries 64 01 01 10 Pointer at index AI0 64 01 02 10 ... Index AI1 3 64 01 03 10 ... Index AI2 4 64 01 04 10 ... Index AI3 5 00 00 00 00 ... on mapping object 5 6 00 00 00 00 ... on mapping object 6 7 00 00 00 00 ... on mapping object 7 8 00 00 00 00 ... on mapping object 8 – 0 … 10 Number of analogue chan nels Yes xx AI0 2 xx AI1 3 xx AI2 4 xx AI3 2 0 PDO U8 communication U32 mapping parameter Read analogue input 1 U8 rw ro I16 – Explanation 0…8 1 6401 Type Attr. Map. Values (hex) 6423 0 Analogue input global interrupt enable B rw – 00 Global interrupt enable 0 = disable 1 = enable 6422 0 Analogue input number of interrupt source banks U8 ro – 1 Number of interrupt source banks 1 Interrupt source bank 1 U32 – 00 Interrupt source bank 1 1) (channel 0 … 15) 1) Reset automatically after read access Festo P.BE-FB14-EN en 1411d English 2-57 2. Commissioning Index (hex) Sub Designation index Type Attr. Map. Values (hex) Explanation 6421 0 Analogue input interrupt trigger selection U8 – 0 … 10 Number of analogue inputs 1 Analogue input 00 AI0 Bit 0: Upper limit value ex ceeded 1) Bit 1: Lower limit value ex ceeded 2) Bit 2: Modification greater than Delta 3) Bit 3 … 7: reserved 2 00 AI1 3 00 AI2 4 00 AI3 0 … 10 Number of analogue inputs 00 Maximum value AI0 1) 2 00 Maximum value AI1 1) 3 00 Maximum value AI2 1) 4 00 Maximum value AI3 1) 6424 1) 2) 3) Bit 0: Bit 1: Bit 2: 2-58 ro rw 0 Analogue input interrupt upper limit integer U8 ro 1 Analogue input I32 rw – “Upper limit exceeded” (as per CiA 401) “Input below lower limit” (as per CiA 401) “Input changed by more than delta” (as per CiA 401) Festo P.BE-FB14-EN en 1411d English 2. Commissioning Index (hex) Sub Designation index Type Attr. Map. Values (hex) Explanation 6425 0 Analogue input interrupt upper limit integer U8 ro – 0 … 10 Number of analogue inputs 1 Analogue input I32 rw 00 Minimum value AI0 2) 2 00 Minimum value AI1 2) 3 00 Minimum value AI2 2) 4 00 Minimum value AI3 2) 0 … 10 Number of analogue inputs 00 Minimum value modification AI0 3) 2 00 Minimum value modification AI1 3) 3 00 Minimum value modification AI2 3) 4 00 Minimum value modification AI3 3) 6426 2) 3) 0 Analogue input interrupt delta unsigned U8 ro 1 Analogue input U32 rw Bit 1: Bit 2: Tab. 2/47: – “Input below lower limit” (as per CiA 401) “Input changed by more than delta” (as per CiA 401) Analogue inputs channel 0 ... 3 Festo P.BE-FB14-EN en 1411d English 2-59 2. Commissioning 2.4.6 Analogue outputs channel 0 … 3 (Receive PDO 2) Index (hex) Sub Designation index Type Attr. Map. Values (hex) Explanation 301 … 37F – Receive PDO 2 – 1401 0 1601 – – xx Telegram length 2, 4, 6 or 8 bytes Byte 0, 1: channel 0 (AO0) Byte 2, 3: channel 1 (AO1) Byte 4, 5: channel 2 (AO2) Byte 6, 7: channel 3 (AO3) PDO U8 communication parameter record ro – 02 Number of entries 1 PDO COB-ID U32 rw 300 + node ID Default COB-ID of the inputs 2 Transmission type U8 FF Default: acyclic 0 PDO U8 communication U32 mapping parameter 0…8 Number of entries 64 11 01 10 Pointer at index AO0 64 11 02 10 ... Index AO1 3 64 11 03 10 ... Index AO2 4 64 11 04 10 ... Index AO3 5 00 00 00 00 ... on mapping object 5 6 00 00 00 00 ... on mapping object 6 7 00 00 00 00 ... on mapping object 7 8 00 00 00 00 ... on mapping object 8 1 2 2-60 rw – Festo P.BE-FB14-EN en 1411d English 2. Commissioning Index (hex) Sub Designation index Type Attr. Map. Values (hex) Explanation 6411 0 U8 ro Yes 0 … 10 Number of analogue channels I16 rw xx xx AO0 2 xx xx AO1 3 xx xx AO2 4 xx xx AO3 0 … 10 Number of analogue channels 1 Default mode AO0 2 1 Default mode AO1 3 1 Default mode AO2 4 1 Default mode AO3 0 … 10 Number of analogue channels 1 Error value AO0 2 2 Error value AO1 3 3 Error value AO2 4 4 Error value AO3 Write analogue output 16 bit 1 6443 0 Analogue output fault mode U8 1 6444 – rw 0 Analogue output error integer 32 bit 1 U = unsigned ro = read only rw = read/write Tab. 2/48: ro U8 ro I32 rw – Map. = Mapping possible Attr. = attribute Analogue outputs channel 0 ... 3 Festo P.BE-FB14-EN en 1411d English 2-61 2. Commissioning 2.4.7 Analogue inputs channel 4 … 15 (Transmit PDO 3) Index (hex) Sub Designation index Type Attr. Map. Values (hex) Explanation 381 … 3FF – Transmit PDO 3 – 1802 0 – – xx Telegram length 2, 4, 6 or 8 bytes Byte 0, 1: channel 4 (AI4) Byte 2, 3: channel 5 (AI5) Byte 4, 5: channel 6 (AI6) Byte 6, 7: channel 7 (AI7) PDO U8 communication parameter record ro – 05 Number of entries 1 PDO COB-ID U32 rw 380 + node ID Default COB-ID of the inputs 2 Transmission type U8 FF Default: acyclic 1) 3 Inhibit time U16 01 F4 (= 50 ms) Transmit blocking time inputs [100 μs] 4 – – Not used 5 Event timer 00 00 Time-controlled transmission of the inputs [ms] U = unsigned ro = read only rw = read/write 1) Map. = Mapping possible Attr. = attribute è Note on page 2-49 2-62 Festo P.BE-FB14-EN en 1411d English 2. Commissioning Map. Values (hex) Explanation – 0…8 Number of entries 64 01 05 10 Pointer at index AI4 64 01 06 10 ... Index AI5 3 64 01 07 10 ... Index AI6 4 64 01 08 10 ... Index AI7 5 00 00 00 00 ... on mapping object 5 6 00 00 00 00 ... on mapping object 6 7 00 00 00 00 ... on mapping object 7 8 00 00 00 00 Pointer on mapping object 8 – 0 … 10 Number of analogue channels Yes xx xx AI4 6 xx xx AI5 ... ... ... 10h xx xx AI15 Index (hex) Sub Designation index 1A02 0 1 2 6401 0 PDO U8 communication U32 mapping parameter Read analogue input 5 6422 1) Type Attr. U8 rw ro I16 0 Analogue input number of interrupt source banks U8 ro – 1 Number of interrupt source banks (è PDO 2) 1 Interrupt source bank 1 U32 ro – 00 Interrupt source bank 1 1) (channel 1 … 16) Reset automatically after read access Festo P.BE-FB14-EN en 1411d English 2-63 2. Commissioning Index (hex) Sub Designation index Type Attr. Map. Values (hex) Explanation 6421 0 Analogue input interrupt trigger selection number of analogue input U8 – 0 … 10 Number of analogue inputs 5 Analogue input 00 AI4 6 00 AI5 ... ... ... 10h 00 AI15 0 … 10 Number of analogue inputs 00 Maximum value AI4 6 00 Maximum value AI5 ... ... ... 10h 00 Maximum value AI15 0 … 10 Number of analogue inputs 00 Minimum value AI4 6 00 Minimum value AI5 ... ... ... 10h 00 Minimum value AI15 6424 6425 2-64 ro rw 0 Analogue input interrupt upper limit integer U8 ro 5 Analogue input I32 rw 0 Analogue input interrupt upper limit integer U8 ro 5 Analogue input I32 rw – – Festo P.BE-FB14-EN en 1411d English 2. Commissioning Index (hex) Sub Designation index Type Attr. Map. Values (hex) Explanation 6426 0 Analogue input interrupt delta unsigned U8 ro – 0 … 10 Number of analogue inputs 5 Analogue input U32 rw 00 Minimum value change AI4 6 00 Minimum value change AI5 ... 00 ... 10h 00 Minimum value change AI15 Tab. 2/49: 2.4.8 Analogue inputs channel 4 … 15 (Transmit PDO 3) Analogue outputs channel 4 … 15 (Receive PDO 3) Index (hex) Sub Designation index Type Attr. Map. Values (hex) Explanation 401 … 47F – Receive PDO 3 – 1402 0 – – xx Telegram length 2, 4, 6 or 8 bytes Byte 0, 1: channel 5 (AO4) Byte 2, 3: channel 6 (AO5) Byte 4, 5: channel 7 (AO6) Byte 6, 7: channel 8 (AO7) PDO U8 communication parameter record ro – 02 Number of entries 1 PDO COB-ID U32 rw 400 + node ID Default COB-ID of the inputs 2 Transmission type U8 FF Default: acyclic Festo P.BE-FB14-EN en 1411d English 2-65 2. Commissioning Index (hex) Sub Designation index 1602 0 Map. Values (hex) Explanation – 0…8 Number of entries 64 11 05 10 Pointer on index AO4 64 11 06 10 ... Index AO5 3 64 11 07 10 ... Index AO6 4 64 11 08 10 ... Index AO7 5 00 00 00 00 ... on mapping object 5 6 00 00 00 00 ... on mapping object 6 7 00 00 00 00 ... on mapping object 7 8 00 00 00 00 ... on mapping object 8 1 2 6411 0 – 0 … 10 Number of analogue channels I16 rw Yes xx AO4 6 xx AO5 ... ... ... 10h xx AO15 0 … 10 Number of analogue channels 1 Default mode AO4 6 1 Default mode AO5 ... ... ... 10h 1 Default mode AO15 0 Write analogue output 16 bit rw ro 5 2-66 PDO U8 communication U32 mapping parameter U8 5 6443 Type Attr. Analogue output fault mode U8 ro rw – Festo P.BE-FB14-EN en 1411d English 2. Commissioning Index (hex) Sub Designation index Type Attr. Map. Values (hex) Explanation 6444 0 U8 ro – 0 … 10 Number of analogue channels I32 rw 00 00 00 00 Error value AO4 6 00 00 00 00 Error value AO5 ... ... ... 10h 00 00 00 00 Error value AO15 5 Tab. 2/50: Analogue output error integer 32 bit Analogue outputs channel 4 … 15 (Receive PDO 3) Festo P.BE-FB14-EN en 1411d English 2-67 2. Commissioning 2.4.9 Technology modules, status bits, I/O diagnostic interface (PDO 4) Note In order to use the status bits or the I/O diagnostic interface, they must be activated via the DIL switches on the bus node (è section 1.2.2). Further information on the status bits and on the I/O diagnostic interface can be found in section 3.3 and 3.4. Transmit PDO 4 Index (hex) Sub Designation index Type Attr. Map. Values (hex) Explanation 481 … 4FF – Transmit PDO 4 – – – xx Telegram length 2, 4, 6 or 8 bytes Byte 0, 1: status bits or I/O diagnostics interface (dependent on configuration) Byte 2, 3: reserved Byte 4, 5: reserved Byte 6, 7: reserved 1803 0 PDO commu nication para meter record U8 ro – 05 Number of entries 1 PDO COB-ID U32 rw 480 + node ID Default COB-ID of the inputs 2 Transmission type U8 FF Default: acyclic 1) 3 Inhibit time U16 00 00 Transmit blocking time inputs [100 μs] 4 – – Not used 5 Event timer 00 00 Time-controlled transmission of the inputs [ms] 1) è Note on page 2-49 2-68 Festo P.BE-FB14-EN en 1411d English 2. Commissioning Index (hex) Sub Designation index 1A03 0 Map. Values (hex) Explanation – 0…8 Number of entries 61 00 01 10 Pointer on IW0 61 00 02 10 ... on IW1 3 61 00 03 10 ... on IW2 4 61 00 04 10 ... on IW3 5 00 00 00 00 ... on mapping object 5 6 00 00 00 00 ... on mapping object 6 7 00 00 00 00 ... on mapping object 7 8 00 00 00 00 ... on mapping object 8 0 … 20 Number of IW groups xx IW0, depending on configuration1): – Status bits or – I/O diagnostic interface – 1st Input word technology module 2 xx IW1: depending on configuration: 1st or 2nd input word technology module 1) 3 xx IW2 technology module ... ... ... 20h xx IW31 technology module 1 2 6100 0 PDO U8 communication U32 mapping parameter Read input 16-bit 1 1) Type Attr. U8 U16 rw ro Yes Depending on diagnostic setting Tab. 2/51: Transmit PDO 4 Festo P.BE-FB14-EN en 1411d English 2-69 2. Commissioning Receive PDO 4 A description of the functioning of the I/O diagnostic interface can be found in the Diagnostics chapter of the CPX system description. Index (hex) Sub Designation index Type Attr. Map. Values (hex) Explanation 501 … 57F – Receive PDO 4 – 1403 0 1603 – – xx Telegram length 1...8 bytes Byte 0, 1: I/O diagnostics interface (if configured) Byte 2, 3: reserved Byte 4, 5: reserved Byte 6, 7: reserved PDO U8 communication parameter record ro – 02 Number of entries 1 PDO COB-ID U32 rw 500 + node ID Default COB-ID of the inputs 2 Transmission type U8 FF Default: acyclic 0 PDO U8 communication U32 mapping parameter 0…8 Number of entries 63 00 01 10 Pointer on OW0 63 00 02 10 ... on OW1 3 63 00 03 10 ... on OW2 4 63 00 04 10 ... on OW3 5 00 00 00 00 ... on mapping object 5 6 00 00 00 00 ... on mapping object 6 7 00 00 00 00 ... on mapping object 7 8 00 00 00 00 ... on mapping object 8 1 2 2-70 rw – Festo P.BE-FB14-EN en 1411d English 2. Commissioning Index (hex) Sub Designation index Type Attr. Map. Values (hex) Explanation 6300 0 U8 ro – 0…8 Number of 16-output groups U16 rw Yes xx If configured: – I/O diagnostic interface – Reserved 0 … 20 Number of OW groups xx OW0 technology module 2 xx OW1 technology module 3 xx OW2 technology module ... ... ... 20h xx OW31 technology module 0 … 20 Number of OW groups FF FF Fault mode OW0 2 FF FF ... OW1 3 FF FF ... OW2 ... ... ... 20 FF FF ... OW31 0 … 20 Number of OW groups 00 00 Fault mode OW0 2 00 00 ... OW1 3 00 00 ... OW2 ... ... ... 20 00 00 ... OW31 Write output 16 bit 1 2…8 6300 0 Write output 16 bit 1 6306 0 0 Fault mode output 16 bit Error state output 16-bit 1 Tab. 2/52: rw Yes U16 1 6307 U8 U8 ro U16 rw U8 ro U16 rw – – Receive PDO 4 Festo P.BE-FB14-EN en 1411d English 2-71 2. Commissioning Note With Index 6306 you can define the outputs which are to assume a defined status in the event of a fault. With Index 6307 you can define the status which the fixed outputs are to assume in the event of a fault. The settings do not become active until the CPX valve terminal is put into the operational mode. After each switching on or after each reset (hardware initialization), the default values will automatically be accepted and any maskings will be overwritten. 2.4.10 Manufacturer specific profile Additional information can be found in the following tables and in the CPX system description (P.BE-CPX-SYS-...). Index (hex) Designation Map. Explanation 2000 System data (global system configuration) – Operating mode, details è Tab. 2/54 2010 Module data – Details è Tab. 2/55 2200 System diagnostics data Yes Details è Tab. 2/56 2210 Module diagnostics data – Details è Tab. 2/57 Tab. 2/53: 2-72 Overview of the indices of the manufacturer specific profile area Festo P.BE-FB14-EN en 1411d English 2. Commissioning System data Index (hex) Sub Designa index tion Type Attr. Val ues (hex) Explanation Func tion no. 2000 0 System data U8 3 Number of parameters – 1 Operating mode 1 xx CPX operating mode Bit 0 … 3: CPX operating mode Bit 4: CPX expansion Bit 5: handheld unit Bit 6: force mode Bit 7: system start 0000 2 Fail safe xx è Index 6206, 6207, 6306, 6307 0001 3 Monitoring the CPX ter minal xx Monitoring the CPX terminal: Bit 0 … 3: short circuit/ overload/under voltage Bit 4 … 7: reserved 0002 Tab. 2/54: ro System data Festo P.BE-FB14-EN en 1411d English 2-73 2. Commissioning Module data Index (hex) Sub Designa index tion Type Attr. Val ues (hex) Explanation Func tion no. 2010 0 Module data U8 1… Number of entries 16 + xx 1) 1 Module 0 U16 xx xx Module type 1) (module code + revision code) 2 Module 1 xx xx Module type 1) (module code + revision code) 3 Module 2 xx xx Module type 1) (module code + revision code) ... ... ... ... 0 – U8 1… Number of entries 1 Module seri al number module 0 U32 xx xx xx xx Module serial number 1) 2 Module seri al number module 1 U32 xx xx xx xx ... ... 2110 1) ro ro ... 784 + xx 1) ... All details: è Appendix of the CPX system description Tab. 2/55: 2-74 Module data Festo P.BE-FB14-EN en 1411d English 2. Commissioning System diagnostics data Index (hex) Sub Designa index tion Type Attr. Val ues (hex) Explanation Func tion no. 2200 0 U8 8 Number of entries – ro 1 Status byte 0 … FF Status bits 1936 2 Module number 0,40, … Number of the module with diagnostic message (bit 0...5) Diagnostics completed (bit 6) 1937 3 Error num ber 0 … FF Error number 1938 4…8 Reserved – Reserved 1939 … 1943 Tab. 2/56: System diagnostic data (PDO mapping is possible) Module diagnostics data Index (hex) Sub Designa index tion Type Attr. Val ues (hex) Explanation Func tion no. 2210 0 Module dia gnostics U8 ro 1… Number of entries – 1 Diagnostics module 0 U32 ro 00 … FF 00 … FF 00 00 I/O channel/channel number Error number Reserved Reserved 2008 + xx 1) 2 Diagnostics module 1 00 … FF 00 … FF 00 00 I/O channel/channel number Error number Reserved Reserved ... ... ... ... 1) All details: è Appendix of the CPX system description Tab. 2/57: Module diagnostics data Festo P.BE-FB14-EN en 1411d English 2-75 2. Commissioning Diagnostic memory parameters and data Index (hex) Sub Designa index tion Type Attr. Val ues (hex) Explanation Func tion no. 2300 0 U8 Status/ mode dia gnostic memory ro 8 Number of entries – rw xx Diagnostic memory mode 3480 – – – – 3 rw 00 Number of entries in the diagnostic memory (Writing “0” will delete all entries) 3482 4 ro 00 Current status / overflow 3483 5 rw 00 Trigger conditions (run/stop filter 2, error end filter, error number filter, module/channel filter) 3484 6 00 Module number (MN) 3485 7 00 Channel number (CN) 3486 8 00 Error number (EN) 3487 0 … 28 Number of entries – 00 … FF 00 … 17 00 … 3B 00 … 3B 00 … 63 (+ 80) Number of days Number of hours Number of minutes Number of seconds Number of 10 ms (and designation for 1st. mes sage after power on) Module code Module position Channel number Error number Following channels 3488, … 1 2 2310 0 Diagnostic memory U8 1 1st entry (latest error) Oct. string 2 2nd entry 3 3rd entry ... ... 28h 40th entry (oldest saved error) Tab. 2/58: 2-76 ro 00 … FF 00 … 2F 00 … FF 00 … FF 00 … FF Diagnostic memory data Festo P.BE-FB14-EN en 1411d English 2. Commissioning System parameters Index (hex) Sub Designa index tion Type Attr. Val ues (hex) Explanation Func tion no. 2400 0 System parameters U8 1 Parameter byte 0 2 ro 8 Number of entries – rw 0 … FF Reserved 4400 Parameter byte 1 0 … FF Monitoring (active/inactive) 4401 3 Parameter byte 2 0 … FF Bit 0, 1: Bit 2, 3: Bit 4, 5: Bit 6, 7: 4…8 Reserved – Reserved not used 1) force mode not used system start 2) 4402 – 1) Note: The bus node supports only the mode “Faultmode benutzen” or “Assume fault mode” (è Festo Maintenance Tool). The error characteristics of the individual outputs are parameterised through the objects 6206 and 6207. Outputs whose error characteristics have not been parameterised are reset in case of error. Outputs whose error characteristics have not been parameterised are reset in case of error. (Information on parameterisation of the outputs’ error characteristics è Tab. 2/46) 2) At system start with saved parameterisation, only the objects 2000 ... 5FFF are loaded. The ob jects 6000 … are always loaded with the default settings after power-on. Tab. 2/59: System parameters Detailed information on parameters and data can be found in the CPX system description. Festo P.BE-FB14-EN en 1411d English 2-77 2. Commissioning Module parameters Index (hex) Sub Designa index tion Type Attr. Val ues (hex) Explanation Func tion no. 2410 0 Module Parameter U8 1 Parameter 0 Module 0 2 Parameter 1 Module 0 0 … FF ... ... ... 40h Parameter 63 Module 0 0 … FF 0 Module Parameter 1 Parameter 0 Module 1 ... ... ... 40h Parameter 63 Module 1 0 … FF 2411 2412, … 1) 0 … 40h Parameters 0 … 63 Module 2 … U8 U8 ro 40 Number of entries – rw 0 … FF – Monitoring the CPX mod ule – Behaviour after short cir cuit/overload – Input debounce time – Signal extension time – Data format of analogue values 4828, … ro 40h Number of entries – rw 0 … FF – Monitoring the CPX mod ule – Behaviour after short cir cuit/overload – Input debounce time – Signal extension time – Data format of analogue values xx 1) è CPX system description appendix B xx 1) ... ... Module-dependent, è CPX system description Tab. 2/60: 2-78 Module parameters Festo P.BE-FB14-EN en 1411d English 2. Commissioning 2.4.11 Overview of mappingobjects The following table shows the objects for which mapping is possible: Index (hex) Sub Designation index Type Attr. Values (hex) Explanation 1001 0 Error register U8 ro 00 Number of errors 1002 0 Manufacturer status register U32 ro 00 00 00 00 Module number and error number 2200 1 System dia gnostics data U8 ro xx Status bits 6000 6100 2 Number of the module with diagnostic message 3 Error number 1 Read input 1…8 U8 ... ... ... 10h Read input 121…128 I120 … I127 1 Read input 16-bit U16 ro ro xx xx Status of the inputs (digital or status bits) I0 … I7 Status of the inputs (technology modules or I/O diagnostics interface) IW0 ... ... 20h IW31 Festo P.BE-FB14-EN en 1411d English 2-79 2. Commissioning Index (hex) Sub Designation index Type Attr. Values (hex) Explanation 6200 1 Write output 1…8 U8 Status of the outputs (digital or valves) O0 … O7 ... ... ... 10h Write output 121 … 128 O120 … O127 1 Write output 16bit 6300 6401 6411 rw xx xx Status of the outputs (technology modules) OW0 ... ... 20h OW31 1 Read analogue input 1 ... ... ... 10h Read analogue input 16 AI15 1 Write analogue output 1 ... ... ... 10h Write analogue output 16 AO15 Tab. 2/61: 2-80 U16 rw I16 I16 ro rw xx xx Analogue input channels Default mapping AI0 Analogue output channels AO0 Overview of mapping objects Festo P.BE-FB14-EN en 1411d English 2. Commissioning 2.4.12 Forcing The Force function enables the manipulation of signal statuses disconnected from actual operating statuses and is used mainly during the commissioning phase. Further inform ation can be found in the appendix of the CPX system de scription (P.BE-CPX-SYS-...). CANopen represents 16-bit analogue values left-justified in a 32-bit value. Force table inputs Index (hex) Sub Designa index tion Type Attr. Val ues (hex) Explanation Func tion no. 5000 0 Force enable U8 ro 0 Bit 0: enable force 1) (Corresponds to index 2400,3 bit 2, 3) – 5006 0 Force mode 8-bit digital inputs U8 ro 0 … 10 Number of entries – rw 0 Force mode I0 ... I7 2 0 Force mode I8 ... I15 ... ... ... 10h 0 Force mode I120 ... I127 ro 0 … 10 Number of entries rw 0 Force value I0 ... I7 2 0 Force value I8 ... I15 ... ... ... 10h 0 Force value I120 ... I127 1 5007 0 1 Force mode 8-bit digital inputs Festo P.BE-FB14-EN en 1411d English U8 – 2-81 2. Commissioning Index (hex) Sub Designa index tion Type Attr. Val ues (hex) Explanation Func tion no. 5106 0 U8 ro 0 … 20 Number of entries – U16 rw 0 Force mode IW0 2 0 Force mode IW1 ... ... ... 20h 0 Force mode IW31 1 5107 0 U8 ro 0 … 20 Number of entries U16 rw 0 Force value IW0 2 0 Force value IW1 ... ... ... 20h 0 Force value IW31 ro 0 … 10 Number of entries rw 0 Force mode channel 0 1) (AI0) 2 0 Force mode channel 1 (AI1) ... ... ... 10h 0 Force mode channel 15 (AI15) 1 5433 0 1 5434 0 Force value 16-bit digital inputs Force mode analogue inputs Force value analogue inputs U8 U8 ro 0 … 10 Number of entries I32 rw 0 Force value channel 0 (AI0) 2 0 Force value channel 1 (AI1) ... ... ... 10h 0 Force value channel 15 (AI15) 1 1) Force mode 16-bit digital inputs – – – Values: 0 = disable 1 = enable 2-82 Festo P.BE-FB14-EN en 1411d English 2. Commissioning Force table outputs Index (hex) Sub Designa index tion Type Attr. Val ues (hex) Explanation Func tion no. 5206 0 U8 – ro 0 … 10 Number of entries rw 0 Force mode O0 ... O7 2 0 Force mode O8 ... O15 ... ... ... 10h 0 Force mode O120 ... O127 ro 0 … 10 Number of entries rw 0 Force value O0 ... O7 2 0 Force value O8 ... O15 ... ... ... 10h 0 Force value O120 ... O127 1 5207 0 1 5306 0 Force value 8-bit digital outputs ro 0 … 20 Number of entries U16 rw 0 Force mode OW0 2 0 Force mode OW1 ... ... ... 20h 0 Force mode OW31 0 Force mode 16-bit digital outputs U8 U8 1 5307 Force mode 8-bit digital outputs U8 ro 0 … 20 Number of entries U16 rw 0 Force value OW0 2 0 Force value OW1 ... ... ... 20h 0 Force value OW31 1 Force value 16-bit digital outputs Festo P.BE-FB14-EN en 1411d English – – – 2-83 2. Commissioning Index (hex) Sub Designa index tion Type Attr. Val ues (hex) Explanation Func tion no. 5443 0 U8 – Force mode analogue outputs ro 0 … 10 Number of entries rw 0 Force mode channel 0 1) (AO0) 2 0 Force mode channel 1 (AO1) ... ... ... 10h 0 Force mode channel 15 (AO15) 1 5444 0 Force value analogue outputs U8 ro 0 … 10 Number of entries I32 rw 0 Force value channel 0 1) (AO0) 2 0 Force mode channel 1 (AO1) ... ... ... 10h 0 Force mode channel 15 (AO15) 1 1) – Values: 0 = disable 1 = enable Tab. 2/62: 2-84 Overview of mapping objects Festo P.BE-FB14-EN en 1411d English 2. Commissioning 2.4.13 Function assignment and virtual modules Function assignment lets you operate various expanded CPX terminals with only one PLC software program. You can, for example, configure a maximum expansion of a CPX terminal in your system and, for the other terminals, suppress the modules that are not physically present. Object 4800 is used for this purpose: With it, you can define modules as “virtual” or physically present and so show or suppress them. There are no address shifts through the use of virtual modules. An additional application possibility of the function assignment is to configure the CPX terminal with extensions for another function of the CPX terminal and only show these virtual modules later with the object 4800. In addition, you can use the object 4801, to check the nomin al configuration of the CPX terminal. This function is available only for digital I/O modules. The following objects can only be written if the following conditions are met: Festo P.BE-FB14-EN en 1411d English – The CPX-FB14 is in pre-operational mode. – No error is generated from the object 4800,0. – Object 4000 = 0. 2-85 2. Commissioning Index (hex) Sub Designa index tion Type Attr. Map. Values (hex) Explanation 4000 – Bool 0 Function assignment and virtual modules deactivated 1 Function assignment and virtual modules activated 0 … 10 Number of entries xx 0 = enter virtual bits in object 6000 (input array) 1 = enter physically present bits in object 6000 (input array) (de fault setting) 0 … 10 Number of entries xx 0 = enter virtual bits in object 6200 (output array) 1 = enter physically present bits in object 6200 (output array) (de fault setting) 0 … 30h Number of the configuration entries used 4001 0 1… 10h 4200 0 1… 10h 4800 0 1… 48 2-86 Function assignment mask enable rw Function U8 assignment mask inputs rw Function assignment mask outputs U8 rw Set module config function assignment U8 U32 rw – – – – With these entries, a possible system structure including virtual modules is defined. – Byte 0: number of output bits (digital modules) or number of output bytes (analogue modules) – Byte 1: like byte 0 but for the inputs – Byte 2: CPX module code specification (with 0 = no module code specification) – Byte 3: bit 7: 0 = physically present module, 1 = virtual module Bit 6 ... 2: reserved Bit 1 ... 0: module type: 00 = digital, 01 = analogue, 10 = technology module Festo P.BE-FB14-EN en 1411d English 2. Commissioning Index (hex) Sub Designa index tion 4801 Type Attr. Check module function assignment Significance of ff (error cause in object 4801): 01 = Number of inputs of the module different 02 = Number of outputs of the module different 04 = Incorrect module code Tab. 2/63: Map. Values (hex) Explanation 0 Set module config not used 01 00 00 00 Target/actual comparison successful 80 ff oo mm ff : Error cause (see below) oo: Subindex of the object 4800 in which the error occurred mm: Module number in which the error occurred 08 = Module not permitted as virtual (e.g. analogue module) 10 = Sum of the inputs exceeded (> 128 bit) 20 = Sum of the outputs exceeded (> 128 bit) 40 = Number of the physically present modules does not agree with the configuration Function assignment and virtual modules Festo P.BE-FB14-EN en 1411d English 2-87 2. Commissioning Do the following to use virtual modules in a configuration: 1. Set the CPX-FB14 in the pre-operational mode. 2. Define a possible configuration of your CPX terminal with the object 4800 (requirement: 4800,0 = 0 and 4000 = 0): – 4800,1: module 0 – 4800,2: module 1 etc. 3. Write the number of the configured modules to the object 4800,0. As a result, the configuration defined by the objects 4800,1...4800,x are tested (target/actual comparison). – In case of a faulty target/actual comparison: The object 4800,0 is set to 0, an error code is entered in object 4801 and CPX error 29 is messaged with the emergency message. – In the case of a correct target/actual comparison: The function assignment masks are generated (objects 4001 and 4200) and digital outputs are reset (object 6200). 4. Activate the masks by setting the object 4000 to 1. 5. Adapt the PDO mapping (objects 160x and 1A0x), if you have defined virtual modules. 2-88 Festo P.BE-FB14-EN en 1411d English 2. Commissioning Configuration example with virtual modules In the following example, the CPX terminal should be con figured for two different functions using “Function assign ment”: – Function A = most complex CPX terminal of the system – Function B = CPX terminal A without module 5 (8DI) and module 8 (MPA pneumatics module, 8DO). Through the function assignment, the same PLC software can be used for terminals A and B without address shift. For terminal B, modules 5 and 8 are suppressed as virtual modules with object 4800. CPX terminal for funktion A Module 0 1 2 no.: 8DI 8DI 8DO 3 4 5 8DI 8DO 8O 8O 8 8O 6 4DO 8DI 8DO 8O Fig. 2/7: 7 4DO 8DI 8DO 8DI CPX terminal for function B (as with A without module 5 and 8) Module 2 3 4 5 1 0 no.: 8DI 6 8O Configure two variants of a CPX terminal with function assignment Festo P.BE-FB14-EN en 1411d English 2-89 2. Commissioning Module no. Module I address 1) O address 2) Values fct. A A B 0 0 CPX-FB14 With activated I/O diagnostic interface T-PDO 4: IW0 Obj. 6100,1 R-PDO 4: OW0 Obj. 6300,1 Obj. 4800.1: 02 00 02 02 1 1 CPX-8DE T-PDO 1: I0 … I7 Obj. 6000,1 – Obj. 4800,2: 00 00 08 00 2 2 CPX-8DE-8DA T-PDO 1: I8 … I15 Obj. 6000,2 R-PDO 1: O0 … O7 Obj. 6200,1 Obj. 4800,3: 00 00 08 08 3 3 CPX-4DA – R-PDO 1: O8 … O11 Obj. 6200,2 Obj. 4800,4: 00 00 00 04 4 4 CPX-8DE-8DA T-PDO 1: I16 … I23 Obj. 6000,3 R-PDO 1: O12 … O19 Obj. 6200,2 Obj. 6200,3 Obj. 4800,5: 00 00 08 08 5 – CPX-8DE T-PDO 1: I24 … I31 Obj. 6000,4 – 6 5 MPA1S... (8DO) – R-PDO 1: O20 … O27 Obj. 6200,3 Obj. 6200,4 Obj. 4800,7 00 00 00 08 7 6 MPA1S... (8DO) – R-PDO 1: O28 … O35 Obj. 6200,4 Obj. 6200,5 Obj. 4800,8 00 00 00 08 8 – MPA1S... (8DO) – R-PDO 1: O36 … O43 Obj. 6200,5 Obj. 6200,6 1) 2) Obj. 4800 Values fct. B Obj. 4800,6: 00 00 08 00 Obj. 4800,9 00 00 00 08 Obj. 4800 Obj. 4800,6: 80 00 08 00 Obj. 4800,9 80 00 00 08 With mapping via object 1A00 With mapping via object 1600 Tab. 2/64: 2-90 Virtual modules in example terminal 1 Festo P.BE-FB14-EN en 1411d English 2. Commissioning 2.5 Parameterisation You can set the behaviour of the CPX terminal in the remote I/O operating mode through individual parameterisation. A distinction is made between the following parameterisation types: – System parameterisation, e.g. switching off of error mes sages, etc. – Parameterisation of the diagnostic memory. – Module parameterisation (module- and channel-specific), e.g.: monitoring, settings in case of error, settings of debounce times of inputs. Recommendation: Parameterise the CPX terminal via the SDO in the pre-operational mode. A detailed description of the individual parameters as well as basic principles of application can be found in the CPX system description (P.BE-CPX-SYS-...). Parameter lists for CPX I/O modules and CPX pneumatic in terfaces can be found in the description for the CPX I/O mod ules (P.BE-CPX-EA-...). 2.5.1 Parameterisation during switch-on 1 Parameterisation is loaded into the node by the master 2 Parameterisation Network 1 is distributed to the modules from the node Fig. 2/8: 2 Sequence of start parameterisation Festo P.BE-FB14-EN en 1411d English 2-91 2. Commissioning 2.5.2 Parameterisation with the handheld The CPX handheld offers menu-driven access for paramet erisation of the CPX terminal without configuration software. Information on operating the handheld can be found in the relevant description. 2.5.3 Application example for parameterisation 1 Input with default 1 parameterisation 2 2 Input with reduction of the input debounce time and increase of the signal extension time Î Fig. 2/9: 1st sensor ÓÓÓ ÓÓÓ Î 2nd sensor Application example for parameterisation of debounce time and pulse lengthening (here on the right-hand sensor) In the above application, packets are transported on a fastmoving conveyor belt. With the following parameterisation, signal detection and processing has been improved: 2-92 – Reduction of the input debounce time from 3 ms (factory setting) to 0.1 ms: detection of shorter signals is possible. (Applies to the complete module). – Change in signal extension time to 50 ms: The signal will be registered reliably by the controller. (Here activated only for the input channel of the 2nd sensor). Festo P.BE-FB14-EN en 1411d English 2. Commissioning 2.6 Commissioning the CPX terminal in the system Note Please observe also the switching-on instructions in the handbook for your controller. Procedure: 1. Connect the fieldbus cable to the CPX bus node. 2. Switch on the operating voltages: – of all fieldbus stations, – of the CPX terminal. 3. Switch on the operating voltage for the master module. Recommendation: If the safety concept of your machine/system permits this, commission the CPX terminal with both operating voltages (pins 1 and 2) – but without compressed air. You can then test the CPX terminal without triggering accidental reactions. Festo P.BE-FB14-EN en 1411d English 2-93 2. Commissioning 2.6.1 Correct commissioning, normal operating status In the normal operating status, the LEDs on the bus node light up as follows: LED display MS PS NS PL IO SF M Operating status These LEDs light up green: – MS – NS – IO – PS – PL Red and yellow LEDs do not light up: – SF – M Standard Fig. 2/10: LEDs with normal operating status 2-94 Festo P.BE-FB14-EN en 1411d English Diagnostics Chapter 3 Diagnostics Festo P.BE-FB14-EN en 1411d English 3-1 3. Diagnostics Table of contents 3. Diagnostics . . . . . . . . . . . . . . . . . . . . . . . . . . . . . . . . . . . . . . . . . . . . . . . . . . . 3-1 3.1 3.2 Summary of diagnostics options . . . . . . . . . . . . . . . . . . . . . . . . . . . . . . . . . . . Diagnostics via LEDs . . . . . . . . . . . . . . . . . . . . . . . . . . . . . . . . . . . . . . . . . . . . 3.2.1 Normal operating status . . . . . . . . . . . . . . . . . . . . . . . . . . . . . . . . . . 3.2.2 Displays of the CPX-specific LEDs PS, PL, SF, M . . . . . . . . . . . . . . . . 3.2.3 Displays of the CANopen-specific LEDs MS, NS, IO . . . . . . . . . . . . . Diagnostics via status bits . . . . . . . . . . . . . . . . . . . . . . . . . . . . . . . . . . . . . . . . Diagnostics via the I/O diagnostic interface . . . . . . . . . . . . . . . . . . . . . . . . . . Diagnostics via CANopen . . . . . . . . . . . . . . . . . . . . . . . . . . . . . . . . . . . . . . . . . 3.5.1 The emergency message . . . . . . . . . . . . . . . . . . . . . . . . . . . . . . . . . . 3.5.2 CPX error numbers . . . . . . . . . . . . . . . . . . . . . . . . . . . . . . . . . . . . . . 3-3 3-4 3-5 3-6 3-9 3-12 3-13 3-14 3-15 3-20 3.3 3.4 3.5 3-2 Festo P.BE-FB14-EN en 1411d English 3. Diagnostics 3.1 Summary of diagnostics options The CPX terminal provides comprehensive and user-friendly options for diagnostics and error handling. The following options are available, dependent on the configuration: Diagnostics option Brief description Benefits Detailed de scription LED display The LEDs show directly configuration errors, hardware errors, bus errors, etc. Fast “on-the-spot” error detection Section 3.2 Status bits Internal inputs that supply coded common diagnostic messages. The 8 status bits occupy the first 8 bits of the Transmit PDO 4 (è Fig. 2/1). Fast access to error messages in the user program, independent of the interface and master. Section 3.3 and CPX system de scription (P.BE-CPX-SYS-...) I/O diagnostic interface Bus-independent diagnostic interface at I/O level, which enables access to the internal data of the CPX terminal (16 bits, PDO 4) Read access to internal parameters and data at I/O level. Section 3.4 and CPX system de scription (P.BE-CPX-SYS-...) Diagnostics via CANopen – Emergency message – Objects 1001 ... 1003 – Diagnostics via SDO (e.g. objects 22xx) Detailed error detection. Section 3.5 Diagnostics via the handheld Diagnostic information can be shown on the CPX Handheld in a convenient and menudriven manner. Fast “on-site” error detection Description for the without programming, in plain handheld text Tab. 3/1: Diagnostics options Festo P.BE-FB14-EN en 1411d English 3-3 3. Diagnostics Note Note that the diagnostic information shown can depend on the settings (è section 1.2.2) as well as on the paramet erisation (è section 2.5) of the CPX terminal. 3.2 Diagnostics via LEDs LEDs for the diagnostics of the CPX terminal are available on the bus node as well as on the individual modules. The significance of the LEDs on the electric modules can be found in the description for the relevant module. MS PS NS PL IO SF M MS PS NS PL IO SF 1 M 6 1 9 5 MS PS NS PL IO SF 2 M 1 CPX-specific LEDs: – – – – Fig. 3/1: 3-4 PS PL SF M (green) (green) (red) (yellow) 2 CANopen-specific LEDs (green/red): – – – MS (module status) NS (Network status) IO (I/O status) LEDs of the CPX node Festo P.BE-FB14-EN en 1411d English 3. Diagnostics The LEDs are shown in their various statuses as follows: Illuminated 3.2.1 flashes off Normal operating status In the normal operating status, the LEDs on the bus node light up as follows: LED display MS PS NS PL IO SF M Tab. 3/2: Festo P.BE-FB14-EN en 1411d English Operating status These LEDs light up green: – MS – NS – IO – PS – PL Standard Red and yellow LEDs do not light up: – SF – M LEDs with standard operating status 3-5 3. Diagnostics 3.2.2 Displays of the CPX-specific LEDs PS, PL, SF, M PS (power system) – power sensor/logic supply LED (green) Process ON OFF LED illuminated ON OFF LED flashes ON OFF ON OFF LED not illuminated Tab. 3/3: 3-6 Status Significance/error handling Not an error, operating voltage/ sensor supply applied – Operating voltage/ sensor supply outside the tolerance range Eliminate undervoltage Internal fuse for the operating voltage/ sensor supply has responded 1. Eliminate short circuit/overload on module side 2. Dependent on the parameterisation of the module (module parameter): The sensor supply voltage will be switched on again automatically after the short circuit has been eliminated (default) Power Off/On is necessary The operating voltage/sensor supply is not applied Check the operating voltage connection of the electronics “PS” LED status display Festo P.BE-FB14-EN en 1411d English 3. Diagnostics PL (power load) – power load supply (outputs/valves) LED (green) Process Status Significance/error handling ON Not an error, load voltage applied None Load voltage at the system supply or additional power supply outside the tolerance range Eliminate undervoltage OFF LED illuminated ON OFF LED flashes Tab. 3/4: “PL” LED status display SF (system fail) – system error LED (red) Sequence 1) Status Significance/error handling ON No error – OFF Simple error / information (error class 1) è description of error numbers in the CPX system description and in section 3.5.2. ON Error (error class 2) OFF LED not illuminated ON LED flashes 1x OFF LED flashes 2x ON OFF Serious error (error class 3) LED flashes 3x 1) The system error LED flashes dependent on the applicable error class. Error class 1 (slight error): 1 * flash, pause Error class 2 (error) 2 * flash, pause Error class 3 (severe error): 3 * flash, pause Tab. 3/5: “SF” LED status display Festo P.BE-FB14-EN en 1411d English 3-7 3. Diagnostics M (modify) – parameterisation updated or forcing active LED (yellow) Process Status Significance/error handling ON System start with default parameterisation (factory setting) and current CPX expansion set; external parameterisation is possible (presetting) None Force is active The force function is enabled (è system parameter force mode; function no. 4402) System start with saved parameterisation and saved CPX expansion has been set; Parameters and CPX expansion are saved remanently; external parameterisation is blocked Caution when replacing CPX terminals with saved parameterisation! With CPX terminals with saved parameterisation, parameterisation is not automatically restored by the higher-order PLC/IPC after replacement. In these cases, check which settings are required before the replacement and make these settings if necessary. OFF LED not illuminated ON OFF LED flashes ON OFF LED illuminated Tab. 3/6: 3-8 “M” LED status display Festo P.BE-FB14-EN en 1411d English 3. Diagnostics 3.2.3 Displays of the CANopen-specific LEDs MS, NS, IO MS (module status) LED (green/red) Process Status Error handling ON LSS is activated No station number configured set station number and baud Operational – Pre-operational put CPX terminal into the OFF LED not illuminated ON rate via LSS protocol, if necessary OFF LED illuminated green ON OFF LED flashing green operational mode, if necessary 0.5 Hz ON Stopped LED flashes green fast put CPX terminal into the operational mode, if necessary OFF 2 Hz ON Hardware error Servicing required OFF LED illuminated red Tab. 3/7: “MS” LED status display Festo P.BE-FB14-EN en 1411d English 3-9 3. Diagnostics NS (network status) LED (green/red) Process Status Error handling ON Network OK – Error counter overflow Check bus: cables, plug OFF LED illuminated green ON OFF connectors, signal transmission LED flashing green ON OFF Failure of the 24 V CAN-receiver supply Check and restore power Bus OFF Check bus: cables, plug supply. LED is flashing red ON OFF LED illuminated red Tab. 3/8: 3-10 connectors, signal transmission (error counter overflow) “NS” LED status display Festo P.BE-FB14-EN en 1411d English 3. Diagnostics I/O status LED (green/red) Process Status Error handling ON I/O status OK – “I/O error” undervoltage, short circuit/ overload or wire fracture on a module Eliminate error on module “Communication error” Node guard or heart beat elapsed (system goes into pre-operational mode) 1. Clarify reason for time out 2. Set CPX terminal to operational mode OFF LED illumin ated green ON OFF LED is flash ing red ON OFF LED illumin ated red Tab. 3/9: “I/O” status display Festo P.BE-FB14-EN en 1411d English 3-11 3. Diagnostics 3.3 Diagnostics via status bits The status bits serve to display common diagnostic messages (global error message). Note In order to use the status bits, they must be activated via DIL switches on the bus node (è section 1.2.2) or queried per SDO. If status bits are activated, they occupy as standard 8 bits in the PDO 4 (è section 2.4.9). Bit Diagnostic information with logic 1 Description 0 Error at valve Module type in which an error has occurred 1 Error at output 2 Error at input 3 Error on analogue module/ function module 4 Undervoltage 5 Short circuit/overload 6 Wire break 7 Other error Tab. 3/10: 3-12 Error type Status bits of the CPX-FB14 (optional) Festo P.BE-FB14-EN en 1411d English 3. Diagnostics 3.4 Diagnostics via the I/O diagnostic interface The CPX terminal provides a 16-bit I/O diagnostic interface. The I/O diagnostic interface occupies as standard the bits 0 ... 15 of the PDO 4 (è section 2.4.9) Note In order to use the I/O diagnostic interface, the system diagnostics must be activated via the DIL switch on the bus node (è section 1.2.2). Information on the I/O diagnostic interface can be found in the CPX system description P.BE-CPX-SYS-... Festo P.BE-FB14-EN en 1411d English 3-13 3. Diagnostics 3.5 Diagnostics via CANopen Is there an error? No Yes Enter errors in the diagnostic memory (index 23xx) Enter errors in the module diagnostic data (index 2210) Load error register (index 1001) Load manufacturer status register (index 1002) Same error on module with higher module number. ? No Yes System diagnostic data are updated (index 2200) Shift error memory (index 1003, subindex 1 ... A) Load pre-defined error field (index 1003, subindex 1) Output emergency message Output error optically via the LEDs MS, NS or IO Fig. 3/2: Sequence of error processing in the CPX terminal Information on the behaviour of the inputs and outputs in the event of an error can also be found in section 2.4. 3-14 Festo P.BE-FB14-EN en 1411d English 3. Diagnostics 3.5.1 The emergency message If there is an error, the CPX terminal will transmit an emergency message, which consists of the following: Byte 0 Byte 1 Error code – byte 0, 1: Error code as per CiA 301/CiA 401 – Byte 2: Error register (index 1001) – Byte 3 … 7: Manufacturer-specific error field (contains device-typical error messages) Bytes 3 ... 6 form the manufacturer status register (index 1002). Byte 2 Error register Byte 3 Status bits Byte 4 CPX module no. Byte 5 Byte 6 Byte 7 CPX error no. Reserved Additional error inf. Manufacturer-specific error field Fig. 3/3: Composition of the emergency object (additional information in Tab. 3/11 … Tab. 3/16) The pre-defined error field as error memory If the emergency message is transmitted, a compressed form of the error information will be saved parallel in the predefined error field (index 1003): status bits, CPX module number, error code The pre-defined error field serves as error memory for the last 10 errors. Previous errors will each be shifted by one position (è section 2.4.1, index 1003, subindices 1 … Ah). Festo P.BE-FB14-EN en 1411d English 3-15 3. Diagnostics Composition of the emergency message Byte 0 Byte 1 Error code Byte 2 Byte 3 Byte 4 Byte 5 Byte 6 Byte 7 Error register Status bits CPX module no. CPX error no. Reserved Additional error inf. Index 1001 Byte 1 Index 1002 (manufacturer status register) Byte 0 Explanation 00 00 No error 10 00 General error 23 20 Short circuit at outputs 23 30 Load dump (wire break) 31 20 Input voltage too low 33 20 Output voltage too low 50 00 Hardware error 81 00 Communication error (bus voltage not applied) 81 10 CAN overrun 81 20 CAN in error passive mode 81 30 Error with node guard or heart beat 81 40 CAN recovered from Bus OFF 82 10 Invalid PDO received Tab. 3/11: 3-16 Structure of the error code as per CiA 401 Festo P.BE-FB14-EN en 1411d English 3. Diagnostics Byte 0 Byte 1 Error code Byte 2 Byte 3 Byte 4 Byte 5 Byte 6 Byte 7 Error re gister Status bits CPX module no. CPX error no. Reserved Additional error inf. Index 1001 Index 1002 (manufacturer status register) Bit Significance Explanation 0 Generic error Bit is set for each error 1 Current – Short circuit/overload in sensor supply – Short circuit/overload at the outputs 2 Voltage – UOUT (undervoltage at the outputs) – UVAL (undervoltage at valves) – Failure of load voltage at CPX output module or CPX input module 3 – – 4 Communication error – Node guard, heart beat, CAN error – – Manufacturer specific – Wire break – Other error 5…6 7 bold = Bit is used by CPX terminal Tab. 3/12: Error register (index 1001 with bit assignment as per CiA 301/401) Further diagnostic information is provided by the CPX terminal in bytes 3 ... 6 of the emergency object (manufacturer status register, index 1002). Festo P.BE-FB14-EN en 1411d English 3-17 3. Diagnostics Byte 0 Byte 1 Error code Byte 2 Byte 3 Error register Status bits Index 1001 Byte 4 Byte 5 Byte 6 Byte 7 CPX module no. CPX error no. Reserved Additional error inf. Index 1002 (manufacturer status register) Bit Significance Explanation 0 Error at valve Module type in which an error has occurred 1 Error at output 2 Error at input 3 Error on analogue module/function module 4 Undervoltage 5 Short circuit/overload 6 Wire break 7 Other error Tab. 3/13: 3-18 Error type Byte 0 of the manufacturer status register (status bits) Festo P.BE-FB14-EN en 1411d English 3. Diagnostics Byte 0 Byte 1 Error code Byte 2 Byte 3 Error register Status bits Index 1001 Bit 0…7 Byte 6 Byte 7 CPX module no. CPX error no. Reserved Additional error inf. Index 1002 (manufacturer status register) Explanation CPX module number Number of the module with diagnostic message Byte 0 Byte 1 of the manufacturer status register (CPX module number) Byte 1 Error code Byte 2 Byte 3 Byte 4 Error register Status bits CPX module no. Index 1001 0…7 Byte 5 Significance Tab. 3/14: Bit Byte 4 Byte 5 CPX error no. Byte 6 Byte 7 Reserved Additional error inf. Index 1002 (manufacturer status register) Significance Explanation CPX error number CPX error number (è section 3.5.2) Tab. 3/15: Byte 2 of the manufacturer status register (CPX error number) Festo P.BE-FB14-EN en 1411d English 3-19 3. Diagnostics Byte 0 Byte 1 Error code Byte 2 Byte 3 Byte 4 Byte 5 Byte 6 Error register Status bits CPX module no. CPX error no. Reserved Index 1001 Bit 0…7 Additional error inf. Index 1002 (manufacturer status register) Significance Explanation Additional information on the fault E.g. – Node ID with heart beat error (which participant has caused the time out) – Channel number of the first channel with fault Tab. 3/16: 3.5.2 Byte 7 Byte 7 of the emergency object CPX error numbers The table on the following pages shows the CPX error num bers. Detailed information can be found in the CPX system descrip tion in the chapter “Diagnostics and error handling”. 3-20 Festo P.BE-FB14-EN en 1411d English 3. Diagnostics Error number Error type 0 No error 1 General diagnostics 2 Short circuit/overload in sensor supply (SCS) or at output (SCO) 3 Wire fracture/idling at current input/output 4 Failure of load voltage supply due to short circuit/overload (on output side) 5 Undervoltage in power supply (on input side) 6…8 Reserved 9 Value falling below nominal range 10 Value exceeding nominal range 11 Short circuit at valve 12 Reserved 13 Wire break at valve (open load) 14 Reserved 15 Module/channel failed 16 Module code invalid or incorrect module 17 Incorrect I/O length (e.g. CPX-CP interface) 18 Number of I/O points exceeded 19 Reserved Tab. 3/17: Festo P.BE-FB14-EN en 1411d English CPX error numbers (part 1) 3-21 3. Diagnostics Error number Error type 20 Parameterisation error: configurable signal range 21 Parameterisation error: data format 22 Parameterisation error: data for linear scaling 23 Parameterisation error: digital filter/measurement value smoothing 24 Parameterisation error: lower limit value 25 Parameterisation error: upper limit value 26 Error in actuator supply for analogue output module 27 … 28 Reserved 29 Parameterisation error 30 … 39 Reserved 40 Life guard 41 Heart beat 42 Reserved 43 CAN overrun 44 Invalid PDO received 45 CAN warn limit reached 46 Recovered from bus off 47 Bus power lost 48 … 127 è CPX system description 128 … 199 Error in CPX structure (error number is error information for service personnel) Tab. 3/18: 3-22 CPX error numbers (part 2) Festo P.BE-FB14-EN en 1411d English 3. Diagnostics Error number Error type 200 Error in parameter transfer to module 201 Invalid station number (node) 202 Bus protocol chip: not ready 203 Reserved 204 … 205 è Description for the respective module Tab. 3/19: Festo P.BE-FB14-EN en 1411d English CPX error numbers (part 3) 3-23 3. Diagnostics 3-24 Festo P.BE-FB14-EN en 1411d English Technical appendix Appendix A Festo P.BE-FB14-EN en 1411d English A-1 A. Technical appendix Table of contents A. Technical appendix . . . . . . . . . . . . . . . . . . . . . . . . . . . . . . . . . . . . . . . . . . . . . A-1 A.1 A.2 Technical data, bus node CPX-FB14 . . . . . . . . . . . . . . . . . . . . . . . . . . . . . . . . Examples: Communication sequence . . . . . . . . . . . . . . . . . . . . . . . . . . . . . . . A.2.1 Example 1: Start CANopen network . . . . . . . . . . . . . . . . . . . . . . . . . A.2.2 Example 2: Set output . . . . . . . . . . . . . . . . . . . . . . . . . . . . . . . . . . . . A.2.3 Example 3, Start “node guard” monitoring . . . . . . . . . . . . . . . . . . . A.2.4 Example 4: load objects . . . . . . . . . . . . . . . . . . . . . . . . . . . . . . . . . . A.2.5 Example 5: write objects . . . . . . . . . . . . . . . . . . . . . . . . . . . . . . . . . . A-3 A-5 A-5 A-5 A-6 A-7 A-8 A-2 Festo P.BE-FB14-EN en 1411d English A. Technical appendix A.1 Technical data, bus node CPX-FB14 General General technical data è CPX system description P.BE-CPX-SYS-... Degree of protection provided by housing 1) IP65/IP67 according to IEC/EN 60529, CPX-FB14 completely mounted, plug connector inserted or provided with cover cap Protection against electric shock Protection against direct and indirect contact as per IEC/DIN 60204-1 through the use of PELV circuits (Protected Extra Low Voltage) Module code (CPX-specific) Remote I/O: Remote controller: CDh 9Ch Module identifier (in the handheld) Remote I/O: Remote controller: FB14-RIO CANopen remote I/O FB14-RC CANopen bus node 1) Note that connected devices may only satisfy a lower protection class, a smaller temperature range, etc. Tab. A/1: General technical data Festo P.BE-FB14-EN en 1411d English A-3 A. Technical appendix Power supply Operating voltage/load voltage è CPX system description P.BE-CPX-SYS-... Current consumption bus node CPX-FB14 – from operating voltage supply for electronics/sensors (USEN) max. 200 mA (only CPX-FB14) Operating voltage for bus interface Sub-D plug: pin 3, pin 9 M12 adapter: pin 2, pin 3 Screw terminal adapter: pin 1, pin 5 – Current consumption Max. 30 mA – Nominal value 24 V DC (protected against incorrect polarity, external fuse required) – Tolerance 11 … 30 V Galvanic isolation Bus interface opto-decoupled Tab. A/2: Power supply Technical data for the pneumatics can be found in the de scription of pneumatics. A-4 Festo P.BE-FB14-EN en 1411d English A. Technical appendix A.2 Examples: Communication sequence All examples refer to module ID = 1, i.e. set station number of the CPX terminal = 1. COB-ID Data Example 1: Start CANopen network 000 : xx = station number (00 = all bus stations) A.2.1 ms PS NS PM IO SF (all values in hex) M 01 xx PLC/PC/IPC Fig. A/1: Example 1, start CANopen network A.2.2 Example 2: Set output 201 Data COB-ID In order to set outputs or valves on the CPX terminal, the re ceive PDO must be sent by the master. In the example, only output 0 is set; any outputs already set will be reset. (all values in hex) ms PS NS PM IO SF M : 01 00 PLC/PC/IPC Fig. A/2: Example 2, set output 0 of the CPX terminal Festo P.BE-FB14-EN en 1411d English A-5 A. Technical appendix A.2.3 Example 3, Start “node guard” monitoring First load the indices 100C and 100D via SDO transfer (è ex ample 5). The “node guard” monitoring of the CPX terminal starts when the first “node guard” telegram is received. This telegram must be cyclically repeated within the timeout time: timeout time = guard time · lifetime factor = index 100C · index 100D If this time is exceeded, the valves/outputs will be switched off or they will assume the fail-safe status. COB-ID Note Until the first “node guard” telegram is received, the timeout monitoring in the CPX terminal is inactive: Valves and outputs which are switched on remain set even after loss of communication, bus interruption, etc. 701 PS NS PM IO SF M 1) Node guard response 05 Bit 7 = toggle bit : Data 701 COB-ID PLC/PC/IPC ms 1) (all values in hex) Fig. A/3: Example 3, start “node guard” monitoring (Remote request) A-6 Festo P.BE-FB14-EN en 1411d English A. Technical appendix A.2.4 Example 4: load objects Objects of a CPX terminal can be loaded or read via SDO transfer: – Upload command – Index and subindex The CPX terminal then sends: COB-ID 4 data bytes Data bytes Subindex – Index Index and subindex Initiate domain upload request – ms PS NS PM IO SF M 581 : 43 00 10 00 91 01 02 00 4 data bytes 00 00 00 00 Subindex 00 Index 00 10 Initiate domain upload response : 40 COB-ID PLC/PC/IPC 601 (all values in hex) Fig. A/4: Example 4, index 1000h, read subindex 0 (device type: device profile, device extension) Festo P.BE-FB14-EN en 1411d English A-7 A. Technical appendix A.2.5 Example 5: write objects In order to write objects of a CPX terminal, you must load the following via SDO: – Download command – Index and subindex – Value The CPX terminal then sends as acknowledgement: 4 data bytes Subindex Data bytes (not relevant) Index – Initiate domain upload request Index and subindex COB-ID – ms PS NS PM IO SF M 581 : 60 0C 10 00 00 00 00 00 (4 data bytes) 04 7F 00 00 Subindex 00 Index 0C 10 Initiate domain upload response : 2B COB-ID PLC/PC/IPC 601 (all values in hex) Fig. A/5: Example 5: Index 100Ch, write subindex 0 (guard time) A-8 Festo P.BE-FB14-EN en 1411d English Index Appendix B Festo P.BE-FB14-EN en 1411d English B-1 B. Index Table of contents B. B-2 Index . . . . . . . . . . . . . . . . . . . . . . . . . . . . . . . . . . . . . . . . . . . . . . . . . . . . . . . . . B-1 Festo P.BE-FB14-EN en 1411d English B. Index Index A Abbreviations, product-specific . . . . . . . . . . . . . . . . . . . . . . XI Adapter M12 . . . . . . . . . . . . . . . . . . . . . . . . . . . . . . . . . . . . . . . . 1-31 Screw terminals . . . . . . . . . . . . . . . . . . . . . . . . . . . . . . 1-32 Additional power supply . . . . . . . . . . . . . . . . . . . . . . . . . 1-34 Addressing . . . . . . . . . . . . . . . . . . . . . . . . . . . . . . . . . . . . 2-26 Analogue Inputs . . . . . . . . . . . . . . . . . . . . . . . . . . . . . . . . . . 2-55, 2-62 Outputs . . . . . . . . . . . . . . . . . . . . . . . . . . . . . . . . . 2-60, 2-65 Assembly . . . . . . . . . . . . . . . . . . . . . . . . . . . . . . . . . . . . . . . 1-6 B Baud rate . . . . . . . . . . . . . . . . . . . . . . . . . . . . . . . . . . . . . 1-20 Bus nodes, Reset parameter . . . . . . . . . . . . . . . . . . . . . . 1-19 Bus termination . . . . . . . . . . . . . . . . . . . . . . . . . . . . . . . . 1-33 C Cable, Fieldbus . . . . . . . . . . . . . . . . . . . . . . . . . . . . . . . . . 1-23 CANopen COB identifier . . . . . . . . . . . . . . . . . . . . . . . . . . . . . . . . 2-39 General . . . . . . . . . . . . . . . . . . . . . . . . . . . . . . . . . . . . . . . 2-5 Overview object directory . . . . . . . . . . . . . . . . . . . . . . 2-36 Status transitions . . . . . . . . . . . . . . . . . . . . . . . . . . . . . 2-37 CEC . . . . . . . . . . . . . . . . . . . . . . . . . . . . . . . . . . . . . . . . . . 1-11 Configuration . . . . . . . . . . . . . . . . . . . . . . . . . . . . . . . . . . . . 2-6 Connecting Fieldbus . . . . . . . . . . . . . . . . . . . . . . . . . . . 1-23, 1-27, 1-30 Voltage supply . . . . . . . . . . . . . . . . . . . . . . . . . . . . . . . 1-34 Festo P.BE-FB14-EN en 1411d English B-3 B. Index D Diagnostics, Via fieldbus . . . . . . . . . . . . . . . . . . . . . . . . . 3-14 Diagnostics mode . . . . . . . . . . . . . . . . . . . . . . . . . . . . . . 1-21 Digital Inputs . . . . . . . . . . . . . . . . . . . . . . . . . . . . . . . . . . . . . . 2-47 Outputs . . . . . . . . . . . . . . . . . . . . . . . . . . . . . . . . . . . . . 2-50 DIL switches . . . . . . . . . . . . . . . . . . . . . . . . . . . . . . . . 1-9, 1-10 Dismantling . . . . . . . . . . . . . . . . . . . . . . . . . . . . . . . . . . . . . 1-6 E Electrical connection and display components . . . . . . . . . 1-5 Emergency message . . . . . . . . . . . . . . . . . . . . . . . . . . . . 3-15 Error code . . . . . . . . . . . . . . . . . . . . . . . . . . . . . . . . . . . . . 3-15 Error numbers . . . . . . . . . . . . . . . . . . . . . . . . . . . . . . . . . 3-20 Examples of the communication sequence . . . . . . . . . . . A-5 F FEC . . . . . . . . . . . . . . . . . . . . . . . . . . . . . . . . . . . . . . . . . . 1-11 Field bus baud rate, length . . . . . . . . . . . . . . . . . . . . . . . 1-24 Fieldbus, Connecting . . . . . . . . . . . . . . . . . . . . . . . . . . . . 1-23 Fieldbus cable . . . . . . . . . . . . . . . . . . . . . . . . . . . . . . . . . 1-23 Forcing . . . . . . . . . . . . . . . . . . . . . . . . . . . . . . . . . . . . . . . 2-81 Function assignment . . . . . . . . . . . . . . . . . . . . . . . . . . . . 2-85 H Heart beat . . . . . . . . . . . . . . . . . . . . . . . 2-38, 2-43, 3-16, 3-17 B-4 Festo P.BE-FB14-EN en 1411d English B. Index I I/O diagnostics interface . . . . . . . . . . . . . . . . . . . . . . . . . 2-68 Instructions on the description . . . . . . . . . . . . . . . . . . . . . VIII Intended use . . . . . . . . . . . . . . . . . . . . . . . . . . . . . . . . . . . . . VI L Layer setting service . . . . . . . . . . . . . . . . . . . . . . . . . . . . . . 2-6 Activate . . . . . . . . . . . . . . . . . . . . . . . . . . . . . . . . . . . . . 1-19 LEDs . . . . . . . . . . . . . . . . . . . . . . . . . . . . . . . . . . . . . . . . . . 3-4 LSS, Activate . . . . . . . . . . . . . . . . . . . . . . . . . . . . . . . . . . . 1-19 LSS commands . . . . . . . . . . . . . . . . . . . . . . . . . . . . . . . . . . . 2-6 M M12 adapter . . . . . . . . . . . . . . . . . . . . . . . . . . . . . . . . . . . 1-31 Manufacturer specific profile . . . . . . . . . . . . . . . . . . . . . 2-72 Manufacturer status register . . . . . . . . . . . . . . . . . . . . . . 3-15 Mapping . . . . . . . . . . . . . . . . . . . . . . . . . . . . . . . . . . . . . . 2-41 Overview of mapping objects . . . . . . . . . . . . . . . . . . . 2-79 N Node guard . . . . . . . . . . . . . . . . . . . . . . 2-38, 2-43, 3-16, 3-17 O Object directory, Overview . . . . . . . . . . . . . . . . . . . . . . . 2-36 Operating mode . . . . . . . . . . . . . . . . . . . . . . . . . . . . 1-11, 1-21 Festo P.BE-FB14-EN en 1411d English B-5 B. Index P Parameterisation Sample application . . . . . . . . . . . . . . . . . . . . . . . . . . . . 2-92 Start parameterisation . . . . . . . . . . . . . . . . . . . . . . . . . 2-91 PDO . . . . . . . . . . . . . . . . . . . . . . . . . . . . . . . . . . . . . . . . . . . . 2-5 PDO 1 ... 4, Overview . . . . . . . . . . . . . . . . . . . . . . . . . . . . 2-27 PDO 1 Receive . . . . . . . . . . . . . . . . . . . . . . . . . . . . . . . . . . . . . 2-50 Transmit . . . . . . . . . . . . . . . . . . . . . . . . . . . . . . . . . . . . 2-47 PDO 2 Receive . . . . . . . . . . . . . . . . . . . . . . . . . . . . . . . . . . . . . 2-60 Transmit . . . . . . . . . . . . . . . . . . . . . . . . . . . . . . . . . . . . 2-55 PDO 3 Receive . . . . . . . . . . . . . . . . . . . . . . . . . . . . . . . . . . . . . 2-65 Transmit . . . . . . . . . . . . . . . . . . . . . . . . . . . . . . . . . . . . 2-62 PDO 4 . . . . . . . . . . . . . . . . . . . . . . . . . . . . . . . . . . . . . 3-3, 3-12 Receive . . . . . . . . . . . . . . . . . . . . . . . . . . . . . . . . . . . . . 2-70 Transmit . . . . . . . . . . . . . . . . . . . . . . . . . . . . . . . . . . . . 2-68 PELV . . . . . . . . . . . . . . . . . . . . . . . . . . . . . . . . . . . . . . . . . 1-34 Pictograms . . . . . . . . . . . . . . . . . . . . . . . . . . . . . . . . . . . . . . . X Pin allocation, Fieldbus interface . . . . . . . . . . . . . . . . . . 1-27 Pre-defined error field . . . . . . . . . . . . . . . . . . . . . . . . . . . 3-15 R Receive PDO 1 PDO 2 PDO 3 PDO 4 ...................................... ...................................... ...................................... ...................................... 2-50 2-60 2-65 2-70 Reset parameter . . . . . . . . . . . . . . . . . . . . . . . . . . . . . . . . 1-19 B-6 Festo P.BE-FB14-EN en 1411d English B. Index S Screw terminal adapter . . . . . . . . . . . . . . . . . . . . . . . . . . 1-32 SDO . . . . . . . . . . . . . . . . . . . . . . . . . . . . . . . . . . . 2-5, 3-3, 3-12 Service . . . . . . . . . . . . . . . . . . . . . . . . . . . . . . . . . . . . . . . . . VII Setting Baud rate . . . . . . . . . . . . . . . . . . . . . . . . . . . . . . . . . . . Diagnostics mode . . . . . . . . . . . . . . . . . . . . . . . . . . . . . Operating mode . . . . . . . . . . . . . . . . . . . . . . . . . . . . . . Station number . . . . . . . . . . . . . . . . . . . . . . . . . . . . . . . 1-20 1-21 1-11 1-13 Station number, Setting . . . . . . . . . . . . . . . . . . . . . . . . . . 1-13 Status bits . . . . . . . . . . . . . . . . . . . . . . . . . . . . . . . . . . . . 2-68 Status transitions . . . . . . . . . . . . . . . . . . . . . . . . . . . . . . . 2-37 Strain relief . . . . . . . . . . . . . . . . . . . . . . . . . . . . . . . . . . . . 1-23 Switch cover, Remove and mount . . . . . . . . . . . . . . . . . . . . 1-8 System supply . . . . . . . . . . . . . . . . . . . . . . . . . . . . . . . . . 1-34 T Target group . . . . . . . . . . . . . . . . . . . . . . . . . . . . . . . . . . . . . VII Technical data . . . . . . . . . . . . . . . . . . . . . . . . . . . . . . . . . . A-3 Text designations . . . . . . . . . . . . . . . . . . . . . . . . . . . . . . . . . . X Transmit PDO 1 PDO 2 PDO 3 PDO 4 ...................................... ...................................... ...................................... ...................................... 2-47 2-55 2-62 2-68 U User instructions . . . . . . . . . . . . . . . . . . . . . . . . . . . . . . . . . . IX Festo P.BE-FB14-EN en 1411d English B-7 B. Index V Valve supply . . . . . . . . . . . . . . . . . . . . . . . . . . . . . . . . . . . 1-34 Virtual modules . . . . . . . . . . . . . . . . . . . . . . . . . . . . . . . . 2-85 Voltage supply . . . . . . . . . . . . . . . . . . . . . . . . . . . . . . . . . 1-34 B-8 Festo P.BE-FB14-EN en 1411d English