1
User's
Manual
© 2003 - 2015 Digital Atlantic Corp.
I
CDRoller - User's Manual
Table of Contents
Introduction.
1
1. Installing CDRoller.
3
2. Uninstalling CDRoller.
10
3. Opening and Closing CDRoller.
11
4. How to register the program.
12
5. How to upgrade CDRoller.
13
6. Recovering CD/DVD/BD Data.
14
Overview.
................................................................................................................................... 14
6.1. Disk recognition.
................................................................................................................................... 14
6.2. Using Session
...................................................................................................................................
Selector.
16
6.3. Searching
...................................................................................................................................
the lost UDF files on CD-R/DVD-R/DVD+R disks.
17
6.4. Applying...................................................................................................................................
Scan UDF Disc.
18
6.5. Recovering
...................................................................................................................................
files.
20
6.6. Recovering
...................................................................................................................................
DVD video and photos.
21
6.7. Recovering
...................................................................................................................................
files from UDF discs in ISO mode.
26
6.8. Retrieving
...................................................................................................................................
the photos from mini discs created by Sony Mavica CD cameras.
27
6.9. Identifying
...................................................................................................................................
Raw ISO Data
28
6.10. Burning...................................................................................................................................
recovered data.
29
7. Additional features.
Overview.
34
................................................................................................................................... 34
7.1. Testing disc.
................................................................................................................................... 34
7.2. Extracting
...................................................................................................................................
Audio Tracks.
35
7.3. Extracting
...................................................................................................................................
ISO Image File.
37
7.4. Creating...................................................................................................................................
Short CD/DVD Image.
38
7.5. Examining
...................................................................................................................................
disc sectors at low level.
39
7.6. Extended...................................................................................................................................
Data Recovery.
44
7.7. Use image
...................................................................................................................................
file to manage disc sectors.
47
7.8. Viewing ...................................................................................................................................
Images.
48
8. Contacting Technical Support.
50
© 2003 - 2015 Digital Atlantic Corp.
Contents
II
Annex A Controls and dialog boxes.
51
A.1. Main Window.
................................................................................................................................... 51
A.2. Main Menu
...................................................................................................................................
Commands.
52
A.3. The Toolbars.
................................................................................................................................... 54
A.4. Preferences
................................................................................................................................... 54
A.4.1. Browser
..........................................................................................................................................................
A.4.2. UDF Reader
..........................................................................................................................................................
A.4.3. ISO Reader
..........................................................................................................................................................
A.4.4. CD/DVD..........................................................................................................................................................
Library
A.4.5. Audio Extraction
..........................................................................................................................................................
A.4.6. Disc Test
..........................................................................................................................................................
A 4.7. FAT & NTFS
..........................................................................................................................................................
Annex B License Agreement
54
56
61
62
63
65
66
68
© 2003 - 2015 Digital Atlantic Corp.
II
1
CDRoller - User's Manual
Introduction.
CDRoller is a powerful, easy-to-use and low cost toolset for data recovery from optical discs
(CD/DVD/Blu-ray), hard and flash drives, memory cards and floppy disks.
Powerful: CDRoller finds, retrieves and copies the lost data from CDs, DVDs, Blu-ray discs (BD,
HD-DVD) hard and flash drives that seem to be inaccessible for Windows standard tools. While this
does not include the disks that are physically damaged, the program will:
· Effectively retrieve the data off the discs created by "drag and drop" CD/DVD/BD writing software,
such as well-known Sonic (Roxio, Adaptec) and Ahead Nero software packages, CeQuadrat's
PacketCD, DLA, B's CLiP and others.
· Read unfinalized ("open", "left as-is") CDs and DVDs, including the discs with Microsoft's Live File
system, created by Windows 7, 8, 8.1, 10 or Vista.
· Include an own UDF Reader. No need to install 3-rd party software in order to read an old UDF
discs on your new machine under Windows 7, 8, 8.1, 10 or Vista.
· Offer all-in-one toolset for DVD Video Recovery. Find and recover the lost DVD movies, convert
VOB or VRO data into generic MPG files and, finally, make a new disc that can be played back in
the most DVD players.
· Find, identify and retrieve the lost video off non-finalized DVDs created by a wide set of standalone
devices that record directly onto discs: Hitachi, Canon, Panasonic, Samsung and Sony DVD
camcorders as well as standalone video recorders.
· Recover CD data written by Sony Mavica CD digital cameras.
· Provide a direct access to raw disk data using a special (kernel-mode) driver, bypassing the
restrictions imposed by Windows Vista / 7 / 8 / 8.1 /10 under standard user (non-administrative)
account.
· Examine images (pictures, photos) of all major graphic formats (BMP, JPEG, JPEG 2000, GIF,
PNG, PCX, PSD, EPS, TIFF, WMF, ICO, TGA), popular digital camera raw formats (Canon, Kodak,
Minolta, Nikon, Olympus, Pentax, Fuji, Leica, Sony, Sigma), DICOM files (medical imaging) and
many others.
· Retrieve the lost pictures, video and other types of files from flash memory cards, such as
SmartMedia, Memory Stick, CompactFlash, xD Picture Card and other flash memory drives.
· Find and retrieve the lost data on Hard Disk Drives (HDD), Solid-State Drives (SSD), floppy disks
and other types of Windows disks/drives with FAT / NTFS file systems.
· Burn the recovered data to CDs, DVDs and BDs. The "Burn" option is integrated into a common
shell. Just write a new disc with recovered data within a couple of minutes, without leaving
CDRoller!
· Erase CD, DVD and BD re-writable media. Support of quick and full erase methods.
· Retrieve back up files from the discs recorded in the several stages (multisession discs).
· Find and retrieve the lost files on UDF discs, including: accidently deleted files, files on
quick-formatted disc, files on incorrectly closed disc, etc.
· Examine disc sectors at low level and display the sector content in text, binary, hexadecimal or
unicode mode. Support of external hex editor for detailed analysis of disc contents. Recommended
for engineering purposes and also for law enforcement and forensic investigators.
· Provide direct access to the hardware (CD/DVD/Blu-ray drives), bypassing the Windows File
System. Search for the lost tracks (sessions) every time when you insert a new disc into the drive.
Support of SCSI Pass Through Direct (SPTD) layer under Windows 2000/XP/2003/Vista/7/8/8.1/10
.
· Identify the lost files on ISO/Joliet discs with the damaged file system (volume descriptors, path
tables and directories), using the raw data only.
· Create and use an own image file to manage disc sectors.
· Extract ISO Image file and burn it to a new disc.
· Rescue the data from scratched, damaged or defective discs.
· Extract tracks from audio CDs
· Test disc readability
© 2003 - 2015 Digital Atlantic Corp.
Introduction.
2
Easy-to-use: All features are integrated into a common and easy-to-use intuitive shell.
Low-cost: A Personal License costs only 39 USD. This license does not restrict use to a single user
on a single computer. For example, you can use the program freely on 3 computers: at work, home
and laptop.
Toolset: The program offers a set of instruments to work with a different formats of optical discs (CDs,
DVDs, BDs, HD-DVDs) and file systems (UDF/ISO/Joliet/NTFS/FAT).
CD / DVD / BD / HD-DVD Data Recovery: Unfortunately, there is a lot of factors that can cause you to
lose access to the data on your optical discs. System or power failures, hardware problems, media and
CD/DVD/BD mastering software problems... Often, when a disc becomes inaccessible more than a
single factor has contributed to the problem. Fortunately, many of such problems that prevent "normal"
access to the data can be bypassed when using CDRoller.
© 2003 - 2015 Digital Atlantic Corp.
3
CDRoller - User's Manual
1. Installing CDRoller.
To install CDRoller, you need at least:
· Microsoft Windows 2000/XP/2003/Vista/7/8/8.1/10 operating system
· Intel Pentium or compatible CPU
· 256 MB of RAM
· 12 MB free hard disk space
· CD/DVD/Blu-ray drive(s).
Note. You must have administrator rights to install the program under Windows 2000 or Windows XP.
There are no special considerations for installing CDRoller. It uses no .INI files, and only uses the
registry for holding installation options. It will initially use default options that will be changed further via
the user preferences.
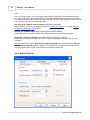
To install CDRoller:
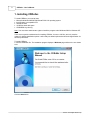
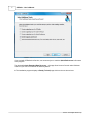
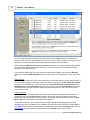
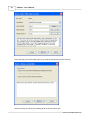
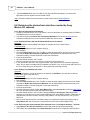
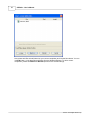
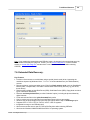
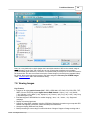
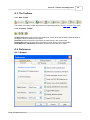
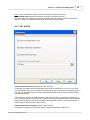
1. Run the installation file. The installation program displays a Welcome page similar to the one shown
here.
Click the Next button.
© 2003 - 2015 Digital Atlantic Corp.
1. Installing CDRoller.
4
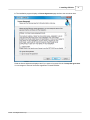
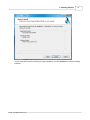
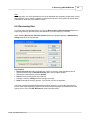
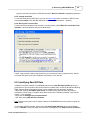
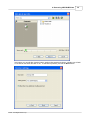
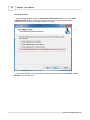
2. The installation program displays a License Agreement page similar to the one shown here.
Read the license agreement displayed and if you agree to its terms click the I accept the agreement.
You must agree to terms of the license agreement to install CDRoller.
© 2003 - 2015 Digital Atlantic Corp.
5
CDRoller - User's Manual
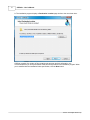
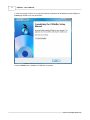
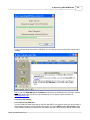
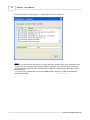
3. The installation program displays a Destination Location page similar to the one shown here.
CDRoller consists of a number of files containing the program and help information. It is
recommended that you accept the default folder structure provided in the installation program. When
you're satisfied with the installation folder specification, click the Next button.
© 2003 - 2015 Digital Atlantic Corp.
1. Installing CDRoller.
6
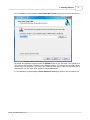
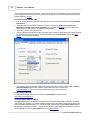
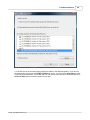
4. The installation program displays a Select Start Menu Folder page similar to the one shown here.
By default, the installation program creates an CDRoller folder on your start menu. This is what you'll
see when you choose Start | Programs on the Windows taskbar. If you want to use an existing folder,
choose it from the list shown; if you want to use a different name, type it in the text field. When you're
satisfied with your start menu folder selection, click the Next button.
5. The installation program displays a Select Additional Tasks page similar to the one shown here.
© 2003 - 2015 Digital Atlantic Corp.
7
CDRoller - User's Manual
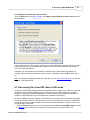
If you work with CDRoller the first time, we recommend you to read the Quick References before start
of the program.
The checked Include Extended Data Recovery ... will popup User Account Control under Windows
Vista/7/8 if you don't run CDRoller as admin by default.
6. The installation program displays a Ready To Install page similar to the one shown here.
© 2003 - 2015 Digital Atlantic Corp.
1. Installing CDRoller.
8
You've made all the choices necessary to begin installation. Click the Install button to begin installing
CDRoller.
© 2003 - 2015 Digital Atlantic Corp.
9
CDRoller - User's Manual
7. After the copying of files to your computer has been completed, the installation program displays a
Finish page similar to the one shown here.
Click the Finish button. Installation of CDRoller is complete.
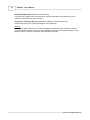
© 2003 - 2015 Digital Atlantic Corp.
2. Uninstalling CDRoller.
10
2. Uninstalling CDRoller.
To uninstall CDRoller you can either:
· Use the menu selection created for this purpose.
· Select the Add/Remove Programs applet from the Windows Control Panel.
CDRoller does not install any system DLLs and does not modify Windows in any manner. Uninstalling
this program will not affect other applications. To uninstall CDRoller, click the Start button on the
Windows Taskbar, then choose Programs | CDRoller | Uninstall CDRoller.
© 2003 - 2015 Digital Atlantic Corp.
11
CDRoller - User's Manual
3. Opening and Closing CDRoller.
Opening CDRoller.
To open the program, click the Start button on the Windows Taskbar, then choose Programs |
CDRoller | CDRoller.
Closing CDRoller.
Close CDRoller as you would any other Windows application by using the File | Exit menu item or
Alt+F4 keyboard shortcut.
© 2003 - 2015 Digital Atlantic Corp.
4. How to register the program.
12
4. How to register the program.
Unregistered version of CDRoller analyzes the inserted disc, finds the lost files and tests their
readability, but it cannot save the found data to the destination drive (folder). To enable the full
functionality, you are required to license and pay the license fee. Once your order has been approved,
a personal license key will be sent to you via e-mail to register your trial copy of CDRoller.
You can always order CDRoller using credit cards or another methods of payments if you visit web
page at http://www.cdroller.com/htm/purchase.html.
To register the program:
1. Run CDRoller (trial version).
2. Select Help | Register option in the Main Menu.
3. Enter your personal license key.
4. Click Accept button.
Note. You don't need to restart the program. Your registration takes effect immediately.
© 2003 - 2015 Digital Atlantic Corp.
13
CDRoller - User's Manual
5. How to upgrade CDRoller.
To upgrade CDRoller:
1. Uninstall an old version of the program.
2. Download a trial copy of CDRoller at http://www.cdroller.com/htm/download.html and install it.
3. Register a trial copy with the help of your licence key.
Note. To upgrade your previous version of CDRoller (4, 5, 6, 7, 8 or 9) to CDRoller 10 with 30%
discount, you should contact our Sales Dept at [email protected]. Please send us your personal
license key, or the name and and e-mail address that you used when purchasing the software, or any
other info (your order ID, post address, etc.) that may help us to identify your purchase status. Your
request will be responded shortly, usually within 2 to 12 hours.
© 2003 - 2015 Digital Atlantic Corp.
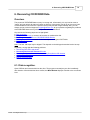
6. Recovering CD/DVD/BD Data.
14
6. Recovering CD/DVD/BD Data.
Overview.
The process of CD/DVD/BD data recovery is not easy and, unfortunately, it's very hard to create a
"magic" tool can retrieve all data in all cases on all discs. In this section, we will try to give you a base
recommendations how to achieve a positive result quickly and with a high reliability. Also, you can
always receive a technical support at [email protected], all your questions regarding the problems
with CD/DVD/BD data recovery will be responded within 2 to 24 hours.
We consider the following steps can be high-lighted:
1. Disk recognition.
2. Using Session Selector to access to all sessions on multisession disk.
3. Searching the lost UDF files on CD-R/DVD-R/DVD+R disks
4. Applying Scan UDF Disc to search for the lost objects on all types of UDF disks.
5. Recovering files.
Note. The 2nd...4th steps may be skipped. This depends on the disk type determined at the 1st step.
Separately, we high-light the following problems:
· Recovering DVD video and photos
· Recovering files from UDF discs in ISO mode
· Retrieving the photos from mini discs created by Sony Mavica CD cameras
· Identifying Raw ISO Data
· Burning recovered data
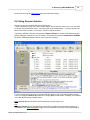
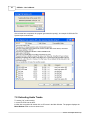
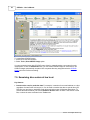
6.1. Disk recognition.
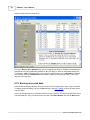
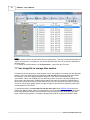
Open CDRoller and insert the disk into the drive. The program must analyse your disc immediately
after insertion. After the disk has been verified, the Main Window displayes it similar to the one shown
here.
© 2003 - 2015 Digital Atlantic Corp.
15
CDRoller - User's Manual
Look at the File System column. This may give us an important info about the type of the disk. In the
picture shown above, this is a disk in which UDF file system has been placed onto a single session.
We will name the disk has one or more such sessions as "UDF disk". If all sessions are displayed
with "ISO/Joliet" in the File System column, we will name such disk as "ISO disk", i.e the disk with
ISO 9660 file system.
At first, click the Recover All button in the Toolbar in order to retrieve all files and folders off the disc
or selected (current) session. Also, check out a readability of the root directory (folder), just left double
click on the disk name, or use the Open command from the Side Bar. Please answer to the following
questions: Is the root folder readable or not? Can i browse the disk contents? The answers may be
applicable at the next stages of cd/dvd data recovery.
Troubleshootings.
1. If the program can not recognize your disk automatically, click the Refresh button in the Tool Bar, or
insert the disk first and then open CDRoller. Also, to read the unclosed disks, i.e the disks left "as-is"
by CD/DVD/BD mastering program we recommend you to use the following method:
· Uncheck Detect disc insertion by Windows under the Browser tab in the Preferences dialog and
wait for the end of disk reading processed by another CD related program.
· Select the Refresh command from the File menu, or click the Refresh button in the Tool Bar.
2. To read UDF disks we recommend you to use CD-RW (DVD-) drives - the disks are recorded with
so-called packet-written technology and old CD-ROM / DVD-ROM drives may not access to their data.
3. Some drives may not support our special methods. These devices may hang the program when
analyzing the disk. In this case, uncheck Always use a drive capabilities under the Browser tab in
the Preferences dialog, insert the disk and try to recognize it again.
4. If you get 'Unknown file system...' message and you're sure the files data were placed on the disc,
please try to scan your disc without using the file system structures:
- If your DVD has been created by DVD camcorder or standalone recorder, please use the Recover
DVD Video option.
- If you know ISO/Joliet file system was actually placed on the disc, try the Identify Raw ISO Data
command.
- In case of UDF disc, if you know a name of CD/DVD/BD mastering program (or standalone device),
which actually created your disc, try the forced scan, selecting the software or device profile in the
© 2003 - 2015 Digital Atlantic Corp.
6. Recovering CD/DVD/BD Data.
16
forced scan list under the UDF Reader tab in the Preferences dialog.
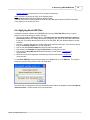
6.2. Using Session Selector.
We often receive the emails similar to the following one:
"I have copied back up files to a CDR in several stages, but the last time I backed up, I was only able
to see the most recent batch of files. The others seem to have disappeared... I presume they are still
there on the CD but "hidden" in some way - may be a different volume ?"
Fortunately, CDRoller offers the tool named as "Session Selector" to access to the data placed into
different sessions (volumes) on your CD or DVD. These disks are known as multisession CD/DVDs.
By default, CDRoller displayes contents of the most recent session.
To select a new session, just click a new item with 'Disc Session' type in the main program window.
Then, try to apply the Recover All command, or simply Open a new session. Probably, you will detect
a new files that have been "hidden" before.
Note. Recover All retrieves all files from the selected (current) session only.
Hint.
Sessions Selector may be also extremely useful if the root folder of the last session seems to be
unreadable at the "Disk recognition" stage, but some important files may be located (duplicated) in
© 2003 - 2015 Digital Atlantic Corp.
17
CDRoller - User's Manual
the previous session(s).
6.3. Searching the lost UDF files on CD-R/DVD-R/DVD+R disks.
A correct reading of UDF files and folders on write-once media (CD-R/DVD-R/DVD+R/DVD+R DL) is
provided by Virtual Allocation Table (VAT). Each time, when you add, change or delete files on the
disc, UDF mastering program creates a new VAT that reflects a new state of your disk. A new VAT is
being placed on the disk physically, when you eject the disk from your computer drive. VAT's location
is crucial for the disks created with the help of drag & drop software, such as well-known Roxio
(Adaptec) DirectCD and Drag-To-Disc. If the VAT can not be found or is corrupted, files will be
missing.
If your CD-R/DVD-R/DVD+R/DVD+R DL is recognized as UDF one, but when you try to open the disk,
you get the error message about unreadable root folder - this means the last VAT is not found. Also,
if you have accidently deleted some files, a new VAT does not point to them. To recover the deleted
files, you should use the previous VATs.
There are two main ways to find the lost files:
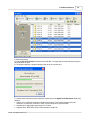
1. Using Scan UDF Disc from the Tools menu.
2. Searching an old VATs in order to recover the files from the previous backups.
The first method is described in the section 6.4. To search all VATs, please do the following:
· Click the Preferences button in the Tool Bar or select the same option from the View menu. Check
on the 'Search of all VATs' box on the UDF Reader tab in the Preferences dialog. Click the OK
button to close the Preferences.
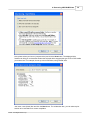
· Click the Refresh button in the Tool Bar. After a while the program will display a progress dialog
similar to the one shown here:
· when the process is completed, you should see the confirmation message:
· Click the OK button. Now, an each backup is shown as a separate "session" in the program
window. When you will see a new disk image (icon) in the program window, please use built-in
© 2003 - 2015 Digital Atlantic Corp.
6. Recovering CD/DVD/BD Data.
18
Session Selector (see the section 6.2) for access to all backups.
Note. Please do not search all VATs on the following disks:
- CD-RW/DVD-RW/DVD+RW (CD/DVD re-writable media),
- DVD-R and DVD+R created by DVD personal recorder (standalone device) and DVD camcorder.
These disks do not contain VAT at all.
6.4. Applying Scan UDF Disc.
In addition to another methods of CD/DVD/BD data recovery, Scan UDF Disc gives you a good
chance to retrieve several types of files, including:
· Files are not visible in Windows Explorer - the writing process was interrupted by a system or
power failure before UDF folders were placed on the disc, but most or all of the files were written
to the disk. This means that the files may be on the CD (DVD, BD), but Windows Explorer cannot
see them.
· Lost files - complete files that do not have a file name associated with them. They can also be files
that you accidently deleted from the CD (DVD, BD).
· Files on the disks quick-formatted by Roxio DirectCD and Nero InCD.
· Files located in unreadable (damaged) UDF folders, including the root one.
· Files located on Sony Mavica CD finalized with failure on the camera. Forced scan is
recommended.
· M2TS files on the discs that were not finalized by AVCHD camcorders. Forced scan is
recommended.
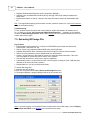
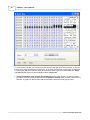
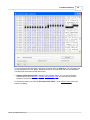
To start Scan UDF Disc select the same option in the Tools menu or in the Side Bar. The program
displays a progress dialog similar to the one shown here.
After UDF scan is completed or canceled, found files and/or folders are displayed in the Lost objects
detected on disc... window similar to the one shown here
© 2003 - 2015 Digital Atlantic Corp.
19
CDRoller - User's Manual
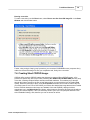
You can rename the selected folders, open them with the help of Open command, or left double
clicking on their names. If the lost folders have been found, try to open them first. This may give you a
chance to recover the files with original names that are located in the found folders.
When applying the Recover All / Recover Selected commands, the program automatically identifies
the types of files, initially shown as FileXXXX ones, or the files having an intermediate extensions,
such as .ole2 for MS Office ones.
If you know an original type, you can rename the selected files manually, with the help of Rename
command, or/and use New Extension option to speed up the re-naming process in case of the large
list.
Hints and Tips.
If you're going to retrieve UDF files from the same disc at the different times, you can save the table of
contents (names,locations, attributes) of the found files into separate file by Save Table Of Contents
command from the File menu. Further, check on the Load Table Of Contents from file box on the
UDF Reader tab in the Preferences dialog. Next time, when you will run Scan UDF Disc the program
will display the list of the found objects shortly, without scanning the disc, and you can continue to
retrieve the files data.
Trouble Shooting.
If the program can not recognize UDF disk, but you are certainly sure the disk contains the files, we
recommend you to try the forced scan of the disk. This may be useful if the disk was incorrectly
finalized, and the system data are not accessible. For example, this problem often occures on Sony
Mavica CD when the finalization step failed on the camera.
To start the forced scan, you should initially know what CD/DVD mastering program (or device)
formatted your disk. For example: Roxio (Adaptec) DirectCD, Nero InCD, PacketCD or Sony Mavica
CD digital camera. Further, you should assign an appropriate profile in the Forced scan list under the
UDF Reader tab in the Preferences dialog and click the Refresh button in the Tool Bar.
© 2003 - 2015 Digital Atlantic Corp.
6. Recovering CD/DVD/BD Data.
20
Note.
Obviously, there is no 100% guarantee to recover all displayed files completely, please keep in mind,
that some files may be erased or partially re-written by a new ones. The program can restore those
FILES DATA, which else it is possible to rescue.
6.5. Recovering files.
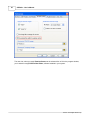
To recover the found files and folders, you can use Recover All and Recover Selected options, or
simply drag and drop selected items to the destination you have chosen on your HDD.
When selecting Recover All / Recover Selected options, the program displays a Data Recovery
dialog similar to the one shown here.
Key Features.
· Saves recovered data into intermediate file. Further, a recovery of the selected file can be
continued with the help of Resume Recovery option in the program window.
· Displays the current results (recovery details).
· Saves recovery results (report) into HTML file.
· Changes a recovery settings, without leaving the process.
· Skips file during the recovery process, if you decide a file isn't so important.
If UDF file consists of the different fragments (so called "extents"), you have the opportuntiny to
recover each extent separately. Right click the file and select Properties command from the next
(pop-up) menu. Go to the UDF Records tab in the Properties dialog.
© 2003 - 2015 Digital Atlantic Corp.
21
CDRoller - User's Manual
Select the file extent and click Recover Selected button. After the process is completed, just rename
the recovered .dat file to the file with required extension. For example, simply assign .vro, .vob or .mpg
extension for video file. A small advice. To change a file's extension in the Windows Explorer, simply
right click the file and select Rename in the next (pop-up) menu.
6.6. Recovering DVD video and photos.
6.6.1. Hardware requirements.
· We strongly recommend to use DVD-RW drives ("dvd writers"). DVD-ROM drives ("dvd readers")
often can not access to the "troubled" or non-finalized DVD discs.
· To read DVD-RAM discs, you should use the computer DVD-RAM drive instead of DVD-RW or
DVD-ROM device. Or, you can use so-called multi-read DVD-RW drive with capabilities to read
DVD-RAMs. If you need our advice regarding a vendor or/and model of a new computer DVD drive,
just contact us at [email protected] .
6.6.2. Searching and recovering the lost data.
CDRoller Wizard interface is designed for novice users and allows to recover DVD videos and photos
off the discs, created by standalone devices (camcorders, personal DVD recorders), using the simple
"step by step" procedure. To display the Wizard dialog, just select the Recover DVD Video option
from the File Menu.
Every Wizard dialog contains a brief instructions, describing a possible user actions in order to achieve
the best results in DVD data recovery.
At the 1st step, please select your computer DVD drive.
© 2003 - 2015 Digital Atlantic Corp.
6. Recovering CD/DVD/BD Data.
22
At the 2nd step, just insert your DVD and click the Next button.
At the 3rd step, please select DVD video recorder (camcorder or standalone dvd recorder) that placed
a video or/and photos on your disc. You can use Any recorder setting and try to scan each of
displayed tracks, starting on the track with the highest length.
© 2003 - 2015 Digital Atlantic Corp.
23
CDRoller - User's Manual
At the 4th step, just click the Next button if you scan the selected area for the first time.
At the next step, you should see a dialog similar to the one shown here.
© 2003 - 2015 Digital Atlantic Corp.
6. Recovering CD/DVD/BD Data.
24
Finally, just recover the found video (VOB files). You can also try to scan another track, shown at the
3rd step.
Note. If your mini DVD+RW was re-formatted by camcorder, an additional test is required in order to
determine whether the lost video is now accessible or not. For inquiry, please contact us at
[email protected]
6.6.3 Using UDF Reader.
6.6.3.1 Recovering VRO files.
You can usually see these video files on the DVD with UDF 2.0 file system. When your dvd recorder or
camera writes a video according to DVD-VR standard. If you see UDF 2.0 under File System column
in the CDRoller window, try to browse the disc folders, find and recover VRO file directly. Please keep
© 2003 - 2015 Digital Atlantic Corp.
25
CDRoller - User's Manual
in mind VRO files are often fragmented. If one fragment is seriously damaged or incorrectly recorded
by the camera, this can stop all recovery process. A solution is to recover each fragment of video (file
extent) separately. Details ...
6.6.3.2 Recovering AVCHD video.
· Can be recommended to find .m2ts files (UDF files) on the non-finalized discs created by AVCHD
camcorders.
· Select the Preferences option from the View menu. Uncheck the Detect disc insertion by
Windows and Always use a drive capabilities boxes under the Browser tab in the Preferences
dialog before you will insert the troubled disc into the drive.
· Insert the "troubled" disc into the drive.
· Click the Preferences option from the View menu again. Select an appropriate option (that depends
on model of your device and type of the "troubled" disc) in the Forced Scan list under the UDF
Reader tab and click the OK button.
·
The program will scan your disc, without using the system data. Further, please follow our Basic
Recommendations from built-in adviser. Also, please feel free to contact us at
[email protected] if you have any questions regarding dvd video recovery.
6.6.4 Viewing VOB files.
To view the recovered VOB files, we recommend PowerDVD from CyberLink at
http://www.gocyberlink.com/.
6.6.5 Converting VOBs into MPGs.
Our Split video option automatically converts a "raw" DVD-video data (VOB or VRO files) into MPG
files without loss of quality. In contrast to VOB file, MPG file can be simply viewed with the help of any
DVD-compatible software (player). To activate the Split video window, just click Split Video button in
the Side Bar (a left panel of 'Step 6...' dialog mentioned above) and assign the recovered file name in
the next dialog. Or, just click Split Video button in the Main ToolBar.
© 2003 - 2015 Digital Atlantic Corp.
6. Recovering CD/DVD/BD Data.
26
6.6.6. Making a new DVD with recovered video.
Just click Burn button in the Main ToolBar, select Make a new DVD with recovered video and click
the Next button.
Further, using a simple "step by step" procedure, you select DVD burner (computer DVD drive), add a
video (MPG files) into your compilation and, finally, burn a new DVD-video disc that can be played
back in the most DVD players.
In addition, you can load the recovered MPG or VOB files into your DVD-authoring software, for
example: Sony Picture Motion Browser, Windows Vista / 7 DVD Maker, Sonic MyDVD, Nero Vision,
etc.
Note. To replicate successfully finalized DVD-video disc, you can extract ISO Image file first, and then
burn it to a new (blank) DVD.
6.7. Recovering files from UDF discs in ISO mode.
Sometimes, CD/DVD/BD mastering software places ISO/Joliet file system on the UDF disc. If the disc
contains both UDF and ISO 9660 file systems it shall be known as a UDF Bridge disc. This UDF
Bridge disc will allow playing DVD-ROM media in computers which may only support ISO 9660. An
example of UDF Bridge disc may be DVD-Video disc created for DVD players.
By default, CDRoller reads the contents of UDF partition, because this is an universal way to find and
recover the lost data. However, UDF directories can become corrupted due to errors of CD/DVD/BD
mastering software, bad quality of DVD media and some hardware problems. A solution can be to try
to read the disc in ISO mode:
· Click the Preferences button in the Tool Bar and check the Read only ISO 9660 tracks box under
the Browser tab in the Preferences dialog. Click the OK button to close the Preferences.
© 2003 - 2015 Digital Atlantic Corp.
27
CDRoller - User's Manual
·
click the Refresh button in the Tool Bar. If your disc has ISO/Joliet partition, you should see
ISO/Joliet in the File System column instead of UDF.
Note. If the disc contains a several sessions, please use the built-in Session Selector.
6.8. Retrieving the photos from mini discs created by Sony
Mavica CD cameras.
6.8.1. General requirements and settings.
· CD-RW or DVD-RW drives (cd or dvd "writers") are more preferable in comparing with CD-ROM or
DVD-ROM drives (cd or dvd "readers").
· You should uncheck the Detect disc insertion by Windows box under the Browser tab in the
Preferences dialog before you will insert the troubled disc into the drive.
6.8.2. Reading mini disc that was finalized with failure on the camera.
Symptom.
The disc finalization was accidently interrupted, for example, due to the power failure.
Troubleshooting.
· Remove any disk(s) from your computer drive(s).
· Run CDRoller.
· Click the Preferences button in the Tool Bar or select the same option from the View menu. Make
sure that the Detect disc insertion by Windows is UNCHECKED on the Browser tab in the
Preferences dialog. Click the OK button to close the Preferences.
· Insert the troubled disc.
· Click the Refresh button in the Tool Bar.
· Does the program recognize your disc? If not, please go to the step 6.8.3
· If you can see the disc icon in the program window, try to open the disc by left-double clicking its
name. Do you get the message about unreadable root folder? If yes, try to run Scan UDF Disc from
the Tools menu and go to the step 6.8.4 if the program has found the lost files.
6.8.3. Reading non-finalized (open) disc.
Symptom.
Disc was not finalized, you lost an access to the data due to Disk Error. You was able to view the
photos earlier (prior to the disk error).
Troubleshooting.
· Remove any disk(s) from your computer drive(s).
· Run CDRoller.
· Click the Preferences button in the Tool Bar or select the same option from the View menu. Make
sure that the Detect disc insertion by Windows box is UNCHECKED on the Browser tab in the
Preferences dialog. Click the OK button to close the Preferences.
· Insert the troubled disc.
· Click the Preferences again. Select Sony Mavica (O) in the Forced scan list under the UDF reader
tab. Click the OK button and close the Preferences again.
· Click the Refresh button in the Tool Bar. If dialog with Step 1. Specify your scan area caption
appears, try to find and recover the lost photos step-by-step, using Wizard interface. Otherwise, the
program tries to find the lost files, scanning "UDF partition". Are any files found? If yes, go to the
step 6.8.4.
· Note. If some pictures look like corrupted, please try to repeat the "forced scan" with the help of
Sony Mavica CD. Also, this option is recommended to find mavica videos (MPEG files).
6.8.4. Recovering the found (indexed) files displayed in the "Lost objects detected..." window.
· Apply Recover All / Recover selected to retrieve the found files (photos) automatically.
· Select file(s) and use Rename or/and New Extension commands to re-name the indexed files to
© 2003 - 2015 Digital Atlantic Corp.
6. Recovering CD/DVD/BD Data.
28
.jpg ones, and then copy them to HDD with the help of Recover selected or drag&drop operations.
6.8.5. Viewing found files.
To view the found photos (JPEG files), you can use View Image option. Just select a JPEG file and
click the View Image in the Side Bar (left panel of the "Lost objects detected..." window).
6.8.6. Burning the recovered files.
To place the recovered photos onto new disc, click Burn button, select Write files and folders onto
data disc in the Start Window and click the Next button.
Further, using a simple "step by step" procedure, you can select a burner (computer drive), add the
recovered files (photos) into your compilation and, finally, burn a new disc.
6.9. Identifying Raw ISO Data
In addition to another methods of CD/DVD/BD data recovery, Raw ISO Data Identifier gives you a
good chance to find and retrieve the lost files from the troubled discs, created by Ahead Nero Burning
ROM, Adaptec (Roxio) Easy Media Creator, Sonic software and other programs, including:
- Discs with currently unreadable system area (so-called Primary and Secondary ISO Volume
Descriptors). When trying to recognize these discs the first time, CDRoller generates "Unknown file
system..." error message.
- Discs with the damaged and corrupted folders.
- UDF Discs having ISO-alike files locations.
Note. Please use this option only if another methods of CD/DVD/BD data recovery have not given an
effect before.
To start Raw ISO Data Identifier, please select the Identify Raw ISO Data option from the Tools
menu, or Side Bar. At the final stage, the found files are displayed in the Step3. Recover found files
© 2003 - 2015 Digital Atlantic Corp.
29
CDRoller - User's Manual
window similar to the one shown here:
First, try to Recover All or Selected files. These commands also allow to complete an identification of
files that have not been preliminary identified on the scan stage, or have an intermediate extensions.
For example, .ole2 for MS Office files. If you know an actual file name, you can Rename the selected
file manually, or/and use New Extension command to speed the re-naming process in case of the
large list of one-type files.
6.10. Burning recovered data.
CDRoller Wizard interface allows to burn the recovered data, using a simple "step by step" procedure.
To display the Wizard dialog, just click the Burn button in the Main ToolBar or select the same option
from File Menu.
Here is an example how to use a Wizard interface in order to place a recovered files and folders onto a
new DVD+RW disc. First, you should select your task in the Start Window and click the Next button:
© 2003 - 2015 Digital Atlantic Corp.
6. Recovering CD/DVD/BD Data.
30
Now, please select your burner (computer drive) and click the Next button. The displayed drive
features can help you to determine whether the selected device supports the type of CD or DVD media
you want to burn. For example, do not try to burn DVD discs, using CD-RW drive.
Just insert a new (blank) disc and click the Next button. For multisession disc, you can select a prior
session to be included into a current compilation.
© 2003 - 2015 Digital Atlantic Corp.
31
CDRoller - User's Manual
Now, please add files or/and folders into your current compilation and click the Next button. You can
use Add button, or just drag files and folders from the Windows Explorer. To edit a current
compilation, please use Delete and Rename options for the selected item(s).
© 2003 - 2015 Digital Atlantic Corp.
6. Recovering CD/DVD/BD Data.
32
At this step, you can edit disc (session) name, assign writing speed and choose - whether you will add
a new files on the same disc later or not. To start a burn process, just click the Burn! button.
© 2003 - 2015 Digital Atlantic Corp.
33
CDRoller - User's Manual
Finally, you should see "Burning disc ..." dialog similar to the one shown here.
Notes.
1. We do not recommend to try to place a new files onto your "troubled" discs. Also, please do not try
to close these discs, hoping to make them readable for Windows. The most safe way is to recover
your files from the "troubled" disc to Hard Disk Drive (HDD) first, and then place (write) them onto a
new (blank) disc.
2. To erase your re-writable disc, just click the Erase button in the Main ToolBar or use the same
option from File Menu.
© 2003 - 2015 Digital Atlantic Corp.
7. Additional features.
34
7. Additional features.
Overview.
CDRoller also offers you additional instruments such as:
·
·
·
·
·
·
·
·
Testing Disc
Extracting Audio Tracks
Extracting ISO Image File
Creating Short CD/DVD Image
Examining disc sectors at low level
Recovering flash data
Use image file to manage disc sectors
Viewing Images
All mentioned above features are integrated into a common intuitive shell of CDRoller.
7.1. Testing disc.
With the help of Disc Test, you can check if a disc contains errors. It can be useful to:
- Check the quality of the CD/DVD/BD media.
- If you have a CD/DVD/BD recorder, you can check whether the data (files and folders) on the disc
are written correctly.
- Get advanced information from the Disc Volume.
The test can be used for both data and audio dscs. It also examines Multisession and Mixed mode
discs.
The list of tests includes File System test, Disc Surface test and Digital Audio Extraction (DAE)
Quality test. Since the program automatically determines the disc type, it always knows what the test
from the list can be applied to the CD/DVD/BD inserted into the drive. With the help of Disc Test
options, you can manually include (exclude) an appropriate test to (from) the list, set scan ratio while
testing the disc surface and also select tests of all sessions or only current session on multisession
disc.
We recommend you to run the disc test periodically on the discs with ISO/Joliet file systems, in order
to make sure a valuable files were really ("physically") placed on the disc, particularly in the following
situations:
- if your DVD was created by Nero Burning ROM.
- if your CD with photos was burnt from memory cards.
To start the disc test, please select the Test Disc option in the Tools menu. The program displays a
progress dialog similar to the one shown here.
© 2003 - 2015 Digital Atlantic Corp.
35
CDRoller - User's Manual
After all tests have completed, the program generates the report(s). An example of ISO/Joliet File
System report is shown here.
7.2. Extracting Audio Tracks.
To extract ("rip") audio track(s):
1. Insert CD audio into the drive.
2. After disk recognition left double click on CD name in the Main Window. The program displays the
Main Window similar to the one shown here.
© 2003 - 2015 Digital Atlantic Corp.
7. Additional features.
36
3. Select the track(s).
4. Click the Recover Selected command in the Side Bar, or simply drag and drop selected track(s) to
the destination on HDD.
5. The program displays a progress dialog similar to the one shown here.
To extract audio tracks the program utilize the method known as Digital Audio Extraction (DAE). Key
features:
· Applies a set of different extraction methods with Dynamic, Fixed synchronization with "jitter"
correction, re-read block of sectors in case of error or/and lost of synchronization.
· Autodetects an appropriate read function for CD drive.
· Supports WAV, MP3, MP2, OGG or RAW formats of output file.
© 2003 - 2015 Digital Atlantic Corp.
37
CDRoller - User's Manual
· Supports Windows ACM (Windows Audio Compression Manager).
· Supports Lame and Blade MP3 encoders (DLLs) and Ogg Vorbis, high-quality and patent-free
audio codec.
· Extracts audio tracks "on-the-fly", directly to the output file without creating an intermediate WAV
file.
Hint. To change default settings (select another encoder, extraction method, etc.) use Audio Extraction
tab in the Preferences dialog.
Troubleshooting.
For the "problem" Audio CDs (discs with various defects, written with hardware or software errors,
etc.), or when you get the "Can not process Digital Audio Extraction ..." message, we recommend
to check the Read damaged sectors "as is" under Browser tab in the program Preferences and try to
extract audio track(s) again.
7.3. Extracting ISO Image File.
Key Features.
· Extracts data into ISO Image File (*.iso file) from CD/DVD/Blu-ray discs with the different file
systems (UDF, ISO/Joliet, FAT 32).
· Can be used to copy (replicate) finalized DVD-video and AVCHD discs.
· Supports Multi-Session discs, extracting data into ISO Image File from the selected session.
· Uses all recovery methods to save a valuable data from the bad discs.
· Creates *.iso file with buit-in ISO 9660 file system and Joliet files names extensions. This is the
most compatible file system that can be read on every machine.
· Converts UDF filenames to Joliet ones to ensure compatibility.
· Automatically creates *.iso file with buit-in UDF 1.02 file system if a large file (over 4 GB) has been
detected on the source UDF disc (session).
· Extracts data into *.iso file from flash media cards.
To extract ISO Image File:
1. Insert the disc into the drive.
2. After disc recognition select Tools | Extract to ISO Image File option.
3. The program displays a progress dialog similar to the one shown here.
Note. To prevent copying of "inaccessible" files from flash media card to ISO Image, uncheck Display
deleted files and folders under Browser tab in the Preferences dialog.
© 2003 - 2015 Digital Atlantic Corp.
7. Additional features.
38
Burning a new disc.
To make a new disc, just click Burn button, select Burn a new disc from ISO Image file in the Start
Window and click the Next button.
Further, using a simple "step by step" procedure, you can select CD/DVD/BD burner (computer drive),
add the recovered ISO Image File into your compilation and, finally, burn a new disc.
7.4. Creating Short CD/DVD Image.
CDRoller offers a simple CD/DVD catalog that is based on usage of Short CD/DVD Image - a file
packed in a special way, with unique name containing ALL DIRECTORY STRUCTURE (directory tree)
of the disk, including complete folders and files names with attributes. This enables you to browse
through the folders, search for the files or/and folders which you need (with the help of Tools | Find
option), detect the prorerties of them, using the Properties command, but in order to retrieve any file,
you should insert a "real" CD or DVD. When you insert a disc that has the image that has been created
before, CDRoller determines this image as a "mirror" of the real CD(DVD), displays it with an
appropriate icon in the Main window and further, utilizes image to access to any folder quickly without
reading of inserted CD(DVD). This is an extremely useful if your "real" CD (DVD) has become a disc
with unreadable folder(s) and, therefore you can not access to its files.
© 2003 - 2015 Digital Atlantic Corp.
39
CDRoller - User's Manual
To create Short CD/DVD Image:
1. Insert CD or DVD into the drive.
2. Select Tools | Short CD/DVD Image option.
You can create the image with CD (DVD) name (label) or manually assign a new name for each
inserted disk. In case of multisession disc, you can create CD/DVD image for each session. All
CD/DVD images automatically are placed into a separate directory assigned under the CD/DVD
Library tab in the Preferences dialog.
7.5. Examining disc sectors at low level.
Key features.
· Intensive disc scan for particular data. For example, it searches for an email address on a disc
regardless of what file the mail may be in. Can be used to examine the data on optical discs (CD,
DVD, Blu-ray) and also on hard disks, flash drives and other types of Windows disks/drives. To
activate the search window, just click the Examine Sectors button in Other Tools section of Side
Bar, or select the same command in the Tools menu.
© 2003 - 2015 Digital Atlantic Corp.
7. Additional features.
40
You can stop a search in any time, view intermediate results and continue the process where you left it
before.
· Sector View allows you to display the disc sectors in the Text, Binary, Hexadecimal/Text or
Unicode mode. There is no requirement that the sectors belong to a file - any sector on the disc can
be displayed. Just click View sector button in the Examine Disc Sectors dialog shown above. There
is no limitation to view the sector data only in a single window - multiple Sector View dialogs can be
open at the same time.
© 2003 - 2015 Digital Atlantic Corp.
41
CDRoller - User's Manual
To move between sectors you can either use the arrows to the right of the sector number, or you can
enter a sector number and press the Enter key, or just paste a new sector number from the clipboard.
You can simply adjust the font size under the View tab in order to get more comfortable view. Copy
and Save To File options are also available under the Export tab.
·
Direct examination of the content of selected file from the main window. To view file content,
just select a file in the main window and click the Examine Sectors button in Other Tools section of
Side Bar. Or, right click the file name and select Examine Sectors from the pop-up menu.
© 2003 - 2015 Digital Atlantic Corp.
7. Additional features.
42
You can find a particular data (text), using a set of options under the Search tab. The information can
be also displayed in the Text, Binary, Hexadecimal/Text or Unicode mode with font size adjustment.
The data pane can be also resized and scrolled.
· Support of External Hex Editor. Instead of built-in Sector Viewer, you can simply connect a
professional hex editor (WinHex, FlexHex, Hex Workshop, HxD, etc.) and use it for detailed
analysis of selected sectors or file data.
To activate this option, just check the Use external hex editor... under CD/DVD Library tab in the
Preferences dialog:
© 2003 - 2015 Digital Atlantic Corp.
43
CDRoller - User's Manual
The next time, when you apply Examine Sectors to the selected disc or file in the program window,
you're asked to assign External Hex Editor, software installed in your system.
© 2003 - 2015 Digital Atlantic Corp.
7. Additional features.
44
Note. If you manage the inserted disc with CDRoller Image, all changes in the sectors data saved by
external editor will modify the image file. Further, you can recover files/folders, or extract a whole
track(s), or create ISO Image File, and then burn a new disc with modified data without leaving
CDRoller.
7.6. Extended Data Recovery.
Key Features.
· Provides a direct access to raw disk data using a special (kernel-mode) driver, bypassing the
restrictions imposed by Windows Vista / 7 / 8 / 8.1 / 10 under standard user (non-administrative)
account.
· Recovers pictures, movies and other types of files from flash memory cards, such as SmartMedia,
Memory Stick, CompactFlash, xD Picture Card and other flash memory devices (e.g. pen drives,
thumb drives).
· Retrieves the lost data on Hard Disk Drives (HDD), Solid-State Drives (SSD), floppy disks and other
types of Windows disks/drives.
· Restores accidently deleted files (so-called "Undelete" option), including the photos deleted by
digital cameras.
· Finds and retrieves files on the quick-formatted flash media.
· Can be used to recover a video files from Hard Disks Drives built into camcorders.
· Allows to see the found images even in the free trial version with the help of View Image option.
· Supports NTFS / FAT12 / FAT16 / FAT32 / exFAT / UDF file systems.
· Integrated into easy-to-use CDRoller shell.
· Writes recovered files onto a new CD, DVD or Blu-Ray discs without leaving CDRoller.
· Works under Windows 2000/XP/2003/Vista/7/8/8.1/10 operating system.
© 2003 - 2015 Digital Atlantic Corp.
45
CDRoller - User's Manual
How to get started.
1. When installing CDRoller, check the Include Extended Data Recovery ... box under Select
Additional Tasks window. Further, this will popup User Account Control under Windows
Vista/7/8/8.1/10 if you don't run CDRoller as admin by default.
2. Simply start CDRoller and select the drive for Extended Data Recovery under CDRoller - Start
Window. Click the OK button.
© 2003 - 2015 Digital Atlantic Corp.
7. Additional features.
46
3. Find and recover the lost data. Simply browse the folders in the displayed partition. If you look for
the deleted files, please open the $LOST FILES$ folder at first. You can use the View Image in order
to preview the found pictures. If your flash with FAT file system media was quick-formatted, please try
Scan FAT Data option for intensive search of files data.
© 2003 - 2015 Digital Atlantic Corp.
47
CDRoller - User's Manual
Notes.
1. Do not save the files to the same drive you're recovering from. This may overwrite the data that still
need to be recovered. For instance, if you recover data from flash card, do not save the data back to
the same card !
2. To change drive (disk partition), use the Select drive... option from the File menu.
7.7. Use image file to manage disc sectors.
This option forces the program to create and then use an own image file to manage the disc data (disc
sectors). Here, disc image means a combination of .tbl and .dat files having the same name before
file extension. There are 2 big advantages of image file. First, some CD and DVDs can be
"poor-written". Often, one CD/DVD drive can read only a part of such disc. If another CD/DVD drive
can access to the bad sectors, CDRoller simply adds a new data to the image file created before. In
other words, you get the best out of each and every drive you use. Second, if you intend to read the
disc twice, you get much greater speed, having the image on your hard drive. Especially, when there
are bad sectors on CD or DVD.
To activate this option, just check the box with the same name under CD/DVD Library tab in the
Preferences dialog. Further, when you insert the disc, you are prompted to type image file name that
will be associated with this disc. We recommend to use friendly and unique name that simply tells
about content of inserted disc. For example, 'My photo album 2010' or 'My trip to Canada in 2010'.
© 2003 - 2015 Digital Atlantic Corp.
7. Additional features.
48
Note. It's a very hard task to check whether the inserted disc matches 100% to the created image or
not. Particularly, for the "bad" CD or DVD, due to a lot of factors that contribute to this problem
(CD/DVD media types and drives). Therefore, it is important that you always use a correct file name for
the inserted disc. We also recommend to keep the created images in the safe place (separate folder).
By default, the program places the images to the folder assigned in Directory for CD/DVD Images
under CD/DVD Library tab in the Preferences dialog.
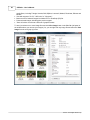
7.8. Viewing Images.
Key Features.
· Support of all major graphic formats (BMP, JPEG, JPEG 2000, GIF, PNG, PCX, PSD, EPS, TIFF,
WMF, ICO and TGA) and popular digital camera RAW formats: Canon (*.cr2, *.crw), Kodak
(*.dcr), Minolta (*.mrw), Nikon (*.nef), Olympus (*.orf), Pentax (*.pef), Fuji (*.raf), Leica (*.raw), Sony
(*.srf) and Sigma (*.x3f).
· Extended support of DICOM files for medical imaging (*.dcm, *.dic, *.dicom, *.v2). Single and
multipage.
· Display of thumbnail previews.
· Support of image EXIF metadata, including GPS fields. Displays the location on geo map with GPS
latitude and longitude coordinates, where selected picture was taken.
· Histogram display (RGB and Gray Scale).
· Batch processing to convert large or small collections of images. Support of image resizing with 11
© 2003 - 2015 Digital Atlantic Corp.
49
CDRoller - User's Manual
·
·
·
·
quality filters, including Triangle, Hermite, Bell, BSpline, Lanczos3, Mitchell, FastLinear, Bilinear and
Bicubic.
View with support of "to-fit", "100% size" or "full screen".
Batch convert of selected images into Adobe PDF or PostScript (PS) file.
Prints selected images, including print preview support.
"Save As" with a convert into a wide set of graphic formats.
To start, just select one or more image files and click View Image button in the Side Bar (left panel of
the window where you can see your images). Or, you can right-click any image file and select the View
Image from the next (pop-up) menu.
© 2003 - 2015 Digital Atlantic Corp.
8. Contacting Technical Support.
50
8. Contacting Technical Support.
The goal of the CDRoller Support Team is to provide our users unrivaled technical assistance when
implementing CDRoller technologies. Our commitment to you is very simple. Top-notch support and
immediate solutions to your technical problems. Since we have customers throughout the globe, we
will do our best to respond to requests 24 hours a day. With our technical assistance, there are no
banker's hours, no auto-responder support replies, and no closed for the holiday's door sign.
Each member of CDRoller's programming staff is an expert inside operating system structure. At our
team, simplicity and elegance are greatly appreciated, practiced, and achieved. Buy our product, use
our service, and you will come to appreciate that too.
You do not have to purchase the software in order to receive support, all your questions
regarding CDRoller will be responded within 12 hours, usually within 4 hours.
If you have purchased the product, please include the email address that you used when purchasing
the software - we use this to confirm your purchase status and support requests from customers
receive priority over others.
You can contact our support department via email at: [email protected]. To be notified about new
versions of CDRoller and new products please subscribe to our mailing list at http://www.cdroller.com .
All questions regarding orders, licenses or other services should be directed to [email protected]. If
you have any suggestions or comments regarding CDRoller, we'd like to hear from you. Please feel
free to send an e-mail to [email protected]. All suggestions will be at least considered and you
will probably see them as new program's features in the future releases. If you have any problem with
our web site at http://www.cdroller.com, please do not hesitate to contact our webmaster at
[email protected].
© 2003 - 2015 Digital Atlantic Corp.
51
CDRoller - User's Manual
Annex A Controls and dialog boxes.
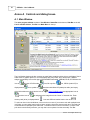
A.1. Main Window.
The main program window consists of List Window, Status Bar at the bottom, Side Bar at the left,
List of available folders, Tool Bar and Main Menu on the top.
The List Window displays the disc contents as main folder containing drives, discs, sub-folders, files or
audio tracks. A graphic symbol, or icon associates with every folder, file or audio track. CDRoller
assigns a proprietary icon to each type of CD/DVD/BD/Flash media: CDROM, CD-R, CD-RW have the
icon as
, all types of DVD media -
displayed with
icon, symbol as
icon, Blu-ray disc -
associates with Mixed CD (data plus audio) and empty
drive (drive without any disc) has the icon as
, and the icon as
icon, CD-DA (Audio CD) is
. Short CD/DVD image has appropriate icon as
is assigned to the image that is the "mirror" of inserted disc. Flash
memory card (drive) is displayed with
icon and USB card reader has the icon as
.
To select an item in the List Window, click on its icon or name. If you want to work with multiple items
in a folder, you can select (mark) each of them, using the check box near an each item. The total size
of selected files is diplayed by the status bar. To select all items in the current folder, or return to the
prior level in the directory structure, you may also use an options from the secondary Tool Bar.
© 2003 - 2015 Digital Atlantic Corp.
Annex A Controls and dialog boxes.
52
Side Bar similar to Microsoft Outlook offers an intuitive list of commands depending on your situation
(disc type, file system, data recovery problems, etc.).
To adjust a column's width, you may move the mouse pointer to the right border of the column heading
box. The mouse pointer changes to a double-headed horizontal arrow with a vertical bar in the middle.
That means you move the border. Hold down the mouse bottom and drag the border left or right as
needed. When the border is in its preferred location, release the mouse button.
Every item displayed in the List Window has its own Pop-up menu - if you right-click on it, a menu will
show up by it, displaying all the options available over the selected item.
All buttons on the Toolbar and Side Bar have a hint - if you don't know what the button does, just
place the mouse over it and wait for a second, and a short description will appear.
CDRoller supports drag-and-drop - meaning that any file and/or folder can be copied to desired
location on HDD, or any audio track can be extracted to the output file by drag-and-drop.
A.2. Main Menu Commands.
A.2.1. File Menu (shortcut Alt + F)
Command
Shortcut
Description
Select drive ...
F2
Open
Ctrl + O
Recover All
F9
Recovers all available objects.
Recover DVD Video
F7
Runs video data recovery using the wizard interface.
Split Video
Ctrl + S
Converts a recovered video into MPEG files.
Refresh
F5
Causes all discs in all drives to be examined.
Properties
-
Displays properties of the selected object(s).
Burn
Ctrl + B
Runs burning process.
Erase
F11
Erases re-writable disc.
Exit
Alt + F4
Selects the drive for Extended Data Recovery
Opens current (selected) disc, session, folder or file.
Ends your CDRoller session.
A.2.2. View Menu (shortcut : Alt + V)
Command
Shortcut
Side Bar
-
Shows/Hides Side Bar.
Status Bar
-
Shows/Hides Status Bar.
Tool Bar Icons Size
-
Selects a size of icons in the Tool Bar (Small or
Large).
Vertical Lines
-
Shows/Hides the vertical lines.
Horizontal Lines
-
Shows/Hides the horizontal line below every item in
the window.
© 2003 - 2015 Digital Atlantic Corp.
Description
53
CDRoller - User's Manual
Highlight Full Row
-
If Checked, the whole line will have the selection or
the focus rectangle around it. If Unchecked, only
item's main text will be highlighted.
Sort By
-
Controls the sequence or order of the folder contents
by Name, Type, Size, Date or in Reverse Order.
Preferences
Ctrl + P
Sets up program options.
A.2.3. Tools Menu (shortcut : Alt + T)
Command
Shortcut
Description
Find
F3
Short CD/DVD Image
Ctrl + I
Creates and adds a new CD/DVD image to the
library.
Test Disc
Ctrl + T
Runs Disc Test.
Extract To ISO Image
File
Ctrl + E
Creates ISO 9660 Image File.
Examine Sectors
Ctrl + X
Activates Examine Disc Sectors dialog.
Scan UDF Disc
Ctrl + U
Runs Scan UDF Disc
Identify Raw ISO Data
Ctrl + R
Runs search and identification of ISO files, without
using a system and directories structures.
Scan FAT Data
Ctrl + D
Runs intensive search of files data on the flash
media
View Image
Ctrl + V
Acivates Image(s) Viewer
Activates the Search Window to search contents of
the inserted discs and also in the collection of
previously created Short CD/DVD Images.
A.2.4. Help Menu (shortcut : Alt + H)
Command
Shortcut
Description
Contents
F1
Ordering Information
-
Displays information about ordering CDRoller.
FAQs
-
Displays Frequently Asked Questions (FAQs) with
answers about CDRoller.
Technical Support
-
Displays information about technical assistance.
Home Page
-
Visits the CDRoller web page.
Opens the CDRoller online help.
Register
Enables you to register CDRoller.
Upgrade
Displays upgrade instructions.
About CDRoller
-
Displays copyright notice.
© 2003 - 2015 Digital Atlantic Corp.
Annex A Controls and dialog boxes.
54
A.3. The Toolbars.
A.3.1. Main ToolBar.
The buttons of the Main ToolBar duplicate the corresponding options in the File, View and Tools menu.
A.3.2. Secondary ToolBar.
Up One Level button returns focus to the parent item, usually to the parent folder (opens the folder of
the higher level) that contains current folder.
Select All selects all items (files, sub-folders or audio tracks) in the current folder.
Deselect All unselects all items (files, sub-folders or audio tracks) in the current folder.
Show/Hides files checkboxes shows/hides checkboxes near each file or folder.
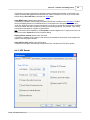
A.4. Preferences
A.4.1. Browser
© 2003 - 2015 Digital Atlantic Corp.
55
CDRoller - User's Manual
Hardware Access Method (default value is: CDRoller proprietary driver for Windows 9x/ME or
Windows NT native access for Windows NT4/2000/XP/2003/Vista/7/8/8.1/10). Sets one of two
methods to access hardware. The key feature of SPTD (SCSI Pass Through Direct) layer is an ability
to provide a direct access to your computer drives and avoid a conflict with "malicious" filter drivers
that can be installed by 3-rd party software. In other words, if you have another CD/DVD/BD related
programs in your system and CDRoller cannot recognize the inserted disc or data recovery seems to
be stalled, please select "SPTD interface" and try to read your disc again. Note. We do not distribute
SPTD layer with CDRoller. It is available for download at http://www.duplexsecure.com .
Set Exclusive Access (default value Uchecked).
If Checked, only CDRoller will have an access to the hardware (your computer drives) via SPTD layer.
Date Format (default value Short Form)
Sets the Date format used by the program to display the Date information.
Time Format (default value Short Form)
Sets the Time format used by the program to display the Time information.
Treat KByte as: (default value 1024 bytes)
Detects the way of 'kilobyte consideration' as 1024 bytes exactly (in 1024 bytes mode) or as 1000
bytes (in 1000 bytes mode). It may be useful for correct file (folders or audio tracks) size calculation,
before these items will be sent to hard disk.
Search of the lost data track (default value Checked)
If Checked , the program searches the lost data track when a new disc is inserted or after Refresh
command, and, if found, displays its contents in the List Window.
Detect disc insertion by Windows (default value Checked)
If Checked the program detects an arrival or removal of the disc using Windows "standard" tools
(messages). This starts disc recognition automatically, without requirement of the refresh. If the
program can not recognize your disc automatically, try to uncheck this option and repeat examination
of a new disc by clicking the Refresh button in the Tool Bar.
Read damaged sectors "as is" (default value Unchecked)
If Checked , when reading system area and folders, unreadable sectors will be accepted "as-is".
This may be useful in some circumstances, but it should be understood that the content of these
"accepted" sectors could be all zero or partially correct data – there is no way to tell. You should use
this mode only if the program can not "recognize" your damaged disc or you vitally need an access to
the unreadable folder. Please keep in mind that your computer drive may not support reading of disk
sector "as is" or the content of that sector may be denied by the further checks in compliance with ISO
9660 and UDF requirements.
Read only ISO 9660 data tracks (default value Unchecked)
If Checked, the program searches and verifies only ISO system area on data tracks after insertion of
new disc. Discs with another file system, such as UDF, require additional recovery procedures that
may take a some time, especially while reading multisession ones. If you are sure that your disc is
actually recorded in ISO 9660 format, you should check on this option in order to accelerate the disc
recognition. Obviously, to read the discs with UDF file system, this option has to be unchecked
Always use a drive capabilities (default value Checked)
If Checked, when reading the damaged sectors, the program will apply some low-level methods and
algorithms based on the capabilities of your computer drive. In some circumstances the drive can slow
the process when meeting a bad zones (unreadable sectors). In this case we recommend you to
uncheck this option.
Display deleted files and folders (default value Checked)
© 2003 - 2015 Digital Atlantic Corp.
Annex A Controls and dialog boxes.
56
If Checked, the program displays files and folders having deleted characteristics on UDF disks. The
objects are shown with special Inaccessible file icon in the List Window. You can try to recover them
with the help of Scan UDF Disc command from Tools Menu.
Apply MRW reader (default value Checked)
If Checked, the program automatically recognizes CD-RW disk formatted in the "Mt.Rainier" CD-RW
format (CD-MRW) placed into non-Mt.Rainier drive, and presents the data portion of the disk as a
"read only" UDF format disk. We also recommend you use this to read the disk inserted into CD-MRW
drive if your MRW disk was not ejected (closed by cd mastering program). For example, if the writing
process was interrupted by a system or power failure.
Hint. To check the drive capabilities, use Properties command applied to the "empty" drive in the List
window and select Features tab in the Properties dialog.
Display adviser window (default value Checked)
If Checked, a separate panel ("adviser") with some recommendations and results of disc analysis will
appear inside the program window.
Apply FAT32 reader (default value Unchecked)
If Checked, the program automatically recognizes the disc, formatted with FAT32 file system.
A.4.2. UDF Reader
© 2003 - 2015 Digital Atlantic Corp.
57
CDRoller - User's Manual
Lost objects (default value Files and folders)
Determines what objects (files and/or folders ) will be looked for by Scan UDF Disc.
Forced scan (default value Don't apply)
If the selected setting is different from the default value, the program will force the drive to scan your
disc in order to find the lost files without using the data of system area. We highly recommend you to
use this only if the inserted disk has not been recognized by CDRoller before, and you are also sure
the disk contains the files. This may be useful if the disk was incorrectly finalized and system area was
not written properly. For example, this problem often occures on Sony Mavica CD when the finalization
step failed on the camera.
If you actually know the name of CD/DVD/BD mastering program (or device) that formatted your disk,
try to select an appropriate value from the list of the following profiles:
Value
Description
Sony Mavica CD
The disk was mastered by Sony Mavica CD digital camera
Sony Mavica (O)
The disk is still open (non-finalized) by Sony Mavica CD digital
camera
DirectCD CD-R
CD-R was formatted by Roxio (Adaptec) DirectCD/Drag-To-Disc
v.6
DirectCD-RW74
CD-RW 74 min was formatted by Roxio (Adaptec) DirectCD
DirectCD-RW80
CD-RW 80 min was formatted by Roxio (Adaptec) DirectCD
InCD3
-RW74
CD-RW 74 min was formatted by Nero InCD v.3
InCD3
-RW80
CD-RW 80 min was formatted by Nero InCD v.3
PacketCD-R
CD-R was formatted by CEQUADRAT PacketCD
DirectCD-MRW
CD-MRW ("Mt. Rainier" CD-RW) was formatted by DirectCD
InCD3
CD-MRW ("Mt. Rainier" CD-RW) was formatted by Nero InCD v.3
-MRW
PacketCD-RW
CD-RW was formatted by CEQUADRAT PacketCD
InstWrite CD-RW
CD-RW was formatted by VOB InstantWrite
InCD4
CD-RW 80 min was formatted by Nero InCD v.4
-RW80
InCD4 -DVD-RW
DVD-RW was formatted by Nero InCD v.4
InCD4 -DVD+RW
DVD+RW was formatted by Nero InCD v.4
InCD4 -MRW
CD-MRW ("Mt. Rainier" CD-RW) was formatted by Nero InCD v.4
DragTo CD-RW
CD-RW was formatted by Roxio Drag-To-Disc v.6
DragTo CD-MRW
CD-MRW ("Mt. Rainier" CD-RW) was formatted by Roxio
Drag-To-Disc v.6
DragTo DVD-RW
DVD-RW was formatted by Roxio Drag-To-Disc v.6
DragTo DVD+RW
DVD+RW was formatted by Roxio Drag-To-Disc v.6
DragTo DVD-R
DVD-R was formatted by Roxio Drag-To-Disc v.6
DragTo DVD+R
DVD+R was formatted by Roxio Drag-To-Disc v.6
© 2003 - 2015 Digital Atlantic Corp.
Annex A Controls and dialog boxes.
58
LiteOn DVD+R
DVD+R was mastering by LiteOn DVD recorder
LiteOn DVD+R (O)
DVD+R is still open (non-finalized) by LiteOn DVD recorder
Hitachi DVD-R (F)
DVD-R was created and finalized by Hitachi DVD camcorder
Hitachi DVD-R (O)
DVD-R is still open (non-finalized) by Hitachi DVD camcorder
Hitachi DVD-RAM
DVD-RAM was mastering by Hitachi DVD camcorder
Rec DVD+RW (F)
DVD+RW was created and finalized by standalone DVD Recorder
(Thomson RCA, Philips, etc.)
Rec DVD+RW (O)
DVD+RW is still open (non-finalized) by standalone DVD
Recorder (Thomson RCA, Philips, etc.)
Rec DVD-RAM
DVD-RAM disc was mastering by standalone DVD recorder
Rec DVD-RAM (E)
DVD-RAM disc was quick-erased by standalone recorder (e.g
Panasonic DVD-RAM recorder)
Sanyo DVD+R (F)
DVD+R was created and finalized by Sanyo DVD+R/RW
standalone recorder
Sanyo DVD+R (O)
DVD+R is still open (non-finalized) by Sanyo DVD+R/RW
standalone recorder
Sony DVD-R (O)
DVD-R is still open (non-finalized) by SONY DVD Camcorder
Sony DVD-RW (O)
DVD-RW is still open (non-finalized) by SONY DVD Camcorder
Sony DVD201-RW
DVD-RW disc was created by Sony DCR-DVD201 camcorder
DragTo DVD-RAM
DVD-RAM disc (4.7GB) was formatted by Roxio Drag-To-Disc
B's CLiP DVD-RW
DVD-RW disc was formatted by BHA B's CLip Software
B's CLiP DVD+RW
DVD+RW disc was formatted by BHA B's CLip Software
Sony abCD CD-RW
CD-RW disc was formatted by Sony Vaio abCD software
Pan Rec DVD-R (O)
DVD-R disc is still open (non-finalized) by Panasonic standalone
recorder
InCD4.3 CD-RW
CD-RW was formatted by Nero InCD v.4.3 or 5
InCD4.3 CD-MRW
CD-MRW ("Mt. Rainier" CD-RW) was formatted by Nero
InCD v.4.3 or 5
InCD4.3 DVD-RAM
DVD-RAM was formatted by Nero InCD v.4.3 or 5
InCD4.3 DVD-RW
DVD-RW was formatted by Nero InCD v.4.3 or 5
InCD4.3 DVD+RW
DVD+RW was formatted by Nero InCD v.4.3 or 5
DragTo7 CD-R
CD-R was formatted by Roxio Drag-To-Disc v.7 (7.5 or 8)
DragTo7 CD-RW
CD-RW was formatted by Roxio Drag-To-Disc v.7 (7.5 or 8)
DragTo7 CD-MRW
CD-MRW ("Mt. Rainier" CD-RW) was formatted by Roxio
© 2003 - 2015 Digital Atlantic Corp.
59
CDRoller - User's Manual
Drag-To-Disc v.7 (7.5 or 8)
DragTo7 DVD-RW
DVD-RW was formatted by Roxio Drag-To-Disc v.7 (7.5 or 8)
DragTo7 DVD+RW
DVD+RW was formatted by Roxio Drag-To-Disc v.7 (7.5 or 8)
DragTo7 DVD+-R
DVD+R/-R was formatted by Roxio Drag-To-Disc v.7 (7.5, 8 or 9)
DragTo7 DVD-RAM
DVD-RAM disc (4.7GB) was formatted by Roxio Drag-To-Disc v.7
(7.5 or 8)
DLA CD-RW
CD-RW was formatted by Sonic DLA
DLA DVD-RW
DVD-RW (4.7 GB) was formatted by Sonic DLA
DLA DVD+RW
DVD+RW (4.7 GB) was formatted by Sonic DLA
AVCHD DVD-R
Mini DVD-R was created by Sony AVCHD camcorder
AVCHD DVD+R DL
Mini DVD+R DL was created by Sony AVCHD camcorder
AVCHD DVD-RW
Mini DVD-RW was created by Sony AVCHD camcorder
AVCHD DVD-RW(2)
Mini DVD-RW was created by Panasonic AVCHD camcorder
AVCHD DVD+RW
Mini DVD+RW was created by Sony AVCHD camcorder
InCD6 CD-RW
CD-RW was formatted by Nero InCD v.6
InCD6 CD-MRW
CD-MRW ("Mt. Rainier" CD-RW) was formatted by Nero InCD v.6
InCD6 DVD-RAM
DVD-RAM was formatted by Nero InCD v.6
InCD6 DVD-RW
DVD-RW was formatted by Nero InCD v.6
InCD6 DVD+RW
DVD+RW was formatted by Nero InCD v.6
InCD6 BD-R
BD-R was formatted by Nero InCD v.6
D2D CD-R
CD-R was formatted by Roxio Drag-To-Disc v.9
D2D CD-RW
CD-RW was formatted by Roxio Drag-To-Disc v.9
D2D CD-MRW
CD-MRW ("Mt. Rainier" CD-RW) was formatted by Roxio
Drag-To-Disc v.9
D2D DVD-RW
DVD-RW was formatted by Roxio Drag-To-Disc v.9
D2D DVD+RW
DVD+RW was formatted by Roxio Drag-To-Disc v.9
D2D DVD-RAM
DVD-RAM was formatted by Roxio Drag-To-Disc v.9
D2D BD-R
BD-R was formatted by Roxio Drag-To-Disc v.9
Win7 DVD-R
DVD-R / DVD+R was formatted by Windows 7
Win7 DVD-RW
DVD-RW was formatted by Windows 7
Win7 DVD+RW
DVD+RW was formatted by Windows 7
Win7 BD-R
BD-R was formatted by Windows 7
© 2003 - 2015 Digital Atlantic Corp.
Annex A Controls and dialog boxes.
Win7 BD-RE
60
BD-RE was formatted by Windows 7
Warning. Please use the forced scan at your own risk. There is no 100% guarantee to retrieve all files
from all disks in all cases. Please keep in mind, that some files may be incorrectly written, erased or
partially re-written by a new ones.
Unpack files after forced scan (default value Unchecked)
If Checked, the program will try to decode the files found by the forced scan on the disks compressed
by Roxio (Adaptec) DirectCD. The found files can be recovered with the help of Recover All, Recover
Selected or drag & drop commands in the "Lost objects detected..." window.
Load Table Of Contents from file (default value Unchecked)
If Checked, you are prompted to select a file with the table of contents of the objects found by Scan
UDF Disc before, instead of new scan of your disk.
Always try to identify file type (default value Checked)
If Checked, the program will try to identify the types of found files at the scan stage (preliminary
identification). On some discs and drives this may slow the scan process.
Restore file tree (default value Checked)
If Checked, the program tries to restore an original file tree from each found folder after "Scan UDF
Disc" is completed or canceled. Note. For the damaged discs, we recommend to run the "Scan UDF
Disc" twice, with checked and unchecked option.
Apply DVD Reader (default value Checked)
If Checked, the program will try to recognize and verify DVD (BD, HD-DVD) automatically. If
Unchecked, only CD identification methods will be applied.
Search of all VATs (default value Unchecked)
Virtual Allocation Table (VAT) is an important part of the UDF File System. VAT's location is crucial for
CD-R/DVD-R/DVD+R/DVD+R DL disks created with the help of drag & drop software, such as
well-known Roxio (Adaptec) DirectCD and Drag-To-Disc. If the VAT can not be found or is corrupted,
files will be missing.
If the option is Checked, the program will try to search all VATs. This may give you a chance to find
and recover the files from the previous backups, including the files accidently deleted by drag & drop
software. If some old VATs are found, the program displayes their files and folders in a separate
sessions. Further, all sessions can be viewed by the built-in Session Selector.
Always check file integrity (default value Checked)
When Checked the program always test the file before decompression, using the data of file header. If
an important file data seem to not be recovered, try to uncheck this option. Please keep in mind that
you may get an unpredictable results, so try this only at your own risk.
Always read Full TOC (default value Checked)
Try to uncheck this box if CDRoller seems to hang up your system when analyzing the disc. This
problem can be caused by DVD43 driver installed in your system. This driver is bundled with some
DVD programs (DVD Idle Pro or DVD Region), and can prevent a normal work of CDRoller.
© 2003 - 2015 Digital Atlantic Corp.
61
CDRoller - User's Manual
A.4.3. ISO Reader
Read Path Table (default value Little Endian (Intel))
By default, the program does use the Path Table because this is the most fast method to access the
directories on your ISO 9660 disc. CDRoller uses the Big Endian addresses by default, because
Windows doesn't use them, so CDRoller offers an alternative method at once, if your disc is not visible
by Windows. However, for a particular disc, if the default settings doesn't work properly, you can try
another settings. For example, if the Path Table seems to be invalid, you can select Don't use path
table. This will force CDRoller to start from the Root directory and scan all directories on the "troubled"
disc.
Apply forced scan if Path Table is invalid (default value Checked)
If Checked, the program will automatically scan the directories in case of inaccessible Path Table.
Ignore Joliet file system (use only ISO 9660) (default value Unchecked)
If Checked, any Joliet directory information on the disc will be ignored and only the ISO-9660 directory
will be displayed. This may be useful if the Joliet directory information is corrupted and files seem to be
inaccessible on the disc. With the help of ISO-9660 directories you can try to access the files data,
bypassing the Joliet file system.
© 2003 - 2015 Digital Atlantic Corp.
Annex A Controls and dialog boxes.
62
A.4.4. CD/DVD Library
Apply To CD/DVD Images, group of options :
- "Open" (default value Checked);
- "Send" (default value Checked);
When Checked the program tries to apply an appropriate command to the created CD(DVD) image.
File Name (default value by Volume Name)
The File Name can be created either by choosing the Disk Volume Name (by Volume Name mode) or
summarizing the word 'CDIM' with four random digits (Random mode) or typing CD(DVD) Image
name manually (Manual mode).
When a new disc is inserted (default value Unhecked)
When Checked the program creates CD/DVD Image for a newly inserted disc.
Use image file to manage disc sectors (default value Unhecked)
If Checked, the program will create and then use an own image file to manage the disc data. Here,
image file means a combination of .tbl and .dat files having the same name before file extension.
There are 2 big advantages of image file. First, some CD and DVDs can be "poor-written". Often, one
CD/DVD drive can read only a part of such disc. If another CD/DVD drive can access to the bad
sectors, CDRoller simply adds a new data to the image file created before. In other words, you get the
best out of each and every drive you use. Second, if you intend to read the disc twice, you get much
greater speed, having the image on your hard drive. Especially, when there are bad sectors on CD or
© 2003 - 2015 Digital Atlantic Corp.
63
CDRoller - User's Manual
DVD.
When you insert the disc, you are prompted to type image file name that will be associated with this
disc. We recommend to use friendly and unique name that simply tells about content of inserted disc.
For example, 'My photo album 2010' or 'My trip to Canada in 2010'. Further, the program will create .tbl
and .dat files and use them to manage disc data.
Use external hex editor to examine sectors (default value Unhecked)
When Checked, you can use an external hex editor to examine disc sectors. For example, WinHex,
FlexHex, Hex Workshop, HxD or others.
Directory for CD/DVD Images (My Documents directory path by default)
Assigns the directory on your Hard Disk Drive (HDD) to store the created CD/DVD Images.
Directory for Temporary Storage (default value Windows Temporary Directory)
Assigns the directory on your HDD to be used as Temporary Storage for drag-and-drop and Open
operations.
Warning. Please do not select "Directory for Temporary Storage" as destination folder for Recover
All and Recover Selected operations. When you close CDRoller, the program automatically cleans
out this temporary folder, and all recovered files and subfolders will be lost!
A.4.5. Audio Extraction
© 2003 - 2015 Digital Atlantic Corp.
Annex A Controls and dialog boxes.
64
DAE Method (default value Dynamic Sync Width)
With the help of Dynamic Sync Width method, the program tries to synchronize a new audio data with
previously read block of audio sectors by changing overlap area between two consecutive read
blocks. Fixed Sync Width means that a set amount of frames is used for blocks synchronization.
Read error detection and lost synchronization control are in the both methods. The audio extraction by
Burst Copying method is the fastest. Burst copy doesn't use any synchronization and error correction.
Read Command (default value AUTODETECT)
If AUTODETECT (recommended setting) option has been selected, the program tries itself to find an
appropriate read algorithm for user's CD drive.
SCSI READ CD function is the base command recommended by SCSI-3 Standard for reading audio
frames. It is supported by all ATAPI drives that have DAE feature, and some SCSI devices.
SCSI READ (10) function may be used for DAE on SCSI drives support SCSI-2 Standard.
Note. The list of audio read commands used by program in AUTODETECT mode is not limited by two
ones mentioned above. Some known read functions are absent in the selection list because a wrong
chosen extraction command may cause problems on some SCSI systems.
Swap Channels (default value Unchecked)
When checked, the program itself will exchange left and right channels in the audio samples before
writing them into output file. This may be suitable for some CD drives to exchange stereo channels
while extraction.
"Big Endian" (default value Unchecked)
Motorola " Big Endian" mode is often used on drives from Grundig, IMS, Kodak, Ricoh and some
others. WARNING. Check this option only if the extracted output file seems to consist of noise!
Wave Format (default value 44,100 Hz; 16 Bit; Stereo)
Indicates a brief description of audio compression format that has been selected.
Select Encoder (default value Internal WAV)
Assigns an appropriate encoder from the list of available ones.
File extension (default value .wav)
Indicates the extension of output file (.wav, .mp3 or .raw).
Options
Activates an options dialog box to select an audio compression format.
High Quality (default value Unchecked)
For some audio compression formats, specifying this flag may improve the audio quality or other
characteristics.
© 2003 - 2015 Digital Atlantic Corp.
65
CDRoller - User's Manual
A.4.6. Disc Test
File System Test group.
Show the details of "import" file (default value Checked)
For multisession discs only. When Checked, a report window displays some info whether a file was
imported from the prior session ("came from session # ..."), or not.
Include to Disc Test (default value Checked)
When Checked File System Test will be included to the list of available tests.
Check on the disc (default value All available sessions)
If All available sessions option has been selected the program checks file systems of all sessions on
multisession disc. In case of Selected session only the selected session is examined.
Note. There is no difference between these two settings for single session disc.
Disc Surface Test group.
Scan ratio Track Bar (default position 20 to 2000 sectors)
Sets the current ratio of read sectors to total sectors in the block. For example, "20 to 2000 sectors"
setting means that the program reads 20 sectors in the block of 2000 sectors and therefore, then skips
(2000 - 20) sectors before the next reading. This setting is used for Disc Surface Test and also for
DAE Quality test.
Include to Disc Test (default value Unchecked)
When Checked Disc Surface Test is included to the list of available tests. For mixed CDs it means that
as Disc Surface Test as DAE Quality test will be included to the list of available tests.
Check on the disc (default value All available sessions)
If All available sessions option has been selected the program scans disc surface on all sessions. In
case of Selected session only the selected session is examined on multisession disc.
© 2003 - 2015 Digital Atlantic Corp.
Annex A Controls and dialog boxes.
66
Note. There is no difference between these two settings for single session disc.
Audio Read Overlap (default and minimum values are 0, maximum value is 7)
Sets the number of overlapping sectors for DAE Quality test. This may be useful to determine the
value of overlap for so-called "jitter correction" while reading CD audio data.
A 4.7. FAT & NTFS
Check if the deleted file is in use (default value Checked)
If Checked, the program always tests whether each cluster of deleted file is "in use" or not. In other
words, CDRoller tries to test an integrity of the deleted file. If any of the clusters of a deleted file are "in
use", this can indicate that the cluster was reassigned to another file and part of the deleted file was
overwritten by another.
There are many scenarios of cluster allocations and how files may be overwritten by another files. If
you're looking for the data of big video file, it may be useful to try to find the file with unchecked option.
Having assumed the most part of file is located in the sequential clusters, a loss of small number of
clusters may not affect the functionality of all file.
Display deleted files and folders (default value Checked)
If Checked, the program displays found objects in the special $LOST FILES$ folder.
© 2003 - 2015 Digital Atlantic Corp.
67
CDRoller - User's Manual
Enable NTFS Deep Scan (default value Unchecked)
If Checked, the program scans unused clusters, trying to locate the lost files based only on file
signatures, ignoring the file system records.
Directory for Temporary Storage (default value: Windows Temporary Directory)
Assigns the directory as Temporary Storage for some operations.
Warning.
Please do not select "Directory for Temporary Storage" as destination folder for Recover All and
Recover Selected operations. When you close CDRoller, the program automatically cleans out this
temporary folder, and all recovered files and subfolders will be lost!
© 2003 - 2015 Digital Atlantic Corp.
Annex B License Agreement
68
Annex B License Agreement
CDRoller - End User License Agreement (EULA).
YOU SHOULD CAREFULLY READ THE FOLLOWING LEGAL AGREEMENT. USE OF THE
SOFTWARE PROVIDED WITH THIS AGREEMENT (THE "SOFTWARE") CONSTITUTES YOUR
ACCEPTANCE OF THESE TERMS. IF YOU DO NOT AGREE TO THE TERMS OF THIS
AGREEMENT, DO NOT INSTALL AND/OR USE THIS SOFTWARE. USER'S USE OF THIS
SOFTWARE IS CONDITIONED UPON COMPLIANCE BY USER WITH THE TERMS OF THIS
AGREEMENT.
1. LICENSE GRANT.
Digital Atlantic Corp. grants you a license to use the SOFTWARE on an unlimited number of
computers provided that you are the only individual using the SOFTWARE and only one copy of the
SOFTWARE is in use at any one time. If you are an entity, Digital Atlantic Corp. grants you the right to
designate one individual within your organization ("Named User") to have the right to use the
SOFTWARE in the manner provided above. If you have registered multiple copies (#), the organisation
/ entity may designate # number of individuals within the organization ("Named Users") to have the
right to use the SOFTWARE in the manner provided above. "Use" means storing, loading, installing,
executing or displaying the SOFTWARE. You may not modify the SOFTWARE or disable any
licensing or control features of the SOFTWARE except as an intended part of the SOFTWARE's
programming features. When you first obtain a copy of the SOFTWARE, you are granted an
evaluation period of not more than 14 days, after which time you must pay for the SOFTWARE
according to the terms and prices discussed in the SOFTWARE's documentation, or you must remove
the SOFTWARE from your computer. This license is not transferable to another company, entity, or
individual.
2. OWNERSHIP.
The SOFTWARE is owned and copyrighted by Digital Atlantic Corp. Your license confers no title or
ownership in the SOFTWARE and should not be construed as a sale of any right in the SOFTWARE.
3. COPYRIGHT.
The SOFTWARE is protected by United States copyright law and international treaty provisions. You
acknowledge that no title to the intellectual property in the SOFTWARE is transferred to you. You
further acknowledge that title and full ownership rights to the SOFTWARE will remain the exclusive
property of Digital Atlantic Corp. and you will not acquire any rights to the SOFTWARE except as
expressly set forth in this license. You agree that any copies of the SOFTWARE will contain the same
proprietary notices which appear on and in the SOFTWARE.
4. UNAUTHORIZED USE.
You may not use, copy, rent, lease, sell, modify, decompile, disassemble, otherwise reverse engineer,
or transfer the SOFTWARE except as provided in this agreement. Any such unauthorized use shall
result in immediate and automatic termination of this license.
5. DISTRIBUTION.
Permission to distribute the SOFTWARE is not transferable, assignable, saleable, or franchisable.
Each entity wishing to distribute the package must independently satisfy the terms of the distribution
license. All distribution of SOFTWARE is further restricted with regard to sources which also distribute
virus source code and related virus construction/creation materials. The SOFTWARE may not be
made available on any site, CD-ROM, or with any package which makes available or contains viruses,
virus source code, virus construction programs, or virus creation material.
6. WARRANTY.
THIS SOFTWARE IS PROVIDED ON AN "AS IS" BASIS. DIGITAL ATLANTIC CORP. DISCLAIMS
ALL WARRANTIES RELATING TO THIS SOFTWARE, WHETHER EXPRESSED OR IMPLIED,
INCLUDING BUT NOT LIMITED TO ANY IMPLIED WARRANTIES OF MERCHANTABILITY OR
© 2003 - 2015 Digital Atlantic Corp.
69
CDRoller - User's Manual
FITNESS FOR A PARTICULAR PURPOSE. NEITHER DIGITAL ATLANTIC CORP. NOR ANYONE
ELSE WHO HAS BEEN INVOLVED IN THE CREATION, PRODUCTION, OR DELIVERY OF THIS
SOFTWARE SHALL BE LIABLE FOR ANY INDIRECT, CONSEQUENTIAL, OR INCIDENTAL
DAMAGES ARISING OUT OF THE USE OR INABILITY TO USE SUCH SOFTWARE, EVEN IF
DIGITAL ATLANTIC CORP. HAS BEEN ADVISED OF THE POSSIBILITY OF SUCH DAMAGES OR
CLAIMS. THE PERSON USING THE SOFTWARE BEARS ALL RISK AS TO THE QUALITY AND
PERFORMANCE OF THE SOFTWARE. SOME JURISDICTIONS DO NOT ALLOW LIMITATION OR
EXCLUSION OF INCIDENTAL OR CONSEQUENTIAL DAMAGES, SO THE ABOVE LIMITATIONS
OR EXCLUSION MAY NOT APPLY TO YOU TO THE EXTENT THAT LIABILITY IS BY LAW
INCAPABLE OF EXCLUSION OR RESTRICTION.IN NO EVENT SHALL ANY THEORY OF
LIABILITY EXCEED THE LICENSE FEE PAID TO DIGITAL ATLANTIC CORP.
7. SEVERABILITY.
In the event of invalidity of any provision of this license, the parties agree that such invalidity shall not
affect the validity of the remaining portions of this license.
8. LIABILITY.
NO LIABILITY FOR CONSEQUENTIAL DAMAGES. IN NO EVENT SHALL DIGITAL ATLANTIC
CORP. OR ITS SUPPLIERS BE LIABLE TO YOU FOR ANY CONSEQUENTIAL, SPECIAL,
INCIDENTAL OR INDIRECT DAMAGES OF ANY KIND ARISING OUT OF THE DELIVERY,
PERFORMANCE OR USE OF THE SOFTWARE, EVEN IF DIGITAL ATLANTIC CORP. HAS BEEN
ADVISED OF THE POSSIBILITY OF SUCH DAMAGES. IN NO EVENT WILL DIGITAL ATLANTIC
CORP.'S LIABILITY FOR ANY CLAIM, WHETHER IN CONTRACT, TORT OR ANY OTHER THEORY
OF LIABILITY, EXCEED THE LICENSE FEE PAID BY YOU,IF ANY.
9. INSPECTION AND TESTING.
You agree and acknowledge that you will thoroughly inspect and test the SOFTWARE for all of your
purposes upon commencement of your use. Any suit or other legal action, claim or any arbitration
relating in any way to this agreement or software covered by it must be officially filed or officially
commenced no later than Three months (90 days) after your first use of the SOFTWARE.
10. ENTIRE AGREEMENT.
This is the entire agreement between you and Digital Atlantic Corp. which supersedes any prior
agreement or understanding, whether written or oral, relating to the subject matter of this license.
11. RESERVED RIGHTS. All rights not expressly granted here are reserved to Digital Atlantic Corp.
© 2003 - 2015 Digital Atlantic Corp.