1
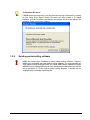
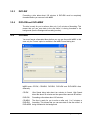
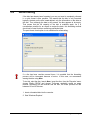
User Manual
Ahead Software AG
Information on copyright and trade marks
The InCD user manual and all its contents are protected by copyright and are the
property of Ahead Software. All rights reserved. This user manual contains
material that is protected by internationally valid copyright. This manual may not in whole or in part - be copied, transmitted or otherwise reproduced without the
express written permission of Ahead Software AG.
Ahead Software rejects any claims that transcend the legal guarantee rights.
Ahead Software AG does not undertake any liability for the correctness of the
content of the InCD user manual. The contents of the software supplied, as well
as of the InCD user manual, may be changed without prior warning.
The trademarks mentioned here are only listed for information purposes. All trade
names and trademarks are the property of the respective owners.
The "Mount Rainier" and "EasyWrite Reader" trademarks are properties of the
Mount Rainier Group.
Be aware that some early versions of InCD 4 do not include all of the features
presented herein. Check on www.nero.com for the latest version.
Copyright © 2003 Ahead Software AG
REV 1.3
Contents
1
2
3
InCD
About InCD......................................................................................... 5
1.1
Information on InCD......................................................................... 5
1.2
1.2.1
1.2.2
1.2.3
1.2.4
Hints on working with InCD............................................................. 5
Operating systems ............................................................................. 5
Existing packet writing software ......................................................... 6
CD-MRW / DVD+MRW (Mount Rainier) ............................................ 7
UDF reader driver............................................................................... 8
Installation ......................................................................................... 9
2.1
Introduction ...................................................................................... 9
2.2
Installing InCD .................................................................................. 9
2.3
Uninstalling InCD ........................................................................... 10
Working with InCD........................................................................... 11
3.1
Starting InCD .................................................................................. 11
3.2
3.2.1
3.2.2
3.2.3
3.2.4
Discs supported by InCD............................................................... 12
CD-RW ............................................................................................. 12
CD-MRW .......................................................................................... 12
DVD-RW .......................................................................................... 13
DVD+RW and DVD+MRW ............................................................... 13
3.3
3.3.1
Format ............................................................................................. 13
Background formatting ..................................................................... 15
3.4
Reformatting ................................................................................... 16
3.5
3.5.1
3.5.2
3.5.3
Ejecting a disc ................................................................................ 18
Ejecting CD-RW and DVD-RW discs ............................................... 18
Ejecting a CD-MRW, DVD+RW and DVD+MRW............................. 18
Loading a disc .................................................................................. 18
3.6
Copying data to a disc formatted by InCD................................... 19
3.7
Erasing Discs ................................................................................. 21
Contents • 3
4
5
InCD
Commands....................................................................................... 22
4.1
Context menu ................................................................................. 22
4.2
About ............................................................................................... 22
4.3
Help ................................................................................................. 22
4.4
Options............................................................................................ 23
4.5
Drive properties.............................................................................. 24
4.6
Format InCD.................................................................................... 25
4.7
Erase InCD ...................................................................................... 25
4.8
Eject................................................................................................. 26
Index ................................................................................................. 27
Contents • 4
1
1.1
About InCD
Information on InCD
InCD is a program which formats rewritable discs (CD-RW, DVD+RW and DVDRW) in such a way that they can be used like hard disks or floppy disks. This
means that you can save, copy or delete files from any application onto the disc.
InCD uses only rewritable discs (CD-RW, DVD+RW, DVD-RW). Discs which can
only be written on once (CD-R, DVD+R or DVD-R) cannot be used with InCD.
1.2
Hints on working with InCD
1.2.1
Operating systems
The system requirements for InCD are as follows:
Hardware
CD/DVD-Rewritable compatible recorder (MMC Compliant, Multiread RW Recorder)
Software
Windows 95 (Version B / Service Release 2 onwards) with the
DCOM95 update (available if you install Internet Explorer 4.0)
Windows 98
Windows Me
Windows NT 4.0 with IE 4.0
Windows 2000
Windows XP
Windows Server 2003
Disc type
Rewritable disc (CD-RW, DVD+RW, DVD-RW)
Note for users of Windows 95/98/Me!
InCD is not compatible with the 'Adaptec CD-Burning Plug-in', which is installed
as part of Windows Media Player 7.x. Please uninstall the plug-in using
'Add/Remove Programs' from the Windows Control Panel.
InCD
About InCD • 5
To Windows XP users!
If InCD causes a serious error, you can send the error log to Microsoft by clicking
on the ‘Send Error Report’ button. Microsoft will then forward it to Ahead
Software, so that our software developers can analyze the error and improve the
software. Thank you for your support!
1.2.2
Existing packet writing software
InCD can handle discs formatted by other packet writing software. However,
InCD is not compatible with other packet writing software. You must uninstall any
other packet writing packages before you install InCD. Before installation begins,
InCD will check the applications that have already been installed and will exit the
set-up procedure if it finds another packet writing program. A window will be
displayed with a message explaining this.
InCD
About InCD • 6
1.2.3
CD-MRW / DVD+MRW (Mount Rainier)
To format discs in the so-called MRW (Mount Rainier) format using InCD, you
must check the corresponding check box (if InCD detects a recorder supporting
MRW, then this option is enabled by default). The RW disc will then become a
MRW disc once the format is complete. The check box is located in the InCD
Options dialog box for overall control, and in the drive properties InCD tab for
drive control. In either case, this option can only be modified if your recorder
supports this function. There is more information on this in the 'Options' and
‘Drive properties’ sections.
Unlike CD-RW and DVD-RW discs, MRW discs can be written on after only about
one minute of formatting. This does not mean that the MRW is fully formatted
after two minutes, but simply that it is formatted sufficiently for you to be able to
copy data on it. The remainder of the formatting will continue in the background.
Mount Rainier is also known as ‘EasyWrite’. You can find more information on
Mount Rainier at http://www.mt-rainier.org.
You can only write data in MRW format with drives that support this format. You
must also ensure that the 'MRW Format on all MRW capable drives' checkbox is
checked.
Drives that do not support Mt. Rainier can only read these discs with a Remapper
(see the 'Remapper' section).
Most drives supporting Mount Rainier feature the EasyWrite logo:
The EasyWrite logo is a registered trademark owned by Philips.
InCD
About InCD • 7
1.2.3.1
Disc type
CD-MRW discs are standard CD-RW discs formatted as MRW on a recorder
supporting Mt. Rainier and DVD+MRW discs are standard DVD+RW discs, again
formatted as MRW on a recorder that supports Mt. Rainier.
1.2.3.2
Remapper
In order to be able to read discs in Mount Rainier format on drives that do not
support this format (CD-MRW/DVD+MRW), you need a so-called remapper (the
‘EasyWrite Reader’). This is not installed as part of the InCD installation
process, so you will need to install it separately. Depending on the operating
system, you may also have to install InCD.
You can find the information you need in the following table:
You need the remapper in order to be able to read CDWindows 95
MRW/DVD+MRW. You can download the remapper free
Windows 98
Windows Me
of charge from http://www.nero.com.
Windows 2000
Windows XP
Windows Server 2003
Windows NT
You cannot read CD-MRW/DVD+MRW using only the
remapper. For this operating system you must install
InCD as well as the remapper.
The remapper will not allow you write MRW discs. Only MRW-write compliant
recorders can write MRW discs.
1.2.4
UDF reader driver
On a PC running Windows 95B or Windows 98 or Windows ME and on which
InCD is not installed, in order to be able to read a disc formatted using InCD, you
need a UDF reader driver. This driver is part of the above EasyWrite Reader.
You can download it free of charge from Ahead Software AG's web site at
www.nero.com.
Note for users of Windows NT4:
The current version of the UDF driver does not support Windows NT4. If you are
running NT4, you must install InCD instead of the UDF driver.
InCD
About InCD • 8
2
2.1
Installation
Introduction
InCD comes in several installation packages.
CD-ROM multi-installer. It pops up when you insert the Nero CD-ROM in your
drive and if the auto-insert notification is enabled on your system.
CD-ROM standalone installer. You can install InCD bypassing the multiinstaller by directly launching the InCD installer that can be found on the CDROM.
Internet standalone installer. You can download its Web installer, but if you
want to install InCD you must have a registered version of either Nero
Burning ROM or Nero Express.
2.2
Installing InCD
To install the software on Windows NT 4.0, Windows 2000, Windows XP Pro or
Windows Server 2003, you must have administrator rights.
1. Close all the Windows applications you do not need and close any anti-virus
software that may be running.
2. Put the CD with InCD on it into the CD or DVD drive or download InCD’s Web
installer (for instance from www.nero.com).
3. Start the installation
CD-ROM Multi installer - Click on the InCD area of the start window.
CD-ROM standalone installer – browse your CD-ROM and open a folder
called ‘InCD’ if the CD-ROM is a Nero 5.5 CD-ROM (or ‘InCD4’ if you have
a Nero 6 CD-ROM). Double-click to launch the ‘Setup.exe’ file, which is
located in this folder.
Internet standalone installer – launch the downloaded file.
4. Click on the 'Next' button to install the software.
If an earlier version of InCD 4 has already been installed, you can update it by
clicking on the 'Next' button.
InCD
Installation • 9
You cannot update from InCD 3.x to InCD 4. You will first have to uninstall InCD
3.x before installing InCD 4.
5. Read the license terms and conditions carefully and then choose the option ‘I
accept the terms in the preceding license agreement’, if you agree to the
terms of the agreement and then click on the 'Next' button.
You cannot install InCD unless you agree to the license terms.
6. Enter your user name in the 'User name' field. If InCD is installed on a
company computer, you must also enter the company name in the 'Company
name' field. As the 'Company name' field is obligatory, you must enter data in
this field. We recommend that private users repeat their user name in this
field. The default installation folder is 'C:\Program Files\Ahead\InCD'. You can
change this folder by clicking on the 'Change' button and entering the folder of
your choice. When all the details are correct, click on the 'Next' button.
7. You must restart your computer before you can use InCD.
Click on the 'Restart' button to restart your computer.
If you click on the 'Exit' button, the installation program will be closed. You
cannot use InCD until you have restarted your computer.
2.3
Uninstalling InCD
The uninstall window varies depending on the operating system.
1. Choose START > SETTINGS > CONTROL PANEL > ADD/REMOVE
PROGRAMS.
2. Select 'Ahead InCD' and click on the appropriate button. InCD will be
uninstalled immediately without further prompting and all installed drivers will
be deleted.
3. You will be prompted to reboot. It is advised that you do so since the drivers
might still be active (e.g. if you have an InCD formatted disc in your recorder).
Click on the ‘Restart’ button.
InCD
Installation • 10
3
3.1
Working with InCD
Starting InCD
When you start your computer, InCD starts automatically. There is no link to
InCD in the Programs folder.
The InCD icon appears in the system tray, which is usually in the bottom righthand corner of the screen. The InCD icon shows information on the CD currently
in the drive, or about the drive itself. This information will only be shown for a few
seconds when the status changes. Then the icon will change back to the normal
icon. Please refer to the FAQs (in the InCD installation folder) for more details.
InCD mounted the disc in the DVD/CD-RW drive.
InCD recognized the disc in the DVD/CD-RW drive, but could not mount
it.
InCD mounted the disc in the DVD/CD-RW drive, but access to the disc
is read-only.
InCD did not detect a disc in the drive.
InCD
Working with InCD • 11
3.2
Discs supported by InCD
3.2.1
CD-RW
Ultra-speed discs take about ten minutes to be formatted. High-speed discs take
about 20 minutes and low-speed discs around 40 minutes. A CD-RW must be
completely formatted before you can use it with InCD.
Here are the different CD-RW media speeds available at the time this manual is
written.
Low speed
1-4x
Sometimes referred to as ‘normal speed’ or ‘multi-speed’.
Can be burnt in any RW recorder.
High Speed
4-10x, 4-12x
Can be burnt in High Speed, Ultra Speed and Ultra
Speed+ drives. High Speed CD-RW and High Speed
capable drives feature the High Speed logo.
Ultra Speed
16-24x
Can be burnt only in Ultra Speed or Ultra Speed+ capable
drives. The Ultra Speed drives and discs feature the Ultra
Speed logo.
Ultra Speed+
32x
Can be burnt only on Ultra Speed+ drives. The Ultra
Speed+ drives and discs feature the Ultra Speed+ logo.
The logos shown here are owned by Philips.
3.2.2
CD-MRW
The disc is ready for you to write on after only 1 to 2 minutes of formatting. This
means that you can save data to the disc while it is being formatted in the
background (see the 'Background formatting' section).
As for CD-RW, the same restrictions concerning disc speed and recorder speed
compatibility apply.
InCD
Working with InCD • 12
3.2.3
DVD-RW
Formatting a disc takes about 120 minutes. A DVD-RW must be completely
formatted before you can use it with InCD.
3.2.4
DVD+RW and DVD+MRW
The disc is ready for you to write on after only 1 to 2 minutes of formatting. This
means that you can save data to the disc while it is being formatted in the
background (see the 'Background formatting' section).
3.3
Format
You must format unformatted discs before you can use them with InCD. In this
case only the 'Format' option is available in the InCD 'Format' dialog box.
InCD treats CD-RW, CD-MRW, DVD-RW, DVD+RW and DVD+MRW discs
differently.
CD-RW
Ultra Speed discs take about ten minutes to format. High Speed
discs take about 20 minutes and low-speed discs around 40 minutes.
DVD-RW
Formatting a disc takes about 120 minutes.
CD-MRW
The disc is ready for you to write on after only 1 to 2 minutes of
formatting. This means that you can save data to the disc while it is
DVD+RW
DVD+MRW being formatted in the background.
InCD
Working with InCD • 13
You cannot run any other commands on the same disc during the formatting
process. Nevertheless, if you have several recorders, you can process each
inserted disc independently (e.g. if you have two recorders, you can format two
discs at the same time, or format one while the other is being written on or
erased)
1. Insert a disc into the recorder.
2. Start 'Windows Explorer'.
3. Right-click with the mouse on the recorder’s drive icon and select the 'InCD
Format' command from the menu.
This opens the formatting dialog, which automatically uses the recorder you
have selected.
4. If you want, you can enter a name for the disc. This name can have a
maximum of 11 characters (blank spaces are not allowed).
5. You can check the disc after complete reformatting. In this case activate check
the ‘Verify after format’ checkbox. Time varies according to disc size.
6. Click on the 'Start' button to start the formatting process.
InCD
Working with InCD • 14
7. You will see a format completion notice if you checked this option in the
general options that are accessible via the system tray icon or the ‘Options’
button in the Format and Erase dialogs.
3.3.1
Background formatting
The formatting process is done by the drive itself while it is idle (i.e. not used for
reading or writing). The background format will be interrupted if you try to access
the disc (to read it, to write on it or to eject it) and will be resumed once the drive
is idle again and contains the aforesaid disc. This also applies if you shut down
your PC during background formatting.
InCD
Working with InCD • 15
3.4
Reformatting
If the disc has already been formatted, you may not need to completely reformat
it, a quick format is also possible. This means that the disc is only formatted
logically: the data on the disc is not deleted, only the information on the data on
the disc. Thus, although the data is still present, the disc appears to be empty.
That means that the full capacity of the disc is available again. As it is
nevertheless possible for an expert to restore the data, this formatting method
should not be used for discs containing confidential data.
The post-format check option is not available after reformatting.
If a disc has been rewritten several times, it is possible that the formatting
process will be interrupted because of errors. In this case, we recommend
erasing the disc using Nero.
To do this, eject the disc, launch Nero, insert the disc, from the 'Recorder' menu
choose 'Erase CD-RW' and choose 'Full-erase rewritable media' as erase
method. Depending on the recorder and the disc, the erase process will last
between 10 and 20 minutes.
1. Insert a formatted disc into the recorder.
2. Start 'Windows Explorer'.
InCD
Working with InCD • 16
3. Right-click on the recorder’s drive icon and select the 'InCD Format’ command
from the menu.
The formatting dialog opens and automatically uses the drive you selected.
4. If you want to, you can enter a name for the disc. The name can have a
maximum of 11 characters (blank spaces are not allowed).
5. Click on the 'Start' button to start the formatting process.
6. You will see a format completion notice if you checked this option in the
general options available via the system tray icon or the ‘Options’ button in the
Format and Erase dialogs.
InCD
Working with InCD • 17
3.5
Ejecting a disc
InCD treats CD-RW/DVD-RW, CD-MRW, DVD+RW and DVD+MRW discs
differently. Please refer to the appropriate section below.
3.5.1
Ejecting CD-RW and DVD-RW discs
You can eject a formatted CD-RW/DVD-RW by using the 'Eject' command in the
right click drive contextual menu (see ‘Context menu’ section), by pressing the
eject button on the recorder or by clicking the ‘Eject’ button in the ‘Format’ or
‘Erase’ InCD dialog windows.
1. Use a method of ejection.
2. Take the disc out of the recorder and close the tray.
You can close the tray using the ‘Load’ command (described in the ‘Loading a
disc’ section).
3.5.2
Ejecting a CD-MRW, DVD+RW and DVD+MRW
You can eject a CD-MRW, a DVD+RW or DVD+MRW that is not yet fully
formatted by using the 'Eject' command in the right click drive contextual menu
(see ‘Context menu' section), by pressing the eject button on the recorder or by
clicking the ‘Eject’ button in the ‘Format’ or ‘Erase’ InCD dialog windows.
1. Use a method of ejection. If background formatting is still in progress, it needs
to be suspended and a dialog will then appear telling you that this process will
take one to two minutes.
2. Take the disc out of the recorder and close the tray.
3.5.3
Loading a disc
When a disc is ejected and the recorder’s door is still open, the InCD ejection
commands are changed from 'Eject' to 'Load'. The effect of choosing this action
will be the recorder’s tray to close.
This feature might not be supported by your recorder. This depends mainly on
whether the recorder has a motorized tray or not.
InCD
Working with InCD • 18
The following items are then changed: the 'Eject' command in the drive’s rightclick contextual menu,
and the 'Eject' button located in the 'Erase’ and in the 'Format' dialog windows of
InCD.
3.6
Copying data to a disc formatted by InCD
You can use a disc formatted by InCD in the same way as a hard disk or floppy
disk. This means that you can copy data onto the disk simply by using drag and
drop or retrieve documents stored by other applications.
1. Insert a formatted disk into the recorder.
2. Open Windows Explorer, select the data you want to copy and drag and drop
it onto the recorder's drive icon or retrieve the documents from the other
applications. When saving documents, you can also select the recorder’s drive
as any other drive.
InCD
Working with InCD • 19
If a writable formatted disk is inserted in a recorder, you can send data to it using
the ‘Send to’ command of the contextual right-click menu. For more information
on this command, please consult the documentation of your operating system.
InCD
Working with InCD • 20
3.7
Erasing Discs
Erasing a rewritable disc is not like deleting data from a floppy disk or a hard disk.
Erasing a disc also removes the formatting, leaving the disc completely blank.
After being erased, the disc is as if it was a brand new one. This means it can be
burned using Nero or otherwise.
1. Insert a formatted disc into the recorder.
2. Start 'Windows Explorer' and select a recorder drive.
3. Right-click on the recorder’s icon and select the 'InCD Erase' command from
the menu.
4. The erasing dialog opens and automatically uses the selected recorder.
5. Select the desired method of erasing and click on the 'Start' button.
If you insert the disc you have just erased, the format dialog will be displayed just
like it does for every blank disc.
You cannot run any other commands on the same disc during the erasing
process. Nevertheless, if you have several recorders, you can process each
inserted disc independently from the others (e.g. if you have two recorders, you
can erase two discs at the same time, or erase one, while formatting the other).
InCD
Working with InCD • 21
4
4.1
Commands
Context menu
You can right-click the mouse on the InCD symbol in the System Tray to open a
context menu. Select and click with the mouse to execute commands.
Right-click the mouse in 'Windows Explorer' on the recorder’s drive icon to open
a context menu. Provided a rewritable disc is inserted, there are three commands
for use with InCD. To avoid confusion, the other commands are not shown on the
screenshot below.
4.2
About
The 'About' command displays information on the version of InCD that is
currently installed on your system.
4.3
Help
The 'Help' command opens the InCD help file.
InCD
Commands • 22
4.4
Options
The 'Options' command opens the InCD program settings window.
To save the changes you have made, click on the 'Apply' button and the dialog
box will close. To close the dialog box without saving the changes, click on the
'Cancel' button.
If this check box is activated, the Format
dialog will pop up when you put a blank
disc in the drive. (Default)
If this is unchecked, the InCD icon appears
in the system tray. (Default)
If the check box is activated, discs on all
MRW-compatible drives will be formatted
as MRW. For per-drive MRW control, see
‘Drive properties’. (Default).
The check box appears gray (deactivated),
if no MRW-compatible recorder is installed.
This means that you have several drives
supporting Mount Rainier, and that not all
of them are currently set to format an
inserted disc as MRW. For more
information, see ‘Drive properties’.
If this check box is deactivated, a message
is displayed to indicate when the formatting
process is complete. (Default)
InCD automatically selects the language
according to your local settings.
InCD
Commands • 23
4.5
Drive properties
Right-click the mouse in 'Windows Explorer' on the recorder drive’s icon to open
the context menu. Then choose the ‘Properties’ command.
InCD provides an ‘InCD’ tab with information on the recorder and the inserted
disc. You will find more information on the displayed icon in the ‘Starting InCD’
section.
From here you can also control whether this drive should format the disc as
Mt. Rainier or not (if your drive has Mt. Rainier support). Make sure you click on
‘Apply’ to get the change taken into account.
The format and erase operations are also available, provided the drive contains a
compatible disc. Just click on the corresponding button. To learn more about
disc/drive compatibility, you can read the ‘Discs supported by InCD’ section.
InCD
Commands • 24
4.6
Format InCD
The 'InCD Format' command opens the 'Format' dialog box. You will find detailed
information in the ‘Format’ and 'Reformatting' sections.
4.7
Erase InCD
The 'InCD Erase' command opens the 'Erase' dialog box. There is full information
in the 'Erasing Discs' section.
InCD
Commands • 25
4.8
Eject
The 'Eject' command causes the disc in the drive to be ejected. You will find more
detailed information in the 'Ejecting a disc' section.
InCD
Commands • 26
5
DVD+MRW 18
DVD+RW 18
DVD-RW 18
Index
F
Formatting 13
Background formatting 15
Reformatting 16
C
I
CD-MRW
Disc type 12
Ejecting 18
CD-RW
Disc type 12
Ejecting 18
Command
Eject 26
Erase 25
Format 25
Context menu 22
Copying
Disc 19
Icon 11, 24
InCD
Erasing 21
Uninstalling 10
Update 9
L
Loading
Disc 18
M
Media speed 12
Mount Rainier 7, 8
D
Disc
Copying to 19
Loading 18
Disc type
CD-MRW 12
CD-RW 12
DVD+MRW 13
DVD+RW 13
DVD-RW 13
DVD+MRW
Disc type 13
Ejecting 18
DVD+RW
Disc type 13
Ejecting 18
DVD-RW
Disc type 13
Ejecting 18
N
Nero 16, 21
R
Reformatting
Quick format 16
U
Uninstalling 10
Update 9
W
Windows Media Player 5
E
Ejecting
CD-MRW 18
CD-RW 18
InCD
Index • 27