1
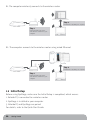
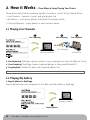
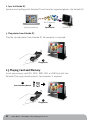
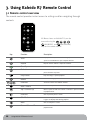
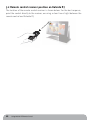
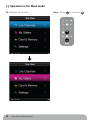
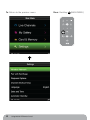
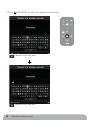
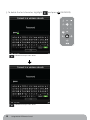
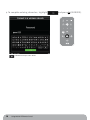
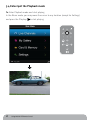
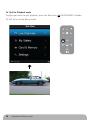
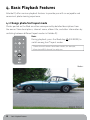
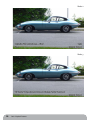
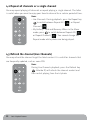
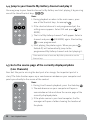
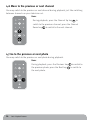
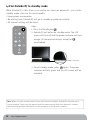
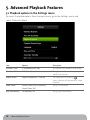
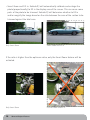
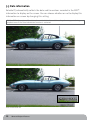
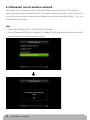
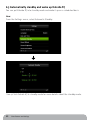
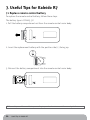
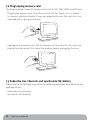
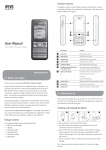
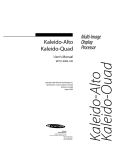
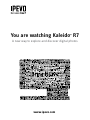
You are watching Kaleido™ R7
A new way to explore and discover digital photos
www.ipevo.com
Table of Contents
1. Getting Started
1.1 What you need
1.2 Initial Setup 1.3 Re-entering Initial Setup 2. How it Works – Three Ways to Enjoy Playing Your Photos
2.1 Playing Live Channels
2.2 Playing My Gallery
2.3 Playing Card and Memory
3. Using Kaleido R7 Remote Control
3.1 Remote control overview
3.2 Remote control receiver position on Kaleido R7
3.3 Operations in the Menu mode
3.4 Enter/quit the Playback mode
4. Basic Playback Features
4.1 Change photo/text layout mode
4.2 Repeat all channels or a single channel
4.3 Refresh the channel (Live Channels)
4.4 Jump to your favorite My Gallery channel and play it
4.5 Go to the source page of the currently displayed photo (Live Channels)
4.6 Move to the previous or next channel
4.7 Go to the previous or next photo
4.8 Set Kaleido R7 to standby mode
5. Advanced Playback Features
5.1 Playback options in the Settings menu
5.2 Zoom mode
5.3 Date information
6. Extra Features and Settings
6.1 Change wireless network settings
6.2 Reconnect current wireless network
6.3 Automatically standby and wake up Kaleido R7
6.4 Update firmware
6.5 Reset settings
7. Useful Tips for Kaleido R7
7.1 Replace remote control battery
7.2 Plug/unplug memory card
7.3 Subscribe Live Channels and synchronize My Gallery
8. FAQ and Troubleshooting
02
Table of Contents
03
03
04
05
06
06
06
07
08
08
09
10
17
19
19
22
22
23
23
24
24
25
26
26
27
29
30
30
31
32
33
33
34
34
35
35
36
1. Getting Started
1.1 What you need
To start using your Kaleido R7, you need the following items:
Hardware
PC:
• 2GHz and above CPU (Dual-core CPU recommended)
• 1GB RAM
• 550MB free hard disk space
Mac:
• A Mac with Intel processor
• 1GB RAM
• 50MB free hard disk space
Software
PC:
Microsoft Windows XP (Home or Professional edition) or Vista (32-bit)
Mac:
Mac OS X 10.5 (Leopard) and above
EyeStage software:
Included in the CD-ROM or download from www.ipevo.com
Network environment:
• Broadband Internet access (Cable or DSL)
• Wireless router (with support for 802.11b or 802.11g)*
• Access to wireless network (i.e. password if you have one)
* In general, wireless routers that are specified as 802.11N should be backward compatible. However,
this is not always the case, and you should refer to the relevant sections in the user manual or
specifications of the router to ensure that it is compatible with 802.11b or 802.11g standards.
Note for Network environment:
Kaleido R7 will only recognize computers in the same (wireless) network. In other
words, both the computer and Kaleido R7 must be connected to the same wireless
network access point. It could be one of the following scenarios:
03
Getting Started
#1. The computer wirelessly connects to the wireless router
Step 2.
Pair Kaleido™ R7 with your computer.
DSL / Cable
Step 1.
Connect Kaleido™ R7 to the
same wireless network as your
computer.
#2. The computer connects to the wireless router using wired Ethernet
Step 2.
Pair Kaleido™ R7 with your computer.
DSL / Cable
Step 1.
Connect Kaleido™ R7 to the
same wireless network as your
computer.
1.2 Initial Setup
Before using EyeStage, make sure the Initial Setup is completed, which means:
1. Kaleido R7 is connected to a wireless router
2. EyeStage is installed in your computer
3. Kaleido R7 and EyeStage are paired
For details, refer to the Quick Start Guide.
04
Getting Started
1.3 Re-entering Initial Setup
If the Initial Setup described above is not completed when you turn Kaleido R7 on,
you may start the process again through these steps:
1. Reset all settings in Kaleido R7 by activating the following menu item:
Settings > Reset Settings > All Settings
2. Power Kaleido R7 off, wait for a few seconds, then power it on again.
3. Kaleido R7 will enter Initial Setup.
05
Getting Started
2. How it Works – Three Ways to Enjoy Playing Your Photos
Three outstanding feature combine together to make a ‘one of a kind’ digital frame.
• Live Channels – capture, stream, and play photos live
• My Gallery – synchronize photos to Kaleido R7 and play locally
• Card and Memory – enjoy photos in your memory device
2.1 Playing Live Channels
2
Live Streaming
1
Live Capturing
3
Live Playback
Different photo folders in the computer
Wi-Fi Network
EyeStage Software
Kaleido™ R7
1. Live capturing: EyeStage captures photos in your computer or from the Web on the fly.
2. Live streaming: EyeStage streams captured photos to the paired Kaleido R7.
3. Live playback: Kaleido R7 plays the streamed photos live.
* In Live Channels, the computer must be switched on and running EyeStage.
2.2 Playing My Gallery
1. Import photos to EyeStage:
Import photos from your computer or the Web into My Gallery in EyeStage.
Different photo folders in the computer
EyeStage Software
1
Import photos
06
How it Works – Three Ways to Enjoy Playing Your Photos
2. Sync to Kaleido R7:
Synchronize EyeStage with Kaleido R7 and store the imported photos into Kaleido R7.
Wi-Fi Network
2
Synchronize
EyeStage Software
Kaleido™ R7
3. Play photos from Kaleido R7 :
Play the synced photos from Kaleido R7. No computer is required.
3
Play photos
2.3 Playing Card and Memory
Insert any memory card (SD, SDHC, MMC, MS) or USB flash disk into
Kaleido R7 to enjoy stored contents. No computer is required.
1
Insert memory device
2
Play photos
07
How it Works – Three Ways to Enjoy Playing Your Photos
3. Using Kaleido R7 Remote Control
3.1 Remote control overview
The remote control provides instant access to settings and for navigating through
contents.
All Menus items on Kaleido™ R7 can be
accessed using the
(OK/MODE), and
(BACK/MENU)
keys on the remote control.。
Key
Function
Description
GoTo
In playback mode, the source of the image (file location or URL)
opens in a new window on your computer monitor.
Repeat
Repeats current channel or repeat all channels.
Standby
Activates standby mode (screen switches off, device remains on).
Refresh
Refreshes the contents of the current channel/ Start showing
photos from the 1st picture.
Play/Pause
Plays the image or pauses playback.
Rotate
Rotates the image 90° clockwise.
Favorites
Shortcuts of three user-defined channels.
Back / Menu
Returns to the previous menu / Cancels playback.
Up / Channel Up
Moves to previous item on the menu or switches to previous channel
in playback mode.
Previous
Goes to previous photos / views.
OK / Mode
Confirms/accepts the current selection;
toggles the display mode during playback.
Next
Goes to next photos / views.
Down / Channel Down
Moves to next item on the menu or switches to next channel in
playback mode.
08
Using Kaleido R7 Remote Control
3.2 Remote control receiver position on Kaleido R7
The location of the remote control receiver is shown below. For the best response,
point the control directly to the receiver, ensuring a clear line of sight between the
remote control and Kaleido R7.
09
Using Kaleido R7 Remote Control
3.3 Operations in the Menu mode
To: Navigate menu items �
10
Using Kaleido R7 Remote Control
Press: Up key
or Down key 。
To: Select an item in the menu
11
Using Kaleido R7 Remote Control
Press: OK key
(OK/MODE) 。
To: Return to the previous menu
12
Using Kaleido R7 Remote Control
Press: Back key
(BACK/MENU) �
To: Enter characters
1. Use 。。。。
to highlight a character.
= Windows: Backspace / Mac: Delete
= Windows: Backspace / Mac: Delete
13
Using Kaleido R7 Remote Control
2. Press
(OK/MODE) to input the highlighted character.
= Windows: Backspace / Mac: Delete
= Windows: Backspace / Mac: Delete
14
Using Kaleido R7 Remote Control
3. To delete the last character, highlight
= Windows: Backspace / Mac: Delete
= Windows: Backspace / Mac: Delete
15
Using Kaleido R7 Remote Control
and press
(OK/MODE).
4. To complete entering characters, highlight
= Windows: Backspace / Mac: Delete
16
Using Kaleido R7 Remote Control
and press
(OK/MODE).
3.4 Enter/quit the Playback mode
To: Enter Playback mode and start playing
In the Menu mode, you may move the cursor to any location (except for Settings)
and press the Play key to start playing.
17
Using Kaleido R7 Remote Control
To: Quit the Playback mode
Anytime you want to quit playback, press the Menu key
R7 will return to the Menu mode.
18
Using Kaleido R7 Remote Control
(BACK/MENU). Kaleido
4. Basic Playback Features
Kaleido R7 offers various playback features to provide you with an enjoyable and
convenient photo viewing experience.
4.1 Change photo/text layout mode
Photos posted on the Web are often accompanied by detailed descriptions from
the owner. View descriptions, channel name, album title, and other information by
switching between different layout modes in Kaleido R7.
How:
During playback, press the Mode key (OK/MODE) to
switch among four* layout modes.
* Some channel sources have fewer modes; for example,
Info-oriented RSS channel has only one.
Mode 1
19
Basic Playback Features
Mode 2
Mode 3
20
Basic Playback Features
Mode 4
21
Basic Playback Features
4.2 Repeat all channels or a single channel
You may repeat playing all channels or repeat playing a single channel. The latter
is useful when you want to enjoy your favorite channel for a certain period of time.
How:
• Live Channels: During playback, press the Repeat key
to switch between Repeat All (
) or Repeat
Channel (
).
• My Gallery / Card and Memory: When in the Menu
mode, press
to switch between Repeat All (
)
or Repeat Channel (
). You cannot change the
Repeat mode while photos are being played.
4.3 Refresh the channel (Live Channels)
You may refresh the channel to get the latest content. It is useful for channels that
are frequently updated, such as news RSS.
How:
During Live Channels playback, press the Refresh key
. Kaleido R7 will refresh the channel content and
then restart playing from the 1st photo.
22
Basic Playback Features
4.4 Jump to your favorite My Gallery channel and play it
You may jump to your favorite channel in My Gallery and start playing it by pressing
one of the three Shortcut keys,
.
How:
1. During playback or when in the main menu, press
one of the Shortcut keys, for example .
2. If the shortcut channel is not programmed yet, the
setting menu appears. Select CH1 and press (OK/
MODE).
3. The list of My Gallery channels* will appear. Select a
channel and press (OK/MODE) again. Shortcut key
is now programmed.
4. Start playing the photos again. When you press ,
Kaleido R7 will automatically jump to the
programmed My Gallery channel and start playing it.
* You need to have at least one My Gallery channel to use the
Shortcut keys.
4.5 Go to the source page of the currently displayed photo
(Live Channels)
Ever feel like you’re missing the best part of an image, the important part of a
story? The Goto function opens up a new browser window on your computer and
points you directly to the source of the content.
How:
1. During Live Channels playback, press the Goto key .
2. The web browser on your computer will open a
new window or tab and show the source page of the
currently displayed photo.
3. If the photo source is your local computer, the file
manager will open a folder showing the location of
the photo.
23
Basic Playback Features
4.6 Move to the previous or next channel
You may switch to the previous or next channel during playback, just like switching
between channels on your television set.
How:
During playback, press the Channel Up key
to
switch to the previous channel; press the Channel
Down key
to switch to the next channel.
4.7 Go to the previous or next photo
You may switch to the previous or next photo during playback.
How:
During playback, press the Previous key
the previous photo; press the Next key
the next photo.
24
Basic Playback Features
to switch to
to switch to
4.8 Set Kaleido R7 to standby mode
While Kaleido R7 is idle, there is no need to turn the main power off - just use the
standby mode. Here are the main benefits:
• Saves power consumption.
• No waiting time: Kaleido R7 will go to standby or wake up instantly.
• All internal settings will be intact.
How:
1. Press the Standby key .
2. Kaleido R7 will enter the standby mode. The LCD
screen will turn off and the power indicator will turn
orange. All remote control keys except for
are disabled.
Power indicator
3. To exit standby mode, press
again. The power
indicator will turn green and the LCD screen will be
activated.
Note: When using the remote control during Live Channels playback, Kaleido R7 may take some
time to respond. Processing the request from the remote control takes time because it involves
communication between Kaleido R7 and the computer via the wireless network.
25
Basic Playback Features
5. Advanced Playback Features
5.1 Playback options in the Settings menu
To access the below options from the main menu, go to the Settings menu and
select Playback Options.
Item
Options
Description
Time per Slide
5 sec(default) to 1 day
The interval time between each photo
Transition Effects
Off (default), 7 effects, random
The graphical effects when a photo
switches to the next
Repeat Mode
Repeat All(default) / Channel
The same effect as pressing
(see 4.2 Repeat all channels or a single
channel)
Zoom Mode
Smart Zoom & Fill in (default),
Smart Zoom, Off
On (default), Off
See 5.2 Zoom Mode
Date Information
26
Advanced Playback Features
See 5.3 Date Information
5.2 Zoom mode
Kaleido R7 provides three zoom modes: Smart Zoom and Fill in, Smart Zoom, and
None (Off). Zooming applies to photos smaller than Kaleido R7 LCD display screen
area.
• None: Kaleido R7 will not enlarge the photo.
Zoom mode Off
• Smart Zoom: Kaleido R7 will automatically calibrate and enlarge the photo
(proportionally) for display on the screen. This is useful for displaying small
photos in their optimal size, making the images easier to see and occupy more
screen space. The maximum magnification is set at 200% to prevent the mosaic
effect which distorts the image.
Before Smart Zoom
27
Advanced Playback Features
After Smart Zoom
• Smart Zoom and Fill in: Kaleido R7 will automatically calibrate and enlarge the
photo (proportionally) to fill in the display area of the screen. This can cause some
parts of the photo to be trimmed. Kaleido R7 will determine whether to fill in
and/or magnify the image based on the ratio between the area of the section to be
trimmed against the total area.
trimmed
trimmed
Only Smart Zoom
Smart Zoom and Fill in
If the ratio is higher than the optimum value, only the Smart Zoom feature will be
activated.
trimmed
trimmed
Only Smart Zoom
28
Advanced Playback Features
If Smart Zoom and fill in
5.3 Date information
Kaleido R7 automatically collects the date and time values recorded in the EXIF*
information to display on the screen. You can choose whether or not to display this
information on screen by changing this setting.
* If the EXIF information of the photo does not include date and time, they do not appear during
playback even if the Date Information function is activated.
Date information off
Date information on
29
Advanced Playback Features
6. Extra Features and Settings
6.1 Change wireless network settings
You may change the following settings related to wireless network.
• Connect with other wireless networks
• Manually configure the IP address
• View the current network status
• Reconnect with the current wireless network (see the next section for details)
How:
From the Settings menu, select Wireless Network.
30
Extra Features and Settings
6.2 Reconnect current wireless network
You might face a situation where Kaleido R7 does not connect with the wireless
router anymore due to external factors: unstable network, wireless router reset, etc.
In such cases you do not need to reconfigure the wireless network setting – just use
the Reconnect function.
How:
1. From the Settings menu, select Wireless Network.
2. Select 'Reconnect Wireless Network'. Kaleido R7 will automatically reconnect with
the previously connected wireless router.
31
Extra Features and Settings
6.3 Automatically standby and wake up Kaleido R7
You can put Kaleido R7 into standby mode and wake it up on a scheduled basis.
How:
From the Settings menu, select Automatic Standby.
See 4.8 Set Kaleido R7 to standby mode for more details about the standby mode.
32
Extra Features and Settings
6.4 Update firmware
1. Download the latest firmware from www.ipevo.com.
2. Save the firmware in a USB flash disk.
3. Before updating, restart (power off then power on) Kaleido R7.
4. Insert the USB flash disk into Kaleido R7’s USB port.
5. Go to Settings > Firmware Update menu using ↓ / ↑ / ↓ (OK/MODE) / ↑
(BACK/MENU).
6. The firmware location list appears. Select USB Flash Disk.
7. Select “Update”. Kaleido R7 will then automatically complete the firmware update
process. DO NOT switch off the power or remove the USB flash disk during the
update process.
8. Once the firmware update is completed, turn off and restart Kaleido R7.
9. To ensure stable operation, first reset all settings (see 6.5 Reset settings for
details) in Kaleido R7 and re-enter the initial setup.
6.5 Reset settings
Two types of reset settings are available in Kaleido R7.
• Reset User Settings will keep the wireless network and EyeStage connection intact,
but reset all other settings. It is effective when you want to reset playback settings
but do not want to affect the connection with EyeStage.
• Reset All Settings will reset all Kaleido R7 internal settings. It is effective when
Kaleido R7 is not functioning properly or does not connect well with EyeStage
(assuming that there are no problems with the wireless network and computer).
How:
1. From the Settings menu, select Reset Settings > User Settings or Reset All.
2. After resetting user settings, Kaleido R7 will go back to the main menu.
3. After resetting all settings, turn Kaleido R7 power off and turn it on again. You will
re-enter the Initial Setup.
33
Extra Features and Settings
7. Useful Tips for Kaleido R7
7.1 Replace remote control battery
To replace the remote control battery, follow these steps.
The battery type is CR2025, 3V.
1. Pull the battery compartment out from the remote control main body.
2. Insert the replacement battery with the positive side (+) facing up.
3. Reinsert the battery compartment into the remote control main body.
* Please dispose of the used battery according to your local environmental laws and guidelines.
34
Useful Tips for Kaleido R7
7.2 Plug/unplug memory card
The diagram below shows the location of the slot for SD, SDHC, MMC, and MS card.
• Plugging the memory card: Insert the card into the slot. Make sure it is placed
in securely, otherwise Kaleido R7 may not recognize the card (the card slot is not
equipped with a spring mechanism).
• Unplugging the memory card: Pull the memory card out from the slot. If you are
playing the card content, first cancel the playback before unplugging the card.
7.3 Subscribe Live Channels and synchronize My Gallery
Please refer to the EyeStage manual for the following operations (available from the
EyeStage menu).
• Subscribe to Live Channels
• Sync photos to Kaleido R7
35
Useful Tips for Kaleido R7
8. FAQ and Troubleshooting
1. Please visit the product support page on www.ipevo.com for all the latest FAQ and
related product information.
2. If there are problems with connections between Kaleido R7 and EyeStage, please
restart both Kaleido R7 and EyeStage, then try again.
3. For up-to-date information on Kaleido R7, visit www.ipevo.com/kaleido.
USA, Canada
International
IPEVO Inc.
2860 Zanker Road, Suite 104,
San Jose, CA 95134, USA
Tel: 1-877-269-4738
Service mail: [email protected]
http://us.ipevo.com
IPEVO corp
3F, No.53, Bo-ai Rd.,
Taipei 100, Taiwan
Tel: +886-2-5550-8686
Service mail: [email protected]
http://www.ipevo.com
© 2009 IPEVO corp. All rights reserved. IPEVO, Kaleido, Eyestage, the IPEVO logo, and other IPEVO marks are owned by IPEVO corp
and may be registered. All other trademarks are the property of their respective owners.
36
FAQ and Troubleshooting