1
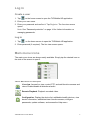
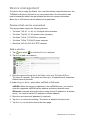
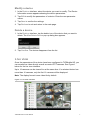
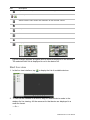
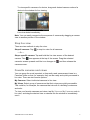
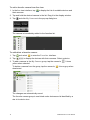
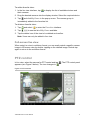
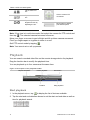
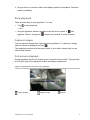
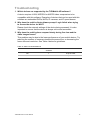
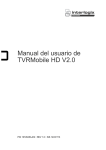
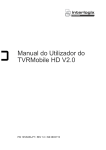
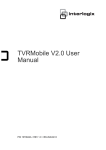
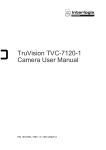
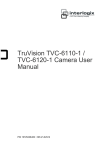
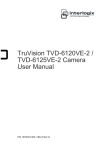
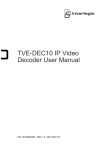
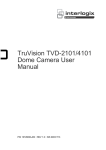
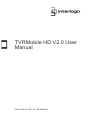
TVRMobile HD V2.0 User Manual P/N 1072645A • REV 1.0 • ISS 20AUG13 Copyright © 2013 UTC Fire & Security Americas Corporation, Inc. Interlogix is part of UTC Climate Controls & Security, a unit of United Technologies Corporation. All rights reserved Trademarks and patents The TruVision and UltraView names and logos are trademarks of UTC Fire & Security. Other trade names used in this document may be trademarks or registered trademarks of the manufacturers or vendors of the respective products Manufacturer UTC Fire & Security Americas Corporation, Inc. 2955 Red Hill Avenue, Costa Mesa, CA 92626-5923, USA Authorized EU manufacturing representative: UTC Fire & Security B.V. Kelvinstraat 7, 6003 DH Weert, The Netherlands Contact information For contact information, see www.utcfireandsecurity.com or www.utcfssecurityproducts.eu Content Introduction 4 Overview 4 System requirements 4 Software setup 4 Installing the TVRMobile app on a phone 4 Log in 5 Create a user 5 Log in 5 Main menu icons 5 Device management 6 Devices that can be connected 6 Add a device 6 Modify a device 7 Delete a device 7 Live view 7 Start live view 8 Stop live view 9 Favorite cameras and views 9 Full-screen live view 11 PTZ control 11 Playback 12 Start playback 12 Stop playback 13 Capture images 13 Full-screen playback 13 Configuration 14 Password protection 14 Update software 14 Get help 14 Troubleshooting 15 TVRMobile HD V2.0 User Manual 3 Introduction Overview The TVRMobile HD is an Android tablet and iPad application that can be used over a wireless network to remotely view live video, to play back recorded files, and to control alarm outputs from DVRs, NVRs, IP cameras, and PTZ cameras. It can also be used to control PTZ cameras. Once installed on your mobile device, you can easily log on to the front-end device via Wi-Fi, 2G, 3G, or 4G. If there is no public IP available, you can use a dynamic name or by forwarding ports to the public IP router. System requirements Table 1: TVRMobile system requirements Software Android tablet: Android OS V2.3 or higher iPad: iOS 4.3 or higher Maximum number of devices that can be added 100 Network stream Main stream and substream Frame rate 2 to 8 fps (depending on the performance of the mobile device) Resolution QCIF, up to 5 megapixels if supported by the device Stream type Video and audio Bit rate 32 Kbp to 16 Mbps (depending on the network environment) Software setup The phone must be connected to the internet before installing the TVRMobile HD application. Installing the TVRMobile HD app on a tablet 1. Go to the Android Market or the Apple Store web site and search for the TVRMobile HD application. 2. Download it. 3. On your tablet’s home screen, tap 4 to open the app. TVRMobile HD V2.0 User Manual Log in Create a user 1. Tap on the home screen to open the TVRMobile HD application. 2. Enter your user name. 3. Enter your password and confirm it. Tap Register. The live view screen opens. Note: See “Password protection” on page 14 for further information on managing passwords. Log in 1. Tap on the home screen to open the TVRMobile HD application. 2. Enter password (if required). The live view screen opens. Main menu icons The main menu icons are always easily available. Simply tap the desired icon on the side of the screen to open it. Table 2: Main menu icon description Live view: Access live view, control PTZ, and add favorite cameras and views. Enable/disable bi-directional audio. Remote Playback: Playback recorded video. Configuration: Display the device list, add/delete/modify devices, view device information, add/delete/view favorite cameras, configure passwords, update software, and access the Help menu. TVRMobile HD V2.0 User Manual 5 Device management The device list is empty by default. You must first add the required devices to the TVRMobile HD device list before you can access them. Once the device has been successfully added, the app obtains the device’s camera information. Note: Up to 100 devices can be added to the application. Devices that can be connected This app provides support for following devices: TruVision TVR 10, 11, 40, 41, 60 digital video recorders TruVision TVN 20, 21, 50 network video recorders TruVision TVC-N, TVC-M IP box cameras TruVision TVD-N, TVD-M IP dome cameras UltraView UVP-N, UVP-M IP PTZ cameras Add a device 1. Tap and select to enter the Devices interface. 2. Tap Add to add a new device. 3. Enter the name of the device to be linked, such as a TruVision DVR or TruVision IP cameras. The name can have up to 16 alphanumeric characters. Default name is Device01. 4. Under Register Mode, select either ezDDNS or IP/Domain. ezDDNS: When the device is registered in the ezDDNS server, you need to enter the registered ezDDNS server address and device domain name. IP/Domain: manually access the device using a fixed IP address or a domain server. You need to edit the IP address or domain address. 5. Enter the user name and password (if required). 6. Tap Save to confirm the settings. The device is added to the device list. 7. Tap Devices to exit and return to the main page. 6 TVRMobile HD V2.0 User Manual Modify a device 1. In the Devices interface, select the device you want to modify. The Device Information screen appears showing the device parameters. 2. Tap Edit to modify the parameters of a device. Enter the new parameter values. 3. Tap Save to confirm the settings. 4. Tap Devices to exit and return to the main page. Delete a device 1. In the Devices interface, tap the delete icon of the device that you want to delete. The Hint-Delete Device pop-up dialog box appears. 2. Tap Confirm. The device disappears from the list. Live view Once the parameters of the device have been configured in TVRMobile HD, you can access live video directly as well as control PTZ cameras. See Figure 1 below for the live view interface. Up to 16 cameras can be viewed live at the same time. If a selected device has more than 16 cameras, only the first 16 cameras will be displayed. Note: The display format is one video tile by default. Figure 1: Live view interface TVRMobile HD V2.0 User Manual 7 Icon Description Capture a video snapshot of the selected camera image. Start/stop bi-directional audio. / Switch between main stream and substream for the selected camera. Set favorite cameras and views. Stop all live views. Full screen. PTZ control. Display/hide the device nodes. A green triangle appears alongside all the cameras displayed in the window. The selected video tile is displayed in red in the device list. Start live view 1. In the live view interface, tap to display the list of available devices. 2. To view all the cameras of a device, drag the desired device node to the window for live viewing. All the cameras for that device are displayed in a multi-tile format. — Or — 8 TVRMobile HD V2.0 User Manual To view specific cameras of a device, drag each desired camera nodes of a device to the window for live viewing. Live view starts immediately. Note: You can easily reorganize the sequence of cameras by dragging a camera view to another position in the window. Stop live view There are two methods to stop live view: Stop all cameras: Tap to stop live view for all cameras. — Or — Stop a specific camera: Tap and hold the live view screen of the desired camera. This icon appears at the top of the screen. Drag the selected camera’s screen upwards until the icon changes to , and then release the camera screen. Favorite cameras and views You can group the most important or frequently used cameras and views in a Favorites folder so that, for example, they can be easily and quickly accessed in live view. There are two favorite options: My Cameras: Select individual cameras in live view. My Views: Select group of cameras so that their views are quickly accessible. This could be, for example, the cameras that view all of a building’s entrances and exits. To view your favorite cameras and views, tap My Views or My Cameras node in live view, and drag the desired view or camera into the window to immediately see it. TVRMobile HD V2.0 User Manual 9 To add a favorite camera from live view: 1. In the live view interface, tap their cameras. to display the list of available devices and 2. Tap and hold the desired camera in the list. Drag it to the display window. 3. Tap and click My Cameras in the pop-up dialog box. The camera is immediately added to the favorites list. To add/delete a favorite camera: 1. Tap 2. Tap and select to enter the Favorites interface. to display the devices with their cameras. Select a device. 3. To add a camera to the My Camera group, tap the camera’s yellow when selected. To delete a camera from the group, tap the camera’s deselected. . It turns . It turns grey when The changes are automatically saved. The favorite camera group is now listed under devices and is identified by a star in its device icon. 10 TVRMobile HD V2.0 User Manual To add a favorite view: 1. In the live view interface, tap their cameras. to display the list of available devices and 2. Drag the desired cameras into the display window. Select the required device. 3. Tap and click My Views in the pop-up menu. The camera group is immediately added to the favorites list. To delete a favorite view: 1. Tap 2. Tap and select to enter the Favorites interface. to see the list of My Views available. 3. Tap the delete icon of the view to be deleted and confirm. Note: Views can only be added in live view. Full-screen live view When using live view in multiview format, you can easily watch a specific camera image in full-screen view by double- tapping on the desired image. Double-tap again to return to the multiview format. PTZ control In live view, select the camera for PTZ control and tap . The PTZ control panel appears (see Figure 2 below). The icon changes to . Figure 2: PTZ interface TVRMobile HD V2.0 User Manual 11 Table 3: PTZ icon description Tap to zoom in or out. Click to control PTZ movement. Tap to focus in or out. Tap to adjust the brightness level by adjusting the iris. Move button to adjust pan and tilt speed. Note: If live view is in multiview mode, first select the camera for PTZ control and then tap . The selected camera becomes full screen. Move your finger on-screen to pan left/right and tilt up/down camera movement. Pinch you fingers apart or together to zoom in or out. Quit PTZ control mode by tapping . Note: You cannot set or call up presets. Playback You can search recorded video files on the remote storage device for playback. Drag the timeline bar to modify the playback time. You can playback up to four cameras at the same time. Figure 3: Description of the playback toolbar Capture snapshot Pause playback Timeline Full screen Stop playback Start playback 1. In the playback menu, tap to display the list of devices available. 2. Tap the start and end date/time boxes to set the start and end date as well as time for playback search. 12 TVRMobile HD V2.0 User Manual 3. Drag a device or camera node to the display window for playback. Playback starts immediately. Stop playback There are two ways to stop playback. You can: Tap to stop playback. — Or — Drag the playback window upwards to the top of the screen. A appears. When it changes to icon , release the window. It is then deleted. Capture images You can capture images from cameras during playback. To capture an image, select a camera in playback and tap . The snapshots are saved in the photo folder of your tablet, where they can be viewed and deleted. Full-screen playback During playback, tap the full screen button to get full-screen mode. Tap and hold on the right edge of the playback toolbar and drag to reposition it. Figure 4: Description of the full screen playback Pause playback TVRMobile HD V2.0 User Manual Capture image Restore 13 Configuration Password protection The application does not have password protection by default. By setting up password protection, you ensure that only persons knowing the password can access the TVRMobile application. To enable/disable password protection: 1. Tap and select Local Config to enter the Configuration interface. Password protection is indicated as On (enabled) or Off (disabled). 2. To enable password protection, tap Off. Enter the password in the pop-up dialog box and tap Confirm to save the settings. To disable password protection, tap On. Enter the password in the pop-up dialog box and tap Confirm to save the settings. To modify a password: 1. Tap and select Local Config to enter the Configuration interface. 2. Tap Modify Password and enter the old and new passwords in the pop-up dialog box. Tap Confirm to save the settings. Update software When there is a new version of the TVRMobile application available in the App Store, the software will automatically prompt you to update the software. You can update the software immediately when prompted or update it later. The Software Update button is only available when there is a new version of the software in the Android Market or the Apple Store. To update the software: 1. Tap and select Local Config to enter the Configuration interface. 2. Tap Software Update. 3. Tap Confirm on pop-up notification. This will take you to the app store. 4. Update with the new version of the app. Get help Online instructions for using the application can also be found under > Help. If you continue to have problems, please contact your local supplier. 14 TVRMobile HD V2.0 User Manual Troubleshooting 1. Which devices are supported by the TVRMobile HD software? A device requires H.264, MPEGS4 or MJPEG video compression to be compatible with this software. Examples of devices that can be used with this software are embedded DVRs, NVRs, IP cameras, and IP speed domes. 2. Why does the mobile client software prompt ‘Login failed’ when trying to access the device via Wi-Fi? Please check the network settings of the device being accessed. It is also important to ensure that the device is always online and accessible. 3. Why does the mobile phone respond slowly during live view and the video images freeze? This problem may be due to the lower performance of your mobile device. Try reducing the number of cameras viewed at the same time, or decreasing the frame rate and resolution. See Table 4 below for guidelines. Table 4: Video recommendations Resolutions Recommend number of cameras Recommend frame rate CIF 1 8 fps or lower QCIF 4 8 fps or lower TVRMobile HD V2.0 User Manual 15 16 TVRMobile HD V2.0 User Manual