1
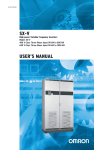
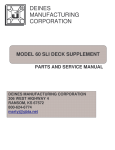
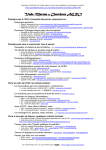
AG-OISPLUS-E004 Industrial Automation & Process Control APPLICATION GUIDE Connection to Toshiba Adjustable Speed Drives CONTENTS Toshiba International Corporation Phone: 800.894.0412 - Fax: 888.723.4773 - Web: www.ctiautomation.net - Email: [email protected] Important Information Misuse of this equipment can result in property damage or human injury. Because controlled system applications vary widely, each user should satisfy him/herself as to the acceptability of this equipment for its intended purpose. In no event will Toshiba International Corporation be responsible or liable for either indirect consequential damage or injury that may result from the use of this equipment. No patent liability is assumed by Toshiba Corporation with respect to use of information, illustrations, circuits, equipment or examples of application in this publication. Toshiba International Corporation reserves the right to make changes and improvements to this publication and/or related products at any time without notice. No obligation shall beincurred other than as noted in this publication. This publication is copyrighted and contains proprietary material. No part of this book may be reproduced, stored in a retrieval system, or transmitted, in any form or by any means electrical, mechanical, photocopying, recording, or otherwise without obtaining prior written permission from Toshiba International Corporation . Safety Precautions This application guide is prepared for users of Toshiba programmable controller PROSEC T-series (hereafter called PLC). Read this guide and your PLC's manual thoroughly to use the PLC system safely. Hazard Classifications In this guide, the following two hazard classifications are used to explain the safety precautions. ! WARNING Indicates a potentially hazardous situation which, if not avoided, could result in death or serious injury. ! CAUTION Indicates a potentially hazardous situation which, if not avoided, may result in minor or moderate injury. It may also be used to alert against unsafe practices. Phone: 800.894.0412 - Fax: 888.723.4773 - Web: www.ctiautomation.net - Email: [email protected] Even when a precaution is classified as CAUTION, it may cause serious results depending on the situation. Observe all applicable the safety precautions . Safety Precautions ! CAUTION • Read the Safety Precautions described in your the User's Manuals before using the referenced equipment • Carefully design a fail-safe system in order to avoid unsafe situation caused by equipment failure. • When the equipment detects an error in its self-diagnosis, it goes into an error down mode. In the error down mode, all the outputs turn OFF and the analog outputs become 0 (zero). Contacting Toshiba’s Customer Support Center Toshiba’s Customer Support Center may be contacted to obtain help in resolving any system problems that you may experience or to provide application information. The center is open from 8 a.m. to 5 p.m. (CST), Monday through Friday. The Support Center’s toll free number is: US 800-231-1412 Fax 713-466-8773 Canada 800-527-1204 Mexico 01-800-527-1204. You may also contact Toshiba by writing to: Toshiba International Corporation 13131 West Little York Road Houston, Texas 77041-9990 Attn: PLC Marketing Or email Phone: 800.894.0412 - Fax: 888.723.4773 - Web: www.ctiautomation.net - Email: [email protected] Manual Revisions Please have the following information available when contacting Toshiba International Corp. about this manual. Name: Connection to Toshiba ASDsl Document: AG-OISPLUS-E004 Revision: Rev No. Date Description 0 2013/06/15 Initial Issue (for V200) Related Manuals UM-OISPLUS-E001: Hardware & Specifications UM-OISPLUS-E002: Display Programming UM-OISPLUS-E004: Universal Serial (ASCII) Driver UM-V200-E001: Setup and Operation (for ladder logic programming) UM-V200-E002: Ladder Logic (how to use the ladder instructions) UM-OISPLUS-E003: Networking Phone: 800.894.0412 - Fax: 888.723.4773 - Web: www.ctiautomation.net - Email: [email protected] TOC Table of Contents Important Information............................................................................................................................... ii Safety Precautions ................................................................................................................................... ii Hazard Classifications.............................................................................................................................. ii Safety Precautions .................................................................................................................................. iii Introduction............................................................................................................................................... 2 1.1 About This Guide ............................................................................................................................. 3 1.2 Who Should Use this Guide ............................................................................................................. 3 OIS PLUS SETUP ...................................................................................................................................... 4 2.1 Define the Network ........................................................................................................................... 5 2.2 Define Tags in the Tag Database ..................................................................................................... 6 2.3 Create the Screens .......................................................................................................................... 8 V200 PLC Setup ...................................................................................................................................... 10 3.1 Define the Network ......................................................................................................................... 11 3.2 Create the Tags ............................................................................................................................. 12 3.3 Global Copy Tags........................................................................................................................... 13 ASD Setup ............................................................................................................................................... 14 4.1 Match OIS PLUS Settings .............................................................................................................. 15 4.2 ASD Pro Setup ............................................................................................................................... 15 Selecting ASD Registers & Coils ........................................................................................................... 17 5.1 G9, VF-AS1, & Earlier ASDs .......................................................................................................... 18 5.2 VF-S15 ASDs ................................................................................................................................. 20 5.3 ASD Modbus RTU Slave ................................................................................................................ 21 5.3.1 Setup for Modbus ........................................................................................................ 21 5.3.2 Determine Modbus Tags ............................................................................................. 22 5.3.3 Global Tasks Necessary ............................................................................................. 23 Phone: 800.894.0412 - Fax: 888.723.4773 - Web: www.ctiautomation.net - Email: [email protected] Introduction ♦ About this Guide ♦ Who Should Use this Guide Phone: 800.894.0412 - Fax: 888.723.4773 - Web: www.ctiautomation.net - Email: [email protected] 1.1 About This Guide This application guide explains how to set up communications between Toshiba’s OIS PLUS (small operator displays/HMIs) and Toshiba’s ASDs (Adjustable Speed Drives/VFDs/Inverters) It also covers communications between Toshiba’s small V200 PLCs and Toshiba’s ASDs.. For detailed information on individual items of equipment, please refer to the User’s Manual for that device. V200 PLC OIS PLUS Display VF-S15 ASD 1.2 Who Should Use this Guide This guide is intended for a person developing a program to exchange data between the devices listed above. The tool for doing this is the OIL-DS (Operator Interface & Logic Development Software). It is recommended that a thorough review of the OISPLUS network manual, UM-OISPLUS-E003 be performed prior to reading this guide. Phone: 800.894.0412 - Fax: 888.723.4773 - Web: www.ctiautomation.net - Email: [email protected] OIS PLUS SETUP ♦ Define the Network ♦ Define Tags in the Tag Database ♦ Create the Screens Phone: 800.894.0412 - Fax: 888.723.4773 - Web: www.ctiautomation.net - Email: [email protected] 2.1 Define the Network In this example the network refers to the ASDs connected to the OIS PLUS. Each ASD must be setup as a Node on the network. Go to the navigation panel/network configuration and then alternate click in the setup panel. Then click on Add. Note Com 1 Is and RS232 only port. Complete the setup for the VF-S15 ASD. Then click on Add. Do this for each ASD on the network. The next ASD will be Node 2, Address 2. The OIS PLUS/V200 is always Com 0. Note that the VF-S15 must have the same communications settings as above. Phone: 800.894.0412 - Fax: 888.723.4773 - Web: www.ctiautomation.net - Email: [email protected] 2.2 Define Tags in the Tag Database In the navigation panel, click on the Tags folder This will open up the tag data base in the work area. All the default tags for the Operator Panel are displayed. Alternate click in this area and then click Add to define tags for Com2. Define the following tags in the tag data base: Start/Stop: FA000_10 Fwd/Rev: FA000_9 Jog: FA000_8 Monitor Run Freq: FD000 Set Run Freq: FA001 The tag below is for starting and stopping the S15 1. 2. 3. 4. 5. 6. Node Name: Make sure the correct node is selected (default is “Operator Panel”). Register/Coil Type: Select command data. Tag-Type: Select Coil or Bit addressed register. Coil: Select the bit number (10). Tag-Name: Define the tag name, Star/Stop for example. OK: Add the tag. Use the same procedure above to setup the other 4 tags. For more information on OIS PLUS to ASD tags, see section 4. Phone: 800.894.0412 - Fax: 888.723.4773 - Web: www.ctiautomation.net - Email: [email protected] When all tags are setup, the tag data base should look as follows: Default Tags User Defined Tags Keep adding ASD tags as required by the application. Phone: 800.894.0412 - Fax: 888.723.4773 - Web: www.ctiautomation.net - Email: [email protected] 2.3 Create the Screens The following screen uses the tags created in the tag data base to monitor and control the VF-S15 ASD. This screen shows basic control and monitoring of the VF-S15 ASD. Each of the buttons and the bar graph are setup using the properties panel to assign the tag to the object. Tag created in the tag database and assigned to the bar graph object The other objects are setup in a similar manner. Phone: 800.894.0412 - Fax: 888.723.4773 - Web: www.ctiautomation.net - Email: [email protected] In the example using the start and stop buttons which alternates between two objects, it is necessary to: 1. Assign an ON & OFF conditions & 2. Create a task. For additional information on creating screens, please see Users Manual UM-OISPLUS-E002 sections 4.1 thru 4.5. Phone: 800.894.0412 - Fax: 888.723.4773 - Web: www.ctiautomation.net - Email: [email protected] V200 PLC Setup ♦ Define the Network ♦ Create the Tags ♦ Global Copy Tags Phone: 800.894.0412 - Fax: 888.723.4773 - Web: www.ctiautomation.net - Email: [email protected] 3.1 Define the Network As with the OIS45E PLUS, the first thing to do is to setup the V200 PLC network. Setup is identical to setting up the OIS45E PLUS. Each ASD must be setup as a Node on the network. Go to the navigation panel/network configuration and then alternate click in the setup panel. Then click on Add. Complete the setup for the VF-S15 ASD. Then click on Add. Do this for each ASD on the network. The next ASD will be Node 2, Address 2. The V200 PLC is always Com 0. Note that the protocol settings must match the protocol settings used in the VF-S15. Phone: 800.894.0412 - Fax: 888.723.4773 - Web: www.ctiautomation.net - Email: [email protected] 3.2 Create the Tags In the navigation panel, click on the Tags folder This will open up the tag data base in the work area. All the default tags for the Operator Panel are displayed. Alternate click in this area and then click Add to define tags for Com2. Define the following tags in the tag data base: Start/Stop: FA000_10 Fwd/Rev: FA000_9 Jog: FA000_8 Monitor Run Freq: FD000 Set Run Freq: FA001 Create these tags exactly as they were created in section 2.2. Tags are tags, rather they are used by the OIS PLUS displays or the V200 PLCs. While the S15 ASD tags can be attached directly to objects in the OIS PLUS displays, they can not be used directly in the ladder logic. Another set of tags must be created for the ladder logic. These are devices and registers that can be used in the ladder program. Start/Stop1: B04090 Fwd/Rev1: B04089 Jog1: B04088 Monitor Run Freq1: D4090 Set Run Freq1: D4092 Keep adding tags as required by the application. Note that the tag numbers may change after they are entered. The OIL-DS program groups all panel tags in one number sequence and all node tags in another sequence. Phone: 800.894.0412 - Fax: 888.723.4773 - Web: www.ctiautomation.net - Email: [email protected] 3.3 Global Copy Tags It is now necessary to create 5 global tasks, 4 write and 1 read. Use the “Copy Tag B to Tag A task to do the following: Tag B Start/Stop1: B04090 Fwd/Rev1: B04089 Jog1: B04088 Set Run Freq1: D4092 Write To S15. Tag A Start/Stop: FA000_10 Fwd/Rev: FA000_9 Jog: FA000_8 Set Run Freq: FA001 Read From S15 Monitor Run Freq: FD00 Monitor Run Freq1: D4090 Go to the navigation panel and select Tasks. Click on Global Tasks and create the tasks above. Click Add to add the last tag. This procedure must be used in native ladder for both the OIS PLUS displays and the V200 PLCs. It is necessary for moving data between the VF-S15 and the ladder program. Phone: 800.894.0412 - Fax: 888.723.4773 - Web: www.ctiautomation.net - Email: [email protected] ASD Setup ♦ Match OIS PLUS Settings ♦ ASD Pro Setup Phone: 800.894.0412 - Fax: 888.723.4773 - Web: www.ctiautomation.net - Email: [email protected] 4.1 Match OIS PLUS Settings If the following parameters are established in the OIS PLUS display or V200 PLC, the same parameters have to be setup in the ASD. The current setting in the OIS PLUS are: 4.2 ASD Pro Setup ASD communications parameters can be set using either the ASD keypad or the ASD Pro setup software. The following example uses the ASD Pro software (download from website). Go to the Windows view. 4 = 19.2k baud 1= Even Parity 1 = Inverter No. 1 0 = Toshiba Protocol Phone: 800.894.0412 - Fax: 888.723.4773 - Web: www.ctiautomation.net - Email: [email protected] Set the ASD up for Serial Communications: Command Mode, ׆Π0d: Set at 2 = RS485 Communications Frequency Mode, FΠ0d: Set at 4 = RS485 Communications Check the appropriate ASD manual for other ASD models. OIS PLUS/V200 and S15 not communicating? Check the following: 1. Inverter Number must not be set at 0. 0 Is for the broadcast mode 2. If Comm. No F829 is visible, set it to 0 = Toshiba Inverter Protocol. 3. Make sure the OIS is connected to the ASD with the correct cable. 3.1 EC-P-108C-00 for OIS PLUS. 3.2 RC-P-108C-00 for V200 PLC. Note: Cut off 9 pin D-shell end of cable EC-P-108C for connection to Com2 on V200 PLC. 4. On the 1st download of the program into the OIS PLUS, make sure the Firmware box is checked when the OIL-DS download (transfer under the project menu) is selected and executed. Phone: 800.894.0412 - Fax: 888.723.4773 - Web: www.ctiautomation.net - Email: [email protected] Selecting ASD Registers & Coils ♦ G9, VF-AS1, & Earlier ASDs ♦ VF-S15 ASD ♦ ASD Modbus RTU Slave Phone: 800.894.0412 - Fax: 888.723.4773 - Web: www.ctiautomation.net - Email: [email protected] 5.1 G9, VF-AS1, & Earlier ASDs Explanation of terms. Ret in The OIS selection list means retentive parameters. In the Toshiba inverter, two types of writes are available. 1. Writing parameters in the RAM 2. Writing parameter in the EEPROM and RAM The EEPROM has a limited number of write cycles, so it is recommended that the parameters that need to be written into the EEPROM should be declared as "Ret parameter" Example, to write in the basic parameter 0000: To write it in RAM, declare it as A0000 To write it in EEPROM, declare it as R0000 OIL-DS has a selection list of all basic drive registers/ corresponding register and bit parameters. See list below with explanation. Action Toggles Inverter On/Off Toggles Inverter Fwd/Rev Jogs Inverter when ON Reset Trip Set Operating Freq. Mon Freq, when drive is running Stores Data Basic Settings (RAM) Freq settings (EEPROM & RAM) OIS list Selection Run/Stop bit Fwd/Rev bit Jog bit Reset Trip bit Operating Freq Monitoring FC Data Registers Basic Parameters Ret. Basic Parameters I/O Parameters Ret. I/O Parameters Frequency Parameter Ret. Freq Parameters Drive Mode settings (RAM) Drive Mode set (EEPROM & RAM) Torque Settings (RAM) Drive Mode Parameters Ret. Drive Mode Para Torque Performance Basic Settings (EEPROM & RAM) I/O settings (RAM) I/O settings (EEPROM & RAM) Frequency settings (RAM) OIS Notation AR000 AF000 AJ000 AT000 AOF01 AMF00 AD000 A0000 ASD Notation Bit 10 in FA00 Bit 9 in FA00 Bit 8 in FA00 Bit 13 in FA00 FA01 FE00 D000 F000 Action Read - Write Read - Write Read - Write Read - Write Read - Write Read - Write Read - Write Read - Write R0000 A0100 R0100 F000 F100 F100 Read - Write Read - Write Read - Write A0200 F200 Read - Write R0200 F200 Read - Write A0300 F300 Read - Write R0300 A0400 F300 F400 Read - Write Read - Write Phone: 800.894.0412 - Fax: 888.723.4773 - Web: www.ctiautomation.net - Email: [email protected] Action Drive Mode settings (RAM) Drive Mode set (EEPROM & RAM) Torque Settings (RAM) Torque Settings (EEPROM & RAM) Accel/Decel time set (RAM) Accel/Decel time set (EEPROM RAM) Protection settings (RAM) Protection set (EEPROM & RAM) Panel Settings (RAM) Panel Set (EEPROM & RAM) Communication set (RAM) Comm Set (EEPROM & RAM) Set Commands Inverter Settings Read Codes Monitors Run Frequency Monitors Drive Status OIS list Selection Drive Mode Parameters OIS Notation A0300 ASD Notation F300 Action Read - Write Ret. Drive Mode Para Torque Performance R0300 A0400 F300 F400 Read - Write Read - Write Ret. Torque Perform Accel/Decel Time Para Ret. Acc/Dec Time Para Protection Parameters R0400 A0500 F400 F500 Read - Write Read - Write R0500 A0600 F500 F600 Read - Write Read - Write Ret. Prot Parameters Panel Parameters Ret. Panel Parameters Comm Parameters Ret. Comm Parameters Command Parameters Inverter Parameters Code Parameters Freq Monitoring State Monitoring R0600 A0700 R0700 A0800 R0800 AFA00 AFB00 AFC00 AFD00 AFE00 F600 F700 F700 F800 F800 FA00 FB00 FC00 FD00 FE00 Read - Write Read - Write Read - Write Read - Write Read - Write Read - Write Read - Write Read only Read only Read only Phone: 800.894.0412 - Fax: 888.723.4773 - Web: www.ctiautomation.net - Email: [email protected] 5.2 VF-S15 ASDs The following is the list of basic driver register/bit parameters: OIS Action OIS List Selection Notation ASD Notation # Action Registers Toggles Inverter On/Off Run/Stop bit FA000_10 Bit 10 in FA00 R/W Toggles Inverter Fed/Rev Fwd/Rev bit FA000_09 Bit 9 in FA00 R/W Jogs Inviter when ON Jog bit FA000_08 Bit 8 in FA00 R/W RESET TRIP Reset Trip bit FA000_13 Bit 13 in FA00 R/W Set Operating Freq Operating Freq FA001 FA01 R/W Mon Drive Freq Monitoring Freq FD000 FD00 R 71 Mon Drive Status Monitoring Data FE000 FE00 R 92 Mon Drive Status Monitoring Data FC000 FC00 R 100 Basic Settings Basic Parameters BP000 F000 R/W 26 Extended settings Ex Parameter F1 F100 R/W 100 Ret. Extended settings Ret. EX Para Ret. F1 RF100 R/W 100 Freq Parameters Freq. Parameter F2 F200 R/W 99 Ret. Freq Para Ret. Freq Para Ret. F2 RF200 R/W 99 Operation Mode Para Op Mode Para F3 F300 R/W 95 Ret. Operation Mode Para Ret. Op Mode Para Ret. F3 RF300 R/W 95 Torque Boost Para Torque boost Para F4 F400 R/W 100 Ret. Torque Boost Para Ret. Torque Boost Ret. F4 RF400 R/W 100 Accel/Decel Para Accel/Decel Para F5 F500 R/W 99 Ret. Accel/Decel Para Ret. Accel/Decel Ret. F5 RF500 R/W 99 Protection Parameters Ret. Protection Parameters Protect Parameters F6 F600 R/W 94 Ret. F6 RF600 R/W 94 Operation Panel Para Op Panel Para F7 F700 R/W 100 Ret. Operation Panel Para Ret. Op Panel Para Ret. F7 RF700 R/W 100 Comm Parameters Comm Parameters F8 F800 R/W 100 Ret. Comm Parameters Ret. Comm Para Ret. F8 RF800 R/W 100 PM Motor Parameters PM Motor Para F9 F900 R/W 85 Ret. PM Motor Parameters Ret. PM Motor Para Ret. F9 RF900 R/W 85 Ret. Protect Para Note: Parameters that need to be written in EEPROM, should be declared as "Retentive Parameters". Phone: 800.894.0412 - Fax: 888.723.4773 - Web: www.ctiautomation.net - Email: [email protected] 5.3 ASD Modbus RTU Slave Sometimes it is necessary to communicate with 2 or more different items of equipment on the same network. A simple example would be maintaining a constant flow in a pipe. This would require an ASD and a Flowmeter. The desired flow rate would be entered into the OIS45E PLUS. The OIS45E PLUS would read the actual flow rate from the flowmeter and then adjust the speed of the driver up or down accordingly. The system would look as follows: Modbus RS485 In the above example even though the drive is a Toshiba ASD and the flowmeter is a Toshiba magmeter, the communications protocol for each is different. Fortunately they can both be setup for Modbus protocol allowing the OIS45E PLUS display to communicate with both the drive and the flowmeter on the same network. The following information will cover how to setup the VF-S15 as Modbus slave communicating with an OIS45E PLUS setup as a Modbus master. For how to setup other Modbus slave devices on the Modbus network, please refer to the manufacturer (or marketing department) for that device. 5.3.1 Setup for Modbus Both the OIS PLUS display and the VF-S15 must be setup for Modbus operation: For the OIS PLUS, setup Com2 as a Modbus RTU master. For the VF-S15, set F829 = 1. This automatically sets up the VF-S15 as a Modbus RTU slave. No other settings in the VF-S15 are necessary. Make sure that the communications settings are still the same for both the Display and the ASD. Phone: 800.894.0412 - Fax: 888.723.4773 - Web: www.ctiautomation.net - Email: [email protected] 5.3.2 Determine Modbus Tags The VF-S15 registers numbers are hexadecimal numbers. To use these registers as Modbus registers; convert them to decimal and add 1. The command register FA00 becomes 64001 (64000 + 1). The frequency monitor register FD00 becomes 64769 (64768 + 1). Placing a 4 in the leftmost position of the register number makes it a Modbus holding register. Thus: ASD Register/Device Start/Stop: FA00_10 Fwd/Rev: FA00_9 Jog: FA00_8 Set Run Freq: FA01 Monitor Run Freq: FD00 Becomes Modbus Register/Device 464001_10 464001_9 464001_8 464002 464769 The first tag would be created as follows with the add tag wizard. The remaining tags should be created in the same manner. On Screen 1 attach the Modbus tags to the same objects to which the Toshiba tags were attached. Also create the same tasks using the Modbus tags. Note that if the Modbus register data is to be used in the OIS PLUS/V200 ladder program, a table of Modbus registers must be mapped to internal ladder registers. Then global tasks must be setup to copy this information back and forth. See section 3.3. Phone: 800.894.0412 - Fax: 888.723.4773 - Web: www.ctiautomation.net - Email: [email protected] 5.3.3 Global Tasks Necessary When using the VF-S15 in the Modbus mode, an extra step has to be programmed into the OIS PLUS or V200 PLC. Bits 14 and 15 in the command register FA00 must be set to ON. This gives commands from the display/PLC priority. The native Toshiba drivers do this automatically. But in Modbus mode it a separate step is required. First, create the task. Create the Command Priority tag, 464001_15 in the same manner. Second, make turning on these tags a Global Task. Now the Reads and Writes from/to the VF-S15 have priority. Phone: 800.894.0412 - Fax: 888.723.4773 - Web: www.ctiautomation.net - Email: [email protected]