1
M307E 03.6.CF.2 (Supplement )
Additions and corrections to the User’s Manual
for the COOLSCOPE
Thank you for purchasing a Nikon product.
This booklet contains important material, which you should read together with the the User’s
Manual for the COOLSCOPE.
-1-
Additions and corrections to the User’s Manual for the COOLSCOPE
<1>
Modify “7 Unpacking and Unclamping” in P.7 as indicated below.
(Change the underlined text.)
///////////////////////////////////////////////////////////////////////////////////////////////////////////////////////////////////////////////////////////////////////////////////////////////////////////
7
Unpacking and Unclamping
1)
Check the contents to ensure that the package contains the following:
・
・
・
・
・
COOLSCOPE
Hex wrench
Power cord <<deleted
User’s manual
Compact flash card
To avoid discoloration and fading of printed characters, do not use any organic solvents (e.g.,
alcohol, ethanol, thinner) on painted, plastic, and printed areas. Use of a silicon cloth is
recommended. To clean the display and other peripherals, please refer to their respective
instruction manuals.
///////////////////////////////////////////////////////////////////////////////////////////////////////////////////////////////////////////////////////////////////////////////////////////////////////////
<2>
Modify “7 Unpacking and Unclamping” in P.8 as indicated below.
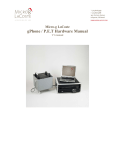
(Add the underlined figure.)
///////////////////////////////////////////////////////////////////////////////////////////////////////////////////////////////////////////////////////////////////////////////////////////////////////////
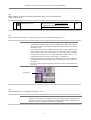
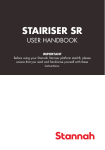
Enlarged
Section B
Section C
The cover (1) on the right side is detached.
///////////////////////////////////////////////////////////////////////////////////////////////////////////////////////////////////////////////////////////////////////////////////////////////////////////
<3>
Modify “2 Names and Functions of Buttons (Observation buttons)” in P.26 as indicated below.
(Add the underlined text.)
///////////////////////////////////////////////////////////////////////////////////////////////////////////////////////////////////////////////////////////////////////////////////////////////////////////
2
[MAG.] button
Changes the magnification
P.32
* Right-click, first to change the optical zoom
magnification, then to perform autofocus.
(Note: This function is enabled only when the
optical zoom magnification is adjusted from low
to high magnification)
///////////////////////////////////////////////////////////////////////////////////////////////////////////////////////////////////////////////////////////////////////////////////////////////////////////
-2-
Additions and corrections to the User’s Manual for the COOLSCOPE
<4>
Modify “2 Names and Functions of Buttons (Observation buttons)” in P.26 as indicated below.
(Add the underlined text.)
///////////////////////////////////////////////////////////////////////////////////////////////////////////////////////////////////////////////////////////////////////////////////////////////////////////
6
[APERTURE] button
Adjusts the aperture (coarse movement)
P.42
* Right-click to adjust the aperture (fine
movement).
///////////////////////////////////////////////////////////////////////////////////////////////////////////////////////////////////////////////////////////////////////////////////////////////////////////
<5>
Add the following text and figure to “3 Bringing the Image into Focus (Automatic Focusing)” in P.31.
///////////////////////////////////////////////////////////////////////////////////////////////////////////////////////////////////////////////////////////////////////////////////////////////////////////
NOTE:
• When the [AF] button is used for the first time following specimen-slide
replacement, always select 5 x as the magnification. Note also that the
[AF] button must be used with the specimen positioned at the center of
the field of view.
• If it is difficult to bring the image into focus, display a high-contrast area
of the image at the center of the field of view and then click on the [AF]
button again. Note that right-clicking on the [AF] button enables
confirmation of the AF area. For more information, please refer to “1.9
Displaying the AF area on the micro image” in Chapter VI.
• During autofocusing, a progress bar is displayed on the micro image to
indicate the process status. When the bar reaches the end, autofocus is
complete.
• The color of the progress bar will be the same as the color selected for
the scale.
Progress bar
///////////////////////////////////////////////////////////////////////////////////////////////////////////////////////////////////////////////////////////////////////////////////////////////////////////
<6>
Add the following text to “4.2 Changing magnifications” in P.32.
///////////////////////////////////////////////////////////////////////////////////////////////////////////////////////////////////////////////////////////////////////////////////////////////////////////
NOTE:
Right-click, first to change the optical zoom magnification, then to perform
autofocus. This function is enabled only when the optical zoom magnification is
adjusted from low to high magnification. If the magnification is changed from
high to low, right-clicking will not activate autofocus.
///////////////////////////////////////////////////////////////////////////////////////////////////////////////////////////////////////////////////////////////////////////////////////////////////////////
-3-
Additions and corrections to the User’s Manual for the COOLSCOPE
<7>
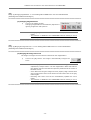
Modify “2 Specifying the Image Storage Format, Storage Medium, and File Name” in P.36 as indicated below.
(Add/change the underlined text.)
///////////////////////////////////////////////////////////////////////////////////////////////////////////////////////////////////////////////////////////////////////////////////////////////////////////
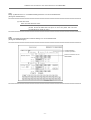
On delivery, the COOLSCOPE has the following settings set for image storage format, storage
medium, and filename.
No.
1
Item
Storage format
Initial setting
Image file format
BMP
Image size
1280*960
Image quality
FINE
2
Storage medium
Compact Flash Card
3
Folder name
F
4
File name
IMAGE
Change the image storage format, storage medium, and/or file name as necessary. The
settings remain in effect until the power switch of the COOLSCOPE is turned off. If you use the
[POWER OFF] button to switch off the COOLSCOPE, the current settings for image file format,
image quality, and storage medium are saved. These settings are reloaded the next time power
is switched on.
///////////////////////////////////////////////////////////////////////////////////////////////////////////////////////////////////////////////////////////////////////////////////////////////////////////
<8>
Add the following text to “3 Capturing an Image” in P.38.
///////////////////////////////////////////////////////////////////////////////////////////////////////////////////////////////////////////////////////////////////////////////////////////////////////////
NOTE:
•
When a scale is displayed on the screen, the scale is also added to the
saved image. However, the scale cannot be displayed when the image
size is 2560 x 1920.
///////////////////////////////////////////////////////////////////////////////////////////////////////////////////////////////////////////////////////////////////////////////////////////////////////////
<9>
Add the following text to “2.2 Closing/opening the aperture” in P.42.
///////////////////////////////////////////////////////////////////////////////////////////////////////////////////////////////////////////////////////////////////////////////////////////////////////////
NOTE:
•
Right-click to enable adjustment in 5% increments (range: 25% to
100%).
///////////////////////////////////////////////////////////////////////////////////////////////////////////////////////////////////////////////////////////////////////////////////////////////////////////
-4-
Additions and corrections to the User’s Manual for the COOLSCOPE
<10>
Add the following text to “4.1 Enabling the saving of observation conditions to the CF CARD” in P.44.
///////////////////////////////////////////////////////////////////////////////////////////////////////////////////////////////////////////////////////////////////////////////////////////////////////////
NOTE:
If you use the [POWER OFF] button to switch off the COOLSCOPE, the
observation save enable/disable conditions are saved. These settings are
reloaded the next time power is switched on.
///////////////////////////////////////////////////////////////////////////////////////////////////////////////////////////////////////////////////////////////////////////////////////////////////////////
<11>
Modify “4.2 Saving the current observation conditions” in P.44 as indicated below.
(Change the underlined text.)
///////////////////////////////////////////////////////////////////////////////////////////////////////////////////////////////////////////////////////////////////////////////////////////////////////////
1)
Click on the [MEMORY] button.
A number appears on the macro image. At the same time, the [RECALL] button
with the same number is displayed in the Memory area. Numbers are assigned
automatically incremented by 1.
///////////////////////////////////////////////////////////////////////////////////////////////////////////////////////////////////////////////////////////////////////////////////////////////////////////
-5-
Additions and corrections to the User’s Manual for the COOLSCOPE
<12>
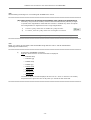
Modify “4.5 Replicating a set of observation conditions saved on the CF CARD” in P.46 as indicated below.
(Add/change the underlined text and figure.)
///////////////////////////////////////////////////////////////////////////////////////////////////////////////////////////////////////////////////////////////////////////////////////////////////////////
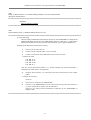
3)
Click on the [RECALL] button.
A list of Recall folders is displayed.
List of Recall folders
NOTE:
“[All clear] the Memory before reading out the CF card.” appears if any of
the observation conditions remain undeleted from the COOLSCOPE
memory. The message will disappear automatically.
4)
Select the name of the folder in which the desired set of observation conditions is saved.
Reading of stored observation conditions starts.
Click the [CLOSE] button to close the Recall folder list and halt the reading operation.
5)
Click on the NUMBER button with a number corresponding to the set of observation
conditions to be replicated.
The set of observation conditions for the clicked NUMBER button is replicated.
In the absence of a specimen slide in the COOLSCOPE, the image saved on the CF CARD
is replicated.
///////////////////////////////////////////////////////////////////////////////////////////////////////////////////////////////////////////////////////////////////////////////////////////////////////////
-6-
Additions and corrections to the User’s Manual for the COOLSCOPE
<13>
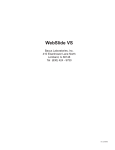
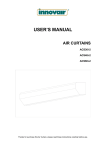
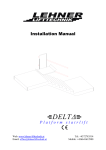
Modify “3.1 NetWork Settings submenu” in P.62 as indicated below.
(Add/change the underlined text and figure.)
///////////////////////////////////////////////////////////////////////////////////////////////////////////////////////////////////////////////////////////////////////////////////////////////////////////
(1) Submenu buttons
(2) [Return to Window] button
(3) Enable NetWork
(4) Read Only
(5) Internal Server
(6) Enable FTP Client
(10) IP Authority
(7) External Server
(8) [SAVE] button
(9) [Default] button
///////////////////////////////////////////////////////////////////////////////////////////////////////////////////////////////////////////////////////////////////////////////////////////////////////////
<14>
Modify “(4) Read Only (FTP、WEB: disable Write/Control)” in “3.1 NetWork Settings submenu” in P.62 as indicated below.
(Change the underlined text.)
///////////////////////////////////////////////////////////////////////////////////////////////////////////////////////////////////////////////////////////////////////////////////////////////////////////
(4) Read Only (FTP、WEB: disable Write/Control)
Allows you to write-enable or write-disable the Web and FTP server.
To operate the COOLSCOPE from another PC through the Web screen, as when
magnifications are changed, uncheck this box so that the asterisk (*) disappears. Note,
however, that this option may be left write-disabled if you simply wish to retrieve
images.
* = Write/COOLSCOPE operation disabled
= Write/COOLSCOPE operation enabled
///////////////////////////////////////////////////////////////////////////////////////////////////////////////////////////////////////////////////////////////////////////////////////////////////////////
-7-
Additions and corrections to the User’s Manual for the COOLSCOPE
<15>
Modify “(7) External Server” in “3.1 NetWork Settings submenu” in P.64 as indicated below.
(Change the underlined text.)
///////////////////////////////////////////////////////////////////////////////////////////////////////////////////////////////////////////////////////////////////////////////////////////////////////////
- GateWay
Sets the gateway address.
///////////////////////////////////////////////////////////////////////////////////////////////////////////////////////////////////////////////////////////////////////////////////////////////////////////
<16>
Add the following text to “3.1 NetWork Settings submenu” in P.64.
///////////////////////////////////////////////////////////////////////////////////////////////////////////////////////////////////////////////////////////////////////////////////////////////////////////
(10) [IP Authority]
Used to specify IP addresses permitted to connect to the COOLSCOPE. To designate IP
addresses allowed to connect to the COOLSCOPE, display an asterisk ("*") and register
authorized IP addresses by the procedures given below. (Up to eight IP addresses.)
Registering IP addresses authorized to connect
1)
Insert a CF card into the PC.
2)
Create a folder named "\NET" on the CF card.
3)
Create a file and list of IP addresses authorized to connect.
- Example of data 192.168.10.2
192.168.10.10
192.168.10.36
192.168.21.*
(You can use the wild card character ("*"). In this example, the wild card character *
represents all values from 1 through 254.)
4)
Assign a name with the ".ip" extension to the text file and save it to the "\NET"
folder.
- Example of filename Autho.ip
5)
Insert the CF card into the COOLSCOPE.
6)
Connect to the COOLSCOPE from the external PC using Telnet and execute a
"w_IPA" command to register the IP addresses.
(Refer to "3.5 Using Telnet Commands to Operate on the COOLSCOPE" in
Chapter VIII.)
///////////////////////////////////////////////////////////////////////////////////////////////////////////////////////////////////////////////////////////////////////////////////////////////////////////
-8-
Additions and corrections to the User’s Manual for the COOLSCOPE
<17>
Modify “(3) Date and Time” in “3.2 Additional Settings submenu” in P.65 as indicated below.
(Change the underlined text.)
///////////////////////////////////////////////////////////////////////////////////////////////////////////////////////////////////////////////////////////////////////////////////////////////////////////
(3) Date and Time
Enter the date and time here.
NOTE:
The timer stops if the COOLSCOPE is left unpowered for an extended
period. Check the date and time prior to use if the power has not been
turned ON for a month or more.
///////////////////////////////////////////////////////////////////////////////////////////////////////////////////////////////////////////////////////////////////////////////////////////////////////////
<18>
Modify “3.2.2 Setting Essential Items—Network Settings” in P.72 as indicated below.
(Change the underlined figure.)
///////////////////////////////////////////////////////////////////////////////////////////////////////////////////////////////////////////////////////////////////////////////////////////////////////////
Enables/disables
network operation.
Sets the IP address of the
COOLSCOPE.
///////////////////////////////////////////////////////////////////////////////////////////////////////////////////////////////////////////////////////////////////////////////////////////////////////////
-9-
Additions and corrections to the User’s Manual for the COOLSCOPE
<19>
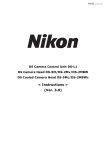
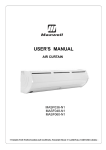
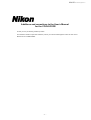
Modify “3.3.3 WEB screen functions” in P.77 as indicated below.
(Change the underlined text and figure.)
///////////////////////////////////////////////////////////////////////////////////////////////////////////////////////////////////////////////////////////////////////////////////////////////////////////
Micro image
Controller
(1) [RELOAD] button
(2) [INTERVAL TIMER]
list box
(3) [RUN] button
(4) [MOVE] button
(16) [+AF] Check box
(5) [MAG.] button
(6) [AF] button
(7) [FOCUS] button
(8) [DIGITAL ZOOM] button
(9) [APERTURE] button
(10) [AE] button
(11) [DOWNLOAD] button
(12) [TYPE] list box
(13) [SIZE] list box
(14) [QUALITY] list box
(15) [ANNOTATION]
check box
Macro image
///////////////////////////////////////////////////////////////////////////////////////////////////////////////////////////////////////////////////////////////////////////////////////////////////////////
- 10 -
Additions and corrections to the User’s Manual for the COOLSCOPE
<20>
Add the following text and figure to “3.3.3 WEB screen functions” in P.77
///////////////////////////////////////////////////////////////////////////////////////////////////////////////////////////////////////////////////////////////////////////////////////////////////////////
(16) [+AF] Check box
NOTE:
Allows automatic enabling/disabling of autofocusing after
optical zoom magnification adjustment.
If the Web screen displays the following image, the COOLSCOPE network
setting is set to "Read Only."
(Refer to "3.1 NetWork Settings submenu" in Chapter VII.)
///////////////////////////////////////////////////////////////////////////////////////////////////////////////////////////////////////////////////////////////////////////////////////////////////////////
- 11 -
Additions and corrections to the User’s Manual for the COOLSCOPE
<21>
Modify “(2) Selecting intervals for updating the micro image“ in “3.3.4 Working with the WEB screen” in P.78 as indicated below.
(Change the underlined text and figure.)
///////////////////////////////////////////////////////////////////////////////////////////////////////////////////////////////////////////////////////////////////////////////////////////////////////////
(2) Selecting intervals for updating the micro image
Select intervals for updating the micro image. Eight options – off, 5 sec, 10 sec, 30 sec,
1 min, 2 min, 5 min, and 10 min – are available to choose from for updating intervals.
The updating intervals are set at “off” when the WEB screen opens.
1)
Click on the [INTERVAL TIMER] list box and select
the desired intervals from the list.
///////////////////////////////////////////////////////////////////////////////////////////////////////////////////////////////////////////////////////////////////////////////////////////////////////////
<22>
Modify “(2) Selecting intervals for updating the micro image“ in “3.3.4 Working with the WEB screen” in P.78 as indicated below.
(Change the underlined figure.)
///////////////////////////////////////////////////////////////////////////////////////////////////////////////////////////////////////////////////////////////////////////////////////////////////////////
(3) Starting/pausing updating of the micro image
1)
Click on the [RUN] button to start micro image
updating.
2)
NOTE:
Click on the [RUN] button again to pause updating.
The [RUN] button becomes a [Pause] button when updating of the micro
image starts.
///////////////////////////////////////////////////////////////////////////////////////////////////////////////////////////////////////////////////////////////////////////////////////////////////////////
<23>
Add the following text to “(4) Changing the observation position“ in “3.3.4 Working with the WEB screen” in P.78.
///////////////////////////////////////////////////////////////////////////////////////////////////////////////////////////////////////////////////////////////////////////////////////////////////////////
NOTE:
・ This function is disabled if the COOLSCOPE network setting is set to
"Read Only."
///////////////////////////////////////////////////////////////////////////////////////////////////////////////////////////////////////////////////////////////////////////////////////////////////////////
- 12 -
Additions and corrections to the User’s Manual for the COOLSCOPE
<24>
Modify “(5) Changing magnifications “ in “3.3.4 Working with the WEB screen” in P.79 as indicated below.
(Add/change the underlined text and figure.)
///////////////////////////////////////////////////////////////////////////////////////////////////////////////////////////////////////////////////////////////////////////////////////////////////////////
(5) Changing magnifications
1)
Click on the [MAG.] button.
Changing magnifications automatically adjusts the
lighting brightness and aperture.
NOTE:
・ Changing magnifications from the PC automatically updates the micro
image.
・ This function is disabled if the COOLSCOPE network setting is set to
"Read Only."
///////////////////////////////////////////////////////////////////////////////////////////////////////////////////////////////////////////////////////////////////////////////////////////////////////////
<25>
Modify “(6) Bringing the image into focus “ in “3.3.4 Working with the WEB screen” in P.79 as indicated below.
(Add/change the underlined text and figure.)
///////////////////////////////////////////////////////////////////////////////////////////////////////////////////////////////////////////////////////////////////////////////////////////////////////////
(6) Bringing the image into focus
The image is brought into focus with 5x selected as the magnification.
1)
NOTE:
Click on the [AF] button. The image is automatically brought into
focus.
・ When the [AF] button is used for the first time following specimen-slide
replacement, always select 5 x as the magnification. Note also that the
[AF] button must be used with the specimen positioned at the center of
the field of view.
・ If it is difficult to bring the image into focus, display a high-contrast area
of the image at the center of the field of view and then click on the [AF]
button again.
・ Executing auto focus from the PC automatically updates the micro
image.
・ This function is disabled if the COOLSCOPE network setting is set to
"Read Only."
///////////////////////////////////////////////////////////////////////////////////////////////////////////////////////////////////////////////////////////////////////////////////////////////////////////
- 13 -
Additions and corrections to the User’s Manual for the COOLSCOPE
<26>
Modify “(7) Adjusting the image focus“ in “3.3.4 Working with the WEB screen” in P.80 as indicated below.
(Add/change the underlined text and figure.)
///////////////////////////////////////////////////////////////////////////////////////////////////////////////////////////////////////////////////////////////////////////////////////////////////////////
(7) Adjusting the image focus
1)
Click on the [FOCUS] button.
NOTE:
・ Adjusting the image focus from the PC automatically updates the micro
image.
・ This function is disabled if the COOLSCOPE network setting is set to
"Read Only."
///////////////////////////////////////////////////////////////////////////////////////////////////////////////////////////////////////////////////////////////////////////////////////////////////////////
<27>
Add the following text to “(9) Adjusting the aperture “ in “3.3.4 Working with the WEB screen” in P.80.
///////////////////////////////////////////////////////////////////////////////////////////////////////////////////////////////////////////////////////////////////////////////////////////////////////////
NOTE:
・ This function is disabled if the COOLSCOPE network setting is set to
"Read Only."
///////////////////////////////////////////////////////////////////////////////////////////////////////////////////////////////////////////////////////////////////////////////////////////////////////////
<28>
Add the following text to “(10) Adjusting the image brightness “ in “3.3.4 Working with the WEB screen” in P.80.
///////////////////////////////////////////////////////////////////////////////////////////////////////////////////////////////////////////////////////////////////////////////////////////////////////////
NOTE:
・ This function is disabled if the COOLSCOPE network setting is set to
"Read Only."
///////////////////////////////////////////////////////////////////////////////////////////////////////////////////////////////////////////////////////////////////////////////////////////////////////////
- 14 -
Additions and corrections to the User’s Manual for the COOLSCOPE
<29>
Add the following text and figure to “3.3.4 Working with the WEB screen” in P.82.
///////////////////////////////////////////////////////////////////////////////////////////////////////////////////////////////////////////////////////////////////////////////////////////////////////////
(16) Setting autofocus to be performed immediately after optical zoom magnifications
When the [+AF] function is enabled, autofocus activates automatically after any changes
in optical zoom magnification. Note that this function is enabled only when the optical
zoom magnification is adjusted from low to high magnification.
1)
Click the [+AF] check box to enable the [+AF] function.
2)
To cancel, click the [+AF] check box once again to uncheck.
NOTE:
After autofocusing is completed, the micro image is automatically updated.
///////////////////////////////////////////////////////////////////////////////////////////////////////////////////////////////////////////////////////////////////////////////////////////////////////////
<30>
Modify “3.4.1 Using FTP Commands to Get COOLSCOPE Image Files from a PC” in P.80 as indicated below.
(Add/change the underlined text.)
///////////////////////////////////////////////////////////////////////////////////////////////////////////////////////////////////////////////////////////////////////////////////////////////////////////
3)
Execute the cd RAMIBOX command.
Eight file names that are virtual names will be displayed.
•
IMG1280.bmp
•
IMG1280.jpg
•
IMG640.bmp
•
IMG640.jpg
•
IMG320.bmp
•
IMG320.jpg
•
MACRO.bmp
•
MACRO.jpg
The time of day for the files displayed at this time is 0 hours 0 minutes. The actually
acquired files are given the time of day when you issued the Get command.
///////////////////////////////////////////////////////////////////////////////////////////////////////////////////////////////////////////////////////////////////////////////////////////////////////////
- 15 -
Additions and corrections to the User’s Manual for the COOLSCOPE
<31>
Modify “Setting External Servers of the COOLSCOPE—Network Settings” in P.91 as indicated below.
(Change the underlined figure.)
///////////////////////////////////////////////////////////////////////////////////////////////////////////////////////////////////////////////////////////////////////////////////////////////////////////
Enables/disables FTP client
function.
Sets the IP address of
the server.
///////////////////////////////////////////////////////////////////////////////////////////////////////////////////////////////////////////////////////////////////////////////////////////////////////////
<32>
Modify “6 Transporting (Clamping)” in P.110 as indicated below.
(Add the underlined figure.)
///////////////////////////////////////////////////////////////////////////////////////////////////////////////////////////////////////////////////////////////////////////////////////////////////////////
Enlarged
Section B
Section C
The cover (1) on the right side is detached.
///////////////////////////////////////////////////////////////////////////////////////////////////////////////////////////////////////////////////////////////////////////////////////////////////////////
- 16 -