1
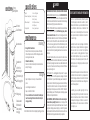
instruction manual
Read, understand, and follow all instructions and
warnings in this manual before operating this stove.
This stove is for outdoor use only.
This stove is intended to burn solid
biomass only. Never add liquids, gels,
plastics, or other accelerants into stove.
Metal surfaces will be hot when stove is
operating and present a burn hazard.
Not designed for use in heavy rain. Keep
Power Module dry.
Follow all local fuel collection and firemaking regulations. Cooking and fire
policies vary from season to season and
park to park. Only you can prevent forest
fires.
Thank
you
for
purchasing
a
BioLite.CampStove.
The information contained in
this instruction manual as well as
videos to help clarify operation
are available on our website.
http://www.biolitestove.com/support
for product and service inquiries, contact:
P.O. Box 21905, Brooklyn, NY 11201 USA
[email protected]
www.biolitestove.com
CampStove
0
at home
BEFORE FIRST USE OF THIS PRODUCT, please follow
the instructions below on how to charge the
rechargeable lithium-ion battery.
Like a car, your BioLite CampStove contains a
battery to aid in easy startup. Before first use, it is
recommended that you charge the battery with
an external power source. If the stove is unused for
more than six months, repeat these steps to ensure
your stove’s battery is properly charged.
1. Using the included double ended USB cable,
connect the USB port on the CampStove’s Power
Module to a USB charging port (on a computer,
laptop, USB wall charger, etc).
2. The light around the USB port
on the Power Module will flash
orange while charging.
3. The light will stop flashing and
become solid orange when
the battery is ready for first use.
(May take up to 2 hours.)
3
Note: “fuel” refers to solid biomass, e.g. wood, pine
cones, etc., never use liquid fuels or charcoal.
1. Slide Power Module probe into stove
body side. There will be a gap between
the Power module and the body. This
gap is intentional and is not meant to
be sealed.
2. Fully extend all legs to lock Power
Module in place.
3. Place on level ground away from any
overhanging branches. Clear away
dry brush on the ground around the
stove. Have water handy in case of
accident.
4. Place small, loose, and dry fuel in Fuel
Chamber. See right for suggestions on
firestarting.
5. Light the fuel. Use a long match or
the included firelighters to aid in safe
firelighting.
6. After ten seconds, push Power Button
to start fan. (This sets fan to LO to start
oxygen flow.) If fan turns off, push
Power Button again.
Fire-building suggestions
2
✓
X
!
WARNING
• Exercise extreme caution when moving pot
or adding fuel as pot and its contents are hot.
• As the pot is placed on the stove, flames may
bend around the pot and present a burn
hazard.
2
fuel
sizing
guide
Cell phones
Smartphones
MP3 Players
LED Flashlights
Headlamps
Rechargable Batteries
*Not all manufacturer’s products
may be supported.
!
2
run
1. As fire builds, add larger dry fuel. At this point, you
can push Power Button to HI. (This sets fan to HI to
increase oxygen flow.)
2. Use Power Button to toggle between LO and HI
to optimize fire. The fan indicator light will glow
green when set to HI, and orange when set to LO.
While the fan has the ability to greatly increase
fire efficiency, the high setting can blow out a
weak flame. When starting the fire or restarting
the fire from embers, use the LO fan setting. As the
fire grows to a roar, use the HI fan setting. To cool
down fire to simmer, use the LO fan setting.
3. At peak operation, the stove can be packed to
the top with fuel.
CAUTION
touch here
1. Charging capability is ready when the bar light
around the USB port glows green. The bar light
above the USB will glow orange when USB is not
ready, and green when USB is ready.
2. Attach your device’s charging cable to the USB
port. Power output varies with the strength of your
fire. For maximum output, maintain a well-fueled
fire with fan set to HI. Some devices charge
continuously. Other devices, like smartphones,
will charge in regular
NOTE
intervals of boosted
The CampStove supports
power output.
charging the following:*
NOTE
NOTE
Avoid using wet or damp
wood or leaves. These
will smoke excessively
and burn poorly.
charge
1. Place pot directly onto stove Pot
Stand. The pot should be placed so
the pot handle is aligned with a Pot
Stand support so flames do not heat
the handle.
2. During cooking, remove pot carefully
and add dry fuel as needed.
3. To simmer, let fire burn down. Push
Power Button to return fan to LO.
Recommended fuels for best fires:
• Tinder: dried twig shavings, birch bark
• Kindling: dry twigs (e.g. evergreen)
• Use firelighters to aid in firestarting
• Dry, dense fuels will burn hottest and
longest (e.g. oak, maple, fir, birch)
Arrangement
• Break twigs to fit. Crisscross dry twigs
above the tinder and kindling.
• Loosely fill Stove Chamber. Avoid
blocking the jets on the side of the
chamber.
1
4
cook
To avoid
damage to the
Power Module,
ensure that it is
never downwind
of the flame.
1
start up
WARNING
When plugging and unplugging devices, do
so carefully and without touching any metal
surfaces as they can burn you. Keep devices
away from flames and protected from spills.
operating
tinder kindling small larger
dry
twigs
twigs
example of
start up fuel
arrangement
5
shut down
1. Allow fire to burn down to cold ash. For live
embers, pour into a dugout hole, extinguish with
water, and cover with dirt.
2. The Power Module will turn off automatically as the
stove cools. To manually power
3C
off, hold Power Button for three
seconds. After a manual turn
off, the fan may automatically
turn back on to keep the Power
3B
Module cool and protected from
the residual heat.
3A
3. To store the stove after the Fuel
Chamber is cool,
A. Fold legs down.
B. Remove Power Module.
C. Slide Power Module into
Fuel Chamber.
!
WARNING
• To protect the stove’s components, never
pour water into the stove.
• When dumping embers, remember to
extinguish and bury embers because live
embers can start fires!
not here
Metal Surfaces will be
hot. While stove is hot
or running, only touch
plastic parts.
&
tips+troubleshooting
1. Use dry fuel whenever possible.
2. For hottest and most efficient fire, make sure that
there is space between the pieces of wood,
the holes on the side of the Fuel Chamber are
not blocked, and all wood is entirely inside Fuel
Chamber.
3. To avoid excessive smoking, use small twigs to
restart a fire from embers.
Problem
USB not
charging
(orange bar
light)
Cause
Solution
Insufficient fire
Add more fuel to fire.
Battery not
charged
Add more fuel to fire to charge
battery.
Check cable connection. Unplug
cable on both ends and try again.
USB not
charging
(green bar
light)
Unplug cable on both ends. Hold
power button for 3 seconds and wait
for the Power Module to automatically
turn back on. When charging
capability restores, replug cable.
If problem persists, contact BioLite.
Battery not
charged (if
flashing light)
Fan not
running when
button pressed (if no flashing
light)
Charge battery by plugging Power
Module USB connection to computer.
Contact BioLite.
for more troubleshooting, please visit www.biolitestove.com
instructions
your
anatomy ofCampStove
Pot Stand
Fuel Chamber
Power Module
specifications
! DANGER
Weight
2 lbs. 1 oz. / 935 grams
Fire Power Output (peak):
3.4 kW [lo mode]
5.5 kW [hi mode]
USB Power Output:
2W @ 5V [max continuous]
4W @ 5V [peak]
Pot Weight Limit:
8 lbs or 1 gallon of liquid
maintenance
cleaning
• Orange Plastic Power Module
Remove from stove body and wipe down with a damp
cloth with soap and water. DO NOT submerge in water or
allow to get excessively wet.
Power Button
LOW/HI Fan
Indicator Lights
USB Indicator Light
• Stainless Steel Stove Body
Clean out all ash and scrub with nylon brush. Dishwasher
safe. Dry thoroughly.
storage
USB Charging Port
• Keep CampStove in a cool, dry, and well-ventilated
place.
USB Drop Cover
• Avoid storage in excessive heat.
Folding Legs
• If stove is stored for more than six months, the battery may
need to be recharged. Follow the instructions in Step 0 to
charge your battery.
Double-ended
USB cable (for
startup battery
charging)
• Keep out of reach of children
Contact BioLite for instructions on properly recycling your stove.
CARBON MONOXIDE, EXPLOSION, FIRE, BURN, & CORROSION HAZARD
CARBON MONOXIDE HAZARD. This stove is for OUTDOOR USE ONLY,
never for use in tents, vehicles, indoors, or other places without fresh
air. Carbon Monoxide inhalation can cause death or brain damage.
Carbon Monoxide (CO) is produced when fuel burns.
EXPLOSION - FIRE HAZARD. This stove is intended to burn solid biomass
(e.g. wood, pinecones, etc) only. NEVER add liquids, gels, plastics,
or other accelerants into stove. This stove is hot during use and can
ignite flammable materials too close to the flame. Keep flammable
materials at least 18 inches from the sides and 48 inches from the
top of the stove. Keep gasoline and other flammable liquids and
vapors well away from the stove. Clean stove frequently to avoid
grease accumulation and possible grease fires. Never leave stove
unattended.
BURN HAZARD. Metal surfaces on stove will be hot when stove is
operating and present a burn hazard. Handle stove by Power Module
only. Flames may be large. Never leave stove unattended when hot
or in use. Do not move stove while lit. Keep out of reach of children.
Always use on level ground.
BATTERY HAZARD. The rechargeable battery inside the power
module may present a risk of fire, explosion, leakage or chemical
burn if mishandled. To prevent hazards, keep power module dry to
preclude corrosion of the battery. Keep power module and battery
well away from other heat sources. Do not expose the battery to
excessive physical shock, pressure, or vibration. DO NOT attempt to
change the battery yourself. If the battery does not recharge, please
contact BioLite for repair information.
READ, UNDERSTAND, AND FOLLOW ALL instructions and warnings in
this manual before operating this stove. Failure to comply with the
precautions and instructions provided with these stoves can result in
property loss or damage, serious bodily injury, or death. Only persons
who can understand and follow the instructions should use this stove.
Contact BioLite with any questions about safety or operation.
BIOLITE CAMPSTOVE WARRANTY INFORMATION
BioLite has a 1-year limited warranty. Should this product
not function properly under normal use within 1 year of
purchase, contact BioLite or your local distributor for return
process information. BioLite alone will determine if the
problem is due to a manufacturing flaw. If so, BioLite will
repair or replace the unit at its discretion and return it to
you, free of charge.
This warranty does not cover any damage or malfunction
arising from misuse, improper maintenance, negligence,
normal wear and tear, or accident. The CampStove
may only be used as a cooking appliance or charger.
Never alter the CampStove in any way or use with any
part or accessory not expressly approved by BioLite. This
warranty applies only to the original purchaser and proof
of purchase is required.
All implied warranties required under law are limited to one
year. BioLite shall not be liable for any consequential or
incidental damages whatsoever. BioLite shall not be held
liable if the product or defect herein causes damage to or
failure of other equipment.
This warranty gives you specific legal rights. You may
also have other rights that vary from state to state. Some
states do not allow the exclusion or limitation of incidental
or consequential damages, or limitation or exclusion of
implied warranties, so the above exclusions or limitations
may not apply to you.