1
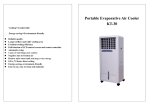
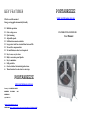
KEY FEATURES
Effective and Economical
Energy-saving Environmentally-friendly
!
!
!
!
!
!
!
!
!
!
!
!
!
!
Reliable operation.
Cools a large area.
Quiet running.
Adjustable speed.
Full function remote controller.
Large water tank for extended time between fills.
No need for compressed air.
No installation, no duct work required.
Easy to use, easy to clean.
Body is corrosion-proof plastic.
Easy to maintain.
Fully portable.
Can be attached to standard garden hose.
Timer function for auto start or auto stop.
PORTABREEZE
www.portabreeze.com.au
Factory 3 / 20 CAPITAL COURT
BRAESIDE
VICTORIA
3095
AUSTRALIA
(03) 9580 3214
[email protected]
FACEBOOK https://www.facebook.com/pages/Portabreeze/575674909138425
PORTABREEZE
www.portabreeze.com.au
EVAPORATIVE AIR COOLER
User Manual
TROUBLESHOOTING
INTRODUCTION
Thank you for purchasing our product. We trust it will give you long and trouble free
service.
Malfunction
-Operating screen
stays dark
Reason
-No power
-Main control board
failure
-Fuse is blown
-Panel failure
Remedy/Solution
The cooler is a high-tech product, showing simplicity and outstanding reliability, due
-Check unit is plugged in
-Change control board
-Change fuse
-Change panel
-Check to ensure there is
nothing preventing free
rotation of the fan
-Clean the cooling pad and
dust filter
-Change the fan
-Change the main control
board
to its European design origin.
Its working principle is that water evaporation uses up the surrounding heat and causes
the temperature to cool down.
When water is continuously distributed onto the cooling pad surface, the air being
-Display is normal
but without air
flow or the air
speed is too low
-The fan is jammed
-Cooling pad or dust
filter is blocked
-Fan is distorted
-Main control board
failure
-Motor does not
respond to control
panel
-Main control board
failure
-Panel failure
-Change the main control
board
-Change panel
-Water leaking
from drain valve
-Drain valve is loose
-Tighten drain valve nut
-Clean drain valve
This cooler is currently being used in many different industries and applications in
-Check water pipe to top of
filter pad and reattach or
tighten as necessary
Company offices, shops, hospitals, schools, workshops, workers dormitories, outdoor
-Water drops
splash out of the
air diffuser
-Dirt in valve
-Water pipe
come loose
has
drawn through the pad causes the water to evaporate, making the air cool and fresh.
The circulating water moves down to the reservoir, where it is again pumped up
through the cooling pads. If the hose option is being used (supplied as standard), a float
valve keeps the reservoir full continuously. If filled manually, the big 60 Litre capacity
reservoir ensures hours of uninterrupted operation. There is a digital level indicator to
quickly check the amount of water remaining.
APPLICATIONS
many countries.
teahouse/coffee bars, restaurants, recreation facilities.
Manufacturing:
Textile, machinery, ceramic, refined chemical industries, metallurgy, hardware and
leather industries.
Industrial processing:
NOTE: This troubleshooting is for reference purposes only. If any technical assistance
Electronics, clothes & shoe making, plastics, food industries, packaging.
is needed, please contact your distributor for service/repair
Others:
Indoor sports courts, bakeries, playgrounds, laundries, kitchens, vegetable markets,
gymnasiums, underground parking lots, greenhouses, chicken and pig farms, gardens,
the list goes on…
-08-
-01-
TECHNICAL SPECIFICATION
MAINTENANCE
MODEL
KMB-1B-1
Power supply/Frequency (V/HZ)
220-240/50
Power Consumption (W)
550
Fan Type
Axial
Water Consumption (L/H)
10-15
Water Capacity (L)
60
Dimension (L*W*H) (mm)
1130×620×1410
Weight(kg)
60
For best results and long term operation,
regular maintenance is essential.
To ensure the cooler delivers fresh and clean air, regularly change the water
when dirty, and clean both the dust filter and the cooling pad.
1) Remove the filter pad by unscrewing the 4 screws on the rear of the cooler,
Effective Cooling Area (M )
150-200
then lift the pad and pull out at the bottom to release. To replace the pad,
Climate
T
slide up into the slot under the top of the cooler, push in at the bottom and
2
allow to drop into the lower slot.
2)
TECHNICAL FEATURE
Clean the pad from the inner-side to out-side of pad (inner side is towards
motor). Never use any liquid detergent. Never use pressurized water, as it
may cause damage to the pad.
3) Unscrew the drainage lid to let dirty water flow out, then clean the water
tank thoroughly with a soft cloth. Wash off dirt on the water sensor, water
pump and the float valve. Rinse thoroughly.
4)
Use mild soap and soft clean cloth when cleaning the cooler casing. Do not
use any caustic chemical detergent that may cause damage to the surface of
the cooler.
5
To prevent buildup of algae and biological organisms in the reservoir,
regularly
add
chlorine/bromine tablets as per tablet manufacturer
recommendation for evaporative cooler reservoirs.
-02-
-07-
KEY COMPONENTS
OPERATION INSTRUCTION
WARNING
1. All electrical repairs must only be carried out by a suitably qualified
electrician, after all power is disconnected.
2. This cooler is not intended for use by children or persons with reduced physical,
sensory or mental capabilities or lack of experience and knowledge.
3. Children should be supervised to ensure that they do not play with the appliance.
Keypad
Instruction
ON/OFF
COOL
BLAST
SPEED
TIMER
Delayed start
Comment
This turns the cooler on or off.
This activates the cooling function. Note that there is a delay of
one minute before the fan starts while the cooling pads wet up.
When COOL is pressed again, the water evaporation feature is
turned off, with only the fan operating.
Pressing SPEED will select low, medium or high fan speed.
The timer setting can be used to start the cooler after a certain
number of hours delay. When only the green POWER light is on,
press TIMER until the number of hours delay (1-24) is shown.
TIMER
When the cooler is already going, press timer to set the number
Automatic stop
of hours (1-24) until the machine will automatically switch off.
Use only clean, fresh water.
WATER
SUPPLY
Pour water into the water inlet on the right hand side of the unit
(max 60L). Alternatively, attach a hose to the water inlet on the
left side for automatic filling. Note a pressure reducing valve is
recommended for high pressure water supplies.
-04-
-05-