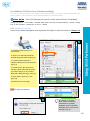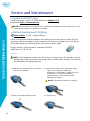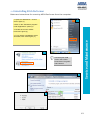
1
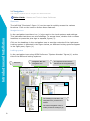
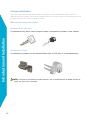
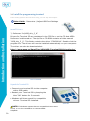
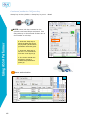
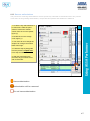
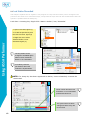
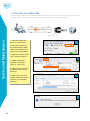
ASSA PERFORMER MANUAL
ASSA Performer
User Manual
V 3.4.4
Introduction and Installation ............................................... 3
1. About this manual ........................................................................ 4
1.1. Definitions and Abbreviations ......................................................... 6
2. Introduction ..................................................................................... 7
2.1. Introduction to ASSA Performer and ASSA CLIQ ................................. 7
2.2. Navigation ................................................................................8
2.3. Locking system ..........................................................................9
2.4. Lock chart .............................................................................. 10
2.5. Keys and Cylinders ................................................................... 12
3. Installation ..................................................................................... 16
3.1. What is needed for installation ...................................................... 16
Table of Contents
3.2. Software Installation .................................................................. 17
3.3. Install the programming terminal ................................................... 20
3.4. First login ............................................................................... 22
3.5. Load License Key ..................................................................... 23
3.6. Import a locking system ......................................................... 24
Using ASSA Performer ..................................................... 26
4. Users ............................................................................................... 26
5. Address book ............................................................................... 27
5.1. Internal .................................................................................. 27
5.2. Outlook ................................................................................. 29
6. Overview of the keys in the lock system .......................... 29
7. Mechanical keys and cylinders ............................................ 30
7.1. Issuing keys ............................................................................ 30
7.2. Return of keys ......................................................................... 33
7.3. Lost Stolen Discarded ................................................................ 35
7.4. Ordering of keys for an existing locking system.................................. 36
7.5. Key rings ............................................................................... 39
8. CLIQ keys and cylinders ......................................................... 40
8.1. Activate CLIQ keys ................................................................... 41
8.2. Disable a CLIQ key ................................................................... 44
8.3. Authorize CLIQ User Keys (chrome marking) .................................... 45
2
8.4. Lost Stolen Discarded ................................................................ 48
8.5. Audit trails .............................................................................. 49
8.6. Copy and paste authorizations ..................................................... 52
8.7. Load CLIQ rights from cylinders .................................................... 56
8.8. Schedule ............................................................................... 58
Service and Maintenance................................................. 60
9. Update ASSA Performer ......................................................... 60
10. Battery Replacement CLIQ Keys ...................................... 60
11. Backup and restore a MS SQL database ...................... 62
12. Uninstalling ASSA Performer ............................................. 63
Table of Contents
13. Generate an analysis file...................................................... 64
Complaint handling ............................................................. 65
14. Complaints ................................................................................. 65
14.1. Complaints regarding CLIQ cylinders ............................................ 65
14.2. Reprogramming after complaints ................................................. 66
FAQ - Frequently Asked Questions ............................. 68
15.1. My ASSA Performer doesn’t work ................................................ 68
15.2. I can’t log into ASSA Performer, the user is locked ............................ 68
15.3. ASSA Performer can’t find my Terminal PD .................................... 69
15.4. How can see a System overview? ................................................ 69
15.5. Search functions for searching all locking systems simultaneously ......... 70
15.6. My CLIQ User key is not working even though it has authorization ......... 70
15.7. Export address book ................................................................ 70
15.8. I want to print my order but can’t find it .......................................... 71
15.9. Keys are shown in white in my locking system ................................. 71
15.10. I got a warning message asking me to insert the lock system in port 2 ... 72
15.11. The database is of a later version than Performer. ........................... 72
Upgrade to CLIQ Remote ................................................ 73
16. Importing to CLIQ Web Manager ...................................... 75
3
Introduction and Installation
1. About
this manual
Below is a review of how the manual is organized, for example the symbols used and what it means
when the text is italicized.
The manual is divided into four main chapters:
Introduction and Installation
Using ASSA Performer
Introduction and Installation
Service and Maintenance
Troubleshooting and Tips
Scan or click the code
to download this manual
Mechanical Systems and CLIQ Systems
The part of the manual that describes the management of keys is divided into two
sections: Mechanical locking systems and CLIQ locking system.
The pages that handle CLIQ locking system are marked with a
CLIQ symbol in the upper right corner. These pages don’t need
to be read if only mechanical locking systems are held.
Introduction of chapter
This chapter, which contains step-by-step instructions, each begin with a brief
overview where only the principal steps are mentioned. This is written in italics. The
character » means the next step.
Example: Settings » User » Right Click » New user » Save
• Clickable buttons in the text are indicated by quotation marks, and are written
in italics (example: "People", "Internal", "Leave out / in (address)")
• The referenced text that is not clickable is printed only in italics. (Example:
Name, Company)
• The figures are surrounded by a black frame and marked with numbers. Most
figures are clipped and show only the necessary information.
• Clickable links are underlined and written in bold. E.g. Read more Chapter 2.3
Expressions
Click = Left click,
Right click = Click the right mouse button
Double click = Quickly click twice with the left mouse button
4
Symbols and Signs
Video Guide - Clickable links to video guides on ASSA's website.
NOTE: Carefully read all text marked with a warning triangle.
1
These boxes contain step by
step instructions.
Introduction and Installation
The steps related to the figures,
the figures that steps be related
to marked with Figure (1)
The areas in an figure are
important, and where it is to be
clicked is highlighted in red.
Example: Click on "People"
Figure number,
Up (2)
Grey boxes contain tips and
announcements. Next to
these is a light bulb.
2
Right Click is marked with
an arrow and a circle
Green marker contains
information that is not of
the same importance as
the red marks.
An arrow with two circles
indicates a double click with
the left mouse button
NOTE: Colors and line thickness can be customized to appear clearer
5
1.1. Definitions and Abbreviations
Below is a list of the most common terms and concepts used in the manual.
Words
Meaning
ASM
ASSA Security Master Program - the ASSA handle locking
system used
Database file that is sent between ASM and ASSA Performer
Introduction and Installation
. Rear file
. csv file
A file with values separated by commas (comma-separated
values) that stores tabular data (numbers and text)
. xls file
Files of the workbook in Microsoft Excel
Setup Key
Admin Key
Terminal PD Programming Unit
PIN
Password with a combination of letters or numbers
URL
Web Address
2. Introduction
This chapter provides an introductory text to provide an understanding of what ASSA Performer can
do and how its functions interact with the ASSA lock system. Examination of components that may be
included in an ASSA lock system and the necessary preparations to be made before the program can
be used.
2.1. Introduction to ASSA Performer and ASSA CLIQ
Basic introduction to ASSA Performer and ASSA CLIQ and their functions and purpose.
ASSA Performer
Introduction and Installation
Assa Performer is a software for managing keys in your locking system. The safety
in the locking system only works as long as you have control of your keys. If you
lose the keys, safety cannot be maintained without taking action.
There are four things that are important to know about a lock system with respect
to key administration:
1. What keys have been issued?
2. Who has the keys?
3. Which locks are they for?
4. When should they be handed in?
Key Administration is time consuming when done manually, and manual handling
increases the risk of errors. ASSA Performer gives you more control of your locking
system.
ASSA CLIQ
CLIQ is an electromechanical locking system with an additional level of security and
flexibility, a natural choice for anyone looking for a modern security solution. CLIQ
combines a modern mechanical basic platform with an advanced electronic function
that allows keys lost to automatically be locked in the lock cylinders.
CLIQ consists of a high security cylinder with a mechanical and electronic lock. The
key consists of a patented mechanical code and a unique electronic code.
Information contained in the key is transmitted through a contact rail to be
approved and registered in the cylinder.
Keys and cylinders have digital labeling for simple PC Management. All keys
included in the system are empowered with ASSA Performer. The Setup key is used
to program and deploy cylinders. The Setup key is also used for changing
authorization and read-out history log files.
7
2.2. Navigation
This chapter explains how to navigate the ASSA Performer.
Video Guide - Menus and Tools in Assa Performer
Shortcuts
The left field "Shortcuts" figure (1) can be used to quickly access the various
functions. Click on the icons to access these features.
Navigation tree
Introduction and Installation
In the navigation tree there is a (+) sign next to the Lock systems and settings.
This indicates that there are sub-headings. To access them, double click on these
headlines or press the plus sign to expand, figure (2)
Click on the headings in the navigation tree to see the contents of the right pane.
Locking system is selected in the figure below, so different locking systems appear
in the right pane, figure (1)
Locking system
In the navigation tree using ASSA Performer "System Number" figure (1) as the
title of the different locking systems.
Shortcuts
Navigation Bar with
navigation tree
The right bar shows what is
selected in the navigation tree
1
3
2
The heading is selected in the
navigation tree, printed in the
header.
The entire navigation route to
orders printed according to (3)
8
2.3. Locking system
This chapter describes what a locking system is and how to navigate to find out its contents and
functions.
A locking system includes locks and cylinders. A several piece locking system can
be imported into ASSA Performer. Such systems are presented with different names
and system numbers. Each lock system has a unique set of cylinders and keys.
Introduction and Installation
Below is a description of two methods for accessing the Cylinders, Keys, People,
Orders and Lock charts which are part of the relevant locking system.
Method 1 as shown (1)
1: Click on the "Master
Key" under Shortcuts or
the navigation tree.
System number is what the title of the
navigation tree, example: IQC59
2: Double-click on the
desired lock system.
1
3: Then click on the
desired function
Method 2 as shown (1)
1: Click (+) or double-click
the "Master Key" in the
navigation tree
2: Click (+) or doubleclicking on the lock
system, such as showing
"IQC59"
3: Then click on the
desired function
Then they are a (+) on the left side, it is
double-clicked on the headline or the (+)
to get to the next level.
9
2.4. Lock chart
This chapter describes how to access the lock chart and what the different symbols and colors mean.
2.4.1. Open lock chart
Method 1, orange boxes
1: Click the "MKS" under
"Shortcuts", figure (1)
1
Introduction and Installation
2: Double-click on the desired
locking system figure (1)
3: Double click on the "Lock
chart", figure (2)
Method 2, green boxes:
1: Use the navigation tree,
double-click "MKS", figure (2)
2: Double-click on the desired
lock system, figure (2)
3: Click the "Lock chart" in the
navigation tree, figure (2)
When there is a (+) on
the left side, it is doubleclicked on the headline or
the (+) to get to the next
level.
10
2
2.4.2. Symbols and signs
The padlock
The padlock indicates if CLIQ tasks can be performed in the Lock chart. These tasks
are added to the task list. It is not possible to undo a task once it has been sent to
the task list. After this the programming is done and a new job is created.
Introduction and Installation
Locked: Changes in the Lock chart may not be made until the pin code has
been entered.
Front: Changes can be made in the Lock chart, pin code has been entered.
Key not active
Key active
Double click here to lock / unlock, a dialog
box asking the user to fill in the PIN code to
the Setup key will be showed.
Key is active during a specific
time interval.
4
Symbols
"Mechanical" level:
Mechanical check
Electronic check
Cannot get permission
"Electronic" level:
Are not authorized
Will get authorization
Have permission
Authorization will be removed
A CLIQ task needs to be updated with the Setup key.
Will be authorized after updating with the Setup key.
Group Level = dark green
Individual key = light green
Authorization will be removed with the Setup key.
11
2.5. Keys and Cylinders
There are various types of mechanical keys and cylinders. Some examples are shown below. All
different keys and cylinders can be used in ASSA Performer. A good overview of its locking system can
be gained simply with a label and a serial number.
2.5.1. Mechanical keys and cylinders
Mechanical key (chrome)
Introduction and Installation
A mechanical key which can be used to open a mechanical cylinder in the system.
Mechanical cylinder
A mechanical cylinder can be opened either with a CLIQ key or a mechanical key.
NOTE: All types of mechanical cylinder and key can be administered by ASSA Performer.
These are just a few examples.
12
2.5.2. Keys and Cylinders in CLIQ system
A CLIQ locking system has electronic keys and cylinders, each with different features and specific
purposes. Below is a summary of its features and opportunities for increased understanding about the
CLIQ system.
Master Setup key (marked in blue)
Master Setup key is the highest level among the setup keys. There is only one
Master Setup key in each CLIQ locking system. The key is marked in blue.
Master Setup key is used to:
• Give administrator privileges to setup keys
• Block lost CLIQ keys
Introduction and Installation
• Block lost Setup keys
Master Setup key
• Change PIN Setup keys
• Get event log from cylinders
• Program cylinders
NOTE: A Master Setup key has no mechanical code and cannot be used to open
cylinders. This key should be stored in a secure place with limited access to the
system security to be maintained.
Setup key (marked in red)
A setup key can be given the same administrative privileges as the Master Setup
key. The setup key is marked in red. However, it can never be used to block other
setup keys or change their PIN code. Only the Master Setup key has this function.
Use the Setup key to:
• Block lost user keys
• Get the event log for cylinders
Setup key
• Program cylinders
NOTE: A Setup Key has no mechanical code and cannot be used to open
cylinders.
13
CLIQ User key (marked in chrome)
A CLIQ key used to open the cylinders in a CLIQ locking
system. The key is íssued to a user and permissions are set
to suit the user's needs. For a cylinder to be able to
authorize a key, the following requirements must be met:
CLIQ user key,
• The cylinder is programmed to provide access to key
o The mechanical code is correct,
o The cylinder is electronically programmed to give the key competences
Introduction and Installation
• The key is valid in the cylinder (have not blocked)
• The key active and valid between the start and end dates (or always active)
A CLIQ key has space for up to 100 events, and these are uploaded to ASSA
Performer when the key is updated in a Terminal PD.
PDK Contact Key
The System operator's key. The contact key is used to
identify the cylinders and for adding to or expanding
the lock system. This key is also used to read the
cylinder identification number.
NOTE: Can be used to create an analysis file that is sent to ASSA for
troubleshooting purposes.
CLIQ cylinder
A CLIQ cylinder has one or more mechanical codes. Before
its functionality can be expanded, it must go through an
extra electronic validation process before permission is
given to a CLIQ key.
A cylinder may contain authorizations for up to 1,000 key
groups or 1000 individual keys.
The electronic part of the cylinder is powered by the battery
in the key inserted into the cylinder, so no additional power
supply is needed.
14
Programming Unit
Terminal PD is used as a gateway between ASSA Performer and CLIQ keys to
perform updates and collect history, or to upload data to the Setup keys.
Introduction and Installation
Port 2
Port 1
Terminal PD
Terminal PD is used by administrators in a CLIQ system. To be able to handle a
locking system that uses CLIQ, it is necessary to have a Terminal PD and a Setup
Key that is connected to a computer. A Terminal PD is also used to download
programming data to the Setup key. A Terminal PD has the ports listed below.
Connections to a Terminal PD
Connections Function
1
2
Port 1: Key port used to connect the setup keys. Marked with a
blue semicircle
Port 2: Key Port used to connect the user keys
3
Port 3: Used for connecting cylinders
4
COM port for data communication
5
USB port for data communication
6
Port for external 9 volt power supply
15
3. Installation
The text under this heading describes how to install ASSA Performer and the operations required to
use ASSA Performer on a daily basis.
3.1. What is needed for installation
ASSA Performer can be installed with CD-ROM or
a downloaded file.
Introduction and Installation
ASSA Performer can be downloaded from
http://www.assa.se/
Demo License: A demo license is always included. If the program was not
purchased, in the license can be used for 30 days. It is not possible to update the
lock chart via ASSA with a demo license.
The demo license is on the disk named "DemoLicens.lic".
System
Below are the recommended hardware requirements for your computer.
System requirements: ASSA Performer
•
Windows XP SP3
•
1.5 Ghz
•
2GB of RAM
•
4GB of available disk space
Windows 7 System
• 1.5 Ghz
• 2GB of RAM (32-bit) or 2GB RAM (64-bit)
• 16 GB of available disk space (32-bit) or 20 GB (64-bit)
16
3.2. Software Installation
Installation of the Performer software is described here. The figures show all the windows that pop up
during installation. Please note that the figures have been cropped in the manual to take up less
space.
NOTE: If .Net framework is not installed on your system, it will automatically be
installed during the installation. A few extra steps will be included and a reboot
will be required.
1: Open the CD-ROM disc or unzip the
folder from the ZIP file
1
Introduction and Installation
2: Double-click the Setup file (1)
2: Read the license agreement "License
Agreement", tick the "I Agree", press
"Next" (2)
3: If the database is not installed already,
it will be installed in this subsection (3)
4: Choose the destination for where you
want the program to be installed
"Browse", when this is done, press "Next"
(4)
3
2
4
17
Continued Software Installation
5: Check the desired options, click "Next"
(various alternatives explained below)
figure (1)
4
6: Select the language "English" selected
in this example. Then press "Next" figure
(5)
7: Installation in progress photo (6)
Introduction and Installation
8: Installation Complete, press "Finish"
Installation Complete Figure (7)
Connection to Internal address
book
The address book that is part of
ASSA Performer
5
Connection to the Outlook
address book
To use this feature requires a
license from ASSA.
This provides the ability to
synchronize ASSA Performer
with Outlook and use the
address book from Outlook, for
example, leave out keys or
sending reminders.
The three bottom options is
always recommended to
choose at installation
6
18
7
19
3.3. Install the programming terminal
If the locking system does not have CLIQ, you can skip this chapter.
Video Guide - Determine / Adjust USB Port Settings
Install Drivers
"/ Performer 3.4/USB_driv_2_0"
Introduction and Installation
Drivers for Terminal PD are contained in the ZIP file or on the CD that ASSA
Performer is delivered on. The zip file or CD-ROM contains a folder named
"USB_driv_2_0". This folder contains the driver "CDM20814". Double-click the
program file. The drivers will now be installed automatically on your computer.
The driver can also be downloaded at:
http://www.assa.se/PageFiles/1590155/Terminal.PD-Drivrutin.zip/
Driver installed
Unpack the Terminal PD
• Connect your terminal PD to the computer
with a USB cable.
• Restart your Terminal PD by keeping the
blue "OK" button for 2 seconds.
• Windows will then search for compatible
drivers. Terminal PD installed.
ON mode
NOTE: If Windows reports that no compatible drivers were
found, re-run the installation or contact ASSA
Helpdesk.
20
3.3.1. Settings for Terminal PD
In order for the Terminal PD to work, the right port must be selected.
1
1: Select “File »CLIQ settings” figure (1)
2: Change the port by clicking the "..."
figure (2), Works Terminal PD does not
perform this step
Test it until it works, usually the USB
port is the right option. Other units
attached to your computer may cause
the ASSA Performer to use a COM
port instead, then choose this option.
Introduction and Installation
3: Modify System Key Poll each to “60
seconds” Figure (3)
2
3
If the correct port is not
displayed; scan ports.
Change this option to 60
for better performance
21
3.4. First login
On first login, only the system administrator for ASSA Performer can log in. No password is required
on first login.
On first login, enter "SA" (System Administrator) as the user name and leave the
password field empty.
NOTE: It is recommended to create a password on "SA" (System Administrator).
Introduction and Installation
To change the password
on the "SA" upon first login
please tick the "Change
passwords box" Keep
"Password" blank.
Fill in the "New Password"
and "Confirm password"
then click ok.
It’s recommended to
create a new user
immediately after the first
login, Chapter 4.
This box will appear after initial login with SA, Chapter 4. shows the new user is created,
click OK to enter the ASSA Performer
22
3.5. Load License Key
This section describes how to activate ASSA Performer by reading the license key. If the popup in
figure (2) appears after the first login, ignore step 1.
Help » License Information » Read from file » Open » Save to File » OK » Restart Performer
1
1: Go to the "Help" menu to enter the
"License Information" figure (1)
3: Browse to the folder where the
license is located, (if "License Files" is
selected, only visible license files).
Select the license file and click "OK"
figure (3)
Introduction and Installation
2: Select "Read from file" figure (2)
2
4: check the data (no change), then
press "Save" figure (2)
5: The process is completed; restart
ASSA Performer to activate the
license. Figure (5)
This file is included
with the program; the
name “.lic” is always
the file format.
3
4
23
a locking system
A locking system contains keys and cylinders. In order to get an overview of these in ASSA Performer,
the locking system must be imported. The file that contains the locking system is called bak-file
”.bak”. Then keys are ordered, the locksmith updates this file and sends it back. When this is done,
this process must be repeated.
Video Guide - Import a MKS - the master key system
Archive » Importing » Security Master » Browse » Open
Introduction and Installation
1: Open the File »Import»
Security Master (1)
1
2: Scroll to. Behind file, select
and press "open" (2)
2
NOTE: If CLIQ is used, a Master Setup key is required to import the locking system.
ASSA Performer allows imports to be done without the Master Setup key, but in that case
the system will not work optimally.
To import the locking
system it’s required
to have the Master
Setup key inserted
into Port 1.
24
Port 2
Introduction and Installation
3.6. Import
25
Using ASSA Performer
4. Users
This chapter describes how to create users and which rights can be assigned. A user is someone who
uses the program, for example to issue keys.
Video Guide- Create user
Settings » User » Right Click » New user » Save
Use a table to show roles.
Using ASSA Performer
1: In the navigation tree,
click the "Settings »Users
"(1)
1
2: The right field now
contains all users. If no
users are created, only
"SA" exists (1)
3: Right-click in the right
pane and click "New
User", figure (1)
4: Fill in the "Username",
"Full Name" and select
password, figure (2)
5: Select the rights of the
created user to receive,
figure (2)
User
6: Then click "Save",
figure (2)
7: Now you are a new
user created, seemingly
under users in the same
field as the "SA" figure (1)
What roles Administrator, ,
Key Clients, Reading
means can be read under
"Settings> Roles"
Double-click on the
selected role in the right
window, the same window
where the user 'SA' figure
(1)
26
2
5. Address book
Persons in an address book can be assigned authorizations and have keys assigned to them. This
chapter describes how to manage an address book and how to add new persons to the address book.
5.1. Internal
An internal address is an address book created in ASSA Performer.
Add people to address book
Video Guide - Setting Up the Internal Address Book
Archive »Address Book» Internal »New» Save
1
Using ASSA Performer
1.Click on "File" »" Address Book "» "Internal" figure (1)
2.Click on "New" figure (2)
3.Fill out the information regarding the person photo (3)
4.Click "Save" figure (3)
2
3
ASSA Performer use
"persons" as the title of
those who are added to
the system in the
address book
27
Navigation
During navigation, the manual shows where to find the persons added to ASSA Performer and how
their status differs depending on where they are.
1
Using ASSA Performer
Under "Persons" ASSA
Performer shows those
persons who have issued
keys. (1)
Under " Persons " in a
specific lock system, only
people with issued keys are
listed. figure (2)
2
Note that the "persons" who
dash indicates is under lock
system "IQC59"
All persons added to the system can be
found under "File" »" Address Book "»
"Internal" figure (3)
3
Examples of an address book, figure (4)
4
28
5.2. Outlook
ASSA Performer has a built-in connection which allows keys to be issued to persons
in the Outlook address book
NOTE: If you cannot find Outlook in the address book, press the CTRL and ALT keys and
press “A” three times keeping the two keys pressed. Then go to "File » Address Book"
and select the address books you want to make visible.
NOTE: The license must have this feature in order for it to work. The Outlook connection
is not included in the basic service and must be purchased separately.
6. Overview
of the keys in the lock system
Using ASSA Performer
This chapter describes how to quickly gain an overview of the keys that have been issued and are
available in the locking system. It also gives examples of how to gain a quick overview of who the
keys have been issued to.
Locking system»Lock chart» Show » View all » Individuals
1: Start by opening Lock chart
"Locking system » lock chart "
(Chapter 2.4)
1
2: Select "Show » View all »
Individual' figure (1)
3: Now you can see all the key
individuals in the locking system
Its also possible to hand in /
out keys here, highlight the
desired group or individual
key and click "Hand out", or
"Return"
2
29
7. Mechanical
keys and cylinders
7.1. Issuing keys
This part of the manual describes how to issue keys. There are several ways of doing this. Two of
them are presented below.
7.1.1. For specific access, e.g. apartment / master key
The example below describes how to distribute keys to a tenant with a specific
apartment. The “internal” address book is used in this example. If you want to use the
“Outlook” address boo k, see chapter5.2Outlook
Locking system» Select locking system » Keys » Select group "Apartment" » Issue » Internal
» Select / new person » Select keys » Finish
Using ASSA Performer
1
2
1: Select the keys in the lock
system that is to be handed
out, figure (1)
2: Right click on the desired
group, in the example,
Apartment with marking 1L4
selected. Then select "Hand
out" “Internal ", figure (2)
3: Select the key holder, then
click "ok", figure (3)
Continued on the next page
30
3
Continued Issuing keys, Explanation of the print box
4: Select which keys to be
handed out by clicking on the
desired key. The selected keys
ticked figure (4)
5: Then click "Finish" figure (4)
You can also fill in a number instead of
clicking each key.
There is a possibility to fill in when you
wish the key to be returned
Using ASSA Performer
4
Checkmark
demonstrates
that key is
selected
To print window
envelopes both "Print
receipt" and "Window
envelopes" needs to be
selected
By clicking here you are
given the option to
change the text that is
printed on the receipt.
figure (5)
NOTE: If the "Print receipt" option is not selected, no receipt will be issued. "Print
receipt" should always be selected.
5
31
7.1.2. The key number
Here is another scenario where a random key is produced to be distributed to a person. Below is an
example of how this specific key can be issued in a simple way.
Persons » Right-click in right field » Hand out/in (address book) » Internal » Search » Fill in
your details » Next » Finish
1: During the current lock
system, select "People".
Figure (1)
1
2: Right click anywhere in
the green highlighted field.
Select "Leave out / in »
Internal ", figure (1)
Using ASSA Performer
3: Click "Browse" figure (2),
and then type the label on
the key and select the
number (this is the key)
figure (3)
4: Click the ">" figure (2), the
key will now appear with a
green arrow figure (4)
5: Click "Next" figure (5)
6: Check the data click
"Finish" figure (6)
2
3
4
5
Note only one
key, "Number 1"
which was
chosen earlier,
only this
disclosure.
32
6
For more information about this photo (4) pages30
7.2. Return of keys
7.2.1. By name
Below, a simple procedure is described for reporting that keys have been handed in with the help of a
name. All keys issue are registered under a person. To see what keys have been issued for a specific
locking system, select persons under the desired locking system.
Persons » Hand out/in keys » Select key "<" » Next » Finish
1
Using ASSA Performer
2
1: Locate the person submitting
keys. (1)
2: Right click on this and select
"Check in / out keys" (2)
3: The right pane displays all the
keys that the person has. Select
the key desired return. (3)
4: Click the < , the key will be
highlighted with a red arrow (3)
5: Click "Next" (3)
3
6: Check the details then click
"Finish" (4), the next page.
Pressing the "<<" selects all
keys directly.
The right pane shows the
keys that the person has
failed
33
Continued Return of keys, by name
4
For more information on this figure to see chapter 7.1.1.photo (5)
7.2.2. By key number, marking
Using ASSA Performer
Below is a description of how to proceed in ASSA Performer if you only know the label on the key. This
can be useful for identifying a lost key that has been handed in.
Search » Choose what to look for » Search » Right Click » Return » Finish
In this example, we search for a key with the label FS and the number 1. The
individual label number for this key is FS-1.
1: Press "Search", figure (1)
1
2: Select the desired options,
figure (2), this example has
been chosen. "All Systems",
"Key Individuals" and "Marking"
figure (3)
3: Fill in the labeling issue
figure (2)
4: Press the "Search" figure (2)
5: If you find the key, right-click
and choose "Returning" figure
(2)
6: Check the information, click
"Finish", figure (5), above
In order to make the
search bar bigger draw
this vertical stretch, hold
down the left mouse
button.
34
3
2
7.3. Lost Stolen Discarded
This chapter explains how to register in the program if a key has been stolen, lost or discarded.
Lock chart »Locate key» Right click »Status» Stolen / Lost / Discarded
NOTE: CLIQ keys cannot be given the status “Available” after they are discarded. A discarded
CLIQ key is discarded.
1: Open Lock chart, figure (1)
1
2: Locate the specific key that
the case concerns. photo (2)
The key status can be
changed to Available again
after it's been marked as
Stolen / Lost / discarded.
Lock chart
Using ASSA Performer
3: Right-click, then select
"Status" Stolen, Lost or
discarded "figure (3)
2
Lock chart
3
Count column becomes red
and Stolen / Lost / Discarded
printed with black text.
35
7.4. Ordering of keys for an existing locking system
If more keys are needed, an order is sent to the locksmith. The locksmith receives the order and
delivers the ordered keys.
Locking system »New »Check the system »Enter request and Supplier » New individuals »
Complete order » Print
1
1: Click on the desired locking
system figure (1)
2: Click the 'new' figure (1)
Using ASSA Performer
NOTE: Please note that orders
must be made on a selected
system.
3: Check the locking system
complete the Requisition figure
(2)
4: Select Accounts, click the "...
▼". Figure (2)
2
5: Select Accounts from the
address book or create new and
click "OK" figure (3)
Continued on the next page
Supplier is in most
cases a locksmith.
3
If you want to save a
Supplier by default. Click on
this box. Can be useful if it is
widely used specific.
36
Continued, Ordering of keys
New individuals » Complete order » Print
4
6: Select the key group, then
click "New individuals' figure (4)
7: Check Group and select
Number of new keys, then click
"OK" figure (5)
8: Click "Finish", figure (4)
Using ASSA Performer
9: Make sure the "Submit Order"
is selected, then click "OK" figure
(6)
10: If no changes are required to
make the report text click ok,
figure (7)
5
New individuals
appear white.
Click here to edit the text
that is sent to the Provider
7
6
NOTE: After the order is sent to the system, a document needs to be emailed or sent to
the supplier. This document is generated after these steps are completed.
37
7.4.1. Receiving orders
When the locksmith manufactures and deliveres the key, it also needs to be received to be managed
in ASSA Performer. The procedure for doing this is described below, and there is also some advice on
things to keep in mind.
Locking system» Orders » Right click on sent order » Receiving orders » Receiving
1: Go to Orders in the current
lock system. Figure (1)
Once the order is received Status changed
from "Sent" to "Received"
2: Right click on the order to
be accepted. Then select
"Receive Order" figure (1)
1
Using ASSA Performer
3: Then select a specific order
and click "Receive". Do you
wish to receive all orders,
click "Receive all" figure (2)
4: The ordered keys are now
in your lock system.
2
The keys are white when the
lock chart isn’t updated. To
update this the locksmith
needs send a new .bak file.
This file is later used to update
the current locking system.
3
NOTE: If a CLIQ locking system is used, the lock system must be updated before
the ordered keys can be used.
38
7.5. Key rings
This chapter describes how to create key rings in ASSA Performer.
Video Guide - Creating a key ring
Video Guide - Search for key rings
1
1: Click "Keyrings" then click
on "New keyring 'figure (1)
Using ASSA Performer
2: Click the key under "Select
keyindividual", then press ">"
to add the key in the key
chain. Repeat this to the key
chain provides the desired
keys, figure (2)
3: Click "save", then close the
box. figure (2)
2
4: Click the "▼" then select
which address book is
desired to use to find the
person key ring to be put to.
Figure (3)
5: Select the contact and
complete the process for
more information on this, see
chapter 7.1.1.
By clicking on the "<" as a
key individual is selected,
it is removed from the
keyring
3
This box shows the
key individuals that are
added in the keyring
4
39
8. CLIQ
keys and cylinders
This chapter explains how to manage a CLIQ system in ASSA Performer. Many procedures relating to
CLIQ system, such as the changing of authorizations or the modification of authorizations, require that
a Setup key is inserted in your Terminal PD.
Video Guide - Commission CLIQ system step-by-step
Using ASSA Performer
Most operations in which CLIQ keys are used require you to have a setup key
inserted in the Terminal PD. Later in this chapter, the procedure with be described
for how to give a Setup key rights to administer other CLIQ keys.
At hand in of keys
and changes of
authority it’s required
to insert a setup key
in port 1
Port 2
NOTE: A Master Setup key has no mechanical code and cannot be used to open
cylinders. To maintain the security of the system, this key should be stored in a
secure place with limited access.
40
8.1. Activate CLIQ keys
8.1.1. Setup key (marked in red)
A Setup key should be authorized to administer over the keys. There is only one master key setup,
and it should be stored safely after a red Setup key has received permission to administer the system.
Below is a description of how to grant authorization to a red Setup key. The Master Setup key and the
Setup key are needed in order to perform this operation.
Video Guide - Activate a C-Key
Lock chart » Lock chart» Appearance » Selection » Setup keys » PIN » Right Click » Status »
Active » Double click on rights » Send » Master Setup key in cylinders » Read
Using ASSA Performer
In order to use your setup key to issue keys and grant authorizations, they must be
activated and permission must have been obtained. Setup keys are hidden on
startup. To make them visible, you need to change some settings.
NOTE: The step-by-step continues on the next page.
1: Insert Master Setup key in the
Port 1 and the Setup key in the
Port 2 on Terminal PD.
1: Open the "Lock chart"
2: In the menu select "Lock chart
» Selection" figure (2)
1
3: Check "Setup Keys" figure (3)
Enter the "PIN", then click "OK".
(4)
2
3
4
41
Continued - Activate the Setup key
NOTE: A Master Setup key has no mechanical code and cannot be used to open cylinders.
To maintain the security of the system, this key should be stored in a secure place with
limited access.
5
4: The Setup key is now visible in
the lock chart. Right click on this
and select "Status » Active"
figure (6) Insert the Setup key in
the Port 1 and enter "new unique
PIN"
Using ASSA Performer
5: Double click the circle below
the cylinder that you wish for the
Setup key to have rights. The
circle is now marked with a black
plus sign. Figure (6)
6: Return the Master Setup key in
the Port 1, click the "Send" figure
(7) Insert the Master Setup key in
each cylinder, this is to give the
Setup key physical access.
c
6
Will now show a black
cross. This means that
it will get permission
NOTE: After the Master Setup key has been inserted into the cylinder for the purpose of
updating authorizations, wait for the second beep. If the system is multitasking, this
may take up to 30 seconds.
7
7: Insert the Master Setup key
into port 1 on the Terminal PD
again and click "Read" figure (7)
8: Setup Key now has jurisdiction.
figure (8)
8
42
The circles are now
filled in orange to
indicate, Red setup
key now has
authorization.
8.1.2. CLIQ User Keys
In order for a CLIQ key to work, it must be activated.
Setup key port 1 » User key port 2 » Lock chart » CLIQ activation » Enable » Active
1
Using ASSA Performer
1: Insert the Setup key in the
Port 1 and the user key in
port 2 on Terminal PD
2: Click the CLIQ activation
figure (1)
3: Click the "Enable" and
click "Active" figure (2)
4: Clear, click "OK" figure (3)
5: Figure (2) can now be
closed, please click "Cancel"
2
Note: Inactive
If desired, a specific
time period when the
key is to be active.
Enter Date of effect
before 'Active' is
clicked, figure (2)
3
43
8.2. Disable a CLIQ key
Setup key port 1 »User key port 2» Lock chart »CLIQ activation» Inactive » Inactive
1
1: Insert the Setup key in the
Port 1 and the User Key to be
disabled in Port 2 on Terminal
PD.
Using ASSA Performer
2: Click the "CLIQ activation”
figure (1)
3: Click the "Inactive", then
click the button with the green
arrow "Inactive" figure (2)
4: Click "OK" figure (3)
5: Figure (2) Can now be
closed, click "Cancel"
2
Note: Active
3
44
8.3. Authorize CLIQ User Keys (chrome marking)
In order for a CLIQ user key to be used for the desired cylinders, it needs to receive authorization for
these cylinders. The process for giving this authorization is described below.
Video Guide - Give CLIQ Access to Keys In Locks (Level Group / Individual)
Setup key port 1 » Lock chart » Double-click where the key to authorization » Send » Setup
key in the cylinder » Setup key in port 1 » Read
8.3.1. Authorize a User key
Learn more about navigation and symbols and signs in the lock chart in Chapter 2.4.
Using ASSA Performer
1
1: Insert the Setup Key Port 1 in
Terminal PD
2: Open Lock chart and locate the
key that will get permission figure (1)
3: Locate the point where the
cylinder and key meet in the schema
figure (1)
4: Double-click in the round circle
that is the point that gives the power
you wish to figure (1). The circle is
filled with a black plus sign. photo (2)
5: Click "Send", figure (1) »"OK"
figure (3)
Continued on the next page
2
Will get permission
3
By clicking on an upper
level, where several key
individuals are included
highlights all the individuals
simultaneously, Circle shows
this figure (3), (4)
45
Continued, authorize CLIQ user key
Setup key in the cylinder » Setup key in port 1 » Read
4
NOTE: Leave the key inserted in the
cylinder until two beeps are heard. This
may take up to 30 seconds if there are a
lot of tasks on the key.
Using ASSA Performer
6: Insert the Setup key to
which the data was sent to
the physical cylinder where
permission has been given.
7: Insert the Setup key in
the Port 1 on Terminal PD
and click "read" figure (4)
8: The circles should now
be filled in orange to
indicate that jurisdiction's
photo (5)
Have authorization
5
46
8.3.2. Remove authorizations
The process for removing authorizations from a specific key individual is described below. The process
is the same as for granting authorization, except that the symbols and headers are different.
1: Locate the key authorizations to
be removed. Locate the point
where it crosses the vertical
column from the current cylinder,
figure (1)
1
2: Double-click on the orange
circle, figure (1)
Using ASSA Performer
3: The circle will now change the
shape of an orange circle with a
black minus sign.
4: Follow the step by step guide
from the previous chapter 8.3.1.
From step 5 onwards.
5: After the permissions are
removed, any point white circle
with a red border.
Have authorization
Authorization will be removed
Do not have authorization
47
8.4. Lost Stolen Discarded
This chapter explains how to register in the program if a key has been stolen, lost or scrapped. The
process is the same as for mechanical keys, except that the keys will lose their authorization after the
cylinder is updated with the Setup key.
Lock chart » Locating key »Right Click »Status »Stolen / lost / discarded
1
1: Open Lock chart, figure (1)
2: Locate the specific key that
the case concerns. figure (2)
Using ASSA Performer
3: Right-click, then select
"Status" Stolen, Lost or
discarded "figure (3)
2
The key status can be
changed to Available again
after it's been marked as
Stolen / Lost / discarded.
A CLIQ key loses all
permissions when this
measure is implemented.
NOTE: If a Setup key has been registered as Stolen, Lost or discarded, it cannot be
reactivated.
3
Count column becomes red
and Stolen / Lost / Discarded
printed with black text.
The symbol has now been
changed, that the entry will
be removed.
48
8.5. Audit trails
This chapter explains how to work with event logs for keys and cylinders.
8.5.1. From Keys
The event log on the key contains information about where and when the key is used, when different
authorizations were given and which Setup keys gave the authorizations.
Video Guide - Read Audit Trail from the User Key
Setup key port 1 » User key port 2» Lock chart » Click on the key icon » Right-click the key »
CLIQ » View key event log
Using ASSA Performer
1
1: Insert In the Setup key in the
Port 1 and User Key in Port 2 on
Terminal PD
2: Click the wrench icon figure (1)
3: Right click on the current key
select "CLIQ » Show key
audithtrail"
4: Event log now displayed (3)
2
3
49
8.5.2. From Cylinders
The event logs for a cylinder contain all events or actions performed in the cylinder, which keys have
opened or have been refused authorization, and when this occurred. Event logs also contain
information about when the Setup keys have performed actions.
Video Guide- Read Audit Trail from lids Using C-key
Setup key port 1 » Lock chart» Right-click the cylinder » CLIQ » Get event log from the
cylinder » OK » Send » Setup key in the cylinder » Setup key in port 1 » Read » Right Click
on the cylinder » CLIQ » Get audit trail from cylinder
1
1: Open your lock chart
Using ASSA Performer
2: Right click on the cylinder on
the cylinder event log must be
extracted from figure (1). Select
"CLIQ »Get event log from
cylinder" figure (2)
3: Select the number of events
required for download. Click
"OK" figure (3)
Continued on next page
NOTE: The Setup key must
be inserted in port 1.
If event logs from many
cylinders shall be collected, it
is recommended to enter a
value of "Enter the number of
audits"
50
2
3
Continued, event log for cylinder
Send » Setup key in the cylinder » Setup key in port 1 » Read » Right Click on the cylinder »
CLIQ » View cylinder audit trail
4
Using ASSA Performer
5
NOTE: Wait for the Setup key to beep
twice while it is inserted in the cylinder.
The second beep is long.
4: Check the Setup key in the Port 1 on
Terminal PD.
5: Tick the Action that says Read event
log, then click "Send" figure (4)
6: Insert the Setup key in the cylinder,
let it beep twice, this can take up to 30
seconds, depending on how much
information that is stored.
6
7: Insert the Setup key in the Port 1 on
Terminal PD. Click "Read" figure (5)
8: Select "View of the cylinder event
log" figure (6), see previous page
figure (1.2).
9: Audit trail figure (7)
7
51
8.6. Copy and paste authorizations
This chapter explains how to copy authorizations from a cylinder or key and give those same
authorizations to another cylinder or key.
8.6.1. Cylinders
“Copy CLIQ functionality" is a quick option if you want to give the same keys authorizations, for
example to two different cylinders. This method can also be used if a cylinder needs to be replaced.
1
Using ASSA Performer
1: Start by right-clicking on the
cylinder the desired copy
functionality from, figure (1). Then
select "Copy CLIQ functionality",
figure (2)
2: Do the same as above, but now
select "Paste CLIQ functionality"
3: Check the Setup key in Terminal
PD in Port 1 and click "Send", photo
(4)
2
Continued on next page.
3
4
Will get permission
Cylinder needs to be
updated and the information
loaded from the Setup key
52
Continued, copy rights for keys
4: Insert the Setup key in
the cylinders that the key
has been given permission
to. Let it beep twice in each
cylinder.
5: Plug it into Port 1 on
Terminal PD again and
click "Read", photo (5)
Using ASSA Performer
5
Have permission
53
8.6.2. Keys
This chapter describes how to easily give one key the same rights as another by copying functionality.
1: Start by right-clicking on the
key that the desired copy
functionality from, figure (1).
Then select "Copy CLIQ
functionality", figure (2)
1
2: Do the same as above, but
now select "Paste CLIQ
functionality" on the key that
smokers enjoy the same rights
as the key that it was copied
from, figure (2)
2
Using ASSA Performer
3: Check the Setup key in
Terminal PD in Port 1 and click
"Send", photo (4)
Continued on next page.
jjjjjjjjjmmm
4
3
Will get permission
54
Continued, copy rights for keys
4: Insert the Setup key in
the cylinders that the key
has been given permission
to. Let it beep twice in each
cylinder.
5
Using ASSA Performer
5: Plug it into Port 1 on
Terminal PD again and
click "Read", photo (5)
6
Has acess
55
8.7. Load CLIQ rights from cylinders
This chapter describes how to download the authorizations possessed by cylinders. If, for example, a
computer crashes and the lock chart no longer displays the correct data, the rights that previously
appeared in the Lock chart can be retrieved.
Video Guide - Readings CLQ Functionality from Locks
Retrieving information from a cylinder
1
1: Right click on the cylinder the desired
retrieve information from, figure (1)
2: Select "CLIQ» Read CLIQ
functionality from cylinder ", figure (2)
Using ASSA Performer
Continued on next page
Retrieving information from all cylinders
1: Select 'Lock chart » Read CLIQ
functionality from all cylinders," photo
(3)
Continued on next page
2
As seen in Figure (1)
shows the reading
chart no rights,
3
56
Continued Load CLIQ rights
3
NOTE: The Master key must be inserted in Port 1 to send the information. It is recommended to
always use the Setup Master key.
3
Using ASSA Performer
1: Tick the files and then click
"Send", photo (4)
2: Insert the Setup key and let
beep twice in the cylinders that
information must be extracted
from, photo (5)
3: Replace the Setup key Port
1 on Terminal PD and click
"Read"
57
8.8. Schedule
This chapter describes how to use the schedule to set the times and days when the keys are to work.
Setup key port 1 »User key port 2»Lock chart»Time Functions»Add the desired rights»»
Write to Key »Cancel»
OK
NOTE: A special license is required to access the function schedule.
1
Using ASSA Performer
1: Start by putting the Setup key in Port1
2: Insert the User-key as it should be
schedule to Port 2, Button then "Time
functions", figure (1)
3: Choose the options "Start Day", "Start
Time," Stop Day "," Stop time "then click"
"to add the line. Figure (2)
4: Then click "Write to key" then click
"Cancel", figure (2)
2
Displays all the
added rows. Key will
only operate within
these ranges.
NOTE: Keys will not work outside the ranges are set
NOTE: All error message regarding the key's firmware; please contact ASSA for more
information
58
59
Service and Maintenance
9. Update
ASSA Performer
Install the latest version of ASSA Performer Chapter 3.2.
Located at http://www.assa.se
NOTE: No settings will disappear. Lock systems and database will be preserved. Do not
uninstall the program to perform an update.
10. Battery
Replacement CLIQ Keys
Video Guide - CLIQ - change battery
Service and Maintenance
ASSA recommends that the battery be replaced every two years or after 20,000
openings. When the battery needs replacing CLIQ key will signal this by emitting
three long beeps and blinking three times with a green light.
Energy supply: Lithium battery standard CR2025.
ASSA part. no. 88 04 74
Do this
NOTE: If the batteries remain out of the key for longer than 30 seconds, the key
will become inactive and lose the stored time. In that case, the key will need to
be activated and reprogrammed.
1.Hold the key with the black conductor
bar facing upwards
2.Remove the metal cover plate with CLIQ
logo on by inserting a small flat
screwdriver underneath it. Make sure the
screwdriver is inserted completely
underneath the cover plate to avoid
damaging the plate.
NOTE: Twist the screwdriver carefully.
3.Loosen the small Phillips screw.
60
4.Turn the key.
6.Remove the old battery and insert the new
one with the + (plus) side facing up.
7.Replace the bottom grip and make sure
it is secured properly.
8.Turn the key and replace the screw.
9.Replace the metal cover plate.
10.Done.
Service and Maintenance
5.Push the bottom grip against the tip of
the key and remove it. You may need
to push quite hard.
61
11. Backup
and restore a MS SQL database
When ASSA Performer is installed, the program “Backup & Restore" is included with the system. It is
used to back up and restore the database. Below is an explanation of where to find this program and
the user guide.
Video Guide - Back Up Performer Database
Start Menu » All Programs » ASSA » Backup & Restore » Backup & Restore
Backup = Backup
Restore = Recovery
1
Service and Maintenance
1: From the Start Menu select
"ASSA »Backup & Restore »
Backup & Restore 'figure (1)
2: Choose whether you want to
perform do Backup or Restore.
Figure (2)
2
A help topic is available here. "Backup & Restore - ASSA Performer Help".
(1)
Navigate forward and
backward in the guide.
This box is positioned
in the upper right
corner
Index simplifies the process
of finding what is of interest.
62
Figure
12. Uninstalling ASSA
Performer
Below are instructions for removing ASSA Performer from the computer.
1: Open the "Start Menu » Control
Panel "figure (1)
1
2.Click on the "Uninstall a program"
under Applications. photo (2)
3: Double click on the "ASSA
Performer" figure (3)
Service and Maintenance
4: For a regular uninstallation select
Automatic, click "Next" figure (4)
2
Use the layout small
icons in the Control
Panel select "Programs
and Features"
3
4
63
13. Generate
an analysis file
Below are instructions for how to generate an analysis file. This can be useful when a cylinder is not
working properly. The ASSA support team sometimes asks for a copy of this report.
Service and Maintenance
1: Insert the "Setup-key"
Port 1 on Terminal PD
1
2: Put PDK Contact Key,
the cylinder and the cable
that is connected to key in
the port 3 on Terminal PD
3: Open lock chart and then
click "CLIQ box 'figure (1)
2
4: Select "Advanced »
Analyzed » Cylinder"
(port 3), figure (2)
5: Select where to save the
file and then click "Save",
photo (3)
6: Click "OK" on the next
square, analysis file is now
saved on your computer,
photo (4)
3
3
64
Complaint handling
14.
Complaints
Video Guide - Create new complaint case
ASSA processes all complaints via our complaint system at the
addresshttp://complaint.assaabloy.com
Please note the following:
In the "sent" menu, you can track the complaint and see:
•
•
•
•
•
All open cases
All closed cases; they will remain there for 2 months after being closed
Number of products included in a complaint case received by ASSA
The decision made regarding the complaint (Approved / Not approved)
Order number of the replacement delivery (if applicable)
Complaints
Replacement options for a complaint regarding the system:
1. Replacement product delivered immediately free of charge. If the returned
product is not received within 30 days, the customer will be retroactively
charged for the replacement product and the case will be closed. If the
complaint is not approved, the customer will be retroactively charged for the
replacement product and the original product will be returned to the customer.
2. Replacement product delivered after complaint has been approved. If the claim is
approved, ASSA will immediately deliver a replacement product. If the complaint
is not approved, the original product will be returned to the customer.
To speed up your claim, please include the following information in your complaint:
•
•
•
•
•
If the wrong product was delivered, state the order number
In the event of crediting, state ASSAs invoice number or order number
Please enter the correct shipping address
Clearly write the complaint number on the outer packaging.
The faulty or incorrect products must be returned to ASSA within 30 days.
If you have any questions regarding complaints processing, or if you want to log in,
contact our helpdesk on +46 771 640 640 or via email.
[email protected]
14.1. Complaints regarding CLIQ cylinders
If the complaint regards a CLIQ cylinder, send the cylinder to ASSA. A new cylinder
marked with the same ID and programmed with the same CLIQ ID will be sent as a
replacement. It is crucial that there are no duplicates in a CLIQ locking system. For
this reason, ASSA will not send a replacement cylinder before the defective cylinder
has been received and checked.
65
14.2. Reprogramming after complaints
If a cylinder is replaced, it can be reprogrammed to have the same authorizations. This is always done
when a new cylinder is received after a complaint.
1
1: Open the "lock chart"
2: Right-click the cylinder to be
reprogrammed, figure (1)
3: Select "CLIQ » Rewrite
accesslists" figure (2)
4: Click "OK"
Complaints
5: Tick the files and then click "Send",
figure (4)
2
3
4
Do not forget to
check this box
66
Continued reprogramming
6: Insert the Setup key in the
cylinders to be reprogrammed
and let it beeps twice.
5
7: Replace the Setup key in the
Port 1 on Terminal PD and click
"Read"
Service and Maintenance
8: The cylinder is now
reprogrammed and have the
same rights as before
67
FAQ - Frequently Asked Questions
15.1. My ASSA Performer doesn’t work
If ASSA Performer has problems starting or does not work properly, try reinstalling
the program Chapter 3.2.
All settings, lock systems and the database will be preserved. It is recommended to
install the latest version.
FAQ - Frequently Asked Questions
Access it here: http://www.assa.se
15.2. I can’t log into ASSA Performer, the user is locked
Not being able to sign in can be caused by many different things, as well as Windows ASSA Performer
problems, a common reason is that the user is locked.
A locked user is usually caused by ASSA Performer being closed down incorrectly,
for example if a computer crashes or if a user who is already logged tries to log in
again. If this is the problem, the following message will appear:
The user must be unlocked in order to use the system again.
1: Log in as an
administrator, such as SA
Chapter 3.4 First login
2: Select the "Users"
under "Settings", figured
right.
3: Right-click the Users
who are locked and
select "Unlock User"
Do not perform this
procedure if someone
is logged in with the
current user.
68
15.3. ASSA Performer can’t find my Terminal PD
If ASSA Performer sends a message that it cannot find a Terminal PD, make sure it
is switched on and connected to the computer and that the proper USB / COM Port
is selected.
Check that the Terminal PD is switched on.
• Start your Terminal PD by pressing the blue
“OK" button for 2 seconds.
FAQ - Frequently Asked Questions
Check that the correct port is selected,
Chapter 3.3.
15.4. How can see a System overview?
A detailed list can be used to get quick information.
1: Click on the icon for the
System overview, figure (1)
1
Example at the right shows
a Detailed List of Persons,
the view of which keys are
handed out to the person
David Williams.
69
15.5. Search functions for searching all locking systems simultaneously
FAQ - Frequently Asked Questions
ASSA Performer has a built-in search function that allows searching in all locking
systems, e.g. to find persons, keys or cylinders. Click on the binocular icon to
search (see figure below).
This search function is used in Chapter 7.2.2.
15.6. My CLIQ User key is not working even though it has authorization
Check that the key is active.
Use the method below Chapter 8.2.
Check the battery
Chapter 10. explains how to change the battery.
If the key’s battery does not light up or beep when it is inserted into the cylinder
and ASSA Performer cannot find it when it is inserted in the Terminal PD, the
battery may be flat.
15.7. Export address book
ASSA Performer has a built-in tool for exporting a text file that stores the internal
address book in a text file. The Performer Translator program can be used to
convert these text files into Excel files.
Chapter Upgrade to CLIQ Remote describes how to perform this export.
70
15.8. I want to print my order but can’t find it
When an order is placed, the user is given the option of printing it. If this is not
done but the user wants to print it at a later stage, the same information can be
found under Orders.
FAQ - Frequently Asked Questions
1
15.9. Keys are shown in white in my locking system
After a key is ordered and added to the system, it will be displayed in white as
shown in figure (1).
In order for this white key icon to be
replaced with a gray key icon, you must
import a locking system that has been
updated in ASSA Security Master.
1
This update is usually performed by a
locksmith or ASSA.
The process for importing a locking
system is described in Section 3.6.
71
15.10. I got a warning message asking me to insert the lock system in port 2
FAQ - Frequently Asked Questions
This warning message means that the CLIQ User key must be inserted into port 2
before the task can be completed.
The example above writes Insert IQC59 in port 2. The CLIQ user key is associated
with this lock system.
15.11. The database is of a later version than Performer.
This error message can occur after installing ASSA Performer. The most likely
reason is that a later version is installed or has previously been installed. Figure (1)
shows the error message. Under figure (2) you can see details of which database
version or Performer version is installed.
1
2
Install a version of ASSA Performer which is the same or later than the database
version. In the example above, the ASSA Performer 3.4.2.78 or later to be
installed.
NOTE: The database is included in the installation of ASSA Performer. For this
reason, a newer version of the program can be installed when the database is
upgraded.
72
Upgrade to CLIQ Remote
ASSA Performer’s internal address book can be imported into CLIQ Web Manager, the system CLIQ
Remote uses. This means that the contacts do not have to be written manually in CLIQ Web Manager.
All contacts added in ASSA Performer can be exported, which saves a lot of time.
NOTE: When a dp CLIQ locking system is upgraded to CLIQ Remote, all cylinders and
keys in the system are replaced with new ones. The user data from the old system can
be reused.
Archive» Address » Internal » Export » Save » Internal » PerformerTranslator.exe » Browse
» Browse »Translate » Send. Csv file
Upgrade to CLIQ Remote
1
1: Click "File" Address Book
"Internal" figure (1)
2: Click "Export" figure (2)
3: Select where to save the file and
click 'Save' (3)
4: Complete, a. Txt file is now
saved on your computer photo (4)
Continued on next page
2
3
4
If the process has been
followed correctly now have a.
Txt file created in the location
73
Continued upgrade to CLIQ Remote
PerformerTranslator.exe» Browse » Browse »Translate» Send. Csv file
5: Open PerformerTranslater.exe
available on CD-ROM disc or ZIP file
photo (5)
5
6: Click "Browse" under Performer
file and locate the .txt file that was
previously created figure (6)
Upgrade to CLIQ Remote
7: Click "Browse" under the Output
directory and locate the place which
the new file photo (6)
8: Then click Translate
9: The file is now saved on your
computer; send the .csv file to ASSA.
6
For the exported file to be
imported into CLIQ Web
Manager the .txt file need
to be converted to a
different format. This is
when Performer Translator
is used.
When the steps are
completed, a. csv file have
been created. This file must
be sent to ASSA or a
locksmith, depending on who
handled the update.
74
7
16. Importing
to CLIQ Web Manager
After a new CLIQ Remote locking system has been
commissioned, the Address Book file can be imported
as described below.
Administration » Import » Import employees
Upgrade to CLIQ Remote
1
Select your exported ASSA Performer file and click “Upload”
2
Now CLIQ Web Manager is updated with ASSA Performer’s user data.
75
76
Scan or click the code
to download this manual