1
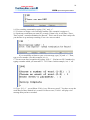
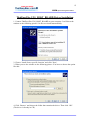
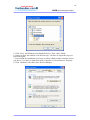
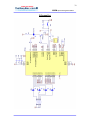
VAJA Speech Recognition Module
User Manual v1.0
Copyright © 2008, ThaiEasyElec , All rights reserved
Disclaimer:
This document is intended only to assist the reader in the use of the product.
ThaiEasyElec.com shall not be liable for any loss or damage arising from the use of any
information in this document or any error or omission in such information or any incorrect
use of the product.
2
VAJA Speech Recognition Module
Content
Specifications
Basic knowledge
Board’s Components
Operation Mode
Display Mode
Jumper and DIP Switch Configuration
Firmware Downloading
Quick Start
ThaiEasyElec U2S_HOST_BOARD Driver Installation
VAJA 1 Command’s Details
The meaning of return code
Firmware’s flowcharts
Schematics
3
4
5
6
7
8
9
10
15
18
29
31
32
3
VAJA Speech Recognition Module
Specifications
1. Use VR Stamp™ 8-bit processor module from Sensory for speech
recognition
2. 14.32 MHz clock frequency
3. 16 Mbits flash memory for storing 31 voice commands and recording sound
up to 253 secs
4. Serial EEPROM for storing configuration up to 8 patterns, 50 messages to be
shown on 16x2 character LCD and 31 events after recognition
5. Build-in microphone and audio jack for external microphone
6. An audio jack for connecting headset or speaker set
7. A terminal block with amplifier for using with normal speaker
8. DIP switch for selecting microphone’s gain, and a socket for connecting
resistor to make custom gain
9. 16 pins IDC header for 16x2 character LCD with variable resistor for
adjusting LCD’s contrast
10. 8 digital output ports
11. Use RS-232 (a separate RS232 converter chip, eg. the MAX3232 is necessary)
to upgrade firmware. Compatible with ThaiEasyElec U2S_HOST Board to
communicate and powered via USB
12. 5VDC 2.5mm power jack with a 3.3V regulator
13. 2 modes available, text mode for use with Hyper Terminal and silent mode
for use with microcontroller, computer application or standalone using
14. 1 push button switch and 1 reset switch
15. 4 LEDs for indicating module’s function, 1 LED for showing module’s sleep
mode, 1 LED for showing POWER status
16. 2 jumpers for selecting power source and operation mode
4
VAJA Speech Recognition Module
Basic knowledge
Speech recognition is a system that can memorize and recall voice from user.
VAJA 1 is ‘speaker dependent recognition’ type. Speaker dependent recognition is a
speech recognition that recognition result depends on specific user (or speaker).
Speaker dependent recognition has three steps in recognition process
1) Training
Train system to know words.
2) Template storage
Store voice data into memory.
3) Recognition
Receive voice and compare with voice data in memory. Then, send result to
the user. Thus the word that the system can recall must be the trained word in
memory.
Sensory’s Fluentchip Technology has special functions called ‘Fast
Recognition’ (SDF) and ‘Wordspot’ (SDWS). SDF use multi-tasking process. Thus, it
works faster. However, it may be overload or hard working especially the system that
receive many input signals in background.
For SDWS technology, the system is focus on interested or ‘trigger’ word. It
receives voice until found a trigger word. So, this technology is appropriate for long
word such as “watermelon” or “go to sleep”. But it is not appropriate for too short or
too long word, such as “call” or “answer incoming call”. Because too short word is
not enough data and too long word has too much data.
Note : In Thai language, “va-ja” means “speech”.
5
VAJA Speech Recognition Module
Board’s Components
(1) VR Stamp Module
(2) LED
(3) Output port
(4) DIP switch for microphone’s gain selection
(5) Socket for custom gain (insert a resistor)
(6) Serial EEPROM (AT24C64N)
(7) Variable resistor for LCD’s contrast adjusting
(8) ThaiEasyElec U2S_HOST_BOARD (USB to Serial) socket
(9) Switch for using some purpose (SW1)
(10) Jumper for power source selection
(11) 5VDC power jack
(12) 16x2 character LCD’s socket
(13) Power indicator
(14) Jumper for mode selection (Program/Run)
(15) Sleep status indicator
(16) Reset switch
(17) Serial flash (AT45DB161)
(18) Output amplifier
(19) Terminal block for speaker
(20) Audio output
(21) Custom microphone input
(22) Board’s microphone
6
VAJA Speech Recognition Module
Operation Mode
VAJA1 Speech Recognition has 3 operation modes
1. Speech recognition mode
It is default mode that work when you power on or reset the VAJA1 Speech
Recognition board. It waits to receive voice command every 1 second automatically
until go to sleep mode. So, you can speak command continuously. If it has no any
respond, please speak again. Because you may not speak in voice receive interval or
speak do not like the voice that you have trained.
2. Sleep mode
In speech recognition mode, when the time is up, it will enter sleep mode. The
‘Power Down’ status LED will on and the system cannot receive command until it
receive double hand clap voice. Received double hand clap voice, it will wake up and
enter speech recognition mode. When sleep mode is start, the system use 3 seconds to
setup timer and you cannot wake it during this 3-second unless reset it.
3. Command mode
You can enter this mode by press SW1 for 2 seconds. Then, you have to send
a character ‘0’ or ‘1’ to VAJA 1 to choose display mode. If you send ‘0’, it will enter
‘silent mode’. And it will enter ‘text mode’ if you send ‘1’. (About display mode, you
can read in ‘Display Mode’ article.)
In command mode, you can send any text command to VAJA 1 by serial port.
If you connect VAJA 1 to computer, the easiest way to send command is using Hyper
Terminal and keyboard .If you use microcontroller, you can use UART to send
character to VAJA 1.
When you want to back to speech recognition mode, you have to send a
character ‘*’ (star). Then it will return to speech recognition mode.
7
VAJA Speech Recognition Module
Display Mode
1. Text mode
This mode is appropriate for new user or simple use because it easy to
understand and send command. Every communication is text-base, thus, you can use
keyboard to type command and see response messages form VAJA 1 in format that
you can understand by Hyper Terminal.
2. Silent mode
This mode just sends results and status numeric code to serial port. You cannot
see what you send if you use Hyper Terminal. But you will see a lot of number such
as [ 00][ 003] or [ 99][ 03] .
However, this mode is suitable for using with microcontroller or PC
application software such as VB, Delphi, etc. Use COM Port (for PC) or UART (for
microcontroller) to send command to VAJA 1.
Because of the limitation of code size in VR Stamp, using as standalone
device may be small provide for your work. But plenty of command in VAJA 1
firmware can provide your work widely if you just add a small microcontroller or
create a small software to control it.
8
VAJA Speech Recognition Module
Jumper and DIP Switch Configuration
1. Jumper at number 1 use for select Run / Program Mode. If you choose
, it will
be in Run Mode. But if you choose
, it will be in Program Mode that use for
download firmware to VR Stamp.
2. Jumper at number 2 use for select power source. If you choose
, it will use
power supply from USB (ThaiEasyElec U2S_HOST_BOARD). But if you choose
, it will use power supply from 5VDC adaptor.
3. DIP switch at number 3 use for select both board’s microphone and external
microphone input gain. You can select by switch one of them to upper position.
Switch number 1 provide small gain, number 2 is medium gain, number 3 is large
gain and number 4 is custom gain. You can put a resistor at a socket next to the DIP
switch to make your input gain. The more resistance will provide more gain. You
should select one of them because nothing selected switch will cause very small gain.
Å According to this picture, this is an example for setting the large gain.
9
VAJA Speech Recognition Module
Firmware Downloading
1. Connect VAJA 1 with computer by serial port. You can use ThaiEasyElec
U2S_HOST_BOARD or RS-232 converter circuit to connect them.
2. Set jumper to Program Mode .
3. Press Reset switch. You will hear a beep sound.
4. Open ‘Sensory Loader 4’, set it as you see in the picture. In the ‘Port’ field, you
have to choose serial port that you want to use. In the ‘File’ field, click at
choose a file (.hex or .dat) you want.
and
5. Click ‘Download’ button and wait while it work.
6. Change jumper setting to Run Mode
and reset the board. Then you can use it.
10
VAJA Speech Recognition Module
Quick Start
1. Install ThaiEasyElec U2S_HOST_BOARD driver.
2. Set jumper to select power source from USB
.
3. Set jumper to Run Mode
.
4. Set DIP switch number 3 to ON position
.
5. Connect ThaiEasyElec U2S_HOST_BOARD with VAJA 1 and set jumper to 3V3.
11
VAJA Speech Recognition Module
6. Connect your speaker.
7. Connect USB cable to computer. You will hear a short beep.
8. Open Hyper Terminal and set to 57600-8-None-2 None.
12
VAJA Speech Recognition Module
9. Press the reset button. If you see [99 ][19] , It is work.
13
VAJA Speech Recognition Module
10. Press SW1 button for 2 second. Messages will be stop sending.
11. Type ‘1’ on your keyboard. The message “Text Mode” will be shown on your
screen.
12. Type ‘[14]’ and (Enter) to erase all words and format its memory.
13. Train a word by typing [10] . You will hear the voice “Please say word one.”
and you have to speak your command. Then, you will hear “Please repeat.” and you
have to speak the same word. If the training success, you will see ‘OK’ .Then you will
hear “Please say word two”. You should press SW1 to stop training because this
example uses only 1 voice command. But if the training is error, It will beep and not
continue to next word. You have to train it again. Sometimes it will show ‘[99 ][xx ]’
on your screen. That mean training is error. The [xx ] is error code and you can find
the meaning in this manual.
14
VAJA Speech Recognition Module
14. Use recording command by typing ‘[30 ]’ and ‘ ’.
15. You have to assign a voice message number. This example is assign to 1.
16. Speak any words that you want in 3 seconds. If time is up, it will show “Error:
Time expired - normal termination for Record”. This is not an error. But it only tells
you the time is up and stop recording. Your voice was recorded.
If you would like to listen to your voice message, type [31] and ‘ ’. Then,
type a voice number. (For this example, it is 1.)
17. Set an event after recognition by typing ‘[64] ’. You have to fill 3 numbers by
typing a number which you want and ‘ ’ for 3 times. In this example, it is ‘1’ all.
18. Type ‘[11] ’, you will hear VAJA 1 say “Please say word”. You have to say the
word that you have trained in 1 second. If it has no error, VAJA 1 will play voice
message that you have recorded.
15
VAJA Speech Recognition Module
ThaiEasyElec U2S_HOST_BOARD Driver Installation
1. Connect ThaiEasyElec U2S_HOST_BOARD to your computer. It will show the
window as the following picture if it does not install automatically.
2. Choose ‘Install from a specific location’ and click ‘Next’.
3. When you see the window as the following picture. You have to choose the option
like this.
4. Click ‘Browse’ and choose the folder that contains the driver. Then click ‘OK’.
(The driver is already in CD.)
16
VAJA Speech Recognition Module
5. Click ‘Next’ and Windows will install the driver. Then, click ‘Finish’.
6. It may be show the window as in the first step. You have to repeat the step you
have done again.
7. If you finish the installation, you have to realize which port the computer knows
you device. You have to right click at My Computer’s icon and choose ‘Property’.
8. Click ‘Hardware’ tab, then click ‘Device Manager’
17
VAJA Speech Recognition Module
9. You will see window as the following picture. Search ‘Ports (COM & LPT)’ and
click ‘+’ in front of them. The port name ‘USB Serial Port’ is ThaiEasyElec
U2S_HOST_BOARD and port number in braces are the port number that you have to
use to communicate with your computer.
18
VAJA Speech Recognition Module
VAJA 1 Command’s Details
Command’s Format
VAJA 1 use numerical command to command it. The format is
[AA] B Where AA is command number that must be in the braces [ ], B is data, value or
parameter. And is ‘Enter’, ‘\r’ or carriage return (0Dh) .And every time it works, it
will return response in format
[XX ][YYY ]
Where XX is 00(no error) or 99(error). If XX is 00, YYY will be the result of
recognition. And if XX is 99, YYY will be the error code
Note : The return code both XX and YYY are follow by a ‘space’(20h) and not have
(0Dh).
Parameter
Some commands not have parameter while some commands have parameter.
But every parameters have their limit for each command. You should assign
parameter value in the limit of each command.
Group 1 : Speech Recognition Usage
[10] = Train
Every voice command you would like to use with VAJA 1 must be trained
before let the system to learn your voice and memories it. So, you must use this
command once before using any voice command at first time.
When you use this command, VAJA 1 will prompt you to say the first voice
command. If the first command is success, it will prompt you to say the second to the
thirty-first command.
If training for each command is success, VAJA 1 will return a response to
serial port. In text mode, it sends message “OK”. And in silent mode, it sends “[00 ]”.
But if training is fail, it will send an error code. And details of the codes
meaning are in ‘Meaning of Return Code’ article.
You can stop training by pressing SW1 button.
[11] = Recog SD
Use for let the system listen to your voice and recognize it by ‘Speaker
Dependent’ method. If it has no voice data in memory, it will send an error code
“[99 ][19 ]” in silent mode or “nothing trained” in text mode.
19
VAJA Speech Recognition Module
If it has trained word in memory, VAJA 1 will listen to your voice for 1
second or any time you set. During listen to your voice, LED1 will turn on. In case of
success, it will work as you set in command [64] (Set event after recognition).
However if recognition fail, it will send an error code.
[12] = Recog SDF
Use speech recognition by Fast Recognition method.
[13] = Recog SDWS
Use speech recognition by Wordspot method.
[14] = Erase word
Use for erase all trained words and sound that you have recorded. This
command will format entire flash memory both voice command part and sound
recording part.
Group 2 : Speech Recognition Setting
[20] = Set strictness for training (set_strict_t)
Use for set strictness level for training process.
In training process, you have to say at least 2 times to let the system compare
and average of 2 voice data. Thus, speaking in different speed, tone, loudness or other
parameter will not accepted by the system. Strictness level use to determine limit of
difference that the system will accept your voice.
You have to set parameter for this command. This parameter is strictness level
from 1 to 5. So, you have to send ‘[20] x ’, where x is an ASCII character form
‘1’ to ‘5’. The more value you assign will cause difficulty of training.
Default setting is level 3. If you assign the parameter out of range, the system
will adjust to default value.
[21] = Set strictness for recognition (set_strict_r)
Use for set strictness level for recognition process.
In recognition process, the system will compare voice in memory with voice
that is received from user. Therefore, higher level will be hard to recognize but lower
level may cause the system confuse with two or more similar sound.
Range : 1-5
Default : 1
If you assign the parameter out of range, the system will adjust to default
value.
[22] = Set difference of sound for training (set_diff)
It is not necessary if you would like to train similar word. Thus, the system
will reject training for that word. This command is use for set difference level
between trained word and word that you have being trained in order to accept new
trained word. The higher level will increase possibility of the system to decide new
word is similar to trained word in memory.
Range : 1-50
Default : 12
20
VAJA Speech Recognition Module
If you assign the parameter out of range, the system will adjust to default
value.
[23] = Set maximum time to wait for speech (set_timeout)
Use for set time (in second) to wait for receiving voice command in
recognition process.
Range : 0-255
Default : 1
If you assign the parameter out of range, the system will adjust to 255. Value 0
mean ‘no time out’.
[24] = Set time to wait for a second utterance (set_sepSil)
Use for set time to wait for a second utterance (separate silence) in 0.25
seconds unit
Range : 0-255
Default : 2 (0.5 sec)
If you assign the parameter out of range, the system will adjust to 255.
[25] = Set maximum number of utterances to analyze (set_maxWrd)
Use for set maximum number of utterances to analyze
Range : 1-4
Default : 2
If you assign the parameter out of range, the system will adjust to default
value.
Group 3 : Sound Record Usage
[30] = Record
Use for recording voice message for playing back. You have to assign
message number for each record and you can assign number 0-254. But, in practical,
VAJA 1 has only 253 minutes for all record and minimum time you can set for
recording is 1 second. So, it is impossible to make 256 records in the same time.
However, you can assign number 1, 3, 18 and 254 for 4 records in the same time.
Range : 0-254
Default : none
If you assign the parameter out of range, the system will adjust to 255 that
cause to be an error and can not start recording.
[31] = Play
Use for playback voice message that you have recorded.
Range : 0-254
Default : none
21
VAJA Speech Recognition Module
If you assign the parameter out of range, the system will adjust to 255 that
cause to be an error and cannot start playing.
[32] = Copy message
Use for copying a stored voice message to a new desired number
Range : 0-254
Default : none
If you assign the parameter out of range, the system will adjust to 255 that
cause to be an error and cannot copy it.
[33] = Delete message
Use for deleting a stored voice message.
Range : 0-254
Default : none
If you assign the parameter out of range, the system will adjust to 255 that
cause to be an error and cannot delete it.
[34] = Message existence
Use for checking a voice message that number exist in the memory or not.
Range : 0-254
Default : none
If you assign the parameter out of range, the system will adjust to 255 that
cause to be an error and cannot check it.
[35] = Space
Use for checking available space for recording in second unit.
Range : no parameter
Default : none
[36] = Get bit rate
Use for checking compression level for recording.
Range : no parameter
22
VAJA Speech Recognition Module
Default : none
[37] = Erase record
Use for erasing all voice message entire the memory.
Range : no parameter
Default : none
Group 4 : Sound Record Setting
[40] = Set record time
Use for set maximum time for each record in second unit. 0 for no timeout that
is time up when the memory is full.
Range : 0-253
Default : 3
If you assign the parameter out of range, the system will adjust to default
value.
[41] = Set record mode
Use for setting recording mode. VAJA 1 has 4 options that you can choose
more than one or not choose anything. The options are
1) Threshold silence : save silences as silence blocks (saves space)
2) Trim initial : Trim initial silence
3) Trim final : Trim final silence
4) Detect pops : Detect pops. If trimming is also in effect then trim pops. If
threshold is in effect, replace pops with silence blocks.
You have to send ‘0’ or ‘1’ to choose or not choose for each option. ‘1’ for
choose and ‘0’ for not choose. If you assign the parameter out of range, you will have
to choose again until you send ‘0’ or ‘1’.
Range : 0-1
Default : 0, 0, 0, 0 (choose nothing / none set)
[42] = Set play mode
Use for set playback speed. Send ‘0’ for normal speed or ‘1’ for fast speed.
23
VAJA Speech Recognition Module
Range : 0-1
Default : 0
If you assign the parameter out of range, the system will adjust to default
value.
[43] = Set play volume
Use for setting playback volume attenuations
0: 0 db (Min volume atten)
1: -2.2 db
2: -4.5 db
3: -6.7 db (Max volume atten)
Default : 0
If you assign the parameter out of range, the system will adjust to default
value.
[44] = Set bit rate
Use for setting compression level for recording. ‘0’ is 4 bits per sample and
‘1’ is 8 bits per sample. The number of bits used to store each sample in a voice
recording. Larger compression levels result in higher quality recording; smaller levels
require less memory. Because of other data stored in the recordings, the memory
savings from recording at 4-bit rather than 8-bit is approximately 6:11.
Range : 0-1
Default : 1
If you assign the parameter out of range, the system will adjust to default
value.
Group 5 : IO Usage
[50] = Send output to digital output port
Use for sending digital output (0 and 3.3V) to output port for 1 bit. To send it,
assign port number and logic value in the same set. The left digit is port number and
the right digit is logic value, such as 61 for port 6 and logic 1.
24
VAJA Speech Recognition Module
Because port 0-4 share output with LCD, so, do not use port 0-4 when you
use LCD. You can use only port5-7 if you want to use LCD.
Range : 0-7 for left digit, 0-1 for right digit
Default : none
If you assign the parameter out of range, the system will return an error code.
[51] = Send character to LCD
Use for sending character to LCD. When you use this, message that you type
will appear on LCD immediately and stop when you press ‘Enter’ or send 16
characters. But its cursor does not move to the next line when it stops. You have to
use command [52] and [53] to move it.
Range : Same as ASCII code
Default : none
[52] = Move cursor to line 1
Use for moving the LCD’s cursor to the first line.
Range : no parameter
Default : none
[53] = Move cursor to line 2
Use for moving the LCD’s cursor to the second line.
Range : no parameter
Default : none
[54] = Clear LCD’s screen
Use for clearing LCD’s screen.
Range : no parameter
Default : none
[55] = Send LCD’s command code
Use for sending LCD’s command code. For details, please see your LCD’s
datasheet
25
VAJA Speech Recognition Module
Range : see LCD’s datasheet
Default : none
[56] = Initialize LCD
Use for initialize LCD. Please use this command before using LCD.
Range : no parameter
Default : none
Group 6 : EEPROM Usage
[60] = Save setting
Use for saving all setting, both speech recognition and sound recording, to
EEPROM. And you can save up to 8 setting patterns. A pattern of setting is call ‘slot’.
Thus, you have 8 slots to save.
Range : 1-8
Default : none
If you assign the parameter out of range, the system will return an error code.
[61] = Load setting
Use for loading setting in EEPROM. However, VAJA 1 does not check which
slot is empty. If you load an empty slot, it will load ‘0xFF’ for all setting and cause
many problems. So, be careful to load any slot.
Range : 1-8
Default : none
If you assign the parameter out of range, the system will return an error code.
[62] = Save LCD’s message
Use for saving message to show on LCD to EEPROM. You have to assign
message number for each saved message.
Range : 1-50
Default : none
If you assign the parameter out of range, the system will return an error code.
26
VAJA Speech Recognition Module
[63] = Load LCD’s message
Use for loading LCD’s message form EEPROM. You have to choose a
message number to load it.
Range : 1-50
Default : none
If you assign the parameter out of range, the system will return an error code.
[64] = Set event after recognition
Although you have never used this command, VAJA 1 usually sends result to
serial port after it succeeds recognition. However, you can set a command to cause it
work automatically when finishes sending result. But not all command you can set by
[64], you can choose only 1 from 3. These 3 commands are [31] (play sound), [51]
(send output) and [63] (load LCD’s message). This command ([64]) uses number 0-3
to represent each of them and call ‘event of word’. That is
0 = None set : If you select this choice, VAJA 1 will send result to serial port.
1 = Play sound ([31]) : After send result, it will play recorded sound.
2 = Send output ([51]) : After send result, it will send output.
3 = Load LCD’s message ([63]) : After send result, it will load LCD’s
message.
When you use this command, it requires 3 data. First, you have to set a desired
word’s number. Then, choose an event choice (0-3). Finally, set parameter for event’s
command as same as you use these commands in usual way.
For example, you want to set VAJA 1 to send logic 1 to port 6 when you say
word 4. You have to send data like this.
[64] Enter 4 Enter 2 Enter 61 Enter
Group 7 : LED Usage
[70] = All LEDs on
Use for turn on all 4 LEDs.
[71] = All LEDs off
Use for turn off all 4 LEDs.
27
VAJA Speech Recognition Module
[72] = LED1 on
Use for turn on LED1.
[73] = LED1 off
Use for turn off LED1.
[74] = LED2 on
Use for turn on LED2.
[75] = LED2 off
Use for turn off LED2.
[76] = LED3 on
Use for turn on LED3.
[77] = LED3 off
Use for turn off LED3.
[78] = LED4 on
Use for turn on LED4.
[79] = LED4 off
Use for turn off LED4.
Group 8 : Miscellaneous
[80] = Set timer
Use for setting timer that countdown to sleep mode in minute unit. This timer
counts when VAJA 1 works in recognition mode only. Thus, no sleep in command
mode. You have 7 choices to choose; 0, 1, 3, 5, 10, 20 and 30, that 0 is no timeout.
Range : 0, 1, 3, 5, 10, 20 and 30; 0 is no timeout.
Default : 3
28
VAJA Speech Recognition Module
If you assign the parameter out of range, the system will adjust to default
value.
[81] = Clear event
Use for erasing all events that you have set by command [64]. VAJA 1 will
just send result to serial port for all 31 voice command.
29
VAJA Speech Recognition Module
The meaning of return code
Because VAJA 1 has simple protocol, every time that VAJA 1 finishes
working, it will send message to tell its success or error. These messages seem to be
‘Acknowledge’ and ‘Not Acknowledge’ in network protocol. They have 2 formats
1) Success case : VAJA 1 will send [00 ] or [00 ][xxx ]. (Please note that they
have ‘space’ before ‘]’.) [00 ][xxx ] is for speech recognition result and [00 ] is for
general command. For example, [00 ][003 ] mean recognition successful and the
result is word 3.
2) Failure case : VAJA 1 will send [99 ][xx ] or no response when it fails.
Where xx is error code that set by Sensory and ThaiEasyElec.com. The meaning of
error codes are explained in the following table.
The meaning of error codes
0x: Data collection errors
01
ERR_DATACOL_TIMEOUT
timeout (no data)
02
ERR_DATACOL_TOO_LONG
too long (memory overflow)
03
ERR_DATACOL_TOO_NOISY
too noisy
04
ERR_DATACOL_TOO_SOFT
spoke too soft
05
ERR_DATACOL_TOO_LOUD
spoke too loud
06
ERR_DATACOL_TOO_SOON
spoke too soon
07
ERR_DATACOL_TOO_CHOPPY
too many segments/too complex
09
ERR_DATACOL_BAD_SETUP
invalid setup
1x: Recognition errors
11
ERR_RECOG_FAIL
recognition failed
12
ERR_RECOG_LOW_CONF
recognition result doubtful
13
ERR_RECOG_MID_CONF
recognition result maybe
14
ERR_RECOG_BAD_TEMPLATE
invalid sd/sv template
16
ERR_RECOG_SIMILAR
too similar to another template
30
VAJA Speech Recognition Module
17
ERR_RECOG_DURATION
bad pattern durations
3x: Record and Play errors
31
ERR_RP_BAD_LEVEL
illegal compression level in recording
32
ERR_RP_MEMORY_FULL
recording ended because of memory
limit
33
ERR_RP_TIME_EXPIRED
recording ended because of time limit
34
ERR_RP_PATGEN_SILENCE
recording ended, patgen detected
silence
35
ERR_RP_XMEM_IN_USE
external memory in use
36
ERR_RP_BAD_PTRS
start, end ptrs incompatible
37
ERR_RP_EM_IN_USE
interrupt vector in use
38
ERR_RP_NO_MSG
message does not exist
39
ERR_RP_MSG_EXISTS
message already exists
3A
ERR_RP_BAD_MSG
illegal message number
Cx: Internal errors (all) ** Please report to
Sensory if an internal error is returned
C0
ERR_SW_STACK_OVERFLOW
software stack full
Fx: Interrupt conditions (all)
FC
ERR_INT_SYNTH
speech (SxTalkHandler)
FD
ERR_INT_RP
rec/play (StopRPRec, StopRPPlay)
FF
ERR_INT_BLOCK
block (BlockHandler, BfeHandler)
Other Error
19
ERR_NO_TRAINED
No trained word in memory/cannot
access
55
ERR_INVALID_PARA
Invalid parameter
31
VAJA Speech Recognition Module
Firmware’s flowcharts
32
VAJA Speech Recognition Module
Schematics
33
VAJA Speech Recognition Module
Schematics (Cont.)
34
VAJA Speech Recognition Module
Schematics (Cont.)
35
VAJA Speech Recognition Module
Schematics (Cont.)