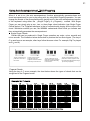
1
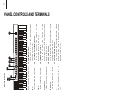
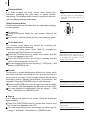
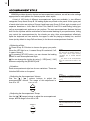
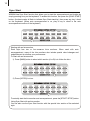
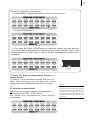
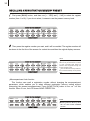
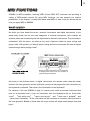
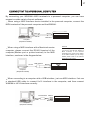
1
CONTENTS
Safety Precautions
P. 2
SYNCHRO Start
P. 16
Panel Controls and Terminals
P. 6
SYNCHRO Stop
P.19
Preparations
P. 9
Accompaniment Sections (Main A/B &
Setting up
P. 9
fill-ins)
Connections
P. 9
Using Auto Accompaniment
Headphone and Audio Output
P. 9
Multi fingering
P.21
MIDI Input and Output
P. 9
Percussion
P.23
Playing the Piano
P. 20
P. 10
Keyboard Percussion
P.23
Starting to Play the Piano
P.10
Metronome
P.23
DEMO Songs
P.10
Saving Songs
P.24
Playing all Songs
P.10
Song Recording
P.25
Playing a Single Selected Song
P.10
Recording a User Song
P.25
Voice
P.10
Song Clear
P.28
Playing Voices
P.10
Track Clear
P.29
Dual Voice
P.11
Playing a Song
P.30
Balancing the Dual
P.11
A-B repeat
P.31
Control and Effect
P.11
ReverbPitch bend Roller
P. 12
Registration Memory
Recording
a Registration
Memory
Footswitch
P.12
Touch Respond
P. 12
Recalling a Registration Memory Preset
Reverb
P.12
P.34
Chorus
P. 12
Tuning
P.13
What Is MIDI?
P.35
Transpose
P.13
MIDI Functions
P.36
Harmony
P.13
Connecting to a PC
P.37
Minus Channel
P. 13
Appendix
P.38
P.14
Voice List
P.38
P.14
Rhythm List
P. 40
Drum Set Table
P.41
Function Parameters
P. 43
Troubleshooting
P.44
Technique Specifications
P.45
Accompaniment Style
Selecting a Style
Adjusting the Accompaniment Volume
P.14
Adjusting the Accompaniment Tempo
P. 1 4
Playing the Accompaniment
P.15
Preset
P.33
MIDI Functions
P.33
P.35
2
Safety Precautions
Symbols
Various symbols are used in this user's manual guide and on the product itself to ensure
that the product is used safely and Correctly, and to prevent injury to the user and other
person as well as damage to property. Those symbols along with their Meanings are shown
below.
WARNING!
This indication stipulates matters that have the risk of causing death or serious injury
if the product is operated incorrectly while ignoring this indication.
CAUTION!
This indication stipulates matters that have the risk of causing injury as well as matters
for which there is the likelihood of occurrence of physical damage only if the product
is operated incorrectly while ignoring this indication.
Symbol Examples
This triangle symbol means that the user should be careful. ( The example at
left indicates electrical shock caution.)
This circle with a line through it means that the indicated action must not be
performed. Indications within or nearby this symbol are specifically prohibited. (The
example at left indicates that disassembly is prohibited.)
The black dot means that the indicated action must be performed. Indications
within this symbol are actions that are specifically instructed to be performed. (The
example at left indicates that the power plug must be unplugged from the electrical
socket.)
! WARNING
Please use caution regarding the handling of the AC adaptor.
Do not use a voltage other than the indicated power supply voltage. Use of a voltage
other than that indicated may cause fire or electrical shock.
If the power cord should become damaged (expose wired, disconnection, etc.),
purchase a new AC adaptor. Use of a damaged power cord may cause fire or electrical
shock.
Do not cut or damage the power cord. Also do not place heavy objects on top of it or
subject it to excessive heat.
Damage to the power cord may cause fire or electrical shock.
3
Do not attempt to shape the power cord or subject it to excessive bending, twisting
or pulling. This may cause fire or electrical shock.
Please use the adaptor specified for this instrument. Use if another adaptor may
cause fire, electrical shock, or malfunction.
Do not locate the instrument or its stand on an uneven or unstable surface.
* Locating the instrument or its stand on an uneven or unstable surface can cause it
to full, creating the danger of personal injury.
Do not place containers containing water or other liquids on the instrument.
Do not place the following objects on the instrument. Placing such objects on the
instrument may cause fire or electrical shock of they pill and get inside the instrument.
Containers filled with water or other liquids(including vases, potted plants, cups,
cosmetics and medicines)
Small metal objects (including hairpins, sewing needles and coins)
Flammable objects
In the event a foreign object should happen to get inside the instrument, please take
the following actions:
1.Turn power off.
2.Unplug the AC adaptor from the wall outlet.
3.If there are any batteries loaded in the keyboard, remove them.
*. Do not touch the batteries directly with your hands when removing them. They may
be hot or battery fluid may be leaking from them.
4.Consult with the dealer where you purchase the keyboard or with an authorized PRELUDE
service provider.
Do not disassemble or modify the instrument.
Never attempt of take apart or modify the instrument, its accessories, or separately
sold options. Doing so may cause fire, electrical shock or malfunction. Consult your
dealer concerning all inspection, adjustment or repair of internal components.
Do not use if there is an abnormality or malfunction.
*. Do not use the instrument if there appear to be abnormalities such as the presence
of smoke or abnormal odor. Also do not use the instrument if there appear to be malfunctions such as the power not coming on or sound not being produced. Use under
such conditions may cause fire or electrical shock. In such cases, take the following
actions immediately. Never attempt to repair the instrument yourself.
1.Turn power off.
2.Unplug the AC adaptor from the wall outlet.
3.If there are any batteries loaded in the keyboard, remove them.
*. Do not touch the batteries directly with your hands when removing them. They may
be hot or battery fluid may be leaking from them.
4. Consult with the dealer where you purchased the keyboard or with an authorized
PRELUDE service provider.
When the instrument has been dropped:
*. In the case the instrument has been dropped or damaged, take the following actions.
Continued use may cause fire or electrical shock.
1. Turn power off.
2. Unplug the AC adaptor from the wall outlet.
3. If there are any batteries loaded in the keyboard, remove them.
*. Do not touch the batteries directly with your hands when removing them. They may
be hot or battery fluid may be leaking from them.
4. Consult with the dealer where you purchased the keyboard or with an authorized
PRELUDE service provider.
4
Be careful of the bags around children.
*. Never allow anyone to place the plastic bags of the instrument, its accessories,
and its separately sold options over their heads. Doing so many cause suffocation.
Particular caution is required in homes with small children.
! CAUTION
AC Adapter
*. Do not locate the power cord in close proximity to heaters or other heating appliances.
This may cause the cord to melt leading to possible fire or electrical shock.
*. When unplugging the AC adapter from an electrical outlet, always make sure to
pull on the adaptor itself and not the cord. Pulling excessively on the cord may cause
it to be damaged or break leading to possible fire or electrical shock.
*. Do not touch the AC adapter with wet hands when it is plugged in. This may cause
electrical shock.
*. When not using the instrument for an extended period such as when travelling,
always make sure to unplug the AC adapter from the electrical outlet for safety
reasons.
*. After use turn off the power switch of the instrument and unplug the AC adapter
from the electrical outlet.
Batteries
*. Improper battery use may cause batteries to rupture and leak. This may cause
injury, malfunction of the instrument or discolouration of furniture and other articles
that come into contact with battery fluid. Take care to observe the followings.
*. Install batteries so their polarity (+/-) matches that indicated on the instrument.
*. For safety and to prevent possible leakage of battery fluid, always make sure to
remove batteries from the instrument when you do not plan to use it for a long time.
*. Always make sure that the batteries making up a set are all of the same type.
*. Never combine the new batteries with old ones.
*. Never dispose of batteries by incinerating them. Never short or disassemble
batteries, and do not expose them to excessive heat.
*. Replace dead batteries as soon as possible.
*. Never attempt to recharge batteries.
Transport
*. When transporting the instrument, always make sure to unplug the AC adaptor
from the electrical outlet and confirm that all other external connections have been
disconnected. Only then should the instrument be transported. If the above is not
done, the cord may be damaged leading to possible fire or electrical shock.
Care
*. Whenever caring, make sure to first unplug the ac adaptor from the electrical outlet.
Also remove the instrument's batteries if battery power if being used.
Location
*. Never locate the instrument in areas subject to high humidity or heavy accumulation
of dust. Doing so may cause fire or electrical shock.
*. Never locate the instrument in areas subject to grease splatters or steam, such
as in a kitchen or near a humidifier. Doing so may cause fire or electric shock.
5
Don not place keyboard on lacquered furniture.
*. The instrument's silicone rubber feet may eventually blacken or scar lacquered
surfaces. Use felt cloth pads to insulate the feet preferably use a PRELUDE musical
instrument stand designed for your keyboard.
Do not place heavy objects on the instruments.
*. Do not place heavy instruments on the instruments. This may cause the instrument
to tip over or break resulting in injury.
Volume
*. Very high volume levels can damage hearing. Avoid using the instrument at very
high volume settings for long periods. Consult with a physician immediately if you
experience impaired hearing or ringing in the ears.
Liquid Crystal Display (LCD) Precautions
*. Avoid subjecting the keyboard's LCD to strong impact, which can crack or break
the LCD's glass creating the danger of personal injury.
*. Should the LCD glass ever crack or break, do not allow the liquid inside the LCD to
come into contact with your skin, which can cause inflammation and reddening.
*. Should the LCD liquid get into your mouth, immediately wash out your mouth with
water and then consult a physician.
*. Should the LCD liquid get into your eyes or on your skin, immediately flush with
water for at least 15 minutes and then consult a physician.
Do not get onto the instrument or stand.*
*. Do not crawl on top of the instrument or its optional stand. Particular caution is
required in homes having small children. This may cause the instrument or stand to
tip over and break resulting injury.
Optional stand*
*. Carefully assemble the stand following the assembly instructions that come with it.
Securely tighten all bolts, nuts, and fasteners, and make sure that you mount the
instrument correctly onto the stand. Incorrectly or insufficiently tightening screws,
or incorrectly mounting the instrument onto the stand can cause the stand to tip over
or the instrument to fall off the stand, possibly leading to injury.
* The stand is available as an option.
26
11
15
14
3
16
17
18
12
Front Panel
27
7.[TOUCH] button
P.12)
It is to turn on / off the reverberation. (See
6.[REVERB] button
(See. P. 12)
This turns on / off the Sustain function.
5.[SUSTAIN] button
11)
It is to turn on / off the Dual voice. (See P.
4.[DUAL ]button
voices of the W8808A. (See P.10)
These are used to select the various
3.[VOICE] buttons
W8808A.
This determines the overall volume of the
button. (See P.11)
This is to search the function of [+ / -]
12.[SEARCH] dial
P.23)
This turns on / off the percussion. (See
11.[PERCUSSION] button
(See P.13)
It is to control the Channel of the keyboard.
10.[Minus Channel] button
(See P.13)
This turns on / off the Harmony function.
9.[HARMONY] button
(See P.12)
It is to turn on / off the Chorus function.
8. [CHORUS] button
(See P.12)
24
22
20
25
10
2.[MASTER VOLUME] dial
9
7
23
4
21
8
This turns the Touch function on and off.
2
19
6
1.Power switch (STAND BY / ON)
31
13
28
30
5
12
pattern). (See P.11)
press comes with a different function
It is to select the function pattern. (Each
17.[FUNCTION] button
of W8808A. (See P.14)
It is to decide the accompaniment style
16.[STYLE] button
songs. (See P.14)
accompaniment and the demonstration
It is to control the tempo of the
15.[TEMPO] button
accompaniment. (See P.14)
It is to control the volume of the
14. [ACMP VOLUME] button
function. (See P.10)
This turn on / off the demonstration
13.[DEMO] button
29
6
PANEL CONTROLS AND TERMINALS
Style mode; and fast rewind the song or
function. (See P. 15, 29)
selected, this is used as a
Song mode. (See P.16, 29)
selected, this is used as a
rewind
rewind
mode; and when the Song mode is
fast
control, or moves the song
is selected, this is used as a
in the Style mode, and when Song mode
This button controls the ending function
It is to control the Intro function in Style
23.[INTRO] button
(P.15)
26. [ENDING] button
20)
accompaniment in Style mode; and to
start / stop song playback in Song mode.
playback point toward the end. (See P.
control, or move the song
It is to start / stop the auto
forward
Style mode; and when Song mode is
temporarily pauses the song playback in
22.[START/STOP] button
auto accompaniment sections while in
function in accompaniment mode; and it
fast
It is to control the auto fill and change the
It is to turn on / off the SYNC Start
25.[MAIN B] button
(See P.20)
function. (See P. 19)
21.[SYNC START] / [PAUSE] button
toward the beginning in Song mode.
It is to turn on / o ff the SYNC Sto p
move the song playback point back
auto accompaniment sections while in
mode, this calls up the A-B Repeat
20.[SYNC STOP] button
It is to control the auto fill and change the
24.[MAIN A ] button
accompaniment on and off. In the Song
selected, this turns the auto
P.16)
point back toward the beginning. (See
19. [ACMP ON/OFF] button
When the accompaniment mode is
Control, or moves the song playback
18.[+ / YES] & [- / NO]
is
to
recall
the
freeze
natural musical instruments. (See P.12)
It is to simulate the pitch bend of the
31.PITCH BEND ROLLER
Mode. ( See P. 10)
accompaniment parameters in the Style
This
30.[STYLE FREEZE] button
refer to P. 23.
Information about this function please
29.[METRONOME]
special chord track). (See P.25)
at most six musical tracks (including a
songs. Each song can be recorded with
[M5], [A]) are used for recording the
These buttons ([RECORD], [BANK], [M1]-
28.[SONG RECORDING] buttons
presets. (See P.33)
recording the Registration Memory
[N1]-[N4]) are used for selecting and
These buttons ([MEMORY], [REGISTER],
27.[REGISTRATION MEMORY] buttons
(See P. 18)
Playback point back toward the beginning .
7
20
25
FOOT SWITCH
BACK BOARD
8
9
24
22 23
25
Damper Pedal
P. 12
P. 12
P. 9
Footswitch
Sustain Pedal
P. 9,35
MIDI OUT
23
24
P. 9,35
P. 9
Rear Panel
MIDI IN
P. 9
AC Adapter Socket
21
22
P. 9
Headphone / Auxiliary Output
20
21
BACK BOARD
REAR PANEL
8
External Terminals
9
PREPARATIONS
Setting Up
4
3
6
2
1
5
1.Fix the left and right feet on the
ground board with 4 black screws
at each side.
2.Put 8 wooden screws into the
small holes in the front left and
right feet. 4 for each side. Then
fix these feet separately on the
ground board and ground feet.
3.Place the piano body onto the
plank, and fix it with 4 zinc-gilded
screws at each side as shows in
the illustration.
4.Connect the cable of foot switch
with the socket cable (As shown
in the illustration).
5.Move the screw between the
sustain pedal and damper pedal
right onto the ground, in order to
pin up the pedal.
6. Use 6 screws to fix the baffle on
the angle iron corresponding to
the pedal and left & right back
feet.
Using Headphones or Stereo System
You can connect a set of stereo headphone to the PHONES/OUTPUT
jack. While such connection is made, you could only hear the sound
through the earphone. Thus, you could practice and play without
disturbing others. This jack can also be connected to the external
amplifier / speaker system, in order to form a better amplifier system.
Stereo System
MIDI INPUT / OUTPUT
MIDI IN
MIDI OUT
MIDI IN could be used to receive the MIDI data from the outside
equipment connected.
MIDI OUT could send the MIDI Data of this instrument.
10
PLAYING THE PIANO
STARTING TO PLAYTHE PIANO
TURNING ON THE INSTRUMENT
Before plugging in the AC cable, set the [POWER] to 0 .
First plug the power cable output in [AC Socket], then
connect the cable input with the 220V alternating current.
Press down the 1 on the POWER switch, then the LCD
displays.
NOTE:
You should wait 2 or 3 seconds if you
want to restart the instrument. The time
is to let the internal circuit discharge
thoroughly. Otherwise, the performance
will go abnormal to a certain extent.
POWER
¡öSETTING THE VOLUME
Set the [MASTER VOLUME] dial to a suitable place, about
1/4 circle. Also you can adjust it after playing.
MAX
MIN
NOTE
Usually, you should set the
[MASTER VOLUME] dial within 3 / 4
circle. Otherwise, certain note may
not be properly voiced.
VOLUME
DEMO SONGS
There are all together 22 demonstration songs in this
instrument, which thoroughly display its excellent quality in
the tone and melody. You can get a general idea of this
instrument through them.
Playing all demo songs
Press the [DEMO] button, and all the demonstration songs
would be performed in order.
Playing a single selected demo song
After pressing the [DEMO] button, you could use [+ / YES]
and [- / NO] to select the appropriate number of the desired
song during playback, also you can use the [SEARCH] dial to
select the number.
NOTE:
You can still play on the keyboard while
the demo song is being played, but if
the sound overpasses the maximum
value, it might not be voiced.
Voice
In this instrument, there are 348 vivid voices, including 25 Chinese voices, and many GM
voices. All these are separated into A and B groups and all leading voices are printed on the
panel. At the upper part of each voice button are voices of Group A and lower part of Group B.
Selecting a Voice
Press [MAIN A / B] to select a voice.
Press the [VOICE] button to choose a leading voice
Press [+ / YES] and [- / NO] or use the [SEARCH] dial to
decide the voice you desire.
NOTE:
Only the names of leading voices are
printed on the panel. In fact each voice
has its variations. While selecting a
voice, you can see the name in the
LCD.
11
Dual Voice
This function allows you to play two voices at the same time.
Follow the previous Selecting a Voice process to choose the
first voice.
Press the [DUAL] button to enter into Dual Voice mode. The
name of the second voice will appear in the LCD;
Follow the previous Selecting a Voice process again to
choose the second voice;
Press the [DUAL] button to stop Dual Voice function.
Balancing the Dual Voice
You should balance the volume of each voice by yourself.
Press the [FUNCTION] button until it shows
Second
Voice Volume in the LCD.
Press [+ / YES] and [- / NO] or use the [SEARCH] dial to
adjust the second voice volume, ranging from 0 to 127.
NOTE:
In Dual Voice mode, if you press
the keyboard, it may sound
differently or like two voices mixed
together. If you press this button
right after you turn on this instrument,
stringed instruments ensemble 1
would be automatically set as
defaulted second voice.
In this mode, you cannot choose
the first voice, so you ought to settle
the first voice before entering into
this mode.
NOTE:
By pressing [+ / YES] and [- / NO] at
the same time, the volume would
return to the primary setting.
CONTROL AND EFFECT
This digital piano offers you various types of effects. You can freely choose your favourite one.
The Usage of Function buttons
Press each button once to choose different function
1.Voice 2. Style mode 3.Demo Song 4 Minus Channel
(for demon songs) 5. Harmony 6. Chorus 7. Transpose
8.Tuning 9. Dual Balance 10. Metronome
Stop certain function or return to the primary setting by
pressing [+ / YES] and [- / NO] at the same time.
Withdraw from the Function MENU.
Press the [FUNCTION] button for 2 seconds to withdraw
from the Function MENU.
Using the [SEARCH] dial
Adjust the [SEARCH] dial to select certain function directly.
Any function that can be controlled by the [+ / YES] and [- /
NO] can be applied to this dial.
Adjust the [SEARCH] dial.
FUNCTION
YES
NO
SEARCH
12
Pitchbend Roller
It is used to adjust the voice volume when playing this
instrument, simulating the pitch bend of natural musical
instruments. This enables certain voices (e.g. guitar) to be more
vivid, and display different music styles.
NOTE:
This Roller has no effect on Auto Bass
chord.
The primary setting is +/- 200 dieresis (2
semitones), and the adjust range is +/-1
octachord.
Using Pitch bend Roller
Turn the roller with your left hand while you right hand is playing
on the keyboard.
PITCH BEND
Footswitch
Using the Sustain Pedal can add sustain effect to the
melody.
You can diminish the melody pitch by using damper pedal.
Touch Response
This function could adjust the volume by controlling the
strength of pressing the keyboard.
There are five touch types (Touch SNS 15) available by
pressing the [TOUCH] button in the panel.
Press the [TOUCH] button to enable this function, and the
Touch icon appears in the LCD.
Press the [TOUCH] button for at least 3 seconds, and the
name of the type appears in the LCD.
You can change the touch type by using [+ / YES] and [- / NO]
buttons or [SEARCH] dial.
Reverb
This function is to add reverberation effect to the voices, which
can create live effect and sound as if you were performing in a
small room or a concert. A total of eight different Reverb types
simulating various different performance environments are
available. Press the [REVERB] button to shift this mode.
Press the [REVERB] button for at least 3 seconds to enable
this function, and there appears the Reverb icon in the LCD.
You can change the reverberation type by using [+ / YES]
and [- / NO] buttons or [SEARCH] dial.
Chorus
It is to add chorus effect to the voices. There are 8 different
types available.
Press the [FUNCTION] button to choose this function, and
the Chorus icon appears in the LCD.
You can close this function and change the chord type by
using [+ / YES] and [- / NO] buttons or [SEARCH] dial.
NOTE:
The keyboard will automatically call up
touch response after you turn it on. Its
default touch type is medium response.
As to setting the parameter in touch
function, please see P.63.
NOTE:
More information please see P. 43.
This instrument will automatically call up
Reverberation On mode after you turn it on.
NOTE:
By pressing [+ / YES] and [- / NO] at the
same time, the tuning would return to its
primary setting.
More information please see P. 43.
13
Tuning
This function determines the fine pitch setting of both the main
voice and the bass/chord accompaniment of the selected style.
It also determines the pitch of the songs. This allows you to
accurately match the tuning with that of other instruments
without changing your fingering. The Tuning setting can be
adjusted over a range of +/- 100(approx. +/- 1 semitone).
Press the [FUNCTION] button to select this function, and
the Tune icon appears in the LCD.
You can change the tuning by using [+ / YES] and [- / NO]
buttons or [SEARCH] dial.
Transpose
This function determines the key of both the main voice and
the bass/chord accompaniment of the selected style. It also
determines the pitch of the songs. This allows you to easily
match the pitch of this instrument to other instruments or
singers, or play in a different key without changing your
fingering. The transpose settings can be adjusted over a range
of +/-12 semitones(+/-1 octave).
Press the [FUNCTION] button to select this function, and
the Transpose icon appears in the LCD.
You can adjust the range of transpose by using [+ / YES]
and [- / NO] buttons or [SEARCH] dial.
Harmony
The Harmony section features a variety of performance effects
that enhance the melodies you play when using the
accompaniment styles of the W8808A. A total of twenty-six
Harmony types are available.
Tremolo, Trill and Echo effects can be used even if
accompaniment is off. There are five different Harmony Types
that automatically create harmony parts(for notes played in the
upper section of the keyboard) to match the accompaniment
chords.
Press the [FUNCTION] button to select this function. When
Harmony Disabled
appears in the LCD, it means this
function is closed.
Press [+ / Yes] to enter into harmony mode.
You can chose your desired harmony type by using [+ / YES]
and [- / NO] buttons or [SEARCH] dial.
NOTE:
By pressing [+ / YES] and [- / NO] at the
same time, the pitch would return to the
primary setting.
More information please see P. 43.
NOTE:
By pressing [+ / YES] and [- / NO] at the
same time, the mode would return to the
primary setting. A new mode is only valid
to the notes played after this new mode
is set.
This function is to change the places of
the notes, in order to display the melody
and accompaniment for the present
voice and accompaniment style. But it
has no effect on keyboard percussion
music.
Please refer to P.43 for the details of
setting the transpose parameters.
NOTE:
For the first ten Harmony Types(Duet,
Octave, Tremolo 1/4, Tremolo 1/6,
Tremolo 1/8, Tremolo 1/12, Echo 1/4,
Echo 1/6, Echo 1/8, Echo 1/12), chords
must be played in the Accompaniment
section of the keyboard.
The harmony voice will change its pitch
to match the chord you are playing.
The speed of the Tremolo, Trill and Echo
effects depends on the Tempo setting.
Each voice of the W8808A has its own
independent Harmony setting.
¡ö Minus Channel
This function controls the keyboard channel and has effect only on the demo songs, which makes
easier for users to practise to the demo songs.
While playing the demo songs, pressing [MINUS CHANNEL] button can turn on / off the keyboard
channel of the demo song.
Pressing [MINUS CHANNEL] button at lease 3 seconds to close the channel you desired.
Use [+/YES] and [-/NO] or adjusting [SEARCH] dial to select left channel or right channel.
14
ACCOMPANIMENT STYLE
W8808A provides dynamic rhymes and accompaniment patterns, as well as voice settings
appropriate for each pattern for various popular music styles.
A total of 100 kinds of different accompaniment styles are available, in two different
categories Group A and Group B. All leading styles are printed on the panel. At the upper part
of each style button are styles of Group A and lower part Group B. Each style is made up of
separate sections : Intro, Main A / Auto Fill-in, Main B / Auto Fill-in and Ending, letting you
call up accompaniment sections as you perform. The auto accompaniment features that are
built into the rhythms add the excitement of instrumental backing to your performance, letting
you control the accompaniment by the chords you play. Auto accompaniment effectively
splits the keyboard into two sections: the upper is used for playing a melody line, and the
lower (set by default to keys F#2 and lower) is for the auto accompaniment function.
¡öSelecting a Style
Press Group A / B button to choose the group you prefer.
When the LED light is on, it means Group B is selected; if off,
it means Group A.
By pressing [STYLE] button, you can choose the leading
pattern in each accompaniment style.
You can change the rhythm by using [+ / YES] and [- / NO]
buttons or adjusting the [SEARCH] dial.
NOTE:
The accompaniment styles printed on
the panel are the leading patterns in
each style. Each style actually
concludes one or several different
patterns.
The name of the accompaniment
style you choose will be shown in the
LCD.
¡öVariation
Each accompaniment style has its own variations. There are
Variation A/B button on the panel.
¡öAdjusting the Accompaniment Volume
Use the [
] [
] volume buttons to adjust the
accompaniment volume. The range of this adjustment is
ACMP VOLUME
from 0 to 127.
¡öAdjusting the Accompaniment Tempo
Use the [ ] [ ] tempo buttons to adjust the accompaniment
tempo, and its range is from 40 to 240.
TEMPO
NOTE:
By pressing [ ] [ ] buttons at the same
time, the volume will return to its primary
setting.
NOTE:
By pressing [ ] [ ] buttons at the same
time, the tempo will return to its primary
setting.
15
Playing the Accompaniment
The panel buttons below function as accompaniment controls.
This button turns on / off
bass and chord accompaniment.
This button turns on / off
Sync Start function.
This button controls the
Intro section.
Press this button to call up
Main B, and automatically add
a fill-in before the change.
DEMO SONGS. CONTROL & EFFECT
DEMO
DUAL
REVERB
CHORD
SYNC STOP
SYNC
START
TOUCH
CHORUS
START/STOP INTRO
HARMONY
MAIN A
MINUS
CHANNEL
MAIN B
PERCUSSION
ENDING
CHOOSE & PLAY
This button turns on / off
Sync Stopt function.
This button turns on / off
the accompaniment.
Press this button to call up
Main A, and automatically add
a fill-in before the change.
This button controls the
Ending section.
Turn on the auto accompaniment
Press the [CHORD] button to enable (turn on) the auto accompaniment.
DEMO SONGS. CONTROL & EFFECT
DEMO
DUAL
REVERB
CHORD
SYNC STOP
SYNC
START
TOUCH
CHORUS
START/STOP INTRO
HARMONY
MAIN A
MINUS
CHANNEL
MAIN B
PERCUSSION
ENDING
CHOOSE & PLAY
Start the accompaniment
You can do this in one of the following ways:
Press the [START / STOP] button
The rhythm starts playing immediately without bass and chord accompaniment.
The currently selected Main A / B section will play.
DEMO SONGS. CONTROL & EFFECT
DEMO
DUAL
REVERB
CHORD
SYNC STOP
SYNC
START
TOUCH
CHORUS
START/STOP INTRO
HARMONY
MAIN A
MINUS
CHANNEL PERCUSSION
MAIN B
ENDING
CHOOSE & PLAY
You can select the Main A / B section by pressing the appropriate button[MAIN A/B]before
pressing the [START / STOP] button.(The display briefly shows the letter of the selected
section: MAIN A or MAIN B .)
DEMO SONGS. CONTROL & EFFECT
DEMO
DUAL
REVERB
CHORD
SYNC STOP
SYNC
START
TOUCH
CHORUS
START/STOP INTRO
CHOOSE & PLAY
HARMONY
MAIN A
MINUS
CHANNEL
MAIN B
PERCUSSION
ENDING
16
Sync Start
W8808A has Sync Start function that allows you to start the accompaniment and rhythm by
simply pressing a key on the keyboard. To enable this function, first press the [SYNC START]
button, (the beat marks all flash to indicate Sync Start stand-by), then press any key / chord
on the keyboard. (When auto accompaniment is on, play a key or chord in the auto
accompaniment section of the keyboard.)
DEMO SONGS. CONTROL & EFFECT
DEMO
DUAL
REVERB
CHORD
SYNC STOP
SYNC
START
TOUCH
CHORUS
START/STOP INTRO
HARMONY
MAIN A
MINUS
CHANNEL
MAIN B
PERCUSSION
ENDING
CHOOSE & PLAY
Starting with an Intro section.
Each style has two or four-measure Intro sections. When used with auto
accompaniment, many of the Intro sections also include special chord changes and
embellishment to enhance your performance.
To Start with an Intro section.
1). Press [MAIN] button to select which section (A or B) is to follow the Intro.
DEMO SONGS. CONTROL & EFFECT
DEMO
DUAL
REVERB
CHORD
SYNC STOP
SYNC
START
TOUCH
CHORUS
START/STOP INTRO
HARMONY
MAIN A
MINUS
CHANNEL
MAIN B
PERCUSSION
ENDING
CHOOSE & PLAY
2) Press [INTRO] button.
DEMO SONGS. CONTROL & EFFECT
DEMO
DUAL
REVERB
CHORD
SYNC STOP
SYNC
START
TOUCH
CHORUS
START/STOP INTRO
HARMONY
MAIN A
MINUS
CHANNEL
MAIN B
PERCUSSION
ENDING
CHOOSE & PLAY
To actually start the Intro section and accompaniment, press the [START / STOP] button.
Using Sync Start with an Intro section
You can also use the Sync Start function with the special Intro section of the selected
style.
17
To use Sync Start with an Intro section:
1). Press [MAIN] to choose which section (A / B) is to follow the Intro.
DEMO SONGS. CONTROL & EFFECT
DEMO
DUAL
REVERB
CHORD
SYNC STOP
SYNC
START
TOUCH
CHORUS
START/STOP INTRO
HARMONY
MAIN A
MINUS
CHANNEL
MAIN B
PERCUSSION
ENDING
CHOOSE & PLAY
2) Press [INTRO] button.
DEMO SONGS. CONTROL & EFFECT
DEMO
DUAL
REVERB
CHORD
SYNC STOP
SYNC
START
TOUCH
CHORUS
START/STOP INTRO
HARMONY
MAIN A
MINUS
CHANNEL PERCUSSION
MAIN B
ENDING
CHOOSE & PLAY
3). First press the [SYNC START] button to enable this function, and then start the
Intro section and accompaniment by playing any key on the keyboard. (When auto
accompaniment is on, play a key or chord in the auto accompaniment section of the
keyboard.)
DEMO SONGS. CONTROL & EFFECT
DEMO
DUAL
REVERB
CHORD
SYNC STOP
SYNC
START
TOUCH
CHORUS
START/STOP INTRO
HARMONY
MAIN A
MINUS
CHANNEL
MAIN B
PERCUSSION
ENDING
CHOOSE & PLAY
1 .Using
the Auto accompaniment function to
change chords
Try playing a few successive chords with your left
hand, and experience how the bass and chord
accompaniments change with each chord you play.
2 .Stop the accompaniment
There are three ways to stop the accompaniment.
Pressing the [START / STOP] button
The rhythm and accompaniment stops playing
immediately.
DEMO SONGS. CONTROL & EFFECT
DEMO
DUAL
REVERB
CHORD
SYNC STOP
SYNC
START
TOUCH
CHORUS
START/STOP INTRO
CHOOSE & PLAY
HARMONY
MAIN A
MINUS
CHANNEL
MAIN B
PERCUSSION
ENDING
NOTE:
Chords played in the auto accompaniment
section of the keyboard are also detected
and played when the accompaniment is
stopped. In fact, this gives you a
split
keyboard, with bass and chords in the
left hand and the normally selected voice
in the right.
18
Using an Ending section
Press the [ENDING] button, then the accompaniment stops after the Ending section is
finished.
DEMO SONGS. CONTROL & EFFECT
DEMO
DUAL
REVERB
CHORD
SYNC STOP
SYNC
START
TOUCH
HARMONY
CHORUS
START/STOP INTRO
MAIN A
MINUS
CHANNEL
PERCUSSION
ENDING
MAIN B
CHOOSE & PLAY
Pressing the [SYNC START] button
Doing this can immediately stop the accompaniment and automatically enables Sync
Start, letting you re-start the accompaniment by simply playing a key or a chord in the
auto accompaniment section of the keyboard.
DEMO SONGS. CONTROL & EFFECT
DEMO
DUAL
REVERB
CHORD
SYNC STOP
SYNC
START
TOUCH
HARMONY
CHORUS
START/STOP INTRO
MAIN A
MINUS
CHANNEL
PERCUSSION
ENDING
MAIN B
CHOOSE & PLAY
Changing the Split Point of the Accompaniment Track
Press the [ACMP SPLIT] button until in the LCD appears
Select the
Accompaniment Track Split Point .
Then use [+ / YES] and [- / NO] buttons or [SEARCH] dial to change the split point
you want.
REGISTRATION MEMORY
REGISTRATION
MEMORY
SONG
NUMBER
4
BANK
ACMP
METRONOME FREEZE
ACMP
SPLIT
ACMP
TRACK
CLEAR
RECORD
SONG MEMORY
Changing the Keyboard Split Point
Press the [CHORD] button until in the LCD appears
Split .
Then use [+ / YES] and [- / NO] buttons or [SEARCH] dial to change the keyboard
split point you want.
DEMO SONGS. CONTROL & EFFECT
DEMO
DUAL
REVERB
CHORD
SYNC STOP
SYNC
START
TOUCH
CHORUS
START/STOP INTRO
CHOOSE & PLAY
HARMONY
MAIN A
MINUS
CHANNEL
MAIN B
PERCUSSION
ENDING
19
SYNC Stop
This convenient feature lets you stop / pause the auto accompaniment by releasing your
fingers from the auto accompaniment section of the keyboard. Playing the chord again
restarts the auto accompaniment. This is ideal for putting dynamic breaks in your
performance for example, stopping the rhythm and accompaniment briefly while you play a
melodic break or solo with your right hand.
Press the [ACMP] button.
To enable the accompaniment function. By pressing [CHORD] button repeatedly, you can
get KEYBOARD SPLIT, SINGLE FINGER CHORD, FINGERED CHORD, CHORD CLOSE,
ACCOMPANIMENT functions in order.
DEMO SONGS. CONTROL & EFFECT
DEMO
DUAL
REVERB
CHORD
SYNC STOP
SYNC
START
TOUCH
CHORUS
START/STOP INTRO
HARMONY
MAIN A
MINUS
CHANNEL
MAIN B
PERCUSSION
ENDING
CHOOSE & PLAY
Press the [SYNC STOP] button.
Setting Sync Stop to on before starting the auto accompaniment automatically sets Sync
Start on as well.
DEMO SONGS. CONTROL & EFFECT
DEMO
DUAL
REVERB
CHORD
SYNC STOP
SYNC
START
TOUCH
CHORUS
START/STOP INTRO
HARMONY
MAIN A
MINUS
CHANNEL
MAIN B
PERCUSSION
ENDING
CHOOSE & PLAY
Play a chord on the keyboard (in the auto accompaniment section of the keyboard).
The auto accompaniment starts automatically as soon as you play a chord.
Stop the auto accompaniment by releasing the chord.
To start the auto accompaniment again, just play a chord.
To turn Sync Stop off, please press [SYNC STOP] button once more.
Pressing [START / STOP] button can completely stop the auto accompaniment.
20
Accompaniment Sections (Main A / B and Fill-ins)
While the accompaniment is playing, you can add variation in the rhythm / accompaniment by
pressing the [MAIN / AUTO FULL] button. This switches between the Main A and Main B
sections, automatically playing a fill-in pattern to smoothly lead into the next section. For
example, if the Main A section is currently playing, pressing this button automatically plays a
fill-in pattern, followed by the Main B section. (See illustration on this page) If you do not want
to change to the Main B after a fill-in is being played, just press [MAIN A] right after pressing
[MAIN B], then you can enjoy Main A again.
You can also select either the Main A or B section to start by pressing the [MAIN / AUTO FILL]
button before starting the style.
DEMO SONGS. CONTROL & EFFECT
DEMO
DUAL
REVERB
CHORD
SYNC STOP
SYNC
START
TOUCH
MINUS
CHANNEL
HARMONY
CHORUS
START/STOP INTRO
MAIN A
MAIN B
PERCUSSION
ENDING
CHOOSE & PLAY
About the Fill-in Patterns
.. .A fill-in pattern plays
If you press the [MAIN/
AUTO FILL] button before
beat 4...
end of the measure.. .
2
1
2
And the Main A / B section
plays here.
immediately until the
3
4
If you press the [MAIN /
AUTO FILL] button here,
after beat 4...
1
3
2
3
4
1
2
A fill-in pattern plays
from here...
3
And the Main A / B section
begins here...
21
Using Auto Accompaniment Multi Fingering
When it is set to on, the auto accompaniment function automatically generates bass and
chord accompaniment for you to play along with, by using Multi Fingering operation. You can
change the chords of the accompaniment by playing keys in the auto accompaniment section
of the keyboard using either the
Single Finger or Fingered
method. With Singer
Finger you can simply play a one-, two- or three-finger chord indication (see Single Finger
Chords below). The Fingered technique is that of conventionally playing all the notes of the
chord. Whichever method you use, the W8808A understands what chord you indicate and
then automatically generates the accompaniment.
Single Finger Chords.
Chords that can be produced in Single Finger operation are major, minor, seventh and
minor seventh. The illustration below shows how to produce the four chord types. (The key of
C is used here as an example; other keys follow the same rules. For example, B 7 is played
as B and A.)
To play a major chord:
press the root note of
the chord.
To play a minor chord:
press the root note
together with the nearest
black key to the left of it.
To play a seventh chord:
press the root key together
with the nearest white key
to the left of it.
To play a minor seventh chord:
press the root key together with
the nearest white and black keys.
(three keys together)
Fingered Chords.
Using the key of C as an example, the chart below shows the types of chords that can be
recognized in the Fingered mode.
*Notes enclosed in parenthesis are optional; The chords will be recognized without them.
22
NOTE:
Notes in parentheses can be omitted.
Playing two same root keys in the
adjacent octaves produces
accompaniment based only on the root.
A perfect fifth (1+5) produces
accompaniment based only on the root
and fifth which can be used with both
major and minor chords.
The chord fingerings listed are all in
root
position, but other inversions
can be usedwith the following
exceptions: m7, m7 5, 6, m6, sus4,
aug, dim7, 7 5, 6(9), 1+2+5.
Inversion of the 7sus4 and m7(11)
chords are not recognized if the notes
shown in parentheses are omitted.
The auto accompaniment will
sometimes not change when related
chords are played in sequence (e.g.
some minor chords followed by the
minor seventh).
Two-note fingerings will produce a
chord based on the previously played
chord.
23
PERCUSSION
KEYBOARD PERCUSSION
By applying percussion function, you can give a vivid performance as if you were playing
a drum or some other percussion instruments. This keyboard can produce 61 different kinds
of percussion music, and 18 traditional Chinese percussions.
Press [PERCUSSION] button to select the percussion.
DEMO SONGS. CONTROL & EFFECT
DEMO
DUAL
REVERB
CHORD
SYNC STOP
SYNC
START
TOUCH
CHORUS
START/STOP INTRO
HARMONY
MAIN A
MINUS
CHANNEL
MAIN B
PERCUSSION
ENDING
CHOOSE & PLAY
Press [PERCUSSION] button at least 3 second, then
you can see keyboard percussion groups in the LCD.
Then use [+ / YES] and [- / NO] buttons or [SEARCH]
dial to select the keyboard percussion group you
desired.
By playing on the keyboard you can get the percussion
music you want. On each key there is a certain icon
standing for a corresponding percussion. By this key,
you can get the music vivid to this real percussion. All
the percussion and keys are list in Page 41.
By pressing [PERCUSSION] button or any other voice
button you can close this percussion function.
METRONOME
When the Metronome is on, it will voice in Song Playback /
/ User Song Record mode.
Press the [METRONOME] button to turn on/off this
function.
When the Metronome is on, press [SYNC START]
button to enable it to voice.
REGISTRATION MEMORY
REGISTRATION
MEMORY
SONG
NUMBER
4
BANK
RECORD
SONG MEMORY
ACMP
METRONOME FREEZE
ACMP
SPLIT
ACMP
TRACK
CLEAR
NOTE:
When the Percussion function is on,
you cannot change the present melody.
Moreover, if you choose a certain voice
after the percussion function is on, this
function will be automatically cancelled.
When the auto undertone function is
on, the 19 lowest undertone keys (C1 to
F2) cannot be applied to percussion
music.
NOTE
The Metromome function is off
when the power is just turned on.
24
SAVING SONGS
To save songs is to save your own performance (5 melody channels) and the accompaniment
(chord channel) together as a song, in case sometimes you want to repeat it again. This
instrument can save at most 5 songs. Saving Songs consists of 8 control buttons: [SONG NO.]
to choose the song, [SAVE] to do the preparation, [MELODY 1-5] to choose the melody voice
part, [CHORD / CLEAR] to select the chord and musical track and as well as clear the saved
songs.
DEMO SONGS. CONTROL & EFFECT
DEMO
DUAL
REVERB
CHORD
SYNC STOP
SYNC
START
TOUCH
CHORUS
START/STOP INTRO
HARMONY
MAIN A
MINUS
CHANNEL
MAIN B
PERCUSSION
ENDING
CHOOSE & PLAY
As a matter of fact, this function provides with 5 musical tracks available for saving the
melody (Melodies in each track can choose different kinds of voices and percussions) and one
special channel to save the accompaniment (using Style mode or auto bass chord function).
Please save the songs with the methods below:
Save any melody track or chord track. (Single track record)
When the auto bass chord function is on, save the melody track and chord track
together.(Double tracks record)
NOTE:
There's no special difference between
single-track recording and double-track
recording. Even when you record the
melody and chord performance by
double-track recording, this instrument
can automatically separate it into melody
track and chord track according to your
performance. Thus, you can re-record a
certain track (or correct an error) after
double-track recording.
In addition, each track can save what stated below
Melody1-5: the melody played on the keyboard, voice,
dual on/off(and the choice of the second voice), dual balance,
reverb on/off, sustain on/off, pitch bend roller, touch response
on/off, percussion, chord on/off(with the parameters you've
set), transpose on/off(with the parameters you've set).
Chord: the chord played on the keyboard (regardless of
auto bass chord mode), Style choice, accompaniment
proceeding (intro, fill-in, ending, A/B variation on/off, change
of accompaniment volume).
NOTE:
Both the beginning tempo and the tempo
change in the recording will be recorded
as parts of the song.
25
SONG RECORDING
W8808A features powerful and easy-to-use song recording features that let you record your
keyboard performancesusing up to six independent tracks (including one track for
accompaniment)for creating your own complete, full orchestrated compositions. You can
record and save up to five User songs.
REGISTRATION MEMORY
REGISTRATION
MEMORY
SONG
NUMBER
4
BANK
RECORD
ACMP
METRONOME FREEZE
ACMP
SPLIT
ACMP
TRACK
CLEAR
SONG MEMORY
Song recording on the W8808A is similar to using a tape recorder; whatever you play on the
keyboard is recorded in real time as you play it. Also, when you record subsequent parts to
other tracks, you can hear the previously recorded parts as you record new ones.
Recording a User Song
The data that can be recorded to normal (melody) tracks are listed as below:
Note on/off
Velocity
Touch Type
Sustain
Voice Number
Tempo, Time Signature (if it is not in the chord track)
Reverb Type
Chorus Type
The data recorded into Chord track:
Style number
Accompaniment Volume
Chord changes and timing
Tempo, Time Signature
Changing Sections (Intro, Main A / B, Fill-in, Ending, etc.)
Those settings can be recorded only once when the music begins, while others can be
changed during the music.
To make all desired W8808A settings.
Before you actually start recording, you'll need to make various settings for the songsuch
as selecting a style, setting the Tempo, and selecting a voice.
If desired, also make other settings. Refer to the list above for settings that can be
recorded to a song.
26
To select a User song number for recording.
Press [SONG NO] button, and use [+ / Yes] or [- / No] button to choose song number
you want for recording.
REGISTRATION MEMORY
REGISTRATION
MEMORY
SONG
NUMBER
4
BANK
RECORD
ACMP
METRONOME FREEZE
ACMP
SPLIT
ACMP
TRACK
CLEAR
SONG MEMORY
To chose the recorded track number.
While holding down the [RECORD] button press the
appropriate Song Memory button. Melody track 1 to 5 can
only be chosen once at a time and the display light of time
signature flicks. The track number temporarily appears in the
LCD before it recovers to its the previous display.
NOTE:
Keep in mind that all recording
operations replace all the
information recorded before. In
other words, if you record to a track
that already has recorded data; all
previous data in the track will be
erased and replaced by the newly
recorded data.
REGISTRATION MEMORY
REGISTRATION
MEMORY
SONG
NUMBER
4
BANK
RECORD
ACMP
METRONOME FREEZE
ACMP
SPLIT
ACMP
TRACK
CLEAR
SONG MEMORY
¡öRecording to the Chord Track
A special chord track is prepared for recording accompaniment data. This is automatically
recorded to the Chord track (track A). Selecting the chord track will also automatically turns
on the accompaniment.
REGISTRATION MEMORY
REGISTRATION
MEMORY
SONG
NUMBER
4
BANK
RECORD
ACMP
METRONOME FREEZE
ACMP
SPLIT
ACMP
TRACK
CLEAR
SONG MEMORY
¡öRecording to a Melody Track (1 to 5)
Five independent melody tracks are prepared to record your keyboard performance.
Usually, you'll want to record these after you've recorded the Chord track. But you can also
simultaneously record Chord track and one Melody track.
27
Muting Tracks During Playback
While the recording is enabled, you can selectively mute different tracks. This is useful
for when you want to clearly hear certain tracks, and not others, during recording. Muting
can also be done on the fly during playback. To use muting, press the corresponding
SONG MEMORY button, repeatedly if necessary, until the desired track number in the
display is off.
Each press of a SONG MEMORY button (when playback is stopped) cycles through the
following settings.
To start recording.
When the beat marks and track number start flashing,
you can start recording simply by playing the keyboard (or by
pressing the [START/STOP] button).
¡ö When Sync start is on, play the first chord of the
song in the auto accompaniment section of the keyboard.
The accompaniment starts automatically and you can
continue recording, playing other chords in time with the
accompaniment.
NOTE
If the previous accompaniment track or
melody track is on, it can be monitored
during the recording. If no of that track
is needed, you can press its button
again to close it. The screen will show
the current track number in the
state column.
Stop recording:
After you finished playing the song you want to record,
press the [START/ STOP] button or [RECORD] button to
stop recording.
Record to other tracks as desired.
To do this, simply repeat step 3 to 5 above. Make sure
that when you press the [SONG MEMORY] button
corresponding to the desired track, the track number in the
display flashes.
Listen to newly recorded song:
To play back the song from the beginning, simply press
the [START/STOP] button again. Playback stops when the
[START/STOP] button is pressed again.
NOTE
If no power is provided, the recorded
data can only be reserved for one week
or more. Important data should be
stored in other equipment through the
function of batch output.
28
SONG CLEAR
The Song Clear operation completely erases all the recorded data on all tracks of a selected
User song. Use this operation only when you are sure you want to erase a song and record a
new one. To erase an individual track of a song while leaving the other tracks intact, use the
Track Clear operation.
Select the desired song.
Press the [SONG NO] button, and then use [+ / YES] or [- / NO] button to select the
desired song (between No.1 to No.5).
REGISTRATION MEMORY
REGISTRATION
MEMORY
SONG
NUMBER
4
BANK
RECORD
ACMP
METRONOME FREEZE
ACMP
SPLIT
ACMP
TRACK
CLEAR
SONG MEMORY
While holding down the [RECORD] button, press Song Memory buttons.
All track indications in the LCD flash, indicating that all tracks are to be erased.
REGISTRATION MEMORY
REGISTRATION
MEMORY
SONG
NUMBER
4
BANK
RECORD
ACMP
METRONOME FREEZE
ACMP
SPLIT
ACMP
TRACK
CLEAR
SONG MEMORY
Press [+ / YES] button.
At the
Sure?
prompt, press the [+ / yes] button, or press the [- / NO] button to abort.
Press the [+ / YES] button is to clear the desired song. LCD shows
Again press the [+ / YES] button and LCD says, Cleared .
Press button [- / NO] is to cancel the operation.
Sure?
29
TRACKS CLEAR
The Track Clear operation is to completely erase all the recorded data on a selected track of
a selected User song, leaving the other tracks intact. Use this operation only when you are
sure to clear a track and record a new one. To erase the data of an entire song, use the Song
Clear operation.
Select the desired song.
Press the [SONG NO] button, and then use the numeric keypad or press [+ / Yes] or [- / No]
button to select the desired song (No.1 to No.5).
REGISTRATION MEMORY
REGISTRATION
MEMORY
SONG
NUMBER
4
BANK
ACMP
METRONOME FREEZE
ACMP
TRACK
RECORD
ACMP
SPLIT
CLEAR
SONG MEMORY
Press and hold down the button corresponding to the track to be erased.
Press and hold down the appropriate [SONG MEMORY] button
TRACK] for at least one second.
[M1]-[M5]
[ACMP
REGISTRATION MEMORY
REGISTRATION
MEMORY
SONG
NUMBER
4
BANK
RECORD
METRONOME
ACMP
FREEZE
ACMP
SPLIT
ACMP
TRACK
CLEAR
SONG MEMORY
Press the [+ / YES] button.
At the
Sure?
prompt, press the [+ / YES] button, or press the [- / NO] button to abort.
Pressing the [+ / YES] button is to clear the desired track. LCD shows
Again press the [+ / YES] button and in the LCD says, Cleared .
Pressing button [- / NO] is to cancel the operation.
sure?
30
PLAYING A SONG
This button is the panel button of song control functions. Its usage covers your saved User
songs and the demo songs.
This is to enable A-B
Repeat function.
Song Fast Rewind Function
DEMO SONGS. CONTROL & EFFECT
DEMO
DUAL
REVERB
CHORD
SYNC STOP
SYNC
START
TOUCH
MINUS
CHANNEL PERCUSSION
HARMONY
CHORUS
START/STOP INTRO
MAIN A
ENDING
MAIN B
CHOOSE & PLAY
This is to enable Song
Pause function
Song Fast Forward Function
About Song track:
REGISTRATION MEMORY
REGISTRATION
MEMORY
SONG
NUMBER
ACMP
4
BANK
METRONOME FREEZE
ACMP
SPLIT
ACMP
TRACK
CLEAR
RECORD
SONG MEMORY
Melody Track
Accompaniment Track
Start the desired song.
Press [START / STOP] button.
DEMO SONGS. CONTROL & EFFECT
DEMO
DUAL
REVERB
CHORD
SYNC STOP
SYNC
START
TOUCH
CHORUS
START/STOP INTRO
HARMONY
MAIN A
MINUS
CHANNEL
MAIN B
PERCUSSION
ENDING
CHOOSE & PLAY
Stop the song playback.
Press [START / STOP] button. If the playback is repeated by using the button [START/
STOP], the song will automatically stop.
31
A B REPEAT
This convenient A-B Repeat function is an ideal aid for practicing and learning. It allows you
to specify a phrase of a song (from A point to B point), and repeat it while yourself practice or
play along with it.
Set point A (the start point) while playing a song.¡£
During the playback, press the [A-B REPEAT] button once, at the beginning point to be
repeated.
DEMO SONGS. CONTROL & EFFECT
DEMO
DUAL
REVERB
CHORD
SYNC STOP
SYNC
START
TOUCH
CHORUS
HARMONY
START/STOP INTRO
MAIN A
MINUS
CHANNEL
MAIN B
PERCUSSION
ENDING
CHOOSE & PLAY
Set point B (the end point).
While the song continues playing, press the [A-B repeat]
button once again, at the place you want it to stop repeating.
Thus, the selected phrase repeats indefinitely until stopped.
NOTE:
DEMO SONGS. CONTROL & EFFECT
DEMO
DUAL
REVERB
CHORD
SYNC STOP
SYNC
START
TOUCH
CHORUS
HARMONY
START/STOP INTRO
MAIN A
MINUS
CHANNEL
MAIN B
PERCUSSION
ENDING
The A and B points can only be
specified at the beginning of a measure
(beat 1), and not at any point in the
middle of a measure.
To set the A point to the beginning of
a song, press the [A-B REPEAT] button
before starting playback.
CHOOSE & PLAY
Pause or stop playback as needed.
Just use [PAUSE] or [START / STOP] button. Stopping playback does not cancel the set
A / B point or the A-B Repeat function.
DEMO SONGS. CONTROL & EFFECT
DEMO
DUAL
REVERB
CHORD
SYNC STOP
SYNC
START
TOUCH
CHORUS
START/STOP INTRO
CHOOSE & PLAY
HARMONY
MAIN A
MINUS
CHANNEL
MAIN B
PERCUSSION
ENDING
32
Turn off the A-B Repeat function
Press the [A-B REPEAT] button
DEMO SONGS. CONTROL & EFFECT
DEMO
DUAL
REVERB
CHORD
SYNC STOP
SYNC
START
TOUCH
CHORUS
START/STOP INTRO
HARMONY
MAIN A
MINUS
CHANNEL
MAIN B
PERCUSSION
ENDING
CHOOSE & PLAY
HINT:
If you are repeat practicing a particularly difficult section, try slowing down the tempo to an
appropriate speed to make it easier to play and master the part. You may also want to slow
down the Tempo while setting the A / B point, this makes it easier to accurately set the points.
You can also set the A-B Repeat function while the song is paused or stopped. Simply use
[F F] / [REW] button to select the measures you want, then press the [A-B REPEAT] button
for each point, and finally just start playback.
DEMO SONGS. CONTROL & EFFECT
DEMO
DUAL
REVERB
CHORD
SYNC STOP
SYNC
START
TOUCH
CHORUS
START/STOP INTRO
CHOOSE & PLAY
HARMONY
MAIN A
MINUS
CHANNEL
MAIN B
PERCUSSION
ENDING
33
REGISTRATION MEMORY
By applying this convenient function, you can save at most 32 panel settings (8 groups and 4
in each group). And you can recall any setting at any moment if you want.
Each panel consists of parameters below:
Voice (as well as Group A / B choice);
Dual Voice (Second voice choice and Dual balance)
Chorus on/off, type
Touch Type
Reverb
Transpose setting
Style Number (as well as Group A / B choice)
Tempo setting
Tuning
Harmony on / off and its type
Accompaniment volume
RECORDING A REGISTRATION MEMORY PRESET
Press the [BANK] button then there appears
BANK
in the LCD. Using [+ / YES]
and [- / NO] buttons to choose the group (18 groups)
REGISTRATION MEMORY
REGISTRATION
MEMORY
SONG
NUMBER
ACMP
METRONOME FREEZE
4
BANK
ACMP
TRACK
RECORD
ACMP
SPLIT
CLEAR
SONG MEMORY
Keep the [Registration Memory] button pressed and then press any button from N1 to
N4. In LCD, there appears
Registration Memory
, and as well as the corresponding
number. The new setting will be saved to corresponding place in the memory. The register
number shows in the first line of the scream for a short time and then the original display
recovers.
REGISTRATION MEMORY
REGISTRATION
MEMORY
SONG
NUMBER
4
BANK
RECORD
SONG MEMORY
ACMP
METRONOME FREEZE
ACMP
SPLIT
ACMP
TRACK
CLEAR
34
RECALLING A REGISTRATION MEMORY PRESET
First press [BANK] button, and then use [+ / YES] and [- / NO] to select the register
number (from 1 to 18); if you do not select, it means to use the present memory bank.
REGISTRATION MEMORY
REGISTRATION
MEMORY
SONG
NUMBER
4
BANK
MINUS
METRONOME CHANNEL
ACMP
SPLIT
ACMP
TRACK
CLEAR
RECORD
SONG MEMORY
Then press the register number you want, and it will be recalled. The register number will
be shown in the first line of the scream for a short time and then the original display recovers.
NOTE.
REGISTRATION MEMORY
REGISTRATION
MEMORY
SONG
NUMBER
4
BANK
RECORD
METRONOME
ACMP
FREEZE
ACMP
SPLIT
ACMP
TRACK
CLEAR
SONG MEMORY
If no power is provided, the recorded
data can only be reserved for one week
or more. Important data should be
stored in other equipment through the
function of batch output.
If do not select the memory bank first,
then it will automatically use the present
bank.
¡öAccompaniment Lock function
This function can recall a registration number without changing the accompaniment
parameters, which enables you to adopt different registration memory setting without
interrupting the present accompaniment. Press [ACMP LOCK] button to turn on / off this
function. When it is on, the LCD shows ACMP FREEZE ON.
REGISTRATION MEMORY
REGISTRATION
MEMORY
SONG
NUMBER
4
BANK
RECORD
SONG MEMORY
ACMP
METRONOME FREEZE
ACMP
SPLIT
ACMP
TRACK
CLEAR
NOTE
¡¤
Selecting different Memory Bank
will not close ACMP FREEZE
function.
35
MIDI FUNCTIONS
W8808A is MIDI-compatible, featuring MIDI IN and MIDI OUT terminals and providing a
variety of MIDI-related controls. By using MIDI functions, you can expand your musical
possibilities. In this chapter, it mainly talks about what MIDI is, what it can do, and as well as
how you apply MIDI to W8808A.
WHAT IS MIDI?
No doubt you have heard the terms----acoustic instruments and digital instruments. In the
world today, these are the two main categories of musical instruments. Let's consider an
acoustic piano and a classical guitar as representative acoustic instruments. They are easy to
understand. With the piano, you strike a key, and a hammer inside hits some strings and
plays a note. With guitars, you directly pluck a string and the note sounds. But how do digital
instruments go about playing a note?
Based on playing information from the keyboard,
a sampling note stored in the tone generator is
played through the speakers.
As shown in the pictures above, in digital instruments, the sample notes (reserved notes)
stored in the tone generator section (electronic circuit) can be played when the information on
the keyboard is collected. Then what is the information on the keyboard?
For instance, if you use W8808A to play a C quarter note, unlike an acoustic instrument that
puts out a resonated note, it puts out information from the keyboard such as
voice
,
with which key
when was it released
,
about how strong
, and
with what
when was it pressed
and
. All the information will be converted to a number value and sent to
the tone generator. Based on these data, the music source will adopt stored sample note and
play it.
36
MIDI FUNCTION
MIDI is the abbreviation of musical instruments digital interface. It allows the digital
instruments to communicate with each other, by sending and receiving compatible notes,
control change and program change, and as well as other types of MIDI data and information.
MIDI is an international standard. It enables all the instruments to connect together, and
allows them to control each other and exchange data. That is, it makes all the instruments a
system, and greatly enlarges its function.
W8808A can control MIDI device by transmitting note-related data and various types of
controller data, and also can be controlled by outside MIDI information, which can
automatically decide the music source mode, and choose MIDI track, voice and effect, and
change the parameter and as well as perform the appointed voice.
¡öMIDI Interface
MIDI IN is to receive outside data from other MIDI devices like sequencer in order to control
this instrument; MIDI OUT is to send MIDI data (like the note and touch data) from this
instrument.
MIDI IN
MIDI OUT
¡öREMOTE PASSAGE
To set the MIDI passage to receive outside keyboard data, please select 01-16. The outside
keyboard must set the source passage from which the data is sent and its MIDI OUT
connects this keyboard's MIDI IN by the MIDI cable. When set is OFF, this keyboard will
receive from all the16 tracks. Pressing [-/NO] and [+/YES] buttons at the same time can
retune to the original setting (OFF)
¡öKEYBOARD OUTPUT
To determine whether the data output from the MIDI OUT.
NOTE
Never use MIDI cables longer than about 15 metres. Cables longer than this can pick up
noise which can cause data errors.
37
CONNECTINT TO A PERSONAL COMPUTER
By connecting your W8808A's MIDI terminals to a personal computer, you can have
access to a wide variety of music software.
When using a MIDI interface device installed in the personal computer, connect the
MIDI terminals of the personal computer and the W8808A.
MIDI OUT
MIDI IN
MIDI IN
W220
8808A
MIDI OUT
Computer
(Sequencer software)
NOTICE:
While using Macintosh computers,
you have to set the time setting of
MIDI interface in the Internet
applications the same as the setting
of the MIDI interface you are using.
Details please refer to the Internet
applications instructions.
When using a MIDI interface with a Macintosh series
computer, please connect the RS-422 terminal of the
computer(Modem port or printer terminal) to the MIDI
interface, as shown in the diagram below.
MIDI Interface
RS-422
MIDI IN
W220
220ÐÍ
8808A
MIDI OUT
Computer
(Sequencer software)
When connecting to a computer with a USB interface, just use MIDI interface: first use
a standard USB cable to connect Ux16 interface to the computer, and then connect
W8808A to UX16 interface correctly.
Ux16 Interface
USB
Computer
(Sequencer software)
MIDI IN
8808A
W220
MIDI OUT
38
VOICE LIST
VOICE LIST
The W8808A has 64-note maximum polyphony. This means that it can play a maximum of up to
64 notes at once, regardless of what functions are used. Auto Accompaniment uses a number of
the available notes, so when Auto Accompaniment is used the total number of available notes for
playing on the keyboard is correspondingly reduced. The same applies to the Split Voice and
Song functions.
Caution: The Voice List includes MIDI program change numbers for each voice. Use these program
change numbers when playing the W8808A via MIDI from an external device.
Voice MIDI
No
No
01
02
03
04
05
06
07
08
0
1
2
3
4
5
6
7
09
10
11
12
13
14
15
16
8
9
10
11
12
13
14
15
17
18
19
20
21
22
23
24
16
17
18
19
20
21
22
23
25
26
27
28
29
30
31
32
24
25
26
27
28
29
30
31
33
34
35
36
37
38
39
40
32
33
34
35
36
37
38
39
Voice MIDI
No NO
Name of Voice
PIANO
ACOUSTIC GRAND PIANO
BRIGHT ACOUSTIC PIANO
ELECTRIC GRAND PIANO
HONKY-TONK PIANO
ELECTRIC PIANO1
ELECTRIC PIANO2
HARPSICHORD
CLAV1
CHROMATIC PERCUSSION
CELESTA
GLOCKENSPIEL
MUSIC BOX
VIBRAPHONE
MARINBA
XYLOPHONE
TUBULAR BELLS
DULCIMER
ORGAN
DRAWBAR ORGAN
PERCUSSIVE ORGAN
ROCK ORGAN
CHURCH ORGAN
FEED ORGAN
ACCORDION
HARMONICA
TANGO ACCORDION
GUITAR
ACOUSTIC GUITAR(NYLIN)
ACOUSTIC GUITAR(STEEL)
ELECTRNIC GUITAR(JAZZ)
ELECTRNIC GUITAR(CLEAN)
ELECTRNIC GUITAR(MUTED)
OVERDRIVEN GUITAR
DISTOTION GUITAR
GUITAR HARMONICS
BASS
ACOUSTIC BASS
ELECTRIC BASS(FINGER)
ELECTRIC BASS(PICK)
FRETLESS BASS
SLAP BASS1
SLAP BASS2
SYNTH BASS1
SYNTH BASS2
1
2
1
2
1
2
41
42
43
44
45
46
47
48
40
41
42
43
44
45
46
47
49
50
51
52
53
54
55
56
48
49
50
51
52
53
54
55
57
58
59
60
61
62
63
64
56
57
58
59
60
61
62
63
65
66
67
68
69
70
71
72
64
65
66
67
68
69
70
71
73
74
75
76
77
78
79
80
72
73
74
75
76
77
78
79
Name of Voice
STRINGS
VOLIN
VLOLA
CELLO
CONTRABASS
TREMOLO ATRINGS
PIZZICATO STRINGS
ORCHESTRAL HARP
TIMPANI
RNSEMBLE
STRINGS ENSEMBLE1
STRINGS ENSEMBLE12
SYNTH STRINGS1
SYNTH STRINGS2
CHOIR AAHS
VOICE OOHS
SYNTH VOICE
ORCHESTRA HIT
BRASS
TRUMPET
TROMBONE
TUBA
MUTED TRUMPET
FRENCH HORN
BRASS SECTION
SYNTH BRASS1
SYNTH BRASS2
REED
SOPRANO SAX
ALTO SAX
TENOR SAX
BARTION SAX
OBOE
ENGLISH HORN
BASSOON
CLARINET
PIPE
PICCOLO
FLUTE
RECORDER
PAN FLUTE
BLOWN BOTTLE
SHAKUHACHI
WHISTLE
OCARINA
1
2
1
2
1
2
39
VOICE LIST
Voice MIDI
No No
81
82
83
84
85
86
87
88
80
81
82
83
84
85
86
87
89
90
91
92
93
94
95
96
88
89
90
91
92
93
94
95
97
98
99
100
101
102
103
104
96
97
98
99
100
101
102
103
105
106
107
108
109
110
111
112
104
105
106
107
108
109
110
111
113
114
115
116
117
118
119
120
112
113
114
115
116
117
118
119
Name of Voice
SYNTH REED
LEAD1(WOUARE)
LEAD2(SAWTIITH)
LEAD3(CALLIOPE)
LEAD4(CHIFF)
LEAD5(CHARANG)
LEAD6(VOICE)
LEAD7(FIFTH)
LEAD8(BASS+LEAD)
SYNTH PAD
PAD1(NEW AGE)
PAD2(WARM)
PAD3(POLYSYNTH)
PAD4(CHOIR)
PAD5(BOWED)
PAD6(METALLIC)
PAD7(HALO)
PAD8(SWEEP)
SYNTH EFFECTS
FX1(RAIN)
FX2(SOUNDTRACK)
FX3(CRYSTAL)
FX4(ATMOSPHERE)
FX5(BRIGHTNESS)
FX6(GOBLINS)
FX7(ECHOES)
FX8(SCO-FI)
ETHNIC
SITAR
BANJO
SHAMISEN
GUZHENG
KALIMBA
BAGPIPE
ERHU
SUONAI
PERCUSSION
TINKLE BELL
AGOGO
STEEL DRUMS
WOOOBLOCK
TAIKO DRUM
MELODIC TOM
SYNTH DRUM
REVERSE CYMBAL
Voice MIDI
No
No
121
122
123
124
125
126
127
128
120
121
122
123
124
125
126
127
129
130
131
132
133
134
135
136
137
138
139
140
141
142
143
144
145
146
147
148
149
150
151
152
153
128
129
130
131
132
133
134
135
136
137
138
139
140
141
142
143
144
145
146
147
148
149
150
151
152
154
155
156
157
158
159
160
161
162
163
153
154
155
156
157
158
159
160
161
162
Name of Voice
SOUND EFFECT
FRET NOSE
BREATH NOISE
SEASHORE
BIRD TWEET
TELEPHONE RING
HELICOPTER
APPLAUSE
GUNSHOT
FOLK
YUNLUO
GUANMEILANG
BIANMANG
YANGQIN
LUSHENG
PIBA
LUOQIN
YUQIN
DARUAN
ZHONGRUAN
GUOHU
ERHU
ZHONGHU
ERHUQUN1
ERHUQUN2
ZHONGHUQUN
BANGDI
KUNDI
XIAO
BANHU
XIPI
ZHUIHU
SANXIAN
GUZHENG
GUOYINSUONA
PERCUSSION
STANDARD DRUMS
CHINESE PERCUSSION
ROOM DRUMS
ROCK DRUMS
ELECTRIC DRUMS
T 808 DRUMS
JAZZ DRUMS
BRUSH KIT
CLASSIC DRUMS
SFX KIT
1
2
T808
40
RHYTHM LIST
No
00
01
02
03
04
05
06
07
08
09
10
11
12
13
14
15
16
17
18
19
20
21
22
23
24
25
26
27
28
29
30
31
32
33
34
35
36
37
38
39
40
41
42
43
44
45
46
47
48
Name
8/16BEAT
8BEAT-1
8BEAT-2
8BEAT-3
16BEAT-1
16BEAT-2
16BEAT-3
POP
POOPROCK
FOLKROCK
POPBOLERO
POPWALTZ
SOULBALLAD
MOOTOWN
DANCE
HOUSE
TECHNO-1
TECHNO-2
RAVE
DANCE-1
DANCE-2
DISCO-70S
DISCO
MACARENA
R&B
GOSPEL-1
GOSPEL-2
R&B-1
R&B-2
BLUES-1
BLUES-2
FUNK
ROCK
ROCK-60S
ROCK-70S
ROCK-80S
BALLROCK
SLOWROCK
SLOWROCK6/8
ROCK&ROLL
ROCK&ROLL-1
ROCK&ROLL-2
SHUFFLE
TWIST
BOOGIE-1
BOOGIE-2
SWING/JA
SWING
LOUNGE
DIXIE-1
DIXIE-2
JAZZBALLAD-1
JAZZBALLAD-2
JAZZWALTZ
CHARLSTON
RAGTIME
COUNTRY
NO
49
50
51
52
53
8/16
8 1
8 2
8 3
16 1
16 2
16 3
54
55
56
57
58
59
60
61
62
63
64
1
2
1
2
70
1
2
1
2
1
2
65
66
67
68
69
70
71
72
73
74
75
76
77
78
79
80
81
82
60
70
80
6/8
83
84
85
86
87
88
89
90
1
2
1
2
/
1
2
1
2
91
92
93
94
95
96
97
98
99
Name
COUNTRY-1
COUNTRY-2
COUNTRYDANCE
COUNTRYROCK
COUNTRYWALTZ
CARIBBEAN
REGGAE-1
REGGAE-2
CARIBBEAN
LATIN-1
BOSSA-1
BOSSA-2
SAMBA-1
SAMBA-2
RUMBA
BEGUINE
CHACHA-1
CHACHA-2
LATIN-2
SALSA
CUMBIA
MERENQUE
MAMBO
LATIN
GIPSY
D.SAMBA
ORIENTAL
CINGENE
MUS5/8
ORIENTAL
OYUNHAVA
WORLDMUSIC
SEVILLIANA
HOLLYWOOD
SP.RUMBA
SP.BOLERO
SIRTAKI
BAROQUE
HAWAII
BALLROOM
FOXTROT
QUICKSTEP
SLOWFOX
TRAD.WALTZ
JIVE
PASODOBLE
TANGO
TANGOARG
WALTZ/MARCH
GERMWALTZ
VIENNAWALTZ
MUSETTE
SLOWWALTZ
MARCH
MARCH6/8
POLKA
D.POLKA
SCHLAGER
1
2
1
2
1
1
2
1
2
1
2
2
6/8
41
DRUM SET TABLE (MIDI CHANNEL 10)
1
HQ STD SET1
39 - D#2
42 - F#2
44 - G#2
46 - A#2
49 - C#3
51 - D#3
54 - F#3
Closed Hi Hat [EXC1]
56 - G#3
58 - A#3
61 - C#4
63 - D#4
66 - F#4
89
90
91
92
93
94
95
96
F6
Low Wood Block
- F#6 Mute Cuica [EXC4]
G6
Open Cuica [EXC4]
- G#6 Mute Triangle [EXC5]
A6
Open Triangle[EXC5]
- A#6 Shaker
B6
Jingle Bell
C7
Belltree
2
3
CHINESE SET HQ ROOM SET
4
HQ POWER SET
5
HQ ELEC. SET
42
DRUM SET TABLE (MIDI CHANNEL 10)
6
HQ TR808 SET
7
HQ DANCE SET
8
BRUSH
9
ORCHESTRA
10
SFX SET
HQ Dance snare1
HQ Dance snare2
808 OHH [EXC1] 808 OHH [EXC1]
89
90
91
92
93
94
95
96
F6
- F#6
G6
- G#6
A6
- A#6
B6
C7
Horse Gallop
Birds
Rain
Thunder
Wind
Sea Shore
Stream
Bubble
*
*
*
*
43
FUNCTION PARAMETERS
TYPE
DISPLAY
RANGE/
SETTING
INSTRUCTION
W8808A
W8808A
W8808A
W8808A,
44
TROUBLESHOOTING
Problems
Possible Causes and Solutions
When the W8808A is turned on or off,
a popping sound is temporarily
produced.
This is normal and indicates that this
instrument is receiving electrical power.
When using a mobile phone, noise is
produced.
Using a mobile phone in close proximity to the
W8808A may produce interference. To prevent
this, turn off the mobile phone or use it further
away from the W8808A.
There is no sound even when the
keyboard is played or when a song is
being played back.
Check that nothing is connected to the
PHONES/OUTPUT jack on the rear panel.
When a set of headphones is plugged into this
jack, no sound is output.
The sound of the voices or rhythms
seems unusual or strange
The battery power is too low. Replace the
batteries.
The accompaniment does not sound
properly.
Make sure that the Accompaniment Volume is
set to an appropriate level.
The voice chosen does not sound
properly, or the volume is too low.
Make sure the settings are appropriate: master
volume, dual balance
Not all of the voices seem to sound,
or the sound seems to be cut off.
The W8808A is polyphonic up to a maximum of
64 notes. If the Dual voice is being used and a
style or song is playing back at the same time,
some notes/sounds may be omitted (or
stolen ) from the accompaniment or song.
The sound of a voice changes from
note to note.
This is normal. The AWM tone generation
method uses multiple recordings (samples) of
an instrument across the range of the
keyboard; thus, the actual sound of the voice
may be slightly different from note to note.
The foot switch (for sustain) seems to
produce the opposite effect. For
example, pressing the foot switch
cuts off the sound and releasing it
sustains the sounds.
The polarity of the foot switch is reversed.
Make sure that the foot switch plug is properly
connected to the SUSTAIN jack before turning
on the power.
45
Panel Control
88
348
s
64
Demo songs, Voice, Style Mode, Accompaniment
Volume, Touch Sense, Reverb, Sustain, Dual,
Function, Song Number, Memory, Song Memory,
Registration Memory
Functions:
Dual Voice, Dual Balance, Sustain, Pitch bend
Roller, Touch Response, Reverb, Tuning,
Transpose, Tempo, Harmony Metronome
Large LCD Screen Display
Auxiliary Interfaces
DC input, earphone/auxiliary output,
Foot Switches
Sustain Pedal, Damper Pedal
Power Ouput
10W + 10W
16.5
Bass, rhythmic chord , long
chord, sentence1/2,
large/small accompaniment mode
220V AC
138
92
53
ON/OFF
75 kg
Main A/B (Auto Fill-ins)
Songs:
22 Demo songs and 5 User songs.
The specifications are subject to change without notice.
5
WARNING!
Chord
DOMESTIC USE ONLY! AVOID
BEING CAUGHT IN RAIN! DO NOT
DISSEMBLE IT BY YOURSELF!
WELCOME
To the happy family of satisfied PRELUDE electronic musical instrument owners! To get the
most out of the many features and functions of the keyboard, please be sure to read
carefully this manual and keep it at hand for future reference.
MAIN FEATURES
Strong multifunctional LCD system with large-scream display in many languages, which
makes selecting and editing parameters much easier.
348 different kinds of voices, including 25 voices of Chinese folk instruments( Trichord,
Gu-Zheng, Erhu, Suona)
Almost including 100 popular accompaniment styles in the world. Each has its own intro
and main (A, B two types), variation and ending.
32 types of commonly-used voices and 32 types of commonly-used styles for rapid choice.
With 9 groups of percussion instrument and a group of Chinese traditional percussion
instrument.
Great combination with direct selection and digital search.
Graceful piano shape design and soft LCD back light makes the piano more luxurious.
Be able to synthesize certain digital effects like the reverb chorus
and 3 D stereo effect,
which could create various sound field effects.
Be able to record at most 5 user songs, and they could be played repeatedly.
22 demonstration songs, making great contributions to lifting your performance level.
Panel-register function could save your beloved panel, and recall it whenever you want.