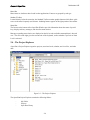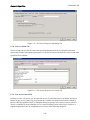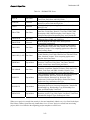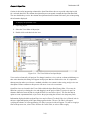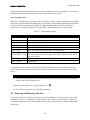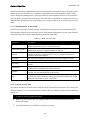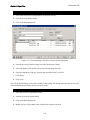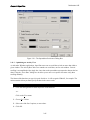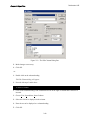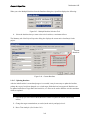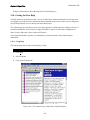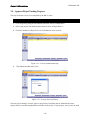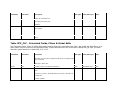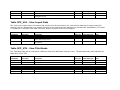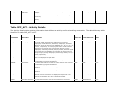
1
PUBLICATION 615 Scheduling Manual Procedures for Design Schedules 3rd Edition – October 2013 PUB 615 (10-13) Forward Publication 615 Prepared by: The Pennsylvania Department of Transportation In conjunction with Gannett-Fleming, Inc. Raudenbush Engineering, Inc. Published October 2013 This manual has been prepared for the purpose of providing guidance to Department staff and their consultants on how the Open Plan and WelcomHome tools should be used for design scheduling on Department projects. It should be noted that the Department has a series of publications that deal with scheduling topics and that the guidance in Publication 615 is only intended for the design process. Our Estimating Manual, Publication 352, deals with how scheduling factors can have an impact on estimates. The Project Planning and Scheduling Workbook, Publication 449, focuses on construction schedules. Questions with regards to Publication 615 can be directed to the Project Schedules, Specifications, and Constructability Section in the Bureau of Project Delivery. i Table of Contents Publication 615 PUBLICATION615 SCHEDULINGMANUAL–PROCEDURESFORDESIGNSCHEDULES CHAPTER SUBJECT PAGE Chapter 1 – Policy ................................................................................................................................. 1-1 1.0 Introduction ...................................................................................................................................... 1-1 1.1 - Purpose ...................................................................................................................................... 1-1 1.1.1- Project and Schedule Requirement .......................................................................................... 1-1 1.2 - Standard Template ......................................................................................................................... 1-2 1.2.1 - Standard Activities.................................................................................................................. 1-3 1.2.2 - Non-Standard Activities ......................................................................................................... 1-3 1.3 - Schedule Setup and Documentation .............................................................................................. 1-3 1.3.1 - Schedule Setup ....................................................................................................................... 1-3 1.3.2 - Schedule Access and Access Rights ....................................................................................... 1-3 1.3.3 - Documentation........................................................................................................................ 1-4 1.3.4 - Activity Duration .................................................................................................................... 1-4 1.3.4.1 –Project Calendar ................................................................................................................... 1-4 1.3.5 - Project Constraints .................................................................................................................. 1-4 1.3.5.1 - Target Date .......................................................................................................................... 1-4 1.3.5.2 - Intermediate Target Dates.................................................................................................... 1-4 1.3.5.3 - Delivery Date ....................................................................................................................... 1-4 1.4– Project Identification ...................................................................................................................... 1-5 1.4.1 - External ................................................................................................................................... 1-5 1.4.2 - Internal .................................................................................................................................... 1-5 1.5 - Local Projects ................................................................................................................................ 1-5 1.6 - Activity Coding ............................................................................................................................. 1-5 1.7– Level of Detail – Work/Activities .................................................................................................. 1-6 1.7.1 - Project Scope Requirements ................................................................................................... 1-6 1.7.2 - Submissions/Reviews ............................................................................................................. 1-6 1.7.3 – Project Reporting Activities ................................................................................................... 1-6 1.8 – Project Baseline ............................................................................................................................ 1-6 TOC-1 Table of Contents Publication 615 1.8.1 – Baseline Creation ................................................................................................................... 1-6 1.8.2 – Baseline Types ....................................................................................................................... 1-6 1.8.2.1 – Initial ................................................................................................................................... 1-6 1.8.2.2 – Committed........................................................................................................................... 1-7 1.8.2.3 – Benchmark .......................................................................................................................... 1-7 1.8.3 – Baseline Target Completion Date .......................................................................................... 1-7 1.9 – Lead/Grouped Project ................................................................................................................... 1-7 1.9.1 – Lead Project ........................................................................................................................... 1-7 1.9.2 – Grouped Projects .................................................................................................................... 1-7 1.9.3 – Breakout Project..................................................................................................................... 1-7 1.10 – Project Types .............................................................................................................................. 1-8 1.10.1 – Design-Bid-Build Project ..................................................................................................... 1-9 1.10.2– Design-Build Project ............................................................................................................. 1-9 1.11 - Project Complexity ...................................................................................................................... 1-9 1.12 – Schedule Monitoring ................................................................................................................. 1-10 1.12.1 – Activity Progress ................................................................................................................ 1-10 1.12.2 - Project Delay ...................................................................................................................... 1-10 1.12.3 - Project Time Recovery ....................................................................................................... 1-10 1.13 – Project Scope Change ............................................................................................................... 1-10 1.13.1 – Increased Scope of Work ................................................................................................... 1-10 1.13.2 – Decreased Scope of Work .................................................................................................. 1-10 1.14 – Yearly Committed and Potential Projects ................................................................................. 1-11 1.14.1 - Committed Projects ............................................................................................................ 1-11 1.14.2 - Potential Projects ................................................................................................................ 1-11 1.15 - Project Schedule Closeout ......................................................................................................... 1-11 1.15.1 – Project Closeout ................................................................................................................. 1-11 1.16 - Project Suspension or Cancellation ........................................................................................... 1-11 1.16.1 - Project Suspension .............................................................................................................. 1-12 1.16.2 - Project Cancellation ............................................................................................................ 1-12 1.17 - Project Re-Bid ........................................................................................................................... 1-12 1.18 - Scheduling Archiving ................................................................................................................ 1-12 Chapter 2 – Open Plan ............................................................................................................................ 2-1 2.0 – Project Management ..................................................................................................................... 2-1 TOC-2 Table of Contents Publication 615 2.1 – Open Plan and PennDOT .............................................................................................................. 2-1 2.2 – Using Open Plan ........................................................................................................................... 2-2 2.3 – Launching Open Plan Desktop (PennDOT Environment Only) ................................................... 2-2 2.3.1 – Starting Open Plan Desktop – Remote Access ...................................................................... 2-2 2.3.2 – Exploring the Open Plan Window ......................................................................................... 2-3 2.4 – The Project Explorer ..................................................................................................................... 2-4 2.5 – Working with Open Plan Files ...................................................................................................... 2-7 2.5.1 – File Types............................................................................................................................... 2-8 2.5.2 – Opening Open Plan Projects .................................................................................................. 2-8 2.5.3 – Working with Open Projects ................................................................................................ 2-10 2.5.4 – Saving Open Plan Projects ................................................................................................... 2-10 2.5.5 – Saving Projects with a New Name ....................................................................................... 2-10 2.5.6 – Closing Open Plan Projects.................................................................................................. 2-11 2.6 – Creating a New Open Plan Project ............................................................................................. 2-11 2.6.1 – Create a New Open Plan Project .......................................................................................... 2-11 2.6.2 – Project Naming Convention ................................................................................................. 2-12 2.7 – Supplying Open Plan Project Information .................................................................................. 2-12 2.7.1 - The Summary Tab ................................................................................................................ 2-14 2.7.2 – The Preferences Tab............................................................................................................. 2-14 2.7.3 – The Files Tab ....................................................................................................................... 2-15 2.7.4 – The Status Tab ..................................................................................................................... 2-16 2.7.5 – The Cost Tab ........................................................................................................................ 2-16 2.7.6 – The Notes Tab ...................................................................................................................... 2-16 2.7.7 – The Scheduling Tab ............................................................................................................. 2-17 2.7.8 – The User Fields Tab ............................................................................................................. 2-18 2.7.9 – The Access Control Tab ....................................................................................................... 2-18 2.7.10 – The Open Status Tab .......................................................................................................... 2-20 2.7.11 – The Codes Tab ................................................................................................................... 2-21 2.8 – Working with Views ................................................................................................................... 2-22 2.8.1 – Displaying Open Plan Views ............................................................................................... 2-22 2.8.2 – Scrolling Views .................................................................................................................... 2-25 2.9 – Entering and Relating Activities ................................................................................................. 2-25 2.9.1 – Identifying Basic Activity Fields ......................................................................................... 2-26 TOC-3 Table of Contents Publication 615 2.9.2 – Entering Activity Data ......................................................................................................... 2-26 2.9.3 – Using the Activity Details Dialog ........................................................................................ 2-28 2.9.4 – Modifying Activity Relationships ........................................................................................ 2-30 2.9.5 – Attaching and Reading Notes .............................................................................................. 2-34 2.9.6 – Editing Activity Entries ....................................................................................................... 2-35 2.9.7 – Modifying the Schedule ....................................................................................................... 2-36 2.9.8 – Recurring Activities ............................................................................................................. 2-37 2.10 – Auxiliary Files .......................................................................................................................... 2-38 2.10.1 – Calendar File ...................................................................................................................... 2-38 2.10.2 – Resource File ..................................................................................................................... 2-40 2.10.3 – Code Files .......................................................................................................................... 2-40 2.11 – Working with Activity Views ................................................................................................... 2-42 2.11.1 – Working with the Activity Bar Chart View ....................................................................... 2-42 2.11.2 – Working with Parent/Children Activities........................................................................... 2-42 2.11.3 – Optimizing an Activity View ............................................................................................. 2-45 2.11.4 – Managing Columns ............................................................................................................ 2-48 2.11.5 – Managing Rows ................................................................................................................. 2-50 2.12 – Time Analysis ........................................................................................................................... 2-53 2.12.1 – Time Analysis Defined ...................................................................................................... 2-53 2.12.2 – Performing Time Analysis ................................................................................................. 2-54 2.13 – Baselines ................................................................................................................................... 2-56 2.13.1 – Recording a Baseline ......................................................................................................... 2-56 2.13.2 – Creating a Baseline ............................................................................................................ 2-57 2.13.3 – PennDOT Baseline Naming Convention ........................................................................... 2-59 2.13.4 – Selecting a Baseline ........................................................................................................... 2-60 2.13.5 – Updating Baselines ............................................................................................................ 2-61 2.14– Updating a Project...................................................................................................................... 2-63 2.14.1 – Entering Activity Progress ................................................................................................. 2-63 2.14.2 – Updating Activity Detail .................................................................................................... 2-65 2.14.3 – Progress Results and Progress Out of Sequence ................................................................ 2-66 2.14.4 – Displaying Progress Information ....................................................................................... 2-67 2.15 – Filters and Sorts ........................................................................................................................ 2-68 2.15.1 – Filtering Project Data ......................................................................................................... 2-68 TOC-4 Table of Contents Publication 615 2.15.2 – Sorting Project Data ........................................................................................................... 2-70 2.16 – Managing and Backing Up Open Plan Files ............................................................................. 2-72 2.16.1 – The File Backup Process .................................................................................................... 2-72 2.16.2 – The File Restoration Process.............................................................................................. 2-74 2.16.3 – Importing from Primavera and Microsoft Project .............................................................. 2-77 2.17 – Printing in Open Plan ................................................................................................................ 2-77 2.17.1 – Previewing the Printout...................................................................................................... 2-77 2.17.2 – Controlling Print and Layout Options ................................................................................ 2-78 2.17.3 – Printing the Document ....................................................................................................... 2-81 2.18– Getting On-Line Help ................................................................................................................ 2-83 2.18.1 – Using Help ......................................................................................................................... 2-83 Chapter 3 – WelcomHome ...................................................................................................................... 3-1 3.0– WelcomHome Overview................................................................................................................ 3-1 3.1 – Logging on to WelcomHome ........................................................................................................ 3-1 3.2 – Setting Up A Project ..................................................................................................................... 3-2 3.3 – Updating A Project ....................................................................................................................... 3-7 3.4 – Approve/Reject Pending Progress .............................................................................................. 3-10 APPENDIX A ................................................................................................................................................ STANDARD REPORT ACTIVITIES................................................................................................... 3-1 APPENDIX B ................................................................................................................................................ SCHEDULE SETUP CHECKLIST...................................................................................................... B-1 B.1 Project Checklist ............................................................................................................................ B-1 APPENDIX C ................................................................................................................................................ PORTFOLIO MANAGER REFERENCE............................................................................................ C-1 C.1 CALENDAR FILE - ALTERNATIVE WORK SCHEDULE ....................................................... C-1 C.2 RESOURCE FILE.......................................................................................................................... C-1 C.3 CODE FILES ................................................................................................................................. C-1 C.4 MASTER FILES ............................................................................................................................ C-2 C.5 FILTERS AND SORTS ................................................................................................................. C-2 C.5.1 Creating a New Filter ............................................................................................................. C-2 C.5.2 Creating a New Sort ................................................................................................................ C-3 C.5.3 Saving Filters and Sorts ........................................................................................................... C-4 C.6 CREATING/MODIFYING VIEWS .............................................................................................. C-4 TOC-5 Table of Contents Publication 615 C.7 PROJECT SCHEDULING ARCHIVING ..................................................................................... C-5 C.8 SECURITY APPLET ..................................................................................................................... C-6 APPENDIX D ................................................................................................................................................ CRYSTAL REPORTS ................................................................................................................................ D.1 INTRODUCTION ......................................................................................................................... D-1 D.2 CLIENT SOFTWARE ................................................................................................................... D-1 D.3 ENTERPRISE ................................................................................................................................ D-1 D.4 OPEN PLAN REPORTS ............................................................................................................... D-1 D.4.1 – The Performance Metric Report........................................................................................... D-1 D.4.2 – PDOC Wall Charts ............................................................................................................... D-2 APPENDIX E ................................................................................................................................................ GLOSSARY ......................................................................................................................................... E-1 APPENDIX F ................................................................................................................................................ REFERENCES ..................................................................................................................................... F-1 TOC-6 Chapter 1: Policy Publication 615 Chapter 1 – Policy 1.0 Introduction All project design schedules, prepared for the Pennsylvania Department of Transportation (PennDOT), will be prepared and maintained using the project management software and release currently in use by PennDOT. It is the responsibility of the design firm(s) to verify the software in use and maintain a license for this software. 1.1 - Purpose The purpose of this policy is to identify the requirements of how a design schedule will be prepared and maintained during the life of a project as to assure uniformity for PennDOT. A design schedule is required to plan the project scope into a time sequential process that will: - Deliver a complete project package for bidding within a defined time. - Coordinate the various design requirements to minimize delay. - Identify potential project issues/delays and minimize their impact. - Account for obstacles and scope changes during the project life and coordinate any requirement into the project plan. - Measure the progress and status of the design process during the life of the project. 1.1.1- Project and Schedule Requirement PennDOT identifies projects as: - Most Complex (Major) - Moderately Complex - Non-Complex (Minor) For the purpose of this design schedule policy, any project that is defined as Most Complex (Major) or Moderately Complex is required to have a design schedule created and monitored for the life of the project. For those projects that are within the definition of Non-Complex (Minor), Table 1.1 specifies the requirements for a design schedule. Emergency design projects, those that may result from a natural (e.g., flood) disaster or unforeseen incident (e.g., vehicle crash) will not require a design schedule due to the urgent nature of repairs or replacement. 1-1 Chapter 1: Policy Publication 615 Table 1.1 – Non-Complex (Minor) – Schedule Requirements Project Schedule Bridge Replacement Required Bridge Rehab/Repair (TIP funded) Required Micro-Surfacing Projects (TIP funded) Recommended Betterments (no ROW/no permits/no utilities) (TIP funded) Recommended Betterments (ROW/permits/utilities needed) (TIP funded) Required Transportation Alternative Projects (excluding Transit) Required District-Wide Program Projects (RPMs, Guiderail, Line painting, etc.) Not Required Grade Crossing (when not part of a highway project) Not Required ITS only (camera and/or VMS/DMS installation) Not Required Maintenance Funded Paving Projects Not Required Maintenance Funded Bridge Projects Recommended Department Force Bridge/Boxes/Culverts Recommended Any project that all pre-construction phases can be completed within 4 months Not Required It will be the discretion of the District to create and maintain a design schedule for any project within Table 1.1 that is tagged as Recommended or Not Required. The District Portfolio Manager is responsible to ensure that project schedules are created and maintained as defined within this policy 1.2 - Standard Template The Pennsylvania Department of Transportation maintains a master template to be used in the development of all project design schedules. The template contains the activities that are commonly found in the process of performing analysis, studies, and other necessary work required to complete a project and prepare necessary bid documents for the project. The organization and nomenclature of activities within the template are not to be altered. Work that is required for a project that may not be identified or contained in the template may be added following the procedure in Section 1.2.2 – Non-Standard Activities. 1-2 Chapter 1: Policy Publication 615 For the purpose of project design schedules, activities are defined as standard and non-standard activities. 1.2.1 - Standard Activities Standard activities are those organized and defined within the current PennDOT master template. These activities have specific and required descriptions and coding that is required and used in the preparation of reports. To maintain the integrity and consistency of report data, altering activity descriptions or coding is not permitted. 1.2.2 - Non-Standard Activities Any activity added to a design schedule that is not identified in the current PennDOT master template is considered a non-standard activity. Non-standard activities are to be: - Inserted within an appropriate activity structure already identified in the template - Identified by an ID number consistent with the group it is placed within - Assign all activity level codes that is established for the project 1.3 - Schedule Setup and Documentation Schedules prepared for PennDOT require specific information for the purpose of project tracking and data retrieval. The following sections define those requirements. 1.3.1 - Schedule Setup PennDOT’s master template contains fields that require specific data entry. These fields are either a drop down selection box or a field capable of direct data entry. Chapter 2 of this document provides information regarding the fields that must contain information. It also provides direction as to what information and the required format for direct data entry. A project schedule shall contain all the activities that define the scope of work. During the development of a project schedule all necessary parties will be consulted to identify and plan the work, the duration needed to complete the work requirements, and the interaction and sequencing of work to complete the project scope in an achievable time frame. 1.3.2 - Schedule Access and Access Rights To facilitate the review of project schedules, PennDOT staff and business partners must be provided access to the schedule. This access is accommodated and controlled by users and groups and provides a level of access rights to the project schedule. Chapter 2 of this document identifies the codes required to identify user and group access and the level of rights, e.g., read only, to individual schedules. All project schedules must identify who has access to the schedule and the level of access identified throughout the life of the project. 1-3 Chapter 1: Policy Publication 615 1.3.3 - Documentation Schedule development and changes made to the schedule during the life of the project need to be identified and recorded. This project information is to be maintained and made available for review and archiving. The project documentation may be comprised of notes attached to the schedule, to schedule activities, or electronic files maintained separate of the project schedule. 1.3.4 - Activity Duration Working days will be the unit of time assigned to activities for their durations. 1.3.4.1 –Project Calendar PennDOT’s design template contains the standard project calendar to be used for all design projects requiring a schedule. This project calendar contains various individual calendars that address non-work days. Any revision made to the standard calendar will be made by PennDOT’s Central Office. Any revision made to the standard calendar will be communicated by Central Office and will be further communicated by the District Offices as needed. The standard PennDOT calendar shall be the only calendar associated with a design schedule. 1.3.5 - Project Constraints To manage the delivery of a project, date constraints shall be set for the project let date as well as select milestones within the project. Date constraints shall be coordinated with the appropriate Department(s). The rescheduling of any specific activity constrained date must be approved before the revision is made to the project schedule. The number of date constraints will be minimal to facilitate flexibility but sufficient to provide on time delivery of the project. 1.3.5.1 - Target Date A target date will be assigned to the last activity of a project schedule and may also be assigned to the first activity of the project. 1.3.5.2 - Intermediate Target Dates To facilitate the on time completion of a project, intermediate target dates may be set for document delivery or other events that are determined critical to the project delivery. The need to coordinate any intermediate target is necessary with the appropriate Department or Agency. Any change to intermediate target dates will require the approval of the impacted parties prior to revision. Intermediate targets will be facilitated by the addition of a finish milestone activity. 1.3.5.3 - Delivery Date A target delivery date will be set for the project. This date will coincide with an established let date defined by PennDOT. The target date will be assigned to the last activity (finish milestone) of the project schedule (Open Bids). 1-4 Chapter 1: Policy Publication 615 1.4– Project Identification Project identification will be maintained at two levels; external and internal. 1.4.1 - External The external project identification shall be the project MPMS number and will be the identification method for tracking the project with the various accounting and tracking systems that PennDOT uses. 1.4.2 - Internal For the purpose of project identification, each project will be identified by a type and category. Project type and category are code files associated with the PennDOT’s design schedule template. The project type and category will be selected from the values available. 1.5 - Local Projects A local project shall be defined as: - A municipality or agency owned/lead project that may include roadway, bridge, or roadway facility construction, reconstruction or maintenance. - A transportation alternative project. All requirements set for the preparation and updating of a project schedule apply to local projects. Responsibility for developing the project scope of work will be a joint effort of any local agency and PennDOT. PennDOT will provide support and guidance in the preparation of the design schedule so that the schedule requirements are achieved. The project schedule shall be progressed as defined in Section 1.12 - Schedule Monitoring, of this document so that the status of the project can be tracked. Any scope change identified during the life of the project will be immediately addressed so that any impact to the project let date can be determined. A baseline schedule shall be set for local projects. PennDOT should take into consideration the delivery of previous local projects when setting a baseline schedule. Any baseline schedule adjustments shall follow the guidance as provided in Section 1.8 - Project Baseline, of this document. 1.6 - Activity Coding Activities contained in the PennDOT master template are assigned codes that associate the activity with specific PennDOT identifiers corresponding to the PennDOT: - Work Breakdown Structure - Organizational Breakdown Structure - Cost Structure 1-5 Chapter 1: Policy Publication 615 Codes assigned to standard activities should not be changed. Any revision to activity code assignments shall obtain prior approval from the Portfolio Manager. All activities within a design schedule shall have all code fields occupied with the appropriate code value. 1.7– Level of Detail – Work/Activities Work that is required to be performed pertaining to the design process in order for the project to be let should be tracked in the project schedule. Deletion of any work / activities from the PennDOT master template for a project means that the work / activity does not pertain to the delivery of the project; this is the only instance when an activity is to be deleted from the project schedule. Refer to Section 1.13.2 – Decrease Scope of Work for further information. 1.7.1 - Project Scope Requirements Any time that there is a change in scope the project schedule will be updated to reflect the change. 1.7.2 - Submissions/Reviews All submissions, reviews, re-submittals, and time for addressing comments are required to be included within the project schedule. Reviews from different agencies and PennDOT’s Central Office require a standardized review time which is allocated in the templates. These durations cannot be lessened unless prior approval is given by the appropriate party responsible for the review. 1.7.3 – Project Reporting Activities To support project status reporting for various PennDOT Departments, specific activity descriptions are required and shall be used in all design schedules. These specific activity descriptions are provided within Appendix A – Standard Report Activities. These descriptions are not to be altered. 1.8 – Project Baseline All design project schedules require a baseline schedule to be set. 1.8.1 – Baseline Creation Once all of the appropriate parties have reviewed, and concurrence is reached of the project schedule, an initial baseline schedule shall be created for comparison purposes. This initial baseline schedule should always be set prior to any progress being entered into the schedule. For PennDOT reporting purposes, the initial baseline should not be deleted. 1.8.2 – Baseline Types A baseline shall be identified either as initial, committed, or bench mark. 1.8.2.1 – Initial An initial baseline shall be established to track the progress of a design project. Initial baselines are created prior to reporting work progress and have an estimated let date that may fall two or more years beyond the start of the design process. 1-6 Chapter 1: Policy Publication 615 1.8.2.2 – Committed A committed baseline shall be established prior to the end of the calendar year preceding the project let date. Projects that contain a committed baseline are those that are part of PennDOT’s committed program and have a locked down let date. 1.8.2.3 – Benchmark Benchmark baseline or snap shot can be created at any time throughout the project life cycle. These baselines may be used as a documentation of activity status at a particular time or phase of a project. When a project is selected to be a part of PennDOT’s yearly committed program, a committed baseline is established. 1.8.3 – Baseline Target Completion Date In the process of establishing a baseline schedule, a target date shall be set. This target date shall coincide with the date recorded in PennDOT’s ECMS system. 1.9 – Lead/Grouped Project When there are several small like projects, e.g., roadway striping, guiderail replacement, which will be occurring county or district wide, these small projects may be combined into a single project The following shall define, as it pertains to design projects, what a lead project is and what a grouped project comprise. 1.9.1 – Lead Project A lead project is a single project schedule. A lead project is described as one single ECMS number that encompasses more than one MPMS number. The schedule of the lead project is required to have the detail and work requirements associated with the entire project scope of work. This project scope of work will include the individual scope of work required to execute all the individual MPMS work requirements. 1.9.2 – Grouped Projects A grouped project does not require its own project schedule; they will be encompassed under the lead project schedule. Grouped projects must be called out and identified for reporting purposes so that the accurate project information is pulled from the lead project. 1.9.3 – Breakout Project When an individual project is pulled out from the group and is to be let on its own a stand-alone project schedule now must to be created. The stand-alone project can no longer be tracked under the lead project schedule. All activities that are associated with the stand-alone project must be included in the breakout project schedule. 1-7 Chapter 1: Policy Publication 615 1.10 – Project Types Each project schedule will be identified by a project type (Table 1.2) Table 1.2 - Project Type Code Description New Alignment Bridge Alignment Environmental Assessment Project Environmental Impact Study Project Roadway Alignment Bridge Bridge Preservation Bridge Preservation / Design-Build Bridge Preservation / Design-BidBuild Bridge Rehabilitation Bridge Rehabilitation / Design-Build Bridge Rehabilitation / Design-BidBuild Bridge Replacement Bridge Replacement / Design-Build Bridge Replacement / Design-BidBuild Maintenance Interstate Maintenance Maintenance Betterment Roadway Intersection Improvement Roadway Reconstruction Roadway Rehabilitation Roadway Resurfacing Other Information Transportation System Culvert Traffic Signals Transportation Alternative Project Code ID ALI ALI.BRG ALI.EA ALI.EIS ALI.RDW BRG BRG.PRE BRG.PRE.DB BRG.PRE.DBB BRG.REH BRG.REH.DB BRG.REH.DBB BRG.REP BRG.REP.DB BRG.REP.DBB MAT MAT.IM MAT.MB RDW RDW.INT RDW.REC RDW.REH RDW.RES OTR OTR.ITS OTR.CVT OTR.TFS OTR.TAP To coincide with the project type, a second level of type is used. This will identify the project as DesignBid-Build or Design-Build. 1-8 Chapter 1: Policy Publication 615 1.10.1 – Design-Bid-Build Project A Design-Bid-Build project is the customary design project type where all documents required for the construction of a project are complete prior to the advertisement and letting of the project. 1.10.2– Design-Build Project A Design-Build (D-B) project shall be a project that its design requirements are partially complete by either PennDOT or a consultant design team which will be awarded to a contractor for the continuation of design work and final construction. The design-build project will transfer the responsibility of design work to a design and construction team (D-B team) which may include but are not limited to the following items: - Design of Highway Item(s) - Design of Structure Item(s) When a design-build project is executed (let), PennDOT will retain responsibility for specific approvals and or the transfer of information for review and approval before certain construction activities may commence or continue. The specific work that PennDOT will facilitate coordination of will be defined within the design-build special provision included in the bid documents of the design-build contract. Work that a D-B team will be required to perform, that PennDOT will coordinated and or approve, will be included in the D-B team’s design-build schedule and will identify a duration that is considered appropriate for the work to be complete. To accommodate the PennDOT coordination of work, the design-build schedule will contain the activity descriptions that are contained in the current PennDOT template. 1.11 - Project Complexity Each project schedule will be identified by complexity, Table 1.3 - Project Complexity will coincide with PennDOT’s definitions: Table 1.3 - Project Complexity Code Description Complexity Most Complex (Major) Moderately Complex Non-Complex (Minor) Code ID PLX PLX.MAJ PLX.MOD PLX.MIN 1-9 Chapter 1: Policy Publication 615 1.12 – Schedule Monitoring PennDOT requires that all schedules are updated a minimum of once every month with a record date (data date) of the first of the month. The record date is defined as the day that project work will continue after recording progress. 1.12.1 – Activity Progress Progress is to be entered monthly and is to document the status or amount of work realized on or before the record date. All progress must be entered by the tenth of every month. For reporting purposes, work shall be progressed in increments of 5% and not to exceed 95% complete until the work is actually complete and any necessary documentation is transferred to the responsible party. 1.12.2 - Project Delay As part of project schedule documentation, if a delay is identified in scheduled work, information as to the reason or purpose of delay should be recorded. Refer to Section 1.3.3 - Documentation. 1.12.3 - Project Time Recovery If a delay in a project activity results in the project being forecasted as being delivered greater than 15 working days beyond the scheduled delivery date, a plan to recover this lost time must be identified and implemented. The course of action will be defined as the schedule recovery plan. 1.13 – Project Scope Change Any change in scope of work will be applied to the current schedule status prior to the next scheduled update so that the effect of the change in scope can be relayed to the project team. 1.13.1 – Increased Scope of Work When the scope of work is increased in a project, the project schedule will be updated to reflect the change in scope and the increase in scope of work will be documented. PennDOT’s master template contains activities commonly found in a design project. When additional work is required to be inserted into a schedule, the master template shall be the source of identifying the additional work. When the additional work is not identified in the master template, Central Office shall be contacted for guidance. 1.13.2 – Decreased Scope of Work During the life of the project, when the scope of work is decreased, the project schedule will be updated to reflect the change in scope and the decrease in scope of work will be documented. Activities that pertain to the scope reduction should not be deleted from the schedule. These activities may be closed out as follows: 1-10 Chapter 1: Policy - Publication 615 Record the date of activity modification by inputting Actual Start and Actual Finish dates from the activity. Record the reason of activity modification within the activity note field. The reason shall contain persons contacted, date of contact, and other relative information. Project logic shall be addressed as necessary to retain the schedule’s integrity. If an activity must be deleted from the project schedule, documentation is required as per Section 1.3.3 – Documentation. The reason as to why it was deleted shall contain persons contacted, date of contact, and other relative information. PennDOT’s Central Office shall be contacted for guidance in updating the project schedule to reflect the scope change. The decrease in scope of work will be documented as required. 1.14 – Yearly Committed and Potential Projects Each year the Districts are responsible for submitting a list of committed and potential projects. Each project shall have a project schedule planning the scope of work and identifying when the project can be delivered. 1.14.1 - Committed Projects A committed project is defined as a project that the District obligates to letting during the calendar year and gives a forecasted completion date and open bid date. The open bid date that is provided by the District is placed in the Committed Date field of ECMS and is then locked. 1.14.2 - Potential Projects A potential project is defined as a project that the District is anticipating to complete within the calendar year. Potential projects require a target finish date and a baseline schedule as previously defined. The District provides a list of projects that it believes can be delivered during the calendar year. For these projects a forecasted let date is not entered into ECMS. 1.15 - Project Schedule Closeout Once a project is let the project schedule shall be updated to reflect the overall project status of complete. 1.15.1 – Project Closeout A project schedule shall be considered complete when all activities in the schedule record actual start and finish dates. No activity shall be deleted from the schedule. Refer to Section 1.13.2. 1.16 - Project Suspension or Cancellation The following sections define the procedure to follow when a project is suspended or cancelled. 1-11 Chapter 1: Policy Publication 615 1.16.1 - Project Suspension A project suspension may occur not limited to the following events: - Loss or lack of funding - A delay in work execution by a project sponsor In the event of a project suspension the project schedule will be retained. The project schedule shall contain information as to the date of suspension as well as factors or events that result in the suspension. A milestone activity will be added to the schedule within the project management group with the description Project Suspension. The activity will provide the date of suspension. If the project is part of a yearly program, Central Office shall be made aware of the suspension so that any necessary action can be taken. Upon the startup of a suspended project, the original schedule shall be updated at the resumption of work. The update shall follow the policy set for a change in scope, in that activities may require to be added or removed. 1.16.2 - Project Cancellation In the event of a project cancellation, the project schedule shall contain information as to the date of cancellation as well as factors or events that result in the cancellation. A milestone activity will be added to the schedule within the project management group with the description Project Cancelled. The activity will provide the date of cancellation. Cancellation of the project shall be communicated to Central Office so that necessary action may take place. The project schedule will be archived. 1.17 - Project Re-Bid When PennDOT determines that a project award will not occur and a repackaging or re-advertising of a project will occur, the project schedule will be updated to account for the project re-bid. Activities addressing the repackaging or other work required to be performed before a re-advertising will be included in the project schedule and monitored and progressed as defined in Section 1.12 Schedule Monitoring. 1.18 - Scheduling Archiving Once a project is let and the overall status of the project schedule shows complete, the project schedule should be backed up and restored to the archive environment that was created to store completed projects. For the purposes of project reporting, project archiving shall not be performed until one month after the end of a calendar year. At that time all completed projects shall be restored to the designated archive environment so that historical data can be retrieved. 1-12 Chapter 2: Open Plan Publication 615 Chapter 2 – Open Plan The purpose of this chapter and the next is to give Department and Consultant staff specific direction on how the Department expects them to use Open Plan and WelcomHome software packages. This manual provides insight on what is needed to create, manage and progress a PennDOT design schedule using Open Plan and WelcomHome. 2.0 – Project Management Project management is the process of organizing and scheduling tasks in a required sequence so that a project is completed in a specified time period. Project management includes allocating resources to complete project activities without exceeding a project budget. A project manager must keep track of the progress of project activities to ensure that the project is completed on schedule. In order to accomplish this, a project manager must keep track of an enormous amount of information and needs to communicate clearly and regularly with the project team. Project scheduling software assists the project manager in organizing project information. The manager can use the software to define a work plan and organize tasks and details. The software can also help keep the project team and management informed and involved, and can provide a conduit to incorporate feedback from team members. As actual work on the project is completed, reports can be generated to show project performance by comparing work performed to an established work plan, or “baseline.” This information can assist the project manager in pinpointing problem areas of the project. Project management software is a tool which offers the following benefits: - Organizes project and activity details - Manages resources and identifies scheduling conflicts - Provides reports tailored to the team members’ needs - Provides documentation of scheduled dates - Identifies tasks that are ahead of or behind schedule - Assists in planning and rescheduling; can compare different options 2.1 – Open Plan and PennDOT The Pennsylvania Department of Transportation (PennDOT) uses Open Plan, a project management software package, to help oversee and manage its highway and bridge program. Open Plan plays a crucial role in the delivery of this program because it: - Enhances the ability of PennDOT Project Mangers to plan and manage highway projects - Supports project management and reporting at both the project and portfolio levels. - Provides Historical Data Management and Analysis. 2-1 Chapter 2: Open Plan Publication 615 PennDOT maintains a standard template to be used in the creation of a project schedule. This template, the PDSMASTER, contains a master list of standard activities and their required coding for PennDOT design projects. The PDSMASTER template is available on the Department’s Open Plan server and also on PennDOT’s ECMS mainframe. Any design schedule created for PennDOT must use the PDSMASTER template. In this manual, PDSMASTER and or PDSMASTER template will refer to the current PDSMASTER template residing on the PennDOT Open Plan server. The ideal time for schedules to be created is within one month of the scoping field view. However, since the project development process may contain factors which can generate a lag in the start of the major design activities, the schedules must be developed in a timeframe commensurate with their complexity. Minor projects should have a schedule developed no later than two months from the approved scoping form date. Major and moderate-complexity projects should have a schedule developed no later than six months from the approved scoping form date. In all cases, the schedule development must be completed prior to the physical start of any schedule activities contained within the schedule. 2.2 – Using Open Plan Open Plan is designed to provide the tools that a project manager needs to create project schedules, update project progress, and communicate the status of projects to the project team. Two versions of Open Plan are installed throughout PennDOT. The two versions include Open Plan Desktop (the most commonly used version) and Open Plan Professional (used primarily by Portfolio Managers). The following table lists differences between the two versions: Table 2.1 – Open Plan Professional vs. Open Plan Desktop Open Plan Professional Open Plan Desktop Can create and perform filters and sorts. Can create templates and views. Can create calculated fields. Can change preference in Network and Barchart Views. Can create a “master project” by including external subprojects as activities. Can create and perform filters and sorts. Can create views; cannot create templates. Cannot create calculated fields. Cannot change preferences in Network and Barchart views. Cannot include external subprojects as activities. 2.3 – Launching Open Plan Desktop (PennDOT Environment Only) When Open Plan is started, the Open Plan Explorer appears on the screen. From the Explorer, you can open any existing project that you may have access to or create a new project. 2.3.1 – Starting Open Plan Desktop – Remote Access To Start Open Plan from the Windows Desktop: 1. Click on the Start button. 2-2 Chapter 2: Open Plan Publication 615 2. Choose All Programs. 3. Select Accessories. 4. Select Remote Desktop Connection (A shortcut can be created for this on your desktop). 5. There will be a prompt for server name – Choose PDTSOPENPLAN. 6. Connect. 7. OK. 8. Logon to PENNDOT (Use CWOPA Username and Password). 9. Double-click on the Open Plan Desktop shortcut icon. -orClick on the Start button , Choose All Programs, Welcom Applications, Open Plan Desktop 3.1, and Open Plan Desktop. 10. Logon with your assigned Open Plan user id and password. 2.3.2 – Exploring the Open Plan Window Many of the screen features displayed on the Open Plan screen are familiar to users of other applications. Others are unique to Open Plan. Menu Bar Standard Toolbar Status Bar Figure 2.1 – The Open Plan Screen (Open Plan Explorer) 2-3 Chapter 2: Open Plan Publication 615 Menu Bar Menu items are similar to those found in other applications. Features are grouped by task type. Standard Toolbar Located directly below the menu bar, the Standard Toolbar contains graphic buttons which allow quick access to the most frequently used features. Outlining buttons appear on the right portion of the toolbar. Status Bar The bar across the bottom of the Open Plan Window provides information about the status of special keys, displays advisory messages, and describes menu choices. Messages regarding menu choices are displayed on the left as each available command item is hovered over. The area on the right gives the current state of the keyboard, such as whether Caps Lock or Num Lock is activated. 2.4 – The Project Explorer Open Plan’s Project Explorer organizes projects, associated code, calendar, and view files, and other data. Figure 2.2 – The Project Explorer The Open Plan Project Explorer contains the following folders: - My Folder Projects Open Plan Library 2-4 Chapter 2: Open Plan - Publication 615 Briefcase Users Startup Additional folders can be created within “My Folder” to help organize project files. To Add a Folder to the Project Explorer: 1. Display the Project Explorer. 2. Select the My Folder. 3. Right click on the folder and select New Folder. 4. Name the new folder. 5. Press Enter. To Add/Remove a Column in the Project Explorer View: Adding or Removing Columns in the Project Explore View can only be done in the Projects folder. 1. Display the Project Explorer. 2. Click on the Projects Folder. 3. Right click on the columns along the top (See Figure 3.3). Right click along the columns Figure 2.3 - The Project Explorer 4. Click Customize Columns. 5. The Customize Columns Box will appear. If you want to add a column, choose a field from the left hand side and click the > button. If you want to remove a column, choose a field from the right hand side and click the < button. Once all the columns that you want to appear show up on the right hand side, click OK (See Figure 2.4). 2-5 Chapter 2: Open Plan Publication 615 Figure 2.4 – Customize Columns To Sort a Column in the Project Explorer View: 1. Display the Project Explorer. 2. Click on the Projects Folder. 3. Right click on the column along the top that you want the sort to apply to. For example, if you want to sort the projects based on Project Manager, right click on the Project Manager column. 4. Click either Sort Ascending or Sort Descending (See Figure 2.5). Figure 2.5 – Sorting in the Project Explorer View 2-6 Chapter 2: Open Plan Publication 615 To Apply a Filter in the Project Explorer View: 1. Display the Project Explorer. 2. Right Click on the Projects Folder. 3. Click Filter. 4. Check Enable Filter. 5. Choose what Field Name you want to filter on, select an Operator, and enter a Criterion. 6. Click OK. Figure 2.6 – Filtering in the Project Explorer View Note that only those projects that fit the criteria selected will be displayed. To remove the filter, disable the filter unselecting the Enable Filtering. The projects shown in the Open Plan Explorer can also be grouped by any of the fields appearing within the right hand side of the Open Plan Explorer. To Group Projects in the Project Explorer View: 1. Display the Project Explorer. 2. Right Click on the Project Column Heading for the type of grouping desired. 3. Click Group. To expand any group, click the “+” to the left of the group title. The grouping can be cancelled by right clicking within the column heading and selecting Ungroup. 2.5 – Working with Open Plan Files Once Open Plan has been started, the user can create a new project or open a project that was previously created. Once the project data has been entered, the project must be saved in order to store the changes. When a project is closed, its image is removed from the project workspace and it is cleared from memory. 2-7 Chapter 2: Open Plan Publication 615 2.5.1 – File Types Open Plan uses specific file types in projects that appear within the Project Explorer: - Project Data - Calendar Definition - Resource Definition - Code Definition - View Definition - Backup File Within each installation of Open Plan there is only one Project Explorer. It holds icons for all project and ancillary files added to it. Therefore, every time you open or create a new file (be it a project, resource, code, or calendar file), a corresponding icon is added to the Project Explorer. Open Plan is designed to store a project’s information in a project folder. This means that Open Plan uses a project explorer window to represent the contents of a project plan. 2.5.2 – Opening Open Plan Projects Opening a project from the Open Plan Project Explorer makes all of the components of the project accessible. The project is opened by selecting a project view within the project. To Open an Open Plan Project: 1. Click on the Open button. -orChoose File, Open. Press CTRL + O as an alternative. 2-8 Chapter 2: Open Plan Publication 615 Figure 2.7 – The File Open Dialog Box 2. Select the desired project to be opened and also select the Open Mode (See Open Modes below for descriptions). 3. Click OK. -or1. Right click on the project name in the project explorer window. 2. Click Open. 3. Select the desired Open Mode (See Open Modes below for descriptions). -or1. Double click on the project name in the project explorer window. 2. Select the View folder of the project. 3. Double-click on the desired view name. When double clicking the view name the project will open in the default mode that was set in the Project Properties Dialog Box, on the Preferences Tab. Types of Open Modes Default - In the Project Properties Dialog Box, on the Preferences Tab, you can specify the default mode in which to open your project. This will open the project as defined within the Project Properties window of that project. Exclusive – A user can make any changes to a project that the users’ security level allows if the project is opened in exclusive mode. The changes will not be saved until the Open Plan project is saved. Once the project is opened in exclusive mode, other users can only open the project in read only mode. 2-9 Chapter 2: Open Plan Publication 615 Shared (only available in Open Plan Professional) - If a project is opened in shared mode, multiple users can open and make changes to that particular project at the same time. There are some restrictions to opening a project in shared mode such as not being able to add or change an auxiliary file and if resource scheduling and time analysis is performed, the results are not saved. Extreme caution is to be used when opening a project in shared mode. Read Only – Read-only mode only allows users to view a project. If changes are made to the project, the only way to save the project is by selecting “save as”; Using just the “save” command will not work. When a project is opened in read only mode, other users can open the project in any other mode. 2.5.3 – Working with Open Projects In the Windows environment, it is possible to work with more than one project at a time. Several Open Plan projects can be opened at one time. When more than one Open Plan project is open, the Window menu can be used to move between several projects. To Move between “Open” Open Plan Projects: 1. Choose the Window menu. 2. Select the desired project name from the menu list. Press CTRL + F6 as an alternative. (Note: CTRL+F6 only tabs through open windows.) 2.5.4 – Saving Open Plan Projects When a project has been modified, it must be saved to store the changes. Saving an existing project overwrites the original version of the project. It is also possible to save an existing project using a different name so that the original project remains unchanged and a new project is created. To Save an Open Plan Project: Click on the Save button. -orChoose File, Save. Press CTRL + S as an alternative. 2.5.5 – Saving Projects with a New Name The Save As command is used when the name of a saved project needs to be changed. To Save an Open Plan Project With a New Name: 1. Choose File, Save As. 2-10 Chapter 2: Open Plan Publication 615 Figure 2.8 – The File Save As Dialog Box 2. Type a name for the project in the New Name textbox. 3. Click OK. 2.5.6 – Closing Open Plan Projects Although several projects can be open at one time, it is best to close a project when it is not needed. Closing a project removes its image from the project workspace and clears it from memory. If a project is closed before it has been saved, Open Plan prompts the user to save the project. Note that the automatic save feature is not available within Open Plan Desktop. To Close an Open Plan Project: 1. Choose File, Close. -or1. Right click on the project name in the project explorer window. 2. Click Close. 2.6 – Creating a New Open Plan Project The following Steps is the process that all PennDOT users should follow to create a new project. A shortcut to this method would be to do a ‘save as’ on the PDSMASTER. A project created this way starts with all the standard activities and coding values already referenced in, and requires only that the PM delete non-applicable activities and assign logic and durations to those remaining. 2.6.1 – Create a New Open Plan Project To Create a New Open Plan Project Using a Copy of an Existing Project: 1. Click on the New button. -orChoose File, New. 2-11 Chapter 2: Open Plan Publication 615 -orPress CTRL + N as an alternative. 2. Choose Project from the New File dialog. Figure 2.9 – The New File Dialog Box 3. Enter a Name and Description for the new project (See Project Naming Convention Below). 4. Click Next. 5. Choose Create a New File as a Copy of an Existing File. 6. Select PDSMASTER. 7. Fill out the New File Wizard Summary and continue hitting the Next button until everything is filled out and the Next button is grayed out (See Supplying Open Plan Project Information Below). 8. Click Finish. 2.6.2 – Project Naming Convention The MPMS project number will be used as the project name for the project schedule. This is critical for linking and retrieving data from Open Plan to generate reports. The project description field can be used to further identify the project. It is recommended that the project description include county, state route, section and local name. If an existing project is to be replaced by an updated project, and the existing project is to remain on the server, the project name for the existing project should use the MPMS project number followed by “OLD”. 2.7 – Supplying Open Plan Project Information 2-12 Chapter 2: Open Plan Publication 615 Open Plan provides a place for the project manager to store descriptive information about the project. It is referred to as the Project Properties dialog box. Information such as the project name, project manager, and project description are entered into this dialog box. This information is vital since it is drawn upon for reports and can be used for filtering and sorting. To access the project properties dialog box from within an open project, select Project Properties from the main menu. To access the project properties dialog box from the Explorer view, right-click on the project folder icon, and then select Properties. Table 2.2 describes the categories of information that are stored in the project properties dialog box. Table 2.2 – Project Properties Tabs Properties Tab Name Summary Preferences Files Status Cost Notes Scheduling User Fields Access Control Open Status Codes Description Provides descriptive information about the project. Contains default settings, such as Default Date Format, Default Activity Type, Default Duration Units, and Default Access Mode. Contains information on calendar, resource, and code files. Contains an overview of the project’s current status. Contains information on project costs. Contains a section for maintaining project notes. Contains both the project’s priority and the type of dates that should be used when calculating the resource usage summary. Contains the values that Open Plan should include for user-defined fields on the project table. Contains information about the access rights that users with a given group and role assignment have to the project. Provides such information about the open status of the project as the ID of each person who has the project open, the computers on which it is open, the mode in which each user has it open, as well as the date and time when it was last updated. Controls the project-level codes that are assigned to the project. To Add/Edit Open Plan Project Information: 1. Choose Project, Properties. 2. Click on a tab. 3. Enter text as desired. 4. Click OK. A project needs to be opened in Exclusive mode for information to be edited within the Project Properties dialog box. 2-13 Chapter 2: Open Plan Publication 615 2.7.1 - The Summary Tab Every project needs to have the Engineering District, project manager, and consulting firm identified in the Open Plan project properties for sorting and categorization. The fields in the summary tab should be filled out with the following data: Project Manager = PennDOT Project Manager Company = Consultant Firm or PennDOT Client = Engineering District X-0 (X being the district number) Figure 2.10 – The Project Properties Summary Tab 2.7.2 – The Preferences Tab The following project settings are controlled using this tab: - Description - Default Date Format - Default Activity Type - Default Activity Calendar - Startup View - Default Relationship Calendar - Conversions - Default Duration Units - Minimum Calculated Duration - Default Access Mode - Earned Value 2-14 Chapter 2: Open Plan Publication 615 Note that the conversions that are set should not be modified. The conversions must be 1 day = 8 hours, 1 week = 40 hours, and 1 month = 160 hours. Figure 2.11 – The Project Properties Preferences Tab 2.7.3 – The Files Tab The Files tab provides information on the various auxiliary files associated with a project. These files include the project calendar, resource file, and code files. PennDOT’s PDSMASTER template has the appropriate calendar, resource, and code files assigned. These files should not be changed or removed. Additional code files can be assigned to a project when it is open in exclusive mode. Clicking the ellipsis to the right of the Codes Files box will result in a selection window of available code files and available code fields. Figure 2.12 – The Project Properties Files Tab 2-15 Chapter 2: Open Plan Publication 615 2.7.4 – The Status Tab On the Status Tab, the following project constraints are set: - Finish Type must be “On Target”. - Target Finish constraint date must match the “Not Later Than” finish constraint date set on Open Bids activity or whatever activity is the last one in the schedule. Applying these constraints will report negative and positive float in the Minimum Total Float field of the Status Tab after project updating and a time analysis is run. Figure 2.13 – The Project Properties Status Tab 2.7.5 – The Cost Tab The Cost Tab displays summary cost information for the project. PennDOT is not presently using Open Plan for cost tracking. Further information regarding cost functions within Open Plan can be found in the On Line Open Plan User’s Manual. 2.7.6 – The Notes Tab The Notes Tab is used to provide information regarding the overall project status, new activities or project requirements, changes in parameters, or to provide additional information when a project is not meeting its target date. Note text can be typed directly into the note field or cut and pasted from another source by using CTRL + C to copy and CTRL + V to paste. The text box can contain a maximum of 29KB of text. Links to files, web pages, and email addresses may also be entered. Information for adding links and their required format can be found through the Open Plan Help menu under Note. Each note may be assigned a category. The category field is used to group notes. A drop down arrow is displayed to facilitate the selection of predefined and user defined note categories. Table 2.3 lists the note 2-16 Chapter 2: Open Plan Publication 615 categories the Department is reserving to facilitate certain required information. Notes are not saved until the project is saved. Table 2.3 – Project Note Categories Category ID <Default> Cost Schedule Notes BOD Committed HQAD_weekly ROW Description / Purpose If the project is behind schedule, the Schedule Recovery Plan is inserted here. The recovery plan should document how the project team plans to gain time on the project to eliminate the negative float. If a project is not needed, the text “N/A” must be entered in this field, for reporting purposes. If the project is more than 15% over budget, the Cost Recovery Plan is inserted here. This should include information about how the cost discrepancy is to be made up over the course of the project. General notes about the project are entered here. This field is for notes arising out of BOPD/HDD reviews. This field is for notes regarding the project status, and is only used for projects which are committed lets for the current year. This field holds notes from the weekly meetings held in the PDOC room. This field is used by some districts regarding ROW parcels. Figure 2.14 – The Project Properties Notes Tab 2.7.7 – The Scheduling Tab The Scheduling tab allows the user to specify both the project's priority and the type of dates that should be used when calculating the resource usage summary. Further information regarding the Scheduling Tab and project priority within Open Plan can be found in the Open Plan Users’ Manual. 2-17 Chapter 2: Open Plan Publication 615 Figure 2.15 – The Project Properties Scheduling Tab 2.7.8 – The User Fields Tab The User Fields tab specifies the values that Open Plan should include for user-defined fields on the project table. Further information regarding the User Fields Tab and user-defined files can be found in the Open Plan Users’ Manual. Figure 2.16 – The Project Properties User Fields Tab 2.7.9 – The Access Control Tab Privilege to create, edit and or view an Open Plan project is controlled using Access Rights and Access Modes. On the Access Control Tab, four columns are available providing input/selection of GROUP, ROLE, USER ID, and READ ONLY. Within this dialog box groups, roles, and users may be selected. Access is controlled by being identified as a User (an individual given the right to log in to and use a supported application), then by assignment to one or more of the following categories: 2-18 Chapter 2: Open Plan Publication 615 Figure 2.17 – The Project Properties Access Control Tab Group - a selection of user individuals. Using groups is a convenient method to grant a specific right or rights to a large number of users. A user must be assigned to at least one group so that the user may log into an Open Plan application. Role - an identity that defines what permission a User or Group may have. Roles apply to projects, auxiliary files, views, etc. The following table lists the predefined groups and their descriptions. Table 2.4 – Predefined Groups Group Description All users of Central Office that have access to Open Plan. This group must be assigned CO to every schedule, with role set to “Team Member” and read-only set to “Yes.” CO_EXEC Members of the Central Office Executive Staff. Contains every Open Plan user within a specific district. This group is typically DIST## assigned read-only access. Read-only access permits users to back up files, but not to restore them, and users cannot edit a project’s contents. Used by Project Development Engineers in Central Office to add notes based on letting PDES calls, weekly PDOC sessions, and other meetings. This group must be assigned to every schedule, with read-only set to “No.” Used for PennDOT Project Managers. Users assigned a PM role can create and delete PM projects, update progress, restore files, and perform most Open Plan functions. District Portfolio Managers are assigned this role, as is the Open Plan Support Team in Central Office. Users assigned SYSADMIN rights have complete and unrestricted SYSADMIN access to all of Open Plan, the Security Administrator, and the Migration Utility. Members can also make system changes as needed. This group covers any user that has access to Open Plan. If this group is assigned to a WORLD schedule, read-only must be set to “Yes.” To do otherwise allows anyone to edit a schedule, for good or for ill. 2-19 Chapter 2: Open Plan Publication 615 Roles are assigned to Users and to Groups. A User may be assigned to multiple Groups and have Multiple Roles. Data security is managed by assigning permissions to roles. If a User is granted multiple roles with different access restrictions in a single project, the greater permission controls. Table 3.5 lists the predefined roles, along with their descriptions. Table 2.5 – Predefined Roles Role Default Team Member PM SYSADMIN Description A minimal role that allows read-only access. Default Users cannot change data. All DIST## groups and the CO group have “Default” set as the role for that group. This allows everyone in a District access to view a project schedule, but not to make any changes to it. Can update project status, but cannot edit activities, descriptions, or durations. Can perform most functions as a SYSADMIN, but cannot define the workweek. Provides unrestricted access within a project. Every project should use access controls. The following roles are standard: - Project Manager = Project Manager - ADE for Design = Team Member (Read Only) - Team Members = Team Member - PDES = Team Member - CO = Team Member (Read Only) The USER ID column is populated with all users of the Open Plan software. Within this column, a single user can be identified and provided access rights. The remaining column, Read Only, is a toggle. It provides read only access to a project or file. 2.7.10 – The Open Status Tab The Open Status tab displays the information about the open status of the project. The following information is displayed on this tab: - User ID — This column displays the user ID of each person who has the project open. - Machine ID — This column displays the ID of each computer where the file is open. - Open Mode — This column displays the mode in which the project is open. - Opened On – This column displays the date and time that the project was opened. Open modes include Exclusive, Shared, and Read-Only. In Exclusive mode, only the user with the file open is able to make changes to it. Other users are “locked out,” and only able to open in Read-Only mode. Shared mode allows multiple users to open the file and make changes simultaneously, while ReadOnly mode does not allow users to overwrite or save changes within the open project. Users in Read-Only mode are able to save changed by selecting “Save As” and creating a new file. 2-20 Chapter 2: Open Plan Publication 615 Figure 2.18 – The Project Properties Open Status Tab 2.7.11 – The Codes Tab The PDSMASTER template contains a list of standard project types and complexities. During the schedule setup, the PennDOT PM should select the appropriate project type from the drop-down menu. The Project Type classification is based on the primary nature of the project. For example, a 10 mile roadway resurfacing project which includes a bridge should be classified as “roadway resurfacing,” not bridge preservation. Similarly, a bridge replacement project which includes the reconstruction of 1000 feet of approach on both sides should be classified “bridge replacement. In addition the project type is further defined as either Design-Build or Design-Bid-Build. Therefore a bridge replacement project may be coded as “bridge replacement/design-build’ or bridge replacement/design-bid-build”. Figure 2.19 – The Project Properties Codes Tab 2-21 Chapter 2: Open Plan Publication 615 Additionally, all projects shall have a project code that identifies the complexity of the project. These consist of the following: - Major Complexity - Moderate Complexity - Minor Complexity. The definitions of the above are those found in PennDOT’s Design Manual DM1 Chapter 2. 2.8 – Working with Views A view is a screen or window that displays project data. Project information such as Activity ID, description, start and finish date, duration, WBS code, and other data is presented through the use of graphical and tabular data formats. With the creation of a project, Open Plan links an assortment of views that may consist of Gantt / bar charts, network diagrams, hierarchy trees, histograms, and tables. These views have been standardized to facilitate the input, presentations and retrieval of key project information. Views can be linked (added) or unlinked (removed) from a project. When modifications are made to a standard view and it is to be saved, a new name must be given to the view. If you do not change the name of the view, the original view will be overwritten and the changes made to the view will appear in all projects that have links to the view. For district-specific views, the following standard naming convention applies, where X is the District: - DD[X]BAR[001] – For Barchart Views - D[X]NET[001] – For Network Views - D[X]SRD[001] – For Spreadsheet Views - D[X]HST[001] – For Histogram Views The Description should be representative of what the views actually present. 2.8.1 – Displaying Open Plan Views Views are independent files and are housed in the Open Plan Library. Views can be accessed through any open project. PennDOT’s standard Open Plan views are included (linked) in the PDSMASTER template. These views are available whenever the PDSMASTER is used to create a new project. 2-22 Chapter 2: Open Plan Publication 615 Table 2.6 – PDSMASTER Views View Title Type BARVW Bar Chart FLOWVW Network LOGICT Network PDSACTBR Bar Chart PDSMLSUM Bar Chart PDSNETWK Network PDSSCHVR Bar Chart PDSSCHVR_LATE Bar Chart PDSSRD001 Spreadsheet PDVARBAR Bar Chart PSSPDVW Spreadsheet RELSPDVW Spreadsheet SPREADVW Spreadsheet Description Bar Chart with columns: Activity ID, Description, Duration, Total Float, Early Start, and Early Finish. Pure logic diagram presenting project top level parent activities as nodes with their logic ties. Pure logic diagram presenting project activities as nodes with their logic ties. Bar Chart with columns: Activity ID, Activity Description, Start Date, Finish Date, Duration, Total Float, WBS, WBS Description, OBS, OBS Description, Cost Function, Cost Function Description, Responsible Party, and Calendar ID. Bar Chart with columns: Activity ID, Activity Description, Milestone Dates, WBS, and Total Float. Network diagram with logic links. Nodes provide responsibility information. Bar chart with columns: Activity ID, Activity Description, Actual Duration, Early Start, Early Finish, and Total Float. Schedule Variance View comparing against active Baseline based on Early Dates. Bar chart with columns: Activity ID, Activity Description, Actual Duration, Late Finish, Baseline Late Finish and Total Float. Schedule Variance View comparing against active Baseline based Late Dates. Table containing columns: Activity ID, Activity Description, Duration, Total Float, Early Dates, Late Dates, Baseline Finish, Actual Start, Actual Finish, and Notes. Bar chart with columns: Activity ID, Activity Description, Duration, Actual Start, Baseline Variance, Early Start, Early Finish, Total Float, and WBS. Schedule Variance View comparing baseline start dates versus actual start dates. Table containing columns: Activity ID, Activity Description, Computed Status, Successor, Successor Description, Successor Status, Successor Log, Successor Type, Predecessor, Predecessor Description, Predecessor Status, Predecessor Lag, and Predecessor Type. Table containing columns: Predecessor, Predecessor Description, Successor, Successor Description, Calendar ID, Relationship Lag, Relationships Type, Relationship Free Float, and Relationship Total Float. Table Containing Columns: Activity ID, Activity Description, Duration, Activity Type, Early Dates, Late Dates, Total Float, Calendar ID, Progress Type, and Progress Value. When a new project is created from scratch, it does not immediately inherit every view listed in the Open Plan Library. Rather, Open Plan only installs three views. If a new project is created from an existing project, those views linked to the originating project template are carried over. 2-23 Chapter 2: Open Plan Publication 615 Caution is advised in interpreting column titles. Open Plan allows the user to provide a descriptive title for a selected data field. The column description may not correspond or match the Open Plan data field. The user should always review the column description and actual column field source prior to interpreting the information displayed. To Display an Open Plan View: 1. Open any project. 2. Select the View folder of the project. 3. Double-click on the desired view icon. Figure 2.19 – The View Folder of an Open Project Views can be referenced by all projects. If a change is made to a view, such as a column width change or time scale alteration, this change will appear in all projects that have links to this view. It is imperative that anyone who makes a revision to a standard or default view rename it when saving, and give it a new description. Failure to adhere to this process will cause views to be overwritten. Open Plan views are located in the Views folder within the Open Plan Library folder. Views may be linked to a project by selecting the view and dragging it to the project folder. If a project is open, an alternate method to create the link is to right-click the view and select “Open.” The user then has an option to create a permanent link, or just review the project using the selected view (temporary link). Information displayed within an Open Plan view may be filtered. To check if the view is filtered, look in the lower right hand portion of the Open Plan program window. The text "No Filter" will appear, verifying the absence of a filter application. If a filter is present, its title will appear. To remove or apply a filter to the present view, select Tools Filters Cancel Filter, or select a filter to apply. 2-24 Chapter 2: Open Plan Publication 615 Information presented within Open Plan views can be transferred to an Excel spreadsheet. A direct copyand-paste will transfer all information from a given Open Plan view into Excel. 2.8.2 – Scrolling Views Since only a limited portion of a project can be viewed on a screen at one time, Open Plan provides both mouse and keyboard methods for changing the project display. These methods include moving from task to task as well as moving through the timescale. Traditional horizontal and vertical scroll bars are provided for “browsing” the project view using a Mouse. Keyboard shortcuts are also provided. Table 2.7 – Keyboard Movements Keyboard Command Up Arrow Down Arrow CTRL + Left Arrow CTRL + Right Arrow CTRL + Home CTRL + End TAB or SHIFT + TAB CTRL + PgDn CTRL + PgUp Action Move up one row. Move down one row. Move to the first (far left) field of the current row. Move to the last (far right) field of the current row. Move to the first field of the first task row. (top left) Move to the last field of the last task row. (bottom right) Move around in a form, table, or dialog box. Within a spreadsheet view, TAB moves the cursor one cell to the right, while SHIFT+TAB moves the cursor one cell to the left. Expand All (lists all tasks, including subprojects and activities) Collapse All A vertical divider bar separates the table portion from the timescale portion of all Gantt or Bar Chart views. This bar can be moved to the left or to the right to adjust the size of each portion viewed on the screen. To Adjust the Partition of the Activity Barchart View: 1. Position the mouse pointer on the vertical bar that separates the table portion from the timescale portion of the Activity Barchart view. The mouse pointer appears as a vertical sizing arrow. 2. Click and drag with the mouse to the desired position. 2.9 – Entering and Relating Activities One major component of a project is a database of activity information. The user can enter some of this information; some of it is calculated. In a simple project, only a few activity fields may be entered (i.e., activity name and duration). In a more complex project, more of the fields may be used to further define each activity. 2-25 Chapter 2: Open Plan Publication 615 Normal activities are the fundamental events or work that may be deemed necessary to finish the project. Milestones are activities that serve as markers for important events or turning points in the life of the project. During the planning process, Subproject activities (parent/summary activities) can be created to represent phases or components of the project. Activities that are subordinate to a subproject activity are indented under the subproject. By using subprojects, your project plan can be viewed at various levels of detail. 2.9.1 – Identifying Basic Activity Fields Open Plan views provide an efficient means of entering and viewing project activity information. The following table identifies some of the basic activity fields and the information it reports. Some fields are user input fields while some are computed data generated by Open Plan. Table 2.8 – Basic Activity Fields Field Name ID Activity Description Duration Early Start Early Finish Total Float Predecessors Calendar Type Description Denotes an assigned number that is used to reference the activity. The ID number appears only after it is entered by the user. Denotes the name of the activity, which may consist of up to 255 alphanumeric characters. Duplicate names are allowed. Represents the length of the activity expressed in working time units. For example, an activity’s duration may be 3 days or 2 weeks. Durations are entered by the project manager. The earliest date (and time) when the activity can be scheduled to start. The earliest date (and time) when the activity can be anticipated to finish. The difference between early and late start dates measured in working periods. Denotes the ID of any other activity whose scheduled dates must be considered when scheduling this selected activity. A definition of valid working periods for an activity. The Calendar ID used to calculate the start and finish dates of the activity. Defines how the activity is treated during time analysis. By default, the type is ASAP (As Soon As Possible). Other types include Start Milestone, Finish Milestone, and ALAP (As Late As Possible). 2.9.2 – Entering Activity Data Any activity-oriented view can be used to enter an activity ID and activity description. The Activity Bar Chart, the default view, is convenient because it provides the most commonly used fields for building an activity list. To Enter an Activity ID and Description: 1. While in an activity data view (for example, BARVW), select the first available cell in the Activity ID column. 2. Type the ID number you would like to assign to the activity. 2-26 Chapter 2: Open Plan Publication 615 3. Press TAB. 4. Type the name of the activity. A default duration of 0 day and an Early Start and Early Finish date for the activity are automatically calculated. 5. Press Enter. 6. Repeat steps 2 through 5 until all activities are entered. The duration of an activity is the amount of time units determined to perform the described work. For example, one workweek is normally described as 5 days of work. Duration is entered by the project manager. The following table identifies the time units that are used to describe activity duration. Table 2.9 – Time Units Time Unit Minutes Hours Days Weeks Months Data Entry Shortcut t h d w m For consistency, all durations assigned to activities will be in working days. Historic durations for many activities are contained in the PDSMASTER template alongside standard descriptions and required coding values. For activities which are to be completed by the District, these durations may be changed provided the changes are made with a sound understanding of the project’s needs and typical review times. For reviews involving Central Office staff or FHWA, the durations contained within the PDSMASTER should be considered as minimums. Generally, these review periods are 15 days for Bureau of Project Delivery reviews and 25 days for FHWA reviews. For Design-Build projects, the PS&E reviews – Activity 280.040 – can be reduced from 15 days to 10 days. To Enter a Duration: 1. Select the appropriate cell in the Duration column. 2. Type a number followed by a time unit abbreviation to indicate the length of time to be allotted to the activity. Open Plan automatically applies the default time unit if you do not enter one. The default time unit is defined in the Project Properties Preferences tab. 3. Press Enter. 2-27 Chapter 2: Open Plan Publication 615 4. Repeat steps 2 and 3 until durations for all project activities are entered. Durations cannot be entered for parent activities (this is either an internal or external subproject). The duration of a parent activity is a function of the duration and logic of its children. 2.9.3 – Using the Activity Details Dialog The Activity Details Dialog provides a means by which users can add information or change settings for a selected activity. To Open the Activity Details Dialog: Double-click on the desired activity’s row selector cell (the left-most gray block on the activity’s row). Row Selector Figure 2.20 – Row Selector -or1. Click on Edit. 2. Select Edit Activity. You can also click on the row selector cell with the secondary mouse, and then select Edit Activity from the shortcut menu. The Activity Details dialog will appear. Figure 2.21 – The Activity Details Dialog Box 2-28 Chapter 2: Open Plan Publication 615 The Activity Details Dialog contains fields of data that are not available in the PennDOT Standard Activity Bar Chart view. These fields are grouped into eight separate categories. These categories are described in the following table. Table 2.10 – Activity Detail Tabs Category General Relationships Resources Codes Advanced Risk User Fields Notes Description Includes basic activity information such as name, duration, target start and finish dates. Also includes activity type (ASAP, Start Milestone, Finish Milestone, etc.) Includes information about activity predecessors, successors, and the types of dependency links for each. Includes information about resource assignments. Displays code identifiers. Activity constraints and milestones are indicated. Displays information regarding an activity’s probability. Displays user-defined information about an activity. Provides a memo text area for attaching notes or documentation to an activity. An activity’s Activity Type defines how the activity is treated during time analysis. Open Plan supports eight different activity types, all of which are listed below: - ASAP (As Soon As Possible) - ALAP (As Late As Possible) - Start Milestone - Finish Milestone - Discontinuous - Subproject - Hammock - Effort Driven - External Subproject (available only in Open Plan Professional) The most commonly used activity types are ASAP, Start Milestone, Finish Milestone, and Subproject. A Hammock is a task that summarizes the duration from the start of one task to the end of another task. To hang a hammock between two activities, create a new activity ID and description, and keep this activity type as ASAP. Under relationship, set the first task as a predecessor (start to start) and the last task is also as a predecessor (finish to finish). Once that is set, go back to the activity type and change it to hammock. A Subproject Activity is a parent by default and cannot be changed to another type of activity. If all child activities of an existing parent activity are deleted, the parent activity type does not automatically change, and must be manually changed from subproject to ASAP. 2-29 Chapter 2: Open Plan Publication 615 A Milestone is an activity which does not represent any actual work, but is used to mark a significant point within a project. Start Milestones denote the beginning of activity, such as the start of a particular project phase. Finish Milestones denote an activity’s end, such as delivery date for a product, or completion of a segment of highway. Milestones always have a duration of zero days. To Define an Activity Type: 1. Select the activity to be edited. 2. Open the Activity Details dialog. 3. Click on the General tab (if not already there). 4. Select an activity type from the Type drop-down list. 5. Click Close. To Remove an Activity Type: 1. Select the constrained activity. 2. Open the Activity Details dialog. 3. Click on the General tab. 4. Choose ASAP from the Type drop-down list. 5. Click Close. 2.9.4 – Modifying Activity Relationships Activity relationships can be modified or deleted completely, and lag and lead time between activities can be assigned. There are four types of activity relationships that can be designated in Open Plan. The following table lists the type of relationships along with their descriptions. Table 2.11 – Relationship Types Type of Relationship Finish-to-Start (FS) Start-to-Start (SS) Finish-to-Finish (FF) Start-to-Finish (SF) Description The successor activity cannot start until the predecessor activity has finished. This is the most commonly-used activity type. The successor activity can start as soon as the predecessor activity has begun. This is the second most commonly-used activity type. The finish date of the successor activity is tied to the finish date of the predecessor activity. This is infrequently used. The successor activity cannot finish until the predecessor has started. This relationship type should rarely be used. 2-30 Chapter 2: Open Plan Publication 615 To Create an Activity Relationship Using the Activity Details Dialog: 1. Select either the successor (dependent) or predecessor activity. 2. Open the Activity Details dialog. 3. Click on the Relationships tab. Figure 2.22 - The Relationships Tab of the Activity Details Dialog Box 4. Position the cursor in the first empty line in the Predecessor column. 5. Select the number of the predecessor activity from the drop-down list. 6. Select the dependency link type from the drop-down list in the Type field. 7. Click Apply. 8. Click Close. The Activity Details dialog can be used to modify a relationship. This dialog allows the user to review all of the relationships associated with one activity all at once. To Modify an Activity Relationship Using the Activity Details Dialog: 1. Select the successor (dependent) activity. 2. Activate the Activity Details dialog. 3. Click on the Relationships tab. 4. Modify the type of dependency link or add lead or lag time as desired. 2-31 Chapter 2: Open Plan Publication 615 5. Click Apply. 6. Click Close. Relationships can also be deleted. If a relationship is deleted accidentally, it must be recreated. It cannot be recovered using an Undo feature. To Delete an Activity Relationship Using the Activity Details Dialog: 1. Select the appropriate activity. 2. Activate the Activity Details Dialog. 3. Click on the Relationships tab. 4. Select the activity link to be deleted. 5. Press Delete. 6. Click Apply. 7. Click Close. Relationships can also be literally “drawn” between activities using the mouse pointer. However, you must be in Relationship Mode to use this method. When creating a relationship using the mouse, the mouse must be positioned directly over the activity bar to activate the Z-formation mouse pointer. To Create an Activity Relationship Using the Mouse: 1. Click the Relationship Mode button on the toolbar. 2. Position the mouse pointer on the appropriate edge of the predecessor bar. The mouse pointer appears as a one-headed Z. 2-32 Chapter 2: Open Plan Publication 615 This is an example of a relationship line that was drawn in. Figure 2.23 – Activity Relationships Using the Mouse in the Bar Chart View 3. Click and drag the mouse pointer to the appropriate edge of successor activity. Logic ties (relationships) between activities are not assigned in the template; they need to be set by the design team. Every child activity must have a predecessor and a successor, the only exceptions being the first activity (Start Project) does not need a predecessor and the last activity (Open Bids) does not need a successor. Lag time is a pause or wait time between two activities. For example, on a small painting project with one painter, the painter might need to plan for drying time between the first and second coats of paint. Lag time is expressed using a specific amount of time, such as 1d or 24h. Paint 1 Paint 1 Paint 2 Paint 2 Figure 2.24 – An Example of Lag Time Negative Lag sometimes called Lead time is an overlap between two activities. For example, one painter might be able to begin painting a room before the plasterer is finished sanding the surface. Lead time is expressed as a negative number in the lag field, such as -1d or -24h. 2-33 Chapter 2: Open Plan Publication 615 Plaster Paint Figure 2.25 – An Example of Lead Time Lag and lead time can also be expressed in terms of a percentage. Percentages are permitted only on startto-start relationships. The percent is calculated based on the predecessor activity duration. 2.9.5 – Attaching and Reading Notes Most of the fields in the activity database serve a specific purpose and are limited in length. A Notes field is provided to give the user a place to type in paragraphs of text to describe an activity. The Notes field can contain any information that the user determines is important. The Notes field can be spell checked by using the spell checker button. Note text can be typed directly into the note field or added using the copy/cut and paste command function to transfer text from another source. The text box can contain a maximum of 29KB of text. In addition to text, links to files, web pages, and email addresses may be entered. Information for adding links and their required format can be found through the Open Plan Help menu under Note. At the activity level, each note may be assigned a category. The category field is used to group notes. A drop down arrow is displayed to facilitate the selection of predefined and user defined note categories, which is the same as the note categories at the project level. Figure 2.26 – The Notes Tab of the Activity Details Dialog Box 2-34 Chapter 2: Open Plan Publication 615 To Attach a Note to an Activity: 1. Select the desired activity. 2. Open the Activity Details dialog and click on the Notes tab. 3. Select the Category that the note should appear in. 4. Position the cursor in the Notes box. 5. Type the note. 6. Click Apply. 7. Click Close. Once an activity note has been created, a notepad icon will appear in the row selector cell (the leftmost gray box), showing that there is a note associated with that activity. The Activity Details dialog can be used to quickly read and review the note. Figure 2.27 – Note Indicator Icon To Read an Activity Note: 1. Select the activity containing the note. 2. Open the Activity Details dialog and click on the Notes tab. If the note is not visible, use the Category drop-down box to check in another note category. 2.9.6 – Editing Activity Entries Open Plan Desktop provides several tools for modifying any of the entries that are made in a project. Several of the editing tools, such as Cut, Copy, and Paste are standard features in most software. When an entry is made in a view, the entry can be modified using the Entry Bar. Corrections can be canceled using the Esc key or accepted using the Enter key. To Edit an Activity: 1. Select the cell containing the information to be edited. 2. Type the new word or characters. 3. Press Enter. 2-35 Chapter 2: Open Plan Publication 615 In order to perform editing operations on specific activities, it is necessary to select the information that is to be manipulated. There are several methods for selecting information. To Select an Activity Field: 1. Position the mouse pointer on the activity field cell. 2. Click the primary mouse button. To Select an Entire Activity (i.e., the entire row): 1. Position the mouse pointer on the activity’s row selector button. 2. Click the primary mouse button. To Select Multiple Consecutive Activities: 1. Select the first activity in the range. 2. Press Shift and select the last activity in the range. Press Ctrl while selecting activities to select multiple, non-consecutive activities. 2.9.7 – Modifying the Schedule Once a schedule is created using the PDSMASTER template, it will need to be modified to conform to the project. Any activity that pertains to the project should be tracked in the schedule. Sometimes this will necessitate the use of duplicate activities. For example, if a project has multiple structures, each individual structure should be tracked separately in the schedule. If the activity is not listed in the PDSMASTER, a nonstandard PennDOT activity can be created. As a project progresses it may also become necessary to track detail that was not included in the original schedule. This can be accomplished by opening a read-only copy of the PDSMASTER template and copying the activities over. When you copy activities from the PDSMASTER, all code fields are copied along with the activity. If you copy a parent activity, all the children activities will be brought over along with the parent activity. To Copy and Paste Activities from the PDSMASTER: 1. Open the current project in exclusive mode that you want to add the activities to. 2. Minimize the current project. 3. Open the PDSMASTER in read only mode. 4. Find the activity in the PDSMASTER that needs to be copied. Click on the left most gray box of the first activity that you want to copy. If there are several activities in a row that need to be copied, you can click on the first one and drag the cursor down to the last one that you want to copy. If the activities are not in a row, you can select multiple activities by holding down the CTRL key. If you select a parent activity, you do not need to select all the children activities they will automatically be brought in with the parent activity. 2-36 Chapter 2: Open Plan Publication 615 5. Once the activities are selected that you want to copy, go up to the Edit menu and select Copy Record(s). 6. Go to the Window menu, and select the current project that you want to paste the selected activities into. 7. Scroll down to the next available row to paste the records and click on the left most gray box to highlight the row. 8. Go up to the Edit menu and select Paste Record(s). 9. The Activity IDs may need to be edited to match the Activity IDs in the PDSMASTER. Any activity that is added to a schedule that is not part of the PDSMASTER template is considered a nonstandard PennDOT activity. The PDSSTANDARD code field is used to screen non-standard activities out of the Department’s historical data. A “1” is assigned to all standard activities – those found in the PDSMASTER template. Any activity that is added outside of these standard activities should be assigned a “2.” To Create a Non-standard PENNDOT Activity: 1. Scroll down to the next available row and double click the left most gray box to open the Activities Detail Dialog box. 2. Give the new activity a unique Activity ID and Description. The Activity ID and Description cannot be one that is being utilized by any of the templates. 3. Give the new activity an appropriate duration. 4. Select the Codes tab of the Activity Detail Dialog box. Assign a “2” for the PDSSTANDARD code. The PDSWBS, PDSOBS, and PDSCOST codes should also be filled out for the new activity. 5. Select the Relationships tab of the Activity Detail Dialog box. Give the new activity a predecessor and a successor. 6. Click Apply. 7. Click Close. 8. Repeat steps 1 through 7 to add any additional non-standard PENNDOT activities. 2.9.8 – Recurring Activities For some projects, there may be a need to track the same activity or group of activities more than once. For such recurring activities, a letter should be added to the standard activity ID; this will show such activities in sequence, in the correct location in the schedule. As with other activities, the activities should be copied and pasted following the standard PennDOT templates, so that all activity descriptions and code files are left. 2-37 Chapter 2: Open Plan Publication 615 For example, the standard activity ID for a structure is Activity 120.010, “Structure (S-XXXXX).” For a simple bridge replacement project this will be the only activity needed, because the bridge is the only structure being tracked. But suppose a new directional interchange is to be built, entailing several structures. Since all of these must be tracked individually, one would copy and paste the standard structures activity, then add a letter, resulting in a list: - 120.010A – Structure (S-54701) - 120.010B – Structure (S-54703) - 120.010C – Structure (S-54704) - 120.010D – Structure (S-54705) - 120.010E – Structure (S-54709) Changes made to parent activities are automatically applied to their children. So for instance, if you rename 120.010 to 120.010A, the standard activity 120.010.010 – TS&L Development – will switch to 120.010A.010. This method of numbering with letters should be used for any recurring activity in the schedule. 2.10 – Auxiliary Files 2.10.1 – Calendar File Calendars define valid working periods for project activities. Before assigning a calendar to an activity, the calendar needs to be created and saved within the calendar file. The calendar file contains one or more calendars, up to 255. Calendar files have one calendar called default. If no calendar is assigned to a project, i.e., PDSCAL, Open Plan performs all calculations based on the Open Plan DEFAULT calendar, which is based on a 5-day work week and an 8-hour work day. The PDSCAL calendar file is the standard PennDOT calendar file, and should be used for all PennDOT projects. This calendar file contains multiple calendars that define different standard work days and hours. Within the PDSCAL are two calendars, 5-day and PennDOT 5-day. The PennDOT 5-day calendar is based on a 7.5 hour work day. The 5 day calendar is based on an 8 hour work day. Both identify holidays and weekends. Activities that will be performed by PennDOT or DEP can be assigned the PennDOT 5 day calendar. Other concerns (consultants, etc.) can be assigned the 5 day calendar. To View a Calendar File: 1. Go to the Open Plan Library Folder. 2. Select the Calendars folder. 3. Double click on the calendar that you want to view. Use the Page Up key to go to previous years. Use the Page Down keys to go to next year. Note that there can be several different calendars in a calendar file. 2-38 Chapter 2: Open Plan Publication 615 Figure 2.28 – Calendar View The most important thing to keep track of when viewing any calendar is the title bar at the top of the Open Plan window. This indicates which calendar is being viewed. To change the calendar that you are viewing, right click in the white area of the screen, select manage calendars, and select a different calendar to view. To ensure that your project is being scheduled during valid working periods, make sure that the PDSCAL calendar file is assigned to the project. No changes should be made to the PDSCAL. To Assign a Calendar File to a Project: 1. Drag the calendar file icon from the Calendar folder in the Open Plan Library into the Project folder. -or1. Open the Project Properties dialog box. 2. Click on the Files tab. 3. Ensure the proper calendar file is listed in the calendar field. If not, click on the ellipses to assign the proper file. Alternately, drag the calendar file icon from the Calendar folder in the Open Plan Library into the Project folder. By default, all activities are assigned the project’s default calendar (typically the PDSCAL) that is attached to the project, but the calendar for individual activities may be different. For instance, consultant 2-39 Chapter 2: Open Plan Publication 615 surveyors might be willing to work overtime to make up negative float, but design and environmental would still be working on a standard week. To Assign a Calendar to an Activity: 1. Open the PENNDOT Standard Activity Spreadsheet. 2. Select the activity to be edited. 3. Open the Activity Details dialog. 4. Click on the General tab (if not already there). 5. Select the Calendar ID field of the activity. 6. Select the calendar from the drop-down list at the top of the spreadsheet. 7. Continue assigning calendars. 8. Click Close. -or1. Open the PENNDOT Standard Activity Barchart. 2. Insert a new column using the Calendar field. 3. Click in the Calendar column of the activity’s row. 4. Select the Calendar from the drop-down list at the top of the spreadsheet. 2.10.2 – Resource File A resource is an item required by an activity. Resources can be people, equipment, facilities, funding – anything needed to perform the work of a project. The PDSRES resource file is the standard PennDOT resource file, and is to be used for all PennDOT projects. The PDSRES is already assigned when a project is created using the PDSMASTER template. 2.10.3 – Code Files A coding system is a structured methodology of identifying an activity, task, item or group of similar activities/tasks/items by the use of a single or group of alphanumeric figures. Code files are used to assign specific tags to activities/tasks/items/groups to facilitate sorting, filtering, and reporting information. Within Open Plan, a coding system is referred to as a code file. Open Plan can support up to 90 code files per project. This means that an activity can have up to 90 codes assigned to it. To Identify The Code Files Within a Project: 1. Expand a project folder (select the “+” at the left of the project folder) 2-40 Chapter 2: Open Plan Publication 615 2. Click on the Codes folder. The four standard PennDOT code files must be assigned to the project. These consist of the Department work breakdown structure (PDSWBS), organizational breakdown structure (PDSOBS), cost function file (PDSCOST) and standard activity file (PDSSTANDARD). Projects created with the Department’s standard PDSMASTER template already have these files referenced in. The standard assignments are as follows. Table 2.12 – Code Table Code Assignment 1 2 3 4 Code File Prompt PDSWBS PDSOBS PDSCOST PDSSTANDARD All of the standard activities within the PDSMASTER template have coding assignments already given to them. If you add non-standard PennDOT activities to your schedule, these activities must also have coding values added. For non-standard activities, the PDSSTANDARD must be 2, while the other coding values should be selected which are appropriate for that activity. To Select Coding Values for a New Activity: 1. Open the Activity Details dialog box. (see section 3.7.3 for instructions on how to do this) 2. Click on the ‘Codes’ Tab. 3. Select the appropriate WBS, OBS, and COST codes from the drop-down menu. It is the responsibility of the District Portfolio Manager to make coding assignments consistent with PennDOT methodology. If the Portfolio Manager has questions with regards to how these changes should be applied, contact the Open Plan Support Group within Central Office. For standard activities established in the PDSMASTER template, no changes to the PDSWBS codes are permitted. Changes can only be approved and implemented by Central Office, in order to preserve historical data. To Bring Additional Code Reference Files into a Project: 1. Open the Open Plan Library, and then select the Codes folder. 2. Locate the code file, right-click, and select “Copy.” 3. Open the target project’s code folder. 4. Right-click anywhere within the folder and select “Paste”. The first four code fields are reserved for the PennDOT standard code references, as detailed in Table 3.12. Additional code files may be referenced in slots 5 through 99. Note also that any edits made within a 2-41 Chapter 2: Open Plan Publication 615 coding reference will propagate to all other projects which reference this coding file. For this reason it is not permitted to modify the PDSWBS, PDSOBS, PDSCOST or PDSSTANDARD. 2.11 – Working with Activity Views 2.11.1 – Working with the Activity Bar Chart View In a Bar Chart view, activities are shown as colored bars. PennDOT standard Bar Chart views provide a set of pre-determined projects and what data should be displayed on the chart. It is possible to display many different pieces of data on a bar chart, but care must be taken so that it is not illegible or “busy.” The value of any view is the project information and the story that it tells. To Display Relationships While in Bar Data Mode: 1. Choose Tools, Barchart Preferences. -or2. Click the secondary mouse button while in the barchart area, and then choose Preferences. 3. Select Show Relationships. 4. Click OK. This procedure displays relationship lines that will print. To Change “Bar Data Mode” to “Relationship Mode”: Click the Relationship Mode button on the toolbar. -orChoose View, Relationship Mode. This procedure displays relationship lines that will not print. 2.11.2 – Working with Parent/Children Activities Figure 3.28 shows parent/child activities. Using parent/child activities has the advantage of allowing the project to proceed in a flexible manner. A project can be planned using large activities, and as the scope becomes more concrete detail can be added. When new child activities are created, the activity a level above them becomes a parent. For more information on adding child activities to a mature schedule, and the logic changes required to do so, see Section 3.12.2. The parent/child activity structure also allows easier reporting, in that a report can be prepared showing only top-level activities. Such reports show a summary of information pertaining to that activity grouping without troubling the reader with excessive detail. This is particularly useful when reporting project data to management. 2-42 Chapter 2: Open Plan Publication 615 Parent Activity Child Activity Figure 2.29 – Bar Chart View Parent activities can be either shown “rolled up” (denoted by a plus sign “+” next to the activity), or “expanded” (denoted by a minus sign “-“ next to the activity). When a parent task is expanded, all of its children are shown. When a parent task is rolled up, only the parent activity is visible. Oftentimes, multiple parent activities will be nested. For instance, Activity 120 – Structures – might be a parent of several structure activities. Any one of these structures, e.g. 120.010 – Structure (S-54705) may itself have several child activities, such as 120.010.010 – TS&L Development. These activities may themselves be parents. Successively clicking the plus button “+” to expand the activity list is sometimes refered to as “drill down.” The buttons in the Open Plan menu bar include double-plus and double-minus signs ( ), which can be used to quickly expand or collapse all activities. Clicking the double-plus will show all activities, while the double-minus will only show top-level activities. To Expand a Parent Activity: 1. Select the parent activity of the subproject that you want to expand. 2. Click on the plus sign (+) that appears to the left of the parent activity. -orChoose, View, Expand. -orClick the Expand button on the toolbar. You can also issue a command to collapse parent information while in a barchart or spreadsheet view. To Collapse a Parent Activity: 1. Select the parent activity of the subproject that you want to collapse. 2-43 Chapter 2: Open Plan Publication 615 2. Click on the minus sign (-) that appears to the left of the parent activity. -orChoose, View, Collapse. -orClick the Collapse button on the toolbar. This procedure hides the children of the subproject and allows you to work with the data at a summary level. Open Plan also allows parent and children to be presented as an outline, where the parent activities are listed as headings and the children are listed as subsections. This outlining can be turned off, causing all items to appear as a single list of activities. Removing outlining can be useful when applying filters. To Remove Outlining: 1. Click with the right mouse button anywhere on the spreadsheet. 2. Choose Preferences. 3. Select Disable Subsections and Outlining. 4. Click OK. 2-44 Chapter 2: Open Plan Publication 615 Figure 2.30 – The Spreadsheet Preferences Dialog Box 2.11.3 – Optimizing an Activity View As with other Windows applications, Open Plan users can use scroll bars to look at more data within a given window. The Activity Bar Chart view contains two scroll bars, one for each window. Vertical scrolling is accomplished with a single bar, since data on the spreadsheet corresponds to data on the bar chart. Using the “Go to Date” dialog box can allow you to move to a specific time more easily than scrolling manually. The format of the date that you type in is quite freeform – it will recognize 25Mar95, for example. The main constraint is that you must specify the date in the correct order. To Go To a Specific Date: 1. Click with the right mouse button anywhere on the barchart. -orClick on the View menu. 2. Choose Go To Date. 3. Select one of the first 3 options, or enter a date. 4. Click OK. 2-45 Chapter 2: Open Plan Publication 615 The Date Scale controls the display of bars. Because reporting standards vary widely between organizations, Open Plan allows you to define the components of the date scale on the bar chart view. To Stretch the Date Scale: 1. Point to the date scale area of the barchart. 2. Position the mouse pointer on top of any vertical border. The mouse will turn to a black, double-headed arrow. 3. Click, hold, and drag the mouse to the right or the left to contract or stretch the date scale. The smallest time unit that you have defined for the date scale defines the minimum distance that you can scroll on the date scale. The manner in which Open Plan displays the date scale on bar chart and histogram views can be controlled by using the Date Scale Preferences dialog. This dialog lists a variety of settings. Table 2.13 – Date Scale Settings Setting # of Axes Reference Date Autoscaling Axis Number Time Unit Count Format Position Full Scale Line Width Axis Height Description Controls the number of lines display in the date scale. Used to calculate relative dates. The default for the Reference Date is the project start date. Displays the Automatic Scaling dialog box. This secondary dialog box can be used to control the date range displayed on the scale or to display the entire project’s timescale on a single screen. Identifies the axis which you are applying a date scale to. Clicking within the date scale in the preview window displays the axis number of the selected row. Controls the frequency with which the date labels and vertical tick marks appear on the date scale. Possible units include: hours, days, weeks, months, quarters, and years. Controls the frequency with which Open Plan should mark the time unit. Specifies the appearance of the dates in the date scale. Controls how the date label should be aligned within the vertical tick marks. Possible options are: left, center, or right. This option extends the vertical tick marks on the scale down into the workspace of the barchart or histogram view. This option is used to control the thickness of the full scale lines. The thickness can be set to a value between 1 and 8. Control the height of the axis. The manner in which Open Plan displays the date scale on bar chart and histogram views can be controlled by using the Date Scale Preferences dialog. This dialog lists a variety of settings such as those listed in the table that follows. 2-46 Chapter 2: Open Plan Publication 615 To Format the Date Scale: 1. Click with the right mouse button at the top of the barchart (where the dates are displayed). -or1. Click on the View menu. 2. Choose Edit Date Scale. 3. Click on the Manual tab. Figure 2.31 – The Date Scale Preferences Dialog Box 4. Use the Preview area to select the axis that is to be adjusted. 5. Make changes as necessary. For example: Use the Time Unit drop-down list to select a time unit for the axis. Use the Format builder button to select a date format for the axis. 6. Click OK. All PennDOT views can be easily modified. However, the changes made are only temporary until saved. Because Open Plan Desktop does not allow templates to be re-written, all changes to a view must be saved to a new view. To Save Changes to a View: 1. Choose File, Save View. 2-47 Chapter 2: Open Plan Publication 615 2. Type a name for the view in the Name textbox. 3. Type a description for the view in the Description textbox. 4. Click OK. Additional information regarding views, their creation, and naming can be found in Section 3.5. 2.11.4 – Managing Columns Open Plan is a flexible project planning application. It allows the project manager to customize any view in a variety of ways. For example, a spreadsheet or barchart view can have new columns inserted, or current columns removed. This section reviews the methods for customizing columns in Open Plan. To Change Column Widths: 1. Position the mouse pointer on a border in the column header of the spreadsheet. The mouse pointer will change to a double arrow. 2. Click, hold, and drag the mouse to the right or to the left to stretch or shrink the width. -or1. Click the right mouse button while on any spreadsheet cell. 2. Choose Size Column for Best Fit from the shortcut menu. To Change the Display of Column Data: 1. Click the right mouse button on the column heading of the column that is to be changed. 2. Select Edit Column from the shortcut menu. The Edit Column dialog will appear. 2-48 Chapter 2: Open Plan Publication 615 Figure 2.32 – The Edit Column Dialog Box 3. Make changes as necessary. 4. Click OK. -or1. Double click on the column heading. The Edit Column dialog will appear. 2. Proceed with steps 3 and 4 above. To Insert a Column: 1. Click on the column heading of the column that will be to the right of column that is about to be inserted. 2. Choose View, Spreadsheet, Insert Column. 3. Select the field to be displayed in the column. 4. Enter the text to be displayed as a column heading. 5. Click OK. 2-49 Chapter 2: Open Plan Publication 615 To Remove a Column: 1. Click on the column heading of the column that is about to be removed. 2. Choose View, Spreadsheet, Remove Column. To Change the Order of Columns: 1. Click on the column heading, and then drag the column to its new position. As noted earlier, Open Plan Desktop does not allow templates to be re-written. Therefore, all changes to a bar chart or spreadsheet must be saved to a new “view file.” To Save Changes to a View: 1. Choose File, Save View. 2. Type a name for the view in the Name textbox. 3. Type a description for the view in the Description textbox. 4. Click OK. Additional information regarding views, their creation, and naming can be found in Section 3.5. 2.11.5 – Managing Rows Changes to a bar chart or spreadsheet view are not limited to modifying columns; the project manager can just as easily make changes to the rows in Open Plan. This section reviews the methods for customizing rows To Insert a Row or Multiple Rows Between Existing Tasks: 1. Click with the right mouse button on the row indicator for the row that will be beneath the new inserted row. The row indicator is on the left-most side of the screen. 2-50 Chapter 2: Open Plan Publication 615 Figure 2.33 – The Standard Activity View Showing an Entire Row Selected. The figure indicates that the new row will be added above activity ID 010.010.040.020. 2. Select Insert Rows from the listing that appears. Figure 2.34 – The Shortcut Menu Showing “Insert Rows.” -or1. Click on the row indicator for the row that will be beneath the new inserted rows. 2. Choose View, Spreadsheet, Insert Rows. The Insert Rows dialog will appear. Figure 2.35 – The Insert Rows Dialog Box 3. Enter the number of rows to be inserted. 4. Click OK. New rows will appear. 2-51 Chapter 2: Open Plan Publication 615 To Delete a Row (Activity): 1. Click with the right mouse button on the row indicator for the row that you wish to delete. Figure 2.36 – The Standard Activity View Showing an Entire Row Selected. The figure indicates that the deleted row will be activity ID 010. 2. Select Delete Rows from the listing that appears. Figure 2.37 – The Shortcut Menu Showing “Delete Rows.” Note that the options shown in this dialog box reflect those available in Open Plan Desktop. Open Plan Professional has more options available. The row will disappear. If you have selected a parent activity, a warning will appear before the parent and its children are deleted (See below). 2-52 Chapter 2: Open Plan Publication 615 Figure 2.38 – Warning Regarding Deleting a Parent Activity 3. Repeat steps 1-3 to delete additional rows as necessary. -or1. Click with the left mouse button on the row indicator for the row that you wish to delete. 2. Press the Delete key (as found on the right side of the keyboard). To Delete Multiple Rows: 1. Click on the row indicator for the first row to be deleted (within a contiguous block). 2. Hold the Shift key, and then click on the last row to be deleted (within the contiguous block). 3. Choose View, Spreadsheet, Delete Rows. The Delete Rows confirmation dialog will appear. 4. Click Yes. The selected rows will be deleted. 2.12 – Time Analysis 2.12.1 – Time Analysis Defined Time Analysis is the process of determining the overall schedule of a project by calculating start and finish dates for each activity. Time analysis calculations are based on the Time Now date, the duration of the activities remaining to be complete, and the logical relationships between them. When you perform a time analysis, the following data is calculated: Table 2.14 – Calculated Data when Time Analysis is Run Calculated Item Early Dates Late Dates Float Definition The earliest dates on which an activity can start or finish. The latest dates when an activity can start or finish and still meet the project completion date and/or project target dates. The amount of time an activity can be delayed before it starts to affect other 2-53 Chapter 2: Open Plan Activity Information Subproject Information Project Information Publication 615 activities within the project. Activity Progress (remaining duration or percent complete), flags (start or finish dates, logic issues), and whether activity is critical. Internal and external projects with relationships to project activities. Project status, early and late finish dates, completion percentage, number of in-progress and completed activities. The Time Now date, or Project Status date, is the date from which all forward-looking project progress is computed. It can be thought of as “the day the remaining work starts.” In the PennDOT standard Bar Chart views, the Time Now date is a dashed red vertical line. 2.12.2 – Performing Time Analysis Time Analysis recalculates all the schedule values (Early/Late dates, Float, etc) based off the current entered progress and Time Now date. If you are just creating a schedule and no progress has yet been entered, Time Analysis will form a preliminary schedule. As changes are made, Time Analysis will yield an updated schedule, and will report when a project is falling behind. Time Analysis should be run: - Once all activities and logic are entered - If any activity’s attributes are changed - If an activity is added or deleted - If the calendars used by the project are changed - If the Time Now date is changed or updated - If an activity has progress entered To Perform a Time Analysis: 1. Display any project view. 2. Select Project-Time Analysis. 3. In the Options tab of the Time Analysis dialog box, enter the new Time Now date. “Actual Date Option” and “Show Summary Dates in Subprojects” should both be checked. 2-54 Chapter 2: Open Plan Publication 615 Figure 2.39 – Time Analysis Dialog Box, Options Tab The Target Type in Time Analysis should be the same as the Project Finish Type. To check the Project Finish type, load the Project Properties Dialog and select the Status tab. If you would like to have Open Plan automatically calculate time analysis each time your data changes, select the Analyze Each Time Data Changes option. 4. In the Advanced tab of the Time Analysis dialog box, Multiple Ends should not be checked and the Ignore Positive Lag of Predecessor radio button should be selected. Figure 2.40 – Time Analysis Dialog Box, Advanced Tab 5. Click OK. 2-55 Chapter 2: Open Plan Publication 615 Time Analysis can also be performed clicking on the Time Analysis button on the toolbar ( ). Using the button to run Time Analysis does not allow one to update the Time Now date. To update the Time Now Date, open the Time Analysis Dialog Box using the procedure outlined above. Regardless of how Time Analysis is performed (via the Time Analysis dialog or Time Analysis tool), the system will produce a Time Analysis Log File. To View the Log Viewer: 1. Choose View, Log Viewer. 2. Click on the Time Analysis Tab. Figure 2.41 – Welcom Log Viewer, Time Analysis Tab 2.13 – Baselines 2.13.1 – Recording a Baseline Before you start to track progress of the project activities, you will need to freeze the initial project plan by creating a baseline. By creating a baseline, you can compare “where you started from” with “where you are” to see if you are progressing as planned. Once a project schedule has been reviewed, fine-tuned, and approved, it can be considered final. At this point it is important to set an Initial Baseline which records the initial project plan, including scheduled dates, task assignments, work and costs. . The Initial Baseline provides a reference for comparing the current schedule with the original schedule. The Initial Baseline should always be created prior to any progress being entered into the schedule. 2-56 Chapter 2: Open Plan Publication 615 Once the project gets underway, estimated dates and durations of the schedule are replaced with actual dates. As this information is entered in the schedule, Open Plan recalculates the scheduled dates. PennDOT’s policy regarding baselines is within Chapter One of this document. 2.13.2 – Creating a Baseline The Baseline command in the Project menu can be used to create and save a baseline at any time. To Create a Baseline: 1. Choose Project, Baselines. The Baselines dialog will appear. Figure 2.42 – The Baselines Dialog Box 2. From the Baselines dialog, choose New. The Add Baseline dialog will appear. 2-57 Chapter 2: Open Plan Publication 615 Figure 2.43 – The Add Baseline Dialog Box 3. In the Add Baseline dialog box, enter a name and a description for the baseline (Reference 3.13.3 for Baseline naming requirements). 4. From the Based On drop-down list, you can choose early, late, or scheduled dates for storing information related to resources and costs In PennDOT projects, Initial Baselines should always be based on Late Dates, and others should be based on Late Dates unless the user desires to track Early dates. 5. Select desired filters and settings. If you are creating an Initial Baseline, “Include In-Progress Activities” and “Include Complete Activities” should both be checked. To restrict the baseline to a definite group of activities, a filter can be specified. A user can either pick an existing filter or a new filter can be created by clicking the ellipsis button. Table 2.15 – Filters in the Add Baseline Dialog Box Filter Include In-Progress Activities Include Completed Activities Function In-progress activities will be included in the baseline if this option is checked. If this is not checked progress will not be included in the baseline. Completed activities will be included in the baseline if this option is checked. If this is not checked, completed activities will not be included in the baseline. 2-58 Chapter 2: Open Plan Publication 615 Update Activities Already in Baseline This option can only be checked when you are updating a baseline. It allows the user to choose what should be done with activities already in a baseline. If there are new activities, Open Plan will add baseline information for those activities and update the existing activities. This option can be checked in conjunction with Include In-progress Activities and Include Completed Activities, if this is the case, the Keep Existing Baseline Dates is enabled also. 6. Click OK to return to the main baseline dialog. 7. Click OK again to return to the view. 2.13.3 – PennDOT Baseline Naming Convention Every project must have an "Initial Baseline" created once the schedule is finalized. This initial baseline should be based on Late Start and Late Finish dates, and named BASE00. Updated baselines should be saved using a different name, to preserve the integrity of the initial baseline. Updated baselines may be created if the let date, scope, or detail changes. Table 2.16 – PennDOT Standard Baseline Naming Convention Name BASE00 BASE01 BASE02 BASE.. BASE99 Description Initial Baseline (12/12/12) 1st Baseline (05/08/13) 2nd Baseline (08/08/13) Nth Baseline (11/12/13) 99th Baseline (05/10/15) 2-59 Chapter 2: Open Plan Publication 615 2.13.4 – Selecting a Baseline To Select a Baseline: 1. Choose Project, Baselines. The Baselines dialog will appear (Figure 2.44). Figure 2.44 – The Baselines Dialog Box 2. In the Baselines dialog box, highlight the baseline that you want to serve as the current baseline. If you do not want to load a baseline with the project at this time, highlight <No Baseline> from the list. 3. Choose Select to return to the view. You can create as many baselines as you like, but only three baselines can be associated with the project at any given time. For PennDOT schedules, the Initial Baseline must always be the first active baseline. Baselines can be created as benchmarks, when the let date changes, or for comparison or to see how commitments are being met or where the schedule started falling behind. In order to select multiple baselines, the baselines must first be created. To Select Multiple Baselines: 1. Choose Project, Baselines. The Baselines dialog will appear (See Figure 2.44). 2. In the Baselines dialog box, highlight Multiple Baselines. 3. Choose Select. 2-60 Chapter 2: Open Plan Publication 615 When you select Multiple Baselines from the Baselines dialog box, Open Plan displays the following: Figure2.45 – Multiple Baseline Selection Tool 4. Select the baselines that you want as the active baselines, a maximum of three. The Summary tab of the Project Properties dialog box displays the current active baseline(s) for the project. Current Baselines Figure 2.46 – Current Baselines 2.13.5 – Updating Baselines After the initial baseline is created and progress is recorded, it may be necessary to update the baseline, perhaps the scope of work has changed, or a revised target finish date has been approved. Baselines can be updated with all new Target Dates and Activities, or a filter can be used to limit the activities and dates which are updated. To Create a Baseline Update: 1. Open the project in Exclusive Mode (Baselines cannot be updated in Shared or Read Only modes). 2. Change the target constraint date, as needed, at the activity and project level. 3. Run a Time Analysis. (See Section 2.10). 2-61 Chapter 2: Open Plan Publication 615 4. From the Open Plan menu, Choose Project, Baselines. The Baseline dialog box will appear. Figure 2.47 – The Baselines Dialog Box 5. From the list of existing baselines, select the baseline to be updated and choose Update. The Update Baseline dialog box will appear. Figure 2.48 – The Update Baseline Dialog Box 6. In the Update Baseline dialog box, edit the description by revising the date to the date that the update is performed. The two checkboxes “Update Activities Already in Baseline” and “Update Baseline Dates with Current Plan Dates” must be selected, so that the updated baseline will incorporate the new finish date. To update only certain activities or dates, click the […] box next to the “Filter” line. This will allow you to select any of many filters that already exist, or use a custom filter to only update certain activities. 2-62 Chapter 2: Open Plan Publication 615 7. Click OK. The values in the Initial Baseline table are now updated. Baseline information should be verified prior to the project being saved. 2.14– Updating a Project The steps in this section are for in-house project updating. For updating within WelcomHome, see Chapter 3. 2.14.1 – Entering Activity Progress Once an initial baseline is created, a schedule can be updated to show and report activity progress. Updating consists of recording activity Actual Start dates, the amount of work complete, and Actual Finish dates when the activities are complete. Progress for each activity is entered in the Activity Progress dialog box. The Activity Progress box can remain open while you perform other operations in Open Plan. To Open the Activity Progress Box: 1. Open a project activity view. 2. Right click on the left most box of the activity to be progressed to open the Activity Details Dialog Box. Figure 2.49 – The Activity Details Dialog Box 3. Click Progress. The Activity Progress Dialog Box will open. 2-63 Progress Button Chapter 2: Open Plan Publication 615 Figure 2.50 – The Activity Progress Dialog Box Table 2.17 – Functions within the Activity Details Dialog Box Field Actual Start Actual Finish Expected Finish As Planned Remaining Duration Elapsed Duration Percent Complete Complete Usage Once an activity starts, that start date is entered here. When an Actual Start date is entered, a progress type must also be entered. If you do not enter a progress type the As Planned selection is used and Open Plan will compute an elapsed duration on its own, and once the original duration has passed will presume the activity is complete. This can cause schedules to show up as having positive float when in fact they are behind. When an activity is complete, the Actual Finish date is entered here. When you enter this date, also select “complete” from the progress type buttons. Actual Finish dates should never exceed the Time Now Date. Expected Finish dates may be considered if no other information is provided. This date takes precedence over any Actual Start date entered. Once an activity is in-progress, progress needs to continue to be tracked accurately. If an Expected Finish date is entered and the Expected Finish date is met or exceeded, the activity will be considered complete. In PennDOT schedules, Expected Finish dates should never be used; this field should always be left blank. This is the default activity progress type. All activities which have not yet started are set to As Planned. Once an activity has started and an Actual Start date has been entered, the progress type must be changed to elapsed duration, remaining duration, or percent complete. Otherwise Open Plan will assume the activity is complete once the original duration is met. Remaining duration is used to enter the portion of an activity that remains to be completed. Always enter a start date as well. Elapsed duration is used to enter the amount of work that has already been performed on an activity. Always enter a start date as well. Percent Complete is used to enter a completion estimate as a percentage. Always enter a start date as well. When an activity has been completed, enter an Actual Finish date and select this progress type. 2-64 Chapter 2: Open Plan Publication 615 Table 2.17 lists the various functions and settings within the Activity Progress dialog box. When you progress an activity an actual start date must be entered and an actual finish date must be entered when the activity is finished. Do not enter an expected finish date. When an activity is in progress, use either remaining duration, elapsed duration or percent complete, do not use as planned. Once the activity is complete, mark it as complete and enter the actual finish date. 2.14.2 – Updating Activity Detail As a project progresses it may be necessary to provide additional detail or address activities that may not be required due to a change in scope. Adding Activity Detail When a change in project scope occurs there may be the necessity to add work detail to the existing schedule. Section 3.7.7 – Modifying the Schedule and Section 3.7.8 – Recurring Activities provides the method for adding detail (activities) to a schedule. When activities are added to a project, the new activities need to be tied into the project and a time analysis performed to verify that the original target date is still being met. In the event that the project duration is extended beyond the target date, project logic and activity durations may need to be changed. Any change made should have the concurrence of the project team. Upon concurrence, the project initial baseline should be updated. Activity Closeout During the life of a project, work that is initially identified as being required may be determined that it is no longer needed by way of a scope change or study outcome. To address this situation, activities associated with the initial scope of work should not be deleted from the schedule but should be closed out. If the project tis in progress, the activity that is no longer needed to be tracked must be recorded as complete by using the following procedure: 1. Record the date that someone determined the activity is not needed as the Actual Start and Actual Finish dates. 2. Set the Progress Type as ‘Complete’ and Progress Value as ‘100%’. 3. Do not change the plan duration of an activity. Open Plan will calculate the duration based on the activity dates entered for the activity. 4. Record the reason why the activity is not needed in the Activity Details ->Notes Tab. Select ‘Task Note’ fr4om the Category drop-down menu, and then enter an explanation of why the activity is not needed and by whose direction. 5. After entering the data, run a time analysis with the Time Now date set for one day later than the most recent actual date. Review the log viewer for progress out of sequence and make any necessary changes in logic to eliminate the out of sequence progress. The remaining logic of the project schedule should be reviewed and adjustments made, as needed, in respect to the target finish date. 2-65 Chapter 2: Open Plan Publication 615 6. Keep the necessary activities logically tied into the schedule. Many activities within the schedule are used in project reports and serve as a measure of project progress. Deleting activities after the baseline is set could result in an inaccurate measurement of project status. For projects that do not have a baseline set, the activity may be deleted and its predecessors and successors re-linked as needed. Deleting Activities When you delete an activity in Open Plan, the software will not automatically reestablish the logic in place of the deleted activity. If you are deleting an individual activity, a dialog box will pop up asking if you wish to ‘Delete the activity and its relationships’ or ‘Delete the activity and reconnect its predecessors to its successor using Finish to Start relationships’. It is highly recommended that you choose ‘Delete the activity and reconnect its predecessors to its successor using Finish to Start relationships’. If the first option is selected, there will be a logic break in the schedule which will need to be corrected. The deletion of activities should only occur during the project planning phase. After a project is progressed, existing activities that are affected by a change in scope should be closed out. Figure 2.50 – The Delete Activity Dialog Box 2.14.3 – Progress Results and Progress Out of Sequence After recording activity progress, a time analysis should be performed. After the time analysis is performed, review the project status, observing when the project will finish and any activity reporting negative float. Data verification and a review of the Open Plan log viewer should also be performed. The Time Analysis tab of the log viewer presents specific information about the project, its activities, and if any activity is progressed out of sequence. Within the Time Analysis report, any activity that has been progressed out of sequence will be listed at the bottom of the report. 2-66 Chapter 2: Open Plan Publication 615 Figure 2.51 – Log Viewer Time Analysis Report Progress out of sequence occurs when an activity is started or completed when its assigned relationship type is not honored, e.g., a finish to start relationship linking two activities is not being followed. Progress out of sequence must be fixed by reviewing activity logic and making necessary activity relationship edits. Open Plan provides four network views (DEVFLOW, FLOWVW, FLOWPATH, and LOGICT) to assist in reviewing activity logic and progress. These views provide a visual overview of activity progress and logic strings. The LOGICT view, in conjunction with the Trace Logic command (see the menu bar AddIns – Trace Logic), provides a method to identify specific logic flow through the project schedule. Take note that a project needs to be open in exclusive mode, the LOGICT view needs to be linked with the project (LOGICT view contained in the project’s view folder), and an activity needs to be selected before executing the trace logic function command. Once the trace logic function is executed the network view can be further refined (filtered, grouped, etc.) by right clicking the view within the white area and selecting Placements… or Preferences… Do not to save the view after performing any selection of placements or preferences. Any placements, preferences used will be saved and the next person using the view may end up with a blank view set to the criteria you have set. 2.14.4 – Displaying Progress Information It is often desirable to produce Bar Charts which show how activities have performed relative to a baseline. The PennDOT Standard Schedule Variance Bar Chart is the Department’s standard view used to compare baseline information to progressed data. There are two PennDOT standard variance views: 2-67 Chapter 2: Open Plan Publication 615 PDSSCHVR and PDSSCHVR_LATE. PDSSCHVR compares the early finish dates to the active baseline, while PDSSCHVR_LATE compares the late finish dates to the active baseline. Figure 2.52 – The PennDOT Standard Schedule Variance Bar Chart The legend for the schedule variance bar chart is displayed in the printed report. Figure 2.53 – PennDOT Standard Bar Chart Legend The numbers after each of these markings indicate whether the activity is running behind schedule or ahead of schedule compared to the active baseline. If the number is zero (0), the activity is running on schedule compared to the active. 2.15 – Filters and Sorts 2.15.1 – Filtering Project Data A technique used to analyze a project is to limit the number of tasks that are displayed to make it easier to focus on specific tasks. A filter is used to apply a logical condition to tasks or resources in the project. Only tasks or resources that meet the conditions in the criteria appear when the filter is used. By default, applying a filter in Open Plan hides tasks that do not meet the filter criteria. Filters can be customized and new filters can be defined. Use the status bar (See Figure 3.1) to identify which filter or sort is currently applied to the project data. Disable subsections and outlining before applying a filter. 2-68 Chapter 2: Open Plan Publication 615 To Apply an Existing Filter: 1. Open any activity view. 2. Choose Tools, Filters. The Filters dialog will appear. Figure 2.54 – The Filters Dialog Box 3. Select the filter you want to apply to the view. 4. Click OK. In order to return to a complete display of project data, a filter must be removed. To remove an existing filter, the current filter must be canceled. To Remove a Filter: 1. Choose Tools, Filter. 2. Choose <Cancel filter>. 3. Click OK. A temporary filter is a filter that does not require a name and does not need to be saved. The temporary filter will only be in effect while you are in the current view. Once you close out of the view or the project, the temporary filter will be gone. If you save a view with a temporary filter applied, the view will be saved with the temporary filter in effect. To Create a Temporary Filter: 1. Choose Tools, Filters. The Filters dialog will appear (See Figure 3.52). 2-69 Chapter 2: Open Plan Publication 615 2. Select <Temporary Filter>. 3. Click Edit. The Filters Expression Dialog box will appear. Figure 2.55 – The Filter Expression Dialog Box 4. Create the filter expression. (A drop down arrow is available to select from defined fields) 5. Click OK. 6. Click Apply. 7. Click OK. 2.15.2 – Sorting Project Data Sorts are similar to filters in the way that they are accessed and created. However, unlike filters, sorts do not hide data – they reorganize it. By default, activities are sorted by Activity ID. Use the status bar (See Figure 3.1) to identify which filter and/or sort is currently applied to the project data. Disable subsections and outlining before applying a sort. To Apply an Existing Sort: 1. Open any activity view. 2. Choose Tools, Sorts. 2-70 Chapter 2: Open Plan Publication 615 Figure 2.56 – The Sorts Dialog Box 3. Select the Sort you want to apply to the view. 4. Click OK. To Remove a Sort: 1. Choose Tools, Sorts. 2. Choose <Cancel sort>. 3. Click OK. A temporary sort is a sort that does not require a name and does not need to be saved. The temporary sort will only be in effect while you are in the current view. Once you close out of the view or the project, the temporary sort will be gone. If you save a view with a temporary sort applied, the view will be saved with the temporary sort in effect. To Create a Temporary Sort: 1. Choose Tools, Sorts. The Sorts dialog will appear (See Figure 2.56). 2. Select <Temporary Sort>. 3. Click Edit. 4. The Temporary Sort Expression Dialog box will appear. 2-71 Chapter 2: Open Plan Publication 615 Figure 2.57 – The Temporary Sort Expression Dialog Box 5. Create the sort expression. (A Fields… button is available to help create sort expressions) 6. Click OK. 7. Click Apply. 8. Click OK. If a filter is applied prior to a sort, only those activities that meet the filter criteria will appear in the sort. Therefore, if one wants all activities to be sorted, the filter should be removed before applying the sort. Also, certain views are based on a defined filter and a sort. The status bar will identify which filter or sort is being used (See Figure 3.1). 2.16 – Managing and Backing Up Open Plan Files 2.16.1 – The File Backup Process The backup process enables the user to back up an entire project along with all associated baseline and additional files such as code, calendar and resource files into a single backup file. This backup file provides an easy way to collect all of the information that is associated with a project and transport it to another computer where it can be restored. To Backup a Project: 1. Before starting the backup procedure ensure that the “WORLD” group has the “SYSADMIN” role for the project. To minimize the possibility of version control issues staff with a project level role of PM or SYSADMIN should be the only members that are backing up files. 2. To backup an individual project file, choose File, Manage Files, Backup File. 2-72 Chapter 2: Open Plan Publication 615 Figure 2.58 – Backup File 3. Select the project to back up. Pay close attention to the project name that is selected in this step. During the restore process this project name will be assigned to the restored project. Figure 2.59 - The Backup Dialog Box 4. Click OK. 5. Select the file location to back up the project and name the backup file. The file name chosen for the .bk3 file during this step is independent of the actual project(s) name during the backup and restore process. It is recommended that the date be include in the backup file name to help identify versions of the bk3 file. For example if you are working on ECMS Project 123456 then the 2-73 Chapter 2: Open Plan Publication 615 file name used in this step might look like 123456-20080325.bk3 where 20080325 represents the date (year, month, date) the file was backed up. Figure2.60 – The Backup Save As Dialog Box 6. Click Save. This completes the file backup process. At this point the file can be shared either by saving it to a disc or through an email attachment. 2.16.2 – The File Restoration Process The restore process allows the user to restore project files that were backed up using the Open Plan Backup function. The process will write all project data, views, code, calendar, resource files, and other auxiliary data to the project destination during the restore process, unless precautions are taken. Extra caution needs to be taken during the restore process since this process can overwrite existing views, codes, calendar files, etc. that are currently in the destination database thus affecting all projects that are linked to the various views, calendars, etc. To Restore a Project Backup: 1. Click File, Manage Files, Restore Files. Staff with a project level role of PM or SYSADMIN should be the only members that restore files. This will minimize the possibility of version control issues. 2-74 Chapter 2: Open Plan Publication 615 Figure 2.61 – Restore File 2. Select the location of the Open Plan project backup file with a .bk3 extension. Figure 2.62 – Open Restore File 3. Click Open. 4. Select the project to be restored. PENNDOT users should ensure that none of the following items are checked: Views, Auxiliary Data, External Subprojects, and System Library Data. 2-75 Chapter 2: Open Plan Publication 615 Uncheck Everything Figure 2.63 – File Restoration 5. Click Finish. Auxiliary files such as calendar, resource, and code files should not be modified from the Department standard files nor should additional auxiliary files be attached to the project file. The Department will not be adding these files to the server environment and incorporation of these files could generate errors during the restore process. If the views, auxiliary data, external subprojects, or system library data options are not unchecked, the existing files on the PENNDOT Open Plan server will be overwritten. For file and data integrity, these options should always be unchecked. 6. If a project already exists with the same name within the target Open Plan database, you will receive the restore target exists dialog. You will then be asked what you would like to do with the restoration of this file. Figure 2.64 – The Restore Target Exists Dialog Box 2-76 Chapter 2: Open Plan Publication 615 7. Select what you would like to do with the restoration of this file by selecting: Skip Restore of Item, Overwrite existing Item, or Rename and restore. The Rename and restore option should not be used because any project baselines will be lost in this process. The correct way to restore an updated existing project is to rename the existing project on the server before the restore process. The existing project can be renamed to the original name with the term “old” following the ECMS number. Once the existing schedule is renamed, the new updated schedule can be restored and at this point the restore target exists dialog should not appear. If there is an existing project with an initial baseline already established and there are major changes in the project that require an updated schedule, a bk3 file should be sent to the consultant. Once the consultant restores the bk3 file, the changes should be made within the existing file; a new file should not be created. The initial baseline should not be modified. Once the changes are complete and the schedule is good, a bk3 file should be sent back to the PennDOT Project Manager. Before the new schedule is restored, the original project on the PennDOT server can be renamed to the original name with the term “old” following the ECMS number. Once the project is restored, check to make sure the initial baseline is still there. If everything is intact and the changes that were made are acceptable, the old file can then be deleted. 2.16.3 – Importing from Primavera and Microsoft Project The requirement within PennDOT to import and export data resides primarily within the construction side, where PennDOT and Contractors require two way communications when reporting project status. For example, Contractors are required to report project status to PENNDOT and PENNDOT may want to communicate project data back to the Contractor. However, contracting firms may use various project management tools; therefore, a standard method of transferring project data is needed. Whether you are managing a design consultant or monitoring a contractor’s schedule, you will need to import project files that were not created in Open Plan. Therefore, you must know how to convert file formats and then how to import and export those converted project files. Information concerning importing and exporting data can be accessed using the Open Plan On-Line Help, see 3.15 of this Publication, or the Open Plan Users Guide, Chapter 23. 2.17 – Printing in Open Plan Open Plan Desktop provides many options for printing. Users can print most views, such as the Activity Bar Chart and the Network Diagram. Open Plan provides an easy-to-use Print Preview feature for previewing a view before it is printed. 2.17.1 – Previewing the Printout Print Preview allows users to see what the hard copy of the printout looks like before sending it to the printer. Previews may be zoomed in to show greater detail or zoomed out to examine multiple pages side by side. Once a document is appropriately formatted, it can be printed directly from the preview screen. 2-77 Chapter 2: Open Plan Publication 615 To Preview the View Printout: 1. Display the project in the desired view. 2. Click on the Print Preview button. 3. -or4. Choose File, Print Preview. 5. Display additional pages by clicking on the Next Page button, or by scrolling down using the vertical scrollbar. Change the display using the Zoom In, Zoom Out, or Two Pages buttons. 6. Position the mouse pointer (magnifying glass) on the area of the preview screen that you wish to enlarge and click. 7. Click Close to return to the project window. 2.17.2 – Controlling Print and Layout Options The amount of information that is displayed and the layout of charts are controlled, in part, by the print options. Open Plan contains defaults for many of the print options for views although all of the options may be changed. A separate print configuration is required for each view. For example, setting a header or footer for one view does not affect other views. To Change Print Options: 1. Display the project in the desired view. 2. Choose File, Print Options. 3. Click on the General tab. 2-78 Chapter 2: Open Plan Publication 615 Figure 2.65 – T he Print Options Dialog Box Showing its General Page 4. Select the desired page Orientation. Portrait Landscape 5. Click OK. Page margins can be controlled through the Print Options dialog box on the General Tab. By limiting the margins on the page, it is sometimes possible to fit more of the Gantt Chart timescale on the page. To Change Page Margins: 1. Display the project in the desired view. 2. Choose File, Print Options. 3. Click on the General tab. 4. Enter the desired margins in the corresponding value boxes. 5. Click OK. The View Options page in the page setup dialog box provides settings that control the way that the view is printed. To Change View Options: 1. Display the project in the desired view. 2. Choose File, Print Options. 2-79 Chapter 2: Open Plan Publication 615 3. Click on the View tab. 4. Select the desired view option: Date Range – Specifies the specific date range that you want included in the report. The settings in the table below are used to control the range of dates to be included: Table 2.18 – Date Range functions Option From To Function The earliest date that you wish to start the report from. The latest date that you want included in the report. Clicking this button will open the Date Range dialog box. Enter the appropriate information and Open Plan will calculate a date range for you. Calculate Figure 2.66 – The Print Options Dialog Box – View Tab 5. Click OK. A legend appears as a default on both the Gantt Chart and the PERT Chart views. The position of the legend can be changed as well as the text that appears along with the legend. To Change Legend Options: 1. Display the project in the desired view. 2. Choose File, Print Options. 3. Click on the View tab. 2-80 Chapter 2: Open Plan Publication 615 4. Click on the checkbox indicating the inclusion of a legend. 5. Click on the option indicating the desired alignment for the legend text. 6. Click OK. You can include up to six title blocks in most reports. Three title blocks can be defined for the header of the report and three for the footer. To Add a Header or Footer: 1. Display the project in the desired view. 2. Choose Tools, Title Blocks. 3. Select the desired header/footer line item, and then choose Edit. 4. Make any manual changes to the text. –orClick the Fields button. 5. Repeat step 4 until all desired items have been entered for the headers and footers. 6. Click OK to complete the editing. 7. Click OK to close the Title Blocks window. 2.17.3 – Printing the Document Before printing a document, it is important to check that the appropriate printer is selected. To Select the Printer: 1. Choose File, Print. 2. Select the desired printer from the Name list. 3. Choose Properties to change the printer settings. 4. Specify the desired printer settings. 5. Click OK to set the properties. 6. Click OK to print the view. -or1. Choose File, Print Options. 2. Click on the Preview button. 2-81 Chapter 2: Open Plan Publication 615 3. Choose Print. 4. Select the desired printer. 5. Choose Properties to change the printer settings. 6. Specify the desired printer settings. 7. Click OK twice. Once the formatting and layout of the view pages are complete, a view can be printed. If the data in the view is filtered, only the displayed data will print. Sorted data also prints as displayed. To Print a View: 1. Display the project you want to print in the desired view. 2. Choose File, Print (Press Ctrl + P as an alternative). Figure 2.67 – The Print Dialog Box 3. Select the Print range you wish to print. 4. Type the Number of copies to print. 5. Click OK. -or1. Display the project you want to print in the desired view. 2. Click on the Print button. 2-82 Chapter 2: Open Plan Publication 615 Using the Print button on the toolbar bypasses the Print dialog box. 2.18– Getting On-Line Help The Help feature in Open Plan provides a variety of methods for obtaining information. Some help tools are designed to provide reference information about commands and processes. Other tools are designed to provide Help while the user is working on an Open Plan project. The Contents page provides direct access to the Help application, which contains a complete reference of Open Plan information. Tools include a categorized outline of topics (Contents tab), an alphabetized index of topics (Index tab), and a search tool (Find tab). About Open Plan Desktop provides user information, system information, and technical support information. 2.18.1 – Using Help The contents page lists the topics and subtopics in Help. To Use Help Contents: 1. Click Help. 2. Select Contents. 3. Click on the Contents tab. Figure 2.68 – The Contents Page of Open Plan’s Help Dialog Box 2-83 Chapter 2: Open Plan Publication 615 A book icon indicates that the topic has subtopics. A page icon with a question mark represents the actual Help topic that can be displayed. 4. Double-click on the topic. 5. Repeat step 4 until the desired topic is listed in the Contents. 6. Double-click on the topic. 7. Click on the Close button in the upper-right corner when finished. -orChoose File, Exit. The following table lists the buttons that may be displayed at the top of a Help window. Table 2.19 – Help Buttons Help Buttons Help Topics Back Print Description Returns to the Help Topics dialog box. Returns to the last topic. Prints the Help topic. Provides a listing of additional help topics that are related to the current help See Also topic. This button does not appear in the regular help screen. Exit Exits from the help window. This button does not appear in the regular screen. The Help Index is an alphabetical list of topics, similar to the index in a book. To Use Help Index: 1. Click Help. 2. Select the Index tab 2-84 Chapter 2: Open Plan Publication 615 Figure 2.69 – The Index Page of Open Plan’s Help Topics Dialog Box 3. Type the first few letters of the word until the word is visible in the list box. -or1. Scroll through the list box. 2. Click on the appropriate index entry. If additional topics appear, click on the topic. 3. Click on the Close button in the upper-right corner when finished. -orChoose File, Exit. 2-85 THIS PAGE INTENTIONALLY LEFT BLANK Chapter 3: WelcomHome Publication 615 Chapter 3 – WelcomHome 3.0– WelcomHome Overview WelcomHome is a web-based collaboration portal that allows users to view and update Open Plan project schedules over the Web. There are also other collaborative features, such as user discussion forums and item tracking, which can enhance project delivery. The primary benefit of WelcomHome for PennDOT is the ability to allow business partners to update project schedules in Open Plan without having to send in a schedule via electronic or paper means. The purpose of this chapter is to provide users with the information to quickly get started in WelcomHome and start taking advantage of the benefits of the tool. To access WelcomHome, a user must have at least general user access to ECMS. PennDOT users must also be a member of the ECMS WelcomHome security group. Business partners must be a member of the ECMS BPWELCOMHOME security group; this access is granted by the BPADMIN user account. 3.1 – Logging on to WelcomHome How to Logon to WelcomHome: 1. Login to ECMS and select the References tab. Then click on the WELCOMHOME link. Figure 3.1 – ECMS Homepage 2. Log on to WelcomHome with the same log on as ECMS. At this point you can create a shortcut directly to this page by adding the link to your favorites. 3-1 Chapter 3: WelcomHome Publication 615 Figure 3.2 – WelcomHome Login 3.2 – Setting Up A Project WelcomHome projects should be set up by the PennDOT Project Manager. Section 3.2 is written for District staff. How to Create a Project in WelcomHome: 1. Click Projects on the left and then click New Project. Figure 3.3 – WelcomHome Screen 2. Enter the project name (Use the same name as Open Plan, which should be the ECMS Number). 3. Click on Project Folders. “Associate with Folder” allows the user to choose where to put the project. If left blank, the project will be placed in the projects folder. If you want to associate it with a folder, a folder must be created first. (To create a folder, click on the Tools along the left hand side, Click on the Project Folders, then name the folder and click Apply. 4. “Copy Project” can be left as “None,” or you can copy a project that was already created. 5. Click OK. 3-2 Chapter 3: WelcomHome Publication 615 Figure 3.4 – New Project Screen 6. Click the Admin tab across the top to the far right. This is where you will set up your entire project within WelcomHome. Figure 3.5 – Administration Screen 7. Click on Schedule Link. Enter the following information: - Application = Open Plan 3.x - Data Source = OPP - Schedule – Browse for the schedule name from the Open Plan server. - Breakdown Structure can be left as “none”. - Filter Code can be left as “none”. - Save Timesheet Comments to Note Category can be left as “default”. - Save Activity Comments to Note Category can be left as “default”. - Assign Cobra Program should be unchecked. 3-3 Chapter 3: WelcomHome Publication 615 Figure 3.6 – Schedule Link 8. Click OK. 9. Click on Project Usernames/Groups. Under “Owner,” specify who the owner of the project is. The default will be the creator of the WelcomHome project, but this can be changed at any time by using the drop down box. 10. Click Add. 11. If Security Information dialogue box pops up asking “Do you wish to display the nonsecure items?”, click Yes. 12. In the Bottom right hand corner, check the “Show Users” box. 13. Check the users that you want access given to. Use caution when adding entire groups such as WELCOMHOME, PM, etc. because that will add all members of that group to the project. Table 3.1 – WelcomHome Groups Group WELCOMHOME BP WELCOMHOME PM Description This group is for PennDOT personnel. Members of this group have limited access rights. Users can become a member of this group by requesting access via the ECMS security form. This is the primary group for business partners. The BP Admin ECMS security account must add their users to the BP WELCOMHOME group in ECMS in order to grant access to WELCOMHOME. This is a generic group for all PENNDOT project managers. Membership gives users certain rights, such as creating a project, etc. All PENNDOT PMs should be in this group. 14. Select a role for each user. While you can check multiple people at the same time, they will all have the same role. If people need different roles, only select the users that will have a given role, 3-4 Chapter 3: WelcomHome Publication 615 then repeat the process for each other role. Read only rights can be given by checking the “read only” box. Table 3.2 – WelcomHome Roles Role Owner PM Team Member Description This should either be the Portfolio Manager, Assistant Portfolio Manager or Project Manager. The owner can set up all admin settings within the project. This should be the PennDOT Project Manager. The PM can approve or reject progression. Assign this role to both PennDOT, FHWA & BP team members. Team members can progress the schedule, but the progression needs approval from the PM before the progression is validated. 15. Click OK (If more people need to be added, just click Add). 16. Click OK again when all the users are added. By default, an email will be sent to each user that was added, but there may be a lag in time. Figure 3.7 – Add Users Screen 17. Click on Dataviews. 18. Select the views that you want associated with the project. At a minimum, select Gantt Chart, Milestones, and Project Health. 3-5 Chapter 3: WelcomHome Publication 615 Figure 3.8 – Dataviews Screen 19. Click OK. 20. If desired, you may change the date format. This is accomplished by clicking on Date Format. Figure 3.9 – Date Format Screen Additional items are available. These are not required for every project, they are optional, see below table. 3-6 Chapter 3: WelcomHome Publication 615 Table 3.3 – Additional Project Functionality Optional Item External Application Link Homepage Dashboards Process Template Notices Clean Up Items Forums Collaborate Contents Documents Functionality You can link your WelcomHome project to any number of external applications that store their data in a database. The WelcomHome project can be linked to external applications that house their data in databases. The Configure Home Page Interface allows users to construct a home page that shows information that is important to the project team. The dashboard component allows users to create, customize and view high-level project or program-level dashboards and associated instruments. This module allows users to generate, duplicate, configure and delete process templates. You can post notices to people working on the project by sending them the notice via email or by just posting the notice. This module allows users to clean up items that were created before a specific date. A user can either delete or archive global and project level items. The forums module is a medium where users can debate or talk about certain posted topics. If there are users online you are able to talk directly with them via computer, i.e. a chat room. You can upload documents to attach to the project here. 3.3 – Updating A Project How to Progress a Project: 1. Click Projects along the left hand side and click on the Projects folder. Figure 3.10 – WelcomHome Screen 2. Click on the Project that you want to progress. 3-7 Chapter 3: WelcomHome Publication 615 3. Click the Dataviews tab across the top of the navigation menu and select the Gantt Chart dataview on the right. Figure 3.11 – Bar Chart Data View 4. Click the activity you want to update and then select the progressing tab at the top. 5. Enter the updated information. - Actual Start date - Actual Finish date, if the activity is complete. - Do not enter an “Expected Finish” date if the activity is not complete. - Progress Type (Use “Percent Complete,” “Remaining Duration,” “Elapsed Duration,” or, if the activity is complete, “Complete”) - Progress Value, expressed as either days or a percentage depending on Progress Type. 3-8 Chapter 3: WelcomHome Publication 615 Figure 3.12 – Progressing Screen 6. Click Submit. If your security level permits and “Save Directly to Open Plan” is checked, the progress information will be saved directly to Open Plan; otherwise, it will go into a queue for the project manager to approve/reject. How to View & Progress Single or Multiple Projects based on a Date Range: 1. Click Progressing along the left hand side and click Activities. 2. Select your project from the drop down menu or select All Open Plan 3.x. 3. Click Date Range along the top. 4. Enter a “Start Date” and “End Date,” then click OK. This will give you a list of activities in which the late start and late finish dates fall within the date range that was specified. 5. Click the activity that you want to progress. 6. Enter the updated information: - Progress Type - Progress Values - Actual Start date - Actual Finish date, if complete. (Do not enter an “Expected Finish” date if not complete) - Progress Type (Use “Percent Complete,” “Remaining Duration,” “Elapsed Duration,” or, if the activity is complete, “Complete”) Figure 3.13 – Progressing Screen using Date Range 7. Click Submit. 3-9 Chapter 3: WelcomHome Publication 615 3.4 – Approve/Reject Pending Progress The steps in Section 3.4 are to be completed by the PM or owner. How to Approve/Reject Pending Progress in WelcomHome: 1. Click Progressing along the left hand side and click Activity Authorization. 2. Select your project from the drop down menu or select All Open Plan 3.x. 3. Check the Authorize or Reject boxes or click authorize all or reject all. Figure 3.14 – Activity Authorization Page 4. Click Submit and then click Close. Figure 3.15 – Activity Save Log Dialog Once the project manager or owner approves progression, Open Plan must be launched and a time analysis must be run with an updated time now date on the project. If any progress was rejected, an email 3-10 Chapter 3: WelcomHome Publication 615 is not automatically sent to the consultant. Emails to the consultant can be sent directly through WelcomHome. How to Send an Email when Progress is Rejected: 1. Once the progress is rejected and submitted, the rejected activity will be highlighted in red. Click the envelope icon of the highlighted row. (See Figure 3.17) Figure 3.16 – Activity Authorization Page 2. This will open up a new email. If the person’s email is already associated with their profile, the recipient’s email address will be automatically generated; otherwise an email address will need to be provided. A subject should be provided, such as Project XXXXX. In the contents, type a few sentences stating that the progress for Project XXXXX, Activity ID XXX.XXX is rejected because . . . . If there is more than one rejected activity submitted by the same person, you may want to just type one email to that person as opposed to an email for each rejected activity. 3. Once the email is ready to be sent, click send. Note that an email can be sent at any other time through the activity authorization page by clicking the envelope icon ( ). 3-11 THIS PAGE INTENTIONALLY LEFT BLANK APPENDIX A STANDARD REPORT ACTIVITIES THIS PAGE INTENTIONALLY LEFT BLANK Appendix A: Standard Report Activities Publication 615 To facilitate standard reports, Table A-1 Standard Report Activities is a tabulation of activity descriptions that shall be used in all design schedules. Changes or alterations (abbreviations, etc.), shall not be performed. The specific text and spacing that appears in this table shall be used. The activities below are consistent with the current PennDOT master design schedule template. A-1 Appendix A: Standard Report Activities Publication 615 005 010.030 020 020.030 020.040 030 030.060 030.100 040 040.010.010 040.010.050 040.010.070 040.010.090.040 040.010.130 050 060 060.050 060.070 060.900 060.999 080 080.010 080.020 Start Project Consultant Services Environmental Analysis Perform Threatened and Endangered Species Coordination Cultural Resources Environmental Documentation Section 4(f) Evaluations Environmental Clearance Design Field View Surveys Line & Grade Safety Review Submit Plans and Authorization to Utilities Preliminary Pavement Design Design Exceptions Erosion & Sedimentation Control Plan / NPDES Review & Submit Erosion and Sedimentation Control Plan Review & Submit NPDES Permit Application E&S Plan Approved NPDES Permit Approved Final Pavement Design and Preservation Final Pavement Design Pavement Preservation Package A-2 LOCAL URWS CDAS BQAD HQAD Sig Projects Proj Trk’ng Grade X’ing Permits Pavement Utility Activity Description. PDOC Activity ID ROW Table A-1 – Standard Report Activities x x x x x x x x x x x x x x x x x x x x x x x x x x x x x x x x x x x X x x 110.050.010 110.050.050 110.050.999 110.100 A-3 x X X x CDAS BQAD HQAD Sig Projects Proj Trk’ng Grade X’ing Permits Pavement Utility x LOCAL Pavement Design Approved Final Right-of-Way Plan Development Perform Final ROW Plan Check Final ROW Plan Approved Right-of-Way Appraisal & Negotiation Perform Right-of-Way Appraisal Complete Appraisal Review Appraisal Perform Right-of-Way Negotiation DT Requests to Central Office File DT and Notify Condemnee Request Just Compensation Funds Relocations Complete – Occupants Vacated Request R/W Certificate Issue Interim ROW Certificate Issue Final ROW Certificate Waterway Permit Application Prepare Hydrologic and Hydraulic Report H&H Report Approved Joint Permit Application / 401 Water Quality Certificate Prepare Joint Permit Application / 401 Water Quality Certificate Submit Final Joint Permit Application Joint Permit Application Approved GP XXX Permit Application URWS 080.999 090 090.050 090.999 100 100.010 100.010.030 100.010.040 100.020 100.020.020 100.020.030 100.020.040.010 100.020.045 100.020.050 100.025 100.030 110 110.010 110.025.999 110.050 Activity Description. PDOC Activity ID Publication 615 ROW Appendix A: Standard Report Activities x x x x x x x x x x x x x x X X x x x x x x x x x x x X X x x x x x x x x x x x x X x 110.100.010 110.100.030 110.100.999 110.110 110.110.010 110.110.999 110.120.010 110.120.999 120 120.010.010 Prepare GP XXX Permit Application Submit GP XXX Permit Application Review / Approve GP XXX Permit Application (Agencies) GP XXX Permit Application Approved Exx - 9999 Permit Prepare and Submit Exx - 9999 Permit Exx - 9999 Permit Approved DEP Prepare and Submit USACE Permit USACE Permit Approved Structures Type, Size & Location Development 120.010.020.999 Final TS&L Complete 120.010.030 120.010.030.999 120.010.040 120.010.040.999 150 180 180.050.010 Structure Foundation Development Final Structure Foundation Report Approved Final Structure Design Final Structure Plans Approved Perform Value Engineering / VEACTT Develop Final Utility Plan Obtain D-419 Utility Clearance Utility Agreement Package Received from Utility - Final Design Phase (metric) Utility Agreement Executed and Issued to (Utility) Issue Utility Relocation Clearance D-419 (District) 110.100.080 180.050.010.020 180.050.010.060 180.060.010 x x LOCAL URWS CDAS x X x x x x x x x x X x x x x A-4 BQAD HQAD Sig Projects Proj Trk’ng Grade X’ing Permits Pavement Utility Activity Description. PDOC Activity ID Publication 615 ROW Appendix A: Standard Report Activities X X X X X x X X x x x x x x X x x x x x x 180.060.020 190 190.010.030 190.030 190.030.020 190.050 190.070 190.080 210 270 280 280.020 280.030 280.040 280.050 280.060 300 310 315 320 Issue Utility Relocation Clearance Certification (Central Office) Perform Public Utility Commission Coordination Prepare Railroad Reimbursement Agreement (CON) File PUC Application Submit ROW Plan to PUC Issue PUC Secretarial Letter Issue PUC Order Submit Construction Plans to PUC Hold Final Plan Checks (BOPD) Final Design Office Meeting PS&E Package Perform QA of PS&E Package (District) Submit PS&E to Bureau of Project Delivery Review PS&E (BOPD) Review PS&E (FHWA) PS&E Approved Advertise Project Open Bids Project Re-Bid Award Contract A-5 LOCAL URWS CDAS BQAD HQAD Sig Projects Proj Trk’ng Grade X’ing Permits Pavement Utility Activity Description. PDOC Activity ID Publication 615 ROW Appendix A: Standard Report Activities x X x x x x x x x x X X x x x X x x x X X x x x x X x X x x x x x x x THIS PAGE INTENTIONALLY LEFT BLANK APPENDIX B SCHEDULE SETUP CHECKLIST THIS PAGE INTENTIONALLY LEFT BLANK Appendix B: Schedule Setup Checklist Publication 615 B.1 Project Checklist Create the new project using the PDSMASTER template (See Page 2-11). The MPMS project number should be used as the project name for the project schedule. Enter the project description which should include county, state route, section and local name. In the Project Properties Summary Tab fill in the following (See Page 2-14): - Company = Consulting Firm’s name or PennDOT for in-house projects - Project Manager = PENNDOT Project Manager - Client = Engineering District X-0 In the Project Properties Preferences Tab, make sure Auxiliary Files are set to open in Read Only Default Access Mode and also that the following conversions are set (See Page 2-15): - 1 day = 8 hours, 1 week = 40 hours, and 1 month = 160 hours. In the Project Properties Files Tab, the following files must be associated with the project (See Page 2-15): - Calendar File = PDSCAL - Resource File = PDSRES - Code Files = Code 1 = PDSWBS = Code 2 = PDSOBS = Code 3 = PDSCOST = Code 4 = PDSSTANDARD In the Project Properties Access Controls Tab, give access to the appropriate individual users and groups (See Page 2-18). In the Project Properties Notes Tab, type “N/A” in the “default” notes category (See Page 2-16). In the Project Properties Codes Tab, select the appropriate codes that pertain to the schedule (See Page 2-21). Delete activities that do not pertain to the project (See Page 2-52). Add additional nonstandard or reoccurring activities to the schedule if necessary. (See Page 2-36) B-1 Appendix B: Schedule Setup Checklist Publication 615 Assign an appropriate duration to all of the activities in the schedule (See Page 2-27). The only activities that can have a zero duration are flagged milestone activities. Create the logic in the schedule (See Page 2-31). All activities must have a predecessor and a successor, the exceptions being the first activity does not need a predecessor and last activity does not need a successor. Once the durations and logic are established in the schedule, run time analysis with an appropriate time now date and review the early and late finish dates for the project (See Page 2-54). If this is a consultant project, the consultant shall create a bk3 file and send it to the PENNDOT PM (See Page 2-72). If this is a consultant project, the PENNDOT PM will then restore the project into PENNDOT’s environment (See Page 2-74). The PENNDOT PM will review the schedule for logic and duration. If any changes are needed, they will be made at this point. Once the schedule is finalized, the PENNDOT PM will need to determine what the committed let date will be for the project, or if the project will not be let a Project Finish date will need to be determined. Make sure the let date matches when the funding will be available for the project and that it coincides with a scheduled PennDOT let date. Once the let date is established, the Open Bids activity and/or the Project Finish activity should have a “Not Later Than” finish constraint date matching the committed let date or committed project finish date. On the Project Properties Status Tab, set an “On Target” finish date, to match the date on the Open Bids or Project Finish activity, whichever is the last activity in the schedule (See Page 216). Run another time analysis with an appropriate time now date after the constraint dates are associated with the Open Bids and/or Project Finish activity and the overall project (See Page 254). The PENNDOT PM will then create the initial baseline (See Page 2-57) based on late dates following PENNDOT’s standard naming convention (See Page 2-59). Once the initial baseline is created, it should not be modified or deleted. If this is a consultant project, the PENNDOT PM should create a bk3 file and send it to the consultant so that they have the current schedule (See Page 2-72). If this is a consultant project, before the project starts, the PENNDOT PM must set up a WelcomHome project (See Page 3-2). Once the project starts, progress must be entered into the schedule via WelcomHome for consultants and Open Plan for in-house jobs. At a minimum, schedules must be updated once a B-2 Appendix B: Schedule Setup Checklist Publication 615 month. The time now date should be set to the first of the month. All schedules must be updated and a time analysis must be run by the tenth of the month. The morning of the tenth, Central Office will run standardized reports capturing the data for the previous month. When an activity is started, an actual start date must be entered (See Page 2-63). When an activity is in progress, “Remaining Duration”, “Elapsed Duration”, or “Percent Complete” must be used, do not leave the activity “As Planned”. Once an activity is completed, an actual finish date must be entered and the activity must be marked complete. If this is a consultant project, after the progress is submitted in WelcomHome, the PENNDOT PM will need to go into WelcomHome to review the progress and either approve or reject the progress (See Page 3-10). Once the progress is approved, it will not show up in the schedule until the PENNDOT PM goes into Open Plan and runs a time analysis with an appropriate time now date. Over the life of the project, if there is negative float in the schedule greater than or equal to fifteen days a schedule recovery plan is required. This should include how you plan on making up the lost time or if the time cannot be made up it may require the let date to be moved. If a schedule recovery plan is required, the “N/A” should be removed in the project level “default” notes category by the PENNDOT PM and the recovery plan cited (See Page 2-16). If this is a consultant project and there are changes that need to be made to the schedule, other than progress, the PENNDOT PM must send a bk3 file of the current schedule to the consultant. The consultant will then restore the file on their environment, make the necessary changes, save the file, then create a bk3 file to send back to the PENNDOT PM. B-3 THIS PAGE INTENTIONALLY LEFT BLANK APPENDIX C PORTFOLIO MANAGER REFERENCE THIS PAGE INTENTIONALLY LEFT BLANK Appendix C: Portfolio Manager Reference Publication 615 C.1 CALENDAR FILE - ALTERNATIVE WORK SCHEDULE The PDSCAL calendar file is the standard PENNDOT calendar file for design projects. This is the only calendar file that should be associated with each project schedule. This calendar file has several different calendars associated with it. If a particular activity requires an alternative work schedule, it should be assigned through the PDSCAL file. If the appropriate calendar is not within the PDSCAL calendar file, a change request should be submitted to Central Office. There will be no changes made directly to the PDSCAL calendar file unless approved by Central Office. Any change request to the PDSCAL file will have to be submitted by the Portfolio Manager to Central Office for approval. If an approved change does take place, Central Office will make the change and send a notification out to the Department when the change is made. C.2 RESOURCE FILE The PDSRES resource file is the standard PENNDOT resource file. The standard PENNDOT resource file is installed when using the PDSMASTER template. At this point in time the Department is piloting the usage of this resource file for the future implementation of resource balancing. Having this file already associated with each schedule will make the transition a smooth one once the pilot is completed. C.3 CODE FILES The Department work breakdown structure (PDSWBS), organizational breakdown structure (PDSOBS), cost function file (PDSCOST) and standard activity file (PDSSTANDARD) should be associated with the project schedule. Please use the following assignment table: Table C.1 - Code Assignment Table Code Assignment Code File Prompt 1 PSDWBS 2 PDSOBS 3 PDSCOST 4 PDSSTANDARD Every activity in the project schedule should have all four codes assigned. Any changes to the predefined codes that are established in the PDSMASTER template should be approved by the Portfolio Manager so that historical data is not compromised. If the Portfolio Manager has questions with regards to how these changes are to be applied they should contact Central Office. The PDSSTANDARD code field should be used for screening non-standard activities out of the Department’s historical data. A “1” has already been added and is used to identify all the activities in the PDSMASTER template. Any new activity that is added outside of these activities should be assigned a “2”. C-1 Appendix C: Portfolio Manager Reference Publication 615 Any changes to the established code files will have to be submitted by the Portfolio Manager to Central Office for approval. If an approved change does take place, Central Office will make the change and send a notification out to the Department when the change is made. C.4 MASTER FILES Master files can function as a means for viewing a District’s entire portfolio within one file. They can be a good management tool to summarize data and run monthly meetings. Global edits can be made in a master file to change items in multiple projects at the same time as opposed to having to open up each individual file. Master files have many advantages, but caution must be used when master files are being utilized. Time analysis should not be run within the master file, time analysis should be run within the individual files. If a time analysis is run in the master file, it can skew the data in the individual files. C.5 FILTERS AND SORTS C.5.1 Creating a New Filter To Create a New Filter: 1. Open any activity view. 2. Choose Tools, Filters. 3. Click on New. The Filter Expression dialog will appear. Figure C.1 - The Filter Expression Dialog 4. Name the filter. 5. Choose the field you want to filter on (Code fields are C1-C90). C-2 Appendix C: Portfolio Manager Reference Publication 615 6. Choose an operator. 7. Enter the criteria (Criteria is case-sensitive). 8. Add additional fields as necessary. 9. Click OK. C.5.2 Creating a New Sort To Create a New Sort: 1. Open any activity view. 2. Choose Tools, Sorts. 3. Click on New. 4. Name the sort. 5. Select the table that the sort will apply to. 6. Click OK. The Sort Expression dialog will appear. Figure C.2 - The Sort Expression Dialog 7. In the Sort Expression dialog box, enter the sort expression using the Field and Order columns. 8. Click OK. 9. Click OK. C-3 Appendix C: Portfolio Manager Reference Publication 615 C.5.3 Saving Filters and Sorts Filters and sorts can be easily added to any Open Plan view. However, the new filters and sorts are only temporary until saved. In order for the filter or sort to remain in the view, all changes must be saved to a “view file”, which is outlined below. To Save a Filter or Sort to a View: After the filter or sort is applied to the view: 1. Choose File, Save View. 2. Type a name for the file in the Name textbox. 3. Click OK. The new view file is placed in the active Project’s views folder and in the Open Plan Library in the Views folder. To make it available to other projects, select the View file from the Open Plan Library and then drag the icon into the appropriate project folder. C.6 CREATING/MODIFYING VIEWS Portfolio Managers are the only individuals who should be creating or saving modified views. The only way to create a new view is to do a “save view”. To Save a View: In order to save a view the view that you are doing a “save view” on must be open. 1. Choose File, Save View. 2. Type a name for the file in the Name textbox (See below for naming convention). 3. Click OK. If modifications are made to a view and a “save view” was not done, when closing out of the view a dialog box will appear, See Figure C.3. Figure C.3 - Save Changes to View Dialog If the changes that you made to a view are something that you want to keep you would have to click yes. Once you click yes another dialog box will appear, See Figure C.4. If you click no, the modifications that you made to the view will not be saved. C-4 Appendix C: Portfolio Manager Reference Publication 615 Figure C.4 - Save Current View As Dialog When modifications are made to a standard view and it is to be saved, a new name must be given to the view (See below). If you do not change the name of the view, the original view will be overwritten and the changes made to the view will appear in all projects that have links to the view. The following convention should be used for naming views: Department Views: - PDSBAR001 - PDSNET001 - PDSSRD001 - PDSHST001 District Specific Views: (where the "X" represents the District number) - DXBAR001 - DXNET001 - DXSRD001 - DXHST001 For both cases the Description should be representative of what the views actually do. C.7 PROJECT SCHEDULING ARCHIVING An archiving environment was set up to store all projects that were let and any old project that is not being worked on. This environment will be used to pull historical data. One month after the beginning of the calendar year, the Project Manager or Portfolio Manager should create a backup file for all projects that were let the previous year and restore it to the archiving environment. Once the project is restored on the archiving environment, it should be deleted from the production environment. How to Switch between the Production & Archiving Environment: 1. Logon to the Remote Desktop. 2. Double Click on the Open Plan Icon to open Open Plan. 3. Type your username and password. C-5 Appendix C: Portfolio Manager Reference Publication 615 4. Hold down the CTRL button and Click LOGIN. 5. Select OPP31 for the production environment or Select OPP31_Archive for the archiving environment and Click OK. (See Figure C.5) FIGURE C.5 - Open Plan Data Sources Dialog C.8 SECURITY APPLET A security applet was developed, as part of the Open Plan software package, to assist organizations in controlling access to their applications and data. The Portfolio Manager will be responsible for two aspects of the WelcomSecurity: creating users and unlocking projects. Portfolio Managers and their assistants should not modify any of the other features within the security applet as it may cause system inoperability. Just like Open Plan, the WelcomSecurity is located on the Remote Desktop. To Access the WelcomSecurity Administrator: 1. Click on the Start button. 2. Choose Programs. 3. Select Accessories. 4. Select Remote Desktop (A shortcut can be created for this on your desktop). 5. There will be a prompt for server name – Choose PDTSOPENPLAN. 6. Connect. 7. OK. 8. Logon to PENNDOT using your LAN username and password. 9. Double-click on the WelcomSecurity Administrator shortcut icon. -or- C-6 Appendix C: Portfolio Manager Reference Publication 615 Click on the Start button , Choose All Programs, Welcom Applications, OPP3.1, Security and WelcomSecurity Administrator. 10. Logon with your assigned user id and password, which is the same as your Open Plan user id and password. Once you are logged in the WelcomSecurity Administrator dialog will appear. Figure C.6 - Welcom Security Administrator To Create a New User: 1. Double Click on the Users folder. 2. Choose Edit, Add. -orRight click on the users folder and choose add. 3. A user name will have to be created for the individual. As a default the name “newuser” will be used. This “newuser” will be highlighted in blue, See Figure C.7 below, and have to be renamed. The users name should be their LAN user ID for consistency. If you click off the “newuser” before renaming a user account named “newuser” will be created. Renaming of user accounts is not permitted in the security applet. C-7 Appendix C: Portfolio Manager Reference Publication 615 Figure C.7 - Welcom Security Administrator Users 4. In the General Tab of the User Details all fields will have to be filled out and a password will have to be created. To create a password, click the password button. You will have to type in a temporary password twice then click ok. 5. In the Groups Tab, the user will have to be added to at least one group. Click the add button and select from the list of groups then click ok. Any user that will be creating projects should be added to the PM group. For users that are just going to be viewing projects, they should be added to their district’s group. The only individuals who should be assigned to the SYSADMIN group are Portfolio Managers and their assistant. 6. In the products tab, click the add button. The user will have to be granted access to either Open Plan Desktop or Open Plan Professional. All users should be granted access to Open Plan Desktop unless they demonstrate the need to use the upgraded features available in Open Plan Professional. If a user is granted access to Open Plan Professional they should also be granted access to Open Plan Desktop. The only individuals who should be granted access to Open Plan Professional are Portfolio Managers, their assistants and other users that demonstrate the need as stated previously. The Address, Data and Notes Tabs do not have to have any information input into them. To Unlock a Project: 1. Click the + sign next to the Objects folder. C-8 Appendix C: Portfolio Manager Reference Publication 615 Figure C.8 - Welcom Security Administrator Projects 2. Double Click the Projects folder. 3. Click on the Project Name that needs unlocked. 4. Click Remove Lock. A dialog box will appear asking if you are sure if you want to remove the lock, See figure C.9. If you click yes, another dialog box will appear, See Figure C.10. If you click yes, the information that was not saved in the project will be lost. Once you click yes, the project is now unlocked. Figure C.9 - Welcom Security Administrator Remove Lock Dialog C-9 Appendix C: Portfolio Manager Reference Publication 615 Figure C.10 - Welcom Security Administrator Remove Lock Assurance Dialog C-10 APPENDIX D CRYSTAL REPORTS THIS PAGE INTENTIONALLY LEFT BLANK Appendix D: Crystal Reports Publication 615 D.1 INTRODUCTION While Open Plan views can facilitate a lot of the Department’s reporting needs it may be easier to create a Crystal Report when the reporting need requires pulling data from multiple projects. Crystal Reports is the Department’s official software for generating reports. Crystal Reports pulls data from the Open Plan data source to create user defined reports. There are two ways of using Crystal Reports: the client software and the enterprise version. D.2 CLIENT SOFTWARE The client software is installed on a PC and used to create standalone Crystal Reports and Enterprise Reports. The data structure of the Open Plan software can be very confusing for a user trying to create a report. Therefore, if a District needs assistance creating a Crystal Report using Open Plan data they can contact Central Office. However, if the District chooses to create their own reports they can reference the System Data contained in this appendix to locate the appropriate tables and fields within Open Plan to create their Crystal Reports. D.3 ENTERPRISE This intranet based system contains Crystal Reports that have already been developed by Central Office. These reports have various parameters that are used to refresh the reports based on current Open Plan data. All of the Open Plan reports can be found in the Open Plan folder under Public Folders. Central Office is responsible for uploading Crystal Reports to this folder but District users with the appropriate security level can run the reports located here at their discretion. The Open Plan folder contains a multitude of reports and new reports are added regularly. D.4 OPEN PLAN REPORTS Central Office runs multiple reports on a regular basis. There are two main reports that individuals within Central Office and the Districts are getting measured on, the Performance Metric and the PDOC charts. D.4.1 – The Performance Metric Report The Performance Metric Report is run on the 10th of every month. The Performance Metric Report encompasses the district’s entire portfolio of Open Plan schedules. The Performance Metric Report measures the baseline finish date against both the early and late finish dates of the project. If either the early or late finish date is past the baseline finish date, a zero will be reported for that project. If the early and late finish dates are on or before the baseline finish date, a one will be reported for that project. The report than totals the number of projects meeting the baseline finish dates, divides that by the total number of projects showing up on the Performance Metric Report, and calculates a percentage. The goal is to have all of the districts at a percentage greater than 90%. In order for a project to show up on the Performance Metric Report, the following must be strictly adhered to: D-1 Appendix D: Crystal Reports Publication 615 - The name of the project must be the ECMS number only; no extra text can be used in the project name. - The client field must be Engineering District X-0 (X being the District number). - A baseline must be established based on late dates with the description including “Initial Baseline”. Note only one base line schedule should be described as Initial Baseline. - The project status must be as planned or in progress. If the project status is complete, it will not be pulled onto Performance Metric Report. All Open Plan schedules should have an initial baseline created after the project team has reviewed and approved the schedule. This review and approval should occur prior to the progressing of activities so that the data in the initial baseline is not skewed. Once an initial baseline is established, it cannot be modified or deleted. Once it is created, the Districts will be measured against that baseline finish date for the life of the project until the project is let. There is one exception to this: once a project is committed for a calendar year, the initial baseline should be updated to reflect the committed let date. D.4.2 – PDOC Wall Charts The PDOC wall charts form the basis for the Department’s weekly Project Delivery Operations Center meetings. Rather than being accessed through Crystal Reports / Business Objects, PDOC charts are accessed through PDIF, the PennDOT Data Integration Facility. Access to PDIF can be requested by contacting the ECMS help desk at 717-783-7711. Once access has been granted, the PDOC reports can be accessed using the following procedure. To Access the PDOC Wall Chart Report: 1. Log onto PDIF at http://pdif.pdot.state.pa.us/PDIF_Home.aspx 2. Click on ARRA. 3. Click on Report. 4. From the dropdown menus, select Project Delivery, then Design 5. From the list of reports select ARRA045 – ARRA District Projects Timeline - Chart The PDOC chart is a combination of data pulled from MPMS, ECMS, and Open Plan. PDOC charts have several color-coded columns – Let Date, Description, Milestone Activities, and Float – and each has a separate color coding scheme. These schemes are outlined in the tables below. Table D.1 – PDOC Chart, Let Date color coding Let Date Column Color Description D-2 Appendix D: Crystal Reports Publication 615 The project was let and the ECMS Actual Bid Date is within 30 days of the ECMS committed Bid Date. This is a miss. The Open Plan Open Bids Date is more than 30 days past the ECMS committed Bid Date and the current date the report was run on is 30 days past the ECMS Committed Bid Date. The Open Plan Open Bids Date is before the ECMS Committed Bid Date and the project has not been let yet. The Open Plan Open Bids Date was moved from its original ECMS Committed Bid Date, but is still within 30 days. This is an anticipated miss. The Open Plan Open Bids Date is more than 30 dates past the ECMS Committed Bid Date and the ECMS Committed Bid Date is still within 30 days of the current date that the report was run on. The Open Plan Open Bids Date is equal to the ECMS Committed Bid Date and the date is in the future. Green Red Blue Yellow Red/Yellow Stripes White Table D.2 – PDOC Chart, Project Description color coding Description Column Color White Yellow Red Light Green Green Light Orange Light Blue Purple Description The project is more than three weeks away from being advertised. The project is to be advertised within three weeks. The project has missed the ECMS or Open Plan Advertisement Date. The project is Advertised, but not Bid. The project has been Bid. Notice to Proceed has been issued. Physical Work is Complete Project is not in ECMS, or is a Department Force project Table D.3 – PDOC Chart, Project Milestone color coding Project Milestone Color White Yellow Red Green Green w/ Red Outline Description Open Plan Late Start/Finish dates are in the future. Open Plan Late Start date has been missed Open Plan Late Finish date has been missed Open Plan Actual Start or Actual Finish Dates are entered Open Plan Actual Start or Actual Finish dates are entered, but the Actual Start or Actual Finish dates fall after the Baseline date. Table D.4 – PDOC Chart, Float color coding Float Color Green Red Description Project has less than 15 days of negative float. Project has equal to or greater than 15 days of negative float. D-3 System Data Configuration Data Table OPP_ALR - Email Advisory Definitions The Email Alerts table contains Open Plan email alerts definitions. System-defined items are stored with a blank USR_ID field. The data dictionary table identifier for table OPP_ALR is ALR. Open Plan Data Type Oracle Data Type Nulls TEXT VARCHAR2(32) NOT NULL None Flag indicating whether the email addresses are embedded in INTE the field or listed in a field. NUMBER(10, 0) NOT NULL ALR_ID None The unique name of an email advisory definition. TEXT VARCHAR2(60) NOT NULL ALR_UID None The unique identifier of an email advisory definition. This field GUID is not displayed in Open Plan. VARCHAR2(22) NOT NULL COMBINE None Flag indicating that Open Plan will combine all the messages generated by the advisory into a single email that is sent to each addressee. INTE NUMBER(10, 0) NOT NULL FILTER None The name of a filter assigned to an email advisory definition. TEXT VARCHAR2(1024) NULL LASTUPDATE None The date and time that the email advisory definition was last updated. DATE DATE NOT NULL MESSAGE None The body of message that will be sent by the email advisory definition. MEMO LONG NULL OWNER_ID None The user ID of the owner of the email advisory definition. TEXT VARCHAR2(20) NULL SEQUENCE None Used to manage multi-user concurrency in shared mode. This INTE field is not displayed in Open Plan. NUMBER(10, 0) NOT NULL SUBJECT None The subject line for emails generated by an email advisory definition. VARCHAR2(100) NULL USR_ID None If empty, indicates that the email advisory definition is shared TEXT by all users. VARCHAR2(20) NULL Field Name Field Label Description ADDR_FIELD None The email address to which an email advisory message is to be sent. ADDR_FMT TEXT Table OPP_BGE - Batch Global Edit Definitions The Batch Global Edit Definitions table contains batch global edit definitions. The data dictionary table identifier for table OPP_BGE is BGE. Open Plan Data Type Oracle Data Type Nulls The name of a batch global edit definition. This name must be unique for each Data type. TEXT VARCHAR2(60) NOT NULL None The unique identifier of a batch global edit definition. This field is not displayed in Open Plan. GUID VARCHAR2(22) NOT NULL GLOBALEDITS None The global edit expressions contained in the batch global edit definition. MEMO LONG NOT NULL LASTUPDATE None The last date and time that the batch global edit definition record DATE was updated. DATE NOT NULL OWNER_ID None The user ID of the owner of the batch global edit definition. TEXT VARCHAR2(20) NULL SEQUENCE None Used to manage multi-user concurrency in shared mode. INTE NUMBER(10, 0) NOT NULL TABLE_TYPE None The table type to which the batch global edit applies. TEXT VARCHAR2(4) NOT NULL USR_ID None If empty, indicates that the batch global definition is shared by all TEXT users. VARCHAR2(20) NULL Field Name Field Label Description BGE_ID None BGE_UID Table OPP_CLC - Calculated Fields, Filters & Global Edits The Calculated Fields, Filters & Global Edits table contains Open Plan calculated field, filter, and global edit definitions. All of these items may be referred to as calculated fields. System-defined items are stored with a blank USR_ID field. The data dictionary table identifier for table OPP_CLC is CLC. Open Plan Data Type Field Name Field Label Description Oracle Data Type Nulls CLC_ID None The name of a calculated field, filter or global edit, unique within TEXT each table type for which calculated fields, filters, and global edits may be defined. VARCHAR2(60) NOT NULL CLC_UID None The unique identifier of a calculated field record. This field is not displayed in Open Plan. GUID VARCHAR2(22) NOT NULL EXPRESSION None A calculated field, filter or global edit expression. TEXT VARCHAR2(4000) NULL FILTER None The filter used by a global edit expression. TEXT VARCHAR2(1024) NULL FLAGS None Contains a value that identifies a record as a calculated field or a filter. INTE NUMBER(10, 0) NOT NULL GEDATA None The field that is updated by a global edit expression. The TEXT presence of a value in this field identifies a record in this table as a global edit. VARCHAR2(60) NULL LASTUPDATE None The date and time that the calculated field, filter or global edit was last updated. DATE NOT NULL DATE OWNER_ID None The owner of the calculated field, filter or global edit. TEXT VARCHAR2(20) NULL SCALE None The number of decimal places for a numeric calculated field or global edit expression. INTE NUMBER(10, 0) NOT NULL SEQUENCE None Used to manage multi-user concurrency in shared mode. INTE NUMBER(10, 0) NOT NULL TABLE_TYPE None The table type upon which the calculated field, filter or global edit TEXT is based. Valid values are: ACT (Activity), BSA (Baseline Activity), BSU (Baseline Usage), CDR (Code Data), PRJ (Project Directory), PSU (Project Summary Usage), ASG (Resource Assignment), REL (Relationship), AVL (Resource Availability), CST (Resource Cost), RES (Resource Data), RSL (Resource Escalation), USE (Resource Usage, RSK (Risk Detail), and SUB (Subproject). Note that PRJ and SUB are not valid for global edits. VARCHAR2(4) NOT NULL TYPE None The data type of the calculated field, filter or global edit TEXT expression. Valid values are: BOOL (Logical), DATE (Date), DBLE (Decimal), DURA (Duration), FDAT (Finish Date), INTE (Integer), or TEXT (Character). Note that filter expressions will always be of type BOOL. VARCHAR2(4) NOT NULL USR_ID None If empty, indicates that the calculated field, filter, or global edit is TEXT shared by all users. VARCHAR2(20) NULL Table OPP_CTX - Crosstable Export Definitions The Crosstable Export Definitions table stores crosstable export definitions. This table is not defined in the Open Plan data dictionary, and its structure must not be changed. Field Name Field Label Description Open Plan Data Type Oracle Data Type CTX_ID None The unique name of a crosstable export definition. None VARCHAR2(60) NOT NULL CTX_UID None The unique identifier for a crosstable export definition record. This field is not displayed in Open Plan. None VARCHAR2(22) NOT NULL LASTUPDATE None The date and time that the crosstable export definition was last updated. None DATE NOT NULL Nulls OWNER_ID None The owner of a crosstable export definition. None VARCHAR2(20) NULL SEQUENCE None Used to manage multi-user concurrency in shared mode. None NUMBER(10, 0) NOT NULL SETTINGS None The various settings that make up a crosstable export definition. None LONG NOT NULL USR_ID None If empty, indicates that the crosstable export definition is shared by all users. None VARCHAR2(20) NULL Table OPP_RCD - Reporting Calendars The Reporting Calendar Details table contains reporting calendar definitions. Reporting calendars are system-defined items. The data dictionary table identifier for table OPP_RCD is RCD. Field Name Field Label Description Open Plan Data Type Oracle Data Type Nulls CUT_DATE None A date period in a reporting calendar. FDAT DATE NULL CUT_LABEL None The label for a date period in a reporting calendar. TEXT VARCHAR2(20) NULL DIR_UID None The unique identifier that links a reporting calendar detail record to a unique reporting calendar object directory record. This field is not displayed in Open Plan. The reporting calendar’s name (DIR_ID) is displayed instead. GUID VARCHAR2(22) NOT NULL RCD_UID None The unique identifier for a reporting calendar record. GUID VARCHAR2(22) NOT NULL SEQUENCE None Used to manage multi-user concurrency in shared mode. INTE NUMBER(10, 0) NOT NULL Table OPP_RLP - Rollup Definitions The Rollup Definitions table stores rollup definitions. The data dictionary table identifier for table OPP_RLP is RLP. Field Name Field Label Description Open Plan Data Type Oracle Data Type LASTUPDATE None The date and time that the roll-up definition was last updated. DATE DATE NOT NULL OWNER_ID None The owner of a rollup definition. TEXT VARCHAR2(20) NULL RLP_ID None The name of a rollup definition, unique within each table type for which rollups may be defined. TEXT VARCHAR2(60) NOT NULL Nulls RLP_UID None The unique identifier for a rollup definition record. GUID VARCHAR2(22) NOT NULL ROLLUPS None The rollup fields contained in the rollup definition. MEMO LONG NOT NULL SEQUENCE None Used to manage multi-user concurrency in shared mode. INTE NUMBER(10, 0) NOT NULL TABLE_TYPE None The data type for which the roll-up definition is specified. Valid values are: ACT (Activity), RES (Resource data), and CDR (Code data). TEXT VARCHAR2(4) NOT NULL USR_ID None If empty, indicates that the crosstable export definition is shared by all users. TEXT VARCHAR2(20) NULL Table OPP_SCA - Code Structure Associations The Code Structure Association table stores the mapping of all breakdown structures to other folder-level objects such as projects and resource files. The data dictionary table identifier for table OPP_SCA is SCA. Field Name Field Label Description Open Plan Data Type Oracle Data Type Nulls COD_NUMBER None The position of the code associated with a project or resource file. INTE NUMBER(10, 0) NULL COD_UID None The unique identifier of the code file that is associated. GUID VARCHAR2(22) NOT NULL DIR_UID None The unique identifier of a project object or resource file object directory record to which the code file is associated. GUID VARCHAR2(22) NULL PROMPT_TEXT None The prompt that is displayed for this code file instead of the code field name. TEXT VARCHAR2(20) NULL SCA_ID None The field name used for the associated code file, C1 through C90. TEXT VARCHAR2(59) NOT NULL SCA_UID None A unique identifier for a code structure association record. GUID VARCHAR2(22) NOT NULL TABLE_TYPE None The data type to which the code file is assigned. Valid values are ACT (Activity) and RES (Resource Data). TEXT VARCHAR2(4) NULL Table OPP_SPD - Spread Curves The Spread Curves table contains Open Plan spread curves definitions. These spread curves are used on resource assignments. The data dictionary table identifier for table OPP_SPD is SPD. Field Name Field Label Description Open Plan Data Type Oracle Data Type Nulls DESCRIPTION None The description of a spread curve. TEXT VARCHAR2(60) NOT NULL SP_F1 None The first value in a spread curve. INTE NUMBER(3, 0) NOT NULL SP_F10 None The tenth value in a spread curve. INTE NUMBER(3, 0) NULL SP_F2 None The second value in a spread curve. INTE NUMBER(3, 0) NULL SP_F3 None The third value in a spread curve. INTE NUMBER(3, 0) NULL SP_F4 None The fourth value in a spread curve. INTE NUMBER(3, 0) NULL SP_F5 None The fifth value in a spread curve. INTE NUMBER(3, 0) NULL SP_F6 None The sixth value in a spread curve. INTE NUMBER(3, 0) NULL SP_F7 None The seventh value in a spread curve. INTE NUMBER(3, 0) NULL SP_F8 None The eighth value in a spread curve. INTE NUMBER(3, 0) NULL SP_F9 None The ninth value in a spread curve. INTE NUMBER(3, 0) NULL SPD_ID None The unique name of a spread curve definition. INTE VARCHAR2(1) NOT NULL Table OPP_SRT - Sort Definitions The Sort Definitions table contains Open Plan sort definitions. System-defined items are stored with a blank USR_ID field. This table is separated from the Calculated Fields, Filters & Global Edits table because sort names have to be unique only within the sort type whereas calculated field names must be unique across all calculated field types. The data dictionary table identifier for table OPP_SRT is SRT. Field Name Field Label Description Open Plan Data Type Oracle Data Type Nulls DATA None The sort expression. TEXT VARCHAR2(200) NOT NULL NOT NULL DESCRIPTION None The description of a sort expression. TEXT VARCHAR2(60) LASTUPDATE None The date and time that the sort definition was last updated. DATE DATE NOT NULL OWNER_ID None The owner of a sort definition. TEXT VARCHAR2(20) NULL SEQUENCE None Used to manage multi-user concurrency in shared mode. INTE NUMBER(10, 0) NOT NULL SRT_ID None The name of a sort, unique within each table type for which sorts may be defined. TEXT VARCHAR2(60) NOT NULL SRT_UID None The unique identifier for a sort definition record. GUID VARCHAR2(22) NOT NULL TABLE_TYPE None The table type to which the sort is applied. TEXT VARCHAR2(4) NOT NULL USR_ID None If empty, indicates that the sort definition is shared by all users. TEXT VARCHAR2(20) NULL Table WST_DCT - Data Dictionary The data dictionary table defines the columns for tables within Open Plan. The structure of this table itself should never be modified. If the structure of any Open Plan tables defined in the data dictionary is modified, appropriate entries or adjustments must be made to this table. This table is not defined in the Open Plan data dictionary, and its structure must not be changed. Open Plan Data Type Oracle Data Type None None NUMBER(10, 0) NOT NULL FKEY_FLD_NAME None None VARCHAR2(20) NULL FKEY_REQUIRED None None NUMBER(10, 0) NOT NULL FKEY_TABLE None None VARCHAR2(4) NULL FKEY_VIRTUAL None None NUMBER(10, 0) NOT NULL FLD_NAME None The name of an Open Plan field. None VARCHAR2(20) NOT NULL LENGTH None The number of characters required for the field. None NUMBER(10, 0) NOT NULL SCALE None The number of decimal places required for the field. None NUMBER(10, 0) NOT NULL STRING_ID None The identifier of the field's string resources. None NUMBER(10, 0) NOT NULL Field Name Field Label COL_FLAGS Description Nulls SYS_NAME None None VARCHAR2(14) NULL TABLE_TYPE None The three-character identifier of the table in which the field exists. None VARCHAR2(4) NOT NULL TYPE None The Open Plan data type of the field. None VARCHAR2(4) NOT NULL USR_NAME None A user-defined name to be displayed for this field, overriding the name determined by the STRING_ID None VARCHAR2(60) NULL Table WST_LCK - Object Locks The Locked Objects table maintains a list of items that are currently open within Open Plan. The data dictionary table identifier for table OPP_LCK is LCK. Open Plan Data Type Oracle Data Type Nulls GUID VARCHAR2(22) NOT NULL Field Name Field Label Description DIR_UID None The unique identifier of the locked directory object. This value is not displayed in Open Plan. The object’s name (DIR_ID) is displayed instead. LASTUPDATE None The date and time that the lock record was last updated. DATE DATE NOT NULL LCK_UID None The unique identifier for an object lock record. This value is not displayed in Open Plan. GUID VARCHAR2(22) NOT NULL LOCKMODE None The mode in which the directory object is locked: E (Exclusive), S (Shared), R (Read Only), B (checked out to the briefcase data source), or I (checked out to the main data source). TEXT VARCHAR(1) NOT NULL MACHINE_ID None The machine ID of a user associated with an object lock record. TEXT VARCHAR2(15) NOT NULL PRD_UID None The unique identifier for a Welcom product record. NUMBER(10, 0) NOT NULL ULI_UID None The identifier for the user’s login, unique for each session even if for the same user. VARCHAR(22) NOT NULL USR_ID None The ID of the user that has the object locked. VARCHAR2(20) NOT NULL TEXT Table WST_MSG - User Messages The User Messages table stores messages that are to be sent to users via Open Plan. Once the message has been sent, the record is removed from this table. This table is not defined in the Open Plan data dictionary, and its structure must not be changed. Field Name Field Label Description Open Plan Data Type Oracle Data Type Nulls MESSAGETEXT None The text of the Open Plan message. None VARCHAR2(250) NOT NULL MESSAGETIME None The date and time that an Open Plan message is to be sent. None DATE NOT NULL MSG_UID None The unique identifier for a user messages record. None VARCHAR2(22) NOT NULL ULI_UID None The identifier for the user’s login, unique for each session even if for the None same user. VARCHAR2(22) NOT NULL USR_ID None The ID of the user to whom the message will be sent. VARCHAR2(20) NOT NULL None Table WST_TAB - Table Names The Table Names table provides a mapping between the 3-character data dictionary table identifier and the actual database table name. This table is not defined in the Open Plan data dictionary, and its structure must not be changed. Field Name Field Label Description Open Plan Data Type Oracle Data Type Nulls COTYPE None For Welcom use only. None VARCHAR2(4) NULL FLAGS None For Welcom use only. None NUMBER(10, 0) NOT NULL PRIMARY_KEY None Not used by Open Plan. None VARCHAR2(100) NULL TABLE_NAME None Names of the tables defined in the Open Plan data dictionary (WST_DCT). None VARCHAR2(15) NOT NULL TABLE_TYPE None Table types defined in the Open Plan data dictionary (WST_DCT). None VARCHAR2(4) NOT NULL VERSION None None VARCHAR2(4) NOT NULL Table WST_UPD - User Preference Defaults The User Preference Defaults table stores the default values for user preference information used within Open Plan. This table is not defined in the Open Plan data dictionary, and its structure must not be changed. Open Plan Data Type Field Name Field Label Description CAT_VALUE None The value of the user preference default. None VARCHAR2(255) NULL CATEGORY None The category for a user preference default record. None VARCHAR2(50) NOT NULL PRD_UID None The unique identifier for a Welcom product record. None NUMBER(10, 0) NOT NULL Oracle Data Type Nulls Table WST_UPF - User Preference Settings The User Preferences table stores all user preference information used within Open Plan. This table is not defined in the Open Plan data dictionary, and its structure must not be changed. Field Name Field Label CAT_VALUE None CATEGORY None DIR_UID None PRD_UID None USR_ID None Open Plan Data Type Oracle Data Type Nulls The value of the user preference setting. None VARCHAR2(255) NULL The category for a user preference setting. None VARCHAR2(50) NOT NULL None VARCHAR2(22) NOT NULL The unique identifier for a Welcom product record. None NUMBER(10, 0) NOT NULL The user to whom the user preference setting applies. None VARCHAR2(20) NOT NULL Description Directory Data Table OPP_PRJ - Project Directory Details The Project Directory Details table contains detail information on projects that are defined in the Object Directory table. The data dictionary table identifier for table OPP_PRJ is PRJ. Field Name Field Label Description Open Plan Data Type Oracle Data Type Nulls ACT_CLH_ID Default Activity Calendar The name of the default activity calendar for the project. TEXT VARCHAR2(60) NULL ACTDATEOPT TA - Actual Date The value of the time analysis actual date option. Option INTE NUMBER(10, 0) NULL ACTTYPE Default Activity Type The default activity type for a project. Valid values are: ALAP, ASAP, Discontinuous, Effort Driven, External Subproject, Finish Milestone, Hammock, Subproject, and Start Milestone, which are stored in the database as L, N, D, R, E, F, H, P and S , respectively. ACTT VARCHAR2(4) NULL ACWP_LAB ACWP Labor The actual cost of work performed for labor resources assigned a project's activities. DBLE NUMBER(15, 2) NULL ACWP_MAT ACWP Material The actual cost of work performed for material resources assigned a project's activities. DBLE NUMBER(15, 2) NULL ACWP_ODC ACWP Other Direct Cost The actual cost of work performed for other resources assigned a project's activities. DBLE NUMBER(15, 2) NULL ACWP_QTY Labor Actual Units The sum of the quantities of units for the work performed by labor resources assigned to the project's activities. DBLE NUMBER(15, 2) NULL ACWP_SUB ACWP Subcontract The actual cost of work performed for subcontract resources assigned a DBLE project's activities. NUMBER(15, 2) NULL AFDATE Actual Finish A project's actual finish date. ANCILMODE Ancillary File Open Mode A project's default open mode for its ancillary files. Valid values are: TEXT Exclusive, Shared, or Read Only, which are stored in the database as E, S, or R, respectively. FDAT DATE NULL VARCHAR2(4) NULL ASDATE Actual Start A project's actual start date. DATE DATE NULL AUTOANAL TA - Auto Time Analysis Option Flag which indicates whether automatic time analysis is on or off. INTE NUMBER(10, 0) NULL AUTOPROGACT Auto Progress Flag which indicates whether activities should be progressed during Activities Option automatic progressing or not. INTE NUMBER(10, 0) NULL AUTOPROGBASE Auto Progress Flag for progress calculation option. Based On Option INTE NUMBER(10, 0) NULL AUTOPROGCFB Auto Progress Complete If Finished Flag for progress calculation option. INTE NUMBER(10, 0) NULL AUTOPROGEND Auto Progress End Date End date for progress calculations. DATE DATE NULL AUTOPROGFILT Auto Progress Filter Filter for progress calculations. TEXT VARCHAR2(50) NULL AUTOPROGPPC Auto Progress PPC Option Flag for progress calculation option. INTE NUMBER(10, 0) NULL AUTOPROGPSB Auto Progress Complete If Started Flag for progress calculation option. INTE NUMBER(10, 0) NULL AUTOPROGRES Auto Progress Resources Option Flag for progress calculation option. INTE NUMBER(10, 0) NULL AUTOPROGSTRT Auto Progress Start Date Start date for progress calculations. DATE DATE NULL AUTOPROGTYPE Auto Progress Type Flag for progress calculation option. INTE NUMBER(10, 0) NULL BAC_LAB BAC Labor The budget at completion for labor resources assigned to a project's activities. DBLE NUMBER(15, 2) NULL BAC_MAT BAC Material The budget at completion for material resources assigned to a project's activities. DBLE NUMBER(15, 2) NULL BAC_ODC BAC Other Direct The budget at completion for other resources assigned to a project's activities. Cost DBLE NUMBER(15, 2) NULL BAC_QTY Labor Budget Units DBLE NUMBER(15, 2) NULL BAC_SUB BAC Subcontract The budget at completion for subcontract resources assigned to a project's activities. DBLE NUMBER(15, 2) NULL BCWP_LAB BCWP Labor The budgeted cost of work performed for labor resources assigned to a project's activities. DBLE NUMBER(15, 2) NULL BCWP_MAT BCWP Material The budgeted cost of work performed for material resources assigned to DBLE a project's activities. NUMBER(15, 2) NULL BCWP_ODC BCWP Other The budgeted cost of work performed for other resources assigned to a NUMBER(15, 2) NULL The total number of labor resource units rolled up to the project level. DBLE Direct Cost project's activities. BCWP_QTY Labor Earned Units The summed earned value of labor resource units budgeted for the project's activities. DBLE NUMBER(15, 2) NULL BCWP_SUB BCWP Subcontract The budgeted cost of work performed for subcontract resources assigned to a project's activities. DBLE NUMBER(15, 2) NULL BCWS_LAB BCWS Labor The budgeted cost of work scheduled for labor resources assigned to a project's activities. DBLE NUMBER(15, 2) NULL BCWS_MAT BCWS Material The budgeted cost of work scheduled for material resources assigned to DBLE a project's activities. NUMBER(15, 2) NULL BCWS_ODC BCWS Other Direct Cost The budgeted cost of work scheduled for other resources assigned to a project's activities. DBLE NUMBER(15, 2) NULL BCWS_QTY Labor Scheduled The budgeted quantity of labor for the work scheduled for the project Units from the baseline start date until time now. DBLE NUMBER(15, 2) NULL BCWS_SUB BCWS Subcontract The budgeted cost of work scheduled for subcontract resources assigned DBLE to a project's activities. NUMBER(15, 2) NULL BFDATE Baseline Finish The baseline finish date for a project. FDAT DATE NULL BSDATE Baseline Start The baseline start date for a project. DATE DATE NULL CALACTCST Cost - Calculate Actual Cost Flag for cost calculation option. INTE NUMBER(10, 0) NULL CALBUDCST Cost - Calculate Budgeted Cost Flag for cost calculation option. INTE NUMBER(10, 0) NULL CALCCOSTBASE Cost - Calculate Cost Based On Flag for cost calculation option. INTE NUMBER(10, 0) NULL CALCSTESC Cost - Calculate Escalated Cost Flag for cost calculation option. INTE NUMBER(10, 0) NULL CALEVCST Cost - Calculate Earned Value Flag for cost calculation option. INTE NUMBER(10, 0) NULL CALREMCST Cost - Calculate Remaining Cost Flag for cost calculation option. INTE NUMBER(10, 0) NULL CLD_UID Calendar File The unique identifier that links a project record to a unique calendar GUID object directory record for the calendar file assigned to the project. This field is not displayed in Open Plan – the calendar file’s name (DIR_ID) is displayed instead. VARCHAR2(22) NULL CST_ROLLUP Cost – Rollup Calculated Cost Flag for cost calculation option. INTE NUMBER(10, 0) NULL DEFDURUNIT Default Duration The default duration unit for a project. Unit INTE NUMBER(10, 0) NULL DEFENDHR Default Finish Hour The hours in the default end time for a project. INTE NUMBER(10, 0) NULL DEFENDMN Default Finish Minute The minutes in the default end time for a project. INTE NUMBER(10, 0) NULL DEFSTARTHR Default Start Hour The hours in the default start time for a project. INTE NUMBER(10, 0) NULL DEFSTARTMN Default Start Minute The minutes in the default start time for a project. INTE NUMBER(10, 0) NULL DFORMAT Current Date Format Current date format for the project. TEXT VARCHAR2(50) NULL DIR_UID Name The unique identifier that links a project record to a unique project object directory record. This field is not displayed in Open Plan. The project’s name (DIR_ID) is displayed instead. GUID VARCHAR2(22) NOT NULL EFDATE Early Finish Date The early finish date for a project. FDAT DATE NULL ETC_LAB ETC Labor The estimate to complete for labor resources assigned to a project's activities. DBLE NUMBER(15, 2) NULL ETC_MAT ETC Material The estimate to complete for material resources assigned to a project's activities. DBLE NUMBER(15, 2) NULL ETC_ODC ETC Other Direct The estimate to complete for other resources assigned to a project's Cost activities. DBLE NUMBER(15, 2) NULL ETC_QTY Labor Remaining The estimated labor remaining quantity for a project. Units DBLE NUMBER(15, 2) NULL ETC_SUB ETC Subcontract The estimate to complete for subcontract resources assigned to a project's activities. DBLE NUMBER(15, 2) NULL EVT Earned Value Technique VARCHAR2(2) NULL HARDZERO ETC Subcontract Flag for resource scheduling option. INTE NUMBER(10, 0) NULL LFDATE Late Finish Date The project's late finish date, calculated by time analysis. FDAT DATE NULL MINCALCDU Min. Calculated Duration Unit The minimum calculated duration unit for the project. INTE NUMBER(10, 0) NULL MINTOTFT Min. Total Float The minimum total float for the project DURA VARCHAR2(15) NULL MNPERDAY Minutes per Day Minutes per day for the project. INTE NUMBER(10, 0) NULL MNPERMON Minutes per Month Minutes per month for the project. INTE NUMBER(10, 0) NULL MNPERWK Minutes per Week Minutes per week for the project. INTE NUMBER(10, 0) NULL MSPIMPORT MSP Import Options Stores the settings specified for MSP Import/Export. TEXT VARCHAR2(20) NULL MULTIEND TA – MultipleEnd Option Flag for time analysis option. INTE NUMBER(10, 0) NULL NRISKSIMULS Risk - Number of Flag for risk analysis option. Simulations INTE NUMBER(10, 0) NULL The default earned value technique for a project. Valid values are: Level EVTE of Effort, Percent Complete, 50-50, 0-100, 100-0, User-Defined Percentage, Planning Package, and Resource % Complete. These values are stored in the Open Plan database as A, C, E, F, G, H, K, and L, respectively. OPCLIENT Client The name of the client. TEXT VARCHAR2(60) NULL OPCOMPANY Company The name of the company. TEXT VARCHAR2(60) NULL OPMANAGER Project Manager The name of the project manager. TEXT VARCHAR2(60) NULL OPSTAT Project Status ACTS VARCHAR2(4) NULL OUTOFSEQ TA - Out-ofFlag for time analysis option. Sequence Option INTE NUMBER(10, 0) NULL PCOMPLETE Percent Complete INTE NUMBER(10, 0) NULL PM_EMAIL Project Manager The project manager's email address. E-mail TEXT VARCHAR2(60) NULL PRIORITY1 RS - Priority 1 Option Flag for resource scheduling option. TEXT VARCHAR2(60) NULL PRIORITY2 RS - Priority 2 Option Flag for resource scheduling option. TEXT VARCHAR2(60) NULL PRIORITY3 RS - Priority 3 Option Flag for resource scheduling option. TEXT VARCHAR2(60) NULL The computed status of a project. Valid value are Planned, In Progress and Complete. These values are stored in the database as 0, 1, and 2, respectively. The project’s percent complete. PRJ_FLAG Project Flag INTE NUMBER(10, 0) NULL PROGPRIO RS - In Progress Flag for resource scheduling option. Priority Option INT NUMBER(10, 0) NULL PROJSTATUS Project Phase VARCHAR2(4) NULL PROJTYPE Project Type TEXT VARCHAR2(20) NULL RCL_ID Reporting Calendar The name of the default reporting calendar for the project. TEXT VARCHAR2(20) NULL RDS_UID Resource File The unique identifier that links a project record to a unique resource GUID object directory record for the resource file assigned to the project. This field is not displayed in Open Plan. The resource file’s name (DIR_ID) is displayed instead. VARCHAR2(22) NULL REFDATE Reporting Reference Date Reporting reference date for the project. DATE DATE NULL REL_CLH_ID Relationship Calendar The name of the default relationship calendar for the project. TEXT VARCHAR2(60) NULL RISKSEED Risk - Fixed Seed Option Flag for risk analysis option. INTE NUMBER(10, 0) NULL RS_ACTDATE RS - Ignore Actual Dates Flag for resource scheduling option. INTE NUMBER(10, 0) NULL RS_ALTPRTY RS - Use Alternate Flag for resource scheduling option. INTE NUMBER(10, 0) NULL The project status. Valid values are: Proposed, Open, and Closed. These PRJS values are stored in the Open Plan database as P, O, and C, respectively. Resource RS_CONUSE RS - Consider Flag for resource scheduling option. Usage on Higher INTE NUMBER(10, 0) NULL RS_OVLLATE Flag for resource scheduling option. RS - Force Overloaded Activities to Late Dates INTE NUMBER(10, 0) NULL RS_PRIORTY Project Priority Flag for resource scheduling option. INTE NUMBER(10, 0) NULL RS_REPROF RS - Limit Reprofiling to Original Level Flag for resource scheduling option. INTE NUMBER(10, 0) NULL RS_SUMDATE Flag for resource scheduling option. Project Summary Usage Date Option INTE NUMBER(10, 0) NULL RS_SUMMARY Create Project Flag for resource scheduling option. If True, project summary usage Summary Usage information will be saved when the project is saved. INTE NUMBER(10, 0) NULL RSK_CALSD Risk - Use Flag for risk analysis option. Activity Calendar INTE NUMBER(10, 0) NULL SCHMETHOD RS - Scheduling Flag for resource scheduling option. Method Option INTE NUMBER(10, 0) NULL SFDATE Scheduled Finish The scheduled finish date for a project. Date FDAT DATE NULL SMOOTHING RS - Smoothing Option Flag for resource scheduling option. INTE NUMBER(10, 0) NULL DATE STARTDATE Start Date The start date for a project. DATE NULL STARTPC User Defined EVT Split % If the User-Defined Percentage is selected as the default earned value INTE technique for the project, this field stores the percentage that is earned at the start of the activity. NUMBER(10, 0) NULL STARTVIEW Startup View The view that is opened when a project is opened. TEXT VARCHAR2(20) NULL STATDATE Time Now The time now date for a project. DATE DATE NULL TA_BEFORE_RK Risk - Time Analyze Before Risk Analysis Flag for risk analysis option. INTE NUMBER(10, 0) NULL TA_SUBEND TA - Subproject End Activity Flag for time analysis option. INTE NUMBER(10, 0) NULL TA_SUMMARY Flag for time analysis option. TA - Show Summary Dates Option INTE NUMBER(10, 0) NULL TARGCOST Project Target Cost Target cost for the project. DBLE NUMBER(15, 2) NULL TFDATE Target Finish The target finish date for a project. FDAT DATE NULL Date TFTYPE Target Finish Type TIMEUNIT The target finish type for a project. TARG VARCHAR2(4) NULL RS - Scheduling Flag for resource scheduling option. Interval INTE NUMBER(10, 0) NULL TOTACT Total Activities INTE NUMBER(10, 0) NULL TOTACTCOM Total Completed The number of completed activities in the project. Activities INTE NUMBER(10, 0) NULL TOTACTPRG Total Activities in Progress The number of in-progress activities in the project. INTE NUMBER(10, 0) NULL TOTRELSHP Total Relationships The number of relationships in the project. INTE NUMBER(10, 0) NULL TOTRESO Total Resource Assignments The number of resource assignments in the project. INTE NUMBER(10, 0) NULL TSDATE Target Start Date A project's target start date. DATE DATE NULL TSTYPE Target Start Type A project's target start type. TARG VARCHAR2(4) NULL The total number of activities in the project. Table OPP_RDS - Resource Structure Directory Details The Resource Structure Directory Details table stores information used to define the structure of a resource structure. The data dictionary table identifier for table OPP_RDS is RDS. Open Plan Data Type Oracle Data Type Nulls A resource file's default open mode for its ancillary files. Valid values are: Exclusive, Shared, or Read Only, which are stored in the database as E, S, or R, respectively. TEXT VARCHAR2(4) NULL None The unique identifier that links a resource file record to a unique calendar object directory record for the calendar file assigned to the resource file. This field is not displayed in Open Plan. The calendar’s name (DIR_ID) is displayed instead. GUID VARCHAR2(22) NOT NULL DIR_UID None GUID The unique identifier that links a resource structure record to a unique resource object directory record. This field is not displayed in Open Plan. The resource file’s name (DIR_ID) is displayed instead. VARCHAR2(22) NOT NULL STARTVIEW None The view that is opened when a resource file is opened. VARCHAR2(20) NULL Field Name Field Label Description ANCILMODE None CLD_UID TEXT Table WST_COD - Code Structure Directory Details The Code Structure Directory Details table stores information used to define the structure of a code breakdown structure. The data dictionary table identifier for table WST_COD is COD. Open Plan Data Type Oracle Data Type Nulls None None VARCHAR2(60) NOT NULL DIR_UID None GUID The unique identifier that links a code structure record to a unique resource object directory record. This field is not displayed in Open Plan. The code file’s name (DIR_ID) is displayed instead. VARCHAR2(22) NOT NULL PROMPT_TEXT None The default prompt text that is displayed when the code file is attached to a project or resource file. TEXT VARCHAR2(20) NULL STARTVIEW None The view that is opened when a code breakdown structure is opened. TEXT VARCHAR2(20) NULL TH_FLAGS None TEXT VARCHAR2(10) NULL Field Name Field Label DATA Description Table WST_DIR - Object Directory The Object Directory table is the master directory for all project-related data items. The data dictionary table identifier for table WST_DIR is DIR. Field Name Field Label Description Open Plan Data Type Oracle Data Type DESCRIPTION None The description of a directory object. TEXT VARCHAR2(100) NULL DIR_ID None The name of a project, code, calendar, resource, or view object. In Open Plan, these objects are often referred to as "files". TEXT VARCHAR2(22) NOT NULL DIR_UID None A unique identifier for an object directory record. This field is not displayed in Open Plan. GUID VARCHAR2(22) NOT NULL LASTUPDATE None The date and time that the directory object record was last updated. DATE DATE NULL OPENMODE None The mode in which the object is to be opened: Exclusive, Shared, or Read Only. The values are stored in the database as E, S, and R, respectively. TEXT VARCHAR2(1) NOT NULL Nulls OWNER_ID None The user ID of the object's owner. TEXT VARCHAR2(20) NULL SEQUENCE None Used to manage multi-user concurrency in shared mode. INTE NUMBER(10, 0) NOT NULL TABLE_TYPE None The data type of the directory object. Valid values are: CLD (calendar file), COD (code file), PRJ (project file), RCL (reporting calendar), RDS (resource file), and VUE (view file). TEXT VARCHAR2(4) NOT NULL USR_ID None The user ID of the last user to update the directory object record. TEXT VARCHAR2(20) NOT NULL Security Data Table WST_ACL - Object Access Rights The Object Access Control table stores access control information for items in the object folder table. The data dictionary table identifier for table WST_ACL is ACL. Open Plan Data Type Oracle Data Type Nulls The unique identifier for an access control record. This field is not displayed in Open Plan. GUID VARCHAR2(22) NOT NULL None The unique identifier for the directory object record to which the access control record applies. This field is not displayed in Open Plan. GUID VARCHAR2(22) NOT NULL GRP_ID None The unique identifier of a group. TEXT VARCHAR2(20) NULL READONLY None Determines whether the user, group, or role combination is restricted to INTE opening the directory object in read only mode. NUMBER(10, 0) NOT NULL ROL_ID None The unique identifier of a role. TEXT VARCHAR2(20) NOT NULL USR_ID None The unique identifier of a user. TEXT VARCHAR2(20) NULL Field Name Field Label Description ACL_UID None DIR_UID Table WST_GRP - Group Definitions The Group Definitions table contains definitions of valid groups. The data dictionary table identifier for table WST_GRP is GRP. Description Open Plan Data Type None The description of a group. TEXT VARCHAR2(60) NULL None The unique identifier of a group. TEXT VARCHAR2(20) NOT NULL Field Name Field Label DESCRIPTION GRP_ID Oracle Data Type Nulls MANAGER None The group's manager. TEXT VARCHAR2(20) NULL ROL_ID None The default role for a group. TEXT VARCHAR2(20) NULL Table WST_LIC - License Exceptions The License Exceptions table contains information about license exceptions. This table is not defined in the Open Plan data dictionary, and its structure must not be changed. Field Name Field Label Description Open Plan Data Type Oracle Data Type Nulls LIC_USERS None None NUMBER(10, 0) NOT NULL LICENSE None None VARCHAR2(32) NOT NULL LOGGED_USERS None None NUMBER(10, 0) NOT NULL The number of logged in users when the exception occurred. LOGINTIME None A user's last login date and time. None DATE NOT NULL MACHINE_ID None The machine ID of a currently logged in user. None VARCHAR2(20) NOT NULL PRD_UID None The unique identifier for a Welcom product record. None NUMBER(10, 0) NOT NULL USR_ID None The unique identifier for a user. None VARCHAR2(20) NOT NULL Table WST_PFA - Product Function Group Access Rights Access rights to a product function group are assigned for each role that the administrator has defined. These access rights are stored in the Product Function Group Access Rights table. Records in this table represent the intersection of a Role and a Product Function group and the specified access rights. Each function group has 2 security attributes that can be controlled. The first attribute controls the visible state of securable objects in the function group as Visible or Not Visible. The second attribute controls the enabled state of securable objects in the function group as Enabled or Not Enabled. The access attributes are stored in a single field using the following definitions: FLAG_VISIBLE Mask = 0x00000001L 0 = Not Visible 1 = Visible FLAG_ENABLED Mask = 0x00000002L 0 = Not Enabled 1 = Enabled These flags are independent so that a user may be granted rights to execute a command or modify a data element even if it is not displayed to the user because of the state of the visibility flag. Data in the access right table is stored in a sparse format such that records only exist for items that have rights granted to them. If an item is not specified as visible and is not specified as enabled, then a record does not exist in the access rights table. This table is not defined in the Open Plan data dictionary, and its structure must not be changed. Field Name Field Label Description GRP_ID None The unique identifier of a group. PFG_UID None The unique identifier of a product function group record. RIGHTS None The rights specified by the product function group access record. ROL_ID None The unique identifier of a role. Open Plan Data Type Oracle Data Type Nulls None VARCHAR2(20) NULL None VARCHAR2(22) NOT NULL None NUMBER(10, 0) NOT NULL None VARCHAR2(20) NULL Table WST_PFD - Project Function Group Detail The Product Function Group Details table stores the associations of Securable objects to function groups. This table is used by the Security Runtime module to determine the securable objects that are controlled by a particular function group. It is not referenced by the Security administration module. This table is not defined in the Open Plan data dictionary, and its structure must not be changed. Field Name Field Label OBJ_UID None PFG_UID None Description The unique identifier of a product function group record. Open Plan Data Type Oracle Data Type Nulls None VARCHAR2(60) NOT NULL None VARCHAR2(22) NOT NULL Table WST_PFG - Product Function Group Definitions The Product Function Group table stores a collection of one or more Securable objects that are controlled as a single item for purposes of defining access control. For instance, the user might define a function group that contains a single command. This group can then be set to define whether or not a user can execute that command. Another function group might be made up of a group of data elements that are secured as a group such as the fields that make up Activity Costs. Another function group could be defined to control the ability to update Activity Progress. This function group might contain both command and data elements to prevent the user from both displaying the progress dialog as well as changing the data elements through a spreadsheet. As implied by their title, product function groups are defined by each product. Product function groups are also defined as applying to either a Group or a Role based on the value of the TYPE field. A TYPE field value of 0 represents a Group, a value of 1 represents a Role. Function groups defined for groups are displayed as part of the Group administration module by product. Function groups defined for Roles are displayed as part of the Role administration module by product. Product function groups are stored in the Product Function Group table by product ID. This table is not defined in the Open Plan data dictionary, and its structure must not be changed. Field Name Field Label Description Open Plan Data Type Oracle Data Type Nulls DESCRIPTION None The description of the product function group. None VARCHAR2(60) NULL PFG_ID None None VARCHAR2(17) NULL NULL PFG_UID None The unique identifier of a product function group record. None VARCHAR2(22) PRD_UID None The unique identifier for a Welcom product record. None NUMBER(10, 0) NOT NULL TYPE None None NUMBER(10, 0) NULL Table WST_PRD - Installed Welcom Products The Installed Products table stores product identifiers that are used to determine security information for each specific product. This table is not defined in the Open Plan data dictionary, and its structure must not be changed. Field Name Field Label Description Open Plan Data Type Oracle Data Type Nulls DESCRIPTION None The name of the installed product. None VARCHAR2(60) NOT NULL None NUMBER(10, 0) NULL None DATE NOT NULL FLAG None INSTALLDATE None The date and time the product was installed. INSTALLEDVER_MAJ None The major version number (the portion of the version number to the left None of the decimal place). NUMBER(10, 0) NULL INSTALLEDVER_MIN None The minor version number (the portion of the version number to the right of the decimal place). NUMBER(10, 0) NULL None LICENSE None The license key for the installed product. None VARCHAR2(32) NULL MESSAGETEXT None A message that is to be displayed to each user upon logging into the product. None VARCHAR2(250) NULL MSGEXPIRE None The expiration date of the login message. None DATE NULL PRD_UID None The unique identifier for a Welcom product record. None NUMBER(10, 0) NOT NULL Table WST_PSO - Securable Object Definition The Securable Object Definition table stores items that products define and recognize as being able to participate in the overall security model. Securable objects can be broken down into 2 distinct groups: Data elements and Commands. Data elements represent is the persistent properties of an object that are typically stored as fields on a database table. Commands are operations that can be executed by the user - these are most analogous to the menu options available in each product. Securable objects are stored on the table by Product ID. The securable object table enumerates all items that the product exposes as securable. This table is not defined in the Open Plan data dictionary, and its structure must not be changed. Field Name Field Label OBJ_UID None PRD_UID None Description The unique identifier for a Welcom product record. Open Plan Data Type Oracle Data Type Nulls None VARCHAR2(60) NOT NULL None NUMBER(10, 0) NOT NULL Table WST_ROL - Role Definitions Roles are used to specify access rights against product function groups. The Security Role Definition table contains the definitions of the Security roles. The data dictionary table identifier for table WST_ROL is ROL. Open Plan Data Type Field Name Field Label Description Oracle Data Type Nulls DESCRIPTION None The description of a role. TEXT VARCHAR2(60) NULL MANAGER None The role's manager. TEXT VARCHAR2(20) NULL ROL_ID None The unique identifier of a role. TEXT VARCHAR2(20) NOT NULL Table WST_ULI - Logged In Users The currently Logged In Users table contains a list of all logged in users as well as the machine ID of the workstation from which the user logged in. The product number and password are also tracked for license-checking purposes. The data dictionary table identifier for table WST_ULI is ULI. Description Open Plan Data Type Oracle Data Type Nulls LICENSEREVOKED None Deprecated, no longer used by Open Plan. None NUMBER(10, 0) NOT NULL LOGINTIME None A user's last login date and time. DATE DATE NOT NULL MACHINE_ID None The machine ID of a currently logged in user. TEXT VARCHAR2(15) NOT NULL PRD_UID None The unique identifier for a Welcom product record. INTE NUMBER(10, 0) NOT NULL ULI_UID None The unique identifier for a user login record. GUID VARCHAR2(22) NOT NULL USR_ID None The login name of a currently logged in user. Records may remain in this table if a user exits the software abnormally, but they will be removed the next time the user logs in and exits normally on the same machine. TEXT VARCHAR2(20) NOT NULL Field Name Field Label Table WST_UPA - User Product Access Control The User Product Access Control table stores information about which products user are permitted to run. The data dictionary table identifier for table WST_UPA is UPA. Open Plan Data Type Oracle Data Type INTE NUMBER(10, 0) NOT NULL The unique identifier for a Welcom product record. INTE NUMBER(10, 0) NOT NULL None The unique identifier of a user. INTE VARCHAR2(20) NOT NULL None Not used by Open Plan. VARCHAR2(22) NULL Field Name Field Label FLAGS None PRD_UID None USR_ID LICN_UID Description Nulls Table WST_USG - User-group Assignment The User-Group Assignment table contains the associations of users to groups. The data dictionary table identifier for table WST_USG is USG. Field Name Field Label Description Open Plan Data Type Oracle Data Type Nulls GRP_ID None The unique identifier of a group. TEXT VARCHAR2(20) NOT NULL USG_UID None The unique identifier for a user-group association record. GUID VARCHAR2(22) NULL USR_ID None The unique identifier of a user. TEXT VARCHAR2(20) NOT NULL Table WST_USR - User Definitions The User Definitions table contains definitions of valid users. The data dictionary table identifier for table WST_USR is USR. Open Plan Data Type Oracle Data Type Nulls None TEXT VARCHAR2(4) NULL ACT_FIELD None TEXT VARCHAR2(30) NULL ACT_RULE None INTE NUMBER(10, 0) NULL ACT_VALUE None TEXT VARCHAR2(30) NULL ADDRESS1 None The user's address. TEXT VARCHAR2(60) NULL ADDRESS2 None Second line in the user's address. TEXT VARCHAR2(60) NULL Field Name Field Label ACT_COMPARE Description ALTMANAGER None The user's alternate manager. TEXT VARCHAR2(20) NULL CITY None The user's city. TEXT VARCHAR2(20) NULL COMMENTS None Comments for the user record. TEXT VARCHAR2(255) NULL COUNTRY None The user's country. TEXT VARCHAR2(20) NULL NULL DEPARTMENT None The user's department. TEXT VARCHAR2(60) DESCRIPTION None A description of the user's account. TEXT VARCHAR2(60) NULL EMAIL None The user's email address. TEXT VARCHAR2(60) NULL FAX None The user's fax number. FILTER None FIRST_NAME None The user's first name. TEXT VARCHAR2(50) NULL LAST_NAME None The user's last name. TEXT VARCHAR2(50) NULL LOCATION None The user's location. TEXT VARCHAR2(60) NULL MANAGER None The user's manager. TEXT VARCHAR2(20) NULL PASSWD None The user's encrypted password. TEXT VARCHAR2(32) NULL TEXT VARCHAR2(20) NULL TEXT VARCHAR2(10) NULL PHONE None The user's phone number. TEXT VARCHAR2(20) NULL STATE None The user's state. TEXT VARCHAR2(20) NULL USR_ID None The user's ID. TEXT VARCHAR2(20) NOT NULL ZIP None The user's zip code TEXT VARCHAR2(20) NULL View Data Table OPP_BRS - Bar Set Definitions The Bar Set Definition table stores bar set definitions used by barchart views. The data dictionary table identifier for table OPP_BRS is BRS. Open Plan Data Type Field Name Field Label Description Oracle Data Type Nulls BRS_ID None The unique name of a bar set. TEXT VARCHAR2(32) NOT NULL BRS_UID None The unique identifier of a bar set. This field is not displayed in Open Plan. GUID VARCHAR2(22) NOT NULL DATA None The binary data used by a bar set. LONG RAW NULL DATALEN None INTE NUMBER(10, 0) NULL DESCRIPTION None The description of a bar set. TEXT DATE NULL LASTUPDATE None The date and time that the bar set record was last updated. DATE DATE NOT NULL SEQUENCE None Used to manage multi-user concurrency in shared mode. INTE NUMBER(10, 0) NOT NULL TYPE None Flag used to determine the type of bar set, Activity or Multi-table. INTE These values are stored in the Open Plan database as 0 and 1, respectively. NUMBER(10, 0) NULL USR_ID None The user ID of the last user to update the bar set. TEXT VARCHAR2(20) NOT NULL VERSION None INTE NUMBER(10, 0) NULL Table OPP_EMF - Metafiles The Metafile Data table stores the list metafile names that are used by title blocks and bar charts. The data dictionary table identifier for table OPP_EMF is EMF. Field Name Field Label Description DATA None The binary field used to store enhanced metafiles. DATALEN None Open Plan Data Type INTE Oracle Data Type Nulls LONG RAW NULL NUMBER(10, 0) NULL DESCRIPTION None The description of a metafile. TEXT VARCHAR2(60) EMF_ID None The name of a metafile. TEXT VARCHAR2(20) NULL NOT NULL SHAPE None The shape of the metafile. Used to help categorize metafiles into manageable groups. TEXT VARCHAR2(32) NULL Table OPP_VLD - View Layout Data The View Layout table stores information that results from the intersection of a view and the data that is being viewed (for example, the box placements on a network drawing or the collapse/expand settings of a subsectioned spreadsheet). This table is not defined in the Open Plan data dictionary, and its structure must not be changed. Field Name Field Label Description Open Plan Data Type Oracle Data Type DATA None The view layout data. None LONG RAW NOT NULL DIR_UID None The unique identifier of the directory object for which the view layout data is being stored. None VARCHAR2(22) NOT NULL VUE_UID None The unique identifier of the view for which the view layout data is None being stored. VARCHAR2(22) NOT NULL Nulls Table OPP_VTB - View Title Blocks The Title Block table stores information relating to title block definitions used by views. The data dictionary table identifier for table OPP_VTB is VTB. Field Label Description Open Plan Data Type Oracle Data Type DATA None The binary data used by a title block. None LONG RAW NULL DATALEN None INTE NUMBER(10, 0) NULL NULL Field Name Nulls DESCRIPTION None The description of a view title block. TEXT VARCHAR2(60) LASTUPDATE None The date and time that the title block record was last updated. DATE DATE NOT NULL SEQUENCE None Used to manage multi-user concurrency in shared mode. INTE NUMBER(10, 0) NOT NULL USR_ID None The last user to update the title block. TEXT VARCHAR2(20) NOT NULL VTB_ID None The unique name of a view title block. TEXT VARCHAR2(20) NOT NULL Table OPP_VUE - View Data The View Data table stores sort, filter, and title block properties for each defined view. The data dictionary table identifier for table OPP_VUE is VUE. Field Name Field Label Description Open Plan Data Type Oracle Data Type Nulls BRS_ID None The name of a bar set assigned to a view. TEXT VARCHAR2(20) NULL DATA None The binary data used by a view. None LONG RAW NULL DATA_TYPE None TEXT VARCHAR2(4) NULL DATALEN None DIR_UID None The unique identifier that links a view data record to a unique view object directory record. This field is not displayed in Open Plan. ETYPE None INTE NUMBER(10, 0) NULL GUID VARCHAR2(22) NOT NULL The type of view. Valid values are B (Barchart), C (Code View), H VIEW (Resource Histogram), K (Risk Histogram), M (Multi-table Spreadsheet), N (Network View), R (Resource View), S (Spreadsheet), X (Multi-table Barchart), and Y (Calendar View) VARCHAR2(4) NOT NULL NULL FLT_ID None The filter name or expression applied to a view. TEXT VARCHAR2(1024) SRT_ID None The sort name or expression applied to a view. TEXT VARCHAR2(1024) NULL VERSION None INTE NUMBER(10, 0) NULL VTB_ID None TEXT VARCHAR2(20) NULL The name of a view title block assigned to a view. User Data Baseline Data Table OPP_BAS - Project Baseline Directory The Project Baseline Directory stores information used to define baselines that have been created on a project. The data dictionary table identifier for table OPP_BAS is BAS. Field Name Field Label Description Open Plan Data Type Oracle Data Type Nulls BAS_ID None The name of a baseline, unique within a project. TEXT VARCHAR2(10) NOT NULL BAS_UID None The unique identifier for a baseline record. This field is not displayed in Open Plan. GUID VARCHAR2(22) NOT NULL BASETYPE None A flag indicating the baseline type (Early, Late, or Scheduled). INTE NUMBER(10, 0) NOT NULL These values are stored in the Open Plan database as 0, 1, 2, respectively. DESCRIPTION Description The description of a baseline. TEXT VARCHAR2(60) NULL DIR_UID None The unique identifier that links a baseline record to a unique GUID project object directory record. This field is not displayed in Open Plan. VARCHAR2(22) NOT NULL FILTER None The filter used when updating a baseline. TEXT VARCHAR2(1024) NULL FLAGS None Specifies the options that were selected on the baseline update dialog. INTE NUMBER(10, 0) NULL LASTUPDATE None The date and time that the baseline was last updated. DATE DATE NOT NULL OWNER_ID None The user ID of the baseline's owner. TEXT VARCHAR2(20) NOT NULL SEQUENCE None Used to manage multi-user concurrency in shared mode. INTE NUMBER(10, 0) NOT NULL USR_ID None TEXT VARCHAR2(20) NOT NULL Table OPP_BCR - Baseline Activity Calculated Results The Baseline Activity Calculated Results table contains data that is calculated by the scheduling and cost calculation modules. The data dictionary table identifier for table OPP_BCR is BCR. Open Plan Data Type Field Name Field Label Description Oracle Data Type Nulls ACWP_LAB ACWP Labor The actual cost of work performed for labor resources assigned to DBLE an activity in a baseline. NUMBER(15, 2) NULL ACWP_MAT ACWP Material The actual cost of work performed for material resources assigned to an activity in a baseline. DBLE NUMBER(15, 2) NULL ACWP_ODC ACWP Other Direct Cost The actual cost of work performed for other resources assigned to DBLE an activity in a baseline. NUMBER(15, 2) NULL ACWP_QTY Labor Actual Units The quantity of units for the work performed by labor resources assigned to the activity. DBLE NUMBER(15, 2) NULL ACWP_SUB ACWP Subcontract The actual cost of work performed for subcontract resources assigned to an activity in a baseline. DBLE NUMBER(15, 2) NULL BAC_LAB BAC Labor The budget at completion for labor resources assigned to an activity in a baseline. DBLE NUMBER(15, 2) NULL BAC_MAT BAC Material The budget at completion for material resources assigned to an activity in a baseline. DBLE NUMBER(15, 2) NULL BAC_ODC BAC Other Direct Cost The budget at completion for other resources assigned to an activity in a baseline. DBLE NUMBER(15, 2) NULL BAC_QTY Labor Budget Units The total number of labor resource units budgeted for the activity DBLE in the baseline. NUMBER(15, 2) NULL BAC_SUB BAC Subcontract The budget at completion for subcontract resources assigned to an activity in a baseline. DBLE NUMBER(15, 2) NULL BAS_UID None The unique identifier for a baseline record. This field is not displayed in Open Plan. The baseline’s name (BAS_ID) is displayed instead. GUID VARCHAR2(22) NOT NULL BCWP_LAB BCWP Labor The budgeted cost of work performed for labor resources assigned to an activity in a baseline. DBLE NUMBER(15, 2) NULL BCWP_MAT BCWP Material The budgeted cost of work performed for material resources assigned to an activity in a baseline. DBLE NUMBER(15, 2) NULL BCWP_ODC BCWP Other Direct Cost The budgeted cost of work performed for other resources assigned to an activity in a baseline. DBLE NUMBER(15, 2) NULL BCWP_QTY Labor Earned Units The earned value of labor resource units budgeted for the activity DBLE in a baseline. NUMBER(15, 2) NULL BCWP_SUB BCWP Subcontract The budgeted cost of work performed for subcontract resources assigned to an activity in a baseline. DBLE NUMBER(15, 2) NULL BCWS_LAB BCWS Labor The budgeted cost of work scheduled for labor resources assigned DBLE to an activity in a baseline. NUMBER(15, 2) NULL BCWS_MAT BCWS Material The budgeted cost of work scheduled for material resources assigned to an activity in a baseline. DBLE NUMBER(15, 2) NULL BCWS_ODC BCWS Other Direct Cost The budgeted cost of work scheduled for other resources assigned to an activity in a baseline. DBLE NUMBER(15, 2) NULL BCWS_QTY Labor Scheduled Units The budgeted quantity of labor for the work scheduled for the project from the baseline start date until time now. DBLE NUMBER(15, 2) NULL BCWS_SUB BCWS Subcontract The budgeted cost of work scheduled for subcontract resources assigned to an activity in a baseline. DBLE NUMBER(15, 2) NULL BSA_UID Activity ID The unique identifier of a baseline activity record. This field is not GUID displayed in Open Plan. VARCHAR2(22) NOT NULL COMP_RS_C Sched. Actions Indicates if an activity in a baseline was split, stretched, or RSCL reprofiled. Valid values are: Normal, Splittable, Stretchable, Reprofilable, and Immediate. These values are stored in the Open Plan database as null, P, T, R, and I, respectively. VARCHAR2(4) NULL COMPSTAT Computed Status The computed status of an activity in a baseline. Valid value are Planned, In Progress and Complete. These values are stored in the database as 0, 1, and 2, respectively. ACTS VARCHAR2(4) NULL CRITICAL Critical Flag The critical flag for an activity in a baseline. Valid values are: Not CRIT Critical, Critical, Most Critical, and Controlling Critical. These values are stored in the Open Plan database as 0, 1, 2, and 3, respectively. VARCHAR2(4) NULL CRITINDEX Probability of Being Critical The criticality index for an activity in a baseline. INTE NUMBER(10, 0) NULL DELAYRES_UID Delaying Res. The unique identifier of the delaying resource for an activity in a baseline. This field is not displayed in Open Plan. GUID VARCHAR2(22) NULL DIR_UID Name The unique identifier that links the baseline activity calculated results record to a unique project object directory record. This field is not displayed in Open Plan. The project’s name (DIR_ID) is displayed instead. GUID VARCHAR2(22) NOT NULL EFDATE Early Finish The early finish date for an activity in a baseline. FDAT DATE NULL ESDATE Early Start The early start date for an activity in a baseline. DATE DATE NULL ETC_LAB ETC Labor The estimate to complete for labor resources assigned to an activity in a baseline. DBLE NUMBER(15, 2) NULL ETC_MAT ETC Material The estimate to complete for material resources assigned to an activity in a baseline. DBLE NUMBER(15, 2) NULL ETC_ODC ETC Other Direct Cost The estimate to complete for other resources assigned to an activity in a baseline. DBLE NUMBER(15, 2) NULL ETC_QTY Labor Remaining Units The estimated labor remaining quantity for an activity in a baseline. DBLE NUMBER(15, 2) NULL ETC_SUB ETC Subcontract The estimate to complete for subcontract resources assigned to an activity in a baseline. DBLE NUMBER(15, 2) NULL FEDATE Earliest Feasible Start The earliest feasible start date for an activity in a baseline. DATE DATE NULL FINFREEFLT Finish Free Float The finish free float for an activity in a baseline. DURA VARCHAR2(10) NULL FINTOTFLT Finish Total Float The finish total float for an activity in a baseline. DURA VARCHAR2(10) NULL FREEFLOAT Free Float The free float of an activity in a baseline. DURA VARCHAR2(10) NULL LFDATE Late Finish The late finish date for an activity in a baseline. FDAT DATE NULL LOGICFLAG Activity Logic Flag The activity logic flag for an activity in a baseline. Valid values are: Start Activity, None, End Activity, Start and Finish Activity, and Isolated, which are stored in the database as S, null, F, SF, and I, respectively. LOGI VARCHAR2(4) NULL LSDATE Late Start The late start date for an activity in a baseline. DATE DATE NULL MEAN_EF Mean Early Finish The mean early finish date for an activity in a baseline. FDAT DATE NULL MEAN_ES Mean Early Start The mean early start date for an activity in a baseline. DATE DATE NULL MEAN_FF Mean Free Float The mean free float for an activity in a baseline. DURA VARCHAR2(10) NULL MEAN_LF Mean Late Finish The mean late finish date for an activity in a baseline. FDAT DATE NULL MEAN_LS Mean Late Start The mean late start date for an activity in a baseline. DATE DATE NULL MEAN_TF Mean Total Float The mean total float for an activity in a baseline. DURA VARCHAR2(10) NULL REM_DUR Computed Remaining The remaining portion of the original duration for an activity in a Dur. baseline. DURA VARCHAR2(10) NULL RES_DATE First Usage The date upon which an activity in a baseline first used a resource DATE DATE NULL RS_FLOAT Sched. Float The scheduled float for an activity in a baseline. DURA VARCHAR2(10) NULL SCHED_DUR Sched. Duration The scheduled duration for an activity in a baseline. DURA VARCHAR2(10) NULL SDEV_EF Std. Deviation of The early finish standard deviation for an activity in a baseline. FDAT VARCHAR2(10) NULL Early Finish SDEV_ES Std. Deviation of Early Start The early start standard deviation for an activity in a baseline. DATE VARCHAR2(10) NULL SDEV_FF Std. Deviation of Free Float The free float standard deviation for an activity in a baseline DURA VARCHAR2(10) NULL SDEV_LF Std. Deviation of Late Finish The late finish standard deviation for an activity in a baseline. DURA VARCHAR2(10) NULL SDEV_LS Std. Deviation of Late Start The late start standard deviation for an activity in a baseline. DATE VARCHAR2(10) NULL SDEV_TF Std. Deviation of Total Float The total float standard deviation for an activity in a baseline. DURA VARCHAR2(10) NULL SFDATE Sched. Finish The scheduled finish date for an activity in a baseline. FDAT DATE NULL SSDATE Sched. Start The scheduled start date for an activity in a baseline. DATE DATE NULL TOTALFLOAT Total Float The total float for an activity in a baseline. DURA VARCHAR2(10) NULL Table OPP_BSA - Baseline Activity Details The Baseline Activity Details table contains information copied from the Activity Details table for baseline comparison purposes. The data dictionary table identifier for table OPP_BSA is BSA. Open Plan Data Type Field Name Field Label Description Oracle Data Type Nulls ACT_TYPE Activity Type The activity type stored in a baseline for an activity. Valid values ACTT are: ALAP, ASAP, Discontinuous, Effort Driven, External Subproject, Finish Milestone, Hammock, Subproject, and Start Milestone, which are stored in the database as L, N, D, R, E, F, H, P and S , respectively. In multi-projects where not all external subprojects are opened, the types Foreign Project, Foreign Subproject, and Foreign Activity may be present, but these types are not stored in the database. If exported, the short forms for Foreign Project, Foreign Subproject, and Foreign Activity are Z, Y and G, respectively. VARCHAR2(4) NULL ACT_UID Activity ID The unique identifier that links an activity record to a baseline activity records. This field is not displayed in Open Plan. The activity ID (ACT_ID) field is displayed instead. GUID VARCHAR2(22) NOT NULL AFDATE Actual Finish The actual finish date stored in a baseline for an activity. FDAT DATE NULL ASDATE Actual Start The actual start date stored in a baseline for an activity. DATE DATE NULL BAS_UID None The unique identifier for a baseline record. This field is not displayed in Open Plan. GUID VARCHAR2(22) NOT NULL BFDATE Actual Start The baseline finish date stored in a baseline for an activity. FDAT DATE NULL BSA_ID Baseline Activity ID The activity ID of an baseline activity record. TEXT VARCHAR2(59) NOT NULL BSA_UID None The unique identifier of a baseline activity record. GUID VARCHAR2(22) NOT NULL BSDATE Baseline Start The baseline finish date stored in a baseline for an activity. DATE DATE NULL CLH_UID Calendar ID The unique identifier that links a baseline activity record to a unique calendar detail record. This field is not displayed in Open Plan. The calendar’s name (CLH_ID) is displayed instead. GUID VARCHAR2(59) NULL DESCRIPTION Activity Desc. The activity description stored in a baseline for an activity. TEXT VARCHAR2(100) NULL DHIGH Pessimistic Duration The maximum duration for an activity in a baseline. DURA VARCHAR2(10) NULL DIR_UID Project File The unique identifier of a project object directory record. This field is not displayed in Open Plan. The project’s name (DIR_ID) is displayed instead. GUID VARCHAR2(22) NOT NULL DLOW Optimistic Duration The minimum duration for an activity in a baseline. CURA VARCHAR2(10) NULL DSHAPE Duration Distribution The duration distribution curve for an activity in a baseline. Type DIST VARCHAR2(4) NULL EVT Earned Value Technique The earned value technique assigned to an activity in a baseline. EVTE Valid values are: Level of Effort, Percent Complete, 50-50, 0-100, 100-0, User-Defined Percentage, Planning Package, and Resource % Complete. These values are stored in the Open Plan database as A, C, E, F, G, H, K, and L, respectively. VARCHAR2(2) NULL MAXDUR Max. Duration The maximum duration of a stretchable or reprofilable activity in a baseline. VARCHAR2(10) NULL MAXSPLITS Max. Number of Splits The maximum number of splits possible for a splittable activity in INTE a baseline. NUMBER(10, 0) NULL MINSPLITD Min. Split Length The minimum size of a split for a splittable activity in a baseline. DURA VARCHAR2(10) NULL OPKEY Key Activity The state of the key activity flag for an activity in a baseline. BOOL VARCHAR2(4) NULL ORIG_DUR Original Duration The original duration for an activity in a baseline. DURA VARCHAR2(10) NULL PPC Physical % Complete The physical percent complete for an activity in a baseline. DBLE NUMBER(15, 2) NULL PRIORITY Priority Resource scheduling priority for an activity in a baseline. INTE NUMBER(10, 0) NULL PROGTYPE Progress Type The progress type used by an activity in a baseline. Valid values PROG are: Planned, Remaining Duration, Percent Complete, Elapsed Duration, Expected Finish, and Complete. These values are stored in the Open Plan database as null, R, P, E, X, and C, respectively. VARCHAR2(4) NULL PROGVALUE Progress Value The progress value for an activity in a baseline. DURA VARCHAR2(10) NULL RS_SUPRESS Suppress Requirements The state of the suppress resources flag for an activity in a baseline. BOOL VARCHAR2(4) NULL RSCLASS R/S Type The resource scheduling options for an activity in a baseline. Valid values are: Normal, Splittable, Stretchable, Reprofilable, and Immediate. These values are stored in the Open Plan database as null, P, T, R, and I, respectively. RSCL VARCHAR2(4) NULL SEP_ASG Separate Assignments The state of the Separate Assignments flag for an activity in a baseline. BOOL VARCHAR2(4) NULL DURA SEQUENCE Update Count Used to manage multi-user concurrency in shared mode. INTE NUMBER(10, 0) NOT NULL STARTPC User Defined EVT Split % When using the "User-defined percentage" earned value technique, this field contains the percentage earned at the start of the activity in a baseline. INTE NUMBER(10, 0) NULL TARGFTYPE Target Finish Type The target finish type for an activity in a baseline. Valid values are: None, Not Earlier Than, Not Later Than, On Target, and Fixed Target. These values are stored in the Open Plan database as null, NE, NL, ON, and FX, respectively. TARG VARCHAR2(4) NULL TARGSTYPE Target Start Type The target start type for an activity in a baseline. Valid values are: None, Not Earlier Than, Not Later Than, On Target, and Fixed Target. These values are stored in the Open Plan database as null, NE, NL, ON, and FX, respectively. TARG VARCHAR2(4) NULL TFDATE Target Finish The target finish date for an activity in a baseline. FDAT DATE NULL TSDATE Target Start The target start date for an activity in a baseline. DATE DATE NULL XFDATE Expected Finish The expected finish stored in a baseline for an activity FDAT DATE NULL Table OPP_BSC - Baseline Access Control List The Baseline Access Control table stores access control list information for items in the baseline directory table. The data dictionary table identifier for table OPP_BSC is BSC. Field Name Field Label ACCESS_ID None BAS_UID None BSC_UID None ID_TYPE None RIGHTS None Open Plan Data Type Oracle Data Type Nulls TEXT VARCHAR2(20) NOT NULL The unique identifier for a baseline record. This field is not displayed in Open Plan. GUID VARCHAR2(22) NOT NULL The unique identifier for a baseline access control record. GUID VARCHAR2(22) NOT NULL TEXT VARCHAR2(2) NOT NULL TEXT VARCHAR2(5) NOT NULL Description Table OPP_BSD - Baseline Subproject Associations The Baseline Association table contains information that associates baselines created in a master project with its external subprojects so that the baseline can be viewed and edited in the external subproject. The data dictionary table identifier for table OPP_BSD is BSD. Field Name Field Label Description Open Plan Data Type Oracle Data Type Nulls BAS_UID None The unique identifier for a baseline record. This field is not displayed in Open Plan. GUID VARCHAR2(22) NOT NULL BASESEL None Indicates if a baseline is selected or not. The value is 1 if selected INTE and 0 if not. NUMBER(10, 0) NULL BSD_UID None The unique identifier of a baseline description record. GUID VARCHAR2(22) NOT NULL DIR_UID None The unique identifier that links a baseline record to a unique GUID project object directory record. This field is not displayed in Open Plan. VARCHAR2(22) NOT NULL Table OPP_BSU - Baseline Resource Usage The Baseline Resource Usage table contains information copied from the resource usage table for baseline comparison purposes. The data dictionary table identifier for table OPP_BSU is BSU. Open Plan Data Type Oracle Data Type Nulls The unique identifier that links an assignment record for an activity stored in a baseline to the resource record representing the resource assignment alternate. GUID VARCHAR2(22) NULL Early Finish The unique identifier for a resource assignment in a baseline. GUID VARCHAR2(22) NULL None The unique identifier for a baseline record. This field is not displayed in Open Plan. GUID VARCHAR2(22) NOT NULL BSA_UID None The unique identifier of a baseline activity record. This field is not GUID displayed in Open Plan. VARCHAR2(22) NOT NULL BSU_UID None The unique identifier of a baseline resource usage record. This field is not displayed in Open Plan. GUID VARCHAR2(22) NOT NULL CLH_UID None The unique identifier of the resource calendar for a baseline usage record. GUID VARCHAR2(22) NULL CST_CLASS Cost Class The cost class for a resource assignment in a baseline. TEXT VARCHAR2(20) NULL DIR_UID None The unique identifier that links a baseline usage record to a unique project object directory record. This field is not displayed in Open Plan. The project’s name (DIR_ID) is displayed instead. GUID VARCHAR2(22) NOT NULL PALLOC_UID Project Allocation The unique identifier of the project directory object for which this GUID resource was reserved. This field is not displayed in Open Plan. VARCHAR2(22) NULL RDS_UID None The unique identifier that links a baseline usage record to a GUID unique resource object directory record. This field is not displayed in Open Plan. The resource file’s name (DIR_ID) is displayed instead. VARCHAR2(22) NOT NULL RES_CST Resource Cost The cost for resource usage in a baseline. DBLE NUMBER(15, 2) NULL RES_ESC Resource Escalated The escalated cost for resource usage in a baseline. DBLE NUMBER(15, 2) NULL Field Name Field Label Description ALT_RES_UID Alternate Res. ID ASG_UID BAS_UID Cost RES_UID A unique identifier that links a baseline usage record to a resource file. GUID VARCHAR2(22) NOT NULL RES_USED Res. Used The total quantity of resource used between the start and finish dates of the baseline record. DBLE NUMBER(15, 2) NULL RFDATE Finish Date The end of the period during which the resource was used in the baseline. FDAT DATE NULL RSDATE Start Date The beginning of the period during which the resource was used in the baseline. DATE DATE NULL SEQUENCE Update Count Used to manage multi-user concurrency in shared mode. INTE NUMBER(10, 0) NOT NULL Calendar Data Table OPP_CLH - Calendar Headers The Calendar Header table stores calendar name and description information for individual calendar definitions within a calendar file. The data dictionary table identifier for table OPP_CLH is CLH. Field Name Field Label Description CLH_ID None CLH_UID Open Plan Data Type Oracle Data Type Nulls The name of a calendar within a calendar file, unique within each HIEI file. VARCHAR2(59) NOT NULL None A unique identifier for a calendar header record. This value is not GUID displayed in Open Plan. VARCHAR2(22) NOT NULL DESCRIPTION None The description of a calendar within a calendar file. VARCHAR2(100) NULL DIR_UID None The unique identifier that links a calendar header record to a GUID unique calendar object directory record. This field is not displayed in Open Plan. VARCHAR2(22) NOT NULL LASTUPDATE None The date and time that the calendar was last updated. DATE DATE NOT NULL SEQUENCE None Used to manage multi-user concurrency in shared mode. INTE NUMBER(10, 0) NOT NULL SUPPRESS None BOOL VARCHAR2(4) NULL USR_ID None TEXT VARCHAR2(20) NOT NULL The user ID of the user who last updated the record. TEXT Table OPP_CLR - Calendar Details The Calendar Detail table stores the working and non-working information for calendars defined in the calendar header table. The data dictionary table identifier for table OPP_CLR is CLR. Open Plan Data Type Oracle Data Type Nulls The unique identifier that links a calendar detail record to the calendar header table. This field is not displayed in Open Plan. GUID VARCHAR2(22) NOT NULL None A unique identifier for a calendar detail record. GUID VARCHAR2(22) NOT NULL None A string that identifies a type of rule for a calendar. Valid values are: Sunday through Saturday (standard days); a date with no year (recurring holidays); a specific date. DSPC VARCHAR2(10) NOT NULL DIR_UID None The unique identifier that links a calendar detail record to a GUID unique calendar object directory record. This field is not displayed in Open Plan. VARCHAR2(22) NOT NULL OPFINISH None A valid time later than the OPSTART time. SHFT VARCHAR2(6) NOT NULL OPSTART None A valid time. SHFT VARCHAR2(6) NOT NULL OPWORK None Flag indicating whether the specified date period is working or non-working. BOOL VARCHAR2(4) NOT NULL SEQUENCE None Used to manage multi-user concurrency in shared mode. INTE NUMBER(10, 0) NOT NULL Field Name Field Label Description CLH_UID None CLR_UID DATESPEC Code Data Table OPP_CRA - Code Assignments The Code Assignments table stores code values assigned to projects, activities, resources, and codes. The COD_NUMBER field identifies the code number to which the CDR_UID value is associated. This table is a sparse storage mechanism that contains only the records that have been assigned. The data dictionary table identifier for table OPP_CRA is CRA. Open Plan Data Type Oracle Data Type Nulls GUID VARCHAR2(22) NULL DIR_UID GUID VARCHAR2(22) NOT NULL FIELD_NAME TEXT VARCHAR2(60) NOT NULL FIELD_VALUE CODE VARCHAR2(22) NOT NULL GUID VARCHAR2(22) NOT NULL GUID VARCHAR2(22) NOT NULL TEXT VARCHAR2(4) NOT NULL Field Name Field Label BAS_UID The unique identifier that links a baseline record to a code assignment. This field is not displayed in Open Plan. FK_UID The unique ID that links a code record to a record in another table. This value is not displayed in Open Plan. ROW_UID TABLE_TYPE Description File Type Table WST_CDR - Code Breakdown Definition The Code Breakdown Definitions table contains the code elements that make up a code breakdown structure. The data dictionary table identifier for table WST_CDR is CDR. Field Name Field Label Description Open Plan Data Type Oracle Data Type Nulls BARCOLOR None Not used by Open Plan. None NUMBER(15, 2) NULL BARSTYLE None Not used by Open Plan. None VARCHAR2(6) NULL BOXCOLOR None Not used by Open Plan. None VARCHAR2(6) NULL BOXSTYLE None Not used by Open Plan. None VARCHAR2(6) NULL CA_PF None Not used by Open Plan. None NUMBER(15, 2) NULL CA_PU None Not used by Open Plan. None NUMBER(15, 2) NULL CA_VF None Not used by Open Plan. None NUMBER(15, 2) NULL CA_VU None Not used by Open Plan. None NUMBER(15, 2) NULL CC_PF None Not used by Open Plan. None NUMBER(15, 2) NULL CC_PU None Not used by Open Plan. None NUMBER(15, 2) NULL CC_VF None Not used by Open Plan. None NUMBER(15, 2) NULL CC_VU None Not used by Open Plan. None NUMBER(15, 2) NULL CDR_ID Code ID A unique code within a code breakdown structure. None VARCHAR2(59) NULL CDR_UID None The unique identifier of a code record. This field is not displayed in Open Plan. GUID VARCHAR2(22) NOT NULL CP_PF None Not used by Open Plan. None NUMBER(15, 2) NULL CP_PU None Not used by Open Plan. None NUMBER(15, 2) NULL CP_VF None Not used by Open Plan. None NUMBER(15, 2) NULL CP_VU None Not used by Open Plan. None NUMBER(15, 2) NULL DESCRIPTION Code Description The description of a record in a code breakdown structure. TEXT VARCHAR2(100) NULL DIR_UID None GUID VARCHAR2(22) NOT NULL LASTUPDATE Last Updated The date and time that the code record was last updated. DATE DATE NOT NULL NUMCHILD None Not used by Open Plan. None NUMBER(10, 0) NULL PARENT None Not used by Open Plan. None VARCHAR2(59) NULL POSITION_NUM Child Position INTE NUMBER(10, 0) NULL SC_PF None Not used by Open Plan. None NUMBER(15, 2) NULL SC_PU None Not used by Open Plan. None NUMBER(15, 2) NULL SC_VF None Not used by Open Plan. None NUMBER(15, 2) NULL SC_VU None Not used by Open Plan. None NUMBER(15, 2) NULL SEQUENCE Update Count Used to manage multi-user concurrency in shared mode. INTE NUMBER(10, 0) NOT NULL SP_PF None Not used by Open Plan. None NUMBER(15, 2) NULL SP_PU None Not used by Open Plan. None NUMBER(15, 2) NULL SP_VF None Not used by Open Plan. None NUMBER(15, 2) NULL SP_VU None Not used by Open Plan. None NUMBER(15, 2) NULL SUPPRESS Suppress INTE VARCHAR2(4) NULL TAG None Not used by Open Plan. None VARCHAR2(20) NULL USR_ID Updated By The user ID of the last user to update the code. TEXT VARCHAR2(20) NOT NULL Explorer Data Table OPP_EXF - Explorer Folders The Explorer Folders table stores the data associated with folders assigned to the Open Plan Explorer. The data dictionary table identifier for table OPP_EXF is EXF. Field Name Field Label Description Open Plan Data Type Oracle Data Type Nulls DIR_UID None The object directory item in which the folder was created. GUID VARCHAR2(22) NULL EXF_ID None The unformatted name of the Open Plan Explorer Folder. HIEI VARCHAR2(60) NOT NULL EXF_UID None The unique identifier of an Open Plan Explorer folder. This value is not displayed in Open Plan. GUID VARCHAR2(22) NOT NULL TABLE_TYPE None TEXT VARCHAR2(4)) NULL USR_ID None TEXT VARCHAR2(22) NULL The user to whom the Open Plan Explorer folder belongs. Table OPP_EXI - Explorer Folder Items The Explorer Folder Items table stores the data associated with folder items assigned to the Open Plan Explorer. The data dictionary table identifier for table OPP_EXI is EXI. Open Plan Data Type Oracle Data Type Nulls For rows where the table type is VUE, specifies the unique identifier of the object directory item to which the view is assigned. GUID VARCHAR2(22) NULL None The unique identifier of an Open Plan Explorer folder. This value is not displayed in Open Plan. GUID VARCHAR2(22) NULL None The unique identifier of an Open Plan Explorer folder item. This GUID VARCHAR2(22) NOT NULL Field Name Field Label Description DIR_UID None EXF_UID EXI_UID value is not displayed in Open Plan. ITEM_TYPE None The type of item. Valid values are: CLD (Calendar file), COD (Code file), PJT (Project template), PRJ (Project file), RDS (Resource file), and VUE (View). TEXT VARCHAR2(4) NULL ITEM_UID None The unique identifier for an Open Plan Explorer item. This field is not displayed in Open Plan. GUID VARCHAR2(22) NULL USR_ID None The user to whom the item belongs. If blank, the item refers to the Projects or Open Plan Library folders. TEXT VARCHAR2(20) NULL Table OPP_EXL - Explorer Listview Fields The Explorer Listview fields table contains the fields selectable for display in the list view of the Open Plan Explorer. This table is not defined in the Open Plan data dictionary, and its structure must not be changed. Open Plan Data Type Oracle Data Type Nulls None VARCHAR2(50) NULL A field displayed in the Explorer folder’s listview. None VARCHAR2(60) NOT NULL The field’s position in the listview. None NUMBER(10, 0) NOT NULL None The field upon which the listview items are grouped. None NUMBER(10, 0) NULL None The fields by which with list view items are sorted. None NUMBER(10, 0) NULL None None VARCHAR2(4) NOT NULL USR_ID None None VARCHAR2(20) NULL WIDTH None None NUMBER(10, 0) NOT NULL Field Name Field Label CUSTOM_NAME None FIELD_NAME None FIELD_ORDER None GROUP_FIELD SORT_FIELD TABLE_NAME Description The width of the field’s column in the listview. Table OPP_EXS - Explorer Shortcut Items The Explorer Shortcut Items table stores the data associated with shortcuts assigned to the Open Plan Explorer. The data dictionary table identifier for table OPP_EXS is EXS. Field Name Field Label Description Open Plan Data Type Oracle Data Type Nulls DATA None The definition of the shortcut. TEXT VARCHAR2(512) NOT NULL DESCRIPTION None The shortcut’s description. TEXT VARCHAR2(60) NOT NULL EXS_UID None The unique identifier of an Open Plan Explorer shortcut. This value is not displayed in Open Plan. GUID VARCHAR2(22) NOT NULL Project Data Table OPP_ACR - Activity Calculated Results The Activity Calculated Results table contains data that is calculated by the scheduling and cost calculation modules. The data dictionary table identifier for table OPP_ACR is ACR. Open Plan Data Type Oracle Data Type Nulls GUID VARCHAR2(22) NOT NULL ACWP Labor The actual cost of work performed for labor resources assigned to DBLE an activity. NUMBER(15, 2) NULL ACWP_MAT ACWP Material The actual cost of work performed for material resources assigned to an activity. DBLE NUMBER(15, 2) NULL ACWP_ODC ACWP Other Direct Cost The actual cost of work performed for other resources assigned to DBLE an activity. NUMBER(15, 2) NULL ACWP_QTY Labor Actual Units The quantity of units for the work performed by labor resources assigned to the activity. DBLE NUMBER(15, 2) NULL ACWP_SUB ACWP Subcontract The actual cost of work performed for subcontract resources assigned to an activity. DBLE NUMBER(15, 2) NULL BAC_LAB BAC Labor The budget at completion for labor resources assigned to an activity. DBLE NUMBER(15, 2) NULL BAC_MAT BAC Material The budget at completion for material resources assigned to an activity. DBLE NUMBER(15, 2) NULL BAC_ODC BAC Other Direct Cost The budget at completion for other resources assigned to an activity. DBLE NUMBER(15, 2) NULL BAC_QTY Labor Budget Units The total number of labor resource units budgeted for the activity. DBLE NUMBER(15, 2) NULL BAC_SUB BAC Subcontract The budget at completion for subcontract resources assigned to an activity. DBLE NUMBER(15, 2) NULL BCWP_LAB BCWP Labor The budgeted cost of work performed for labor resources assigned to an activity. DBLE NUMBER(15, 2) NULL BCWP_MAT BCWP Material The budgeted cost of work performed for material resources assigned to an activity. DBLE NUMBER(15, 2) NULL BCWP_ODC BCWP Other Direct Cost The budgeted cost of work performed for other resources assigned to an activity. DBLE NUMBER(15, 2) NULL BCWP_QTY Labor Earned Units The earned value of labor resource units budgeted for the activity. DBLE NUMBER(15, 2) NULL BCWP_SUB BCWP Subcontract The budgeted cost of work performed for subcontract resources assigned to an activity. DBLE NUMBER(15, 2) NULL Field Name Field Label Description ACT_UID None The unique identifier for an activity record in the database. This field is not displayed in Open Plan. ACWP_LAB BCWS_LAB BCWS Labor The budgeted cost of work scheduled for labor resources assigned DBLE to an activity. NUMBER(15, 2) NULL BCWS_MAT BCWS Material The budgeted cost of work scheduled for material resources assigned to an activity. DBLE NUMBER(15, 2) NULL BCWS_ODC BCWS Other Direct Cost The budgeted cost of work scheduled for other resources assigned to an activity. DBLE NUMBER(15, 2) NULL BCWS_QTY Labor Scheduled Units The budgeted quantity of labor for the work scheduled for the project from the baseline start date until time now. DBLE NUMBER(15, 2) NULL BCWS_SUB BCWS Subcontract The budgeted cost of work scheduled for subcontract resources assigned to an activity. DBLE NUMBER(15, 2) NULL COMP_RS_C Sched. Actions Calculated by resource scheduling. Indicates if the activity was RSCL split, stretched, or reprofiled. Valid values are: Normal, Splittable, Stretchable, Reprofilable, and Immediate. These values are stored in the Open Plan database as null, P, T, R, and I, respectively. VARCHAR2(4) NULL COMPSTAT Computed Status The computed status of an activity as determined by time analysis. Valid value are Planned, In Progress and Complete. These values are stored in the database as 0, 1, and 2, respectively. ACTS VARCHAR2(4) NULL CRITICAL Critical Flag The critical flag for an activity. Calculated by time analysis. Valid values are: Not Critical, Critical, Most Critical, and Controlling Critical. These values are stored in the Open Plan database as 0, 1, 2, and 3, respectively. CRIT VARCHAR2(4) NULL CRITINDEX Probability of Being Critical The criticality index for an activity, calculated by risk analysis. Stores the number of times the activity fell on the critical path, expressed as a percentage. INTE NUMBER(10, 0) NULL DELAYRES_UID Delaying Res. The unique identifier of the resource that caused the activity to GUID be delayed during resource scheduling. This field is not displayed in Open Plan. VARCHAR2(22) NULL DIR_UID None The unique identifier that links the activity calculated results GUID record to a unique project object directory record. This field is not displayed in Open Plan. VARCHAR2(22) NOT NULL EFDATE Early Finish The early finish date calculated by time analysis for an activity. FDAT DATE NULL ESDATE Early Start The early start date calculated by time analysis for an activity. DATE DATE NULL ETC_LAB ETC Labor The estimate to complete for labor resources assigned to an activity. DBLE NUMBER(15, 2) NULL ETC_MAT ETC Material The estimate to complete for material resources assigned to an activity. DBLE NUMBER(15, 2) NULL ETC_ODC ETC Other Direct Cost The estimate to complete for other resources assigned to an activity. DBLE NUMBER(15, 2) NULL ETC_QTY Labor Remaining Units The estimated labor remaining quantity for an activity. DBLE NUMBER(15, 2) NULL ETC_SUB ETC Subcontract The estimate to complete for subcontract resources assigned to an activity. DBLE NUMBER(15, 2) NULL FEDATE Earliest Feasible Start The earliest feasible start date for an activity, calculated by resource scheduling. DATE DATE NULL FINFREEFLT Finish Free Float The finish free float calculated by time analysis for an activity. DURA VARCHAR2(10) NULL FINTOTFLT Finish Total Float The finish total float calculated by time analysis for an activity. DURA VARCHAR2(10) NULL FREEFLOAT Free Float The free float calculated by time analysis for an activity. DURA VARCHAR2(10) NULL LFDATE Late Finish The late finish date calculated by time analysis for an activity. FDAT DATE NULL LOGICFLAG Activity Logic Flag The activity logic flag for an activity. Indicates how this activity is LOGI related to others in the network. Valid values are: Start Activity, None, End Activity, Start and Finish Activity, and Isolated, which are stored in the database as S, null, F, SF, and I, respectively. VARCHAR2(4) NULL LSDATE Late Start The late start date calculated by time analysis for an activity. DATE DATE NULL MEAN_EF Mean Early Finish The mean early finish date calculated by risk analysis for an activity. FDAT DATE NULL MEAN_ES Mean Early Start The mean early start date calculated by risk analysis for an activity. DATE DATE NULL MEAN_FF Mean Free Float The mean free float calculated by risk analysis for an activity. DURA VARCHAR2(10) NULL MEAN_LF Mean Late Finish The mean late finish date calculated by risk analysis for an activity. FDAT DATE NULL MEAN_LS Mean Late Start The mean late start date calculated by risk analysis for an activity. DATE DATE NULL MEAN_TF Mean Total Float The mean total float calculated by risk analysis for an activity. DURA VARCHAR2(10) NULL REM_DUR Computed Remaining The remaining portion of the original duration for an activity, Dur. calculated by time analysis. Based on progress information supplied by the user or calculated during progress calculations. DURA VARCHAR2(10) NULL RES_DATE First Usage The date upon which an activity first used a resource, calculated by resource scheduling. DATE DATE NULL RS_FLOAT Sched. Float The activity's scheduled float, calculated by resource scheduling DURA VARCHAR2(10) NULL SCHED_DUR Sched. Duration The activity duration calculated by resource scheduling. DURA VARCHAR2(10) NULL SDEV_EF Std. Deviation of Early Finish The early finish standard deviation for an activity calculated by risk analysis. FDAT VARCHAR2(10) NULL SDEV_ES Std. Deviation of Early Start The early start standard deviation for an activity calculated by risk analysis. DATE VARCHAR2(10) NULL SDEV_FF Std. Deviation of Free Float The free float standard deviation for an activity calculated by risk DURA analysis. VARCHAR2(10) NULL SDEV_LF Std. Deviation of Late Finish The late finish standard deviation for an activity calculated by risk FDAT analysis. VARCHAR2(10) NULL SDEV_LS Std. Deviation of Late Start The late start standard deviation for an activity calculated by risk DATE analysis. VARCHAR2(10) NULL SDEV_TF Std. Deviation of Total Float The total float standard deviation for an activity calculated by risk DURA analysis. VARCHAR2(10) NULL SFDATE Sched. Finish The scheduled finish date calculated by resource scheduling for an activity. FDAT DATE NULL SSDATE Sched. Start The scheduled start date calculated by resource scheduling for an DATE activity. DATE NULL TOTALFLOAT Total Float The total float calculated by time analysis for an activity. VARCHAR2(10) NULL DURA Table OPP_ACT - Activity Details The Activity Details table contains information that defines an activity and its scheduling constraints. The data dictionary table identifier for table OPP_ACT is ACT. Field Name Field Label Description Open Plan Data Type Oracle Data Type Nulls ACT_ID Activity ID An activity ID, unique within a project. HEIR VARCHAR2(59) NOT NULL ACT_TYPE Activity Type The activity type stored in a baseline for an activity. Valid values ACTT are: ALAP, ASAP, Discontinuous, Effort Driven, External Subproject, Finish Milestone, Hammock, Subproject, and Start Milestone, which are stored in the database as L, N, D, R, E, F, H, P and S , respectively. In multi-projects where not all external subprojects are opened, the types Foreign Project, Foreign Subproject, and Foreign Activity may be present, but these types are not stored in the database. If exported, the short forms for Foreign Project, Foreign Subproject, and Foreign Activity are Z, Y and G, respectively. VARCHAR2(4) NULL ACT_UID None The unique identifier for an activity record in the database. This field is not displayed in Open Plan. GUID VARCHAR2(22) NOT NULL AFDATE Actual Finish The actual finish date for an activity. Value may be user-entered or calculated by progress calculations. FDAT DATE NULL ASDATE Actual Start The actual start date for an activity. Value may be user-entered or calculated by progress calculations. DATE DATE NULL BFDATE Baseline Finish The baseline finish date for an activity, based on the last baseline FDAT selection. DATE NULL BSDATE Baseline Start The baseline start date for an activity, based on the last baseline selection. DATE DATE NULL CLH_UID Calendar ID The unique identifier that links an activity record to a unique calendar record. This field is not displayed in Open Plan. The name of the calendar (CLH_ID) is displayed instead. GUID VARCHAR2(22) NOT NULL DESCRIPTION Activity Desc. The description of an activity. TEXT VARCHAR2(100) NULL DHIGH Pessimistic Duration The maximum duration used by risk analysis for an activity. DURA VARCHAR2(10) NULL DIR_UID Project File The unique identifier that links an activity record to a unique GUID project object directory record. This field is not displayed in Open Plan. The project file’s name (DIR_ID) is displayed instead. VARCHAR2(22) NOT NULL DLOW Optimistic Duration The minimum duration used by risk analysis for an activity. VARCHAR2(10) NULL DSHAPE Duration Distribution The duration distribution curve used by risk analysis for an DIST Type activity. Valid values are: None, Uniform, Normal, Beta, and Triangular. These values are stored in the Open Plan database as null, U, N, B, and T, respectively. VARCHAR2(4) NULL EVT Earned Value Technique The earned value technique assigned to an activity. Valid values are: Level of Effort, Percent Complete, 50-50, 0-100, 100-0, User-Defined Percentage, Planning Package, and Resource % Complete. These values are stored in the Open Plan database as A, C, E, F, G, H, K, and L, respectively. EVTE VARCHAR2(2) NULL LASTUPDATE Last Updated The date and time that the activity was last updated. DATE DATE NOT NULL MAXDUR Max. Duration For a stretchable or reprofilable activity, the maximum duration that resource scheduling can use for this activity. DURA VARCHAR2(10) NULL MAXSPLITS Max. Number of Splits For a splittable activity, the maximum number of times that resource scheduling can split the activity. INTE NUMBER(10, 0) NULL MINSPLITD Min. Split Length For a splittable activity, the minimum period of time that resource DURA scheduling can use when splitting the activity. VARCHAR2(10) NULL MSPUNIQUEID MSP Unique ID The MSP unique ID field for activities imported from Microsoft Project. INTE NUMBER(10, 0) NULL OPKEY Key Activity Controls whether risk analysis is to provide a detailed analysis of the activity. BOOL VARCHAR2(4) NULL ORIG_DUR Original Duration The original duration for an activity. This value is user-entered, DURA except for hammocks and subprojects, where the value is calculated by time analysis, and effort driven activities, where the value is calculated based on the amount of resource assigned to the activity. VARCHAR2(10) NULL PPC Physical % Complete The physical percent complete for an activity. Value may be user- DBLE entered or calculated by progress calculations. NUMBER(15, 2) NULL PRIORITY Priority The relative priority used by resource scheduling of this activity compared to others. INTE NUMBER(10, 0) NULL PROGTYPE Progress Type The progress type used by an activity. Controls the behavior of the activity in conjunction with the actual date information. Valid values are: Planned, Remaining Duration, Percent Complete, Elapsed Duration, Expected Finish, and Complete. These values are stored in the Open Plan database as null, R, P, E, X, and C, respectively. PROG VARCHAR2(4) NULL PROGVALUE Progress Value The progress value for an activity. The interpretation of Progress Value depends on the value of Progress Type. For example, a progress value of 100 could represent 100% complete or 100d remaining duration. DURA VARCHAR2(10) NULL DURA RS_SUPRESS Suppress Requirements If set to true, this activity and its resource requirements are ignored during resource scheduling. BOOL VARCHAR2(4) NULL RSCLASS R/S Type The resource scheduling options for an activity when the activity cannot be scheduled without conflict. Valid values are: Normal, Splittable, Stretchable, Reprofilable, and Immediate. These values are stored in the Open Plan database as null, P, T, R, and I, respectively. RSCL VARCHAR2(4) NULL SEP_ASG Separate Assignments Controls whether Open Plan should consider multiple assignments BOOL of members of the same pool or skill as separate assignments. VARCHAR2(4) NULL SEQUENCE Update Count Used to manage multi-user concurrency in shared mode. INTE NUMBER(10, 0) NOT NULL STARTPC User Defined EVT Split % When using the "User-defined percentage" earned value technique, this field contains the percentage earned at the start of the activity. The remainder is earned upon completion of the activity. INTE NUMBER(10, 0) NULL TARGFTYPE Target Finish Type The target finish type for an activity. Valid values are: None, Not TARG Earlier Than, Not Later Than, On Target, and Fixed Target. These values are stored in the Open Plan database as null, NE, NL, ON, and FX, respectively. VARCHAR2(4) NULL TARGSTYPE Target Start Type The target start type for an activity. Valid values are: None, Not TARG Earlier Than, Not Later Than, On Target, and Fixed Target. These values are stored in the Open Plan database as null, NE, NL, ON, and FX, respectively. VARCHAR2(4) NULL TFDATE Target Finish The target finish date for an activity. FDAT DATE NULL TSDATE Target Start The target start date for an activity. DATE DATE NULL USR_ID Updated By The user ID of the last user to update the activity record. TEXT VARCHAR2(10) NOT NULL XFDATE Expected Finish The expected finish date for an activity. FDAT DATE NULL Table OPP_ASG - Resource Assignments The resource assignments table stores activity resource assignments that are used for resource scheduling and cost calculations. The data dictionary table identifier for table OPP_ASG is ASG. Open Plan Data Type Oracle Data Type Nulls The unique identifier for an activity record in the database. This field is not displayed in Open Plan. The activity’s ID (ACT_ID) is displayed instead. GUID VARCHAR2(22) NOT NULL Alternate Res. ID The unique identifier that links the assignment record to the resource record representing the resource assignment alternate. GUID VARCHAR2(22) NOT NULL None The unique identifier for a resource assignment. GUID VARCHAR2(22) NOT NULL Field Name Field Label Description ACT_UID Activity ID ALT_RES_UID ASG_UID CST_CLASS Cost Class The cost class for the assignment. This information is used during TEXT Cobra integration. VARCHAR2(20) NULL DIR_UID Project File The unique identifier that links a resource assignment record to a GUID unique project object directory record. This field is not displayed in Open Plan. The project’s name (DIR_ID) is displayed instead. VARCHAR2(22) NOT NULL LASTUPDATE Last Updated The date and time that the resource assignment was last updated. DATE DATE NOT NULL LEV_TYPE Res. Curve The spread curve selected for the resource assignment. A null value means that the resource is a level-per-time unit instead of a total. Valid values for this field come from the spread curves defined via the Open Plan Tools Menu, Spread Curves. TEXT VARCHAR2(1) NULL PPC Physical % Complete The physical percent complete for a resource assignment. RDS_UID DBLE NUMBER(15, 2) NULL The unique identifier that links a resource assignment record to a GUID unique resource object directory record. This field is not displayed in Open Plan. The resource file’s name (DIR_ID) is displayed instead. VARCHAR2(22) NOT NULL REMAINING Remaining Requirement The remaining resource requirement for a resource assignment. DBLE NUMBER(15, 2) NULL RES_LEVEL Res. Level The amount of resource required by the resource assignment. DBLE NUMBER(15, 2) NULL RES_OFFSET Res. Offset The number of time units that must elapse between the start of an activity and the time when the resource starts working. DURA VARCHAR2(10) NULL RES_PERIOD Res. Period The total time for which the resource is required. DURA VARCHAR2(10) NULL The unique identifier that links the assignment record to a resource record. GUID VARCHAR2(22) NOT NULL RES_UID SEQUENCE Update Count Used to manage multi-user concurrency in shared mode. INTE NUMBER(10, 0) NOT NULL SUPPRESS Suppress Flag Flag to suppress a resource's requirement during resource scheduling. BOOL VARCHAR2(4) NULL USR_ID Updated By The user ID of the last user to update the resource assignment record. TEXT VARCHAR2(20) NOT NULL Table OPP_CST - Resource Actuals The Resource Actuals table stores actual quantities and actual costs that are incurred by resources against activities. The RDS_UID and RES_UID fields are allowed to be blank to support activity level costs. The data dictionary table identifier for table OPP_CST is CST. Field Name Field Label Description ACT_UID Activity ID The unique identifier for an activity. This field is not displayed in Open Plan. The activity’s ID (ACT_ID) field is displayed instead. Open Plan Data Type Oracle Data Type Nulls GUID VARCHAR2(22) NOT NULL ACWP_CST ACWP Cost DBLE NUMBER(15, 2) NULL ACWP_ESC ACWP Escalated Cost The escalated actual cost of work performed for an individual cost DBLE record. NUMBER(15, 2) NULL ACWP_QTY ACWP Quantity The quantity of units for the work performed by labor resources for a cost record. DBLE NUMBER(15, 2) NULL BCWP_CST BCWP Cost The budgeted cost of work performed for an individual cost record. DBLE NUMBER(15, 2) NULL BCWP_ESC BCWP Escalated Cost The escalated budgeted cost of work performed for an individual cost record. DBLE NUMBER(15, 2) NULL BCWP_QTY BCWP Quantity The earned value of labor resource units budgeted for the activity. DBLE NUMBER(15, 2) NULL CST_UID None The unique identifier for a cost record. This field is not displayed in Open Plan. GUID VARCHAR2(22) NOT NULL DIR_UID Project File The unique identifier that links a resource cost record to a unique GUID project object directory record. This field is not displayed in Open Plan. The project file name (DIR_ID) is displayed instead. VARCHAR2(22) NOT NULL END_DATE Period End Date The end date for the resource cost period. DATE NULL RDS_UID Resource File The unique identifier that links a cost record to a unique resource GUID directory object record. This field is not displayed in Open Plan. The resource file’s name (DIR_ID) is displayed instead. VARCHAR2(22) NULL The unique identifier that links a cost record to a unique resource GUID record. This field is not displayed in Open Plan. The resource ID (RES_ID) field is displayed instead. VARCHAR2(22) NULL RES_UID The actual cost of work performed for an individual cost record. FDAT SEQUENCE Update Count Used to manage multi-user concurrency in shared mode. INTE NUMBER(10, 0) NOT NULL START_DATE Period Start Date The start date for a resource cost period. DATE DATE NULL Table OPP_IRL - Inter-project Relationships The Inter-project Relationships table contains the definition and scheduling constraint information for relationships between activities in different projects. The data dictionary table identifier for table OPP_IRL is IRL. Open Plan Data Type Field Name Field Label Description Oracle Data Type Nulls CLH_UID Calendar ID The unique identifier that links the relationship record to a unique GUID calendar detail record. This field is not displayed in Open Plan. The Calendar’s name (CLH_ID) is displayed instead. VARCHAR2(22) NOT NULL The unique identifier for an inter-project relationship record. This GUID value is not displayed in Open Plan. VARCHAR2(22) NOT NULL The date and time that the inter-project relationship record was last updated. DATE NOT NULL IRL_UID LASTUPDATE Last Updated DATE PRED_ACT_UID Predecessor The unique identifier of the predecessor activity. This field is not GUID displayed in Open Plan. The predecessor activity’s ID (ACT_ID) is displayed instead. VARCHAR2(22) NOT NULL PRED_DIR_UID None The unique identifier of the predecessor activity's project. GUID VARCHAR2(22) NOT NULL REL_FF Relationship Free Float The relationship's free float. DURA VARCHAR2(10) NULL REL_LAG Relationship Lag The relationship's lag. DURA VARCHAR2(10) NOT NULL REL_TF Relationship Total Float The relationship's total float. DURA VARCHAR2(10) NULL REL_TYPE Relationship Type The relationship type. Valid values are: Finish to Start, Start to Start, Start to Finish, and Finish to Finish. These values are stored in the Open Plan database as FS, SS, SF, and FF, respectively. RELT VARCHAR2(4) NOT NULL SEQUENCE Update Count Used to manage multi-user concurrency in shared mode. INTE NUMBER(10, 0) NOT NULL SUCC_ACT_UID Successor The unique identifier of the successor activity. This field is not displayed in Open Plan. The successor activity’s ID (ACT_ID) is displayed instead. GUID VARCHAR2(22) NOT NULL SUCC_DIR_UID None The unique identifier of the successor activity's project. GUID VARCHAR2(22) NOT NULL USR_ID Updated By The user ID of the last user to update the inter-project relationship record. TEXT VARCHAR2(20) NOT NULL Table OPP_REL - Activity Relationships The Activity Relationships table contains the definition and scheduling constraint information for relationships between activities in the same project. The data dictionary table identifier for table OPP_REL is REL. Open Plan Data Type Field Name Field Label Description Oracle Data Type Nulls CLH_UID Calendar ID The unique identifier that links the relationship record to a unique GUID calendar detail record. This field is not displayed in Open Plan. The Calendar’s name (CLH_ID) is displayed instead. VARCHAR2(22) NOT NULL DIR_UID Project File The unique identifier that of a project object directory record. This field is not displayed in Open Plan. The project file’s name (DIR_ID) is displayed instead. GUID VARCHAR2(22) NOT NULL LASTUPDATE Last Updated The date and time that the relationship record was last updated. DATE DATE NOT NULL PRED_ACT_UID Predecessor The unique identifier of the predecessor activity. This field is not GUID displayed in Open Plan. The predecessor activity’s ID (ACT_ID) is displayed instead. VARCHAR2(22) NOT NULL REL_FF Relationship Free Float The relationship's free float. VARCHAR2(10) NULL DURA REL_LAG Relationship Lag The relationship's lag. DURA VARCHAR2(10) NOT NULL REL_TF Relationship Total Float The relationship's total float. DURA VARCHAR2(10) NULL REL_TYPE Relationship Type The relationship type. Valid values are: Finish to Start, Start to Start, Start to Finish, and Finish to Finish. These values are stored in the Open Plan database as FS, SS, SF, and FF, respectively. RELT VARCHAR2(4) NOT NULL REL_UID The unique identifier for an activity relationship record. GUID VARCHAR2(22) NOT NULL SEQUENCE Update Count Used to manage multi-user concurrency in shared mode. INTE NUMBER(10, 0) NOT NULL SUCC_ACT_UID Successor The unique identifier of the successor activity. This field is not displayed in Open Plan. The successor activity’s ID (ACT_ID) is displayed instead. GUID VARCHAR2(22) NOT NULL USR_ID Updated By The user ID of the user who last updated the relationship record. TEXT VARCHAR2(20) NOT NULL Table OPP_RSK - Risk Key Activities The risk key activities table contains information generated by the risk analysis module for activities that are marked as key activities. The data dictionary table identifier for table OPP_RSK is RSK. Open Plan Data Type Oracle Data Type Nulls The unique identifier for an activity record in the database. This field is not displayed in Open Plan. The activity’s ID (ACT_ID) is displayed instead. GUID VARCHAR2(22) NOT NULL Project File The unique identifier of a project object directory record. This field is not displayed in Open Plan. The project’s name (DIR_ID) is displayed instead. GUID VARCHAR2(22) NOT NULL EFDATE Early Finish Date The early finish date for a risk activity record. FDAT DATE NOT NULL ESDATE Early Start Date The early start date for a risk activity record. DATE DATE NOT NULL LFDATE Late Finish The late finish date for an activity calculated by risk analysis. FDAT DATE NOT NULL LSDATE Late Start Date The late start date for an activity calculated by risk analysis. DATE DATE NOT NULL PERCENTILE Percentile INTE NUMBER(10, 0) NULL RSK_UID None The unique identifier for a risk activity record. GUID VARCHAR2(22) NOT NULL SEQUENCE Update Count Used to manage multi-user concurrency in shared mode. INTE NUMBER(10, 0) NOT NULL Field Name Field Label Description ACT_UID Activity ID DIR_UID Table OPP_SUB - Subproject Summary Information The Subproject Summary Information table contains calculated summary data for subproject activities as well as the external subproject name for external subproject activities. The data dictionary table identifier for table OPP_SUB is SUB. Open Plan Data Type Oracle Data Type Nulls The unique identifier for an activity record in the database. This field is not displayed in Open Plan. The activity’s ID (ACT_ID) is displayed instead. GUID VARCHAR2(22) NOT NULL Project File The unique identifier of a project object directory record. This field is not displayed in Open Plan. The project’s name (DIR_ID) is displayed instead. GUID VARCHAR2(22) NOT NULL S_EFDATE Early Finish The subproject's early finish date. FDAT DATE NULL S_ESDATE Early Start The subproject's early start date. DATE DATE NULL S_LFDATE Late Finish The subproject's late finish date. FDAT DATE NULL S_LSDATE Late Start The subproject's late start date. DATE DATE NULL S_SFDATE Sched. Finish The subproject's scheduled finish date. FDAT DATE NULL S_SSDATE Sched. Start The subproject's scheduled start date. DATE DATE NULL SEQUENCE Update Count Used to manage multi-user concurrency in shared mode. INTE NUMBER(10, 0) NOT NULL SUBPCOMP Sub. % Complete The subproject's percent complete. DBLE NUMBER(15, 2) NULL SUBPRJ_UID External Subproject The unique identifier that identifies an external subproject within a project. This field is not displayed in Open Plan. The external subproject’s name (DIR_ID) is displayed instead. GUID VARCHAR2(22) NOT NULL Field Name Field Label Description ACT_UID Activity ID DIR_UID Table OPP_USE - Resource Usage The Resource Usage table contains resource usage information that is generated by the resource scheduling module. The data dictionary table identifier for table OPP_USE is USE. Open Plan Data Type Oracle Data Type Nulls The unique identifier for an activity. This field is not displayed in Open Plan. The activity’s ID (ACT_ID) is displayed instead. GUID VARCHAR2(22) NOT NULL Alternate Res. ID The unique identifier that links the resource usage record to the resource record representing the resource assignment alternate. This field is not displayed in Open Plan. The alternate resource’s ID (RES_ID) is displayed instead. GUID VARCHAR2(22) NULL None The unique identifier for a resource assignment. This field is not displayed in Open Plan. GUID VARCHAR2(22) NOT NULL Field Name Field Label Description ACT_UID Activity ID. ALT_RES_UID ASG_UID CLH_UID Calendar ID The unique identifier of the resource calendar for a resource usage record. This field is not displayed in Open Plan. The calendar’s ID (CLH_ID) is displayed instead. GUID VARCHAR2(22) NOT NULL CST_CLASS Cost Class The cost class for the resource usage. This information is used during Cobra integration. TEXT VARCHAR2(20) NULL DIR_UID Project File The unique identifier of a project object directory record. This field is not displayed in Open Plan. The project’s name (DIR_ID) is displayed instead. GUID VARCHAR2(22) NOT NULL PALLOC_UID Project Allocation The unique identifier of the project directory object for which this GUID resource was reserved. This field is not displayed in Open Plan. The project’s name (DIR_ID) is displayed instead. VARCHAR2(22) NULL RDS_UID Resource File The unique identifier that links a resource usage record to a unique resource object directory record. This field is not displayed in Open Plan. The resource file’s name (DIR_ID) is displayed instead. GUID VARCHAR2(22) NOT NULL RES_CST Resource Cost The cost of the resource used during the period defined by the record's start and end dates. DBLE NUMBER(15, 2) NULL RES_ESC Resource Escalated Cost The escalated cost of the resource used during the period defined DBLE by the record's start and end dates. NUMBER(15, 2) NULL RES_UID Resource ID The unique identifier for a resource. This field is not displayed in GUID Open Plan. The resource’s ID (RES_ID) is displayed instead. VARCHAR2(22) NOT NULL RES_USED Res. Used The amount of resource used during the period defined by the record's start and end dates. DBLE NUMBER(15, 2) NULL RFDATE Finish Date The end of the period during which the resource was used. FDAT DATE NULL RSDATE Start Date The date the resource usage begins. DATE DATE NULL SEQUENCE Update Count Used to manage multi-user concurrency in shared mode. INTE NUMBER(10, 0) NOT NULL USE_UID None The unique identifier of a resource usage record. GUID VARCHAR2(22) NOT NULL Resource Data Table OPP_AVL - Resource Availability The Resource Availability table contains information describing the amount of resource quantity that is available for a specific time period. The data dictionary table identifier for table OPP_AVL is AVL. Field Name Field Label Description Open Plan Data Type Oracle Data Type Nulls AVL_UID None The unique identifier for a resource availability record. GUID VARCHAR2(22) NOT NULL CLH_UID Calendar ID The unique identifier of the resource calendar for a resource GUID VARCHAR2(22) NULL usage record. This field is not displayed in Open Plan. The calendar’s ID (CLH_ID) is displayed instead. DIR_UID Project File The unique identifier that links a resource usage record to a unique project object directory record. This field is not displayed in Open Plan. The project’s name (DIR_ID) is displayed instead. GUID VARCHAR2(22) NOT NULL LASTUPDATE Last Updated The date and time that the resource availability record was last updated. DATE DATE NOT NULL PALLOC_UID Project Allocation The unique identifier of the project directory object for which this GUID resource was reserved. This field is not displayed in Open Plan. The project’s name (DIR_ID) is displayed instead. VARCHAR2(22) NULL RES_LEVEL Res. Level Quantity available of this resource during the time period defined DBLE by the start and finish dates. NUMBER(15, 2) NOT NULL RES_UID Resource ID The unique identifier for a resource. This field is not displayed in GUID Open Plan. The resource’s ID (RES_ID) is displayed instead. VARCHAR2(22) NOT NULL RFDATE Finish Date A valid date upon which the resource availability ends. FDAT DATE NULL RSDATE Start Date A valid date upon which the resource become available. DATE DATE NULL SEQUENCE Update Count Used to manage multi-user concurrency in shared mode. INTE NUMBER(10, 0) NOT NULL USR_ID Updated By The user ID of the last user to update the resource availability record. TEXT VARCHAR2(20) NOT NULL Table OPP_PSU - Project Summary Usage The Resource Project Summary Usage table stores information that is used to produce a complete summary usage of project resources. The data dictionary table identifier for table is OPP_PSU is PSU. Field Name Field Label Description Open Plan Data Type Oracle Data Type Nulls ACT_ID Activity ID An activity ID for a project summary usage record. TEXT VARCHAR2(59) NULL The unique identifier that links a project summary usage record to a unique calendar object directory record for the calendar file assigned to the project. This field is not displayed in Open Plan. GUID VARCHAR2(22) NULL CLD_UID CLH_UID Calendar ID The unique identifier that links the project summary usage record GUID to a calendar detail record. This field is not displayed in Open Plan. VARCHAR2(22) NULL DIR_UID Project File The unique identifier of a project object directory record. This field is not displayed in Open Plan. The project’s name (DIR_ID) is displayed instead. GUID VARCHAR2(22) NOT NULL PALLOC_UID Project Allocation The unique identifier of the project directory object for which this GUID resource was reserved. This field is not displayed in Open Plan. The project’s name (DIR_ID) is displayed instead. VARCHAR2(22) NULL PRJ_UID None The unique identifier of a project object directory record. This field is not displayed in Open Plan. GUID VARCHAR2(22) NOT NULL PSU_UID None The unique identifier for a project summary usage record. This field is not displayed in Open Plan. GUID VARCHAR2(22) NULL RES_CST Resource Cost The cost of the reserved resource. DBLE NUMBER(15, 2) NULL RES_ESC Resource Escalated Cost The escalated cost of the reserved resourced. DBLE NUMBER(15, 2) NULL RES_LEVEL Res. Level The amount of reserved resource that was assigned. DBLE NUMBER(15, 2) NULL RES_UID Resource ID The unique identifier of the reserved resource. This field is not displayed in Open Plan. The resource’s ID (RES_ID) is displayed instead. GUID VARCHAR2(22) NOT NULL RES_USED Res. Used The total amount of resource that is reserved. DBLE NUMBER(15, 2) NULL RFDATE Finish Date The date the resource reservation ends. FDATE DATE NULL RS_PRIORTY Priority Used to determine the order of processing during resource scheduling. INTE NUMBER(10, 0) NOT NULL RSDATE Start Date The date the resource reservation begins. DATE DATE NULL SEQUENCE Update Count Used to manage multi-user concurrency in shared mode. INTE NUMBER(10, 0) NOT NULL Table OPP_RES - Resource Definitions The Resource Definition table contains the resource elements that make up a resource breakdown structure. The data dictionary table identifier for table is OPP_RES is RES. Open Plan Data Type Oracle Data Type Nulls BOOL VARCHAR2(4) NULL Progress based on Act Progress If True, the resource's progress is calculated from the progress of BOOL the activity to which it is assigned. VARCHAR2(4) NULL DESCRIPTION Res. Desc. The description of a resource record. TEXT VARCHAR2(100) NULL DIR_UID None The unique identifier that links a resource record to a unique resource object directory record. This field is not displayed in Open Plan. GUID VARCHAR2(22) NOT NULL EFF_FACTOR Effort Factor The effort factor for a resource. DBLE NUMBER(15, 2) NULL EMAIL Email Address The email address of a resource. TEXT VARCHAR2(60) NULL EMP_ID Employee ID The employee ID of a resource. TEXT VARCHAR2(20) NULL LASTUPDATE Last Updated The date and time that the resource file was last updated. DATE DATE NOT NULL NO_LIST Suppress in Lists If selected, this option suppresses the inclusion of this resource in BOOL all lists. While the resource is not deleted from the file (and, thus, VARCHAR2(4) NULL Field Name Field Label Description CLC_COST Cost based on Progress Qty If True, the cost of the resource is based on the progressed quantity of the resource. CLC_PROG does not affect cost calculations), the resource cannot be used in resource assignments, nor is it included in any list of resources. PALLOC_UID Project Allocation POSITION_NUM Child Position RES_CLASS Res. Category The resource category. Valid values are: Labor, Material, Other Direct Costs, and Subcontract. These values are stored in the Open Plan database as L, N, C, and S, respectively. RES_ID Resource ID RES_TYPE Res. Type RES_UID The unique identifier of the project directory object for which this GUID resource was reserved. This field is not displayed in Open Plan. VARCHAR2(22) NULL INTE NUMBER(10, 0) NULL RESC VARCHAR2(20) NULL The identifier of a resource, unique within a resource file. HIER VARCHAR2(59) NOT NULL The resource type. Valid values are: Normal, Consumable, Perishable, Resource Pool, and Skill. These values are stored in the Open Plan database as null, C, D, P and S, respectively. REST VARCHAR2(20) NULL The unique identifier for a resource record. GUID VARCHAR2(22) NOT NULL ROLLCOST Res. Type If set to False, Open Plan does not consider this resource during cost calculations and it is not rolled up to the activity level. BOOL VARCHAR2(4) NULL ROLLUP Roll-up for Scheduling If selected, this option specifies that all availabilities and assignments for this resource should be treated as availabilities and assignments for the first parent of the resource in the hierarchy that does not have this option selected. BOOL VARCHAR2(4) NULL SEQUENCE Update Count Used to manage multi-user concurrency in shared mode. INTE NUMBER(10, 0) NOT NULL SUPPRESS Suppress If selected, this option suppresses resource scheduling for this resource. During resource scheduling, Open Plan treats suppressed resources as though they were unconstrained. BOOL VARCHAR2(4) NULL THRESHOLD Res. Threshold Specifies an additional number of units of availability for a resource that can be used to avoid project delays if necessary. DBLE NUMBER(15, 2) NULL UNIT Res. Units The unit in which a resource's cost is measured. TEXT VARCHAR2(20) NULL UNIT_COST Res. Unit Cost The unit cost of a resource. DBLE NUMBER(15, 2) NULL USR_ID Updated By The last user to update the record. TEXT VARCHAR2(20) NOT NULL Table OPP_RSL - Resource Cost Escalation The Resource Cost Escalation table stores information that allows resource cost to change over time. The data dictionary table identifier for table OPP_RSL is RSL. Field Name Field Label Description Open Plan Data Type Oracle Data Type Nulls COST Res. Unit Cost The resource escalation rate of a resource. DBLE NUMBER(15, 2) NOT NULL The unique identifier of a resource object directory record. This field is not displayed in Open Plan. GUID VARCHAR2(22) NOT NULL DIR_UID LASTUPDATE Last Updated RES_UID RSL_DATE Res. Effective Date RSL_UID The date and time that the resource escalation record was last updated. DATE DATE NOT NULL The unique identifier that links a resource escalation record to a resource record. GUID VARCHAR2(22) NOT NULL The date upon which the resource escalation rate takes effect. DATE DATE NOT NULL The unique identifier for a resource escalation record. This field is GUID not displayed in Open Plan. VARCHAR2(22) NOT NULL SEQUENCE Update Count Used to manage multi-user concurrency in shared mode. INTE NUMBER(10, 0) NOT NULL USR_ID Updated By The user ID of the last user to update the resource escalation record. TEXT VARCHAR2(20) NOT NULL Table OPP_SKL - Skill Assignments The Resource Skill Assignment table stores skill assignments to be used against resource definitions. The data dictionary table identifier for table OPP_SKL is SKL. Open Plan Data Type Field Name Field Label Description Oracle Data Type Nulls DIR_UID None The unique identifier that links a skill record to a unique resource GUID object directory record. This field is not displayed in Open Plan. VARCHAR2(22) NOT NULL RES_SKL_UID None The unique identifier for a skill assigned to a resource. GUID VARCHAR2(22) NOT NULL RES_UID None The unique identifier for the resource record that represents a skill record. GUID VARCHAR2(22) NOT NULL SEQUENCE None Used to manage multi-user concurrency in shared mode. INTE NUMBER(10, 0) NOT NULL SKL_UID None The unique identifier for a skill record. GUID VARCHAR2(22) NOT NULL User Defined Fields Table OPP_NTX - Note Text The Note Text table stores the note text associated with note categories assigned to a data object. The data dictionary table identifier for table OPP_NTX is NTX. Open Plan Data Type Field Name Field Label Description BAS_UID None The unique identifier that links a baseline record to a note record. GUID This field is not displayed in Open Plan. Oracle Data Type Nulls VARCHAR2(22) NULL DIR_UID None The unique identifier of the directory object to which the note text belongs. GUID VARCHAR2(22) NOT NULL FIELD_NAME None The category of a note text field, which is a field name in OPP_UDF. TEXT VARCHAR2(60) NOT NULL FIELD_VALUE None The text of a note. MEMO LONG NULL FK_UID None The unique ID that links a note text record to a record in another GUID table. This value is not displayed in Open Plan. VARCHAR2(22) NOT NULL ROW_UID None A unique identifier for the note text record. VARCHAR2(22) NOT NULL TABLE_TYPE None The data type for which the note text is stored. Valid values are: TEXT ACT (Activity), CDR (Code Directory), COD (Code Data), PRJ (Project Directory), RDS (Resource Directory), and RES (Resource Data). VARCHAR2(4) NOT NULL GUID Table OPP_UDF - User Field Definitions The User Fields table stores the definitions of user-defined fields for each table with which they are associated. The data dictionary table identifier for table OPP_UDF is UDF. Field Name Field Label Description Open Plan Data Type Oracle Data Type Nulls DESCRIPTION None The description of a user-defined field. TEXT VARCHAR2(20) NULL FIELD_NAME None The name of a user defined field. TEXT VARCHAR2(20) NOT NULL FIELD_TYPE None The name of a user defined field, note category, or code assignment field. TEXT VARCHAR2(4) NOT NULL SEQUENCE None Used to manage multi-user concurrency in shared mode. INTE NUMBER(10, 0) NOT NULL TABLE_TYPE None The data type for which the user-defined field is specified. Valid values are: TEXT VARCHAR2(4) NOT NULL UDF_UID None The unique identifier for a user-defined field record. GUID VARCHAR2(22) NOT NULL Table OPP_UDT - User Date And Finish Date Data The User Dates table stores user-defined date field data. This table is a sparse storage mechanism that contains only the data for fields that have data defined. The data dictionary table identifier for table OPP_UDT is UDT. Field Name Field Label Description BAS_UID None The unique identifier for a baseline record. This field is not displayed in Open Plan. Open Plan Data Type Oracle Data Type Nulls GUID VARCHAR2(22) NULL DIR_UID None The unique identifier of the directory object to which the userdefined field belongs. GUID VARCHAR2(22) NOT NULL FIELD_NAME None The name of a user defined date or finish date field. TEXT VARCHAR2(60) NOT NULL FIELD_VALUE None The value of a user defined date or finish date field. DATE DATE NOT NULL FK_UID None The unique ID that links a user defined date or finish date record GUID to a record in another table. This value is not displayed in Open Plan. VARCHAR2(22) NOT NULL ROW_UID None The unique identifier for a user-defined date or finish date value. VARCHAR2(22) NOT NULL TABLE_TYPE None The data type for which the user-defined date field data is stored. TEXT Valid values are: ACT (Activity), BSA (Baseline Activity), CDR (Code Directory), COD (Code Data), PRJ (Project Directory), ASG (Resource Assignment), REL (Relationship), AVL (Resource Availability), RES (Resource Data), and RDS (Resource Directory. VARCHAR2(4) NOT NULL GUID Table OPP_UDU - User Duration Data The User Durations table stores user defined duration data. This table is a sparse storage mechanism that contains only the data for fields that have data defined. The data dictionary table identifier for table OPP_UDU is UDU. Open Plan Data Type Oracle Data Type Nulls The unique identifier for a baseline record. This field is not displayed in Open Plan. GUID VARCHAR2(22) NULL None The unique identifier of the directory object to which the userdefined field belongs. GUID VARCHAR2(22) NOT NULL FIELD_NAME None The name of a user defined duration field. TEXT VARCHAR2(60) NOT NULL FIELD_VALUE None The value of a user defined duration field. DURA VARCHAR2(10) NOT NULL FK_UID None The unique ID that links a user defined duration record to a record in another table. This value is not displayed in Open Plan. GUID VARCHAR2(22) NOT NULL ROW_UID None The unique identifier for a user-defined duration value. GUID VARCHAR2(22) NOT NULL TABLE_TYPE None The data type for which the user-defined duration field data is TEXT stored. Valid values are: ACT (Activity), BSA (Baseline Activity), CDR (Code Directory), COD (Code Data), PRJ (Project Directory), ASG (Resource Assignment), REL (Relationship), AVL (Resource Availability), RES (Resource Data), and RDS (Resource Directory. VARCHAR2(4) NOT NULL Field Name Field Label Description BAS_UID None DIR_UID Table OPP_UNM - User Numeric Data The User Numbers table stores user defined number field data. This table is a sparse storage mechanism that contains only the data for fields that have data defined. The data dictionary table identifier for table OPP_UNM is UNM. Open Plan Data Type Oracle Data Type Nulls The unique identifier for a baseline record. This field is not displayed in Open Plan. GUID VARCHAR2(22) NULL None The unique identifier of the directory object to which the userdefined field belongs. GUID VARCHAR2(22) NOT NULL FIELD_NAME None The name of a user defined numeric field. TEXT VARCHAR2(60) NOT NULL FIELD_VALUE None The value of a user defined numeric field. DBLE NUMBER(15, 2) NOT NULL FK_UID None The unique ID that links a user defined numeric record to a record in another table. This value is not displayed in Open Plan. GUID VARCHAR2(22) NOT NULL ROW_UID None The unique identifier for a user-defined numeric value. GUID VARCHAR2(22) NOT NULL TABLE_TYPE None The data type for which the user-defined numeric field data is TEXT stored. Valid values are: ACT (Activity), BSA (Baseline Activity), CDR (Code Directory), COD (Code Data), PRJ (Project Directory), ASG (Resource Assignment), REL (Relationship), AVL (Resource Availability), RES (Resource Data), and RDS (Resource Directory. VARCHAR2(4) NOT NULL Field Name Field Label Description BAS_UID None DIR_UID Table OPP_UTX - User Text Data The User Text table stores user defined text field data. This table is a sparse storage mechanism that contains only the data for fields that have data defined. The data dictionary table identifier for table OPP_UTX is UTX. Open Plan Data Type Oracle Data Type Nulls The unique identifier for a baseline record. This field is not displayed in Open Plan. GUID VARCHAR2(22) NULL None The unique identifier of the directory object to which the userdefined field belongs. GUID VARCHAR2(22) NOT NULL FIELD_NAME None The name of a user defined text field. TEXT VARCHAR2(60) NOT NULL FIELD_VALUE None The value of a user defined text field. TEXT VARCHAR2(255) NOT NULL FK_UID None The unique ID that links a user defined text record to a record in another table. This value is not displayed in Open Plan. GUID VARCHAR2(22) NOT NULL ROW_UID None The unique identifier for a user-defined text value. GUID VARCHAR2(22) NOT NULL TABLE_TYPE None The data type for which the user-defined text field data is stored. TEXT Valid values are: ACT (Activity), BSA (Baseline Activity), CDR VARCHAR(4) NOT NULL Field Name Field Label Description BAS_UID None DIR_UID (Code Directory), COD (Code Data), PRJ (Project Directory), ASG (Resource Assignment), REL (Relationship), AVL (Resource Availability), RES (Resource Data), and RDS (Resource Directory. Other Data WelcomHome Table SP_RESASSOC - Op2x Resource Association The Resource Association table contains information that associates resources created in Open Plan 2.x with resources in WelcomHome. These Open Plan resources can be viewed and edited in WelcomHome. The table is not used by Open Plan. This table is not defined in the Open Plan data dictionary, and its structure must not be changed. Field Name Field Label Description Open Plan Data Type Oracle Data Type Nulls RES_ID None Not used by Open Plan. None VARCHAR2(59) NOT NULL USR_ID None Not used by Open Plan. None VARCHAR2(20) NOT NULL Table WH_OP3_RESASSOC - Op3x Resource Association The Resource Association table contains information that associates resources created in Open Plan 3.x with resources in WelcomHome. These Open Plan resources can be viewed and edited in WelcomHome. The table is not used by Open Plan. This table is not defined in the Open Plan data dictionary, and its structure must not be changed. Field Name Field Label Description Open Plan Data Type Oracle Data Type Nulls RES_ID None Not used by Open Plan. None VARCHAR2(59) NOT NULL SCHEDULEDSN None Not used by Open Plan. None VARCHAR2(100) NULL USR_ID None Not used by Open Plan. None VARCHAR2(20) NOT NULL APPENDIX E GLOSSARY THIS PAGE INTENTIONALLY LEFT BLANK Appendix E: Glossary Publication 615 Activity – The smallest self-contained unit of work used to define the logic of a project. In general, activities have a definite start and finish date, use resources such as people, materials, or facilities, and have an associated cost. Activity Loading – Assigning to an activity required or projected costs or actual labor (equipment) hours or days. Activity-On-Arrow – A network diagramming method where nodes and activities are plotted to represent the logical connection of activities and their interdependence. Activity Status – The state of completion of an activity. Examples of status are: Planned (The activity has not yet started.); In-progress (The activity is in progress.); Complete (The activity is complete.) Actual Cost of Work Performed (ACWP) – The actual cost expended on an activity, a part of a project, or an entire project. Actual Finish – The date on which an activity was completed. Actual Start– The date on which an activity was started. Actual Resource – Within resource scheduling, a resource that Open Plan may substitute for an activity requirement during resource leveling, if the requested (1st selected) resource is not available. As-Late-As-Possible (ALAP) – An activity for which Open Plan sets the early dates as late as possible without delaying the early dates of any successor. As Soon As Possible – An activity for which Open Plan sets the early dates to be as soon as possible. This is the default activity type. Assignment Profile Curve – A profile that describes how a resource assignment is spread through the duration of an activity. Open Plan provides seven standard assignment profile curves: back load, double peak, early peak, front load, late peak, linear, and normal (bell). Asymmetrical Distribution – A non-balanced distribution around a center point, unbalanced, the right side does not equal the left side, front load, back load. Arrow Diagramming Method (ADM) – A type of network diagramming method that uses two nodes to identify activities and activity interdependency. Auxiliary File – A resource, code, or calendar file associated with an Open Plan/DOS project. These files may be stored in either an Open Plan/DOS project directory, or an Open Plan/DOS common directory. Back Load(ed) - Pertaining to a distribution of effort or budget, an assignment of effort that has a greater amount or percentage of the whole or all of the effort occurring during the end or closing duration of a task E-1 Appendix E: Glossary Publication 615 Backward Pass – A procedure within time analysis to calculate the late start and late finish date of all activities in a project schedule. Barchart View – A view that uses horizontal bars on a time scale to depict activity information. In Open Plan, a Barchart view is a composite view that displays an activity Barchart, a spreadsheet, and, if resources are assigned to the project, a histogram. A barchart is frequently called at Gantt chart. Baseline – A copy of the project data for baseline comparison use. Beta Distribution – A family of continuous probability distributions in which the random variable varies in the range of 0 to 1 and with a skew and kurtosis (“peakedness”) that depends on a pair of parameters. In the context of Open Plan, the definition of the beta distribution has been expanded to allow random variables distributed between any pair of user-specified values, instead of always between 0 and 1. Breakdown Structure – A hierarchical, validated structure for codes that allows you to summarize project data for reporting requirements. Budget – The planned cost for an activity or project. Budget at completion (BAC) – The sum total of the time-phased budget. Budgeted Cost of Work Performed (BCWP) – A measure used in cost control that allows you to quantify the overall progress of the project in monetary terms. BCWP is calculated by multiplying the physical percent complete by the planned cost. Another term for BCWP is “earned value”. Budgeted Cost of Work Scheduled (BCWS) – Planned cost multiplied by the percentage of completion that should have been achieved according to the project baseline dates. Calendar – A definition of valid working periods for a group of project activities. Calendar File – A file containing calendar information for one or more calendars. Calendar - Default – If no calendar is assigned to a project or activity, Open Plan performs all calculations based on the defined default calendar. Central Tendency – the midpoint or typical, or average (mean) value of a distribution. Child– A lower-level element in hierarchical structure. Code – A single or group of alphanumeric figures used for identification of activities or groups of activities belonging to a structured system. Code Field – A file used in reporting that contains information associated with codes entered on an activity record. Confidence – The likelihood of a statistical deduction from empirical data. Confidence is usually expressed as a percentage and applied to a range of possibilities. See also Confidence Interval. E-2 Appendix E: Glossary Publication 615 Confidence Interval – A pair of values bracketing an estimate (usually derived from sample data), indicating that there is some stated percentage probability that the true value falls within that range. For example, a 99% confidence interval would be a pair of values such that there was a 0.5% chance of the true value being less than the lower value, and a 0.5% chance that the true value is above the higher value. Consumable Resource – A type of resource that remains available until depleted e.g., a material. Controlling Relationship – A logic link that controls the early date of the successor activity. In Open Plan, a controlling relationship can be detected by its free float value of zero. Cost Variance (CV) – The difference between the budgeted and actual cost of work performed. CPM – A project management system that can identify critical activities, forecast labor, equipment and cost requirements and aid the decision making process by guiding the user in selecting a method to expedite a project. Critical Activity – An activity that controls the total duration of a project time Critical Path – A chain of activities controlling the total length (duration) of the project by being the longest sum of durations in the network. Criticality index – In Open Plan, a measure of the probability that a particular activity is on the critical path of a project. Expressed as a percentage. Cumulative Distribution – The representation of a probability distribution as a cumulative curve. Each point on the curve represents the probability that the random variable will be no greater than the value represented by that point. By definition, the height of such a curve must be non-decreasing, starting at zero and increasing to one. Delay – A suspension of work on a particular work activity. Delaying resource – In resource scheduling, inadequate availability of one or more resources may require that the completion of an activity be delayed beyond the date on which it could otherwise be completed. The delaying resource is the first resource on an activity that causes the activity to be delayed. Dependency – A relationship between two activities (ADM scheduling) that identifies how or when the activities may be performed. Discontinuous Activity – An activity in which the interval between the start and finish dates is allowed to exceed its duration in order to satisfy start-to-start and finish-to-finish relationships with other activities. Distribution – See Probability Distribution. Double Peak - Pertaining to a distribution of effort or budget, an assignment of effort that increases and maximizes at two points during the duration of a task. E-3 Appendix E: Glossary Publication 615 Dummy Node – A point. A type of node used in arrow diagramming (ADM) scheduling to avoid a logic loop. Dummy Activity – An activity with zero duration used to indicate precedence relationships in an ADM network. Duration – The number of working periods required to perform the work represented by an activity. In risk analysis, this corresponds to “most likely” duration. Earliest Feasible Date – The earliest date on which the activity could be scheduled to start based on the scheduled dates of all its predecessors, but in the absence of any resource constraints on the activity itself. This date is calculated by resource scheduling. Early Dates – Calculated in the forward pass of time analysis, early dates are the earliest dates on which an activity can start and finish. Early Finish - The earliest date on which an activity can finish. This date is calculated by time analysis. See Section 2.6.A for sample calculations. Early Peak - Pertaining to a distribution of effort or budget, an assignment of effort that maximizes at one point during the beginning duration of a task. Early Start – The earliest date on which an activity can start. This date is calculated by time analysis. See Section 2.6.A for sample calculations. Earned Value Cost Control – An approach to project cost control that quantifies the overall progress of the project in monetary terms. Earned value is calculated by multiplying the physical percent complete by the planned cost. Another term for earned value is budgeted cost of work performed (BCWP). End Activity – An activity with no logical successors. Also known as a finish activity. Escalation – A feature that allows you to specify different resource unit costs and the date on which each new cost takes effect. External Subproject – A complete independent project schedule represented as a single activity in a higher-level (master) project. Within the master schedule, the external subproject is a link to a project file. Extra Work Day – An exception to the standard non-working day. For example, assume that a calendar defines a Monday thru Friday as days on which work is normally performed. In this case, a specific Saturday might be identified as an extra workday if work is to be performed on that day. Finish Activity – An activity that has no successor. Also known as an end activity. Finish Float – the number of work periods between the early finish date and the late finish date. Finish Milestone – A type of activity signifying the end of a project or project phase assigned a zero duration. E-4 Appendix E: Glossary Publication 615 Finish-to -Finish Relationship – The relationship between activities that specifies that the finish of the successor activity depends on the completion of the predecessor activity. In most cases, this means that the successor activity cannot be completed before the predecessor activity is completed. Finish-to-Start Relationship – The relationship between activities that specifies that the start of the successor activity depends on the completion of the predecessor activity. In most cases, this means that the successor activity cannot start until the predecessor activity is completed. This is the default relationship. Fixed-Form Significant Coding Structure – A coding structure that relies on the length of the code to represent the hierarchical level. Float – The number of time periods by which an activity can be delayed without affecting other activities in the project. Foreign Activity – A placeholder activity used to represent relationships with projects that are not currently open. Forward Pass - A procedure within time analysis to calculate the early start and early finish date of all activities in a project schedule. A process to calculate the earliest a project will be completed. Free Float – The maximum amount by which an activity can be delayed beyond its early dates without delaying any successor activity beyond its early dates. In the absence of finish targets, free float is always less than or equal to total float. Front Load(ed) - Pertaining to a distribution of effort or budget, an assignment of effort that has a greater amount or percentage of the whole or all of the effort occurring during the start or beginning duration of a task Hammock – An activity that plays no part in time analysis, but which provides the means to report on the start, finish, and total duration of a group of activities. Hard Zeros – In resource scheduling, there is a distinction made between resource availabilities specified as zero but which can be exceeded under certain circumstances, and hard zeros, which can never be exceeded. Hierarchical Coding Structure – A coding system that can be represented as a multi-level tree structure in which every code except those at the top of the tree has a parent code. Hierarchical Project – A project that allows you to break down project information into multiple levels using the activity ID. With hierarchical projects, you enter project data at the lowest level of the project hierarchy, and then summarize it to appropriate levels for reporting purposes. Hierarchical Resource Structure – Resource definitions organized in a hierarchical structure in which every resource except those at the top of the tree has a parent. E-5 Appendix E: Glossary Publication 615 Histogram View – A view in which resource or risk information are shown against a time scale. In Open Plan, a resource histogram can be displayed both alone and in combination with a barchart view. Holiday – An exception to the standard working day. For example, assume that a calendar defines Monday thru Friday as days on which work is normally performed. In this case, a specific Monday might be identified as a holiday if the office would be closed on that day. Immediate Activity – An activity that can be forced to start on its earliest feasible date by resource scheduling, even if that means overloading a resource. In Progress – An activity partially completed. Internal Subproject – A group of activities represented as a single activity in a higher level of the same project, i.e. a parent activity. Iteration – In Open Plan, one complete trial of Monte Carlo simulation of a project (that is, sampling a value for each activity duration, performing a time analysis with this sampled data, and storing the results). The Monte Carlo technique accumulates the results from a large number of these iterations. Job Logic – The sequencing of activities that represents a step by step process that a construction job or project may follow form beginning (notice to proceed) to end (job turnover). Key Activity – In Open Plan, an activity specified by a user about which the program is to store detailed information generated by risk analysis. Kurtosis – a technical term used to define a characteristic of the shape of a probability distribution, identified with the thickness of the tails of the distribution. Labor Resources – Open Plan permits certain resources to be flagged as representing labor. The significance of this is that only resources so flagged will be included in the labor percent complete calculations. Ladder – a style for displaying children in a breakdown structure. Lag – A time delay associated with a relationship in a project. Lag can be either positive or negative. Negative lag is sometimes called “lead”. Late Dates – Calculated in the backward pass of time analysis, late dates are the latest dates on which an activity can start and finish. Late Finish – The latest date on which an activity must be completed if the project completion date and any finish targets are to be met. This date is calculated by time analysis. See Section 2.6.A for calculations. Late Start – The latest date on which an activity must start if the project completion date and finish targets are to be met. This date is calculated by time analysis. See Section 2.6.A for calculations. E-6 Appendix E: Glossary Publication 615 Late Peak - Pertaining to a distribution of an effort or budget, an assignment of effort that maximizes at one point during the finish or end duration of a task. Linear - Pertaining to a distribution of an effort or budget, an assignment of effort that is consistent during the duration of a task. Logic Loop – A sequence of activities that forms a loop back into its own beginning activity. Mean – The most common and useful measure of central tendency for a probability distribution. The mean value is the same as the “average” or “expected” value. Median – A measure of the central tendency of a probability distribution such that there is a 50% chance of a value sampled from the distribution is less than the medium. Milestone – An activity with zero duration – must be designated as either a start milestone or a finish milestone. A significant point in time when an activity or activities is identified as beginning or ending. Military Time – A means of representing time by use of a 24-hour clock. Mode – A measure of central tendency for a probability distribution, being the most likely single value for a variable sampled from that distribution. For a theoretical distribution, the mode is represented by the peak of the curve. The mode is the same as the “most likely” value. Monte Carlo Simulation – The technique used in Open Plan to estimate the likely range of outcomes from a complex random process by simulating the process a large number of times. Most Likely Value – See Mode. Multiple Ends Processing Option – The multiple ends processing option causes time analysis to treat each end activity as if it was the end of an independent project, so that the float would normally be zero. Negative Float – The amount of time by which the early date of an activity exceeds its late date. Network – A series of activities required to complete a project. Network View – A project drawing in which the project logic is the sole determinant of the placements of the activities in the drawing. Frequently called a flowchart, PERT chart, logic drawing, or logic diagram. Node – A point in time represented on a network schedule as a circle. Non-Working Day – The standard non-working day on the calendar. For example, assume that a calendar defines Monday thru Friday as days on which work is normally performed. In this case, a Saturday that has not been identified as an extra workday would be a non-working day. Normal (Bell) - Pertaining to a distribution of effort or budget, an assignment of effort that follows a typical bell curve distribution as presented in statistical studies. E-7 Appendix E: Glossary Publication 615 Normal Distribution – A family of symmetrical continuous probability distributions defined by two parameters representing the mean and standard deviation of the distribution. In Open Plan, the sampling method for normal distributions is an approximation that curtails the curve at three standard deviations either side of the mean. (In theory there would be approximately a 1% chance of values falling outside of this range.) Organizational Breakdown Structure (OBS) – A hierarchical structure designed to pinpoint the area of an organization responsible for each cost element in a project. Out-Of-Sequence Progress – Progress that has been reported even though activities that have been deemed predecessors in project logic have not been completed. Pad Character – A character that is used to fill out a code in a fixed format significant breakdown structure so that all codes are the same length. Parent – A higher-level element in a hierarchical structure that summarizes lower-level elements. Percent Complete – One measure of completion used in Open Plan to determine the remaining duration of a partially completed activity. Perishable Resource – A consumable resource with an expiration date. Physical Percent Complete – The percentage of the work content of an activity that has been achieved. See also Budgeted Cost of Work Performed. Placements – The automatic calculation of coordinates for activities in a network view. Planned Activity – An activity not yet started. Precedence Diagram Method (PDM) – One of the two popular methods of representing projects as networks, in which the activities are represented by nodes and the relationships between them by arcs. Predecessor – an activity that logically precedes another activity. Normally, this term refers to an immediate predecessor, that is, one directly implied by the project data. Priority Rule – A rule used to determine the order of processing in resource scheduling algorithms. Probability – The measure of the chance of a particular outcome resulting from a random process. If the process can be performed a number of times, then the proportion of times that a particular outcome results should converge on a value, called the probability, as the number of trials increases. Probability Distribution – The representation of the range and relative probabilities of the possible outcomes from a random process. A probability distribution may be in the form of a table, a curve, or a histogram. Production Rate – A ratio of units of work to a given unit of time (e.g. cubic meters (cubic yards) of excavation per hour). E-8 Appendix E: Glossary Publication 615 Progress – The partial completion of a project, or a measure of same. Project – A set of activities directed to an overall goal, also, the collection of data relating to the achievement of that goal. More specifically, a network of activities, or the file(s) containing such a network. Project Duration – A time, measured in calendar days, allotted to complete an entire project. Project Logic – The relationships between the various activities in a project. Punctuated Significant Coding Structures – A coding structure in which a specific character (usually a period) is used to separate the part of the code that corresponds to the different levels in the breakdown structure. Re-Profiling – In resource scheduling, it is possible to indicate that the specified resource requirement profile may be modified to fit the availability, without changing the total amount required. Relationship – A logical connection between two activities. Relationship Float – Open Plan permits the calculation of both free and total float on relationships, which are analogous to the float fields on the activities. Remaining Duration – The remaining portion of an in-progress activity. Requested Resource – The preferred resources requirement for an activity. Resource – An item required by an activity. Resources can be people, equipment, facilities, funding – anything needed to perform the work of a project. Resource Allocation – A feature, used in conjunction with alternate resources, pools, and skills, that allows you to selectively replace a requested resource with one suggested by Open Plan. During resource allocation, you can also selectively lock the allocation of either the requested, or the suggested resource. Resource Assignment – The requirement for a particular resource by a particular activity, or part of an activity. Sometimes called a resource requirement. Resource Availability – The level of availability of a resource, which may vary over time. Resource Breakdown Structure – A feature of hierarchical resources. Resource Definition – Three data tables (resource description, resource availability, and escalation files) that together define a resource. Resource Level – A specified level of resource units required by an activity per time unit. Resource Leveling – The resource scheduling process of determining scheduled dates such that neither the project completion date nor any target finishes are jeopardized while minimizing the maximum extent to which any resource availability is exceeded. E-9 Appendix E: Glossary Publication 615 Resource-Limited Resource Scheduling – The production of scheduled dates in which the resource constraints are considered as absolute and project completions are delayed as necessary to avoid exceeding resource requirements. Resource Offset – The number of work periods between the start of the activity and when the resource is first required. Resource Period – The number of work periods for which a resource is required. Resource Pool – A higher-level resource in a resource breakdown structure. Resource Scheduling – The process of calculating a set of scheduled dates that takes into account the resource requirements of each activity and the availability of these resources. Resource Thresholds – In resource-limited scheduling, it is possible to specify that a particular resource may be exceeded, if necessary, by an amount not to exceed the specified threshold for that resource. Resource Total – A specified total of resource units required by an activity over a period of time. Risk Analysis – Any technique designed to quantify the impact of uncertainty. Usually, but not necessarily, associated with the Monte Carlo simulation technique used in Open Plan. Schedule – A combination of work and work related activities having a time requirement assignment and logical tie or link between them. Scheduled Dates – The start and finish dates calculated by the resource-scheduling program, having regard to resource constraints as well as project logic. Schedule Variance (SV) – A summary measure of lateness for a project or part of a project. Scheduled Duration – The scheduled duration of an activity is calculated by resource scheduling, and takes into account such advanced activity management techniques as activity splitting, stretching, or reprofiling. Scheduled Finish – The date calculated by the resource scheduling program as the earliest date on which an activity can finish, having regard to resource constraints as well as project logic. Scheduled Float – Calculated during resource scheduling, the scheduled float of an activity is the difference between the late finish date and the scheduled finish date of the activity. In some circumstances, scheduled float may be shared with other activities in the logical flow of the project. Scheduled Start – The date calculated by the resource scheduling program as the earliest date on which an activity can start, having regard to resource constraints as well as project logic. Skew – A measure of the degree of asymmetry in a probability distribution. For symmetrical distributions, the skew is zero. E-10 Appendix E: Glossary Publication 615 Smoothing – A resource-scheduling option that modifies the way time-limited scheduling (and resourcelimited scheduling with thresholds) works. Splitting – In resource scheduling, it is possible to indicate that the specified duration may be divided into two or more pieces, while retaining the specified profile for resource requirements relative to this split duration. Spreadsheet View – A view in which data is shown in a tabular format. Three types of spreadsheet views are available in Open Plan: activity spreadsheets, relationship spreadsheets, and resource assignment spreadsheets. An activity spreadsheet is always shown as one of the windows in a barchart view. Standard Deviation – A measure of the amount of random variation in a random variable, calculated as the square root of the variance. Same as root mean square deviation. Start Activity – An activity that is not logically dependent on any predecessor activity. Start Milestone – A milestone activity signifying the start of a project phase. Start-To-Finish Relationship – The relationship between activities that specifies that the finish of the successor activity depends on the start of the predecessor activity. In most cases, this means that the successor activity cannot be completed before the start of the predecessor activity. Start-To-Start Relationship – The relationship between activities that specifies that the start of the successor activity depends on the start of the predecessor activity. In most cases, this means that the successor activity cannot be started before the start of the predecessor activity. Stochastic – Random variation that cannot be predicted other than in statistical terms. Stretching – In resource scheduling, it is possible to indicate that the specified duration may be increased, while the specified profile is reduced proportionately. Subproject – Can be either internal or external. An internal subproject is also known as a “parent” activity. An external subproject is a complete project shown as a single activity (subproject) in a large project (master project). Subsection – A block of data in a spreadsheet that typically begins with a subheading, and ends with a subtotal. Successor – An activity that logically follows another activity. Normally, this term refers to an immediate successor, that is, one directly implied by the project data. Symmetrical Distribution – A probability distribution in which variations from the central tendency by a given amount in either direction is equally likely. Target Date – A date imposed on an activity or project by the user. There are two types of target dates: target start dates and target finish dates. E-11 Appendix E: Glossary Publication 615 Target Finish – A finish date imposed on an activity or project by the user. Target Start – A start date imposed on an activity or project by the user. Target Type – Open Plan allows you specify four types of target dates for activity start and finish dates: Not Earlier Than – The earliest date on which the activity can start or finish. This constraint affects the early dates calculated by time analysis. Not Later Than - The latest date on which the activity can start or finish. This constraint affects the late dates calculated by time analysis. On Target – Combines the effects of both Not Earlier Than and Not Later Than target dates, and affects both the early and late dates calculated by time analysis. Fixed Target – Requires that the activity take place on the given date even if the logic of the project says that it cannot happen. Threshold – The level to which Open Plan may exceed the availability of a resource during resourcelimited resource scheduling. Triangular Distribution – A family of probability distributions that is triangular in shape when represented as a frequency distribution. Time Analysis – The process of calculating the early and late dates for each activity on a project, based on the Time Now date, the duration of the activities, and the logical relations between them. Time Now – The status date of a project. All progress information entered for a project should be correct as of this status date. The time analysis or resource scheduling functions prior to this date will schedule no work. Total Float – The maximum number of work periods by which an activity can be delayed without delaying project completion or violating a target finish date. Uncertainty – The lack of precision in estimating or predicting the outcome of some process. Uniform Distribution – A family of probability distributions characterized by two parameters, representing the minimum and maximum possible values. Any allowable outcome between the two extreme values is equally likely. For example, the distribution of the outcome from the throwing of a single die is uniform in the range 1 to 6. Variance – A discrepancy between the actual and planned performance on a project, either in terms of schedule or cost. Whole Relationship – A relationship in which both the predecessor and the successor activities are visible in the displayed view. Work Breakdown Structure (WBS) – The breakdown of a project from the client’s point of view in terms of deliverables. E-12 Appendix E: Glossary Publication 615 Working Day – The standard working day on the calendar. For example, assume that a calendar defines Monday through Friday as days on which work is normally performed. In this case, a Monday that has not been identified as a holiday would be a working day. Work Period – Any unit of time that work may be done. Zoning – A feature of Open Plan that causes activities on a network view to be grouped into horizontal bands based on one or more criteria. E-13 THIS PAGE INTENTIONALLY LEFT BLANK APPENDIX F REFERENCES THIS PAGE INTENTIONALLY LEFT BLANK Appendix F: References Publication 615 Callahan, Michael T., Daniel G. Quackenbush and James E. Rowings. (1992) Construction Project Scheduling, McGraw-Hill Series in Construction Engineering and Project Management. Clough, Richard H. (1986) Construction Contracting, Fifth Edition, John Wiley & Sons. Fisk, Edward R. (1992) Construction Project Administration, Fourth Edition, Prentice Hall. Open Plan 3.1. WST Corporation. 15990 North Barkers Landing, Suite 350 Houston, Texas 77079-2458 USA. WelcomHome 4.3. WST Corporation. 15990 North Barkers Landing, Suite 350 Houston, Texas 770792458 USA. F-1 THIS PAGE INTENTIONALLY LEFT BLANK