1
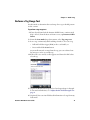
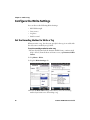
Intermec RFID Demo
User Guide
Intermec Technologies Corporation
Worldwide Headquarters
6001 36th Ave. W.
Everett, WA 98203
U.S.A.
www.intermec.com
The information contained herein is provided solely for the purpose of allowing customers to
operate and service Intermec-manufactured equipment and is not to be released, reproduced, or
used for any other purpose without written permission of Intermec Technologies Corporation.
Information and specifications contained in this document are subject to change without prior
notice and do not represent a commitment on the part of Intermec Technologies Corporation.
© 2013 by Intermec Technologies Corporation. All rights reserved.
The word Intermec, the Intermec logo, Norand, ArciTech, Beverage Routebook, CrossBar,
dcBrowser, Duratherm, EasyADC, EasyCoder, EasySet, Fingerprint, i-gistics, INCA (under license),
Intellitag, Intellitag Gen2, JANUS, LabelShop, MobileLAN, Picolink, Ready-to-Work, RoutePower,
Sabre, ScanPlus, ShopScan, Smart Mobile Computing, SmartSystems, TE 2000, Trakker Antares,
and Vista Powered are either trademarks or registered trademarks of Intermec Technologies
Corporation.
There are U.S. and foreign patents as well as U.S. and foreign patents pending.
ii
Intermec RFID Demo User Guide
Contents
Contents
Before You Begin. . . . . . . . . . . . . . . . . . . . . . . . . . . . . . . . . . . . . . . . . . . . . . . . . . . . . . . . . . . . . . . . . . v
Global Services and Support . . . . . . . . . . . . . . . . . . . . . . . . . . . . . . . . . . . . . . . . . . . . . . . v
Warranty Information. . . . . . . . . . . . . . . . . . . . . . . . . . . . . . . . . . . . . . . . . . . . . v
Web Support . . . . . . . . . . . . . . . . . . . . . . . . . . . . . . . . . . . . . . . . . . . . . . . . . . . . . v
Send Feedback. . . . . . . . . . . . . . . . . . . . . . . . . . . . . . . . . . . . . . . . . . . . . . . . . . . . v
Telephone Support . . . . . . . . . . . . . . . . . . . . . . . . . . . . . . . . . . . . . . . . . . . . . . . v
Who Should Read This Manual . . . . . . . . . . . . . . . . . . . . . . . . . . . . . . . . . . . . . . . . . . . vi
Related Documents . . . . . . . . . . . . . . . . . . . . . . . . . . . . . . . . . . . . . . . . . . . . . . . . . . . . . . vi
1 Read a Tag
................................................................ 1
About Intermec RFID Demo . . . . . . . . . . . . . . . . . . . . . . . . . . . . . . . . . . . . . . . . . . . . . . . . . . . . . . . 2
Supported Computers. . . . . . . . . . . . . . . . . . . . . . . . . . . . . . . . . . . . . . . . . . . . . . . . . . . . . 2
Read and Write Modes . . . . . . . . . . . . . . . . . . . . . . . . . . . . . . . . . . . . . . . . . . . . . . . . . . . . 3
Configure the Read Settings . . . . . . . . . . . . . . . . . . . . . . . . . . . . . . . . . . . . . . . . . . . . . . . . . . . . . . . 3
Adjust the RF Field Strength . . . . . . . . . . . . . . . . . . . . . . . . . . . . . . . . . . . . . . . . . . . . . . . 4
Select the Tag Data Format . . . . . . . . . . . . . . . . . . . . . . . . . . . . . . . . . . . . . . . . . . . . . . . . 5
Log the Data for Tags You Read . . . . . . . . . . . . . . . . . . . . . . . . . . . . . . . . . . . . . . . . . . . . 6
Enable the Tag Read Beep . . . . . . . . . . . . . . . . . . . . . . . . . . . . . . . . . . . . . . . . . . . . . . . . . 7
Enable a Search Sound . . . . . . . . . . . . . . . . . . . . . . . . . . . . . . . . . . . . . . . . . . . . . . . . . . . . 7
Enable the Option to Decode Tag Data . . . . . . . . . . . . . . . . . . . . . . . . . . . . . . . . . . . . . 7
Define a Data Field to Read . . . . . . . . . . . . . . . . . . . . . . . . . . . . . . . . . . . . . . . . . . . . . . . . 8
Enable the Option to Use ASCII EPC Filter. . . . . . . . . . . . . . . . . . . . . . . . . . . . . . . . . . 9
How to Read Tags. . . . . . . . . . . . . . . . . . . . . . . . . . . . . . . . . . . . . . . . . . . . . . . . . . . . . . . . . . . . . . . . 10
Read a Single Tag . . . . . . . . . . . . . . . . . . . . . . . . . . . . . . . . . . . . . . . . . . . . . . . . . . . . . . . . 11
View Tag Field Details . . . . . . . . . . . . . . . . . . . . . . . . . . . . . . . . . . . . . . . . . . . . . . . . . . . . 12
Read a Small Group of Tags . . . . . . . . . . . . . . . . . . . . . . . . . . . . . . . . . . . . . . . . . . . . . . 13
Read a Large Group of Tags. . . . . . . . . . . . . . . . . . . . . . . . . . . . . . . . . . . . . . . . . . . . . . . 14
Locate a Tag . . . . . . . . . . . . . . . . . . . . . . . . . . . . . . . . . . . . . . . . . . . . . . . . . . . . . . . . . . . . . 14
Take Inventory. . . . . . . . . . . . . . . . . . . . . . . . . . . . . . . . . . . . . . . . . . . . . . . . . . . . . . . . . . . 16
Perform a Tag Range Test. . . . . . . . . . . . . . . . . . . . . . . . . . . . . . . . . . . . . . . . . . . . . . . . . 17
Intermec RFID Demo User Guide
iii
Contents
2 Write a Tag
. . . . . . . . . . . . . . . . . . . . . . . . . . . . . . . . . . . . . . . . . . . . . . . . . . . . . . . . . . . . . 19
Configure the Write Settings . . . . . . . . . . . . . . . . . . . . . . . . . . . . . . . . . . . . . . . . . . . . . . . . . . . . . . 20
Set the Encoding Method to Write a Tag . . . . . . . . . . . . . . . . . . . . . . . . . . . . . . . . . . . 20
Log the Write Tag Data . . . . . . . . . . . . . . . . . . . . . . . . . . . . . . . . . . . . . . . . . . . . . . . . . . . 21
Enable a Write Sound . . . . . . . . . . . . . . . . . . . . . . . . . . . . . . . . . . . . . . . . . . . . . . . . . . . . 21
How to Write to a Tag . . . . . . . . . . . . . . . . . . . . . . . . . . . . . . . . . . . . . . . . . . . . . . . . . . . . . . . . . . . . 21
Write the EPC Value. . . . . . . . . . . . . . . . . . . . . . . . . . . . . . . . . . . . . . . . . . . . . . . . . . . . . . 22
Write to the User Memory . . . . . . . . . . . . . . . . . . . . . . . . . . . . . . . . . . . . . . . . . . . . . . . . 24
Write the Access Password . . . . . . . . . . . . . . . . . . . . . . . . . . . . . . . . . . . . . . . . . . . . . . . . 25
Write the Kill Password . . . . . . . . . . . . . . . . . . . . . . . . . . . . . . . . . . . . . . . . . . . . . . . . . . . 26
Protect a Tag . . . . . . . . . . . . . . . . . . . . . . . . . . . . . . . . . . . . . . . . . . . . . . . . . . . . . . . . . . . . 27
Unprotect a Tag. . . . . . . . . . . . . . . . . . . . . . . . . . . . . . . . . . . . . . . . . . . . . . . . . . . . . . . . . . 28
3 Troubleshooting
. . . . . . . . . . . . . . . . . . . . . . . . . . . . . . . . . . . . . . . . . . . . . . . . . . . . . . . 31
Troubleshooting . . . . . . . . . . . . . . . . . . . . . . . . . . . . . . . . . . . . . . . . . . . . . . . . . . . . . . . . . . . . . . . . . 32
Verify if RFID is enabled . . . . . . . . . . . . . . . . . . . . . . . . . . . . . . . . . . . . . . . . . . . . . . . . . . 33
About the Write Error Messages . . . . . . . . . . . . . . . . . . . . . . . . . . . . . . . . . . . . . . . . . . . . . . . . . . . 36
iv
Intermec RFID Demo User Guide
Before You Begin
Before You Begin
This section provides you with safety information, technical support
information, and sources for additional product information.
Note: Notes either provide extra information about a topic or contain
special instructions for handling a particular condition or set of
circumstances.
Global Services and Support
Warranty Information
To understand the warranty for your Intermec product, visit the
Intermec website at www.intermec.com and click Support >
Returns and Repairs > Warranty.
Web Support
Visit the Intermec website at www.intermec.com to download our
current manuals (in PDF).
Visit the Intermec technical knowledge base (Knowledge Central) at
www.intermec.com and click Support > Knowledge Central to
review technical information or to request technical support for your
Intermec product.
Send Feedback
Your feedback is crucial to the continual improvement of our
documentation. To provide feedback about this manual, please
contact the Intermec Technical Communications department directly
at [email protected].
Telephone Support
In the U.S.A. and Canada, call 1-800-755-5505.
Outside the U.S.A. and Canada, contact your local Intermec
representative. To search for your local representative, from the
Intermec website, click About Us > Contact Us.
Intermec RFID Demo User Guide
v
Before You Begin
Who Should Read This Manual
This Intermec RFID Demo User Guide is for the person who is using
responsible for demonstrating the functions and features of the
Intermec RFID Demo application.
Related Documents
Here are some key related Intermec documents (not limited to this
list) that you might find useful:
•
70 Series Mobile Computer User Manual
•
BRI Programmer’s Reference Manual
•
IP30 Handheld RFID Reader User Guide
The Intermec website at www.intermec.com contains our documents
(as .pdf files) that you can download for free.
To download documents
1 Visit the Intermec website at www.intermec.com.
2 Click the Products tab.
3 Using the Products menu, navigate to your product page. For
example, to find the CK70 computer product page, click
Computers > Handheld Computers > CK70.
4 Click the Manuals tab.
If your product does not have its own product page, click Support >
Manuals. Use the Product Category, the Product Family, and
Product to find your documentation.
vi
Intermec RFID Demo User Guide
1
Read a Tag
Use this chapter to learn about the following topics:
•
About Intermec RFID Demo
•
Configure the Read Settings
•
How to Read Tags
1
Chapter 1 — Read a Tag
About Intermec RFID Demo
You can use the Intermec RFID Demo to perform these tasks on the
IP30 or the 70 Series RFID-enabled computers to read RFID tags, and
write data to RFID tags. The RFID Demo comes installed on the 70
Series RFID-enabled mobile computers. For mobile computers that
support the IP30 handheld RFID reader, you need to download the
Intermec RFID Demo onto your computer. For existing customers,
you must download this Intermec RFID Demo from the Intermec
download web page at www.intermec.com > Support > Downloads.
Supported Computers
You can use the Intermec RFID Demo with any Intermec RFIDenabled mobile computer, including mobile computers that use the
IP30. You can launch the Intermec RFID Demo from the Start or
Home screen of the 70 Series RFID-enabled computers.
The Start Screen and the Home Screen
2
Intermec RFID Demo User Guide
Chapter 1 — Read a Tag
Read and Write Modes
The Intermec RFID Demo offers two modes: Read and Write.
The Read Mode allows you to select several Scan mode options. For
more information, see the next section, “Configure the Read
Settings.” The Write Mode allows you to select what to write and
from what program. For more information, refer to “Configure the
Write Settings” on page 20.
Configure the Read Settings
You can configure the following Read Settings:
•
RF Field Strength
•
Format
•
Log data
•
Enable tag read beep
•
Enable search sound
•
Decode tag data
•
Define data field to read
•
Use filter
Intermec RFID Demo User Guide
3
Chapter 1 — Read a Tag
Adjust the RF Field Strength
The RF Field Strength is the RFID power level you use to read tags.
Increasing the level of the RF Field Strength increases the range for
reading a tag, but it will decrease battery life. The change you make on
the Read Settings screen is only temporary.
The default value of the RF Field Strength is 30 dB. You can change
the default setting from the Start screen: Settings > System >
Intermec Settings > RFID > Reader 1 > RFID Module. For help, see
the mobile computer user manual.
To temporarily adjust the level of the RF Field Strength
1 If you already launched the Intermec RFID Demo, continue with
Step 2. If not, from the Start or Home screen, tap Intermec RFID
Demo.
2 Tap the Read Settings tab.
3 Adjust the RF Field Strength slider bar to the power level you
want to read tags with.
4
Intermec RFID Demo User Guide
Chapter 1 — Read a Tag
Select the Tag Data Format
You can use the Intermec RFID Demo to specify the format of the
data on the tags.
To select the tag data format
1 If you already launched the Intermec RFID Demo, continue with
Step 2. If not, from the Start or Home screen, tap Intermec RFID
Demo.
2 Tap the Read Settings tab.
3 From the Format drop-down menu, select Hex or ASCII.
Intermec RFID Demo User Guide
5
Chapter 1 — Read a Tag
Log the Data for Tags You Read
You can enable the Intermec RFID Demo to log and save information
about the tags you read. The log data is saved to the file
TagReadData.txt. You can access this log data file by tapping File
Explorer on the Start screen, then tap Program Files > RFIDDemo.
To log read tag data
1 If you already launched the Intermec RFID Demo, continue with
Step 2. If not, from the Start or Home screen, tap Intermec RFID
Demo.
2 Tap the Read Settings tab.
3 Select the Log data check box.
6
Intermec RFID Demo User Guide
Chapter 1 — Read a Tag
Enable the Tag Read Beep
You can enable your computer to beep each time when it finds an
RFID tag.
To enable tag read beep
1 If you already launched the Intermec RFID Demo, continue with
Step 2. If not, from the Start or Home screen, tap Intermec RFID
Demo.
2 Tap the Read Settings tab.
3 Select the Enable Tag Read Beep check box.
Enable a Search Sound
Enabling the Search Sound allows the computer to beep each time it
finds an RFID tag. This feature is especially useful when using Locate
Tag on the Read Mode tab. For help, see “Locate a Tag” on page 14.
To enable a search sound
1 If you already launched the Intermec RFID Demo, continue with
Step 2. If not, from the Start or Home screen, tap Intermec RFID
Demo.
2 Tap the Read Settings tab.
3 Select the Enable Search Sound check box.
Enable the Option to Decode Tag Data
Tag EPC values can be encoded in a number of data formats, for
example, SSCC96, or SGIN-96. If the tag data is encoded, the
application decodes that data when reading the RFID tags. The
Intermec RFID Demo does not encode tag data on the Write screen.
To enable the computer to decode tag data
1 From the Start or Home screen, tap Intermec RFID Demo.
2 Tap the Read Settings tab.
3 Select the Decode tag data check box.
Intermec RFID Demo User Guide
7
Chapter 1 — Read a Tag
Define a Data Field to Read
When defining the data field for a tag, you can specify what data
appears each time you read the tag. For a specific tag, you can choose
to view the following options:
•
User definable
•
TID-4
•
TID-8
•
Access password
•
Kill password
To define a data field
1 If you already launched the Intermec RFID Demo, continue with
Step 2. If not, from the Start or Home screen, tap Intermec RFID
Demo.
2 Tap the Read Settings tab.
3 Select the Define data field to read check box and select a data
field type from the drop-down menu.
For information about Access or Kill password, see the BRI
Programmer Reference Manual.
8
Intermec RFID Demo User Guide
Chapter 1 — Read a Tag
Enable the Option to Use ASCII EPC Filter
In situation such as demonstrating the computer to read a specific
subset of tags in an environment with many tags, such as a lab or
trade show environment, you can enable the system to filter on tags
that have an ASCII EPC code beginning with a “1” and having exactly
12 ASCII characters including the 1. Remember that the ASCI EPC
code can include spaces, but cannot end with a space. See sample
ASCII EPC codes below:
•
Valid entry: 1abcf wz1234
•
Invalid entries: 2abcf wz1234, zabcf wz1234, 1abcf wz123(space)
To enable the option to use ASCII EPC Filter
1 If you already launched the Intermec RFID Demo, continue with
Step 2. If not, from the Start or Home screen, tap Intermec RFID
Demo.
2 Tap the Read Settings tab.
3 Select the Use filter check box.
Intermec RFID Demo User Guide
9
Chapter 1 — Read a Tag
How to Read Tags
The Intermec RFID Demo allows you to read RFID tags by selecting
various scan modes.
There are six options under Scan mode.
Scan Mode Options
10
Scan Mode
Description
Read small group (<10)*
Reports tags every 0.1 seconds.
Read large group (>10)*
Reports tags every 1 second.
Read single tag*
Reports tags at very close range.
Take inventory*
Reports each tag one time.
Locate tag*
Locates tag with the specified EPC number.
Tag range test*
Tests the read range of the test tag.
Intermec RFID Demo User Guide
Chapter 1 — Read a Tag
Read a Single Tag
You can use the Intermec RFID Demo to read a single tag. This
method of reading reduces the output power so that the computer
can attempt to read a specific tag without picking up other nearby
tags that may typically be picked up at higher power.
To read a single tag once
1 If you already launched the Intermec RFID Demo, continue with
Step 2. If not, from the Start or Home screen, tap Intermec RFID
Demo.
2 From the Scan mode drop-down menu, select Read single tag.
3 Position the computer an inch away from the tag.
Note: By default, the system automatically adjusts the power
down when selecting the option of Read single tag.
4 Scan the tag:
•
Pull and hold the trigger (IP30) or the scan handle, or
•
Press and hold the Scan button.
If the read is successful, a table appears and displays the EPC value
of the tag.
5 (Optional) To view more details about the tag, see “View Tag
Field Details” on page 12.
Intermec RFID Demo User Guide
11
Chapter 1 — Read a Tag
View Tag Field Details
Based on the selection of the data field of the Read Settings screen,
you can view the following information about a tag in any read mode:
User definable, TID-4, TID-8, Access password, or Kill password.
To view tag field detail
1 Specify which data field you want to view. For help, see “Define a
Data Field to Read” on page 8.
2 Read a tag. For help, see “How to Read Tags” on page 10.
3 Double-tap the EPC ID to view details about a specific tag. The
Details dialog box appears.
12
Intermec RFID Demo User Guide
Chapter 1 — Read a Tag
Read a Small Group of Tags
You can use the Intermec RFID Demo to read a small group of tags.
This feature allows the computer to efficiently read a small group of
tags versus a much larger tag group of more than 10 tags.
To read a small group of tags
1 If you already launched the Intermec RFID Demo, continue with
Step 2. If not, from the Start or Home screen, tap Intermec RFID
Demo.
2 From the Scan mode drop-down menu, select Read small group
(<10).
3 Scan the tags continuously:
•
Pull and hold the trigger (IP30) or the scan handle, or
•
Press and hold the Scan button.
4 If the read is successful, a table appears and displays the EPC value
of each tag.
5 (Optional) To view more details about the tag, see the previous
section, “View Tag Field Details.”
Intermec RFID Demo User Guide
13
Chapter 1 — Read a Tag
Read a Large Group of Tags
You can use the Intermec RFID Demo to read a large group of tags.
This feature allows you to test how efficiently the RFID reader can
repeatedly read individual tags in a large group of tags.
To read a large group of tags
1 If you already launched the Intermec RFID Demo, continue with
Step 2. If not, from the Start or Home screen, tap Intermec RFID
Demo.
2 From the Scan mode drop-down menu, select Read large group
(>10).
3 Scan the tags continuously:
•
Pull and hold the trigger (IP30) or the scan handle, or
•
Press and hold the Scan button.
4 If the read is successful, a table appears and displays the EPC value
of the tag.
5 (Optional) To view more details about the tag, see “View Tag
Field Details” on page 12.
Locate a Tag
You can use the Intermec RFID Demo to select and search for a single
tag or a specific tag among a group of tags.
To locate a tag
1 If you already launched the Intermec RFID Demo, continue with
Step 2. If not, from the Start or Home screen, tap Intermec RFID
Demo.
2 From the Scan mode drop-down menu, select Locate a tag.
3 Scan a group of tags:
14
•
Pull and hold the trigger (IP30) or the scan handle, or
•
Press and hold the Scan button.
Intermec RFID Demo User Guide
Chapter 1 — Read a Tag
The system displays the number of tags found and all of the tags
in a certain radius are displayed in the Enter EPC ID field.
4 From the Enter EPC ID drop-down menu, select the EPC value
you want to locate.
5 To locate a tag, press the Scan button and hold it. The screen will
give visual indicators of the distance between the tag and the
computer.
•
The Far to Near visual indicator shows you the distance the tag
is located from the computer.
•
The value of the Signal Strength changes based on the distance
to the tag. Higher number refers to a farther distance to the
tag. Lower number refers to a closer distance to the tag.
6 (Optional) Tap Clear to locate a tag from another group of tags.
The list from the Enter EPC ID drop-down list disappears. Repeat
Steps 1 through 4.
For each tag you want to locate in the list, repeat Steps 1 through 6
and select a different EPC value each time.
Intermec RFID Demo User Guide
15
Chapter 1 — Read a Tag
Take Inventory
Inventory mode allows you to scan a group of tags and display them
one time each. By default, the application is set to read a large group
of tags (like you are taking inventory).
To take inventory
1 If you already launched the Intermec RFID Demo, continue with
Step 2. If not, from the Start or Home screen, tap Intermec RFID
Demo.
2 From the Scan mode drop-down menu, select Take inventory.
3 Scan a group of tags:
•
Pull and hold the trigger (IP30) or the scan handle, or
•
Press and hold the Scan button.
4 If the read is successful, a table appears and shows the EPC value
of each tag.
Note: When performing multiple inventory reads, wait several
seconds (i.e. more than 5 seconds) to allow the tags time to clear the
session state. This avoids the possibility of missing some tags.
16
Intermec RFID Demo User Guide
Chapter 1 — Read a Tag
Perform a Tag Range Test
Use this mode to determine the read range for a tag or the RF pattern
on the scanner.
To perform a tag range test
1 If you already launched the Intermec RFID Demo, continue with
Step 2. If not, from the Start or Home screen, tap Intermec RFID
Demo.
2 From the Scan mode drop-down menu, select Tag range test.
3 Scan a tag continuously while walking towards it. To scan a tag:
•
Pull and hold the trigger (IP30) or the scan handle, or
•
Press and hold the Scan button.
As you walk towards or away from the tag, you can evaluate how
far away you can be to read the tag.
4 If the read is successful, a table appears and shows the EPC value
of each tag.
5 (Optional) Modify the RF power level and repeat Steps 1 through
3. For more information, see “Adjust the RF Field Strength” on
page 4.
6 (Optional) You can view field detail information of a tag from any
read mode.
Intermec RFID Demo User Guide
17
Chapter 1 — Read a Tag
18
Intermec RFID Demo User Guide
2
Write a Tag
Use this chapter to learn about the following topics:
•
Configure the Write Settings
•
How to Write to a Tag
19
Chapter 2 — Write a Tag
Configure the Write Settings
You can choose the following Write Settings:
•
RF Field Strength
•
Data source
•
Log data
•
Enable sound
Set the Encoding Method to Write a Tag
When you write a tag, the data you specify for the tag is encoded with
the data source method you specified.
To set the encoding method to write a tag
1 If you already launched the Intermec RFID Demo, continue with
Step 2. If not, from the Start or Home screen, tap Intermec RFID
Demo.
2 Tap Menu > Write.
3 Tap the Write Settings tab.
4 From the Data source drop-down menu, select the encoding
method you want to use for writing a tag.
20
Intermec RFID Demo User Guide
Chapter 2 — Write a Tag
Log the Write Tag Data
You can enable the Intermec RFID Demo to log and save information
about the tags you write.
To log write tag data
1 If you already launched the Intermec RFID Demo, continue with
Step 2. If not, from the Start or Home screen, tap Intermec RFID
Demo.
2 Tap Menu > Write.
3 Tap the Write Settings tab.
4 Select the Log data check box.
Enable a Write Sound
You can enable the computer to beep each time the application writes
to a tag.
To enable sound
1 If you already launched the Intermec RFID Demo, continue with
Step 2. If not, from the Start or Home screen, tap Intermec RFID
Demo.
2 Tap Menu > Write.
3 Tap the Write Settings tab.
4 Select the Enable sound check box.
How to Write to a Tag
You can use the Intermec RFID Demo to demonstrate how to write to
an RFID tag. Types of data you can write to a tag are:
•
EPC
•
User Memory
•
Access Password
•
Kill Password
You can also use the Intermec RFID Demo to protect data that you
write to a tag.
Intermec RFID Demo User Guide
21
Chapter 2 — Write a Tag
Write the EPC Value
You can use the Intermec RFID Demo to write the electronic product
code (EPC) of an RFID tag.
To write the EPC Value
1 If you already launched the Intermec RFID Demo, continue with
Step 2. If not, from the Start or Home screen, tap Intermec RFID
Demo.
2 Tap Menu > Write and then tap the Write Settings tab. Set the
encoding method for writing the tag. For help, see “Set the
Encoding Method to Write a Tag” on page 20.
3 Tap the Write Mode tab and select EPC from the Program
drop-down menu.
22
Intermec RFID Demo User Guide
Chapter 2 — Write a Tag
4 Select Write from the next drop-down menu.
5 In the Data field, enter an EPC value. The EPC value must be an
even number of bytes.
EPC values are typically 96-bits long. If you enter a shorter data
string, the application adds zeros until the string is 96-bits long.
Note: If you want to protect the EPC so it cannot be overwritten,
select Protect or Write and protect from the drop-down menu,
for more information, see “Protect a Tag” on page 27.
6 Scan a tag:
•
Pull and hold the trigger (IP30) or the scan handle, or
•
Press and hold the Scan button.
7 View the results of the write.
•
If the write is successful, a table displays the EPC value of the
tag and a “WROK” (Write OK) message.
•
If the write is unsuccessful, a table displays the EPC value of
the tag with an error. For a list of errors, see “About the Write
Error Messages” on page 36.
8 (Optional) To verify that the EPC value was written successfully,
read the tag. For help, see “Read a Single Tag” on page 11.
Intermec RFID Demo User Guide
23
Chapter 2 — Write a Tag
Write to the User Memory
You can use the Intermec RFID Demo to write to the user memory of
an RFID tag. The user memory allows you to store any data you want
to associate with a tag. The length of the data you can enter depends
on the memory bank you select to program in.
To write the user memory
1 If you already launched the Intermec RFID Demo, continue with
Step 2. If not, from the Start or Home screen, tap Intermec RFID
Demo.
2 Tap Menu > Write and then tap the Write Settings tab. Set the
encoding method for writing the tag. For help, see “Set the
Encoding Method to Write a Tag” on page 20.
3 Tap the Write Mode tab.
4 Select User memory from the Program drop-down menu.
5 Select Write from the drop-down menu.
Note: If you want to protect the user memory so it cannot be
overwritten, select Protect or Write and protect from the dropdown menu. For more information, see “Protect a Tag” on
page 27.
6 In the Data field, enter the data for the user memory. The user
memory must have an even number of bytes/characters.
7 Scan a tag:
•
Pull and hold the trigger (IP30) or the scan handle, or
•
Press and hold the Scan button.
8 View the results of the write.
24
•
If the write is successful, a table displays the EPC value of the
tag and a “MEMOVRN” (memory overrun) message.
•
If the write is unsuccessful, a table displays the EPC value of
the tag with an error. For a list of errors, see “About the Write
Error Messages” on page 36.
Intermec RFID Demo User Guide
Chapter 2 — Write a Tag
Write the Access Password
You can use the Intermec RFID Demo to write the access password for
an RFID tag. The access password allows you to protect the EPC value
on a tag so it cannot be overwritten.
To write the access password
1 If you already launched the Intermec RFID Demo, continue with
Step 2. If not, from the Start or Home screen, tap Intermec RFID
Demo.
2 Tap Menu > Write and then tap the Write Settings tab. Set the
encoding method for writing the tag. For help, see “Set the
Encoding Method to Write a Tag” on page 20.
3 Tap the Write Mode tab.
4 Select Access password from the Program drop-down menu.
5 Select Write from the drop-down menu.
Note: If you want to protect the access password so it cannot be
overwritten, select Write or Write and protect from the dropdown menu, see “Protect a Tag” on page 27.
6 In the Data field, enter the data for the access password. The user
memory must be:
•
a hex formatted data string
•
4-bytes long.
7 Write to a tag:
•
Pull and hold the trigger (IP30) or the scan handle, or
•
Press and hold the Scan button.
8 View the results of the write.
•
If the write is successful, a table displays the EPC value of the
tag and a “WROK” (means Write OK) message.
•
If the write is unsuccessful, a table displays the EPC value of
the tag with an error. For a list of errors, see “About the Write
Error Messages” on page 36.
Intermec RFID Demo User Guide
25
Chapter 2 — Write a Tag
9 (Optional) To verify that the access password was written
successfully to the tag:
a Set the application to read the access password. For help, see
“Define a Data Field to Read” on page 8.
b Read the tag. For help, see “Read a Single Tag” on page 11.
c
View the tag details field. For help, see “View Tag Field
Details” on page 12.
Write the Kill Password
You can use the Intermec RFID Demo to write the kill password for
an RFID tag.
To write the kill password
1 If you already launched the Intermec RFID Demo, continue with
Step 2. If not, from the Start or Home screen, tap Intermec RFID
Demo.
2 Tap Menu > Write and then tap the Write Settings tab. Set the
encoding method for writing the tag. For help, see “Set the
Encoding Method to Write a Tag” on page 20.
3 Tap the Write Mode tab and select Kill password from the
Program drop-down menu.
4 Select Write from the drop-down menu.
Note: If you want to protect the kill password so it cannot be
overwritten, select Write or Write and protect from the dropdown menu. For more information, see “Protect a Tag” on
page 27.
5 In the Data field, enter the data for the kill password. The data
must be:
•
a hex formatted data string
•
4-bytes long.
6 Scan a tag:
26
•
Pull and hold the trigger (IP30) or the scan handle, or
•
Press and hold the Scan button.
Intermec RFID Demo User Guide
Chapter 2 — Write a Tag
7 View the results of the write.
•
If the write is successful, a table displays the EPC value of the
tag and a “WROK” (Write OK) message.
•
If the write is unsuccessful, a table displays the EPC value of
the tag with an error. For a list of errors, see “About the Write
Error Messages” on page 36.
8 (Optional) To verify that the kill password was written
successfully:
a Set the application to read the kill password. For help, see
“Define a Data Field to Read” on page 8.
b Read the tag. For help, see “Read a Single Tag” on page 11.
c
View the tag details field. For help, see “View Tag Field
Details” on page 12.
Protect a Tag
You can use the Intermec RFID Demo to protect an EPC value, user
memory, access password, or kill password you have written to a tag.
You must first program and protect the access password in order to
perform this procedure.
To protect a tag
1 If you already launched the Intermec RFID Demo, continue with
Step 2. If not, from the Start or Home screen, tap Intermec RFID
Demo.
2 Tap Menu > Write. The Write Mode tab appears.
3 From the Program drop-down menu, select one of the following:
•
EPC
•
User memory
•
Access password
•
Kill password
4 From the drop-down menu, select Protect.
5 In the Data field, enter the access password you recently
programmed. The password must be 4 bytes.
Intermec RFID Demo User Guide
27
Chapter 2 — Write a Tag
6 Scan the tag:
•
Pull and hold the trigger (IP30) or the scan handle, or
•
Press and hold the Scan button.
7 View the results of the write.
•
If the write is successful, a table displays the data value and a
“Write OK” message.
•
If the write is unsuccessful, a table displays the data value with
an error. For a list of errors, see “About the Write Error
Messages” on page 36.
8 (Optional) To verify that the tag was protected successfully:
a Set the application to read the data you just protected. For
help, see “Define a Data Field to Read” on page 8.
b Read the tag. For help, see “Read a Single Tag” on page 11.
c
View the tag details field. For help, see “View Tag Field
Details” on page 12.
Unprotect a Tag
If you have protected data in a tag, you can use the Intermec RFID
Demo to unprotected an EPC value, user memory, access password, or
kill password. You must first program and protect the access
password in order to perform this procedure.
To unprotect tag data
1 If you already launched the Intermec RFID Demo, continue with
Step 2. If not, from the Start or Home screen, tap Intermec RFID
Demo.
2 Tap Menu > Write. The Write Mode tab appears.
3 From the Program drop-down menu, select one of the following:
•
EPC
•
User memory
•
Access password
•
Kill password
4 From the drop-down menu, select Unprotect.
28
Intermec RFID Demo User Guide
Chapter 2 — Write a Tag
5 In the Data field, enter the password you used to protect the tag
data.
6 Scan the tag:
•
Pull and hold the trigger (IP30) or the scan handle, or
•
Press and hold the Scan button.
7 View the results of the write.
•
If the write is successful, a table displays the data value and a
“Write OK” message.
•
If the write is unsuccessful, a table displays the data value with
an error. For a list of errors, see “About the Write Error
Messages” on page 36.
8 (Optional) Verify that the tag was unprotected successfully.
•
Write to the tag. For help, see “How to Write to a Tag” on
page 21.
If the application can write to the tag without a password, the tag
has been successfully unprotected.
Intermec RFID Demo User Guide
29
Chapter 2 — Write a Tag
30
Intermec RFID Demo User Guide
3
Troubleshooting
Use this chapter to learn about the following topics:
•
Troubleshooting
•
About the Write Error Messages
31
Chapter 3 — Troubleshooting
Troubleshooting
Use this section to troubleshoot problems that may prevent you from
using the Intermec RFID Demo application.
Problems Using RFID Demo Application
Problem
Solution
Intermec RFID
If the Intermec RFID Demo does not start or connect to the reader, make
Demo fails to start. sure you:
• verify the IP30 battery is fully charged and properly seated.
• verify RFID is enabled.
• reboot your mobile computer.
Three ways to verify if RFID is enabled:
• from the Start screen, tap Settings > Connections > Wireless Center
•
•
from the Title bar on the Home screen
from the Intermec Settings.
For more information, see “Verify if RFID is enabled” on page 33.
If all of the above options look OK, and the RFID Demo still fails to start, or
the reader shows up as not connected under Reader 1, then you need to try a
warm boot of the computer. Press the Power button and select Reboot from
the menu. The computer systematically shuts down, restarts, and goes
through the initialization process.
Intermec RFID
Demo does not
read tag.
If the Intermec RFID Demo does not read tags, perform the following steps
to resolve the issue:
To fix the issue of Intermec RFID Demo not reading tags:
1 Verify that the tag works.
2 Verify that you are either holding the tag properly or that the tag is
mounted properly.
For example, a metal mount tag will not work properly unless it is
mounted on metal. If you hold a tag in your hand you can detune it and
it will not work properly.
3 Move the computer in the right position or angle to avoid some dead
spots or possible interference.
4 Verify that reader settings are properly configured within Intermec
Settings for RFID.
For example, if you enter a too low value for the Field Strength dB you
may not be able to read tags.
32
Intermec RFID Demo User Guide
Chapter 3 — Troubleshooting
Verify if RFID is enabled
Three ways to verify if RFID is enabled:
•
Verify if RFID is enabled from the Start screen. Tap Settings >
Connections > Wireless Center
•
Verify if RFID is enabled from the Title bar on the Home screen.
a Tap the Wi-Fi connection icon (
system displays more icons.
Intermec RFID Demo User Guide
) on the title bar. The
33
Chapter 3 — Troubleshooting
b Tap the Connectivity icon (
screen.
c
34
) to view the Connectivity
Tap the Wireless Center link to view the Wireless Center
screen.
Intermec RFID Demo User Guide
Chapter 3 — Troubleshooting
•
Verify if RFID is enabled from the Intermec Settings.
a On the Intermec Settings Main Menu screen, tap the vertical
bar down to RFID.
b For Windows Embedded Handheld 6.5, tap RFID > Enable
RFID Service and verify that RFID is enabled.
Intermec RFID Demo User Guide
35
Chapter 3 — Troubleshooting
c
Tap Reader 1 on the Intermec Settings > RFID > Reader 1
screen and verify that Reader Model selection is IM11.
About the Write Error Messages
The following Error Messages table list error messages that appear
when you attempt to program a tag:
Error Messages
36
Message
Description
WRERR
Failed to write tag. The tag was found, but failed for an
unknown reason.
PWERR
Failed to write tag because power was too low.
PVERR
Failed to write tag because the tag is password
protected. You did not enter a password, or entered an
incorrect password.
MEMOVRN
Attempted to write to memory that does not exist in
the specified tag.
No Tag Found!
The computer cannot find or read the tag.
Intermec RFID Demo User Guide
Worldwide Headquarters
6001 36th Avenue West
Everett, Washington 98203
U.S.A.
tel 425.348.2600
fax 425.355.9551
www.intermec.com
© 2013 Intermec Technologies
Corporation. All rights reserved.
Intermec RFID Demo User Guide
*934-068-001*
P/N 934-068-001