1
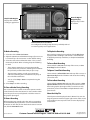
Pressure Pro PC Quick Start Guide
IMPORTANT! Make sure to carefully read these instructions and the User’s Manual before you begin to use the software
CD Contents
Kit Contents
The Pressure Pro application CD contains:
•
•
•
Pressure Pro Gauge
Pressure Pro PC User Guide
Pressure Pro PC Application Software Installation
Microsoft® .NET Framework Software
Fittings
When you insert the CD into your computer it will start
automatically and displays the selection screen in your
default browser. If it does not start, simply navigate to the
default.htm file located in the LocalSite folder on the CD.
From the start screen you can select (click) on one of the
following:
•
•
•
•
•
View System Requirements
View Installation Instructions
View User’s Manual (also
viewable from the applications
Help File)
Install .Net Framework 3.5 (if
needed)
Install Pressure Pro PC
IMPORTANT! Before You Install the Pressure Pro PC:
USB Cable
Pressure Pro Application CD
Hookup Procedure
1. Plug the USB cable into your computer and the other end
into the Pressure Pro Gauge.
2. If needed, connect one of the fittings into the inlet end of
the pressure gauge. Note: 2 fittings are included with your
Pressure Pro PC Kit. However, depending on the pressure
source you are measuring, other common user supplied
fittings may be required.
•
Verify that your computer meets the minimum
requirements. Install the Microsoft® .Net Framework 3.5
if needed.
3. Connect the Pressure Pro Gauge to the pressure source
you want to measure. Caution! To avoid injury or damage
from high pressure, make sure there are no leaks at the
connections and that they are solid and safe.
•
Carefully read the installation instructions. We suggest
printing a copy for reference.
4. If you have not already done so, start/open the Pressure
Pro PC Application on your computer.
•
Make sure you have the CD jacket as it contains an 8 digit
serial number that you must enter during the installation
process to activate the software.
5. Depending on the pressure source you are testing, you
may need to turn the vehicle on if required to generate
pressure (refer to the vehicle’s shop manual if necessary).
To Install the Software:
Select Install Pressure Pro PC from the CD’s start screen and
follow the on-screen instructions.
6. You are ready to begin testing. Please refer to the online
User’s Manual for procedures and the back of this sheet
for a Quick Reference.
Pressure Pro PC Application Requirements
Operating System Requirements
Computer Hardware Minimum Requirements
•
•
•
•
•
•
•
•
•
•
•
•
Windows® XP Professional (32 Bit) w/ Service Pack 3 or higher
Windows® XP Home Edition (32 Bit) w/ Service Pack 3 or higher
Windows® Vista Home Basic (32 Bit)
Windows® Vista Home Premium (32 Bit)
Windows® Vista Business Edition (32 Bit)
Windows® Vista Ultimate Edition (32 Bit)
Windows 7 (32 bit / 64 bit)
Windows 8 (32 bit / 64 bit)
Software Requirements
•
•
Microsoft® Internet Explorer 6 (w/ service pack 1 or higher)
Microsoft® .Net Framework 3.5 service pack.
•
•
1GHz or higher processor
Minimum 512 MB of RAM
Minimum 250 MB free hard disk space
Minimum screen display resolution: 1024 x 600 pixels, 1024
x 768 or higher is recommended
CD-ROM drive (if installing from a CD)
One available USB 2.0 port
Power Considerations
The Pressure Pro pressure gauge receives power from your
computer when it is connected via the USB cable. Therefore,
the USB port needs to be able to drive at least 100 ma current.
Keep in mind that prolong use of the laptop and pressure
gauge without a plug-in wall power supply may result in a
quicker discharge of the laptop battery.
Round & Digital
Gauge Display
Displays the psi value
in real-time
Graphic Plot Region
Displays the real-time
readings in graph form
Auto Set Features List Sections
Pre-configured recording setups that are specifically tailored
to certain typical pressure applications.
To Make a Recording
To Playback a Recording
1. Select the desired Auto Set Feature.
Once you have stopped your recording, click the Play button
to play back the recording in real-time at 1 second intervals.
To playback previously saved data, see To Open a Saved Data
Recording.
2. Adjust the Maximum and Minimum Range of pressures to
be viewed if you do not want to use the default setting.
3. Select the desired record duration. Note: This is set to 5
minutes by default. When selecting, keep the following
in mind:
• The 5 minute capture does not stop automatically.
Instead, after every 5 minutes, it will begin to overwrite
the previously recorded data until you press stop.
To Save a Data Recording
Select either the Save icon at the top of the screen, or Save
Recording from the File Menu.
To Open a Saved Data Recording
• The 30 minute capture records up to 30 minutes
without overwriting data and automatically stops at
the end of the 30 minutes.
Select either the Yellow Folder icon at the top of the screen, or
Open Recording from the File Menu and select the recording
you wish to view.
• You can select Stop or Pause at anytime during the
recording.
To Print a Data Recording
4. Select Stop to end the recording.
To Enter a Marker During Recording
You can enter up to 8 markers on the data capture to mark a
point of interest on the data stream. To enter a marker either
press the space bar on your keyboard or click the mouse in
the graphics plot region.
To View a Recording
After stopping your recording, the data and any set markers
are automatically displayed on the screen in Full View Mode.
To zoom in on the data, click on the desired section. To zoom
out, click the Zoom Out button.
19121-032 Rev A
Select either the Printer icon at the top of the screen, or Print
Capture Window from the File Menu to print out the current
data in the graphics plot region of the screen You can only
print when you are in View Mode or Playback Mode in the
paused state.
About the Help File
The Help menu item displays the User’s Manual. You can also
drag the question mark icon (upper right corner of the screen)
over and drop it onto any item on the screen to display help
on that item.
Customer Care and Technical Support: 1-800-342-5080 or 216-541-8060
©2013 Hickok Inc.
All rights reserved.