1
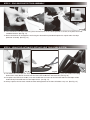
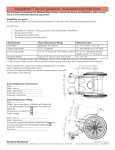
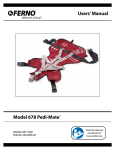
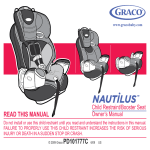
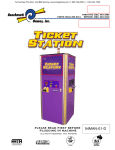
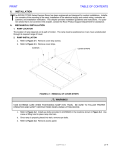
® LICENSED PRODUCT ® LICENSED PRODUCT Yamaha, the Tuning Fork Mark, FX Nytro and the likeness thereof are trademarks of Yamaha Motor Corp, USA and Yamaha Motor Co. Ltd. used under license by Sport Dimension Inc. www.yamaha-motor.com This Product is not manufactured or distributed by Yamaha Motor Corporation U.S.A. or Yamaha Motor Co., Ltd. For Consumer inquires, please contact Sport Dimension Inc. at 1-800-678-7873. USER US SER S ER R MA MAN MANUAL M AN NUAL & SAFETY AF FET TY IN NS STRUCT CTIO ONS SAF SAF SA ET ETY TY INSTRUCTIONS Ultimate Slop Slope-Side Snow Fun With The FX <0 MAX. WEIGHT OF RIDER BELOW 88 lb (40 kg) UÊIMPORTANT INFORMATION INSIDE Read this User Manual carefully before using your winter product 6+ Please read user manual as included in this package for product set-up Adult Assembly Required WARNING WARNING: CHOKING HAZARD – SMALL PARTS. NOT FOR CHILDREN UNDER (3) YEARS. Adult Assembly Required To Avoid Injury: :DUQLQJLQIRUPDWLRQLQWKH8VHU0DQXDORQWKHSURGXFWDQGSDFNDJLQJPXVWDOZD\VEHUHDGEHIRUHHYHU\XVHDQG explained to anyone using this product. 7KLVSURGXFWLVGHVLJQHGIRUXVHE\DSHUVRQVL[\HDUVRIDJHDQGDERYH&RPSHWHQWDGXOWVXSHUYLVLRQLVUHTXLUHG Do not leave children unattended while using this product. 8VHRIWKLVSURGXFWDQGSDUWLFLSDWLRQLQWKLVVSRUWLQYROYHVLQKHUHQWULVNVRILQMXU\RUGHDWK 8VHU0867IROORZWKHLQVWUXFWLRQIURP8VHU0DQXDODQGWKH:DUQLQJDWDOOWLPHs, improper use of this product will cause serious injury or death. 7KLVSURGXFWPXVWQRWEHXVHGE\PRUHWKDQRQHULGHUZLWKDPD[LPXPZHLJKWRIOENJDWDWLPH'RQRW exceed the recommended number of rider or weight capacity. $OZD\VZHDUSURWHFWLYHHTXLSPHQWVXFKDVDKHOPHWJRJJOHVDQGJORYHV 7KLVSURGXFWLVGHVLJQHGZLWKOLPLWHGEUDNLQJDQGVWHHULQJ%HDZDUHWKLVSURGXFWFDQGHYHORSKLJKVSHHGVXQGHUFHUWDLQ snow conditions. 7KHPHWDOVQRZEUDNLQJV\VWHPGRHVQRWDOORZIRUDTXLFNVKRUWVWRS,WLVVROHO\LQWHQGHGDVDZD\WRJUDGXDOO\UHGXFH the downhill speed. '2127WRZEHKLQGDQ\PRWRUL]HGYHKLFOHRQODQGRUVQRZWKLVLVQRWDWRZDEOHLWHP '2127WRZEHKLQGDQ\PRWRUL]HGYHKLFOHRUSHRSOHZKHQULGHUVHDWLQJRQWKHSURGXFW 'RQRWXVHRQVNLKLOOVLF\VXUIDFHVVXUIDFHVZLWKRXWDGHTXDWHVQRZFRYHUDJHDQGLQREVWUXFWHGRUGDQJHURXVDUHDV 'RQRWXVHWKLVSURGXFWQHDUURDGVWUHHVRURWKHUKD]DUGRXVREMHFWVRUFRQGLWLRQV 'RQRWGLYHKHDGILUVWRQWRWKLVSURGXFW 'RQRWXVHWKLVSURGXFWZKLOHXQGHUWKHLQIOXHQFHRIGUXJVDQGDOFRKRO .HHSFRQWURORI\RXUVOHGDWDOOWLPHV,WLV\RXUUHVSRQVLELOLW\WRDYRLGSHRSOHDQGREMHFWVLQIURQWRI\RX $OZD\VNHHSWKHULGHUSRVLWLRQHGQHDUWKHIURQWIRULQFUHDVHGFRQWURODQGVWHHULQJ$VERG\LVVKLIWHGFORVHUWRWKHEDFN the steering and control are reduced. $OZD\VUHSODFHWKHWRZOHDVKKDQGOHDQGWKHORFNLQJEXFNOHWRWKHIURQWVNLEHIRUHHYHU\XVH 8VHDW\RXURZQULVN 'RQRWXVHRQVWHHSVORSHVRQO\XVHRQVORSHVZLWKDORZLQFOLQHZLWKLQ\RXUVNLOOOHYHO 'RQRWRSHUDWHZLWKSRRURUOLPLWHGYLVLELOLW\ PARTS DIAGRAM 1. Front Nose 2. Wind Shield 3. Metal Mount 4. Steering Column 5. Pro Grip Protectors x 2 6. Back Bracket x 2 7. Suspension Column 8. Seat 9. Main Frame 10. Side Ski x 2 11. Front Ski (Tow Handle & Automatic Retracted Tow Rope Device) 12. Allen Key 13. Screw Driver 14. Front Ski Bolt 15. Front Nose Bolt 16. Side Ski Bolt X 2 17. Seat Screw X 4 18. Wind Shield Screw X 1 and Metal Mount Screw X 3 19. Pro Grip Protectors Bolt X 4 20. Locknut (A) x 4 21. Locknut (B) x 4 22. Tighten 6 7 8 4 5 2 9 1 11 3 14 10 15 16 20 17 19 21 18 8 12 2 13 3 22 Fig.1 INSTALLATION STEP 1 - SIDE SKI ASSEMBLY Fig.2 Fig.3 1. Assemble the side ski by inserting the protruding steel tongue at the front of the main frame through the square hole at the top of the ski. (see Fig. 2) 2. Fasten the side ski using the side ski bolts assembly. Pass the side ski bolt from the bottom of the ski up through the frame. Then, place the locknut and tighten it securely using the nut tightener. (see Fig. 3) 3. Repeat the step 1 and 2 for Assembling other side ski. STEP 2 - STEERING COLUMN AND FRONT SKI ASSEMBLY Fig.4 Fig.5 4. Insert the Steering Column to the front of the Main steel frame (See Fig. 4). 5. Insert the Suspension column to the Steering column as shown (See Fig. 4). 6. Insert end of the steering column into fitted cut away area on the Mount of the Front Ski. (See Fig. 5) 7. Align the bolt hole on the steering unit’s end and the holes on the front Ski mount wall. (See Fig. 6) 8. Insert the front ski bolt, screw the locknut on and tighten it well using the Allen key provided. (See Fig. 6) Fig.6 STEP 3 - ADJUSTABLE SEAT ASSEMBLY Fig. 7 Fig. 8 Fig. 9 9. The seat can be mounted in one of three positions depending on the size of the rider. To begin your seat assembly, place the seat upside down with the upside down frame on top of it as shown. 10. Select your seat position by aligning the seat assembly points with the desired assembly slots on the frame. (See Fig. 7 & 8) 11. Attach the seat by inserting the 4 seat Screws through the seat position slots on the Frame and tightening into the seat assembly points using the Allen Key. (See Fig. 9) STEP 4 - WIND WINDOW AND FRONT NOSE ASSEMBLY Fig. 10 Fig. 12 Fig. 11 Fig. 13 12. Insert the wind shield to the front nose as shown on Fig. 10. Make sure the end of the holes on the wind shield is locked into the nose. 13. Screw the wind shield Screw on and tighten it well using the screw driver provided. (See Fig. 11) 14. Attach the Metal mount to the front nose as shown and screw the three Screws on to fix it. (See Fig. 12) 15. Attached the other end of the Metal Mount to the Steering column and align the bolt hole. Insert the front Nose bolt, screw the locknut on and tighten it well using the Allen key and Nut Tightener provided. (See Fig. 13) STEP 5 - PRO GRIP PROTECTORS ASSEMBLY Fig. 14 Fig. 15 16. To assemble the Pro Grip Protectors, place the front cover in the correct position as shown, then place the 2 Bolt and back bracket. (See Fig. 14) 17. Screw the locknut on and tighten it well using the Screw driver provided. Repeat this step for other Pro Grip protector assembly. (See Fig. 15) STEP 6 - USING THE AUTOMATIC RETRACTABLE TOW LEASH SYSTEM Fig. 16 Fig. 17 Fig. 18 18. The Automatic retractable tow leash system is designed to easily place and store your tow handle while riding. Release the safety buckle and take out the Tow leash handle from the Front Ski. (see Fig. 16) 19. To replace the Tow leash handle, insert the Handle into the mount of the Front Ski and the Tow Rope will be Automatically Retracted into the Tow Rope Device. (see Fig. 17) 20. Always replace the tow leash handle and the locking buckle to the front ski before every use. (See Fig. 18) STICKER GUIDE D1 D3 D2 L2 G1 D4 K1 C2 C1 B1 K2 I1 B2 I2 H1 H2 F J2 J1 E E E E A L M2 D2 D4 L Q1 B1 F N2 A Q2 B2 O E C1 H1 J1 L1 M1 P1 O Q2 I1 N1 N1 P2 Q1 D3 L1 P1 M1 D1 N2 G2 K1 G1 IMPORTANT Fig. 19 - This is the only correct riding position. (see Fig. 19) - Check all screw parts and make sure they are properly tightened and in good working condition before using the product. - Always wear protective equipment such as a helmet, goggles and gloves. - Always keep the rider positioned near the front for increased control and steering. As body is shifted closer to the back the steering and control are reduced. - The braking system does not allow for a quick short stop. It is solely intended as a way to gradually reduce the downhill speed. - Be sure to learn and practice with lots of room and a shallow hill. You may progress to larger hills as you feel more confident. - Make sure you have enough room to slow and stop in all situations. - Always replace the tow leash handle and the Locking Buckle to the front ski before every use. - DO NOT tow behind any motorized vehicle or people when rider seating on the product. Warranty Sport Dimension warrants each FX NYTRO sled against defects in workmanship and materials for 30 days from the date of purchase. Proof of purchase is required. This warranty does not apply to damage or failure due to impact from accident, abuse and negligence in use. The user assumes all inherent risks in the use of the product, including but not limited to personal injury, property damage and/or other losses. If you have any warranty / parts inquiry, please contact our customer service email: [email protected] Yamaha, the Tuning Fork Mark, FX Nytro and the likeness thereof are trademarks of Yamaha Motor Corp, USA and Yamaha Motor Co. Ltd. used under license by Sport Dimension Inc. www.yamaha-motor.com This Product is not manufactured or distributed by Yamaha Motor Corporation U.S.A. or Yamaha Motor Co., Ltd. For Consumer inquires, please contact Sport Dimension Inc. at 1-800-678-7873. Distributed by 966 Sandhill Ave., Carson, CA 90746 800-678-7873 www.sportdimension.com MADE IN CHINA