1
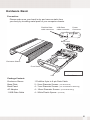
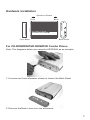
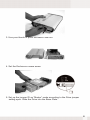
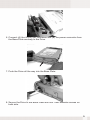
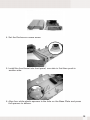
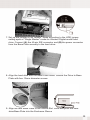
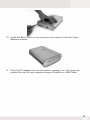
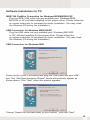
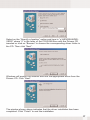
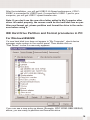
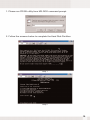
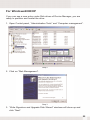
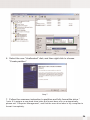
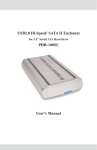
IEEE1394A FireWire /USB2.0 Hi-Speed Enclosure
for ATA Hard Drive,
ATAPI CD-ROM/RW and DVD-ROM/ DVD Combo Drive
HEXD5UA
User’s Manual
CONTENTS
INTRODUCING 1394A FIREWIRE/
USB2.0 HI-SPEED ENCLOSURE
About this Guide
System Requirements
Package Contents
Safety Precautions
3
3
3
4
4
HARDWARE BASIC
6
HARDWARE INSTALLATION
7
For CD-ROM/RW/DVD-ROM/DVD Combo Drives
For Hard Disk Drives
SOFTWARE INSTALLATION
Software Installation for MAC
FireWire Connection for MacOS
USB Connection for MacOS
Software Installation for PC
7
11
15
15
15
15
16
IEEE1394A FireWire Connection for Windows98SE/ME/2000/XP 16
USB Connection for WindowsME/2000/XP
16
USB Connection for Windows98SE Software Installation
16
IDE HARD DRIVE PARTITION and
FORMAT PROCEDURES in PC
For Windows98SE/ME
For Windows2000/XP
CD Mastering Software
18
18
22
25
2
Introducing IEEE1394A FireWire/ USB2.0 Hi-Speed
Enclosure-HEXD5UA
Thank you for choosing the HEXD5UA aluminum IEEE1394A FireWire/
USB2.0 Hi-Speed Enclosure. This enclosure support ATA Hard Drive, ATAPI
CD-ROM/R/RW and DVD-ROM Drive. It is simple to install and comes with
all the parts you need to create an external IEEE1394A FireWire/ Hi-Speed
USB2.0 device.
About This Guide
Before you begin using the HEXD5UA, be sure to read this manual in its
entirety.
This guide contains:
• Introducing IEEE1394A FireWire/Hi-Speed USB2.0 Enclosure
• Hardware Installation
• Software Installation
System Requirements
For Mac
• Any Macintosh desktop or PowerBook computer with an available
FireWire or USB port
• MacOS 9.X, FireWire support 2.4 and up, and/or USB
support 1.4.1 and up for USB1.1 Speed
• MacOS X, For USB2.0 Hi-Speed, USB2.0 port is required
For PC
• Pentium II/compatible or above with an available 1394A FireWire or
USB port
• Windows98 SE, Windows2000, WindowsME or WindowsXP
• USB2.0 port is required for Hi-Speed USB2.0 transfer speed
3
Package Contents
The HEXD5UA aluminum USB2.0 Hi-Speed Enclosure package includes the
following software and documentation:
•
•
•
•
•
•
IEEE1394A FireWire/ USB2.0 Hi-Speed Enclosure
Front Bezel
6 pin-6 pin IEEE1394A FireWireCable
USB2.0 cable
AC/DC Adapter
The software CD contains the drivers and manual
Safety Precautions
ON INSTALLATION
1. To reduce the risk of fire or electric shock, do not expose this
product to rain, water or moisture.
2. Do not place any containers with liquids (drinking glass, flower
vase, etc.) or containers with small metal parts (paper clips, etc.)
on top of the unit.
3. According to standard industry practice, surge protection is
recommended for all telecommunications devices. Surge suppressors
and/or line conditioning should be used on the input power supply.
ON OPERATION
•
•
•
•
•
•
•
•
Do not move the chassis during operation. Doing so may cause
a malfunction.
Protect the unit from shocks and vibrations.
Do not use the subsystem in areas exposed to oily smoke or steam,
such as a kitchen or close to a humidifier.
Do not use the subsystem in locations exposed to rain or splashes of
water, such as outdoors, in a bathroom, or close to a window.
Do not use the subsystem on an unstable or slanted surface without
proper support.
Do not expose the unit to direct sunlight or hot air where the
temperature could exceed 45ºC, or very cold locations where the
temperature is below 0ºC.
Keep the power cord away from hot appliances.
Do not touch the power cord with wet hands.
4
ON TRANSPORTATION
Save the packing materials as you may need to repack and transport the
unit at a later date.
Always remove the disc before moving the unit.
ON POWER SOURCES
When you are not using the unit for a long time, disconnect the power cord
from the unit.
To unplug the AC power adapter from the wall outlet, grasp the adapter
itself. Do not pull the cord.
Warning
If any of the following conditions occur, immediately disconnect the power
cord from the wall outlet and contact your dealer or an authorized service
station. Continuing to use the computer involves the risk of fire and electric
shock.
•
•
•
•
•
Smoke or unusual smell is coming from the subsystem.
Water has entered the unit, or the unit has become wet.
A foreign object has entered the unit.
The unit has been dropped or the front panel or frame has been damaged.
The power cable is damaged, causing wire breakage or exposed leads.
5
Hardware Basic
Precaution:
Please make sure your hand is dry and remove static from
your body by touching metal parts of your computer chassis.
FireWire Data
cable connector
USB Data
cable connector
Power
Connector
Back Panel
Base Plate
Enclosure Sleeve
Front Panel
LED
Front Bezel
Package Content:
Enclosure Sleeve
Base Plate
1 FireWire 6-pin to 6-pin Data Cable
2 - 5mm Diameter Screws (For Back Panel)
Back Panel
AC Adapter
1 USB Data Cable
4 - 7mm Diameter Screws (For CD-ROM Drive Mounting)
4 - 10mm Diameter Screws (For HDD Mounting)
4 - White Plastic Spacer (For HDD)
6
Hardware Installation
Enclosure Sleeve
Front
Back
FireWire/USB2.0
PHC-500BC
Front Bezel
Back Panel
For CD-ROM/RW/DVD-ROM/DVD Combo Drives
Note: The diagrams below are using the HEXD5UA as an example
1. Unscrew two 5mm diameter screws to loosen the Back Panel.
2. Remove the Back Panel from the Enclosure.
7
3. Use your thumb to push the Base Plate out.
4. Set the Enclosure Sleeve aside.
5. Set up the jumper ID as “Master” mode according to the Drive jumper
setting spec. Slide the Drive into the Base Plate.
8
(A)
(B)
6. Connect (A) the 40-pin IDE connector and (B) the power connector from
the Base Plate securely to the Drive.
7. Push the Drive all the way into the Base Plate.
8. Secure the Drive to the Base Plate with four 7mm diameter screws on
both side.
9
Front Sleeve
9. Align the rear Base Plate to the Sleeve Slot. Slide and push the
Drive/Base Plate into the Enclosure Sleeve
10. Install the Back Panel to the Enclosure and secure it with two 5mm
diameter screws
11. Plug the AC adapter into the Enclosure to power it on. You may now
connect the unit to your computer using a FireWire or USB Cable.
10
For Hard Disk Drives
Note: The diagrams below are using the PHC-500BC as an example
1. Unscrew two 5mm diameter screws to loosen the Back Panel.
2. Remove the Back Panel from the Enclosure.
3. Use your thumb to push the Base Plate out.
11
4. Set the Enclosure Sleeve aside.
5. Install the front bezel into front panel, one side in first then push in
another side.
6. Align four white plastic spacers to the hole on the Base Plate and press
the spacers to adhere.
12
(A)
(B)
7. Set up the jumper ID as “Master” mode according to the HDD jumper
setting spec or "Single Master" mode for Western Digital model hard
drive. Connect (A) the 40-pin IDE connector and (B) the power connector
from the Base Plate securely to the hard drive.
8. Align the hard drive and the Base Plate holes. Secure the Drive to Base
Plate with four 10mm diameter screws.
Front Sleeve
9. Align the rear Base Plate to the Sleeve Slot. Slide and push the hard
drive/Base Plate into the Enclosure Sleeve
13
10. Install the Back Panel to the Enclosure and secure it with two 5mm
diameter screws
11. Plug the AC adapter into the Enclosure to power it on. You may now
connect the unit to your computer using a FireWire or USB Cable.
14
Software Installation
Software Installation for Mac
FireWire Connection for MacOS 9 and X
When the enclosure is connected to the computer, MacOS will
recognize it automatically, initialize the hard drive (if the drive is not
initialized) and mount the drive to desktop.
USB Connection for MacOS 9 and X
When the enclosure is connected to the computer, MacOS will
recognize it automatically, initialize the hard drive (if the drive is not
initialized) and mount the drive to desktop.
* For USB2.0 performance, you must plug the enclosure into a
USB2.0 port in Mac OS X, or you will get USB1.1
performance only.
Note: Whether it is FireWire or USB Connection, MacOS X provides a Disk Utility to
create multiple volumes, which is located in Utilities folder inside Applications folder.
15
Software Installation for PC
IEEE1394 FireWire Connection for Windows98SE/ME/2000/XP
Plug the IEEE 1394 cable into any available port, Windows(98SE,
ME,2000 or XP) will start installing for the proper driver. Please follow the
on screen instruction to complete the driver installation. (You may need
the Windows CD during the installation.)
USB Connection for Windows ME/2000/XP
Plug the USB cable into any available port, Windows(,ME,2000
or XP) will start installing for the proper driver. Please follow the
on screen instruction to complete the driver installation. (You may need
the Windows CD during the installation.)
USB Connection for Windows98SE
Power on the USB2.0 Enclosure and plug the USB cable into your USB
port. The “Add New Hardware Wizard” should automatically appear as
shown above. Click “Next” when this window appears.
Choose “Search for the best driver for your device.” And click “Next”.
16
Select on the “Specify a location” option and type in “x:\HEXD5UA\DRIVERS” where “x” is the letter of the CD-ROM drive with the Drivers CD
inserted or click on “Browse” to choose the corresponding driver folder in
the CD. Then click “Next”.
Windows will search the location and find the appropriate driver from the
Drivers CD. Click “Next”.
The window shown above indicates that the driver installation has been
completed. Click “Finish” to end the installation.
17
After the installation, you will get USB2.0 Hi-Speed performance, if PHC500BC is connected to USB2.0 port; if connected to USB1.1 port in your
computer, you will get USB1.1 speed transfer rate.
Note: If you don’t see the new drive letter added in My Computer after
driver is loaded properly, the reason could be the hard disk has no partition and format yet, please partition and format the drive in the enclosure before using it.
IDE Hard Drive Partition and Format procedures in PC:
For Windows98SE/ME
If a new hard disk icon dose not appear in “My Computer”, check device
manager under system in the control panel. Then double click on
“Disk Drives” to see if a new entry appears.
If you can see a new entry as shown (Example, WDC WD80 OBB-32BSA0)
above, you are ready to partition and format the drive.
18
1. Please run FDISK utility from MS-DOS command prompt.
2. Follow the screens below to complete the Hard Disk Partition.
Step 1
Step 2
19
Step 3
Step 4
Step 5
20
Step 6
Step 7
Step 8
3. After restart the computer, please verify the new drive in "My Computer".
4. Please do a full format to the hard drive before using it.
21
For Windows2000/XP
If you can see a new entry under Disk drives of Device Manager, you are
ready to partition and format the drive.
1. Open Control panel, “Administrative Tools” and “Computer management”.
Step 2
2. Click on “Disk Management”.
Step 3
3. “Write Signature and Upgrade Disk Wizard” windows will show up and
click “Next”.
22
Step 4
4. Write a signature to the new drive, click “Next”.
Step 5
5. Click “Finish” to close the wizard.
23
6. Select the new “Unallocated” disk, and then right click to choose
“Create partition”.
Step 7
7. Follow the onscreen instruction to partition and fully format the drive.*
*note: If it assigns a new hard drive letter but format dose not run automatically,
please exit “Computer Management”, and find the new drive letter in My computer to
format it completely.
24
CD Mastering Software
If you install a supported CD-RW drive in the enclosure, in order to write or
create your own custom CDs, you need a CD recording software or tools.
The FireWire/ USB2.0 Hi-Speed Enclosure standard package does not
include any CD mastering applications software. You will need to purchase
the application separately. Here are some examples of CD mastering software for your reference.
•
Easy CD Creator 5 platinum or higher by Roxio for Windows, and
Toast 5 Titanium for Mac
•
Nero v5.5 or higher for Windows etc.
You can burn files from computer to a CD-R or CD-RW media by using
those CD Mastering Software.
25