1
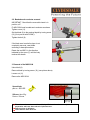
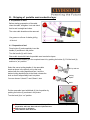
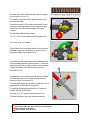
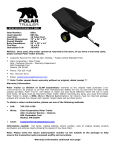
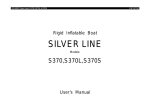
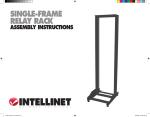
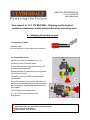
KEMPSTON, BEDFORDSHIRE, UK
t: +44 (0) 1234 855855
www.clydesdale.net
User manual for CLY 370 MSC/2544 - Stripping tool for bonded
screens on elastomeric cables and peelable semi-concuctive layer.
A – Stripping of bonded screens
1. Preparation of cable
Clean the cable
Put silicon grease on the bonded semi-conductor
2.1. Preparation of tool
Open the tool body by unscrewing nut (11).
Pull the two parts of the body apart.
Loosen the screw by turning the bolt (8) by 180° do not unscrew completely!
Retract the blade (9) completely by turning screw
(10) as far as it will go.
If available, use tool PLHMF for presetting the
correct depth.
Preset the tool stop (7) by pushing the button (2)
and select the remaining length of semiconductive
layer according to the technical data sheet of the
joint supplier.
The tool allows the following steps:
30 – 40 – 45 mm (see marking on the
body/picture).
) The tools must be used on non-live cables by skilled workers who are competent in cable
preparation and know about electrical phenomenons.
) Wearing gloves is obligatory.
) Clean the tools after each use.
2.2. Bonded semi-conductor removal
IMPORTANT: Check that the removable insert is in
position „off“.
Fit MSC/2544 onto bonded semi-conductor as shown.
Tigthen screw (11).
Set the blade (9) to the required depth by turning screw
(10) (if not pre-set with PLHMF).
Tighten the bolt (8)
If the black semi-conductive layer is not
completely removed, reset blade
according to description above.
Rotate the tool BSC1 in the direction
indicated by the arrow (7) until the body
touches the sheath.
3. Removal of the MSC/2544
Unlock bolt (8)
Remove blade by turning screw (10) (see picture above)
Loosen nut (11)
Remove the MSC/2544
Spare blade
part no. BSC1ER
Silicone, tube 35 g
Part no. Silicone
30-45 mm
) The tools must be used on non-live cables by skilled workers who are competent in cable
preparation and know about electrical phenomenons.
) Wearing gloves is obligatory.
) Clean the tools after each use.
B - Stripping of peelable semi-conductive layer
4. Preparation of cable
Before starting preparation of the cable,
clean the cable, straighten it out and check
that its end is straight and clean.
The outer cable sheath must be removed.
Use grease or silicone for better gliding
of the tool.
4.1. Preparation of tool
Press button (2) and completely insert the
handle (3) as shown in the picture.
Turn the handle (3) until it locks.
Removable insert with blade for peelable semi-conductive layers:
If it is not in place already, put the complete insert in by pushing the button (6). Pull the knob (4)
and turn to „on“-position.
Select the correct cutting depths of the removable
insert as shown in the picture: pull up the knob
marked with the cutting depths and turn it until the
desired cutting depths points to the blade, release the
knob so that it snaps audibly back into place.
You can choose: 0,4mm/0,7 mm/0,9mm/1,1mm
Pull up and turn
Cutting
depths
blade
Put the removable insert with blade (4) into its position by
pushing the button (6) as shown in the picture.
Turn the knob (4) to “on”-position.
) The tools must be used on non-live cables by skilled workers who are competent in cable
preparation and know about electrical phenomenons.
) Wearing gloves is obligatory.
) Clean the tools after each use.
Place the tool on the cable end and screw it in place
by turning the red nut (11).
The position of the tool on the cable is shown in the
picture to the right.
Preset the tool stop (7) by pushing the button (2) and
select the remaining length of semi conductive layer
according to the technical data sheet of the joint
supplier.
The tool allows the following steps:
30 – 40 – 45 mm (see marking on the body/picture)
Turn knob (4) to “on”-position.
Peel off the screen by rotating the tool in the direction
indicated on the tool (12) and by the green arrow in
the picture. Make four complete turns.
Check that you can peel off the semi-conductive layer
and no marking remains on the insulation - if the layer
cannot be removed, or marks remain on the insulation,
change the setting of the blade according to the
description in 4.2.
13
To stabilize the tool, unlock screw (8), advance blade
(9) by turning knob (10) so that it touches the semiconductive layer. Lock screw (8).
The removable insert can be taken out whilst the tool’s
body remains on the cable in its position.
The peeling is finished when the stop (13) comes in
contact with the outer sheath.
Put knob (4) to “off”-position and remove the tool.
The semi-conductor has to be removed manually.
) The tools must be used on non-live cables by skilled workers who are competent in cable
preparation and know about electrical phenomenons.
) Wearing gloves is obligatory.
) Clean the tools after each use.